

Page 1

Installation Instructions
ControlLogix Chassis and Power Supply
Standard Chassis Catalog Numbers 1756-A4, 1756-A10, 1756-A13, 1756-A17
ControlLogix-XT Chassis Catalog Numbers 1756-A4LXT, 1756-A5XT, 1756-A7XLT, 1756-A7XT
Standard Power Supplies Catalog Numbers 1756-PA72, 1756-PA75, 1756-PB72, 1756-PB75, 1756-PC75, 1756-PH75
ControlLogix-XT Power Supplies Catalog Numbers 1756-PAXT, 1756-PBXT
Redundant Power Supplies Catalog Numbers 1756-PA75R, 1756-PB75R
Redundant Power Supplies Chassis Adapter Catalog Number 1756-PSCA2
ControlLogix-XT Redundant Power Supplies Catalog Numbers 1756-PAXTR, 1756-PBXTR
ControlLogix-XT Redundant Power Supplies Chassis Adapter Catalog Number 1756-PSCA2XT
Page 2
Important User Information
IMPORTANT
Read this document and the documents listed in the additional resources section about installation, configuration, and
operation of this equipment before you install, configure, operate, or maintain this product. Users are required to
familiarize themselves with installation and wiring instructions in addition to requirements of all applicable codes, laws,
and standards.
Activities including installation, adjustments, putting into service, use, assembly, disassembly, and maintenance are required
to be carried out by suitably trained personnel in accordance with applicable code of practice.
If this equipment is used in a manner not specified by the manufacturer, the protection provided by the equipment may be
impaired.
In no event will Rockwell Automation, Inc. be responsible or liable for indirect or consequential damages resulting from the
use or application of this equipment.
The examples and diagrams in this manual are included solely for illustrative purposes. Because of the many variables and
requirements associated with any particular installation, Rockwell Automation, Inc. cannot assume responsibility or
liability for actual use based on the examples and diagrams.
No patent liability is assumed by Rockwell Automation, Inc. with respect to use of information, circuits, equipment, or
software described in this manual.
Reproduction of the contents of this manual, in whole or in part, without written permission of Rockwell Automation,
Inc., is prohibited.
Throughout this manual, when necessary, we use notes to make you aware of safety considerations.
WARNING: Identifies information about practices or circumstances that can cause an explosion in a hazardous environment,
which may lead to personal injury or death, property damage, or economic loss.
ATTENTION: Identifies information about practices or circumstances that can lead to personal injury or death, property
damage, or economic loss. Attentions help you identify a hazard, avoid a hazard, and recognize the consequence.
Identifies information that is critical for successful application and understanding of the product.
Labels may also be on or inside the equipment to provide specific precautions.
SHOCK HAZARD: Labels may be on or inside the equipment, for example, a drive or motor, to alert people that dangerous
voltage may be present.
BURN HAZARD: Labels may be on or inside the equipment, for example, a drive or motor, to alert people that surfaces may
reach dangerous temperatures.
ARC FLASH HAZARD: Labels may be on or inside the equipment, for example, a motor control center, to alert people to
potential Arc Flash. Arc Flash will cause severe injury or death. Wear proper Personal Protective Equipment (PPE). Follow ALL
Regulatory requirements for safe work practices and for Personal Protective Equipment (PPE).
Allen-Bradley, Rockwell Software, Rockwell Automation, ControlLogix, ControlLogix-XT, and FLEX I/O-XT are trademarks of Rockwell Automation, Inc.
Trademarks not belonging to Rockwell Automation are property of their respective companies.
Page 3

Summary of Changes
This manual contains new and updated information. Changes throughout this
revision are marked by change bars, as shown to the right of this paragraph.
New and Updated
Information
The following components were added to these installation instructions.
• ControlLogix-XT Redundant Power Supply (catalog number
1756-PAXTR)
• ControlLogix-XT Redundant Power Supply (catalog number
1756-PBXTR)
• ControlLogix-XT Redundant Power Supply Chassis Adapter (catalog
number 1756-PSCA2XT)
Rockwell Automation Publication 1756-IN005C-EN-P - March 2014 3
Page 4

Summary of Changes
Notes:
4 Rockwell Automation Publication 1756-IN005C-EN-P - March 2014
Page 5

Table of Contents
Preface
Install Chassis and Power Supplies
Standard ControlLogix Systems . . . . . . . . . . . . . . . . . . . . . . . . . . . . . . . . . . . . . 7
ControlLogix-XT Systems . . . . . . . . . . . . . . . . . . . . . . . . . . . . . . . . . . . . . . . . . . 7
Where to Start . . . . . . . . . . . . . . . . . . . . . . . . . . . . . . . . . . . . . . . . . . . . . . . . . . . . . 8
Installation Advisories. . . . . . . . . . . . . . . . . . . . . . . . . . . . . . . . . . . . . . . . . . . . . . 9
Additional Resources . . . . . . . . . . . . . . . . . . . . . . . . . . . . . . . . . . . . . . . . . . . . . 11
Chapter 1
Tools Required . . . . . . . . . . . . . . . . . . . . . . . . . . . . . . . . . . . . . . . . . . . . . . . . . . 13
Parts Required . . . . . . . . . . . . . . . . . . . . . . . . . . . . . . . . . . . . . . . . . . . . . . . . . . . 13
Follow These Steps. . . . . . . . . . . . . . . . . . . . . . . . . . . . . . . . . . . . . . . . . . . . . . . 14
Plan the System . . . . . . . . . . . . . . . . . . . . . . . . . . . . . . . . . . . . . . . . . . . . . . . . . . 15
Power Supply and Chassis Compatibility . . . . . . . . . . . . . . . . . . . . . . . 15
Minimum Cabinet Size . . . . . . . . . . . . . . . . . . . . . . . . . . . . . . . . . . . . . . . 15
Spacing Requirements . . . . . . . . . . . . . . . . . . . . . . . . . . . . . . . . . . . . . . . . 16
Mounting Dimensions. . . . . . . . . . . . . . . . . . . . . . . . . . . . . . . . . . . . . . . . 17
Install the Chassis and Power Supply . . . . . . . . . . . . . . . . . . . . . . . . . . . . . . 21
Ground the Chassis . . . . . . . . . . . . . . . . . . . . . . . . . . . . . . . . . . . . . . . . . . . . . . 23
Install a Central Ground Bus . . . . . . . . . . . . . . . . . . . . . . . . . . . . . . . . . . 24
Connect the Functional Earth Ground on the Chassis. . . . . . . . . . . 24
Connect the Protective Earth Ground . . . . . . . . . . . . . . . . . . . . . . . . . 25
Connect the Grounding Conductors to the Ground Bus . . . . . . . . 26
Connect Ground Bus to Grounding-electrode System . . . . . . . . . . . 26
Connect the Power. . . . . . . . . . . . . . . . . . . . . . . . . . . . . . . . . . . . . . . . . . . . . . . 27
Remove the Protective Label . . . . . . . . . . . . . . . . . . . . . . . . . . . . . . . . . . . . . . 28
Apply Power to the Chassis . . . . . . . . . . . . . . . . . . . . . . . . . . . . . . . . . . . . . . . 28
Input Power Requirements and Transformer Sizing. . . . . . . . . . . . . . . . . 29
Troubleshoot the Power Supply . . . . . . . . . . . . . . . . . . . . . . . . . . . . . . . . . . . 30
Install Chassis and Redundant Power
Supplies
Rockwell Automation Publication 1756-IN005C-EN-P - March 2014 5
Chapter 2
Redundant Power Supplies. . . . . . . . . . . . . . . . . . . . . . . . . . . . . . . . . . . . . . . . 31
Components of the Redundant System . . . . . . . . . . . . . . . . . . . . . . . . . . . . 32
Tools Required . . . . . . . . . . . . . . . . . . . . . . . . . . . . . . . . . . . . . . . . . . . . . . . . . . 33
Parts Required . . . . . . . . . . . . . . . . . . . . . . . . . . . . . . . . . . . . . . . . . . . . . . . . . . . 33
Follow These Steps. . . . . . . . . . . . . . . . . . . . . . . . . . . . . . . . . . . . . . . . . . . . . . . 34
Plan the System . . . . . . . . . . . . . . . . . . . . . . . . . . . . . . . . . . . . . . . . . . . . . . . . . . 35
Redundant Power Supply and Chassis Compatibility. . . . . . . . . . . . 35
Spacing Requirements . . . . . . . . . . . . . . . . . . . . . . . . . . . . . . . . . . . . . . . . 35
Mounting Dimensions. . . . . . . . . . . . . . . . . . . . . . . . . . . . . . . . . . . . . . . . 37
System Configuration Recommendations . . . . . . . . . . . . . . . . . . . . . . 41
Install the Chassis and Chassis Adapter . . . . . . . . . . . . . . . . . . . . . . . . . . . . 42
Install the Redundant Power Supplies. . . . . . . . . . . . . . . . . . . . . . . . . . . . . . 44
Ground the Chassis . . . . . . . . . . . . . . . . . . . . . . . . . . . . . . . . . . . . . . . . . . . . . . 45
Install a Central Ground Bus . . . . . . . . . . . . . . . . . . . . . . . . . . . . . . . . . . 46
Connect the Functional Earth Ground on the Chassis. . . . . . . . . . . 46
Page 6

Table of Contents
Connect the Protective Earth Ground on the Chassis
and Redundant Power Supply . . . . . . . . . . . . . . . . . . . . . . . . . . . . . . . . . 47
Connect the Grounding Conductors to the Ground Bus. . . . . . . . . 48
Connect Ground Bus to Grounding-electrode System . . . . . . . . . . . 48
Connect the Power . . . . . . . . . . . . . . . . . . . . . . . . . . . . . . . . . . . . . . . . . . . . . . . 49
Connect the 1756-CPR2 Cable. . . . . . . . . . . . . . . . . . . . . . . . . . . . . . . . 49
Connect Power to the Redundant Power Supply . . . . . . . . . . . . . . . . 49
Connect the Solid-state Relay. . . . . . . . . . . . . . . . . . . . . . . . . . . . . . . . . . 50
Remove the Protective Label . . . . . . . . . . . . . . . . . . . . . . . . . . . . . . . . . . . . . . 52
Apply Power to the Chassis . . . . . . . . . . . . . . . . . . . . . . . . . . . . . . . . . . . . . . . 52
Input Power Requirements and Transformer Sizing . . . . . . . . . . . . . . . . . 53
Troubleshoot the Redundant Power Supplies . . . . . . . . . . . . . . . . . . . . . . . 54
Chassis Adapter Status Indicator. . . . . . . . . . . . . . . . . . . . . . . . . . . . . . . 54
Remove or Replace a Redundant Power Supply . . . . . . . . . . . . . . . . . . . . . 55
Remove a Redundant Power Supply . . . . . . . . . . . . . . . . . . . . . . . . . . . . 55
Replace a Redundant Power Supply . . . . . . . . . . . . . . . . . . . . . . . . . . . . 55
Remove or Replace a Chassis Adapter . . . . . . . . . . . . . . . . . . . . . . . . . . . . . . 56
Remove a Chassis Adapter. . . . . . . . . . . . . . . . . . . . . . . . . . . . . . . . . . . . . 56
Replace a Chassis Adapter . . . . . . . . . . . . . . . . . . . . . . . . . . . . . . . . . . . . . 56
6 Rockwell Automation Publication 1756-IN005C-EN-P - March 2014
Page 7

Preface
Standard ControlLogix Systems
ControlLogix-XT Systems
The ControlLogix system is a modular system that requires a 1756 I/O chassis
that houses various modules. Chassis are available with 4, 7, 10, 13, and 17 slots
for standard applications where temperatures range from 0…60 °C
(32…140 °F). You can place any module into any slot.
The chassis backplane provides the following features:
• A high-speed communication path between modules
• Power distribution to each module housed in the chassis
• Messages passed between multiple controllers housed in the chassis
• Messages passed between and through multiple communication-interface
modules housed on the chassis
The ControlLogix-XT products include power, control, and communication
system components that, when used with FLEX I/O-XT™ products, provide a
complete control system solution that can be used in environments where
temperatures range from -20…70 °C (-4…158 °F). Chassis are available with 4, 5,
and 7 slots.
When used independently, ControlLogix-XT systems can withstand
environments where temperatures range from -25…70 °C (-13…158 °F) for
equipment designated as ‘XT’ and -25…60 °C (-13…140 °F) for equipment
designated ‘LXT’.
These installation instructions describe how to install the following components
of a ControlLogix system:
• Standard ControlLogix chassis
• Standard ControlLogix power supplies
• ControlLogix-XT™ chassis
• ControlLogix-XT power supplies
• ControlLogix redundant power supplies
• ControlLogix chassis adapters
Rockwell Automation Publication 1756-IN005C-EN-P - March 2014 7
Page 8
Preface
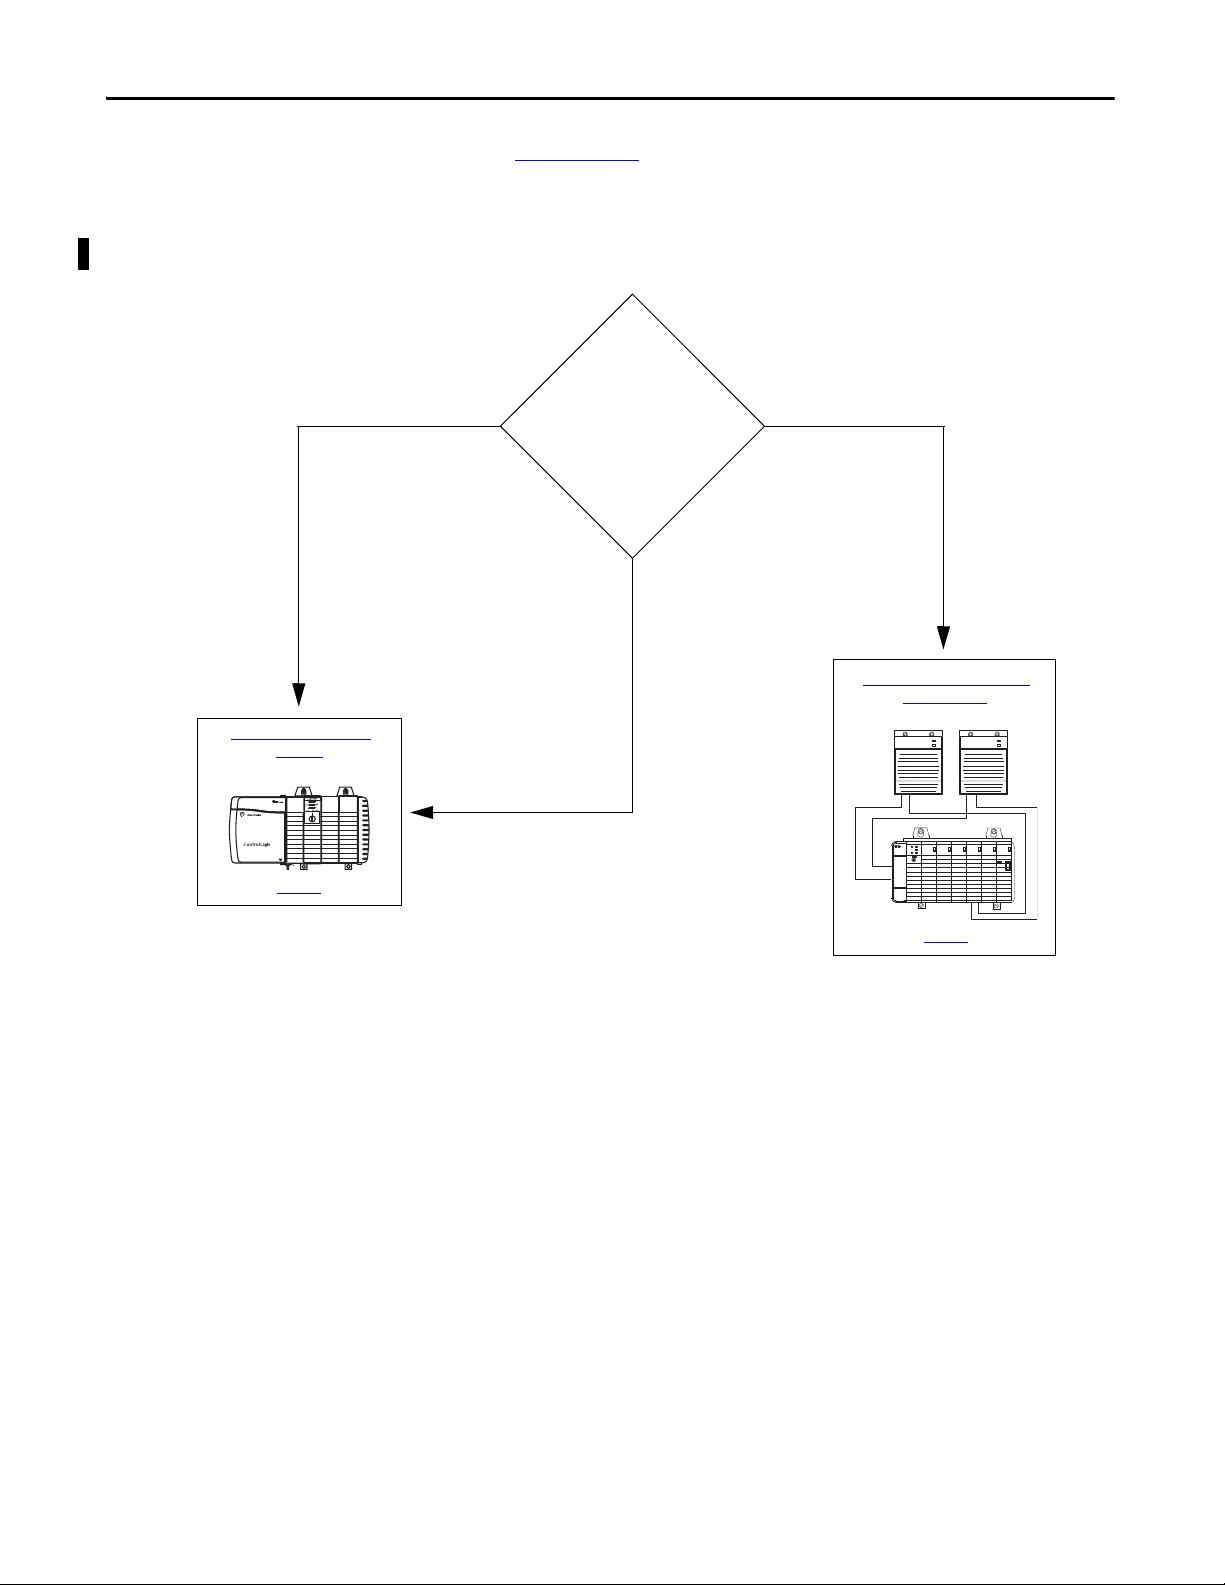
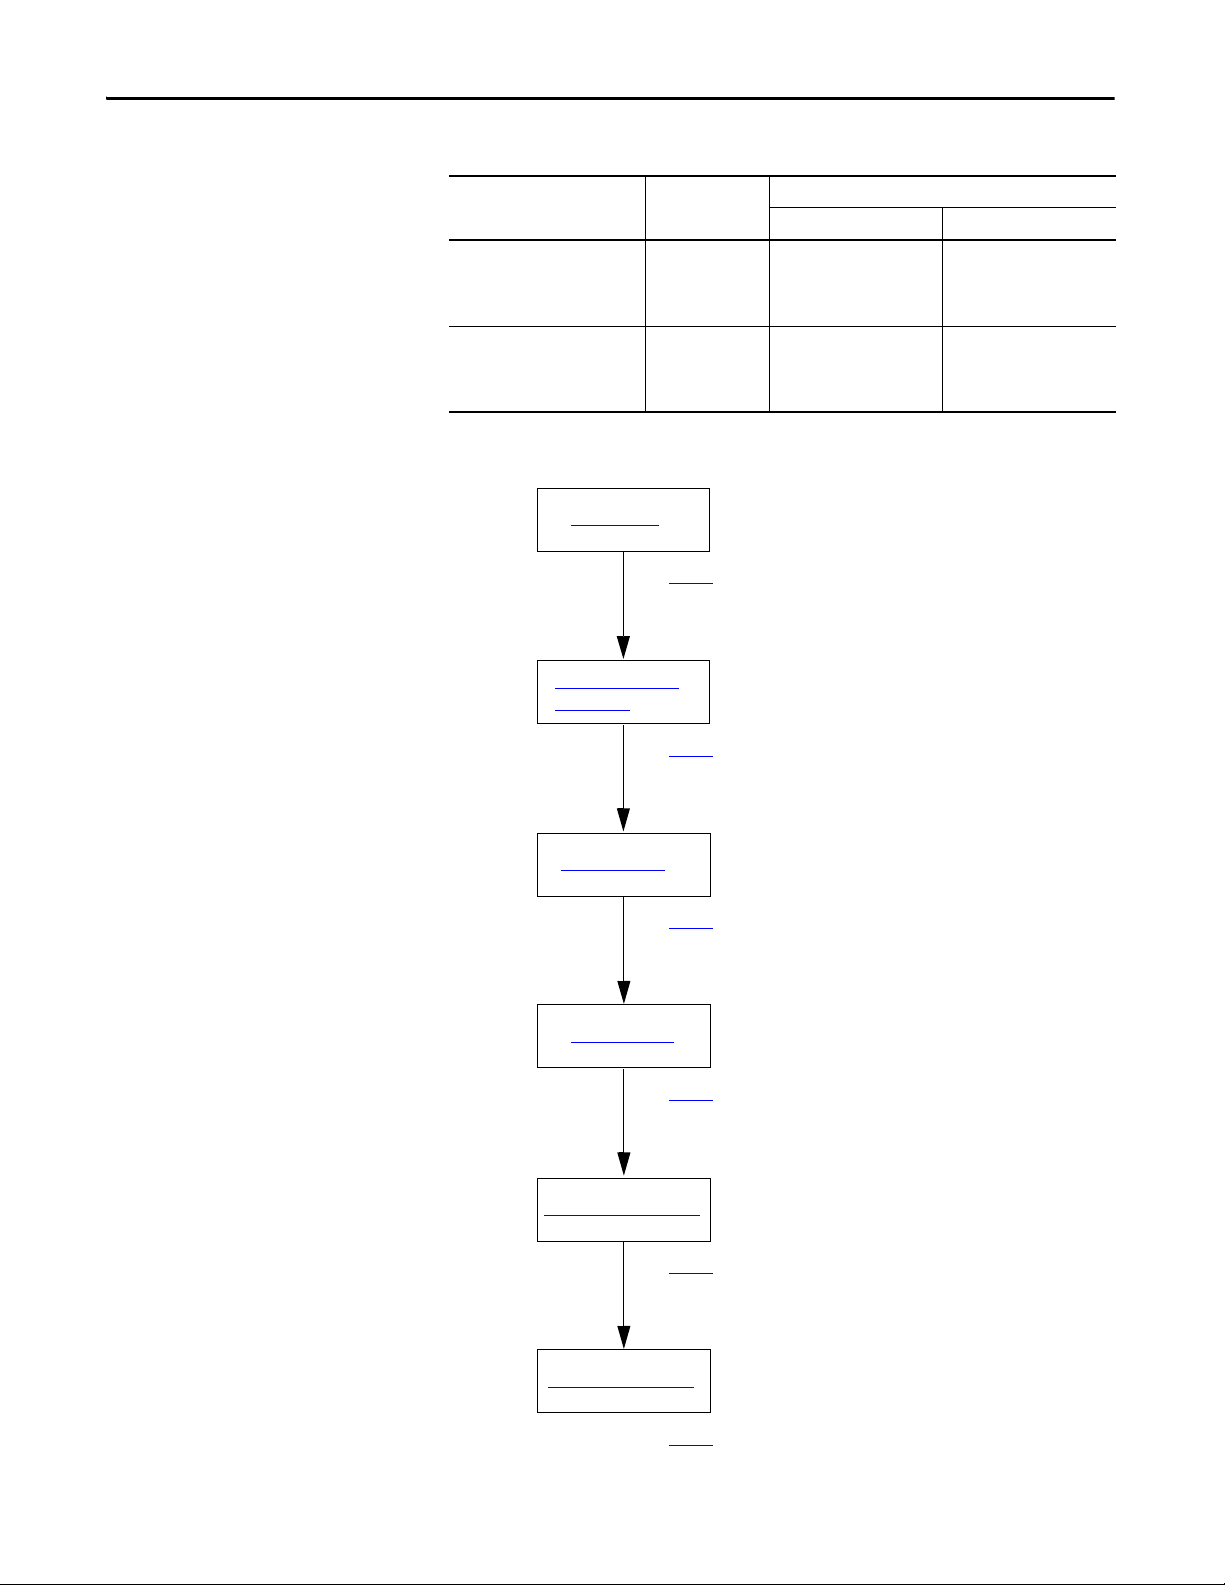
Are you using a Standard
ControlLog ix,
ControlLogix-XT or
ControlLogix w ith
Redundant Power Supply
System?
Standard
Control Logix
System
ControlLog ix-XT
System
ControlLogix with
Redundant Power
Supply System
Install Chassis and Power
Supplies
Install Chassis and Redundant
Power Sup plies
page 31
page 13
Where to Start
Use the Where to Start chart below to determine the steps to follow.
8 Rockwell Automation Publication 1756-IN005C-EN-P - March 2014
Page 9
Installation Advisories
IMPORTANT
ATTENTION: Environment and Enclosure
This equipment is intended for use in a Pollution Degree 2 industrial environment, in overvoltage Category II applications (as defined
in IEC 60664-1), at altitudes up to 2000 m (6562 ft) without derating.
This equipment is not intended for use in residential environments and may not provide adequate protection to radio communication
services in such environments.
This equipment is supplied as open-type equipment. It must be mounted within an enclosure that is suitably designed for those
specific environmental conditions that will be present and appropriately designed to prevent personal injury resulting from
accessibility to live parts. The enclosure must have suitable flame-retardant properties to prevent or minimize the spread of flame,
complying with a flame spread rating of 5VA or be approved for the application if nonmetallic. The interior of the enclosure must be
accessible only by the use of a tool. Subsequent sections of this publication may contain additional information regarding specific
enclosure type ratings that are required to comply with certain product safety certifications.
In addition to this publication, see the following:
• Industrial Automation Wiring and Grounding Guidelines, publication 1770-4.1
• NEMA 250 and IEC 60529, as applicable, for explanations of the degrees of protection provided by enclosures
Preface
, for additional installation requirements
ATTENTION: Prevent Electrostatic Discharge
This equipment is sensitive to electrostatic discharge, which can cause internal damage and affect normal operation. Follow these
guidelines when you handle this equipment:
• Touch a grounded object to discharge potential static.
• Wear an approved grounding wriststrap.
• Do not touch connectors or pins on component boards.
• Do not touch circuit components inside the equipment.
• Use a static-safe workstation, if available.
• Store the equipment in appropriate static-safe packaging when not in use.
ControlLogix-XT system components are rated for extreme environmental conditions only when used properly with
other Logix-XT system components. The use of ControlLogix-XT components with standard ControlLogix system
components nullifies extreme-environment ratings.
If a ControlLogix-XT module is used with standard ControlLogix products, the ControlLogix-XT module can withstand only the
environments specified for the standard ControlLogix version of the module. For example, if a 1756-L63XT controller is used in a
standard 1756-A10 chassis, the ControlLogix-XT controller can withstand only the environment specified for the standard
1756-L63 controller.
The ControlLogix-XT system components are designed to meet the same and greater operational and environmental requirements
as traditional ControlLogix products.
When a ControlLogix-XT component is used as a replacement for a traditional ControlLogix component, the functional and
environmental requirements of the traditional ControlLogix component apply, with the exception of the power output ratings.
ATTENTION: If this equipment is used in a manner not specified by the manufacturer, the protection provided by the equipment
may be impaired.
Rockwell Automation Publication 1756-IN005C-EN-P - March 2014 9
Page 10
Preface
European Hazardous Location Approval
The following applies when the product bears the Ex Marking.
This equipment is intended for use in potentially explosive atmospheres as defined by European Union Directive 94/9/EC and has been found to
comply with the Essential Health and Safety Requirements relating to the design and construction of Category 3 equipment intended for use in
Zone 2 potentially explosive atmospheres, given in Annex II to this Directive.
Compliance with the Essential Health and Safety Requirements has been assured by compliance with EN 60079-15 and EN 60079-0.
ATTENTION: This equipment is not resistant to sunlight or other sources of UV radiation.
WARNING:
• This equipment shall be mounted in an ATEX-certified enclosure with a minimum ingress protection rating of at least IP54 (as
defined in IEC60529) and used in an environment of not more than Pollution Degree 2 (as defined in IEC 60664-1) when
applied in Zone 2 environments. The enclosure must have a tool-removable cover or door.
• Provision shall be made to prevent the rated voltage from being exceeded by transient disturbances of more than 140% of the
rated voltage when applied in Zone 2 environments.
• This equipment must be used only with ATEX certified Rockwell Automation backplanes.
• Secure any external connections that mate to this equipment by using screws, sliding latches, threaded connectors, or other
means provided with this product.
• Do not disconnect equipment unless power has been removed or the area is known to be nonhazardous.
North American Hazardous Location Approval
The following information applies when operating this equipment
in hazardous locations.
Products marked "CL I, DIV 2, GP A, B, C, D" are suitable for use in Class I
Division 2 Groups A, B, C, D, Hazardous Locations and nonhazardous locations
only. Each product is supplied with markings on the rating nameplate
indicating the hazardous location temperature code. When combining
products within a system, the most adverse temperature code (lowest "T"
number) may be used to help determine the overall temperature code of the
system. Combinations of equipment in your system are subject to
investigation by the local Authority Having Jurisdiction at the time of
installation.
WARNING: EXPLOSION HAZARD -
• Do not disconnect equipment unless power has been
removed or the area is known to be nonhazardous.
• Do not disconnec t connections to this equipment unless
power has been removed or the area is known to be
nonhazardous. Secure any external connections that
mate to this equipment by using screws, sliding latches,
threaded connectors, or other means provided with this
product.
• Substitution of components may impair suitability for
Class I, Division 2.
• If this product contains batteries, they must only be
changed in an area known to be nonhazardous.
Informations sur l’utilisation de cet équipement en
environnements dangereux.
Les produits marqués "CL I, DIV 2, GP A, B, C, D" ne conviennent qu'à une
utilisation en environnements de Classe I Division 2 Groupes A, B, C, D
dangereux et non dangereux. Chaque produit est livré avec des marquages
sur sa plaque d'identification qui indiquent le code de température pour les
environnements dangereux. Lorsque plusieurs produits sont combinés dans
un système, le code de température le plus défavorable (code de
température le plus faible) peut être utilisé pour déterminer le code de
température global du système. Les combinaisons d'équipements dans le
système sont sujettes à inspection par les autorités locales qualifiées au
moment de l'installation.
AVERTISSEMENT: RISQUE D’EXPLOSION –
• Couper le courant ou s'assurer que l'environnement est
classé non dangereux avant de débrancher
l'équipement.
• Couper le courant ou s'assurer que l'environnement est
classé non dangereux avant de débrancher les
connecteurs. Fixer tous les connecteurs externes reliés à
cet équipement à l'aide de vis, loquets coulissants,
connecteurs filetés ou autres moyens fournis avec ce
produit.
• La substitution de composants peut rendre cet
équipement inadapté à une utilisation en
environnement de Classe I, Division 2.
• S'assurer que l'environnement est classé non dangereux
avant de changer les piles.
10 Rockwell Automation Publication 1756-IN005C-EN-P - March 2014
Page 11
Preface
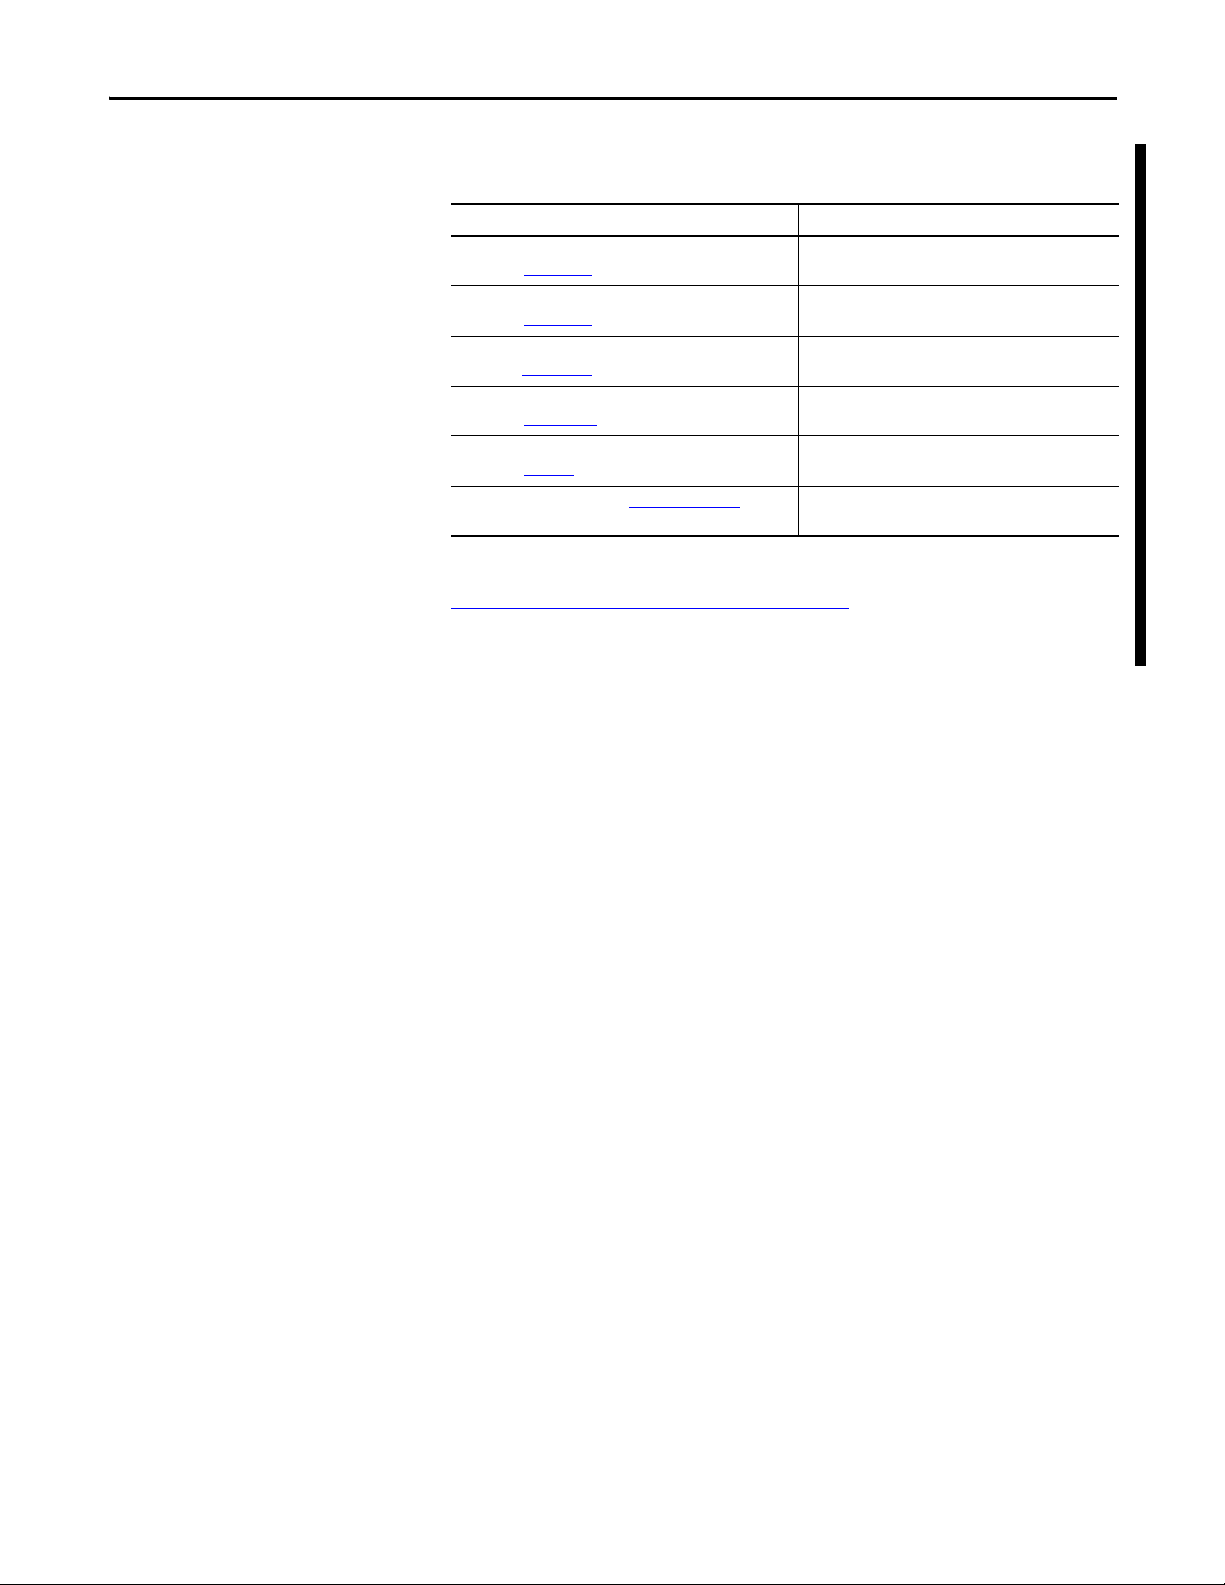
Additional Resources
These documents contain additional information concerning related products
from Rockwell Automation.
Resource Description
ControlLogix Selection Guide,
publication 1756-SG001
ControlLogix Chassis Specifications Technical Data,
publication 1756-TD006
ControlLogix Power Supplies Specifications Technical Data,
publication 1756-TD005
ControlLogix System User Manual,
publication 1756-UM001
Industrial Automation Wiring and Grounding Guidelines,
publication 1770-4.1
Product Certifications website, http://www.ab.com Provides declarations of conformity, certificates, and
Provides overview of the ControlLogix system and its
products.
Provides technical specifications for ControlLogix
chassis.
Provides technical specifications for ControlLogix power
supplies.
Provides information on how to install, configure,
program, and use ControlLogix controllers.
Provides general guidelines for installing a
Rockwell Automati on® industrial system.
other certification details.
You can view or download publications at
http:/www.rockwellautomation.com/literature/
. To order paper copies of
technical documentation, contact your local Allen-Bradley distributor or
Rockwell Automation sales representative.
Rockwell Automation Publication 1756-IN005C-EN-P - March 2014 11
Page 12

Preface
12 Rockwell Automation Publication 1756-IN005C-EN-P - March 2014
Page 13

Chapter 1
Install Chassis and Power Supplies
This chapter describes how to install standard and ControlLogix-XT versions of
the 1756 chassis with nonredundant power supplies.
Tools Required
Parts Required
When installing either the standard or ControlLogix-XT versions of your 1756
chassis and power supplies, the following items are required:
• 3.18 mm (0.125 in.) slotted screwdriver
• 6.35 mm (0.25 in.) slotted or #2 Phillips screwdriver
• Torque screwdriver
• Needle-nose pliers
• Crimping tool
• Wire-stripping tool
• Drill
Use these tables to determine the parts required to install your chassis. These
parts are not included with the chassis and must be ordered separately.
Table 1 - Parts Required Per Mounting Tab
Tab Position With SEM Screws
Top • 1 Phillips screw
• 1 flat washer
• 1 split-lock washer
Bottom 1 SEM screw • 1 Phillips screw
(1)
Without SEM Screws
N/A
• 1 star washer
(1) Phillips screw with attached star washer.
Table 2 - Total Parts Required Per Chassis
Chassis Number of
1756-A4, 1756-A7,
1756-A4LXT, 1756-A7LXT
1756-A10,
1756-A5XT, 1756-A7XT
Rockwell Automation Publication 1756-IN005C-EN-P - March 2014 13
Mounting Tabs
2 top
2 bottom
3 top
3 bottom
Total Parts Required Per Chassis
With SEM Screws Without SEM Screws
• 2 Phillips screws
• 2 flat washers
• 2 split-lock washers
• 2 SEM screws
• 3 Phillips screws
• 3 flat washers
• 3 split-lock washers
• 3 SEM screws
• 4 Phillips screws
• 2 flat washers
• 2 split-lock washers
• 2 star washers
• 6 Phillips screws
• 3 flat washers
• 3 split-lock washers
• 3 star washers
Page 14
Chapter 1 Install Chassis and Power Supplies
Plan the System
page 15
Install the Chassis and
Power Supply
page 21
Ground the Chassis
page 23
Connect the Power
page 27
Remove the Protective Label
page 28
Apply Power to the Chassis
page 28
Table 2 - Total Parts Required Per Chassis
Follow These Steps
Chassis Number of
Mounting Tabs
1756-A13 4 top
4 bottom
1756-A17 5 top
5 bottom
Total Parts Required Per Chassis
With SEM Screws Without SEM Screws
• 4 Phillips screws
• 4 flat washers
• 4 split-lock washers
• 4 SEM screws
• 5 Phillips screws
• 5 flat washers
• 5 split-lock washers
• 5 SEM screws
• 8 Phillips screws
• 4 flat washers
• 4 split-lock washers
• 4 star washers
• 10 Phillips screws
• 5 flat washers
• 5 split-lock washers
• 5 star washers
14 Rockwell Automation Publication 1756-IN005C-EN-P - March 2014
Page 15
Install Chassis and Power Supplies Chapter 1
IMPORTANT
Plan the System
Use the following information to assist you in planning your system.
Power Supply and Chassis Compatibility
The chassis series you have determines the power supply you can use. The
following table lists the chassis that can be installed with each power supply.
Table 3 - Chassis Compatibility
Power Suppl y Cat. No. Chassis Cat. No.
1756-PA72/C 1756-A4/A, 1756-A7/A, 1756-A10/A, 1756-A13/A, 1756-A17/A,
1756-PB72/C
1756-PA75/B 1756-A4/B, 1756-A7/B, 1756-A10/B, 1756-A13/B, 1756-A17/B
1756-PB75/B
1756-PC75/B
1756-PH75/B
1756-PBXT 1756-A4LXT, 1756-A5XT, 1756-A7LXT, 1756-A7XT
1756-PAXT
1756-A4/B, 1756-A7/B, 1756-A10/B, 1756-A13/B, 1756-A17/B
Minimum Cabinet Size
The following table lists the minimum cabinet size for each ControlLogix chassis.
To meet the UL/CSA standards, the cabinet housing your ControlLogix chassis
cannot be smaller than these minimum cabinet-size requirements.
Chassis Minimum Cabinet Size (H x W x D), approx
1756-A4 50.8 x 50.8 x 20.3 cm (20 x 20 x 8 in.)
1756-A7 50.8 x 60.9 x 20.3 cm (20 x 24 x 8 in.)
1756-A10 50.8 x 76.2 x 20.3 cm (20 x 30 x 8 in.)
1756-A13 60.9 x 76.2 x 20.3 cm (24 x 30 x 8 in.)
1756-A17 76.2 x 91.4 x 20.3 cm (30 x 36 x 8 in.)
1756-A4LXT 50.8 x 50.8 x 20.3 cm (20 x 20 x 8 in.)
1756-A5XT 50.8 x 76.2 x 20.3 cm (20 x 30 x 8 in.)
1756-A7LXT 50.8 x 60.9 x 20.3 cm (20 x 24 x 8 in.)
1756-A7XT 50.8 x 76.2 x 20.3 cm (20 x 30 x 8 in.)
Rockwell Automation Publication 1756-IN005C-EN-P - March 2014 15
Page 16
Chapter 1 Install Chassis and Power Supplies
IMPORTANT
W
i
r
e
w
a
y
Wireway
W
i
r
e
w
a
y
45796
15.3 (6.0)
10.2
(4.0)
7.7
(3.0)
5.1 (2.0)
15.3 (6.0)
5.1 (2.0)
15.3 (6.0)
10.2
(4.0)
The 10.2 (4.0)
measurement to the side
of the enclosure can
include the wireway.
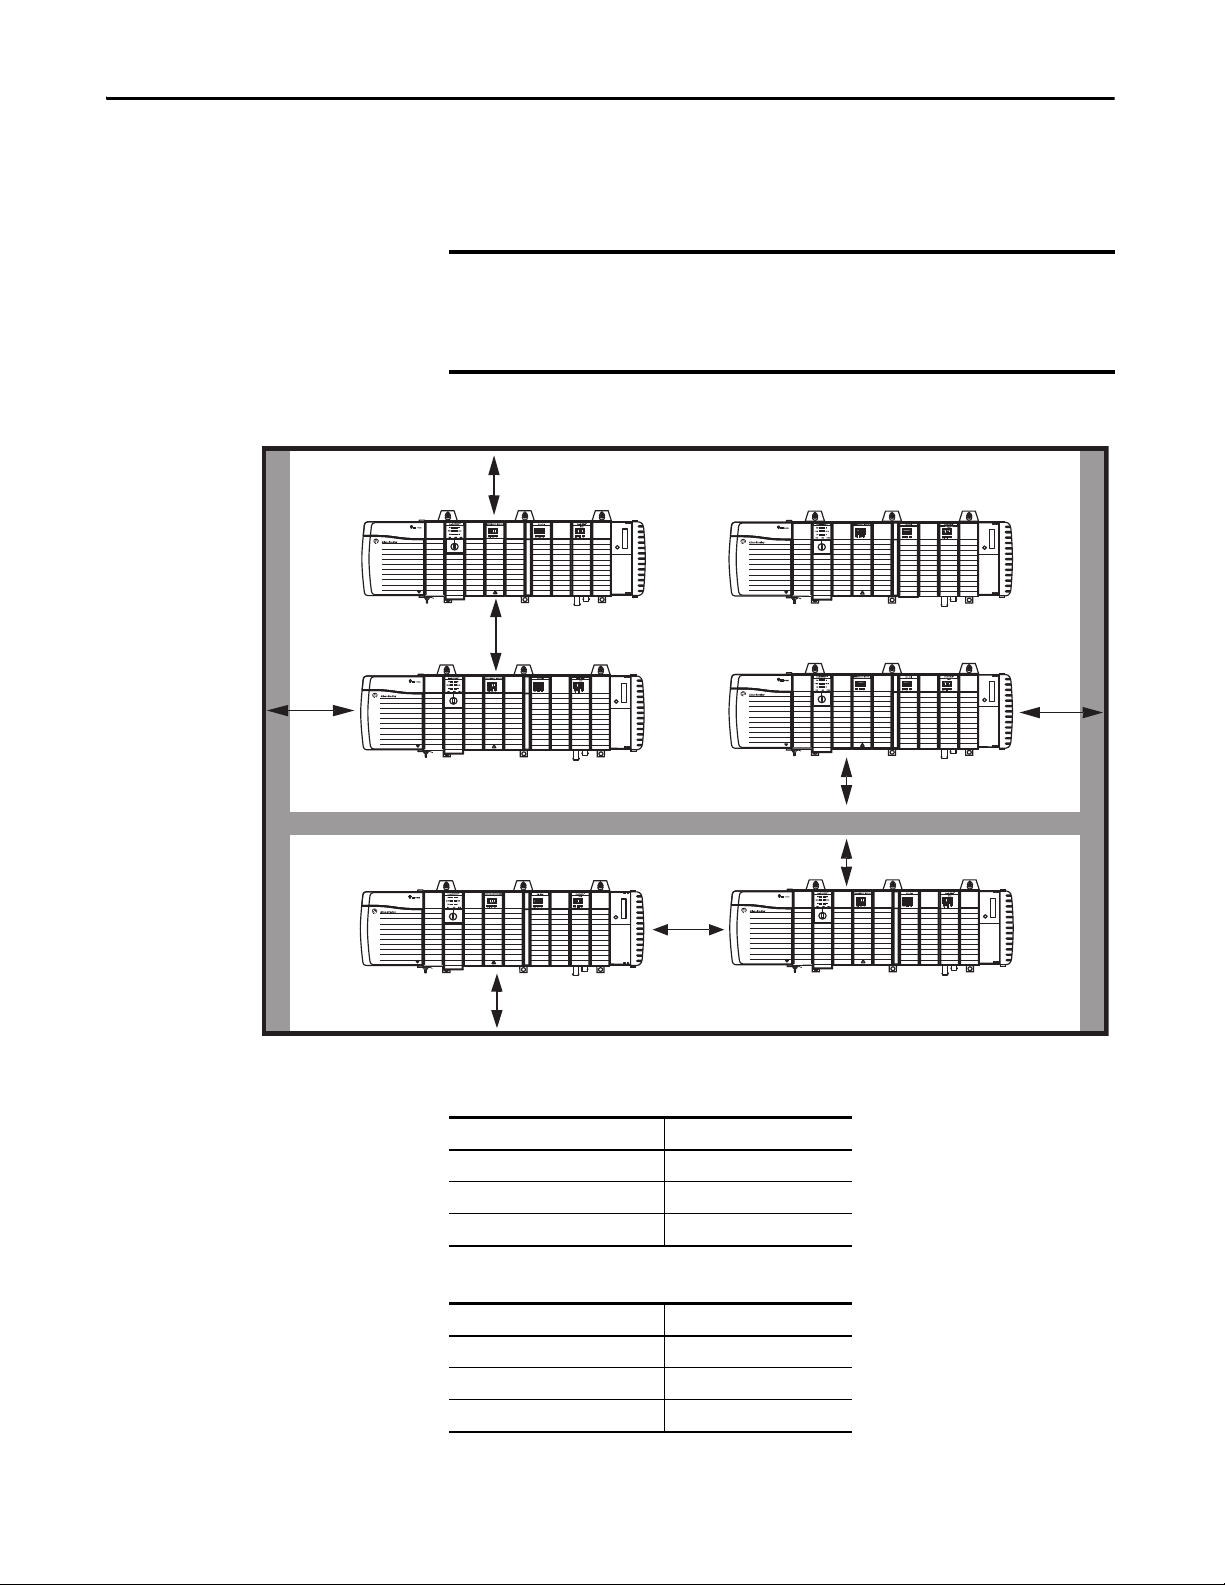
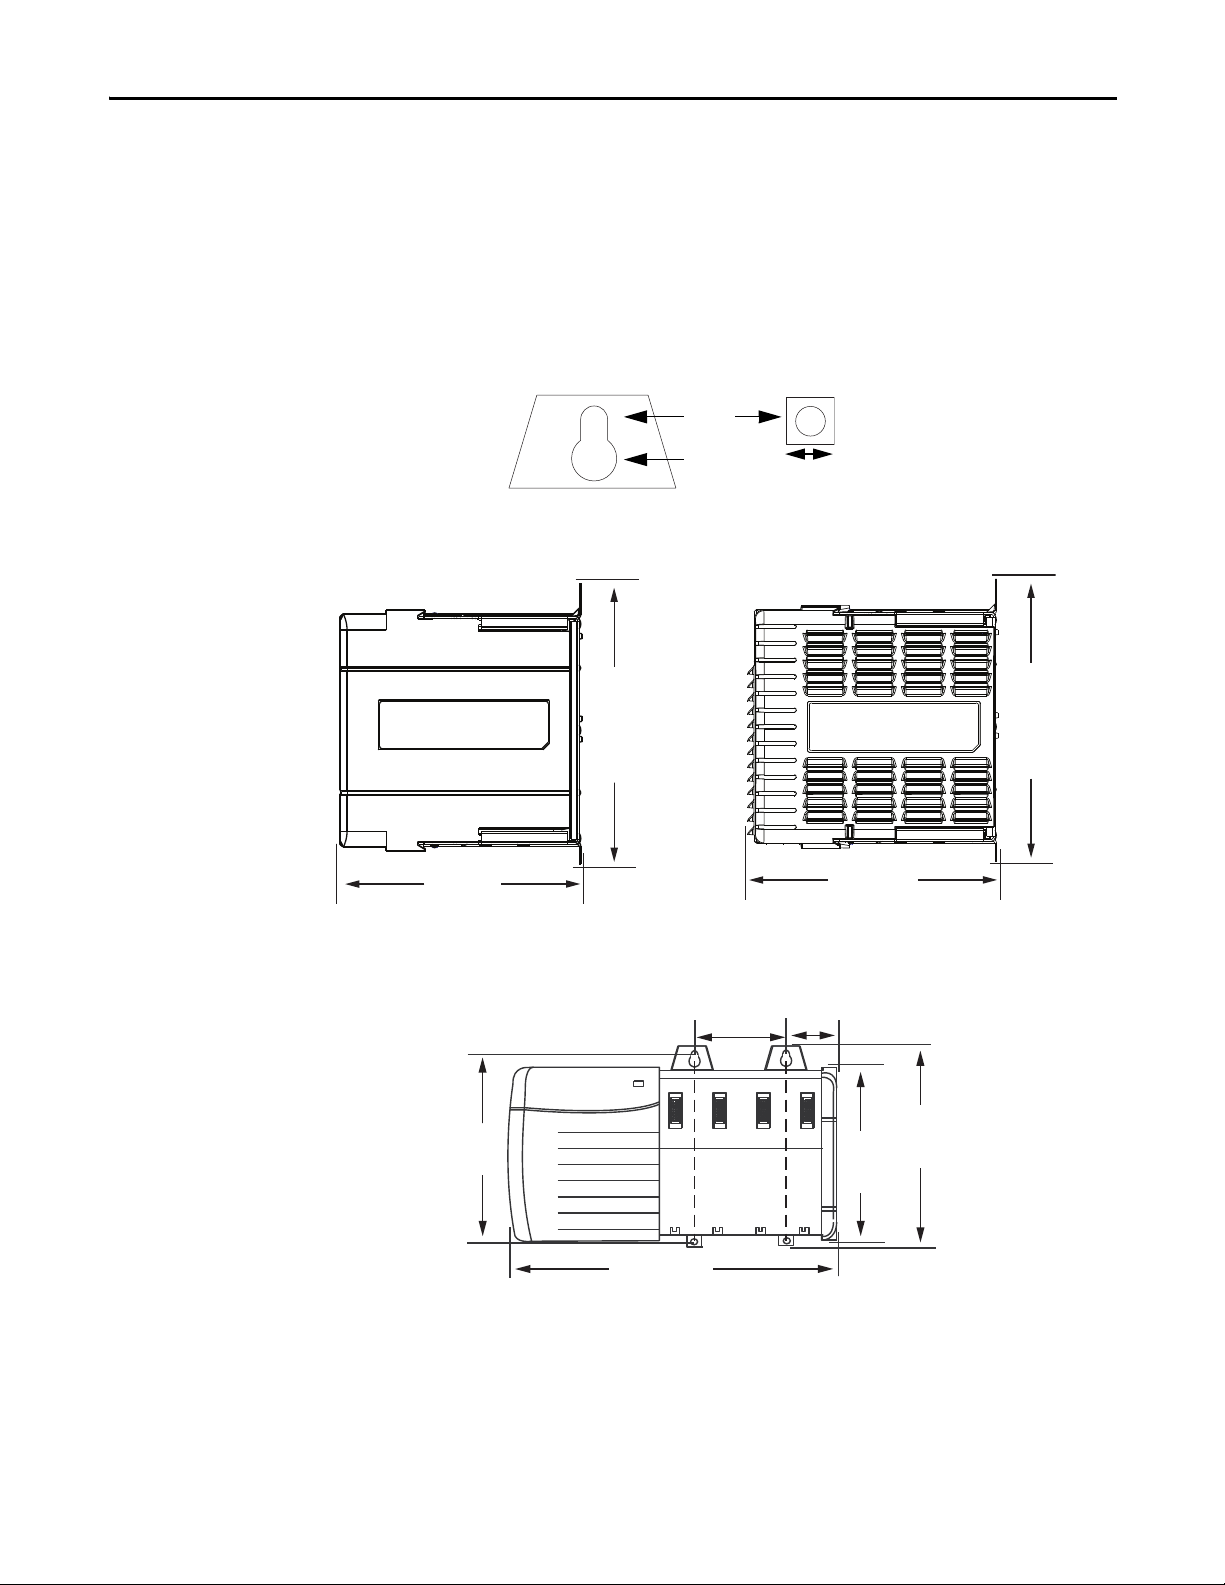
Spacing Requirements
Use the following information to plan your installation.
Make sure you meet the minimum spacing requirements specified.
Allow 15.3 cm (6.0 in.) between chassis and a heat source, and allow
5.1 cm (2.0 in.) between a wireway and the top or bottom of a chassis.
Chassis are intended to be mounted only horizontally. Do not mount vertically.
Dimensions are in cm (in.).
16 Rockwell Automation Publication 1756-IN005C-EN-P - March 2014
Table 4 - Spacing Requirements, Top and Bottom
From a chassis to a Requires this space, min
Cabinet 15.3 cm (6.0 in.)
Chassis or other heat source 15.3 cm (6.0 in.)
Wireway 5.1 cm (2.0 in.)
Table 5 - Spacing Requirements, Sides
From a chassis to a Requires this space, min
Cabinet 10.2 cm (4.0 in.)
Chassis or other heat source 7.7 cm (3.0 in.)
Wireway No minimum spacing required
Page 17
Install Chassis and Power Supplies Chapter 1
1.1
(0.433)
0.55
(0.217)
Top Mounting
Hole Diameter
Bottom Mounting
Hole Diameter
Right-side View of All Standard Chassis
16.9
(6.65)
14.5
(5.71)
0.78
(0.31)
43591
45797
16.9
(6.65)
14.9
(5.87)
45865
Right-side View of All ControlLogix-XT Chassis
7.0
(2.76)
4.71
(1.85)
16.9
(6.65)
26.3
(10.34)
43592
15.8
(6.22)
14.5
(5.70)
Mounting Dimensions
Use these dimensions to plan your chassis installation.
Dimensions are in cm (in.).
Figure 1 - Chassis Common Dimensions
Figure 2 - 1756-A4 Chassis and Power Supply
Rockwell Automation Publication 1756-IN005C-EN-P - March 2014 17
Page 18
Chapter 1 Install Chassis and Power Supplies
17.5
(6.89)
14.5
(5.70)
16.9
(6.65)
36.7
(14.47)
43593
15.8
(6.22)
4.71
(1.85)
14.5
(5.70)
16.9
(6.65)
48.3
(19.02)
43594
15.8
(6.22)
5.7
(2.25)
14.0
(5.51)
14.0
(5.51)
14.5
(5.70)
16.9
(6.65)
58.8
(23.13)
43595
15.8
(6.22)
5.7
(2.25)
14.0
(5.51)
14.0
(5.51)
10.5
(4.13)
Figure 3 - 1756-A7 Chassis and Power Supply
Figure 4 - 1756-A10 Chassis and Power Supply
Figure 5 - 1756-A13 Chassis and Power Supply
18 Rockwell Automation Publication 1756-IN005C-EN-P - March 2014
Page 19

Figure 6 - 1756-A17 Chassis and Power Supply
14.5
(5.70)
16.9
(6.65)
73.8
(29.04)
43596
15.8
(6.22)
4.7
(1.85)
14.0
(5.51)
14.0
(5.51)
13.3
(5.22)
13.3
(5.22)
7.0
(2.76)
6.3
(2.48)
16.9
(6.65)
27.8
(10.96)
45798
15.8
(6.22)
14.5
(5.72)
14.5
(5.72)
16.9
(6.65)
49.8
(19.62)
45799
15.8
(6.22)
7.3
(2.87)
14.0
(5.51)
14.0
(5.51)
Figure 7 - 1756-A4LXT Chassis and Power Supply
Install Chassis and Power Supplies Chapter 1
Figure 8 - 1756-A5XT Chassis and Power Supply
Rockwell Automation Publication 1756-IN005C-EN-P - March 2014 19
Page 20

Chapter 1 Install Chassis and Power Supplies
17.5
(6.89)
14.5
(5.72)
16.9
(6.65)
38.3
(15.10)
45800
15.8
(6.22)
6.3
(2.48)
14.5
(5.70)
16.9
(6.65)
49.8
(19.62)
45801
15.8
(6.22)
7.3
(2.87)
14.0
(5.51)
14.0
(5.51)
Figure 9 - 1756-A7LXT Chassis and Power Supply
Figure 10 - 1756-A7XT Chassis and Power Supply
20 Rockwell Automation Publication 1756-IN005C-EN-P - March 2014
Page 21

Install Chassis and Power Supplies Chapter 1
IMPORTANT
20289-M
Install the Chassis and Power Supply
After planning your system, use these instructions to properly install the standard
or ControlLogix-XT versions of your 1756 chassis and power supplies.
ATT EN TI ON : Do not drill holes above an installed chassis. Metal chips from
drilling can damage the backplane and cause intermittent operation.
Chassis are intended to be mounted only horizontally. Do not mount vertically.
1. Drill holes in the back panel of the enclosure for the chassis mounting tabs.
See the Plan the System on page 15 for assistance in hole placement.
2. Scrape paint off the back panel for an electrical connection between the
chassis and back panel.
3. Hold the chassis in place against the holes.
ATT EN TI ON : If the chassis mounting tabs do not lay flat before the screws are
tightened, use additional washers as shims so the chassis is not warped by
tightening the screws.
Warping a chassis can damage the backplane and cause intermittent operation.
4. Install the hardware for the top mounting tabs and tighten.
See Parts Required
on page 13 for more information.
Rockwell Automation Publication 1756-IN005C-EN-P - March 2014 21
Page 22

Chapter 1 Install Chassis and Power Supplies
20290-M
Leave farleft bottom
tab open.
Card Guide
43614
43614
5. Leaving the far-left bottom tab open for functional ground, install the
remaining tab screws.
6. Align the power-supply circuit board with the card guides on the left side
of the chassis and slide the power supply back until it is flush with the front
of the chassis.
7. Tighten the top and bottom screws to fasten the power supply to the
chassis.
22 Rockwell Automation Publication 1756-IN005C-EN-P - March 2014
Page 23

Install Chassis and Power Supplies Chapter 1
TIP
Functional Earth Ground, page 24
Protective
Earth Ground,
page 25
Cabinet
To Grounding-electrode System
45805
8.3 mm² (8 AWG) solid or
stranded-copper wire
rated at 90 °C (194 °F) or
greater
2.1 mm² (14 AWG) solid or
stranded-copper wire
rated at 90 °C (194 °F) or
greater
Ground Bus
Ground the Chassis
Complete these steps to properly ground your chassis.
Grounding Step Page
Install a Central Ground Bus 24
Connect the Functional Earth Ground on the Chassis 24
Connect the Protective Earth Ground 25
Connect the Grounding Conductors to the Ground Bus 26
Connect Ground Bus to Grounding-electrode System 26
The following figure shows an example grounding configuration. After you
complete the grounding steps, your system looks similar to this figure.
To minimize the resistance between the chassis and ground connection, keep
wire lengths as short as possible.
Figure 11 - Grounding Configuration Example
Use these guidelines when connecting the grounding:
Rockwell Automation Publication 1756-IN005C-EN-P - March 2014 23
• Use a steel enclosure to guard against electromagnetic interference (EMI).
• Install a bonding wire for electrical contact between the enclosure door
and the enclosure; do not rely on the hinge.
• Make sure the enclosure-door viewing window is a laminated screen or a
conductive optical substrate (to block EMI).
Page 24

Chapter 1 Install Chassis and Power Supplies
20291-M
1
3
4
2
Install a Central Ground Bus
Each enclosure must contain a central ground bus. The ground bus is the
common connection for each chassis within the enclosure and the enclosure
itself.
For more information on installing a central ground bus, refer to the Industrial
Automation Wiring and Grounding Guidelines, publication 1770-4.1
.
Connect the Functional Earth Ground on the Chassis
Use 8.3 mm (8 AWG) solid or stranded-copper wire rated at 90 °C (194 °F) or
greater to connect the functional earth ground.
Connect the functional earth ground as shown in Figure 12
Figure 12 - Functional Earth Ground Connection
Item Description
1 Chassis mounting tab
2 Equipment grounding conductor (ground lug with 8.3 mm² [8 AWG] solid or
stranded-copper wire rated at 90 °C [194 °F] or greater)
3 M4 or M5 (#10 or #12) flat or star washer
4 M4 or M5 (#10 or #12) Phillips screw and flat or star washer (or SEM screw)
.
24 Rockwell Automation Publication 1756-IN005C-EN-P - March 2014
Page 25

Install Chassis and Power Supplies Chapter 1
+
-
+
-
45802
5
3
4
1
3
2
3
To G rou nd Bu s
IMPORTANT
Connect the Protective Earth Ground
Use 2.1 mm (14 AWG) solid or stranded-copper wire rated at 90 °C (194 °F) or
greater to connect the protective earth ground. Tighten the nuts on the
protective earth ground terminal stud to a torque of 16.27 N•m (12 lb•in).
Connect the functional earth ground as shown in Figure 13
Figure 13 - Protective Earth Ground Connection
.
Some chassis can have a second protective earth-ground terminal stud. If your
application requires the use of a second protective earth-ground terminal stud,
please use the additional protective earth-ground terminal stud to connect the
chassis to the ground bus.
Item Description
1 Protective earth-ground terminal stud
2Star washer
3 Equipment grounding conductor (ground lug with 2.1 mm² [14 AWG] solid or stranded-copper wire rated
4 Nut with captive star washer
5 Wiring terminal block (bottom terminal is protective earth ground)
Rockwell Automation Publication 1756-IN005C-EN-P - March 2014 25
at 90 °C [194 °F] or greater)
Page 26

Chapter 1 Install Chassis and Power Supplies
2
3
4
1
5
45803
2
3
1
45803
Connect the Grounding Conductors to the Ground Bus
Connect the equipment grounding conductors (functional and protective
earth ground) directly from each chassis to an individual bolt on the ground bus.
Figure 14 - Ground Bus Connection
Item Description
1 Flat or star washer
2Bolt
3 Equipment grounding conductor (from protective and functional earth ground connections)
4Ground bus
5 Ground bus mounting
Connect Ground Bus to Grounding-electrode System
Use a grounding-electrode conductor to connect the ground bus to the
grounding-electrode system.
At minimum, use 8.3 mm (8 AWG) solid or stranded-copper wire rated at
90 °C (194 °F) or greater for the grounding-electrode conductor to guard against
EMI. The National Electrical Code specifies safety requirements for the
grounding-electrode conductor.
Figure 15 - Grounding-electrode System Connection
Item Description
1 Flat or star washer
26 Rockwell Automation Publication 1756-IN005C-EN-P - March 2014
2Bolt
3 Equipment grounding conductor (ground lug with minimum 8.3 mm² [8 AWG] solid or stranded-
copper wire rated at 90 °C [194 °F] or greater)
Page 27

Connect the Power
IMPORTANT
L1
L2
L1
L2
+
-
+
-
AC Power Supplies DC Power Supplies
1
2
3
1
3
2
4
4
45806
45807
Install Chassis and Power Supplies Chapter 1
WARNING: If you connect or disconnect wiring while the field-side power is on,
an electrical arc can occur. This can cause an explosion in hazardous location
installations. Be sure that power is removed or the area is nonhazardous before
proceeding.
ATT EN TI ON : Do not wire more than 1 conductor on any single terminal.
Use 15 A time-delay type fuse in all ungrounded power connections.
Use 2.5 mm (14 AWG) solid or stranded-copper wire rated at 90 °C (194 °F), or
greater, 1.2 mm (3/64 in.) insulation maximum to connect power. Tighten the
terminals to a torque of 0.8 N•m (7 lb•in).
Connect the power as shown in Figure 16
.
The power supplies’ voltage input connections are auto-sensing.
You do not use a jumper, for example, a 120/240V AC jumper, when
connecting external power to the power supply, as shown in Figure 16
Figure 16 - Power Connection
Item Description, AC Power Supplies Description, DC Power Supplies
1 L1 (high side of line power) DC+ (positive supply)
2 L2 (low side of line power) DC- (negative supply return)
3 This terminal is not used and is capped to prevent use
4 2.5 mm² (14 AWG) 75 °C (167 °F) copper wire with 1.2 mm (3/64-in.) insulation
.
Rockwell Automation Publication 1756-IN005C-EN-P - March 2014 27
Page 28

Chapter 1 Install Chassis and Power Supplies
20264b-M
43615
Remove the Protective Label
Apply Power to the Chassis
ATT EN TI ON : Make sure the chassis is mounted and all panel fabrication is
complete before you remove the protective label. This label protects the power
supply from metal shavings falling inside the power supply and damaging it
during operation.
Remove the plastic label from the top of the power supply.
Tur n o n the pow er.
28 Rockwell Automation Publication 1756-IN005C-EN-P - March 2014
Page 29

Install Chassis and Power Supplies Chapter 1
75
60
45
30
15
0
0 20 40 60 80 100 120
6
100
75
60
45
30
15
0
0 20 40 60 80 100 120
4
95
75
60
45
30
15
0
0 20 40 60 80 100 120
4
95
42
35
28
21
14
7
0
0 10 20 30 40 50 60 70
64
6
43895
1756-PA72/C, 1756-PA75/B (AC)
1756-PB72/C, 1756-PB75/B (DC)
43896
Real Power (Watts)
Backplane Power
Load (Watts)
Apparent Power (Watts) = Transformer Load (VA) = Real Power (Watts)
Backplane Power
Load (Watts)
Real Power (Watts)
1756-PH75/B, 1756-PC75/B (DC)
43618
Backplane Power
Load (Watts)
Real Power (Watts)
Backplane Power
Load (Watts)
Real Power (Watts)
1756-PBXT (DC)
1756-PAXT (AC)
Backplane Power
Load (Watts)
45808
45809
Real Power (Watts)
Input Power Requirements and Transformer Sizing
These graphs show the input power requirements for the power supplies, given
the power they are providing to the modules in the chassis.
Follow these steps to determine the power requirements for your chassis.
1. Calculate the Backplane Power Load by adding the power draw (in Watts)
for all of the planned modules.
Refer to the module specification tables in the ControlLogix Selection
Guide, publication 1756-SG001
, for module power draws.
2. Locate the Backplane Power Load on the graph’s vertical (y) axis and
determine the corresponding Real Power (input-power) rating on the
horizontal (x) axis.
The Real Power value is the amount of power consumed by the power
supply.
Figure 17 - Power Supply Power Requirements
54
42
35
28
21
14
7
4
0
0 10 20 30 40 50 60
For more information about calculating the required power for your system, see
the ControlLogix Selection Guide, publication 1756-SG001
Rockwell Automation Publication 1756-IN005C-EN-P - March 2014 29
.
Page 30

Chapter 1 Install Chassis and Power Supplies
Status Indicator
45810
Troubleshoot the Power Supply
All ControlLogix power supplies have a green status indicator that remains ON
during normal operation.
If the indicator turns OFF during operation, take these steps to troubleshoot the
power supply.
1. Verify that the line voltage is within the specified range.
2. If the indicator remains OFF, turn off the power.
3. Loosen the screws holding the power supply to the chassis.
See step 7 on page 22
for the location of the screws on the power supply.
4. Slide the power supply out so that the rear connector is disconnected.
5. Turn on th e p ow er.
6. Follow these steps if the indicator does the following:
• Tur ns ON :
a. Verify that the Backplane Power Load of the system is within the
output rating of the power supply.
b. Turn off the power.
c. Reinstall the power supply in the chassis.
d. Turn on the power.
• Remains OFF:
Contact your local Allen-Bradley distributor.
30 Rockwell Automation Publication 1756-IN005C-EN-P - March 2014
Page 31

Chapter 2
Install Chassis and Redundant Power Supplies
This chapter describes how to install standard and ControlLogix-XT versions of
the 1756 chassis with redundant power supplies.
Redundant Power Supplies
The redundant power supply system provides additional uptime protection for
chassis used in critical applications. The two remotely-mounted supplies are
designed to share the current required by the chassis and are available in AC
(catalog number 1756-PA75R/A or 1756-PAXTR) and DC (catalog number
1756-PB75R/A or 1756-PBXTR) versions that can be mixed or matched when
used in tandem.
In the event of a failure by one power supply, the remaining supply accommodates
the entire load of the chassis without disruption to chassis activity.
The 1756-PSCA2 chassis adapter is a passive device designed to funnel power
from one or two ControlLogix redundant power supplies to the single power
connector on the ControlLogix chassis (only Series B) backplane.
Rockwell Automation Publication 1756-IN005C-EN-P - March 2014 31
Page 32

Chapter 2 Install Chassis and Redundant Power Supplies
42655
2
3
1
4
Components of the Redundant System
The following figure shows the components of a redundant system in a typical
configuration.
Item Description Cat. No.
1 Redundant power supply 1756-PA75R/A and/or 1756-PB75R/A
2 Redundant power supply cable
(Length = 0.91 m [3 ft])
3 Redundant power supply chassis adapter 1756-PSCA2
4 Annunciator wiring
(Maximum length = 10 m [32.8 ft])
(1) Cable bend radius is 12.7 cm (5.0 in.)
(2) Optional user-provided annunciator wiring can be connected to the solid-state relay for status and troubleshooting
purposes. See page 50
(2)
for more information.
(1)
1756-CPR2
User-supplied
32 Rockwell Automation Publication 1756-IN005C-EN-P - March 2014
Page 33

Install Chassis and Redundant Power Supplies Chapter 2
Tools Required
Parts Required
When installing your chassis and power supplies, the following items are
required:
• 3.18 mm (0.125 in.) slotted screwdriver
• 6.35 mm (0.25 in.) slotted or #2 Phillips-head screwdriver
• Torque screwdriver
• Needle-nose pliers
• Crimping tool
• Wire-stripping tool
• Drill
Each redundant power supply requires four, #10 Phillips screws for installation.
Eight, #10 Phillips screws are required to install two redundant power supplies.
Use these tables to determine the parts required to install your chassis. These
parts are not included with the chassis and must be ordered separately.
For each mounting tab on the chassis, the following parts are required.
Tab Position With SEM Screws
Top • 1 Phillips screw
• 1 flat washer
• 1 split-lock washer
Bottom 1 SEM screw • 1 Phillips screw
(1)
Without SEM Screws
N/A
• 1 star washer
(1) Phillips screw with attached star washer.
Table 6 - Mounting Tabs per Chassis
Chassis Number of
1756-A4, 1756-A7,
1756-A4LXT, 1756-A7LXT
1756-A10,
1756-A5XT, 1756-A7XT
1756-A13 4 top
1756-A17 5 top
Mounting Tabs
2 top
2 bottom
3 top
3 bottom
4 bottom
5 bottom
Total Parts Required Per Chassis
With SEM Screws Without SEM Screws
• 2 Phillips screws
• 2 flat washers
• 2 split-lock washers
• 2 SEM screws
• 3 Phillips screws
• 3 flat washers
• 3 split-lock washers
• 3 SEM screws
• 4 Phillips screws
• 4 flat washers
• 4 split-lock washers
• 4 SEM screws
• 5 Phillips screws
• 5 flat washers
• 5 split-lock washers
• 5 SEM screws
• 4 Phillips screws
• 2 flat washers
• 2 split-lock washers
• 2 star washers
• 6 Phillips screws
• 3 flat washers
• 3 split-lock washers
• 3 star washers
• 8 Phillips screws
• 4 flat washers
• 4 split-lock washers
• 4 star washers
• 10 Phillips screws
• 5 flat washers
• 5 split-lock washers
• 5 star washers
Rockwell Automation Publication 1756-IN005C-EN-P - March 2014 33
Page 34

Chapter 2 Install Chassis and Redundant Power Supplies
Plan the System
page 35
Install the Chassis and
Chassis Adapter
page 42
Ground the Chassis
page 45
Connect the Power
page 49
Remove the Protective Label
page 52
Apply Power to the Chassis
page 52
Install the Redundant
Power Sup plies
page 44
Follow These Steps
34 Rockwell Automation Publication 1756-IN005C-EN-P - March 2014
Page 35

Install Chassis and Redundant Power Supplies Chapter 2
IMPORTANT
Plan the System
Use the following information to assist you in planning your system.
Redundant Power Supply and Chassis Compatibility
The redundant power supplies and chassis adapter are compatible with only
standard, Series B, ControlLogix chassis.
Table 7 - Chassis Compatibility
Power Suppl y Cat. No. Chassis Cat. No.
1756-PA75R 1756-A4/B, 1756-A7/B, 1756-A10/B, 1756-A13/B, 1756-A17/B,
1756-PB75R
1756-PAXTR 1756-A4/B, 1756-A7/B, 1756-A10/B, 1756-A13/B, 1756-A17/B,
1756-PBXTR
1756-A4LXT, 1756-A5XT, 1756-A7LXT, 1756-A7XT
1756-A4LXT, 1756-A5XT, 1756-A7LXT, 1756-A7XT
Spacing Requirements
Use the following information to plan your installation.
Make sure you meet the minimum spacing requirements specified:
• 10.2 cm (4.0 in.) between redundant power supplies and cabinet housing
the control system
• 12.7 cm (5.0 in.) below redundant power supply for 1756-CPR2 cable
routing and connection
• 2.55 cm (1.0 in.) between redundant power supplies
• 15.3 cm (6.0 in.) between chassis and heat source
• 5.1 cm (2.0 in.) between wireway and top or bottom of chassis or
redundant power supply
• 12.7 cm (5.0 in.) of clearance next to the chassis adapter for 1756-CPR2
cable routing to conform to cable bend radius
Chassis and redundant power supplies are intended to be mounted only
horizontally. Do not mount vertically.
The 1756-CPR2 cable has a bend radius of 12.7 cm (5.0 in.). The chassis must
have a minimum clearance of 12.7 cm (5.0 in.) on the left side in order to
properly route and connect the 1756-CPR2 cable. The redundant power
supplies must have a minimum clearance of 12.7 cm (5.0 in.) below the supply
to properly route and connect the 1756-CPR2 cable.
Rockwell Automation Publication 1756-IN005C-EN-P - March 2014 35
Page 36

Chapter 2 Install Chassis and Redundant Power Supplies
45828 (2)
15.3 (6.0)
10.2
(4.0)
12.7
(5.0)
5.1 (2.0)
5.1 (2.0)
15.3 (6.0)
10.2
(4.0)
10.2
(4.0)
15.3
(6.0)
2.55
(1.0)
12.7
(5.0)
12.7
(5.0)
5.1 (2.0)
12.7 (5.0)
The 10.2 (4.0) measurement
to the side of the enclosure
can include the wireway on
the right side of the chassis.
15.3 (6.0)
15.3 (6.0)
15.3 (6.0)
12.7
(5.0)
12.7
(5.0)
12.7
(5.0)
WIREWAY
WIREWAY
W
I
R
E
W
A
Y
Dimensions are in cm (in.).
Figure 18 - Minimum Spacing Requirements
Table 8 - Spacing Requirements, Top and Bottom
From a To a chassis
Cabinet 15.3 cm (6.0 in.) 10.2 cm (4.0 in.), 12.7 cm (5.0 in.) (only
Chassis or other heat source 15.3 cm (6.0 in.) 15.3 cm (6.0 in.)
Wireway 5.1 cm (2.0 in.) 5.1 cm (2.0 in.), 2.7 cm (5.0 in.) (only
requires this space, mi n
To a redu nda nt po wer s upp ly
requires this space, min
bottom)
bottom)
Table 9 - Spacing Requirements, Sides
From a To a chassis
Cabinet 10.2 cm (4.0 in.), 12.7 cm (5. 0 in.) (only left
requires this space, mi n
side)
To a redu nda nt po wer s upp ly
requires this space, min
10.2 cm (4.0 in.)
36 Rockwell Automation Publication 1756-IN005C-EN-P - March 2014
Page 37

Table 9 - Spacing Requirements, Sides
1.1
(0.433)
0.55
(0.217)
Top Moun ting
Hole Diameter
Bottom Mounting
Hole Diameter
17.5
(6.88)
14.4
(5.66)
42668
45829
15.8
(6.22)
7.0
(2.76)
Install Chassis and Redundant Power Supplies Chapter 2
From a To a chassis
requires this space, mi n
Chassis or other heat source 7.7 cm (3.0 in.), 12.7 cm (5.0 in.) (only left
side)
Redundant power supply 7.7 cm (3.0 in.), 12.7 cm (5.0 in.) (only left
side)
Wireway No minimum spacing required, 12.7 cm
(5.0 in.) (only left side)
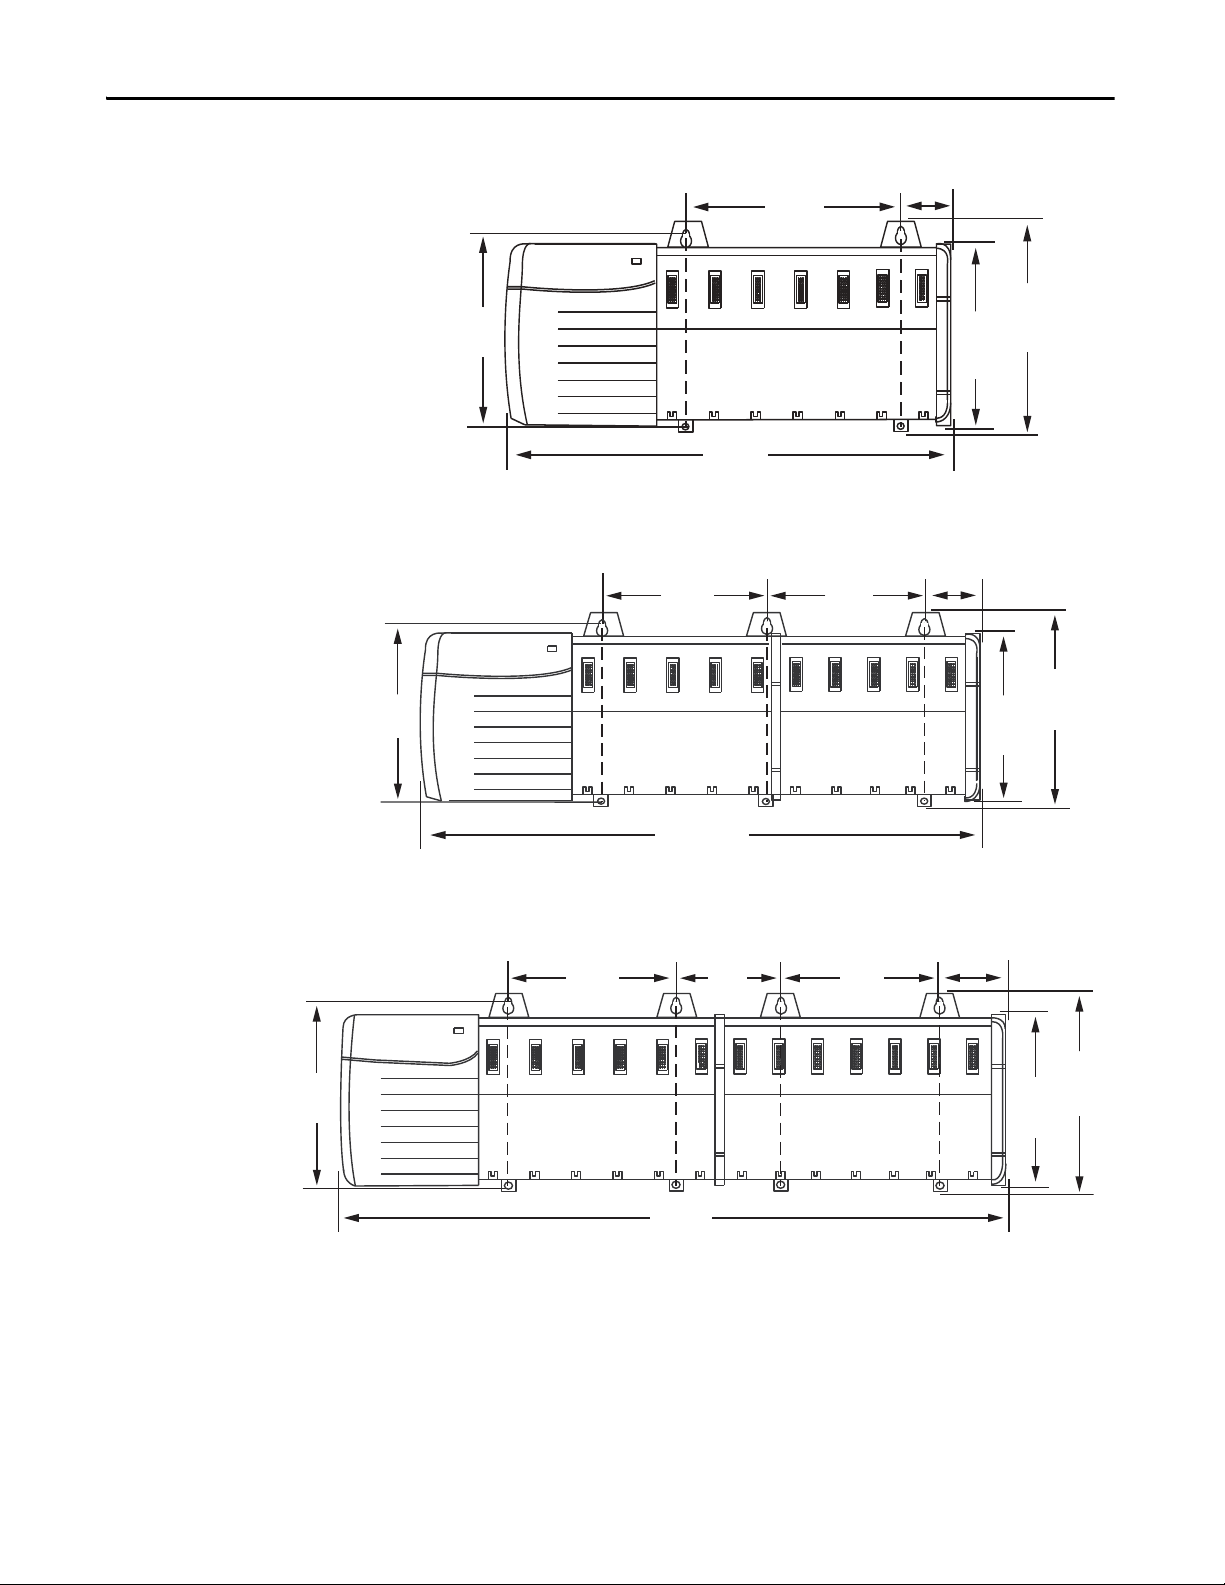
Mounting Dimensions
Use these dimensions to plan your chassis installation.
Dimensions are in cm (in.).
Figure 19 - Redundant Power Supplies
To a redu nda nt po wer s upp ly
requires this space, min
7.7 cm (3.0 in.)
2.55 cm (1.0 in.)
No minimum spacing required
Rockwell Automation Publication 1756-IN005C-EN-P - March 2014 37
Page 38

Chapter 2 Install Chassis and Redundant Power Supplies
1.1
(0.433)
0.55
(0.217)
Top Moun ting
Tab Diameter
Bottom Mounting Tab
Diameter
Right-side View of All Chassis
16.9
(6.65)
14.5
(5.71)
0.78
(0.31)
43591
45797
7.0
(2.76)
4.7
(1.85)
16.9
(6.65)
18.6
(7.32)
45830
15.8
(6.22)
14.5
(5.70)
17.5
(6.89)
14.5
(5.70)
16.9
(6.65)
29.1
(11.46)
45831
15.8
(6.22)
4.7
(1.85)
Figure 20 - Chassis Common Dimensions
Figure 21 - 1756-A4 Chassis and Chassis Adapter
Figure 22 - 1756-A7 Chassis and Chassis Adapter
38 Rockwell Automation Publication 1756-IN005C-EN-P - March 2014
Page 39

Figure 23 - 1756-A10 Chassis and Chassis Adapter
14.5
(5.70)
16.9
(6.65)
40.6
(15.98)
45832
15.8
(6.22)
5.71
(2.25)
14.0
(5.51)
14.0
(5.51)
14.5
(5.70)
16.9
(6.65)
51.1
(20.12)
45833
15.8
(6.22)
5.71
(2.25)
14.0
(5.51)
14.0
(5.51)
10.5
(4.13)
14.5
(5.70)
16.9
(6.65)
66.1
(26.02)
45834
15.8
(6.22)
4.7
(1.85)
14.0
(5.51)
14.0
(5.51)
13.3
(5.22)
13.3
(5.22)
Figure 24 - 1756-A13 Chassis and Chassis Adapter
Install Chassis and Redundant Power Supplies Chapter 2
Figure 25 - 1756-A17 Chassis and Chassis Adapter
Rockwell Automation Publication 1756-IN005C-EN-P - March 2014 39
Page 40

Chapter 2 Install Chassis and Redundant Power Supplies
6.29
(2.48)
16.9
(6.65)
20.1
(7.91)
15.8
(6.22)
14.5
(5.70)
7.0
(2.76)
45866
14.5
(5.70)
16.9
(6.65)
42.1
(16.57)
15.8
(6.22)
7.3
(2.87)
14.0
(5.51)
14.0
(5.51)
45867
Figure 26 - 1756-A4LXT Chassis and Chassis Adapter
Figure 27 - 1756-A5XT/A7XT Chassis and Chassis Adapter
40 Rockwell Automation Publication 1756-IN005C-EN-P - March 2014
Page 41

Install Chassis and Redundant Power Supplies Chapter 2
Figure 28 - Recommended Configurations for a System That Uses One Chassis
42655 42657
Figure 29 - Recommended Configurations for a System That Uses Two Chassis
4265542658
System Configuration Recommendations
We recommend you use one of these methods to configure your redundant
power supply system.
Rockwell Automation Publication 1756-IN005C-EN-P - March 2014 41
Page 42

Chapter 2 Install Chassis and Redundant Power Supplies
IMPORTANT
20289-M
Install the Chassis and Chassis Adapter
After planning your system, use the instructions below to properly install your
chassis and 1756-PSCA2 chassis adapter.
ATT EN TI ON : Do not drill holes above an installed chassis. Metal chips from
drilling can damage the backplane and cause intermittent operation.
Chassis are intended to be mounted only horizontally. Do not mount vertically.
1. Drill holes in the back panel of the enclosure for the chassis mounting tabs.
See the Spacing Requirements on page 35 for assistance in hole placement.
2. Scrape paint off the back panel for an electrical connection between the
chassis and back panel.
3. Hold the chassis in place against the holes.
ATT EN TI ON : If the chassis mounting tabs do not lay flat before the screws are
tightened, use additional washers as shims so the chassis is not warped by
tightening the screws.
Warping a chassis can damage the backplane and cause intermittent operation.
4. Install the hardware for the top mounting tabs and tighten.
See Parts Required
on page 33 for more information.
42 Rockwell Automation Publication 1756-IN005C-EN-P - March 2014
Page 43

Install Chassis and Redundant Power Supplies Chapter 2
20290-M
Leave the farleft bottom
tab open.
Card Guide
45835
5. Leaving the far-left bottom tab open for functional ground, install the
remaining tab screws.
6. Align the 1756-PSCA2 adapter’s circuit board with the card guides on the
left side of the chassis and slide the adapter back until it is flush with the
front of the chassis.
WARNING: If you connect or disconnect the 1756-CPR2 cables while
either backplane power source is on, an electrical arc can occur. This
could cause an explosion in hazardous location installations. Repeated
electrical arcing causes excessive wear to contacts on both the module
and its mating connector. Worn contacts may create electrical
resistance that can affect module operation.
Be sure that power is removed or the area is nonhazardous before
proceeding.
Rockwell Automation Publication 1756-IN005C-EN-P - March 2014 43
Page 44

Chapter 2 Install Chassis and Redundant Power Supplies
Install the Redundant Power Supplies
Follow these steps to install your redundant power supplies.
ATT EN TI ON : Do not drill holes for a redundant power supply above installed
equipment. Metal chips from drilling can damage the backplane and cause
intermittent operation.
1. Drill holes in the back panel of the enclosure for the redundant power
supply.
See the Spacing Requirements
2. Insert the #10 Phillips screws into the top mounting holes, but do not
tighten completely.
3. Slide the redundant power supply over the installed screws and tighten the
screws.
4. Insert the bottom screws and tighten them.
5. Repeat these steps for additional power supplies.
on page 35 for assistance in hole placement.
44 Rockwell Automation Publication 1756-IN005C-EN-P - March 2014
Page 45

Install Chassis and Redundant Power Supplies Chapter 2
TIP
Functional Earth Ground, page 46
Protective Earth
Ground, page 47
Cabinet
To Grounding-electrode System
45836
Ground Bus
8.3 mm² (8 AWG) solid
or stranded-copper
wire rated at 90 °C
(194 °F) or greater
2.1 mm² (14 AWG) solid
or stranded-copper
wire rated at 90 °C
(194 °F) or greater
Ground the Chassis
Complete these steps to properly ground your system.
Grounding Step Page
Install a Central Ground Bus 46
Connect the Functional Earth Ground on the Chassis 46
Connect the Protective Earth Ground on the Chassis and
Redundant Power Supply
Connect the Grounding Conductors to the Ground Bus 48
Connect Ground Bus to Grounding-electrode System 48
Figure 30
shows an example grounding configuration. After you complete the
47
grounding steps, your system looks similar to this figure.
To minimize the resistance between the chassis and ground connection, keep
wire lengths as short as possible.
Figure 30 - Grounding Configuration Example
Use these guidelines when connecting the grounding:
• Use a steel enclosure to guard against electromagnetic interference (EMI).
• Install a bonding wire for electrical contact between the enclosure door
and the enclosure; do not rely on the hinge.
• Make sure the enclosure-door viewing window is a laminated screen or a
conductive optical substrate (to block EMI).
Rockwell Automation Publication 1756-IN005C-EN-P - March 2014 45
Page 46

Chapter 2 Install Chassis and Redundant Power Supplies
20291-M
1
3
4
2
Install a Central Ground Bus
Each enclosure must contain a central ground bus. The ground bus is the
common connection for each chassis within the enclosure and the enclosure
itself.
For more information on installing a central ground bus, refer to the Industrial
Automation Wiring and Grounding Guidelines, publication 1770-4.1
.
Connect the Functional Earth Ground on the Chassis
Use 8.3 mm (8 AWG) solid or stranded-copper wire rated at 90 °C (194 °F) or
greater to connect the functional earth ground.
Connect the functional earth ground as shown in Figure 31
Figure 31 - Functional Earth Ground Connection
Item Description
1 Chassis mounting tab
2 Equipment grounding conductor (ground lug with 8.3 mm² [8 AWG] solid or
stranded-copper wire rated at 90 °C [194 °F] or greater)
3 M4 or M5 (#10 or #12) flat or star washer
4 M4 or M5 (#10 or #12) Phillips screw and flat or star washer (or SEM screw)
.
46 Rockwell Automation Publication 1756-IN005C-EN-P - March 2014
Page 47

Install Chassis and Redundant Power Supplies Chapter 2
45837
5
2
4
3a
1
3b
45836
To Ground Bus
To G rou nd Bus
IMPORTANT
Connect the Protective Earth Ground on the Chassis and Redundant Power Supply
Use 2.1 mm (14 AWG) solid or stranded-copper wire rated at 90 °C (194 °F) or
greater to connect the protective earth ground. Tighten the nuts on the
protective earth ground terminal stud to a torque of 16.27 N•m (12 lb•in).
Connect the functional earth ground as shown in Figure 32
Figure 32 - Protective Earth Ground Connection
.
Some chassis can have a second earth ground terminal stud. Either of these
terminal studs can be used to connect the chassis to the ground bus.
Item Description
1Star washer
2 Nut with captive star washer
3a Equipment grounding conductor (ground lug with 2.1 mm² [14 AWG] solid or stranded-
3b Equipment grounding conductor (2.1 mm² [14 AWG] solid or stranded-copper wire rated
4 Protective earth-ground terminal stud
5 Wiring terminal block (bottom terminal is protective earth ground)
Rockwell Automation Publication 1756-IN005C-EN-P - March 2014 47
copper wire rated at 90 °C [194 °F] or greater)
at 90 °C [194 °F] or greater)
Page 48

Chapter 2 Install Chassis and Redundant Power Supplies
2
3
4
1
5
45803
2
3
1
45803
Connect the Grounding Conductors to the Ground Bus
Connect the equipment grounding conductors (functional and protective
earth ground) directly from each chassis to an individual bolt on the ground bus.
Figure 33 - Ground Bus Connection
Item Description
1 Flat or star washer
2Bolt
3 Equipment grounding conductor (from protective and functional earth ground connections)
4Ground bus
5 Ground bus mounting
Connect Ground Bus to Grounding-electrode System
Use a grounding-electrode conductor to connect the ground bus to the
grounding-electrode system.
At minimum, use 8.3 mm [8 AWG] solid or stranded-copper wire rated at 90 °C
[194 °F] or greater for the grounding-electrode conductor to guard against EMI.
The National Electrical Code specifies safety requirements for the groundingelectrode conductor.
Figure 34 - Grounding-electrode System Connection
Item Description
1 Flat or star washer
48 Rockwell Automation Publication 1756-IN005C-EN-P - March 2014
2Bolt
3 Equipment grounding conductor (ground lug with minimum 8.3 mm² [8 AWG] solid or stranded-
copper wire rated at 90 °C [194 °F] or greater)
Page 49

Install Chassis and Redundant Power Supplies Chapter 2
31176
31174
Connect the Power
Use the information in the following sections to connect the power.
Connect the 1756-CPR2 Cable
Use the 1756-CPR2 cable to connect your redundant power supply to the
1756-PSCA2 chassis adapter.
WARNING: If you connect or disconnect the 1756-CPR2 cables while either
backplane power source is on, an electrical arc can occur. This could cause an
explosion in hazardous location installations. Repeated electrical arcing causes
excessive wear to contacts on both the module and its mating connector. Worn
contacts may create electrical resistance that can affect module operation.
Be sure that power is removed or the area is nonhazardous before proceeding.
1. Connect the male end of the 1756-CPR2 cable to the 1756-PSCA2
chassis adapter.
2. Connect the female end of the 1756-CPR2 cable to the redundant
power supply.
3. Tighten the screws to hold the cable in place.
Make sure you tighten the screws all the way to hold the cable in place for
the life of the product.
4. Repeat these steps with the second redundant power supply.
Connect Power to the Redundant Power Supply
WARNING: If you connect or disconnect wiring while the field-side power is on,
an electrical arc can occur. This can cause an explosion in hazardous location
installations. Be sure that power is removed or the area is nonhazardous before
proceeding.
Rockwell Automation Publication 1756-IN005C-EN-P - March 2014 49
Page 50

Chapter 2 Install Chassis and Redundant Power Supplies
IMPORTANT
1756-PA75R/A (AC) 1756-PB75R/A (DC)
1
3
2
5
45839
4
1
3
2
5
45840
4
ATT EN TI ON : Do not wire more than 1 conductor on any single terminal.
Use 15 A time-delay type fuse in all ungrounded power connections.
Use 2.5 mm (14 AWG) solid or stranded-copper wire rated at 90 °C (194 °F), or
greater, 1.2 mm (3/64 in.) insulation maximum to connect power. Tighten the
terminals to a torque of 0.8 N•m (7 lb•in).
Connect the power as shown in Figure 35
.
The power supplies’ voltage input connections are auto-sensing.
You do not use a jumper, for example, a 120/240V AC jumper, when
connecting external power to the power supply, as shown in Figure 35
Figure 35 - Power Connection
Item Description, 1756-PA75R/A (AC) Description, 1756-PB75R/A (DC)
1 L1 (high side of line power) Not used
2 Not used DC+ (positive supply)
3 L2 (low side of line power) Not used
4 Not used DC- (negative supply return)
5 2.5 mm² (14 AWG) solid or stranded-copper wire rated at 90 °C (194 °F), or greater,
1.2 mm (3/64 in.) insulation max
.
For recommendations on how to route the wiring in your redundant power
supply application, see page 45
.
Connect the Solid-state Relay
A solid-state relay on your redundant power supplies can be connected to any
compatible monitoring or signaling device. This connection indicates if the
supplies are functioning properly.
50 Rockwell Automation Publication 1756-IN005C-EN-P - March 2014
Page 51

Install Chassis and Redundant Power Supplies Chapter 2
The redundant power supply and the annunciator
cable that use different input power sources.
Redundant power supply and the annunciator cable
that use the same input power source.
The annunciator wiring must be tucked under the tab at the top of
the plastic barrier and routed separately from the power wires.
1
3
2
5
4
1
4
2
3
Configuration 1
Configurat ion 2
45841
45842
The relays are closed during standard operation. The solid-state relay contacts
open if either of these events occur:
• One or both of the supplies fail.
In this case, the contact opens on the failed supply (or supplies), and the
input module alerts you to the failure through the controller program.
• The connected redundant power supplies are turned OFF.
When you use the solid state relay annunciator function, connect a compatible
source voltage to either contact terminal. Then connect the other terminal to the
monitoring or signaling device.
ATT EN TI ON : Annunciator cable length is less than 10 m (32.8 ft).
The annunciator output is rated for resistive loads. Do not use it to drive the coil of
an electromagnetic relay.
Connect the solid-state relay as shown in Figure 36
.
Figure 36 - Solid-state Relay Connection
Item Description
1Source voltage
2 Annunciator cable to input module
3 0.25…2.5 mm² (22…14 AWG) solid or stranded-copper wire rated at 90 °C (194 °F), or
4 0.25…2.5 mm² (22…14 AWG) solid or stranded-copper wire rated at 90 °C (194 °F), or
5 Plastic barrier
greater, 1.2 mm (3/64 in.) insulation max
greater, 1.2 mm (3/64 in.) insulation max
Rockwell Automation Publication 1756-IN005C-EN-P - March 2014 51
Page 52

Chapter 2 Install Chassis and Redundant Power Supplies
42841
43615
Remove the Protective Label
ATT EN TI ON : Make sure the power supply is mounted and all panel fabrication
is complete before you remove the protective label. This label protects the
power supply from metal shavings falling inside the power supply and
damaging it during operation.
Remove the plastic label from the top of the power supply.
Apply Power to the Chassis
Tur n o n the pow er.
52 Rockwell Automation Publication 1756-IN005C-EN-P - March 2014
Page 53

Install Chassis and Redundant Power Supplies Chapter 2
0
7
14
21
28
35
42
10 20 30 40 50 60 70 80 0
75
6
0
7
14
21
28
35
42
10 20 30 40 50 60 70 80 0
64
6
75
60
45
30
15
0
0 20 40 60 80 100 120
115
13
75
60
45
30
15
0
0 20 40 60 80 100 120
110
7
43588
1756-PA75R/A (AC)
Backplane Power
Load (Watts)
Real Power (Watts)
Real Power (Watts)
Backplane
Power Load
1756-PB75R/A (DC)
43589
1756-PAXTR (AC)
Backplane Power
Load (Watts)
Real Power (Watts)
Real Power (Watts)
Backplane Power
Load (Watts)
1756-PBXTR (DC)
Apparent Power (Watts) = Transformer Load (VA) = Real Power (Watts)
43897
43898
Input Power Requirements and Transformer Sizing
These graphs show the input power requirements for the power supplies, given
the power they are providing to the modules in the chassis.
Follow these steps to determine the power requirements for your chassis.
1. Calculate the Backplane Power Load by adding the power draw (in Watts)
for all of the planned modules.
Refer to the module specification tables in the ControlLogix Selection
Guide, publication 1756-SG001
, for module power draws.
2. Locate the Backplane Power Load on the graph’s vertical (y) axis and
determine the corresponding Real Power (input-power) rating on the
horizontal (x) axis.
The Real Power value is the amount of power consumed by the power
supply.
Figure 37 - Power Supply Power Requirements
For more information about calculating the required power for your system, see
the ControlLogix Selection Guide, publication 1756-SG001
Rockwell Automation Publication 1756-IN005C-EN-P - March 2014 53
.
Page 54

Chapter 2 Install Chassis and Redundant Power Supplies
Power
Non-red
45843
Troubleshoot the Redundant Power Supplies
The redundant power supplies have a green status indicator for power and an
amber status indicator for non-redundancy.
The following table describes how to use the status indicators to troubleshoot
your redundant power supplies.
Power Indicator Non-red Indicator Description Take This Action
Solid green Off Both power supplies are operating properly. None
Solid green Solid amber This power supply is operating properly, but is the only
power supply providing power to the chassis adapter.
Off Solid amber All possible connections are made, but the power supply is
turned off.
Off Off Any of the following conditions can apply: Take the corresponding action:
The supply is turned OFF. Turn the power supply ON.
Line voltage is not within the specified range. Verify that line power is in the specified range. If the indicators
All connections are made, but input power is not
supplied.
All connections are made, including input power, but the
output cable (1756-CPR2) is not connected.
The power supply is ON but defective. The power supply can need to be replaced.
Check the other power supply.
Turn the power supply ON. If the power supply does not turn ON, follow
these steps.
1. Remove the input power from the power supply
2. Wait 30 seconds
3. Reconnect the input power
4. Turn the power supply ON.
If the power supply still does not turn ON, it can need to be replaced.
remain O FF, cycle power.
Verify that input power is supplied and turn the power supply ON.
Connect the output cable and turn the power supply ON.
Chassis Adapter Status Indicator
The chassis adapter has a green power status indicator. When the status indicator
is solid green, the chassis is receiving power from the redundant power supplies. If
the indicator is off, the chassis is not receiving power from the redundant power
supplies. See the table above to troubleshoot the redundant power supplies.
54 Rockwell Automation Publication 1756-IN005C-EN-P - March 2014
Page 55

Install Chassis and Redundant Power Supplies Chapter 2
IMPORTANT
Remove or Replace a Redundant Power Supply
Use this information to remove or replace a redundant power supply.
WARNING: Remove or replace power supplies only when backplane and power
supply power are removed or the area is known to be nonhazardous. Removal
or replacement of a power supply in a hazardous area can cause an electrical arc
across the contacts if backplane power is still applied.
You can replace one redundant power supply while the other supply is
operating in nonredundant mode without affecting chassis operation.
Remove a Redundant Power Supply
Follow these steps to remove the redundant power supply.
1. Turn the r ed un da nt po we r supp ly OFF.
2. Disconnect the line power source voltage from the redundant power
supply and annunciator.
3. Remove the wiring terminal blocks.
4. Unscrew and disconnect the 1756-CPR2 cable.
5. Remove the bottom mounting screws.
6. Loosen the top mounting screws and slide the supply up and off the
mounting screws.
Replace a Redundant Power Supply
Follow the steps below to replace a redundant power supply.
1. Slide the redundant power supply over the top mounting screws and
tighten them.
2. Install the bottom mounting screws.
3. Connect the 1756-CPR2 cable.
4. Install the wiring terminal blocks.
5. Connect the line power source voltage to the redundant power supply and
annunciator.
6. Turn the r ed un da nt po we r supp ly ON.
When you turn ON the replacement redundant power supply, the
connected chassis automatically draws power from both redundant power
supplies.
Rockwell Automation Publication 1756-IN005C-EN-P - March 2014 55
Page 56

Chapter 2 Install Chassis and Redundant Power Supplies
Remove or Replace a Chassis Adapter
Use this information to remove or replace a redundant power supply.
Remove a Chassis Adapter
Follow these steps to remove a chassis adapter.
1. Turn the redundant power supplies OFF.
2. Disconnect the 1756-CPR2 cable.
3. Push the top and bottom locking tabs on the chassis adapter to the side and
pull the module off the chassis.
Replace a Chassis Adapter
Align the adapter’s circuit board with the card guides on the left side of the
chassis and slide the adapter back until it is flush with the front of the chassis.
56 Rockwell Automation Publication 1756-IN005C-EN-P - March 2014
Page 57

Notes:
Install Chassis and Redundant Power Supplies Chapter 2
Rockwell Automation Publication 1756-IN005C-EN-P - March 2014 57
Page 58

Chapter 2 Install Chassis and Redundant Power Supplies
58 Rockwell Automation Publication 1756-IN005C-EN-P - March 2014
Page 59

Page 60

Rockwell Automation Support
Rockwell Otomasyon Ticaret A.Ş., Kar Plaza İş Merkezi E Blok Kat:6 34752 İçerenköy, İstanbul, Tel: +90 (216) 5698400
Rockwell Automation provides technical information on the Web to assist you in using its products.
At http://www.rockwellautomation.com/support
software service packs. You can also visit our Support Center at https://rockwellautomation.custhelp.com/
updates, support chats and forums, technical information, FAQs, and to sign up for product notification updates.
In addition, we offer multiple support programs for installation, configuration, and troubleshooting. For more
information, contact your local distributor or Rockwell Automation representative, or visit
http://www.rockwellautomation.com/services/online-phone
Installation Assistance
If you experience a problem within the first 24 hours of installation, review the information that is contained in this
manual. You can contact Customer Support for initial help in getting your product up and running.
United States or Canada 1.440.646.3434
Outside United States or Canada Use the Worl dwi de Locat or
Rockwell Automation representative.
at http://www.rockwellautomation.com/rockwellautomation/support/overview.page, or contact your local
New Product Satisfaction Return
you can find technical and application notes, sample code, and links to
for software
.
Rockwell Automation tests all of its products to help ensure that they are fully operational when shipped from the
manufacturing facility. However, if your product is not functioning and needs to be returned, follow these procedures.
United States Contact your distributor. You must provide a Customer Support case number (call the phone number above to obtain one) to your
Outside United States Please contact your local Rockwell Automation representative for the return procedure.
distributor to complete the return process.
Documentation Feedback
Your comments will help us serve your documentation needs better. If you have any suggestions on how to improve this
document, complete this form, publication RA-DU002
Rockwell Automation maintains current product environmental information on its website at
http://www.rockwellautomation.com/rockwellautomation/about-us/sustainability-ethics/product-environmental-compliance.page
, available at http://www.rockwellautomation.com/literature/.
.
Publication 1756-IN005C-EN-P - March 2014
Supersedes Publication 1756-IN005B-EN-P - February 2013 Copyright © 2014 Rockwell Auto mation, Inc. All rights reserved. Pr inted in the U.S.A.
 Loading...