

Page 1
Page 2

Contact Rockwell
Customer Support Telephone — 1.440.646.3434
Online Support — http://www.rockwellautomation.com/support/
Copyright Notice
Trademark Notices
Other Trademarks
Warran ty
© 2011 Rockwell Automation Technologies, Inc. All rights reserved. Printed in USA.
This document and any accompanying Rockwell Software products are copyrighted by Rockwell Automation
Technologies, Inc. Any reproduction and/or distribution without prior written consent from Rockwell Automation
Technologies, Inc. is strictly prohibited. Please refer to the license agreement for details.
Allen-Bradley, ControlLogix, eProcedure, FactoryTalk, Rockwell Automation, Rockwell Software, RSLinx, RSView,
and the Rockwell Software logo, are registered trademarks of Rockwell Automation, Inc.
The following logos and products are trademarks of Rockwell Automation, Inc.:
RSBizWare, the RSBizWare logo, RSBizWare Batch, FactoryTalk Batch, RSBizWare BatchCampaign, RSBizWare
BatchHistorian, FactoryTalk Historian Classic for Batch, RSBizWare Historian, FactoryTalk Historian Classic,
RSBizWare MaterialTrack, FactoryTalk Batch Material Manager, and RSLoop Optimizer.
Any Rockwell software or hardware not mentioned here are also trademarks, registered or otherwise, of Rockwell
Automation Technologies, Inc.
ActiveX, Microsoft, Microsoft Access, SQL Server, Visual Basic, Visual C++, Visual SourceSafe, Windows, Windows
ME, Windows NT, Windows 2000, Windows Server 2003, Windows XP, and Vista are either registered trademarks or
trademarks of Microsoft Corporation in the United States and/or other countries.
Adobe, Acrobat, and Reader are either registered trademarks or trademarks of Adobe Systems Incorporated in the
United States and/or other countries.
Oracle is a registered trademark of Oracle Corporation.
All other trademarks are the property of their respective holders and are hereby acknowledged.
This product is warranted in accordance with the product license. The product’s performance may be affected by system
configuration, the application being performed, operator control, maintenance, and other related factors. Rockwell
Automation is not responsible for these intervening factors. The instructions in this document do not cover all the
details or variations in the equipment, procedure, or process described, nor do they provide directions for meeting every
possible contingency during installation, operation, or maintenance. This product’s implementation may vary among
users.
This document is current as of the time of release of the product; however, the accompanying software may have
changed since the release. Rockwell Automation, Inc. reserves the right to change any information contained in this
document or the software at anytime without prior notice. It is your responsibility to obtain the most current information
available from Rockwell when installing or using this product.
Page 3

Contents
1 • Overview . . . . . . . . . . . . . . . . . . . . . . . . . . . . . . . . . . . . . . . . . . . . . 1
Features . . . . . . . . . . . . . . . . . . . . . . . . . . . . . . . . . . . . . . . . . . . . . . . . . . . . . . . . . . . . . 2
Benefits . . . . . . . . . . . . . . . . . . . . . . . . . . . . . . . . . . . . . . . . . . . . . . . . . . . . . . . . . . . . . 3
Distributed FactoryTalk Historian Architecture . . . . . . . . . . . . . . . . . . . . . . . . . . . . . . 4
FactoryTalk and ControlLogix Integration . . . . . . . . . . . . . . . . . . . . . . . . . . . . . . . . . . 6
FactoryTalk Services Platform and FactoryTalk Product Suite . . . . . . . . . . . . . . . 6
ControlLogix System Communications . . . . . . . . . . . . . . . . . . . . . . . . . . . . . . . . 10
Hardware Specifications . . . . . . . . . . . . . . . . . . . . . . . . . . . . . . . . . . . . . . . . . . . . . . . 10
Where to Start . . . . . . . . . . . . . . . . . . . . . . . . . . . . . . . . . . . . . . . . . . . . . . . . . . . . . . . 11
Additional Information. . . . . . . . . . . . . . . . . . . . . . . . . . . . . . . . . . . . . . . . . . . . . . . . . 13
FactoryTalk Licensing . . . . . . . . . . . . . . . . . . . . . . . . . . . . . . . . . . . . . . . . . . . . . . . . . 14
Technical Support . . . . . . . . . . . . . . . . . . . . . . . . . . . . . . . . . . . . . . . . . . . . . . . . . . . . 15
Knowledgebase. . . . . . . . . . . . . . . . . . . . . . . . . . . . . . . . . . . . . . . . . . . . . . . . . . . 15
Worldwide Support. . . . . . . . . . . . . . . . . . . . . . . . . . . . . . . . . . . . . . . . . . . . . . . . 15
TechConnect Support . . . . . . . . . . . . . . . . . . . . . . . . . . . . . . . . . . . . . . . . . . . . . . 15
Consulting Services . . . . . . . . . . . . . . . . . . . . . . . . . . . . . . . . . . . . . . . . . . . . . . . . . . . 16
Training Programs . . . . . . . . . . . . . . . . . . . . . . . . . . . . . . . . . . . . . . . . . . . . . . . . . . . . 16
2 • Getting Started. . . . . . . . . . . . . . . . . . . . . . . . . . . . . . . . . . . . . . . 17
System Requirements. . . . . . . . . . . . . . . . . . . . . . . . . . . . . . . . . . . . . . . . . . . . . . . . . . 17
Software Requirements . . . . . . . . . . . . . . . . . . . . . . . . . . . . . . . . . . . . . . . . . . . . . . . . 18
IE Internet Options . . . . . . . . . . . . . . . . . . . . . . . . . . . . . . . . . . . . . . . . . . . . . . . . 19
IE 7 Hot Fix . . . . . . . . . . . . . . . . . . . . . . . . . . . . . . . . . . . . . . . . . . . . . . . . . . . . . 19
IE 8 Compatibility Mode Internet Option . . . . . . . . . . . . . . . . . . . . . . . . . . . . . . 20
FactoryTalk Historian SE Patch . . . . . . . . . . . . . . . . . . . . . . . . . . . . . . . . . . . . . . 20
Client Tools Software. . . . . . . . . . . . . . . . . . . . . . . . . . . . . . . . . . . . . . . . . . . . . . 20
Hardware Requirements. . . . . . . . . . . . . . . . . . . . . . . . . . . . . . . . . . . . . . . . . . . . . . . . 21
Client Computer Requirements . . . . . . . . . . . . . . . . . . . . . . . . . . . . . . . . . . . . . . 21
ControlLogix Chassis Requirements . . . . . . . . . . . . . . . . . . . . . . . . . . . . . . . . . . 22
Setting up Your ControlLogix Environment . . . . . . . . . . . . . . . . . . . . . . . . . . . . . . . . 24
Installing FactoryTalk Historian ME . . . . . . . . . . . . . . . . . . . . . . . . . . . . . . . . . . . . . . 24
FactoryTalk Historian ME Web Interface . . . . . . . . . . . . . . . . . . . . . . . . . . . . . . . . . . 24
Installing FactoryTalk Historian ME Client Tools . . . . . . . . . . . . . . . . . . . . . . . . . . . 25
Installing FactoryTalk Services Platform. . . . . . . . . . . . . . . . . . . . . . . . . . . . . . . 26
Installing FactoryTalk Historian Management. . . . . . . . . . . . . . . . . . . . . . . . . . . 27
Installing FactoryTalk Historian ME Rule Editor . . . . . . . . . . . . . . . . . . . . . . . . 28
Installing FactoryTalk Historian ME RSLogix 5000 AOP . . . . . . . . . . . . . . . . . 28
iii
Page 4

FACTORYTALK HISTORIAN ME USER GUIDE
Installing FactoryTalk View SE Patch . . . . . . . . . . . . . . . . . . . . . . . . . . . . . . . . . 29
FactoryTalk Historian ME EDS Files . . . . . . . . . . . . . . . . . . . . . . . . . . . . . . . . . 29
Logging In to FactoryTalk Historian ME . . . . . . . . . . . . . . . . . . . . . . . . . . . . . . . . . . 29
Logging Out of FactoryTalk Historian ME . . . . . . . . . . . . . . . . . . . . . . . . . . . . . . . . . 32
3 • Viewing Module Information . . . . . . . . . . . . . . . . . . . . . . . . . . . . 33
System Status . . . . . . . . . . . . . . . . . . . . . . . . . . . . . . . . . . . . . . . . . . . . . . . . . . . . . . . . 33
Status . . . . . . . . . . . . . . . . . . . . . . . . . . . . . . . . . . . . . . . . . . . . . . . . . . . . . . . . . . . . . . 34
Module Information . . . . . . . . . . . . . . . . . . . . . . . . . . . . . . . . . . . . . . . . . . . . . . . 35
System Status . . . . . . . . . . . . . . . . . . . . . . . . . . . . . . . . . . . . . . . . . . . . . . . . . . . . 35
System Utilization . . . . . . . . . . . . . . . . . . . . . . . . . . . . . . . . . . . . . . . . . . . . . . . . 36
Point Statistics . . . . . . . . . . . . . . . . . . . . . . . . . . . . . . . . . . . . . . . . . . . . . . . . . . . 36
Module Identity . . . . . . . . . . . . . . . . . . . . . . . . . . . . . . . . . . . . . . . . . . . . . . . . . . . . . . 37
Module Information . . . . . . . . . . . . . . . . . . . . . . . . . . . . . . . . . . . . . . . . . . . . . . . 37
Network Settings . . . . . . . . . . . . . . . . . . . . . . . . . . . . . . . . . . . . . . . . . . . . . . . . . 38
Security Configuration . . . . . . . . . . . . . . . . . . . . . . . . . . . . . . . . . . . . . . . . . . . . . 38
Client Connections . . . . . . . . . . . . . . . . . . . . . . . . . . . . . . . . . . . . . . . . . . . . . . . . 39
System Utilization . . . . . . . . . . . . . . . . . . . . . . . . . . . . . . . . . . . . . . . . . . . . . . . . . . . . 40
System Statistics. . . . . . . . . . . . . . . . . . . . . . . . . . . . . . . . . . . . . . . . . . . . . . . . . . . . . . 41
Network Manager Statistics . . . . . . . . . . . . . . . . . . . . . . . . . . . . . . . . . . . . . . . . . 43
Snapshot and Archive Statistics . . . . . . . . . . . . . . . . . . . . . . . . . . . . . . . . . . . . . . 46
Archive File Statistics. . . . . . . . . . . . . . . . . . . . . . . . . . . . . . . . . . . . . . . . . . . . . . 47
4 • Viewing Data . . . . . . . . . . . . . . . . . . . . . . . . . . . . . . . . . . . . . . . . . 51
Viewing Current Data . . . . . . . . . . . . . . . . . . . . . . . . . . . . . . . . . . . . . . . . . . . . . . . . . 51
Defining Search Criteria. . . . . . . . . . . . . . . . . . . . . . . . . . . . . . . . . . . . . . . . . . . . 52
Exporting Data . . . . . . . . . . . . . . . . . . . . . . . . . . . . . . . . . . . . . . . . . . . . . . . . . . . 54
Viewing Archive Data . . . . . . . . . . . . . . . . . . . . . . . . . . . . . . . . . . . . . . . . . . . . . . . . . 54
Selecting Archive Data Points . . . . . . . . . . . . . . . . . . . . . . . . . . . . . . . . . . . . . . . 55
Exporting Data . . . . . . . . . . . . . . . . . . . . . . . . . . . . . . . . . . . . . . . . . . . . . . . . . . . 56
Viewing Trends . . . . . . . . . . . . . . . . . . . . . . . . . . . . . . . . . . . . . . . . . . . . . . . . . . 56
Displaying the Trend Chart . . . . . . . . . . . . . . . . . . . . . . . . . . . . . . . . . . . . . . . . . 57
Changing the Views . . . . . . . . . . . . . . . . . . . . . . . . . . . . . . . . . . . . . . . . . . . . . . . . . . . 61
Filtering Search Results Data . . . . . . . . . . . . . . . . . . . . . . . . . . . . . . . . . . . . . . . . 61
Sorting Columns. . . . . . . . . . . . . . . . . . . . . . . . . . . . . . . . . . . . . . . . . . . . . . . . . . 62
Refreshing a View . . . . . . . . . . . . . . . . . . . . . . . . . . . . . . . . . . . . . . . . . . . . . . . . 63
Auto Refreshing a View . . . . . . . . . . . . . . . . . . . . . . . . . . . . . . . . . . . . . . . . . . . . 63
Start and End Times . . . . . . . . . . . . . . . . . . . . . . . . . . . . . . . . . . . . . . . . . . . . . . . 63
5 • Managing Points. . . . . . . . . . . . . . . . . . . . . . . . . . . . . . . . . . . . . . 65
iv
Page 5

CONTENTS
Using the Add Points Wizard. . . . . . . . . . . . . . . . . . . . . . . . . . . . . . . . . . . . . . . . . . . . 65
Discovering Tags . . . . . . . . . . . . . . . . . . . . . . . . . . . . . . . . . . . . . . . . . . . . . . . . . 66
Creating Points . . . . . . . . . . . . . . . . . . . . . . . . . . . . . . . . . . . . . . . . . . . . . . . . . . . 69
Reviewing Results . . . . . . . . . . . . . . . . . . . . . . . . . . . . . . . . . . . . . . . . . . . . . . . . 71
Using the Tag Browser to Create Points . . . . . . . . . . . . . . . . . . . . . . . . . . . . . . . . . . . 73
Folders Pane . . . . . . . . . . . . . . . . . . . . . . . . . . . . . . . . . . . . . . . . . . . . . . . . . . . . . 74
Contents Pane . . . . . . . . . . . . . . . . . . . . . . . . . . . . . . . . . . . . . . . . . . . . . . . . . . . . 74
Selected Tags Pane . . . . . . . . . . . . . . . . . . . . . . . . . . . . . . . . . . . . . . . . . . . . . . . . 74
Creating Points . . . . . . . . . . . . . . . . . . . . . . . . . . . . . . . . . . . . . . . . . . . . . . . . . . . 75
Manually Creating and Editing Points . . . . . . . . . . . . . . . . . . . . . . . . . . . . . . . . . . . . . 78
Defining Point Attributes . . . . . . . . . . . . . . . . . . . . . . . . . . . . . . . . . . . . . . . . . . . . . . . 80
Configuring Scan Types. . . . . . . . . . . . . . . . . . . . . . . . . . . . . . . . . . . . . . . . . . . . . . . . 87
Configuring Trigger Input and Output Points . . . . . . . . . . . . . . . . . . . . . . . . . . . . . . . 87
Input Points. . . . . . . . . . . . . . . . . . . . . . . . . . . . . . . . . . . . . . . . . . . . . . . . . . . . . . 88
Output Points . . . . . . . . . . . . . . . . . . . . . . . . . . . . . . . . . . . . . . . . . . . . . . . . . . . . 88
Point Attributes. . . . . . . . . . . . . . . . . . . . . . . . . . . . . . . . . . . . . . . . . . . . . . . . . . . 89
Trigger Point Configuration Examples. . . . . . . . . . . . . . . . . . . . . . . . . . . . . . . . . 91
Working with Scan Classes . . . . . . . . . . . . . . . . . . . . . . . . . . . . . . . . . . . . . . . . . . . . . 94
Creating a Scan Class . . . . . . . . . . . . . . . . . . . . . . . . . . . . . . . . . . . . . . . . . . . . . . 96
Editing a Scan Class . . . . . . . . . . . . . . . . . . . . . . . . . . . . . . . . . . . . . . . . . . . . . . . 96
Removing a Scan Class . . . . . . . . . . . . . . . . . . . . . . . . . . . . . . . . . . . . . . . . . . . . 96
6 • Collecting Data . . . . . . . . . . . . . . . . . . . . . . . . . . . . . . . . . . . . . . . 97
Collecting Data Overview . . . . . . . . . . . . . . . . . . . . . . . . . . . . . . . . . . . . . . . . . . . . . . 97
Viewing Data Collection Status. . . . . . . . . . . . . . . . . . . . . . . . . . . . . . . . . . . . . . . . . . 99
Starting and Stopping Data Collection. . . . . . . . . . . . . . . . . . . . . . . . . . . . . . . . . . . . . 99
Storing Data . . . . . . . . . . . . . . . . . . . . . . . . . . . . . . . . . . . . . . . . . . . . . . . . . . . . . . . . 100
Archive Statistics . . . . . . . . . . . . . . . . . . . . . . . . . . . . . . . . . . . . . . . . . . . . . . . . 101
Archive Information . . . . . . . . . . . . . . . . . . . . . . . . . . . . . . . . . . . . . . . . . . . . . . 101
Event Queue . . . . . . . . . . . . . . . . . . . . . . . . . . . . . . . . . . . . . . . . . . . . . . . . . . . . 101
Log Threshold Configuration . . . . . . . . . . . . . . . . . . . . . . . . . . . . . . . . . . . . . . . 102
Archive Disk Threshold Configuration . . . . . . . . . . . . . . . . . . . . . . . . . . . . . . . 102
Archive Usage Threshold Configuration . . . . . . . . . . . . . . . . . . . . . . . . . . . . . . 102
Exception Filtering. . . . . . . . . . . . . . . . . . . . . . . . . . . . . . . . . . . . . . . . . . . . . . . . . . . 103
Compression Filtering . . . . . . . . . . . . . . . . . . . . . . . . . . . . . . . . . . . . . . . . . . . . . . . . 107
7 • Transferring Data . . . . . . . . . . . . . . . . . . . . . . . . . . . . . . . . . . . . 111
Transferring Data Overview . . . . . . . . . . . . . . . . . . . . . . . . . . . . . . . . . . . . . . . . . . . 111
Connecting to a FactoryTalk Historian SE or PI Server . . . . . . . . . . . . . . . . . . 111
Uploading Historical Data . . . . . . . . . . . . . . . . . . . . . . . . . . . . . . . . . . . . . . . . . 111
v
Page 6

FACTORYTALK HISTORIAN ME USER GUIDE
Connecting to a New FactoryTalk Historian SE or PI Server . . . . . . . . . . . . . . 112
Failing to Connect . . . . . . . . . . . . . . . . . . . . . . . . . . . . . . . . . . . . . . . . . . . . . . . 112
Processing Tag Data . . . . . . . . . . . . . . . . . . . . . . . . . . . . . . . . . . . . . . . . . . . . . . 112
Monitoring Connections. . . . . . . . . . . . . . . . . . . . . . . . . . . . . . . . . . . . . . . . . . . 112
Shutting Down the Data Transfer Service . . . . . . . . . . . . . . . . . . . . . . . . . . . . . 113
Configuring Data Transfer . . . . . . . . . . . . . . . . . . . . . . . . . . . . . . . . . . . . . . . . . . . . . 113
Prerequisite Information. . . . . . . . . . . . . . . . . . . . . . . . . . . . . . . . . . . . . . . . . . . 113
Establishing a FactoryTalk Historian SE or PI Server Connection . . . . . . . . . . 114
Setting Data Transfer Parameters . . . . . . . . . . . . . . . . . . . . . . . . . . . . . . . . . . . . 117
Maximum Events per Transfer . . . . . . . . . . . . . . . . . . . . . . . . . . . . . . . . . . . . . . 117
Enable Auto Transfer . . . . . . . . . . . . . . . . . . . . . . . . . . . . . . . . . . . . . . . . . . . . . 118
Viewing Data Transfer Statistics . . . . . . . . . . . . . . . . . . . . . . . . . . . . . . . . . . . . 118
Archive File Time Span for ME-to-SE or PI Server Data Transfer. . . . . . . . . . 119
Selecting Points to Transfer . . . . . . . . . . . . . . . . . . . . . . . . . . . . . . . . . . . . . . . . . . . . 119
Adding Points to Transfer. . . . . . . . . . . . . . . . . . . . . . . . . . . . . . . . . . . . . . . . . . 121
Manually Transferring Points. . . . . . . . . . . . . . . . . . . . . . . . . . . . . . . . . . . . . . . 121
Removing Points from Data Transfer. . . . . . . . . . . . . . . . . . . . . . . . . . . . . . . . . 121
8 • Administering the Module . . . . . . . . . . . . . . . . . . . . . . . . . . . . . 123
Setting User Security . . . . . . . . . . . . . . . . . . . . . . . . . . . . . . . . . . . . . . . . . . . . . . . . . 123
Factory Talk Security . . . . . . . . . . . . . . . . . . . . . . . . . . . . . . . . . . . . . . . . . . . . . 123
Native Security . . . . . . . . . . . . . . . . . . . . . . . . . . . . . . . . . . . . . . . . . . . . . . . . . . 125
Managing Users . . . . . . . . . . . . . . . . . . . . . . . . . . . . . . . . . . . . . . . . . . . . . . . . . . . . . 125
Creating Users . . . . . . . . . . . . . . . . . . . . . . . . . . . . . . . . . . . . . . . . . . . . . . . . . . 126
Modifying Users. . . . . . . . . . . . . . . . . . . . . . . . . . . . . . . . . . . . . . . . . . . . . . . . . 126
Removing Users . . . . . . . . . . . . . . . . . . . . . . . . . . . . . . . . . . . . . . . . . . . . . . . . . 126
Managing Groups. . . . . . . . . . . . . . . . . . . . . . . . . . . . . . . . . . . . . . . . . . . . . . . . . . . . 127
Managing Time . . . . . . . . . . . . . . . . . . . . . . . . . . . . . . . . . . . . . . . . . . . . . . . . . . . . . 128
Clock Drifts . . . . . . . . . . . . . . . . . . . . . . . . . . . . . . . . . . . . . . . . . . . . . . . . . . . . 129
Current Time. . . . . . . . . . . . . . . . . . . . . . . . . . . . . . . . . . . . . . . . . . . . . . . . . . . . 129
Battery Clock . . . . . . . . . . . . . . . . . . . . . . . . . . . . . . . . . . . . . . . . . . . . . . . . . . . 129
Time Synchronization Settings. . . . . . . . . . . . . . . . . . . . . . . . . . . . . . . . . . . . . . 130
Verifying Time Synchronization . . . . . . . . . . . . . . . . . . . . . . . . . . . . . . . . . . . . 132
Setting the Time Zone . . . . . . . . . . . . . . . . . . . . . . . . . . . . . . . . . . . . . . . . . . . . 134
Working with System Settings. . . . . . . . . . . . . . . . . . . . . . . . . . . . . . . . . . . . . . . . . . 134
Configuring the Module Name. . . . . . . . . . . . . . . . . . . . . . . . . . . . . . . . . . . . . . 135
Configuring Network Settings . . . . . . . . . . . . . . . . . . . . . . . . . . . . . . . . . . . . . . 136
Uploading Files to the Module. . . . . . . . . . . . . . . . . . . . . . . . . . . . . . . . . . . . . . . . . . 138
Check the Format of an Uploaded File. . . . . . . . . . . . . . . . . . . . . . . . . . . . . . . . 139
Viewing an Uploaded File . . . . . . . . . . . . . . . . . . . . . . . . . . . . . . . . . . . . . . . . . 139
Deleting an Uploaded File . . . . . . . . . . . . . . . . . . . . . . . . . . . . . . . . . . . . . . . . . 139
vi
Page 7

CONTENTS
Backing Up and Restoring Module Configuration Files . . . . . . . . . . . . . . . . . . . . . . 140
Displaying Backup Status. . . . . . . . . . . . . . . . . . . . . . . . . . . . . . . . . . . . . . . . . . 140
Downloading Files to a Client Computer . . . . . . . . . . . . . . . . . . . . . . . . . . . . . . 141
Uploading a Backup File to the Module. . . . . . . . . . . . . . . . . . . . . . . . . . . . . . . 142
Restoring the Module from a Backup File . . . . . . . . . . . . . . . . . . . . . . . . . . . . . 143
Restoring the Module Name. . . . . . . . . . . . . . . . . . . . . . . . . . . . . . . . . . . . . . . . 143
Using the System Log . . . . . . . . . . . . . . . . . . . . . . . . . . . . . . . . . . . . . . . . . . . . . . . . 146
Sorting the System Log . . . . . . . . . . . . . . . . . . . . . . . . . . . . . . . . . . . . . . . . . . . 147
Defining a System Log View . . . . . . . . . . . . . . . . . . . . . . . . . . . . . . . . . . . . . . . 148
Repairing Archives. . . . . . . . . . . . . . . . . . . . . . . . . . . . . . . . . . . . . . . . . . . . . . . . . . . 148
Restoring Defaults . . . . . . . . . . . . . . . . . . . . . . . . . . . . . . . . . . . . . . . . . . . . . . . . . . . 152
Retaining Backup Files. . . . . . . . . . . . . . . . . . . . . . . . . . . . . . . . . . . . . . . . . . . . 152
Resetting the Module . . . . . . . . . . . . . . . . . . . . . . . . . . . . . . . . . . . . . . . . . . . . . 153
Resetting the Security Mode. . . . . . . . . . . . . . . . . . . . . . . . . . . . . . . . . . . . . . . . 153
Resetting the Web Diagnostics Password . . . . . . . . . . . . . . . . . . . . . . . . . . . . . 154
Shutting Down . . . . . . . . . . . . . . . . . . . . . . . . . . . . . . . . . . . . . . . . . . . . . . . . . . . . . . 155
Restarting the Module . . . . . . . . . . . . . . . . . . . . . . . . . . . . . . . . . . . . . . . . . . . . . . . . 156
Rebooting the Module . . . . . . . . . . . . . . . . . . . . . . . . . . . . . . . . . . . . . . . . . . . . . . . . 157
9 • Managing Security . . . . . . . . . . . . . . . . . . . . . . . . . . . . . . . . . . . 159
Security Overview . . . . . . . . . . . . . . . . . . . . . . . . . . . . . . . . . . . . . . . . . . . . . . . . . . . 159
FactoryTalk Security Prerequisites . . . . . . . . . . . . . . . . . . . . . . . . . . . . . . . . . . . . . . 160
Configuring Security . . . . . . . . . . . . . . . . . . . . . . . . . . . . . . . . . . . . . . . . . . . . . . . . . 160
Protocol Settings. . . . . . . . . . . . . . . . . . . . . . . . . . . . . . . . . . . . . . . . . . . . . . . . . 161
Security Modes. . . . . . . . . . . . . . . . . . . . . . . . . . . . . . . . . . . . . . . . . . . . . . . . . . 161
Using FactoryTalk Directory Server . . . . . . . . . . . . . . . . . . . . . . . . . . . . . . . . . 164
Selecting Certificate Parameters. . . . . . . . . . . . . . . . . . . . . . . . . . . . . . . . . . . . . 165
Managing Passwords . . . . . . . . . . . . . . . . . . . . . . . . . . . . . . . . . . . . . . . . . . . . . . . . . 166
Changing User Passwords . . . . . . . . . . . . . . . . . . . . . . . . . . . . . . . . . . . . . . . . . 166
Resetting Passwords . . . . . . . . . . . . . . . . . . . . . . . . . . . . . . . . . . . . . . . . . . . . . . 166
Resetting Default Admin Password . . . . . . . . . . . . . . . . . . . . . . . . . . . . . . . . . . 167
Understanding User Privileges. . . . . . . . . . . . . . . . . . . . . . . . . . . . . . . . . . . . . . . . . . 167
Managing Security Trusts . . . . . . . . . . . . . . . . . . . . . . . . . . . . . . . . . . . . . . . . . . . . . 170
Default Trusts . . . . . . . . . . . . . . . . . . . . . . . . . . . . . . . . . . . . . . . . . . . . . . . . . . . 171
Client Application Trusts . . . . . . . . . . . . . . . . . . . . . . . . . . . . . . . . . . . . . . . . . . 171
Creating a Trust . . . . . . . . . . . . . . . . . . . . . . . . . . . . . . . . . . . . . . . . . . . . . . . . . 172
Editing a Trust . . . . . . . . . . . . . . . . . . . . . . . . . . . . . . . . . . . . . . . . . . . . . . . . . . 173
Deleting a Trust . . . . . . . . . . . . . . . . . . . . . . . . . . . . . . . . . . . . . . . . . . . . . . . . . 173
Creating a Trust Connection with FactoryTalk Historian SE or PI Server . . . . 173
10• Using Web Diagnostics . . . . . . . . . . . . . . . . . . . . . . . . . . . . . . . 183
vii
Page 8

FACTORYTALK HISTORIAN ME USER GUIDE
Web Diagnostics Home . . . . . . . . . . . . . . . . . . . . . . . . . . . . . . . . . . . . . . . . . . . . . . . 183
Hardware Diagnostics . . . . . . . . . . . . . . . . . . . . . . . . . . . . . . . . . . . . . . . . . . . . . . . . 184
Overview . . . . . . . . . . . . . . . . . . . . . . . . . . . . . . . . . . . . . . . . . . . . . . . . . . . . . . 185
CPU, RAM . . . . . . . . . . . . . . . . . . . . . . . . . . . . . . . . . . . . . . . . . . . . . . . . . . . . . 186
NAND. . . . . . . . . . . . . . . . . . . . . . . . . . . . . . . . . . . . . . . . . . . . . . . . . . . . . . . . . 187
Controller Statistics . . . . . . . . . . . . . . . . . . . . . . . . . . . . . . . . . . . . . . . . . . . . . . 188
ControlBus Statistics . . . . . . . . . . . . . . . . . . . . . . . . . . . . . . . . . . . . . . . . . . . . . 189
EtherNet/IP . . . . . . . . . . . . . . . . . . . . . . . . . . . . . . . . . . . . . . . . . . . . . . . . . . . . . 190
Display LED . . . . . . . . . . . . . . . . . . . . . . . . . . . . . . . . . . . . . . . . . . . . . . . . . . . . 192
Time Management . . . . . . . . . . . . . . . . . . . . . . . . . . . . . . . . . . . . . . . . . . . . . . . 193
Firmware Diagnostics . . . . . . . . . . . . . . . . . . . . . . . . . . . . . . . . . . . . . . . . . . . . . . . . 195
Overview . . . . . . . . . . . . . . . . . . . . . . . . . . . . . . . . . . . . . . . . . . . . . . . . . . . . . . 196
Historian Server . . . . . . . . . . . . . . . . . . . . . . . . . . . . . . . . . . . . . . . . . . . . . . . . . 196
CIP . . . . . . . . . . . . . . . . . . . . . . . . . . . . . . . . . . . . . . . . . . . . . . . . . . . . . . . . . . . 197
Data Server . . . . . . . . . . . . . . . . . . . . . . . . . . . . . . . . . . . . . . . . . . . . . . . . . . . . . 198
Data Collection . . . . . . . . . . . . . . . . . . . . . . . . . . . . . . . . . . . . . . . . . . . . . . . . . . 199
Data Transfer . . . . . . . . . . . . . . . . . . . . . . . . . . . . . . . . . . . . . . . . . . . . . . . . . . . 200
Data Storage . . . . . . . . . . . . . . . . . . . . . . . . . . . . . . . . . . . . . . . . . . . . . . . . . . . . 200
Web Configuration Server . . . . . . . . . . . . . . . . . . . . . . . . . . . . . . . . . . . . . . . . . 201
Web Diagnostics Server . . . . . . . . . . . . . . . . . . . . . . . . . . . . . . . . . . . . . . . . . . . 202
Startup Log . . . . . . . . . . . . . . . . . . . . . . . . . . . . . . . . . . . . . . . . . . . . . . . . . . . . . 203
Admin. . . . . . . . . . . . . . . . . . . . . . . . . . . . . . . . . . . . . . . . . . . . . . . . . . . . . . . . . . . . . 204
Hosts . . . . . . . . . . . . . . . . . . . . . . . . . . . . . . . . . . . . . . . . . . . . . . . . . . . . . . . . . . 205
Restart Services . . . . . . . . . . . . . . . . . . . . . . . . . . . . . . . . . . . . . . . . . . . . . . . . . 206
Core Dump Directory . . . . . . . . . . . . . . . . . . . . . . . . . . . . . . . . . . . . . . . . . . . . . 207
PI Commands . . . . . . . . . . . . . . . . . . . . . . . . . . . . . . . . . . . . . . . . . . . . . . . . . . . 208
Download Logs. . . . . . . . . . . . . . . . . . . . . . . . . . . . . . . . . . . . . . . . . . . . . . . . . . 209
Change Password . . . . . . . . . . . . . . . . . . . . . . . . . . . . . . . . . . . . . . . . . . . . . . . . 209
viii
A • FactoryTalk Historian ME Rule Editor . . . . . . . . . . . . . . . . . . . 211
Rule Editor Overview . . . . . . . . . . . . . . . . . . . . . . . . . . . . . . . . . . . . . . . . . . . . . . . . 212
File Management Settings . . . . . . . . . . . . . . . . . . . . . . . . . . . . . . . . . . . . . . . . . 213
Current Rule File Settings . . . . . . . . . . . . . . . . . . . . . . . . . . . . . . . . . . . . . . . . . 214
Rule Table Settings. . . . . . . . . . . . . . . . . . . . . . . . . . . . . . . . . . . . . . . . . . . . . . . 214
Defining Rule Files . . . . . . . . . . . . . . . . . . . . . . . . . . . . . . . . . . . . . . . . . . . . . . . . . . 214
Defining Rules . . . . . . . . . . . . . . . . . . . . . . . . . . . . . . . . . . . . . . . . . . . . . . . . . . . . . . 216
Creating Tag Attribute Files. . . . . . . . . . . . . . . . . . . . . . . . . . . . . . . . . . . . . . . . . . . . 219
B • Data Transfer Sample Scenario . . . . . . . . . . . . . . . . . . . . . . . . 227
Configuring Data Transfer Settings . . . . . . . . . . . . . . . . . . . . . . . . . . . . . . . . . . . . . . 227
Page 9

CONTENTS
Initiating Data Transfer . . . . . . . . . . . . . . . . . . . . . . . . . . . . . . . . . . . . . . . . . . . . . . . 229
Using FactoryTalk Historian DataLink . . . . . . . . . . . . . . . . . . . . . . . . . . . . . . . . . . . 230
Defining the Server Connection . . . . . . . . . . . . . . . . . . . . . . . . . . . . . . . . . . . . . 230
Using Excel as an Add-In: Example Scenario . . . . . . . . . . . . . . . . . . . . . . . . . . 231
C • FactoryTalk Directory Integration . . . . . . . . . . . . . . . . . . . . . . . 239
Integration Prerequisites. . . . . . . . . . . . . . . . . . . . . . . . . . . . . . . . . . . . . . . . . . . . . . . 239
Registering the Module in FactoryTalk Directory . . . . . . . . . . . . . . . . . . . . . . . . . . . 240
Creating the Server Connection . . . . . . . . . . . . . . . . . . . . . . . . . . . . . . . . . . . . . 241
Creating a FactoryTalk Historian ME Connection. . . . . . . . . . . . . . . . . . . . . . . 241
Creating a New User . . . . . . . . . . . . . . . . . . . . . . . . . . . . . . . . . . . . . . . . . . . . . . . . . 243
Using FactoryTalk Historian DataLink . . . . . . . . . . . . . . . . . . . . . . . . . . . . . . . . . . . 247
Using DataLink as an Add-In: Sample Scenario . . . . . . . . . . . . . . . . . . . . . . . . 247
Inserting Trends with the Trend Add-In Wizard . . . . . . . . . . . . . . . . . . . . . . . . 251
D • RSLogix 5000 Add-on Profile . . . . . . . . . . . . . . . . . . . . . . . . . . 257
Using AOP: Sample Scenario . . . . . . . . . . . . . . . . . . . . . . . . . . . . . . . . . . . . . . . . . . 258
Setting Up an Ethernet Driver . . . . . . . . . . . . . . . . . . . . . . . . . . . . . . . . . . . . . . 259
Configuring the Module in RSLogix 5000. . . . . . . . . . . . . . . . . . . . . . . . . . . . . 261
Starting and Stopping Data Collection: Ladder Logic Control Example . . . . . . 266
Using the AOP Module Properties Configuration Tab . . . . . . . . . . . . . . . . . . . . . . . 268
E • Hardware Specifications . . . . . . . . . . . . . . . . . . . . . . . . . . . . . . 271
F • Design Considerations and Limitations. . . . . . . . . . . . . . . . . . 273
Point Configuration . . . . . . . . . . . . . . . . . . . . . . . . . . . . . . . . . . . . . . . . . . . . . . . . . . 274
Point Creation . . . . . . . . . . . . . . . . . . . . . . . . . . . . . . . . . . . . . . . . . . . . . . . . . . . 274
Add Points Wizard . . . . . . . . . . . . . . . . . . . . . . . . . . . . . . . . . . . . . . . . . . . . . . . 274
Point Properties. . . . . . . . . . . . . . . . . . . . . . . . . . . . . . . . . . . . . . . . . . . . . . . . . . 274
Data Collection. . . . . . . . . . . . . . . . . . . . . . . . . . . . . . . . . . . . . . . . . . . . . . . . . . . . . . 276
Scan Types . . . . . . . . . . . . . . . . . . . . . . . . . . . . . . . . . . . . . . . . . . . . . . . . . . . . . 276
High Speed Trend Pace Error . . . . . . . . . . . . . . . . . . . . . . . . . . . . . . . . . . . . . . . 276
Data Types . . . . . . . . . . . . . . . . . . . . . . . . . . . . . . . . . . . . . . . . . . . . . . . . . . . . . 276
Data Quality . . . . . . . . . . . . . . . . . . . . . . . . . . . . . . . . . . . . . . . . . . . . . . . . . . . . 276
Data Transfer . . . . . . . . . . . . . . . . . . . . . . . . . . . . . . . . . . . . . . . . . . . . . . . . . . . . . . . 276
Data Storage . . . . . . . . . . . . . . . . . . . . . . . . . . . . . . . . . . . . . . . . . . . . . . . . . . . . . . . . 277
Time Synchronization . . . . . . . . . . . . . . . . . . . . . . . . . . . . . . . . . . . . . . . . . . . . . . . . 279
Backup and Recovery . . . . . . . . . . . . . . . . . . . . . . . . . . . . . . . . . . . . . . . . . . . . . . . . 279
System Connectivity . . . . . . . . . . . . . . . . . . . . . . . . . . . . . . . . . . . . . . . . . . . . . . . . . 279
ix
Page 10

FACTORYTALK HISTORIAN ME USER GUIDE
Hardware . . . . . . . . . . . . . . . . . . . . . . . . . . . . . . . . . . . . . . . . . . . . . . . . . . . . . . . . . . 280
ControlLogix Chassis . . . . . . . . . . . . . . . . . . . . . . . . . . . . . . . . . . . . . . . . . . . . . 280
Logix Controllers . . . . . . . . . . . . . . . . . . . . . . . . . . . . . . . . . . . . . . . . . . . . . . . . 280
CompactFlash Firmware. . . . . . . . . . . . . . . . . . . . . . . . . . . . . . . . . . . . . . . . . . . 281
Performance . . . . . . . . . . . . . . . . . . . . . . . . . . . . . . . . . . . . . . . . . . . . . . . . . . . . . . . . 281
View Data . . . . . . . . . . . . . . . . . . . . . . . . . . . . . . . . . . . . . . . . . . . . . . . . . . . . . . 282
Web Interface . . . . . . . . . . . . . . . . . . . . . . . . . . . . . . . . . . . . . . . . . . . . . . . . . . . 282
FactoryTalk Product Suite . . . . . . . . . . . . . . . . . . . . . . . . . . . . . . . . . . . . . . . . . . . . . 282
FactoryTalk Historian SE . . . . . . . . . . . . . . . . . . . . . . . . . . . . . . . . . . . . . . . . . . 282
G• Troubleshooting . . . . . . . . . . . . . . . . . . . . . . . . . . . . . . . . . . . . . 283
General Guidelines. . . . . . . . . . . . . . . . . . . . . . . . . . . . . . . . . . . . . . . . . . . . . . . . . . . 284
Providing Issue Information. . . . . . . . . . . . . . . . . . . . . . . . . . . . . . . . . . . . . . . . 284
Rebooting the Module . . . . . . . . . . . . . . . . . . . . . . . . . . . . . . . . . . . . . . . . . . . . 285
Working in Safe Mode . . . . . . . . . . . . . . . . . . . . . . . . . . . . . . . . . . . . . . . . . . . . 285
Hardware Issues . . . . . . . . . . . . . . . . . . . . . . . . . . . . . . . . . . . . . . . . . . . . . . . . . . . . . 285
Web Client Issues. . . . . . . . . . . . . . . . . . . . . . . . . . . . . . . . . . . . . . . . . . . . . . . . . . . . 287
Data Collection Issues . . . . . . . . . . . . . . . . . . . . . . . . . . . . . . . . . . . . . . . . . . . . . . . . 289
Data Storage Issues . . . . . . . . . . . . . . . . . . . . . . . . . . . . . . . . . . . . . . . . . . . . . . . . . . 292
Data Transfer Issues. . . . . . . . . . . . . . . . . . . . . . . . . . . . . . . . . . . . . . . . . . . . . . . . . . 293
Data Export Issues . . . . . . . . . . . . . . . . . . . . . . . . . . . . . . . . . . . . . . . . . . . . . . . . . . . 296
Auto Recovery Issues. . . . . . . . . . . . . . . . . . . . . . . . . . . . . . . . . . . . . . . . . . . . . . . . . 297
Time Management Issues. . . . . . . . . . . . . . . . . . . . . . . . . . . . . . . . . . . . . . . . . . . . . . 298
Client Computer Issues . . . . . . . . . . . . . . . . . . . . . . . . . . . . . . . . . . . . . . . . . . . . . . . 299
Point Server Issues . . . . . . . . . . . . . . . . . . . . . . . . . . . . . . . . . . . . . . . . . . . . . . . . . . . 299
Related FactoryTalk Product Issues. . . . . . . . . . . . . . . . . . . . . . . . . . . . . . . . . . . . . . 300
FactoryTalk Historian DataLink. . . . . . . . . . . . . . . . . . . . . . . . . . . . . . . . . . . . . 300
FactoryTalk Security . . . . . . . . . . . . . . . . . . . . . . . . . . . . . . . . . . . . . . . . . . . . . 300
Glossary . . . . . . . . . . . . . . . . . . . . . . . . . . . . . . . . . . . . . . . . . . . 303
Index . . . . . . . . . . . . . . . . . . . . . . . . . . . . . . . . . . . . . . . . . . . . . . 311
x
Page 11

1
FactoryTalk Historian
ME Web Interface
Overview
The FactoryTalk® Historian Machine Edition (ME) Module is a fully embedded
historian in a ControlLogix
ControlLogix chassis to utilize backplane communications and collect data from
multiple controllers. It collects data at very high speeds, runs calculations and
statistics on the data inside its storage archive, utilizing exception and compression
filtering to significantly reduce the data archive space. System and data information
are viewed through the FactoryTalk Historian ME web interface and all standard
FactoryTalk Historian web clients.
®
module that can be inserted into a Rockwell
1
Page 12

FACTORYTALK HISTORIAN ME MODULE USER’S GUIDE
To provide an overview of your FactoryTalk Historian ME, this chapter provides the
following sections:
“Features”
“Benefits”
“Distributed FactoryTalk Historian Architecture”
“FactoryTalk and ControlLogix Integration”
“Hardware Specifications”
“Where to Start”
“Additional Information”
“FactoryTalk Licensing”
“Technical Support”
“Consulting Services”
“Training Programs”
Features
Key advantages of FactoryTalk Historian ME include:
Easy, automated installation and configuration and a rich, interactive browser
experience.
As an embedded historian in a ControlLogix chassis connected to the backplane,
FactoryTalk Historian ME is easily installed and configured. It communicates at
very high speeds with the controllers in its backplane, reducing implementation
time from hours, days, or months to minutes. It quickly auto-detects ControlLogix
controllers and configures all relevant tags to be historized. The web interface
provides easy configuration, administration, and reporting.
High speed Data Collection rates that are ten times (or more) faster than
traditional historian collection rates.
FactoryTalk Historian ME is not limited by network bandwidth. It leverages
backplane communication to increase the speed of Data Collection and, with
down to a 10 millisecond scan rate, the unit provides more granular data than is
possible on a traditional, network-connected plant historian.
2
Page 13

Reliable and robust hardened, embedded appliance with a low total cost of
ownership. Only a client computer is needed to install and configure your
FactoryTalk Historian ME.
FactoryTalk Historian ME records data safely and accurately with solid-state data
capture. It has no moving parts and requires no operating system or computer
maintenance. It is not subject to downtime due to network outage or the need to
perform maintenance on any subsequent firmware updates. It can be pre-qualified
from an OEM in a Factory Acceptance Test (FAT), thereby significantly reducing
overall validation efforts for end users.
Scalable Data Collection from machine through enterprise
FactoryTalk Historian ME is modular. It is rack-ready to stand alone or can easily
be rolled up and configured into a plant-wide historian for full resolution Data
Collection and transfer. It can capture data from up to four controllers in the local
backplane.
Benefits
FactoryTalk Historian ME provides these benefits:
1 • OVERVIEW
Reduces time-to-market by monitoring and analyzing operational and product
quality in accord with specifications and operations and product constraints.
Helps reduce time to execute grade or product changes by:
Assisting with product waste reduction, recycling, and blending.
Increasing effective equipment capacity and positively impacting materials
cost management.
Improving product development as it collects and evaluates data related to
new operation actions, materials, equipment, equipment capabilities, and
procedures.
Identifying operational or production bottlenecks and improving operating
efficiency to avoid unnecessary capital spending.
Increases compliance as it:
Facilitates, validates, and documents performance within regulatory or
permitted boundaries.
Increases management effectivity.
3
Page 14

FACTORYTALK HISTORIAN ME MODULE USER’S GUIDE
Reduces validation by including OEM delivery and testing.
Enhances performance by:
Monitoring or calculatings effective equipment usage and performance.
Detecting degradation of performance and initiating alerts or requests for
operations and maintenance actions.
Providing real-time, time-stamped operational and production data.
Maximizes delivery, quality, and continuous process improvement by:
Documenting actual versus model production and identifying deviations.
Analyzing for new process and operational boundaries when throughput,
material, or equipment changes occur.
Distributed FactoryTalk Historian Architecture
Data or process historians are software applications that log data from process
equipment, manufacturing devices, and other main data sources that are important
and relevant for the overall manufacturing process and for product quality. The
FactoryTalk Historian collects time series data, which is very different from
traditional relational data and event data. The FactoryTalk Historian collects data
points at given intervals whether or not the data points are changing. This allows
customers to see how these data points are trending, and allows them to look at
correlations of data points.
Because the FactoryTalk Historian continuously collects data, it allows customers to
review past data and view what occurred at a specific past point(s) in time. This
means that if a specific event such as a downtime event, a bad batch, or an alarm
occurs, an operator can look at any process variable in the FactoryTalk Historian for
the same time frame as the event, and search for correlations that might explain the
event. This allows the user to improve production and operational processes,
eliminating the anomaly in the future.
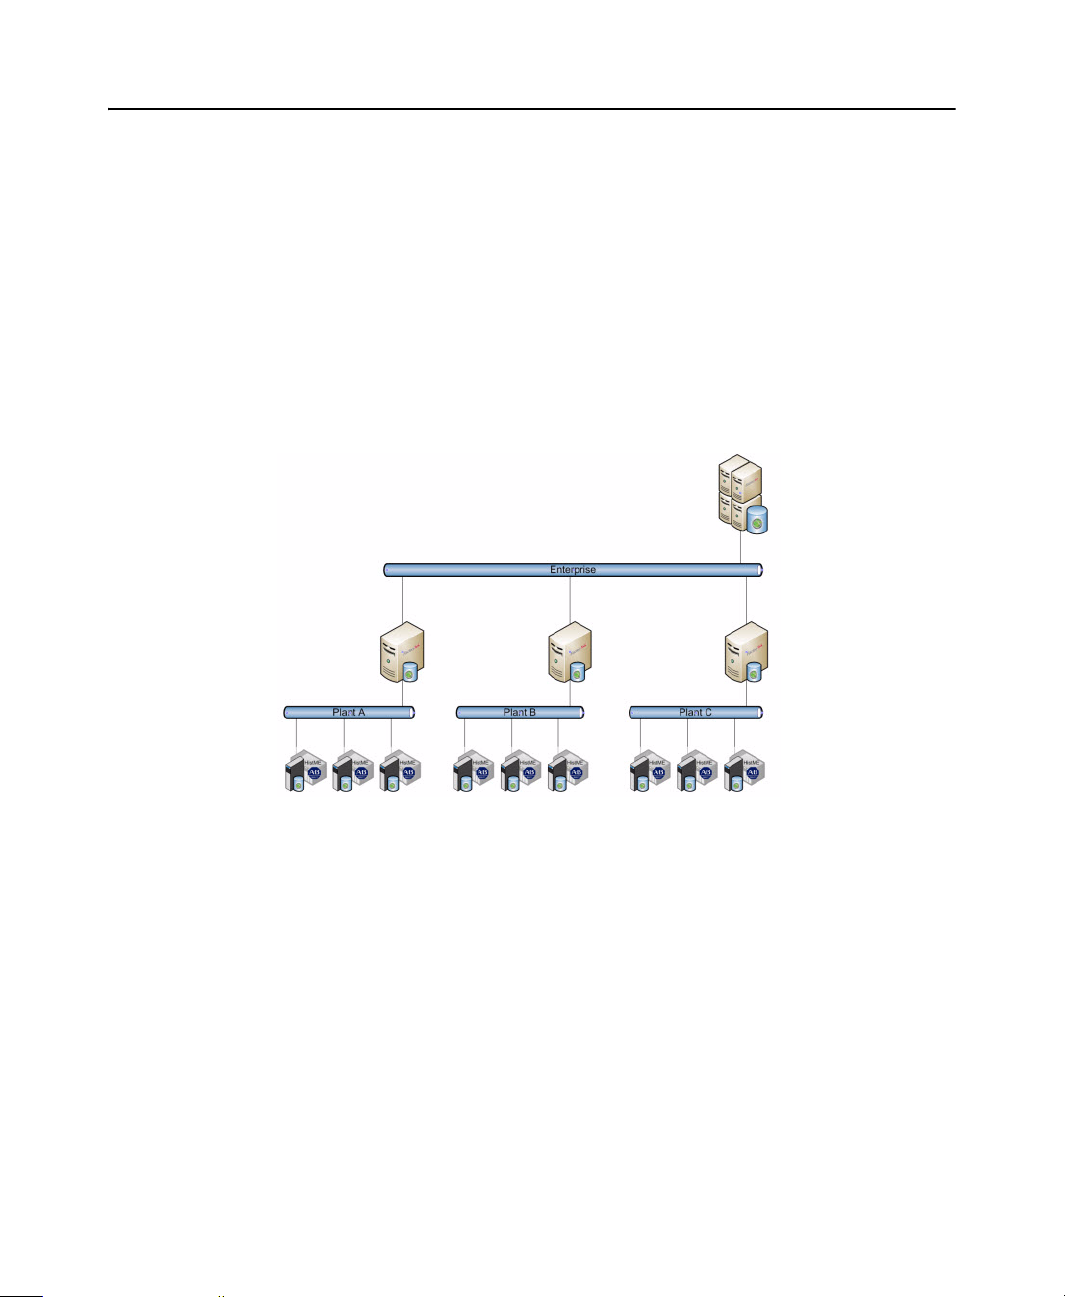
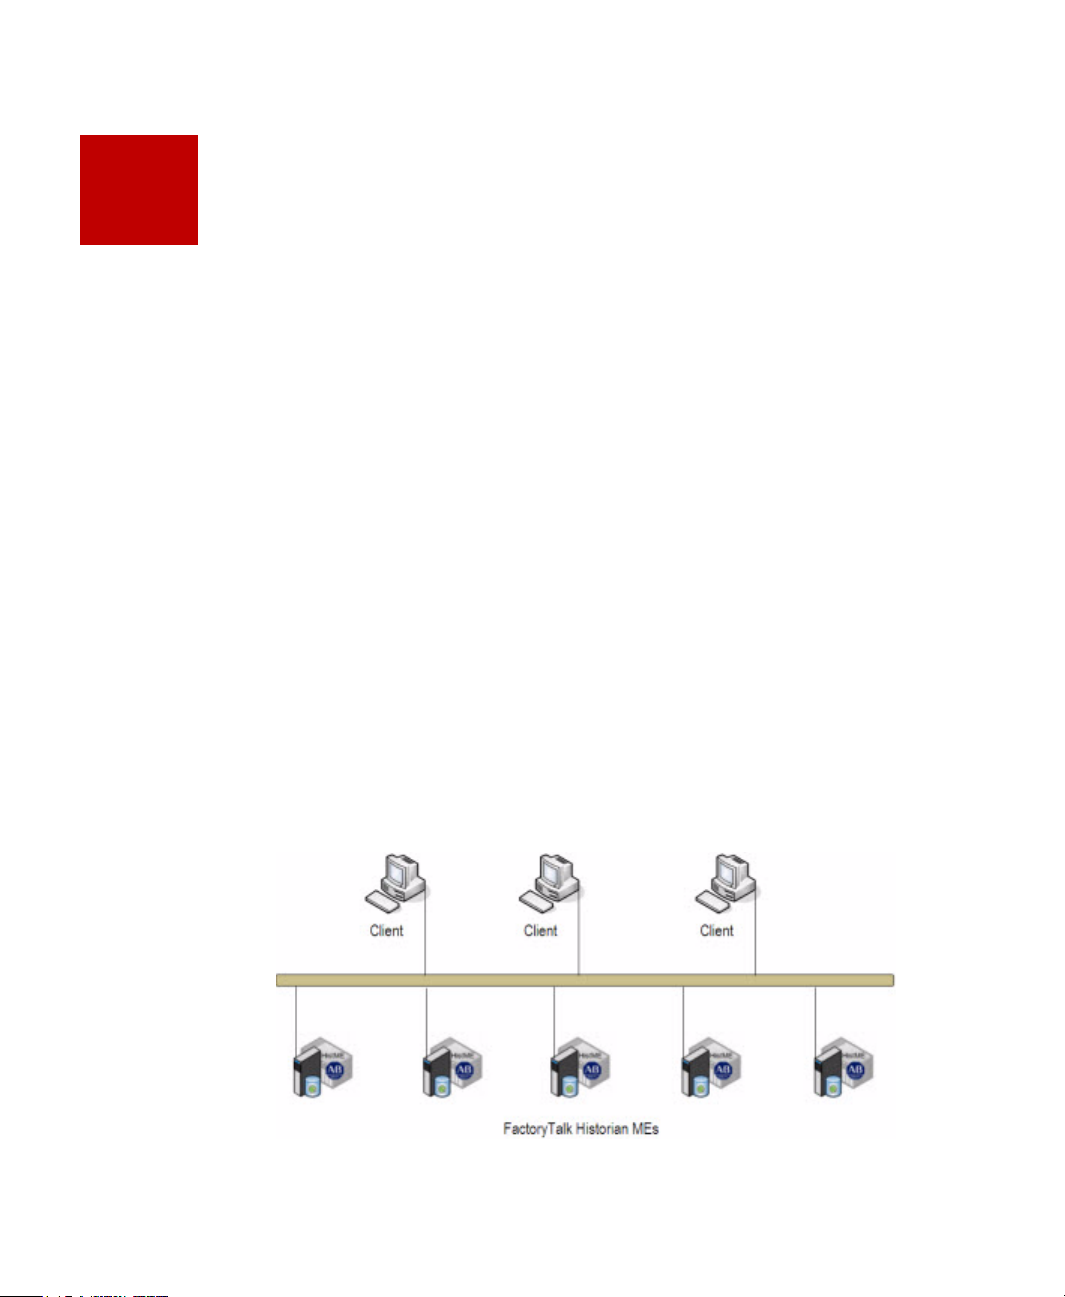
The FactoryTalk Historian distributed architecture is multi-tiered. It redefines
available options for manufacturers who want to maximize their ability to collect and
analyze process data. It introduces a scalable, modular, synchronized methodology
for collecting, maintaining, and analyzing process data at each level of manufacturing
operations - machine or line, plant and enterprise (multi-plant). Specifically,
FactoryTalk Historian ME:
4
Page 15
1 • OVERVIEW
Enterprise
Edition
(future)
Machine
Edition
Site Edition
Provides an engine of unmatched performance and scalability, tightly integrated
with the FactoryTalk Services Platform to provide data accuracy and availability
across the Rockwell Automation
Introduces a historian appliance that offers scalable connectivity to Rockwell
®
Integrated Architecture.
Automation controllers.
Offers Rockwell customers a feature-rich set of commercially proven, industry-
focused applications that are widely regarded as the de-facto standard for plant
and enterprise historian capabilities.
The following diagram depicts the three levels of the FactoryTalk Historian
distributed architecture.
5
Page 16
FACTORYTALK HISTORIAN ME MODULE USER’S GUIDE
FactoryTalk and ControlLogix Integration
FactoryTalk Historian ME works with the FactoryTalk product suite and Rockwell
ControlLogix devices. The ControlLogix hardware and software provide easy and
secure access to resources (data, status, and configuration) within the ControlLogix
devices.
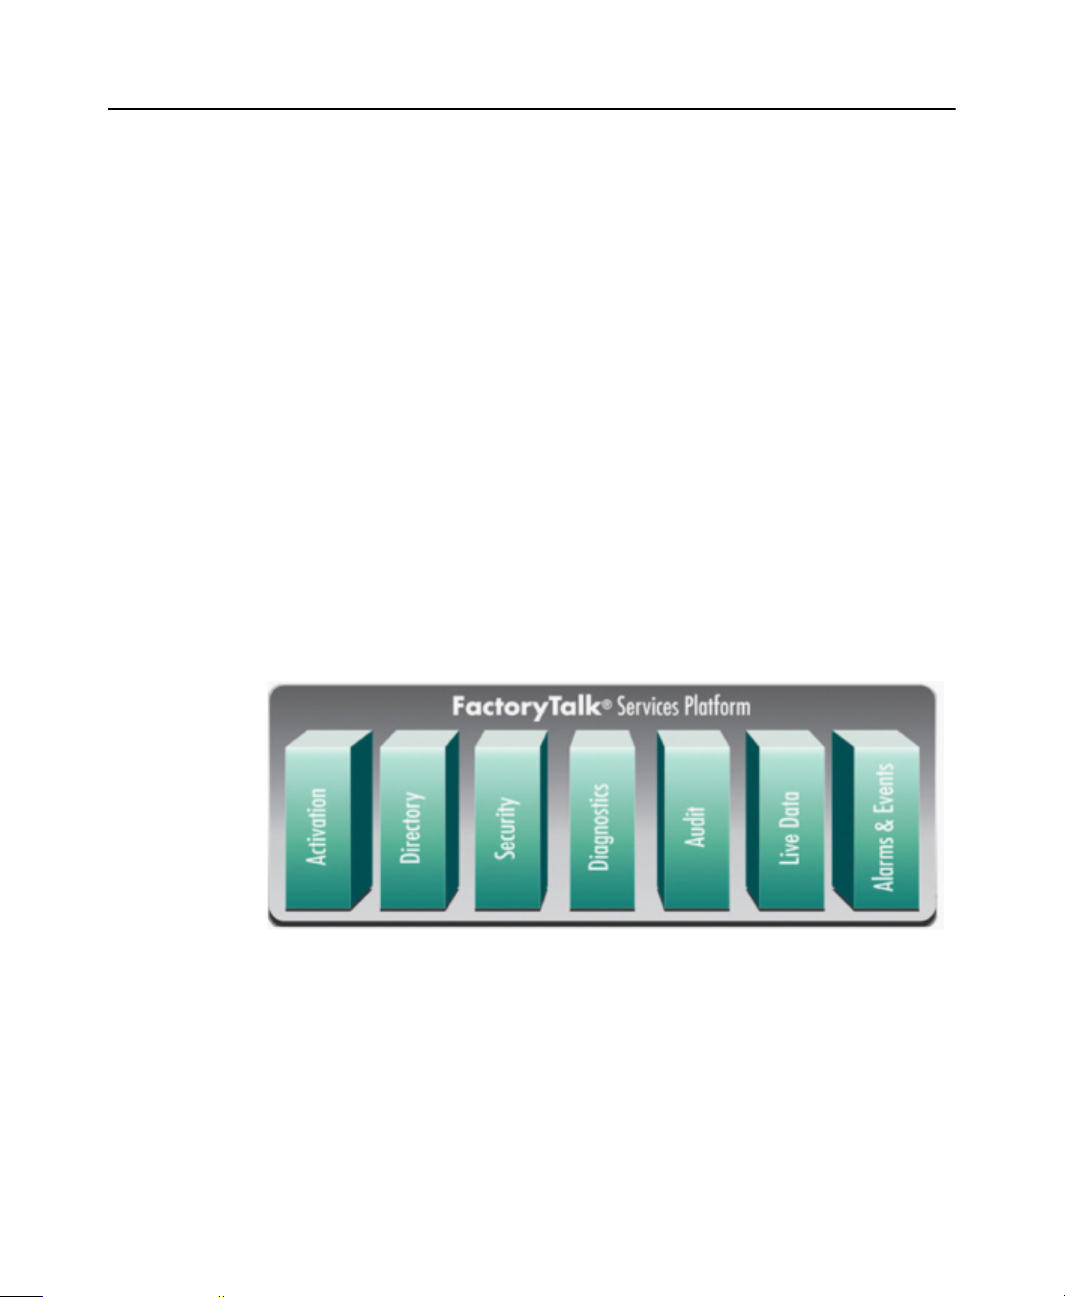
FactoryTalk Services Platform and FactoryTalk Product Suite
You must install the FactoryTalk Services Platform V2.10.02, Coordinated Product
Release 9 (CPR 9) Service Release 2 (SR2) first, on any computer where you plan to
run FactoryTalk Historian ME. Currently, FactoryTalk Historian ME supports these
services:
FactoryTalk Directory
FactoryTalk Security
FactoryTalk Administration Console
FactoryTalk Web Services
If you are using FactoryTalk Services Platform CPR 9 SR1 (or earlier), you must
upgrade to SR2 by installing the FactoryTalk Services Platform CPR 9 SR2 provided
on the FactoryTalk Historian ME Client Tools CD that was shipped with your
module. If you are upgrading a client computer to FactoryTalk Services Platform
version 2.10.02 CPR 9 SR 2, you may also need to upgrade the computer hosting the
6
Page 17

1 • OVERVIEW
FactoryTalk Network Directory Server to FactoryTalk Services Platform version
2.10.02.
For additional information on upgrading a previous version of the FactoryTalk Network
Directory Server, see the Rockwell Automation Knowledgebase at
http://www.rockwellautomation.com/resources/support.html.
The FactoryTalk Services PlatformV2.10.02 CPR 9 SR2 includes services and
applications listed in the following table.
FactoryTalk Services Platform V2.10.02 CPR 9 SP2
FactoryTalk Administration
Console
V2.10.02.24
FactoryTalk Alarms and Events
V2.20.00
FactoryTalk Diagnostics
V2.10.02.24
FactoryTalk Directory
FactoryTalk Security
V2.10.02.24
Provides a way to configure connections to other
FactoryTalk applications such as FactoryTalk
Security. It also allows FactoryTalk Historian ME
and FactoryTalk Historian SE to use FactoryTalk
View SE for data monitoring and trending.
Allows multiple FactoryTalk products to produce a
common, consistent view of alarms and events that
occur in a FactoryTalk system.
Allows FactoryTalk-enabled products to define,
route, and store information about errors or changes
that occur in a FactoryTalk system.
Centralizes access to resources and components for
all FactoryTalk products participating in a control
system.
FactoryTalk Historian ME supports Network
Directory, not Local Directory. Network Directory
manages applications that can consist of multiple
clients and servers on separate computers connected
over a network, such as FactoryTalk Historian ME’s
network applications. You must set up all
participating computers to point at the same Network
Directory computer.
FactoryTalk Security centralizes user authentication
and authorization for FactoryTalk-enabled system.
These security services are fully integrated into the
FactoryTalk Directory.
7
Page 18

FACTORYTALK HISTORIAN ME MODULE USER’S GUIDE
FactoryTalk Services Platform V2.10.02 CPR 9 SP2
FactoryTalk Live Data
V2.10.02.24
FactoryTalk Web Services
V2.10.02
Allows FactoryTalk services-enabled products to
discover, connect, and share real-time data in a
secure, scalable manner.
Provides the ability for thin clients to connect to
Web-based Rockwell Automation software products
through a Web browser. Before installing
FactoryTalk Web Services, install Microsoft Internet
Information Services (IIS). The steps for installing
IIS may be slightly different depending on your
operating system.
The FactoryTalk product suite includes the products listed in the following table.
FactoryTalk Product Suite
FactoryTalk Activation
FactoryTalk Historian SE
V2.1
Software-based product activation. To access the Rockwell
Software Activation website, go to http://
www.licensing.rockwellsoftware.com
Provides Data Transfer service for data logged by
FactoryTalk Historian ME for long-term storage and
analysis.
Before using FactoryTalk Historian SE, you must install
the FactoryTalk Historian SE patch for FactoryTalk
Historian SE Server.
FactoryTalk View SE
V5.0 and above
8
Provides a Trending Object for you to trend FactoryTalk
Historian ME data or FactoryTalk Historian SE data
acquired using FactoryTalk Historian ME.
FactoryTalk Historian ME can be integrated with
FactoryTalk View SE Trending.
See “Installing FactoryTalk View SE Patch” for required
patch information.
Page 19
FactoryTalk Product Suite
1 • OVERVIEW
FactoryTalk VantagePoint
FactoryTalk
and
VantagePoint EMI
V3.1 and above
FactoryTalk Historian
DataLink
V3.1 and above
FactoryTalk Historian
ProcessBook
V3.0 and above
FactoryTalk Historian
Batch View
V3.1 and above
FactoryTalk Historian SQC
Add-in
V3.0 and above
Allows you to view process data from FactoryTalk
Historian ME in VantagePoint Excel® reports, dashboards,
and portals. Integrates the FactoryTalk Historian ME data
into the VantagePoint model, allowing you to correlate the
data with various other data sources.
Provides a Microsoft® Excel add-in component that allows
you to develop Excel reports based on the data in
FactoryTalk Historian ME.
Provides an ad-hoc data analysis capability in FactoryTalk
Historian ME that allows you to visualize the data in trends
and other graphical components.
Adds advanced batch trending and batch comparison
capabilities to FactoryTalk Historian ProcessBook and
FactoryTalk Historian DataLink, providing the ability to
visualize the batches and events collected in the
FactoryTalk Historian batch database.
This is a FactoryTalk Historian ProcessBook and a
FactoryTalk Historian DataLink add-in component.
Allows users to visualize historic data in Statistical Quality
Chart (SQC) ProcessBook displays.
This is a FactoryTalk Historian ProcessBook add-in
component.
For help with the FactoryTalk product suite, select Programs > Rockwell Software >
FactoryTalk Tools, and then click FactoryTalk Help from the Windows
®
Start menu.
9
Page 20

FACTORYTALK HISTORIAN ME MODULE USER’S GUIDE
ControlLogix System Communications
A ControlLogix system consists of anything from your FactoryTalk Historian ME
and a stand-alone controller in a single chassis to more complex configurations that
include Ethernet/IP communication modules. The ControlLogix system in a chassis
uses connections to establish communication links between devices such as a
Logix5000 controller-to-local communication modules such as an EN2T or ENBT
module. RSLogix™ 5000 programming software and RSLinx Classic™ software are
used to facilitate communication and connections in the ControlLogix system.
ControlLogix System Communication Applications
RSLogix 5000 Without AOP:
V13 - V18
With AOP:
V16 - V18
RSLinx Classic V2.55 A communications software that provides
Hardware Specifications
Refer to the “Hardware Specifications” appendix for a summary of hardware
specifications.
A programming software for Logix5000
controllers.
The FactoryTalk Historian ME Add On
Profile (AOP) is a RSLogix 5000 module
profile that allows FactoryTalk Historian
ME users to perform operations such as
tag monitoring, module shutdown, and
module restart without using the
FactoryTalk Historian ME web interface.
Refer to the “RSLogix 5000 Add-on
Profile” appendix for information about
using AOP.
an easy way to upload and download
Ladder logic files from Logix5000
controllers.
RSLogix 5000 uses RSLinx Classic to
browse your controller.
10
Page 21

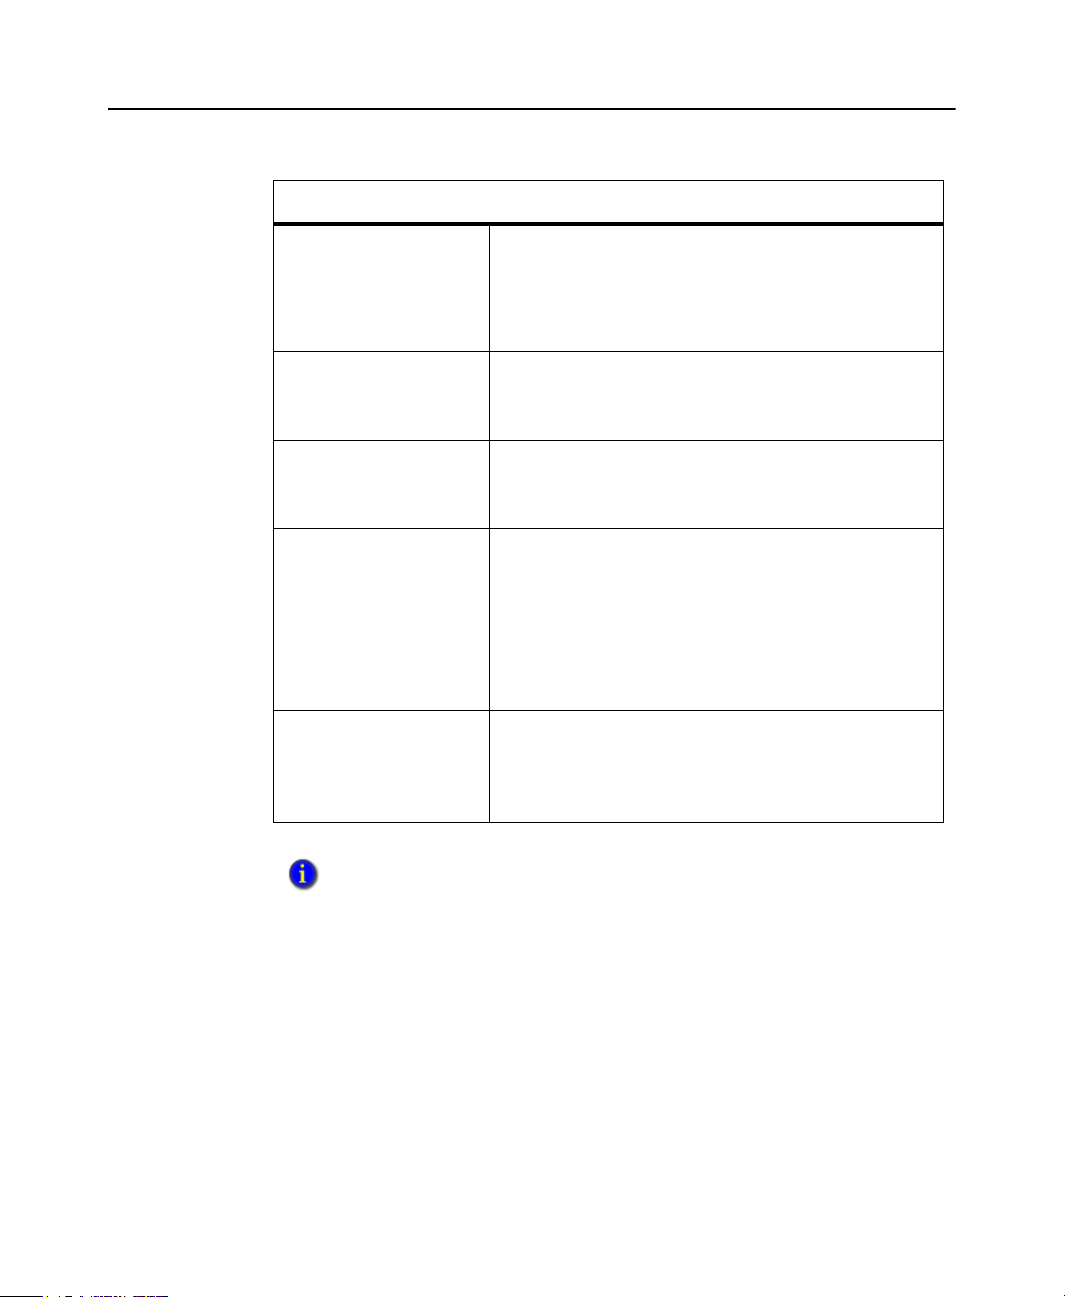
Where to Start
This User’s Guide should be used as a companion to the online help in the
FactoryTalk Historian ME web interface. It is not necessary to read it from front to
back in sequential order. The following table provides a quick reference for tasks you
may want to perform.
If You Want To Go to This Chapter
1 • OVERVIEW
Read about factors that may influence
the design of your FactoryTalk Historian ME environment.
Configure the module for the first time.
Configure time management.
Set up security.
Set up users.
Use the system log.
Backup or restore module configura-
tion files.
Upload configuration or other files.
Fix archives.
Manage administrative or user pass-
words.
Set up trust connections.
Create, edit or delete a trust connec-
tion.
Configure security with FactoryTalk
Directory and FactoryTalk Security.
View, create, or edit points.
Define point attributes.
Configure scan classes.
Work with exception filtering or com-
pression.
“Design Considerations and Limitations”
“Administering the Module”
“Managing Security”
“FactoryTalk Directory Integration”
“Managing Points”
11
Page 22

FACTORYTALK HISTORIAN ME MODULE USER’S GUIDE
If You Want To Go to This Chapter
Stop or start Data Collection.
View the status of Data Collection.
Configure disk or log thresholds.
Work with Compression or Exception
“Collecting Data”
Filtering
Configure Data Transfer.
Stop or start Data Transfer.
Transfer data to a FactoryTalk Histo-
“Transferring Data”
rian SE.
View a model Data Transfer scenario. “Data Transfer Sample Scenario”
View current or archive data.
Create trends in the web interface.
Export data to a spreadsheet.
View performance information about
your module.
View statistics about your module data.
Get diagnostic information about your
“Viewing Data”
“Viewing Module Information”
“Using Web Diagnostics”
“Using Web Diagnostics”
module.
Find guidance to resolve simple issues. “Troubleshooting”
“Using Web Diagnostics”
12
Read introductory information about
your module.
Find related technical publications.
Get training information.
Contact Technical Support.
“Overview”
Page 23

If You Want To Go to This Chapter
1 • OVERVIEW
Learn about software, hardware, or
system requirements.
Work with the Client Tools CD.
Use your module for the first time.
Log In to your module.
Log Out of your module.
Use the Rule Editor.
Create rule files.
Create tag attribute files.
Use the Add-on Profile (AOP).
Start or stop your module without
using the web interface controls.
Restore module default settings with-
out using the web interface controls.
Reset module security without using
the web interface controls.
View a module hardware summary.
Check proper operating temperatures
for your module.
View environmental certifications for
your module.
“Getting Started”
“FactoryTalk Historian ME Rule Editor”
“RSLogix 5000 Add-on Profile”
“Hardware Specifications”
Additional Information
Click Browse FactoryTalk Historian ME User Documents on the FactoryTalk
Historian Client Tools CD that is shipped with
FactoryTalk Historian ME user documentation. In addition to this User’s Guide,
which explains how to configure your
features, the
FactoryTalk Historian ME Quick Start Guide (1756-QS106A-EN-P) - describes
how to quickly install and configure FactoryTalk Historian ME so that users can
start collecting and viewing data without having to configure all features.
FactoryTalk Historian ME documentation set includes the following:
FactoryTalk Historian ME to access
FactoryTalk Historian ME and use its various
13
Page 24

FACTORYTALK HISTORIAN ME MODULE USER’S GUIDE
The quick start guide is also provided as a printed manual.
FactoryTalk Historian ME Installation Instructions (1756-IN106A-EN-P) -
explains how to install
testing and certification information.
The installation information is provided as a printed manual.
FactoryTalk Historian ME Online Help - describes FactoryTalk Historian ME
web interface in detail. Access the help files by clicking the About... links in the
left-side navigation bar of the individual web interface pages and by clicking the
main Help link located in the upper right-hand corner of the web interface.
FactoryTalk Historian ME Release Notes - contains the latest information about
your FactoryTalk Historian ME including new features and a list of known issues.
FactoryTalk Licensing
FactoryTalk Historian ME limits the clients that can access it to the following
Rockwell Automation clients:
FactoryTalk VantagePoint and FactoryTalk VantagePoint EMI
FactoryTalk Historian ME. It also includes environmental
14
FactoryTalk Historian DataLink
FactoryTalk Historian ProcessBook
FactoryTalk View SE Trending
FactoryTalk Administration Console
PI System Management Tools (SMT)
PI SMT Tag Configurator
In addition, you must purchase a point license for FactoryTalk Historian ME-toFactoryTalk Historian SE Data Transfer. Data Transfer works with the Data Storage
and Data Collection services to transfer historical data to a FactoryTalk Historian SE
server. The point license determines the number of points that can be transferred to
FactoryTalk Historian SE. For each FactoryTalk Historian ME, the licensed limit is
2500 points.
Page 25

Technical Support
Please visit Rockwell Automation Customer Support Center at http://
support.rockwellautomation.com/ for access to user forums, sample code, software
and firmware updates, product manuals, and other downloads.
Knowledgebase
The Customer Support Center offers an extensive online knowledgebase that includes
frequently asked questions (FAQs) and the latest patches. Please visit http://
www.rockwellautomation.com/resources/support.html and select the
Knowledgebase link located under Tools & Resources to:
View technical and application notes.
Obtain software patches and firmware updates.
Subscribe to product and service e-mail notifications.
Ask questions.
Worldwide Support
If you are not located in North America and want to contact Rockwell Automation
Support use the Worldwide Locator at http://www.rockwellautomation.com/
locations/ for worldwide contact information.
1 • OVERVIEW
TechConnect Support
With TechConnect Support, your site has unlimited, real-time access to Rockwell
Automation's global network of Customer Support Centers and technical resources.
TechConnect service levels are provided at http://www.rockwellautomation.com/
services/onlinephone/techconnect/
When you call you should be at your computer and be prepared to give the following
information:
Product version number.
Type of hardware you are using.
15
Page 26
FACTORYTALK HISTORIAN ME MODULE USER’S GUIDE
FactoryTalk Historian ME has two product numbers. The 1G or 2G in the part
number indicates how much data storage is associated with the module.
Product Catalog Number Description
1756-HIST1G FactoryTalk Historian ME 1GB module
1756-HIST2G FactoryTalk Historian ME 2GB module
Exact wording of any messages that appeared on your screen.
Descriptions of:
What happened and what you were doing when the problem occurred.
How you tried to solve the problem.
Consulting Services
Rockwell Automation provides expert consulting and turnkey implementations for
making optimal use of Rockwell Software products. Please contact your local
distributor for more information.
16
Training Programs
Rockwell Automation offers a wide range of training programs that include elearning, regularly scheduled and custom-tailored classes, self-paced training, and
certificate programs.
If you would like more information about training, visit the Rockwell Automation
Training site at http://www.rockwellautomation.com/services/training/ or call
1.440.646.3434.
Page 27
2
Getting Started
Before installing FactoryTalk Historian Machine Edition (ME), determine your
platform requirements and configuration environment. The information in this
chapter offers some guidelines as you begin planning.
“System Requirements”
“Software Requirements”
“Hardware Specifications”
“Setting up Your ControlLogix Environment”
“Installing FactoryTalk Historian ME”
“FactoryTalk Historian ME Web Interface”
“Installing FactoryTalk Historian ME Client Tools”
“Logging In to FactoryTalk Historian ME”
“Logging Out of FactoryTalk Historian ME”
System Requirements
The hardware and software required with FactoryTalk Historian ME depends on the
demands an application places on the system. A simple stand-alone architecture is
shown below.
17
Page 28

FACTORYTALK HISTORIAN ME MODULE USER’S GUIDE
The greater the demand, the more powerful a system must be to support this demand.
For large or complex applications, use computers with faster CPUs and more RAM.
In addition to this, there should always be sufficient disk space to provide virtual
memory that is at least twice the size of the physical RAM.
Software Requirements
Software requirements include:
Windows Vista® SP1, Windows XP SP2 or SP3, or Windows Server® 2003 SP2
Windows Vista is only supported for the FactoryTalk Historian ME web interface and
FactoryTalk VantagePoint. It is not supported for FactoryTalk Historian DataLink or
FactoryTalk ProcessBook.
Microsoft Excel 2003 for FactoryTalk Historian DataLink
Microsoft Internet Explorer® (IE) 6, 7, or 8 (in Compatibility Mode)
IE 6 P
ATCHES
For IE 6, the requirements may include installation of the patch KB974455 (10/12/
09) http://support.microsoft.com/kb/974455.
Windows XP SP2
If the \windows\system32\mshtml.dll file has a version that is less than or equal to
6.0.2900.2180 or a date that is before or equal to 08/03/2004, apply patch
KB974455. After the patch has been applied, the \windows\system32\mshtml.dll
file will have a version of 6.0.2900.3627 and a date of 09/24/2009.
Windows XP SP3
If the \windows\system32\mshtml.dll file has a version that is less than
6.0.2900.5512 or a date that is before 04/14/2008, apply the patch KB974455.
After the patch has been applied, the \windows\system32\mshtml.dll file will
have a version of 6.0.2900.5880 and a date 09/24/2009.
Windows Server 2003 SP2
The minimum supported version is 6.0.3790.3959. If the IE 6.0 version is less
than the minimum supported version, apply the patch KB974455 SP2.
18
Page 29

2 • GETTING STARTED
IE Internet Options
The location of your Internet options settings vary according to which operating
system you are using. However, in general, you should:
Disable any popup blockers to view online help.
Select the Local Intranet icon (generally located under Security settings), and
click [Sites] to use the default setting, Automatically detect internet network.
Use the default Security level for this zone. In general, the settings should remain
at the default level and should not be changed. Use the medium-low default
setting.
Enable the following settings:
Binary and script behaviors
Run ActiveX® controls and plug-ins
Script ActiveX controls marked safe for scripting
Initialize and script ActiveX controls not marked as safe for scripting
IE 7 Hot Fix
If you are using IE 7.0 and want to export to Excel, you must install Microsoft’s IE 7
hot fix 929863 (http://support.microsoft.com/kb/929863.) This fix addresses an Excel
file export issue on the Current Data and System Log pages the FactoryTalk Historian
ME web interface. Installing the hot fix adds these registry values:
[HKEY_CLASSES_ROOT\.doc] “PerceivedType”=”document
[HKEY_CLASSES_ROOT\.dot] “PerceivedType”=”document
[HKEY_CLASSES_ROOT\.xls] “PerceivedType”=”document
[HKEY_CLASSES_ROOT\.xlt] “PerceivedType”=”document
[HKEY_CLASSES_ROOT\.ppt] “PerceivedType”=”document
[HKEY_CLASSES_ROOT\.pot] “PerceivedType”=”document
You must manually add the [HKEY_CLASSES_ROOT\.csv]
“PerceivedType”=”document” registry value for the .csv document type.
19
Page 30

FACTORYTALK HISTORIAN ME MODULE USER’S GUIDE
IE 8 Compatibility Mode Internet Option
If you are using Internet Explorer 8 in compatibility mode, you must enable the
security setting for Include local directory path when uploading files to a server.
FactoryTalk Historian SE Patch
FactoryTalk Historian ME can be integrated with FactoryTalk Historian SE 2.1 after
you have installed the FactoryTalk Historian SE patch. The FactoryTalk Historian SE
patch must be installed on the FactoryTalk Historian SE that will be used with
FactoryTalk Historian ME. You can download the FactoryTalk Historian SE patch
from the Rockwell Knowledgebase at http://support.rockwellautomation.com. Click
the Search Answers tab and search for Answer ID 63530.
Once the patch is installed, the FactoryTalk Activation licenses that support the
FactoryTalk Historian ME-to-FactoryTalk Historian SE (FTMS) point source can be
configured for the FactoryTalk Historian SE server within the FactoryTalk
Administration Console. The FactoryTalk Historian SE patch enables the FTMS
point source support. A license is a prerequisite for FactoryTalk Historian ME-toFactoryTalk Historian SE Data Transfer.
In addition, the patch will allow FactoryTalk Historian ME to work with FactoryTalk
Historian SE collecting, storing, analyzing, and visualizing data using reporting tools
such as time-series trends, bar charts, pie charts, pareto, and tabular trends.
20
Client Tools Software
The FactoryTalk Historian ME Client Tools CD shipped with your module includes:
FactoryTalk Services Platform
V2.10.02 CPR 9 SR2 is supported.
FactoryTalk Historian Management
If you install the FactoryTalk Historian Management (Admin Console) on a
remote client computer that has no previously installed Admin Console, you must
make a Windows Registry entry to be able to use a Universal Naming Convention
(UNC) path as the current directory. Manually add the key
[HKEY_CURRENT_USER\Software\Microsoft\Command
Processor\DisableUNCCheck REG_DWORD] and set the value to 0x1 (Hex).
FactoryTalk Historian ME Rule Editor
FactoryTalk Historian ME RSLogix 5000 Module Profile
Page 31

This installs the Add-On Profile (AOP) for your module.
Getting Started Videos
These videos provide instruction in how to install, configure and use the various
FactoryTalk Historian ME components. You must have Adobe Flash Player
installed on your system in order to view these videos.
RSLogix 5000 Clock Update Tool
This tool is located in the \Redist folder on the Client Tools CD.
RSLinx Classic
This tool is located in the \Redist folder on the Client Tools CD.
FactoryTalk Historian ME User Documentation and Release Notes
Hardware Requirements
This section lists client computer and 1756 ControlLogix chassis requirements.
Client Computer Requirements
Client computer requirements include:
2 • GETTING STARTED
Recommended
Intel Celeron
3GHz or higher
1GB of RAM or more
or
Minimum
Intel Pentium III
600MHz
512MB RAM
Mouse or compatible pointing device
21
Page 32

FACTORYTALK HISTORIAN ME MODULE USER’S GUIDE
ControlLogix Chassis Requirements
The ControlLogix chassis is part of a modular system that you can create with
FactoryTalk Historian ME, an Ethernet/IP communication module(s), and controller
module(s). Chassis are available with 4, 7, 10, 13, and 17 slots. You can place the
FactoryTalk Historian ME module into any slot. Slot 0 is the first slot and is always
the left-most slot in the rack (the first slot to the right of the power supply.)
The FactoryTalk Historian ME module communicates with the control processor(s)
in controller module(s) through the ControlLogix backplane (also known as the
ControlBus). The backplane is an electrical interface, or bus, to which modules
connect when inserted into the rack. The backplane provides a high-speed
communication path between modules and distributes power to each of the modules
within the chassis. Controller modules on the backplane can send data to and receive
data from the module.
Chassis requirements include:
1756 ControlLogix Chassis (1756-AXX) and proper chassis power supply for
your environment
RSLogix 5000 software and RSLinx Classic communications software
An Ethernet/IP communication bridge module (1756-ENBT, 1756-EN2T, 1756-
EN2TR, or 1756-EWEB, depending on your environment)
22
ControlLogix 55xx (1756-Lxx) controllers, version 13 or higher
A 1GB or 2GB FactoryTalk Historian ME module
FactoryTalk Historian ME does not support multiple modules collecting data from a
single controller.
U
PGRADING AND REINSTALLING THE FIRMWARE
To upgrade the FactoryTalk Historian ME firmware (or reinstall it in case it becomes
corrupted), you must use the ControlFlash Firmware upgrade kit.
Any kind of firmware upgrade or reinstall will clear out all logs. A firmware upgrade will
preserve archived data and application configuration information, but a reinstall will clear
out all application configuration information and archived data. If you want to save your
settings, download and back up your configuration and logs.
Before you upgrade ensure that:
Data Collection and Data Transfer are stopped.
Page 33

2 • GETTING STARTED
Firmware
version
All clients (including web clients) are logged out and disconnected.
Log files are packaged and downloaded from the Download Logs page of the
Web Diagnostics interface.
See “Download Logs” for more information about web diagnostics.
You collect the following information for the upgrade process:
The catalog number of FactoryTalk Historian ME (1756-HIST1G or 1756-
HIST2G, depending on the size of the CompactFlash drive.)
The network configuration information.
The network path to FactoryTalk Historian ME.
The firmware version number. Click the About link on the on FactoryTalk
Historian ME’s home page to access the version number.
Instructions on how to perform the upgrade, located in the ControlFLASH
Firmware Upgrade Kit Quick Start Guide, Publication Number 1756-
QS105C-EN-E.
23
Page 34

FACTORYTALK HISTORIAN ME MODULE USER’S GUIDE
Setting up Your ControlLogix Environment
Perform the following steps to set up your ControlLogix environment before
installing FactoryTalk Historian ME:
1. Set up the ControlLogix chassis.
2. Insert the ControlLogix controller(s) into the chassis.
3. Power on the system.
4. Configure the ControlLogix device(s).
See your ControlLogix Chassis and ControlLogix Controller documentation for more
detailed information.
Installing FactoryTalk Historian ME
To install FactoryTalk Historian ME, unpack it and insert it into the chassis.
See your FactoryTalk Historian ME Installation Instructions for more hardware
information.
24
FactoryTalk Historian ME Web Interface
FactoryTalk Historian ME receives data from the ControlLogix Data Collection
interface and stores it locally in the module. The module’s data and system
information can be viewed and managed through the FactoryTalk Historian ME web
interface. The web interface supports multiple layers of firmware applications that are
designed to collect data and provide system and module status and statistics.
FactoryTalk Historian ME web interface can be accessed through a web browser after
the installation of the module.
See “Logging In to FactoryTalk Historian ME” for login instructions.
Page 35

2 • GETTING STARTED
Installing FactoryTalk Historian ME Client Tools
After you have selected the platform that best suits your needs and have installed
FactoryTalk Historian ME into the chassis, you will then determine the configuration
environment for the FactoryTalk Historian ME client tools. The client tools can be found on
the CD that was shipped with FactoryTalk Historian ME.
If you plan to use FactoryTalk Historian ME Client Tools, such as the FactoryTalk Historian ME
Rule Editor, FactoryTalk Directory, and/or FactoryTalk Security, then these tools must be installed
before you continue. If you do not plan to use FactoryTalk Historian Client Tools, then skip to
“Logging In to FactoryTalk Historian ME”.
Insert the CD into your computer’s CD drive. If autoplay is turned on, the FactoryTalk
Historian ME installation screen will automatically launch and display the FactoryTalk
Historian ME installation options. If the screen does not automatically launch, click Start >
Run and type D:\setup, where D is the letter of your CD drive.
To access the FactoryTalk Historian ME Client Tools, click Install ME Client Tools from the
main menu. This takes you to the Installation menu. The FactoryTalk Historian ME Client
Tools installation screen allows you to perform the following tasks:
“Installing FactoryTalk Services Platform”
“Installing FactoryTalk Historian Management”
“Installing FactoryTalk Historian ME Rule Editor”
“Installing FactoryTalk Historian ME RSLogix 5000 AOP”
A patch for FactoryTalk View SE and electronic data sheet (EDS) files are also available on
the Client Tools CD. However you should always check the Rockwell Technical Support
Knowledgebase to ensure that you have the latest patches.
See the “Installing FactoryTalk View SE Patch” and “FactoryTalk Historian ME EDS Files”
sections for information.
25
Page 36

FACTORYTALK HISTORIAN ME MODULE USER’S GUIDE
In addition to the tools and patches, the FactoryTalk Historian ME release notes and
user documentation are available on the CD.
26
Installing FactoryTalk Services Platform
This option installs FactoryTalk Services Platform CPR 9 SR2. The FactoryTalk
Services Platform is an underlying architecture and set of common services that
Rockwell Automation products build upon. It must be installed on the computer that
hosts the FactoryTalk Directory server. It is also required if you plan to use
FactoryTalk Security. However, it is optional if you plan to use the FactoryTalk
Historian ME Native security mode.
Refer to the FactoryTalk Services Platform online help for detailed information about the
FactoryTalk Services Platform.
The following components and services are installed as part of the platform:
FactoryTalk Directory organizes project information from multiple FactoryTalk
products across multiple computers on a network. It allows products to share a
Page 37

2 • GETTING STARTED
common address book, which finds and provides access to plant-floor resources,
such as data tags and graphic displays. Only Network Directory is supported.
FactoryTalk Security can be used to secure your FactoryTalk network after
installing FactoryTalk Services Platform.
It is important to select the Custom option to install the FactoryTalk Services
Platform Web Services component. Internet Information Services (IIS) must be
installed and configured before you install FactoryTalk Services Platform. This
must be installed on the computer that hosts the FactoryTalk Directory server and
on the secondary server configured for FactoryTalk Historian ME
If you are using FactoryTalk Security in your environment, see the “Managing
Security” chapter for information on setting up FactoryTalk Security.
.
Installing FactoryTalk Historian Management
The Management option installs the FactoryTalk Administration Console add-on
patch. It provides a method of configuring, managing, and securing applications. To
install the patch, click “Install FactoryTalk Historian Management” on the Client
Tools CD. An installation wizard will lead you through the setup procedure.
To access the console, go to Programs > Rockwell Software > FactoryTalk
Administration Console. Initially, you will be prompted to select a FactoryTalk
27
Page 38

FACTORYTALK HISTORIAN ME MODULE USER’S GUIDE
Select the
FactoryTalk
Network
Directory
Directory. Select the Network radio button; FactoryTalk Historian ME supports a
Network Directory, not Local Directory.
See the FactoryTalk Help at Programs > Rockwell Software > FactoryTalk Tools >
FactoryTalk Help for information about using the FactoryTalk Administration Console.
Installing FactoryTalk Historian ME Rule Editor
The Rule Editor allows you to create and edit user-defined rules for the point
discovery process. The selections you make in the dialog box are automatically
written to this file. The data points matching these rules are found and added to the
FactoryTalk Historian server. You can upload the rule file to FactoryTalk Historian
ME using the FactoryTalk Historian ME Upload Manager feature.
If you are using the Rule Editor, see the “FactoryTalk Historian ME Rule Editor” appendix
for more information.
Installing FactoryTalk Historian ME RSLogix 5000 AOP
FactoryTalk Historian ME can be configured to communicate with a ControlLogix
controller through the Add-on Profile (AOP) add-on in RSLogix 5000 software.
If you are using AOP, see the “RSLogix 5000 Add-on Profile” appendix for more
information.
28
Page 39

2 • GETTING STARTED
Installing FactoryTalk View SE Patch
FactoryTalk Historian ME can be integrated with FactoryTalk View SE V5.0 and
above. FactoryTalk View SE provides a trend object for FactoryTalk Historian ME
users to see visual representations of data. To enable trending of Factory Talk
Historian ME points in FactoryTalk View SE, both the FactoryTalk View SE patch
and the FactoryTalk Historian Management add-on patch must be applied to your
FactoryTalk Historian ME system.
See the “Installing FactoryTalk Historian Management” section for more add-on patch
information.
The FactoryTalk View SE patches are available from the Rockwell Automation
Knowledgebase at http://support.rockwellautomation.com. Click the Search Answers
tab for:
FactoryTalk View SE V5.0 - Answer ID 65614
FactoryTalk View SE V5.1 - Answer ID 65613
FactoryTalk Historian ME EDS Files
Electronic Data Sheet (EDS) files are simple text files used by network configuration
tools to help you identify products and easily commission them on a network. The
FactoryTalk Historian ME EDS files are located on the Client Tools CD under the
Redist/EDS directory.
Avoid configuring FactoryTalk Historian ME as an Ethernet driver in RSLinx Classic. The
module can be recognized the virtual backplane of the RSWho tree pane.
Logging In to FactoryTalk Historian ME
Access FactoryTalk Historian ME through your Microsoft Internet Explorer (IE)
browser.
If a large number of tags is being transferred from the Controller to the module when the
module is going through an initial bootup, please wait about five to ten minutes before
trying to access the web interface.
1. Open your IE browser.
29
Page 40

FACTORYTALK HISTORIAN ME MODULE USER’S GUIDE
2. Enter the IP address of FactoryTalk Historian ME in the Address field. The IP
address scrolls across the LED display on the front panel of FactoryTalk Historian
ME.
Note that the default network configuration type is DHCP. If a DHCP server is not
available, then an IP address will not be displayed. You will either need to
configure a DHCP server or use the AOP to set the IP address. For more
information about the AOP, see Appendix D, “RSLogix 5000 Add-on Profile” on
page 257.
30
Page 41

2 • GETTING STARTED
Change the
blank default
piadmin user
password
immediately
Home
appears in
the top
main
navigation
bar of the
web
interface
Login appears in the left-side navigation
bar of the web interface
3. Click [Go] to the right of the Address field, or click [Enter]. This opens the login
page.
4. Enter the default user name piadmin and leave the password field blank.
The first time you log in, the default user name is piadmin and the password is
blank (no password). After logging in, it is highly recommended that you change
the password for the default piadmin user.
See the “Managing Security” chapter for more information about user and group
security.
5. Click [Login].
31
Page 42

FACTORYTALK HISTORIAN ME MODULE USER’S GUIDE
Click
Logout
before
closing
your
browser
and after
every
session
Logging Out of FactoryTalk Historian ME
To log out of the FactoryTalk Historian ME web interface, click Logout (in the upper
right corner of the web interface) before closing your web browser.
If you close your browser without logging out, a cookie will retain the session for
twenty minutes, and another user may access FactoryTalk Historian ME without
logging into the module.
To prevent unauthorized access, Rockwell suggests that every user log out after every
session to prevent unauthorized users from accessing the module without logging into
the module.
32
Page 43

3
Viewing Module Information
The following sections provide information that will assist you in monitoring
performance and diagnosing common issues.
“System Status”
“Status”
“Module Identity”
“System Utilization”
“System Statistics”
System Status
The System Status information displays when you log in to FactoryTalk Historian
ME. It is located on the bottom, left-hand corner of every page and provides the
following system status information. It refreshes automatically every 30 seconds.
33
Page 44

FACTORYTALK HISTORIAN ME MODULE USER’S GUIDE
System status features include:
CPU usage - percentage of the module’s CPU that is being used..
The CPU usage percent listed under the System Status section on the left-hand side
may display a different percent than what is listed under CPU and Processes in the
main window because the CPU usage listed under System Status is updated
periodically while the CPU usage listed in the main window is static. It does not
change once the page is loaded.
Memory usage - percentage of the module’s system memory that is being used.
Collection rate - current collection rate from the Data Collection service in events
per minute.
Transfer rate - current transfer rate from the Data Transfer service in events per
minute.
Archive rate - current archiving rate from the Archive subsystem through the
server variant table in events per minute.
Archive usage - percentage of used archive files remaining on FactoryTalk
Historian ME. It is calculated based on the type of data being collected and the
rate of Data Collection.
34
Archive capacity - the number of days/hours/minutes (dd:hh:mm) until the
storage space on FactoryTalk Historian ME is used. This calculation is based on
the module’s Data Collection and Data Transfer rates.
Status
The Status page displays when you log into the FactoryTalk Historian ME web
interface. When working in the FactoryTalk Historian ME web interface, you can reaccess this page by going to Home and clicking Status in the left-side navigation bar.
The status information displayed on this page is static. Click the Refresh button on
your browser toolbar to show current status information.
Page 45

3 • VIEWING MODULE INFORMATION
FactoryTalk Historian ME
Module in slot 2
Controller
in slot 1
Module Information
This section displays the module name, the current firmware version, current time for
the module, and the total time the module has been running.
System Status
This section displays the current status of the Point Server, Data Collection Service,
and the Data Transfer Service.
Point Server - FactoryTalk Historian ME server that manages the archives and
provides access to historical data. The status may be Running or Error.
Data Collection Service - FactoryTalk Historian ME Data Collection subsystem.
The status may be Running, Stopped, or Error.
35
Page 46

FACTORYTALK HISTORIAN ME MODULE USER’S GUIDE
Data Transfer Service - FactoryTalk Historian ME Data Transfer subsystem. The
status may be Running, Stopped, or Error.
System Utilization
This section displays the current CPU usage, memory information and storage
information along with a graphical representation of this information. The red portion
indicates a critical stage for each component.
36
Point Statistics
This section displays the total points in the module and how many are actively
receiving data. This information is also represented by a pie chart.
The pie chart rounds the percentage to the nearest whole percent. For instance, if
there are 1000 total points in the system and 995 active points, the pie chart will still
display 100%, but if there are 994 active points, the pie chart will display 99% and
1%.
Page 47

Module Identity
Under Home on the main navigation, click Module Identity in the left-hand
navigation to display the module identity information.
Module Information
This section displays the same information found on the Status page, as well as the
slot number where the module resides and its serial number.
For information on changing these settings, see “Working with System Settings” in the
“Administering the Module” chapter. For additional module hardware information, see
the FactoryTalk Historian ME Installation Instructions.
3 • VIEWING MODULE INFORMATION
This section displays:
Name - FactoryTalk Historian ME name. To change your module name, click
Advanced in the top navigation bar, then click System Settings.
See “Configuring the Module Name” for details about the module name and
information about the impact of changing the module name.
Firmware Version - current firmware version.
Current Time - current time for the module. Click Advanced in the top navigation
bar, then click Time Management to configure time settings.
Up Time - total time past since the module was started.
Module Slot Location - slot location of the module in the ControlLogix chassis.
Serial Number - module serial number. This number cannot be changed.
37
Page 48

FACTORYTALK HISTORIAN ME MODULE USER’S GUIDE
Network Settings
This section displays the current network settings for FactoryTalk Historian ME.
For information on changing these settings, see “Working with System Settings”.
This section displays:
MAC Address - unique Media Access Control (MAC) address of the module.
This number cannot be changed.
IP Address - Internet Protocol (IP) address of the module. Click Advanced in the
top navigation bar, then click System Settings to configure network settings.
38
IP Configuration - Dynamic Host Configuration Protocol (DHCP) or static IP
address will display. DHCP is the default configuration. Click Advanced in the
top navigation bar, then click System Settings to configure network settings.
Link Status - indicates the module’s front Ethernet port is connected successfully.
Security Configuration
This section displays the current security settings for FactoryTalk Historian ME.
For information on changing these settings, see “Managing Security”.
Page 49

3 • VIEWING MODULE INFORMATION
This section displays:
Security Mode - FactoryTalk (FT) Security mode or FactoryTalk Historian ME
Native mode.
Browser Protocol - HTTP or secure HTTP (HTTPs).
Client Connections
This section displays the current number of clients connected to FactoryTalk
Historian ME. Up to 5 clients may be connected simultaneously.
Supported client applications include:
Supported Client Applications
FactoryTalk VantagePoint
FactoryTalk View SE Trending
FactoryTalk VantagePoint EMI
FactoryTalk Historian DataLink FactoryTalk Administration Console
FactoryTalk Historian ProcessBook PI System Management Tools (SMT)
39
Page 50

FACTORYTALK HISTORIAN ME MODULE USER’S GUIDE
System Utilization
Under Home on the main navigation, click System Utilization in the left navigation
bar to display the System Utilization information.
40
Page 51

CPU and Processes - displays the current percent of the CPU in use and the
processes currently running.
The CPU usage percent listed in the System Status section may display a different
percent than the percentage listed in the CPU and Processes section in the main
window. This is because the CPU usage listed in the System Status section is
updated periodically while the CPU Usage information displayed in the main window
is static. It does not change once the page is loaded.
RAM - displays the memory usage of the module.
Ethernet Statistics - displays the total amount of data sent and received by the
module through the network.
Storage (NAND) - displays the total storage space used and available on the
installed flash drive. This section also displays the total number of archive files
and how many are free as well as the archive file size.
System Statistics
Under Home on the main navigation, click System Statistics in the left navigation bar
to display the System Statistics information. This information is important when
troubleshooting any issues with your module. Three radio buttons appear at the top of
the table: Network Manager, Snapshot and Archive, and Archive Files.
3 • VIEWING MODULE INFORMATION
Section Purpose
“Network Manager Statistics” Displays a network management system
statistics.
“Snapshot and Archive Statistics” Displays a snapshot of the archived system
statistics.
“Archive File Statistics” Displays archived system statistics.
Below the table, the Auto Refresh feature is available. To set the table to auto refresh,
enter a refresh interval (in sections) in the Auto Refresh box below the table. Setting
41
Page 52

FACTORYTALK HISTORIAN ME MODULE USER’S GUIDE
the Auto Refresh value to 0 or not entering a value in the box disables the Auto
Refresh feature.
When using the auto refresh feature, follow these guidelines:
Try to limit the amount of time auto refresh is being used. It is not recommended
to keep a page running in auto refresh mode when you are not using it.
Display the minimum amount of data necessary. This will reduce the amount of
memory being used.
Do not choose a refresh rate that is more frequent than necessary. The faster the
auto refresh rate, the more memory will be used.
Closing the browser or switching the browser to another page will release the
memory that was used.
42
Page 53

3 • VIEWING MODULE INFORMATION
Network Manager Statistics
The Network Manager view retrieves a snapshot of the current Network Manager
connection statistics.
If a row does not contain a value for a particular column, then there is no information
available for that column heading for that particular connection.
43
Page 54

FACTORYTALK HISTORIAN ME MODULE USER’S GUIDE
The Network Manager table contains the following fields:
Field Description
ID Connection ID. This is the primary key.
Path Root directory on the server. This directory is the
Name Connection name.
ID Process ID number.
Reg App Name Registered application name.
Reg App Type Registered application type.
Protocol Version Protocol version of connecting application.
same for all connections.
Peer Name
Peer Address
Peer Port
ConType
Net Type Type of network.
ConStatus Status of connection.
ConTime Time of connection.
Last Call Time of last call.
Elapsed Time Amount of time passed.
Bytes Sent Number of bytes sent.
Bytes Recv Number of bytes received.
Msg Sent Number of messages sent.
Msg Recv Number of messages received.
Errors Recv Number of errors received.
Errors Sent Number of errors sent.
API Count Number of APIs.
Host name of connecting machine.
IP Address of connecting machine.
Port number of connecting machine.
Connection type.
44
Page 55

3 • VIEWING MODULE INFORMATION
Field Description
SDK Count Number of SDKs.
Server ID Identification number for the server.
NetMgr Version Network manager version number.
OS Sys Name Operating system name.
OS Node Name Operating system node name.
OS Release Operating system release number.
OS Version Operating system version number.
Machine System name.
User User name.
OS User Operating system user name.
Trust Name of the trust connection.
45
Page 56

FACTORYTALK HISTORIAN ME MODULE USER’S GUIDE
Snapshot and Archive Statistics
The Snapshot and Archive view allows a user to monitor the current FactoryTalk
Historian ME snapshot and archive statistics.
46
The Snapshot and Archive table contains the following fields:
Field Description
Type Snapshot or archive file type.
Counter Performance counter.
Value Current snapshot and/or archive value.
Change Value change between updates.
Page 57

3 • VIEWING MODULE INFORMATION
Archive File Statistics
FactoryTalk Historian ME stores your data in archives, which are files that hold
FactoryTalk Historian ME data. Archive files are fixed which means that they are
always the same size, regardless of how much data they contain.
The archive receiving current data is called the primary archive. When the primary
archive becomes full, an archive shift occurs and the next available archive becomes
the new primary archive. When the primary archive is being backed up, you cannot
modify that archive or the Point database.
Each archive file contains events for a time period specified by the archive start time
and end time. The archive files on each
FactoryTalk Historian ME server should cover
all time ranges, without overlapping time ranges or gaps in time. A list of archive
47
Page 58

FACTORYTALK HISTORIAN ME MODULE USER’S GUIDE
files stored on FactoryTalk Historian ME are displayed by default when you select
the Archive Files option.
The Archive Files table contains the following fields:
Field Description
Archive File File archive name, which includes the full path.
Status Archive status displays one of the following:
Size (MB) Archive file size in megabytes.
Start Time Time that data was first written to the archive file.
End Time The time that data was last written to the archive file.
Lifetime The archive file age in days, hours, minutes, and
Primary - the archive file that is currently receiving
data.
Has Data - indicates the archive file contains data and
is full.
Empty - indicates the archive has no data.
seconds.
48
Last Modified Time
Backup Time
The last time and date the archive file was modified.
The last time and date the archive file was backed up.
Never indicates that the file has never been backed up.
State
The state of the file:
Created
Initialized
Dismounted
Mounted
Type Indicates the type of file, which is always Fixed size.
Write Flag Specifies if a file is writable or read-only.
Shift Flag Specifies if a file is shiftable or not shiftable.
Add Rate/Hour The rate at which files are added to the archive per hour.
% Full The percentage of the archive that is being used.
Page 59

3 • VIEWING MODULE INFORMATION
Field Description
Annotations The size in bytes of the annotation file associated with
the archive file.
Annotation File Size The size in megabytes of the annotation file associated
with the archive file.
Shift Prediction The target archive or the predicted shift time.
Primary Offset The number that indicates the number of primary
archive records in use.
Overflow Offset The number that indicates the number of overflow
records in use.
Record Size The record size for each archive record.
Version The version of the archive header.
# The archive number used by FactoryTalk Historian ME.
49
Page 60

FACTORYTALK HISTORIAN ME MODULE USER’S GUIDE
50
Page 61

4
Viewing Data
This chapter contains the following sections:
“Viewing Current Data”
“Viewing Archive Data”
“Viewing Trends”
“Changing the Views”
Viewing Current Data
To view data that is currently being collected by FactoryTalk Historian ME, click on
View Data, and then click Current Data in the left-side navigation.
51
Page 62

FACTORYTALK HISTORIAN ME MODULE USER’S GUIDE
Defining Search Criteria
Search criteria entered the Current Data, Archive Data, and Trends pages persists
across all three pages. To generate a Current Data, Archive Data, or Trends view,
define your search criteria and enter it in the fields at the top of the page, then click
[Search]. This information tells FactoryTalk Historian ME what data you are
interested in viewing.
Note that for all fields, the asterisk (“*”) is a wildcard value. You can use it:
To represent a contiguous series of characters in any search field (such as, *xxx*,
*xxx, or xxx*).
In any of the search fields to return data that meets all conditions for that field.
In all fields to return ALL points in the system.
1. Enter the point name criteria such as the full name, partial name or wildcard value
for the data you would like to search. “*” is the default.
2. Enter the point source for the current data. The point source is the base attribute
that identifies the interface or other scanning software responsible for providing
data for the associated point. Common point sources depend upon your
environment. They include:
52
FTME - the default point source for FactoryTalk Historian ME
T - the Totalizer utility subsystem.
C - the Performance Equation subsystem.
3. Enter the point type. Point types include:
Int16 - a 16-bit integer value.
Int32 - a 32-bit integer value.
Float16 - a 16-bit floating point value.
Float 32 - a 32-bit floating point value.
Float64 - a 64-bit floating point value.
String - a string value.
Digital - a digital value.
Timestamp - a timestamp value.
Page 63

4 • VIEWING DATA
4. Select a scan rate from the drop-down menu. The scan rate is the rate (in seconds)
at which the data is collected.
5. Select On, Off, or “*” from the Archiving drop-down menu to display points with
a specific archive bit setting.
On - returns points where the archive is set to On.
Off - returns points where the archive is set to Off.
Asterisk (“*”) - returns points that meet either condition (On or Off) and meet
the other search conditions.
6. Select On, Off, or “*” from the Scan drop-down menu to search for points with a
specific scan bit setting.
On - returns points where the scan bit is set to On.
Off - returns points where the scan bit is set to Off.
Asterisk (“*”) - returns points that meet either condition (On or Off) and meet
the other search conditions.
7. Click [Search] to initiate the tag search.
The search populates the Points table with the following information for each data
point:
Select column checkbox - to create a specific list of points to view, check the box
in the Select column for a specific tag or set of tags, then mark the Selected Rows
radio button.
Name - name of the data point.
Value - most recently returned value of the data point.
Timestamp - time that the last value was returned for the specified data point.
Type - data type for the listed point. If the point is a Boolean or String type, no
checkbox will display in the Select column.
For information on sorting and viewing information in the table grid, see “Changing
the Views”.
Clicking [Reset] clears any points that you previously checked in the Select column.
For information about filtering search results, see “Filtering Search Results Data”.
53
Page 64

FACTORYTALK HISTORIAN ME MODULE USER’S GUIDE
Exporting Data
Exporting data will export all points that have been returned after you’ve executed a
search. The export process creates a CSV (comma-separated values) document that
can be opened by Microsoft Excel. If you have selected a few rows to be displayed
and click [Export], all row data will be exported. If you want to export a subset of
rows, enter more specific search criteria. To export data:
1. Click [Export].
2. In the dialog that appears, select a location for your data on your client computer.
3. Either accept the default name or enter a file name of your choice. The file is
named points.csv by default. If you change the file name, .csv must be the file
extension.
4. Accept the default values for the following fields and click [Save].
Save as type: The default type is HTML File.
Language: The default language is Unicode.
5. Click [Save].
If you are using IE 7.0 and want to export to Excel, you must install hot fix 929863
(http://support.microsoft.com/kb/929863.) This fix addresses an Excel file export
issue on the Current Data page. You must manually add the
[HKEY_CLASSES_ROOT\.csv] “PerceivedType”=”document” registry value for the
.csv document type.”
54
The FactoryTalk Historian DataLink Excel Reporting Tool provides a Historian Add-In
for Microsoft Excel. If you export more than 65,535 rows of FactoryTalk Historian ME
events to FactoryTalk Historian DataLink using the Compressed Data (Start Time/
End Time) configuration page, Excel generates an ”r;Output exceeds dimension”
message.
Viewing Archive Data
To view archived data in FactoryTalk Historian ME, click on View Data, and then
click Archive Data in the left-side navigation. This page displays a list of tags and the
latest value collected for each point. By highlighting each point, you can enter a time
period and view archive data that was collected for that period. Archive data collected
for a point may only be viewed for one point at a time.
Page 65

4 • VIEWING DATA
Search criteria entered in the Current Data, Archive Data, and Trends pages persists
across all three pages. In the search fields, enter the search criteria, and then click
[Search].
See “Defining Search Criteria” for information.
Selecting Archive Data Points
Select points for the archived data:
55
Page 66

FACTORYTALK HISTORIAN ME MODULE USER’S GUIDE
1. Highlight the point by positioning the blue highlight bar over the selected point.
You can only view archive data for one highlighted section at a time.
2. Enter a start time and end time.
See the section “Start and End Times” for more details about setting the start and
end times.
3. Click [View] to display archived data for the specified time range.
The Archive Data table will display the values collected for the highlighted tag
during the specified time period.
For information on sorting and viewing information in the table grid, see “Changing
the Views”.
Exporting Data
After you have generated a table of the data for the archived point, you can export
that data to a comma-separated values (CSV) document readable by Microsoft Excel.
You can only export data for one point at a time. To do so:
1. Select the point you want to export and click [Export].
56
2. In the dialog that appears, choose the location on the client computer where you
want to save your data.
3. Either accept the file default name or enter a name of your choice. The default file
name is the name of the point whose data is being exported, with _ArchiveInfo.csv
appended to the end. If you change the file name, you must retain .csv as the file
extension.
4. Accept the default values for the following fields and click [Save].
Save as type: The default type is HTML File.
Language: The default language is Unicode.
5. The point data is exported to the location of your choice.
Viewing Trends
FactoryTalk Historian ME Trends page allows you to select multiple tags and draw a
trend chart to view data. Each trend chart provides a visual representation of the data
collected over a specified time period. To view trend charts, click on View Data, and
then click Trends in the left-side navigation panel.
Page 67

4 • VIEWING DATA
Search criteria entered in the Current Data, Archive Data, and Trends pages persists
across all three pages. In the search fields, enter the search criteria, and then click
[Search].
See “Defining Search Criteria” for information.
Displaying the Trend Chart
The trend chart displays trends for selected points using colored variants to
distinguish between the different points. You will not be able to select the point for
viewing in the trend chart until data has been collected for the new point. Numbers on
the X axis at the bottom of the chart represent the point timestamps. Numbers on the
Y axis at the left of the chart represent the point values.
The table below the trend chart displays the name, value and timestamp for each
point in real-time as the chart is refreshed. Select points to view from the Points table,
set a time range (optional), select an Auto Refresh rate (optional), check the Show
Points and/or Show Vertical Bar checkboxes (optional), and click the green arrow to
draw the trend chart. Use the right-hand scrollbar to view information for more than
two points.
57
Page 68

FACTORYTALK HISTORIAN ME MODULE USER’S GUIDE
58
A
UTO REFRESH
Click the green arrow to generate a trend chart for selected points in the table.
Timestamps on the Y axis change as time passes and the chart refreshes. Click the red
box to stop Auto Refresh. Auto Refresh must be disabled before you use the Zoom,
Show Points, or Show Vertical Bar features.
See the section “Start and End Times” for more details about setting the start and end
times.
Page 69

4 • VIEWING DATA
S
HOW POINTS
Check the Show Points checkbox to display discrete data points in the trend chart.
Each point will be represented in the chart as a bubble. You must disable Auto
Refresh (by clicking the red square) before you can enable the Show Points feature.
If you want to draw a trend chart that consists of high speed points, avoid checking the
Show Points checkbox due to the large number of points that will be displayed.
S
HOW VERTICAL BAR
Check the Show Vertical Bar checkbox to display a vertical bar across all points on
an X axis. At the bottom of the trend chart, timestamps will be adjusted when you
click inside the trend chart and drag the vertical bar across the chart.
When Daylight Savings Time (DST) occurs, the timestamps displayed will
automatically update to reflect the time change. If you adjust the start time to an
earlier start time, the timestamps reflected will coincide with DST even if the DST
transfer did not occur until later.
You must disable Auto Refresh (by clicking the red square) before you can enable the
Show Vertical Bar feature.
59
Page 70

FACTORYTALK HISTORIAN ME MODULE USER’S GUIDE
Click and
drag the
mouse to
zoom in on a
specific
point or set
of points
The small window
shows the chart in
the total time range
S
MALL WINDOW
The small window next to the Trend Chart displays the chart in the total time period
set by the time parameters.
Z
OOM
To zoom in on a specific time span for a set of data, click and drag the mouse to draw
a box and release the mouse. The highlighted area will display in the trend chart
allowing you to view data in a specific time span more closely.
You must disable Auto Refresh (by clicking the red square) to zoom.
60
Page 71

R
ESET
Click [Reset] to restore the small window next to the trend chart to its default view.
To remove a point from the chart, clear the checkbox next to its name in the list
below the trend chart.
Changing the Views
4 • VIEWING DATA
The Current Data, Archive Data, and Trends view can be changed by filtering data,
sorting columns, refreshing, and (for Current Data) auto refreshing.
Filtering Search Results Data
To filter search results, select either the All Rows or Selected Rows radio button.
Your filter selection will persist as you view data on the Current Data, Archive Data,
and Trends pages. If you select the Selected Rows radio button, the table will display
all the rows you have selected in all your searches up to that point.
For example:
1. Run a search where the Point Name criteria is entered as *mon*. It returns one
match (MonitorTag). Click the Select checkbox.
2. Run another search where the Point Name criteria is entered as *999. It returns
one match (int32tag999). Click the Select checkbox.
3. Select the Selected Rows radio button. Both of the rows you selected in the
searches ran in steps 1 and 2 are listed.
61
Page 72

FACTORYTALK HISTORIAN ME MODULE USER’S GUIDE
Click the Up-Down
arrow to toggle the
column sort
Click the Down arrow
to display a list of
columns
Uncheck a column
name(s) to hide a
column(s)
Choosing the Selected Rows radio button will continue to return the selected rows
for each search until [Reset] is clicked. This will return the search parameter
fields to their default values and clear all row selections that were made in
previous searches.
Sorting Columns
You can sort any table column in the current, archive, or trends table. Simply click
the up-down arrow in the column heading.
To reduce the load on the FactoryTalk Historian ME processor, sorting occurs on the
client computer. If you are monitoring your CPU through the Windows Task Manager, you
may see spikes in resource usage due to sorting.
62
Mouse over a column name to display the down arrow. Click the down arrow to
display the table columns. Check the columns you want to display, and clear the
check boxes for the columns you want to hide.
Page 73

4 • VIEWING DATA
Refreshing a View
To refresh a view, click [Search] again.
Auto Refreshing a View
To set the table to auto refresh, enter a refresh interval (in sections) in the Auto
Refresh box below the table. Setting the Auto Refresh value to 0 or not entering a
value in the box disables the Auto Refresh feature.
When using the auto refresh feature, note the following:
Try to limit the amount of time auto refresh is being used. It is not recommended
to keep a page running in auto refresh mode when you are not using it.
Display the minimum amount of data necessary. This will reduce the amount of
memory being used.
Do not choose a refresh rate that is more frequent than necessary. The faster the
auto refresh rate, the more memory will be used.
Closing the browser or switching the browser to another page will release the
memory that was used. Before closing or switching the browser, you should stop
Auto Refresh.
Start and End Times
The start and end times source is the client computer. The default start time is two
minutes before the current time. The default end time is the current time. For
example:
Syntax Definition
-60s Minus sixty seconds (the past sixty seconds)
+45m Plus forty-five minutes (the future forty-five minutes)
-5h Minus five hours (the past five hours)
-3d Minus three days (the past three days)
sun 00:00:00 (midnight) on the most recent Sunday
25 8: 08:00 on the 25th of the current month
63
Page 74

FACTORYTALK HISTORIAN ME MODULE USER’S GUIDE
Syntax Definition
06-dec-08
3:00:00 p.m. on December 6, 2008
15:00:00
mon+14.5h 2:30:00 p.m. last Monday
t 00:00:00 (midnight) on the current date (today)
sat-1m 11:59:00 p.m. last Friday
Where:
Symbol Definition
* Current time
t Today hh:mm:ss
y Yesterday hh:mm:ss
dDay
Monday or mon Last Monday hh:mm:ss
hHour
m Minutes
s Seconds
+ Future time
64
- Past time
Page 75

5
Managing Points
This chapter contains the following sections:
“Using the Add Points Wizard”
“Using the Tag Browser to Create Points”
“Manually Creating and Editing Points”
“Defining Point Attributes”
“Configuring Scan Types”
“Configuring Trigger Input and Output Points”
“Working with Scan Classes”
Using the Add Points Wizard
To start the wizard, click Manage Points in the top navigation bar, then click the Add
Points Wizard in the left navigation bar. The Add Points Wizard guides you through
the process of discovering and collecting tags in controllers, creating points, and then
storing the data from the controller in FactoryTalk Historian ME. You can create a
maximum of 2500 data points per FactoryTalk Historian ME.
Do not use the web interface or the FactoryTalk Historian SE System Management Tools
(SMT) Tag Configurator to change the configuration or points when the module is
collecting data or data interruption may result.
Never delete the FTHMEScanRateDefinition tag or other system-generated tags with
names such as "bae9cf24-c8b3-46c0-ad5d-a64df2174ed9" and values such as "No data".
The FTMEScanRateDefinition tag is a system-generated tag that contains scan class
definitions. If it is deleted, all scan class definitions will be removed. Deleting other
system-generated tags will cause the System Log to overflow with error messages.
Every time point configuration(s) are changed you should expect data interruption.
65
Page 76

FACTORYTALK HISTORIAN ME MODULE USER’S GUIDE
Click the arrow icon to view
the rule file or
the tag attribute file
Check a box to select
controller tags to browse
Discovering Tags
In Step 1: Discover Tags, set the search parameters for discovery of tags. Parameters
include the rule file, tag file, scan rate, and controller.
1. Select a Rule file (optional). ADDefault.xml is the default. You may select None.
66
A rule file is an XML file that determines which points will be discovered by the
wizard. You can view a rule file by clicking the arrow icon to the right of the
drop-down menu.
In addition to the default rule file, you can create and manage custom rule files
using the Rule Editor. After a rule file is created, you can upload it to the module.
See “FactoryTalk Historian ME Rule Editor” for more information about using the
Rule Editor.
If the rule file or tag attribute file you select is invalid, the [Show Tags] button is
disabled. To enable it, you must select a valid rule file or tag file.
See “Uploading Files to the Module” for more information on uploading rule files to
the module.
The search results are based on parameters included in the rule file. Because the
search only applies to web client cached information, it is limited to the first 2000
tags from a single controller. Therefore, some controller tags may be filtered out
of searches due to count limits. To resolve this search limitation and browse more
than 2000 tags per controller:
Page 77

5 • MANAGING POINTS
Edit the default rule file and change the Item.Count LTE parameter value to a
number greater than 2000.
Create a custom rule file with an Item.Count LTE parameter value that is
greater than 2000.
If you select None and do not apply rules, clicking [Show Tags] will generate a
list of all points from Logix controllers.
2. Select a Tag file.
The Tag (also called tag attribute) file is an XML file that determines the
properties (attributes) of the points to be created. FTHMETagDefault.xml is the
default. You can view the tag properties files by clicking the icon to the right of
the drop-down menu.
Tag attribute files are managed through the Rule Editor. Use the Rule Editor to
create and edit tag attribute files that you can upload to the module.
See “FactoryTalk Historian ME Rule Editor” appendix for more information about
using the Rule Editor.
See “Uploading Files to the Module” for more information on uploading tag attribute
files to the module.
3. Set the scan rate.
The scan rate is the rate (in seconds) at which the data will be collected.
If you use multiple tag attribute files that contain a variety of scan rates, you must
select default from the drop-down menu to retain the rates configured in the tag
attribute files.
67
Page 78

FACTORYTALK HISTORIAN ME MODULE USER’S GUIDE
When selecting a scan rate, it is important to be aware that points that have an
invalid scan rate configured will not be created. The valid scan rates are as
follows:
Advised and Polled - equal to or greater than 0.5 seconds.
High Speed - equal to or greater than 0.01 seconds and equal to or less than
0.5 seconds.
68
Any point that was not created is listed in the Review Results page with the
reason it was not created.
See “Reviewing Results” for an image of the Review Results page.
4. Click the checkbox next to the name of the controller that you wish to use for a
data search.
A list of all online controllers in the same chassis is displayed next to the Start
Search In checkbox by default. FactoryTalk Historian ME supports Data
Collection from a maximum of four controllers.
5. Click [Show Tags] to search for tags in the selected controllers.
6. An informational message will appear to indicate data is being retrieved from the
controller.
Page 79

5 • MANAGING POINTS
Creating Points
In Step 2: Create Points, the Add Points Wizard returns search results based on the
criteria set in Step 1: Discover Tags. To search the results, enter search criteria:
Name - the name of the tag in the controller. The default is “*”, which displays all
tags.
Slot - slot location of the controller in the chassis. Tags from the controller
selected in the Start Search In field in Step 1: Discover Tags will display by
default.
Type - displays the controller data types. The default is “*”, which displays all
data types.
You can create a maximum of 2500 data points per FactoryTalk Historian ME. If you
exceed 2500 data points, the Create button will automatically become deactivated.
You can deselect points from the Select field to reduce the number of points. When
the point count is less than 2501, the Create button will automatically become
reactivated.
Stop Data Collection before adding and creating points to ensure minimal impact on
Logix controller memory.
For information on manually creating individual points, see “Manually Creating and
Editing Points”.
The Search Results table contains the following information:
Select - displays checkboxes that allow you to select or clear which tags to create.
Name - the name of the tag found in the controller. The name is a combination of
the ControlLogix project name added as the prefix to the controller tag name.
Type - displays the type of data that the controller tag stores.
Rate - displays the current scan rate for each tag. To change the scan rate, click
[Change Scan Rate].
Path - displays the path to each tag in the device. The path is a combination of the
ControlLogix project name and its slot location [also known as its Control and
Information Protocol (CIP) path].
69
Page 80

FACTORYTALK HISTORIAN ME MODULE USER’S GUIDE
You can also use the following features to tune your selections before you create
points.
70
All/None - toggle the All/None checkbox to select or clear all points. If you select
None, the checkboxes are cleared and you must select points individually to
create them.
[Change Scan Rate] - allows you to alter the scan rate set in Step 1: Discover
Tags. To change the scan rate for selected tags, select a new scan rate in the dropdown menu and click [Change Scan Rate]. All selected tags will change to the
new scan rate.
Selected Points - displays the number of points selected from the total number of
pages.
Page 81

5 • MANAGING POINTS
Alter the original scan rate Change the number of points
Select the points you want to create by selecting the checkboxes for each point and
then clicking [Create]. After all points are created, FactoryTalk Historian ME will
display a list of points that were not created in the Points Not Created table if there
are any errors.
Click [Restart Wizard] to begin the point creation process again. Your browser will
prompt you to verify that you want to recreate points using the wizard. Click [OK] to
continue the process. After creating tags, review results in Step 3: Review Results.
Reviewing Results
Step 3: Review Results displays the following information:
Number of Points Created - number of points created based on the points selected
in Step 2: Create Points. Only points that do not yet exist are created.
Number of Points Not Created - number of selected points that were not created
because:
These points already exist in the archive and do not need to be created.
An error occurred with FactoryTalk Historian ME.
See the “Using the System Log” section for information about error messages.
Total Number of Points in Module - total number of points in FactoryTalk
Historian ME, including the newly created points.
71
Page 82

FACTORYTALK HISTORIAN ME MODULE USER’S GUIDE
List of
points
not
created
Summary
data
about
points
Data Collection Status - indicates whether Data Collection is running or stopped.
To stop Data Collection, click [Stop Data Collection]. The button immediately
changes to [Start Data Collection].
Make sure that Data Collection is fully stopped before starting it again. This may take
a few minutes.
For optimal performance, stopping and re-starting Data Collection is recommended
after tags are created.
Failed points generate error messages that appear in the system log. In addition, a
Points Not Created table will display a list of failed points after the auto discovery
process.
72
Page 83

5 • MANAGING POINTS
Folders
Pane
Selected
Tags
Pane
Contents
Pane
Using the Tag Browser to Create Points
The Add Individual Points page provides a consolidated tree view in which you can
browse and view controller tags and then select one or more tags for point creation.
Click Manage Points in the top navigation bar, then click the Add Individual Points
in the left navigation bar to access the page.
You can create a maximum of 2500 data points per FactoryTalk Historian ME. If you
exceed 2500 data points, the following warning will display:
You can deselect points from the Contents pane to reduce the number of points.
Tag Attribute File - use the drop-down list to select a point configuration file that
will determine the properties (attributes) of the points to be created. To view the
file, expand the blue arrow icon.
See “Creating Tag Attribute Files” appendix for more information about tag attribute
files.
See “Uploading Files to the Module” for more information on uploading tag attribute
files to the module.
73
Page 84

FACTORYTALK HISTORIAN ME MODULE USER’S GUIDE
Scan Rate - use the drop-down list to set the scan rate. The scan rate is the rate (in
seconds) at which the data will be collected. This scan rate setting supercedes the
scan rate specified in the tag attribute file.
The Add Individual Points page consists of three panes: Folders, Contents, and
Selected Tags.
Folders Pane
The Folders pane displays a list of ControlLogix project files.
Highlight (click) the filename to select a project file and browse tags.
The white right arrow opens or expands the levels.
The black down arrow collapses or limits the levels.
Click Refresh to update the project files.
Contents Pane
The Contents pane displays tags from the highlighted node in the Folders pane. The
pane contains three sortable columns:
Select column checkbox - check the box(es) to select a specific tag or list of tags.
74
Name - the tag name.
Type - data type of the tag.
Clicking [Add Tag(s) to List] allows you to populate the selected tags in the Selected
Tags pane.
Selected Tags Pane
The Selected Tags pane displays a list of tags to be created for collecting data. The
table contains four sortable columns:
Name - tag name.
Type - data type of the tag.
Scan Rate - tag scan rate.
Tag File - tag attribute file that determined the properties of the point to be
created.
Page 85

5 • MANAGING POINTS
Select the
folder
The Contents
pane is automatically populated
Creating Points
To create points in the tag browser:
1. Select the folder that contains tags of interest. The Contents pane displays the tag
name and type from the selected folder.
2. Check the box in the Select column to select tags in the Contents pane. You can
use the All/None checkbox or the Tag Filter to filter the tags.
All/None - toggle the All/None checkbox to select or clear all tags. If you
select None, the checkboxes are cleared and you must select tags individually
to add them to the Selected Tags table.
Tag Filter - tags listed in the Contents pane are filtered based on criteria
entered in this field. The asterisk (*) and question mark (?) are valid wildcard
characters. The filter condition persists and will be applied to a newly selected
folder if it is not cleared before the new folder is selected.
3. Click [Add Tag(s) to List] to move selected tags to the Selected Tags pane.
The Selected Tags pane displays the tag name, type, scan rate, and tag file for
each tag. The most recently added tags appear at the top of the table.
The [Create], [Remove], and [Clear] buttons become active when the Selected
Tags pane is populated. To remove tags from the list, highlight each tag, and click
[Remove]. To empty the table, click [Clear]. To create points, go to the next step.
75
Page 86

FACTORYTALK HISTORIAN ME MODULE USER’S GUIDE
Tune your
tag
selection
with the
Tag Filter
or the All/
None
checkbox
Click
[Add Tag(s) to
List] to move
tags to the
table below
and create
points
List of
selected
tags
Click [Create]
4. To create points, click [Create].
76
5. A confirmation dialog box will prompt you with the question, “Are you sure you
want to create these points?” Click [Yes] to proceed.
If Data Collection is already running, points will start to collect data.
Page 87

5 • MANAGING POINTS
Tag
creation
results
Points
Not
Created
Table
Data
Collection
status
A result page will display. The first section provides you with the number of points
created, number of points not created and the total number of points in the module.
The second section provides Data Collection status. The Points Not Created table
provides a list of points not created and the error message that explain the reason why
the point was not created.
Duplicate tag names are not allowed. Points will not be created for tags that have the
same name but different scan rates or source tag files. If duplicate tag names are
discovered, the module will display the following message in the Points Not Created
table:
Point already exists
For optimal performance, we recommend that you stop and restart Data Collection
after you have finished point creation for all tags. If Data Collection is already
running, points will start to collect data.
If Data Collection is not running, click [Start Data Collection] to initiate Data
Collection.
Click [Back] to return to the first page and continue working with tags.
77
Page 88

FACTORYTALK HISTORIAN ME MODULE USER’S GUIDE
Manually Creating and Editing Points
To manually create new points or edit point attributes, click Manage Points in the
top navigation bar, and then click Edit Points in the left navigation bar.
Point attributes tell FactoryTalk Historian ME how and when the server should
collect data from a particular data source. Point attributes specify information such as
the data source location, how often the servers should get new values from the data
source, which values the server can ignore, and which represent valid data.
To create or edit points:
1. Enter search criteria in the available fields and click [Search].
2. Do one of the following:
To crete a new point, click [New] at the bottom of the table.
To edit an existing point, highlight the point in the table and click [Edit].
The Point Property page displays.
3. Define the point attributes and click [Save].
78
Page 89

5 • MANAGING POINTS
Auto
Transfer
Mode
On
Points
Created
with
New
Tag
Names
You can also use the Edit Points page to rename points.
1. Enter search criteria in the available fields and click [Search].
2. In the search results field, highlight the point you want to rename.
3. At the bottom of the table, click [Rename]. The Point Property page opens.
4. Enter the new point name and click [Save]. Click [Reset] to reset the values.
If the Data Transfer service is in Auto Transfer mode, the new points will be created
with the new tag names. If the Data Transfer service is not in Auto Transfer mode, the
service will continue to transfer points until you stop Data Transfer, manually select
points to transfer, and restart the service.
79
Page 90

FACTORYTALK HISTORIAN ME MODULE USER’S GUIDE
Defining Point Attributes
The Point Property page allows you to specify settings for each point. It contains four
sections: General, Exception Filtering, Compression Filtering, and Snapshot Value.
Click [Reset] to clear the sheet and enter new values.
80
G
ENERAL POINT PROPERTIES
The General section contains the following fields:
Name - provides a label for the point. Follow these conventions when naming a
point:
Page 91

5 • MANAGING POINTS
The name must be unique.
The first character must be alphanumeric or the percent sign (%).
No control characters (such as linefeeds or tabs) are allowed.
The following characters are not allowed: * ' ? ; { } [ ] | \ ` ` " ( )
Descriptor - defines the base point attribute that can be used to provide a textual
description of a point. The Descriptor is a common attribute to display in various
client applications and user reports.
Extended Description - only used with Trigger Input or Output tags. Use this field
to specify:
EVENT = <tag name> <condition>
where <condition> is Increment, Decrement, Nonzero, Any, or Anychange
Or
TRIG = <tag name>
When defining multiple triggers, make sure that each event calls a different tag
name.
If you want to define a condition in the Extended Description field, you must use
EVENT=triggername. If you use TRIG=triggername, you cannot define a condition
after it.
If you enter a tag name in this field, the source tag being referenced must not be
high speed or have a scan rate of faster than 1 second. Otherwise, the module will
generate an error and will not allow you to save your work in the Point Property
page.
Instrument Tag - indicates the controller from which the data is coming. If you
replace a controller with a different one that measures the same process value, it is
usually best to continue using the same point. Edit the point as required so that it
will collect the new data.
The format of the instrument tag name is:
[<controllerprojectname>_1_<controllerslotnumber>][<controllertagname>]
Source Tag - only used with Trigger Input or Output tags. Use this field for the
trigger name. If you enter a tag name in this field, the source tag referenced must
not be high speed or have a scan rate of faster than 1 second. Otherwise, the
module will generate an error and will not allow you to save your work in the
Point Property page.
81
Page 92

FACTORYTALK HISTORIAN ME MODULE USER’S GUIDE
Type - specifies the data type of the point values. Changing a point’s data type
causes the Archive subsystem to close the current archive record and start a new
one with the new type information in the header. For points collected
automatically, use the point type that most closely matches the point type in the
source system.
Selections include:
Int16 - used for points whose values are 16-bit integers.
Int32 - used for points whose values are 32-bit integers.
Float16 - used for points whose values are 16-bit floating point values.
Float32 - used for points whose values are 32-bit floating point values.
82
Float64 - used for points whose values are 64-bit floating point values.
String - used to store string data up to 1000 characters.
Strings are not supported for high speed Data Collection.
Digital - used for points whose value can only be one of several discrete states,
such as ON/OFF. Users may define the digital set contents.
Timestamp - used for points whose values are timestamps.
Digital Set - This field only appears if the type selected is digital. Use this field to
select the type of digital set for the selected point.
Page 93

5 • MANAGING POINTS
The default selections available through the FactoryTalk Historian ME web interface
include:
SYSTEM
BatchAct
Phases
Modes
RABoolean
You can use the FactoryTalk Historian SE System Management Tools to create
additional digital sets. For more information, please refer to the FactoryTalk
Historian SE Introduction to Historian System Management guide.
Scan Type - determines the scan type for the point.
Selections include:
Polled - polled tags are scanned and the data event (with value and timestamp)
is sent to the local FactoryTalk Historian ME server at the specified scan time
interval.
In general, polled tags are intended for scan rates greater than 0.5 seconds.
Advised - advised tags are scanned for new values at timed intervals that are
defined by the scan class. However, a new event happens (becomes available)
only if the value has changed from the previous event.
In general, advised tags are intended for scan rates greater than 0.5 seconds.
The Data Collection interface will not put the point on scan if it is configured
at a rate faster than 0.5 seconds.
If Data Collection rates faster than 0.5 seconds are required, use high speed
tags.
83
Page 94

FACTORYTALK HISTORIAN ME MODULE USER’S GUIDE
Trigger Input - triggered input tags are used to collect a data point after a
particular triggering event has occurred. For trigger input tags,
See “Trigger Point Configuration Examples” for a Trigger Input tag configuration
sample.
Output - triggered output tags are used to output (write-back) a data point to a
controller after a particular triggering event has occurred.
See “Trigger Point Configuration Examples” for an Output tag configuration
sample.
High Speed - high speed tags are scanned and the data event (with value and
timestamp) is logged at the specified scan time interval.
In general, high speed tags are intended for fast Data Collection speeds with
scan rates of 10 ms. The Data Collection interface will not put the point on
scan if it is configured at a rate slower than 0.5 seconds.
The module will not allow high speed tags to be created with a scan rate
slower than 500ms, or advised or polled tags to be created with a scan rate
faster than 500ms.
84
Scan On - identifies active tags. Points with this flag set to ON and with a point
source attribute set to FTME are considered active tags. Points with this flag set to
OFF will not update.
Typical Value - provides an example of a reasonable value for this point. For a
numeric tag, it must be greater than or equal to the zero, and less than or equal to
the zero plus the span.
Point Source - identifies a point as belonging to a particular interface. When you
configure an interface, you specify a point source for that interface. All the points
that belong to that interface must use that point source code as the value for the
Point Source attribute.
The default point source is FTME. Other options include T (for the Totalizer
utility subsystem in PI) and C (for the Performance Equation tags.)
Scan Rate - a period of time in seconds, which tells FactoryTalk Historian ME
how often to collect the data. Go to the Manage Points tab and Edit Scan
Class(es) page to define scan rates for scan classes. For Trigger Input and Output
scan types, it is recommended that the scan rate be defined as two seconds or
longer.
Page 95

5 • MANAGING POINTS
Span Value - value for the difference between the top of the range and the bottom
of the range. It is required for all numeric data type points.
Zero Value - indicates the lowest value possible. A zero is required for all
numeric data type points.
E
XCEPTION FILTERING POINT PROPERTIES
The FactoryTalk Historian ME exception-reporting specification determines when to
send data to the Snapshot subsystem. The exception-reporting specification consists
of a deviation (Exception Deviation), a minimum time (Exception Min), and a
maximum time (Exception Max).
The Exception Filtering section contains the following fields:
Field Description Default Value
Exception Min
Exception Max
Exception
Deviation
C
OMPRESSION FILTERING POINT PROPERTIES
Specifies the minimum time span between
exceptions, expressed as dd hh mm ss.
Specifies the maximum time span between
exceptions, expressed as dd hh mm ss.
Specifies in engineering units how much a
value may differ from the previous value
before it is considered to be a significant
value.
0 seconds
10 minutes
0.25 engineering
units
When a new Snapshot arrives, the previous one is evaluated according to the
compression specifications to see if it is a significant event. If so, it is sent to the
Event Queue. If not, it is discarded. The result is that only significant data is written
to the archive. This process is called compression.
The Compression Filtering section contains the following fields:
Field Description
Compression On
This flag should be turned ON for all real-time points in the
system.
With compression OFF, every value sent to the Snapshot
subsystem is saved in the archive.
85
Page 96

FACTORYTALK HISTORIAN ME MODULE USER’S GUIDE
Field Description
Compression Min
Value that indicates events are archived if the elapsed time since
the previous event is greater than or equal to the minimum time,
and the event value has changed by more than the deviation.
The value is expressed as dd hh mm ss.
Typically, the Compression Min should be 0.
Compression Max Value that indicates events are archived if the elapsed time is
greater than the maximum time.
The value is expressed as dd hh mm ss.
The recommended maximum time specification is one work shift
(such as, eight hours). Duplicate values will be archived if the
elapsed time exceeds the Compression Max. Under no
circumstances does this cause the FactoryTalk Historian ME
server to generate events; it only filters events that are externally
generated.
Compression
Deviation
Value for the most important compression specification.
Setting this value too low causes too little data compression and
wastes space in the archive. Setting this value too high causes
loss of useful data. For most flows, pressures, and levels, use a
deviation specification of 1% or 2% span. For temperatures, the
deviation should usually be one or two degrees.
86
Page 97

S
NAPSHOT VALUE POINT PROPERTIES
The Snapshot Value section contains the following fields:
Value - the current value of the tag, which is based on the tag type.
Timestamp - time and date stamp for the current value of the tag.
Configuring Scan Types
The Data Collection service collects points based on scan type and scan rate. You
must ensure scan types and scan rates are correctly configured for the Data Collection
service. Points may be configured automatically using the Add Points Wizard or
manually, using the Edit Points page. In either case, the point scan type must be taken
into consideration.
To configure a point scan type manually, click Manage Points in the top navigation
bar, and then click Edit Points in the left navigation bar. Select a point to edit it. The
scan type setting is located on the Point Property page and described in the “General
Point Properties” section.
To edit a point scan type automatically using the Add Points Wizard, you must ensure
that your XML Rule file properly defines the scan type and scan rate for Data
Collection.
5 • MANAGING POINTS
For information on manually creating individual points, see “Creating Points”. For
information about using the Add Points Wizard to create points, see “Using the Add
Points Wizard”.
Configuring Trigger Input and Output Points
This section provides basic information about Trigger Input and Output points.
Sample configurations are provided in the “Trigger Point Configuration Examples”
section. The trigger mechanism for input points and output points is the same, but the
data flow is different. For input points, the data flows from a controller to the
FactoryTalk Historian ME archive. For output points, the data flow is to a controller
from the FactoryTalk Historian ME archive.
87
Page 98

FACTORYTALK HISTORIAN ME MODULE USER’S GUIDE
FactoryTalk Historian ME Archive
To External Data SourceFrom External Data Source
Output pointsTrigger Input points
Controller
Controller
(Write back)
Input Points
An input point is a polled, advised, or high speed or triggered point when the data
flow is from a controller to the FactoryTalk Historian ME snapshot and archive. For
Trigger Input points, a separate trigger point must be configured. The input point is
associated with a trigger point by entering point attributes in the Extended
Description field for the input point as follows:
<keyword>=‘<trigger_tag_name>’;<condition>
88
where the keyword is TRIG or EVENT, trigger_tag_name is the name of the trigger
point, and condition is Any, Anychange, Nonzero, Decrement, or Increment. Any
scan tag referenced in the Extended Description or Scan Tag fields must not be high
speed or have a scan rate of faster than 1 second. If it does, the module will generate
an error and prevent you from saving your work in the Point Property page.
FactoryTalk Historian ME automatically assumes a point is trigger-based, rather than
scan-based, when the <keyword>=‘<trigger_tag_name>’;<condition> string is found
in the Extended Description field. An input is triggered when a new value is sent to
the snapshot of the trigger point.
Output Points
A point is an output (also known as a write back) point when the data is read from
from the FactoryTalk Historian ME archive to a controller. For Output points, the
timestamp of the trigger value must be greater than the timestamp of the previous
value. Output points are triggered in two ways:
By configuring a separate trigger point. The output point must have the same
point source as the interface, FTME. The trigger point can be associated with any
Page 99

5 • MANAGING POINTS
point source. The point type of the trigger point does not have to be same point
type as the Output point.
The Output point is associated with the trigger point by setting the Source Tag
attribute of the Output point equal to the tag name of the trigger point. Any scan
tag referenced in the Extended Description or Scan Tag fields must not be high
speed or have a scan rate of faster than 1 second. If it does, the module will
generate an error and prevent you from saving your work in the Point Property
page. An output is triggered when a new value is sent to the snapshot of the
trigger point. The new value does not need to be different than the previous value
that was sent to the snapshot to trigger an output, but the timestamp of the new
value needs to be more recent than the previous value.
By writing a new value to the snapshot of the output point itself. The new value
need not be different from the previous value to trigger an output, but the
timestamp of the new value must be more recent than the previous value.
Point Attributes
The Point Property page contains three fields that are used for Trigger Input and
Output points:
Extended Description
Instrument Tag
Source Tag
Note that:
The Scan Rate is not applicable to the Trigger Input tag.
The Scan On drop-down menu must be set to On.
The trigger tag name must be in single quotes.
E
XTENDED DESCRIPTION
: T
RIGGER CONDITIONS
The Extended Description field on the Point Property page is used for the trigger
condition and the keywords that indicate trigger condition: TRIG or EVENT. Ensure
that the words TRIG and EVENT are uppercase. Condition names are caseinsensitive.
The TRIG keyword:
Does not require any condition.
Has a default condition of Any.
89
Page 100

FACTORYTALK HISTORIAN ME MODULE USER’S GUIDE
Treats conditions other than Any as Any.
The EVENT keyword:
Requires a trigger condition for it to function properly.
Allows a space, comma, or semicolon to separate trigger definitions.
Trigger
Keyword
TRIG The condition is always Any.
EVENT Any
Condition Description Example
EVENT
Nonzero Trigger on any non-zero
value.
An event is triggered on a
value change from “Pt
Created” to 1 but it is not
triggered on a value
change from 1 to “bad
Input”.
EVENT
Anychange Trigger on any change as
long as the value of the
current event is different
from the value of the
An event will be triggered
on a value change from 0
to “bad Input” or from
“bad Input” to 0.
previous event.
EVENT
Increment Trigger on any increase in
value.
An event will be triggered
on a value change from 0
to 1.
EVENT Decrement Trigger on any decrease in
value.
I
NSTRUMENT TAG
An event will be triggered
on a value change from 1 to
0.
The Instrument Tag field is used for the full path to the controller. If a source tag
receives events from a controller, the tag in this field will read (or write back) events
from the controller. The tag name syntax is:
90
<controller_name>.<tag_name>
 Loading...