


TubePre V2
Owner’s Manual
English
Español
Deutsch
Français
®
www.presonus.com

0.1Important Safety Instructions
The exclamation point within an equilateral triangle is intended to alert the user to the presence of
important operating and maintenance (servicing) instructions in this manual.
The lightning flash with arrowhead symbol within an equilateral triangle is intended to alert the user to
the presence of uninsulated “dangerous”voltage within the product’s enclosure that may be of sufficient magnitude to constitute a risk of electric shock to humans.
CAUTION: TO REDUCE THE RISK OF ELECTRIC SHOCK, DO NOT REMOVE THE COVER. NO USER-SERVICEABLE
PARTS INSIDE. REFER SERVICING TO QUALIFIED PERSONNEL.
CAUTION: To reduce the risk of electric shock, do not expose this appliance to rain and moisture. The
apparatus shall not be exposed to dripping or splashing liquids and no object filled with liquids, such as vases, shall be placed on the apparatus.
CAUTION: These service instructions are for use by qualified service personnel only. To reduce the risk of
electric shock, do not perform any servicing other than that contained in the operation instructions. Repairs must be performed by qualified service personnel.
1.Read these instructions.
2.Keep these instructions.
3.Heed all warnings.
4.Follow all instructions.
5.Do not use this apparatus near water.
6.Clean only with dry a cloth.
7.Do not block any ventilation openings. Install in accordance with the manufacturer’s instructions.
8.Do not install near any heat sources, such as radiators, heat registers, stoves, or other apparatus (including amplifiers) that produce heat.
9.Do not defeat the safety purpose of the polarized or grounding-type plug. A polarized plug has two blades, with one wider than the other. A grounding-type plug has two blades and a third grounding prong. The wide blade and the third prong are provided for your safety. If the provided plug does not fit into your outlet, consult an electrician for replacement of the obsolete outlet.
10.Protect the power cord from being walked on or pinched, particularly at plugs, convenience receptacles, and the point where they exit from the apparatus.
11.Use only attachments/accessories specified by PreSonus.
12.Use only with the cart, stand,
tripod, bracket, or table specified by the manufacturer or sold with this apparatus. When a cart is used, use caution when moving the cart/apparatus combination to avoid injury from tip-over.
13.Unplug this apparatus during lightning storms or when unused for long periods of time.
14.Servicing is required when the apparatus has been damaged in any way, such as if a power-supply cord or plug is damaged; or liquid has been spilled, or objects have fallen, into the apparatus; or if the apparatus has been exposed to rain or moisture, does not operate normally, or has been dropped. All PreSonus products in the USA should be serviced at the PreSonus factory in Baton Rouge, Louisiana. If your product requires a repair, contact support@presonus.com to arrange for a
return-authorization number. Customers outside the USA should contact their local distributor. Your distributor’s contact information is available at www.presonus.com.
15.The apparatus shall be connected to a Mains power outlet with a protective grounding/earthing connection.
16.Where the Mains plug or an appliance coupler is used as the disconnect device, the disconnect device shall remain readily operable.
EU Directives on the Protection of the Environment and Other Euro Stuff
RoHS This product is compliant with the EU Directive 2011/65/EU for the Restriction of the use of Certain Hazardous Substances in Electrical and Electronic Equipment. No lead (Pb), cadmium (Cd), mercury (Hg), hexavalent chromium (Cr+6), PBB or PBDE
is intentionally added to this device. Any traces of impurities of these substances contained in the parts are below the RoHS specified threshold levels.
REACh This product is compliant with the European Union Directive EC1907/206 for the Registration, Evaluation, Authorization, and Restriction of chemicals (REACh) and contains none or less than 0.1% of the chemicals listed as hazardous chemicals in the REACh regulation.
WEEE This symbol on the product or its packaging indicates that this product must not be disposed of with other waste. Instead, it is your responsibility to dispose of your waste equipment by handing it over to a designated collection point
for the recycling of waste electrical and electronic equipment. The separate collection and recycling of your waste equipment at the time of disposal will help conserve natural resources and ensure that it is recycled in a manner that protects human health and the environment. For more information about where you can drop off your waste equipment for recycling, please contact your local city recycling office or the dealer from whom you purchased the product.
CE This product complies with the European Union Council Directives and Standards relating to electromagnetic compatibility EMC Directive (2006/95/EC) and the Low Voltage Directive (2004/108/EC).
English
Español
Deutsch
Français

English
Español
Deutsch
Français
|
|
PreSonus TubePre V2 |
1 |
Overview and Features |
1 |
Get the big picture with this summary of |
||
|
features and list of what’s in the box. |
|
2 |
Quick Start Guide |
4 |
Follow these basic instructions to start |
||
|
using your TubePre V2 right away. Basic |
|
|
hookup diagrams are on pages 8 and 9. |
|
3 |
Hardware |
10 |
|
||
|
Read the full anatomical breakdown of your TubePre V2. |
|
4 |
Resources |
14 |
|
||
Read the TubePre V2 technical specifications, information on troubleshooting and
repairs, and limited warranty.

Owner’s Manual |
Overview |
1 |
|
|
|
Introduction |
1.1 |
|
|
|
|
1.0 |
Overview |
|
|
|
|
|
|
|
|
|
|
1.1 |
Introduction |
|
|
|
|
|
|
Thank you for purchasing the PreSonus TubePre V2. PreSonus Audio Electronics has designed it utilizing high-grade components to ensure optimum performance that will last a lifetime. With
separate instrument and microphone inputs, the TubePre V2 is a handy direct-injection (DI) box for guitars and bass. The TubePre V2 proves that dynamic preamps can come in small packages!
We encourage you to contact us with questions or comments regarding this product. You can reach us by email at techsupport@presonus.com or call us at 1-225-216-7887 between 9 a.m. and 5 p.m. Central Time (GMT -06:00). PreSonus Audio Electronics is committed to constant product improvement, and we value your suggestions highly. We believe the best way to achieve our goal of constant product improvement is by listening to the real experts: our valued customers. We appreciate the support you have shown us through the purchase of this product.
Please use this manual to familiarize yourself with the TubePre V2’s features, applications, and correct connection procedure before connecting it to your recording system. Pay close attention when connecting the TubePre V2 to your system, as bad cables and improper grounding are the most common causes of problems encountered in recording and P.A. systems. Check your cables, connections, and grounding if you experience noise or other sonic performance problems.
English
Español
Deutsch
Français
1

English
Español
Deutsch
Français
1 |
Overview |
PreSonus TubePre V2 |
1.2Summary of Features
1.2Summary of Features
•• 12AX7 vacuum-tube-based preamp
•• Tube Drive tube-saturation control
•• 48V phantom power
•• 80 Hz high-pass filter
•• Polarity reverse switch
•• Lighted VU meter
•• Clip LED
•• Unbalanced ¼” Instrument input
•• Balanced XLR Microphone input
•• Unbalanced ¼” Line output
•• Balanced XLR Line output
2
Owner’s Manual
1.3What’s in the Box
Overview |
1 |
What’s in the Box |
1.3 |
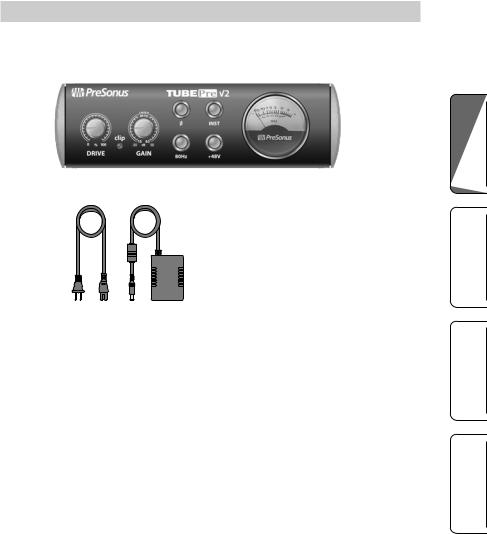
In addition to this manual, your PreSonus TubePre V2 package contains the following:
English
•• PreSonus TubePre V2
Español
•• 12 VDC, 1A power supply
Deutsch
Français
3

English
Español
2 |
Quick Start Guide |
PreSonus TubePre V2 |
2.1Getting Started
2.0Quick Start Guide
This Quick Start Guide is designed to help you connect and use your TubePre V2 as quickly as possible. The following step-by-step instructions are based on a common studio environment. Your setup may vary based on your needs and applications.
2.1Getting Started
Connect the Power
1.Turn every knob on the TubePre V2 front panel completely counterclockwise (left).
2.Connect the included power supply to the TubePre V2 and plug it into a wall socket, power strip, or surge protector.
Deutsch
Français
Connect Your Input Sources
1.Turn down the main output volume on your audio interface or mixer to its lowest position.
2.Grab a microphone and a mic cable and plug them
into |
V2 mic input. |
4
Owner’s Manual |
|
|
Quick Start Guide |
2 |
|
|
|
|
Getting Started |
2.1 |
|
3. |
Connect the audio output (TRS or XLR) of |
|
|||
|
your TubePre V2 to a line input on your audio |
|
|||
|
interface or mixer. For the best sound quality, |
|
|||
|
PreSonus recommends using balanced cables. |
|
|||
4. |
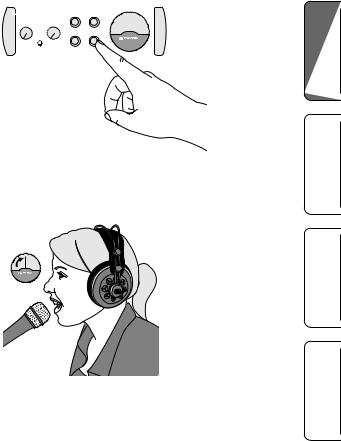
If your microphone requires phantom power, press |
||||
|
the 48V button on the front panel. |
|
|||
|
|
|
|
|
|
|
|
|
|
|
|
|
|
|
|
|
|
|
|
|
|
|
|
5.Speak into the microphone while watching the VU meter on the front panel and slowly turning the TubePre V2 Gain knob clockwise.
English
Español
Deutsch
Français
5
 Loading...