


Quantum 4848
Ultra-low latency Thunderbolt™ Audio Interface
Owner’s Manual
® |
English |
|
www.presonus.com |
||
|

Table of Contents
1Overview — 1
1.1Introduction — 1
1.2Product Registration — 1
1.2What is in the Box — 2
1.3What’s in your My PreSonus Account — 2
1.4Companion PreSonus Products — 3
2Hookup — 4
2.1Front Panel Indicators — 4
2.2Back Panel Connections — 5
2.3Quantum 4848 Hookup Diagram — 7
3Connecting to a Computer — 8
3.1Installation for Windows and macOS — 8
3.2Using a Quantum Interface with Popular Audio Applications — 8
4Universal Control
and UC Surface — 10
4.1Firmware Updates — 10
4.2Universal Control Launch Window — 10
4.3Metering — 12
4.4RTA — 12
5Aggregating Devices — 14
5.1macOS — 14
5.2Windows — 16
6Studio One Profesional
Quick Start — 18
6.1Installation and Authorization — 18
6.2Setting Up Studio One — 19
6.2.1Configuring Audio Devices — 20
6.2.2Configuring MIDI Devices — 20
6.3Creating a New Song — 23
6.3.1Configuring Your I/O — 24
6.3.2Creating Audio and MIDI Tracks — 25
6.3.3Recording an Audio Track — 27
6.3.4Adding Virtual Instruments and Effects — 27
6.4Optimizing Latency and Performance — 29
6.4.1Device Block Size — 29
6.4.2Audio Dropout Protection — 29
6.4.3Plug-in Use with Native Low-Latency Monitoring — 30
6.5Monitor Mixing in Studio One — 30
6.5.1Cue Mix Functions — 31
6.5.2Punching In — 32
6.6Pipeline XT — 33
7Technical Information — 35
7.1Specifications — 35
8Warranty Information — 36
8.1How Consumer Law Relates To This Warranty — 36

1 |
Overview |
Quantum 4848 |
1.1 |
Introduction |
Owner’s Manual |
1 Overview
1.1Introduction
Thank you for purchasing a PreSonus Quantum 4848 Thunderbolt Audio Interface. PreSonus Audio Electronics has designed the Quantum 4848 for the recording professional. Route audio from your vintage gear to your DAW and back without any signal degradation, capturing every nuance of your favorite boutique equipment at extremely low latency thanks to our custom Thunderbolt drivers.
We encourage you to contact us with questions or comments regarding your PreSonus Quantum 4848 interface. PreSonus Audio Electronics is committed to constant product improvement, and we highly value your suggestions. We believe the best way to achieve our goal of constant product improvement is by listening to the real experts: our valued customers. We appreciate
the support you have shown us through the purchase of this product and are confident that you will enjoy your Quantum 4848 interface!
About this manual: We suggest that you use this manual to familiarize yourself with the features, applications, and correct connection procedures for your Quantum 4848 interface before trying to connect it to your computer. This will help you avoid problems during installation and setup.
Throughout this manual you will find Power User Tips that can quickly make you a Quantum-series interface expert. In addition to the Power User Tips, you will find tutorials on Studio One Professional and Pipeline. These tutorials are designed to get you up and running with the included professional software suite as quickly as possible.
1.2Product Registration
PreSonus is committed to delivering the best experience for our customers. My PreSonus is a one-stop portal for all our registered customers’needs. From your My PreSonus account, you can view all your PreSonus hardware and software registrations; download drivers, installers, and content; contact support; track orders and more.
To register your Quantum 4848
Go to My.PreSonus.com and follow the onscreen instructions.
–OR–
Download the MyPreSonus app from the Apple App Store or Google Play.
1
1 |
Overview |
Quantum 4848 |
1.2 |
What is in the Box |
Owner’s Manual |
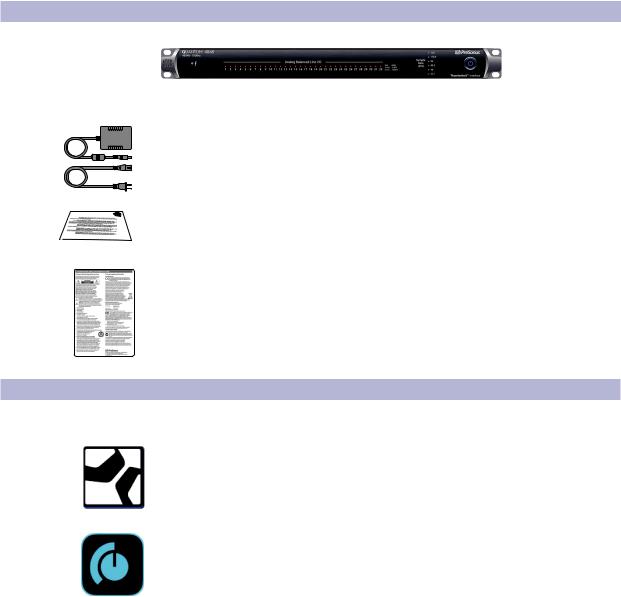
1.2What is in the Box
Your Quantum-series interface package contains the following:
PreSonus Quantum 4848 Thunderbolt Audio Interface
External power supply
Product registration and software authorization card
PreSonus Health Safety and Compliance Guide
Power User Tip: All companion software and drivers for your PreSonus Quantum-series interface are available for download from your My PreSonus user account. Simply visit http://my.presonus.com and register your Quantum-series interface to receive downloads and licenses.
1.3What’s in your My PreSonus Account
Once you register your Quantum-series interface, you will be able to download the following:
Studio One Professional recording software and content
Universal Control (necessary for firmware updates)
2

1 |
Overview |
Quantum 4848 |
1.4 |
Companion PreSonus Products |
Owner’s Manual |
1.4Companion PreSonus Products
Thanks for choosing PreSonus! As a solutions company, we believe the best way to take care of our customers (that’s you) is to ensure that you have the best possible experience from the beginning of your signal chain to the end. To achieve this goal, we’ve prioritized seamless integration throughout every design phase of these products from day one. The result is systems that communicate with each other
as intended—straight out of the box—without excessive configuration hassles. We’re here for you. Find out more at www.presonus.com.
3

2 |
Hookup |
Quantum 4848 |
2.1 |
Front Panel Indicators |
Owner’s Manual |
2 Hookup
2.1Front Panel Indicators
Thunderbolt Sync. This indicator will illuminate blue when your Quantum 4848 is properly synced to your computer over Thunderbolt.
Signal Indicators. These 32 indicators can be set to monitor either the analog input or analog output signal from UC Suface. See Section 4.2.
Sample Rate Indicators. These LEDs display the currently set Sample Rate for your
Quantum 4848.
Power button and Sync light. The lighted ring around the power button of your Quantum 4848 is a clock source / sync indicator. It lets you know if your unit is receiving word clock correctly.
•• Blue. When this light is blue, your Quantum 4848 is correctly synced via Thunderbolt, word clock, or ADAT.
•• Flashing red and blue. Quantum 4848 is in the process of trying to sync to a received clock signal.
•• Red. Quantum 4848 is either not synced to your computer or its external clock source is not present.
•• Flashing purple. The identify button is active in UC Surface.
Power User Tip: Word clock is the timing signal with which digital devices sync frame rates. Proper word clock sync prevents digital devices from having pops, clicks, and distortion in the audio signal due to mismatched digital audio transmission. In general, you will use your Quantum 4848 interface as the master clock in your studio; it provides high-quality word clock for this purpose. However, if you would like to use another device as the master clock, you can set the input source for clocking in UC Surface. See Section 4.1 for details.
4

2 |
Hookup |
Quantum 4848 |
2.2 |
Back Panel Connections |
Owner’s Manual |
2.2Back Panel Connections
Line Inputs. The lower row of DB25 connections are for use with line-level devices. These inputs are scaled to accept line-level signals up to +18 dBu.
Line Outputs. The upper row of DB25 connections provide 32 balanced line outputs to route to external devices, such as headphone amps, signal
processors, and patchbays. Each output has an independent playback stream.
A Quick Note About DB25
1 |
2 |
3 |
4 |
5 |
6 |
7 |
8 |
G C H G C H G C H G C H G C H G C H G C H G C H
13 |
12 |
11 |
10 |
9 |
8 |
7 |
6 |
5 |
4 |
3 |
2 |
1 |
25 24 23 22 21 20 19 18 17 16 15 14
The Tascam format DB25 connectors DB25 connectors provide eight balanced channels on a single analog connector. Balanced DB25 fan-out snakes can be obtained in various configurations at most recording and live-sound retailers. Common configurations are DB25 to (8) XLRM, DB25 to (8) XLRF, and DB25 to (8) TRS.
Clock In and Out. These BNC connections allow Quantum-series interfaces to receive and transmit word clock to and from other digital audio devices.
Power User Tip: When using the BNC Clock input for external clock, you will need to set “Wordclock” as the Clock Source in Universal Control as well as to set the sample rate to be the same as the external clocksource device. See Section 4.1 for details. A 75Ω BNC word clock cable is required to achieve proper sync.
ADAT – S/MUX In and Out. These are the ADAT – Dual S/MUX connections for your external digital devices. When recording or playing back at 44.1 or 48 kHz, each ADAT I/O will provide 8 of the 16 available channels consecutively, from left to right. When recording or playing back at 88.2 or 96 kHz, each connection will provide four of the available eight channels.
These inputs and outputs do not function at 176.4 or 192 kHz:
|
ADAT 1 Input |
ADAT 2 Input |
ADAT 1 Output |
ADAT 2 Output |
44.1 / 48 kHz |
Channels 33-40 |
Channels 41-48 |
Channels 33-40 |
Channels 41-48 |
88.2 / 96 kHz |
Channels 33-36 |
Channels 37-40 |
Channels 33-36 |
Channels 37-40 |
5
2 |
Hookup |
Quantum 4848 |
2.2 |
Back Panel Connections |
Owner’s Manual |
When connecting a PreSonus DigiMax DP88 to your Quantum 4848, the ADAT connections will also send and receive preamp control information for the DigiMax DP88, so that it can be controlled directly from UC Surface or Studio One.
Power User Tip: You will need to set “ADAT 1” as the Clock Source in Universal Control as well as to set the sample rate to be the same as the external clocksource device when clocking external via ADAT. See Section 4.1 for details. The ADAT 2 input cannot be used to receive word clock.
Thunderbolt ports. Use these ports to connect your Quantum 4848 to your computer. The second Thunderbolt port can be used to connect other Thunderbolt devices to your computer.
Power User Tip: Quantum interfaces support clustering over Thunderbolt. In addition to allowing you to use your Quantum-series interface as a Thunderbolt hub, this allows you to chain up to four Quantum interfaces, aggregated over Thunderbolt, for higher I/O counts. See Section 5 for more information.
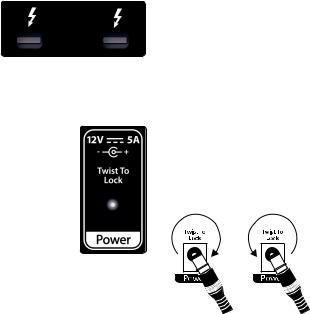
Power Connection. This is where you connect the external power supply for your Quantum 4848. Your Quantum interface is equipped with a twist-lock power connection, keep this in mind when connecting disconnecting it from your interface.
Lock Unlock
6

2 |
Hookup |
Quantum 4848 |
2.3 |
Quantum 4848 Hookup Diagram |
Owner’s Manual |
2.3Quantum 4848 Hookup Diagram
Quantum 4848
DigiMax DP88 |
(CH 41-48) |
DigiMax DP88 |
(CH 33-40) |
1 |
2 |
3 |
4 |
5 |
6 |
7 |
8 |
 Patch Bay 25-48
16 |
17 |
18 |
19 |
20 |
21 |
22 |
23 |
24 |
1 |
2 |
3 |
4 |
5 |
6 |
7 |
8 |
 Patch Bay 1-24
16 |
17 |
18 |
19 |
20 |
21 |
22 |
23 |
24 |
7

3 |
Connecting to a Computer |
Quantum 4848 |
3.1 |
Installation for Windows and macOS |
Owner’s Manual |
3 Connecting to a Computer
Before connecting your Quantum 4848 to a computer, please visit www.presonus. com/products/Quantum-4848/techspecs to verify the latest system requirements.
Note: The speed of your processor, amount of RAM, and capacity, size, and speed of your hard drives will greatly affect the overall performance of your recording system. A faster processor and more RAM can reduce signal latency (delay) and improve overall performance.
The Universal Control installer for macOS and Windows is available for download from your My PreSonus user account. This bundled installer includes Universal Control, UC Surface, and the audio driver for Quantum-series interfaces. To begin, you must create or log into your My PreSonus user account, and register your Quantum interface, either by downloading the My PreSonus app for your iOS or Android device or by visiting http://my.presonus.com. Once registered, all software downloads will be available from within your My PreSonus user account.
3.1Installation for Windows and macOS
Connect your Quantum 4848 to an available Thunderbolt port and launch the Universal Control installer. The installer will take you through each step of the installation process. This application will install the macOS or Windows drivers as well as UC Surface. Please read each message carefully.
It is recommended that you quit all applications before you start the installation.
The Universal Control installer will take you through each step of the installation process.
3.2Using a Quantum Interface with Popular Audio Applications
Complete setup instructions for Studio One Professional and a brief tutorial on its features can be found in Section 6 of this manual. However, you can use your Quantum 4848 with any audio-recording application that supports Core Audio or ASIO. Please consult the documentation that came with your audio application for specific instructions on how to select the Quantumseries interface driver as the audio-device driver for your software.
Below are basic driver-setup instructions for a few popular audio applications.
Ableton Live
1.Launch Ableton Live.
2.Go to Options | Preferences | Audio.
3.Choose Driver Type: ASIO | Audio Device: ASIO PreSonus Quantum 4848.
4.Go to Input Config: Enable and select the desired Input channels.
5.Go to Output Config: Enable and select the desired Output channels.
Avid Pro Tools 10+
1.Launch Pro Tools.
2.Go to Setup | Hardware and select Quantum 4848 from the Peripherals list. Click OK.
3.Go to Setup | Playback Engine and select Quantum 4848 from the menu at the top of the window. Click OK.
8
3 |
Connecting to a Computer |
Quantum 4848 |
3.2 |
Using a Quantum Interface with Popular Audio Applications |
Owner’s Manual |
Apple Logic
1.Launch Logic.
2.Go to Logic | Preferences | Audio.
3.Click on the Devices Tab.
4.On the Core Audio tab, check Enabled.
5.Select PreSonus Quantum 4848 from the device menu.
6.You will be asked if you’d like to relaunch Logic. Click try (re)launch.
7.Your Quantum 4848 features custom I/O labels for faster workflow. To enable these labels for use in Logic, go to Options | Audio | I/O Labels.
8.The second column in the pop-up window will be named Provided by Driver. Activate each of these labels for your Quantum 4848.
Cakewalk Sonar
1.Launch Sonar.
2.Go to Options | Audio... and click on the Advanced tab.
3.Change the Driver Mode to“ASIO.”(Note: Using WDM, rather than ASIO, for pro audio applications is not recommended.)
4.Click the“OK”button.
5.Restart Sonar.
6.Go to Options | Audio... and click on the Drivers tab.
7.Highlight all input and output drivers beginning with“PreSonus Quantum 4848”
8.Go to Options | Audio... and click on the General tab.
9.Set the Playback Timing Master to“PreSonus Quantum 4848... DAW Out 1.”
10.Set the Recording Timing Master to“PreSonus Quantum 4848... Line 1.”
Steinberg Cubase
1.Launch Cubase.
2.Go to Devices | Device Setup.
3.Select“VST Audio System”from the Devices column in the Device Setup.
4.Select PreSonus Quantum 4848 from the ASIO Driver dropdown list.
5.Click“Switch”to begin using the Quantum driver.
6.Once you have successfully changed the driver, go to Devices | VST Connections to enable your input and output buses.
9

4 |
Universal Control and UC Surface |
Quantum 4848 |
4.1 |
Firmware Updates |
Owner’s Manual |
4 Universal Control and UC Surface
Included in Universal Control is UC Surface, a powerful control software for your Quantum 4848 that provides extensive metering as well as configuration options for Quantum 4848 users.
4.1Firmware Updates
UC Surface is designed to verify that your Quantum 4848 has the correct firmware version installed. You will be prompted if your Quantum 4848 interface needs its firmware updated. Click on the Update Firmware button to begin the update.
Warning: Do not power off or disconnect your Quantum 4848 during the firmware update. Once the firmware update is successfully completed, you will be alerted and instructed to disconnect your power supply and Thunderbolt
cable and reconnect it before rebooting your device. It is not sufficient to simply power down your unit, you must disconnect the power source in addition to the Thunderbolt cable.
When the firmware update is complete, you must disconnect the physical power source from your Quantum 4848 and reconnect it. Powering it off it will not complete the update process.
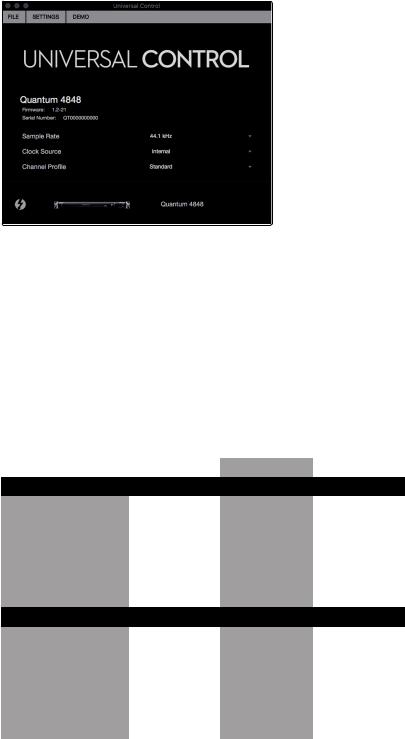
4.2Universal Control Launch Window
Universal Control is a powerful hardware-management application for all PreSonus interface products. It allows you to view any PreSonus interface product connected to your computer or your computer’s network.
When Universal Control is launched, you will see the Launch window. From this window, you can manage all the driver settings.
10
4 |
Universal Control and UC Surface |
Quantum 4848 |
4.2 |
Universal Control Launch Window |
Owner’s Manual |
Sample Rate. Changes the sample rate.
You can set the sample rate to 44.1, 48, 88.2, 96, 176.4, or 192 kHz. A higher sample rate will increase the fidelity of the recording but will increase the file size and the amount of system resources necessary to process the audio.
Clock Source. Sets the digital clock source.
From this menu, you can set the clock source for your Quantum interface: Internal, External S/PDIF, or External ADAT. Please note: Only ADAT 1 can be used as a clock source input for your Quantum.
Channel Profile. Some third-party DAW applications, like ProTools Native, limit simultaneous I/O to 32 ins and outs. Channel Profile modes are provided so that you can customize your 48-channel I/O configuration for 32-channel application as follows:
|
Standard |
16 Line + 16 ADAT |
24 Line + 8 ADAT |
|
Input Streams |
|
|
Recording Streams 1-8 |
Analog 1-8 |
Analog 1-8 |
Analog 1-8 |
Recording Streams 9-16 |
Analog 9-16 |
Analog 9-16 |
Analog 9-16 |
Recording Streams 17-24 |
Analog 17-24 |
ADAT 1 1-8 |
Analog 17-24 |
Recording Streams 25-32 |
Analog 25-32 |
ADAT 2 1-8 |
ADAT 1 1-8 |
Recording Streams 33-42 |
ADAT 1 1-8 |
Disabled |
Disabled |
Recording Streams 43-48 |
ADAT 2 1-8 |
Disabled |
Disabled |
|
Output Streams |
|
|
Playback Streams 1-8 |
Analog 1-8 |
Analog 1-8 |
Analog 1-8 |
Playback Streams 9-16 |
Analog 9-16 |
Analog 9-16 |
Analog 9-16 |
Playback Streams 17-24 |
Analog 17-24 |
ADAT 1 1-8 |
Analog 17-24 |
Playback Streams 25-32 |
Analog 25-32 |
ADAT 2 1-8 |
ADAT 1 1-8 |
Playback Streams 33-42 |
ADAT 1 1-8 |
Disabled |
Disabled |
Playback Streams 43-48 |
ADAT 2 1-8 |
Disabled |
Disabled |
11
 Loading...