


 Loading...
ATOM
Production and Performance Pad Controller
Owner’s Manual
®
www.presonus.com
English

Table of Contents
1Overview — 1
1.1Introduction — 1
1.2Product Registration — 1
1.3What’s in the Box — 2
1.4What’s in your My PreSonus Account — 2
1.5Companion PreSonus Products — 3
1.6Firmware Updates — 4
2Controls — 5
2.1Top Panel Overview — 5
2.2Note Repeat — 6
2.3Quick Setup Mode — 7
2.3.1Pad Modes — 7
2.3.2Pressure Type — 8
2.3.3Pressure Threshold — 9
2.3.4Strike Velocity — 9
2.3.5Internal MIDI Clock Tempo — 10
2.3.6Panic — 10
3Advanced Studio One Integration — 11
3.1Song Setup Mode — 11
3.1.1Controlling Tempo — 11
3.1.2Event Controls — 11
3.1.3Navigating Tracks — 12
3.1.4Adding an Instrument — 13
3.1.5User Pads — 14
3.2Set Loop — 15
3.2.1Zooming — 16
3.3Event Editor — 16
3.3.1Adjusting Pitch — 17
3.3.2Nudging — 18
3.4Instrument Quick Controls — 18
3.5Pattern Editor — 19
3.6Transport Controls — 21
3.7Zooming — 21
3.8Customizing Knobs — 22
4Advanced Ableton® Live Integration — 23
4.1Pad Mode: Session — 23
4.2Pad Mode: Channel — 23
4.3Pad Mode: Note — 23
4.4User Mode — 23
4.5Encoder Assignments — 24
4.6View Selection — 24
4.7Transport Controls — 25
5Studio One Artist Quick Start — 26
5.1Installation and Authorization — 26
5.2Setting Up Studio One — 28
5.2.1Configuring Audio Devices — 28
5.2.2Configuring MIDI Devices — 29
5.3Creating a New Song — 32
5.3.1Configuring Your Audio I/O — 32
5.3.2Creating Audio
and Instrument Tracks — 34
5.3.3Recording an Audio Track — 35
5.3.4Adding Virtual Instruments and Effects — 35
6MIDI Mapping — 37
6.1Pads and Banks — 37
6.2Knobs — 38
6.3Buttons — 39
6.4Advanced Setup Mode — 40
6.4.1Select Pad MIDI Channel — 40
6.4.2Select Knob MIDI Channel — 40
6.4.3Select Button MIDI Channel — 41
6.4.4Select Pressure MIDI Channel — 41
6.4.5Turn Pad Note On/Off — 42
6.4.6Adjusting Brightness — 42
1 |
Overview |
ATOM |
1.1 |
Introduction |
Owner’s Manual |
1 Overview
1.1Introduction
Thank you for purchasing the PreSonus® ATOM production and performance pad controller. With 16 full-size, velocityand pressure-sensitive RGB pads and 8 assignable pad banks, ATOM lets you produce beats, play virtual instruments, and trigger samples and loops with unsurpassed expressiveness and flexibility. More
than a compact, dynamic performance controller, when combined with Studio One® and Ableton® Live, ATOM becomes a tightly integrated production environment. You’ll love how ATOM’s expressive pads, flexible controls, and tight integration with Studio One will open up your production environment and speed up your workflow.
PreSonus Audio Electronics is committed to constant product improvement, and we highly value your suggestions. We believe the best way to achieve our goal of constant product improvement is by listening to the real experts: our valued customers. We appreciate the support you have shown us through the purchase of this product and are confident that you will enjoy your ATOM!
About this manual: We suggest that you use this manual to familiarize yourself with the features, applications, and workflows for your ATOM before trying to connect it to your computer. This will help you to get better performances and faster results.
Throughout this manual, you will find Power User Tips that can quickly make you an ATOM expert and help you get the most out of your investment.
1.2Product Registration
PreSonus is committed to delivering the best experience for our customers. My PreSonus is a one-stop portal for all our registered customers’needs. From your My PreSonus account, you can view all your PreSonus hardware and software registrations; download drivers, installers, and content; contact support; track orders and more.
To register your ATOM
Go to My.PreSonus.com and follow the onscreen instructions.
OR
Download the MyPreSonus app from the Apple App Store or Google Play.
1
1 |
Overview |
ATOM |
1.3 |
What’s in the Box |
Owner’s Manual |
1.3What’s in the Box
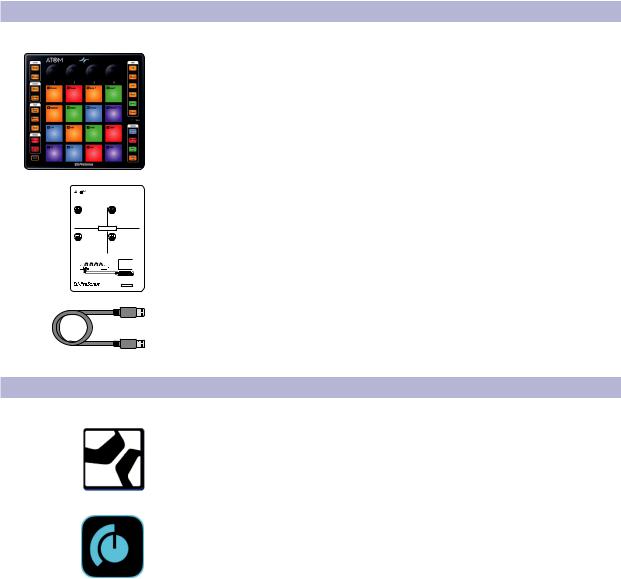
Your ATOM package contains the following:
ATOM production and performance pad controller
and Performanc |
ntroller |
d • Erste Schritte • Có |
• Pour commencer |
m ro
PreSonus ATOM Quick Start Guide
6’(1.8m) USB cable
1.4What’s in your My PreSonus Account
Once you register your ATOM, you will be able to download the following:
Studio One Artist recording software and content
Universal Control (necessary for firmware updates)
2
1 |
Overview |
ATOM |
1.5 |
Companion PreSonus Products |
Owner’s Manual |
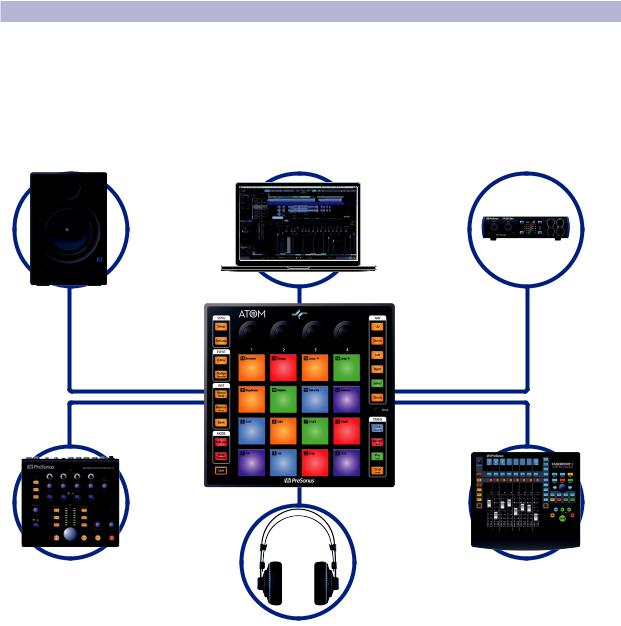
1.5Companion PreSonus Products
Thanks for choosing PreSonus! As a solutions company, we believe the best way to take care of our customers (that’s you) is to ensure that you have the best possible experience from the beginning of your signal chain to the end. To achieve this goal, we’ve prioritized seamless integration throughout every design phase of these products from day one. The result is systems that communicate with each other
as intended—straight out of the box—without excessive configuration hassles. We’re here for you. Find out more at www.presonus.com.
3
1 |
Overview |
ATOM |
1.6 |
Firmware Updates |
Owner’s Manual |
1.6Firmware Updates
PreSonus is committed to constant product improvement. As part of this commitment, we offer periodic firmware updates that add features, improve functionality, and resolve issues that are discovered in the field. Because of this, it is highly recommended that you download Universal Control from your My PreSonus account after registering your ATOM.
Note: At the time of this manual’s publication, a firmware update is required for full functionality of your ATOM. You must download and install Universal Control and run the firmware update on your unit.
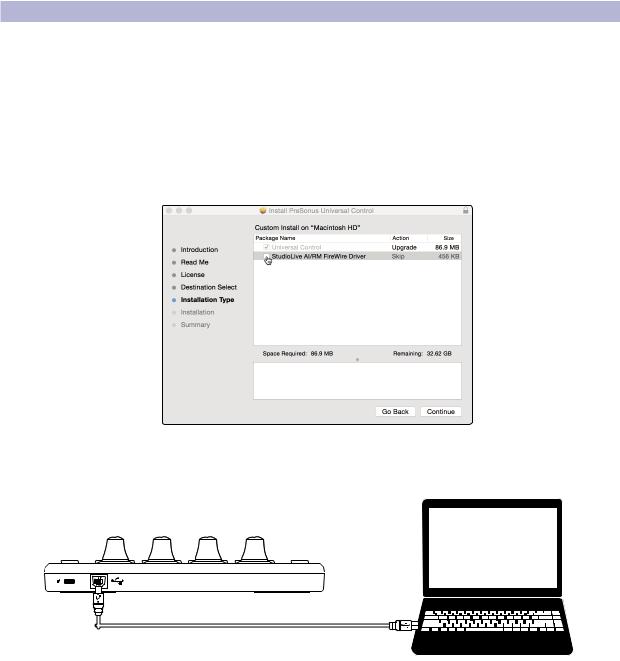
During installation, you will be given the option to install various PreSonus audio drivers. No driver installation is required to use the ATOM.
Once installed, connect your ATOM to your computer. Your ATOM is entirely bus powered. If you are using a USB hub, make sure you are connecting your ATOM to a powered port.
ATOM Rear View
Universal Control will alert you if there is new firmware available for your ATOM. Clicking on the Update Firmware button will begin the update process. When the firmware update is complete, your ATOM will reboot automatically.
4
2 |
Controls |
ATOM |
2.1 |
Top Panel Overview |
Owner’s Manual |
2 Controls
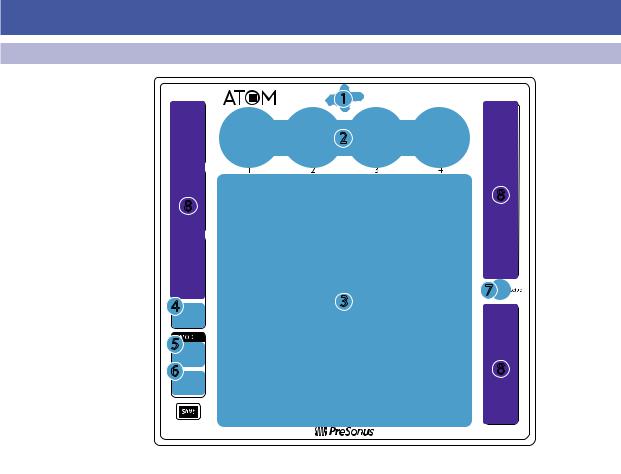
2.1Top Panel Overview
1
 2
2 
8 |
8 |
|
4 |
3 |
7 |
|
||
5 |
|
|
6 |
|
8 |
One Native control is active or not. When Studio One or Ableton Live is connected, the LED will illuminate blue. For other applications, it will illuminate green.
2.Knobs 1-4. These knobs transmit MIDI CC14-17 respectively. See Section 6.2.
3.Pressureand Velocity-sensitive controller pads. These 16 pads can be used to trigger samples and sounds within your software. Two different control modes, as well as several advanced customization options, are available. Please review Section 2.3 for details. MIDI Mapping can be found in Section 6.1.
4.Bank. Use this button to switch between pad banks 1-8. Each bank can control a unique group of 16 individual sounds for a total of 128.
5.Full Level. When engaged, every pad will trigger its assigned sound at full strike velocity (127) no matter how soft or hard you hit (application dependent).
6.Note Repeat. Also known as“roll,”note repeat allows you to trigger a sound at a specified rate as long as the pad is held (application dependent). See Section 2.2 for details.
7.Setup. This button provides access to advanced configuration features. See Section 2.3 for details.
8.Assignable Controls. The remaining buttons have specialized functions in Studio One or Ableton Live (see Sections 3 and 4 for details). These buttons send unique MIDI CC messages and can be used for many purposes in other applications. For a table of assigned MIDI CC messages, please see Section 6.3.
5
2 |
Controls |
ATOM |
2.2 |
Note Repeat |
Owner’s Manual |
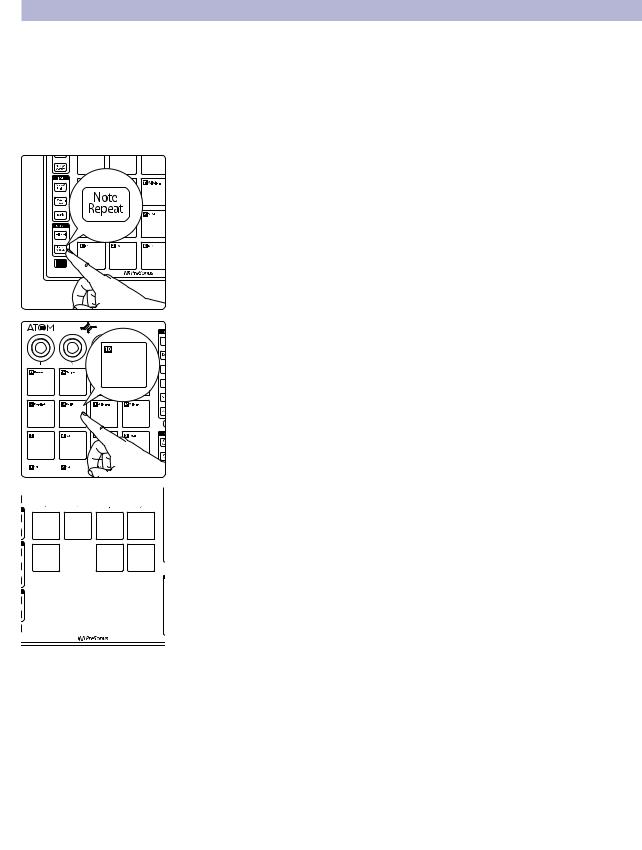
2.2Note Repeat
As previously mentioned, Note Repeat allows you to repeatedly trigger a sound at a specified rate for as long as you hold down the assigned pad. In this way, you can, for example, trigger a series of ¼ notes simply by pressing and holding a pad.
The MIDI clock determines the tempo at which Note Repeat triggers a sound. While on Internal Clock, this is set from the Quick Setup Mode. See Section 2.3.5 for details. When connected to a DAW or other application that provides a master MIDI clock, the tempo is set from within that application.
To engage Note Repeat, press the Note Repeat button while the desired bank is active. All the pads will flash.
Press the pad assigned to the sound on which you’d like to enable Note Repeat.


 Pads 1-8 will illuminate solid.


 Press and hold the Note Value you would like to use. The Note Values displayed to the


 right of each pad’s number.
The sound assigned to the selected pad will repeat at the selected value until you release the pad.
Note: In Studio One, note repeat behaves slightly differently. The last pressed pad will be the pad selected for note repeat.
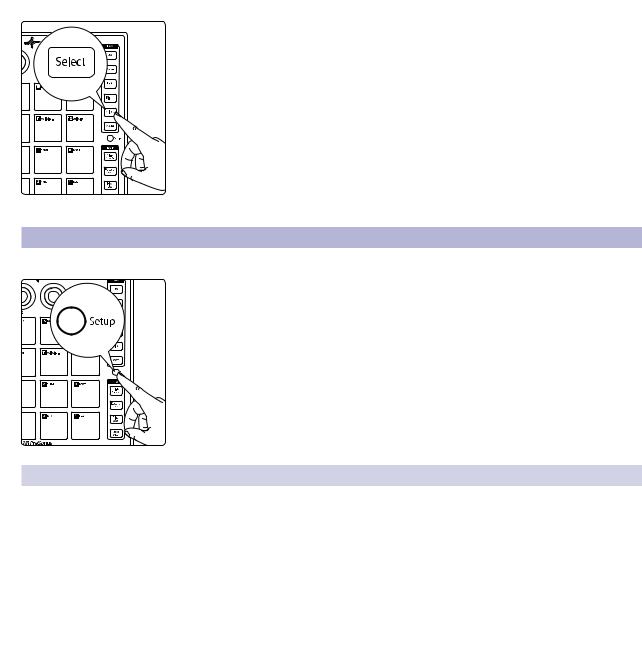
To select a different pad while still in note repeat, press and hold the Select button and select the desired pad. Upon release of the Select button, the new pad will be used for note repeat.
Note: At the time of publication, Ableton Live does not support Note Repeat with ATOM.
6
2 |
Controls |
ATOM |
2.3 |
Quick Setup Mode |
Owner’s Manual |
To change the sound that is being triggered, press the Select button and then press the desired pad.
To exit Note Repeat, press the Note Repeat button again. The button will remain illuminated as long as Note Repeat is active.
2.3Quick Setup Mode
Your ATOM controller provides customization options via Quick Setup Mode.
To launch Quick Setup Mode, press and hold the Setup button on the right side of your ATOM controller.
While Quick Setup Mode is active, the 16 pads on your ATOM controller will not send MIDI messages, rather they will act as toggle buttons for Quick Setup functions.
Releasing the Setup button exits Quick Setup Mode.
For advanced customization features, please see Section 6.4
2.3.1Pad Modes
MIDI Drum mode (Default) MIDI Keyboard mode |
Mardi Gras mode |
|||||
|
|
|
|
|
|
|
|
|
|
|
|
|
|
While Setup is enabled, Pads 1-3 allow you to select the behavior of the pads on your ATOM.
•MIDI Drum Mode. This is the default setting for your ATOM. While in this mode, the pads of your controller will illuminate with the same color for each bank. Pressing a pad will switch the color to white, indicating that the MIDI message has been sent.
•MIDI Keyboard Mode. While in this mode, the pads on your ATOM will illuminate following the pattern of a piano keyboard, where white keys are indicated by yellow and black keys are indicated by blue. See Section 2.3.1.1 for more information.
•Mardi Gras Mode. This is a test mode for your ATOM. While active, the RGB LEDs will cycle through the available colors.
Note: At the time of publication, Pad Modes are not available while Studio One or Live native control is active .
7

2 |
Controls |
|
|
|
|
|
ATOM |
||
2.3 |
Quick Setup Mode |
|
|
|
|
|
Owner’s Manual |
||
|
|
|
|
|
|
|
|
|
|
2.3.1.1 MIDI Keyboard Mode |
|
|
|
|
|
|
|||
|
|
|
C |
|
|
|
|
|
|
|
|
|
|
|
|
|
|
|
|
|
|
|
|
|
OCTAVE |
OCTAVE |
|||
|
|
|
|
|
DOWN |
|
UP |
||
G# A A# B
E F F# G
C C# D D#
While MIDI Keyboard Mode is active, your ATOM pads will function as a single octave keyboard from C to C in each octave. Pads
15 and 16 adjust the octave down or up respectively.
Note: Banking is disabled in this mode. Pad layout may vary depending on application.
2.3.2Pressure Type
|
O |
|
CC |
|
Aftertouch |
Channel Pressure (Default) |
||
|
|
|
|
|
|
|
|
|
|
|
|
|
|
|
|
|
|
You can select the type of message that is sent by pressure as follows:
•Off. This turns off pressure messages.
•CC. Post-strike pressure sends CC22.
•Aftertouch. Post-strike pressure sends Aftertouch (also known as polyphonic aftertouch).
•Channel Pressure. This is the default setting for your ATOM. Post-strike pressure sends Channel Pressure messages (also known as monophonic aftertouch).
8
2 |
Controls |
ATOM |
2.3 |
Quick Setup Mode |
Owner’s Manual |
2.3.3Pressure Threshold
|
Low |
|
Medium |
High (Default) |
|
|
|
|
|
|
|
|
|
|
|
|
|
0 |
0 |
0 |
|
||
|
|
The Pressure Threshold for your ATOM controller pads has three settings:
•Low. This setting requires the least amount of pressure after the initial strike before sending a MIDI pressure message.
•Medium. While this setting is enabled, the pressure message is delayed slightly after the initial strike.
•High. This is the default setting for the ATOM and requires the greatest amount of pressure after the strike for the MIDI pressure message to send.
Power User Tip: Regardless of the Pressure Threshold setting, the pressure value always starts from 0 or 127 (depending on the Global Pressure setting).
The Global Pressure range can be toggled to transmit values from 0 to 127 or from 127 to 0. By default, the range is from 0 to 127.
Pressure Range Toggle
0 to 127 OR 127 to 0 (Default)
2.3.4Strike Velocity
|
Soft |
Medium (Default) |
|
|
Hard |
||
|
|
|
|
|
|
|
|
|
|
|
|
|
|
|
|
|
|
|
|
|
|
|
|
|
|
|
|
|
|
|
|
|
|
|
|
|
|
|
|
The Strike Velocity for your ATOM controller pads has three settings. Use Pads 13-15 to adjust how responsive your pads will be as you press them:
•Soft. This setting is optimized for players who prefer to play softly. Soft pad strikes will result in higher MIDI values.
•Medium. This is the default setting for the ATOM and has been optimized for a wide range of players and performance styles.
•Hard. This setting is optimized for players who prefer to play with a lot of force. Harder pad strikes will result in lower MIDI values.
9

2 |
Controls |
ATOM |
2.3 |
Quick Setup Mode |
Owner’s Manual |
2.3.5Internal MIDI Clock Tempo
MIDI Clock Tempo
TAP
While in Quick Setup Mode, Pad 16 will flash in sync with the Internal MIDI Clock tempo. By default, this is set to 120 BPM. To adjust the Tempo, use this pad to tap the desired BPM.
This pad is disabled if External MIDI Clock is available and the DAW transport playback is active. External MIDI Clock is enabled automatically when Studio One Native control is active.
Power User Tip: Your MIDI Clock Tempo can also be adjusted by turning Knob 4 while in Quick Setup Mode.
2.3.6Panic
Panic
All Notes Off
To disable all MIDI signals, press Pad 4 while holding the Setup button.
10

3 |
Advanced Studio One Integration |
ATOM |
3.1 |
Song Setup Mode |
Owner’s Manual |
3 Advanced Studio One Integration
3.1Song Setup Mode
Pressing the Song Setup button allows you quickly open up the Instrument browser in Studio One, select your Instrument plug-in, choose your desired preset, and create track, all from your ATOM controller as well as provide quick navigation functions.
While in Song Setup mode, the 16 pads on your ATOM will not function as controllers for instruments.
Note: If a plug-in is currently in focus and the Browser is already open when you press the Song Setup button, the knobs will control the plug-in and not function as described in this section. To use the controls as described below, simply close the currently focused plug-in window.
3.1.1Controlling Tempo
While Song Setup mode is active, Pad 14 functions as the tap tempo control for your Studio One session.
 TAP
TAP
Power User Tip: You can also use Knob 2 to adjust the tempo. Turning the knob clockwise will increase the tempo. Turning the knob counterclockwise will decrease it.
Selecting Events
While Song Setup is active, press the Left and Right buttons to select the previous and next events on the currently selected track’s timeline.
Note: These buttons navigate the Browser when it is in focus.
Holding the Shift button while pressing the Left or Right buttons will select multiple events.
11
3 |
Advanced Studio One Integration |
ATOM |
3.1 |
Song Setup Mode |
Owner’s Manual |
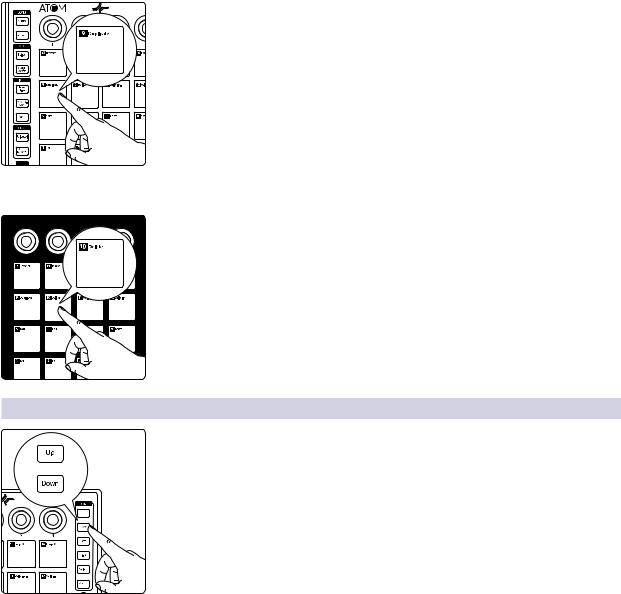
Duplicate Event
Press Pad 9 to duplicate the currently selected event.
Delete Event
Press Pad 10 to delete the currently selected event.
3.1.3Navigating Tracks
Press the Up and Down buttons to navigate through the track list.
Note: These buttons navigate the Browser when it is in focus.
12
Loading...