


 Loading...
StudioLive™ AI Software
Library Reference Manual
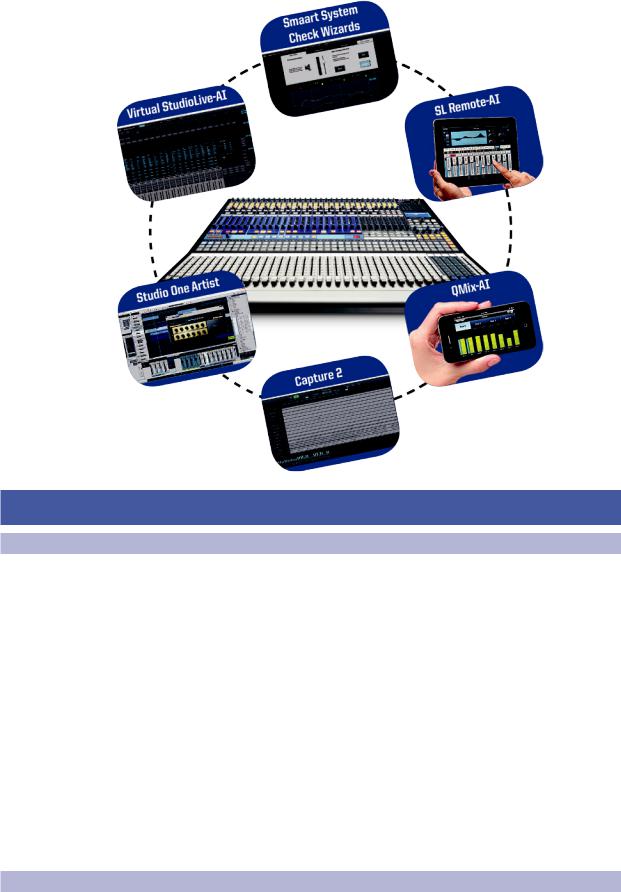
Universal Control-AI with Virtual StudioLive-AI and Smaart® System Check Wizards | StudioLive Remote-AI for iPad® | QMix™-AI for iPhone®/iPod touch®
Capture™ 2 | Studio One® Artist
®
www.presonus.com
English

Table of Contents
1Overview — 1
1.1Introduction — 1
1.2About This Manual — 1
1.3Technical Support — 2
1.4Summary StudioLive AI Software Library Features — 2
1.4.1Virtual StudioLive-AI — 2
1.4.2StudioLive Remote-AI for Apple iPad® — 3
1.4.3QMix-AI for iPhone® and iPod touch® — 3
1.4.4Capture 2 — 4
1.4.5Studio One Artist — 4
2Connecting to a Computer — 5
2.1Installation for Windows — 5
2.2Installation for Mac OS X — 6
2.3Using the StudioLive as an Audio Interface — 6
2.4Using the StudioLive with Popular Audio Applications — 7
2.5Digital Sends and Returns — 8
2.5.1Channel Digital Sends — 8
2.5.2Auxiliary Digital Sends — 9
2.5.3Digital Returns — 10
2.5.4Main Digital Return — 10
2.6Using Plug-In Effects as Inserts — 10
3Networking Your
StudioLive AI mixer — 12
3.1Step 1: Connect your StudioLive to your Network — 12
3.2Step 2: Connect your Computer to your Network — 13
3.3Step 3: Connect your iPad to your Network — 14
3.4Step 4: Connect your iPhone/iPod touch to your Network — 16
3.5Step 5: Setting iOS Permissions — 17
3.5.1StudioLive Remote
for iPad Permissions — 18
3.5.2QMix-AI for iPhone/iPod Touch Permissions — 18
4Universal Control-AI and VSL-AI — 19
4.1Universal Control-AI Launch Window — 19
4.2VSL-AI: Browser — 20
4.2.1VSL-AI: Panel Views — 22
4.3VSL-AI Overview Tab — 23
4.3.1Metering Controls — 23
4.3.2DSP Panel & Channel Controls — 24
4.3.3Aux Panel — 25
4.3.4FX Panel — 26
4.3.5Copying Mixes — 26
4.3.6Copying Channel Settings — 26
4.3.7Quickview — 27
4.4VSL-AI: Fat Channel Tab — 28
4.5Loading Scenes and Presets from VSL-AI — 29
4.5.1Loading a Scene — 29
4.5.2Loading Scribble-Strip Labels — 29
4.5.3Loading a Fat Channel Preset — 29
4.5.4Loading an FX Preset — 30
4.5.5Loading a GEQ Preset — 30
4.6VSL-AI: GEQ Tab — 31
4.6.1Selecting a GEQ to Edit — 31
4.6.2Enabling a GEQ — 31
4.6.3Flattening a GEQ Curve — 31
4.7Enabling Smaart Analysis (GEQ and PEQ) — 31
4.7.1Time-Frequency Spectrograph — 32
4.7.2RTA — 33
4.7.3Using the Smaart Spectrograph to Ring Out Monitors — 33
4.7.4Using the Smaart RTA While Mixing — 34
4.8VSL-AI: Setup Tab — 35
4.8.1Auxiliary Inputs Router — 35

4.8.2Scene Recall Filters — 36
4.8.3Link Channel Faders Preference — 36
4.8.4Default to Fader Locate Preference — 36
4.8.5Enabling Lockout Mode — 36
4.9Smaart System Check Wizards — 37
4.9.1Smaart Room Analysis Wizard — 38
4.9.2Smaart System Delay Wizard — 44
4.9.3Smaart Output Check Wizard — 48
4.9.4Go Remote — 49
4.9.5Mic Position — 50
4.9.6System Alignment Rules — 52
4.9.7Using the Trace: Spotting the Trend — 53
5StudioLive Remote-AI for iPad — 56
5.1Overview Page — 57
5.1.1Bus Assignments Query — 57
5.1.2Fat Channel Microviews and Zooms — 57
5.1.3Channel Controls — 58
5.1.4Masters Overview and Masters Section Page — 59
5.2Aux Mix Page — 59
5.2.1Aux Mix Select and Aux Mixing — 60
5.2.2Aux GEQ — 60
5.2.3FX Mix Select and FX Bus Mixing — 61
5.2.4FX Edit — 61
5.3GEQ Page — 62
5.4Scenes Page — 63
5.5Settings Page — 63
5.6Channel Zoom Page — 65
6QMix-AI for iPhone
and iPod Touch — 66
6.1Aux Mix Page — 66
6.2Wheel of Me — 67
6.3Settings Page — 69
7Capture 2 — 70
7.1Installation Instructions — 70
7.1.1Mac OS X — 70
7.1.2Windows — 71
7.2Start Page — 72
7.2.1Tagging and Organizing a Session — 72
7.2.2Creating a Session — 73
7.2.3Open a Session — 74
7.2.4Audio Device, Networking, and Sample Rate — 75
7.2.5Options Menu — 76
7.3The Session Page — 78
7.3.1Track Column — 79
7.3.2Transport — 80
7.3.3Time Display — 81
7.3.4Timeline Ruler — 81
7.3.5Navigating the Session — 81
7.3.6Editing Tools — 82
7.3.7Meter Bridge — 87
7.3.8Markers and the Marker List — 88
7.4Recording a Session in Capture — 90
7.5Virtual Soundcheck — 90
7.6Saving and Loading StudioLive AI Mix Scenes — 92
7.7Importing and Exporting Audio Files — 92
7.7.1Importing Audio Files into Capture — 92
7.7.2Export Audio Files — 93
7.8Mixing Your Capture Sessions — 94
7.8.1Creating a Mix in Capture 2 — 94
7.8.2Exporting Your Final Mix to an Audio File — 95
7.8.3Mixing a Capture 2 Session in Studio One — 95
7.8.4Mixing a Capture 2 Session in a Different Recording Application — 96
7.9Capture 2 Key Commands — 97

8 Studio One Artist Quick Start — 98
8.1Installation and Authorization — 98
8.1.1Running the Studio One Installer — 98
8.1.2Creating a User Account — 98
8.1.3Activating Studio One Artist Online — 99
8.1.4Activating Studio One Artist Offline — 100
8.1.5Installing Bundled Content
for Studio One Artist — 103
8.1.6Installing Third-Party Content — 104
8.1.7Enabling the Audio Driver — 104
8.2Creating a New Song — 105
8.3Creating Audio Tracks — 107
8.3.1Anatomy of an Audio Track — 108
8.4Adding Virtual Instruments
and Plug-in Effects to Your Song — 109
8.4.1Drag-and-Drop Virtual Instruments — 109
8.4.2Drag-and-Drop Effects — 110
8.4.3Drag-and-Drop Audio and MIDI Files — 110
8.5Recording in Studio One Artist — 110
8.6Mixing Capture Sessions in Studio One Artist — 113
1 |
Overview |
StudioLive™ AI Software Library |
1.1 |
Introduction |
Reference Manual |
1Overview
1.1Introduction
Your StudioLive™ AI mixer comes with a powerful software library that includes Capture™ 2 and Studio One® Artist. In addition, PreSonus Virtual StudioLive AI (VSL-AI) editor/librarian/remote-control software with Smaart Measurement Technology™ for Mac and Windows is a free download from the PreSonus Web site. PreSonus also offers StudioLive Remote-AI (SL Remote-AI) remote-control software for iPad® and QMix™-AI aux-mix control software for iPhone®/iPod touch®; both are free downloads from the Apple App Store.
Whether you want to remote-control your StudioLive from an iPad, provide your musicians with the ability to control their own monitor mixes, record a live show with just one mouse click, analyze your sound system’s performance in a room and adjust to compensate, mix your next hit album, or any combination of the above, your StudioLive and its software provide you with a complete suite of tools.
We encourage you to contact us with questions or comments regarding this product. PreSonus Audio Electronics is committed to constant product improvement, and we value your suggestions highly. We believe the best way to achieve our goal of constant product improvement is by listening to the real experts: our valued customers. We appreciate the support you have shown us through the purchase of this product.
1.2About This Manual
We suggest that you use this manual to familiarize yourself with the features, applications, and correct connection procedures for your StudioLive AI Software Library before trying to connect your StudioLive to your computer, iPad, iPhone, or iPod touch. This will help you avoid problems during installation and setup.
1

1 |
Overview |
StudioLive™ AI Software Library |
1.3 |
Technical Support |
Reference Manual |
Throughout this manual you will find Power User Tips. These tips provide useful hints on how to best use the StudioLive AI Software Library and take advantage of unique workflow functions and features.
1.3Technical Support
Many technical issues can arise when using a standard computer as a digital audio workstation (DAW) and when networking wireless devices. PreSonus can only provide support for issues that directly relate to the StudioLive AI mixer and interface, Universal Control-AI control-panel software, Virtual StudioLiveAI mixer-control software, StudioLive Remote-AI, QMix-AI, and Studio One.
PreSonus does not provide support for computer hardware, iOS hardware, wireless networks, operating systems, and non-PreSonus hardware and software, and it may be necessary to contact the manufacturer of these products for technical support.
Please check our Web site (www.presonus.com) regularly for software information and updates, firmware updates, and support documentation for frequently asked questions.
Online technical support is available to registered users through their My PreSonus account. Visit my.presonus.com to register.
PreSonus telephone technical support is available to customers in the USA on Monday through Friday from 9 a.m. to 5 p.m. Central Time by calling 1-225- 216-7887. Customers outside of the USA should contact their national or regional distributor for telephone technical support. A list of international distributors is provided at www.presonus.com/buy/international_distributors.
Advanced troubleshooting guides can be found at support.presonus.com/forums.
1.4Summary StudioLive AI Software Library Features
1.4.1 Virtual StudioLive-AI
The Virtual StudioLive-AI (VSL-AI) application is completely integrated with StudioLive AI mixers. VSL-AI is a highly advanced editor/librarian and control panel. Because of the continuous bidirectional communication between your StudioLive and VSL-AI, whatever you do on the StudioLive‘s control surface will be reflected in VSL-AI and vice versa.
•• Easy drag-and-drop workflow
•• Drag presets directly to channels
•• Drag parts of presets directly to components in the Fat Channel
•• Adjust the Fat Channel dynamics processing and parametric EQ, the graphic EQ, and the effects
•• Quickly drop entire scenes to the mixer for instant recall of all channel, effects, and graphic EQ settings
•• Swipe the mouse to quickly mute, solo, assign channels to multiple buses, etc.
•• Time-stamped backups of the entire board
•• Smaart Spectra™ Time-Frequency Spectrograph on every channel and bus
•• Smaart Spectra™ Real-Time Analyzer on every channel and bus
•• Smaart Room Analysis Wizard: generates a frequency-response trace of your room
•• Smaart System Delay Wizard: automatically calculates and sets the correct delay time on subgroup outputs
•• Smaart Output Check: quickly verify that StudioLive outputs are connected and functioning correctly
•• Talkback On/Off
•• Talkback Assign
•• Preset Management:
2

1 |
Overview |
StudioLive™ AI Software Library |
1.4 |
Summary StudioLive AI Software Library Features |
Reference Manual |
•• Store and organize presets on your computer, then transfer them to your mixer for use at the gig
•• Create presets on the road, store them to the mixer, then drag them to your preset pool the next time you’re connected to the computer
•• Reorder presets in mixer memory; easily order presets to best fit your gigs and workflow
•• Mixer Overview
•• See all of the most-used parameters on the mixer at once
•• See the state of all Fat Channel settings at once
•• See all aux mixes at once
•• See the current effects and parameter settings
•• See graphic equalizer settings
1.4.2 StudioLive Remote-AI for Apple iPad®
StudioLive Remote-AI (SL Remote-AI) for iPad provides direct wireless control over StudioLive AI mixers. As long as your StudioLive and your iPad are on the same wireless network, SL Remote-AI can control the console.
•• Provides wireless control over the StudioLive AI-series digital mixers
•• Overview page displays levels, mutes, panning, EQ curves, and Fat Channel processing for multiple channels at once
•• Aux page shows the levels, panning, and Fat Channel processing for the aux sends and internal FX buses
•• GEQ page lets you adjust the Main GEQ
•• Channel Zoom page shows every parameter for a single channel
•• Control any StudioLive AI mixer on the wireless network from one iPad
•• Multiple iPads can control the same StudioLive
•• Set permissions on the StudioLive AI mixer so that StudioLive RemoteAI on any iPad on the network controls only specified functions
•• Talkback On/Off
•• Talkback Assignments
•• Remote-Control Smaart Systems Wizards
•• Remotely recall scenes stored on your StudioLive AI mixer
•• Available free from the Apple App Store
1.4.3 QMix-AI for iPhone® and iPod touch®
QMix-AI for iPhone and iPod touch provides performers with wireless control over their monitor (aux) mixes onstage and in the recording studio.
•• Provides wireless control over StudioLive AI-series digital mixers
•• Remote-control aux mixes on any StudioLive on the same network
•• Using the Wheel of Me, control the levels of all of the user’s channels simultaneously, with one simple control.
•• Set permissions on your StudioLive AI mixer so that QMix-AI on any iPhone on the network only controls a specified aux mix
•• Available free from the Apple App Store
3

1 |
Overview |
StudioLive™ AI Software Library |
1.4 |
SummaryStudioLiveAISoftwareLibraryFeatures |
Reference Manual |
1.4.4 Capture 2
Included with StudioLive is Capture 2, a digital-audio multitrack-recording application designed to make recording quick and easy. Perfect for live recording and for mixing your audio in real time to a stereo audio file, Capture 2 was designed to interface perfectly with StudioLive-series mixers, allowing instant setup and recording.
Capture 2 allows you to record a single stereo track from the StudioLive’s main output, one pair of subgroup outputs, or a pair of aux sends, in addition to all input channels. This enables you to record the main mix or create a separate recording mix.
•• Multitrack recording application (input channels plus stereo stream from StudioLive)
•• NEW! One-click recording with Record Now button
•• NEW! Prerecord captures audio up to a minute before you press Record
•• NEW! Auto-Save at user-definable intervals
•• NEW! Automatic session and file recovery if the power fails
•• NEW! Sessions store metadata, enabling automatic session naming
•• NEW! Virtual Soundcheck mode makes it simple to soundcheck using previously recorded material
•• NEW! Session Lock feature prevents accidental keyboard access
•• Essential editing suite (copy, cut, paste, splice, resize)
•• NEW! Big Meter mode turns your monitor into a gigantic meter bridge
•• NEW! Stereo Playback mode—use Capture with any computer sound card
•• Peak LED-style meter bridge with clip indicators
•• Marker placement and recall
•• NEW! Marker List with Quick Locate
•• Export between markers
•• Record stereo mix from StudioLive AI mixer
•• Full transport control
•• Import/export individual WAV, AIFF, or OpenTL
•• Compatible with Mac® and Windows®
1.4.5 Studio One Artist
All PreSonus audio interfaces include PreSonus Studio One Artist recording software, which comes with over 6 GB of plug-ins, loops, and samples, giving you everything you need for music recording and production. The Studio One Artist Quick Start Guide is located in Section 8 of this manual. You will find a complete user manual on the Studio One Artist installation DVD.
•• Unlimited track count, inserts, sends, and plug-in instantiations
•• 20 high-quality PreSonus Native Effects™ plug-ins, in eight categories: amp modeling (Ampire XT), delay (Analog Delay, Beat Delay), distortion (RedLight Dist™), dynamics processing (Channel Strip, Compressor, Gate, Expander, Limiter, Tricomp™), equalizer (Channel Strip, Pro EQ), modulation
(Autofilter, Chorus, Flange, Phaser, X-Trem), reverb (Mixverb™, Room Reverb), and utility (Binaural Pan, Mixtool, Phase Meter, Spectrum Meter, Tuner)
•• Four high-quality PreSonus virtual instruments, including: Presence™ sample player, Impact™ drum machine, SampleOne™ sampler,
and Mojito analog-modeled subtractive synthesizer
•• Over 6 GB of loops, samples, and instruments
•• Open Capture 2 files natively
•• Innovative and intuitive MIDI mapping
•• Powerful drag-and-drop functionality for faster workflow
•• Mac OS X® and Windows® compatible
4
2 |
Connecting to a Computer |
StudioLive™ AI Software Library |
2.1 |
Installation for Windows |
Reference Manual |
2 Connecting to a Computer
The Universal Control-AI installer includes the ASIO/WDM (Windows) and Core Audio (OS X) drivers for the StudioLive AI-series mixers, as well as Universal Control-AI, and Virtual StudioLive-AI. We made the Universal Control-AI installer as simple and easy to follow as possible, and it will take you through each step of the installation process. Please read each message carefully to ensure the StudioLive driver and Universal Control-AI with VSL-AI are properly installed. In particular, be careful not to connect your StudioLive to the computer too soon.
Please visit www.presonus.com for the latest system requirements and an updated list of compatible hardware. It is also recommend that you check your recording software’s system requirements.
Power User Tip: As part of our commitment to the quality of our products, PreSonus continually updates its product drivers and software. Because of this, it is wise to visit www.presonus.com and check for the latest driver build before installing your product. Note: The speed of your processor, amount of RAM, and capacity, size, and speed of your hard drives will greatly affect the overall performance of your recording system. A faster processor and more RAM can reduce signal latency (delay) and improve overall performance.
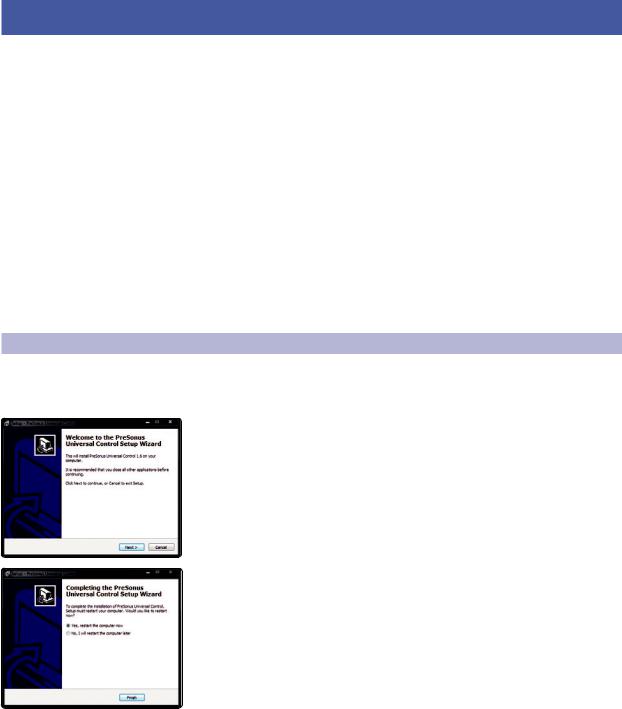
2.1Installation for Windows
Before beginning the Universal Control-AI installation setup, please quit all applications, including antivirus software, and disconnect the StudioLive from your computer.
Follow the onscreen instructions to complete the installation. When the installer has finished, it will prompt you to reboot your computer.
Click“Finish”to automatically restart your PC. Once your computer has rebooted, connect the StudioLive. When the Found New Hardware wizard launches, follow the“Recommended”steps.
Your StudioLive is now synced to your computer and ready to use!
5
2 |
Connecting to a Computer |
StudioLive™ AI Software Library |
2.2 |
Installation for Mac OS X |
Reference Manual |
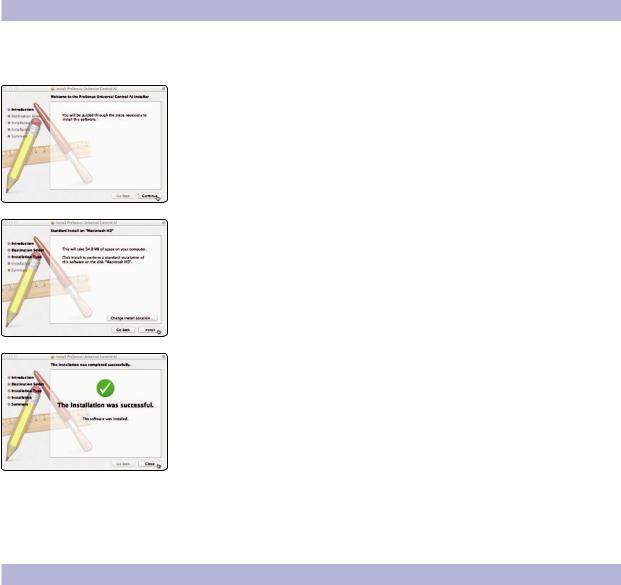
2.2 Installation for Mac OS X
The Universal Control-AI Installer will take you through each step of the installation process. Please read each message carefully, and be especially careful that you do not connect your StudioLive too soon.
1. After launching the installer, you will be directed to the Welcome screen. Click“Continue”and follow the onscreen instructions.
2. You will be directed to choose the hard drive onto which you want to install the StudioLive driver and Universal Control-AI with VSL-AI. You must choose your system drive. Storage drives and partitions cannot be used as hosts for the driver.
3. When the installation is completed, you will be prompted to reboot your computer. After your Mac has restarted, connect your StudioLive with a FireWire cable and power it on.
4. Once the installation is completed, you will find the Universal Control-AI program in your Applications folder. It is recommended that you place this in your Dock.
You are now ready to use your StudioLive!
2.3Using the StudioLive as an Audio Interface
The StudioLive AI mixers feature a built-in FireWire 800 interface that can be used with any application that supports Core Audio or ASIO and can also be used as a WDM device for a Windows computer.
Any input and bus with a Select button, plus the Solo bus, tape input, and talkback mic, can be recorded. Please consult the documentation that came with your audio application for specific instructions on how to select the StudioLive driver as the audio device driver for your software. It is important to note that the StudioLive AI mixers use the same driver as the PreSonus FireStudio family of interfaces and StudioLive 24.4.2 and 16.4.2 mixers. Its driver is displayed as“PreSonus FireStudio”in all driver-selection menus.
Power User Tip: If your StudioLive will not connect to the computer, verify that the FireWire cable is properly connected to the StudioLive and to your computer and disconnect all unnecessary peripheral FireWire devices.
6
2 |
Connecting to a Computer |
StudioLive™ AI Software Library |
2.4 |
Using the StudioLive with Popular Audio Applications |
Reference Manual |
2.4 Using the StudioLive with Popular Audio Applications
Below are basic driver-setup instructions for several popular audio applications. Complete setup instructions for PreSonus Studio One Artist and a brief tutorial on its features are located in Section 8 of this manual.
Steinberg Cubase 4+
1.Launch Cubase.
2.Go to Devices | Device Setup.
3.Select“VST Audio System”from the Devices column in the Device Setup.
4.Select PreSonus FireStudio from the ASIO Driver dropdown list.
5.Click“Switch”to begin using the StudioLive Driver.
6.Once you have successfully changed the driver, go to Devices | VST Connections to enable your input and output buses.
Ableton Live 5+
1.Launch Ableton Live.
2.Go to Options | Preferences | Audio.
3.Choose Driver Type: ASIO | Audio Device: ASIO PreSonus FireStudio
4.Go to Input Config : Enable and select the desired Input channels.
5.Go to Output Config : Enable and select the desired Output channels.
6.You may now select the StudioLive’s inputs and outputs for each track created in Live.
Apple Logic Pro/Express 7+:
1.Launch Logic Pro/Express.
2.Go to Logic | Preferences | Audio.
3.Click on the Devices Tab.
4.On the Core Audio tab, check Enabled.
5.Select PreSonus FireStudio from the device menu.
6.You will be asked if you’d like to relaunch Logic. Click“try (re)launch.”
7.Your StudioLive features custom I/O labels for faster work flow. To enable these labels for use in Logic, go to Options | Audio | I/O Labels.
8.The second column in the pop-up window will be named “Provided by Driver.”Activate each of these labels for your StudioLive. When you are done, close this window.
9.You are now ready to use your StudioLive.
7

2 |
Connecting to a Computer |
StudioLive™ AI Software Library |
2.5 |
Digital Sends and Returns |
Reference Manual |
Avid Pro Tools 9+
1.Launch Pro Tools.
2.Got to Setup | Hardware and select PreSonus FireStudio from the Peripherals list. Click OK.
3.Go to Setup | Playback Engine and select PreSonus FireStudio from the menu at the top of the window. Click OK.
Cakewalk Sonar 6+
1.Launch Sonar.
2.Go to Options | Audio... and click on the Advanced tab.
3.Change the Driver Mode to“ASIO.”
4.Click the“OK”button.
5.Restart Sonar.
6.Go to Options | Audio... and click on the Drivers tab.
7.Highlight all input and output drivers beginning with“PreSonus FireStudio.”
8.Go to Options | Audio... and click on the General tab.
9.Set the Playback Timing Master to“PreSonus FireStudio ... DAW Out 1.”
10.Set the Recording Timing Master to“PreSonus FireStudio ... Mic/Inst 1.”
2.5Digital Sends and Returns
When using the StudioLive as an audio interface, it is important to understand the terms“digital send”and“digital return.”Because the audio interface
in the StudioLive is completely integrated with the other functions of the mixer, the FireWire I/O is designed to work as an independent bus. You can route (send) signals from other buses to the FireWire bus, and its output (return) signal is hard-coded to designated mixer channels.
The StudioLive 32.4.2AI has 48 available sends and 34 returns. The StudioLive 24.4.2AI has 40 available sends and 26 returns. The StudioLive 16.4.2AI has 32 available sends and 18 returns.
2.5.1 Channel Digital Sends
Digital Sends 1 through 32/24/16 are hard-coded to be sent pre-fader from the 32/24/16 input channels of the StudioLive. These sends are preor post-Fat Channel EQ and dynamics depending on the channel or bus being recorded.
The Digital Output button in the Fat Channel indicates the signal flow for the selected channel or bus send to the digital bus. Input channels are sent pre-Fat Channel; while the subgroup, main, and aux buses are sent post-Fat Channel EQ and Dynamics to the digital bus.
8

2 |
Connecting to a Computer |
StudioLive™ AI Software Library |
2.5 |
Digital Sends and Returns |
Reference Manual |
2.5.2 Auxiliary Digital Sends
Each StudioLive AI mixer features additional Digital Sends that can be routed in stereo pairs from the Setup tab in VSL-AI. Any combination of eight of the following stereo inputs and buses can be selected:
•• Main Mix Left / Right
•• Subgroup 1 and 2
•• Subgroup 3 and 4
•• Aux Send 1 and 2
•• Aux Send 3 and 4
•• Aux Send 5 and 6
•• Aux Send 7 and 8 (StudioLive 24.4.2AI and 32.4.2AI only)
•• Aux Send 9 and 10 (StudioLive 24.4.2AI and 32.4.2AI only)
•• Aux Send 11 and 12 (StudioLive 32.4.2AI only)
•• Aux Send 13 and 14 (StudioLive 32.4.2AI only)
•• Aux Send A and B (FXA and FXB Send Mixes)
•• Aux Send C and D (FXC and FXD Send Mixes)
•• Aux Return A (Aux Input A)
•• Aux Return B (Aux Input B)
•• 2 Track Left/Right
•• Talkback Left/Right
•• Solo Left/Right
Power User Tip: Note that either channel of the stereo pair can still be accessed on a mono track in your host application; only the routing must be assigned as a stereo pair. For instance, if you have a backing-vocal group routed to Subgroup 1 and a guitar group routed to Subgroup 2, you would create two mono tracks in your recording application. The track whose input is assigned to Subgroup
1 will record the backing-vocal group, and the track whose input is assigned to Subgroup 2 will record the guitar group. If, however, you have a stereo drum
group assigned to Subgroups 3-4, you can create a stereo track in your recording application and assign its input to Subgroups 3 and 4. For more information on subgroup mixing, please see Section 4.5 in the StudioLive AI Owner’s Manual.
The obvious exception to this principle is the Talkback Mic input. In this instance, the same signal will be printed on both sides of the send. In your recording software, you can create a mono track and assign it to either side of the stereo Digital Send to which it is routed. Both Digital Sends receive the same mono signal from the talkback mic preamp.
Section 4.8.1 discusses how to select the sources for these auxiliary stereo Digital Sends.
9

2 |
Connecting to a Computer |
StudioLive™ AI Software Library |
2.6 |
Using Plug-In Effects as Inserts |
Reference Manual |
2.5.3 Digital Returns
Each StudioLive input is hard-coded to receive its respective digital return. Outputs 1 through 32/24/16 in your recording application route these playback streams to their respective channels on the StudioLive (that is, the software’s Output 1 always goes to StudioLive Channel 1 digital return and so on). Once you route a track in your recording application to play through one of these outputs, it will always be accessible on its channel by simply pressing the Digital Return button.
Power User Tip: It is important to think of your digital returns and your analog inputs in the same way. When a digital return is engaged, it replaces the analog input in the mix. You can process it in the Fat Channel, include in it Aux mixes, and send it to an FX mix.
2.5.4 Main Digital Return
To provide the most flexible mixing environment, PreSonus has provided a stereo Main Digital Return to free the first 32/24/16 returns to be patched directly to their corresponding channels on your StudioLive AI mixer. Digital Returns 33-34/25-26/17- 18 are hard-coded to the Digital Return buttons in the 2Track In and Monitor sections on your StudioLive AI mixer. In this way, you can monitor the main output from your recording application without using two channels on your StudioLive, leaving the other channels available to be routed to the Fat Channel or for inserting a plug-in on a live instrument.
2.6Using Plug-In Effects as Inserts
Digital Transport streaming on your StudioLive is continuously bidirectional. This means that the StudioLive is always sending signals from the direct Digital Sends on all input channels, as well as from the auxiliary inputs and buses assigned to the second bank of Digital Sends. At the same time, the StudioLive is receiving signals back from the digital returns. Because the digital returns always come back to their respective StudioLive channels, you can quickly insert a plug-in from your recording application into any channel strip and monitor it in real time.
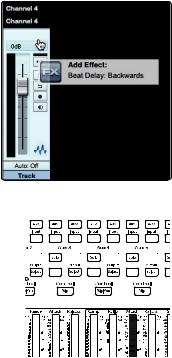
In this example, we will insert the Beat Delay plug-in from PreSonus Studio One onto Channel 4 of the StudioLive.
1.To begin, create a mono audio track in Studio One.
2.Assign its input to Channel 4 and its output to Output 4.
(Several DAW applications, including Apple Logic, do not offer mono output buses. If this is the case, you must route the output stream to, for example, Channels 3-4 and pan the channel all the way to the right so that it will only be sent to Output 4. Please consult your software’s user manual for specific instructions.)
10
2 |
Connecting to a Computer |
StudioLive™ AI Software Library |
2.6 |
Using Plug-In Effects as Inserts |
Reference Manual |
3.Once you have the routing set up in Studio One, drag-and-drop the Beat Delay plug-in onto your track and record-enable it. Software monitoring will be enabled automatically.
4. Press the Digital Return button on Channel 4 of your StudioLive. You can now monitor the analog signal from Channel 4 on your StudioLive with your inserted effect (in this case, Beat Delay).
Power User Tip: When using plug-ins as inserts, it is very important that you set as low a buffer size on your computer as possible without creating performance issues. For most new computers, this won’t be an
issue. A buffer size of 128 or less will provide low enough latency for most plug-in types; however, dynamics and EQ plug-ins and performance plug-ins such as amp-modelers may require lower latency settings.
See Section 4.1 for more information on buffer size settings.
Please note: setting the buffer size too low on older or slower computers, or on a computer that has not been properly optimized, may result
in poor performance. Always be sure to test the limits of your system before attempting CPU-intensive tasks in mission-critical situations.
11
3 |
Networking Your StudioLive AI mixer |
StudioLive™ AI Software Library |
3.1 |
Step1:ConnectyourStudioLivetoyourNetwork |
Reference Manual |
3 Networking Your StudioLive AI mixer
Your StudioLive AI-series mixer provides you with two choices of connecting to a wireless router. You can either connect it directly to the router using an Ethernet cable, or connect it wirelessly using the included USB Wi-Fi adapter. It is important to mention that the StudioLive AI mixer does not support hotswapping the Wi-Fi adapter. It must be connected when you boot up your
mixer to use it. Also, the included adapter is the only LAN adapter supported for use with the StudioLive AI mixer. If a direct Ethernet connection to a network connection is available, the Wi-Fi adapter will not scan for additional networks.
Power User Tip: Network connections occasionally require troubleshooting, especially when a lot of wireless networks are in use. Because of this, it is always a good idea
to get your networked devices and StudioLive happily communicating before the pressure is on, and you have a singer trying to dial in a monitor mix while you’re trying to mic the drum kit. So while the guitarist is flirting with the bartender, take a quick moment to get your iPad, iPhone, computer, and StudioLive talking.
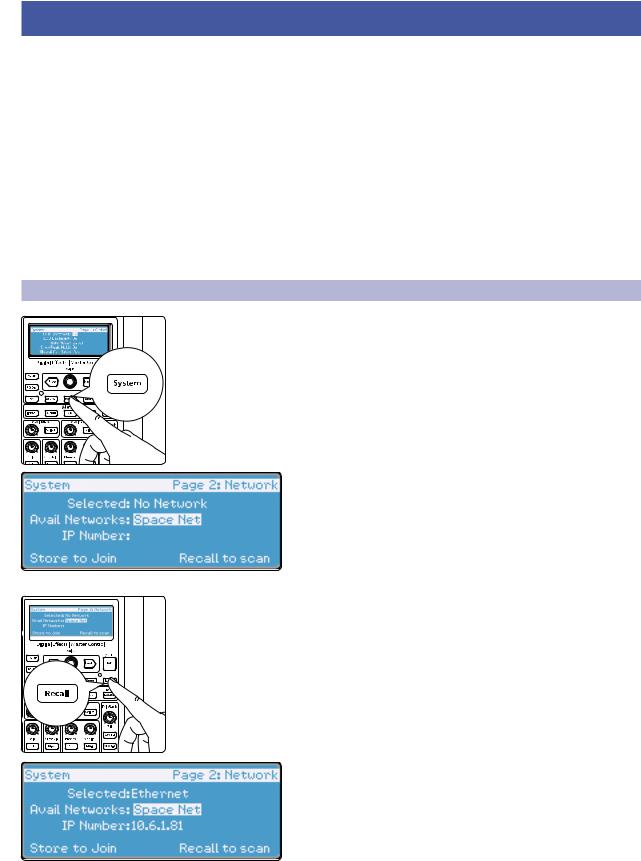
3.1Step 1: Connect your StudioLive to your Network
1. Press the System button on your StudioLive to open the System menu.
2. Page down to Page 2: Network.
3. Press the Recall button to scan for available networks.
If your wireless router is connected to your StudioLive mixer’s Ethernet port, your mixer will join automatically. Once you see an IP number appear on the LCD, your mixer is ready to be wirelessly remote controlled by VSL-AI, SL Remote-AI, or QMix-AI. Continue to Step 4 for instructions on connecting wirelessly to your router.
12
3 |
Networking Your StudioLive AI mixer |
StudioLive™ AI Software Library |
3.2 |
Step 2: Connect your Computer to your Network |
Reference Manual |
4. Use the Value Encoder to scroll through the available networks.
5. When you have found the network you would like to use, press the Store button to join.
Power User Tip: Your StudioLive AI mixer ships from the factory ready to connect to any wireless network named “studiolive” with a password of “studiolive”. If you configure you wireless router with this information, your StudioLive mixer will connect as soon as you press Store.
6. Use the Value encoder and Next button to enter the password for your network. When you are done, press the Store button to connect to the network. Every time you turn on your StudioLive AI mixer, it will look for this network and attempt to connect to it.
Please Note: the StudioLive only supports WPA and WPA2 security.If you do not see an IP address appear within 10 seconds after pressing the Store button, verify that your router is configured using one of these security protocols.
7.Once your mixer has successfully joined to your wireless network, you will see an IP Number appear on the LCD and your mixer is ready to be wirelessly remote controlled by VSL-AI, SL Remote-AI, or QMix-AI.
3.2Step 2: Connect your Computer to your Network
Windows 7+
1.Click on the network icon in the notification area to open the Connect to Network Control Panel.
2.Select the same wireless network that you saved on your StudioLive AI mixer.
3.Enter the password.
4.Click Connect.
Mac OS X 10.7 and later
1.On the Menu bar click on the Wireless Status icon.
2.From the pull-down menu select the same wireless network that you saved on your StudioLive AI mixer.
3.Enter the password.
4.Click Join.
13
3 |
Networking Your StudioLive AI mixer |
StudioLive™ AI Software Library |
3.3 |
Step 3: Connect your iPad to your Network |
Reference Manual |
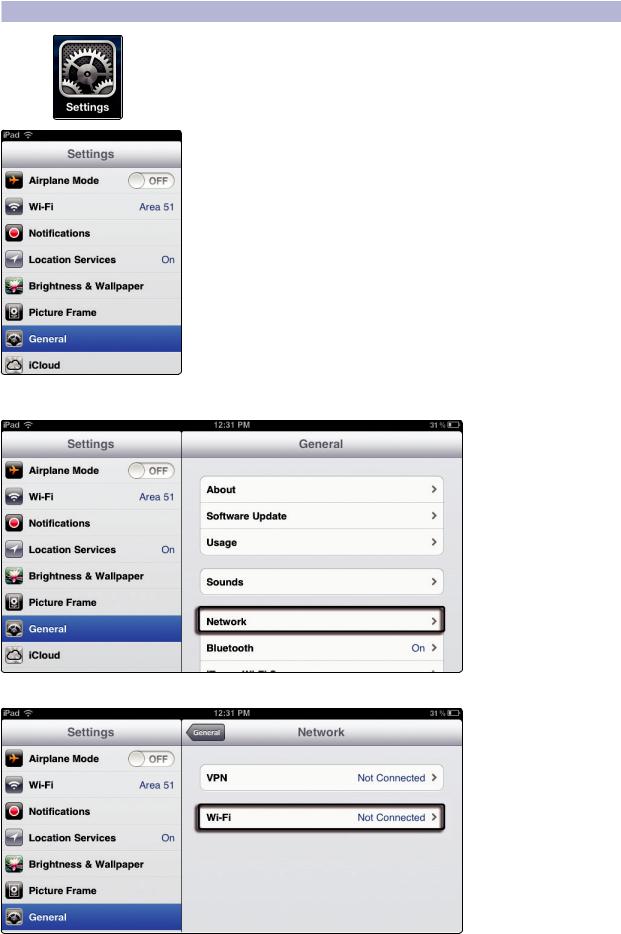
3.3Step 3: Connect your iPad to your Network
1.Tap on the Settings icon in your iPad.
2.Tap on“General.”
3. Tap on“Network.”
4. Tap on“Wi-Fi.”
14

3 |
Networking Your StudioLive AI mixer |
StudioLive™ AI Software Library |
3.3 |
Step 3: Connect your iPad to your Network |
Reference Manual |
5.Under“Choose a Network,”find the same network you saved on your StudioLive from the list. Tap the network to select it.
6. Enter the password when prompted and tap Join.
7.Tap on the menu arrow to the right of the desired network’s name to open its network settings.
8.Turn Auto-Join to“On.”You are now ready to launch StudioLive Remote-AI and mix on the go!
15
3 |
Networking Your StudioLive AI mixer |
StudioLive™ AI Software Library |
3.4 |
Step4:ConnectyouriPhone/iPodtouchtoyourNetwork |
Reference Manual |
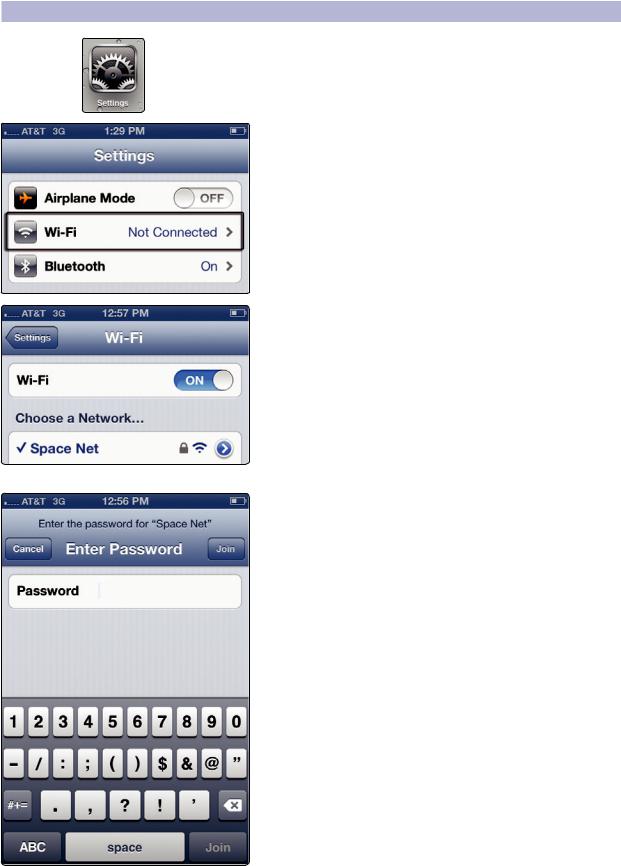
3.4Step 4: Connect your iPhone/iPod touch to your Network
1.Tap on the Settings icon in your iPhone/iPod touch.
2.Tap on“Wi-Fi”making sure it is set to“On.”
3.Under“Choose a Network,”select the same network you saved on your StudioLive from the list.
4.Tap on the network to select it.
5.Enter the password when prompted and tap Join.
Important: You must connect your computer and iOS devices to the same network as your StudioLive AI mixer each time you plan on remote-controlling your StudioLive with StudioLive Remote-AI, VSL-AI, or QMix-AI.
16
3 |
Networking Your StudioLive AI mixer |
StudioLive™ AI Software Library |
3.5 |
Step 5: Setting iOS Permissions |
Reference Manual |
3.5 Step 5: Setting iOS Permissions
Controlling your StudioLive remotely with StudioLive Remote-AI for iPad or QMix-AI for iPhone/iPod touch allows you to move about the venue freely. However, it can also put the full power of the StudioLive in multiple hands— some more adept than others. Therefore, your StudioLive enables you to limit each iOS device’s access to the mixer features by setting permissions.
Once an iOS device is connected to your wireless network and has launched SL Remote-AI or QMix-AI, the device will be displayed in the Remote Devices list on the System Menu on your StudioLive. Each device will be listed using its device name so you can easily identify which device is which. This name can be changed in iTunes or in the General>About settings on the iOS device.
Once you have connected and configured an iOS device, the same permissions will be set for that device every time you connect it. Complete information about SL Remote-AI and QMix-AI can be found in Sections 5 and 6.
Note: You must give permission to an iOS device from the StudioLive System menu in order to remote control your StudioLive AI-series mixer from that device.
1. Press the System button on your StudioLive to launch the System menu.
2.Page down to navigate to Page 3: iOS Setup.
3. Use the Value encoder to scroll through the list of available iOS devices.
4. When you find the device for which you’d like set permissions, use the Next button to navigate to the first permissions field. Use the Value encoder to set the device permission.
17

3 |
Networking Your StudioLive AI mixer |
StudioLive™ AI Software Library |
3.5 |
Step 5: Setting iOS Permissions |
Reference Manual |
3.5.1 StudioLive Remote for iPad Permissions
When setting permissions for SL Remote-AI users, you will choose between giving full access to all SL Remote-AI functions or providing limited access to just a few aux-mix functions. In most cases, one iPad will be configured as front-of-house (FOH), and the others will be configured as aux mixes.
Mix Permissions. Sets the level of functionality in SL Remote-AI.
•• None. SL Remote-AI on the select iPad will not be able to control your StudioLive AI-series mixer
•• FOH. Enables all SL Remote-AI functions.
•• All Auxes. SL Remote-AI will only control the channel send levels for all aux mixes.
•• Aux 1-14/10/6. SL Remote-AI will only control the channel send levels for the specified aux mix.
Other Permissions. Choose between Ch Rename or None. Ch Rename allows SL Remote-AI users to remotely change the channel and bus scribble-strip labels. These changes are also reflected in VSL-AI, QMixAI, and on the Channel Info page on the StudioLive AI mixer.
3.5.2 QMix-AI for iPhone/iPod Touch Permissions
When setting permissions for QMix-AI users, you will choose between providing full access to all aux mixes, providing access to only a single aux mix, and limiting the user to just the Wheel of Me functions.
Mix Permissions. Sets the level of functionality in QMix-AI.
•• None. QMix-AI on the select iPad will not be able to control your StudioLive AI mixer.
•• All Auxes. QMix-AI will control the channel send levels for all aux mixes.
•• Aux 1-14/10/6. QMix-AI will only control the channel send levels for the specified aux mix.
Other Permissions. Choose between Wheel Only or None. Wheel Only disables the Aux Mix page in QMix-AI. When this is enabled, the user will only be able
to use the Wheel of Me on the single aux to which you’ve provided access. When Wheel Only is enabled, you can only give access to one aux mix.
18

4 |
Universal Control-AI and VSL-AI |
StudioLive™ AI Software Library |
4.1 |
Universal Control-AI Launch Window |
Reference Manual |
4 Universal Control-AI and VSL-AI
Universal Control-AI includes two windows: the Launcher window and the Device window. For the StudioLive, the Device window is the Virtual StudioLive-AI (VSL-AI) application. VSL-AI provides bidirectional control of channel, subgroup, aux, and main-bus levels; Fat Channel parameters; aux
mixes; effects; and the graphic EQs. It also provides a visual overview of your StudioLive settings so that you can see, adjust, and organize them. VSL-AI includes a librarian, allowing you to easily manage your presets and scenes.
Controlling your StudioLive with VSL-AI is as easy as drag-and-drop. Load Fat Channel presets and scenes by simply dragging them onto the channel or mixer overview. You can load Fat Channel presets as a complete channel strip or as individual gate, compressor, and EQ presets. Through VSL-AI, you can back up all of the scenes and presets stored on your StudioLive. These stored settings can be loaded from disk or sent to, and stored internally on, the StudioLive.
Since control is bidirectional, fader moves and parameter changes made on the StudioLive are reflected in VSL-AI. So, for example, you can set up the StudioLive the way you want it and then save your scene and other presets in VSL-AI.
VSL-AI also lets you create a password for your StudioLive so that you can lock out unauthorized users. (See Section 4.8.5 for details.) From the Launcher window, you can set basic parameters such as buffer size and sample rate.
To use VSL-AI, you must do one of two things:
•• Connect and sync your StudioLive to your computer using a FireWire s800 cable. This option allows you to use all the features VSL-AI provides, including Smaart Spectra Analysis and the Smaart System Check Wizards while recording and playing back audio through Capture, Studio One, or a third-party DAW of your choice.
•• Connect your StudioLive and computer to the same wireless network. This option will allow you to use your laptop to remote control the StudioLive AI mixer anywhere in the venue, but the Smaart tools
will be disabled as these features require an audio driver.
4.1Universal Control-AI Launch Window
The Universal Control-AI Launch Window offers basic configuration tools for using your StudioLive AI mixer as an audio device on your computer:
Sample Rate. Displays the sample rate set on the StudioLive AIseries mixer. Because your mixer is always the master clock, the sample rate must be set in the System menu on your mixer.
Clock Source. Displays the master clock for the audio driver.
Power User Tip: As mentioned above, the StudioLive AI mixer is the master clock for your audio system. The audio driver is clocked externally by the mixer. This means that your mixer will not be forced to reclock (and mute its outputs) if your computer crashes or is accidentally disconnected.
19

4 |
Universal Control-AI and VSL-AI |
StudioLive™ AI Software Library |
4.2 |
VSL-AI: Browser |
Reference Manual |
Safe Mode. Changes How the StudioLive Driver’s Buffer Size is Set.
•• Low Latency. Input and output buffers are both identical to the Buffer Size setting.
•• Normal Mode. Slightly increases the output buffer for typical operation.
•• Safe Mode 1-2. Increases the output-buffer size for added stability. Block Size (Windows Only). Changes the StudioLive Buffer Size.
You can set the buffer size from 64 to 4,096 samples. The buffer size determines the roundtrip time it takes audio data to be converted from analog to digital and back to analog. As a general rule, the higher the buffer size, the better the system performance, but the less playable virtual instruments and the like become. In general, 512 samples (11 to 12 milliseconds) will provide you with a large enough buffer for optimum system performance, but low enough to be unobtrusive.
You should set your buffer size prior to launching your host application. On the Mac, the buffer size is set from inside your host application.
Power User Tip: In the event that audio playback from your computer is distorted or choppy, you may need to adjust your Block Size so that it is high enough for your computer’s performance capacity. For most modern computers, a Block Size of 32 or 64 samples will perform quite well in most situations. However, if you have loaded several plug-ins that require a large CPU overhead, your computer’s processor is older, or you do not have adequate RAM for your use, you may find that a Block Size of 256 or higher will allow you to add more plug-ins and tracks. Adjusting the Safe Mode to 1 or 2 will also help get better performance out of slower machines.
Device Window Button. Opens the Device Window. Click on this button to open Virtual StudioLive-AI (VSL-AI).
File Menu. Opens and Closes Launch and Device Windows.
From the File menu of the Launch window, you can open and close both windows, as well as quit the Universal Control-AI application.
•• Show All Devices. Opens the Device window for all connected FireStudio-family interfaces.
•• Close All Devices. Closes the Device window for all connected FireStudio-family interfaces.
•• About Universal Control-AI. Displays version information for Universal Control-AI.
•• Quit. Quits the Universal Control-AI application.
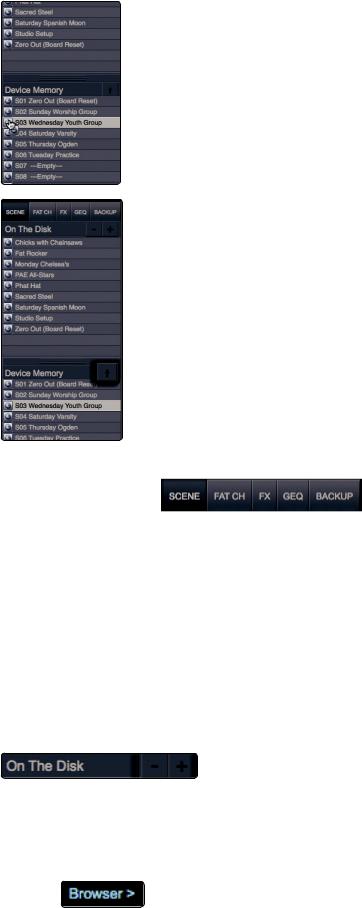
4.2VSL-AI: Browser
When you first launch VSL-AI, notice the browser window along the right side of the screen. The browser in VSL-AI functions similarly to the browser in Studio One. From the browser, you can see all of the scenes, Fat Channel presets, FX presets, and graphic EQ settings that are saved on your StudioLive and on your computer. You can also create new settings and can back up your entire library from this window. Simply drag-and-drop a scene or preset to load it on your StudioLive.
VSL-AI allows you to back up your scenes, Fat Channel, effects, and graphic EQ presets and permanently store them on your computer. Each type of preset can be added separately. In this way, you can back up only what you want, when you want.
20
4 |
Universal Control-AI and VSL-AI |
StudioLive™ AI Software Library |
4.2 |
VSL-AI: Browser |
Reference Manual |
VSL-AI makes reorganizing all the scenes and presets stored on your StudioLive as easy as dragging-and-dropping a file. To load your StudioLive with new scenes and presets, simply drag any scene or preset from the On The Disk section of the browser to any position in the Device Memory section of the browser.
To save a scene or preset from your StudioLive on your computer, simply select it from the Device Memory section and click the Add to Disk button.
Browser Tab Buttons. Displays the Different Preset
Categories on Your StudioLive and Computer.
All of your scenes and presets are contained in dedicated folders in VSL-AI. To view a specific set of presets, simply click on its tab.
•• SCENE. Displays stored scenes.
•• FAT CH. Displays stored Fat Channel presets.
•• FX. Displays stored effects presets.
•• GEQ. Displays graphic EQ presets.
•• BACKUP. Displays any backup logs that have been created in VSL-AI. The Backup tab allows you to create complete time-stamped snapshots of your StudioLive. This can be especially useful when completing a project that may need to be revisited in the future. To create a backup, simply click on the Backup button. To restore any backup file, select it in the On the Disk portion of the browser and drag it into the Device Memory section.
Add New and Remove Buttons. Creates a New or Deletes a Stored Scene or Preset.
To the right of the On The Disk section of the browser, you will see the Add New and Remove buttons. Clicking the Add New button will immediately create a new scene or preset.
Clicking the Remove button will delete the currently selected stored scenes or presets.
Show/Hide Browser. Displays/Hides the Browser Window.
The browser can be hidden from view to provide more real estate for your mix. Simply click on the Browser button to close the browser.
To reopen it, click on the Browser button again.
21
4 |
Universal Control-AI and VSL-AI |
StudioLive™ AI Software Library |
4.2 |
VSL-AI: Browser |
Reference Manual |
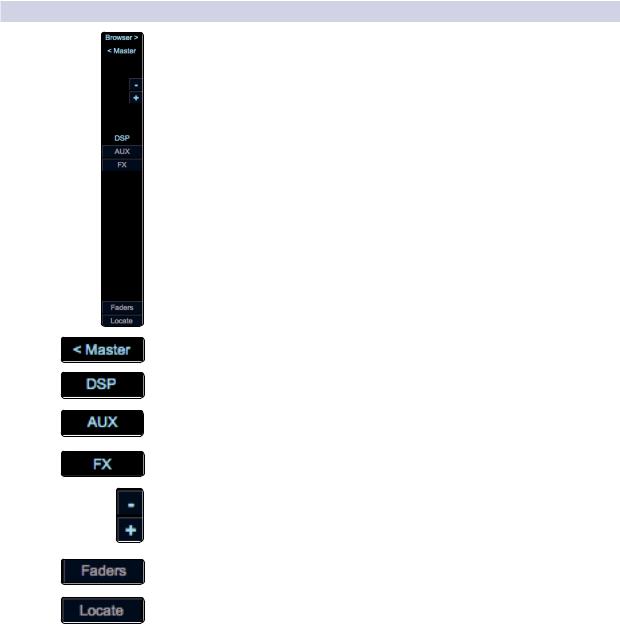
4.2.1 VSL-AI: Panel Views
VSL-AI allows you to customize your view based on your screen size and the amount of parameters you want to simultaneously view. The DSP, Aux, and FX panels of the VSL-AI window are individually available to hide or be shown depending on your needs. Additionally, you can choose to hide the Master and Fader sections.
When VSL-AI launches, it automatically reads your screen size and opens one, two, or three simultaneous panels, depending whether your screen height will support 714, 856, or 994 pixels.
While in Single Panel mode, the DSP, Aux, and FX panels are only individually visible. In Double Panel mode, the DSP panel is always visible but the Aux and FX panels can only be viewed one at a time. For screens larger than 994 pixels high, all three panels can be view simultaneously or hidden depending on your needs.
Master. Click this button to show/hide the entire Master Section, including the Main bus, Subgroups, FX, and Quick View sections.
DSP. Click this button to show/hide the Fat Channel Microviews Panel.
Aux. Click this button to show/hide the Aux Panel.
FX. Click this button to show/hide the FX Panel.
Expand/Contract. This feature is only available on screen resolutions large enough to add another panel to the window. Clicking the Expand button opens the panel below the currently selected panel. Clicking the Contract button closes the bottommost panel.
Faders. Click on this button to show/hide the Fader Panel.
Locate. When the Fader Panel is visible, you can engage Fader Locate mode. While in this mode you can view the physical fader position relative to the VSL-AI fader position.
At the top of the VSL-AI window, you will see four tabs: Overview, Fat Channel, GEQ, and Setup. The Overview tab provides you with a complete graphical representation of your StudioLive. As you adjust parameters on the StudioLive, you will notice that the VSL-AI overview is also updated. If you use your mouse to adjust a parameter in VSL-AI, the StudioLive will be updated remotely. It is important to remember that every button, knob, slider, and fader on the VSLAI corresponds directly to a button, knob, slider, or fader on your StudioLive.
22

4 |
Universal Control-AI and VSL-AI |
StudioLive™ AI Software Library |
4.3 |
VSL-AI Overview Tab |
Reference Manual |
4.3VSL-AI Overview Tab
4.3.1 Metering Controls
At the bottom of the Panel Controls, you will find the Metering Controls. These controls correspond directly to the same controls available on your StudioLive AI mixer:
Input Metering. Turns PFL input metering on and off. Switches the meters to display the pre-dynamics, pre-fader level of the input bus.
GR Metering. Turns gain-reduction metering on and off. Displays the gain reduction of the input bus.
Output Metering. Turns post-fader output metering on/off. Switches the meters to display the post-dynamics, post-fader level of the Input bus.
Aux Metering Button. Turns aux-bus master out metering on and off. Displays the output level of each of the aux and effects buses. Each odd-numbered channel meter displays the output level for the aux bus directly above it (Meter 1 shows the output level for Aux 1, Meter 3 displays the output level of Aux 2, etc.).
23

4 |
Universal Control-AI and VSL-AI |
StudioLive™ AI Software Library |
4.3 |
VSL-AI Overview Tab |
Reference Manual |
4.3.2 DSP Panel & Channel Controls
Digital Return
 Phantom Power
Post EQ & Dyn
 Polarity Invert
 High Pass Filter
Subgroup 1-4
Assign
Main Bus
Assign
Gate
Microview
Compressor
Microview
EQ Microview
GR Meter
Aux Sends 1-14
FX Send A
FX Send B
FX Send C
FX Send D
Pan
Select
Solo
Mute
Scribble
Strip
The Overview Tab provides the same controls for each channel that your StudioLive mixer does. The diagram to the left illustrates the available channel controls.
The DSP Panel displays microviews of each of the Fat Channel components. Double-clicking on any of these components will open the Fat Channel tab. The DSP Panel is the only panel that cannot be hidden while in Double or Triple Panel modes.
You can also copy and paste Fat Channel settings and load presets using these microviews. See Sections 4.3.6 and 4.5.3 for more information.
Fader
Meter
24
4 |
Universal Control-AI and VSL-AI |
StudioLive™ AI Software Library |
4.3 |
VSL-AI Overview Tab |
Reference Manual |
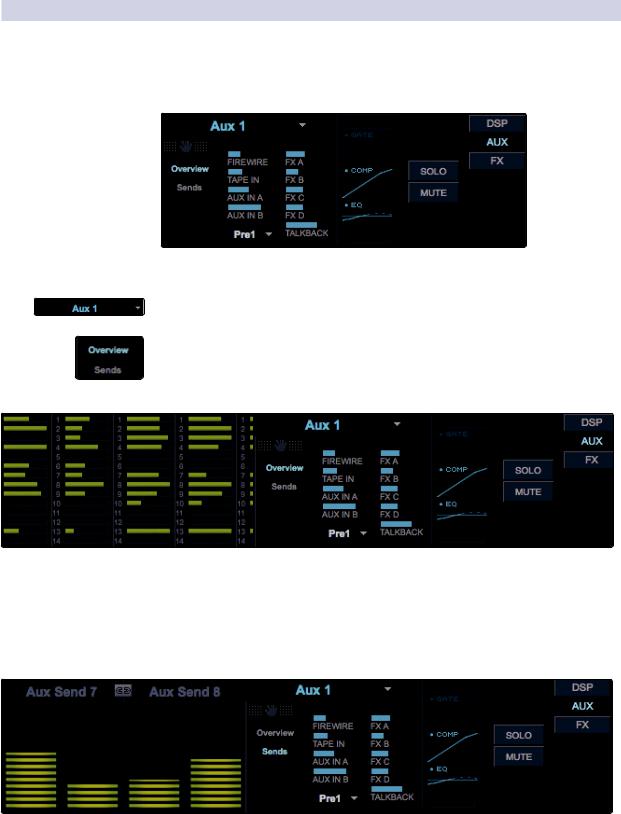
4.3.3 Aux Panel
When the Aux Panel opens, you will notice the Aux Masters view to the far right of the panel. The Masters view displays the controls for each aux bus as the controls appear on the StudioLive. The Masters view also displays the send levels for the Aux Flip Mode Channels (Main Digital Return, Tape Input, Aux In A and B, FXA, FXB, FXC, FXD, and Talkback).
From within the Masters view, you can also select each aux bus to edit its Fat Channel insert.
Click on the pull-down menu to quickly select a different aux.
From the Masters view, you can also choose between two different views of your aux mixes.
The Aux Overview displays the aux-send levels for every aux bus on every channel.
Power User Tip: To quickly set up an aux mix, use your mouse to set the send level for Channel 1. Right-click on the Channel 1 send level and sweep your mouse across the other channel sends for that aux. The send level will be copied to every other channel for that aux.
The Aux Sends view displays the aux mix for an individual aux bus. To select a different aux mix, simply click on that aux’s tab. While in this view, you can also stereo link aux buses.
25
4 |
Universal Control-AI and VSL-AI |
StudioLive™ AI Software Library |
4.3 |
VSL-AI Overview Tab |
Reference Manual |
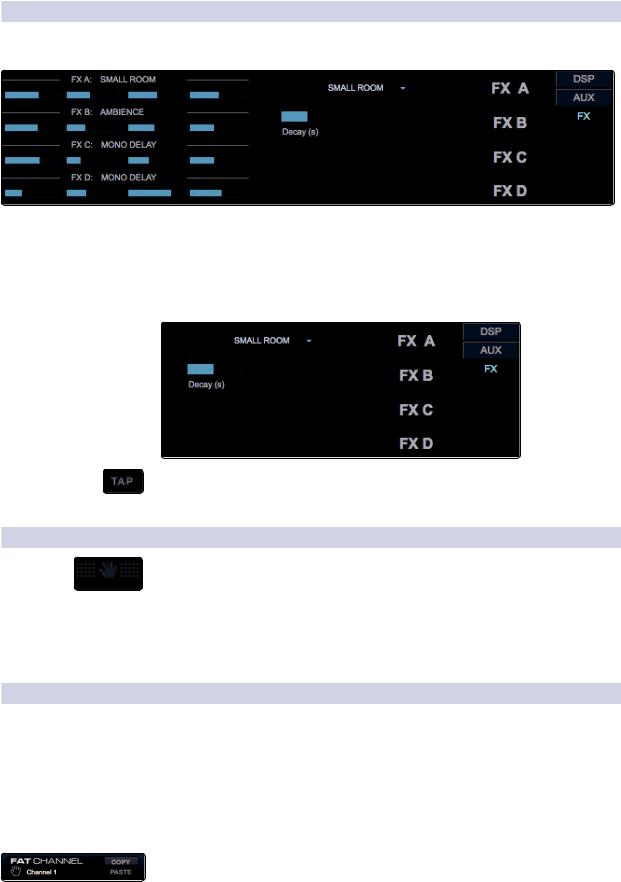
4.3.4 FX Panel
The FX panel provides an overview of the FX send levels for all four FX buses on every channel.
Power User Tip: To quickly set up an FX mix, use your mouse to set the send level for Channel 1. Right-click on the Channel 1 send level and sweep your mouse across the other channel sends for that FX bus. The send level will be copied to every other channel for that FX bus.
The FX masters view allows you to select the FX type and adjust its parameters. Use the tabs on the right of the FX Masters view to switch FX buses.
Tap Tempo (FXC and FX D only). VSL-AI allows you to remotely control the Tap Tempo function for a delay loaded on both the FXC and FXD buses. Clicking on it repeatedly will change the Time parameter to match the tempo entered.
4.3.5 Copying Mixes
Next to the main fader, and in each of the aux masters, you will see the Copy Mix handle. When selected with your mouse, this handle lets you drag-and-drop the mix for that bus to another bus. In this way, you can drag the main-fader mix to Aux 1 to set a starting point and can quickly give the singer the same mix on two different floor wedges.
Note: While the main mix can be copied to any aux, aux mixes can only be copied to other aux mixes and not to the main mix.
4.3.6 Copying Channel Settings
VSL-AI provides you with two ways to copy channel settings from one channel or bus to another. The first method functions essentially like you StudioLive hardware; the second is unique to VSL-AI.
Copy Channel (Copy/Paste)
StudioLive AI mixers give you the ability to quickly copy-and-paste a single channel or bus’s Fat Channel settings onto multiple channels and buses. VSL-AI provides the same functionality in exactly the same way.
To copy a channel or bus, simply select it and click the Copy button. All the Select buttons will flash. Click the Select buttons for the channels and buses to which you want to copy the Fat Channel settings. When you are done, click Paste.
Note: Subgroup and main bus assignments are only copied from channel to channel.
26
Loading...