

Pioneer AVIC 8 DVD II, AVIC 9 DVD II Hardware Manual

Hardware Manual
DVD Navigation Unit
AVIC-9DVD—
AVIC-8DVD—
ENGLISH


Introduction
How To Read This Manual
This manual mainly describes hardware-related information such as the part names of the Navigation System or precautions for use. Please read this manual before using your Navigation
System. The following issues are described in each chapter:
■
How to use this manual
Introduction
In this chapter, precautions for a use of this Navigation System is listed.
1. Setting of Remote Control and names of each part
This chapter describes setting methods and functions of the Remote Control for operating the
Navigation System. In addition, the topics, which are important to know before using this
Navigation System, such as the names of each part, inserting/ejecting discs, or how to set a
PC Card, are described in this chapter.
——
——
2. Using Built-in DVD Player (AVIC-9DVD
This chapter describes how to set DVD Video or CD and play with this Navigation System.
(This function is for AVIC-9DVD
Appendix
In this chapter, how to handle the Navigation System or discs, specifications of the Navigation System and how to reset the system are listed.
— only. This is not available for AVIC-8DVD—.)
only)
1

Table of Contents
Introduction.............................................................................. 1
How To Read This Manual................................................................................................. 1
How to use this manual ................................................................................................1
Table of Contents................................................................................................................. 2
Important Safety Information............................................................................................ 4
Notes Before Using the System....................................................................................... 5
Precaution ....................................................................................................................5
About the main unit battery ..........................................................................................7
Chapter 1
Setting the Remote Control and Names of Each Part ......... 9
Preparing the Remote Control.......................................................................................... 9
Selecting dipswitches ...................................................................................................9
Inserting the batteries to the Remote Control.............................................................11
Getting to Know the Components and What They Do.............................................12
The Remote Control ...................................................................................................12
Microphone.................................................................................................................18
Main unit.....................................................................................................................18
Chapter 2
Using Built-in DVD Player (AVIC-9DVD———— only).................... 21
To Ensure Safe Driving ....................................................................................................21
Before Using Built-in DVD Player ..................................................................................22
Difference of the source screen .................................................................................22
Compatible DVD, CD Formats ...................................................................................23
What the Symbols on DVDs Indicate .........................................................................24
How to Listen to a CD with Built-in DVD Player (AVIC-9DVD———— only) .....................26
How to use the Remote Control .................................................................................26
Basic method of listening to CD .................................................................................27
Basic of CD-Function .................................................................................................28
How to Watch DVD with Built-in DVD Player (AVIC-9DVD———— only) .......................... 29
How to use the Remote Control .................................................................................29
Basic method of watching DVD..................................................................................31
Operation of menu......................................................................................................33
Specifying a title or a chapter .....................................................................................34
Selecting a sound track type, subtitles or camera angles ..........................................34
To Operate While Checking on the Screen................................................................36
Adjusting Settings ............................................................................................................. 39
Basic Operation of the default setting screen.............................................................39
2

Items User can Change.................................................................................................... 40
Setting the subtitle .....................................................................................................40
Setting the audio language ........................................................................................ 41
Setting the menu language........................................................................................ 41
Setting viewing restriction .......................................................................................... 42
Setting aspect ratio of the screen ..............................................................................43
Setting the display of the angle selection mark ......................................................... 43
Language code list............................................................................................................ 44
Operating by Voice............................................................................................................ 45
Available voice commands ........................................................................................ 45
An example of voice operation .................................................................................. 45
Commands related to audio that you can speak ....................................................... 46
Appendix.................................................................................47
Handling and Care of the Disc........................................................................................ 47
Resetting the System ....................................................................................................... 49
Specifications..................................................................................................................... 50
3

Important Safety Information
Before using your Navigation System, be sure to read and fully understand the following safety
information:
• Read the manual before operating this Navigation System.
• This Navigation System is intended solely as an aid to you in the operation of your vehicle.
It is not a substitute for your attentiveness, judgement, and care when driving.
• Do not operate this Navigation System if doing so in any way will divert your attention
from the safe operation of your vehicle. Always observe safe driving rules and follow all
existing traffic regulations.
• Never allow others to use the system unless they have read and understood the operating
instructions.
• Never use this Navigation System to route to hospitals, police stations, or similar facilities
in an emergency. The map data may not include a comprehensive list of emergency service
facilities.
• Route and guidance information displayed by this equipment is for reference purposes
only. It may not accurately reflect the latest permissible routes, road conditions, or traffic
restrictions.
• Traffic restrictions and advisories currently in force should always take precedence over
guidance given by this product. Always obey current traffic restrictions, even if this product
provides contrary advice.
• Failure to input correct information about the local time may result in the product providing improper routing and guidance instructions.
• Never set the volume of your Navigation System so high that you cannot hear outside traffic and emergency vehicles.
• Keep your password secure and confidential. Knowledge of your password can give someone else access to personal information stored by the system, such as the history of destinations you have been to and your home address.
• To promote safety, certain functions are disabled unless the handbrake is on.
• The data encoded in the disc provided with this product is the intellectual property of the
provider, and the provider is responsible for such content.
• As with any accessory in your vehicle’s interior, you should not allow this Navigation System to divert your attention from the safe operation of your vehicle. If you experience difficulty in operating the system or reading the display, please make adjustments while safely
parked.
4
Notes Before Using the System
■
Precaution
• This product complies with the EMC Directives (89/336/EEC, 92/31/EEC) and CE
Marking Directive (93/68/EEC).
• This product does not work correctly in the areas other than Europe.
• Pay close attention to all warnings in this manual and keep this manual handy for future
reference.
• Should this product fail to operate properly, contact your dealer or the nearest authorised
Pioneer service facility.
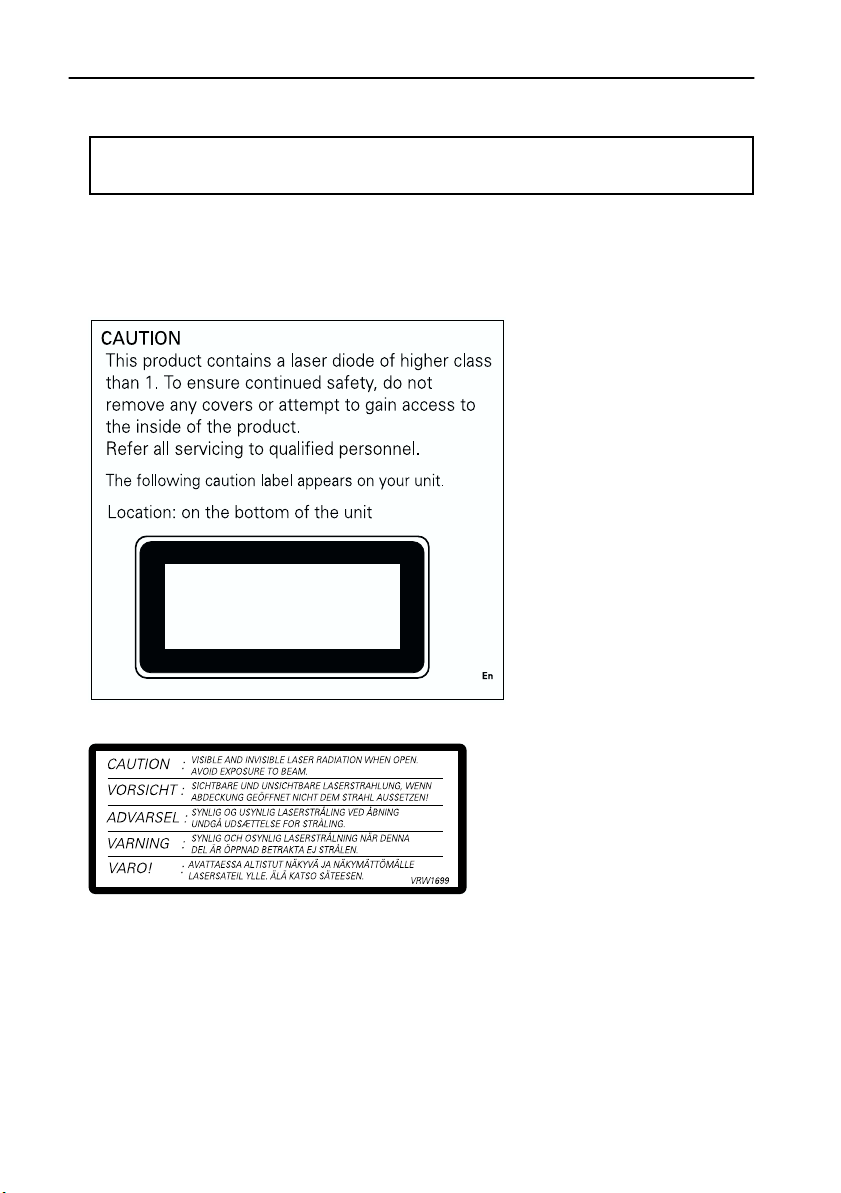
CLASS 1
LASER PRODUCT
On the top of the unit.
• The Pioneer CarStereo-Pass is for use only in Germany.
• Always keep the volume low enough for outside sounds to be audible.
• Protect this product from moisture.
Handbrake interlock
Certain functions offered by this Navigation System could be dangerous if used while driving. To
prevent them being used while in motion, there is an interlock with your vehicle’s handbrake. If you
attempt to use these functions while driving, the message “You cannot use this function while driving” will be displayed. Find a safe place to stop and apply the handbrake.
5

Colour difference of the map display between day and night
To prevent the normal display from appearing too bright and distracting you when driving
after dark or in dull conditions, the map background changes automatically to a darker colour
when you switch on your vehicle lights. You can, however, turn off this automatic switching.
(See “Map Display” in Operation Manual.)
Daytime display
Night display
The examples in this manual are illustrated using the daytime display. When driving at night,
the colours you see may differ from those shown.
To use this function, the Orange/white lead to this unit must be connected correctly. (See
“Map Display” in Operation Manual.)
Avoiding low battery
When using this unit, make sure to start your engine first. Using this unit without starting the
engine will run down the battery.
6
■
About the main unit battery
The main unit of your Navigation System has a lithium battery for memory backup. Please
dispose of the battery properly by following the instructions below.
WARNING
• Keep the lithium battery out of the reach of the children. Should the battery be swallowed,
immediately consult a doctor.
CAUTION
• Do not recharge, disassemble, heat or dispose of the battery in a fire.
• Use a CR2450 (3V) lithium battery only. Never use other types of battery with this unit.
• Do not handle the battery with metallic tools.
• Do not store the lithium battery with metallic materials.
• When disposing of used batteries, please comply with governmental regulations or environmental public institution’s rules that apply in your country/area.
• Always check carefully that you are loading the battery with its (+) and (-) poles facing in
the proper directions.
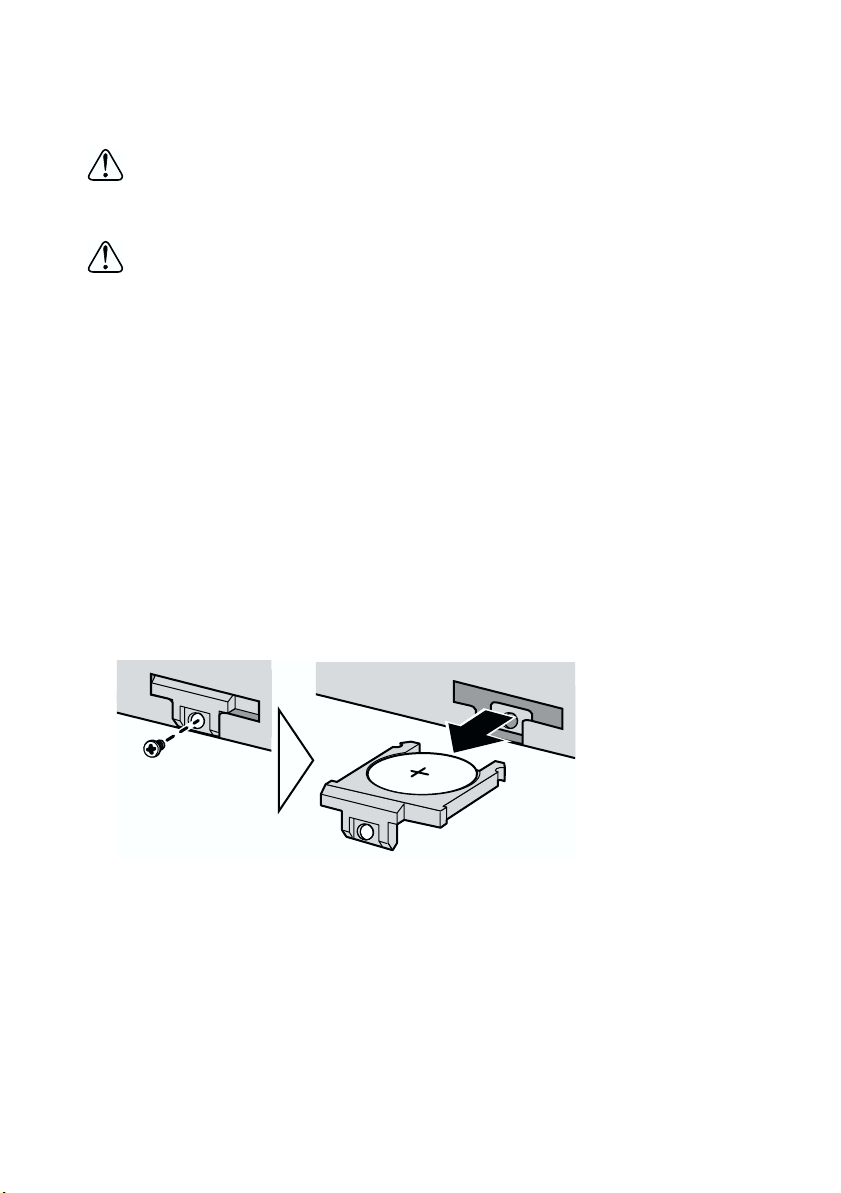
How to remove the battery
PRECAUTION:
• Remove the battery from the main unit using a non-metallic tapered instrument.
1 Using a screwdriver, remove the screw at the side of the main unit.
2 Using a pointed tool, pull out the tray on which the battery is set, and remove the bat-
tery.
7

8
Chapter 1
Setting the Remote Control and Names of Each Part
Preparing the Remote Control
You generally use the Remote Control to operate the Navigation System. Before using the
Remote Control, set the dipswitches and insert the batteries as described in the following sections.
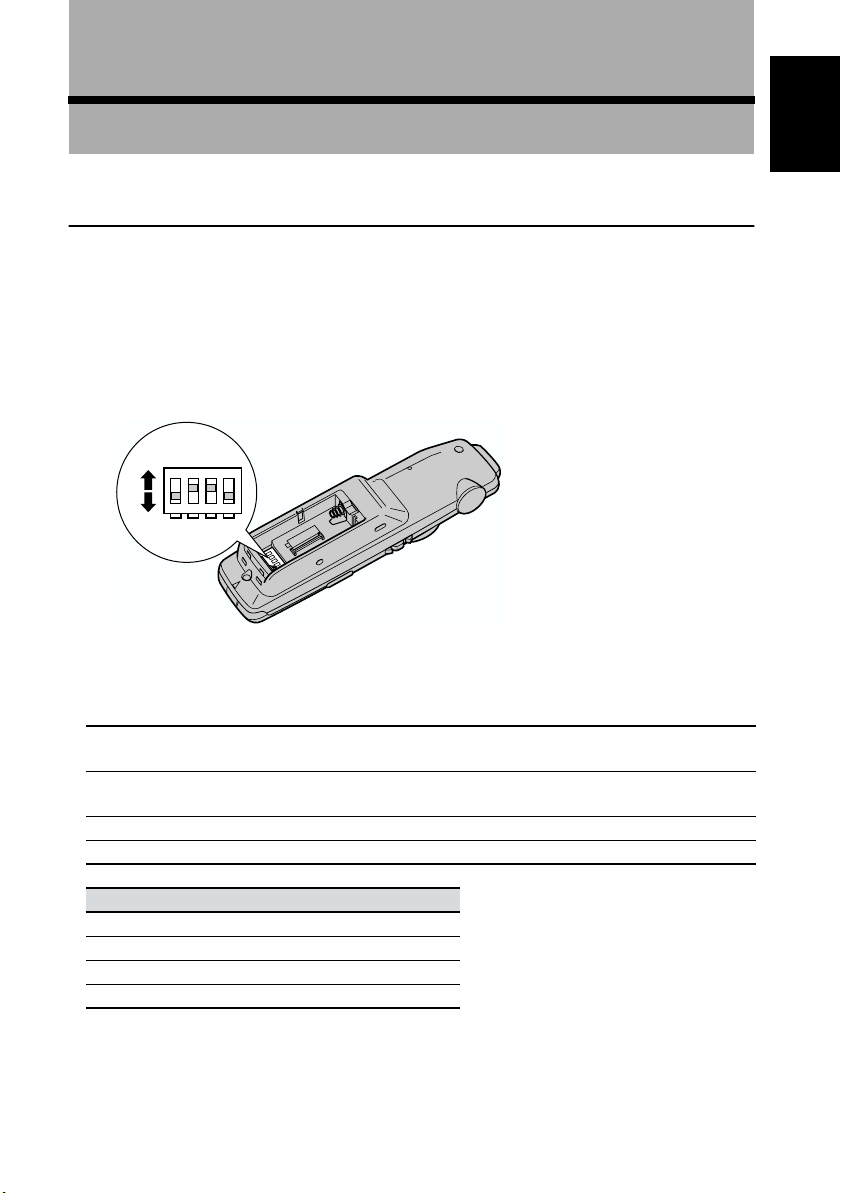
■Selecting dipswitches
When you remove the battery cover of the Remote Control and remove the batteries, you will
see the dipswitches as shown in the following illustration. You can set each dipswitch using
the tip of a ballpoint pen.
ON
ON
1234
OFF
Chapter 1
Setting the Remote Control and Names of Each Part
Setting Switch 1 and 2
Set depending on the equipment being combined. When using an AV master unit, use setting
C or D.
Setting A : When combining with AVH-P6400CD, AVH-P6400R or a display which has
26 pin RGB input terminal.
Setting B : When using with a display other than those above (AVX-P7000CD, AVX-7000,
AVD-W8000, AVD-W6000, AVD-W6010, AVX-7300, AVX-P7300DVD etc.)
Setting C : When using with an AVM-P8000R or AVM-P9000R.
Setting D : When using with an AVM-P7000R.
Switch 1 Switch 2
Setting A : OFF OFF
Setting B : OFF ON
Setting C : ON OFF
Setting D : ON ON
9

Setting Switch 3
Setting Switch 3 ON/OFF determines which DVD code from A to C is transmitted from the
Remote Control. Depending on the combination with a Pioneer DVD player, you need to
change the position of the switch. (If you use units with the same code, when you press a
remote control button all these units will respond, making operation troublesome.) See the
corresponding section from Setting A to Setting D set in “Setting Switch 1 and 2” described
above.
Units receiving A code signals : XDV-P9 (XDV-P9—)
Units receiving B code signals : AVIC-9DVD, AVIC-9DVD
Units receiving C (DVH code) code signals : DVH-P7000R
Units that can be set to receive both A and B codes : AVX-P7300DVD, SDV-P7
Setting A
Switch 3 is not to be used (It does not matter whether it is ON or OFF.)
When the Operation Mode switch is set to “AUDIO”, you can operate units that receive A
code signals.
When the Operation Mode switch is set to “DVD”, you can operate units that receive B code
signals.
Setting B
ON : When the Operation Mode switch is set to “AUDIO”, you can operate units that
receive A code signals.
When the Operation Mode switch is set to “DVD”, you can operate units that receive
B code signals.
OFF : When the Operation Mode switch is set to “AUDIO”, you can operate units that
receive C code signals.
When the Operation Mode switch is set to “DVD”, you can operate units that receive
B code signals.
Setting C and D
ON : You can operate units that receive A code signals.
OFF : You can operate units that receive B code signals.
When the Operation Mode switch is set to “AUDIO”, only the operation with the
NEXT/PREV control, control stick, and the PLAY/PAUSE button is possible.
When the Operation Mode switch is set to “DVD”, you can perform all DVD operations.
—
Setting Switch 4
When the Operation Mode switch is set to “NAVI”, set using VOL dial depending on the
equipment you want to adjust.
ON : Volume of the voice guidance of Navigation system is adjusted.
OFF : Volume of Pioneer Head Unit (including Pioneer AV master unit) is adjusted.
➲ Please set the switches correctly according to the combination of your equipment. Please
make sure that the setting is correct, otherwise the Navigation System will not work properly.
10
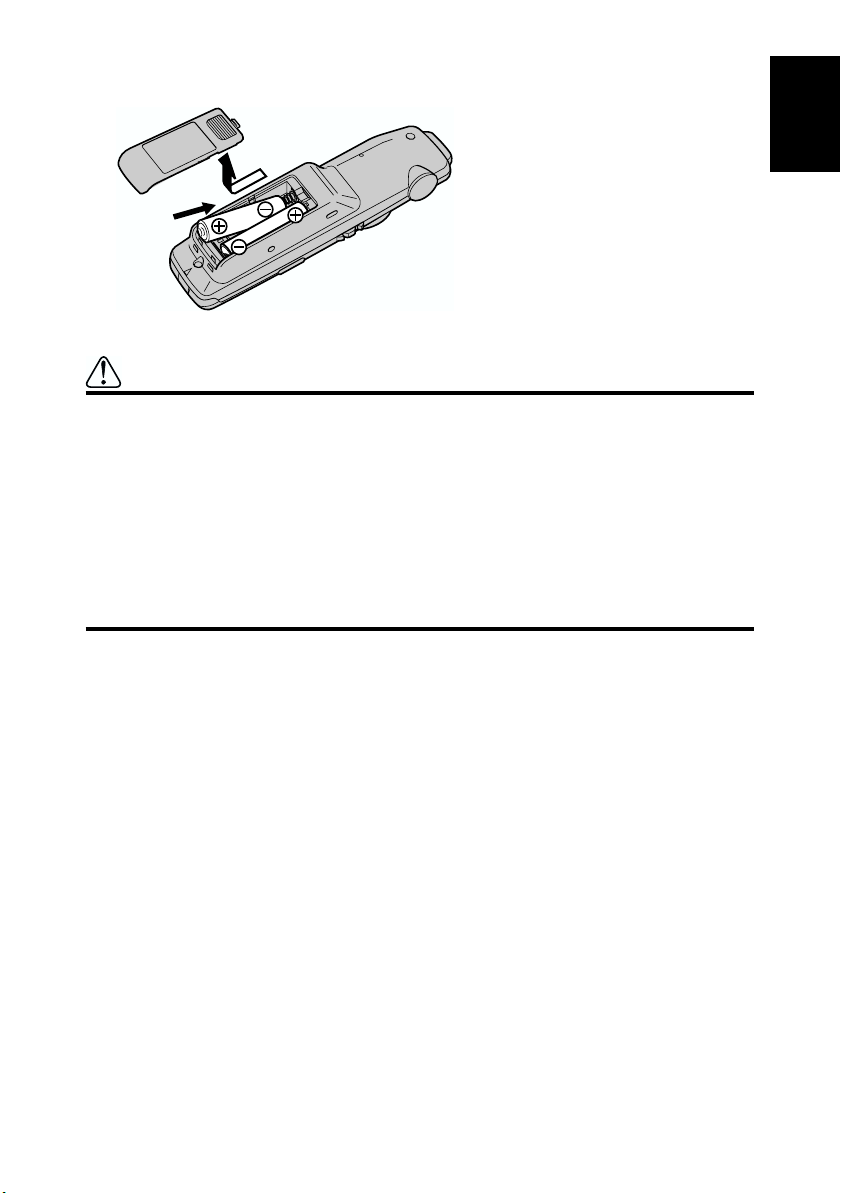
■Inserting the batteries to the Remote Control
Remove the battery cover, and insert two alkaline (UM-4, AAA, LR03, 1.5V) batteries.
Caution
• Take care to insert the batteries the right way round as shown by the + and - marks in
the diagram.
• Do not mix new batteries with old.
• Do not mix different types of batteries. Even batteries of the same size may have different voltages.
• If the Remote Control will be out of use for a long period, remove the batteries.
• If a battery leaks, completely clean any liquid or deposits from the battery compartment before inserting new batteries.
• The supplied batteries cannot be recharged.
• We recommend using alkaline batteries as replacements.
• When disposing of used batteries, please comply with governmental regulations or
environmental public institutional rules that apply in your country/area.
Chapter 1
Setting the Remote Control and Names of Each Part
11

Getting to Know the Components and What They Do
Before using this unit, get to know the name of each component and how it is used.
■The Remote Control
About Operation mode switch
Using the Remote Control, you can switch to operate either the Navigation System, the DVD/
CD, or Pioneer Head Unit (including AV master unit and AV receiver). If switching the operation mode, the function of each button on the Remote Control is also switched. For details
concerning function changes for each button, refer to the pertinent Keyfinder for your settings.
When the Operation Mode switch is ...
“NAVI” “AUDIO” “DVD”
Setting A
Setting B
Setting C
Setting D
Keyfinder 1
(P. 13-P. 16)
Keyfinder 1 Keyfinder 3
Keyfinder 2
(P. 29-P. 31)
(P. 16-P. 17)
Keyfinder 2
Keyfinder 2
12
NAVIGATION Operation (Keyfinder 1)
2
4
6
8
10
MENU
DETOUR
1
CANCEL
ROUTE
TOP
MENU
GUIDE
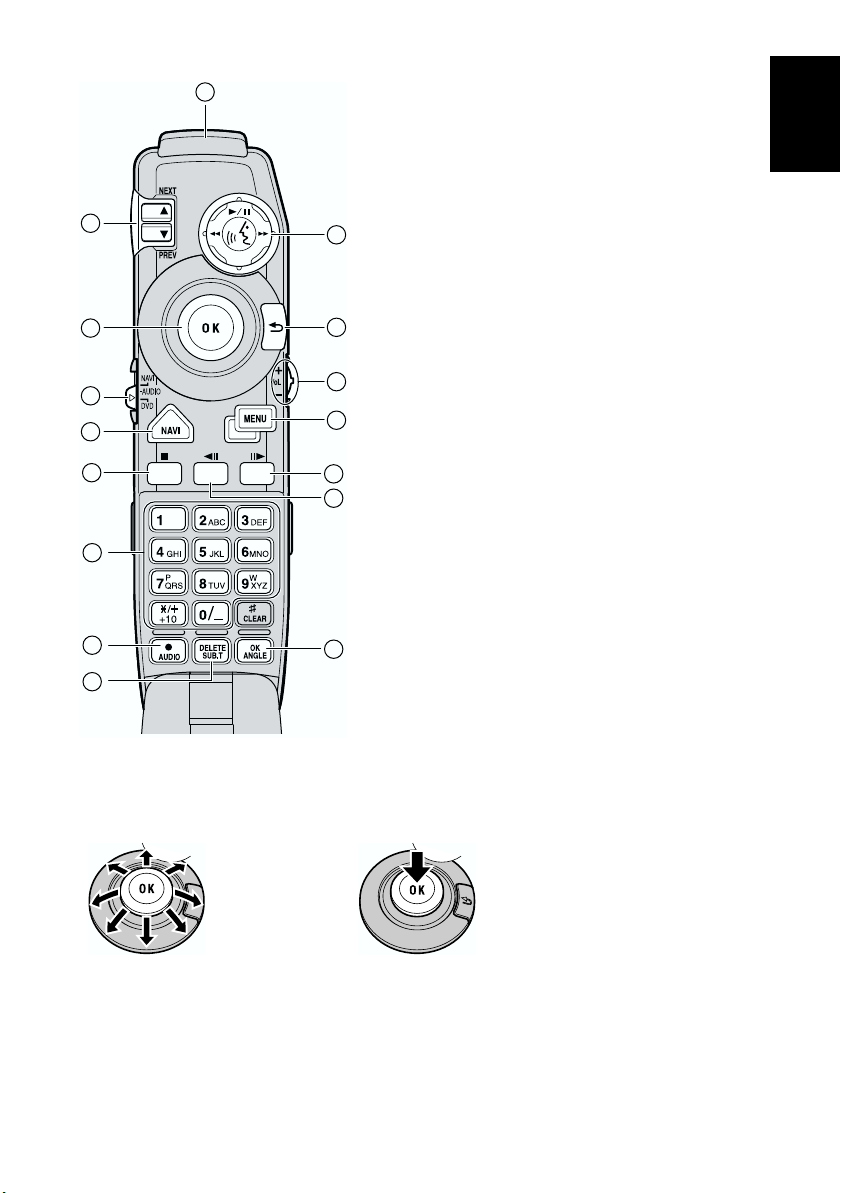
(1) Transmitter
Signals of the Remote Control are transmitted from
here.
(2) NEXT/PREV control
You use the scale control to enlarge or reduce the displayed map. When you move the scale control down-
3
wards, the scale of the displayed map is enlarged and
a more detailed map is displayed. Conversely, moving it upwards reduces the displayed map, and a
wider area is displayed. In menus, when a list is
longer than one screen, this control is used for indi-
5
cating the next screen or previous screen.
(3) Control stick and PLAY/PAUSE button
7
9
(TALK button)
You use the TALK button to start voice recognition,
allowing you to command the Navigation System by
speech. When a voice command is given, you can
12
cycle through possible matches by clicking down this
11
button.
➲ With the “CD-SR80” Steering Remote Control (sold
13
14
15
16
(4) Joystick/OK button
Use the joystick to select items in the display and to scroll the map. The joystick is also the
OK button; simply press it to select a location on the map or an option displayed on the
screen.
separately), you can press the BAND button and
the F button to switch on the operation mode of the
Steering Remote Control. When the operation
mode is switched on, by pressing the BAND button
of the Steering Remote Control, you can activate
voice operation, which is equivalent of pressing
the TALK button. “CD-SR90” and “CD-SR100” also
can start voice operation, which is equivalent of
pressing the TALK button. (For the details of the
operation, see the Owner’s manual of each steering remote control.)
Chapter 1
Setting the Remote Control and Names of Each Part
Used as the joystick :
Directions of movements indicated by arrows are possible.
Used as the OK button :
Press straight down.
13

(5) BACK button
While using a menu, pressing this button cancels the present operation and returns you to the
previously displayed menu or list.
(6) Operation mode switch
Changes the remote control’s mode.
(7) VOL dial
When you turn the dial downwards, the volume decreases. Turning it upwards increases the
volume.
• When the Dipswitch 4 is ON, the volume of the voice guidance of the Navigation System is
adjusted.
• When the Dipswitch 4 is OFF, the volume of Pioneer Head Unit is adjusted. If the dial is
pressed, the volume is reduced to around 1/10th of the volume (ATT function). When
pressed again, the volume returns to its previous level.
(8) NAVI (MENU) button
You press this button to view the map or return to guidance. Also, when the map is scrolled,
pressing this button returns to the display of the map of your surroundings.
(9) MENU (TOP MENU) button
Pressing this button displays a menu of options.
(10) 7777 (DETOUR) button
Press this button to restart route calculation, such as calculating a detour. If this button is
pressed for more than two seconds, you can see the information (passing roads and driving
distance, and so on) of the route down which you are currently being guided.
(11) eeee (CANCEL ROUTE) button
Press this button to cancel the route guidance. When pressed for more than two seconds, the
next via point is recognised as already being passed, and a new route calculation starts.
(12) EEEE (GUIDE) button
Press this button if you want to hear the voice guidance again. If this button is pressed for
more than two seconds, you can listen to traffic information on your route (where available).
(13) Numeric keypad
You use this pad for entering characters or numbers.
(14) AUDIO [•] button
Not used.
(15) SUB.T (DELETE) button
Press to delete the character you just entered. If you press this button for more than two seconds, all the characters entered will be deleted.
(16) ANGLE (OK) button
This works in the same way as “OK” on the text palette.
14
NAVI/AV
191817
N/A
Chapter 1
21
22
/FUNC
BACK
20
24
23
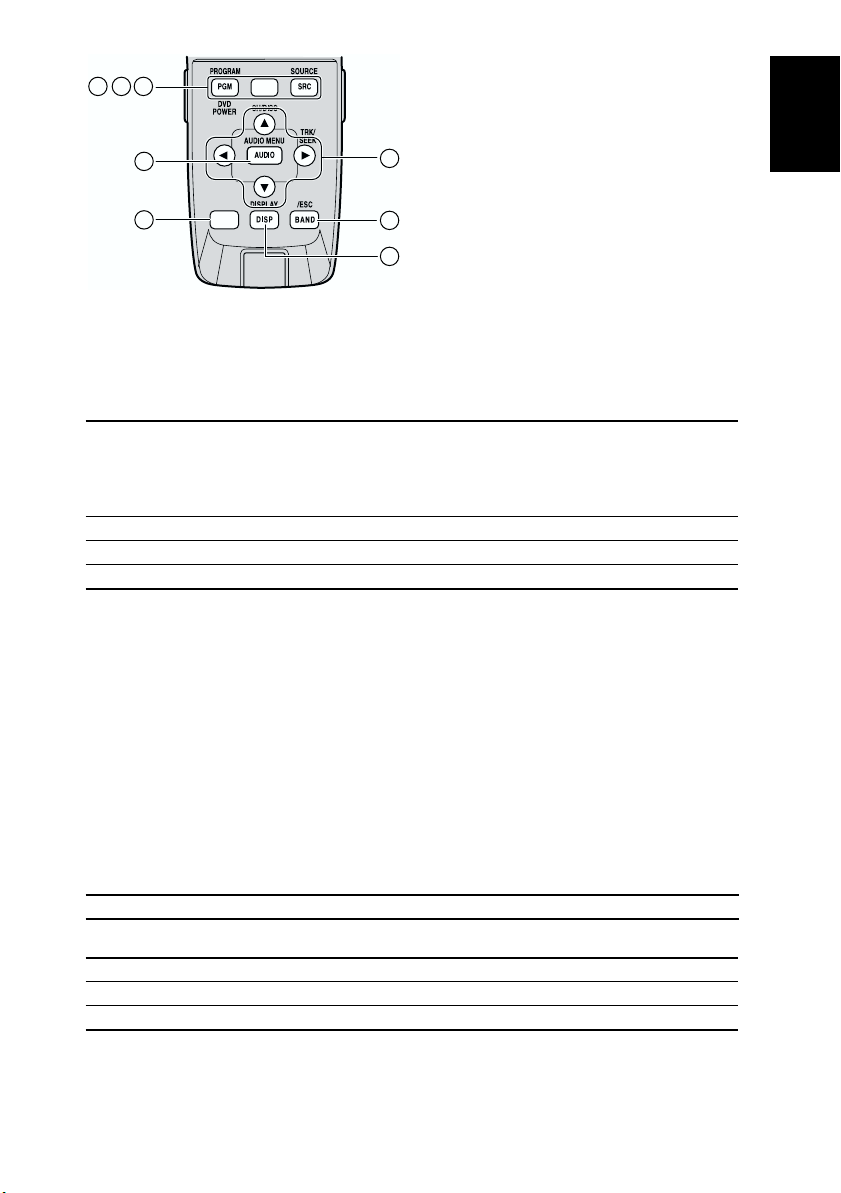
(17) PGM (DVD POWER) button
Function is preset for each source as shown below. Sources not shown below do not feature
this function. (Depending on the component, you can change the Preprogram. For details,
refer to the Head Unit’s instructions.)
Not effective with NAVIGATION built-in sources.
CD (one disc only),
PAUSE
Multi-CD player,
DVD player (one disc only),
Multi-DVD player :
TUNER : BSM (Press for 2 seconds or more)
TV : BSSM (Press for 2 seconds or more)
External unit : FUNC1
(18) NAVI/AV button
Switches the display to the desired indications. Use to switch between Navigation map displays and audio component displays.
(19) SRC (SOURCE) button
Switches between sources and switches power ON/OFF. (Depending on the connected units,
operation may differ slightly. Refer to “Switching Sources” in the connected unit’s instructions.)
(20) Cross Key 2222, 3333, 5555, ∞∞∞∞ button
Use to skip CD tracks, perform preset tuning with the tuner, and select items indicated in the
display.
(21) A.MENU (AUDIO) button
Displays audio menus.
Setting C : Not used.
Setting the Remote Control and Names of Each Part
(22) BACK/FUNC button
Setting A : Returns you to the previous display.
Settings B and D : Display function menus.
Setting C : Not used.
(23) DISP button
If, for example, you use this product with a Multi-CD player, when playing a CD TEXT disc
you can enjoy display of the CD title and other information.
15
 Loading...