


 Loading...
IMPORTANT SAFETY INSTRUCTIONS
The apparatus shall not be exposed to dripping or splashing and that no objects filled with liquids, such as vases, shall be placed on the apparatus. The MAINS plug is used as the disconnect device, the disconnect device shall remain readily operable.
Warning: the user shall not place this apparatus in the confined area during the operation so that the mains switch can be easily
accessible.
1.Read these instructions before operating this apparatus.
2.Keep these instructions for future reference.
3.Heed all warnings to ensure safe operation.
4.Follow all instructions provided in this document.
5.Do not use this apparatus near water or in locations where condensation may occur.
6.Clean only with dry cloth. Do not use aerosol or liquid cleaners. Unplug this apparatus before cleaning.
7.Do not block any of the ventilation openings. Install in accordance with the manufacturer’s instructions.
8.Do not install near any heat sources such as radiators, heat registers, stoves, or other apparatus (including amplifiers) that produce heat.
9.Do not defeat the safety purpose of the polarized or grounding-type plug. A polarized plug has two blades with one wider than the other. A grounding type plug has two blades and a third grounding prong. The wide blade or the third prong is provided for your safety. If the provided plug does not fit into your outlet, consult an electrician for replacement of the obsolete outlet.
10.Protect the power cord from being walked on or pinched particularly at plug, convenience receptacles, and the point where they exit from the apparatus.
11.Only use attachments/accessories specified by the manufacturer.
12.Use only with a cart, stand, tripod, bracket, or table specified by the manufacturer, or sold with the apparatus. When a cart is used, use caution when moving the cart/ apparatus combination to avoid injury from tip-over.
13.Unplug this apparatus during lighting storms or when unused for long periods of time.
14.Refer all servicing to qualified service personnel. Servicing is required when the apparatus has been damaged in any way, such as power-supply cord or plug is damaged, liquid has been spilled or objects have fallen into the apparatus, the apparatus has been exposed to rain or moisture, does not operate normally, or has been dropped.
|
! |
|
|
|
|
|
|
CAUTION: TO REDUCE THE RISK OF ELECTRIC SHOCK,
DO NOT REMOVE COVER (OR BACK)
NO USER SERVICEABLE PARTS INSIDE
REFER SERVICING TO QUALIFIED PERSONNEL
The lightning flash with arrowhead symbol, within an equilateral triangle, is intended to alert the user to the presence of uninsulated “dangerous voltage” within the product’s enclosure that may be of sufficient
magnitude to constitute a risk of electric shock to persons.
Theexclamationpointwithinanequilateraltriangleisintended
!to alert the user to the presence of important operating and maintenance (servicing) instructions in the literature accompanying the appliance.
WARNING: To reduce the risk of fire or electric shock, do not expose this apparatus to rain or moisture.
CAUTION: Use of controls or adjustments or performance of procedures other than those specified may result in hazardous radiation exposure.

PAA3
Personal Audio Analayzer
TABLE OF CONTENTS |
|
|
page |
INTRODUCTION ....................................................................................................... |
4 |
FEATURES ............................................................................................................... |
4 |
CONTROLS AND DISPLAY ..................................................................................... |
6 |
GETTING STARTED ................................................................................................ |
8 |
OPERATING TIPS .................................................................................................... |
9 |
AUDIO ANALYSIS FUNCTIONS ........................................................................... |
10 |
RTA (Real Time Analyzer) - Accoustic........................................................... |
10 |
SPL (Sound Pressure Level) Meter............................................................... |
10 |
RT60 (Reverb Time Analyzing)...................................................................... |
11 |
RTA (Real Time Analyzer) - Electrical Signal................................................. |
12 |
Level Meter.................................................................................................... |
13 |
MEMORY ................................................................................................................ |
13 |
Store ............................................................................................................. |
13 |
Recall ............................................................................................................ |
14 |
Average ......................................................................................................... |
14 |
EQ Setting ..................................................................................................... |
14 |
SETTINGS............................................................................................................... |
15 |
Weighting ...................................................................................................... |
15 |
Level Range .................................................................................................. |
15 |
Max Level ...................................................................................................... |
16 |
Peak Hold ..................................................................................................... |
16 |
Response Time ............................................................................................. |
16 |
Calibration .................................................................................................... |
17 |
PHASE CHECK....................................................................................................... |
17 |
GENERATOR.......................................................................................................... |
18 |
POWER.................................................................................................................... |
18 |
SIMULTANEOUS OPERATION WITH DESKTOP ................................................ |
19 |
DIMENSIONS.......................................................................................................... |
21 |
SPECIFICATIONS................................................................................................... |
22 |
AUDIO TEST SIGNAL TRACK LISTING .............................................................. |
23 |
Phonic reserves the right to improve or alter any information suppied within this document without prior notice. V1.0 JAN 21, 2005

INTRODUCTION
Thank you for purchasing the Phonic PAA3 Personal Audio Assistant, a highly accurate audio analyzer that sits comfortably in the palm of your hand, and features all the tools you need to set up any audio system.
With 31-band real-time spectrum analysis, Sound Pressure Level and dBu / dBV / line voltage measurement, EQ setting, phase checking, and reverb time analyzation, the PAA3 is the ideal companion for all sound engineers. This personal audio assistant is battery powered (4 AA size), with a built in microphone, and XLR inputs and outputs, ensuring all audio analyzing situations are possible. With the PAA3, you will conquer the accoustics of all environments with precision and ease.
Phonic understands the importance of sound reproduction management. We know that as a professional, your main concern is sound quality. Consequently, with an audio tool like the PAA3, you expect a precise ruler to obtain proper measurements and guarantee the best possible quality of sound that any professional would expect. Phonic, therefore, took the utmost of care in ensuring the PAA3 is an extremely accurate and effective means for you to gather all the useful data to determine what your set up needs.
To help you familiarize yourself with the PAA3, this manual includes instructions on every function listed in the main menu and sub-menus. It is recommended that you take the time to have a read of it, before you store it in an easily accessible place, in case it's needed in future.
FEATURES
●Palm Sized Audio Analyzer
●31-band Real Time Spectrum Analyzer
●Built-in calibrated measurement microphone
●Sound Pressure Level Meter from 30 dB to 130 dB
●Line signal measurement displayed in dBu, dBV, or Voltage
●A, C weighting or flat
●3 level range selection for dB SPL and line signal
●Line signal measuring range: dBu = -50 ~ +40dBu
dBV= -52 ~ +38dBV Volts = 5mV ~ +80V
●Maximum level and peak hold display
●4 standard response times: 35 ms, 125 ms (F),
250 ms (M), 1 sec (S)
●10 memories for measurement, and 6 for average calculation
●31-band EQ setting level display (boost/cut)
●160 x 160 graphic display with backlight and contrast adjustment
●Phase checker
●SPL meter Calibration through sound level calibrator (eg: B & K Type 4231)
●Reverb Time (RT60) Analyzer
●Noise generator with pink noise, 1 kHz and polarity test signal, balanced output
●USB communication port, for simultaneous operation through laptop or PC
●Low power consumption for up to 7 hours continuous operation with 4 AA size alkaline batteries (adapter power supply operation available. When power is used from adapter, it automatically cuts off battery power)
●3 power modes: (1) Power saving mode: Auto Offwhen none of the buttons has been pressed for 15 minutes (2) Manual Off (3) Off
●XLR input and output sockets
page 4 |
PAA3 User's Manual |
PHONIC CORPORATION |
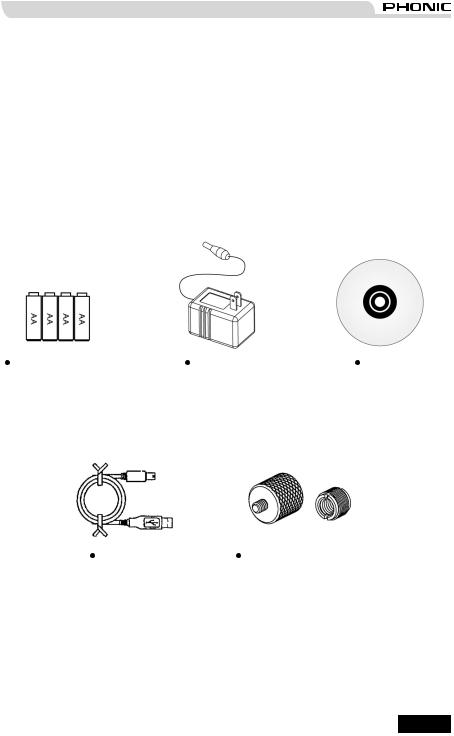
INSIDE THE GIFT BOX
1 x PAA3 Unit
4 x AA Size Batteries
1 x AC Power Adaptor
1 x USB Cable
1 x Leather Case
1 x 3/8" and 5/8" Microphone Stand Adaptors
1 x CD-ROM including 26 test signals and software for PC interface
1 x User Manual (though if you didn't receive the user manual, you probably aren't reading this)
4 x AA Size Batteries |
Power Adaptor |
CD-ROM |
USB Cable |
Microphone Stand Adaptors |
PHONIC CORPORATION |
PAA3 User's Manual |
page 5 |
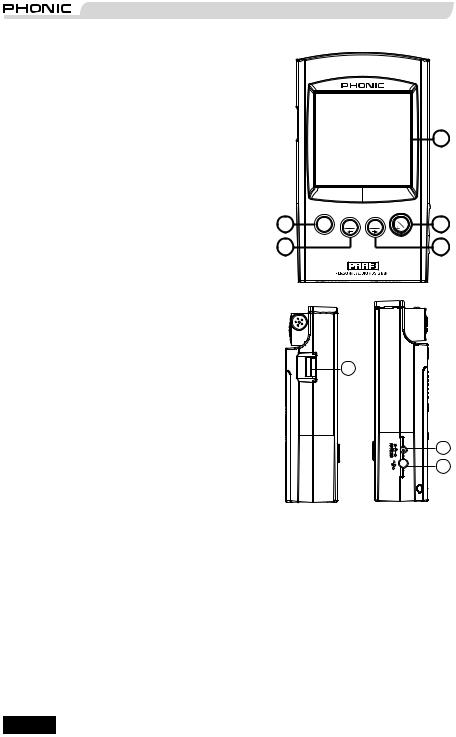
CONTROLS AND DISPLAY
1.LCD Display
160 x 160 graphic LCD screen provides clear and large display.
2.Power / Backlight Button
Before turning the power on, please ensure the POWER LOCK switch (at the rear of the PAA3) is set to the "ON" position. Pressing the Power button for 2 seconds will the power of the PAA3 on. After the power is on, this button allows users to turn the LCD backlight on and off. Holding the button for about 3 seconds will initiate the PAA3's shutdown sequence, saving all stored memories of the PAA3.
3.Right / Down Button
Press this button to scroll down or to the right of the currently selected option.
4.Left / Up Button
Press this button to scroll up or to the left of the currently selected option.
5.Enter Button
Press this button to move from Real Time Spectrum Analyzer (RTA) display to the PAA3's function menu. After moving the cursor to a desired function in the menu by the right/ down or left/up buttons, press the enter button to select.
6.Jog Control
Jog control, on the left-hand side of this unit, provides users with a hassle free method of scrolling menus and selecting options with a single hand. Simply rotate to scroll up and down menus and push the wheel inwards to select (to either enter a sub menu or finalize a setting). Alternately, the three function buttons (the afore-mentioned buttons 3 to 5) may also be used to scroll options and finalize selections.
7.6V DC Power Input
This port is used to connect the included 6V AC to DC converter. When adapter is plugged in, the battery power will be replaced by the adaptor, allowing users to use the PAA3
1
5 


 2
2
43
6
7
8
without fear of running out of power. Use the adapter provided along with the PAA3 only, as to avoid damaging the device. Please note that this will not charge batteries placed into the PAA3's batery compartment.
8.USB Port
This USB connector is for the addition of the provided USB cable, to be connect the PAA3 to any desktop or notebook computer with a USB port. Please see the Simultaneous Operation With Desktop Computer section for more information.
page 6 |
PAA3 User's Manual |
PHONIC CORPORATION |

9.Male XLR Socket (Line Output)
Through this XLR male connector, users can send out three built-in audio test signals: pink noise,1 kHz tone, and the polarity signal. The output level is balanced -10dBu under a 6V DV power supply.
10.Female XLR Socket (Line Input)
This port allows you to send balanced, linelevel input to the PAA3. This signal input allows you to measure signals in dBu, dBV or AC voltage for balanced and unbalanced signals. It is particularly useful for checking the phase of a connections.
11.Contrast Control
By adjusting this control, users can change the contrast of the PAA3's LCD screen to better adapt the device to different lighting conditions.
12.Power Lock
Set this switch to the "ON" position before turning on the PAA3. You can set to the "OFF" position to prevent accidental powering up of the PAA3 when the unit is not in use. It is recommended that users move this switch to the off position when the PAA3 will not be used for a long period of time. Provided that the shut down procedure was followed correctly, turning this switch off after saving your settings will not cause the loss of any data.
13.Built-in Microphone
Turn this accurate built-in Omni-directional mic to operation position (stands 45 degrees) by pressing the axis base. Always press the axis base before rotating the mic, as it is locked into place. If you attempt to rotate the mic without pushing in first, you could very well damage your PAA3.
14.Stand Mount
A stand mount is located on the back for connection to a tripod or any other stand that has a standard #6 - 20 connecting screw, often found on camera tripods. Also included is a stand adapter, allowing the PAA3 to be mounted on microphone stands as well.
10 9
12
13
11
14
15
15.Battery Compartment
The PAA3 requires four AA batteries for operation. Under normal conditions, the PAA3 can last for up to seven hours of continuous operation with the use of Duracell alkaline batteries.
PHONIC CORPORATION |
PAA3 User's Manual |
page 7 |

GETTING STARTED
1.Open the battery compartment and insert four AA batteries, ensuring the positive and negative ends are correctly aligned. You may simply opt to use the 6V DC power adaptor. To do so, plug the DC-head of the power adaptor to the PAA3, and the wallwart power connector into a suitable AC power source.
ATTENTION: Use the adapter provided along with the PAA3 only, as to avoid damaging the PAA3. When connecting the adaptor, ensure the power of the PAA3 is off. Sudden unplugging of the adaptor power may cause the system to crash.
2.Push the axis base to release the PAA3's built in microphone. To best measure audio properties, turn the microphone until it sits at a suitable angle. The mic will lock into place at around 45 degrees.
3.Set the power switch (on the rear of the PAA3) to the "ON" position.
4.Press and hold the power button (on the front) for approximately three seconds to turn the power of the PAA3 on.
5.A startup screen will appear for about 10 seconds, then the real time spectrum analyzer will appear on the screen. Above the RTA, users will note the level range, weighting type, maximum sound pressure level, frequency range and SPL meter.
6.If a backlight is needed, simply press the power / backlight button. Press again to turn the backlight off.
7.Use the ENTER button to bring up the main PAA3 menu, then the UP / RIGHT and DOWN / LEFT buttons to navigate through the various options. Press the ENTER button to enter the main menu and use the UP / RIGHT and DOWN / LEFT buttons to select a function. Then press ENTER again to activate the highlight function or to enter into the submenus. The user may also use the jog control to activate all functions.
page 8 |
PAA3 User's Manual |
PHONIC CORPORATION |
Loading...