


PCX3000
High Precision Stereo 2-Way Mono 3-Way Crossover Crossover de Alta Precisión Estéreo 2-Vías Mono 3-Vías
2 3
PCX3000
English / Español /
User’s Manual Manual del Usuario

PCX3000
High Precision Stereo 2-Way Mono 3-Way Crossover
Crossover de Alta Precisión Estéreo 2-Vías Mono 3-Vías
2 3
CONTENTS |
|
|
CONTENIDO |
|
|
|
|
|
|
|
|
|
|
|
|
INTRODUCTION |
4 |
|
INTRODUCTION |
11 |
|
|
18 |
|
|
||||||
FEATURES |
4 |
|
CARACTERÍSTICAS |
11 |
|
|
18 |
QUICK SETUP |
4 |
|
CONFIGURACIÓN RÁPIDA |
11 |
|
|
18 |
OPERATING THE PCX3000 |
4 |
|
OPERANDO PCX3000 |
11 |
|
PCX3000 |
18 |
2-Way Stereo Operation |
4 |
|
Operación Estéreo de 2 Caminos |
11 |
|
2 |
18 |
Front Panel |
4 |
|
Panel Frontal |
11 |
|
|
18 |
Rear Pane |
5 |
|
Panel de Dorso |
12 |
|
|
19 |
3-Way Mono Operation |
6 |
|
Operación Mono de 3 Caminos |
13 |
|
3 |
20 |
Front Panel |
6 |
|
Panel Frontal |
13 |
|
|
20 |
Rear Panel |
7 |
|
Panel de Dorso |
14 |
|
|
21 |
APPLICATION |
7 |
|
APLICACIÓN |
14 |
|
|
21 |
SPECIFICATIONS |
8 |
|
ESPECIFICACIONES |
15 |
|
|
22 |
DIMENSIONS |
24 |
|
DIMENSIONES |
24 |
|
|
24 |
BLOCK DIAGRAM |
25 |
|
DIAGRAMA DE BLOQUES |
25 |
|
|
25 |
|
|
|
|
|
|
|
|
Phonic preserves the right to improve or alter any information within this document without prior notice Phonic se reserva el derecho de mejorar o alterar cualquier información provista dentro de este documento sin previo aviso PHONIC
V1.0 08/13/2010
IMPORTANT SAFETY INSTRUCTIONS
The apparatus shall not be exposed to dripping or splashing and that no objects |
|
|
|
with liquids, such as vases, |
|
|
|||
|
|
shall be placed on the apparatus. The MAINS plug is used as the disconnect device, the disconnect device shall remain readily operable.
Warning: the user shall not place this apparatus in the 


 area during the operation so that the mains switch can be easily accessible.
1.Read these instructions before operating this apparatus.
2.Keep these instructions for future reference.
3.Heed all warnings to ensure safe operation.
4.Follow all instructions provided in this document.
5.Do not use this apparatus near water or in locations where condensation may occur.
6.Clean only with dry cloth. Do not use aerosol or liquid cleaners. Unplug this apparatus before cleaning.
7.Do not block any of the ventilation openings. Install in accordance with the manufacturer’s instructions.
8.Do not install near any heat sources such as radiators, heat registers, stoves, or other apparatus (including 


 .
.
9.Do not defeat the safety purpose of the polarized or grounding-type plug. A polarized plug has two blades with one wider than the other. A grounding type plug has two blades and a third grounding prong. The wide blade or the third prong is provided for your safety. If the provided plug does not  into your outlet, consult an electrician for replacement of the obsolete outlet.
10.Protect the power cord from being walked on or pinched particularly at plug, convenience receptacles, and the point where they exit from the apparatus.
11.Only use attachments/accessories 


 by the manufacturer.
12.Use only with a cart, stand, tripod, bracket, or
table 


 by the manufacturer, or sold with the apparatus. When a cart is used, use caution when moving the cart/apparatus
combination to avoid injury from tipover.
13.Unplug this apparatus during lighting storms or when unused for long periods of time.
14.Refer all servicing to 


 service personnel. Servicing is required when the apparatus has been damaged in any way, such as power-supply cord or plug is damaged, liquid has been spilled or objects have fallen into the apparatus, the apparatus has been exposed to rain or moisture, does not operate normally, or has been dropped.
CAUTION |
RISK OF ELECTRIC SHOCK |
DO NOT OPEN |
CAUTION: TO REDUCE THE RISK OF ELECTRIC SHOCK, |
DO NOT REMOVE COVER (OR BACK) |
NO USER SERVICEABLE PARTS INSIDE |
REFER SERVICING TO QUALIFIED PERSONNEL |
The lightning flash with arrowhead symbol, within an equilateral triangle, is intended to alert the user to the presence of uninsulated “dangerous voltage” within the product’ 


magnitude to constitute a risk of electric shock to persons.
The exclamation point within an equilateral triangle is intended to alert the user to the presence of important operating and maintenance (servicing) instructions in the literature accompanying the appliance.
WARNING: To reduce the risk of or electric shock, do not expose this apparatus to rain or moisture.
CAUTION: Use of controls or adjustments or performance of procedures other than those 


 may result in hazardous radiation exposure.

INTRODUCTION
Congratulations on your purchase of the PCX3000, a quality high precision 2-way stereo 3-way mono crossover with a multitude of built-in features, such as low pass filters, phase invert switches, and an additional subwoofer channel. This user ’s manual is specially designed to provide you with the best possible information on using the device. We strongly suggest reading the manual carefully before attempting to handle this device, and then store it an easily accessible place for future reference.
FEATURES
•Professional, high-precision stereo 2-way/mono 3-way crossover with separate subwoofer output
•Separate subwoofer section with independent frequency control
•World-class performance 24dB per octave Linkwitz-Riley filters
•Absolutely flat summed amplitude response, zero phase difference
•Individual output level controls for all bands
•Individual output mutes for easy band adjustment
•Individual phase reverse switches for instant phase correction
•Switchable25Hzsubsonicfilteroneachinputforlowfrequency driver protection
•Servo-balanced, XLR connectors for all inputs and outputs
•Ultra-high precision potentiometers for ultimate accuracy and repeatability
•Ultralow-noiseaudiooperationalpre-amplifiersforoutstanding sound performance
•Illuminated switches for secure operation in dark stage environments
•High-quality components and exceptionally rugged construction for long life and reliability
•Shielded toroidal mains transformer for minimal noise interference
QUICK SETUP
1.Make sure your unit is off. Preferably remove the AC power cable.
2.Connect your required output device to the PCX3000’s input connector. Commonly, this would be a mixer’s auxiliary or main output.
3.Connect all of your required input devices to the device’s output connectors. Commonly this would be amplifiers or active speakers/subwoofers.
4.Set the mode button on the rear to your needs. There are two modes total: 2-way stereo and 3-way mono. 5. Turn your devices on in this order: instruments, mixer, signal processors (including the PCX3000), amps/speakers.
OPERATING THE PCX3000
As the PCX3000 runs in a variety of different modes, we have separated this user’s manual by these different modes and highlighted the control elements pertaining to each mode as to help better make the distinction between critical Note: on the rear of the device, the labels located above or below any of the connectors refer to different crossover modes available. Ensure the MODE switch and the corresponding connectors are properly configured as to prevent damage occurring to your speakers.
2-Way Stereo Operation
Set the PCX3000 to 2-way stereo by ensuring the Mode button on the rear of the device is pressed down. When set correctly, the stereo LED on the front of the device will light up, as well as the corresponding function buttons. When set to stereo, both channels will work in an identical manner.
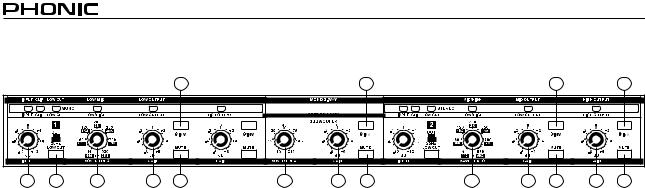
Front Panel
1. Input Control
This control will adjust the input gain between -12 and +12 dB.
2. Low Cut Button
Pushing this button will activate a low cut (high pass) filter, set at 25 Hz, which will help protect woofers from extremely low frequency signals.
3. Low/High Crossover Frequency Control
This control will determine the crossover frequency between the low and high frequency signals. When the Crossover Frequency button on the rear of the device is pushed in, the frequency range is multiplied by a factor of 10.
PCX3000

|
|
|
|
5 |
|
8 |
|
|
12 |
1 |
2 |
3 |
4 |
6 |
7 |
9 |
10 |
11 |
13 |
4. Low Output Control |
|
|
|
|
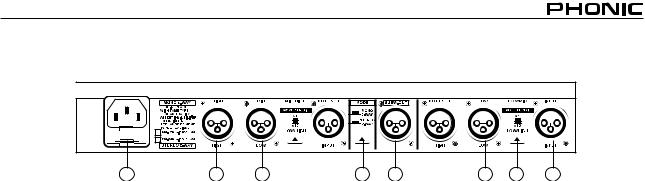
Rear Panel |
|
|
|
|
This controls the level of the low-band output between -6 and +6 dB.
5. Low Phase Invert Control
This button reverses the phasing of the low-band output, making the signal appropriate for out-of-phase or incorrectly wired speakers.
6. Low Mute Button
Pushing this button will mute the low-band signal.
7. High Output Control
This controls the level of the high-band output between -6 and +6 dB.
8. High Phase Invert Button
This button reverses the phasing of the high-band output, making the signal appropriate for out-of-phase or incorrectly wired speakers.
9. High Mute Button
Pushing this button will mute the high-band signal.
10. Subwoofer Crossover
Frequency Control This control will determine the crossover frequency between the low and subwoofer frequency signals between 10 and 215 Hz.
11. Subwoofer Gain Control
This control is used to set the output level of the subwoofer output.
12. Subwoofer Phase Invert Button
This button reverses the phasing of the subwoofer output, making the signal appropriate for out-of-phase or incorrectly wired speakers.
13. Subwoofer Mute Button
Pushing this button will mute the subwoofer signal.
14. AC Connector and Fuse Holder
This connector is used to supply power to the PCX3000 through the AC cable provided along with this unit. The fuse holder located below this connector is used to house the connector’s fuse. If for some reason the fuse blows, replace it with a fuse of identical type and rating.
15. High Output Connectors
This connector will output the high-band signal.
16. Low Output Connectors
This connector will output the low-band signal.
17. Crossover Frequency Button
Pushing this button will raise the control range of frequencies adjustable by the high/low crossover frequency control by 10 times (ie. when the button is released, the control range will be between 44 and 930 Hz; pushed-in, the range will be between 440 Hz and 9.3 kHz).
18. Input Connector
Users can connect their balanced or unbalanced input signals here.
19. Mode Button
This button determines the operating of the crossover. For 2-way stereo operation, the button should be pressed. Release, the PCX3000 will be set to 3-way mono.
Note: Be sure to turn your system off before changing the setting of this button as it produces interference that may have a
negative effect on speakers or other equipment.
20. Subwoofer Output Connectors
This connector will output the subwoofer signal. This signal remains constant when in mono or stereo mode.
14 |
15 |
16 |
17 |
18 |
19 |
20 |
PCX3000
|
|
|
|
5 |
|
|
16 |
|
|
9 |
|
12 |
1 |
2 |
3 |
4 |
6 |
14 |
15 |
17 |
7 |
8 |
10 |
11 |
13 |
3-Way Mono Operation
Set the PCX3000 to 3-way mono by releasing the Mode buttons on the rear of the device. When set correctly, the mono LED on the front of the device will light up, as well as the corresponding function buttons.
Front Panel
1. Input Control
This control will adjust the input gain between -12 and +12 dB.
2. Low Cut Button
Pushing this button will activate a low cut (high pass) filter, set at 25 Hz, which will help protect woofers from extremely low frequency signals.
3. Low/Mid Crossover Frequency Control
This control will determine the crossover frequency between the low and mid frequency signals. When the Crossover Frequency button on the rear of the device is pushed in, the frequency range is multiplied by a factor of 10.
4. Low Output Control
This controls the level of the low-band output between -6 and +6 dB.
5. Low Phase Invert Control
This button reverses the phasing of the low-band output, making the signal appropriate for out-of-phase or incorrectly wired speakers.
6. Low Mute Button
Pushing this button will mute the low-band signal.
7. Mid/High Crossover Frequency Control
This control will determine the crossover frequency between the mid and high frequency signals. When the Crossover Frequency button on the rear of the device is pushed in, the frequency range is multiplied by a factor of 10.
8. Mid Output Control
This controls the level of the mid-band output between -6 and +6 dB.
9. Mid Phase Invert Button
This button reverses the phasing of the mid-band output, making the signal appropriate for out-of-phase or incorrectly wired speakers.
10. Mid Mute Button
Pushing this button will mute the mid-band signal.
11. High Output Control
This controls the level of the high-band output between -6 and
+6 dB.
12. High Phase Invert Button
This button reverses the phasing of the high-band output, making the signal appropriate for out-of-phase or incorrectly wired speakers.
13. High Mute Button
Pushing this button will mute the high-band signal.
14. Subwoofer Crossover Frequency Control
This control will determine the crossover frequency between the low and subwoofer frequency signals between 10 and 215 Hz.
15. Subwoofer Gain Control
This control is used to set the output level of the subwoofer output.
16. Subwoofer Phase Invert Button
This button reverses the phasing of the subwoofer output, making the signal appropriate for out-of-phase or incorrectly wired speakers.
17. Subwoofer Mute Button
Pushing this button will mute the subwoofer signal.
PCX3000
18 |
19 |
20 |
Rear Panel
18. AC Connector and Fuse Holder
This connector is used to supply power to the PCX3000 through the AC cable provided along with this unit. The fuse holder located below this connector is used to house the connector’s fuse. If for some reason the fuse blows, replace it with a fuse of identical type and rating.
19. High Output Connectors
This connector will output the high-band signal.
20. Mid Output Connectors
This connector will output the mid-band signal.
21. Low Output Connectors
This connector will output the low-band signal.
22. Crossover Frequency Button
Pushing this button will raise the control range of frequencies adjustable by the mid/high crossover frequency control by 10 times (ie. when the button is released, the control range will be between 44 and 930 Hz; pushed-in, the range will be between
440 Hz and 9.3 kHz).
23. Input Connector
Users can connect their balanced or unbalanced input signals here.
24. Mode Button
This button determines the operating of the crossover. For 3-way mono operation, the button should be released. When pressed down, the PCX3000 will be set to 2-way stereo.
Note: Be sure to turn your system off before changing the setting of this button as it produces interference that may have a negative effect on
speakers or other equipment.
25. Subwoofer Output Connectors
This connector will output the subwoofer signal. This signal remains constant when in mono or stereo mode.
24 |
25 |
21 |
22 |
23 |
APPLICATION
Measurement & Setup Tools
By using a hand-held spectrum analyzing tool along with pink noise, users are able to better perfect their system’s sound. Check the operation manuals for your analyzer and pink-noise generator for many more useful tips on set up. Play the pink noise through your system and stand about 5 meters from your speaker to take measurements with the spectrum analyzer.
Setting Input Levels
The input level can be cut and boost by up to 6 dB. Provided the output level of your mixer is set to an acceptable degree, setting all input controls to 0 dB should be perfectly acceptable. In the event that the device you connect to the PCX3000’s input is a consumer level device (ie. signal level is as low as -10dBV), using the full amount of boost that the input level control allows may be necessary.
Setting Output Levels
Output levels of each individual band can be cut and boost by up to 6 dB. With the help of an analyzer, all output levels can be set to achieve a linear frequency response in the system. First mute each output, leaving the one you wish to set active, and check crossover frequencies and levels by playing pink-noise through your system. Then, when switching on an adjacent band, the level measured at the crossover frequency should immediately go up by
3 dB. This can then be repeated for all output channels.
Setting the Crossover Frequency
The first thing to keep in mind when setting your crossover is what frequencies can my speakers handle? Be sure to check your subwoofer, full-range speaker or driver’s user’s manual before setting your crossover frequencies. Keeping the signal sent to the speaker in the frequency range ascribed in the user ’s manual will ensure your speakers function smoothly and correctly.
The Linkwitz-Riley filter employed by the PCX3000 employs a slope of 24 dB per octave. It may be interesting to note that, due to the Crossover Frequency Button on the rear of the device, the crossover frequency for the low frequency band is adjustable between 44Hz and 9.3 kHz. This allows for the low output to be used with full-range speakers as well as subwoofer speakers.
Subwoofer Output
PCX3000 features an individual subwoofer output that runs whether in stereo or mono operation. The subwoofer output, featured in addition to the low frequency output, allows exceptionally loud and deep bass to be played through your system. The subwoofer signal is a combined mono signal of the channel 1 and 2 input signals.
PCX3000

SPECIFICATIONS
Audio Inputs
Connectors |
|
XLR |
|
|
|
|
|
Type |
Electronically servo-balanced, HF filtered |
||
Input Impedance |
Balanced >50 kohm, unbalance >25 kohm |
||
|
|
|
|
Max. Input Level |
+22 dBu typical, balanced or unbalanced |
||
|
|
|
|
CMRR |
>40dB, typical >55dB at 1 kHz |
||
|
|
|
|
Audio Outputs |
|
|
|
Connectors |
|
XLR |
|
|
|
|
|
Type |
Electronically servo-balanced, HF filtered |
||
|
|
|
|
Output Impedance |
Balanced 60 ohm, unbalance 30 ohm |
||
|
|
|
|
Max. Output Level |
+20 dBu, balanced or unbalanced |
||
|
|
|
|
Performance |
|
|
|
Bandwidth |
20 Hz to 20 kHz, +0/-0.5 dB |
||
Frequency Response |
<5 Hz to >60 kHz, +0/-3 dB |
||
|
|
|
|
Signal to Noise Ratio |
Ref.: +4 dBu, 20 Hz to 20 kHz, unweighted |
||
Stereo-Mode: |
|
Mono-Mode: |
|
|
|
||
Low Output |
>94 dB |
|
>94 dB |
Mid Output |
|
|
>96 dB |
|
|
|
|
High Output |
>92 dB |
|
>92dB |
|
|
|
|
Dynamic Range |
>106 dB, unweighted |
||
THD & Noise |
|
<0.04% |
|
|
|
|
|
|
High to Low: <93 dB |
||
Interchannel Crosstalk |
High to Mid: <95 dB |
||
|
Mid to Low: <96 dB |
||
Crossover |
|
|
|
Filter-Type |
Linkwitz-Riley, 24 dB/octave, state-variable |
||
|
|
|
|
Mono Mode Frequencies |
x1 |
|
x10 |
|
|
|
|
Low/High |
44 to 930 Hz |
|
440 Hz to 9.3 kHz |
|
|
|
|
Low/Mid |
44 to 930 Hz |
|
440 Hz to 9.3 kHz |
|
|
|
|
Mid/High |
440 Hz to 9.3 kHz |
||
Stereo Mode Frequencies |
x1 |
|
x10 |
|
|
|
|
Low/High |
44 to 930 Hz |
|
440 Hz to 9.3 kHz |
|
|
|
|
USA/Canada |
|
120V ~, 60 Hz |
|
Europe/U.K./Australia |
|
230V ~, 50 Hz |
|
|
|
|
|
Japan |
|
100V ~, 50-60 Hz |
|
|
|
|
|
PCX3000

|
|
|
|
|
|
|
|
|
Power Consumption |
<20 W |
|
|
|
|
Fuses |
100-120 V ~, T630 mA H |
|
|
|
|
|
200-240V ~, T 315 mA H |
|
Mains Connection |
Standard IEC receptacle |
|
|
|
|
Dimensions |
19" x 1.75" x 8.5" (482.6 x 44 x 217 mm) |
|
Net Weight |
6.2 lbs (2.8 kg) |
|
PCX3000
 Loading...