

Page 1

579
MODEL
Page 2

Page 3

Safety..................................... 1
Emergency..................................... 2
Controls..................................... 3
Driving..................................... 4
Maintenance..................................... 5
Information..................................... 6
Page 4

© 2021 PACCAR Inc. - All Rights Reserved
This manual illustrates and describes the operation of features or equipment which may be either
standard or optional on this vehicle. This manual may also include a description of features and
equipment which are no longer available or were not ordered on this vehicle. Please disregard any
illustrations or descriptions relating to features or equipment which are not on this vehicle. PACCAR
reserves the right to discontinue, change specifications, or change the design of its vehicles at any
time without notice and without incurring any obligation. The information contained in this manual is
proprietary to PACCAR. Reproduction, in whole or in part, by any means is strictly prohibited without
prior written authorization from PACCAR Inc.
Page 5

Page 6

1
Chapter 1 | SAFETY
Using this Manual
Safety Alerts..........................................................................................................................................6
Illustrations............................................................................................................................................7
General Safety Instructions...................................................................................................................7
Data Recorder.....................................................................................................................................10
Environmental Protection Agency.......................................................................................................10
Repairs................................................................................................................................................ 11
Additional Sources of Information....................................................................................................... 12
Cab Access.........................................................................................................................................12
How to Access the Upper Bunk.......................................................................................................... 14
Deckplate Access................................................................................................................................19
How to open the hood.........................................................................................................................20
Seat.....................................................................................................................................................23
What to do before starting the vehicle.................................................................................................32
Vehicle Loading...................................................................................................................................34
Visual inspection while approaching the vehicle.................................................................................34
4 Y53-6110-1A1 (01/21)
..................................................................................................................................6
Page 7

Daily Checks....................................................................................................................................... 35
Weekly Checks................................................................................................................................... 36
Systems Check................................................................................................................................... 37
1
Y53-6110-1A1 (01/21) 5
Page 8

1
Using this Manual
Please take the time to get acquainted with
your vehicle by reading this Operator’s
Manual. We recommend that you read and
understand this manual from beginning to
end before you operate this equipment.
This manual contains useful information for
the safe and efficient operation of this
equipment. It also provides service
information, with an outline for performing
safety checks and basic preventive
maintenance inspections. We have tried to
present the information you’ll need to learn
about functions, controls, and operation—
and to present it as clearly as possible. We
hope you’ll find this manual easy to use.
There will be times when you need to take
this manual out of the glovebox. When you
do, please be sure to return it when you
are finished using it.
NOTE
After you've read this manual, it should
be
stored in the cab for convenient reference and remain with this truck
when sold.
Your vehicle may not have all the features
or options mentioned in this manual.
Therefore, you should pay careful attention
to the instructions that pertain to just your
vehicle. In addition, if your vehicle is
equipped with special equipment or options
not discussed in this manual, consult your
dealer or the manufacturer of the
equipment.
There are several tools built into this
manual to help you find what you need
quickly and easily; first is the Quick T
of Contents. Located at the front of the
manual, this table lists the main subjects
covered and gives section numbers where
you can find these subjects. Use the Quick
Table of Contents to find information on a
large subject and then use the detailed
table of contents found on the first page of
each chapter. Cross-referenced citations
also help you get the information you need.
If some other part of the manual contains
further information on the subject you are
reading about, we’ll indicate that in a crossreference like this: (See Safety Alerts on
page 6).
Finally, you’ll find a helpful Subject Index.
It’s in the back of the manual and
alphabetically lists the subjects covered.
All information contained in this manual is
based on the latest production information
able
available at the time of publication.
Peterbilt Motors Company reserves the
right to make changes at any time without
notice.
Safety Alerts
Read and follow all of the safety alerts
contained in this manual. They are there
for your protection and information. These
alerts can help you avoid injury to yourself,
your passengers, and help prevent costly
damage to the vehicle. Safety alerts are
highlighted by safety alert symbols and
signal words such as “WARNING,”
“CAUTION,” or “NOTE.” DO NOT ignore
any of these alerts.
Warnings
The safety message following this symbol
and signal word provides a warning against
operating procedures which could cause
death or injury
equipment or property damage. The alert
will identify the hazard, how to avoid it, and
. They could also cause
6 Y53-6110-1A1 (01/21)
Page 9

the probable consequence of not avoiding
the hazard.
Example:
WARNING
Hot engine oil can be dangerous. You
be burned. Let the engine oil
could
cool down before changing it. Failure
to comply may result in death, personal injury, equipment or property damage.
Cautions
The safety message following this symbol
and signal word provides a caution against
operating procedures which could cause
equipment or property damage. The alert
will identify the hazard, how to avoid it, and
the probable consequence of not avoiding
the hazard.
Example:
CAUTION
Continuing to operate your vehicle with
ficient oil pressure will cause seri-
insuf
ous engine damage. Failure to comply
may result in equipment or property
damage.
Notes
The message following this symbol and
signal word provides important information
that is not safety related but should be
followed. The alert will highlight things that
may not be obvious and is useful to your
ef
ficient operation of the vehicle.
Example:
NOTE
Pumping the accelerator will not assist
in starting the engine.
Illustrations
Some of the illustrations throughout this
manual are generic and will not look
exactly like the engine or parts used in
your application. The illustrations can
contain symbols to indicate an action
required and/or an acceptable or
unacceptable condition.
The illustrations are intended to show
repair or replacement procedures. The
procedure will be the same for all
applications, although the illustrations may
differ.
General Safety Instructions
WARNING
Improper practices, carelessness, or
ignoring any warnings may cause
property damage, personal injury, or
death.
1
Y53-6110-1A1 (01/21)
7
Page 10

1
WARNING
Manually rotating the crankshaft requires a trained technician and specialty
tools. DO NOT pull or pry on the fan in
an attempt to rotate the crankshaft. Applying force to the fan can damage the
fan blades or cause premature fan failure. Failure to comply with the approved
procedure may result in property damage, personal injury
Before performing any repair, read and
understand all of the safety precautions
and warnings. The following is a list of
general safety precautions that must be
followed to provide personal safety
to follow these instructions may cause
death or injury. Special safety precautions
are included in the procedures when they
apply.
Keep in mind that even a well maintained
vehicle must be operated within the range
of its mechanical capabilities and the limits
of its load ratings. See the Weight Ratings
label on the driver's door edge.
Every new vehicle is designed to conform
to all Federal Motor Vehicle Safety
Standards applicable at the time of
manufacture. Even with these safety
, or death.
. Failure
features, continued safe and reliable
operation depends greatly upon regular
vehicle maintenance. Follow the
maintenance recommendations found in
the Preventive Maintenance section. This
will help preserve your investment.
Make sure your vehicle is in top working
condition before heading out on the road, it
is the responsible driver's duty to do so.
Inspect the vehicle according to the
Driver's Check List.
Work areas should be dry, well lit,
•
well ventilated, free from clutter,
loose tools, parts, ignition sources
and hazardous substances.
• Wear protective glasses and
protective shoes when working.
• DO NOT wear loose-fitting or torn
clothing. Tie back and/or tuck in
long hair. Remove all jewelry when
working.
• Before beginning any repair,
disconnect the battery (negative [-]
cable) and discharge any
capacitors.
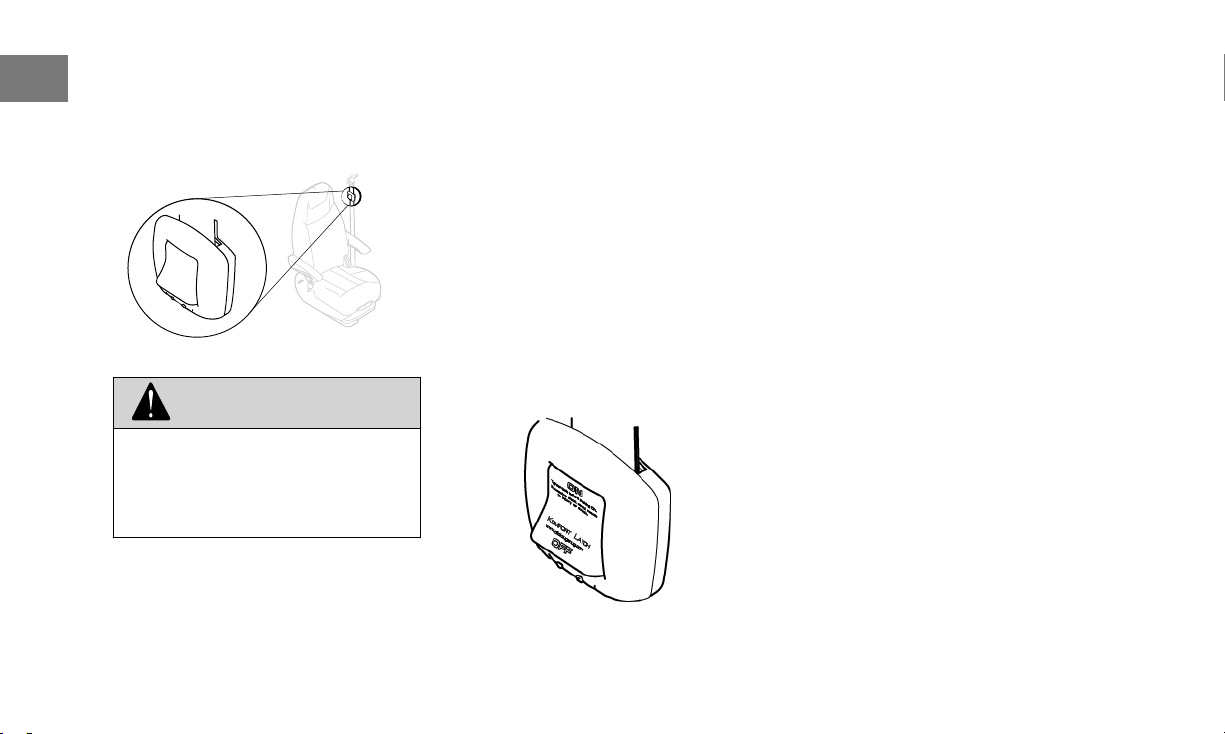
• Put a “DO NOT OPERATE” tag in
the operator's compartment or on
the controls.
• Allow the engine to cool before
slowly loosening the coolant fill cap
to relieve the pressure from the
cooling system.
WARNING
Removing the fill cap on a hot engine
cause scalding coolant to spray
can
out and burn you badly. If the engine
has been in operation within the previous 30 minutes, be very careful in removing the fill cap. Protect face,
hands, and arms against escaping fluid and steam by covering the cap with
a large, thick rag. DO NOT try to remove it until the surge tank cools down
or if you see any steam or coolant escaping. Always remove the cap very
slowly and carefully. Be ready to back
off if any steam or coolant begins to
escape. Failure to comply may result
in death, personal injury, equipment or
property damage.
• Always use wheel chocks or proper
jack stands to support the vehicle
or vehicle components before
performing any service work. DO
NOT work on anything that is
supported only by lifting jacks or a
hoist. Before resting a vehicle on
jack stands, be sure the stands are
8 Y53-6110-1A1 (01/21)
Page 11

rated for the load you will be
placing on them.
Before removing or disconnecting
•
any lines, fittings, or related items,
relieve all pressure in the air, oil,
fuel, and cooling systems. Remain
alert for possible pressure when
disconnecting any device from a
system that contains pressure.
High pressure oil or fuel can cause
death or personal injury.
• Always wear protective clothing
when working on any refrigerant
lines and make sure that the
workplace is well ventilated.
Inhalation of fumes can cause
death or personal injury. To protect
the environment, liquid refrigerant
systems must be properly emptied
and filled using equipment that
prevents the release of refrigerant
gas. Federal law requires capturing
and recycling refrigerant.
• When moving or lifting any heavy
equipment or parts, make sure to
use proper techniques and
assistance. Ensure all lifting
devices such as chains, hooks, or
slings are in good condition and
are of the correct load capacity.
Make sure all lifting devices are
positioned correctly.
• Corrosion inhibitors and lubricating
oils may contain alkali. DO NOT
get the substance in eyes and
avoid prolonged or repeated
contact with skin. DO NOT
swallow. If ingested, seek
immediate medical attention. DO
NOT induce vomiting. In case of
contact, immediately wash skin
with soap and water. In case of
harmful contact, immediately
contact a physician. Always keep
any chemicals OUT OF REACH
OF CHILDREN.
• Naphtha and Methyl Ethyl Ketone
(MEK) are flammable materials and
must be used with caution. Follow
the manufacturer's instructions to
ensure safety when using these
materials. Always keep any
chemicals OUT OF REACH OF
CHILDREN.
• When working on the vehicle, be
alert for hot parts on systems that
have just been turned off, exhaust
gas flow, and hot fluids in lines,
tubes, and compartments. Contact
with any hot surface may cause
burns.
• Always use tools that are in good
condition. Make sure you have the
proper understanding of how to use
the tools before performing any
service work. Use only genuine
replacement parts from PACCAR.
• Always use the same fastener part
number (or equivalent) when
replacing items. DO NOT use a
fastener of lesser quality if
replacements are necessary. (e.g.,
DO NOT replace a SAE 10.9 grade
with 8.8 grade fastener.)
• Always torque fasteners and fuel
connections to the required
specifications. Overtightening or
under-tightening can allow leakage.
• Close the manual fuel valves prior
to performing maintenance and
repairs, and when storing the
vehicle inside.
• DO NOT perform any repair when
impaired, tired, fatigued, or after
consuming alcohol or drugs that
can impair your functioning.
• Some state and federal agencies in
the United States of America have
determined that used engine oil
can be carcinogenic and can cause
reproductive toxicity. Avoid
1
Y53-6110-1A1 (01/21) 9
Page 12

1
inhalation of vapors, ingestion, and
prolonged contact with used engine
oil.
DO NOT connect the jump starting
•
or battery charging cables to any
ignition or governor control wiring.
This can cause electrical damage
to the ignition or governor.
• Coolant is toxic. If not reused,
dispose of coolant in accordance
with local environmental
regulations.
CAUTION
Corrosive chemicals can damage the
engine. DO NOT use corrosive chemicals on the engine. Failure to comply
may result in equipment or property
damage.
California Proposition 65 Warning
• Diesel engine exhaust and some of
its constituents are known to the
State of California to cause cancer,
birth defects, and other
reproductive harm.
• The catalyst substrate located in
the Diesel Particulate Filter (DPF)
contains vanadium pentoxide,
which has been determined by the
State of California to cause cancer
Always wear protective clothing
and eye protection when handling
the catalyst assembly. Dispose of
the catalyst in accordance with
local regulations. If catalyst
material gets into the eyes,
immediately flood eyes with water
for a minimum of 15 minutes. Avoid
prolonged contact with skin. In
case of contact, immediately wash
skin with soap and water. In case
of harmful contact, immediately
contact a physician.
• Other chemicals in this vehicle are
also known to the State of
California to cause cancer, birth
defects or other reproductive harm.
• Battery posts, terminals, and
related accessories contain lead
and lead compounds, chemicals
known to the State of California to
cause cancer and reproductive
harm. Wash hands after handling.
Data Recorder
.
California V
Disclosure of Recording Device
Your vehicle may be equipped with one or
more recording devices commonly referred
to as "event data recorders" (EDR) or
"sensing and diagnostic modules" (SDM).
If you are involved in an accident, the
device(s) may have the ability to record
vehicle data that occurred just prior to
and/or during the accident. For additional
information on your rights associated with
the use of this data, contact:
• The California Department of Motor
• http://www.dmv.ca.gov/
ehicle Code - Section 9951 -
Vehicles - Licensing Operations
Division
Environmental Protection Agency
Some of the ingredients in engine oil,
hydraulic oil, transmission and axle oil,
engine coolant, diesel fuel, air conditioning
refrigerant (R12, R134a, and PAG oil),
batteries, etc., may contaminate the
10 Y53-6110-1A1 (01/21)
Page 13

environment if spilled or not disposed of
.
properly
WARNING
Diesel engine exhaust and some of its
constituents
California to cause cancer, birth defects, and other reproductive harm.
Other chemicals in this vehicle are also known to the State of California to
cause cancer, birth defects or other reproductive harm. This warning requirement is mandated by California law
(Proposition 65) and does not result
from any change in the manner in
which vehicles are manufactured.
Contact your local government agency for
information concerning proper disposal.
are known to the State of
Repairs
WARNING
DO NOT attempt repair work without
suf
ficient training, service manuals,
and the proper tools. You could be kil-
led or injured, or you could make your
vehicle
tasks you are fully qualified to do.
unsafe. Perform only those
WARNING
Modifying your vehicle can make it un-
Some modifications can affect
safe.
your vehicle's electrical system, stability, or other important functions. Before
modifying your vehicle, check with
your dealer to make sure it can be
done safely. Improper modifications
can cause death or personal injury.
CAUTION
The installation of electronic devices to
the
On Board Diagnostics (OBD) connector, the vehicle Controller Area Network (CAN), or their associated wiring
is not permitted. Doing so can adversely affect vehicle performance
and/or cause fault codes to be recorded. The OBD connector is provided for
temporary connection of service tools
and for diagnostic purposes only.
Your dealer’s service center is the best
place to have your vehicle repaired. Y
can find dealers all over the country with
the equipment and trained personnel to get
you back on the road quickly—and keep
you there.
Your vehicle is a complex machine.
Anyone attempting repairs on it needs
good mechanical training and the proper
tools. However, all warranty repairs must
be performed by an authorized service
facility. If you aren’t an experienced
mechanic, or don’t have the right
equipment, please leave all repairs to an
authorized service facility. They are the
ones best equipped to do the job safely
and correctly.
ou
Maintenance Manuals
If you do decide to do any complex repair
work, you’ll need the maintenance
manuals. Order them from your authorized
dealer. Please provide your Chassis Serial
Number when you order, to be sure you
get the correct manuals for your vehicle.
Allow about four weeks for delivery. There
will be a charge for these manuals.
1
Y53-6110-1A1 (01/21) 11
Page 14

1
Final Chassis Bill of Material
A complete, non-illustrated computer
printout listing of the parts used to custombuild your vehicle is available through the
dealer from whom you purchased your
vehicle.
Additional Sources of Information
Major component suppliers also supply
operation manuals specific to their
products. Additional manuals and other
pieces of literature are included in the
glove box literature package. Look for
information on products such as the
engine, driver's seat, transmission, axles,
wheels, tires, ABS/ESC, radio, fifth wheel,
lane departure, and adaptive cruise
control. If you are missing these pieces of
literature, ask your dealer for copies.
Another place to learn more about trucking
is from local truck driving schools. Contact
one near you to learn about courses they
fer. Federal and state agencies such as
of
the department of licensing also have
information. The Interstate Commerce
Commission can give you information
about regulations governing transportation
across state lines.
Cab Access
WARNING
Always reinstall steps before entering
cab or accessing the deck plate.
the
Without steps you could slip and fall.
Failure to comply may result in personal injury or death.
WARNING
Keep steps clean. Clean any fuel, oil,
or
grease off the steps before entering
the cab or accessing the deck plate.
Stepping on a slippery surface can
cause a fall which may result in death
or personal injury.
Be careful whenever you get into or out of
your vehicle’
least three points of contact with your
hands on the grab handles and your feet
on the steps. The following picture shows
s cab. Always maintain at
the best way to enter and exit a
Conventional Cab.
WARNING
Jumping out of the cab or getting into
cab without proper care is danger-
the
ous. You could slip and fall, which
could lead to death or personal injury.
Keep steps clean. Clean any fuel, oil,
or grease off of the steps before entering the cab. Use the steps and grab
handles provided, and always keep at
least three points of contact between
your hands and feet and the truck.
Look where you are going.
12 Y53-6110-1A1 (01/21)
Page 15

How to Lock and Unlock the Cab Doors
The vehicle has one key for cab doors,
ignition, and the optional sleeper luggage
compartment. Frame-mounted tool box
locks and locking fuel tank caps each have
separate, individual keys.
WARNING
To help lessen the chance and/or se-
of death or personal injury in
verity
case of an accident, always lock the
doors while driving. Along with using
the lap shoulder belts properly, locking
the doors helps prevent doors from inadvertently opening and occupants
from being ejected from the vehicle.
To lock or unlock the doors from outside
the cab:
1.
Rotate the key toward the rear
•
of the vehicle to lock
(clockwise), or
• Rotate the key toward the front
of the vehicle (counter
clockwise) to unlock.
Remote Keyless Entry (Option)
Remote Keyless Entry (RKE) is a system
that adds security and convenience to your
vehicle. The system will lock or unlock cab
doors with the key fob. The system will
alert you with parking lights when the
selected doors are locked or unlocked. The
system includes two key fobs that provide
secure rolling code technology that
prevents someone from recording the entry
signal.
NOTE
FCC ID: L2C0031T IC: 3432A-0031T
FCC
ID: L2C0032R IC: 3432A-0032R
This device complies with Part 15 of
the FCC Rules and with RSS-210 of
Industry Canada. Operation is subject
to the following two conditions (1) This
device may not cause harmful interference, and (2) This device must accept
any interference received, including interference that may cause undesired
operation. Changes or modifications
not expressively approved by the party
responsible for compliance could void
the user's authority to operate the
equipment. The term IC: before the radio certification number only signifies
that Industry Canada technical specifications were met.
Operate Door Locks using Remote Keyless Entry
Open doors will not lock using the key fob.
The key fob should be within 30 ft. (9 m) of
1
Y53-6110-1A1 (01/21) 13
Page 16

1
the vehicle and should not be in proximity
of other RF sources such as television,
radio or cell phone transmitters.
o unlock the cab doors:
T
1. Press the UNLOCK button once.
The driver's door will unlock and
the parking lights will come on for
40 seconds.
2. Quickly press the UNLOCK button
a second time within 5 seconds to
unlock the passenger door.
3. Press the LOCK button. The doors
will lock and the parking lights will
come on for 2 seconds.
How to Access the Upper Bunk
Upper Bunk Ladder
This vehicle may be equipped with an
upper bunk ladder. The ladder enables you
to conveniently climb into the upper bunk
without stepping on the lower bunk. The
ladder can be unfolded when needed. The
ladder folds up into the upper bunk
structure when not in use, while driving, or
when accessing the lower bunk. The
ladder can be folded up into the upper
bunk.
Ladder Folded and Latched
Ladder Partially Unfolded
Ladder Unfolded
How to Unfold the Upper Bunk Ladder
It is important to follow all specified safety
instructions when unfolding the upper bunk
ladder
.
14 Y53-6110-1A1 (01/21)
Page 17

WARNING
CAUTION
Unlatching the ladder
1
DO NOT attempt to fold or unfold the
while an occupant is in the low-
ladder
er bunk. Allow the lower bunk occupant to vacate the bunk before folding
or unfolding the ladder. Failure to do
so may result in personal injury.
CAUTION
Upper bunk must be in down position
before
folding and unfolding the ladder. Always lower the upper bunk before folding and unfolding the ladder.
Failure to do so may result in property
damage.
CAUTION
Lower bunk must be in down position
folding and unfolding the lad-
before
der. Failure to do so may result in
property damage.
Y53-6110-1A1 (01/21) 15
Make sure floor area is clear prior to
and unfolding the ladder. There
folding
should be nothing between the ladder
leg and floor carpet when the ladder is
unfolded. Failure to do so may result in
property damage.
1. Ensure the lower bunk is in the
down position.
Lower the upper bunk.
2.
3. Locate the release latch on the
driver's side front edge of the upper
bunk.
4. Release the ladder by pulling the
latch out.
5. Position your left hand, open palm,
beside the latch to control the
unfolding action of the ladder as it
separates from the bunk structure.
Maintain contact with your left
hand, open palm, in the same
position until the ladder is
completely unfolded.
6.
When the ladder is about half way
unfolded, position your right hand,
open palm, on the upper right side
of the ladder to help guide the
ladder into position.
Page 18

1
WARNING
DO NOT grip the ladder while folding
unfolding it. Always use an open
and
hand when folding and unfolding the
ladder to prevent injuries and pinching
of fingers. Failure to comply may result
in personal injury.
Hand Positions to Unfold the Ladder
CAUTION
Do not attempt to open the lower bunk
the ladder is unfolded and verti-
when
cal. Failure to comply may result in
property damage.
Apply pressure in opposite directions to
ensure smooth operation of the ladder
.
CAUTION
Never attempt to pull the bottom of the
ladder
forward when the ladder is in
the down position. Failure to comply
may result in property damage.
CAUTION
Never attempt to fold or force the lad-
toward the passenger side of the
der
7. Make sure the ladder is completely
unfolded against the internal stop.
The ladder should be vertical at this point.
16 Y53-6110-1A1 (01/21)
vehicle once the ladder has reached
vertical position and is against the internal stop inside the upper bunk. Doing so can cause damage to the ladder.
Page 19

How to Climb In and Out of the Upper Bunk
WARNING
Face the ladder
1
WARNING
Make sure the ladder is fully open be-
climbing up or down the ladder.
fore
The ladder should be against internal
stops and vertical before using it. Failure to do so may result in death or personal injury.
WARNING
Never use the ladder while the vehicle
is
in motion. Always fold and stow the
ladder before moving the vehicle. Failure to comply may result in death or
personal injury.
WARNING
Do not exceed the weight limit of 320
on the ladder. Failure to comply may
lb
result in personal injury or death.
Y53-6110-1A1 (01/21) 17
Never climb a damaged, bent, or bro-
ladder. Doing so may result in per-
ken
sonal injury.
WARNING
Never allow multiple people on the ladder
at the same time. Only one person
on the ladder at any time. Failure to
comply may result in personal injury.
Make sure the ladder is in the unfolded
position.
1.
Face the ladder when climbing up
or down.
2. Maintain a firm grip when climbing
up or down the ladder
ladder and grab handles provided,
and always keep at least three
points of contact between your
hands and feet and the truck.
Always face toward the bunk when
entering or exiting the upper bunk
and look where you are going.
. Use the
Page 20

1
1
1
3. As you get higher on the ladder,
maintain contact with the sleeper
upper grab handles as you get onto
the upper bunk.
Upper Grab Handles
1. Upper Grab Handles
How to Fold the Upper Bunk Ladder
WARNING
DO NOT attempt to fold or unfold the
while an occupant is in the low-
ladder
er bunk. Allow the lower bunk occupant to vacate the bunk before folding
or unfolding the ladder. Failure to do
so may result in personal injury.
CAUTION
Lower bunk must be in down position
before
folding and unfolding the ladder. Failure to do so may result in
property damage.
1. Ensure that the lower bunk is in the
down position.
2.
Position your left hand, open palm,
against the lower left side of the
ladder. Maintain contact with your
left hand, open palm, in the same
position until the ladder is
completely folded.
3. Position your right hand, open
palm, against the upper right side
of the ladder. Maintain contact with
your left hand, open palm, in the
same position until the ladder is
approximately half-way folded.
Hand Positions to Fold the Ladder
18 Y53-6110-1A1 (01/21)
Page 21

WARNING
DO NOT grip the ladder while folding
unfolding it. Always use an open
and
hand when folding and unfolding the
ladder to prevent injuries and pinching
of fingers. Failure to comply may result
in personal injury.
CAUTION
Lower bunk must be in down position
before
folding and unfolding the ladder. Always fold the ladder before raising the lower bunk. Failure to do so
may result in property damage.
Apply pressure in opposite directions to
ensure smooth operation of the ladder
WARNING
Right hand must be clear of the ladder
it is approximately half-way fold-
when
ed. Failure to do so may result in personal injury.
4. Use the right hand to apply
pressure to the left and
simultaneously use the left hand to
apply pressure to the right. The
ladder will begin to fold up.
When the ladder is approximately
5.
half-way folded, remove your right
hand from the right side of the
ladder.
6. Continue to push with your left
hand until the ladder has been
folded into the upper bunk
structure.
7. Secure the latch.
Without steps you could slip and fall.
Failure to comply may result in personal injury or death.
WARNING
Keep steps clean. Clean any fuel, oil,
grease off the steps before entering
or
the cab or accessing the deck plate.
Stepping on a slippery surface can
cause a fall which may result in death
or personal injury.
1
CAUTION
Make sure the ladder is fully closed
while the vehicle is in motion. Failure
to do so may result in property damage.
.
Deckplate Access
WARNING
When you are climbing onto and off
the
deck plate, maintain at least three
points of contact with your hands on
the grab handles and your feet on the
steps. Always face toward the vehicle
when entering or exiting the cab and
look where you are going. Failure to
comply may result in death or personal
injury.
WARNING
Always reinstall steps before entering
the
cab or accessing the deck plate.
Y53-6110-1A1 (01/21) 19
Page 22

1
WARNING
mating side is on the cab or quarter
fenders.
When stepping onto a surface to enter
cab or access the deck plate, only
the
use the steps and grab handles installed and designed for that purpose.
Failure to use the proper steps and
grab handles could cause a fall which
may result in death or personal injury.
WARNING
Before opening or closing the hood,
sure your footing is secure and
make
stable. Failure to do so may cause the
hood to open or close uncontrollably
which may result in death or personal
injury.
NOTE
Any alteration (adding bulkheads,
headache
hind the cab that affects the utilization
of installed grab handles, deck plates,
or frame access steps should comply
with Federal Motor Carrier Safety Regulation 399.
racks, tool boxes, etc.) be-
How to open the hood
Access the engine by opening the hood.
The hood is typically held in the closed
position by a latch system. The latches are
typically mounted on the hood and the
20 Y53-6110-1A1 (01/21)
Page 23

CAUTION
A hood not latched securely could
during operation and cause vehi-
open
cle damage. Be sure to latch the hood
securely.
WARNING
A pivoting hood could hurt someone or
be
damaged itself. Before opening or
closing the hood, be sure there are no
people or objects in the way. Failure to
stand in a position of safety can cause
death or personal injury.
1. Release the latches
2. Put one or both hands on the top of
the hood front. T
forward by pulling at the top of the
hood keeping your feet on the
ground for stability. Keep pulling on
the hood until you are certain that
the hood hold open device is
engaged.
ilt the hood
Close the Hood
The hood hold-open device will only be
engaged if the vehicle hood is fully open.
Once it is fully open, the latch will
automatically engage and will need to be
disengaged by the operator
lever for the hood hold-open device is
located near the front hinge of the hood.
. The release
1
Y53-6110-1A1 (01/21) 21
Page 24

1
Pull the lever out to disengage the hood
hold-open device.
When closing the hood, be sure that you
maintain the same point of contact (top of
hood) to control the movement of the hood
as it closes. Gently lower the hood into
place to avoid damage to the hood or cab.
WARNING
DO NOT let go of the hood while it
Close the hood in a controlled
closes.
manner which requires hands firmly
grasping the hood and feet on a stable, non-slip, surface. Failure to control
the hood as it closes may result in
death or personal injury
WARNING
Always ensure the hood hold open
latch
is engaged to keep the hood fully
open any time anyone gets under the
hood for any reason. Failure to do so
may cause the hood to close uncontrollably which may result in death or
personal injury.
WARNING
Before closing the hood, be sure the
is clear—no people or objects are
area
in the way. Failure to do so may result
in death or personal injury.
Under Hood Air Intake?
The option for under hood intake is a
switch on the dash that allows the operator
to use air from under the hood in the event
the air filter housing's inlet is blocked by
snow or ice.
WARNING
DO NOT open the under hood air door
hands. This door is held closed
with
with a spring which may pull the door
closed unexpectedly. Failure to comply
may result in personal injury.
CAUTION
Only operate the under hood intake air
switch
when outside temperatures are
below 32°F (0°C). Engaging the under
hood air intake while temperatures are
above freezing may result in engine
damage.
The switch is directly wired to a solenoid
on the air filter housing. This air solenoid
(normally closed) will engage when
signaled which will supply air to a piston.
This air pressure will overcome a spring
22 Y53-6110-1A1 (01/21)
Page 25

which holds a door closed inside the air
filter housing. Fully engaged, the door will
open and air will enter from under the hood
instead of the opening on the side of the
hood.
Seat
This seat has up to ten different controls
that maximize the driver's comfort.
Lumbar (and bolster support if available)
are provided for superior support to the
back during operation. Lower support is
standard and the optional functions include
upper lumbar and bolster functions.
Pressing on the “+” symbol of the button
will add support in the area. Pressing the
opposite side of the button will release
pressure and will reduce support in the
area.
The seats in this vehicle are equipped with
a switch that locks out the fore-aft isolator
function in the seat. When locked, the seat
will not move back and forth. It will be
rigidly fixed and only allowed to move up
and down with the vehicle’
This vehicle may be equipped with a swivel
function on the passenger seat. This
function allows the passenger seat to
rotate and face towards the inside of the
cab.
s movements.
WARNING
Always ensure that the passenger seat
locked into the forward facing posi-
is
tion when the vehicle is in motion.
Locking the swivel seat into the forward facing position maximizes visibility to the surrounding area. Failure to
comply creates a safety hazard that
may result in death or personal injury.
WARNING
DO NOT use the swivel function while
a
passenger is in the seat and the vehicle is in motion. The seat belt will not
provide proper protection if the passenger is not facing forward and the
vehicle is in an accident. Failure to
comply may result in death or personal
injury.
1
Y53-6110-1A1 (01/21) 23
Page 26

2
1
3
1
2
4
6
5
3
2
1
7
1
CAUTION
WARNING
DO NOT use the seat heater for more
10 minutes at a time. Always turn
than
off the seat heaters when they are not
needed. Overuse of the seat heater
may decrease the capacity of the vehi-
1. Lower and Upper Lumbar
Adjustment
Bolster Adjustment (option)
2.
1. Seat heater/cooler
Seat thigh support up/down
2.
3. Seat bottom angle adjustment
24 Y53-6110-1A1 (01/21)
cle’s batteries and may result in poor
starting and potential equipment damage.
WARNING
This seat may be equipped with a seat
heater or ventilation system. There is a
possibility
heat-induced burns or excessive cooling when using the system. DO NOT
use either of these systems if you
have a diminished ability to sense temperature, a reduced ability to feel pain,
or have sensitive skin.
that some people may suffer
When using the seat heater or ventila-
system, DO NOT place anything
tion
on the seat that insulates against heat
or cooling, such as a blanket, cushion,
or similar item. This may cause the
seat heater or ventilation system to
overheat, which may cause a heat-induced burn or may damage the seat.
1. Seat fore/aft
2.
Express down
3. Suspension stiffness
Page 27
4. Seat height
Lumbar and Bolster (Bolster is an
5.
optional feature)
6. Recline
7. Armrest angle
Locking the swivel seat into the for-
facing position maximizes visibili-
ward
ty to the surrounding area. Failure to
comply creates a safety hazard that
may result in death or personal injury.
driving off, always check to ensure that
seat is firmly latched in position.
the
Failure to comply may result in personal injury, death, equipment or property
damage.
1
WARNING
DO NOT drive or ride with your seat
in the reclined position. You
back
could be injured by sliding under the
seat belts in a collision. Failure to comply may result in personal injury or
death.
Passenger Seat Swivel (Option)
This vehicle may be equipped with a swivel
function on the passenger seat. This
function allows the passenger seat to
rotate and face towards the inside of the
cab.
How to adjust a seat
WARNING
Always ensure that the passenger seat
is
locked into the forward facing posi-
tion when the vehicle is in motion.
Y53-6110-1A1 (01/21) 25
WARNING
DO NOT use the swivel function while
passenger is in the seat and the ve-
a
hicle is in motion. The seat belt will not
provide proper protection if the passenger is not facing forward and the
vehicle is in an accident. Failure to
comply may result in death or personal
injury.
WARNING
DO NOT adjust the driver's seat while
the
vehicle is moving. The seat could
move suddenly and unexpectedly and
can cause the driver to lose control of
the vehicle. Make all adjustments to
the seat while the vehicle is stopped.
After adjusting the seat and before
WARNING
Before driving or riding in a vehicle,
that there is adequate head
ensure
clearance at maximum upward travel
of seat. Injury may occur if head clearance is not adequate. Failure to comply may result in personal injury or
death.
1. Set the seat's fore/aft position via
the bar located below the seat
cushion. This is a mechanical latch
that does not involve any electric or
air operated devices to control
adjustment.
Set the seat height via the large
2.
switch on the left side of the seat
cushion. This switch is located in
the center of the seat pad and uses
air to adjust the seat height.
3. Adjust the thigh support by toggling
the switch located immediately
Page 28

1
under the seat bottom cushion and
above the fore/aft position
adjustment lever
4. Adjust the seat bottom angle using
the switch next to the thigh support.
5. Adjust the seat back recline angle
using the large lever situated near
the seat belt buckle.
6. Adjust the lumbar support by using
the switch bank located on the side
the seat cushion between the up/
down adjustment switch and the
seat recline adjustment lever.
7. Adjust the steering wheel.
8. Adjust the cab side mirrors.
.
Safety Restraint Belts
Safety belts have proven to be the single
most effective means available for
reducing the potential for either death or
personal injury in motor vehicle accidents.
The combination lap/shoulder belt is
equipped with a locking mechanism. The
system adjusts automatically to a person's
size and movements as long as the pull on
the belt is slow. Hard braking or a collision
locks the belt. The belt will also lock when
driving up or down a steep hill or in a sharp
curve.
Unbelted riders could be thrown into the
windshield or other parts of the cab or
could be thrown out of the cab. They could
strike another person. Injuries can be much
worse when riders are unbelted. Always
observe user warnings pertaining to safety
belts. Your vehicle is equipped with a seat
belt indicator lamp located on the dash.
WARNING
DO NOT drive vehicle without your
belt and your passengers' belts
seat
fastened. Riding without a safety belt
properly fastened can lead to injury or
death in an emergency.
WARNING
DO NOT use the swivel function while
a
passenger is in the seat and the vehicle is in motion. The seat belt will not
provide proper protection if the passenger is not facing forward and the
vehicle is in an accident. Failure to
comply may result in death or personal
injury.
Correct Use of Restraint
Correct Placement of Lap Belt
Correct Placement of Shoulder Belt
26 Y53-6110-1A1 (01/21)
Page 29

Incorrect Use of Restraint
Lap Belt T
Shoulder Belt Incorrectly Under the Arm
oo High on the Hip
Safety Restraint Belt Twisted
During Pregnancy
Pregnant women should always wear
combination lap/shoulder belts. The lap
belt portion must be worn snugly and as
low as possible across the pelvis. T
pressure on the abdomen, the belt must
never pass over the waist. A properly worn
seat belt may significantly reduce the risks
to woman and baby in the event of a crash.
o avoid
Safety Restraint Tips
•
DO NOT wear a belt over rigid or
breakable objects in or on your
clothing, such as eye glasses,
pens, keys, etc., as these may
cause injury in an accident.
• Any authorized person sleeping in
your vehicle while it is moving
should use the bunk restraint.
• Any authorized person sitting in the
sleeper area on the sofa bed (if
equipped) while it is moving should
wear a seat belt.
• A responsible operator sees to it
that everyone in the vehicle rides
or sleeps safely. The operator is
responsible to inform any
passengers or co-drivers how to
1
Y53-6110-1A1 (01/21) 27
Page 30

1
properly use the seat belts and
bunk restraint in the vehicle.
DO NOT strap in more than one
•
person with each belt.
• Keep seat belt and bunk restraint
buckles free of any obstruction that
may prevent secure locking.
• Damaged or worn belts in the cab
or sleeper subjected to excessive
stretch forces from normal wear,
must be replaced. They may not
protect you if you are in an
accident.
• Any belts or restraints that have
been subjected to an accident
should be inspected for any loose
(attaching) hardware or damaged
buckles.
• If belts show damage to any part of
assembly, such as webbing,
bindings, buckles or retractors,
they must be replaced.
• DO NOT allow safety belts (seat or
bunk) to become damaged by
getting caught in door, bunk, or
seat hardware, or rubbing against
sharp objects.
• All belts must be kept clean or the
retractors may not work properly.
• Never bleach or dye seat or bunk
restraint belts: chemicals can
weaken them. Do, however, keep
them clean by following the care
label on the belts. Let them dry
completely before allowing them to
retract or be stowed away.
• Make sure the seat belts and bunk
restraint of the unoccupied
passenger seat or bunk is fully
wound up on its retractor or is
stowed, so that the belt or restraint
tongue is in its properly stowed
position. This reduces the
possibility of the tongue becoming
a striking object in case of a
sudden stop.
• DO NOT modify or disassemble
the seat belts or bunk restraint in
your vehicle. They will not be
available to keep you and your
passengers safe.
• If any seat belt or bunk restraint is
not working properly, see an
authorized dealer for repair or
replacement.
How to Use Lap/Shoulder Belt
Follow these steps to fasten your seat belt
and be sure anyone riding with you does
the same.
WARNING
Proper seat belt adjustment and use is
important
ty. Failure to wear or adjust the safety
belt properly may result in death or
personal injury.
To fasten the belt:
1.
2. Pull belt in a continuous slow
3. Insert belt tongue into buckle on
4. Push down until the tongue is
5. Pull belt to check for proper
to maximize occupant safe-
Grasp the belt tongue.
motion across your chest and lap.
inboard side of seat.
securely locked with an audible
click.
fastening and adjustment.
a. Pull shoulder section to make
sure belt fits snugly across the
chest and pelvis.
28 Y53-6110-1A1 (01/21)
Page 31

b. There should be less than one
inch (25 mm) gap between the
body and the belt.
The shoulder belt must be
c.
positioned over the shoulder,
it must never rest against the
neck or be worn under the
arm.
d. Make sure any slack is wound
up on the retractor and that
the belt is not twisted.
If the belt is locked, lean the body back to
remove any tension in the belt. After
releasing the belt, allow the belt to retract
completely by guiding the belt tongue until
the belt comes to a stop.
To unfasten the belt, push the release
button on the buckle and the belt should
spring out of the buckle. The seat belt
indicator will turn off once the driver's seat
belt is fastened.
Tether Belts
Make sure that the tether belt is attached
to the cab floor and seat frame. It should
be routed through the buckle on each side.
Often the attachments are made using a
split-type hook. Make sure both halves of
the hook are around the anchor bracket.
WARNING
DO NOT remove, modify, or replace
tether belt system with a different
the
tether system. A failed or missing tether belt could allow the seat base to
fully extend in the event of an accident. Failure to comply may result in
death or personal injury.
WARNING
Failure to adjust external tether belts
properly
ment of the seat in an accident. Tether
belts should be adjusted so that they
are taut when the seat is in its most
upward and forward position. Failure
to comply may result in death or personal injury.
Adjust an external tether by either
lengthening or shortening the strap. T
lengthen it:
1. Turn the buckle to a right angle to
2. Then pull the buckle.
can cause excessive move-
the webbing.
1
o
Y53-6110-1A1 (01/21) 29
Page 32
1
3. To shorten the tether, pull on the
strap.
Komfort Latch Feature
WARNING
DO NOT set the Komfort Latch with
too
much slack. Too much slack may
reduce the effectiveness of the seat
belt. Failure to comply may result in
death or personal injury.
To eliminate cinching, simply activate the
Komfort Latch device located on the seat
belt webbing at the appropriate time:
1.
Adjust the seat to its proper driving
position.
2. Latch the seat belt.
3.
If available, adjust the seat belt
height adjuster to a comfortable
driving position.
4. While seated appropriately, push
the "on" button to engage the
Komfort Latch.
5. Learn forward in the seat until you
hear a "click."
6. Return to normal driving position,
and the Komfort Latch maintains
the preset amount of tension relief.
More information and video tutorials can be
found at: http://www.clicktugsnug.com/
To disengage the mechanism unbuckle the
seat belt and then press the OFF button of
the Komfort Latch or tug on the shoulder
strap.
Belt Damage and Repair
Damaged belts in the cab must be
replaced. Belts that have been stretched,
cut, or worn out may not protect you in an
accident.
If any seat belt is not working properly
an Authorized Service Center for repair or
replacement.
For further information on seat belts and
seat belt maintenance, see Safety
Restraint System - Inspection on page 249.
, see
Sleeper Bunks and Restraints
This vehicle comes equipped with a bunk
restraint for the primary lower bunk and the
optional upper bunk. These restraints
should be used whenever the bunks are
occupied by a person while the vehicle is in
motion. The sleeper bunk restraint is
intended to reduce the risk of being thrown
from the bunk in a crash. This device is not
designed to hold the occupant in a fixed
position on the bunk and may not prevent
all injuries in the event of a crash.
30 Y53-6110-1A1 (01/21)
Page 33

WARNING
Lower Bunk Sleep Restraints
WARNING
1
Be sure the restraint system is used
anyone is occupying the sleeper
when
while the vehicle is moving. In an accident, an unrestrained person lying in a
sleeper bunk could be seriously injured. He or she could be thrown from
the bunk. Failure to comply may result
in death, personal injury, equipment or
property damage.
Lower Bunk
WARNING
Always keep the lower bunk in its horizontal,
latched, position while the vehicle is moving. If left open, stored items
could become loose during an accident and strike you, causing death or
personal injury.
Before you move the vehicle, check to be
sure the lower bunk is in the down position.
Y53-6110-1A1 (01/21) 31
Upper Bunk
WARNING
Be sure the latch that holds the upper
in the folded position is working
bunk
properly so the bunk will not fall down.
Pull on the bunk to be sure it is latched
securely. If the bunk falls, you could be
injured. Failure to comply may result in
death, personal injury, equipment or
property damage.
Any loose items on the upper or lower
should be moved to a secured
bunk
place before driving the vehicle. Failure to comply may result in death, personal injury, equipment or property
damage.
Per FMCSR 392.60 - Unauthorized
Persons Not to be T
law prohibits the transportation of persons
in commercial vehicles unless they are
specifically authorized in writing by the
motor carrier. See the cited FMCSR for a
ransported. Federal
Page 34

1
complete description of the regulation and
exemptions.
Upper Bunk Sleep Restraints
Upper Rear Sleeper Storage
Your vehicle may be equipped with an
upper storage shelf that extends over the
lower bunk and across the rear of the
sleeper. The following warning applies:
WARNING
Overhead compartments are not intended
for personnel use or for items
exceeding their designed weight limits.
Exceeding the weight limits may cause
the shelf to collapse and/or items may
fall out in a sudden stop which may
lead to death or personal injury
Compartments in the cab and sleeper are
provided for storage of necessary items
used during operation. The storage areas
above the door are designed to hold a
combined total not exceeding 14 lbs (6 kg)
per compartment and the other overhead
compartments (including those in the
optional sleeper) should hold a combined
total not exceeding 5 lbs (2.2 kg) per
compartment.
.
What to do before starting the vehicle
ehicle Operation
Safe V
Be sure to perform pre-trip inspections
before starting and operating the vehicle.
For your safety, as well as those around
you, be a responsible driver:
• If you drink alcohol, do not drive.
• Do not drive if you are tired, ill, or
under emotional stress.
Safe driving is only possible with the
proper concentration on the driving task.
Keep distraction to a minimum to improve
your concentration. Examples of
distractions may include radio controls,
GPS navigation controls, cellular telephone
calls, cellular text messages, reading or
reaching for something on the floor.
Minimizing your distractions will improve
safe driving and will help avoid an accident
involving death or personal injury.
Be aware of local regulations that may
prohibit the use of cellular telephones while
driving. In addition to being an unsafe
practice, it may be against local or federal
ordinances to use cellular devices while
operating the vehicle.
Much has gone into the manufacturing of
your vehicle including advanced
engineering techniques, rigid quality
control, and demanding inspections. These
manufacturing processes will be enhanced
by you, the safe driver, who observes the
following:
• Knows and understands how to
operate the vehicle and all its
controls
• Maintains the vehicle properly
• Uses driving skills wisely.
This manual is not a training manual. It
cannot tell you everything you need to
know about driving your vehicle. For that
you need a good training program or truck
driving school. If you have not been
trained, get the proper training before you
32 Y53-6110-1A1 (01/21)
Page 35

drive. Only qualified drivers should drive
this vehicle.
For more information, refer to Department
ransportation Regulation 392.7, which
of T
states that interstate commercial motor
vehicles are not to be driven unless the
driver is sure that certain parts and
accessories are in working order.
Do not drink alcohol and drive. Your
reflexes, perceptions, and judgment can be
affected by even a small amount of
alcohol. You could have a serious or even
fatal accident, if you drive after drinking.
DO NOT drink and drive or ride with a
driver who has been drinking.
WARNING
The use of alcohol, drugs, and certain
medications can impair perception, reactions, and driving ability. These circumstances can substantially increase
the risk of an accident. Failure to comply may result in property damage,
personal injury, or death.
WARNING
DO NOT text and drive. Your reaction
perceptions, and judgment can
time,
be affected while texting or using any
other form of mobile messaging while
driving. Failure to comply may result in
death, personal injury, equipment or
property damage.
Emergency Equipment
It is good practice to carry an emergency
equipment kit in your vehicle. One day, if
you have a roadside emergency, you will
be glad the following items are with you:
• Window scraper
• Snow brush
• Container or bag of sand or salt
• Emergency light
• Warning triangles
• Small shovel
• First aid kit
• Fire extinguisher
• Vehicle recovery hitches.
Drivers Checklist
o keep your vehicle in top shape and
T
maintain a high level of safety for you, your
passengers, and your load, make a
thorough inspection every day before you
drive. You will save maintenance time later,
and the safety checks could help prevent a
serious accident. Please remember, too,
that Federal Motor Carrier Safety
Regulation 392.7 requires a pre-trip
inspection and so do commercial trucking
companies.
You are not expected to become a
professional mechanic. The purpose of
your inspections is to find anything that
might interfere with the safe and efficient
transportation of yourself, any passengers,
and your load. If you do find something
wrong and cannot fix it yourself, have an
authorized dealer or qualified mechanic
repair your vehicle right away.
The following operations are to be
performed by the driver. Performing these
checks and following the maintenance
procedures in this manual will help keep
your vehicle running properly.
1
Y53-6110-1A1 (01/21) 33
Page 36
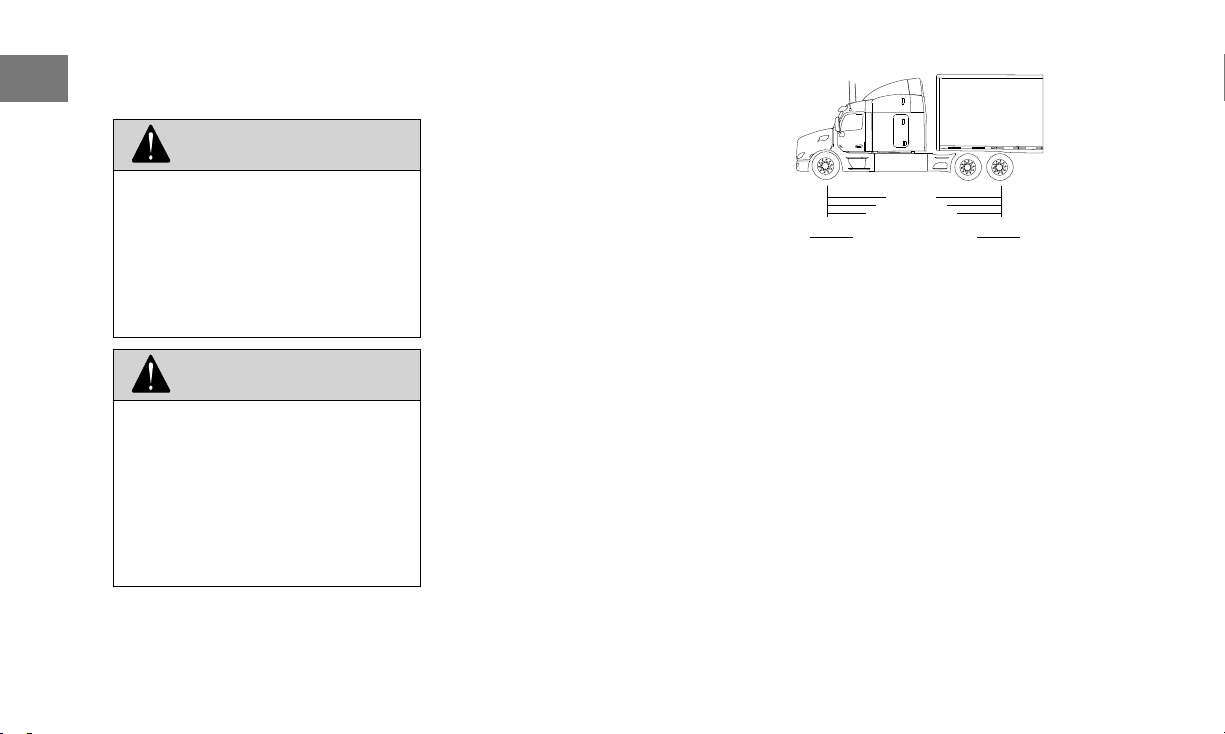
1 - Axle Weight
2 - Payload Distribution
3 - MAXIMUM LOAD RATING
7,880 (3,574)
4,120 (1,869)
12,000
(5,443)
Lbs (Kg)
7,540 (3,420)
24,348 (11,061)
31,925 (14,481)
Lbs (Kg)
(1)
(3)
(2)
1
components installed from the factory on to
Vehicle Loading
the vehicle and their designed
specifications. (Axle weight ratings are
listed on the driver's door edge.)
WARNING
DO NOT exceed the specified load rat-
Overloading can result in loss of
ing.
vehicle control, either by causing component failures or by affecting vehicle
handling. Exceeding load ratings can
also shorten the service life of the vehicle. Failure to comply may result in
death or personal injury.
WARNING
An unevenly distributed load or excessive
load over one axle can adversely
affect the braking and handling of your
GVWR Gross Vehicle Weight Rating. This is
GCW Gross Combination Weight (GCW).
GAWR Gross Axle Weight Rating. This is the
Load
Distribution
the MAXIMUM WEIGHT your vehicle
is allowed to carry
weight of the empty vehicle, loading
platform, occupants, fuel, and any
load. Never exceed the GVWR of your
vehicle.
This is the actual combined weight of
your vehicle and its load: vehicle, plus
trailer(s), plus cargo.
total weight that one axle is designed
to transmit to the ground. You will find
this number listed on the driver's door
edge.
Be sure any load you carry is
distributed so that no axle has to
support more than its GAWR.
, including the
1. Axle Weight
2.
Payload Distribution
3. Maximum Load Rating
Be sure that the load on the vehicle is
distributed evenly across each axle so that
no axle has to support more than its rated
GAWR. In total, the vehicle and its load
should not exceed the GAWR for each axle
and must not exceed the GCW.
vehicle, which could result in an accident. Even if your load is under the legal limits, be sure it is distributed evenly. Failure to comply may result in
death, personal injury, equipment or
Visual inspection while
approaching the vehicle
property damage.
While approaching the vehicle, inspect the
The Gross Vehicle Weight Rating (GVWR)
or the maximum front and rear Gross Axle
W
eight Ratings are determined by the
34 Y53-6110-1A1 (01/21)
general appearance of the vehicle and its
surroundings for any signs of needed
attention.
Page 37

NOTE
If equipped with a three-piece roof fairing,
DO NOT DRIVE WITH ROOF
FAIRING FOLDED DOWN, since the
marker lamps will not be effective in
that position.
Perform these basic inspection steps
before operating the vehicle.
1.
Check the overall appearance and
condition. Are windows, mirrors,
and lights clean and unobstructed?
2. Is the air-intake opening clear of
obstructions?
3. Check beneath the vehicle. Are
there signs of fuel, oil, or water
leaks?
4. Check for damaged, loose, or
missing parts. Are there parts
showing signs of excessive wear or
lack of lubrication? Have a qualified
mechanic examine any
questionable items and repair them
without delay.
5. Check your load. Is it secured
properly?
Daily Checks
NOTE
These checks are in addition to, not in
place
of, Federal Motor Carrier Safety
Regulations. These regulations may
be purchased by writing to: Superintendent of Documents U.S. Government Printing Office Bookstore 710 N.
Capitol St. N.W. Washington, DC
20402, or ContactCenter@gpo.gov.
Engine
•
Engine oil
• Engine coolant
• Power steering fluid
• Engine belt
• Fuel filter (water separator) Fuel
System on page 274
• Windshield washer fluid
• Battery cables - check the
condition of the battery and
alternator cables for signs of
chafing or rubbing. Make sure that
all clamps (straps) holding the
cables are present and in good
working order
• Hood latch
• Brake lines and hoses
• Steering components - check
pitman arm, drag link, tie rod,
steering shaft and power steering
hoses, etc., for loose, broken, or
missing parts.
• Hydraulic clutch fluid
.
Chassis and Cab Exterior
• Lamps - are any exterior lamps
cracked or damaged? Perform an
exterior lamp test. See Exterior
Lighting Self-Test on page 107 for
more information.
• Is the air-intake opening clear of
obstructions?
• Window and mirrors - clean and
adjusted?
• Tires, wheels and hubs Tires on
page 292 Wheels on page 295 and
Systems Check on page 37
• Suspension components - check
for loose or missing fasteners.
Check damage to springs or other
suspension parts such as cracks,
gouges, distortions, bulges or
chafing.
1
Y53-6110-1A1 (01/21) 35
Page 38

1
• Brake lines and hoses - check
lines, linkages, chambers, parking
and service brake operation.
Air system - Air System on page
•
234
• Steps and grab handles
• Frame mounted tanks (fuel, diesel
exhaust fluid, etc) - check
underneath the vehicle for signs of
fluid leaks. If any are found, correct
before operating the vehicle. Is the
tank fill cap secure? Are the tank
straps tight? Is the strap webbing in
place?
• Trailer connections - are they
secure and the lines clear? If they
are not being used, are they stored
properly? Is the trailer spare wheel
secure and inflated? Is the landing
gear up and the handle secured?
• Fifth wheel - Is the kingpin or the
sliding fifth wheel locked?
Cab Interior
• Seat - adjust the seat for easy
reach of controls and visibility.
• Seat belts - fasten and adjust
safety restraint belts (which may
include restraints in the sleeper).
• Steering column - adjust for easy
reach and visibility.
• Mirrors - check and readjust
mirrors if necessary.
• Lamps - turn ignition key to the ON
position to allow the bulb check
and the systems check to test the
truck systems. Perform an Exterior
Light Self-Test
• Instruments - check all instruments
(see Systems Check on page 37)
• Windshield - check operation of
windshield wipers and washers.
• Horn - check operation of horn.
• Fuel - check vehicle's fuel level. Is
there enough fuel?
• Diesel exhaust fluid - check level.
Is there enough fluid?
• Air conditioning filters in the cab
and/or sleeper - check the
condition of the sleeper air
conditioning air filter. Keep the
sleeper floor area behind the
passenger front seat clear of debris
and pet hair. The sleeper air
conditioner draws air from this area
and excessive dirt or pet hair may
shorten the service life of the
sleeper air conditioning air filter.
Weekly Checks
NOTE
These checks are in addition to, not in
place
of, Federal Motor Carrier Safety
Regulations. These regulations may
be purchased by writing to: Superintendent of Documents U.S. Government Printing Office Bookstore 710 N.
Capitol St. N.W. Washington, DC
20402, or ContactCenter@gpo.gov.
Engine
•
Belts
• Hoses
• Clamps
• Radiator
• Air filter and its housing
• Engine Aftertreatment system
components
• Exhaust pipes
• Engine air pre-cleaner (option) For vocational vehicles with
optional engine air pre-cleaner,
check the purge valve at the
bottom of the hood mounted
36 Y53-6110-1A1 (01/21)
Page 39

engine air pre-cleaner for any
105
105
105 105
105
105
105 105
105105
105 105
105
105
105
105
84
114
1
2
obstructions. Make sure the purge
valve will open and close as
needed to purge dirt and water
from the engine intake air
• Automatic transmission fluid
(where applicable) - Check level,
after the engine has warmed up to
operating temperature.
Chassis and Cab Exterior
• Battery - check battery and
terminals.
• Hood supports and guides are
properly lubricated.
• Wheel cap nuts - are they all in
place and torqued properly tighten if necessary. Wheels on
page 295
• Controls and wiring - check for
condition and adjustment
.
• PACCAR 20k Front Axle Kingpin
Joint Grease/Tie Rod Ends (option)
(VOCATIONAL USE) - For
vocational vehicles with this axle,
grease with Heavy-Duty
Multipurpose Lithium Based: #1 or
#2 grade, every 50 hours. (Refer to
Front Axle and Suspension on
page 275 for maintenance
instructions.)
Systems Check
System Check Display
Systems Check evaluates each monitored
system and displays its progress for the
. The Systems Check will appear
operator
when the Exterior Lighting Self-Test (ELST)
is activated, or when viewing the
Notifications sub-menu.
Systems Check can be interrupted at any
time by
• Pressing Select
• Switching the ELST switch to OFF
• Turning the ignition key to OFF or
ACC
• Releasing the Parking Brake.
The Systems Check can also present the
following optional features.
Tire Pressure Monitoring System
(TPMS) (option)
One of the systems the vehicle monitors is
the Tire Pressure Monitoring System
(TPMS).
1
• Steering components - check
pitman arm, drag link, intermediate
shaft U-joint pinch bolt, tie rod,
steering shaft and power steering
hoses, etc., for loose, broken, or
missing parts.
• Cab air conditioner fresh air filter check for condition and
cleanliness.
Y53-6110-1A1 (01/21) 37
Page 40

84
96
105
105
105
21
105
3
105
105 105
105
105
105 105
105
54
105
105
1
TPMS shows individual tire pressures for
each location and will change the color of
the tire:
Outlined – Tire pressure not
•
available
• Gray – Nominal
• Amber – High or low pressure
• Red – Very low or high pressure, or
high temperature
To read about tires and recommended
maintenance practices, see Tires on page
292.
System Check Display with TPMS
shown, as well as general driving tips that
can improve brake saving and fuel
economy (see Driver Rewards).
Driver Performance Assistant (DP
(option)
If enabled, The Driver Performance
Assistant score for Braking Habits is
shown, as well as general driving tips that
can improve brake saving and fuel
economy (see DPA ).
A)
Once the Systems Check has completed,
the results will display in a summary
. A
detailed explanation of this summary can
be viewed by accessing the Menu after a
Systems Check has completed.
Driver Rewards (option)
If enabled, the Driver Rewards score for
Fuel Economy, Engine Idle Time, or both
Fuel Economy and Engine Idle Time are
38 Y53-6110-1A1 (01/21)
Page 41

1
Y53-6110-1A1 (01/21) 39
Page 42

2
Chapter 2 | EMERGENCY
Roadside Assistance
Low Air Alarm .....................................................................................................................................41
Stop Engine Light................................................................................................................................42
Low Oil Pressure.................................................................................................................................42
Engine is Overheating.........................................................................................................................42
How to Inspect and Replace a Fuse................................................................................................... 44
Where are the Fuses Located?...........................................................................................................46
How to Jump Start a Battery............................................................................................................... 46
How to Recover a Vehicle...................................................................................................................48
...........................................................................................................................41
40 Y53-6110-1A1 (01/21)
Page 43

Roadside Assistance
Call toll-free to talk to someone at the
PACCAR Customer Center.
1-800-4Peterbilt (800-473-8372
The Customer Call Center is open
24/7-365 days a year and staffed with
trained personnel (English and other
languages if necessary), free of charge, to
provide total roadside assistance. Their
custom mapping system can locate the
nearest Authorized dealers and
Independent Service Providers (ISPs)
based on the vehicle's location. In addition,
the customer center can dispatch services
for jump and pull starts, tires, trailers, fines
and permits, chains, towing, hazardous
clean-up, out of fuel (roadside), mechanical
repairs, and preventive maintenance
services. If they can’t answer a specific
question, they will direct you to a
representative who can.
Low Air Alarm
If this alarm turns on while parked or
driving, be sure to perform these tasks:
WARNING
If the air pressure falls below 60 psi
kPa) the spring brakes may stop
(414
the vehicle abruptly, which could
cause an accident resulting in personal injury or death. Observe the gauges.
If the warning alert comes on, do not
continue to drive the vehicle until it has
been properly repaired or serviced.
NOTE
The instrument cluster gauges may
appear
, if hidden from view, change
brightness and change color to bring
attention to a particular system.
1. Slow down carefully.
2.
Move a safe distance off the road
and stop.
3. Place the transmission in neutral
(park with automatic transmissions,
if equipped) and set the parking
brake.
4. Turn OFF the engine.
5. Turn ON the emergency flasher
and use other warning devices to
alert other motorists.
If the light and alarm do not turn off at startup, DO NOT try to drive the vehicle until
the problem is found and fixed.
2
Y53-6110-1A1 (01/21)
41
Page 44

2
Stop Engine Light
This warning light illuminates when the
engine has a serious problem. This is an
emergency and the vehicle should be
safely stopped at the soonest opportunity
WARNING
This should be considered an emer-
. You should stop the vehicle as
gency
safely as possible and turn OFF the ignition. The vehicle must be serviced
and the problem corrected before driving again. Failure to do so may cause
severe engine or Diesel Particulate Filter damage, or cause an accident
which may result in death or personal
injury.
Low Oil Pressure
CAUTION
Continuing to operate your vehicle with
ficient oil pressure will cause seri-
insuf
ous engine damage. Failure to comply
may result in equipment or property
damage.
It is important to maintain oil pressure
.
within acceptable limits. If oil pressure
drops below the minimum psi (kPa) the oil
pressure gauge will illuminate and change
color
. Additionally, the Stop Engine Lamp
will turn red.
NOTE
The instrument cluster gauges may
appear, if hidden from view, change
brightness and change color to bring
attention to a particular system.
1. Slow down carefully.
2. Move a safe distance off the road
and stop.
Place the transmission in neutral
3.
(park with automatic transmissions,
if equipped) and set the parking
brake.
4. Turn OFF the engine.
5. Turn ON the emergency flasher
and use other warning devices to
alert other motorists.
6. Wait a few minutes to allow oil to
drain into the engine oil pan, and
then check the oil level.
7. Add oil if necessary. If the problem
persists, contact an authorized
dealer as soon as possible.
Engine is Overheating
42 Y53-6110-1A1 (01/21)
Page 45

CAUTION
The cooling system may overheat if
engine coolant is at the minimum
the
level. A sudden loss of coolant,
caused by a split hose or broken hose
clamp could also lead to an overheat
condition. Always inspect to ensure
hoses and clamps are not cracked,
worn, or loose. Failure to comply may
result in equipment or property damage.
NOTE
engine may be overheating, DO NOT
TURN OFF THE ENGINE unless a low
water warning device indicates a loss of
coolant.
Follow these steps if the engine coolant
temperature is rising, or the temperature is
already above normal, and there are no
other warning alarms displayed in the
instrument cluster
.
NOTE
The instrument cluster gauges may
appear
, if hidden from view, change
brightness and change color to bring
attention to a particular system.
idling without an alert driver present. If
engine does overheat, as indicated
the
by the engine coolant temperature
lamp, immediate action is required to
correct the condition. Continued unattended operation of the engine, even
for a short time, may result in serious
engine damage or a fire. Failure to
comply may result in death, personal
injury, equipment or property damage.
2
The system may also temporarily over-
during severe operating condi-
heat
tions such as:
• Climbing a hill on a hot day
• Stopping after high-speed/highload driving
• Debris blocking air flow through
the cooling module (radiator)
If the engine coolant temperature warning
lamp comes on and the audible alarm
sounds showing an overheat condition, or
if you have any other reason to suspect the
Y53-6110-1A1 (01/21)
1. Reduce engine speed, or stop.
When stopped, place the
transmission in neutral (N) and set
the parking brake. Keep the engine
running.
WARNING
To reduce the chance of personal in-
, vehicle damage, and/or death
jury
from overheated engines, which can
result in a fire, never leave the engine
43
Page 46

2
WARNING
Removing the fill cap on a hot engine
cause scalding coolant to spray
can
out and burn you badly. If the engine
has been in operation within the previous 30 minutes, be very careful in removing the fill cap. Protect face,
hands, and arms against escaping fluid and steam by covering the cap with
a large, thick rag. DO NOT try to remove it until the surge tank cools down
or if you see any steam or coolant escaping. Always remove the cap very
slowly and carefully. Be ready to back
off if any steam or coolant begins to
escape. Failure to comply may result
in death, personal injury, equipment or
property damage.
NOTE
Keep the engine running at idle speed
a warning icon turns on that re-
unless
quires the engine to be shut off.
2. Check to ensure the Oil Pressure
Gauge reads normal.
3. Make sure the engine fan is turning
by switching the Engine Fan
Switch from AUT
(Manual).
4. Idle the engine to see if this
reduces the coolant temperature. If
the temperature does not begin to
drop, shut off the engine and
contact your nearest authorized
dealer.
5. If the temperature begins to return
to normal, allow the engine to idle 3
to 5 minutes before shutting it off.
This allows the engine to cool
gradually and uniformly.
6. If overheating came from severe
operating conditions, the
temperature should have cooled by
this time. If it has not, stop the
engine and let it cool before
checking to see if the coolant is
low.
7. Be sure the vehicle is parked on
level ground or the readings may
be incorrect. Check the coolant
level at the coolant surge tank.
Check the coolant level after each trip
when the engine has cooled. The coolant
level should be visible within the surge
tank. Add coolant if necessary.
O to MAN
How to Inspect and Replace a Fuse
T
urn the ignition off and turn all lights off.
Locate the fuses in either the cab, sleeper,
or main power fuse box.
All the electrical circuits have fuses to
protect them from a short circuit or
overload. If something electrical on your
chassis stops working, the first thing you
should check for is a blown fuse.
WARNING
DO NOT replace a fuse with a fuse of
a higher rating. Doing so may damage
the electrical system and cause a fire.
Failure to comply may result in death,
personal injury, equipment or property
damage.
CAUTION
Never patch fuses with aluminum foil
or
wire. This may cause serious damage elsewhere in the electrical circuit,
and it may cause a fire.
44 Y53-6110-1A1 (01/21)
Page 47

CAUTION
If a circuit keeps blowing fuses, have
electrical system inspected for a
the
short circuit or overload by an authorized dealer as soon as possible. Failure to do so could cause serious damage to the electrical system and/or vehicle.
CAUTION
Before replacing a fuse, turn OFF all
lights
and accessories and remove the
ignition key to avoid damaging the
electrical system.
1. Turn off all lights and accessories
and remove the ignition key to
avoid damaging the electrical
system.
2.
Determine from the chart on the
fuse panel which fuse controls that
component.
• If the circuit has a fuse, remove
that fuse and see if it is blown.
• If the circuit has a polyswitch,
have your electrical system
inspected by an authorized
dealer
.
Blown Fuse
1. Separation (Blown)
3. If it is blown, replace it with a fuse
of the same rating. If a fuse of the
same rating is not available, a fuse
of a lower rating may be
temporarily substituted. You can
also use a fuse from a circuit you
can do temporarily without (for
example an accessory circuit or
radio).
CAUTION
When replacing a failed polyswitch
breaker), always use an ap-
(circuit
proved polyswitch (circuit breaker) with
a current rating equal to or less than
the polyswitch (circuit breaker) being
replaced. Only use the approved Type
II modified reset polyswitch (circuit
breaker). NEVER use a Type I (automatic reset) or Type III (manual reset)
polyswitch (circuit breaker). A fuse
with a current rating equal to or less
than the polyswitch (circuit breaker)
being replaced can also be used.
CAUTION
Always close and latch the engine
compartment
ed cover ensures a water tight seal
which can prevent damage to electrical components.
fuse box cover. A latch-
2
Y53-6110-1A1 (01/21) 45
Page 48

2
Where are the Fuses Located?
Fuses for the cab are located in the fuse
panel behind the drivers side kick panel.
Main power relays are located on the
power distribution center, in the engine
compartment, mounted to the front wall of
the cab.
Fuses for the optional sleeper are located
on a separate fuse box accessible through
the luggage compartment door.
How to Jump Start a Battery
WARNING
Batteries contain acid that can burn
and gases that can explode. Ignoring
safety procedures may result in death,
personal injury, equipment or property
damage.
WARNING
Never jump start a battery near fire,
or electrical sparks. Batteries
flames,
generate explosive gases that could
explode. Keep sparks, flame, and
lighted cigarettes away from batteries.
Failure to comply may result in death,
personal injury, equipment or property
damage.
WARNING
When jump starting using a battery
charger/booster
charger/booster is set to the same jump
start voltage and amperage specifications as the vehicle electrical system
and batteries (i.e., if the vehicle electrical system is a 12 volt system, the jump
start voltage on the battery charger/
booster shall be set at no higher than a
12 volt setting). Failure to comply may
cause an explosion and/or fire resulting
in death, personal injury, and/or equipment or property damage.
, verify that the battery
WARNING
Heed all warnings and instructions of
jumper cable manufacturer. Failure
the
to comply may result in death, personal injury, equipment or property damage.
CAUTION
Applying a higher voltage booster battery
will cause expensive damage to
sensitive electronic components, such
as relays, and the radio. Failure to
comply may result in equipment damage.
CAUTION
Improper hook-up of jumper cables or
following these procedures can
not
damage the alternator or cause serious damage to both vehicles.
46 Y53-6110-1A1 (01/21)
Page 49
CAUTION
Vehicles equipped with an Engine
Module (ESM) should not be
Start
jumped using the ESM Starter terminal
(S+). Failure to comply may result in
arcing or battery damage.
1. Remove any jewelry that may
come in contact with the battery
terminals.
Select a jumper cable that is long
2.
enough to attach to both vehicles in
a way that ensures neither vehicle
touches each other.
3. Position the two vehicles together,
but do not allow them to touch.
4. Turn OFF all lights, heater, radio,
and any other accessory on both
vehicles.
5. Set the parking brake.
6. Shift the transmission into park
position or neutral for manual
transmissions.
7. If either vehicle is equipped with
battery disconnects ensure they
are in the OFF position prior to
connecting the two vehicles.
8. Attach one end of a jumper cable
to the positive (+) terminal of the
discharged (dead) battery
have a large red + or P on the
battery case, post, or clamp.
. This will
NOTE
If your vehicle is equipped with an Engine
Start Module (ESM), attach the
positive (+) cable to the vehicle battery
and not the ESM Starter terminal (S+).
See the Maxwell Installation Guide
and User Manual for additional information about LED status conditions,
maintenance, and troubleshooting.
9. Attach the other end of the same
cable to the positive (+) terminal of
the good (booster) battery
10. Attach the remaining jumper cable
FIRST to the negative (-) terminal
(black or N) of the good battery.
11. Attach the other end of the
negative cable to the negative (-)
terminal of the dead battery.
.
NOTE
Always connect positive (+) to positive
(+) and negative (-) to negative (-).
12. If either vehicle is equipped with
battery disconnects, ensure that
they are in the ON position.
13.
Start the vehicle that has the good
battery first.
• Let it run for 5 minutes, or
• If charging a system containing
an Engine Start Module (ESM),
let it run for 15 minutes. Briefly
pressing the Push-to-Test
button on the ESM will indicate
the ESM's charge state. When
the status LED presents a solid
green light the ESM is
sufficiently charged.
14. Start the vehicle that has the
discharged (dead) battery.
The engine should start. If the engine fails
to start, do not continue to crank the
starter. Instead, contact the nearest
authorized dealer.
2
Y53-6110-1A1 (01/21) 47
Page 50

WARNING
the axle shafts in the axles will cause
damage to the axle gears.
WARNING
2
When disconnecting jumper cables,
sure they do not get caught in
make
any moving parts in the engine compartment. Failure to comply may result
in death, personal injury, equipment or
property damage.
Reverse the above procedure exactly
when removing the jumper cables. With
engine running, disconnect jumper cables
from both vehicles in the exact reverse
, making sure to first remove the
order
negative cable from the vehicle with the
discharged battery.
How to Recover a Vehicle
CAUTION
Remove the drive axle shafts or lift the
driving
wheels off the ground before
towing the vehicle. Towing the vehicle
with either the wheels on the ground or
48 Y53-6110-1A1 (01/21)
CAUTION
If your vehicle has a Meritor axle with
driver-controlled main differential
a
lock, install the caging bolt before removing the axles for towing, see How
to Manually Lock a Differential. Installing the caging bolt prevents damage
by locking internal axle components in
position.
CAUTION
Connect recovery rigging only to hitches
intended for that purpose. DO NOT
attach to bumpers or brackets. Use
only equipment designed for this purpose. Failure to comply may result in
equipment damage.
Before towing a vehicle, test your air
brakes to ensure that you have proper-
connected and inspected the recov-
ly
ery vehicle’s brake system. Failure to
do so could lead to a loss of vehicle
control which may result in an accident
involving death or personal injury.
All lubricating and clutch application oil
pressure is provided by an engine-driven
pump, which will not work when the engine
is stopped. Y
your vehicle by towing it with the driveline
connected and the drive wheels on the
ground. Worse, when vehicles are towed,
either by wrecker or piggyback, the
lubricant in the top front of the drive axle
will drain to the rear. This will leave the top
components dry. The resulting friction may
damage them. Always remove the main
drive axle shafts before towing your
vehicle.
1. Review and understand all the
2. Disconnect the drive axle shafts
ou could seriously damage
cautions and warnings of this
section.
and cover the open hubs. This is
Page 51

necessary because if the
transmission is driven by the
driveshaft (rear wheels on the
ground), no lubricant will reach the
gears and bearings, causing
damage to the transmission. .
See How to Prepare the Axles for T
on page 52
3. Connect the towing chain or cable
using best recovery practices .
See Best Practices for Recovery Rigging
on page 55
4. Make sure the recovered vehicle's
parking brakes are released. .
See Manually Release the Parking Brake
on page 49
5. If you desire to use the recovered
vehicle’s brakes, ensure that the
vehicle’s air system is connected to
that of the recovery vehicle. Ensure
that any air line that has been
removed from a driver-controlled
main differential lock is firmly
capped to prevent loss of air
pressure from the recovery vehicle
if it is supplying air pressure. If you
don’t desire to use the recovered
vehicle’s brakes, ensure that you
cage the spring brakes before
attempting to move the vehicle.
owing
See How to Manually Lock a Differential on
page 53
6. Follow state/provincial and local
laws that apply to vehicles in tow.
7. Do not tow vehicles at speeds in
excess of 55 mph (90 km/h).
For additional information concerning
heavy duty truck recovery, refer to the
following Technology & Maintenance
Council (TMC) literature.
• Recommended Practice #602–A —
“Front Towing Devices For Trucks
and Tractors”
• Recommended Practice #602–B —
“Recovery Attachment Points For
Trucks, Tractors, and Combination
Vehicles"
• Recommended Practice #626 —
“Heavy Duty Truck Towing
Procedures”
Copies of these can be obtained from the
following address: Technology &
Maintenance Council 950 N. Glebe Road
(703) 838-1763 Arlington, VA 22203 Email:
tmc@trucking.org Website: http://
tmc.truckline.com
Manually Release the Parking Brake
There may be times when there is not
enough air pressure, or the engine's air
compressor is not able to produce enough
pressure, to release the parking brakes. In
such cases, the parking brakes (or Spring
Brakes) can be manually released.
WARNING
DO NOT drive vehicle with malfunc-
brakes. If one of the brake cir-
tioning
cuits becomes inoperative, braking
distances will increase substantially
and handling characteristics while
braking will be affected. You could lose
control of your vehicle or cause an accident. Have it towed to the nearest
dealer or qualified repair facility for repair. Failure to comply may result in
property damage, personal injury, or
death.
2
Y53-6110-1A1 (01/21) 49
Page 52

2
WARNING
DO NOT operate a vehicle when the
brakes have been manually re-
spring
leased. Driving a vehicle after its
spring brakes are manually released is
extremely dangerous. The brakes may
not function. Failure to comply may result in death, personal injury, equipment or property damage.
WARNING
chains, or other safe means to prevent
before manually releasing the
rolling
spring brakes.
To move a vehicle immobilized by the
spring brakes due to loss of air pressure in
the brake system, perform the following
procedure:
Remove the cap from the spring
1.
chamber
3. Slide out the release stud.
DO NOT disassemble a spring brake
chamber
powerful spring that is compressed.
Sudden release of this spring may result in death or personal injury.
. These chambers contain a
WARNING
Releasing the spring brakes on an unsecured
dent. The vehicle could roll, which may
result in death, personal injury, equipment or property damage. Always secure the vehicle with wheel chocks,
50 Y53-6110-1A1 (01/21)
vehicle could lead to an acci-
2. Remove the release stud assembly
from the side pocket, and remove
the release nut and washer from
the release stud.
4. Insert the release stud through the
opening in the spring chamber
where the cap was removed. Insert
it into the pressure plate. T
release stud 1/4 turn clockwise in
the pressure plate. This secures
the cross pin into the cross pin
area of the pressure plate and
locks it into the manual release
position.
urn the
Page 53

5. Assemble the release stud washer
and nut on the release stud.
torque the release stud assembly.
(S-Cam-type maximum: 50 lb-ft (68
edge-type maximum: 30
N·m), W
lb-ft (41 N·m)). The spring brake is
now mechanically released.
designed to be used as towing devices for
long distance.
Specially designed hitches are required to
recover your vehicle. The recovery hitches
attach to the frame. T
made up of the following parts, are
recommended for the proper recovery of
your vehicle:
wo hitch assemblies,
2
Recovery Hitch
6. With a wrench, turn the release
stud assembly nut until the
compression spring is 90-95
percent caged. While doing this,
check to make sure the push rod
(adapter push rod or service push
rod) is retracting. DO NOT over-
Y53-6110-1A1 (01/21) 51
A removable recovery hitch is a device that
attaches to the sockets in the front bumper
in the event that the vehicle needs to be
recovered. These hitches are designed for
short distance and intermittent duty to help
pull a vehicle. These hitches are not
If your vehicle is not equipped with the
proper recovery hitch assembly
authorized dealer to obtain the proper
equipment.
, contact an
Page 54

2
WARNING
DO NOT use parts from other trucks or
materials
a hitch or to replace a missing hitch.
The parts provided for recovery are
made of high strength materials and
are specifically designed for vehicle recovery. Failure to use the correct factory equipment may result in an accident involving death or personal injury.
from other sources to repair
CAUTION
Connect recovery rigging only to hitches
intended for that purpose. DO NOT
attach to bumpers or brackets. Use
only equipment designed for this purpose. Failure to comply may result in
equipment damage.
How to use a Recovery Hitch
CAUTION
Recovery pull maximums assume the
rigging evenly distributes the load
tow
between both recovery hitches. See
examples in Recovery Rigging for details. Serious damage to the vehicle
may occur if rigging is not connected
properly.
CAUTION
When recovering ditched or bogged
vehicles,
Capacities. Even at loads below maximum, the physical strain of recovering
a vehicle could damage axles, suspensions, fifth wheels, etc.
Use the following procedure to install the
V
ehicle Recovery Hitches. See Recovery
Hitch Assembly illustration for part
identification.
1. Check the square sockets behind
stay well below Maximum
lower bumper for obstructions,
clear if necessary.
2. With lock pins removed, insert the
hitches through the bumper and
into the square hitch socket.
3.
Align the hole in the tow hitch with
the square hitch socket hole.
4. Insert the lock pin into the square
hitch socket hole and through the
hole in the tow hitch until the lock
tab is within the square hitch
socket.
5. Rotate the lock pin 90 degrees to
secure the pin in place.
6. Ensure that the tow pin and lock
clip are installed before using the
hitch.
7. Remove the hitches and store all
parts after recovering the vehicle.
How to Prepare the Axles for Towing
If the vehicle is going to be towed from the
front axle and using the rear axle for
support, then the axle shafts should be
prepared [removed] so that minimal
damage is made to the differential during
the towing process.
Ensure that the recovered vehicle does not
have an open air line. An open air line on
the recovered vehicle will cause a leak in
the air system of the recovery vehicle if
52 Y53-6110-1A1 (01/21)
Page 55

both vehicles’ brake systems are
connected. This could cause a loss of
system air
brakes not to function, resulting in the
sudden application of the spring brakes
causing wheel lock-up, loss of control, or
overtake by following vehicles.
, which can cause the service
WARNING
An open air line on the recovered vehi-
will cause a leak in the air system
cle
of the recovery vehicle if both vehicles’
brake systems are connected. This
could cause a loss of system air, which
can cause the service brakes not to
function, resulting in the sudden application of the spring brakes causing
wheel lock-up, loss of control, or overtake by following vehicles. You could
be in an accident involving personal injury or death. Ensure that any air line
that has been removed from a drivercontrolled main differential lock is firmly capped to prevent loss of air pressure from the recovery vehicle if it is
supplying air pressure.
1. Lift driving wheels off the ground or
remove the driveline and axle
shafts before towing the vehicle.
CAUTION
Failure to lift the driving wheels off the
or remove the driveline and
ground
axle shafts before towing the vehicle
could seriously damage your vehicle.
All lubricating and clutch application oil
pressure is provided by an enginedriven pump, which does not work
when the engine is stopped. When vehicles are towed either by wrecker or
piggyback, lubricant in the top front of
the drive axle will drain to the rear.
This will leave the top components dry,
resulting in friction that will seriously
damage these components.
2. If the vehicle has driver controlled
differential lock, then manually lock
the differential.
3. Remove drive axle shafts.
4. Cover the open ends of the hubs to
prevent dirt and debris from
entering the axle.
CAUTION
Water, dirt, and other material can en-
an open hub or axle. This can con-
ter
taminate the axle fluid and cause possible damage to components. Ensure
that the hubs are covered with plastic
whenever a drive axle shaft is removed.
How to Manually Lock a Differential
Follow these procedures if the vehicle has
a driver controlled differential lock.
Always lock the differential when the axles
are being removed to aid in re-installation.
This procedure should be done before the
axle shafts are removed.
CAUTION
Failure to install the caging bolt when
towing
main differential lock can result in
damage by failing to lock internal components in position.
vehicles with driver-control
2
Y53-6110-1A1 (01/21) 53
Page 56

2
WARNING
An open air line on the recovered vehi-
will cause a leak in the air system
cle
of the recovery vehicle if both vehicles’
brake systems are connected. This
could cause a loss of system air, which
can cause the service brakes not to
function, resulting in the sudden application of the spring brakes causing
wheel lock-up, loss of control, or overtake by following vehicles. You could
be in an accident involving personal injury or death. Ensure that any air line
that has been removed from a drivercontrolled main differential lock is firmly capped to prevent loss of air pressure from the recovery vehicle if it is
supplying air pressure.
CAUTION
A recovered vehicle will have no operational
the rear axle spring brakes will probably be applied.
brake system. Additionally,
• If you desire to use the recovered
• If you don’t want to use the
1. Remove the air line and firmly cap
2.
3. Screw the caging bolt into the air
s brakes, ensure that the
vehicle’
vehicle's air system is connected to
that of the recovery vehicle. Also
ensure that any air line that has
been removed from a drivercontrolled main differential lock is
firmly capped to prevent loss of air
pressure from the recovery vehicle.
recovered vehicle’s brakes, ensure
that you cage the spring brakes
before attempting to move the
vehicle.
the air line from the vehicle. (2)
Remove the caging bolt from its
storage hole. (1)
line hole. (2)
4. When fully engaged, a 0.25-0.5 in.
(6.35-12.7 mm) space will remain
between the air cylinder and the
bolt head. This action will lock the
differential by pushing a piston into
a “lock” position.
Recovery Hitch Capacities
The maximum rated loads for vehicle
recovery varies depending on the direction
or angle of pull. These capacities are listed
in the table below and are for the two
hitches working together, simultaneously.
Direction of Pull Maximum
Directly forward 80,000 (36,000)
Directly vertical or
horizontally to the
side
45 degrees in any
direction
Capacity lbs.
(kg)
14,600 (6,600)
20,000 (9,000)
54 Y53-6110-1A1 (01/21)
Page 57

Best Practices for Recovery Rigging
CAUTION
Recovery pull maximums assume the
rigging evenly distributes the load
tow
between both recovery hitches. See
examples in Recovery Rigging for details. Serious damage to the vehicle
may occur if rigging is not connected
properly.
CAUTION
When recovering ditched or bogged
vehicles,
Capacities. Even at loads below maximum, the physical strain of recovering
a vehicle could damage axles, suspensions, fifth wheels, etc.
stay well below Maximum
Recovery Rigging Options
Use a double chain or cable setup that
distributes the load equally to both hitches
(see either example in Recovery Rigging
Options illustration):
•
Never loop a single chain or cable
through both hitches, also known
as reeving (not shown).
• Use a spreader or equalizer bar to
distribute the load on both hitches
(1), or
• If no spreader bar is available,
connect the main tow chain or
cable no closer than 6 ft. (1.8 m)
from the vehicle: (2) to (3).
• Secure the towed vehicle using two
additional chains or cables (see
Safety Chains) (not shown).
Returning to Service After Recovering
Once the vehicle is recovered, the axles
need to have oil added to prevent gear
damage during operation.
1.
Into the pinion cage, add 1 pint (.47
liter) of lubricant or into the
interaxle differential, add 2 pints
(.94 liter) of approved lubricant.
2. After adding the specified type and
amount of lubricant, drive the
vehicle. It should be unloaded.
Drive 1 to 2 miles (1.5 to 3 km) at a
speed lower than 25 mph (40
km/h). This will thoroughly circulate
the lubricant through the assembly.
3. If the parking brakes were
manually released, they will need
to be modified back to their normal
operating condition.
4. If the differential lock was manually
locked, then the caging bolt needs
to be put back in its storage
location and the differential lock air
line needs to be re-installed in its
normal position.
Add lubricant back to the axles after
recovering the vehicle and before putting it
back into service.
2
Y53-6110-1A1 (01/21) 55
Page 58

2
What to do if the Vehicle is Stuck in Sand, Mud, Snow or Ice
WARNING
DO NOT spin the wheels faster than
mph (55 km/h). Spinning a tire at
35
speedometer readings faster than 35
mph (55 km/h) can be dangerous.
Tires can explode from spinning too
fast. Under some conditions, a tire
may be spinning at a speed twice that
shown on the speedometer. Any resulting tire explosion could cause injury or death to a bystander or passenger, as well as extensive vehicle damage: including tire, transmission,
and/or rear axle malfunction.
These suggestions are provided to improve
the ability to free a vehicle if the vehicle
gets stuck in sand, mud, snow, or ice:
• Move the gearshift lever or selector
from First to Reverse
• Apply light pressure on the
accelerator pedal while the
transmission is in gear
• Remove your foot from the
accelerator while shifting
• Do not race the engine
• For best traction and safety, avoid
spinning the wheels
Follow these practices to avoid
transmission damage:
Always start vehicle in motion with
•
the shift lever in first gear.
• Be sure that transmission is fully
engaged in gear before releasing
the clutch pedal (manual only).
• Do not shift into reverse while the
vehicle is moving.
• If the vehicle needs to be
recovered from being stuck, do not
permit the vehicle to be towed for
long distances without removing
the driveshaft.
If tire chains are needed, make sure they
are installed on both sides of the driving
axle. Installing chains on only one side of
the axle can cause equipment damage.
CAUTION
Chains on the tires of only one tandem
axle can damage the driveline U-joints
and the inter-axle differential. Repairs
could be costly and time-consuming.
Failure to comply may result in equipment damage.
Towing the Vehicle
A dealer or commercial towing service will
have the necessary equipment to safely
tow the vehicle and should be able to make
arrangements to limit any damage to the
vehicle. The towing service and the dealer
should be aware of towing regulations and
safety precautions.
The towing service will ensure that the
following precautions are taken:
Use of a safety chain system
•
• Abide by all local towing
regulations
• Ensure that the towing device does
not contact any surfaces that could
be damaged while in transit
• If towing from the front, ensure that
the rear axles are prepared for
towing
• If towing from the rear, ensure that
all body components such as roof,
side, and chassis fairings are
secured properly to avoid damage
while in transit
56 Y53-6110-1A1 (01/21)
Page 59

WARNING
Secure the roof, side, and chassis fair-
while towing from the rear. An un-
ings
secured fairing may come off of the
vehicle during transit. Failure to secure
the fairings while towing may cause an
injurious accident resulting in death or
personal injury.
Y53-6110-1A1 (01/21) 57
2
Page 60

Chapter 3 | CONTROLS
3
Instrument Cluster...............................................................................................................................
Peterbilt Digital Display Controls.........................................................................................................62
Peterbilt Digital Display....................................................................................................................... 63
Selecting a View..................................................................................................................................66
Configure Settings...............................................................................................................................72
Drive Summary................................................................................................................................... 77
Driver Rewards (option)...................................................................................................................... 77
Driver Performance Assistant (option)................................................................................................ 78
Bulb Check..........................................................................................................................................79
Guide to the Warning Symbols............................................................................................................81
Optional Gauges................................................................................................................................. 92
Dash Switches.................................................................................................................................... 93
Ignition Key Switch............................................................................................................................107
Exterior Lighting Self-Test................................................................................................................. 107
Steering Column Controls.................................................................................................................108
Steering Wheel Controls................................................................................................................... 112
58 Y53-6110-1A1 (01/21)
60
Page 61

Door Mounted Mirror Controls...........................................................................................................113
Heating and Air Conditioning.............................................................................................................114
Sleeper Alarm Clock......................................................................................................................... 123
Cab Accessories............................................................................................................................... 124
3
Y53-6110-1A1 (01/21) 59
Page 62

Instrument Cluster
For information on using the dash and
instrument cluster options while driving,
see the paragraphs that follow. Please
remember that each vehicle is custom-
our instrument panel may not look
made. Y
exactly like the one in the pictures that
follow. We have tried to describe the most
common features and controls available.
You can pick out the parts that apply to you
and read them to be fully informed on how
your particular vehicle operates.
3
1. Peterbilt Digital
Display
Compact Trailer
2.
Valve
3. Navigation/
Infotainment (or
Optional Gauges)
4. Switches
5. Glovebox
6. Parking Brakes
7. Cupholders
8. Air Conditioning
9. Radio
60 Y53-6110-1A1 (01/21)
Page 63

1. Additional Switches
Ignition Switch
2.
3
Y53-6110-1A1 (01/21) 61
Page 64

Peterbilt Digital Display
1
2
3
Controls
View, navigate and select items in the
Menu, and view Popup messages. The
shortcut button will access items that are
configured in the settings, Shortcuts on
.
page 76
3
Scroll Wheel
Use the Scroll Wheel to navigate through
menus and press down to select menu
options, change settings when in the
menu, and switch between Views.
1. Scroll Wheel
Shortcut
2.
3. Back/Cancel
The controls located on the right pod of the
steering wheel are used to select Drive
62 Y53-6110-1A1 (01/21)
Page 65

For example, press down and then scroll to
access the clock menu. Then press down
and scroll again to adjust the clock values.
Press down to select the menu:
Menu Example: main Menu
Press again to select the sub-menu:
Menu Example: Settings
Use the Scroll Wheel to scroll through the
values then press down to select.
Menu Example Set Function
Back
Use the Back button to return to the
previous menu, suppress a popup , or
cancel a selection. Popups on page 81.
Peterbilt Digital Display
The digital display will stay visible during all
driving situations and in some parked
situations. When the parking brake is set
the following actions will wake the display,
making it visible:
Opening (or keeping open) the cab
•
doors
• Using steering wheel switches
• Tapping the brake
• Turning the ignition switch to ON,
ACC, or START
• Starting the engine.
If after 20 seconds none of these actions
are taken, the display will darken to
conserve power, but will awaken if any
wake action is performed. If the Anti-Theft
option is active and you attempt to start the
engine, a passcode prompt will appear; the
engine cannot be started until the correct
passcode is entered (see Anti-Theft on
page 76).
3
Y53-6110-1A1 (01/21) 63
Page 66

4
5
67
8
3
910
11
12
13
2
1
3
Display Indications Always Shown
1. Active Warnings
Outside Air
2.
Temperature
3. Diesel Particulate
Filter Indicator
4. View Indicator
5. Transmission Mode
6. Sub-Trip
7. Trip
8. Driver Profile
9. Odometer
10. Engine Hours
11. Battery
12. Aux Battery
Indicator
13. Clock
Active Warnings
Red or amber popups are counted and the
total is displayed by the active warning
. In addition, these counts are also
indicator
presented in
• Systems Check
• The Notifications Sub-menu
• A Drive Summary
The numbers may change without user
interaction if individual warnings are
intermittent, time based, self correcting, or
the situation is rectified.
outside temperate approaches freezing
(36°F or 2°C) an icon will appear next to
the temperature (snowflake for freezing
and thermometer for high) and a chime will
sound. The system's unit of measure
Outside Air T
emperature
Outside Air Temperature monitors the
ambient temperature outside the truck
The display will alert the driver to high and
low temperature conditions. When the
(Fahrenheit or Celsius) can be changed by
navigating to the settings menu. The
outside air temperature display uses a
sensor (located at the bottom of the
driver's side mirror assembly) to measure
outside air temperature only. It is not
64 Y53-6110-1A1 (01/21)
Page 67

capable of displaying the temperature of
4 25 1
3
the road surface on either the temperature
display or the snowflake icon. Additionally
the outside air temperature reading may be
affected by exposure to direct sunlight.
View Indicator
The View Indicator identifies which view is
currently selected:
• Favorites (if enabled)
• Minimized
• Minimized with Advance Driving
• Basic
• Enhanced
Drive, Neutral, and Reverse Indicator
The Drive, Neutral, and Reverse Indicator
reflects the shifter position of an Automatic
Transmission. Manual transmissions and
certain automatic transmission do not
provide feedback to the display. Instead,
the transmission shifter indicates the gear
condition.
Assistance (Optional)
Sub-trip Odometer
The T
,
rip Odometer can be split into smaller
segments called Sub-trips. Start a Sub-trip
by pressing Trip on the steering wheel.
The maximum distance that the sub-trip
will show is 9,999.9 at which point it will
start over at zero. When it maxes out, the
current sub-trip ends and begins a new
one. Sub-trip information is also found in
the settings menu Trip Summary on page
72.
Trip Odometer
The Trip Odometer shows how far the
vehicle has gone traveled since last it was
reset. The maximum distance that can be
shown on the Trip Odometer is 99,999.9 at
which point the operator needs to reset.
Press Trip to set. Press and hold Trip to
reset (Item 1 in following image).
Left Switch Pod
1. Trip marker
2.
Limiter control
3. Cruise control ON/OFF
4. Cruise control set/resume
5. Toggle switch
3
Y53-6110-1A1 (01/21) 65
Page 68

3
The operator may also use the trip
summary to view the same information T
Summary on page 72.
Driver Profile Indicator
The number following the icon indicates
which driver is active when Driver Profiles
are enabled. For information on Driver
Profiles, Choosing the Active Driver Profile
on page 74.
Odometer
The odometer displays the total distance
your vehicle has traveled. The maximum
distance that can be shown on the
odometer is 9,999,999.9. The odometer
will roll over to zero if maximum mileage is
achieved.
Engine Hours
Engine hours will display the total number
of hours the engine has been operated.
The maximum hours that can be shown
are 99,999.9 before the counter rolls over
to zero.
Battery Voltage
The Battery Voltage indicator shows the
battery icon, voltage, and the state of
charge. The battery icon will be replaced
rip
with the Low Voltage Disconnect (LVD)
icon when Low Voltage Disconnect is
active. The battery icon is gray when
operating normally, but changes to amber
to indicate a low voltage condition and red
to indicate a high or very low voltage
condition.
Clock
The clock can be displayed in a 12-hour or
24-hour format. Clock settings can be
altered in the Settings Sub-menu.
Transmission Gear Display
Vehicles with PACCAR or Eaton
automated transmissions will show the
transmission mode, current gear, and
diagnostic information associated with the
transmission. Vehicles with manual
transmissions will show the current gear.
This display does not apply for vehicles
with Allison transmissions.
Selecting a View
The instrument cluster has 5 views for the
operator to use.
• Favorites
• Minimized
• (Optional) Minimized with
Advanced Driver Assistant
• Basic View
• Enhanced View
Each view is identified by a specific view
indicator on the right side of the display
area.
Minimized View
A combination speedometer and
tachometer will show in the center of the
Minimized View.
Speedometer and Tachometer
Vehicle and engine speed are presented at
the center of the display. Units for vehicle
speed can be changed to either Standard
or Metric in the Digital Display menu (see
Units and Language on page 72) or by
using the steering wheel Shortcut button
(see )(see Peterbilt Digital Display Controls
on page 62).
Minimized View with Driver Assistance (Option)
66 Y53-6110-1A1 (01/21)
Page 69

Minimized with Driver Assistance (Option)
30ºF
9,999.9
9,999,999.9
348.5
M I
Trip
M I
D
86%
12.5V
100%
10:45 P
AUX
PTO
1
B
MI
11
N
0
5
10
15
20
25
64
RPM
MPH
65
SPEED
LIMIT
18
11
DPF
1
2
2
3
4
5
6
1. Optimal RPM
Indicator
2.
Smart Tach
®
3. Engine Speed
4. Transmission Gear
5. Driver Assistance
area
6. View Indicator
3
Y53-6110-1A1 (01/21) 67
Page 70

3
Adaptive Cruise Control Notification (option)
This indication at vehicle start means it is
equipped with Adaptive Cruise Control
(ACC) and Collision Mitigation. These
features work together to improve driver
safety and enhance the driving experience.
When Cruise Control is active, ACC will
accelerate and slow the truck to maintain a
chosen distance from a detected forward
vehicle. Collision Mitigation will attempt to
prevent a forward collision when advancing
at speeds greater than 15 mph (24 kph).
Please review the ACC section of this
manual, and the manufacturer
prior to driving this vehicle.
’s manual,
Basic View and Enhanced View
68 Y53-6110-1A1 (01/21)
Page 71

Enhanced View
2 21
3
1
1. Gauges for Basic
iew and Enhanced
V
View
2. Gauges for
Enhanced View only
3
Y53-6110-1A1 (01/21) 69
Basic View
This view combines the instrumentation
presented in Minimized V
such as Fuel and DEF level.
iew with gauges
Enhanced View
This view includes all the gauges present
in the Basic View, adding gauges on the
left and right in the display. Enhanced View
Page 72

21
MPG8.2
E
F
DEF
1
2
DEF
21
2
1
MPG8.2
E
F
3
is designated by the bottom icon in the
iew Indicator.
V
Gauges
Gauge locations may be customizable and
the gauge can react depending on the
readout indicated. (Favorites on page
Some gauges are a flat bar rather than a
typical dial gauge.
NOTE
The instrument cluster gauges may
, if hidden from view, change
appear
brightness and change color to bring
attention to a particular system.
75)
Diesel Exhaust Fluid (DEF)
The diesel exhaust fluid gauge shows the
approximate amount of DEF fluid in the
DEF tank.
DEF Level Gauge
CAUTION
Use Diesel Exhaust Fluid only. Failure
to
do so may damage components of
the Diesel Particulate Filter (DPF).
Besides empty and full, the gauge also
indicates 1/4, 1/2, and 3/4 of total capacity
DEF fluid is required to meet certain
emission requirements. A warning icon and
popup message will appear when the DEF
level is low. Do not allow your DEF tank to
remain empty. Please refer to your
emission supplemental manual for more
details about DEF fluid.
NOTE
The instrument cluster gauges may
appear
, if hidden from view, change
brightness and change color to bring
attention to a particular system.
Fuel Level
Fuel Level Gauge
The Fuel gauge(s) indicate the fuel level.
.
WARNING
DO NOT carry additional fuel contain-
in your vehicle. Fuel containers, ei-
ers
ther full or empty, may leak, explode,
and cause or feed a fire. Failure to
comply may result in death or personal
injury.
70 Y53-6110-1A1 (01/21)
Page 73

WARNING
NOTE
NOTE
Diesel fuel in the presence of an igni-
source could cause an explosion.
tion
A mixture of gasoline or alcohol with
diesel fuel increases this risk of explosion. DO NOT remove a fuel tank cap
near an open flame. Use only the fuel
and/or additives recommended for
your engine. Failure to comply may result in death, personal injury, equipment or property damage.
CAUTION
Use only Ultra Low Sulfur Diesel
(ULSD)
Fuel, as recommended by engine manufacturers. If you need further
information on fuel specifications, consult the Engine Operation and Maintenance Manual.
Y53-6110-1A1 (01/21) 71
For Export vehicles, the fuel gauges
will
not state: ULTRA LOW SULFUR
DIESEL FUEL ONLY.
NOTE
This vehicle may be manufactured
different fuel systems and differ-
with
ent draw tube locations. Because of
this and the amount of road crown, it is
recommended that you do not operate
your vehicle with less than one-quarter
of your truck's fuel capacity. Allowing
the fuel level to go below one-quarter
of capacity could result in the lack of
fuel to keep the engine running. In addition, you will want to keep the fuel
tanks at least half-full to reduce condensation of moisture in the tanks.
This moisture can damage the engine.
The instrument cluster gauges may
appear
, if hidden from view, change
brightness and change color to bring
attention to a particular system.
Favorites View (optional)
V
ehicles with Favorites View will allow the
operator to customize the arrangement of
many of the gauges. Using the Favorites
View requires the operator to Scroll to
select the Minimized View. Once the
Minimized view is showing, Scroll up once
more to the star icon the View Indicator.
See Favorites on page 75 to customize
the Favorites view.
3
Page 74

3
Configure Settings
Menu Example: main Menu
Notifications
Notifications display system messages
related to the condition of your vehicle. It
displays
Tire Pressure Monitoring System
•
(TPMS) (optional)
• Active messages
• Systems Check
Automatic Time
(optional)
24-Hour
Time
Set Time Set Time is available when Automatic Time
When enabled, trucks with
Automatic T
zone appropriate data.
Choose between 12 or a 24 hour format.
AM or PM (A or P) shall only be displayed
in 12-hour time format.
isn't enabled. Set the clock to indicate your
local time.
ime will receive time
Trip Summary
Presents a summary of details such as fuel
economy and distance of the trip, collected
during the main trip and/or Sub-trips.
The following Menus
• Notifications
• Trip Summary
• Settings
• Truck Information
are accessible when
1. The Parking Brake is set
2. All active popup messages are
viewed and suppressed
3. Press the Select button
These menus allow the operator to
configure settings on the vehicle.
These details will be collected until the Trip
is reset, or the max trip distance (99,999.9
miles for main, 9,999.9 for Sub-Trips) is
reached.
Settings
Settings allows the operator to customize
the Display.
1
General
Time
This menu allows the operator to
customize the clock.
1
If Anti-Theft is enabled, Settings will not be accessible until the correct Passcode is entered.
72 Y53-6110-1A1 (01/21)
Units and Language
Units
Use this setting to change the units of
measurement between Standard, Metric
(Bar), and Metric (PSI).
Language
Use this setting to change the language.
Features
Features allows the operator to enable
optional features on the vehicle to
customize their experience.
Predictive Cruise Overshoot
Configure the Predictive Cruise Control
Overshoot through this menu item. See
Predictive Cruise Control (Option) on page
Page 75

148 for more details about Overshoot and
Predictive Cruise Control.
LVD Setup
Change the LVD battery voltage set point
for LVD to turn on Low Voltage Disconnect
(LVD) (option) on page 257.
Trailer Detection (Option
The trailer outputs on your vehicle will
detect a connected trailer when this feature
is enabled. The operator will be notified
when a trailer connection is not detected.
Digital RPM (optional
Provides a digital numeric readout of the
engine speed in the speedometer.
Windshield Wiper Interlock
This activates the headlights when the
windshield wipers are turned on.
Dark Cabin
Dark Cabin prevents cab interior lights
from turning on when a cab door is
opened.
Shutdown Timer
WARNING
Never idle your vehicle for prolonged
of time if you sense that ex-
periods
haust fumes are entering the cab. Investigate the cause of the fumes and
correct it as soon as possible. If the
vehicle must be driven under these
conditions, drive only with the windows
open. Failure to repair the source of
the exhaust fumes may result in death,
personal injury, equipment or property
damage.
CAUTION
DO NOT allow your engine to idle, at
low
rpm (400-600 rpm), longer than
five minutes. Long periods of idling after the engine has reached operating
temperatures can decrease engine
temperature and cause gummed piston rings, clogged injectors, and possible engine damage from lack of lubrication. The normal torsional vibrations
generated can also cause transmission wear
.
CAUTION
Do not stay in the vehicle with the en-
running or idling for more than 10
gine
minutes with the vehicle's Heater and
A/C ventilation system in RECIRC or
at LOW FAN SPEED. Even with the
ventilation system on, running the en-
gine while parked or stopped for prolonged periods of time is not recommended.
3
Y53-6110-1A1 (01/21)
73
Page 76
3
CAUTION
Prolonged periods of idling can result
lower than optimal engine/transmis-
in
sion operating temperatures which
could cause increased rates of wear.
Do not allow the engine to operate
at idle for extended periods at temperatures at or below 160F/71C. To
help prevent this from occurring on
PACCAR engines, an idle shutdown
feature can be programmed to shut
the engine down after a period of low
idle operation with no driver activity. A
flashing warning lamp will inform the
driver of an impending shutdown. Failure to comply may result in equipment
or property damage.
NOTE
If you are required to idle your vehicle
long periods of time, install an aux-
for
iliary heater or automatic idle control.
These auxiliary devices can reduce
fuel consumption and save you mon-
.
ey
When active, the Shutdown Timer will keep
the engine running for a period of time after
the ignition switch is placed in the OFF
position. This allows the driver to exit the
cab while sustaining power to the cab
. Normally, this would require the
interior
key to remain in the ignition, potentially
leaving the cab unlocked and accessible.
When the timer reaches zero, the engine
stops, removing power from certain
electrical loads. The timer counts down in
the Drive Summary.
The Shutdown Timer is enabled or
disabled in the Display menu and can be
set for up to 30 minutes. This setting can
be changed in the Settings Sub-menu or
while counting down, in the Drive
Summary, using the Scroll and Select (See
How to Set the Shutdown Timer on page
140). The Shutdown Timer setting may be
limited to less than 30 minutes (See
Greenhouse Gas Certified Configuration).
If your truck has the Engine Idle Shutdown
Timer (EIST) option and it is set for a
shorter shutdown time, the Engine will
shutdown at the shorter timer setting.
Driver Profiles
This feature saves customizations made as
a Driver Profile. Turning Driver Profiles ON
for the first time will load current
customizations into Driver Profile 1 and
make it the active profile. The profile can
be changed in this menu.
The active Driver Profile can also be
changed after setting the park brake and
then pressing Back. 2 Changes to Driver
Profile will be auto-saved while making
customizations. They will not be lost when
turning the feature off.
NOTE
The last used active profile, including
changes to that profile, will remain
any
the profile until a new one is selected.
Choosing the Active Driver Profile
Press Back when the parking brake is set
to change the active Driver Profile.
2
The ignition key may need to be cycled back to OFF and then ON to access the Driver Profiles Settings.
74 Y53-6110-1A1 (01/21)
Page 77

Favorites
o disable Favorites, contact your
T
authorized dealer. Vehicles with Favorites
View enabled allow the operator to create
a customized arrangement of all but
centrally located gauges. To change the
Favorites configuration, stop the truck, set
the parking brake and
• Access Favorites via the Settings
Sub-menu. OR
• Scroll to Favorites (represented by
a star in the View Indicator) and
press Select.
Adding a Gauge to Favorites
The truck must have the Parking Brake set
to add a gauge. You must be in the Edit
Your Favorites menu to perform this
procedure.
Adding a gauge requires that the gauge is
not already assigned a location in
Favorites View. If you want to move a
gauge already assigned, you must first
remove that gauge Removing a Gauge
from Favorites on page 76.
1. Scroll the list until you locate the
desired gauge or compound
gauge.
Edit Your Favorites (Center of Screen)
If the gauge you want to position is already
present in the Favorites V
single or compound gauge) it will not
appear as a menu option.
2. Select to choose the gauge you
want to position.
3. Scroll through the valid locations
(this can include positions currently
iew (either as a
holding a gauge, which may be
replaced) and target that position.
If a position is not valid, the display will
read "Not A
4. Select to Add or Replace the
Navigate and Select "Save Configuration"
when all gauges have been arranged. The
Display will read "Y
configuration has been saved." Press
Back to exit Editing Favorites.
vailable."
Edit Your Favorites (Left-side of image)
gauge.
our favorites
3
Y53-6110-1A1 (01/21) 75
Page 78

3
Removing a Gauge from Favorites
The Parking Brake must be set and at least
one gauge must be in the Favorites V
to remove a gauge.
The Speedometer/Tachometer, Fuel, and
Air pressure gauges located at the Display
center cannot be removed. If the gauge
you want to remove is part of a multiple
gauge group, the whole group must be
removed.
1. Select "Remove Gauge."
2. Scroll to highlight the gauge to be
removed and Select.
Navigate andSelect "Save Configuration" if
this is the last change you want to make to
Favorites View. The Display will read "Your
favorites configuration has been saved."
Press Back to exit Editing Favorites.
iew
Shortcuts
Use the Shortcuts option to assign one of
the following features to the Shortcut
button.
• Dark Cabin – Toggles Dark Cabin
On/Off.
• Digital RPM – Provides a numeric
read-out of RPM within the
speedometer.
• Dual Speedometer – Shows a
compound Speedometer with both
Standard and Metric V
• Favorites – Selects the Favorites
View on the Display.
• Metric Units – Switches all
measured units used on the
Display between Standard and
Metric.
alues. .
Anti-Theft
Anti-Theft prevents starting the engine and
accessing the settings sub-menu. If AntiTheft does not show in the settings submenu, see your authorized dealer to install
Anti-Theft.
If Anti-Theft is enabled, turning the ignition
switch to START prompts the operator to
enter the passcode. Once the correct
passcode is entered, you have five minutes
to start the engine or the passcode must
be re-entered.
To enable or disable Anti-Theft, change
Anti-Theft (ON/OFF) in the settings submenu and enter the current passcode.
3
How to Enter the Passcode
The ignition key and the current Passcode
are required.
The default passcode is set to
factory. Please see an authorized dealer if
a custom passcode is needed. With the
anti-theft feature turned off, the operator
will not need a passcode to start the
engine.
1. Using the Scroll , scroll to the first
number in the code then press
Select.
Anti-theft first digit
The next digit will be selected.
0000 at the
3
The five minute timer can be postponed in one minute intervals using any steering wheel switch.
76 Y53-6110-1A1 (01/21)
Page 79

2. Scroll to the number you want for
this digit and press Select.
The next digit will be selected.
Continue this process until all four
3.
digits have been chosen.
Anti-theft last digit
• Transmission
• GHG Vehicle Speed Limits
• Remote Station Interlocks
• Predictive Cruise Control option
• Adaptive Cruise Control (ACC)
option
• Power Take Off (PTO) option
Information specific to these categories will
be shown in the Truck Information Submenu.
• Three customer-selected reports
(i.e. Idle Time, Fuel Economy)
The Drive Summary collects information
since the last time the engine was off for at
least two hours. When insufficient
information has been collected, Drive
Summary will show dashes for the
monitored component or report. Customerselected reports can be changed at your
local dealership.
3
Drive Summary
The Drive Summary presents information
about the most recent leg of travel and is
shown when the ignition key is turned to
“off.” The Drive Summary consists of
The display will read "Turn Key to Start
Engine."
ruck Information
T
Truck information stores specifications and
data about the vehicle.
• Chassis
• Engine
• Anti-lock Brake System
Y53-6110-1A1 (01/21) 77
• Critical and Non-critical Issues (see
Systems Check)
• Shut Down Timer (if active) (see
Shut Down Timer)
• TPMS (option) (see Tire Pressure
Monitoring System (TPMS) (option)
on page 37)
• Driver Rewards (option) (see Driver
Rewards)
• Driver Performance Assistant
(option) (see DPA)
Driver Rewards (option)
If enabled, Driver Rewards raises or lowers
the vehicle’s max-allowable speed based
on whether a programmed, fuel economy
goal is met. This goal is defined by the
customer and can be based on fuel
consumption, engine idle time, or both fuel
consumption and idle time. The driver is
assigned a score based on how
successfully they meet or exceed this goal.
Driver Rewards is only available for
vehicles equipped with a PACCAR MX
engine.
The fuel consumption goal is met by
reducing the amount of fuel used over a
given distance. This is achieved by
• Driving slower
Page 80

3
• Minimize Speed Changes
Accelerating gently
•
• Coasting in gear
• Using the Cruise Control
• Maintaining optimal tire pressure.
• Reducing the trailer gap
• Running a Warmer Cab.
• Turning off extra electrical loads
The engine idle time goal is met by
reducing the time the engine idles (running
the engine when the vehicle is not in
motion).
The Driver Rewards score is based on
driving habits. This score is compared to
the goal and a max-speed bonus or
penalty is determined. The Driver Rewards
score is shown during a Systems Check
and in the Driver Summary. When there is
a bonus or penalty, it appears below the
Cruise Control (CC) indicator on the dash,
and the max-allowed speed shows to the
right of the CC indicator. Driving habits that
reduce fuel use will earn the operator a
higher max speed; habits that consume
more fuel will lower the max speed. Driver
Rewards will never grant a bonus that
exceeds programmed federal emission
regulated or customer defined speed limits.
During the Systems Check, the Driver
Rewards and DPA features offer general
driving tips that can increase fuel economy
and brake savings. These features also
provide feedback in the Driver Summary
based on a driver’s specific driving habits.
This advice if followed can improve future
Driver Rewards and DPA scores.
Driver Rewards has three customerdetermined modes of activation: only when
CC is in use, when CC is not being used,
or at all times. The Driver Rewards goal
and the amount of penalty or bonus is also
customer-determined and should be based
on reasonable expectations for a known
route of travel. The Driver Rewards goal
should be reconsidered if the manner of
vehicle use or the vehicle route changes
significantly.
To enable or disable Driver Rewards, or
change the mode of activation, reward
amounts, or set a new Driver Rewards
goal, contact your dealership.
Driver Performance Assistant (option)
If enabled, the Driver Performance
Assistant (DPA) determines how skillfully
the operator uses coasting and the engine
brake when reducing vehicle speed.
Coasting and engine brake use, instead of
frequent, aggressive use of the service
brakes, can extend brake life and increase
fuel economy. The DPA assigns the driver
a score based on their braking habits and
provides suggestions on how to improve
these habits. The DPA feature is only
available for vehicles equipped with a
PACCAR MX engine.
The driver’s DPA score is determined by
comparing their braking and coasting
habits against a customer-defined goal for
braking use and coasting. A score that
meets or exceeds this goal will award
positive feedback in the Driver Summary.
During the Systems Check, the DPA and
Driver Rewards features offer general
driving tips that can increase fuel economy
and brake savings. These features also
provide feedback in the Driver Summary
based on a driver’s specific driving habits.
This advice if followed can improve future
DPA and Driver Rewards scores (see
Driver Rewards).
To enable or disable the DPA or set a new
DPA goal, contact your dealership.
78 Y53-6110-1A1 (01/21)
Page 81

Bulb Check
When the ignition switch is turned ON
multiple warning icons will be displayed in
a sequence to test each warning light
indicator. The total sequence should take
no more than 10 seconds to complete.
Have your instrumentation system checked
by a qualified service technician if does not
successfully complete.
Audible Alarm
The audible alarm will sound in conjunction
with most warning lights. These events
include but are not limited to headlight on,
fifth wheel, stop engine, primary/secondary
, and driver door open warnings.
air
Optional Icons
Additional icons may be operational
depending on individual vehicle
specifications.
NOTE
Some optional lights may illuminate
even
though your vehicle is not equip-
ped with that particular feature.
Physical Telltales
3
Y53-6110-1A1 (01/21) 79
Page 82

3
These physical telltales will always appear
across the top of the display
Dedicated Telltales
Dedicated Telltales always appear in the
same location throughout the screen.
Some are visible only when active, but
80 Y53-6110-1A1 (01/21)
.
most signify that the monitored component
requires operator attention.
Page 83

Dynamic Telltales
Engine HighOil
Temp
Reduce
Engine
Load
or
Check
Oil
Level
1
/3
Engine
High
Oil
Temp
Reduce
Engine
Load
or
Check
Oil
Level
1
/2
Popups
Popup: Red Oil T
Suppressable Popup Message
emp
A Popup displays information from the
. Certain types of Popups
Guide to the Warning Symbols
The warning lamps and audible alarm may
indicate a system malfunction. Check the
lamps frequently
soon as you see one go on. These lamps
could save you from a serious accident.
Additionally, gauges may become visible,
may change colors, or may change
brightness to raise awareness to the
operator.
When multiple warning symbols are shown
on the instrument cluster, they will appear
at first and then minimize. When minimized
they will be represented in the active
warnings area of the display. A triangle
represents a warning registered and a
diamond represents a check message.
, and respond promptly as
These dynamic telltales appear on the
display in the rows indicated. A dynamic
telltale communicates the status of a
monitored component, which may require
the operator to respond or take action.
Active W
arnings
Red or amber popups are counted and the
total is displayed by the active warning
indicator. In addition, these counts are also
presented in
• Systems Check
• The Notifications Sub-menu
• A Drive Summary
The numbers may change without user
interaction if individual warnings are
vehicle computer
are indicated by the Warning Indicator in
the display area.
Multiple Popups will appear in the display
as a stack of messages. Suppressible
Popups are those that will move out of the
stack when driving. All are suppressible
when the Parking Brake is set.
The Menu will not be accessible until all
Popups have been Suppressed.
Viewing and Suppressing Popups
A Popup can be read and Suppressed by
pressing the Scroll Wheel. Some situations
may require pressing Back/Cancel
instead. For example, the popup in the
following image is suppressed by pressing
the Scroll Wheel (indicated with a down
arrow) OR by pressing the Back/Cancel
(indicated with an X below the roller).
intermittent, time based, self correcting, or
the situation is rectified.
Y53-6110-1A1 (01/21) 81
3
Page 84

3
WARNING
DO NOT ignore a warning lamp or au-
alarm. These signals tell you
dible
something is wrong with your vehicle.
It could be a failure in an important
system, such as the brakes, which
could lead to an accident causing
death or injury. Have the appropriate
system checked immediately
Check messages are provided to give the
operator additional information regarding
systems that require attention due to a
system malfunction and/or operating
conditions that may hinder safe and proper
performance of the vehicle. The system will
emit a chime to alert the operator that a
.
message is appearing on the cluster. Some
messages can be managed by the
operator while others may require an
authorized dealer repair
table is a list of warning lamp/indicator
symbols that appear in the instrument
cluster. Each symbol has a unique name,
color when illuminated, and whether the
symbol is standard (STD) or optional
(OPT).
. In the following
Symbol Name Color
ADAS Camera Fault
Axle, Stability Control (Option) on page 84 Yellow STD
Axle, Traction Control on page 85 Yellow STD
Brakes, Antilock Brake System on page 86 Yellow STD
Brakes, Low Air on page 86 Red STD
Brake, Park Brake on page 86 Red STD
Brakes, Trailer Antilock Brake System on page 86 Yellow STD
Cab, Door Ajar Amber STD
Differential, Inter-Axle Lock on page 87 Yellow OPT
Dump Truck, Body Up on page 87 Red OPT
82 Y53-6110-1A1 (01/21)
on page 84 Yellow OPT
Standard or
Optional
Page 85

Symbol Name Color
Dump Truck, Gate on page 87Dump T
Diesel Particulate Filter (DPF) Warning Light on page 88 Yellow STD
Emissions, Derate Amber STD
Emissions, High Exhaust System Temperature on page 88 Yellow STD
Emissions, Malfunction Indicator Light on page 88 Yellow STD
Engine, Check Engine on page 89 Yellow STD
Engine, Engine Block Heater on page 89 Yellow OPT
Engine, Low Coolant Level on page 89 Yellow STD
Engine, Overspeed Air Shutdown on page 89 Red OPT
Engine, Retarder (Brake) on page 89 Green OPT
Engine, Stop Engine on page 89 Red STD
Engine Wait-to-Start Light on page 89 Yellow OPT
Fifth Wheel Slide Unlocked on page 90 Red OPT
Fifth Wheel Locked on page 90 Red OPT
Fifth Wheel Unlocked on page 91 Red OPT
Lane Departure Warning (LDW) on page
Lane Departure Warning (LDW) Fault on page 91 Yellow OPT
ruck, Gate Yellow OPT
91 Yellow OPT
Standard or
Optional
3
Y53-6110-1A1 (01/21) 83
Page 86

3
Symbol Name Color
Lights, High Beam on page 91 Blue STD
Fast Idle Control on page
Refrigerator on page 91 Green OPT
Seat Belt Fasten Red STD
Suspension, Lift Axle White OPT
Tire Inflation (TPMS) on page 91 Yellow OPT
Transmission, Auxiliary on page 92 Yellow OPT
Transmission, Check on page 92 Red OPT
Turn Signal, Left on page 92 Green STD
Turn Signal, Right on page 92 Green STD
91 Yellow OPT
Standard or
Optional
optional LKA features are both dependent
ADAS Camera Fault
This amber warning light appears when a
fault occurs with the camera used by the
various Advanced Driver Assist (ADAS)
features: Lane Departure W
Lane Keeping Assist (LKA), and Adaptive
Cruise Control (ACC). The LDW and
84 Y53-6110-1A1 (01/21)
arning (LDW),
on the ADAS camera, and both will be
disabled when this warning occurs.
In addition to issues internal to the camera,
please read the topic Lane Departure
arning (LDW) on page 150 for conditions
W
which may limit camera performance,
resulting in an ADAS Camera Fault.
Axle, Stability Control (Option)
Page 87

Calculates the driver’s intended path of
travel from wheel speed and steering angle
sensors, then compares calculations to the
actual direction of travel. The system uses
individual wheel brakes to re-adjust the
path of the vehicle.
The Stability Control Icon (ESC or
•
Electronic Stability Control)
illuminates during the Bulb Check
when the ignition is turned ON. It
turns off after a few seconds if no
system problems are detected. If a
problem is detected, the ESC
Warning lamp will turn on and stay
on.
• Illuminates when the ESC system
is regulating individual wheel
brakes to correct the vehicle’s
direction of travel. (Refer to
Advanced ABS with Stability
Control for more information.)
WARNING
If this chassis is equipped with an
Electronic Stability Control (ESC) and
is modified (e.g. adding or removing
an axle, converting from a truck to a
tractor, converting from a tractor to a
truck, changing the body, lengthening
of the wheelbase and/or frame, relocating frame components, or modifying
pneumatic
nesses) the ESC must be evaluated
by a qualified technician. If you have
any questions, contact your authorized
dealer. Failure to comply may result in
property damage, personal injury, or
death.
or electrical ABS/ESC har-
NOTE
For more information about the stability
control system installed on your vehicle, please refer to additional material supplied with this operator manual,
included in your glove box informational packet.
Axle, Traction Control
Monitors wheel speed for poor traction. If a
wheel begins to slip due to poor traction, it
may reduce engine power or apply brakes
fort to regain traction.
in an ef
• Illuminates during the Bulb Check
when the ignition is turned ON. It
turns off after a few seconds if no
system problems are detected. If
an ATC problem is detected, the
ATC warning light will turn on and
stay on.
• Illuminates when the ATC is
regulating wheel spin and turns off
after the traction control event has
ended.
• Flashes continuously when the
ATC/Deep Snow & Mud switch is
turned on, indicating that this
feature is active.
3
Y53-6110-1A1 (01/21) 85
Page 88

WARNING
Brakes, Antilock Brake System
Brakes, Low Air
3
If this chassis is equipped with an
Electronic
is modified (e.g. adding or removing
an axle, converting from a truck to a
tractor, converting from a tractor to a
truck, changing the body, lengthening
of the wheelbase and/or frame, relocating frame components, or modifying
pneumatic or electrical ABS/ESC harnesses) the ESC must be evaluated
by a qualified technician. If you have
any questions, contact your authorized
dealer. Failure to comply may result in
property damage, personal injury, or
death.
Stability Control (ESC) and
Illuminates during the bulb check. Have the
ABS system checked by an authorized
dealer if the ABS W
for more than 3 seconds.
• Illuminates during normal operating
conditions to indicate a problem
with the ABS system.
• Illuminates when a problem exists
with Automatic Traction Control
(ATC).
arning Lamp stays on
Brake, Park Brake
Illuminates when system air pressure falls
below 60 psi.
Brakes, T
railer Antilock Brake
System
NOTE
For more information about the stabili-
control system installed on your ve-
ty
hicle, please refer to additional material supplied with this operator manual,
included in your glove box informational packet.
86 Y53-6110-1A1 (01/21)
Illuminates in the status indicator when
parking brakes are applied.
Illuminates during the bulb check and the
tractor/truck is connected with a ABS
equipped trailer
operating conditions to indicate a problem
with the Trailer ABS System. This should
be checked by an authorized dealer as
soon as possible.
. Illuminates during normal
Page 89

NOTE
Tractors/Trucks and trailers built after
03/01/2001
In-Cab Trailer ABS Warning Light (per
U.S. FMVSS121). The industry chose
Power Line Communication (PLC) as
the standard method to turn it on. On
trailers built prior to 03/01/2001 verify
trailer ABS system status via the required external warning light mounted
on the trailer. The indicator light on the
trailer should be yellow and identified
with the letters ABS.
must be able to turn on an
• Variable Road Speed Limiter
(optional)
When a Cruise Control function is enabled,
a white indicator will appear
Cruise Control function has been activated,
the indicator will change from white to
green. For more information on use of the
various Cruise Control functions, see
Cruise Control, Adaptive Cruise Control,
Predictive Cruise Control, and Variable
Road Speed Limiter.
. When a
Differential, Inter-Axle Lock
NOTE
Tractors/Trucks and trailers built after
03/01/2001
In-Cab Trailer ABS Warning Light (per
U.S. FMVSS121). The industry chose
Power Line Communication (PLC) as
the standard method to turn it on. On
trailers built prior to 03/01/2001 verify
trailer ABS system status via the re-
quired external warning light mounted
on the trailer. The indicator light on the
trailer should be yellow and identified
with the letters ABS.
must be able to turn on an
3
Cruise Control
This indicator shows the operator which
Cruise Control function is currently enabled
or active. This includes
•
Cruise Control
• Adaptive Cruise Control (optional)
• Predictive Cruise Control (optional)
Y53-6110-1A1 (01/21) 87
Illuminates when the inter-axle differential
switch is ON thus locking the inter-axle
ferential. This powers the forward rear
dif
and the rear rear differentials equally.
When the switch is turned off (inter-axle
differential unlocked) the engine power is
allowed to flow to any of the four drive tires
based on the differential effect (mostly to
the forward rear differential). This feature is
standard on all tandem axles.
Dump Truck, Body Up
Illuminates when Truck Dump Body is up.
Dump T
Illuminates when Truck Dump gate is open.
ruck, Gate
Page 90

3
Diesel Particulate Filter (DPF)
arning Light
W
This icon and related message will appear
when the DPF needs to be regenerated
and then also during the regeneration
cycle. This may also appear if the system
is attempting to automatically regenerate
while the vehicle is in Power T
operation mode.
Engine aftertreatment system includes a
diesel particulate filter and DPF warning
light.
ake Off
Emissions, High Exhaust System Temperature
WARNING
If this light is on, do not park in an area
combustible vapors or materials.
of
You must keep combustibles at least 5
ft. (1.5 m) away from the exhaust (outlet) stream as it exits the tail pipe while
the HEST light is illuminated. Always
park your vehicle outside. Failure to do
so could ignite an explosion or harm
bystanders which could result in serious injury.
WARNING
If this lamp is on, do not park in an
area
where people are close by. You
must keep combustibles at least 5 ft.
(1.5 m) away from the exhaust outlet
while the HEST lamp is illuminated.
Failure to do so could result in serious
injury.
WARNING
If this lamp is on, temperature of the
tailpipe,
exhaust pipes, the diesel par-
ticular filter (DPF)/selective catalytic
reduction
ing components including enclosures
and steps becomes elevated during
engine operation or any regeneration
event and can cause serious burns to
the skin. Allow adequate cooling time
before approaching, working on or
near any part of the exhaust system or
surrounding components.
Illuminates when the exhaust gas
temperature and exhaust components
become extremely hot.
(SCR) device and surround-
Emissions, Malfunction Indicator Light
Illuminates when an engine emissions
failure has occurred. The vehicle can be
safely driven but should be serviced to
correct the problem. The situation should
not be considered an emergency
cases, the Malfunction Indicator Light will
activate in conjunction with the High
Exhaust Temperature, Diesel Particulate
Filter (DPF), and Diesel Exhaust Fluid
(DEF) Warning Lights.
. In some
88 Y53-6110-1A1 (01/21)
Page 91

Engine, Check Engine
Illuminates when a non emissions related
problem exists, but the vehicle can still be
safely driven. V
correct the problem but the situation should
not be considered an emergency.
ehicle should be serviced to
Engine, Engine Block Heater
Illuminates when the engine block heater is
turned on.
Engine, Low Coolant Level
Illuminates with an audible alarm indicating
critically low coolant level. The vehicle
must be serviced to correct the problem
but the situation should not be considered
an emergency.
Engine, Overspeed Air Shutdown
Illuminates when the Engine overspeed air
shutdown system is activated.
Engine, Retarder (Brake)
Illuminates when the engine retarder
(compression brake or exhaust brake)
switch is turned on.
Engine, Stop Engine
Illuminates and an audible alarm tone will
sound when a major engine system
problem exists.
WARNING
If the Stop Engine warning light illumi-
it means you have a serious en-
nates,
gine system problem. This should be
considered an emergency. You should
stop the vehicle as safely as possible
and turn OFF the ignition. The vehicle
must be serviced and the problem corrected before driving again. Failure to
comply may result in death, personal
injury, equipment or property damage.
Engine Wait-to-Start Light
This warning icon will appear when the
system needs some time before attempting
to start the engine. The light will illuminate
at key ON, and will stay on for a period of
up to 30 seconds.
3
Y53-6110-1A1 (01/21) 89
Page 92

NOTE
lamp stops flashing, the starting motor
will be allowed to function.
in death, personal injury, equipment or
property damage.
3
The length of time the 'Wait-To-Start'
lamp
remains illuminated depends on
the ambient temperature. The lower
the ambient temperature, the longer
the lamp will be illuminated.
Once the Wait-to-Start light turns off, turn
the key to the starting position to start the
engine.
Y
ou may see this appear if the system has
detected a situation where the starter is too
hot and needs to cool down. Alternatively,
you may see it when the engine grid heater
is on and needs some time to warm up.
Emissions, Engine Derate
Fifth Wheel Slide Unlocked
Illuminates when fifth wheel slide switch is
activated. Indicates fifth wheel can move.
Fifth Wheel Locked
NOTE
Vehicles having an air slide fifth wheel
have
a fifth wheel slider lock controlled
by a switch on the instrument panel.
By placing the switch in the unlock position you can slide the fifth wheel to
various positions to adjust weight distribution.
WARNING
NOTE
Some engines are equipped with an
starting motor protection fea-
engine
ture. If the starting motor is engaged
for 30 or more seconds, without the
engine starting, the starter will be
locked out from operating, allowing for
proper cooling of the starting motor.
During this time, the 'Wait-To-Start'
lamp will flash for 2 minutes. Once the
90 Y53-6110-1A1 (01/21)
DO NOT move the fifth wheel while
tractor-trailer is in motion. Your
the
load could shift suddenly, causing you
to lose control of the vehicle. Never
operate the vehicle with the switch in
the UNLOCK position. Always inspect
the fifth wheel after you lock the switch
to be sure the fifth wheel slide lock is
engaged. Failure to comply may result
Illuminates when the fifth wheel is in the
locked position.
Page 93

Fifth Wheel Unlocked
Illuminates when LDW system is not able
to track the vehicle's position within the
lane.
NOTE
See Indicators around the speedometer on
page
135.
Refrigerator
Illuminates when the fifth wheel is in the
unlocked position. Indicates the king pin is
disengaged.
Lights, High Beam
For vehicles equipped with Lane Departure
Warning, please refer to Lane
Departure Warning Driver's Guide for
additional information.
Lane Departure Warning (LDW)
Illuminates to indicate that the refrigerator
is on and ignition is of
f.
Seat Belt Fasten
Fault
Illuminates when the high beams are on.
This icon will flash with audible alarm if the
headlights are left ON when the door is
opened and the key switch is OFF.
In addition, this icon will flash, but without
an audible alarm, if there is a problem with
the low beam headlights or the low beam
headlight wiring. In such event, the high
beam headlights will turn on at 50% normal
brightness.
Lane Departure Warning (LDW)
Y53-6110-1A1 (01/21) 91
This amber warning light will appear when
a fault occurs in the Lane Departure
W
arning (LDW) system. If this occurs, the
LDW feature will be disabled.
Fast Idle Control
The display will show the Fast Idle Control
(FIC) indicator when enabled or activated.
The indicator shows the set RPM value.
Illuminates when the ignition key is turned
on as a reminder to fasten your seat belt.
T
ire Inflation (TPMS)
Illuminates when tire pressures need to be
checked.
3
Page 94

3
Transmission, Auxiliary
Turn Signal, Right
Blinks when the right turn signal or the
hazard light function is operating.
of load you are carrying and the driving
conditions you encounter
temperature may vary, depending upon the
axle and type of lubricant. Very high
temperatures signal a need to have your
axle lubrication checked.
. Maximum axle
CAUTION
Illuminates to indicate auxiliary
transmission is in neutral.
Transmission, Check
Illuminates when transmission has
recorded a fault code.
T
urn Signal, Left
Optional Gauges
For vehicles with a telematic navigation
screen, optional gauges will be part of the
screen functions. Please refer to the
navigation system supplement for further
details about its functions and how it
works. Some vehicles may have optional
analog gauges installed at the factory in
place of the navigation screen.
Drive Axle Temperature Gauge (Forward and Rear)
Driving with very hot temperatures in
rear drive axles can cause seri-
your
ous damage to axle bearings and
seals. Have your axle lubrication
checked if you notice a sign of overheating.
Depending on the vehicle configuration,
there may be a single gauge for more than
just the forward and rear driver
will have an "X" over the representative
axle to indicate which axle's temperature is
being displayed in the gauge.
. The icon
Manifold Pressure Gauge
This gauge indicates the pressure in the
intake manifold. The pressure in the
Blinks when the left turn signal or the
hazard light function is operating.
92 Y53-6110-1A1 (01/21)
These gauges indicate the temperature of
the lubricant in your vehicle's axle(s).
These temperatures will vary with the kind
manifold is directly related to the turbo
output and is related to the engine power
output.
Page 95

switches on the dash may require that the
Dash Switches
This custom vehicle will have a wide
If the pressure indicated by your manifold
pressure gauge goes down, there may be
something wrong with your engine. Have it
checked by a qualified service person.
Title Standard or Optional
Axle, Differential Lock - Tridrive OPT
Axle, Diff-Lock - Dual OPT
Axle, Diff-Lock - Forward Rear OPT
Axle, Diff-Lock - Rear Rear OPT
Axle, Diff-Lock - Single Rear OPT
Axle, Diff-Lock - Steer OPT
Axle, Inter-Axle Differential Locked (Tandem) OPT
Axle, Two Speed OPT
Back Up Alarm Mute OPT
Batteries, Low Voltage Disconnect (LVD) STD
Brakes, ABS Off-Road OPT
Brakes, Parking Brake Valve STD
variety of switch-controlled equipment.
However, this particular vehicle may not
have every switch identified in this section
of the operator manual. Some air device
vehicle either be at a specific speed, have
park brakes set, or another device to be on
f for the air device to operate. The
or of
instrument display will show information
regarding what needs to change in order
for the air device to operate as expected.
The following table provides a complete list
of icons that may be found on the switch.
3
Y53-6110-1A1 (01/21) 93
Page 96

3
Title Standard or Optional
Brake, Trailer Hand STD
Cab Dimmer Switch STD
Dump Truck Gate OPT
Electric Steer, Assist Effort OPT
Engine, Fan Override OPT
Engine, Heater OPT
Engine, Overspeed Air Shutdown (Test) OPT
Engine, Overspeed Air Shutdown (Manual) OPT
Engine, Remote Throttle OPT
Engine, Under Hood Air Intake OPT
Exhaust, Diesel Particulate Filter (DPF) Regeneration STD
Fifth Wheel Slide OPT
Fuel Heater OPT
Generic Air, Accessory OPT
Generic, Spare OPT
Ignition Key Switch STD
Lane Departure Warning (LDW) Disable OPT
Lights, Auto Headlamp STD
94 Y53-6110-1A1 (01/21)
Page 97

Title Standard or Optional
Lights, Auxiliary OPT
Lights, Beacon OPT
Lights, Daytime Running (Override) OPT
Lights, Dome STD
Lights, Exterior Lights Self Test STD
Lights, Flood OPT
Lights, Flood ISO 3732 Spare OPT
Lights, Fog OPT
Lights, Hazard STD
Lights, Headlight and Parking Lights STD
Lights, Marker/Clearance/Cab STD
Lights, Marker/Clearance/Trailer OPT
Lights, Park Light STD
Lights, Spot OPT
Mud and Snow Traction Control STD
Pintle Hook OPT
Power Take-off (PTO) OPT
Power Take-off (PTO), Forward OPT
3
Y53-6110-1A1 (01/21) 95
Page 98

3
Title Standard or Optional
Power Take-off (PTO), Rear OPT
Suspension, Air Retention OPT
Suspension, Axle, Pusher OPT
Suspension, Axle, Tag OPT
Suspension, Dump OPT
Suspension, Third Axle Lift OPT
Trailer Air Supply STD
Trailer, Axle (3rd Axle) Lift OPT
Trailer, Axle Lift Forward OPT
Trailer, Axle Lift Rear OPT
Trailer, Belly Dump OPT
Trailer, Belly Dump Gate Center OPT
Trailer, Belly Dump Gate Front OPT
Trailer, Belly Dump Gate Rear OPT
Trailer, Dump Gate OPT
Trailer, Hotline OPT
Trailer, Suspension Air Dump OPT
Transmission, Transfer Case OPT
96 Y53-6110-1A1 (01/21)
Page 99

Title Standard or Optional
Transmission, Transfer Case Two-Speed OPT
Winch Clutch OPT
Axle, Diff-Lock - Dual
Axle, Differential Lock - Tridrive
Turn switch on to engage Rear Rear Axle
f Lock.
Dif
Axle, Diff-Lock - Single Rear
Turn switch on to engage Front and Rear
f Lock.
Axle Dif
Axle, Diff-Lock - Forward Rear
Turn switch on to engage Single Rear Axle
f Lock.
Dif
Axle, Diff-Lock - Steer
Tridrives will have these axle differential
lock controls and are 2 separate switches.
FRONT will control the forward rear and
REAR will control the center/rear-rear axle
differential. In addition, a vehicle with
Tridrive will have an interaxle differential
lock switch.
Y53-6110-1A1 (01/21) 97
Turn switch on to engage Forward Rear
f Lock.
Axle Dif
Axle, Diff-Lock - Rear Rear
Turn switch on to engage Front Axle Diff
Lock.
3
Page 100

Axle, Inter-Axle Differential Locked
andem)
(T
NOTE
The mute function use is discouraged.
Only use mute when legally required.
Brakes, Parking Brake Valve
Pull yellow knob to activate parking brakes.
3
Turn switch on to engage Inter-Axle
ferential Lock.
Dif
Axle, Two Speed
If equipped, the two speed axle switch
allows you to select axle high and low
ranges. The low range (Of
maximum torque for operating off-highway.
The high range (On) is a faster ratio for
highway speeds.
f) provides
Back Up Alarm Mute
Turn switch on to mute Back Up Alarm.
98 Y53-6110-1A1 (01/21)
Batteries, Low Voltage Disconnect
(L
VD)
If your vehicle is equipped with a Low
V
oltage Disconnect (LVD) feature, the LVD
is integrated into the main load center.
Brakes, ABS Off-Road
Turn switch on to engage ABS Off-Road
mode.
Brake, T
This dash mounted switch provides air
pressure to apply the trailer brakes only
operates independently of the foot treadle
valve.
railer Hand
. It
Cab Dimmer Switch
This switch is used to alter the brightness
of the instrument panel lights.
 Loading...