


In-Cab Infotainment System
Système d’infodivertissement dans la cabine Sistema de Entretenimiento Informativo en la Cabina
OPERATOR’S MANUAL
Manuel de l’opérateur Manual de operario

Contents
Safety
Emergency
Controls
Driving
Maintenance
Information
1
2
3
4
5
6
Index 7

Contents
©2012 Paccar Inc - All Rights Reserved
This manual illustrates and describes the operation of features or equipment which may be either standard or optional on this vehicle. This manual may also include a description of features and equipment which are no longer available or were not ordered on this vehicle. Please disregard any illustrations or descriptions relating to features or equipment which are not on this vehicle.
PACCAR reserves the right to discontinue, change specifications, or change the design of its vehicles at any time without notice and without incurring any obligation.
The information contained in this manual is proprietary to PACCAR. Reproduction, in whole or in part, by any means is strictly prohibited without prior written authorization from PACCAR Inc.

Introduction
1
Preface
Safety Messages . . . . . . . . . . . . . . . . 1-3
General Safety Reminders . . . . . . . . . . . . 1-4
FCC Statement. . . . . . . . . . . . . . . . . 1-5
1-1

Preface
Preface |
WARNING |
|
CAUTION |
|
1 |
|
|
|
|
|
|
Safety Messages |
WARNING! |
|
CAUTION |
|
|
|
|
|
|||
A number of alerting messages are |
|
|
|
|
|
|
|
|
|
|
|
in this manual. Please read and |
When you see this word, the message |
|
Signals a potentially hazardous |
|
|
follow them. They are there for your |
|
|
|
||
that follows is especially vital. It signals |
|
situation which, if not avoided, could |
|
|
|
protection and information. These |
|
|
|
||
a potentially hazardous situation |
|
result in property or vehicle damage |
|
|
|
messages can help you avoid injury to |
|
|
|
||
which, if not avoided, could result in |
|
|
|
|
|
yourself and others, as well as prevent |
|
Example: |
|
|
|
an injury or death. This message will |
|
|
|
||
costly damages to the vehicle. |
|
|
|
||
tell you what the hazard is, what can |
|
|
|
|
|
|
|
CAUTION |
|
|
|
Key symbols and “signal words” are |
happen if you don't heed the warning, |
|
|
|
|
and how to avoid it. |
|
Continuing to operate your vehi- |
|
|
|
used to indicate what kind of message |
|
|
|
||
is going to follow. Pay special attention |
Example: |
|
cle with insufficient oil pressure will |
|
|
to instructions prefaced by symbols |
|
cause serious engine damage. |
|
|
|
|
|
|
|
||
and the signal words “WARNING”, |
|
|
|
|
|
WARNING! |
|
|
|
|
|
“CAUTION”, and “NOTE”. Please do |
|
|
|
|
|
Never carry additional fuel contain- |
|
|
|
|
|
not ignore any of these alerts. |
|
|
|
|
|
|
ers in the vehicle. Such containers, |
|
|
|
|
|
full or empty, may leak, explode or |
|
|
|
|
|
cause a fire in the event of a colli- |
|
|
|
|
|
sion. |
|
|
|
|
1-3

Preface
1 |
|
NOTE |
|
Please take the time to read these |
General Safety Reminders |
|
|
NOTE |
|
messages when you see them, and |
Certain functions are restricted to |
|
|
|
|||
|
|
|
|
remember: |
operate only when the vehicle is |
|
|
|
|||
|
|
|
|
|
stationary for your safety and the |
|
|
Provides general information: for |
|
WARNING! |
safety of those not in the vehicle. |
|
|
|
Something that could seriously in- |
|
|
|
|
example, the note may suggest how to |
|
Safe driving is only possible with the |
|
|
|
|
jure or kill you or others. |
||
|
|
operate the vehicle more efficiently. |
|
proper concentration on the driving |
|
|
|
|
|
||
|
|
Example: |
|
|
task. Keep distraction to a minimum to |
|
|
|
CAUTION |
||
|
|
|
improve your concentration. Examples |
||
|
|
|
|
Something that could cause prop- |
of distractions may include radio |
|
|
NOTE |
|||
|
|
|
erty or vehicle damage. |
controls, GPS navigation controls, |
|
|
|
Pumping the accelerator will not as- |
|
|
cellular telephone calls, cellular text |
|
|
|
|
||
|
|
sist in starting the engine. |
|
|
messages, reading or reaching for |
|
|
|
NOTE |
||
|
|
|
|
something on the floor. Minimizing |
|
|
|
|
|||
|
|
|
|
|
|
|
|
|
|
Useful information. |
your distractions will improve safe |
|
|
|
|
|
driving and will help avoid an accident |
|
|
|
|
|
|
|
|
|
|
|
involving death or personal injury. |
1-4
|
|
|
Preface |
|
|
|
|
|
FCC Statement |
|
|
|
|
|
|
1 |
|
WARNING! |
|
WARNING! |
|
||
|
This device complies with Part 15 of |
|
|||
Only glance at the display monitor |
|
Regardless of how and where the |
|
|
|
|
the FCC rules subject to the following |
|
|
||
while driving. Prolonged periods of |
|
navigation system directs you, it is |
|
|
|
|
two conditions: |
|
|
||
viewing while driving could result in |
|
yourresponsibilitytooperatetheve- |
|
|
|
|
|
|
|
||
an accident and death or personal |
|
hicle in a safe and legal manner. |
This device may not cause harmful |
|
|
injury. |
|
Failure to do so may lead to death, |
|
|
|
|
interference. |
|
|
||
|
|
personal injury or equipment dam- |
|
|
|
|
|
|
|
|
|
WARNING! |
|
age. |
Thisdevicemustacceptallinterference |
|
|
Do not program the System while |
|
|
received, including interference that |
|
|
|
WARNING! |
may cause undesired operation. |
|
|
|
driving. Always stop your vehicle |
|
|
|
||
when programming or changing the |
|
Ensure the volume level of all audio |
Changesormodificationsnotexpressly |
|
|
settings on the System. Program- |
|
devices is set to a level that still al- |
|
|
|
|
approved by the party responsible |
|
|
||
ming the system while driving can |
|
lows you to hear outside traffic and |
|
|
|
|
for compliance could void the user’s |
|
|
||
cause you to take your eyes off the |
|
emergency vehicles. Failure to do |
|
|
|
|
authority to operate the equipment. |
|
|
||
road, which could result in an acci- |
|
so may result in an accident involv- |
|
|
|
|
|
|
|
||
dent which may lead to death, per- |
|
ing death, personal injury or equip- |
|
|
|
sonal injury or equipment damage. |
|
ment damage. |
|
|
|
|
|
|
|
|
|
|
|
|
|
|
|
|
|
NOTE |
|
|
|
|
|
Do not rely on the Navigation Sys- |
|
|
|
|
|
temtorouteyoutotheclosestemer- |
|
|
|
|
|
gency services. Not all emergency |
|
|
|
|
|
services are in the database. |
|
|
|
1-5
|
|
Preface |
|
|
|
1 |
|
To limit Radio Frequency (RF) |
|
|
exposure please keep a distance of at |
|
|
least 20 cm from the device. For any |
|
|
other request regarding RF exposure |
|
|
compliance in Canada, please refer to |
|
|
our local representative: |
Renaissance Consulting
11 Parsons Ridge Road,
Kanata, Ottawa, Ontario,
Canada, K2L 2M1
1-6
CONTROLS
Introduction
PACCAR Truck Navigation System . . . . . . . . 3-3
Touch Screens
Exploring the Touch Screens . . . . . . . . . . . 3-6
3
3-1
Introduction
Introduction
press the power button on the remote |
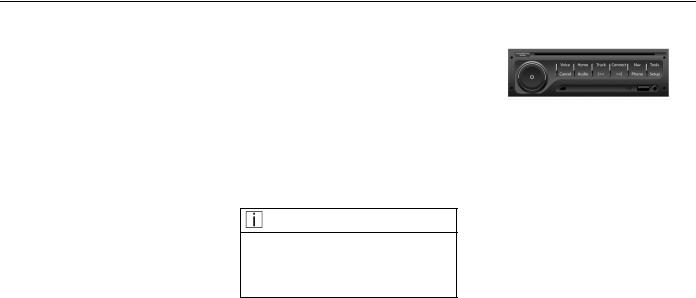
Remote Head Unit |
head unit without using the ignition key. |
|
PACCAR Truck Navigation
System
The PACCAR truck navigation system provides real-time truck monitoring, truck navigation, virtual gauges, hands-free Bluetooth® connectivity, voice recognition, and an integrated audio system with satellite radio as well as MP3 and iPod® capabilities.
The PACCAR truck navigation system enables all functions with or without the key in the ACC or ON position. A power savings feature is enabled when it is being used and the ignition key is not in the ACC or ON position. The power savings feature will enable functionality for 20 minutes and then will enter standby mode to conserve power. The user has the option to insert the ignition key (if not already inserted) and turn it to the ACC or ON position. Alternatively, the user may
If the user presses the power button without using the ignition key, then the PACCAR truck navigation system will enable another 20 minutes of use.
If the user turns the key to the ON position, the system will enable functionality without the power savings feature.
NOTE
After extended times of use with the key out of the ignition, and the operator starts the engine, the unit will shutdown and restart.
The PACCAR truck navigation system consists of a remote head unit and a touch screen display. The remote head unit is located in the instrument panel near the touch screen display. Locations may vary by models.
The following buttons, knobs and |
|
||
connections are on the face of the |
|
||
3 |
|||
head unit |
|||
• Power Button / Volume Knob |
|
||
|
|||
• |
Eject Button |
|
|
• |
Voice Button |
|
|
• |
Home Button |
|
|
• |
Truck Button |
|
|
• |
Connect Button |
|
|
• |
Nav Button |
|
|
• |
Tools Button |
|
|
• |
Cancel Button |
|
|
• |
Audio Button |
|
|
3-3

Introduction
•Rewind Button
•Forward Button
•Phone Button
•Setup Button
•USB jack
3 • 3.5 AUX jack
Touch Screen Home Menu
When the system is first turned on it will default to the home screen.
•Truck
•Connect
•Navigation
•Tools
•Phone
•Audio
•Set Up
Quick Jump Bar
The ‘Quick Jump Bar’ is at the bottom of the screen. It allows you to go directly to other screens with one press of the button.
1.Home
Takes you to the home screen. It will display on every screen except the home menu screen. It will be gray and inactive on the home screen.
2.OK
Takes you to the truck screen options. The green OK icon will be on if all systems working OK. If the systems are not OK a “!” warning icon will appear.
3.Navigation
Takes you to the navigation screen. It will display the current compass heading.
3-4

Introduction
4.Audio
Takes you to the current active audio screen.
5.Phone
Takes you to the current active phone screen.
If no phone is connected the phone will be gray. The red X will be present if a call is missed on a Bluetooth® connected phone. The envelope is gray if there are no text messages.
6.Screen Display Settings
Allows the user to make changes to the screen such as turning the screen off, displaying in day or night mode, and adjusting brightness.
Title Bar
The Title Bar is at the top of the screen. Not every screen will have the title bar due to the particular options for each screen.
1.Identification of Screen/Function
The screen/function shows the screen the user is currently on.
2.Available Screen Pages
The screen pages show the user if multiple pages are available. This feature is only available on menus where more than one page is available. You can press the page number on the screen to go to that page.
3.Time
The time display displays the current system time.
4.Temperature
The temperature display displays the outside temperature.
5.Back Button
Pressing the back button allows |
3 |
the user to go back one screen. The back button is only visible when you get to the third screen of the current menu you are in.
3-5

Touch Screens
Touch Screens
ExploringtheTouchScreens
From the Home menu press the truck icon. This will bring up the Truck menu.
Truck Menu
The truck menu will display the vehicle monitoring functions of the PACCAR Display. It will display four vehicle monitoring features.
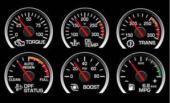
Gauges
Press the GAUGES icon. The screen will display the virtual gauge view.
3
Peterbilt Virtual Gauges
Home Menu Screen
Truck Menu Screen
Truck Menu Icons
•Gauges
•Diagnostic Messages
•Camera
•Hybrid Mode (if equipped)
3-6
|
|
|
Touch Screens |
|
|
Virtual Gauges - Standard |
• |
Manifold Pressure |
|
|
|
• |
|
|
Displays the power your engine is |
|
|
Torque Percentage |
|
putting out by showing the amount |
|
|
|
|
Displays engine output torque as |
|
of turbo boost. |
|
|
|
a percentage of the maximum |
Virtual Gauges - Optional |
|
|
|
|
torque rating. |
|
|
||
• Diesel Particulate Filter (DPF) |
• |
Optional Gauges |
|
|
|
Kenworth Virtual Gauges |
Status |
|
Optional virtual gauges are |
|
3 |
|
Displays the current status of |
|
available. Please refer to the |
|
|
|
the DPF and when it should |
|
vehicle's operator manual for |
|
|
|
be cleaned. Refer to the Engine |
|
information. |
|
|
|
AftertreatmentSystemsOperator’s |
|
|
|
|
|
Manual for additional information. |
|
|
|
|
• Miles Per Gallon (MPG) |
|
|
|
|
|
|
Displays the current fuel economy |
|
|
|
|
|
average in mpg. |
|
|
|
|
• Oil Temperature (if equipped) |
|
|
|
|
|
|
Displays the current engine oil |
|
|
|
|
|
temperature. |
|
|
|
|
• |
Transmission Temperature (if |
|
|
|
|
|
equipped) |
|
|
|
|
|
Displays the current transmission |
|
|
|
|
|
temperature. |
|
|
|
|
3-7
Touch Screens
Warnings
Press the warning icon on the screen. This will display any vehicle system that is out of specification. Refer
to the vehicle operator manual for descriptions of the warning icons.
3
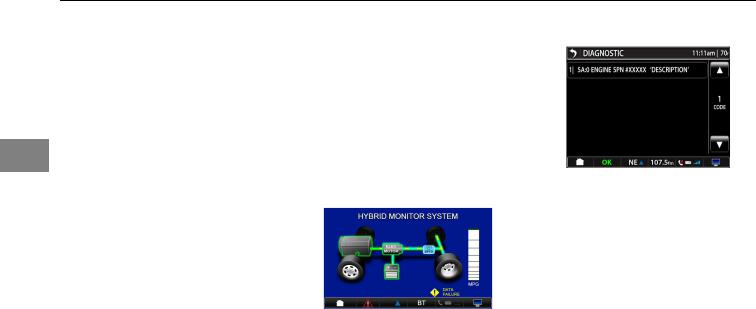
Hybrid
Press the Hybrid icon. This will launch the Hybrid monitoring environment.
When in the Hybrid monitoring environment, the bottom bar menu shall be maintained. The Hybrid screens have no touch screen functionality or interaction. Only the bottom bar will maintain the touch control.
Hybrid Monitoring Screen
Please refer to the Hybrid Operator’s Manual Supplement for more details about the hybrid display.
Diagnostic Messages
Diagnostic Message Home Screen
The truck diagnostic screen will display active messages from the following systems:
•Engine
•Engine Aftertreatment System
•Transmission
•Instrumentation System
•Anti-Lock Braking System (ABS)
3-8

Touch Screens
•PACCARTruckNavigationInternal Diagnostics
The messages will display as long as the fault remains active from the system source. Once the fault is no longer active, the message will be removed from the screen.
TheDiagnosticMessageHomeScreen will show a maximum of 5 messages per screen and can be paged up or down using the arrows on the right hand side of the screen.
The up and down arrows will be gray unless there are more than 5 messages.
Truck Diagnostics Screen
Once a message is selected, the system will go to the Diagnostic Detail Screen. This feature will show the active diagnostic messages on the vehicle and cannot be used as a method to clear them. Clearing
messages will have to be done through the systems diagnostic clearing processes.
Truck Diagnostic Detail Screen
3
The diagnostic detail screen will display:
•Source Address
•Source of Diagnostic Code
•SPN
•FMI
•Text Description of Code
The user can press the CLOSE button at the bottom to return to the Truck Diagnostic Home Screen.
3-9
Touch Screens
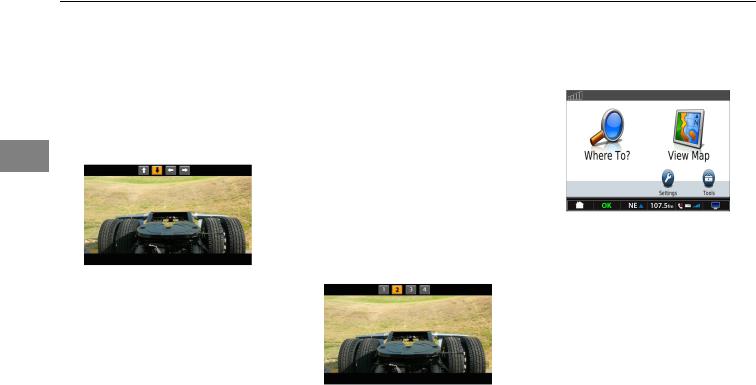
Cameras (Optional) |
• |
Up Arrow – Forward. Activated |
Navigation |
|
|
||
Cameras can be viewed in the |
|
when up arrow on screen is |
Press the Navigation button on the |
|
pressed. |
||
automatic and manual modes. |
|
screen. This will bring up GPS screen. |
|
|
|
||
In the automatic mode, the cameras |
• Right Arrow – Right Side. |
|
|
|
Activated by right turn signal. |
|
|
are identified by the arrow keys. The |
|
|
|
• |
|
|
|
arrow keys indicate the direction the |
Left Arrow – Left Side. Activated |
|
|
operator is seeing. |
|
by left turn signal. |
|
3 |
|
|
|
Automatic Camera Mode
When in automatic mode and in the camera screen, the cameras views are as follows:
In the manual mode, the cameras are identified by numbers. Press the number icons 1-4 at the top of the screen to view that camera. How the cameras were installed will determine which number corresponds with the camera view.
Garmin® GPS Screen
Follow the instructions from the supplied GPS manual on how to use the GPS system.
•Down Arrow – Reverse. Activated when shifted into reverse
Manual Camera Mode
3-10
Touch Screens
Tools |
Calculator |
Alarm |
Press on the Tools button on the screen. The following tools are available:
Tools Screen
•Calculator
•Alarm Clock
•Video Player
•Calendar
Press the calculator icon. The Calculator can perform quick computations. Use the screen just as you would a calculator.
Press the alarm icon. The operator can set the alarm and pick an audio source to play at the designated time. The Alarm will only provide for one alarm setting.
3
Alarm Screen
Calculator Screen
If the alarm time is reached while the device is in its power savings sleep mode, the system will turn on and the alarm will sound at the programmed time.
The up and down arrows on the left hand side of the screen are used to set the hour as the hour advances
3-11

Touch Screens
past 12, the AM to PM transition will happen. The same holds true if the hours are decreasing and go from 1 to 12 in the downward direction. The up and down arrows on the right hand side of the screen are used to set the minutes. Advancing the minutes over 59 or decreasing below 1 does not
3 affect the hour setting.
Pressing the Set button sets the alarm and the bell icon goes from 50% intensity to full intensity. Pressing the Set button turns the alarm off and the belliconreducesbackto50%intensity.
Pressing the Snooze button will activate the snooze feature, which will shut the alarm off for approximately 10 minutes and then the alarm will sound again.
Video
The video screen allows the user to bring in video using the aux-in input on the front of the head unit. When the video button is pressed, the screen will bring in video to the main area of the screen. The top and bottom bars will be maintained.
If no video signal is present from the aux-in input, the main area of the screen will remain blacked out.
Calendar
Press the Calendar icon to bring up the calendar. The left and right arrows will allow you to scroll forward or backwards through the months.
Calendar
3-12
Touch Screens
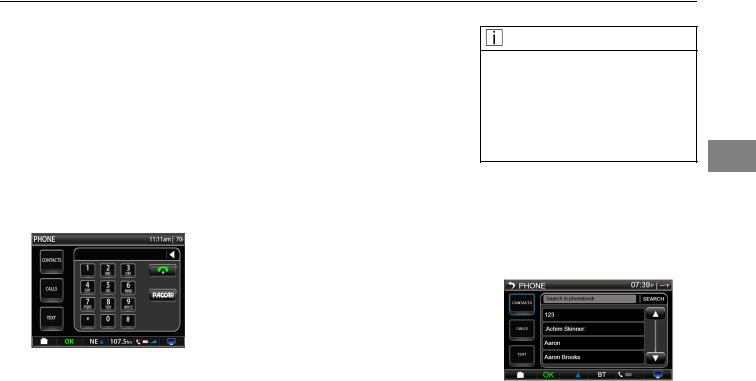
Phone
The Phone function provides the ability for the user to place and receive calls via a Bluetooth® connected phone.
•Phone Key Pad
•Contacts
•Connect Phone
•Call/Answer
•Hang Up/Ignore
Phone Screen
Pressing the PACCAR button will dial the Peterbilt or Kenworth call center
depending on whether the device is a Peterbilt or Kenworth. The call center phone numbers are:
•Peterbilt Call Center: 1-800-473-8372 (1-800-4-Peterbilt)
•Kenworth Call Center: 1-800-592-7747 (1-800-KWASSIST)
Contacts
Pressing the Contacts button will show any contacts that are stored on your phone. Use the up and down arrows to scroll through your contacts. Press the contact you want to select it.
NOTE |
|
If your phone is connected via Blue- |
|
tooth® and has the capability of |
|
sharing the contact list, it will ap- |
|
pear here. Refer to the Changing |
|
Personal Settings section for more |
|
details on how to download the |
3 |
phone’s contact list. |
|
|
Search contacts by pressing "search in phone book" field. Begin entering name on keyboard. Press the contact you want to select. Leaving the contacts screen will clear the search results.
Contacts Screen
3-13
Touch Screens
NOTE
Not all phones will be able to utilizethisfunctionality. Pleasecontact your authorized dealership to find out if your phone is compatible with this function.
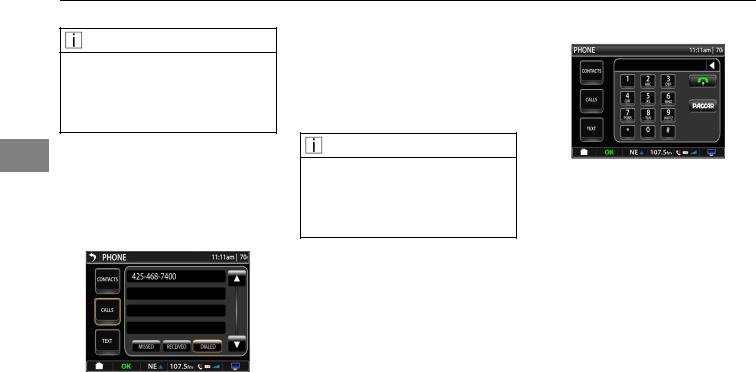
3 Calls
Pressing the Calls button will bring up the calls screen. By pressing the appropriate button you can view any missed, received or dialed calls.
Text
Pressing the Text button will bring up the text screen. Press the new to create a new text message. The keyboard will appear so you can type your message.
NOTE
Not all phones will be able to utilizethisfunctionality. Pleasecontact your authorized dealership to find out if your phone is compatible with this function.
Make Call
Make Call Screen
Select the number from the contact list or dial the number using the touchpad. Press the green phone to make a call. The number or the contact will show up in phone number field. Phone turns red once dialing begins.
Calls Screen
3-14
Touch Screens
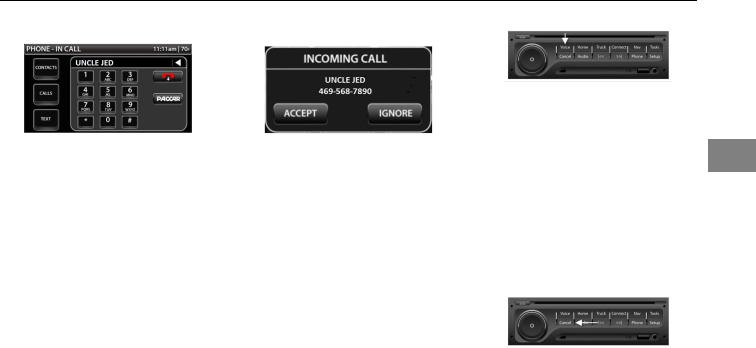
In Call |
Incoming Call |
In Call Screen
The phone title changes to Phone – In Call once the dialing begins
To end the call, press the red phone icon. This will disconnect the call.
Any call received while In Call will simply show missed call icon (‘X’) on the quick jump bar next to the phone symbol.
Incoming Call Popup
When an incoming call comes in the INCOMING CALL popup will appear. The number will be displayed and if it is in the contact list the contact will appear. To accept the call press the accept button. If you chose not to answer press the ignore button.
Phone Voice Recognition
The phone function also includes voice recognition for certain phone controls. To enter a command, press the [VOICE] button (as shown below), wait for the voice prompt and then speak your command in a clear voice.
The system will accept a single word command and will prompt for the next command, such as a name or a phone number. The system is also capable 3 of accepting complex commands of
“Call” or “Dial” and the name or phone number to call.
Pressing the [Cancel] button on the controller will return the voice command back to the phone control
and will allow the process to start over.
If the system does not recognize your command, try speaking louder and reduce background noise such as
3-15
Touch Screens
air conditioning fan, open windows, radio or other conversations. Speak numbers in groups of 3 or 5 and a slight pause in between. Do not speak a 10 digit number without pausing.
The voice recognition system will recognize the language it is currently set for. (For example, if the system is
3 set for French, it will accept commands in French.)
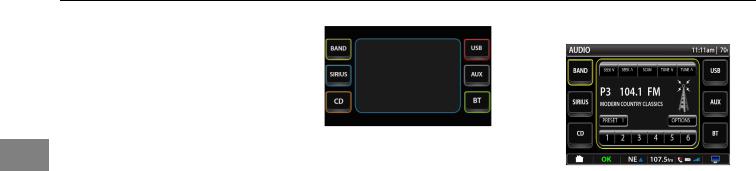
Audio
Pressing the Audio button will bring up the Audio screen. The Audio screen gives the user access to the entertainment audio sources.
Main Audio Screen
•Band – FM/AM/WB
•Sirius – Sirius® Satellite Radio
•CD
•USB – Memory Stick Input
•Aux – MP3 device input or iPod® input
•BT - Bluetooth® Paired Device Input
The button will activate once the source becomes active.
Radio Band Select
Band Select
The band select screen allows the user to select different control features of the FM/AM/WB radio.
The first press of the Band button in the top left hand corner of the audio main screen takes the user to the band select screen. The screen will be for the band last selected and the default will be FM. By pressing the Band button again the user can change audio bands in the following order: FM to AM to WB and then to FM again.
3-16

Touch Screens
The Seek down arrow button lets the user select the next available station down the band. The Seek up arrow button allows the user to advance to the next available station up the band.
The Scan button allows the user to set the radio to automatically scan all available stations by advancing up the band until it reaches the end of the band and then will start again at the bottom of the band. To select a station press the Scan button again.
The Tune down arrow button allows the user to manually tune down the dial while the Tune up arrow button allows the user to manually tune up the dial. There is no fast advancement by holding down on either key.
The Preset button allows the user to select between groups of presets and displays the group currently available by the preset buttons. Example:
Preset 0 is the first group of presets
1-6, Preset 1 is the next group of presets and so on.
The Preset buttons number 1-6 allows the user to store and access up to 24 presets. The presets are divided into four groups of 6 presets labeled 0-3. Pressing on a preset button will take the user to the assigned station.
Press and hold the button for the preset location for more than 1 second to store the desired station. The information area shows what preset the user is on, the station, the band, and any station info that is broadcast.
Sirius®
SIRIUS® Radio:
SIRIUS® Satellite Radio and SIRIUS® Traffic subscriptions sold separately or as a package. Service automatically renews and you will be billed, at then-current rates, unless you call 1-888-539-7474 to cancel. Subscriptions governed by SIRIUS® Terms and Conditions available
at sirius.com. Installation costs, one-time 3 activation fee, other fees and taxes will
apply. SIRIUS® Traffic available in select markets, and SIRIUS® data displays and individual product availability vary by hardware equipment. SIRIUS® service available only to those at least 18 years of age in the 48 contiguous USA, DC, and
Puerto Rico (with coverage limitations). Fees and programming subject to change. © 2010 SIRIUS® XM Radio Inc. SIRIUS®, XM and all related marks and logos are trademarks of SIRIUS® XM Radio Inc. and its subsidiaries.
Pressing the Sirius® button takes the user to the Sirius® Main Screen. There are six presets per each satellite group (SAT0 - SAT3) for a total of 24 preset stations.
3-17

Touch Screens
Sirius® Main Screen
3 The CAT up arrow button takes the user to the next available category and CAT down arrow takes the user to the previously available category.
The Tune up arrow button takes the user up to the next available station and the Tune down arrow button takes the user down to the next available station.
Press the CAT Select button will show the user Category screen.
Sirius® Category Select
Pressing the CH SELECT button takes the user to Channel SELECT screen.
Sirius® Channel Select
The Sirius® screen is activated when the user presses the Info button on the Sirius® Main Screen. Press the Cancel button to leave the screen.
Sirius® Info
Special messages screen comes up when the Sirius® Mode needs to inform user of status.
Sirius® Special Message
The messages available are:
•Acquiring Signal
•Antenna Error
3-18
Touch Screens
• |
Channels Updating |
Pressing the RPT button allows the |
where the track maintains the original |
|
file information. |
|
|||
• |
|
user to repeat the track. Press the |
|
|
Firmware |
|
|
||
button to turn off the repeat function. |
Pressing the SONG button allows the |
|
||
Compact Disc (CD) |
|
|||
Pressing the SHUF button allows the |
user to select the song to be played |
|
||
|
|
(if supported by the CD information). |
|
|
The CD screen is accessed by |
user to select shuffle play mode which |
|
||
Pressing the up and down arrows |
|
|||
pressing the CD button. |
will random play tracks on the CD. |
|
||
to the right will page up and down |
|
|||
|
|
Pressing the SHUF button again will |
|
|
|
|
through the available songs. The user |
3 |
|
|
|
turn off the shuffle feature. |
can play a specific song by selecting it |
|
|
|
Pressing the BWSE button allows the |
from the list or pressing the arrow to |
|
|
|
the right of the song title. Pressing the |
|
|
|
|
user to browse the files on a CD (if |
|
|
|
|
BACK button will take you back to the |
|
|
|
|
supported by the CD information). |
|
|
|
|
previous screen. |
|
|
|
|
Pressing the up and down arrows |
|
|
|
|
|
|
|
|
|
to the right will page up and down |
Pressing the GENRE button allows |
|
|
|
through the available files. Pressing |
|
|
Compact Disc |
the user to select the genre of music |
|
||
a specific file will show a list of songs |
|
|||
|
|
to be played (if supported by the CD |
|
|
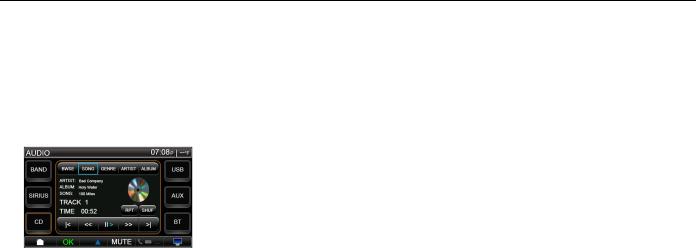
When a CD is loaded and depending |
available in that file. Pressing the |
|
||
information). Pressing the up and |
|
|||
on the CD format, the screen will |
arrow to the right of the file will start |
down arrows to the right will page |
|
|
display the Artist Name, Album Title, |
playing the first song in that file and |
up and down through the selections. |
|
|
Song Title and Track Number out |
continue playing songs from that file. |
Pressing the specific genre wanted will |
|
|
of Tracks available (x/xx), and Time |
Pressing the BACK button will take |
show a list of artists available in that |
|
|
Elapsed. |
you back to the previous screen. Note: |
genre. Pressing the arrow next to the |
|
|
|
|
This feature is for CD’s that have files |
genre will start playing the first track |
|
|
|
|
|
|
loaded from numerous other sources |
within that genre and continue playing |
|
3-19
Touch Screens
other songs from that genre. Pressing the BACK button will take you back to the previous screen.
Pressing the ARTIST button allows the user to select the artist to be played (if supported by the CD information). Pressing the up and down arrows to therightwillpageupanddownthrough
3 the available artists. Pressing a specific artist will show a list of albums available for that artist, pressing the album will show the list of songs from that artist. Pressing the arrow to the right of the artist will start playing the first song for that artist and continue playing songs from that artist. Pressing the BACK button will take you back to the previous screen. Note: This feature is for CD’s that have files loaded from numerous other sources where the track maintains the original artist information.
Pressing the ALBUM button allows the user to select the album to be played
(if supported by the CD information). Pressing the up and down arrows to therightwillpageupanddownthrough the available albums. Pressing a specific album will show a list of songs available on the album. Pressing the arrow to the right of the album will start playing the first song on the album and continue playing songs from that album. Pressing the BACK button will take you back to the previous screen. Note: This feature is for CD’s that have files loaded from numerous other sources where the track maintains the original album information.
The jump back a track, rewind, play, fast forward and jump ahead a track buttons are on the information screen.
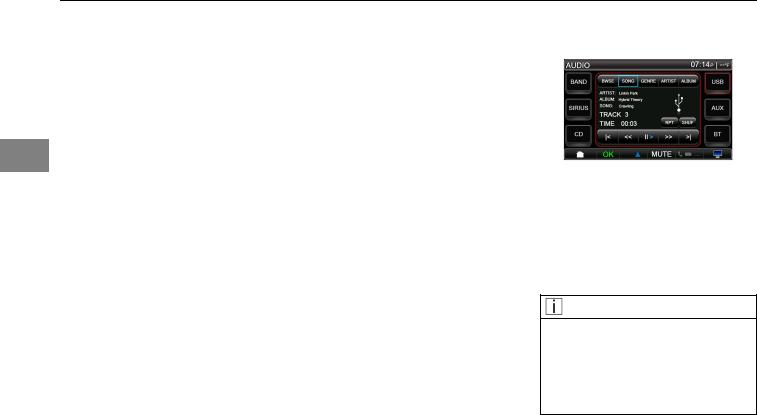
USB Input
In USB mode, the device will play audio files that are stored on a USB audio device. Operating the controls
for the USB input are similar to playing audio on a CD.
USB Input
iPod® Controls
The iPod® controls screen allows the user to access and play iPod® information when an iPod® is connected to the USB port.
NOTE
Not all Apple® devices will be able to utilize all of the funcationality described in this section. Please contact your authorized dealership to find out if your device is compatible with this function.
3-20
 Loading...