


Panasonic TH-L32C10K, TH-L32C10M, TH-L32C10R, TH-L32C10S, TH-L32C10X User Manual
...Operating Instructions
LCD TV
Model No. TH-L32C10K
TH-L32C10M
TH-L32C10R
TH-L32C10S
TH-L32C10X
TH-L32C12K
TH-L32C11KG
Please read these instructions before operating your set and retain them for future reference. The images shown in this manual are for illustrative purposes only.
English
TL TQB4GC0300-1

Turn your own living room into a movie theatre!
Experience an amazing level of multi-
Sharp pictures with HDMI terminal
Create home theatre and DVD recorder link-ups with “VIERA Link” without complicated settings!
2

media excitement
Enjoy rich multimedia
Amplifier with |
DVD Recorder |
Speaker system |
|
SD card
Camcorder
Personal |
computer |
Set top box
VCR |
DVD player |
Contents
Be Sure to Read
Safety Precautions ............................... |
4 |
(Warning / Caution) |
|
Notes .................................................... |
5 |
Maintenance......................................... |
5 |
Quick Start Guide |
|
Guide |
|
Accessories / Options |
.........6 |
||
Identifying Controls............. |
7 |
Start |
|
Basic Connection................ |
9 |
||
Auto Tuning |
10 |
Quick |
|
|
|||
Language Setting .............. |
11 |
|
|
Basic Features |
|
|
|
|
|
||
|
|
||
Watching TV ....................................... |
12 |
Basic |
|
Viewing Teletext.................................. |
14 |
||
Watching Videos and DVDs |
16 |
||
|
|||
Advanced Features |
|
|
|
|
|
||
..............How to Use Menu Functions |
18 |
|
|
(picture, sound quality, etc.) |
|
|
|
Input Labels........................................ |
22 |
|
|
Control Channel Audience.................. |
23 |
|
|
Editing Channels ................................ |
24 |
Advanced |
|
Tuning Channels |
26 |
||
|
|||
Restore Settings ................................ |
28 |
|
|
Displaying PC Screen on TV ............. |
29 |
|
|
Viewing from SD Card |
|
|
|
(VIERA IMAGE VIEWER)................... |
30 |
|
|
VIERA Link “HDAVI Control™”........... |
32 |
|
|
VIERA Tools ....................................... |
39 |
|
|
External Equipment ............................ |
40 |
|
|
|
|
|
|
|
|
|
|
Technical Features |
|
Technical |
|
Technical Information |
42 |
||
|
|||
FAQs .................................................. |
47 |
|
|
Licence ............................................... |
49 |
|
|
Specifications ..................................... |
50 |
|
|
|
|
|
3
Safety Precautions
Warning
Handling the mains plug and lead
Insert the mains plug fully into the socket outlet. If the mains plug is loose, it could generate heat and cause fire.
Ensure that the mains plug is easily accessible.
Do not touch the mains plug with a wet hand. This may cause electrical shock.
Do not damage the mains lead. A damaged lead may cause fire or electrical shock.  Do not move the TV with the lead plugged in the socket outlet.
 Do not place a heavy object on the lead or place the lead near a high-temperature object.
 Do not twist the lead, bend it excessively, or stretch it.
 Do not pull on the lead. Hold onto the mains plug body when disconnecting lead.
  Do not use a damaged mains plug or socket outlet.
If you find any abnormality,
remove the mains plug immediately!
AC AUTO 110-240 V, 50/60 Hz (TH-L32C10R only:
AC Single 220-240 V, 50/60 Hz)
 Mains plug types vary between countries.
Power Source
 This TV is designed to operate on AC AUTO 110-240 V, 50/60 Hz. (TH-L32C10R only: AC Single 220-240 V, 50/60 Hz)
Do not remove covers NEVER modify the TV yourself
High-voltage components may cause serious electrical shock.
 Have the TV checked, adjusted, or repaired at your local Panasonic dealer.
Keep liquids away from the TV
 To prevent damage which may result in fire or shock hazard, do not expose this appliance to dripping or splashing.
 Do not place containers with water (flower vase, cups, cosmetics, etc.) above the TV, including on shelves above, etc.
Do not expose to direct sunlight and other sources of heat
 Avoid exposing the TV to direct sunlight and other sources of heat. To prevent fire never place any type of candle or naked flame on top or near the TV.
Do not place foreign objects inside the TV
 Do not allow any objects to drop into the TV through the air vents. Fire or electrical shock may result.
Do not place the TV on sloped or unstable surfaces
 The TV may fall off or tip over.
Use only the dedicated pedestals / mounting equipment
 Using an unapproved pedestal or other fixtures may make the TV unstable, risking injury. Be sure to ask your local Panasonic dealer to perform setup.
 Use approved pedestals / mounts (p. 6).
Do not allow children to handle SD card
 As with a small object, SD card can be swallowed by young children. Please remove SD card immediately after use.
4

Caution
This appliance is intended for use in tropical climates
When cleaning the TV, remove the mains plug
 Cleaning an energized TV may cause electrical
shock.
When the TV is not going to be used for a long period of time, remove the mains plug
 This TV will still consume some power even in the Off mode, as long as the mains plug is still connected to a live socket outlet.
Allow sufficient space around the TV for radiated heat
Minimum distance
 10
10
10 |
10 |
10 |
(cm)
Notes
Auto power standby function
 If no signal is received and no operation is performed for 30 minutes, the TV will automatically go to standby mode.
Keep the TV away from these types of equipment
 Electronic equipment
In particular, do not place video equipment near the TV. Electromagnetic interference may distort images / sound.
 Equipment with an infrared sensor
This TV also emits infrared rays. This may affect operation of other equipment.
Transport only in upright position
 When using the pedestal, keep the space between the bottom of the TV and the surface where the TV is set.
 In case of using Wall-hanging bracket, follow the manual of it.
Do not block the rear air vents
 Blocked ventilation by newspapers, table cloths, curtains, etc. may cause overheating, fire or electrical shock.
Maintenance
First, remove the mains plug from the socket outlet.
Display panel
Regular care: Gently wipe the surface clean of dirt by using a soft cloth.
Major contamination: Wipe the surface clean using a soft cloth dampened with clean water or diluted neutral detergent (1 part detergent to 100 parts water). Then, using a soft dry cloth, evenly wipe the surface clean until it is dry.
Caution
 The surface of the display panel has been specially treated and may be easily damaged. Do not tap or scratch the surface with your fingernail or other hard object.
 Take care not to subject the surface to insect repellent, solvent, thinner, or other volatile substances. This may degrade surface quality.
Cabinet, Pedestal
Regular care: Wipe the surface clean using a soft dry cloth.
Major contamination: Dampen a soft cloth with clean water or water containing a small amount of neutral detergent. Then, wring the cloth and wipe the surface clean with it. Finally, wipe the surface clean with a dry cloth.
Caution
 Take care not to subject the TV's surfaces to detergent. A liquid inside the TV could lead to product failure.
 Take care not to subject surfaces to insect repellent, solvent, thinner, or other volatile substances. This may deteriorate the surface by peeling the paint.
 Do not allow the cabinet and pedestal to make contact with a rubber or PVC substance for a long time.
Mains plug
Wipe the mains plug with a dry cloth at regular intervals. Moisture and dust may lead to fire or electrical shock.
5

Accessories / Options
Standard accessories
Check that you have the accessories and items shown
Remote Control |
Batteries for the |
N2QAYB000370 |
Remote Control (2) |
N2QAYB000399 |
R6 (AA) |
Cleaning cloth |
Pedestal hole cover |
(Not applicable for |
sheet |
TH-L32C11KG) |
|
Caution |
|
Pedestal |
Assembly screw for |
|
Pedestal (4) |
|
M4 |

 Operating Instructions
This product contains possibly dangerous parts (such as plastic bags), that can be breathed in or swallowed by young children accidentally. Keep these parts out of reach of young children.
Wall-hanging bracket  TY-WK3L2RW
WARNING!
Optional accessories
Please contact your nearest Panasonic dealer to purchase the recommended wall-hanging bracket. For additional details, please refer to the wallhanging bracket installation manual.
 Failure to use a Panasonic bracket or choosing to mount the TV yourself will be done at the risk of the consumer.
Any damage resulting from not having a professional installer mount your TV will void your warranty.  Always be sure to ask a qualified technician to carry out set-up.
Incorrect fitting may cause equipment to fall, resulting in injury and product damage.
 Do not mount the TV directly below ceiling lights (such as spotlights, floodlights or halogen lights) which typically give off high heat. Doing so may warp or damage plastic cabinet parts.
|
Installing remote’s batteries |
|
|
1 |
Pull open |
2 |
Close |
|
|
|
|
Hook |
Note the correct |
|
polarity (+ or -) |
||
|
Caution
 Incorrect installation may cause battery leakage and corrosion, resulting in damage to the remote control.
 Do not mix old and new batteries.
 Do not mix different battery types (such as alkaline and manganese batteries).
 Do not use rechargeable (Ni-Cd) batteries.
 Do not burn or breakup batteries.
Batteries must not be exposed to excessive heat such as sunshine, fire or the like.
6

Attaching the pedestal to TV
Foam mat or thick soft cloth
 Fix securely with assembly screws A. (Total 4 screws)
  Tighten screws firmly.
WARNING
 Always be sure to ask a qualified technician to carry out set-up.
Incorrect fitting may cause equipment to fall, resulting in injury and product damage.
Do not disassemble or modify the pedestal.
 Otherwise the TV may fall over and become damaged, and personal injury may result.
Caution
Do not use any other TV and displays.
 Otherwise the TV may fall over and become damaged, and personal injury may result.
Do not use the pedestal if it becomes warped or physically damaged.
 If you use the pedestal when it is physically damaged, personal injury may result. Contact your nearest Panasonic Dealer immediately.
During set-up, make sure that all screws are securely tightened.
 If sufficient care is not taken to ensure screws are properly tightened during assembly, the pedestal will not be strong enough to support the TV, and it might fall over and become damaged, and personal injury may result.
Identifying Controls
TV
SD card slot  (p. 30)
|
Function select |
|
|
Volume / Contrast / Brightness / |
|
|
Colour / Sharpness / Tint (NTSC |
|
|
mode) / Bass / Treble / Balance / Auto |
|
|
Tuning (p. 20 - 21) |
|
|
Change the channel up/down. When |
|
|
a function is displayed, press up/down |
|
|
to adjust the setting of the selected |
|
|
function. When in standby mode, |
|
C.A.T.S. |
switches TV on. |
|
|
||
(Contrast Automatic |
Change the input mode |
|
Tracking System) sensor |
Mains power On / Off switch |
|
Senses brightness to |
||
Switch On to turn on the TV |
||
adjust picture quality in |
||
|
||
“Eco Mode” in Picture |
|
|
Menu (p. 20) |
|
|
Power LED |
||
|
Standby: red |
|
|
On: green |
|
|
When using the remote control, indicates the TV has |
|
|
received a command. |
|
Remote control signal receiver |
||
|
Do not place any objects between the TV remote |
|
|
control signal receiver and remote control. |
|
Identifying Controls
Accessories / Options Quick Start Guide
7
Identifying Controls
Standby On / Off switch
 Switches TV On or Off standby
Stereo / Bilingual Sound Selection
(p. 43)
Main Menu (p. 18)
Press to access Picture, Sound and Setup menus
Aspect (p. 13)
 Changes aspect ratio from Aspect Selection list
 Also possible by pressing this button repeatedly until you reach the desired aspect
VIERA TOOLS (p. 39) Displays functions of the linked equipment and SD card.
VIERA Link (p. 34)
 Press to access VIERA Link Menu
Cursor buttons
 Make selections and adjustments
Option menu (p. 13)
Easy setting for viewing and sound options
Teletext (p. 14)
 Switches to teletext mode
Viewing a favourite teletext channel (p. 15)
Numeric buttons
Changes channel and teletext pages
When in Standby mode, switches TV On
Sound mute
 Switches sound mute On or Off
Volume Up / Down
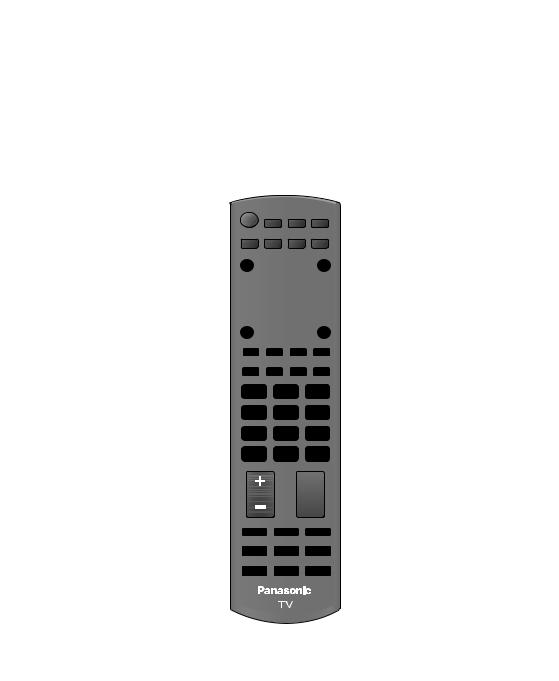
Remote Control
POWER
INPUT
PC TV AV

 MENU SURROUND OFF TIMER
ASPECT EXIT
|
|
|
|
RA TO |
OL |
|
|
|
IE |
||
|
|
k |
V |
|
S |
|
|
|
|
S |
|
|
in |
|
|
||
A |
L |
|
|
|
D |
|
|
|
C |
||
|
|
|
|
R |
|
R |
|
|
|
|
|
E |
|
|
|
|
A |
I |
|
|
|
|
D |
V |
|
|
|
OK |
|
|
|
|
|
|
|
OPTION |
|
|
|
RETURN |
|
R |
|
|
G |
Y B |
|
TEXT |
F.P. INDEX HOLD |
||||
1 2 3
4 5 6
7 8 9
0
MUTE RECALL
POWER PROGRAMME
REC
Input mode selection
PC - switches to PC input mode (p. 29)
TV - switches to TV mode (p. 12) AV - switches to AV input mode
from Input Selection list (p. 16)
Off timer (p. 13)
Turns the TV off automatically after a fixed period of time
Surround (p. 20)
 Switches surrounding sound setting
EXIT
Returns to the normal viewing screen
SD Card (p. 30)
 Switches to SD Card viewing mode
OK
Confirms selections and choices Press after selecting channel positions to quickly change channel
Return
 Returns to the previous menu
Coloured buttons
Used for the selection, navigation and operation of various functions
Hold
Freeze / unfreeze picture (p. 12) Holds the current teletext page (teletext mode) (p. 15)
Index (p. 15)
Returns to the teletext index page (teletext mode)
Programme Information (p. 12)
Channel Up / Down
 Selects channel in sequence
VCR / DVD Panasonic equipment operations (p. 17)
8

Basic Connection
External equipment and cables shown are not supplied with this TV.
Please ensure that the TV is disconnected from the mains socket before attaching or disconnecting any leads. When disconnecting the mains lead, be absolutely sure to disconnect the mains plug at the socket outlet first.
TV only
AC AUTO 110-240 V, 50/60 Hz (TH-L32C10R only: AC Single 220-240 V, 50/60 Hz)
Mains lead
Connecting aerial
Rear of the TV |
|
|
|
Aerial |
|
|
VIDEO |
VIDEO |
|
VIDEO Y |
|
|
L |
L |
L |
PB/CB |
|
|
|
|
|||
|
|
|
|
PR/CR |
|
PC |
R AUDIO |
RAUDIO |
RAUDIO COMPONENT |
RF cable |
|
PC AUDIO |
|||||
via AV2 |
MONITOR OUT |
AV 1 IN |
|
AV 2 IN |
|
Connecting DVD Recorder / VCR
TV, DVD Recorder or VCR
AC AUTO 110-240 V, 50/60 Hz (TH-L32C10R only: AC Single 220-240 V, 50/60 Hz)
Mains lead
Rear of the TV
|
VIDEO |
VIDEO |
|
VIDEO |
Y |
|
L |
L |
L |
PB/CB |
|
|
|
Aerial |
|||
|
|
|
|
|
|
|
|
|
|
PR/CR |
|
PC |
R AUDIO |
RAUDIO |
RAUDIO COMPONENT |
||
PC AUDIO |
MONITOR OUT |
AV 1 IN |
|
AV 2 IN |
|
via AV2 |
|
||||
|
RCA cable |
|
|
|
|
RF cable |
|
|
|
RF OUT |
|
VIDEO |
AUDIO |
RF cable |
|
RF IN |
|||
OUT |
OUT |
||
|
 DVD Recorder or VCR
If the antenna is placed in the wrong location, interference might happen.
Note
 Do not put the RF cable close to the mains lead to avoid noise.
Do not place the RF cable under the TV.
To obtain optimum quality picture and sound, an Aerial, the correct cable (75 Ω coaxial) and the correct terminating plug are required.
If a communal Aerial system is used, you may require the correct connection cable and plug between the wall Aerial socket and the TV.
Your local Television Service Centre or dealer may be able to assist you in obtaining the correct Aerial system for your particular area and the accessories required.
Any matters regarding Aerial installation, upgrading of existing systems or accessories required, and the costs incurred, are the responsibility of you, the Customer.
VIERA Link connection p. 33
 Read the manual of the equipment too.
Basic Connection
Identifying Controls Quick Start Guide
9

Auto Tuning
Search and store TV channels automatically.
These steps are not necessary if the setup has been completed by your local dealer.
1  2
2
3
4
Plug the TV into mains socket and switch On
You can now use the remote control to turn On the TV or switch the TV to standby mode.
(Power LED: On)
Select your language
OSD Language


 1 select
  2 store
Select your area
Channel Plan |
|
|
|
select |
|
|
|
||
Asia/W.Europe |
*1 |
|
|
|
CIS/E.Europe |
|
|
|
|
China |
|
|
|
|
Hong Kong |
|
|
|
|
NZ/Indonesia |
|
|
|
|
CATV/Other |
|
|
|
|
Channel Plan - CATV/Other - |
|
CATV/Other : |
||
Indian CATV |
South Africa |
( Press |
displays ) |
|
American System |
American CATV |
|||
Japan |
Japan |
|
sub menu |
|
*1) Refer to the table below or the display, to select your area.
Asia / |
Malaysia, Singapore, Thailand, India, Kuwait, |
W. Europe |
United Arab Emirates, Saudi Arabia, Iran, etc. |
CIS /E. Europe |
CIS Countries, Viet Nam, etc. |
Start Auto Tuning |
|
|
|
Auto Tuning will start to |
||
|
|
|
|
|
|
search for TV channels |
|
|
|
|
|
|
and store them. |
Auto Tuning |
|
|
|
|
The sorted channel order |
|
1 |
|
|
|
|
||
|
|
CH2 |
||||
Scan |
1 |
|
|
depends upon the TV |
||
|
|
120 |
||||
|
|
|
|
|
|
|
EXIT |
signal, the broadcasting |
RETURN |
system and reception |
|
conditions. |
Select the viewing environment
|
5 |
Please select your viewing environment. |
|
||
|
Home |
Shop |
|
||
|
|
|
“Home” is the recommended mode for |
||
|
|
|
|||
|
|
|
viewing at home. Select “Home” for |
||
|
|
|
|||
|
|
|
optimal picture / power consumption. |
||
|
|
|
“Shop” is for in-store display. |
|
|
|
|
|
Home: “Viewing Mode” is set as |
||
|
|
|
“Normal”. (p. 20) |
|
|
|
|
|
Shop: “Viewing Mode” is set as |
||
|
|
|
“Dynamic”. (p. 20) |
|
|
If you select “Shop” by mistake |
|
Select “Home” |
|
||
Return to the “Home” or “Shop” Selection menu |
|
||||
Automatic Demo |
|
|
|
Please select your viewing environment. |
|
Off |
|
On |
|
Home |
Shop |
Once you press the OK button in this menu, the |
|
|
TV is set to Shop mode. |
1 select |
|
Please reset all settings to set to “Home” mode. |
||
2 set |
||
“Shipping Condition” (p. 28) |
||
|

 1 select
  2 set
2 set
Auto Tuning is complete
Auto Tuning is complete
10
Using the On-Screen Displays
Many features available on this TV can be accessed via the On-Screen Display menu.
ON-SCREEN HELP Instructions box (example: Sound Menu)
Sound Menu |
|
|
|
How to use remote control |
|||
Mode |
|
|
|
|
|
||
Music |
|
Open the main menu |
|||||
Bass |
|
|
|
|
|||
|
+4 |
||||||
Treble |
|
|
|
|
|
||
|
+4 |
|
|
||||
Balance |
|
|
|
|
Move the cursor / select the menu |
||
|
|
0 |
|
|
|||
Surround |
|
|
|
|
|
||
Off |
|
|
|||||
Volume Correction |
|
|
|
|
Move the cursor / adjust levels / select from a range |
||
|
|
0 |
|
|
|||
Speaker Distance to Wall |
|
|
|
|
|
||
Over 30cm |
|
of options |
|||||
MPX |
|
|
|||||
Stereo |
|||||||
Select |
|
|
|
|
Access the menu / store settings after adjustments |
||
Change |
|
|
|
|
have been made or options have been set |
||
EXIT |
|
|
|
|
|
||
RETURN |
|
|
|
|
Return to the previous menu |
||
On-screen |
|
operation guide |
|
||||
|
|
||||||
|
|
Exit the menu system and return to the normal |
|||||
|
|||||||
|
|||||||
|
|
|
|
|
|
|
viewing screen |
Note |
|
|
|
|
|
||
To edit channels |
|
|
|
|
|
||
“Editing Channels” (p. 24) |
|
|
|||||
If tuning have failed |
“Tuning Channels” (p. 26). |
||||||
To reset all settings |
“Shipping Condition” (p. 28) |
||||||
If you turned the TV Off during Standby mode last time, the TV will be in Standby mode when you turn
the TV On with Mains power On / Off switch.
Language Setting
You can change language for on-screen displays.
1 Display the menu
2 |
Select “Setup” |
|
Main Menu |
2 access |
|
|
Picture |
|
Sound |
1 select |
|
|
Setup |
|
Language Setting
Auto Tuning Quick Start Guide
3
4
Select “OSD Language”
Setup Menu |
|
2 access |
Off Timer |
|
|
Child Lock |
|
|
Tuning Menu |
|
|
OSD Language |
Access |
1 select |
Display Settings |
|
VIERA Link Settings
System Menu
Other Settings
Select the language
OSD Language


 1 select
  2 set
2 set
11

Watching TV
 1
1
2
Turn power on
 Mains power On / Off switch should be On. (p. 7)
Select a channel
up or
 down
down
 To select the two-digit channel number, e.g. 39


 (in a short time)
 If one or two-digit channel number

 quickly changes the channel
Note
When the TV is switched to standby, there will be a clicking sound after a short delay. This is normal.
Other useful functions
Hold
Freeze / unfreeze picture
|
Display information banner |
|
Display information banner |
|
|
Also appears when changing channels. |
|
|
|
|
Input mode |
1 ABC |
TV |
|
TV |
|
Channel position |
CH07 |
1 ABC |
|
5.5MHz |
Channel name |
|
PAL |
|
|
16:9 |
|
|
|
CH07 |
Channel number |
15 |
5.5MHz |
Sound system |
|
PAL |
Colour system |
To set display timeout |
16:9 |
Aspect ratio |
“Banner Display |
|
|
Timeout” (p. 21) |
|
|
 Audio mode (p. 43)
Sound mute On
Note
 Colour system will not be displayed if it is set to “Auto”.
15
Off Timer remaining time  For settings
  p. 13
p. 13
Teletext prompt is displayed if Teletext is available
12

Other useful functions
Off Timer
Turn the TV off automatically after a fixed period of time (Off / 15 / 30 / 45 / 60 / 75 / 90 minutes)
Press repeatedly |
or |
Setup Menu |
|
|
|
|
to set the time |
Off Timer |
|
|
|
|
|
|
Off |
|
|
select |
||
|
|
Child Lock |
|
|
|
|
|
|
|
|
|
||
|
|
Tuning Menu |
|
|
|
|
|
|
|
|
|
|
|
|
|
OSD Language |
|
|
|
|
|
|
|
|
|
|
|
|
|
Display Settings |
|
|
|
|
|
|
|
|
|
|
|
|
|
VIERA Link Settings |
|
|
|
|
|
|
|
|
|
|
|
|
|
System Menu |
|
|
|
|
|
|
|
|
|
|
|
|
|
Other Settings |
|
|
|
|
|
|
|
|
|
|
Select “Off Timer” and set the time
 To cancel
  Set to “0”, set to “Off” or turn the TV off.
 To display the remaining time
  Information banner
 When the remaining time is within 3 minutes, the remaining time will flash on screen.
Display the selectable settings for the current programme
Check or change the current programme
status instantly |
|
|
|
2 change |
|
|
|
|
|||
|
|
|
|
|
1 select |
|
|
|
|
|
|
|
Change the settings |
||||
Channel Colour Set |
MPX |
||||
Sets colour depth |
Select Stereo / Mono Sound Menu (p. 20) |
||||
Teletext Character Set |
Volume Correction |
||||
Sets the teletext language |
Adjusts volume of individual programme or |
||||
Setup Menu (p. 21) |
input mode |
||||
Note |
|
|
|
|
|
 Also possible to change the settings in Menu list (p. 20 and p. 21).
|
|
|
|
|
Change aspect ratio |
|
|
|
|
|
|
|
|
|
|
|
|
|
|
|
|
|
|
|
Change the aspect ratio |
|
|
|
|
Aspect Selection |
|
||||
|
|
|
|
|
Just |
|
|||||
|
|
|
|
|
|
|
|
16:9 |
|
||
|
|
|
|
|
|
|
|
14:9 |
|
||
|
|
|
|
|
|
|
|
4:3 |
|
||
Enjoy viewing the picture at its optimum size and aspect. |
|
|
4:3 Full |
|
|||||||
|
|
Zoom3 |
|
||||||||
|
|
|
|
|
|
|
|
|
Zoom1 |
|
|
|
Display Aspect |
2 store |
While the list is |
|
|
Zoom2 |
|
||||
|
|
|
|
RETURN |
|
||||||
|
|
|
|
|
|
|
|
|
|
Select |
|
|
|
|
|
|
|
|
|
|
Change EXIT |
|
|
|
Selection list |
|
displayed, select the |
|
|
|
|
||||
|
|
|
|
|
|||||||
|
|
|
|
|
1 select |
mode |
|
|
Aspect Selection list |
||
|
|
|
|
|
|
||||||
|
To change the mode using the ASPECT button only |
|
|
|
|
|
|||||
|
Press repeatedly until you reach the desired mode |
|
|
|
|
|
|||||
16:9 |
|
|
|
14:9 |
|
Just |
|||||
|
|
Directly displays the image |
|
Displays the image at the |
|
|
Displays a “4:3” image |
||||
|
|
|
|
||||||||
|
|
at “16:9” without distortion |
|
standard “14:9” without |
|
|
full-screen. Stretching |
||||
|
|
(anamorphic). |
|
distortion. |
|
|
is only noticeable at the |
||||
|
|
|
|
|
|
|
|
|
left and right edges. |
||
4:3 |
|
|
|
4:3 Full |
|
Zoom1 |
|||||
|
|
Displays the image at the |
|
Displays a “4:3” image |
|
|
Displays a “16:9” |
||||
|
|
|
|
|
|||||||
|
|
standard “4:3” without |
|
enlarged horizontally to fit |
|
|
letterbox or “4:3” image |
||||
|
|
distortion. |
|
the screen. |
|
|
without distortion. |
||||
|
|
|
|
|
|
HD signal only |
|
|
|
|
|
|
Zoom2 |
Zoom3 |
|
|
|
|
|
|
|||
|
|
Displays a “16:9” letterbox |
|
|
Displays a “2.35:1” letterbox (anamorphic) image full-screen |
||||||
|
|
|
|
||||||||
|
|
(anamorphic) image full- |
|
|
without distortion. At “16:9”, displays the image at its maximum |
||||||
|
|
screen without distortion. |
|
|
(with slight enlargement). |
|
|
|
|
|
|
Note
 Only “16:9” and “4:3” are available in PC mode.
 Only “16:9” is available when “Viewing Mode” is set to “Game”.
 Not available in teletext mode.
 Aspect mode can be memorized separately for each input mode, SD (Standard definition) and HD (High definition) signals.
Basic Watching TV
13

Viewing Teletext
You can enjoy teletext broadcasting, including news, weather forecasts and subtitles, if this service is provided by the broadcasters.
To change mode  “Teletext” in Setup Menu (p. 21)
1


 2
2
Switch to Teletext


 Displays Index
  (content varies depending on the broadcasters)
Sub page number
|
|
|
|
|
|
|
|
|
|
|
|
|
<< 01 02 03 04 05 06 07 |
|
>> |
|
Time / |
||||
Current |
|
|
|
|
17:51 28 Feb |
|
|
|||
|
|
|
|
|
|
|||||
page |
TELETEXT |
|
|
|
date |
|||||
number |
|
|
|
|
||||||
INFORMATION |
|
|
|
|
||||||
|
|
|
|
|
|
|
|
|
|
|
|
|
|
|
|
|
|
|
|
|
|
|
|
|
|
|
|
|
|
|
|
|
|
|
|
|
|
|
|
|
|
|
|
Colour bar
 Pressing this button while watching TV programme directly accesses to the favourite page stored in “blue”.
Select the page (up to page 899)
up |
or |
or |
or |
||
down |
|
(Corresponds to the colour bar) |
To adjust contrast
 (Press three times)
 As the blue bar is displayed
To return to TV

 or
or 
What is FASTEXT mode?
In FASTEXT mode, four differently coloured subjects are situated at the bottom of the screen. To access more information about one of these subjects, press the appropriately coloured button. This facility enables fast access to information on the subjects shown.
What is TOP mode? (in case of TOP text broadcasting)
TOP is a particular improvement of the standard teletext service that results in an easier search and effective guide.
 Fast overview of the teletext information available
 Easy to use step-by-step selection of the topical subject
 Page status information at the bottom of the screen Available page up / down


To select among subject blocks 

To select next subject within the subject block
(After the last subject, it moves to the next subject block.) 

What is List mode?
In List mode, four differently coloured page numbers are situated at the bottom of the screen. Each of these numbers can be altered and stored in the TV’s memory. (“Store frequently viewed pages”, p. 15)
Using teletext conveniently
Reveal hidden data
Reveal hidden words e.g. quiz page answers
 Re-hide
FULL / TOP / BOTTOM
(TOP) |
(BOTTOM) |
Normal (FULL) |
|
|
|
|
|
|
|
|
|
|
|
|
|
|
|
|
|
|
|
|
|
|
|
|
|
|
|
|
|
|
|
|
|
|
|
|
|
|
|
|
|
|
|
|
|
|
|
|
|
|
|
|
|
|
|
|
|
|
|
|
|
|
|
|
|
|
|
|
|
|
|
|
|
|
|
|
|
|
|
|
|
|
|
|
|
|
|
|
|
|
|
|
|
|
|
|
|
|
|
|
|
|
|
|
(Expand the TOP half) |
(Expand the BOTTOM half) |
|
|
|||||||||
14
Using teletext conveniently
HOLD
Stop automatic updating
(If you wish to hold the current page without updating)
To resume 

INDEX
Return to the main index page
 FASTEXT mode only.
Store frequently viewed pages
Store frequently viewed pages in the colour bar (List mode only)
Corresponding |
press and hold |
|
|
colour button |
|
|
|
(As page is displayed) |
|
|
|
To change stored pages |
|
The number changes to white. |
|
|
|
|
|
Colour button you |
Enter new |
|
press and hold |
want to change |
page number |
|
|
Call up a favourite page
View a favourite page stored
 Call up the page stored in “blue”.
 Factory setting is “P103”.
View in multiwindow
Watch TV and Teletext in two windows at once
 Operations can be made only in Teletext screen.
 Select Picture and text On or Off
 (press twice)

To exit multi window 

View sub page
View sub page (Only when teletext is more than one page)
 Appears at top of the screen
To view specific sub page
|
Enter the |
T0006 |
example: P6 |
4-digit number |
|
 Sub pages:
The number of sub pages varies depending on the broadcasters.
It may take some time for searching, during which time you can watch TV.
Watch TV while waiting for update
View the TV picture while searching for a teletext page
Teletext automatically updates itself when new information becomes available.
P108 |
Appears when |
|
|
updating is |
View the updated page |
|
completed |
|
|
|
Changes to TV screen temporarily (You cannot change the programme.)
 The news page provides a function that indicates arrival of latest news (“News Flash”).
Basic Viewing Teletext
15

Watching Videos and DVDs
Connect the external equipment (VCRs, DVD equipment, etc.) and you can watch the input.  To connect the equipment
  p. 9
p. 9
You can operate some functions of selected Panasonic external equipment with this remote control.
1


 2
2
Display the Input Selection menu
Select the input mode of the connected equipment
Input Selection |
|
2 change |
|
|
|
AV1 |
|
|
AV2 |
|
|
PC |
|
1 select |
HDMI1 |
*2 |
|
HDMI2 |
|
|
|
|
|
TV |
|
|
*2) For TH-L32C12K only:
“HDMI1” will be displayed as “HDMI” and “HDMI2” is not displayed.
 You can also select the input using the AV button on the side panel of the TV.
Press the button repeatedly until the desired input is selected.  You can label or skip each input mode
 “Input Labels” (p. 22)
3 View
Displays the selected mode
Note
|
If the external equipment has an aspect adjustment function, set to |
|
To return to TV |
“16:9”. |
|
For details, see the manual of the equipment or ask your local dealer. |
||
|
16
 Loading...