


Model No.
TH-55LFV5U
Operating Instructions
FULL HD LCD Display
|
Before connecting, operating or adjusting this product, |
|
|
|
|
|
|
|
|
English |
|
|
|
|
|
please read these instructions completely. |
|
|
|
|
|
|
|
|
|
Please keep this manual for future reference. |
|
|
|
CAUTION
RISK OF ELECTRIC SHOCK
DO NOT OPEN
WARNING: To reduce the risk of electric shock, do not remove cover or back.
totell the user that parts inside the product are a risk of electric shock to persons.
triangleis intended to tell the user that important operating and servicing instructions are in
WARNING : ! " # ! # "
WARNING $ %" & # ' ( )
*" )
( ( +( #
Do not defeat the purpose of the grounding plug.
2

Important Safety Instructions
%" '
*" Keep these instructions.
-" /
0" 1
2"
3" 4
5" # + ( 6
7" ! " produce heat.
8" ( ( ( 9 #9 # # ( ( +( ( ( #
%;" < ( # they exit from the apparatus.
%%" = > # (
%*" ? # # # (@ > # A (
%-" ? ( (
%0" ' ( ) E ) # ) # #A (# #
%2" 94
3

Dear Panasonic Customer
Welcome to the Panasonic family of customers. We hope that you will have many years of enjoyment from your new LCD Display.
|
|
|
|
! !
Visit our Panasonic Web Site http://panasonic.net
Table of Contents
Important Safety Instructions.................................. |
3 |
FCC STATEMENT...................................................... |
5 |
Safety Precautions ................................................... |
6 |
Maintenance.............................................................. |
7 |
Accessories .............................................................. |
8 |
9 E ......................................... |
8 |
IJE9 O .................................................. |
9 |
4 .................... |
9 |
Parts and Functions............................................... |
10 |
Control Panel.................................................... |
10 |
Input/Output Terminals ...................................... |
11 |
Connections............................................................ |
12 |
94 4 4 ........................................ |
12 |
4 # E ................................................. |
12 |
I >I4'>I4 4 ............................. |
13 |
PC Connection ................................................. |
15 |
J 9 4 ............................... |
17 |
EJ'+9] 4 ......................... |
18 |
4 ................................... |
19 |
Using Network Function ........................................ |
20 |
& 4 ......................................... |
20 |
=E O E ( & 4 ....... |
21 |
Using Web Browser Control.................................. |
22 |
^ ( ? @ # ^ 4 ................. |
22 |
9 ( @ # ^ ............................... |
23 |
On-Screen Display Menu ....................................... |
24 |
J =E O ................................... |
24 |
=E O = ........................................ |
24 |
Input Mode .............................................................. |
31 |
Cleaning and Troubleshooting.............................. |
32 |
Cleaning ........................................................... |
32 |
# ................................................ |
33 |
........................................ |
35 |
4

FCC STATEMENT 1
) # ( ( 4 9 < %2 ( 144 ' # ( ( ) operated in a commercial environment. This equipment generates, uses and can radiate radio frequency energy and, if not( ( = ( ) ( ( # )(
FCC CAUTION:
To assure continued compliance, follow the attached installation instructions and use only the provided power supply cord with ferrite core and DVI interface cable with two ferrite cores.2 The user provided VGA video signal ! " ! ! #$ North America could void the user's authority to operate this device.
( I
O & / 22]1I2?
' # < $ < 4 ( & 9
|
|
|
' ( < & &` ;5%;* 208; |
4 E$ < E 4 4 (
|
|
|
& 9 % 7;; 85-0-8; |
< %2 ( 144 ' # +4 'EE = #A ( $!%" ( ( !*" ( received, including interference that may cause undesired operation.
1 ( ( =>+$< ( ( # ( b # ( > ( ( (6
2 =>+ I+ ( # ( b Iw9 # (
CANADIAN NOTICE:
4 9 4 +4JE ;;-
NOTE:
Image retention may occur. If you display a still picture for an extended period, the image might remain on the screen. / (
Trademark Credits
z Iw9 ( + ^ O 4 z O ( 9 + ?E9
z EIw9 {w9 E{w9 ?{w9 ( I J E 9
z J ( # ( # ( respected.
z / O+ / O+ ] / O + ( ( / O+ ] ]]4 ? E
5

Safety Precautions
 CAUTION
This LCD Display is for use only with the following optional accessories. Use with any other type of optional accessories may cause instability which could result in the possibility of injury.
!9 ( ( ( # < 4 "
z |
' 4 | |
................................... } 'O2;I@ |
z |
4 ( | ..................................... |
} 4122I@2; |
9 # )
E ( | (#A # > ( ## ( ((
When using the LCD Display
Do not bring your hands, face or objects close to the ventilation holes of this Display.
z Top of this Display is usually very hot due to the high( # ventilation holes. Burns or personal injuries can happen ( # # < #A (#A (#
Be sure to disconnect all cables before moving this Display.
z O ## electric shock.
Disconnect the power plug from the wall outlet as a safety precaution before carrying out any cleaning.
z Electric shocks can result if this is not done.
Clean the power cable regularly to prevent it from becoming dusty.
z ^ ? ( a dry cloth.
NOTE:
z Image retention may occur. If you display a still picture for an extended period, the image might remain on the / (
6

Safety Precautions
WARNING
Setup
Do not place this Display on sloped or unstable surfaces, and ensure that this Display does not hang over the edge of the base.
z The Display may fall off or tip over.
Do not place any objects on top of this Display.
z +( ( #A+( ( #A9 E 4
Do not cover the ventilation holes.
z
Transport only in upright position!
z (
& *
z ] (-%2>%3” !%; " # ( ( ( this Display.
z ] ( %-%>-*” !2 "
Cautions for Wall Installation
z @ # ( # professional. Installing this Display incorrectly may lead to an accident that results in death or serious injury.
1 ?]# !IJE9 0;; • 0;;" # used.
NOTE: ' (( 9 “IJE9 O ”.
An apparatus with CLASS I construction shall be connected to a mains socket outlet with a protective earthing connection.
AC Power Supply Cord
The Display is designed to operate on 110 - 127 V AC, 50/60 Hz.
Ensure that the mains plug is easily accessible.
Do not use any power supply cord other than that provided with this unit.
z
Securely insert the power cord plug as far as it will go. z +( ( #
+( #
Do not handle the power cord plug with wet hands. z Doing so may cause electric shocks.
Do not do anything that might damage the power cable. When disconnecting the power cable, hold the plug, not the cable.
z #A#A # ( ( # # If# 9 E 4
If this Display will not be used for a long period of time, unplug the power cord from the wall outlet.
If problems occur during use
If a problem occurs (such as no picture or no sound), or if smoke or an abnormal odor is detected from this Display, unplug the power cord immediately.
z Continuous use of this Display under these conditionsHave9 E 4 E # are strongly discouraged due to its high voltage dangerous nature.
If water or foreign objects get inside this Display, if this Display is dropped, or if the cabinet becomes damaged, disconnect the power cord plug immediately.
z 9 4 9 E 4 ( # made.
Maintenance
The front of this Display panel has been specially treated. Wipe the panel surface gently using only a cleaning cloth or a soft, lint-free cloth.
z +( ( ( ( ## %;; ( ( dry.
z ( ( #A ( # 1 # ) ( ( # ((
If the cabinet becomes dirty, wipe it with a soft, dry cloth.
z +( # ( #? #
z ( ( +(#
z 9 # ) ( # ( # (( (( 1 (( ## <I4
Usage of a chemical cloth
z Do not use a chemical cloth for the panel surface.
z 1 ( ( #
7
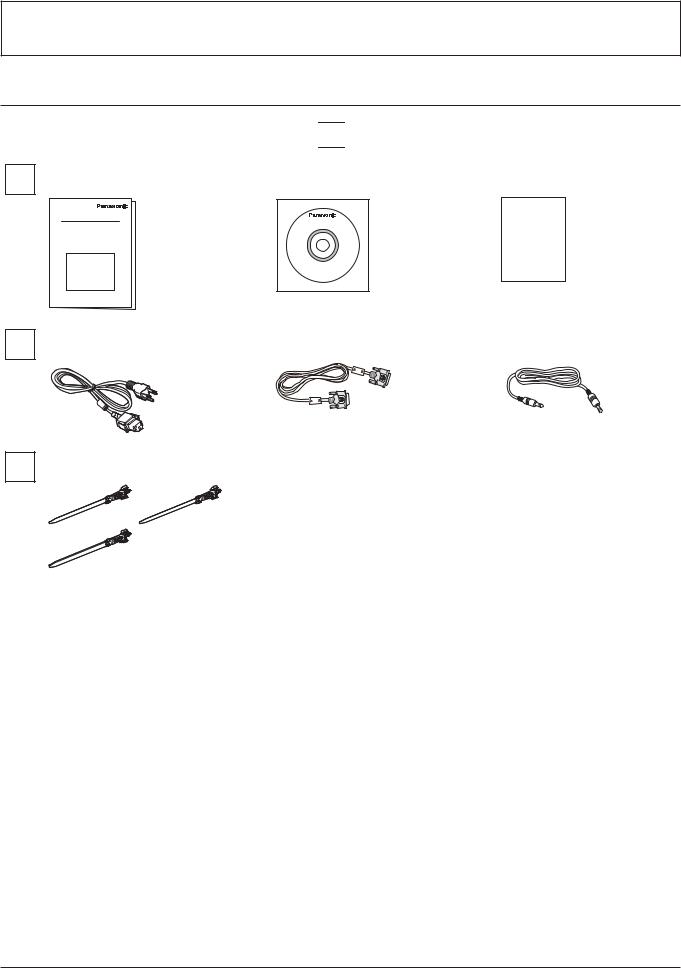
Accessories
Accessories Supplied
Check that you have the Accessories and items shown 

= # |
|
4 '=O != " |
|
@ !1 O " |
|
|
|
|
|
Warranty
94 < 4 |
|
I+ # |
|
4 # ( |
|
|
control |
||
|
|
|
|
Wire clampers
NOTE:
z The remote control is not supplied.
8
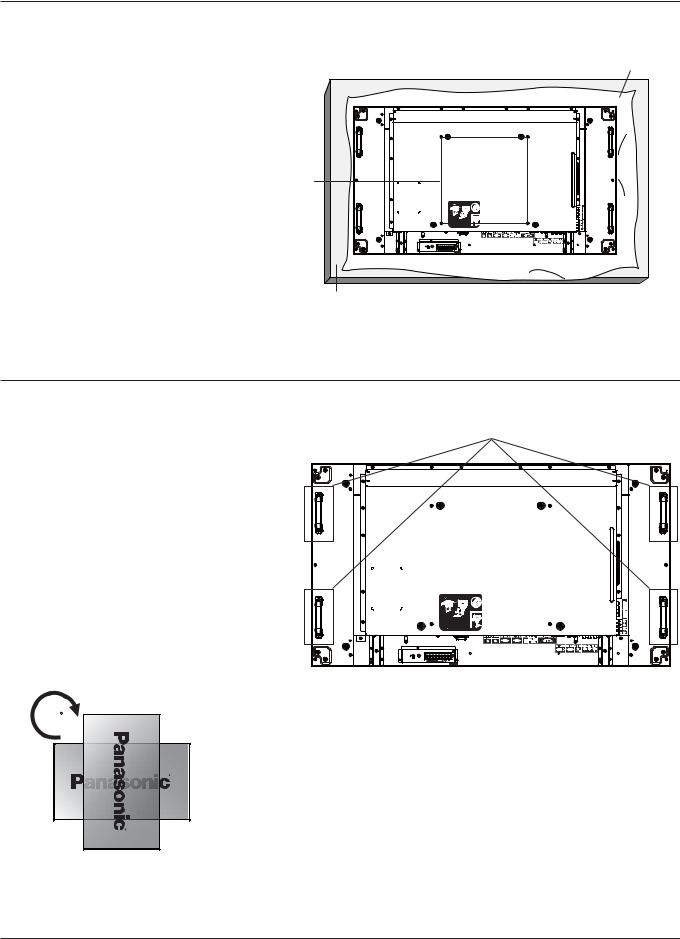
VESA Mounting
# ! # " @( ?I wE > ?]%357 & 9
1. |
] # |
Protective Sheet |
|
|
|
|
# ( |
|
|
so as not to scratch the screen face. |
|
2. |
Ensure you have all accessories for |
|
|
! |
|
|
" |
|
3. |
1 |
VESA Grid |
|
1 ( |
|
|
correct mounting procedures could result |
|
|
in damage to the equipment, or injury to |
|
|
the user or install personnel. The product |
|
|
|
|
|
# |
|
4. |
1 O3 |
|
|
! %; |
|
|
( # " |
Table |
|
tighten them securely. |
|
Cautions when installing or moving
To prevent this Display from falling:
z |
w # |
Handle |
|
z |
Do not touch any parts excep the handles. |
||
|
|||
z |
/ |
|
|
|
| |
|
|
|
# ( |
|
|
z |
1 |
|
|
|
# |
|
|
|
# 1 |
|
|
|
installation instructions, refer to the guide received |
|
|
|
# |
|
|
z |
# # ( A |
|
|
|
resulting from fall of this Display in case of |
|
|
|
) # |
|
|
|
# ( ( |
|
|
|
location. |
|
|
z |
For portrait installation, please turn this Display |
|
|
|
right. |
|
|
|
90 |
|
J{E<!7•*;@‚%;@ƒ%;@„"
NOTE:
z < ( (
9

Parts and Functions
Control Panel
Remote control sensor
Power status Indicator
|
|
|
MUTE INPUT |
|
|
|
|
MENU |
|
9 |
%; |
% |
* |
3 |
4 |
5 |
6 |
7 |
8 |
1POWER button
? ##
2MUTE button
E =&>=11
3INPUT button
? #
z Used as [SET„ # = E
4[ ] button
+ A =E=E ((
5 [ ] button
A =E=E ((
6[ ] button
O # A =E
7[ ] button
O # A =E
8MENU button
< =E =E (( < =E
9 Remote control sensor and power status indicator
z |
' ( |
|
z |
Indicates the operating status of this Display: |
|
|
] |
|
|
] # |
|
|
|
] # •< E • |
|
|
mode |
|
|
When {SCHEDULE’ # # |
|
|
# |
|
|
+( # ( |
|
|
# |
|
|
=(( ( (( |
NOTE:
z
10KENSINGTON LOCK
For security and theft prevention.
10

Input/Output Terminals
J{E<!7•*;@‚%;@ƒ%;@„"
*;@‚%;@ƒ%;@„"E<!7•J{
%-
%*
%%
% |
* |
3 |
4 |
5 6 |
7 |
8 9 |
%; |
1AC IN
4
2MAIN POWER SWITCH
< > ((
3IR TRANSMITTER IN / OUT
' ( ( +'
&= J$+( +' ‚IR TRANSMITTER IN„ 6
4SERIAL OUT / SERIAL IN
'E*-*4 > ( ((
5LAN
]9& ( ( ( from control center.
6HDMI AV IN
+ / O+ ( 9I I+( <4 # I+ / O+ #
7DVI-D IN / DVI-I OUT
Digital video input and output connection.
8PC IN
Input the PC source.
9AUDIO IN 1
+ <4 !-2 A "
10COMPONENT/VIDEO IN (BNC)
+ }<#< ( 9I device.
1 I+ J= 4I^E # (( 9I 6 } ! (^&4 '49 # "
11AUDIO IN 2 (RCA)
+ ( 9I
12AUDIO OUT (RCA)
= ( 9? += +& A 9I
13#+ ;+ <= >? @ +J # QX YZ
Output the audio to your external speakers.
11
 Loading...