


Operating Instructions
58”/65” Class 1080p Plasma HDTV
(58.0/64.7 inches measured diagonally)
Manual de instrucciones
Televisión de alta definición de 1080p y clase 58”/65” de Plasma
(58,0/64,7 pulgadas medidas diagonalmente)
For assistance (U.S.A./Puerto Rico), please call:
1-877-95-VIERA (958-4372)
or visit us at www.panasonic.com/contactinfo
For assistance (Canada), please call:
1-866-330-0014
or visit us at www.vieraconcierge.ca
Para solicitar ayuda (EE.UU./Puerto Rico), llame al:
1-877-95-VIERA (958-4372)
ó visítenos en www.panasonic.com/contactinfo
Model No.
Número de modelo
TC-P58S2
TC-P65S2
Quick Start Guide
 See page 8-16
Guía de inicio rápido
 vea la página 8-16
TM
English
Español
Thank you for purchasing this Panasonic product.
Please read these instructions before operating your set and retain them for future reference. The images shown in this manual are for illustrative purposes only.
Gracias por su decisión de comprar este producto marca Panasonic. |
|
Lea estas instrucciones antes de utilizar su televisor y guárdelas para consultarlas en |
|
el futuro. Las imágenes mostradas en este manual tienen solamente fines ilustrativos. |
TQB2AA0587 |
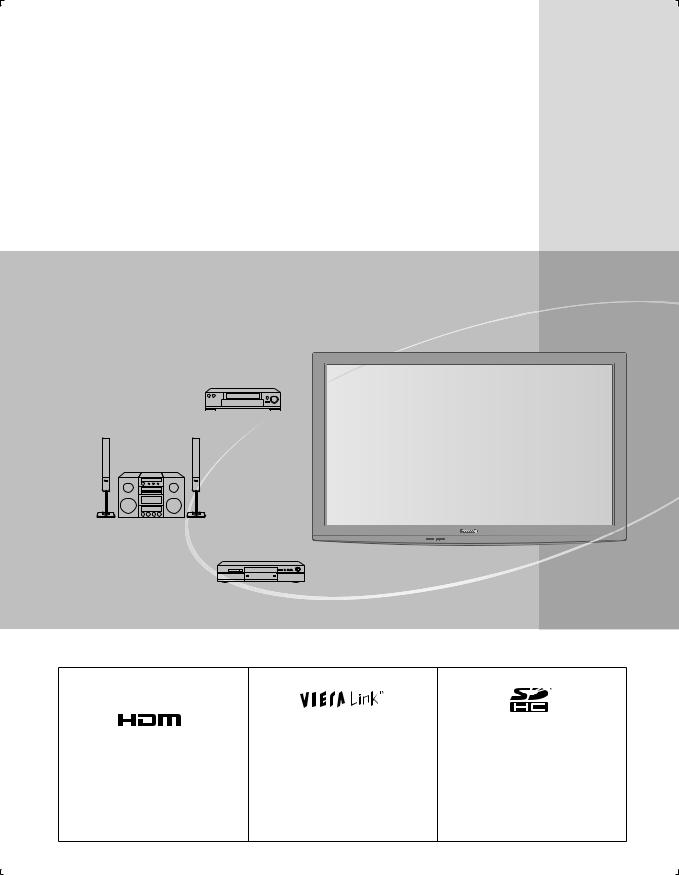
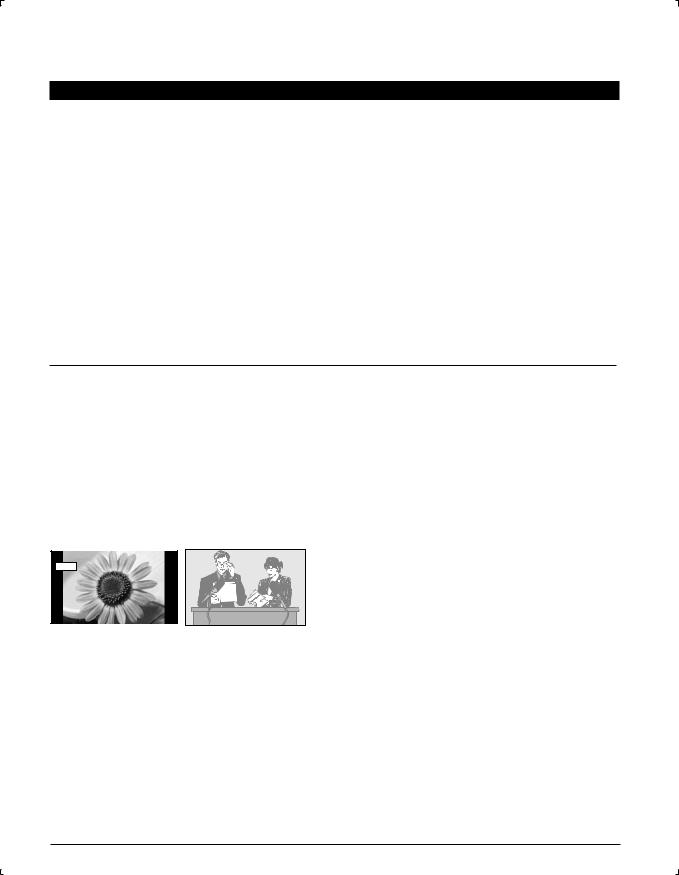
Experience an amazing level of multimedia excitement
Enjoy rich multimedia
VCR
Amplifier
Home theater system
DVD recorder/
Blu-ray Disc recorder
|
|
|
VIERA Link™ is a trademark of |
SDHC Logo is a trademark |
|
|
|
Panasonic Corporation. |
|
|
|
|
of SD-3C, LLC. |
|
HDMI, the HDMI logo and High- |
|
|||
|
|
|||
Definition Multimedia Interface are |
|
|
||
trademarks or registered trademarks |
|
|
||
of HDMI Licensing LLC in the United |
|
Manufactured under license from Dolby |
||
States and other countries. |
|
|||
HDAVI Control™ is a trademark of |
Laboratories. |
|||
|
|
|
Panasonic Corporation. |
Dolby and the double-D symbol are |
|
|
|
|
trademarks of Dolby Laboratories. |
2
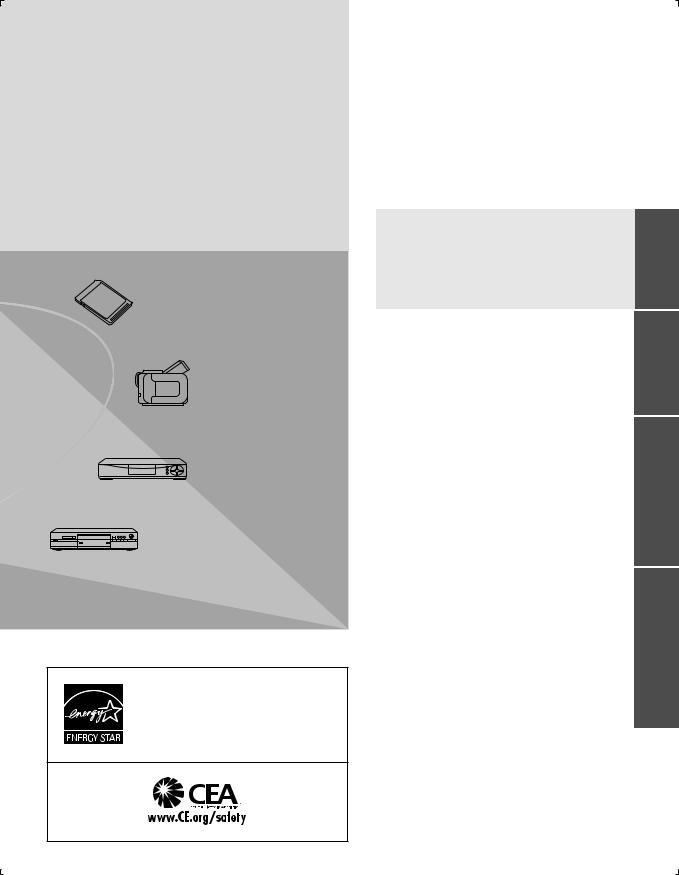
SD memory card
Camcorder
Set Top Box
DVD player/
Blu-ray Disc player
This product qualifies for ENERGY STAR in the “Home Use” setting and this is the setting in which energy savings will be achieved. Any modifications to the “Home Use” setting or other factory default settings could result in greater energy consumption beyond levels that meet ENERGY STAR qualifications.
Contents
Please read before using the unit
●Safety Precautions ··········································4
●Notes·······························································7
Quick Start Guide
● Accessories/Optional Accessory ·····················8 |
StartQuick Guide |
● Basic Connection ·········································· 11 |
|
● Identifying Controls········································13 |
|
● First Time Setup ············································14 |
Enjoy your TV!
Basic Features |
Viewing |
● Viewing with VIERA IMAGE VIEWER ···········22 |
|
● Watching TV··················································17 |
|
● Using VIERA TOOLS ····································20 |
|
● Watching Videos and DVDs ··························24 |
|
Advanced Features
● How to Use Menu Functions |
|
(picture, sound quality, etc.) ··························25 |
Advanced |
● VIERA LinkTM “HDAVI ControlTM” ···················28 |
|
● Lock·······························································34 |
|
● Editing and Setting Channels························36 |
|
● Closed Caption··············································38 |
|
● Input Labels···················································39 |
|
● Using Timer ···················································40 |
|
● Recommended AV Connections····················41 |
|
FAQs, etc.
● Ratings List for Lock······································42 |
|
|
● Technical Information ····································43 |
FAQs, |
|
● Care and Cleaning ········································47 |
||
|
||
● FAQ ·······························································48 |
|
|
● Specifications ················································50 |
.etc |
|
● Limited Warranty |
||
|
||
(for U.S.A. and Puerto Rico only)··················51 |
|
|
● Customer Services Directory |
|
|
(for U.S.A. and Puerto Rico)··························52 |
|
|
● Limited Warranty (for Canada) ······················53 |
|
3
Safety Precautions
CAUTION
RISK OF ELECTRIC SHOCK
DO NOT OPEN
WARNING: To reduce the risk of electric shock, do not remove cover or back. No user-serviceable parts inside. Refer servicing to qualified service personnel.
The lightning flash with arrowhead within a triangle is intended to tell the user that parts inside the product are a risk of electric shock to persons.
The exclamation point within a triangle is intended to
tell the user that important operating and servicing instructions are in the papers with the appliance.
WARNING: |
To reduce the risk of fire or electric shock, do not expose this apparatus to rain or moisture. |
|
Do not place liquid containers (flower vase, cups, cosmetics, etc.) above the set |
|
(including on shelves above, etc.). |
Important Safety Instructions
1) |
Read these instructions. |
11) |
Only use attachments / accessories specified by the |
2) |
Keep these instructions. |
|
manufacturer. |
3) |
Heed all warnings. |
12) |
Use only with the cart, stand, tripod, |
4) |
Follow all instructions. |
|
bracket, or table specified by the |
5) |
Do not use this apparatus near water. |
|
manufacturer, or sold with the apparatus. |
6) |
Clean only with dry cloth. |
|
When a cart is used, use caution when |
7) |
Do not block any ventilation openings. Install in |
|
moving the cart / apparatus combination |
|
accordance with the manufacturer’s instructions. |
|
to avoid injury from tip-over. |
8) |
Do not install near any heat sources such as radiators, |
13) |
Unplug this apparatus during lightning storms or when |
|
heat registers, stoves, or other apparatus (including |
|
unused for long periods of time. |
|
amplifiers) that produce heat. |
14) |
Refer all servicing to qualified service personnel. |
9) |
Do not defeat the safety purpose of the polarized or |
|
Servicing is required when the apparatus has been |
|
grounding-type plug. A polarized plug has two blades with |
|
damaged in any way, such as power-supply cord or plug |
|
one wider than the other. A grounding type plug has two |
|
is damaged, liquid has been spilled or objects have fallen |
|
blades and a third grounding prong. The wide blade or the |
|
into the apparatus, the apparatus has been exposed to |
|
third prong are provided for your safety. If the provided |
|
rain or moisture, does not operate normally, or has been |
|
plug does not fit into your outlet, consult an electrician for |
|
dropped. |
|
replacement of the obsolete outlet. |
15) |
To prevent electric shock, ensure the grounding pin on the |
10) |
Protect the power cord from being walked on or pinched |
|
AC cord power plug is securely connected. |
|
particularly at plugs, convenience receptacles, and the |
|
|
|
point where they exit from the apparatus. |
|
|
WARNING/CAUTION

 WARNING
Small parts can present choking hazard if accidentally swallowed.
Keep small parts away from young children. Discard unneeded small parts and other objects,
including packaging materials and plastic bags/sheets to prevent them from being played with by young children, creating the potential risk of suffocation.
 Set up
This Plasma TV may fall and can cause personal injury or even death if not installed correctly. To prevent personal injury or death, follow these warnings:
 Install the Plasma TV in accordance with the manufacturer’s recommended pedestal or stand, corresponding hardware and installation instructions.
This Plasma TV is for use only with the following optional accessories. Use with any other type of optional accessories may cause instability. The following
accessories are manufactured by Panasonic Corporation.
• Wall-hanging bracket (Angled) TY-WK5P1RW (TC-P58S2) TY-WK6P1RW (TC-P65S2)
 Be sure to ask a qualified technician to carry out the installation and set-up.
Two or more people are required to install or remove the television.
 Some wall mounts (wall-hanging brackets) are not designed to be mounted to walls with steel studs or old cinder block constructions.
Ask your dealer or licensed contractor to properly secure the wall-hanging bracket.
 Do not route the TV’s power cord inside the wall.
The power cord was not designed for in-wall mounting. Doing so can lead to fire hazard.
 Do not place the Plasma TV or its stand on a sloped or unstable surface.
The Plasma TV may fall or tip over.
 Do not support the Plasma TV on a non-specified pedestal.
 Do not place the Plasma TV on furniture that can easily be used as steps, such as a chest of drawers.
 Do not climb or allow children to climb on the Plasma TV
 Place or install the Plasma TV where it cannot be pushed, pulled over or knocked down.
 Route all cords and cables such that they cannot be tripped over or pulled by curious children.
4
 Do not place any objects on top of the Plasma TV.
If water spills onto the Plasma TV or foreign objects get inside it, a short-circuit may occur which could result in fire or electric shock. If any foreign objects get inside the Plasma TV, please consult an Authorized Service Center. In the unlikely event that you receive a shock from this product it is possible that your household outlet may be wired improperly. Have an electrician verify that the TV’s outlet is properly wired. If the symptom persists, have the TV serviced by a qualified authorized technician.
 AC Power Supply Cord
To prevent fire or electric shock:
 The Plasma TV is designed to operate on a 120 V AC, 60 Hz service. Insert the power cord plug as far as it will go into the wall socket.
If the plug is not fully inserted, heat may generate, which could cause a fire.
 The included power cord is for use with this unit only.
 Do not use any power cord other than that provided with this TV.
 Do not handle the power cord plug with wet hands.
 Do not do anything that might damage the power supply cord.
 When disconnecting the power supply cord, hold the plug, not the cord.
 Do not use the power supply cord if the plug or cord is damaged.
Replace the cord or contact your Authorized Service Center
 Do not use a 3-prong to 2-prong AC plug adaptors to connect your TV’s plug to the wall outlet.
Doing so will defeat the TV plug’s safety feature, which can lead to a shock hazard. If the wall outlet does not accommodate a 3-prong plug, have a qualified electrician replace your outlet and check the associated wiring.
 Handling the power supply cord
 Insert the power plug fully into the socket outlet. (If the power plug is loose, it could generate heat and cause fire.)
 Ensure that the power plug is easily accessible.
 Ensure the earth pin on the power plug is securely connected to prevent electrical shock.
•An apparatus with CLASS I construction shall be connected to a power socket outlet with a protective earthing connection.
 Do not touch the power plug with a wet hand. (This may cause electrical shock.)
 Do not use any power cord other than that provided with this TV. (This may cause fire or electrical shock.)
 Do not damage the power cord. (A damaged cord may cause fire or electrical shock.)
•Do not move the TV with the cord plugged in the socket outlet.
•Do not place a heavy object on the cord or place the cord near a high-temperature object.
•Do not twist the cord, bend it excessively, or stretch it.
•Do not pull on the cord. Hold onto the power plug body when disconnecting cord.
•Do not use a damaged power plug or socket outlet.
 If a problem occurs (such as no picture or no sound), or if smoke or an abnormal odor is detected from the Plasma TV, unplug the power supply cord immediately.
Continued use of the TV under these conditions might cause a fire or permanent damage to the TV. Have the TV evaluated by an Authorized Service Center. Servicing of the TV by unauthorized personnel is strongly discouraged due to its high voltage.
 If water or an object gets inside the Plasma TV, if the Plasma TV is dropped, or if the enclosure becomes damaged, unplug the power supply cord immediately.
A short-circuit may occur, which could cause a fire. Contact an Authorized Service Center for an evaluation.

 CAUTION
 Do not cover the ventilation holes.
Doing so may cause the Plasma TV to overheat, which can cause a fire or damage to the Plasma TV.
 Leave a space of 3 15/16” (10 cm) or more at the top, left and right, and 2 3/4” (7 cm) or more at the rear.
 When using the pedestal, keep the space between the bottom of the TV and the pedestal or stand surface clear from objects that may obstruct ventilation.
 When Moving the Plasma TV
 Be sure to disconnect all cables before moving the Plasma TV.
Moving the TV with its cables attached might damage the cables which, in turn, can cause fire or electric shock
 To prevent an electric shock, disconnect the power plug from the wall outlet as a safety precaution before carrying out any cleaning.
 Transport only in upright position
Transporting the unit with its display panel facing upward or downward may cause damage to the internal circuitry.
 Using a dry cloth, clean any dust from the power supply cord and plug regularly.
Build-up of dust on the power cord plug can increase humidity, which might damage the insulation and cause a fire.
This Plasma TV radiates infrared rays;
therefore, it may affect other infrared communication equipment. Install your infrared sensor in a place away from direct or reflected light from your Plasma TV.
The TV will still consume some power as long as the power supply cord is connected to the wall outlet.
 Display panel is made of glass. Do not apply strong force or impact to the display panel.
This may cause damage resulting in injury.
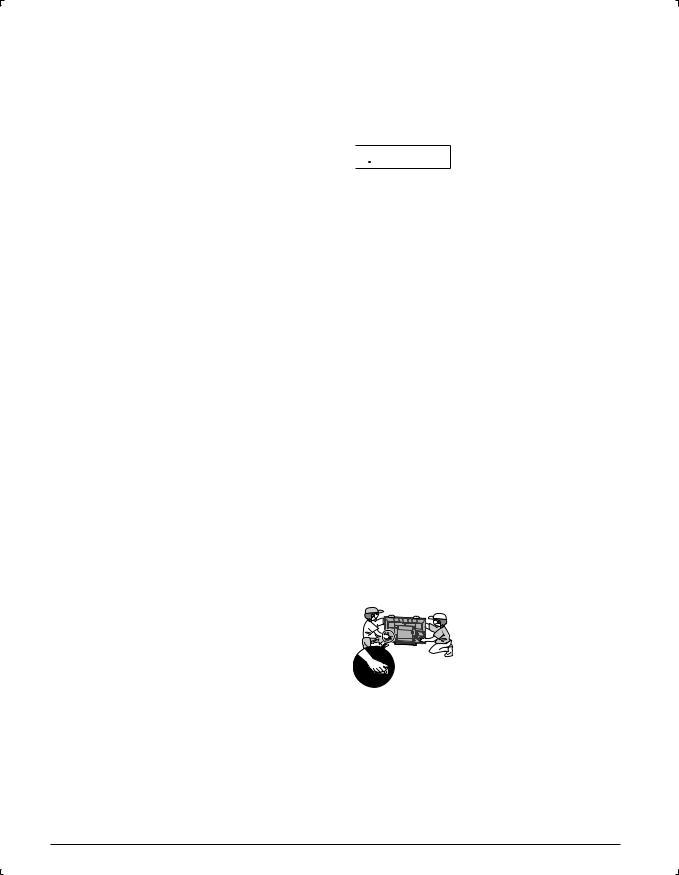
 The TV is heavy. TV should be handled by 2 or more people. Support as shown to avoid injury by the TV tipping or falling.
5

Safety Precautions (Continued)
CEA CHILD SAFETY NOTICES: Flat panel displays are not always supported on the proper stands or installed according to the manufacturer’s recommendations. Flat panel displays that are inappropriately situated on dressers, bookcases, shelves, desks, speakers, chests or carts may fall over and may cause personal injury or even death.
The consumer electronics industry (of which Panasonic is a member) is committed to making home entertainment enjoyable and safe. To prevent personal injury or death, be sure to follow the following safety guidelines:
TUNE INTO SAFETY:
•One size does NOT fit all. Follow the manufacturer’s recommendations for the safe installation and use of your flat panel display.
•Carefully read and understand all enclosed instructions for proper use of this product.
•Don’t allow children to climb on or play with furniture and television sets.
•Don’t place flat panel displays on furniture that can easily be used as steps, such as a chest of drawers.
•Remember that children can become excited while watching a program, especially on “larger than life” flat panel displays. Care should be taken to install the display where it cannot be pushed, pulled over, or knocked down.
•Care should be taken to route all cords and cables connected to the flat panel display so that they cannot be pulled or grabbed by curious children.
WALL MOUNTING: IF YOU DECIDE TO WALL MOUNT YOUR FLAT PANEL DISPLAY, ALWAYS:
•Use a mount that has been recommended by the display manufacturer and/or listed by an independent laboratory (such as UL, CSA, ETL).
•Follow all instructions supplied by the display and wall mount manufacturers.
•If you have any doubts about your ability to safely install your flat panel display, contact your retailer about professional installation.
•Make sure the wall where you are mounting the display is appropriate. Some wall mounts are not designed to be mounted to walls with steel studs or old cinder block construction. If you are unsure, contact a professional installer.
•A minimum of two people are required for installation. Flat panel displays can be heavy.
Panasonic recommends that a qualified installer perform the wall-mount installation. See page 4.
The American Academy of Pediatrics discourages television viewing for children younger than two years of age.
This product incorporates the following software:
(1)software developed independently by or for Panasonic Corporation,
(2)software owned by a third party and licensed to Panasonic Corporation,
(3)software licensed under the GNU General Public License, Version 2 (GPL v2),
(4)software licensed under the GNU LESSER General Public License (LGPL) and/or,
(5)open source software other than software licensed under the GPL and/or LGPL
For the software categorized as (3) or (4), please refer to the terms and conditions of GPL v2 and LGPL, as the case may be at http://www.gnu.org/licenses/old-licenses/gpl-2.0.html and http://www.gnu.org/licenses/old-licenses/lgpl-2.1.html
In addition, software categorized as (3) or (4) is copyrighted by several individuals and/or entities. Please refer to the copyright notice of those individuals at
http://www.am-linux.jp/dl/DTV10UT/.
GPL/LGPL SOFTWARE IS DISTRIBUTED IN THE HOPE THAT IT WILL BE USEFUL, BUT WITHOUT ANY WARRANTY, EXPRESS, IMPLIED OR STATUTORY, INCLUDING THE IMPLIED WARRANTIES OF MERCHANTABILITY OR FITNESS FOR A PARTICULAR PURPOSE.
For at least three (3) years from delivery of products, Panasonic will give to anyone who contacts us at the address provided below, for a charge of no more than our cost of physically performing source code distribution, a complete machine-readable copy of the corresponding source code covered under GPL v2/LGPL. Contact Information
cdrequest@am-linux.jp
Source code is also freely available to you and any other member of the public via our website below. http://www.am-linux.jp/dl/DTV10UT/
6
FCC STATEMENT
This equipment has been tested and found to comply with the limits for an Other Class B digital device, pursuant to Part 15 of the FCC Rules. These limits are designed to provide reasonable protection against harmful interference in a residential installation. This equipment generates, uses and can radiate radio frequency energy and, if not installed and used in accordance with the instructions, may cause harmful interference to radio communications. However, there is no guarantee that interference will not occur in a particular installation. If this equipment does cause harmful interference to radio or television reception, which can be determined by turning the equipment off and on, the user is encouraged to try to correct the interference by one or more of the following measures:
•Reorient or relocate the receiving antenna.
•Increase the separation between the equipment and receiver.
•Connect the equipment into an outlet on a circuit different from that to which the receiver is connected.
•Consult the Panasonic Service Center or an experienced radio/TV technician for help.
FCC Caution:
To assure continued compliance, follow the attached installation instructions and use only shielded interface cables when connecting to peripheral devices. Any changes or modifications not expressly approved by Panasonic Corp. of North America could void the user’s authority to operate this device.
Responsible Party: |
Panasonic Corporation of North America |
|
One Panasonic Way, Secaucus, NJ 07094 |
Contact Source: |
Panasonic Consumer Electronics Company |
|
1-877-95-VIERA (958-4372) |
email: |
consumerproducts@panasonic.com |
CANADIAN NOTICE:
For Model TC-P58S2, TC-P65S2
This Class B digital apparatus complies with Canadian ICES-003.
Notes
 Do not display a still picture for a long time
This causes the image to remain on the plasma screen
(“Image retention”). This is not considered a malfunction and is not covered by the warranty.
12
4 : 3
To prevent the “Image retention”, the screen saver is automatically activated after a few minutes if no signals are sent or no operations are performed. (p. 49)
Typical still images
• Channel number and other logos |
|
|
• Image displayed in 4:3 mode |
• Computer image |
|
• SD Card photo |
• Video game |
|
 Set up
 Do not place the unit where it’s exposed to sunlight or other bright light (including reflections).
  Use of some types of fluorescent lighting may reduce the remote control’s transmission range.
7
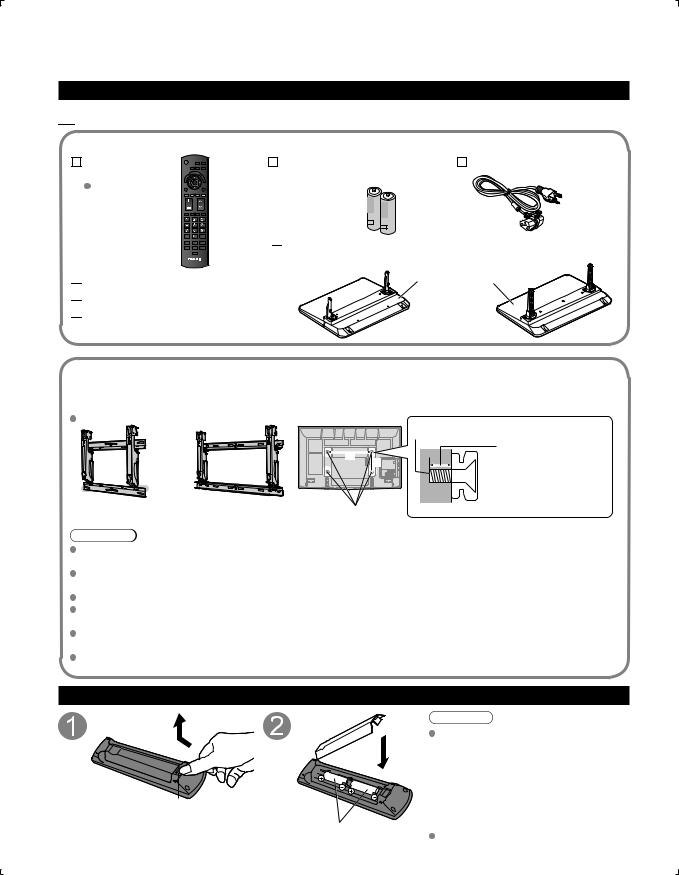
Accessories/Optional Accessory
Accessories

 Check you have all the items shown.
Accessories
Remote Control |
Batteries for the |
AC cord |
Transmitter |
Remote Control |
|
N2QAYB000485 |
Transmitter (2) |
|
 AA Battery

 Pedestal
 TBLX0157 (TC-P58S2)
  TBLX0195 (TC-P65S2)

 Operating Instructions
 VIERA Concierge and Quick start guide
 Product Registration Card (U.S.A.)
Optional Accessory
Wall-hanging bracket
(angle)
How to assemble (p. 9)
Please contact your nearest Panasonic dealer to purchase the recommended wall-hanging bracket. For additional details, please refer to the wall-hanging bracket installation manual.
TY-WK5P1RW (for 58”)  TY-WK6P1RW (for 65”)
a: 19.7” (500 mm) |
a: 26.9” (684 mm) |
b: 11.8” (300 mm) |
b: 11.8” (300 mm) |
Rear of the TV |
|
Screw for fixing the TV onto the wall-hanging bracket |
|
|
|
|
|
(not supplied with the TV) |
a |
|
Depth of screw: |
b |
minimum 0.59” (15.0 mm) (58”) |
|
|
0.55” (14.0 mm) (65”) |
|
|
|
M8 maximum 1.18” (30.0 mm) |
Holes for wall-hanging |
(View from the side) |
|
bracket installation |
|
|
Warning
In order to maintain the TV’s performance and safety, be absolutely sure to ask your dealer or a licensed contractor to secure the wall-hanging brackets.
Carefully read the instructions accompanying optional accessories, and be absolutely sure to take steps to prevent the TV from tipping over.
Handle the TV carefully during installation since subjecting it to impact or other forces may cause product damage. Take care when fixing wall brackets to the wall. Always ensure that there are no electrical cables or pipes in the wall before hanging bracket.
When using the angled-type wall hanging bracket, please ensure that there is sufficient space for the connecting cables not to press against the wall when the TV is tilted forward.
For safety reasons, remove units no longer being used from their wall-mounted locations.
Installing the remote’s batteries
Open
|
Close |
|
Hook |
|
Note the correct polarity |
8 |
(+ or -). |
|
Caution
Incorrect installation may cause battery leakage and corrosion, resulting in damage to the remote control.
•Do not mix old and new batteries.
•Do not mix different battery types (such as alkaline and manganese batteries).
•Do not use rechargeable (Ni-Cd) batteries.
Do not burn or break batteries.

Attaching the pedestal to TV
■Assembling the pedestal
[TC-P58S2 (TBLX0157)]
Fix securely with assembly screws A . (Total 4 screws)
 Tighten screws firmly.
A
Pole
R
 L Pole
Front
 Base
Base
■Set-up
[TC-P65S2 (TBLX0195)]
 Fix securely with assembly screws A . (Total 6 screws)
 Tighten screws firmly using Allen wrench C
A
C
Pole
 Pole
Pole
Front
Base
 Carry out work on a horizontal and level surface.
 Tighten screws firmly.
|
Bottom view |
B |
|
|
Rear side |
Arrow |
Hole for pedestal |
mark |
installation |
|
Pole |
|
Fix securely with assembly |
|
screws B . (Total 4 screws) |
Pole |
|
|
Base |
(Image: TC-P65S2) |
|
Warning |
|
Do not disassemble or modify the pedestal.
Otherwise the TV may fall over and become damaged, and personal injury may result.
Caution
Do not use any other TV and displays.
Otherwise the TV may fall over and become damaged, and personal injury may result.
Do not use the pedestal if it becomes warped or physically damaged.
If you use the pedestal when it is physically damaged, personal injury may result. Contact your nearest Panasonic Dealer immediately.
During set-up, make sure that all screws are securely tightened.
If sufficient care is not taken to ensure screws are properly tightened during assembly, the pedestal will not be strong enough to support the TV, and it might fall over and become damaged, and personal injury may result.
Accessories
Assembly screws
A
(for 58”) XYN5+F25FN
M5 × 25 (Silver) (4)
(for 65”) THEL074
M5 × 30 (Silver) (6)
B
(for 58”) THEL073N
M5 × 30 (Black) (4)
(for 65”) XYN6+F25FJK M6 × 25 (Black) (4)
Poles (2) (for 58”)
L
R
 L or R is printed at the bottom of the poles.
(for 65”)
Back
Front
Base (1) (for 58”)
(for 65”)
Allen wrench
(included tool only for 65”)
C
Accessory Accessories/Optional Start Quick
Guide
9

Accessories/Optional Accessory (Continued)
AC cord connection
To attach |
To remove |
Insert it firmly until the tabs on both sides click into place.
Keep pushing both sides until they snap and pull.
Reference of connection
Antenna terminal |
Pin terminals |
HDMI terminal |
|
red blue green |
|
|
green |
|
Firmly tighten by hand. |
Match colors of plugs and terminals. |
Insert firmly. |
|
Insert firmly. |
|
10
Basic Connection
Example
TV
Connecting Antenna (To watch TV)
|
|
|
|
|
|
VHF/UHF Antenna |
|
VHF/UHF Antenna |
• |
NTSC (National Television System Committee): |
|||||
|
|
|
|
|
|
• |
Conventional broadcasting |
|
|
|
|
|
|
||
|
|
|
|
|
|
ATSC (Advanced Television Systems Committee): |
|
Cable TV |
|
|
|
|
|||
|
|
|
|
Digital TV Standards include digital high-definition television (HDTV), |
|||
|
|
|
|
|
|
|
standard-definition television (SDTV), data broadcasting, multi- |
|
|
|
|
|
|
|
|
|
|
|
|
|
|
|
channel surround-sound audio and interactive television. |
To connect the antenna terminal
VHF/UHF Antenna
Cable TV |
or |
|
Back of the TV
*See page 10 (AC cord connection)
AC 120 V
60 Hz
AC Cord
(Connect after all the other connections have been made.)
Cable
•You need to subscribe to a cable TV service to enjoy viewing their programming.
•You can enjoy high-definition programming by subscribing to a high-definition cable service.
The connection for high-definition can be done with the use of an HDMI or Component Video cable. (p. 12)
•To view high-definition programming select the correct video input. (p. 24)
Note
Not all cables and external equipment shown in this book are supplied with the TV.
For more details on the external equipment’s connections, please refer to the operating manuals for the equipment. When disconnecting the power cord, be absolutely sure to disconnect the power cord plug from the wall outlet first. For additional assistance, visit us at: www.panasonic.com
www.panasonic.ca
Guide |
Start Quick |
|
|
Accessory Accessories/Optional |
TV) + (Antenna Connection Basic |
11
Basic Connection (Continued)
Definition-High
AV cable connections
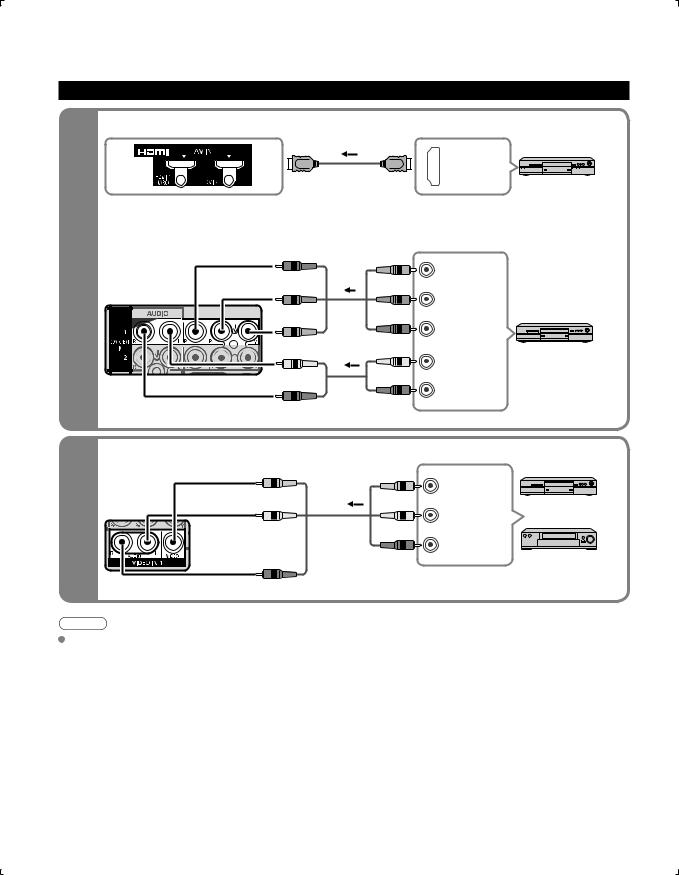
 To use HDMI terminals
AV Equipment
HDMI AV OUT
e.g. Blu-ray Disc player
 Connecting to HDMI terminals will enable you to enjoy high-definition digital images and high-quality sound.
 The HDMI connection is required for a 1080p signal.
 For “VIERA LinkTM connections”, please refer to p. 29.
 To use COMPONENT terminals
red |
|
Y |
|
green green |
|
||
|
|
||
|
|
PB COMPONENT |
|
blue |
blue |
VIDEO OUT |
|
blue |
AV Equipment |
||
|
|
PR |
|
|
|
|
|
green |
red |
red |
e.g. Blu-ray Disc |
|
|
L |
|
|
|
player |
|
|
white |
|
|
white |
white |
AUDIO |
|
|
|
R |
OUT |
red |
red |
red |
|
|
|
|
Definition-Standard
 To use COMPOSITE terminals
yellow |
white |
red
|
|
|
AV Equipment |
yellow |
yellow |
|
e.g. DVD Recorder |
white |
L |
COMPOSITE |
or |
white |
OUT |
|
|
|
R |
|
|
red |
red |
|
e.g. VCR |
Note
For more details on the external equipment’s connections, please refer to the operating manuals for the equipment.
12

Identifying Controls
TV controls/indicators
Front of the TV
Selects channels in sequence
Volume up/down
Displays the Main menu
POWER button
Remote control sensor Within about 23 feet (7 meters) in front of the TV set
Power indicator
(on: red, off: no light)
C.A.T.S. sensor
Plasma C.A.T.S. (Contrast Automatic Tracking System) (p. 26)
Note
Back of the TV |
SD card slot |
|
HDMI Input 3 connector
Changes the input
mode Video Input 2 connector
Chooses Menu and Submenu entries
The TV consumes a small amount of electric energy even when turned off.
Do not place any objects between the TV remote control sensor and remote control.
Remote control
Switches TV On or Off (Standby)
Changes the input mode (p. 24)
Displays Main Menu (p. 25)
Displays Sub Menu (p. 18, 27)
Colored buttons
(used for various functions)
(for example, p. 16, 23, 33)
Volume up/down
Sound Mute On/Off
Changes aspect ratio (p. 18, 43)
Switches to previously viewed channel or input modes
External equipment operations (p. 33)
Closed caption On/Off (p. 18)
Selects Audio Mode for TV viewing (p. 18)


 Exits from Menu screen VIERA Link menu (p. 32-33)
Displays VIERA TOOLS (p. 20)
Viewing from SD Card (p. 22-23)
Selects/OK/Change
Returns to previous menu
Channel up/down
Displays or removes the channel banner (p. 18)
 Operates the Favorite channel list function (p. 18-19)

 Numeric keypad to select any channel
(p. 17) or press to enter alphanumeric input in menus
(p. 16, 24, 32, 34, 36, 39, 40)
Use for digital channels (p. 17)
Controls Identifying Start Quick
connections) cable (AV Connection Basic Guide
13
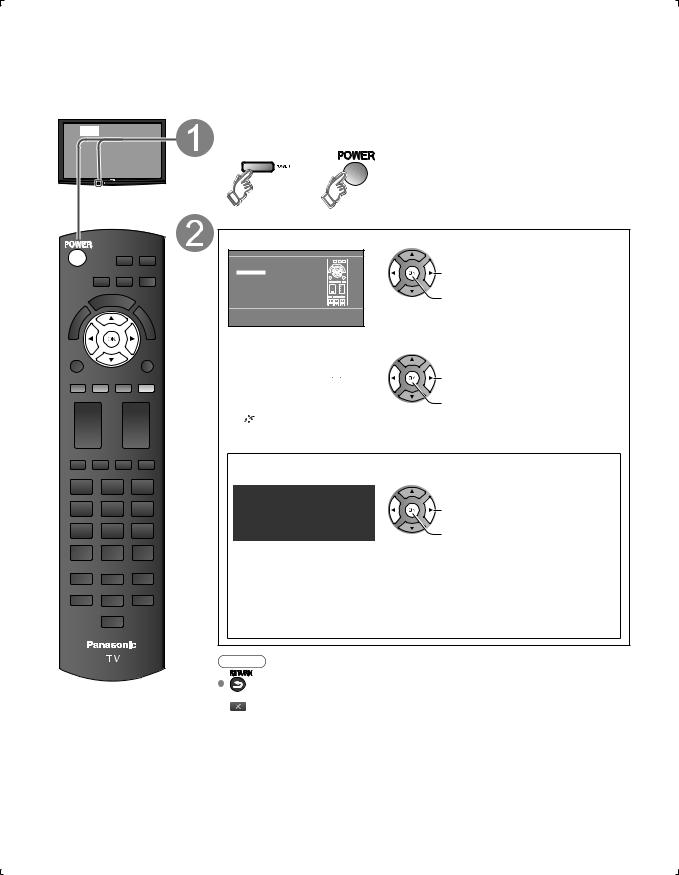
First Time Setup
First time setup screen is displayed only when the TV is turned on for the first time after the power cord is inserted into a wall outlet and when “Auto power on” (p. 27) is set to “No”.
or |
Turn the TV On with the POWER button |
|
|
(TV) |
(Remote) |
or
Configure your viewing mode
 Select your language
Language / Idioma / Langue
English |
|
|
|
|
Español |
Français |
|||
|
|
|
|
|
 select
 OK
OK
 Select your viewing mode (Be sure to select “Home use”)
Set viewing mode |
|
Step 2 of 6 |
|
|
Home Use |
|
|
|
Store Demonstration |
||
|
|
|
|
Select |
OK |
Please select your viewing environment. |
|
RETURN |
Select “Home Use” when using this TV in your |
||
|
home. |
||
|
|
||
|
|
|
|
 select
 OK
OK
 Please confirm your selection (Home Use) before pressing OK button.
 If you select “Store Demonstration” by mistake in
  , confirmation screen will be displayed.
You are selecting the store demonstration mode.
Yes |
|
No |
If you select “Yes”, the picture mode will regularly reset
to “Vivid” and a Picture Refresh message will be displayed on the screen.
 select
 OK
OK
 Select “No” and return to previous screen
  .
.
 If you select “Yes”, Screen enters the store demonstration mode.
To display the “Set viewing mode” screen again as shown above and select “Home Use”, do one of the following:
•Press and hold down the front POWER button for at least five seconds.
•Unplug power cord for 30 seconds and plug it again.
Note
is not available on  -
-  .
.

 is not available on
  .
.
 When you have used
  to turn the TV off, the next time you turn the TV on the “Language” settings will be displayed.
 If you use any other step other than
  to turn the TV off, or if you used the EXIT button to quit before completing the settings, the next time you turn the TV on “First time setup” will not be automatically displayed.
•The settings up to that point are saved.
•You can reset the settings using “First time setup”. (p. 27)
 To change the setting (Language, ANT/Cable setup, Input labels, Clock) later, go to the Menu screen (p. 27)
14
 Press to return to the previous screen
Auto channel setup (ANT/Cable setup)
 Select the connected Antenna in terminal
ANT/Cable setup |
|
Step 3 of 6 |
|
Not used: Go to |
Cable |
Antenna |
Not used |
|
(Label inputs) |
|
|
|
select |
|
|
|
Cable In |
|
|
|
|
ANTENNA |
|
|
|
|
ANTENNA |
OK |
|
|
|
Cable In |
|
Select |
OK |
Select “Not used” when viewing TV via |
RETURN |
Satellite receiver or Cable box. Note: Select |
|
|
“Cable” when viewing via Cable DTA Box. |
Select “Not used” when no wire is connected to the “Antenna/Cable” terminal.  Typical when a Cable/Satellite box is connected to a TV input.
 Prevents accidental tuning to an unavailable signal.
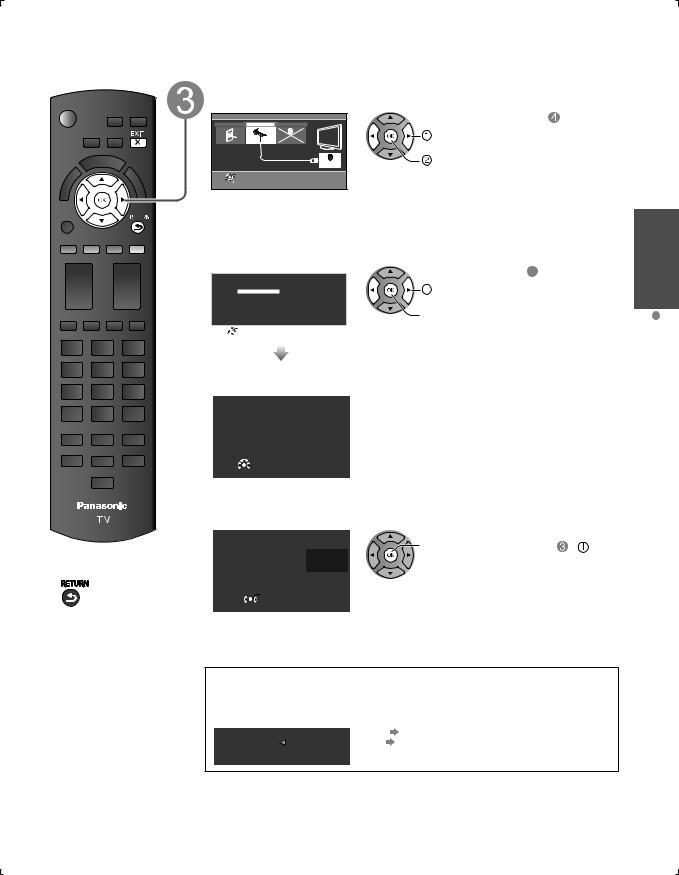
 Select “Start”
Auto program |
|
Step 4 of 6 |
||
|
Start |
|
|
|
|
Skip |
|||
|
OK |
Start scanning for channels via the TV’s |
||
Select |
RETURN |
built-in tuner. Select “Skip” when viewing TV |
||
channels via Satellite receiver or Cable box. |
||||
|
||||
|
|
|
|
|
Skip: Go to 
(Label inputs)
 select
 OK
OK
Start scanning the channels
(Available channels are automatically set.)
Auto program
Progress |
8% |
Number of analog channels |
10 |
Number of digital channels |
0 |
Press RETURN to quit
 RETURN
 Complete the Auto program setup
Completion message is displayed when the Auto program scan is successfully completed.
Auto program |
OK |
If there is no available |
||
Number of analog channels |
channel, return to |
- |
||
10 |
(ANT/ Cable setup). |
|
||
Number of digital channels |
0 |
|
||
“Not used” will be selected. |
||||
Auto program completed. |
|
|||
|
|
|
||
Press OK to continue.
 OK
OK
 RETURN
 Operation of the EXIT button during “First time setup”
Press the button once to display confirmation screen. Press again to close confirmation screen.
[EXIT confirmation screen]
Are you sure you want to exit the First Time Setup? |
Yes |
Exit “First time setup” |
||
|
|
|
No |
Return to the original screen |
Yes |
|
No |
||
|
|
|
||
To repeat the First Time Setup, select “First time setup” in the Setup Menu.
Setup Time First Start Quick
Guide
15
First Time Setup (Continued)
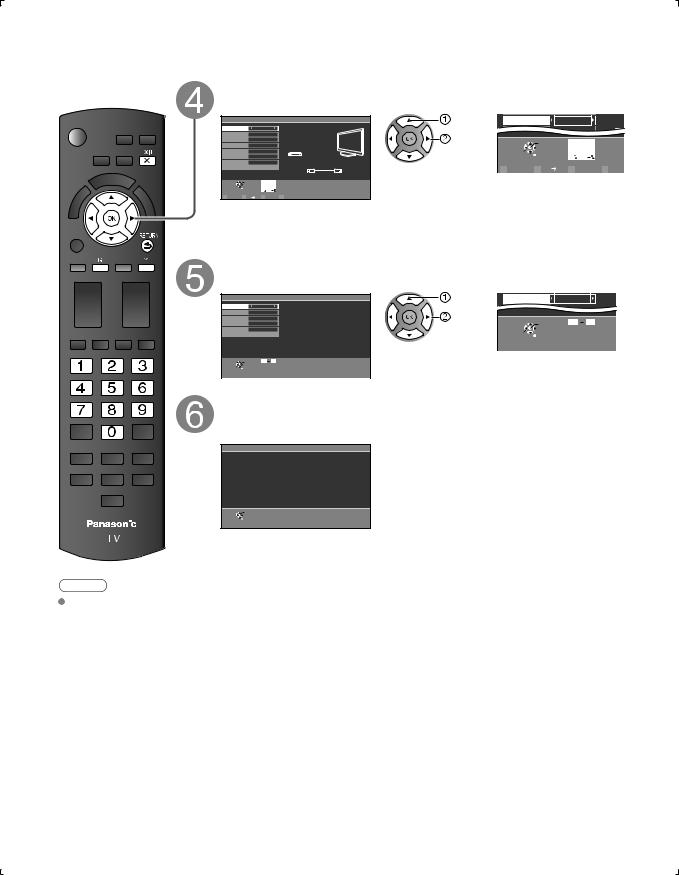
Select the Input labels (Label inputs)
Select NEXT then press OK to go to the next step.
Label inputs |
|
Step 5 of 6 |
select |
|
Video 2 |
|
GA GA |
Blu-r |
|
|
|
|
|
||||||
|
|
|
or |
|
|
||||
HDMI 1 |
|
|
|
NEXT |
|
|
|
|
|
HDMI 2 |
|
|
set |
|
|
|
|
||
HDMI 3 |
|
|
|
|
OK |
|
1 @. |
2 ABC 3 DEF |
|
Component 1 |
|
|
|
|
|
||||
|
|
|
|
Select |
|
4 GHI |
5 JKL 6MNO |
||
Component 2 |
|
|
|
|
RETURN |
7PQRS |
8 TUV 9WXYZ |
||
Video 1 |
Blu-ray, DVD ... |
|
|
|
LAST |
0 - , |
|||
|
|
|
|
||||||
Video 2 |
|
|
|
|
|
|
|
|
|
|
|
|
|
|
|
|
|
|
|
Next |
HDMI |
HDMI |
|
R |
|
G ABC |
abc |
B |
Y Delete |
|
|
|
|||||||
|
|
|
|
|
|
|
Follow the instructions on |
Select |
Edit |
4 |
GHI 5 |
JKL |
6MNO |
Press RIGHT to select a label for each input. |
|
|
|
1 |
@. 2 ABC |
3 DEF |
Press OK to customize the label. |
screen to complete the |
|
Change |
|
7PQRS 8 TUV |
9WXYZ |
Example: DVD, Blu-ray, etc. or “Not used”. |
|
||
|
RETURN LAST 0 |
- , |
|
following operations. |
|||
R |
G ABC |
abc B |
|
|
Y Delete |
||
Label: [BLANK] Not used/Blu-ray/DVD/DVD REC/HOME THTR/GAME/COMPUTER/
VCR/CABLE/SATELLITE/DVR/CAMERA/MONITOR/AUX/RECEIVER/MEDIA
CTR/MEDIA EXT/OTHER
Adjust the Clock (Set clock)
Select NEXT then press OK to go to the next step.
Set clock |
|
Step 6 of 6 |
select |
or |
Minute |
10 |
10 |
|
Year |
-- |
|
|
Next |
|
|
|
|
Month |
-- |
|
set |
|
|
|
|
|
Day |
-- |
|
|
|
|
0 |
9 |
|
Hour |
-- |
|
|
|
|
OK |
||
Minute |
-- |
|
|
|
Select |
|
|
|
Next |
|
|
|
|
RETURN |
|
|
|
|
|
|
|
|
|
|
|
|
|
|
|
|
|
Follow the instructions on |
Select |
Edit |
0 9 |
Current year. |
|||
|
|
screen to complete the |
||||
Change |
RETURN |
|
|
|
||
|
|
|
|
|
following operations. |
|
|
|
|
|
|
||
Complete the First time setup
Completion message is displayed when you have successfully completed the
First time setup.
Setup is complete. Enjoy your
Panasonic VIERA TV.
|
OK |
Press OK to exit. |
|
RETURN |
|
|
|
|
Note
About broadcasting systems
Analog (NTSC):
Conventional broadcasting
Digital (ATSC):
New programming that allows you to view more channels featuring
high-quality video and sound
16
Watching TV
Basic connection (p. 11-12)
To watch TV and other functions
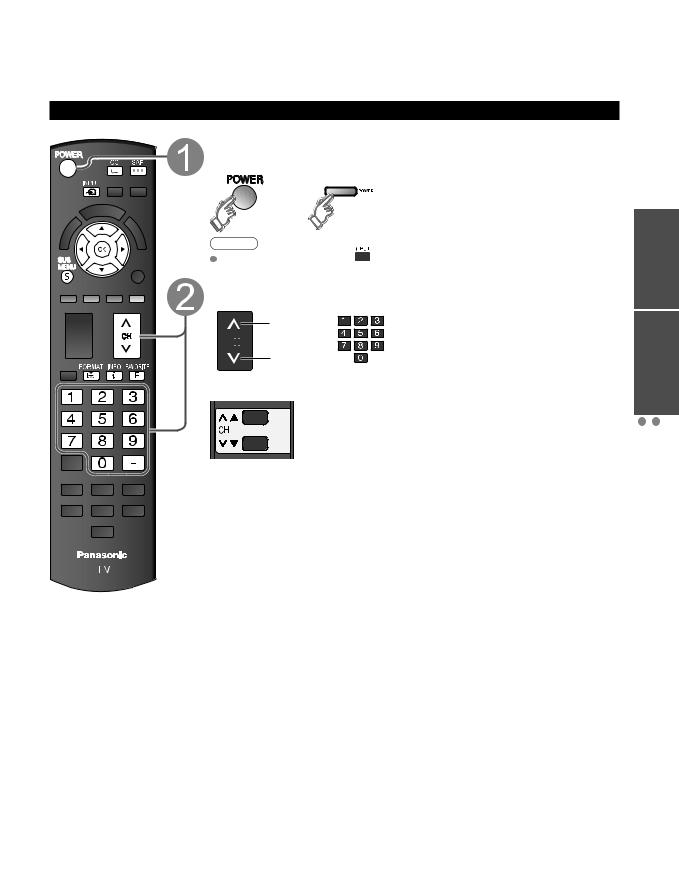
Turn power on
(Remote) (TV)
or
Note
If the mode is not TV, press  and select TV. (p. 24)
Select a channel number
(Remote)
up


 or down
(TV)
 To directly enter the digital channel number
When tuning to a digital channel, press the button to enter the minor number in a compound channel number.
example: CH15-1: 


Note
Reselect “Cable” or “Antenna” in “ANT in” of “ANT/Cable setup” to switch the signal reception between cable TV and the antenna. (p. 15, 37)
The channel number and volume level remain the same even after the TV is turned off.
SetupTVTimeWatchingFirst Viewing StartGuideQuick
17
 Loading...