

Panasonic SC-PMX152 operation manual
EGEBGN
Thank you for purchasing this product.
Please read these instructions carefully before using this product, and save this
manual for future use.
[For_the_United_Kingdom_and_Ireland]
Sales and Support Information
Customer Communications Centre
• For customers within the UK: 0344 844 3899
• For customers within Ireland: 01 289 8333
• Monday–Friday 9:00 am – 5:00 pm
(Excluding public holidays).
• For further support on your product, please visit our website:
www.panasonic.co.uk
Direct Sales at Panasonic UK
•
Order accessory and consumable items for your product with ease and
confidence by phoning our Customer Communications Centre
Monday–Friday 9:00 am – 5:00 pm
(Excluding public holidays).
• Or go on line through our Internet Accessory ordering application at
www.pas-europe.com
• Most major credit and debit cards accepted.
• All enquiries transactions and distribution facilities are provided directly by
Panasonic UK.
• It couldn’t be simpler!
• Also available through our Internet is direct shopping for a wide range of
finished products. Take a browse on our website for further details.
Model number suffix “EB” denotes UK model.
.
Operating Instructions
CD Stereo System
Model No. SC-PMX152
Table of contents
Safety precautions ................................................................................2
Caution for AC Mains Lead .................................................................. 3
Supplied accessories ...........................................................................3
Maintenance ..........................................................................................3
Placement of speakers ......................................................................... 4
Making the connections ....................................................................... 4
Overview of controls ............................................................................5
Preparing the remote control............................................................... 5
Network settings ................................................................................... 6
Streaming music over the network .....................................................9
Using AirPlay.......................................................................................10
About Bluetooth
Bluetooth
Media information ............................................................................... 12
Inserting media ...................................................................................12
Media playback controls ....................................................................13
FM radio ............................................................................................... 14
[PMX152] DAB/DAB+ .............................................................................15
Using the auxiliary input ....................................................................16
Using the PC input ..............................................................................16
Sound effects ......................................................................................16
Clock and timers ................................................................................. 16
Firmware updates ...............................................................................17
Others ..................................................................................................17
Troubleshooting..................................................................................19
Specifications...................................................................................... 22
Limited Warranty (ONLY FOR AUSTRALIA) .....................................35
®
®
................................................................................ 11
operations ........................................................................11
SC-PMX150
TQBJ0992-1
Do the procedures with the remote control. You can
also use the buttons on the main unit if they are the
same.
Your system and the illustrations can look differently.
These operating instructions are applicable to the
following system.
System SC-PMX152 SC-PMX150
Main unit SA-PMX152 SA-PMX150
Speakers SB-PMX100 SB-PMX100
Unless otherwise indicated, illustrations in these operating
instructions are of SC-PMX152.
[PMX152]: indicates features applicable to SC-PMX152
[PMX150]: indicates features applicable to SC-PMX150
Disposal of Old Equipment and Batteries
Only for European Union and countries with
recycling systems
national legislation.
By disposing of them correctly, you will help to save
valuable resources and prevent any potential negative
effects on human health and the environment.
For more information about collection and recycling,
please contact your local municipality.
Penalties may be applicable for incorrect disposal of
this waste, in accordance with national legislation.
TQBJ0992
2
only.
only.
These symbols on the products,
packaging, and/or accompanying
documents mean that used electrical
and electronic products and batteries
must not be mixed with general
household waste.
For proper treatment, recovery and
recycling of old products and used
batteries, please take them to applicable
collection points in accordance with your
Note for the battery symbol (bottom
symbol):
This symbol might be used in
combination with a chemical symbol. In
this case it complies with the
requirement set by the Directive for the
chemical involved.
Safety precautions
WARNING!
Unit
• To reduce the risk of fire, electric shock or product damage,
- Do not expose this unit to rain, moisture, dripping or
splashing.
- Do not place objects filled with liquids, such as vases, on
this unit.
- Use only the recommended accessories.
- Do not remove covers.
- Do not repair this unit by yourself. Refer servicing to
qualified service personnel.
CAUTION!
Unit
• To reduce the risk of fire, electric shock or product damage,
- Do not install or place this unit in a bookcase, built-in
cabinet or in another confined space. Ensure this unit is
well ventilated.
- Do not obstruct this unit’s ventilation openings with
newspapers, tablecloths, curtains, and similar items.
- Do not place sources of naked flames, such as lighted
candles, on this unit.
• This unit is intended for use in moderate climates.
• The mains plug is the disconnecting device.
Install this unit so that the mains plug can be unplugged
from the socket outlet immediately.
• This unit may receive radio interference caused by mobile
telephones during use. If such interference occurs, please
increase separation between this unit and the mobile
telephone.
• This unit utilizes a laser. Use of controls or adjustments or
performance of procedures other than those specified
herein may result in hazardous radiation exposure.
Battery
• Do not break open or short-circuit the battery.
• Do not charge the alkaline or manganese battery.
• Do not use the battery if the cover has peeled off.
• Do not heat or expose to flame.
• Do not leave the battery(ies) in a car exposed to direct
sunlight for a long period of time with doors and windows
closed.
• Remove the battery if you do not use the remote control for
a long period of time. Keep in a cool, dark area.
• Danger of explosion if battery is incorrectly replaced.
Replace only with the type recommended by the
manufacturer.
• When disposing of the batteries, please contact your local
authorities or dealer and ask for the correct method of
disposal.
[For_Continental_Europe,_the_United_Kingdom_and_Ireland]
Declaration of Conformity (DoC)
Hereby, “Panasonic Corporation” declares that this product
is in compliance with the essential requirements and other
relevant provisions of Directive 1999/5/EC.
Customers can download a copy of the original DoC to our
R&TTE products from our DoC server:
http://www.doc.panasonic.de
Contact to Authorised Representative:
Panasonic Marketing Europe GmbH,
Panasonic Testing Centre, Winsbergring 15, 22525
Hamburg, Germany
This product is in compliance with the radio standards of the
following countries.
GB, DE, AT, BE, DK, SE, FR, IT, ES, NL, FI, GR, PT, PL,
HU, CZ, SK, EE, LV, LT, SI, BG, RO, MT, CY, IE, LU, HR,
NO, CH, IS, LI, TR
The WLAN feature of this product shall exclusively be used
inside buildings.
This product on purpose to connect to access point of
2.4 GHz or 5 GHz WLAN.
MPEG Layer-3 audio coding technology licensed from Fraunhofer
IIS and Thomson.
The Bluetooth® word mark and logos are registered trademarks
owned by Bluetooth SIG, Inc. and any use of such marks by
Panasonic Corporation is under license.
Other trademarks and trade names are those of their respective
owners.
The Wi-Fi CERTIFIED™ Logo is a certification mark of Wi-Fi
Alliance®.
The Wi-Fi Protected Setup™ Logo is a certification mark of Wi-Fi
Alliance®.
“Wi-Fi®” is a registered trademark of Wi-Fi Alliance®.
“Wi-Fi Protected Setup™”, “WPA™”, and “WPA2™” are
trademarks of Wi-Fi Alliance®.
Qualcomm is a trademark of Qualcomm Incorporated, registered
Figure A
Figure B
Fuse cover
Figure A
Fuse
(5 ampere)
Figure B
Fuse
(5 ampere)
in the United States, and other countries. AllPlay is a trademark of
Qualcomm Connected Experiences, Inc., registered in the United
States, and other countries.
TuneIn is a trademark of TuneIn Inc., registered in the United
States and other countries and used with permission.
The Spotify software is subject to third party licenses found here:
www.spotify.com/connect/third-party-licenses
DLNA, the DLNA Logo and DLNA CERTIFIED are trademarks,
service marks, or certification marks of the Digital Living Network
Alliance.
Mac, OS X, and AirPort are trademarks of Apple Inc., registered in
the U.S. and other countries.
Windows is a trademark or a registered trademark of Microsoft
Corporation in the United States and other countries.
Google Play and Android are trademarks of Google Inc.
“Made for iPod”, “Made for iPhone”, and “Made for iPad” mean
that an electronic accessory has been designed to connect
specifically to iPod, iPhone, or iPad, respectively, and has been
certified by the developer to meet Apple performance standards.
Apple is not responsible for the operation of this device or its
compliance with safety and regulatory standards.
Please note that the use of this accessory with iPod, iPhone, or
iPad may affect wireless performance.
AirPlay
, iPad, iPhone, iPod, iPod nano, iPod touch,
Retina are trademarks of Apple Inc., registered in the U.S. and
other countries.
iPad mini and iPad Pro are trademarks of Apple Inc.
App Store is a service mark of Apple Inc.
iPad Air,
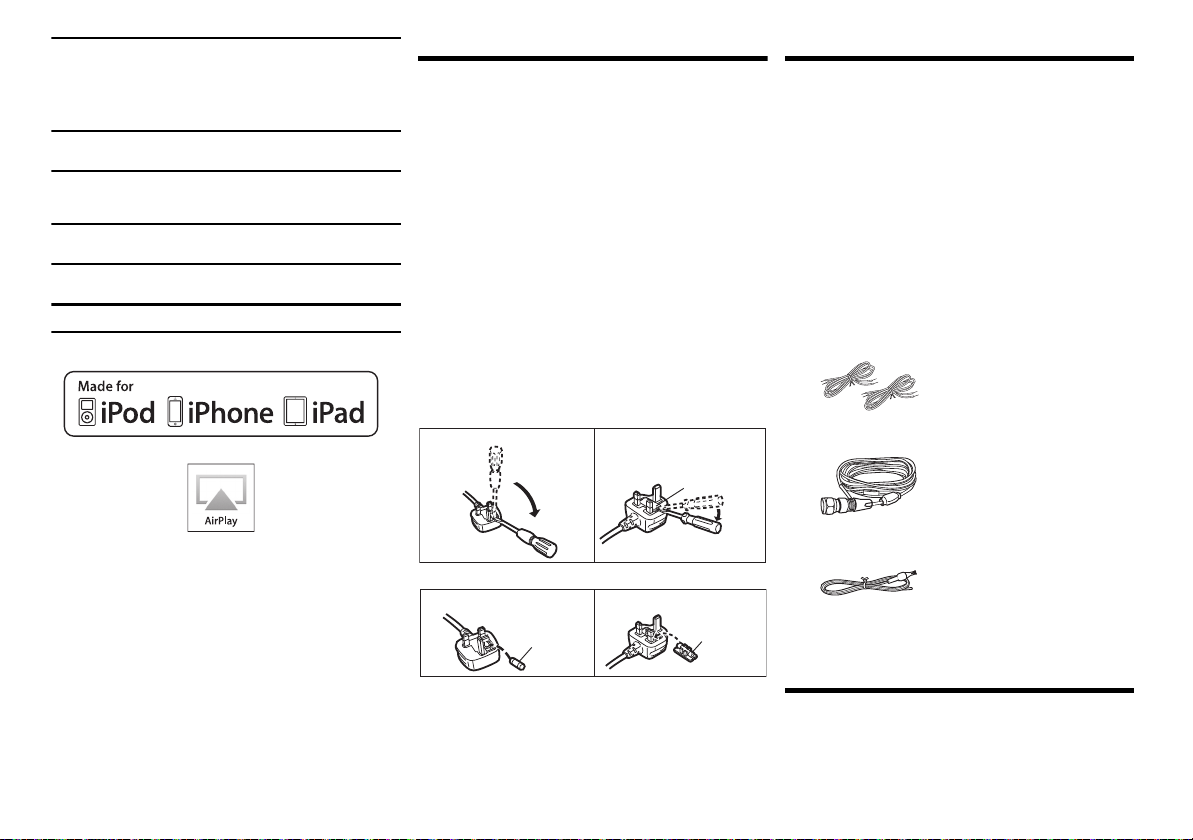
Caution for AC Mains Lead
(For the AC mains plug of three pins)
For your safety, please read the following text carefully.
This appliance is supplied with a moulded three pin
mains plug for your safety and convenience.
A 5-ampere fuse is fitted in this plug.
Should the fuse need to be replaced please ensure that
the replacement fuse has a rating of 5-ampere and that it
is approved by ASTA or BSI to BS1362.
Check for the ASTA mark Ï or the BSI mark Ì on the
body of the fuse.
If the plug contains a removable fuse cover you must
ensure that it is refitted when the fuse is replaced.
If you lose the fuse cover the plug must not be used until
a replacement cover is obtained.
A replacement fuse cover can be purchased from your local dealer.
Before use
Remove the connector cover.
How to replace the fuse
The location of the fuse differ according to the type of AC
mains plug (figures A and B). Confirm the AC mains plug
fitted and follow the instructions below.
Illustrations may differ from actual AC mains plug.
1. Open the fuse cover with a screwdriver.
2. Replace the fuse and close or attach the fuse cover.
and
Supplied accessories
Check and identify the supplied accessories.
∏ (For Continental Europe)
1 x AC mains lead
(K2CQ2YY00107)
∏ (For the United Kingdom and Ireland)
1 x AC mains lead
(K2CT2YY00089)
∏ (For Australia and New Zealand)
1 x AC mains lead
(K2CJ2YY00084)
∏ 1 x Remote control
(N2QAYB001135)
∏ 1 x Remote control battery
∏ 2 x Speaker cables
(REE1840)
∏ ([PMX152]) 1 x DAB antenna
(N1CYYYY00022)
∏ ([PMX150]) 1 x FM indoor antenna
(RSAX0002)
• Product numbers provided in these operating instructions
are correct as of January 2017. These may be subject to
change.
Maintenance
• To clean the main unit, wipe with a soft, dry cloth.
• To clean the speakers, wipe with a fine-textured and
dry cloth such as a microfibre cleaning cloth.
• Never use alcohol, paint thinner or benzine to clean this system.
• Before using chemically treated cloth, read the
instructions that came with the cloth carefully.
TQBJ0992
3
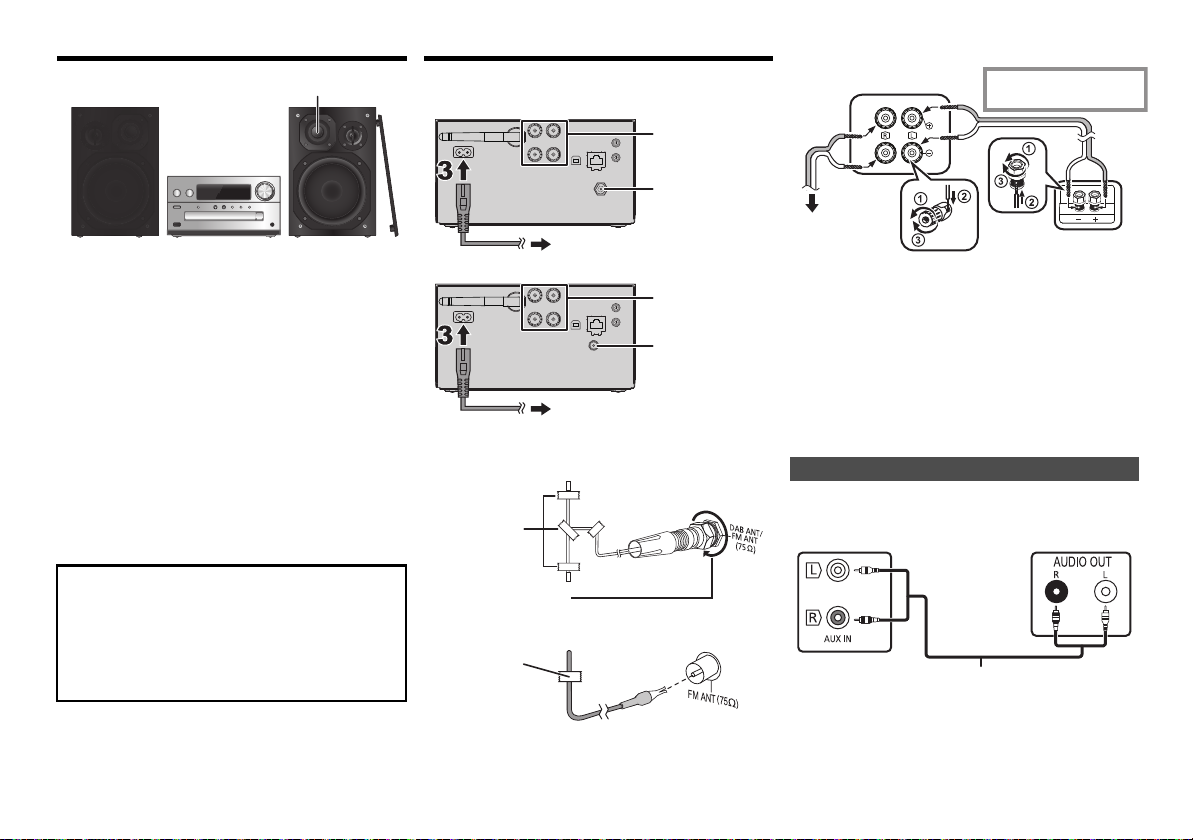
Placement of speakers
Tweeter
22
1
To household mains socket
22
11
To household mains socket
Tape
(not supplied)
Be sur e to fully tighten
the nut.
[PMX152]
Tape
(not supplied)
i: Red line
j: Copper
Main unit (rear)
To right speaker
(rear)
Left speaker (rear)
e.g. DVD player
(not supplied)
Main unit (rear)
Audio cable (not supplied)
Making the connections
Connect the AC mains lead only after all the other
connections have been made.
[PMX152]
2 Connect the speakers.
Place the speakers so that the tweeter is on the inner
side. To prevent damage to the speakers, do not touch
the speaker cones if you remove the nets.
Use only the supplied speakers.
The combination of the main unit and speakers give the
best sound. You can cause damage to the system and
decrease the sound quality if you use other speakers.
Note:
• Keep your speakers more than 10 mm from the main unit
for ventilation.
• Put the speakers on a flat safe surface.
• These speakers do not have magnetic shielding. Do not
put them near TVs, PCs or other equipment easily
influenced by magnetism.
• When you play at high levels for a long period, it can cause
damage to the system and decrease the life of the system.
• Decrease the volume in these conditions to prevent
damage:
- When you play distorted sound.
- When you adjust the sound quality.
CAUTION!
• Use the speakers only with the recommended
system. If not, you can cause damage to the
amplifier and speakers and can cause a fire.
Consult an approved service personnel if damage
occurs or if there is a sudden apparent change in
performance.
• Do the procedures included in these instructions
when you attach the speakers.
TQBJ0992
4
[PMX150]
1 Connect the antenna.
Place the antenna where reception is best.
[PMX150]
• If radio reception is poor, use an outdoor antenna (not supplied).
Be careful not to cross (short-circuit) or reverse
the polarity of the speaker wires as doing so may
damage the speakers.
3 Connect the AC mains lead.
Do not use an AC mains lead with other equipment.
Conserving power
The system consumes a small amount of power ( 22),
even when it is in standby mode. Disconnect the power
supply if you do not use the system.
Some settings will be lost after you disconnect the
system. You have to set them again.
Connecting other equipment
You can connect a VCR, DVD player etc.
Note:
• Disconnect the AC mains lead before connection.
• Switch off all equipment and read the appropriate operating
instructions.
• Components and cables are sold separately.
• If you want to connect equipment other than those
described, refer to the audio dealer.
• Sound distortion can occur when you use an adaptor.
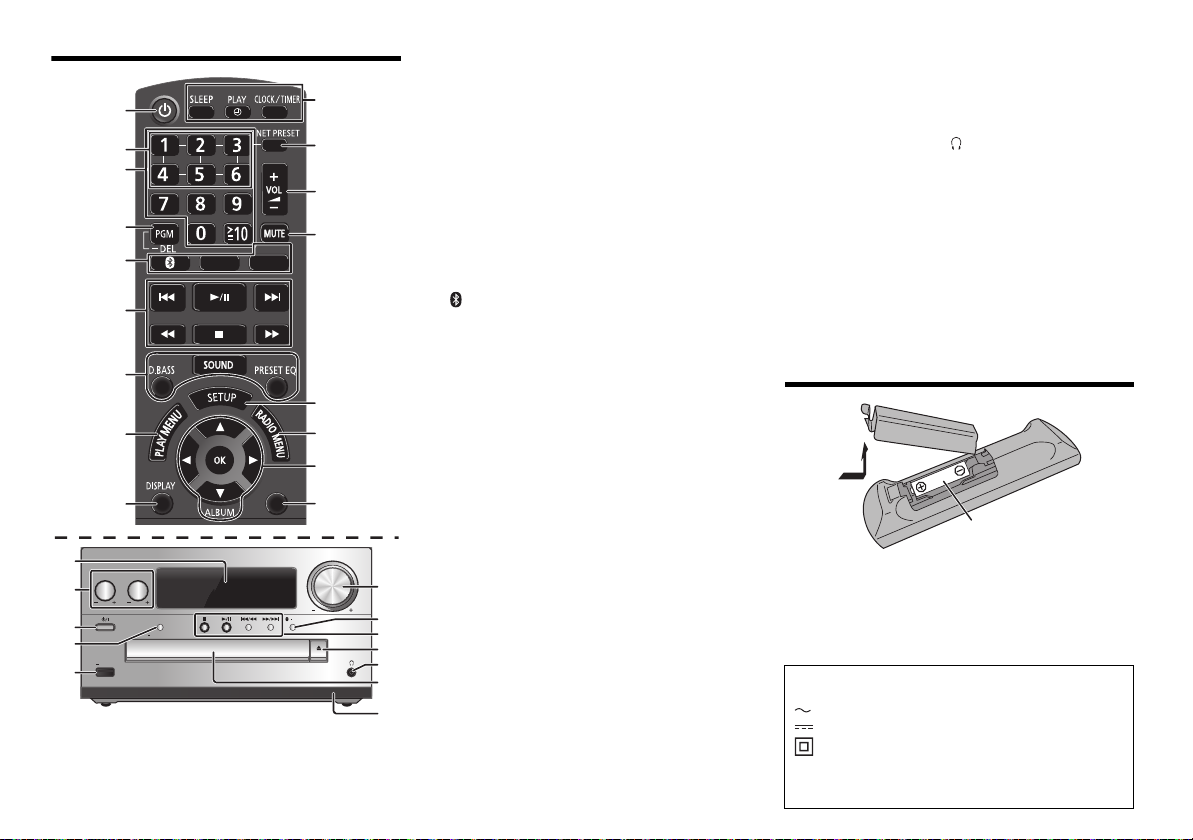
Overview of controls
OPEN/CLOSE
5V 2.1A
VOLUME
SELECTOR
NET PRESET
PAIRING
BASS
TREBLE
EXT-IN
1
3
2
4
5
6
7
8
9
10
11
12
13
14
15
16
17
CD/USB
RADIO
DIMMER
7
5
1
21
22
23
24
20
12
6
18
19
1 Standby/on switch [Í], [Í/I]
Press to switch the unit from on to standby mode or
vice versa. In standby mode, the unit is still
consuming a small amount of power.
2 NET PRESET buttons for storing or selecting
(10
internet radio station ([1] to [6])
3 Numeric buttons [1 to 9, 0, S10]
• To select a 2-digit number
Example: 16: [S10]
• To select a 3-digit number
Example: 124: [S10]
> [1] > [6]
> [S10] >[1] > [2]> [4]
).
4 Set the programme function/Delete a
programmed track
5 Select audio source
On the remote control
[ ]: “BLUETOOTH”
[CD/USB]: “CD”
[RADIO, EXT-IN]:
“DAB+” (
(
[PMX152]) --. “FM” ---. “AUX”
. “USB”*
1
^-- “NETWORK” ( “PC” (-b
On the main unit
[SELECTOR, -NET PRESET]:
“CD”-.“BLUETOOTH”-.“DAB+” (
^-
“NETWORK” ( “PC” (
• Press and hold [SELECTOR, -NET PRESET] to recall
the last preset station for internet radio ( 10).
“USB”
[PMX152]
1
*
(
)
---.
“AUX”
19 Port for iPhone/iPad/iPod and USB devices
20 Bluetooth
• Press to select “BLUETOOTH” as the audio source.
• Press and hold to enter pairing mode ( 11) o r
®
-pairing button
disconnect a Bluetooth
®
device ( 12).
21 Open or close the disc tray
22 Headphones jack ( )
• Plug type: 3.5 mm stereo (not supplied)
• Avoid listening for prolonged periods of time to prevent
hearing damage.
• Excessive sound pressure from earphones and
headphones can cause hearing loss.
• Listening at full volume for long periods may damage
the user’s ears.
23 Disc tray
• Do not put any object in front of the disc tray.
24 Remote control sensor
*1: The display will automatically change to “iPod” when a
compatible iPhone/iPad/iPod is connected to the port for
iPhone/iPad/iPod.
Preparing the remote control
“FM”
(b
6 Basic playback control
7 Select the sound effects
8 Set the play menu item
9 View content information
10 Clock and timer operation
11
Recall the last preset station for internet radio (10).
12 Adjust the volume of the system
13 Mute the sound of the system
Press the button again to cancel.
“MUTE” is also cancelled when you adjust the
volume or when you switch off the system.
14 Enter setup menu
15 Set the radio menu item
16 Select the option
17 Dim the display panel
Press the button again to cancel.
18 Display panel
• Use alkaline or manganese battery.
• Install the battery so that the poles (+ and –) align with
those in the remote control.
• Point the remote control at the remote control sensor,
away from obstacles, at a maximum range of 7 m
directly in front of the main unit, within an angle of
approximately 30° to the left and right.
The symbols on this product (including the
accessories) represent the following:
AC
DC
Class II equipment (The construction of the
product is double-insulated.)
IOn
Í Standby
R6/LR6, AA
TQBJ0992
5
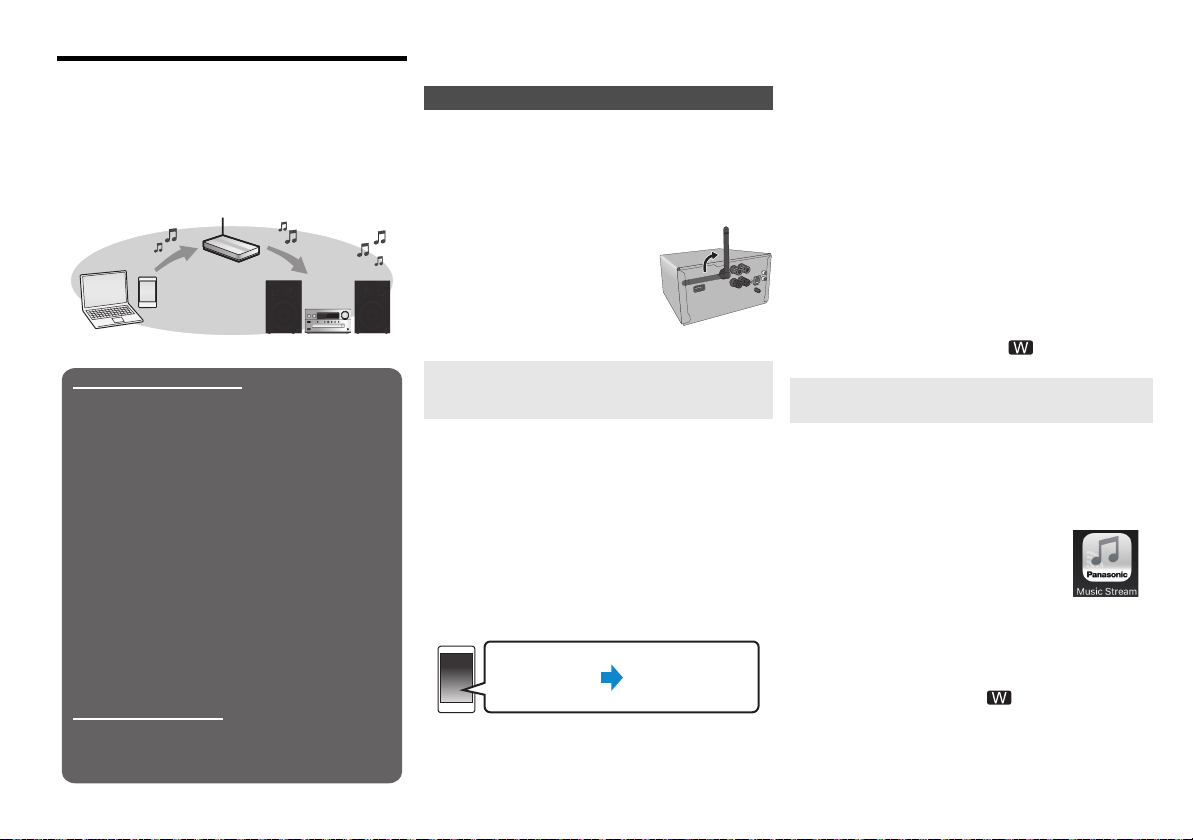
Network settings
Wireless LAN connection
Method 1: “Using the WAC (Wireless
Accessory Configuration)” ( right)
• If you are using an iPhone/iPad/iPod touch (iOS
version 7.0 or later), or Mac (OS X 10.9 or later,
with AirPort Utility 6.3.1 or later), you can send its
Wi-Fi configuration to this system.
Method 2: “Using the app “Panasonic Music
Streaming”” ( right)
• You can make the wireless network settings with
the app, “Panasonic Music Streaming” (free of
charge).
Method 3: “Using an Internet browser” ( 7)
• You can access this unit’s network settings from
the Internet browser on your smartphone or PC,
etc.
Method 4: “Using WPS (Wi-Fi Protected
Setup™)” ( 8)
• If your wireless router supports WPS, you can set
up a connection by either pressing the WPS
button, or entering the WPS PIN code.
Wired LAN connection
Method 5: “Using a LAN cable” ( 8)
• You can make a stable connection to the network
with a LAN cable.
Settings
Wi-Fi settings
You can stream music from an iOS device (iPhone/iPad/
iPod), an Android™ device or a PC (Mac/Windows) to
this system’s speakers by using the Qualcomm
AllPlay™ smart media platform or AirPlay. To use these
features, this system must join the same network as the
compatible device.
Qualcomm® AllPlay™ is a product of Qualcomm Technologies, Inc.
• Please update the system’s firmware after the
network settings are complete. ( 17)
Choose a network setting method from the following.
TQBJ0992
6
Note:
• The setting will be cancelled after the set time limit. In that
case, try the setting again.
To cancel this setting in the middle, press [∫].
®
Wireless LAN connection
This system has built-in Wi-Fi® and can be connected to
a wireless router.
Preparation
• Place this system as close to the wireless router as
possible.
• Do not connect a LAN cable. Doing so will disable the
®
function.
Wi-Fi
• Point the antenna on the rear of
the main unit up as shown in the
figure.
• Do not perform the following:
- Tilting the antenna forward or
backwards when it is pointing up
- Applying too much force to the
antenna
- Carrying this unit by holding the antenna
Method 1:
Using the WAC
(Wireless Accessory Configuration)
• The following explanations are based on an iPhone.
1 Turn this system on.
2 Connect the iPhone to your home wireless
network.
3 Press [RADIO, EXT-IN] on the remote control
repeatedly to select “NETWORK”.
• When “WAC Mode” is indicated on the display, proceed
to step 4.
– If the display stays at “NETWORK”, perform the
operation for network reset. ( 18)
4 Go to Wi-Fi settings on your iPhone.
5 Select “Panasonic PMX152 ” or
“Panasonic PMX150 ” under the “SET
UP NEW AIRPLAY SPEAKER...”.
•“ ” stands for a character that is unique to each set.
6 The “AirPlay Setup” screen appears on your
iPhone.
• This system will be displayed as “Panasonic PMX152”
or “Panasonic PMX150”*.
* To change the name, enter a new name to replace
the existing one.
You can also do the renaming after the network
connection is set up. ( 8, “To make network-related
settings”)
• You can set a password for this system under
“SPEAKER PASSWORD”.
(You will need this password if you make network
settings by Internet browser next time.)
7 Select “Next” to apply the settings.
• On the main unit’s display, “Success” appears when
the connection is established. (“ ” will be
displayed.)
Method 2:
Using the app “Panasonic Music Streaming”
You can also refer to the supplied “Wi-Fi® QUICK SETUP
GUIDE”.
1 Download the app “Panasonic Music Streaming”
(free of charge) on your smartphone/tablet.
(Always use the latest version of the app.)
• [iOS] : App Store
• [Android] : Google Play™
2 Start the app and follow the
on-screen instructions.
3 Check that the connection has completed.
• On the unit’s display, “Success” appears when the
connection is established. (“ ” will be displayed.)
– If “Fail” is displayed press [OK], check the network
name (SSID) and the password, and then try the
setting again.
The operations and on-screen display items, etc. of
Settings
Wi-Fi settings
●●●●●●●●
Refresh list
the app “Panasonic Music Streaming” are subject to
change.
For the latest information, visit
http://panasonic.jp/support/global/cs/audio/app/
(This site is in English only.)
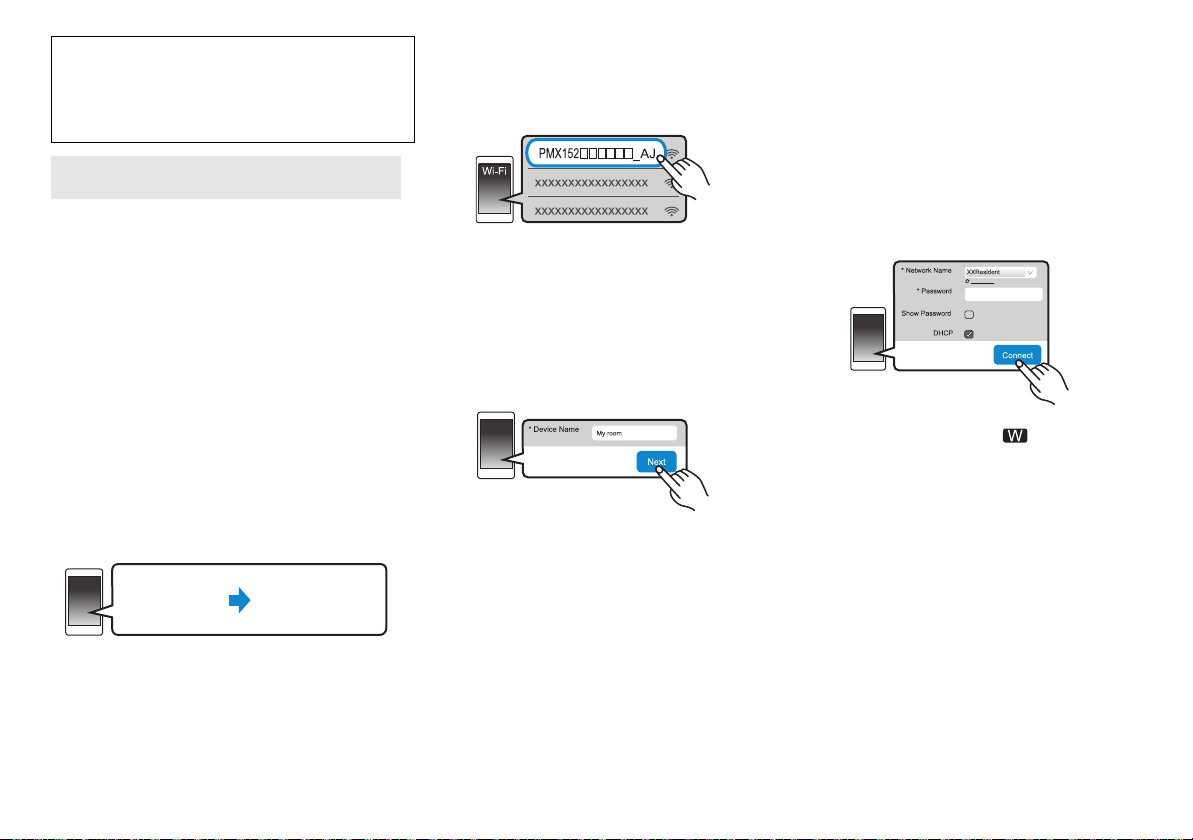
Method 3:
Using an Internet browser
• The following explanations are based on a
smartphone.
1 Turn this system on.
2 Press [RADIO, EXT-IN] on the remote control
repeatedly to select “NETWORK”.
3 To enter “Setting” mode
1 Press [SETUP] on the remote control repeatedly
to select “Net Setup” and then press [OK].
2Press [2, 1] on the remote control to select
“Manual” and then press [OK].
3Press [2, 1] on the remote control to select
“OK? Yes” and then press [OK].
• After pressing [OK] to confirm “OK? Yes”, the
previous network connection you have set with this
unit will be cleared.
• Alternatively, while pressing and holding down
[<, OPEN/CLOSE] on the unit, press and hold down
[1/;] on the unit for at least 4 seconds.
“Setting” blinks on the display.
4 Go to Wi-Fi settings on your compatible device.
5 Select “PMX152_AJ” or
“PMX150_AJ” to connect to this
system.
•“ ” stands for a character that is unique to each set.
• This can take up to 1 minute to appear in your Wi-Fi list.
• If this operation does not work correctly, please repeat
it several times.
• iOS device: If “Panasonic PMX152 ” or
“Panasonic PMX150 ” appears under “SET
UP NEW AIRPLAY SPEAKER...” instead, proceed to
perform steps 5 to 7 of “Method 1” to complete the
network setting procedure. ( 6)
• Make sure that DHCP is enabled for the network
setting on your compatible device.
About the network setting page:
iOS device: The settings page will be automatically
displayed in the Internet browser.
Except the iOS device: Swipe down the device's
notification bar to check for "Sign in to Wi-Fi network"
notification and tap on it to display the settings page.
• If there is no notification, open the Internet browser and
refresh the page to display the settings page. If the
settings page is not displayed, type
"http://172.19.42.1/" into the URL address field.
6 Type a device name and then select “Next”.
• The device name will be displayed as this system’s
name on the network.
• Maximum characters that can be shown: 32
• Emoji characters are not supported.
• The device name is set when “Next” is selected.
• You can also change the device name after the network
connection is set up. ( 8, “To make network-related
settings”)
7 Select your security options for this system.
To set the AirPlay password
1 Select “Yes” and then select “Next”.
2 Set your password and then select “Next”.
• You will need this password the next time this network
setting method is used.
• If you have performed a network reset ( 18) , the
password will be cleared.
To skip this setting
Select “No” and then select “Next”.
• You can also change this setting after the network connection
is set up. (
8, “To make network-related settings”)
8
Select your network name (SSID) and type the
password.
• Check the wireless router for the network name (SSID)
and the password.
• A list of network names (SSIDs) will be appeared when
you select the “Network Name” box.
• To show the characters typed in the “Password” box,
select “Show Password”.
• If your network requires specific settings, deselect
“DHCP” to disable DHCP.
– You can use specific IP address, subnet mask,
default gateway, primary DNS, etc.
• To update the network name (SSID) list, select
“Refresh list”.
9
Select “Connect” to apply the settings.
• On the main unit’s display, “Success” appears when
the connection is established. (“ ” will be
displayed.)
– If “Fail” is displayed press [OK], check the network
name (SSID) and the password, and then try the
setting again.
• Depending on the device, the connection complete
screen may not be displayed.
10
Make sure to connect your compatible device
back to your home wireless network.
Note:
• Enable Java and Cookies in your browser settings.
TQBJ0992
7
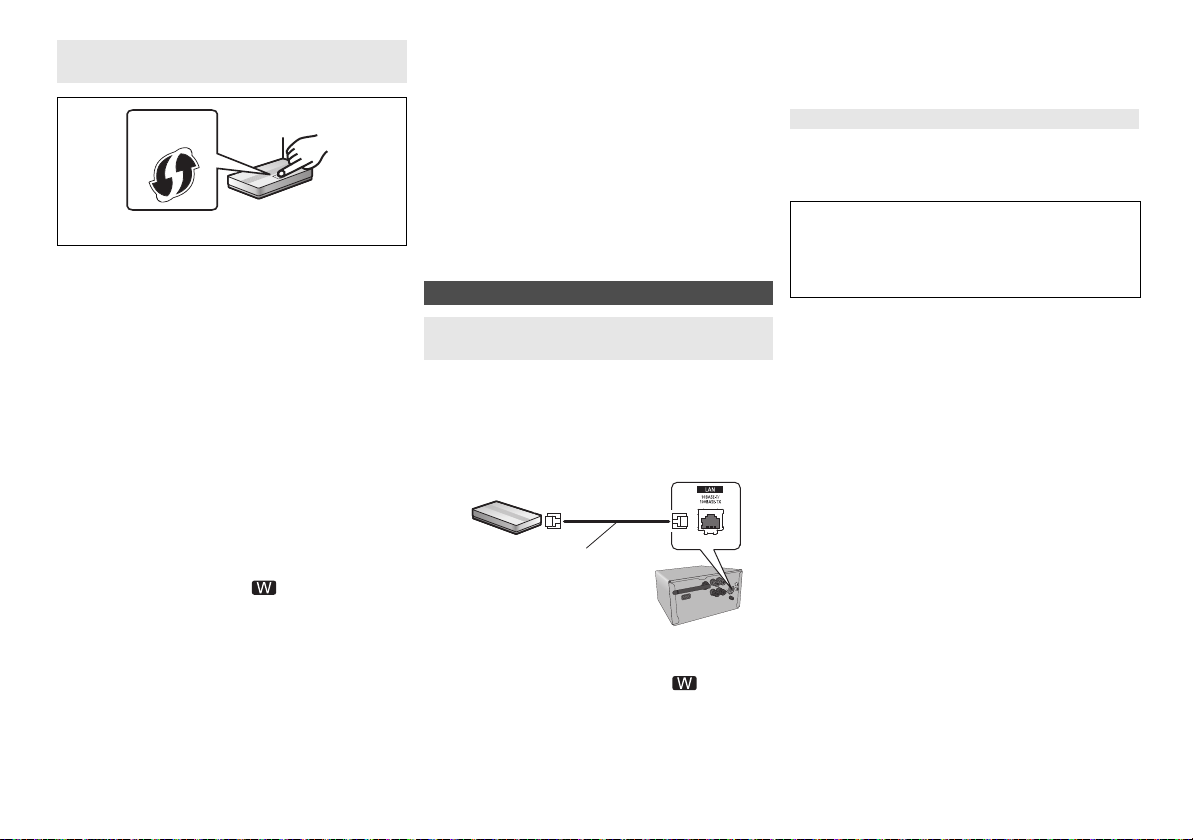
Method 4:
e.g.,
LAN cable
(not supplied)
Broadband router, etc.
e.g.,
Using WPS (Wi-Fi Protected Setup™)
A compatible wireless router may have the WPS
identifier mark.
1 Turn this system on.
2 Press [RADIO, EXT-IN] on the remote control
repeatedly to select “NETWORK”.
3 To enter “WPS Push” mode
1 Press [SETUP] on the remote control repeatedly
to select “Net Setup” and then press [OK].
“WPS Push” is indicated on the display.
2 Press [OK].
3Press [2, 1] on the remote control to select
“OK? Yes” and then press [OK].
• Alternatively, while pressing and holding down
[5/9] on the main unit, press and hold
[SELECTOR, -NET PRESET] on the main unit for at
least 4 seconds.
• If the unit is already connected to a wireless LAN network,
“Network Initializing” is displayed for about 1 minute.
“WPS” flashes on the display.
4 Activate the WPS button on the wireless router.
• On the main unit’s display, “Success” appears when the
connection is established. (“ ” will be displayed.)
– “Fail” may be displayed if the connection was not made
within the set time limit. Press [OK]. Try the setting
again. If “Fail” is still displayed, try other methods.
∫ Using the WPS PIN code
1 Turn this system on.
2 Press [RADIO, EXT-IN] on the remote control
repeatedly to select “NETWORK”.
TQBJ0992
3 To enter “WPS PIN” mode
1 Press [SETUP] on the remote control repeatedly
8
to select “Net Setup” and then press [OK].
2Press [2, 1] on the remote control to select
“WPS PIN” and then press [OK].
• Alternatively, while pressing and holding down
[:/6] on the main unit, press and hold
[SELECTOR, -NET PRESET] on the main unit for at
least 4 seconds.
• If the unit is already connected to a wireless LAN network,
“Network Initializing” is displayed for about 1 minute.
The PIN code is indicated on the display.
4 Enter the PIN code into the wireless router.
Note:
• Once the system enters WPS PIN code mode, you cannot
set up using the WPS button. To use the WPS button, turn
the system off and then on, and redo the network settings.
• Depending on a router, other connected devices may
temporarily lose their connection.
• For details, refer to the operating instructions of the
wireless router.
Wired LAN connection
Method 5:
Using a LAN cable
1 Disconnect the AC mains lead.
2 Connect the main unit to a broadband router, etc.
using a LAN cable.
3 Connect the AC mains lead to the main unit and
turn this system on.
• When the connection is established, “ ” is indicated
on the main unit’s display.
Note:
• Use category 5 or above straight LAN cables (STP) when
connecting to peripheral devices.
• The LAN cable must be connected or disconnected while
the AC mains lead is disconnected.
• Inserting any cable other than a LAN cable in the LAN port
can damage the system.
• If the LAN cable is disconnected, the network-related
settings ( below) will be initialized. In that case, make the
settings again.
• When a LAN cable is connected, the Wi-Fi function will be
disabled.
To make network-related settings
You can change this system’s name on the network,
change the security options for this system, and use
specific IP address, subnet mask, default gateway,
primary DNS, etc.
You can also change the name of this system by
changing a setting in the app “Panasonic Music
Streaming” ( 9). For details on the app, refer to the
site below.
http://panasonic.jp/support/global/cs/audio/app/
(This site is in English only.)
Preparation
• Complete the network settings. ( 6)
• Connect your device to the same network as this
system.
• Check this system’s IP address ( 18), and note it
down.
1 Start an Internet browser on your device and
then type this system’s IP address into the
address field to display the settings page.
• It may take a few minutes until the settings page is
displayed depending on the environment. In that case,
reload the browser.
• If the unit is connected with Wi-Fi, only a device name
and the security options for this system can be
changed. Close the settings page after making the
changes.
– To change the device name, select “Change”, and
type a new device name, and then select “Apply”.
– To change the security options for this system, select
“Change” for the AirPlay password setting.
If you have set an AirPlay password previously, you
will need your old password before making changes.
Make the changes and then select “Apply”.
2 Type a device name and then select “Next”.
• Refer to the step 6 of “Using an Internet browser” ( 7)
for details on a device name.
3 Select your security options for this system.
• Refer to the step 7 of “Using an Internet browser” ( 7)
for details on security options for this system.
4 Select and input the details.
• If your network requires specific settings, deselect
“DHCP” to disable DHCP.
– You can use specific IP address, subnet mask,
default gateway, primary DNS, etc.
5 Select “Connect” to apply the settings.
• When the connection is established, “Success”
appears on the main unit’s display.
Streaming music over the network
You can stream music from your devices or online music
services to this system’s speakers and other speakers
powered by AllPlay.
You can also stream music source of this system to other
speakers powered by AllPlay.
Streaming music on network devices
You can use the AllPlay function to stream music from
the device on the network to this system’s speakers by
using the app “Panasonic Music Streaming” (free of
charge), etc.
[iOS]
: App Store
•
[Android]
•
Preparation
• Complete the network settings. ( 6)
• Connect the following devices to the same network as
The following steps are based on “Panasonic Music
Streaming”.
: Google Play™
The operations and on-screen display items, etc. of the
app “Panasonic Music Streaming” are subject to change.
For the latest information, visit
http://panasonic.jp/support/global/cs/audio/app/
More apps are available. For details, visit
www.panasonic.com/global/consumer/homeav/
allseries/service
(These sites are in English only.)
this system.
– Device with “Panasonic Music Streaming”, etc.
installed
– Device containing music
1 Turn this system on.
• Check that “ ” is indicated on the display.
• If it is not indicated, check the network settings. ( 6)
2 Start the app “Panasonic Music Streaming”.
• Always use the latest version of the app.
3 From “Speaker”, select this system as the output
speakers.
• If you have multiple speakers powered by AllPlay, you
can enjoy synchronised sound from them.
To group speakers, drag e.g., “ ” of the desired
speakers over each other.
– You can also play different songs on other speakers
powered by AllPlay at the same time.
– The number of speakers powered by AllPlay that can
perform playback at the same time differs depending
on the situation of use.
– When you turn off one of the speakers powered by
AllPlay, other speakers in the same group may stop
the playback.
4 Select a music source.
5 Select a song.
Note:
• This system will be displayed as “Panasonic PMX152” or
“Panasonic PMX150” if the device name is not set.
• When playing back music from the DLNA server (PC with
Windows 7 or later installed, smartphone, Network
Attached Storage (NAS) device, etc.), add the contents and
folder to the libraries of the Windows Media
smartphone, or the NAS device, etc.
• Playlist of Windows Media
contents that are stored in the libraries.
• About supported format, refer to “Specifications” ( 22).
– File formats that are not supported by your DLNA server
cannot be played.
• Depending on the contents and the connected equipment,
playback may not be performed properly.
• Ensure to stop playback on your device before turning it off.
®
Player can play back only the
Streaming online music
This system is compatible with several online music
services.
Visit the following website for the compatibility information.
www.panasonic.com/global/consumer/homeav/
allseries/service
®
Player, the
Preparation
• Make sure that the network is connected to the
Internet.
• Connect a device with a compatible app installed to the
same network as this system.
1 Turn this system on.
• Check that “ ” is indicated on the display.
• If it is not indicated, check the network settings. ( 6)
2 Start the app, and select a song to playback.
∫ Using Spotify
You will need Spotify Premium. For details, visit the
following website.
www.spotify.com/connect/
After step 2
3 Select the square image of the song’s cover art in
the bottom left of the playback screen.
4 From “ ”, select this system as the output
speakers.
• To enjoy synchronised sound from the multiple
speakers powered by AllPlay, you need to group the
speakers using the app “Panasonic Music Streaming”.
( left)
∫ Using online music services other than
Spotify
After step 2
3 From “ ”, select this system as the output
speakers.
• Depending on the service, you might need to open full
screen player to display “ ”.
• If you have multiple speakers powered by AllPlay, you
can enjoy synchronised sound from them. Select
“Group” and then select the speakers to group.
Note:
• This system will be displayed as “Panasonic PMX152” or
“Panasonic PMX150” if the device name is not set.
• Registration/subscription is required.
• Fees may apply.
• Services, icons, and specifications are subject to change.
• For details, visit the individual music service’s website.
TQBJ0992
9

Streaming music on this system Storing stations under (NET PRESET)
You can use the app “Panasonic Music Streaming” (9) to
stream this system’s music source (radio/CD/ Bluetooth
AUX/USB/PC source) to other
.
AllPlay
Preparation
• Complete the network settings. ( 6)
• Prepare the desired audio source on this system (e.g.
insert a CD, etc.)
• Install the app “Panasonic Music Streaming” on your
device.
• Connect your device and your speakers powered by
AllPlay to the same network as this system.
speakers powered by
1 Turn this system on.
• Check that “ ” is indicated on the display.
• If it is not indicated, check the network settings. (6)
2 Start the app “Panasonic Music Streaming”.
• Always use the latest version of the app.
3 From “Speaker”, select the speaker to stream
this system’s audio.
• To stream this system’s audio to other speakers
powered by AllPlay, drag e.g., “ ” of the desired
speakers over each other.
4 Select your desired music source from the list.
5 Select this system.
The device will start to read the selected music
source’s information from this system.
• This system will change to the selector mode for the
selected music source.
• The speaker selected in step 3 and this system will be
automatically grouped together.
• Depending on the selected music source, playback
may start. If a content list appears on your device,
select the desired content to start playback.
• The number of speakers powered by AllPlay that can
perform playback at the same time differs depending
on the situation of use.
• When you turn off one of the speakers powered by
AllPlay, other speakers in the same group may stop the
playback.
•
DSD 5.6 MHz file can be played on this system but
cannot be streamed to other speakers in the same group.
TQBJ0992
Note:
• This system will be displayed as “Panasonic PMX152” or
10
“Panasonic PMX150” if the device name is not set.
• When enjoying video contents with this function, the video
and audio output may not be synchronised.
[1] to [6]
®
/
(Only when playback using internet
radio app)
This unit is compatible with the Qualcomm®
AllPlay™ Radio powered by TuneIn.
You can preset stations when playback using
internet radio app “AllPlay Radio”.
Qualcomm® AllPlay™ Radio powered by TuneIn is a product of
Qualcomm Technologies, Inc.
You can store up to 6 stations under (NET PRESET) [1]
to [6].
• A station previously stored is overwritten when another
station is stored under the same (NET PRESET) [1] to
[6].
Preparation
• Make sure that the network is connected to the
Internet.
• Connect a device with an “AllPlay Radio” app installed
to the same network as this system.
1 Turn this system on.
• Check that “ ” is indicated on the display.
• If it is not indicated, check the network settings. ( 6)
2 Start the app “AllPlay Radio”, and select a
station to playback.
• Always use the latest version of the app.
3 Press and hold one of [1] to [6] until “NET P ”
appears on the display.
(“ ” stands for a number.)
∫ Listening to a stored station
Press one of [1] to [6].
• Press [NET PRESET] first if the current selector is
other than NETWORK.
Note:
• If the selected preset channel has not been preset, “No
Preset” is displayed.
• If you press [NET PRESET], the last preset station can be
recalled.
Alternatively, press and hold [SELECTOR, -NET PRESET]
on the main unit.
• To select preset stations by the main unit
– Press and hold [SELECTOR, -NET PRESET], then
press [:/6] or [5/9].
Using AirPlay
AirPlay works with iPhone, iPad, and iPod touch with
iOS 4.3.3 or later, Mac with OS X Mountain Lion or later,
and PC with iTunes 10.2.2 or later.
Preparation
• Complete the network settings. ( 6)
• Connect the iOS device or PC to the same home
network as this system.
1 Turn this system on.
• Check that “ ” is indicated on the display.
• If it is not indicated, check the network settings. ( 6)
2 iOS device: Start the “Music” (or iPod) app.
PC: Start “iTunes”.
• If the Music app on your iOS device is used, select the
audio file you want to play.
3 Select “Panasonic PMX152 ” or
“Panasonic PMX150 ”*
AirPlay icon.
• Check the volume settings before starting the
playback. (When AirPlay is used for the first time, the
volume may be output at the maximum setting.)
1, 2
from the
4 Start play.
• The playback will start with a slight delay.
Note:
• This system can be set to turn on automatically when this
system is selected as the output speakers.
( 18, “Network standby”)
• Volume changes on the iOS device or iTunes will be
applied to this system. (Refer to the iTunes Help for the
required settings in iTunes.)
• With some iOS and iTunes versions, it may not be possible
to restart the AirPlay playback if the selector is changed
(e.g., “CD”) or this system is turned off, during the AirPlay
playback.
In this case, select a different device from the AirPlay icon
of the Music App or iTunes and then re-select this system
as the output speakers.
• AirPlay will not work when playing back videos on iTunes.
*1: “
” stands for a character that is unique to each set.
*2: The name that is displayed for this system can be
changed from “To make network-related settings”. ( 8)
About Bluetooth
Panasonic bears no responsibility for data and/or
information that is compromised during a
wireless transmission.
Frequency band used
• This system uses the 2.4 GHz frequency band.
Certification of this device
• This system conforms to frequency restrictions and
has received certification based on frequency laws.
Thus, a wireless permit is not necessary.
• The actions below are punishable by law in some
countries:
- Taking apart or modifying this system.
- Removing specification indications.
Restrictions of use
• Wireless transmission and/or usage with all Bluetooth
equipped devices is not guaranteed.
• All devices must conform to standards set by Bluetooth
SIG, Inc.
• Depending on the specifications and settings of a
device, it can fail to connect or some operations can be
different.
• This system supports Bluetooth
depending on the operating environment and/or
settings, this security is possibly not sufficient.
Transmit data wirelessly to this system with caution.
• This system cannot transmit data to a Bluetooth
device.
Range of use
• Use this device at a maximum range of 10 m.
The range can decrease depending on the
environment, obstacles or interference.
Interference from other devices
• This system may not function properly and troubles
such as noise and sound jumps may arise due to radio
wave interference if this system is located too close to
other Bluetooth
2.4 GHz band.
• This system may not function properly if radio waves
from a nearby broadcasting station, etc. is too strong.
Intended usage
• This system is for normal, general use only.
• Do not use this system near an equipment or in an
environment that is sensitive to radio frequency
interference (example: airports, hospitals, laboratories,
etc).
®
®
security features. But
®
®
devices or the devices that use the
Bluetooth® operations
By using the Bluetooth® connection, you can listen to the
sound from the Bluetooth
wirelessly.
• Refer to the operating instructions of the Bluetooth
device for details.
Connecting via Bluetooth® menu
Preparation
• Turn on the Bluetooth
the device near this unit.
Pairing with Bluetooth® devices
®
audio device from this system
®
feature of the device and place
1 Press [ ] to select “BLUETOOTH”.
®
If “Pairing” is indicated on the display, go to step 3.
2 Press [PLAY MENU] to select “Pairing” and then
press [OK].
• Alternatively, press and hold [ -PAIRING] on the
unit.
3 Select “SC-PMX152” or “SC-PMX150” from the
Bluetooth
• The MAC address (e.g., 6C:5A:B5:B3:1D:0F) may be
• The name of the connected device is indicated on the
4 Start playback on the Bluetooth
®
device’s Bluetooth® menu.
displayed before “SC-PMX152” or “SC-PMX150” is
displayed.
display for a few seconds.
®
device.
Connecting a paired Bluetooth® device
1 Press [ ] to select “BLUETOOTH”.
®
“Ready” is indicated on the display.
2 Select “SC-PMX152” or “SC-PMX150” from the
Bluetooth
The name of the connected device is indicated on
the display for a few seconds.
3 Start playback on the Bluetooth
Note:
• If prompted for the passkey, input “0000”.
• You can register up to 8 devices with this unit. If a 9th
device is paired, the device that has not been used for the
longest will be replaced.
• This unit can only be connected to one device at a time.
• When “BLUETOOTH” is selected as the source, this unit
will automatically try and connect to the last connected
Bluetooth
during this process.) If the connection attempt fails, try to
establish a connection again.
®
device’s Bluetooth® menu.
®
device.
®
device. (“Linking” is indicated on the display
Bluetooth® transmission mode
You can change the transmission mode to prioritise
transmission quality or sound quality.
Preparation
• Press [ ] to select “BLUETOOTH”.
• If a Bluetooth
it.
®
device is already connected, disconnect
1 Press [PLAY MENU] repeatedly to select
“Link Mode”.
2 Press [2, 1] to select the mode and then press
[OK].
Mode 1: Emphasis on connectivity
Mode 2: Emphasis on sound quality
Note:
• Select “Mode 1” if the sound is interrupted.
• When enjoying video contents with this function, the video
and audio output may not be synchronised. In this case,
select “Mode 1”.
• The factory default is “Mode 2”.
TQBJ0992
11
 Loading...