

Page 1

Settings and Printing Network
Maintenance and Spec.
Maintenance and Spec.
Maintenance and
Specifications
User Replaceable Components . . . . . . . . . . . . . . . . . . . . . . . . . . 2
Upgrade Options . . . . . . . . . . . . . . . . . . . . . . . . . . . . . . . . . . . . . . . . 6
Cleaning the Printer. . . . . . . . . . . . . . . . . . . . . . . . . . . . . . . . . . . . 7
External . . . . . . . . . . . . . . . . . . . . . . . . . . . . . . . . . . . . . . . . . . . . . . . 7
Internal. . . . . . . . . . . . . . . . . . . . . . . . . . . . . . . . . . . . . . . . . . . . . . . . 7
Clearing a Jam . . . . . . . . . . . . . . . . . . . . . . . . . . . . . . . . . . . . . . . 14
Jam 1 . . . . . . . . . . . . . . . . . . . . . . . . . . . . . . . . . . . . . . . . . . . . . . . . 15
Jam 2 . . . . . . . . . . . . . . . . . . . . . . . . . . . . . . . . . . . . . . . . . . . . . . . . 17
Jam 3, 5, 6, 8, 9 . . . . . . . . . . . . . . . . . . . . . . . . . . . . . . . . . . . . . . . . 18
Jam 4, 7 . . . . . . . . . . . . . . . . . . . . . . . . . . . . . . . . . . . . . . . . . . . . . . 19
Jam 21, 22 . . . . . . . . . . . . . . . . . . . . . . . . . . . . . . . . . . . . . . . . . . . . 23
Jam 31 . . . . . . . . . . . . . . . . . . . . . . . . . . . . . . . . . . . . . . . . . . . . . . . 25
Troubleshooting . . . . . . . . . . . . . . . . . . . . . . . . . . . . . . . . . . . . . 26
Warning / Printer Error Messages . . . . . . . . . . . . . . . . . . . . . . . 52
Printer LCD Panel . . . . . . . . . . . . . . . . . . . . . . . . . . . . . . . . . . . . . . 52
Repacking. . . . . . . . . . . . . . . . . . . . . . . . . . . . . . . . . . . . . . . . . . . 70
Specifications . . . . . . . . . . . . . . . . . . . . . . . . . . . . . . . . . . . . . . . 83
Printer . . . . . . . . . . . . . . . . . . . . . . . . . . . . . . . . . . . . . . . . . . . . . . . 83
Media . . . . . . . . . . . . . . . . . . . . . . . . . . . . . . . . . . . . . . . . . . . . . . . . 86
Controller . . . . . . . . . . . . . . . . . . . . . . . . . . . . . . . . . . . . . . . . . . . . . 97
HOST . . . . . . . . . . . . . . . . . . . . . . . . . . . . . . . . . . . . . . . . . . . . . . . . 98
Utility . . . . . . . . . . . . . . . . . . . . . . . . . . . . . . . . . . . . . . . . . . . . . . . . 98
Parallel (IEEE1284) Interface . . . . . . . . . . . . . . . . . . . . . . . . . . . . 100
USB (Universal Serial Bus) Interface. . . . . . . . . . . . . . . . . . . . . . . 102
Network Interface. . . . . . . . . . . . . . . . . . . . . . . . . . . . . . . . . . . . . . 103
1
Page 2

Settings and Printing Network
Maintenance and Spec.
Maintenance and Spec.
User Replaceable Components
User Replaceable Components
When the printer panel indicates that a supply needs to be replaced, make sure that you have
replacement supplies (see below) on hand. The printer may continue to print until the supply is
completely used up.
• Toner cartridge
• Waste toner cartridge
• Print cartridge
• Fuser unit
• Accumulator unit
• Transfer roller
Please contact the reseller from which the printer was purchased.
2
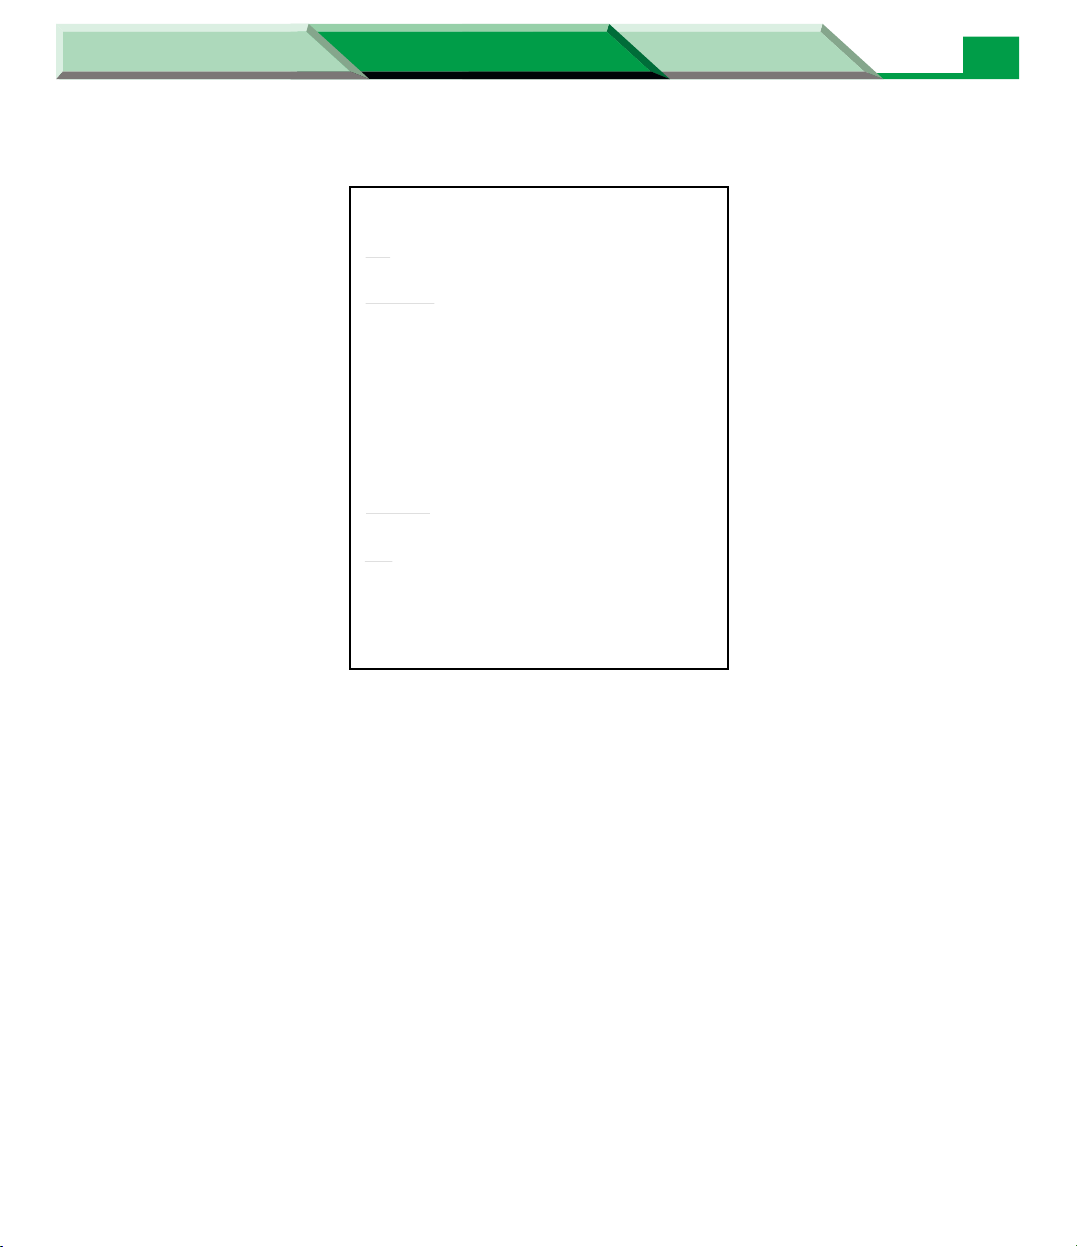
Printer component Printer panel message
Toner cartridge
(Status)*
Low <Color> Toner
(Have the <Color> toner cartridge available.)
TC- <Color>
Replace
(Replace the <Color> toner cartridge.)
1
*
The rated life expectancy of each consumable is based on printing under specific operating
conditions such as page coverage for a particular page size (5% coverage per color at 600 x 600
dpi resolution on letter size paper). The actual consumables life will vary depending on its use
and other printing variables including page coverage, page size, media type, print resolution,
continuous or intermittent printing, number of color planes, ambient temperature and humidity.
2
*
Printer includes free starter toner cartridges that yield 2,500 pages (based on 5% page coverage
per color).
3
Ready, Ready(PCM), Processing, Printing or Power Save etc. is displayed in the upper line of
*
LCD.
3
Average life*
5,000 pages*
(5% coverage)
1
2
Page 3
Settings and Printing Network
Maintenance and Spec.
Maintenance and Spec.
User Replaceable Components
Printer component Printer panel message Average life
Waste toner cartridge
(Status)*
WTC Full
1
24,000 pages
(Black and White 5% coverage)
(Have the waste toner cartridge available.)
6,000 pages
(Full color -
WTC
5% coverage)
Replace
(Replace the waste toner cartridge.)
Print cartridge
(Status)*
1
13,000 pages
PC-Black wearing out
(Have the black print cartridge available.)
3
(Status)*
1
PC-Black Replace
(Replace the black print cartridge.)
(Status)*
1
13,000 pages
PC-Color wearing out
(Have the color print cartridge available.)
(Status)*
1
PC-Color Replace
(Replace the color print cartridge.)
Fuser unit
(Status)*
1
100,000 pages
FSR wearing out
(Have the fuser unit available.)
(Status)*
1
FSR Replace
(Replace the fuser unit.)
*1Ready, Ready(PCM), Processing, Printing or Power Save etc. is displayed in the upper line of
LCD.
Page 4
Settings and Printing Network
Maintenance and Spec.
Maintenance and Spec.
User Replaceable Components
Printer component Printer panel message Average life
4
Accumulator unit
(Status)*
1
83,000 pages
AU wearing out
(Have the accumulator unit available.)
(Status)*
1
AU Replace
(Replace the accumulator unit.)
Transfer roller
(Status)*
1
100,000 pages
TR wearing out
(Have the transfer roller available.)
(Status)*
1
TR Replace
(Replace the transfer roller.)
*1Ready, Ready(PCM), Processing, Printing or Power Save etc. is displayed in the upper line of
LCD.
Page 5
Settings and Printing Network
Maintenance and Spec.
Maintenance and Spec.
User Replaceable Components
Example (5% coverage)
Personal Image Editing System
Feature:
Congratulations on your purchase of the XX-XXXX, the three-in-one solution to today's office
needs. This amasing little desktop unit can be used as a : Printer, Scanner, Copier.
Printer Specification
Printing Method:
Print Speed:
Resolution:
Paper Feed:
Paper Outout:
Software Emulation:
Paper Size/Weight:
Memory Capacity:
Dimensions:
Mass (Weight):
Consumables:
Noise Level:
CPU:
Other Specification
Operating Environment:
Storing Environment:
Feature:
Congratulations on your purchase of the XX-XXXX, the three-in-one solution to today's office
needs. This amasing little desktop unit can be used as a : Printer, Scanner, Copier.
❈ Application Soft : Text Bridge, Card Scan
Model No. XX-XXXX
Semiconductor Laser Electro-Photography
X ppm maximum (A4 size paper, text mode, 5 % image area)
600 dpi X 600 dpi
1 Multi-purpose manual feed up to 250 sheets of paper [75 g/m
Face-down paper ejection (up to 150 sheets) [75 g/m
GDI + Soft XXXX
Letter, Legal, A4, Envelope, Executive, OHP, Label
2 MB
399 (W) X 390 (D) X 254 (H) mm (15.7" X 15.4" X 10")
Approx. 10 Kg (22 lbs.)
Starter toner cartridge : 20,000 pages average
Toner cartridge: 4,000 pages average
Drum unit: 20,000 pages average
Printing: 48 dBA
Stadby: 27 dBA
Intel 80C51 compatible
10 to 32.5ûC [50 to 90.5ûF] 20 to 80% RH
0 to 35ûC [32 to 95ûF] 20 to 80% RH
2
(20 lbs.)]
2
(20 lbs.)]
5
! Waste Disposal Method
Waste material may be dumped or incinerated under conditions which meet all federal, state and local
environmental regulations.
WARNING
• Do not incinerate toner or toner containers. Toner dust may cause flashback when exposed to an
open flame.
Page 6

Settings and Printing Network
Maintenance and Spec.
Maintenance and Spec.
User Replaceable Components
Upgrade Options
The following upgrade options can be installed in the printer.
Please contact the reseller from which the printer was purchased.
CLHD20: Hard Disk Drive (20 GB 2.5")
The Check and Print, Memory Print, and Confidential Print (PCL printer driver only) are available
in Windows only (not available in Macintosh) by installing this option.
Refer to the installation manual included in the option's carton to install it.
DA-DS1: Optional Paper Feeder
An additional cassette can be used by installing this option. This option can be installed up to two
units. Refer to the installation manual included in the option's carton to install it.
CLEM256: 256MB DIMM (Optional Memory)
It is strongly recommended to install this option if printing documents in Enhance mode or Duplex
mode. If the printer is not equipped with the optional memory, the Memory Overflow error may
occur and it causes the deterioration of the image quality. Refer to the installation manual included
in the option's carton to install it.
6
DA-MC1: Upgrade Kit (for PostScript 3)
Printing for PostScript is available from Windows or Macintosh by installing this option.
This option is for DP-CL21P only.
Refer to the installation manual included in the option's carton to install it.
Page 7
Settings and Printing Network
Maintenance and Spec.
Maintenance and Spec.
Cleaning the Printer
Cleaning the Printer
Periodic cleaning of the printer is recommended. The frequency of cleaning is dependent upon the
environment in which the printer is used. You should clean the printer:
• At least once a month.
• When the printer experiences frequent media jams.
• When print quality has become deteriorated.
External
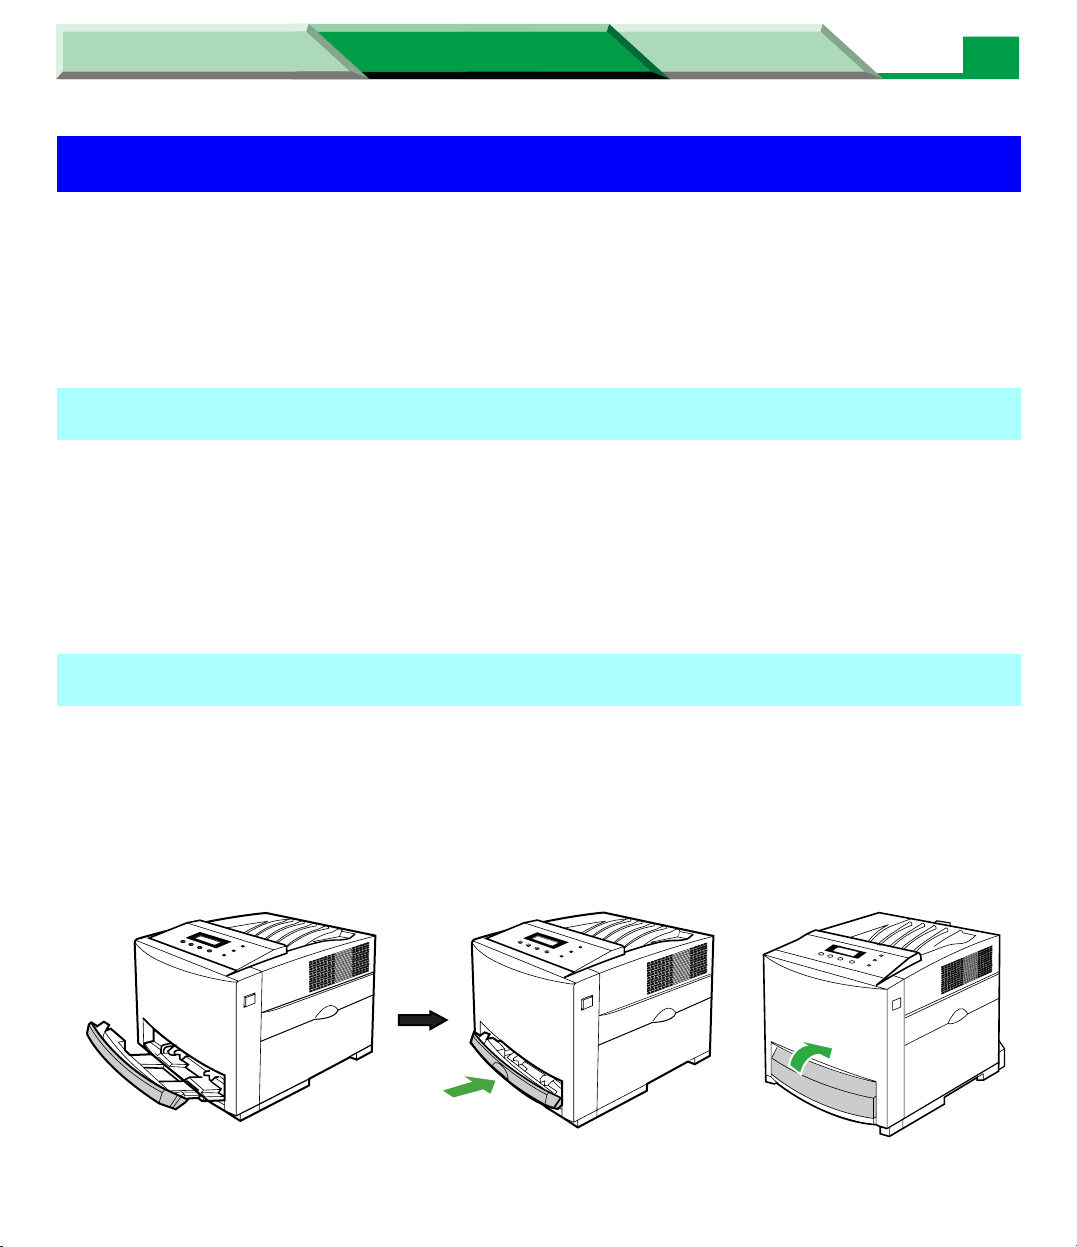
1 Turn the power OFF.
2 Clean all the covers with a soft cloth. Use any mild commercial cleaner.
CAUTION
• Do not use benzene, thinner, aerosol cleaners, or any abrasive powder.
7
Internal
When using isopropyl alcohol with a lint-free cloth, make sure that the alcohol is at least 90% pure,
obtainable from your local pharmacy. (Do not use rubbing alcohol; it can damage the printer.)
NOTE:
• If using the multi-purpose tray or opening the tray cover, be sure to push the multi-purpose tray and
close the tray cover before you pull the media tray out of the printer or open the front door.
2
1
Page 8
Settings and Printing Network
Maintenance and Spec.
Maintenance and Spec.
Cleaning the Printer
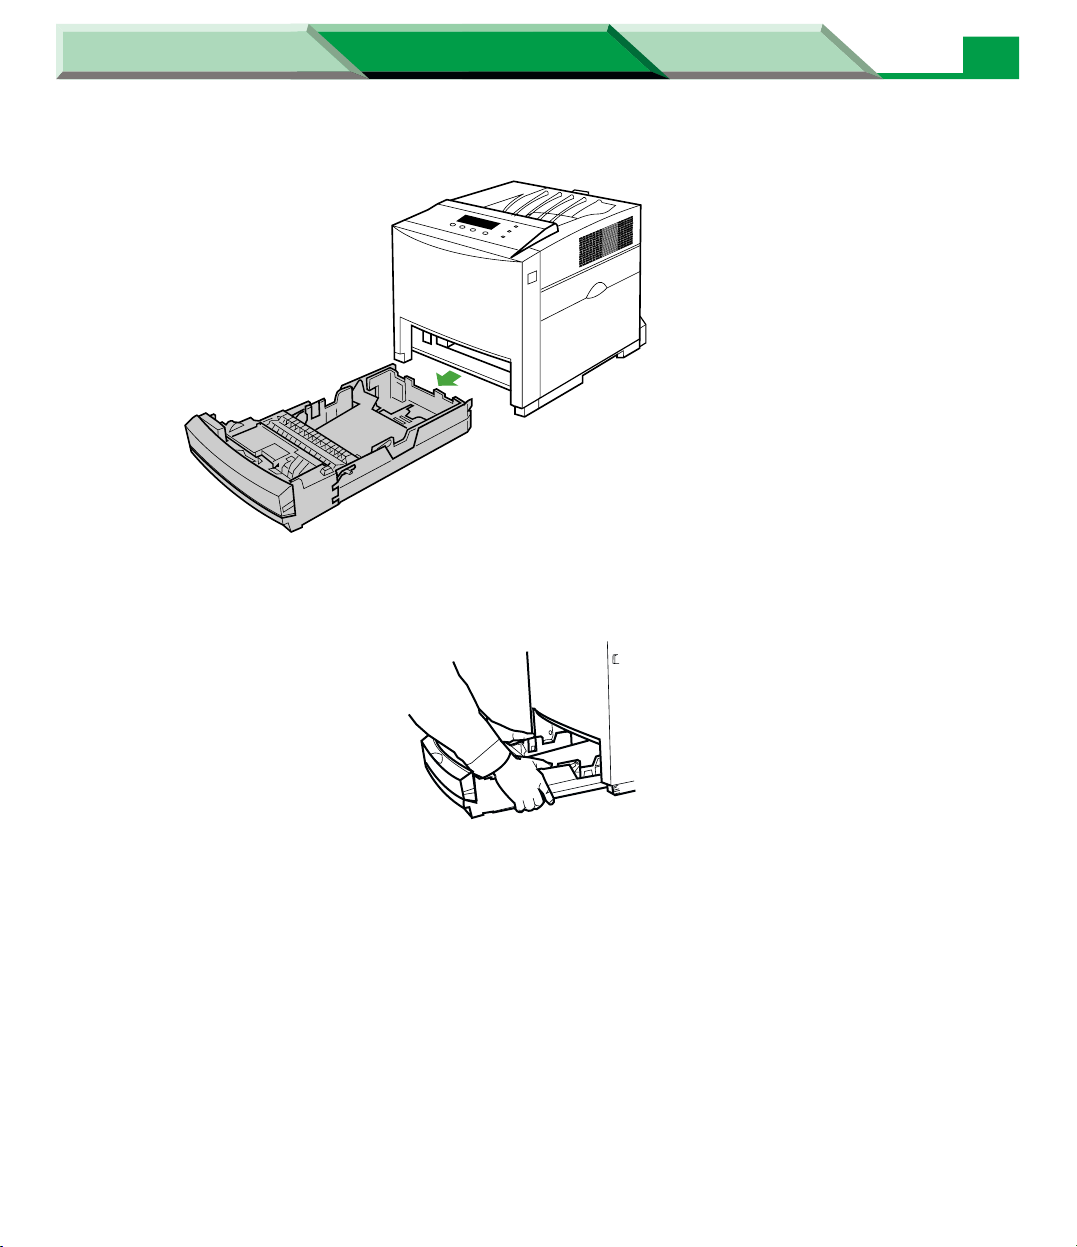
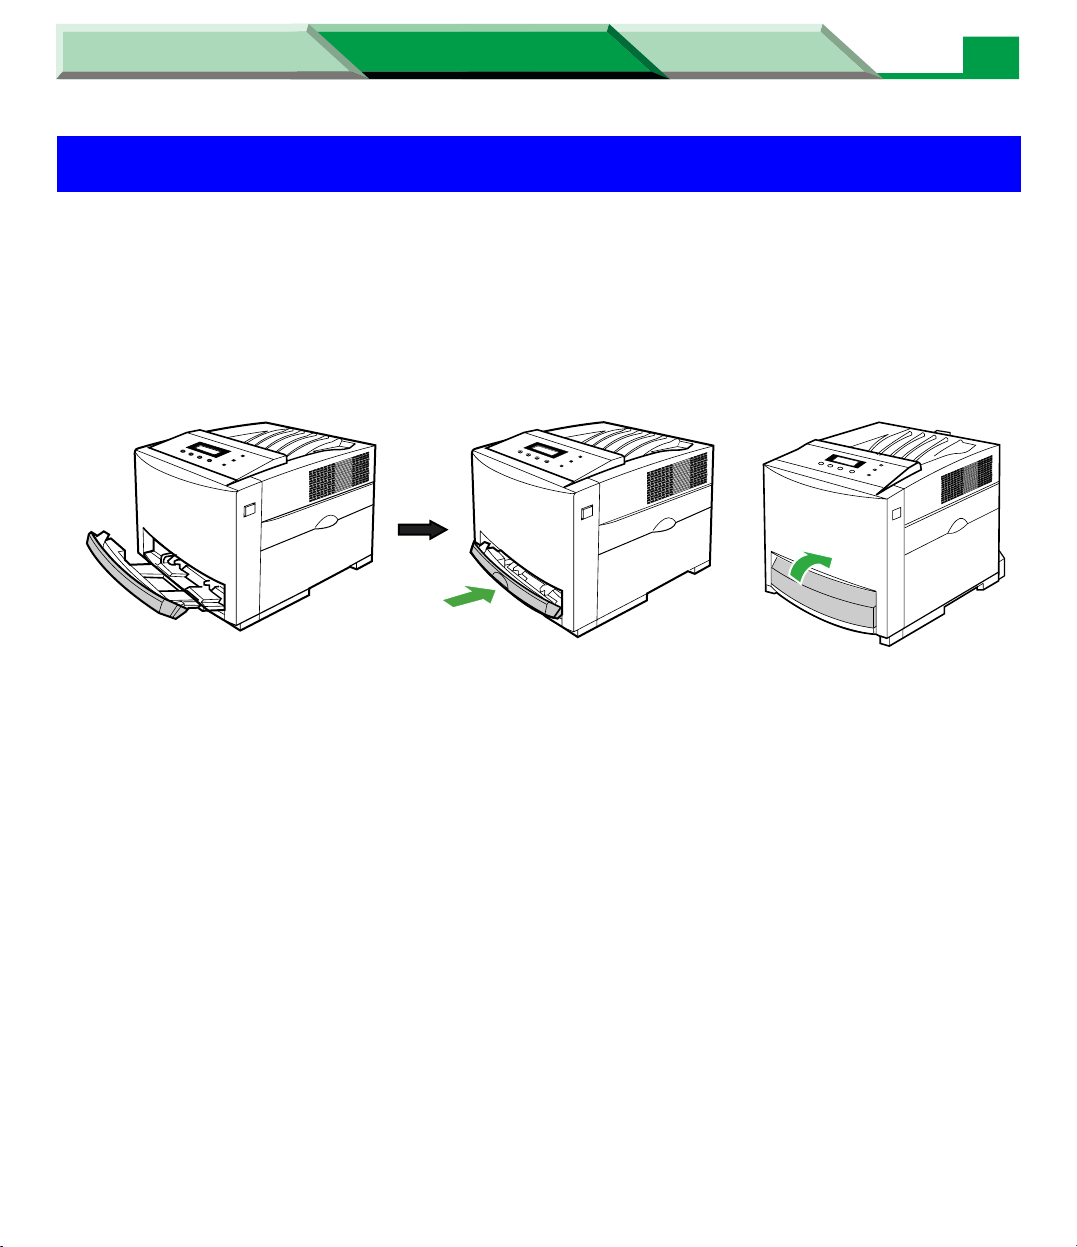
1 Pull the media tray out of the printer while slightly raising its front portion.
CAUTION
• Be sure to hold the media tray with both hands so you do not drop it.
8
2 Remove media from the media tray.
3 Turn over the media tray.
Page 9
Settings and Printing Network
2
1
Maintenance and Spec.
Maintenance and Spec.
Cleaning the Printer
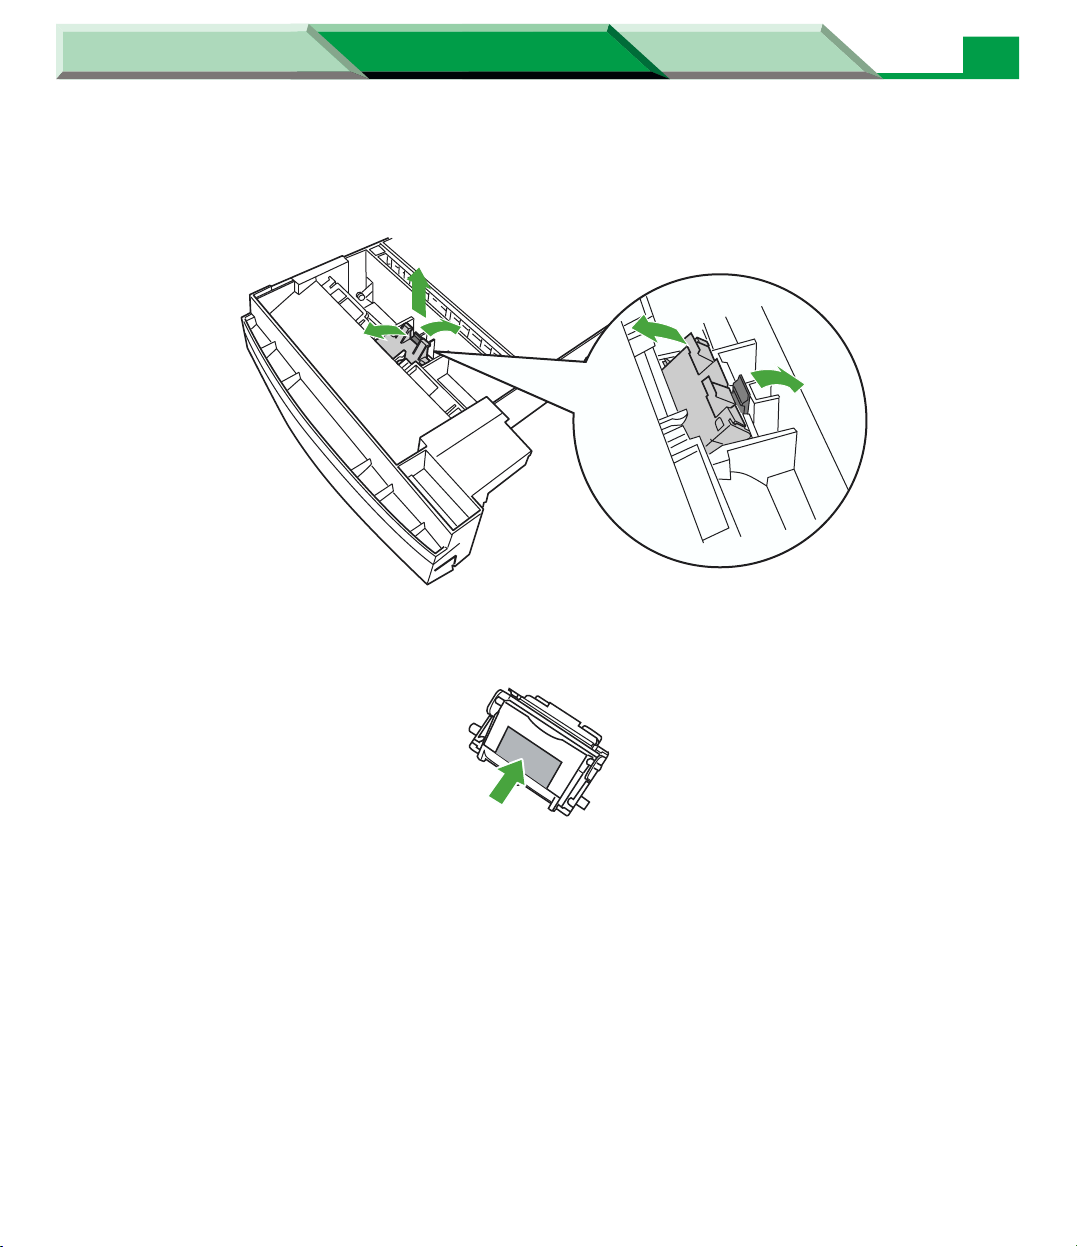
4 Pull the delay pad (2) while pushing the tab (1), then remove the delay
pad (3).
3
9
2
5 Clean the pad.
6 Turn over the media tray.
1
2
1
Page 10
Settings and Printing Network
1
2
Maintenance and Spec.
Maintenance and Spec.
Cleaning the Printer
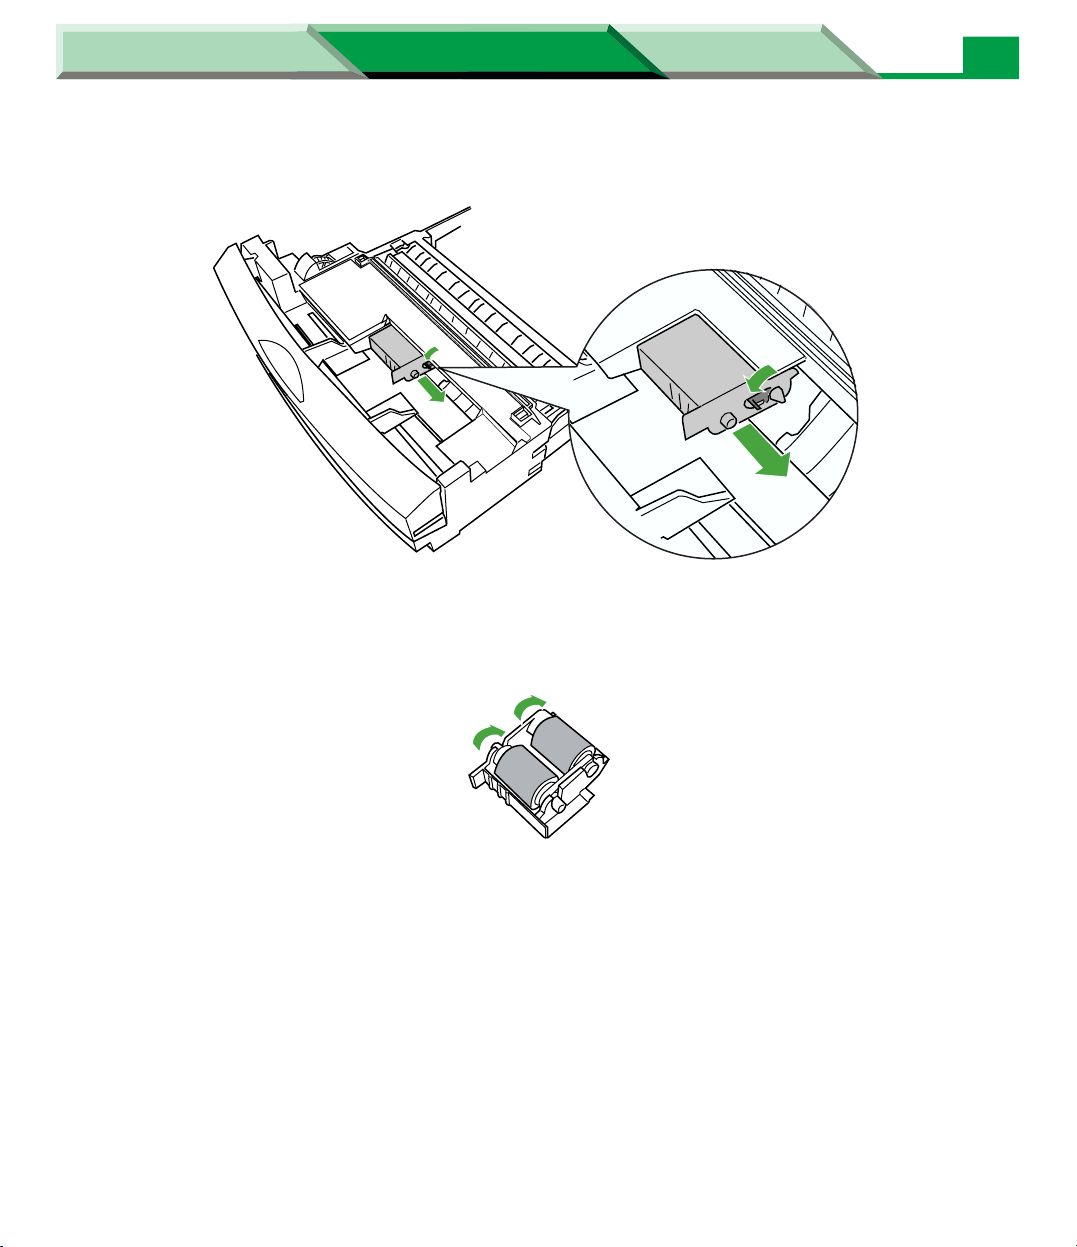
7 Remove the pickup roller (2) while pushing the tab (1).
1
2
8 Wipe the rollers with a lint-free cloth that has been moistened with
10
isopropyl alcohol while rotating it.
Page 11
Settings and Printing Network
2
1
Maintenance and Spec.
Maintenance and Spec.
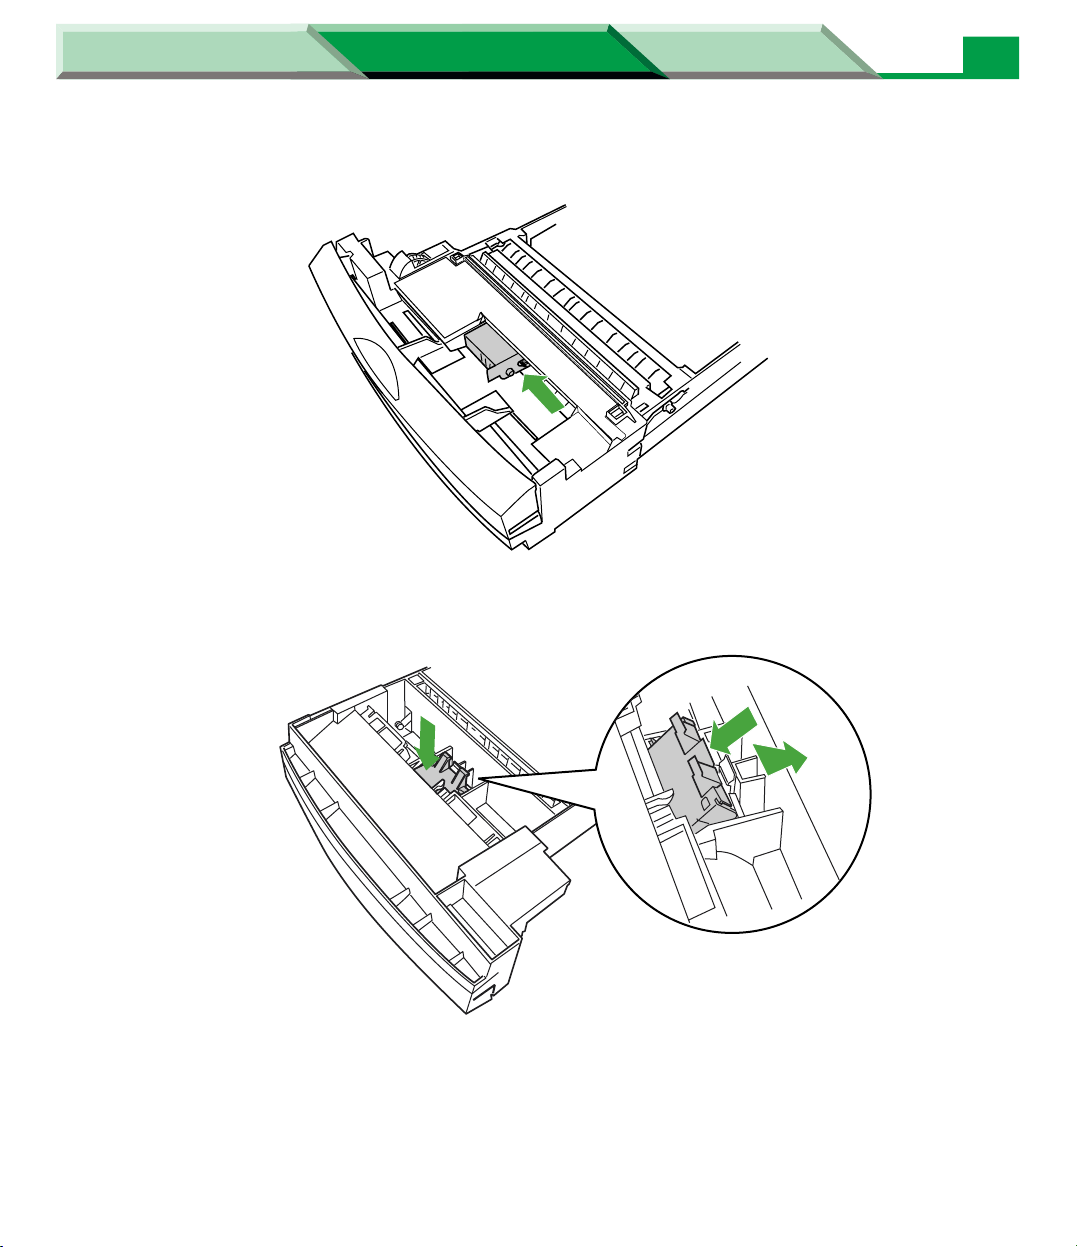
9 Install the pickup roller.
10 Turn over the media tray and install the delay pad.
11
Cleaning the Printer
Page 12
Settings and Printing Network
Maintenance and Spec.
Maintenance and Spec.
Cleaning the Printer
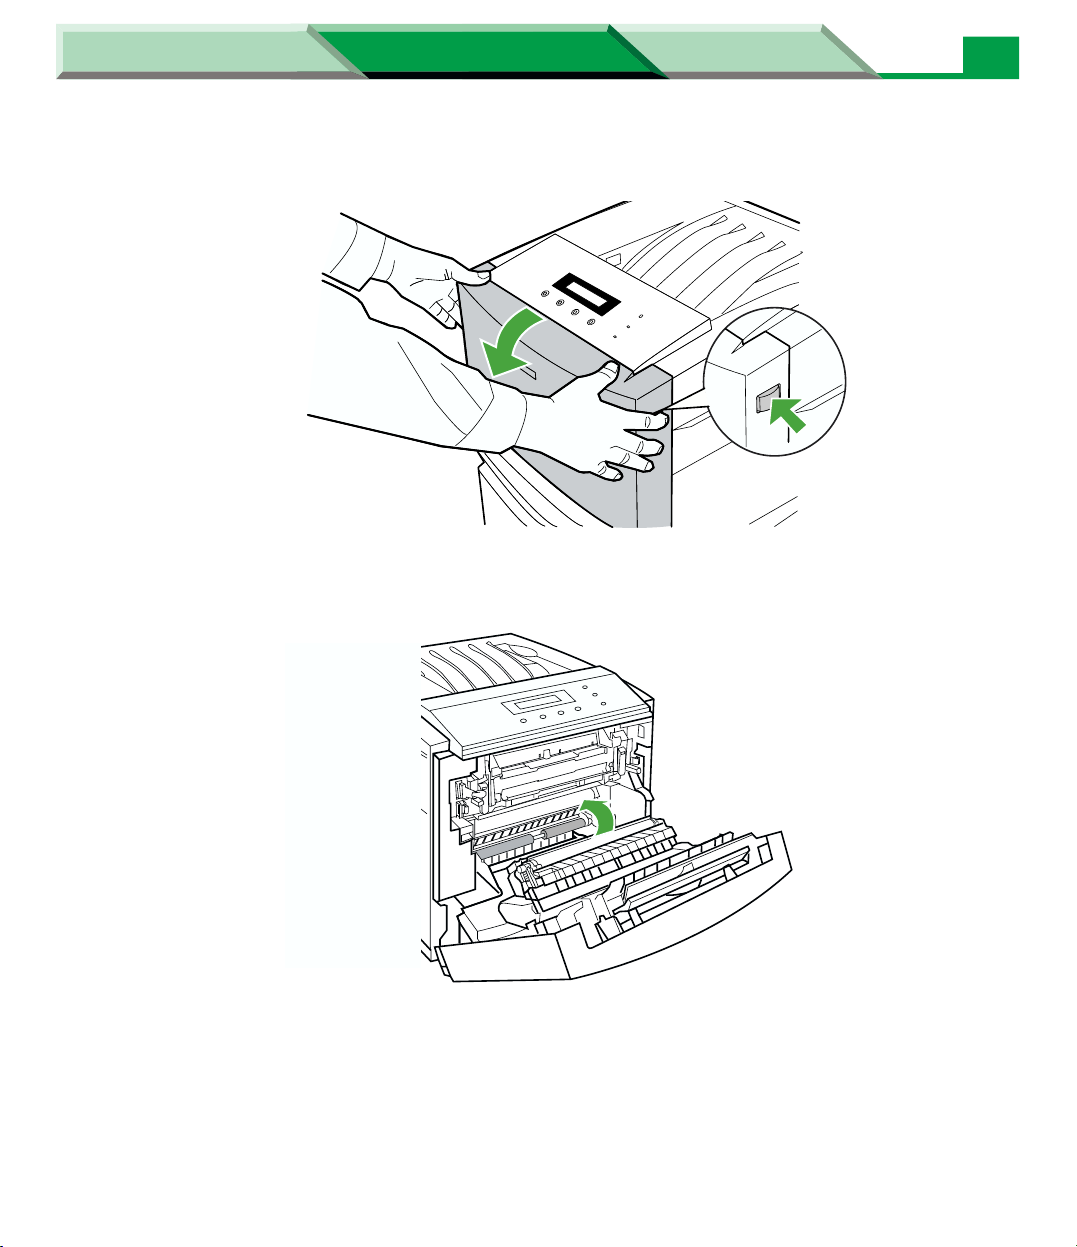
11 Push the front door release button (1) and open the front door (2).
222
11
12 Clean the roller while rotating it.
12
Page 13
Settings and Printing Network
Maintenance and Spec.
Maintenance and Spec.
Cleaning the Printer
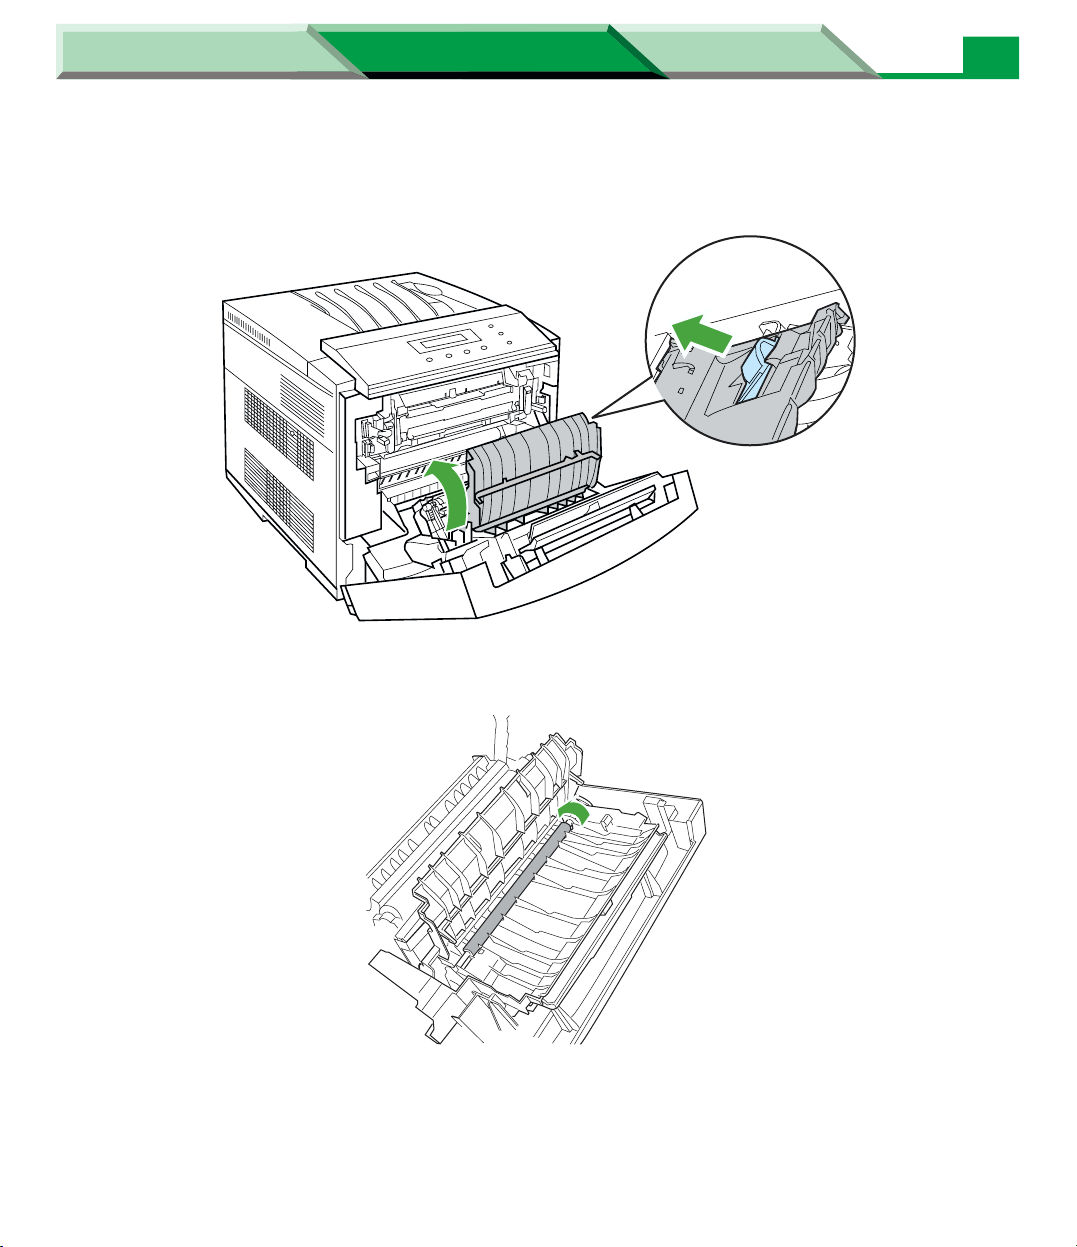
13 If the Automatic Duplex Unit is installed in the printer, pull the lock lever
(1) and open the cover (2).
1
22
13
14 Clean the roller while rotating it.
15 Close the cover of the Automatic Duplex Unit.
16 Close the front door.
17 Place media in the media tray and install the media tray.
Page 14
Settings and Printing Network
Maintenance and Spec.
Maintenance and Spec.
Clearing a Jam
Clearing a Jam
If the printer has frequent media jams, make sure that you follow these guidelines:
If a media jam occurs, the printer panel reports “Jam <#>”.
NOTE:
• When a media jam occurs while you are using the multi-purpose tray, be sure to push the multipurpose tray and close the tray cover before you pull the media tray out of the printer or open the front
door.
2
1
14
Page 15
Settings and Printing Network
Maintenance and Spec.
Maintenance and Spec.
Clearing a Jam
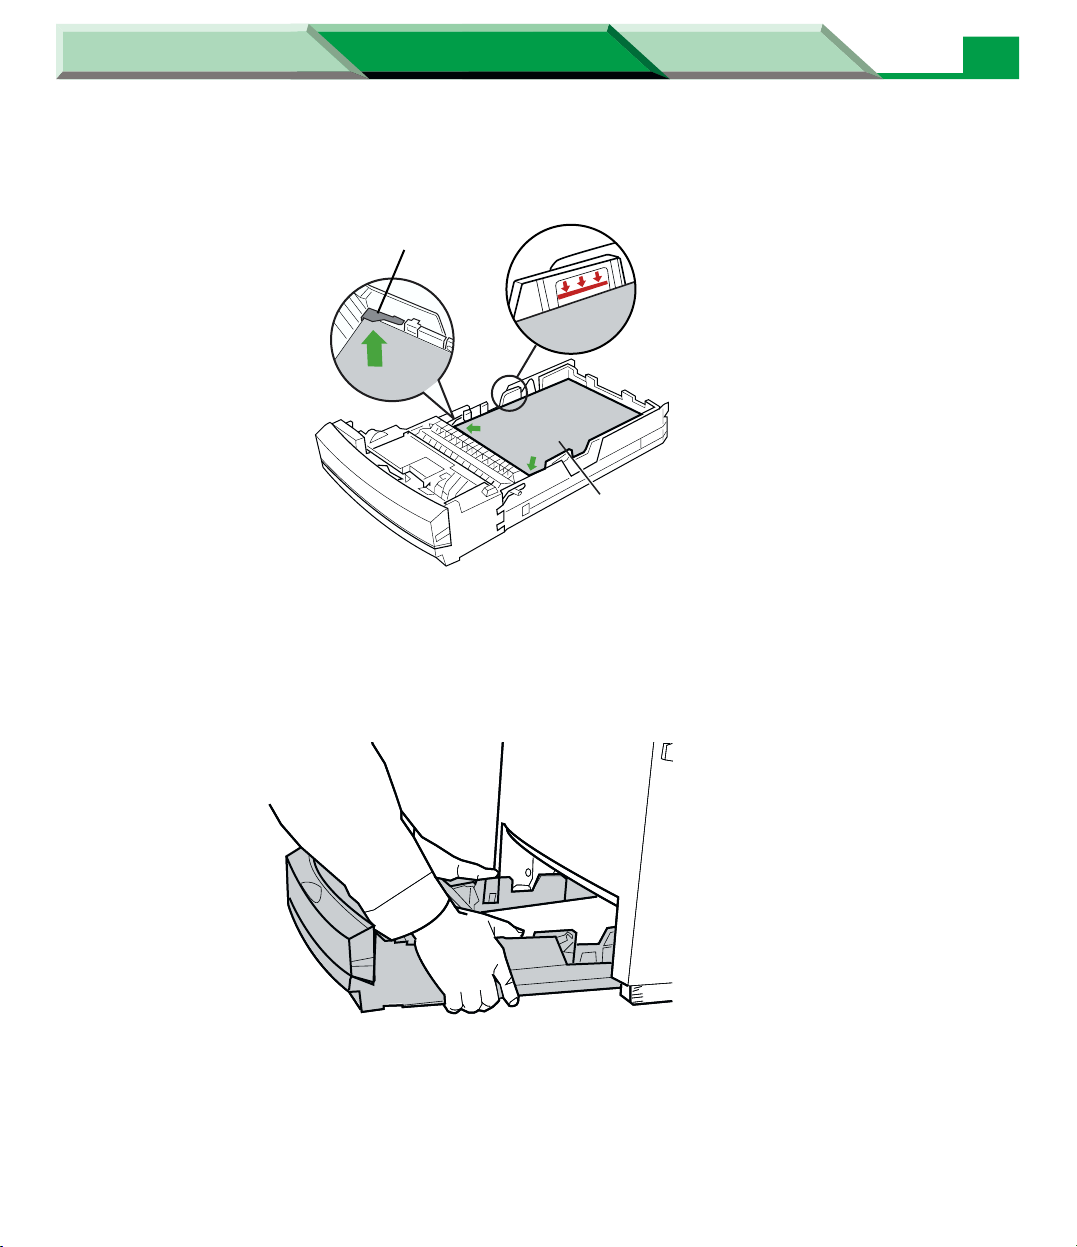
Jam 1
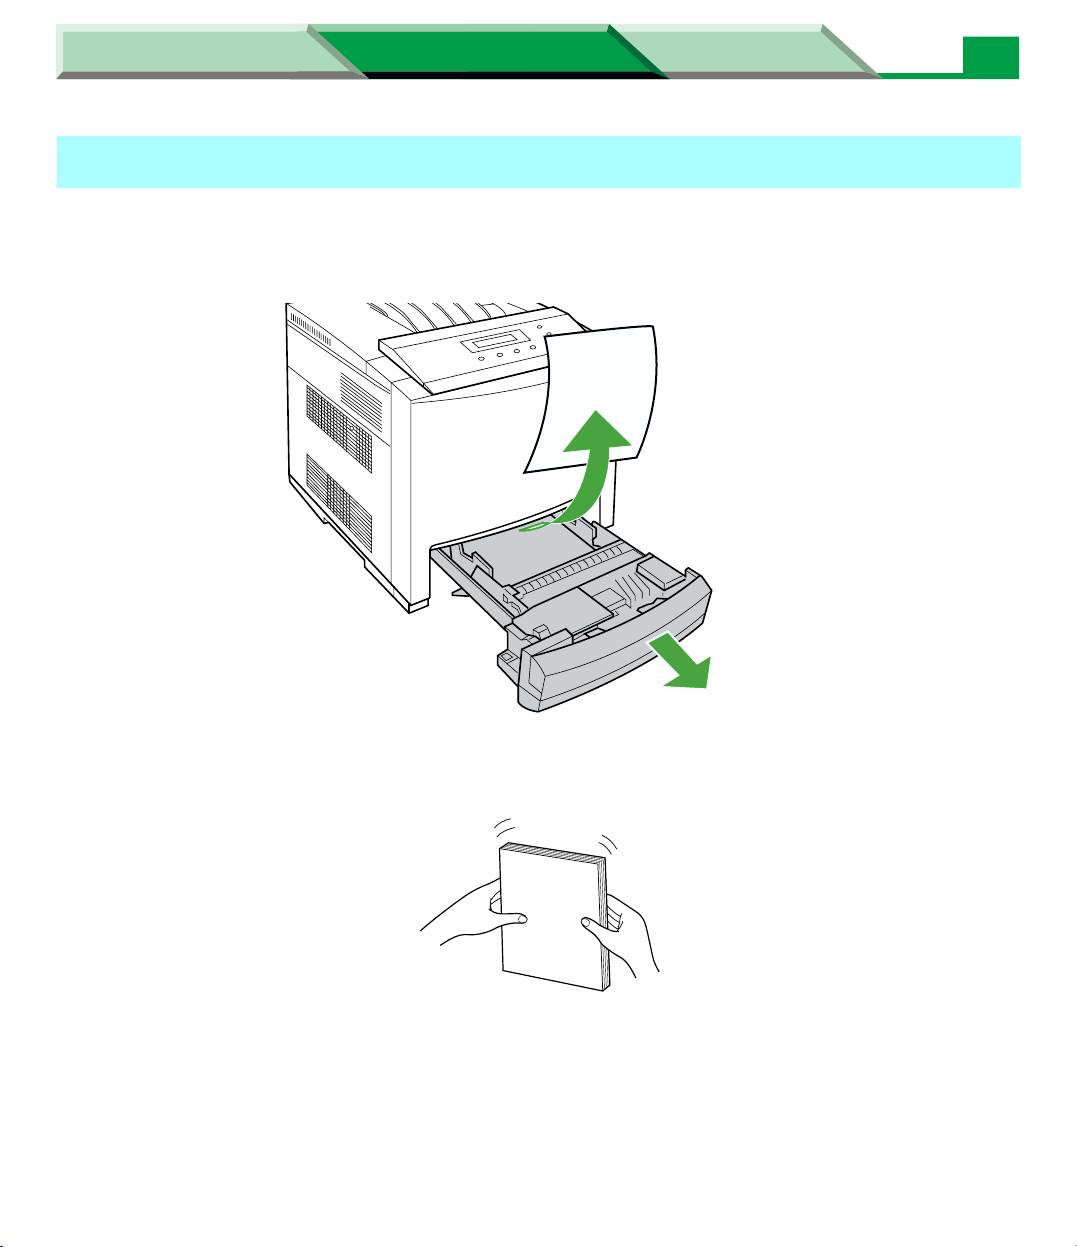
1 Pull the media tray (1) out of the printer. Then remove jammed media (2).
• Be sure the tray cover is closed before you pull the media tray out of the printer.
2
15
1
2 Tap the media stack on a level surface to avoid media jams or skewed
printing.
• If a media feed error has occurred, remove the media stack from the media tray and tap it.
Page 16
Settings and Printing Network
Maintenance and Spec.
Maintenance and Spec.
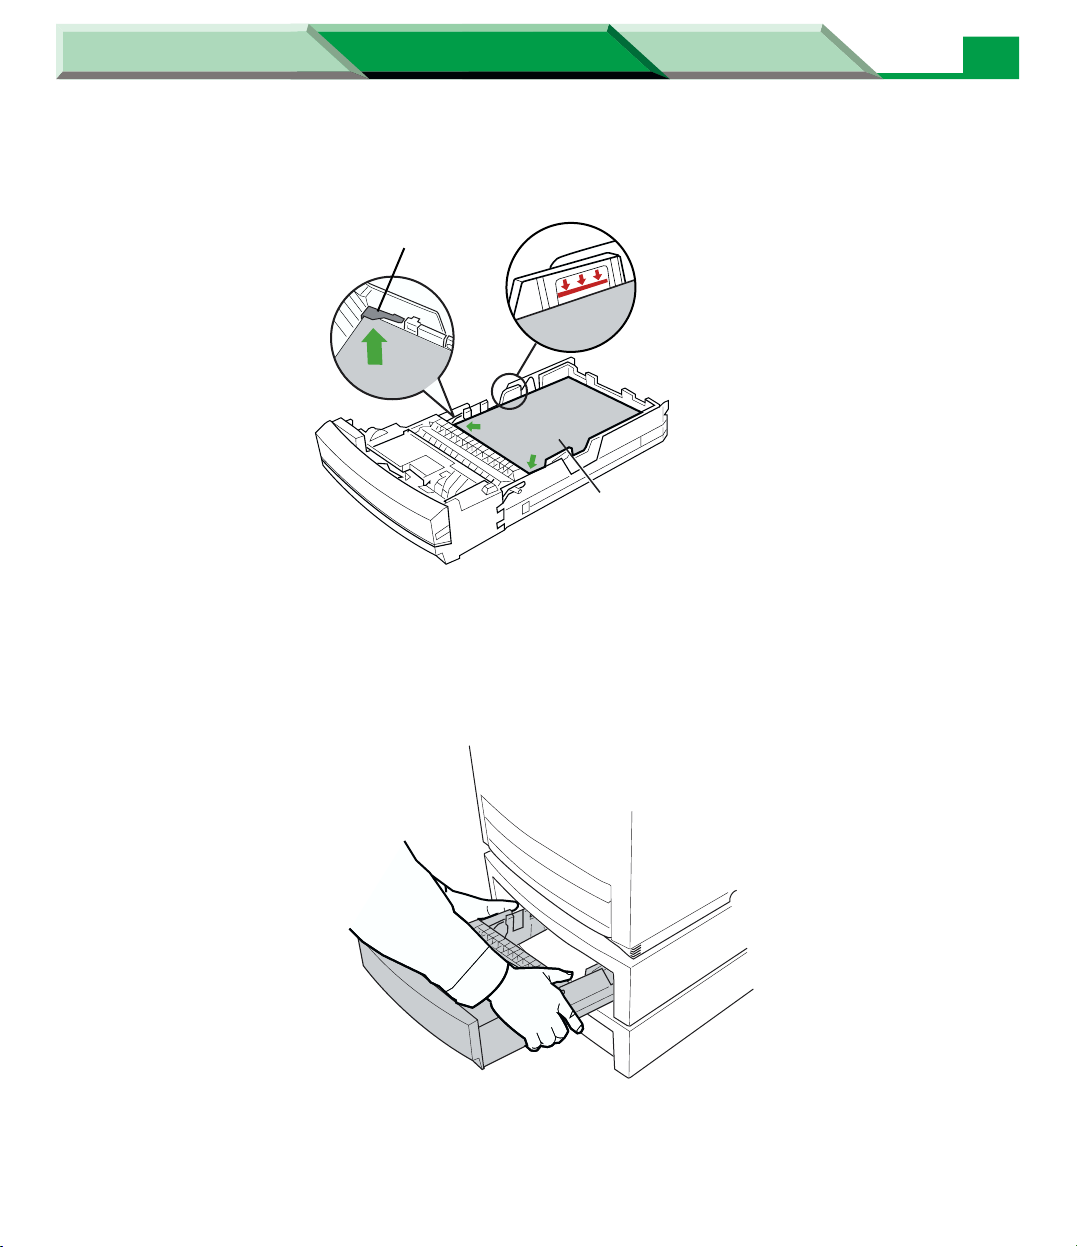
3 Place media with the print side up under the hooks in the tray.
•Be sure that the media does not exceed the limit mark.
Hook
Fill media up
to here.
Load media with
print side up.
4 Install the media tray into the printer.
16
Clearing a Jam
CAUTION
• Be sure to hold the media tray with both hands so you do not drop it especially when it is fully loaded.
Page 17
Settings and Printing Network
1
Maintenance and Spec.
Maintenance and Spec.
Jam 2
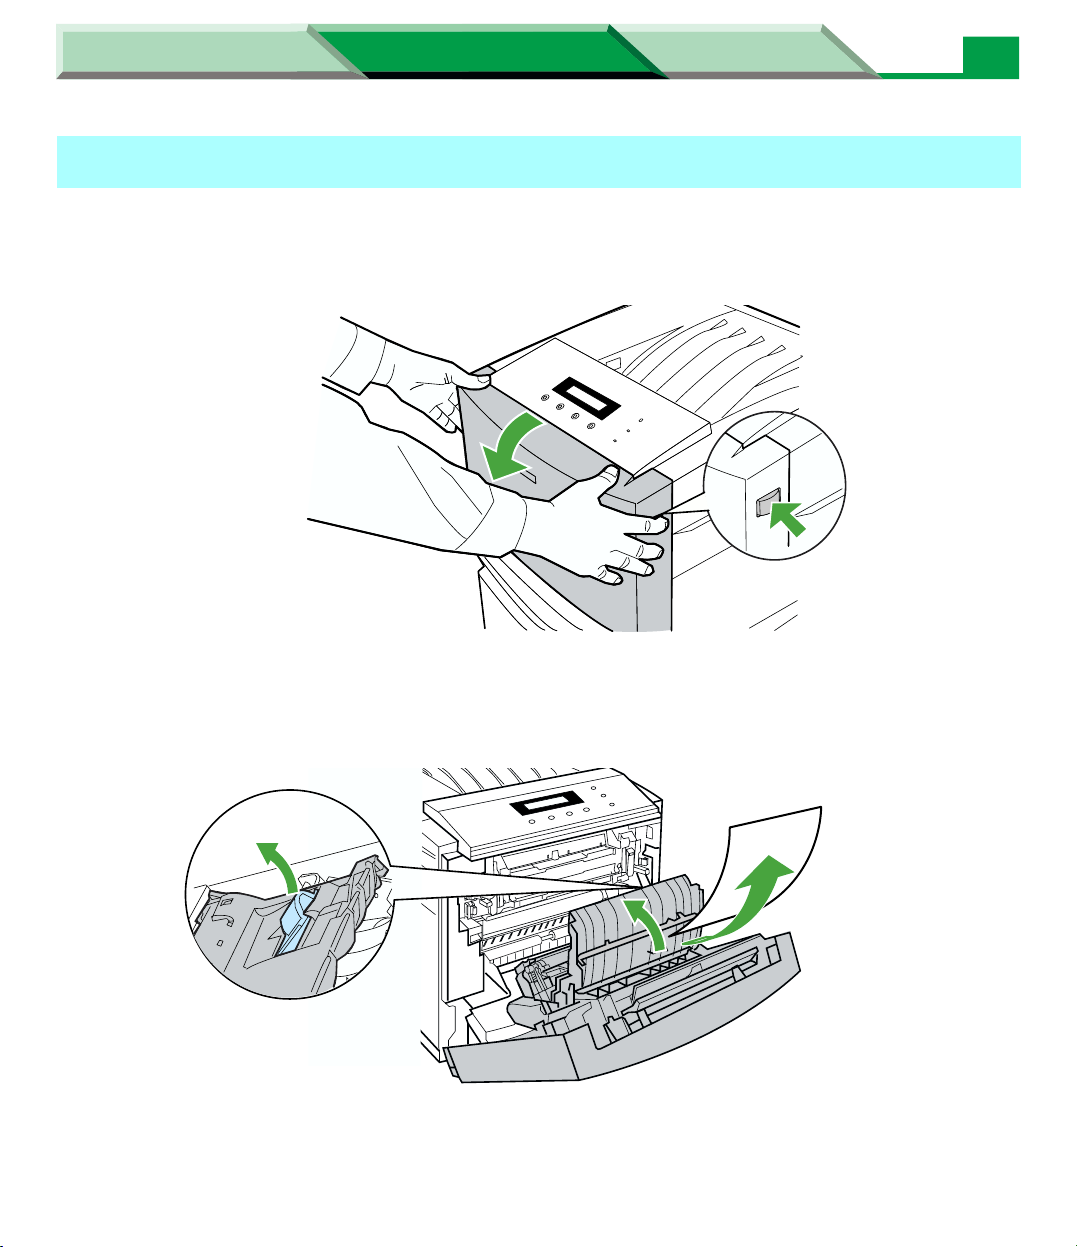
1 Push the front door release button (1) and open the front door (2).
• Be sure the tray cover is closed before you open the front door.
222
11
17
Clearing a Jam
2 Open the media guide (1), then grasp both sides of the jammed media
and slowly pull it out of the printer (2).
2
3 Close the front door.
Page 18
Settings and Printing Network
1
3
Maintenance and Spec.
Maintenance and Spec.
Jam 3, 5, 6, 8, 9
1 Push the front door release button (1) and open the front door (2).
• Be sure the tray cover is closed before you open the front door.
222
11
2 Pull the paper release lever (1) and open the media guide (2), then
remove the jammed media (3).
18
Clearing a Jam
3
1
11
3
2
3
2
3 Lock paper release levers.
4 Close the front door.
NOTE:
• When a Jam 9 has occurred, the length of the actual media size will be shorter than the paper size
setting of the printer driver. Clear the media jam and replace the media with the correct one.
Page 19
Settings and Printing Network
Maintenance and Spec.
Maintenance and Spec.
Clearing a Jam
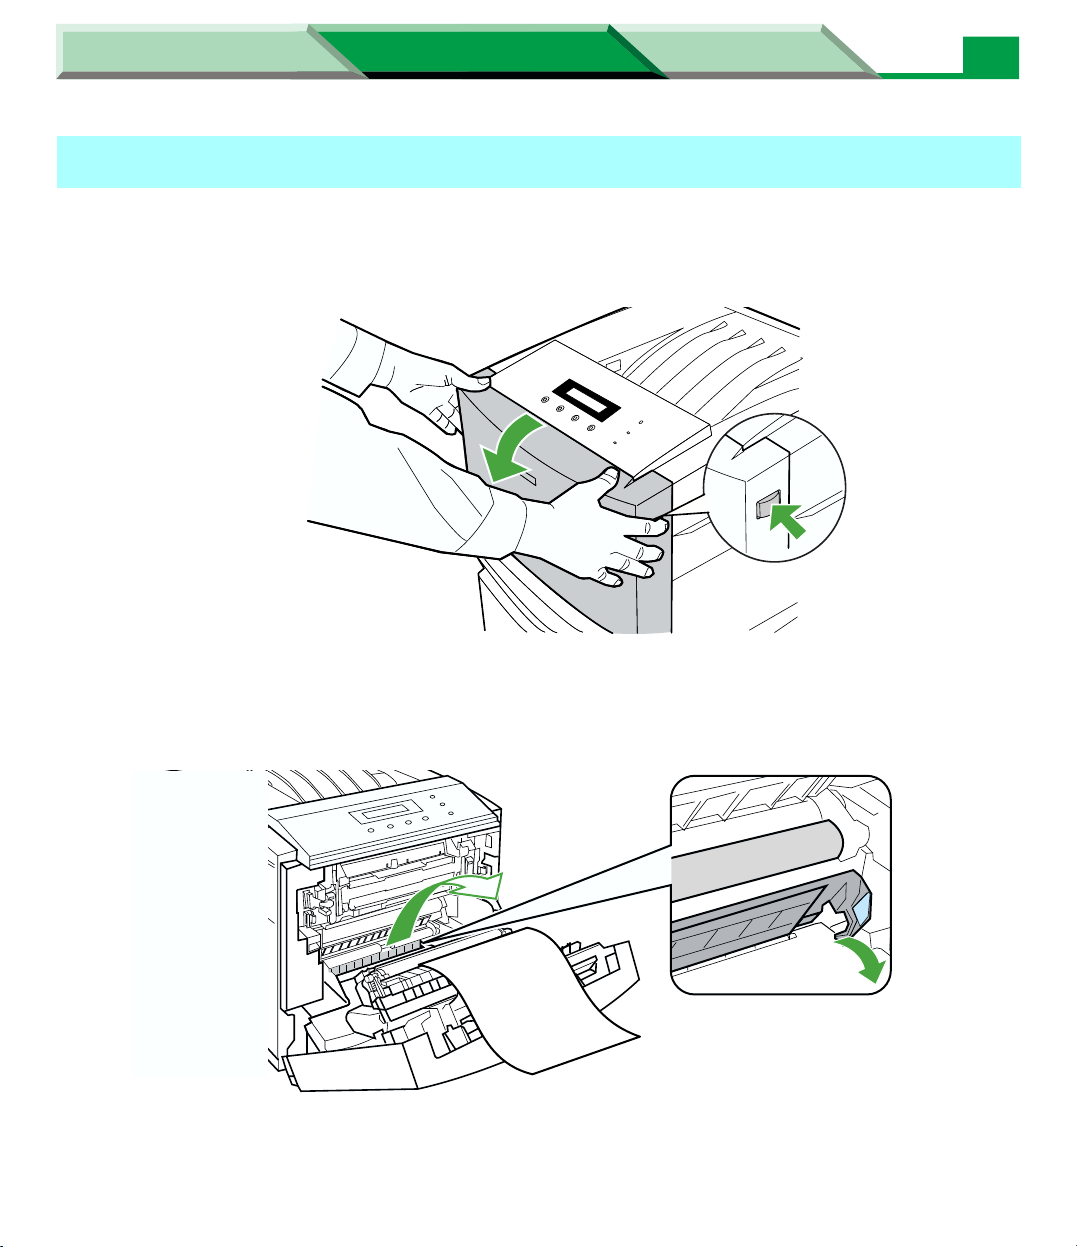
Jam 4, 7
SAFETY CAUTION
• The fuser is hot; to avoid personal injury, be careful to touch it by referring to the caution label of the
fuser unit.
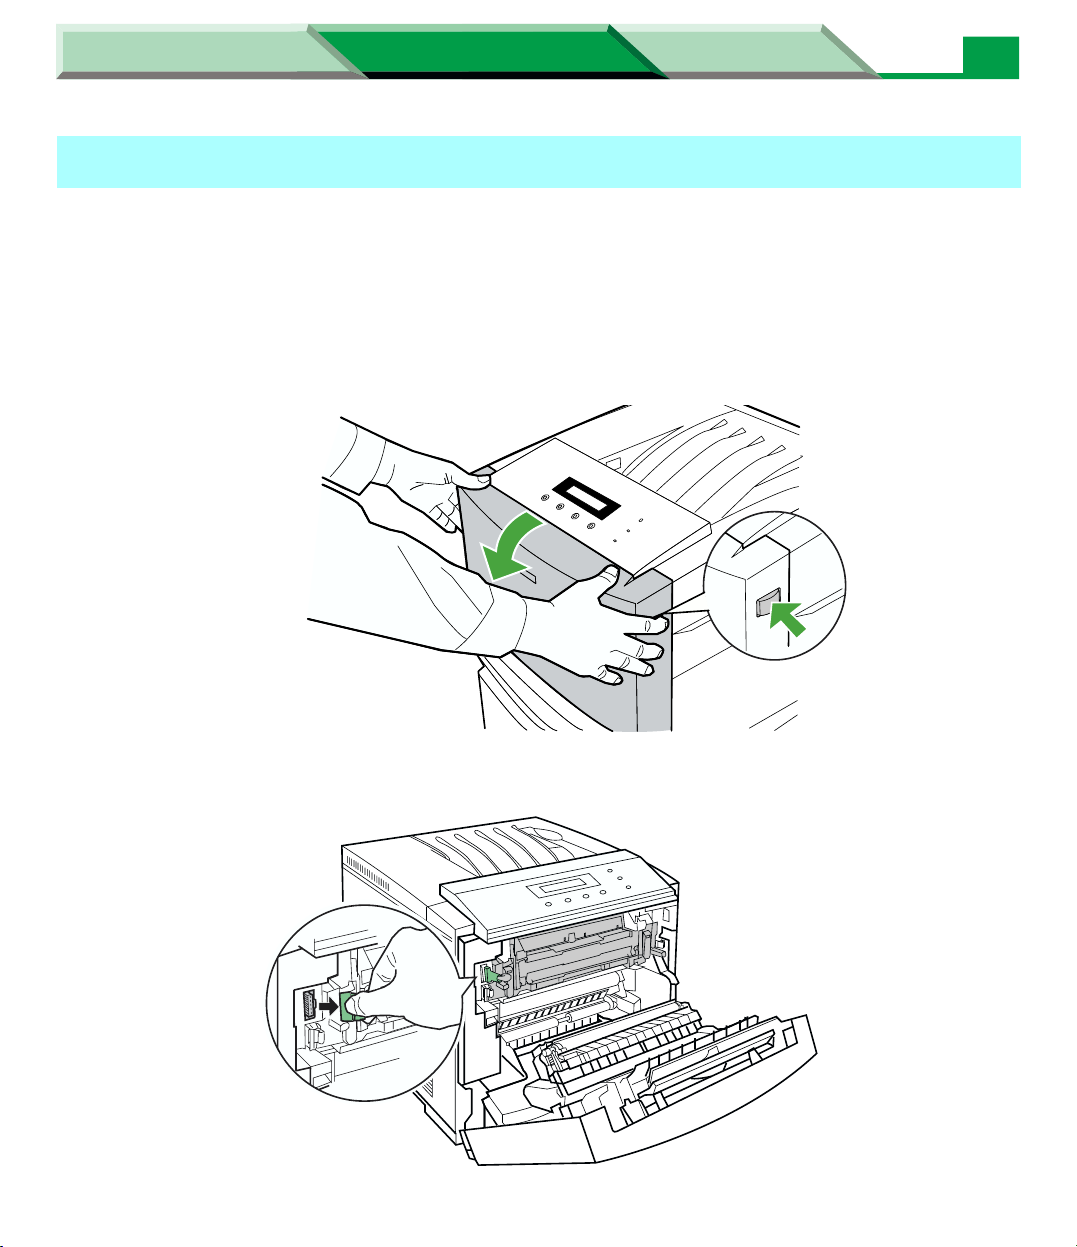
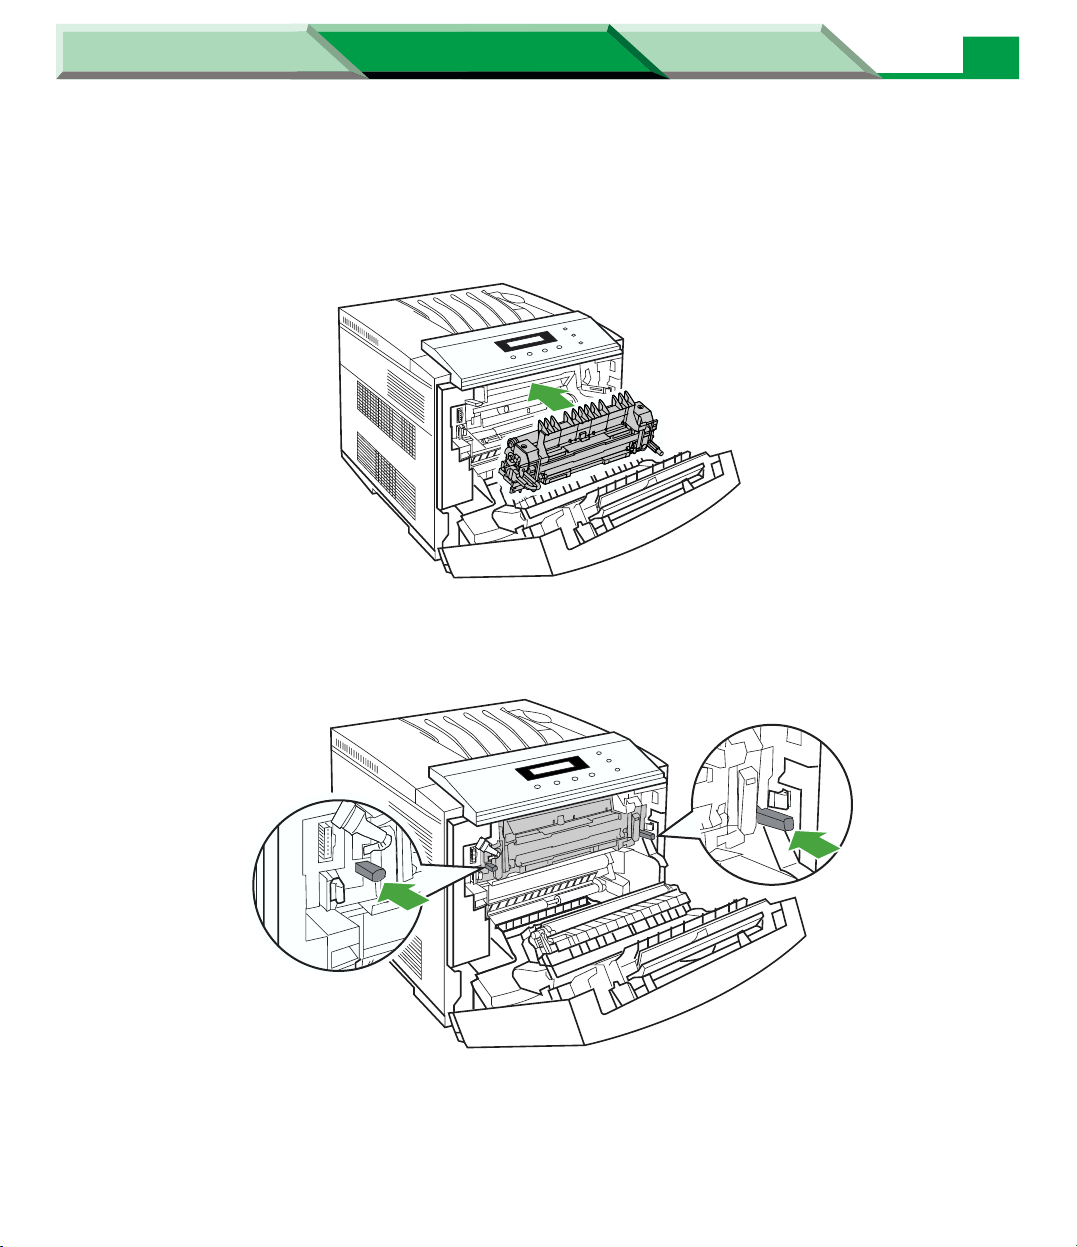
1 Push the front door release button (1) and open the front door (2).
• Be sure the tray cover is closed before you open the front door.
222
11
19
2 Remove the connector of the fuser unit.
Page 20

Settings and Printing Network
Maintenance and Spec.
Maintenance and Spec.
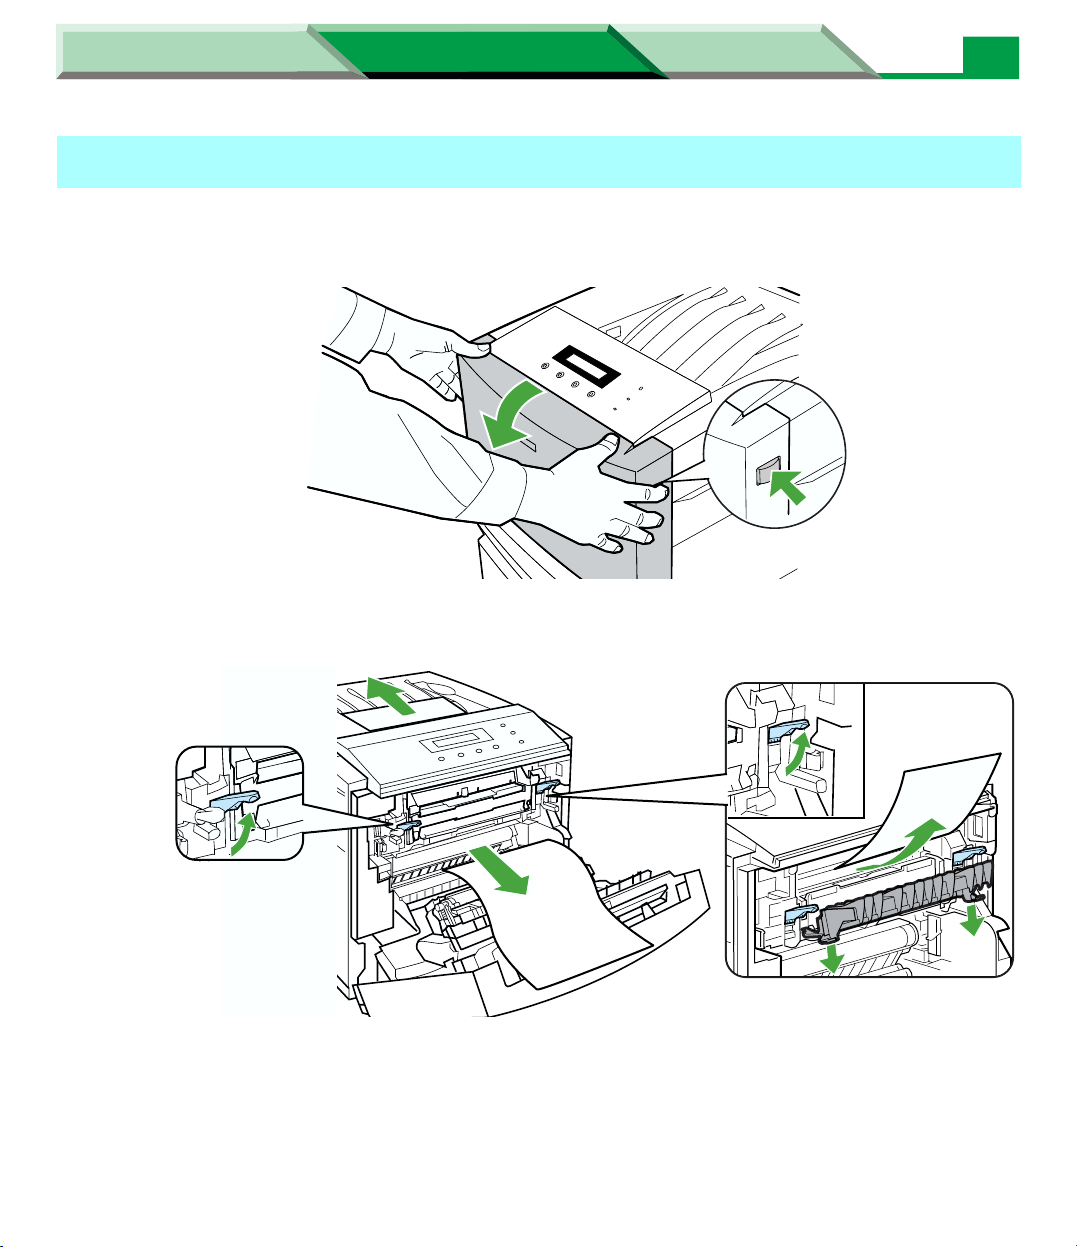
3 Unlock the both sides of the fuser unit.
4 Remove the fuser unit.
20
Clearing a Jam
SAFETY CAUTION
• Do not touch the film and the parts around the film when handling the fuser unit, because they may be
hot.
CAUTION
HOT SURFACE
DO NOT TOUCH.
Page 21
Settings and Printing Network
Maintenance and Spec.
Maintenance and Spec.
5 Remove the jammed media.
6 Reinstall the fuser unit.
21
Clearing a Jam
7 Push the both side knobs of the fuser unit until it is locked.
Page 22

Settings and Printing Network
Maintenance and Spec.
Maintenance and Spec.
Clearing a Jam
8 Connect the connector (1) of the fuser unit and close the front door (2).
2
1
22
Page 23

Settings and Printing Network
Maintenance and Spec.
Maintenance and Spec.
Clearing a Jam
Jam 21, 22
1 Pull the media tray out of the optional paper feeder. Then remove
jammed media.
2
2
11
1
1
23
2 Tap the media stack on a level surface to avoid media jams or skewed
printing.
•If a media feed error has occurred, remove the media stack from the media tray and tap it.
Page 24
Settings and Printing Network
Maintenance and Spec.
Maintenance and Spec.
3 Place media with the print side up under the hooks in the tray.
• Be sure that the media does not exceed the limit mark.
Hook
Fill media up
to here.
Load media with
print side up.
4 Install the media tray into the printer.
24
Clearing a Jam
CAUTION
• Be sure to hold the media tray with both hands so you do not drop it especially when it is fully loaded.
Page 25
Settings and Printing Network
01090007
2
Maintenance and Spec.
Maintenance and Spec.
Jam 31
1 Push the front door release button (1) and open the front door (2).
• Be sure the tray cover is closed before you open the front door.
25
Clearing a Jam
2 Pull the lock lever (1) and open the cover (2), then remove jammed media
222
(3) from the Automatic Duplex Unit.
1
11
3
2
3 Close the front door.
Page 26

Settings and Printing Network
Maintenance and Spec.
Maintenance and Spec.
Troubleshooting
Troubleshooting
! Executing the Test Print
It enables you to print each color (Cyan, Magenta, Yellow and Black) halftone page to check the print
quality.
1 Press MENU/EXIT (PAUSE) button on the printer panel.
2 Press (CONTINUE) button until Test Page menu appears.
3 Press ENTER button.
4 Press (CONTINUE) button until Test Print menu appears.
5 Press ENTER button to print each color page.
! Printing the test pattern for Adjustment to Media setting
When using media types other than those recommended, you may need to confirm the print quality by
printing the test pattern below. To print the test pattern, see “Setting the “ADJ. to Media” (Windows
Only)” on page 69 in “Settings and Printing”.
26
Test pattern:
Page 27
Settings and Printing Network
Maintenance and Spec.
Maintenance and Spec.
Troubleshooting
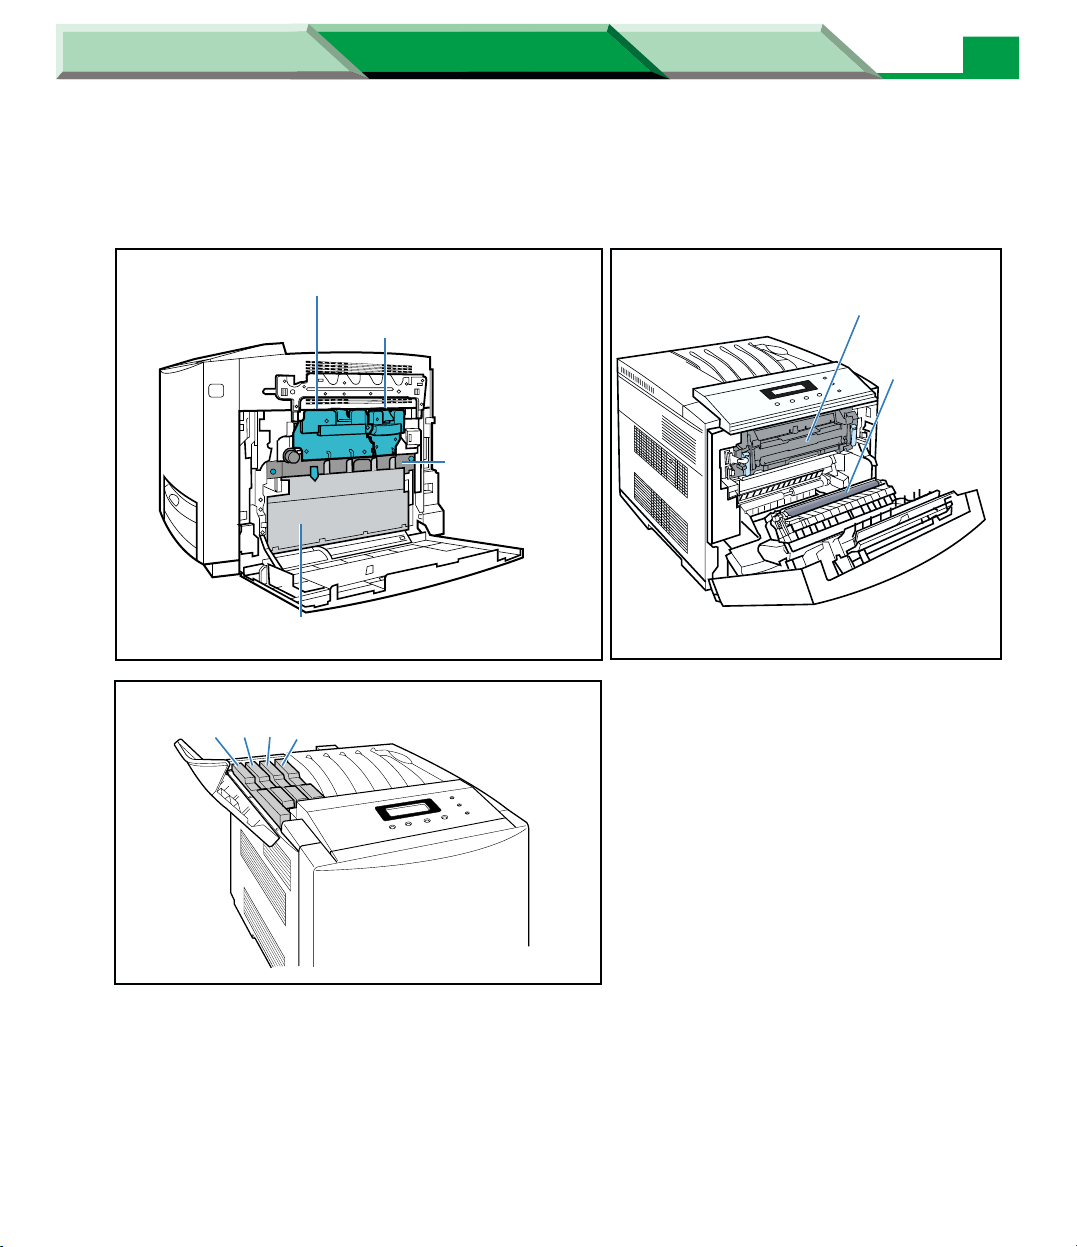
! Printer Components
You may need to replace the following components if they have expired. For consumable model
numbers, refer to “Options and Supplies” in the Setup Guide.
Color print cartridge
Black print cartridge
Accumulator unit
Waste toner cartridge
Fuser unit
Transfer roller
27
Toner cartridges
(4) (3) (2) (1)
Page 28
Settings and Printing Network
Trouble Possible Cause Corrective Action
READY indicator is
blinking.
READY indicator is off. The printer is not ready, is
ERROR indicator is on. Error occurred that is not user-
ERROR indicator is
blinking.
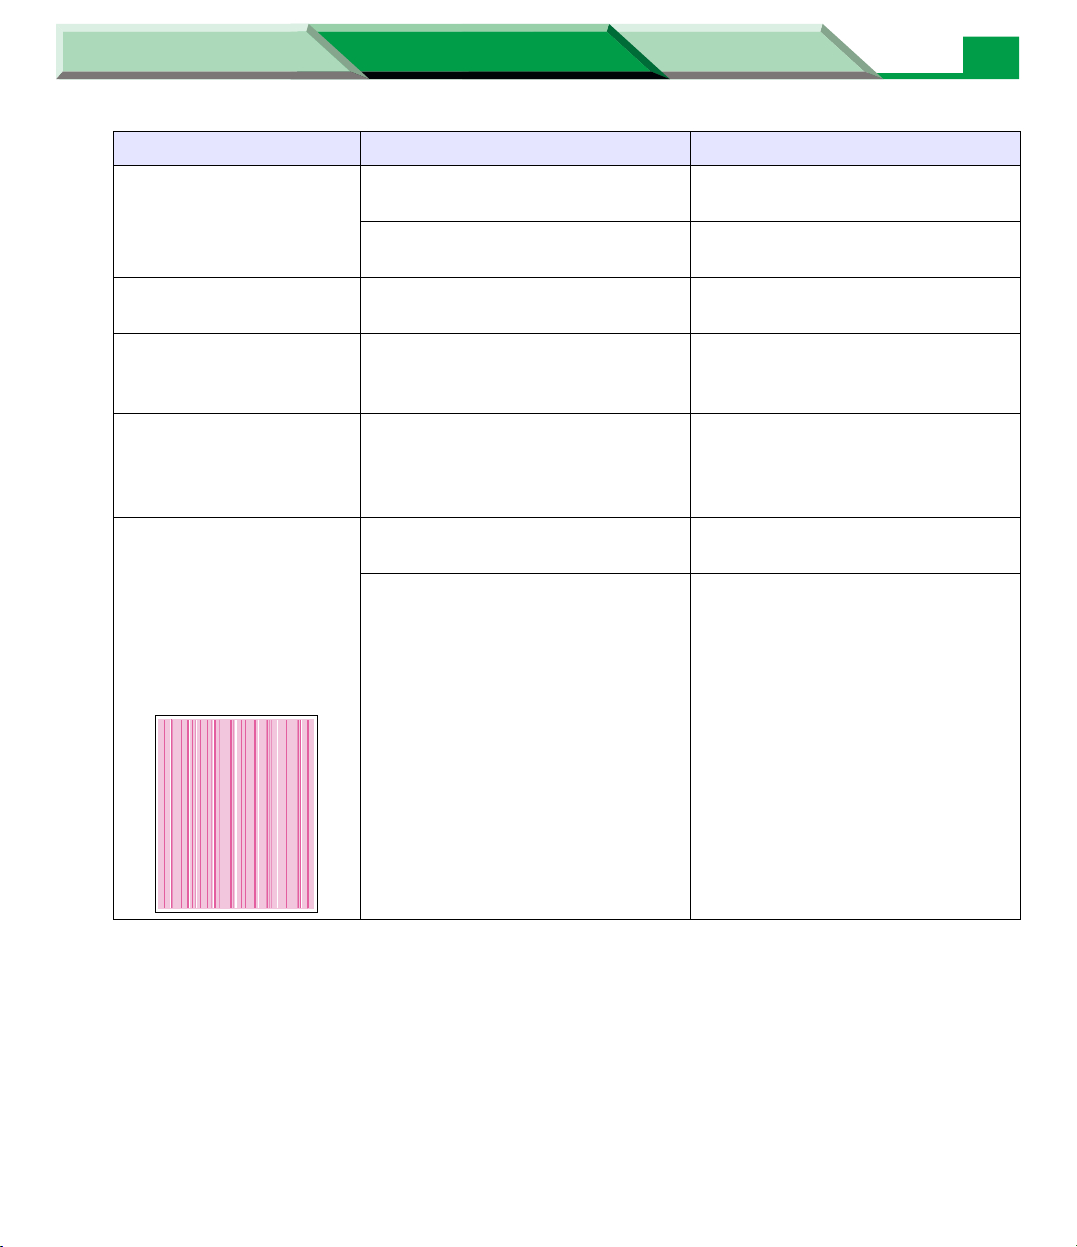
On the Test Print, a
single color is not
uniform or many vertical
streaks (both light and
dark) of slightly different
density and non-uniform
color.
Maintenance and Spec.
Maintenance and Spec.
The printer is receiving,
processing or printing job.
You have entered the Menu mode
in the printer panel.
disabled, or has detected an error.
correctable.
The printer has stopped because it
detected a user-correctable error
such as an open door or a media
jam.
The toner is almost depleted. Replace the toner cartridge.
The print cartridge is damaged. Replace the print cartridge.
Wait for the job to be completed or
cancel the job.
Exit the Menu mode by pressing
the MENU/EXIT (PAUSE) button.
Read the printer panel message to
determine the printer status.
Turn the printer off and back on
again. If the indicator is still on, the
printer requires service.
Correct the condition displayed on
the printer panel (e.g., close the
door or clear the media jam).
28
Troubleshooting
Page 29
Settings and Printing Network
Trouble Possible Cause Corrective Action
On the Test Print, half
tone area has areas of
weak color.
Maintenance and Spec.
Maintenance and Spec.
Paper doesn’t match the
environmental conditions, or it has
too much moisture.
Try fresh paper, or another type of
paper.
Store media in the original, dustfree package in the same
environmental conditions as the
printer.
29
Troubleshooting
A single color appears
faded.
On the Test Print, a
single color has a sharp,
dark or light vertical
streak.
The color density is set incorrectly
in the printer panel.
The toner is almost depleted. Replace the color toner cartridge
The print cartridge is damaged. Replace the print cartridge.
The toner cartridge is almost
depleted and is not properly
applying toner.
The print cartridge is damaged. Replace the print cartridge.
Check the density setting by
printing the Color Calibration Test
Print Page in the Color Calibration
menu from the printer panel.
Compare the settings with the
color density samples on the Color
Calibration Card. If necessary,
adjust the density from the printer
panel. Refer to “Adjusting the
Color Density (Color
Calibration)” on page 63 in
“Settings and Printing”.
soon.
Replace that toner cartridge.
Page 30
Settings and Printing Network
Trouble Possible Cause Corrective Action
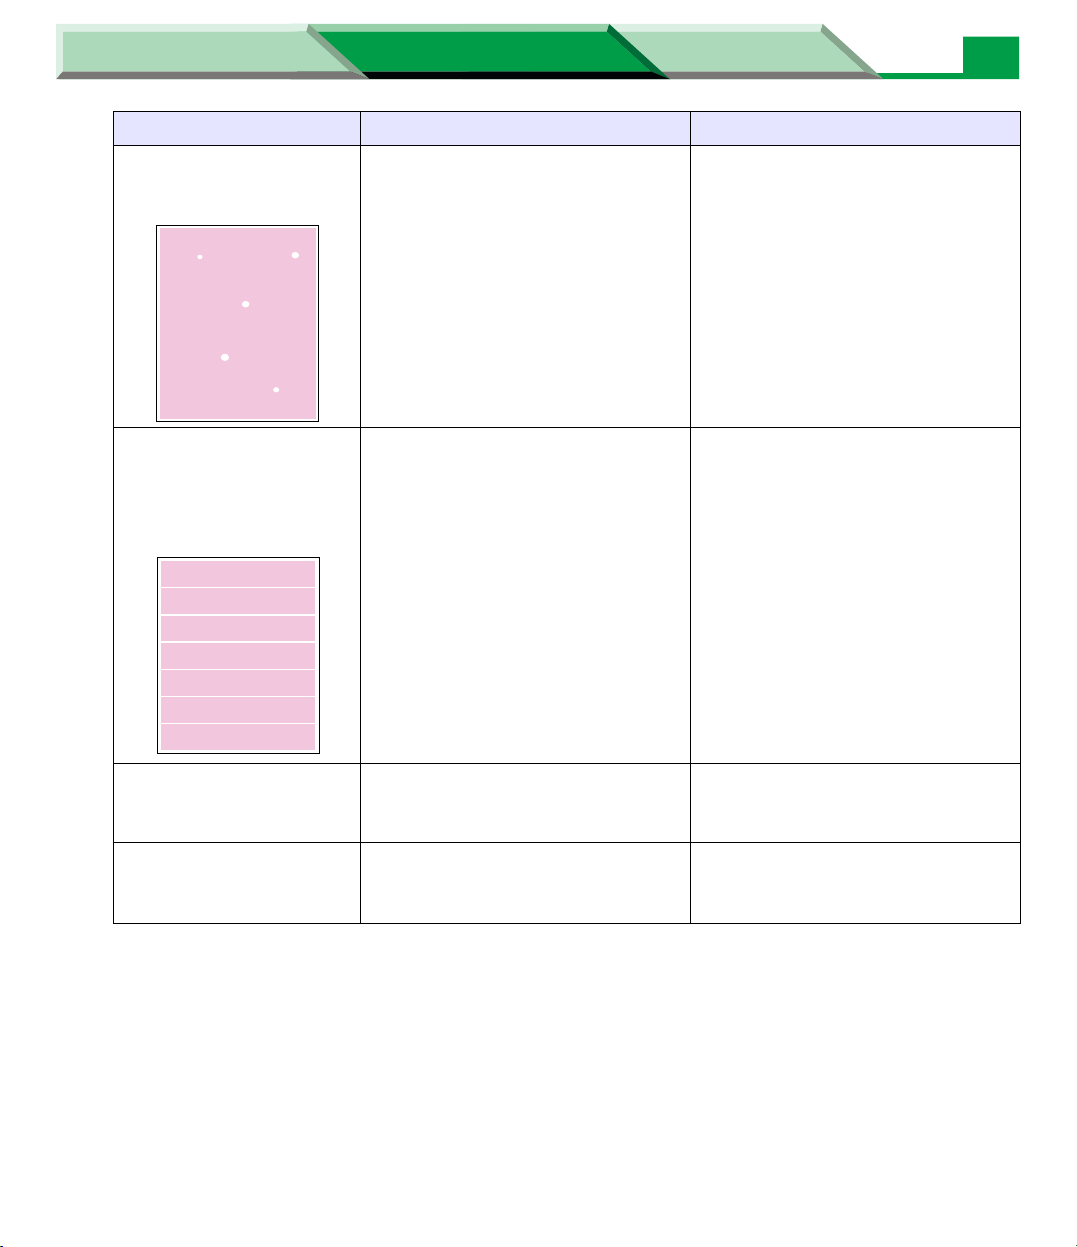
Small white spots appear
on OHP transparency.
Maintenance and Spec.
Maintenance and Spec.
OHP transparency has dust on its
surface.
Remove dust or dirt from OHP
transparency.
30
Troubleshooting
On the Test Print, a
single color shows a light
or dark, repeating
horizontal line.
Prints are missing fineline detail.
Dark color spots and
dark or light streaks
appear in all colors.
The roller in the print cartridge has
a slight impression after a long
period of storage.
The accumulator unit is worn out,
or the print resolution is set to
high.
The accumulator unit has reached
the end of its useful life.
Run 20-50 prints.
Replace the accumulator unit or
reduce the print resolution.
Replace the accumulator unit.
Page 31

Settings and Printing Network
Trouble Possible Cause Corrective Action
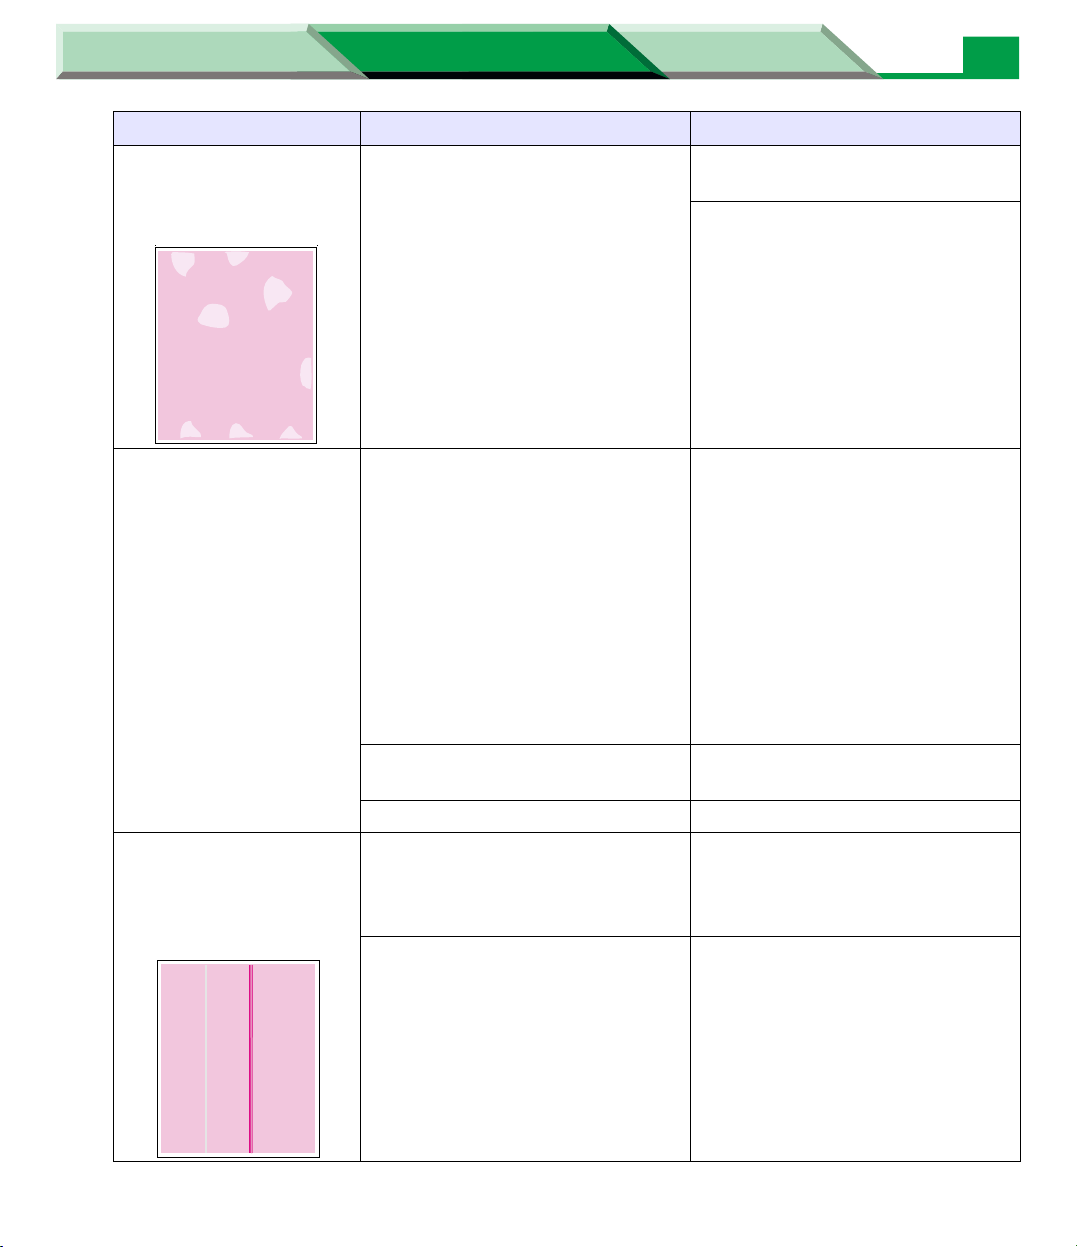
On the Test Print,
straight, thin light vertical
line in colors.
Maintenance and Spec.
Maintenance and Spec.
The intermediate belt inside the
accumulator unit is scratched.
The print cartridge is damaged. Replace the print cartridge.
Replace the accumulator unit.
31
Troubleshooting
On the Test Print, a
single white spot
appears in approximately
the same vertical place
on the page.
On the Test Print, large
light spot(s) appear
randomly.
The accumulator unit is damaged. Replace the accumulator unit.
Fingerprint(s) on the intermediate
belt (inside) of the accumulator
unit.
Print several pages until the spots
fade and disappear.
Page 32

Settings and Printing Network
Trouble Possible Cause Corrective Action
76 mm
(3 in.)
Maintenance and Spec.
Maintenance and Spec.
The print cartridge is damaged. Run 20-50 prints.
Replace the print cartridge.
32
Troubleshooting
On the Test Print, one or
more dark vertical lines
appear on the print in all
colors.
The surface of the
printed image appears to
have vertical scratches
(visible by holding the
print at an angle and
observing the “shine” of
the image).
At first, the scratches
appear only on the
printed image;
eventually, dark vertical
scratches appear on the
imprinted portion of the
page.
Toner spots appear on
the back of the media.
The accumulator unit is scratched. Replace the accumulator unit. If a
new accumulator unit does not
correct the problem:
Put the old accumulator unit back
into the printer.
Repack the new accumulator unit.
Check the fuser.
The fuser unit is damaged. Replace the fuser unit.
The fuser unit is near the end of its
useful life.
The transfer roller is worn out. Replace the transfer roller.
Replace the fuser unit (depending
on your quality needs, you can
continue to print until the dark
vertical lines appear).
Page 33

Settings and Printing Network
Trouble Possible Cause Corrective Action
The page prints in black
in the image area only.
(The borders are clear.)
Maintenance and Spec.
Maintenance and Spec.
Either the image processor board
or engine control board is not
functioning properly.
Turn the printer off and back on
again. If the problem persists, call
for service.
33
Troubleshooting
Solid color print for red,
green and blue are not
printed out evenly in the
Adjustment to Media test
pattern.
1
*
(1) Solid Image Pattern
Black, cyan and
magenta halftone have
weak color area.
2
*
Unrecommended media is used. Adjust the value of ADJ. to Media.
See “Setting the “ADJ. to
Media” (Windows Only)” on
page 69 in “Settings and Printing”.
Use the Recommended media
(see “Media” on page 86).
(2) Halftone Image
Pattern
Service Error is
displayed on the LCD.
1, 2
*
For the entire image, see page 34.
An error occurred that is not usercorrectable.
Turn the printer off and back on
again. If the error persists, call for
service.
Page 34

Settings and Printing Network
Maintenance and Spec.
Maintenance and Spec.
! Entire image samples
34
Troubleshooting
(1) Image Quality (at Solid Image Pattern)
Normal Image Sample
Red
Green
Blue
Poor Image Sample
(2) Image Quality (at Halftone Image Pattern)
Normal Image Sample
Black
Cyan
Magenta
Poor Image Sample
NOTE:
• These image samples may differ depending on the media or circumstances (temperature and
humidity) using the printer.
Page 35

Settings and Printing Network
Maintenance and Spec.
Maintenance and Spec.
! If the printer driver cannot be installed
Trouble Possible Cause Corrective Action
35
Troubleshooting
The following error
message is displayed and
the printer software cannot
be installed.
“You must log on your
computer with the
administrative privilege to
run this Setup program.”
(Windows NT
Windows 2000
Windows XP
*
® 4.0*
2
*
/
3
)
1
/
The printer driver cannot
be installed with the
shared folder of another
server computer after
installing the printer driver
with the shared folder of
the server computer.
You have not logged on the
computer as an
administrator.
The same model of the
printer cannot be installed
with the installer in the
printer CD-ROM disk when
the printer driver is already
installed.
If the error message is displayed when
starting the installer, log on the computer
as an administrator and install the
printer software.
If the error message is displayed when
Windows
4
®*
is restarted after the printer
software was installed, log on the
computer as an administrator.
1
*
Microsoft® Windows NT® operating
system Version 4.0 (hereafter
Windows NT 4.0)
2
*
Microsoft® Windows® 2000
operating system (hereafter Windows
2000)
3
*
Microsoft® Windows® XP operating
system (hereafter Windows XP)
4
*
Microsoft® Windows® operating
system (hereafter Windows)
Add a printer with Add Printer Wizard.
The printer CD-ROM disk
may be required when
modifying or repairing the
installed printer software
after installing the printer
software with the shared
folder of the server
computer.
The server computer is
turned off.
The server computer is
disconnected from the
Turn on the server computer to share
the folder for the installation program.
Connect the server computer to the
network.
network.
Network problems occur. Consult with the network administrator.
Page 36

Settings and Printing Network
Trouble Possible Cause Corrective Action
Maintenance and Spec.
Maintenance and Spec.
36
Troubleshooting
A document cannot be
printed from Windows
2000 or Windows XP
when adding a network
printer with Add Printer
Wizard.
(Windows 2000 /
Windows XP)
The printer was added on
condition that the printer
does not use HP JetAdmin.
Change the protocol from Raw to LPR
as follows:
1. Display the Printers folder.
• Windows 2000:
Click [Start], select Settings and
click Printers.
• Windows XP Professional:
Click [Start], then click Printers
and Faxes.
• Windows XP Home:
Click [Start], click Control Panel,
click Printers and Other
Hardware icon, then click
Printers and Faxes icon.
2. Click the printer icon, click File
menu and click Properties.
3. Click the Ports tab.
4. Click the created printer port and
click [Configure Port...].
5. Change the Protocol from Raw to
LPR in the Configure Standard TCP/
IP Port Monitor window.
6. Enter lp in the Queue Name box of
the LPR Settings.
7. Click [OK] and click [Close].
Page 37

Settings and Printing Network
Trouble Possible Cause Corrective Action
Maintenance and Spec.
Maintenance and Spec.
37
Troubleshooting
The Found New Hardware
Wizard window is
displayed during restarting
Windows after installing
the printer driver in
Windows XP.
(Windows XP)
The printer driver must be
installed with plug & play.
Perform the following instructions.
1. Select Install the software
automatically in the Found New
Hardware Wizard window and click
[Next >].
2. Select Printer Driver and
click [Next >].
3. Click [Continue Anyway].
4. Click [OK].
The Files Needed window is
displayed.
5. Click [Browse...] and select PCL
folder [D (CD-ROM drive letter):
WinXP \ ENGLISH \ PCL] or PS
folder [D (CD-ROM drive letter):
WinXP \ ENGLISH \ PS]
6. Follow the instructions on the
screen.
Page 38

Settings and Printing Network
Trouble Possible Cause Corrective Action
Maintenance and Spec.
Maintenance and Spec.
38
Troubleshooting
When connecting a printer
with USB interface and
installing the printer driver
with plug & play, the
following error message
may be displayed.
“This printer could not be
installed. Quit all
programs, restart
Windows, and then try
again. If the problem
persists, contact your
system administrator.”
(Windows 98
1
*
Microsoft® Windows®
98 operating system
(hereafter Windows 98)
1
*
)
The printer driver is
already installed with the
LPT, network or another
USB port. (This is the error
of standard USB class
driver and USB port
monitor installed in
Windows.)
Perform the following instructions to
install the printer driver again.
1. Be sure to turn the printer on.
2. Connect the printer to the computer
with a USB cable and restart
Windows.
3. Insert the printer CD-ROM disk in
the computer.
4. Exit the Panasonic Setup window.
5. Click [Start], select Settings and
click Control Panel.
6. Double click the System icon.
7. Click the [Device Manager] tab.
8. Click PanasonicDP-CL21P or
PanasonicDP-CL21M in the Other
devices.
9. Click [Properties].
10. Click [Reinstall Driver] and click
[Next >].
11. Select Search for a better driver
than the one your device is using
now. (Recommended).
12. Click [Next >].
13. Click on the Specify a location
check box, then click [Browse...].
14. Select Pcl folder [D (CD-ROM drive
letter): \ Win9x \ English \ Pcl] or PS
folder [D (CD-ROM drive letter): \
Win9x \ English \ Ps], then click
[OK].
15. Click [Next >].
16. Click [Next >].
17. Select Keep existing driver
(recommended) and click [Next >].
18. Click [Next >].
19. Select [No] and click [Finish].
20. Click [Finish].
Page 39

Settings and Printing Network
Trouble Possible Cause Corrective Action
Maintenance and Spec.
Maintenance and Spec.
39
Troubleshooting
When connecting a printer
with USB interface and
installing the printer driver
with plug & play, the
printer is not added to the
Printers folder.
(Windows 98)
Specifying the driver folder
is incorrect during installing
the printer driver with plug
& play.
Perform the following instructions to
install the printer driver again.
1. Be sure to turn the printer on.
2. Connect the printer to the computer
with a USB cable.
3. Click [Start], select Settings and
click Control Panel.
4. Double click the System icon.
5. Click the [Device Manager] tab.
6. Click DP-CL21P or DP-CL21M in
the Other devices.
7. Click [Remove].
8. Click [OK].
9. Click [Close].
10. Restart Windows.
11. Install the printer driver following the
Wizard window.
For the detailed instructions, refer to
“Installing the DP-CL21P
/DP-CL21M Software (For
Windows)” in the Setup Guide.
Page 40

Settings and Printing Network
Maintenance and Spec.
Maintenance and Spec.
! If you can’t make a print
Trouble Possible Cause Corrective Action
40
Troubleshooting
Printer is not operating. The printer may not be
plugged into an AC outlet
or turned on.
The interface cable(s) may
not be connected properly.
The printer does not print
correctly.
The setting for printing is
not effective.
When a document is
printed via the server
computer, the following
error message is
displayed.
Appropriate driver may not
be installed or DP-CL21P/
DP-CL21M printer may not
be selected.
Some applications may not
allow you to change the
settings through the
DP-CL21P/DP-CL21M
printer driver’s setting
window.
Everyone privilege for
printing was deleted on the
server computer.
Make sure that you plugged in the
printer, turned it on and it's Ready.
Make sure that you connected the
interface cable(s) properly.
If the communication link between your
computer and the printer is working but
the printer ejects a blank page when
printing from your application or through
Windows, make sure that the
appropriate driver is installed and that
you have selected the printer correctly.
Change the application’s settings.
Consult with the administrator to add
your printing privilege on the server
computer.
“There was an error found
when printing the
document “document” to \\
<server name> \
CL21MPS (printer name).
Do you want to retry or
cancel the job? “
(Windows NT 4.0 /
Windows 2000)
Page 41

Settings and Printing Network
Trouble Possible Cause Corrective Action
Maintenance and Spec.
Maintenance and Spec.
41
Troubleshooting
The following spool32
error message is
displayed:
“This program has
performed an illegal
operation and will be shut
down. If the problem
persists, contact the
program vendor.”
(Windows 98)
Jobs in the spooler are
deleted after media jam
has occurred.
(Windows 98)
Error of standard LPT port
monitor installed in
Windows.
Error of standard USB port
monitor installed in
Windows when printing
through USB.
Perform the following instructions to
avoid this problem:
1. Restart Windows.
2. Click [Start], select Settings and
click Printers.
3. Click the printer icon using the LPT
port, click File menu and click
Properties.
4. Click the Details tab and click
[Spool Settings...].
5. Select Start printing after last page
is spooled.
6. Click [OK].
7. Click [OK].
Print the document again.
Page 42

Settings and Printing Network
Trouble Possible Cause Corrective Action
Maintenance and Spec.
Maintenance and Spec.
42
Troubleshooting
Printer does not print
correctly when using
Panasonic DP-CL21P
PCL 5c or Panasonic
DP-CL21M PCL 5c printer
driver.
Example:
(1) Printer does not print
an image even if it is
displayed on the
screen.
(2) An image which is not
displayed on the
screen is printed.
(3) Characters which are
displayed correctly on
the screen are printed
over other characters.
(4) The edge of a
character is not
printed even if it is
displayed correctly on
the screen.
(5) Font displayed on the
screen is different
from that printed.
Error of EMF in Windows. Disable the Metafile Spooling as follows:
1. Perform the steps 1 - 4 of “Disabling
the Device Font” below.
2. Click the Output tab.
3. Remove the check mark of the
Metafile Spooling check box.
4. Click [OK].
The document includes
different fonts from the
printer's resident fonts.
Disabling the Device Font
1. Display the Printers folder.
•Windows 95
Windows 2000:
Click [Start], select Settings and click Printers.
• Windows XP Professional:
Click [Start], then click Printers and Faxes.
• Windows XP Home:
Click [Start], click Control Panel, click Printers and Other
Hardware icon, then click Printers and Faxes icon.
2. Click the printer icon to change the setting.
3. Display the printer properties window.
• Windows 95 / Windows 98 / Windows Me:
Click File menu and click Properties.
Click Setup tab.
• Windows NT 4.0:
Click File menu and click Document Defaults....
• Windows 2000 / Windows XP:
Click File menu, click Printing Preferences....
4. Click [Advanced...].
5. Click the Font tab.
6. Remove the check mark of the Use Device Fonts check box.
7. Click [OK].
1
*
/ Windows 98 / Windows Me*2 / Windows NT 4.0 /
Change the fonts in the document for
fonts installed in Windows.
Disable the setting of the Device Font as
follows:
(Windows - PCL)
1
*
Microsoft® Windows® 95 operating system (hereafter Windows 95)
2
*
Microsoft® Windows® Millennium Edition operating system
(hereafter Windows Me)
Page 43

Settings and Printing Network
Trouble Possible Cause Corrective Action
Maintenance and Spec.
Maintenance and Spec.
43
Troubleshooting
A media is not fed from
the multi-purpose tray
when the media is loaded
in the multi-purpose tray
only.
A different size's media is
fed even if automatic tray
selection is selected for
paper source.
(Windows NT 4.0 /
Windows 2000 /
Windows XP - PS)
Multi-Purpose Tray is not
selected for Paper Source.
The tray assignment of the
printer driver is not
matched the actual size of
the media in the tray.
Select Multi-Purpose Tray for Paper
Source.
Change the tray assignment as follow:
1. Display the Printers folder.
• Windows NT 4.0 / Windows 2000:
Click [Start], select Settings and
click Printers.
• Windows XP Professional:
Click [Start], then click Printers
and Faxes.
• Windows XP Home:
Click [Start], click Control Panel,
click Printers and Other
Hardware icon, then click
Printers and Faxes icon.
2. Click the PS printer icon.
3. Click File menu and click
Properties.
4. Change the Form To Tray
Assignment setting in Device
Settings tab to the actual size of the
media in the tray.
5. Click [OK].
Page 44

Settings and Printing Network
Trouble Possible Cause Corrective Action
Maintenance and Spec.
Maintenance and Spec.
44
Troubleshooting
An application data cannot
be printed correctly.
(Windows - PCL)
A document is printed on
one side even if you
specify the automatic
duplex printing in the
printer driver.
The printer cannot receive
all print data within the
Time Out setting.
Changing the printer's spool setting
1. Display the Printers folder.
• Windows 95 / Windows 98 / Windows Me / Windows NT 4.0 /
Windows 2000:
Click [Start], select Settings and click Printers.
• Windows XP Professional:
Click [Start], then click Printers and Faxes.
• Windows XP Home:
Click [Start], click Control Panel, click Printers and Other
Hardware icon, then click Printers and Faxes icon.
2. Click the printer icon to change the setting.
3. Click File menu and click Properties.
4. Click the tab.
• Windows 95 / Windows 98 / Windows Me:
Click the Details tab and click [Spool Settings...].
• Windows NT 4.0:
Click the Scheduling tab.
• Windows 2000 / Windows XP:
Click the Advanced tab.
5. Click the Start printing after last page is spooled check button.
6. Click [OK] (and click [OK]).
An Automatic Duplex Unit
is not installed in the
printer.
Change the printer's spool setting as
follows:
Install an Automatic Duplex Unit in the
printer.
(Windows)
Page 45

Settings and Printing Network
Maintenance and Spec.
Maintenance and Spec.
! If the printer does not work properly
Trouble Possible Cause Corrective Action
45
Troubleshooting
The following menu is
grayed out or cannot be
used:
Pages per Sheet,
Booklet, Scale,
Fit to Output Paper Size,
Poster,
Watermark,
Overlay,
Reverse Page Order and
Collate (without hard disk
drive)
(Windows - PCL)
The installer was not used
to install the printer driver.
(Example)
The printer driver was
installed with Alternate
Driver (Windows NT 4.0) or
Additional Driver (Windows
2000 / Windows XP).
Reinstall the printer driver as follows:
1. Display the Printers folder.
• Windows 95 / Windows 98 /
Windows Me / Windows NT 4.0 /
Windows 2000:
Click [Start], select Settings and
click Printers.
• Windows XP Professional:
Click [Start], and then click
Printers and Faxes.
• Windows XP Home:
Click [Start], click Control Panel,
click Printers and Other
Hardware icon, then click
Printers and Faxes icon.
2. Click the printer icon to delete it.
3. Click File menu and click Delete.
4. Insert the printer CD-ROM disk in
the computer.
5. Click Custom Printer Setup and
click Install Printer Driver and
Utilities.
6. If the Purchase Information
window is displayed, select the shop
where you purchased the printer and
click [Next >].
• If you cannot find the shop where
you purchased the printer, select
Other and click [Next >].
7. Click [Yes].
8. Click the Client PC check button
and click [Next >].
9. Click [Browse...] and select the
printer shared by the server
computer.
10. Follow the instructions on the
screen.
Page 46

Settings and Printing Network
Trouble Possible Cause Corrective Action
Maintenance and Spec.
Maintenance and Spec.
46
Troubleshooting
The printer stops printing
halfway when printing a
document with Adobe
Acrobat Reader.
(Windows 2000 - PCL)
The file name must be
entered twice when
printing a document to
create a print file.
(Windows - PCL)
A print file cannot be
created.
(Windows - PCL)
The message notified the
print result is not
displayed.
(Windows Status Display)
Adobe Acrobat Reader (or
Spooler) stops making an
EMF (Enhanced Meta File)
file halfway.
The following feature is
activated:
Pages per Sheet, Booklet,
Scale, Fit to Output Paper
Size, Poster, Watermark,
Overlay, Reverse Page
Order or Collate (without
hard disk drive).
Notify Remote Print feature
is disabled.
Disable “Print as image” setting in the
print window of the Adobe Acrobat
Reader.
Turn the feature off.
Enable the Notify Remote Print feature
as follows:
1. Click [Start], select Programs,
Panasonic, and Panasonic
DP-CL21P or Panasonic
DP-CL21M, and then click Setup
for Status Display.
2. Click on the Enable check button of
the Notify Remote Print.
3. Click [OK].
Page 47

Settings and Printing Network
Trouble Possible Cause Corrective Action
Maintenance and Spec.
Maintenance and Spec.
47
Troubleshooting
Spooled jobs are not
displayed in the HDD
Spooler window.
(Windows - HDD Utility)
A spooled job still remains
in the HDD Spooler
window even if you delete
it using the printer panel.
(Windows - HDD Utility)
Printer's status information
in the HDD Spooler
window is not changed.
(Windows - HDD Utility)
X mark is displayed on the
printer's icon listed in the
HDD Utility window.
(Windows - HDD Utility)
The network traffic may be
heavy.
Printer's information in the
HDD Spooler window is not
updated periodically.
The printer is turned off or
the network cable is
disconnected.
Update the HDD Spooler window.
1. Click the View menu and click
Refresh.
Turn the printer on or connect the
network cable, and then update the
HDD Utility window.
1. Click the View menu and click
Refresh.
The brightness cannot be
adjusted when printing a
document of the PDF
data.
The print setting of the
application Lotus
Freelance is not effective.
(Windows)
The brightness setting is
not effective with some
Acrobat Reader programs
if the PDF data includes
the color management
setting of the printer.
This is the specification of
the Lotus Freelance.
Use the Acrobat Reader in the printer
CD-ROM disk provided.
Change the printer driver’s setting by
selecting the printer icon in the Printers
folder under Windows. Refer to
“Setting the PCL Printer Driver” on
page 84 or “Setting the PS Printer
Driver (DP-CL21M only)” on page 145.
Page 48

Settings and Printing Network
Trouble Possible Cause Corrective Action
Maintenance and Spec.
Maintenance and Spec.
48
Troubleshooting
A document is printed in
color even if the Color
Appearance or Color is set
to Monochrome or Black &
White.
(Windows NT 4.0 /
Windows 2000 /
Windows XP - PS)
Though you try to change
the Installable Options of
your printer, the Installable
Options are not displayed.
(Mac OS 8.1 - 9.2)
Color Appearance or Color
setting is not effective for
some application such as
Acrobat Reader.
The PPD file except
Panasonic
DP-CL21M.PPD is
selected as the printer’s
PPD file.
The Parsed PPD file in the
initial setting folder may be
broken.
Set the Color Management to Grayscale
(see “Advanced Tab (Windows NT
4.0)” on page 173 or “Advanced
Options Window (Windows 2000 /
Windows XP)” on page 177 in
“Settings and Printing”).
1. Remove the desktop printer icon.
2. Reinstall the DP-CL21M software.
Refer to “Installing the DP-CL21M
Software (For Macintosh)” in the
Setup Guide.
1. Remove the desktop printer icon.
2. Remove the following file.
System Folder:Preferences:Printing
Prefs:Parsed PPD Folder:Panasonic
DP-CL21M.PPD
3. Reinstall the DP-CL21M software.
Refer to “Installing the DP-CL21M
Software (For Macintosh)” in the
Setup Guide.
Page 49

Settings and Printing Network
Maintenance and Spec.
Maintenance and Spec.
! Media problems
Trouble Corrective Action
49
Troubleshooting
Frequent paper-picking
errors.
Frequent media jams. Make sure that you use a high-quality laser paper:
Fan the paper or transparencies before installing them in their
respective trays; this is especially important for transparencies because
they tend to stick together.
Make sure that the media is installed under the hooks at the front of the
media tray.
60-105 g/m
60-165 g/m
Use only recommended transparencies (see “Specifications”).
We cannot guarantee the results of other transparencies.
Make sure that the media is installed under the hooks at the front of the
media tray.
Do not overfill the media tray, as indicated by the red line on the right
side of the tray.
2
(16-28 lb.) paper in the media trays and
2
(16-44 lb.) paper in the multi-purpose tray.
Page 50

Settings and Printing Network
Maintenance and Spec.
Maintenance and Spec.
! Problems with image size and position
Trouble Corrective Action
Off-set images. 1. Check your application for correct image sizing.
If the trouble still remains, perform the following step.
2. Adjust the top or left margin (see “Position Setting” on page 38 in
“Settings and Printing”).
Cut-off images. 1. Check your application for image sizing.
If the trouble still remains, perform the following step.
2. Make sure that the correct size media is in the media tray.
If the trouble still remains, perform the following step.
3. Make sure that the image size is smaller than printable area (see
“Print Area” on page 90).
If the trouble still remains, perform the following step.
4. Adjust the top or left margin (see “Position Setting” on page 38 in
“Settings and Printing”).
50
Troubleshooting
! Print quality problems
Trouble Corrective Action
Prints have dull, faded
colors.
Print the Calibration Test Print Page from the Color Calibration menu in
the printer panel. Check the density settings for each color and compare
them with the color density samples on the Color Calibration Card. Refer
to “Adjusting the Color Density (Color Calibration)” on page 63 in
the “Settings and Printing” for instructions on comparing and setting
color density.
Make sure that the print cartridge stays covered until immediately before
installing it in the printer. Exposure to light can damage the print
cartridge and it will produce light streaks or faded prints.
Make sure that the toner cartridges are installed correctly.
Make sure that you use a high-quality laser paper:
60-105 g/m
60-165 g/m
2
(16-28 lb.) paper in the media trays and
2
(16-44 lb.) paper in the multi-purpose tray.
Page 51

Settings and Printing Network
Trouble Corrective Action
Maintenance and Spec.
Maintenance and Spec.
51
Troubleshooting
Image is very faded or
pieces of the image are
missing; toner on the
page is loose.
Streaks or spots. Most spots are caused by fingerprints or dust introduced into the printer
The back of the printed
page appears dirty.
When using the multi-purpose tray, make sure that you have selected
the correct media type in the driver.
while installing the printer consumables or loading media.
Make sure that the surface where you unpack the printer, paper, and
transparencies is free of dust. Keep supplies in a covered area or a
closed box.
Make sure that the print cartridge stays covered until immediately before
installing it in the printer. Exposure to light for more than 45 seconds
may damage the print cartridge.
Do not touch the intermediate belt of the accumulator unit; fingerprints
affect print quality.
Make sure that the paper or transparency film is clean.
Make sure that you handle the media on the outside edges to avoid
fingerprints.
To get rid of fingerprint spots, print a few prints.
Toner particles have contaminated the transfer roller. This may happen if
the printed image is larger than the media (for example, when printing
on envelopes). Run 10-20 prints to clean the transfer roller.
The print quality of a
transparency is poor.
There may be a defect on the coated surface of the transparency. Try
printing on the other side.
Page 52

Settings and Printing Network
Maintenance and Spec.
Maintenance and Spec.
Warning / Printer Error Messages
Warning / Printer Error Messages
Printer LCD Panel
NOTE:
• Tray 1 is the standard media tray. Tray 2 is the tray of the Optional Paper Feeder. Tray 3 is the tray of
the lower one when the 2nd Optional Paper Feeder is installed.
! Warning Messages
The following warning message is displayed in the lower line of the LCD panel.
Warning Message Possible Cause Corrective Action
52
Low Cyan Toner Cyan toner cartridge is almost
empty.
Low Magenta Toner Magenta toner cartridge is almost
empty.
Low Yellow Toner Yellow toner cartridge is almost
empty.
Low Black Toner Black toner cartridge is almost
empty.
WTC FULL Waste toner cartridge is near full. Have the waste toner cartridge
PC-Black wearing out Black print cartridge is wearing
out.
PC-Color wearing out Color print cartridge is wearing
out.
PC-Black Replace Black print cartridge is worn out. Replace the black print cartridge.
PC-Color Replace Color print cartridge is worn out. Replace the color print cartridge.
AU wearing out Accumulator unit is wearing out. Have the accumulator unit
Have the cyan toner cartridge
available.
Have the magenta toner cartridge
available.
Have the yellow toner cartridge
available.
Have the black toner cartridge
available.
available.
Have the black print cartridge
available.
Have the color print cartridge
available.
available.
AU Replace Accumulator unit is worn out. Replace the accumulator unit.
TR wearing out Transfer roller is wearing out. Have the transfer roller available.
Page 53

Settings and Printing Network
Maintenance and Spec.
Maintenance and Spec.
Warning / Printer Error Messages
Warning Message Possible Cause Corrective Action
TR Replace Transfer roller is worn out. Replace the transfer roller.
FSR wearing out Fuser unit is wearing out. Have the fuser unit available.
FSR Replace Fuser unit is worn out. Replace the fuser unit.
Tray1 Empty Tray 1 is empty. Load media in the tray 1.
Tray1 not installed Tray 1 is not installed. Install tray 1.
Tray2 Empty Tray 2 is empty. Load media in tray 2.
Tray2 not installed Tray 2 is not installed. Install tray 2.
Tray3 Empty Tray 3 is empty. Load media in tray 3.
Tray3 not installed Tray 3 is not installed. Install tray 3.
HDD Full Hard disk drive is full. Remove unnecessary files from
the hard disk drive.
HDD I/O Error HDD I/O error has occurred. Perform Check Disk operation in
the HDD Maintenance mode.
If it still remains, perform Quick
Format or HDD Format operation
in the HDD Maintenance mode.
(see “Using the HDD
Maintenance Mode” on page 76
in “Settings and Printing).
53
Adjusting for media At continuous printing fuser
temperature is higher than
predetermined temperature.
The printing is stopped
automatically until the fuser
temperature is lower than the
predetermined temperature.
Page 54

Settings and Printing Network
Maintenance and Spec.
Maintenance and Spec.
Warning / Printer Error Messages
! Printer Error Messages (User Error)
Error Message Possible Cause Corrective Action
54
Output Tray
Full
Memory Overflow There is not enough memory in
HDD I/O Error HDD I/O error has occurred. Perform Check Disk operation in
FSR
Not Installed
TC-C
Not Installed
TC-C
Replace
TC-M
Not Installed
Output tray is full. Remove the printed media from
the output tray.
Add memory or select a lower
the printer.
Fuser unit is not installed. Install the fuser unit.
Cyan toner cartridge is not
installed.
Cyan toner cartridge is empty. Replace the cyan toner cartridge.
Magenta toner cartridge is not
installed.
resolution in the printer driver.
the HDD Maintenance mode.
If it still remains, perform Quick
Format or HDD Format operation
in the HDD Maintenance mode
(see “Using the HDD
Maintenance Mode” on page 76
in “Settings and Printing).
Install the cyan toner cartridge.
Install the magenta toner cartridge.
TC-M
Replace
TC-Y
Not Installed
TC-Y
Replace
TC-K
Not Installed
TC-K
Replace
Magenta toner cartridge is empty. Replace the magenta toner
cartridge.
Yellow toner cartridge is not
installed.
Yellow toner cartridge is empty. Replace the yellow toner cartridge.
Black toner cartridge is not
installed.
Black toner cartridge is empty. Replace the black toner cartridge.
Install the yellow toner cartridge.
Install the black toner cartridge.
Page 55

Settings and Printing Network
Maintenance and Spec.
Maintenance and Spec.
Warning / Printer Error Messages
Error Message Possible Cause Corrective Action
55
WTC
Replace
PC-Black
Not Installed
PC-Color
Not Installed
Reset Tray1
Remove MPT Paper
Front or Right door
Open
Toner Door
Open
Reset Tray1 Multi-purpose tray motor error has
Load Letter Any tray does not contain letter
Load Legal Any tray does not contain legal
Waste toner cartridge is full. Replace the waste toner cartridge.
Black print cartridge is not
installed.
Color print cartridge is not
installed.
Multi-purpose tray is not in closed
position.
Front or right side door is open. Close the front or right side door.
Toner door is open. Close the toner door.
occurred.
size media.
size media.
Install the black print cartridge.
Install the color print cartridge.
Remove media from the multipurpose tray.
Uninstall tray 1 and then install it.
Uninstall tray 1 and then install it.
Load letter size media.
Load legal size media.
Load A4 Any tray does not contain A4 size
media.
Load B5 (JIS) Any tray does not contain B5 (JIS)
size media.
All Media Tray
Empty
Load Letter
in Tray1
All trays that are possible to feed
media are empty.
If the upper tray is not installed
when Optional Paper Feeder(s) is
installed, it is impossible to feed
media from the lower tray.
Letter size media is not loaded in
tray 1.
Load A4 size media.
Load B5 (JIS) size media.
Load media in a media tray (not to
be the multi-purpose tray).
Load letter size media in tray 1.
Page 56

Settings and Printing Network
Maintenance and Spec.
Maintenance and Spec.
Warning / Printer Error Messages
Error Message Possible Cause Corrective Action
56
Load Legal
in Tray1
Load A4
in Tray1
Load B5 (JIS)
in Tray1
Tray 1
Not Installed
Tray 1
Empty
Load Letter
in Tray2
Load Legal
in Tray2
Load A4
in Tray2
Load B5 (JIS)
in Tray2
Tray 2
Not Installed
Legal size media is not loaded in
tray 1.
A4 size media is not loaded in tray 1.Load A4 size media in tray 1.
B5 (JIS) size media is not loaded
in tray 1.
Tray 1 is not installed. Install tray 1.
Tray 1 is empty. Load media in tray 1.
Letter size media is not loaded in
tray 2.
Legal size media is not loaded in
tray 2.
A4 size media is not loaded in tray 2.Load A4 size media in tray 2.
B5 (JIS) size media is not loaded
in tray 2.
Tray 2 is not installed. Install tray 2.
Load legal size media in tray 1.
Load B5 (JIS) size media in tray 1.
Load letter size media in tray 2.
Load legal size media in tray 2.
Load B5 (JIS) size media in tray 2.
Tray 2
Empty
Load Letter
in Tray3
Load Legal
in Tray3
Load A4
in Tray3
Load B5 (JIS)
in Tray3
Tray 3
Not Installed
Tray 2 is empty. Load media in tray 2.
Letter size media is not loaded in
tray 3.
Legal size media is not loaded in
tray 3.
A4 size media is not loaded in tray 3.Load A4 size media in tray 3.
B5 (JIS) size media is not loaded
in tray 3.
Tray 3 is not installed. Install tray 3.
Load letter size media in tray 3.
Load legal size media in tray 3.
Load B5 (JIS) size media in tray 3.
Page 57

Settings and Printing Network
Maintenance and Spec.
Maintenance and Spec.
Warning / Printer Error Messages
Error Message Possible Cause Corrective Action
57
Tray 3
Empty
JAM 01
See front door label
JAM 02
See front door label
JAM 03
See front door label
JAM 04
See front door label
JAM 05
See front door label
JAM 06
See front door label
JAM 07
See front door label
JAM 08
See front door label
JAM 09
See front door label
Tray 3 is empty. Load media in tray 3.
Pickup jam Clear media jam (see page 15)
Jam at registration sensor Clear media jam (see page 17)
Jam at fuser Clear media jam (see page 18)
Jam at fuser Clear media jam (see page 19)
Jam at fuser Clear media jam (see page 18)
Jam at fuser Clear media jam (see page 18)
Jam at fuser Clear media jam (see page 19)
Jam at fuser Clear media jam (see page 18)
Media size is wrong. Clear media jam (see page 18)
and set correct size media.
JAM 21
See front door label
JAM 22
See front door label
JAM 31
See front door label
AU/WTC
Not Installed
Letter in MPT
Plain Paper
Jam at tray 2 Clear media jam (see page 23)
Jam at tray 3 Clear media jam (see page 23)
Jam at automatic duplex unit Clear media jam (see page 25)
Accumulator unit or waste toner
cartridge is not installed.
Letter size plain paper is
requested in the multi-purpose
tray.
Install the accumulator unit or the
waste toner cartridge.
Load plain, letter sized paper in
the multi-purpose tray.
Page 58

Settings and Printing Network
Maintenance and Spec.
Maintenance and Spec.
Warning / Printer Error Messages
Error Message Possible Cause Corrective Action
58
Letter in MPT
Thin Paper
Letter in MPT
Thick Paper/Card
Letter in MPT
Transparency
Letter in MPT
Label
Letter in MPT
Coated Paper
Letter in MPT
Envelope
Letter in MPT
Bond/Letterhead
Letter in MPT
Recycled Paper
Letter size thin paper is requested
in the multi-purpose tray.
Letter size thick paper/card is
requested in the multi-purpose
tray.
Letter size transparency is
requested in the multi-purpose
tray.
Letter size label is requested in the
multi-purpose tray.
Letter size coated paper is
requested in the multi-purpose
tray.
Letter size envelope is requested
in the multi-purpose tray.
Letter size bond/letterhead is
requested in the multi-purpose
tray.
Letter size recycled paper is
requested in the multi-purpose
tray.
Load thin, letter sized paper in the
multi-purpose tray.
Load thick, letter sized paper/card
in the multi-purpose tray.
Load letter sized transparency in
the multi-purpose tray.
Load letter sized label in the multipurpose tray.
Load coated, letter sized paper in
the multi-purpose tray.
Load letter sized envelope in the
multi-purpose tray.
Load bond/letterhead, letter sized
paper in the multi-purpose tray.
Load recycled, letter sized paper
in the multi-purpose tray.
A4 in MPT
Plain Paper
A4 in MPT
Thin Paper
A4 in MPT
Thick Paper/Card
A4 in MPT
Transparency
A4 in MPT
Label
A4 size plain paper is requested in
the multi-purpose tray.
A4 size thin paper is requested in
the multi-purpose tray.
A4 size thick paper/card is
requested in the multi-purpose
tray.
A4 size transparency is requested
in the multi-purpose tray.
A4 size label is requested in the
multi-purpose tray.
Load plain, A4 sized paper in the
multi-purpose tray.
Load thin, A4 sized paper in the
multi-purpose tray.
Load thick, A4 sized paper/card in
the multi-purpose tray.
Load A4 sized transparency in the
multi-purpose tray.
Load A4 sized label in the multipurpose tray.
Page 59

Settings and Printing Network
Maintenance and Spec.
Maintenance and Spec.
Warning / Printer Error Messages
Error Message Possible Cause Corrective Action
59
A4 in MPT
Coated Paper
A4 in MPT
Envelope
A4 in MPT
Bond/Letterhead
A4 in MPT
Recycled Paper
Legal in MPT
Plain Paper
Legal in MPT
Thin Paper
Legal in MPT
Thick Paper/Card
Legal in MPT
Transparency
A4 size coated paper is requested
in the multi-purpose tray.
A4 size envelope is requested in
the multi-purpose tray.
A4 size bond/letterhead is
requested in the multi-purpose
tray.
A4 size recycled paper is
requested in the multi-purpose
tray.
Legal size plain paper is requested
in the multi-purpose tray.
Legal size thin paper is requested
in the multi-purpose tray.
Legal size thick paper/card is
requested in the multi-purpose
tray.
Legal size transparency is
requested in the multi-purpose
tray.
Load coated, A4 sized paper in the
multi-purpose tray.
Load A4 sized envelope in the
multi-purpose tray.
Load bond/letterhead, A4 sized
paper in the multi-purpose tray.
Load recycled, A4 sized paper in
the multi-purpose tray.
Load plain, legal sized paper in the
multi-purpose tray.
Load thin, legal sized paper in the
multi-purpose tray.
Load thick, legal sized paper/card
in the multi-purpose tray.
Load legal sized transparency in
the multi-purpose tray.
Legal in MPT
Label
Legal in MPT
Coated Paper
Legal in MPT
Envelope
Legal in MPT
Bond/Letterhead
Legal in MPT
Recycled Paper
Legal size label is requested in the
multi-purpose tray.
Legal size coated paper is
requested in the multi-purpose
tray.
Legal size envelope is requested
in the multi-purpose tray.
Legal size bond/letterhead is
requested in the multi-purpose
tray.
Legal size recycled paper size is
requested in the multi-purpose
tray.
Load legal sized label in the multipurpose tray.
Load coated, legal sized paper in
the multi-purpose tray.
Load legal sized envelope in the
multi-purpose tray.
Load bond/letterhead, legal sized
paper in the multi-purpose tray.
Load recycled, legal sized paper in
the multi-purpose tray.
Page 60

Settings and Printing Network
Maintenance and Spec.
Maintenance and Spec.
Warning / Printer Error Messages
Error Message Possible Cause Corrective Action
60
B5 (JIS) in MPT
Plain Paper
B5 (JIS) in MPT
Thin Paper
B5 (JIS) in MPT
Thick Paper/Card
B5 (JIS) in MPT
Transparency
B5 (JIS) in MPT
Label
B5 (JIS) in MPT
Coated Paper
B5 (JIS) in MPT
Envelope
B5 (JIS) size plain paper is
requested in the multi-purpose
tray.
B5 (JIS) size thin paper is
requested in the multi-purpose
tray.
B5 (JIS) size thick paper/card is
requested in the multi-purpose
tray.
B5 (JIS) size transparency is
requested in the multi-purpose
tray.
B5 (JIS) size label is requested in
the multi-purpose tray.
B5 (JIS) size coated paper is
requested in the multi-purpose
tray.
B5 (JIS) size envelope is
requested in the multi-purpose
tray.
Load plain, B5 (JIS) sized paper in
the multi-purpose tray.
Load thin, B5 (JIS) sized paper in
the multi-purpose tray.
Load thick, B5 (JIS) sized paper/
card in the multi-purpose tray.
Load B5 (JIS) sized transparency
in the multi-purpose tray.
Load B5 (JIS) sized label in the
multi-purpose tray.
Load coated, B5 (JIS) sized paper
in the multi-purpose tray.
Load B5 (JIS) sized envelope in
the multi-purpose tray.
B5 (JIS) in MPT
Bond/Letterhead
B5 (JIS) in MPT
Recycled Paper
A5 in MPT
Plain Paper
A5 in MPT
Thin Paper
A5 in MPT
Thick Paper/Card
B5 (JIS) size bond/letterhead is
requested in the multi-purpose
tray.
B5 (JIS) size recycled paper is
requested in the multi-purpose
tray.
A5 size plain paper is requested in
the multi-purpose tray.
A5 size thin paper is requested in
the multi-purpose tray.
A5 size thick paper/card is
requested in the multi-purpose
tray.
Load bond/letterhead, B5 (JIS)
sized paper in the multi-purpose
tray.
Load recycled, B5 (JIS) sized
paper in the multi-purpose tray.
Load plain, A5 sized paper in the
multi-purpose tray.
Load thin, A5 sized paper in the
multi-purpose tray.
Load thick, A5 sized paper /card in
the multi-purpose tray.
Page 61

Settings and Printing Network
Maintenance and Spec.
Maintenance and Spec.
Warning / Printer Error Messages
Error Message Possible Cause Corrective Action
61
A5 in MPT
Transparency
A5 in MPT
Label
A5 in MPT
Coated Paper
A5 in MPT
Envelope
A5 in MPT
Bond/Letterhead
A5 in MPT
Recycled Paper
Executive in MPT
Plain Paper
Executive in MPT
Thin Paper
A5 size transparency is requested
in the multi-purpose tray.
A5 size label is requested in the
multi-purpose tray.
A5 size coated paper is requested
in the multi-purpose tray.
A5 size envelope is requested in
the multi-purpose tray.
A5 size bond/letterhead is
requested in the multi-purpose
tray.
A5 size recycled paper is
requested in the multi-purpose
tray.
Executive size plain paper is
requested in the multi-purpose
tray.
Executive size thin paper is
requested in the multi-purpose
tray.
Load A5 sized transparency in the
multi-purpose tray.
Load A5 sized label in the multipurpose tray.
Load coated, A5 sized paper in the
multi-purpose tray.
Load A5 sized envelope in the
multi-purpose tray.
Load bond/letterhead, A5 sized
paper in the multi-purpose tray.
Load recycled, A5 sized paper in
the multi-purpose tray.
Load plain, executive sized paper
in the multi-purpose tray.
Load thin, executive sized paper in
the multi-purpose tray.
Executive in MPT
Thick Paper/Card
Executive in MPT
Transparency
Executive in MPT
Label
Executive in MPT
Coated Paper
Executive in MPT
Envelope
Executive size thick paper/card is
requested in the multi-purpose
tray.
Executive size transparency is
requested in the multi-purpose
tray.
Executive size label is requested
in the multi-purpose tray.
Executive size coated paper is
requested in the multi-purpose
tray.
Executive size envelope is
requested in the multi-purpose
tray.
Load thick, executive sized paper/
card in the multi-purpose tray.
Load executive sized transparency
in the multi-purpose tray.
Load executive sized label in the
multi-purpose tray.
Load coated, executive sized
paper in the multi-purpose tray.
Load executive sized envelope in
the multi-purpose tray.
Page 62

Settings and Printing Network
Maintenance and Spec.
Maintenance and Spec.
Warning / Printer Error Messages
Error Message Possible Cause Corrective Action
62
Executive in MPT
Bond/Letterhead
Executive in MPT
Recycled Paper
ENV.C5 in MPT
Plain Paper
ENV.C5 in MPT
Thin Paper
ENV.C5 in MPT
Thick Paper/Card
ENV.C5 in MPT
Transparency
ENV.C5 in MPT
Label
Executive size bond/letterhead is
requested in the multi-purpose
tray.
Executive size recycled paper is
requested in the multi-purpose
tray.
Envelope C5 size plain paper is
requested in the multi-purpose
tray.
Envelope C5 size thin paper is
requested in the multi-purpose
tray.
Envelope C5 size thick paper/card
is requested in the multi-purpose
tray.
Envelope C5 size transparency is
requested in the multi-purpose
tray.
Envelope C5 size label is
requested in the multi-purpose
tray.
Load bond/letterhead, executive
sized paper in the multi-purpose
tray.
Load recycled, executive sized
paper in the multi-purpose tray.
Load plain, Envelope C5 sized
paper in the multi-purpose tray.
Load thin, Envelope C5 sized
paper in the multi-purpose tray.
Load thick, Envelope C5 sized
paper/card in the multi-purpose
tray.
Load Envelope C5 sized
transparency in the multi-purpose
tray.
Load Envelope C5 sized label in
the multi-purpose tray.
ENV.C5 in MPT
Coated Paper
ENV.C5 in MPT
Envelope
ENV.C5 in MPT
Bond/Letterhead
ENV.C5 in MPT
Recycled Paper
Envelope C5 size coated paper is
requested in the multi-purpose
tray.
Envelope C5 size envelope is
requested in the multi-purpose
tray.
Envelope C5 size bond/letterhead
is requested in the multi-purpose
tray.
Envelope C5 size recycled paper
is requested in the multi-purpose
tray.
Load coated, Envelope C5 sized
paper in the multi-purpose tray.
Load Envelope C5 sized envelope
in the multi-purpose tray.
Load bond/letterhead, Envelope
C5 sized paper in the multipurpose tray.
Load recycled, Envelope C5 sized
paper in the multi-purpose tray.
Page 63

Settings and Printing Network
Maintenance and Spec.
Maintenance and Spec.
Warning / Printer Error Messages
Error Message Possible Cause Corrective Action
63
ENV.C6 in MPT
Plain Paper
ENV.C6 in MPT
Thin Paper
ENV.C6 in MPT
Thick Paper/Card
ENV.C6 in MPT
Transparency
ENV.C6 in MPT
Label
ENV.C6 in MPT
Coated Paper
ENV.C6 in MPT
Envelope
Envelope C6 size plain paper is
requested in the multi-purpose
tray.
Envelope C6 size thin paper is
requested in the multi-purpose
tray.
Envelope C6 size thick paper/card
is requested in the multi-purpose
tray.
Envelope C6 size transparency is
requested in the multi-purpose
tray.
Envelope C6 size label is
requested in the multi-purpose
tray.
Envelope C6 size coated paper is
requested in the multi-purpose
tray.
Envelope C6 size envelope is
requested in the multi-purpose
tray.
Load plain, Envelope C6 sized
paper in the multi-purpose tray.
Load thin, Envelope C6 sized
paper in the multi-purpose tray.
Load thick, Envelope C6 sized
paper/card in the multi-purpose
tray.
Load Envelope C6 sized
transparency in the multi-purpose
tray.
Load Envelope C6 sized label in
the multi-purpose tray.
Load coated, Envelope C6 sized
paper in the multi-purpose tray.
Load Envelope C6 sized envelope
in the multi-purpose tray.
ENV.C6 in MPT
Bond/Letterhead
ENV.C6 in MPT
Recycled Paper
ENV.#9 in MPT
Plain Paper
ENV.#9 in MPT
Thin Paper
Envelope C6 size bond/letterhead
is requested in the multi-purpose
tray.
Envelope C6 size recycled paper
is requested in the multi-purpose
tray.
Envelope #9 size plain paper is
requested in the multi-purpose
tray.
Envelope #9 size thin paper is
requested in the multi-purpose
tray.
Load bond/letterhead, Envelope
C6 sized paper in the multipurpose tray.
Load recycled, Envelope C6 sized
paper in the multi-purpose tray.
Load plain, Envelope #9 sized
paper in the multi-purpose tray.
Load thin, Envelope #9 sized
paper in the multi-purpose tray.
Page 64

Settings and Printing Network
Maintenance and Spec.
Maintenance and Spec.
Warning / Printer Error Messages
Error Message Possible Cause Corrective Action
64
ENV.#9 in MPT
Thick Paper/Card
ENV.#9 in MPT
Transparency
ENV.#9 in MPT
Label
ENV.#9 in MPT
Coated Paper
ENV.#9 in MPT
Envelope
ENV.#9 in MPT
Bond/Letterhead
ENV.#9 in MPT
Recycled Paper
Envelope #9 size thick paper/card
is requested in the multi-purpose
tray.
Envelope #9 size transparency is
requested in the multi-purpose
tray.
Envelope #9 size label is
requested in the multi-purpose
tray.
Envelope #9 size coated paper is
requested in the multi-purpose
tray.
Envelope #9 size envelope is
requested in the multi-purpose
tray.
Envelope #9 size bond/letterhead
is requested in the multi-purpose
tray.
Envelope #9 size recycled paper is
requested in the multi-purpose
tray.
Load thick, Envelope #9 sized
paper/card in the multi-purpose
tray.
Load Envelope #9 sized
transparency in the multi-purpose
tray.
Load Envelope #9 sized label in
the multi-purpose tray.
Load coated, Envelope #9 sized
paper in the multi-purpose tray.
Load Envelope #9 sized envelope
in the multi-purpose tray.
Load bond/letterhead, Envelope
#9 sized paper in the multipurpose tray.
Load recycled, Envelope #9 sized
paper in the multi-purpose tray.
ENV.#10 in MPT
Plain Paper
ENV.#10 in MPT
Thin Paper
ENV.#10 in MPT
Thick Paper/Card
ENV.#10 in MPT
Transparency
Envelope #10 size plain paper is
requested in the multi-purpose
tray.
Envelope #10 size thin paper is
requested in the multi-purpose
tray.
Envelope #10 size thick paper/
card is requested in the multipurpose tray.
Envelope #10 size transparency is
requested in the multi-purpose
tray.
Load plain, Envelope #10 sized
paper in the multi-purpose tray.
Load thin, Envelope #10 sized
paper in the multi-purpose tray.
Load thick, Envelope #10 sized
paper/card in the multi-purpose
tray.
Load Envelope #10 sized
transparency in the multi-purpose
tray.
Page 65

Settings and Printing Network
Maintenance and Spec.
Maintenance and Spec.
Warning / Printer Error Messages
Error Message Possible Cause Corrective Action
65
ENV.#10 in MPT
Label
ENV.#10 in MPT
Coated Paper
ENV.#10 in MPT
Envelope
ENV.#10 in MPT
Bond/Letterhead
ENV.#10 in MPT
Recycled Paper
ENV.DL in MPT
Plain Paper
ENV.DL in MPT
Thin Paper
Envelope #10 size label is
requested in the multi-purpose
tray.
Envelope #10 size coated paper is
requested in the multi-purpose
tray.
Envelope #10 size envelope is
requested in the multi-purpose
tray.
Envelope #10 size bond/letterhead
is requested in the multi-purpose
tray.
Envelope #10 size recycled paper
is requested in the multi-purpose
tray.
Envelope DL size plain paper is
requested in the multi-purpose
tray.
Envelope DL size thin paper is
requested in the multi-purpose
tray.
Load Envelope #10 sized label in
the multi-purpose tray.
Load coated, Envelope #10 sized
paper in the multi-purpose tray.
Load Envelope #10 sized
envelope in the multi-purpose tray.
Load bond/letterhead, Envelope
#10 sized paper in the multipurpose tray.
Load recycled, Envelope #10
sized paper in the multi-purpose
tray.
Load plain, Envelope DL sized
paper in the multi-purpose tray.
Load thin, Envelope DL sized
paper in the multi-purpose tray.
ENV.DL in MPT
Thick Paper/Card
ENV.DL in MPT
Transparency
ENV.DL in MPT
Label
ENV.DL in MPT
Coated Paper
Envelope DL size thick paper/card
is requested in the multi-purpose
tray.
Envelope DL size transparency is
requested in the multi-purpose
tray.
Envelope DL size label is
requested in the multi-purpose
tray.
Envelope DL size coated paper is
requested in the multi-purpose
tray.
Load thick, Envelope DL sized
paper/card in the multi-purpose
tray.
Load Envelope DL sized
transparency in the multi-purpose
tray.
Load Envelope DL sized label in
the multi-purpose tray.
Load coated, Envelope C5 sized
paper in the multi-purpose tray.
Page 66

Settings and Printing Network
Maintenance and Spec.
Maintenance and Spec.
Warning / Printer Error Messages
Error Message Possible Cause Corrective Action
66
ENV.DL in MPT
Envelope
ENV.DL in MPT
Bond/Letterhead
ENV.DL in MPT
Recycled Paper
ENV.Monarch in MPT
Plain Paper
ENV.Monarch in MPT
Thin Paper
ENV.Monarch in MPT
Thick Paper/Card
ENV.Monarch in MPT
Transparency
Envelope DL size envelope is
requested in the multi-purpose
tray.
Envelope DL size bond/letterhead
is requested in the multi-purpose
tray.
Envelope DL size recycled paper
is requested in the multi-purpose
tray.
Envelope Monarch size plain
paper is requested in the multipurpose tray.
Envelope Monarch size thin paper
is requested in the multi-purpose
tray.
Envelope Monarch size thick
paper/card is requested in the
multi-purpose tray.
Envelope Monarch size
transparency is requested in the
multi-purpose tray.
Load Envelope DL sized envelope
in the multi-purpose tray.
Load bond/letterhead, Envelope
DL sized paper in the multipurpose tray.
Load recycled, Envelope DL sized
paper in the multi-purpose tray.
Load plain, Envelope Monarch
sized paper in the multi-purpose
tray.
Load thin, Envelope Monarch
sized paper in the multi-purpose
tray.
Load thick, Envelope Monarch
sized paper/card in the multipurpose tray.
Load Envelope Monarch sized
transparency in the multi-purpose
tray.
ENV.Monarch in MPT
Label
ENV.Monarch in MPT
Coated Paper
ENV.Monarch in MPT
Envelope
ENV.Monarch in MPT
Bond/Letterhead
Envelope Monarch size label is
requested in the multi-purpose
tray.
Envelope Monarch size coated
paper is requested in the multipurpose tray.
Envelope Monarch size envelope
is requested in the multi-purpose
tray.
Envelope Monarch size bond/
letterhead is requested in the
multi-purpose tray.
Load Envelope Monarch sized
label in the multi-purpose tray.
Load coated, Envelope Monarch
sized paper in the multi-purpose
tray.
Load Envelope Monarch sized
envelope in the multi-purpose tray.
Load bond/letterhead, Envelope
Monarch sized paper in the multipurpose tray.
Page 67

Settings and Printing Network
Maintenance and Spec.
Maintenance and Spec.
Warning / Printer Error Messages
Error Message Possible Cause Corrective Action
67
ENV.Monarch in MPT
Recycled Paper
Custom in MPT
Plain Paper
Custom in MPT
Thin Paper
Custom in MPT
Thick Paper/Card
Custom in MPT
Transparency
Custom in MPT
Label
Custom in MPT
Coated Paper
Envelope Monarch size recycled
paper is requested in the multipurpose tray.
Custom size plain paper is
requested in the multi-purpose
tray.
Custom size thin paper is
requested in the multi-purpose
tray.
Custom size thick paper/card is
requested in the multi-purpose
tray.
Custom size transparency is
requested in the multi-purpose
tray.
Custom size label is requested in
the multi-purpose tray.
Custom size coated paper is
requested in the multi-purpose
tray.
Load recycled, Envelope Monarch
sized paper in the multi-purpose
tray.
Load plain, Custom sized paper in
the multi-purpose tray.
Load thin, Custom sized paper in
the multi-purpose tray.
Load thick, Custom sized paper/
card in the multi-purpose tray.
Load Custom sized transparency
in the multi-purpose tray.
Load Custom sized label in the
multi-purpose tray.
Load coated, Custom sized paper
in the multi-purpose tray.
Custom in MPT
Envelope
Custom in MPT
Bond/Letterhead
Custom in MPT
Recycled Paper
Custom size envelope is
requested in the multi-purpose
tray.
Custom size bond/letterhead is
requested in the multi-purpose
tray.
Custom size recycled paper is
requested in the multi-purpose
tray.
Load Custom sized envelope in
the multi-purpose tray.
Load bond/letterhead, Custom
sized paper in the multi-purpose
tray.
Load recycled, custom sized
paper in the multi-purpose tray.
Page 68

Settings and Printing Network
Maintenance and Spec.
Maintenance and Spec.
Warning / Printer Error Messages
Error Message Possible Cause Corrective Action
68
The first page is printed,
then error message and
CONTINUE or CANCEL
are displayed by turns.
The length of the loaded media in
the multi-purpose tray is shorter
than the paper size setting of the
printer driver.
Replace the media with the correct
one and press (CONTINUE)
button on the printer panel.
The printer will print from the first
page.
Press (CANCEL) button on the
printer panel to cancel printing.
Set the paper size of the printer
driver correctly.
Page 69

Settings and Printing Network
Maintenance and Spec.
Maintenance and Spec.
Warning / Printer Error Messages
! Printer Error Messages (Call Service)
Some Operation errors cause the ERROR indicator to blink and printing to stop. A message will be
displayed on the LCD panel until the problem is fixed. If the LCD panel message includes the
instruction, Call for Service, contact an authorized service representative.
In addition, if the following conditions occur, turn off and unplug the printer from the outlet and contact a
qualified service representative:
• The power cord or plug is damaged or frayed.
• Liquid has been spilled into the printer.
• The printer has been exposed to rain or water.
• The printer does not operate normally though the operating instructions are being followed. Adjust
only those controls that are described in the operating instructions; improper adjustment of other
described in the operating instructions; improper adjustment of other controls may result in damage
and will often require extensive work to restore the printer to normal operation.
69
Page 70

Settings and Printing Network
Maintenance and Spec.
Maintenance and Spec.
Repacking
It is highly recommended that you keep the original carton and ALL packing materials.
Should you need to transport or ship your printer, please follow these instructions.
SAFETY CAUTION
• The printer weighs about 30 kg (66 lbs.). It must be handled by two people.
NOTE:
• Should you need to send your printer for service, consult your reseller first or Panasonic.
• Please use the original carton and all of the original packing materials.
• If you do not have the packing for the consumable units: contact Panasonic for packing.
• Improper repacking of the printer may result in a service charge to remove spilled toner.
• Since the printer uses dry toner, extreme care must be taken when handling. The printer should be
handled and shipped in the upright (vertical) position.
70
Repacking
Material required:
• Original carton and packing materials
• Newspaper or drop cloth
• Shipping tape and scissors
Page 71

Settings and Printing Network
Maintenance and Spec.
Maintenance and Spec.
1 Turn off the printer, remove the power code and all interface cables.
2 Open the right side door.
71
Repacking
3 Slide the green lever for the waste toner cartridge to the right
(RELEASE).
Page 72

Settings and Printing Network
Maintenance and Spec.
Maintenance and Spec.
Repacking
4 Remove the waste toner cartridge.
•Be sure the green lever is in the RELEASE position so that upper openings of the
waste toner cartridge are completely closed.
Opening
5 Insert the waste toner cartrigde into a plastic bag and seal the end of the
bag tightly with adhesive tape.
72
6 Unlock the two levers (1) and open the print cartridge holder (2).
1
1
2
Page 73

Settings and Printing Network
Maintenance and Spec.
Maintenance and Spec.
Repacking
7 Pull out the color print cartridge halfway and remove it (2) while pressing
the green stopper (1) on the left side.
2
1
NOTE:
• To prevent damage to the print cartridge,
- Do not touch the green drum surface.
- Do not expose to light for more than 45 seconds.
- Do not expose to direct sunlight.
73
Green
drum
Page 74

Settings and Printing Network
2
Maintenance and Spec.
Maintenance and Spec.
8 Replace the lower seal cover (1) and the upper one (2).
•Be sure the three sealing levers of the print cartridge are exposed through the lower
seal cover.
2
74
Repacking
Lever
1
9 Insert the color print cartridge into the black plastic bag and seal the end
of the bag tightly with adhesive tape.
Page 75

Settings and Printing Network
Maintenance and Spec.
Maintenance and Spec.
10 Pull out the black print cartridge.
NOTE:
• To prevent damage to the print cartridge,
- Do not touch the green drum surface.
- Do not expose to light for more than 45 seconds.
- Do not expose to direct sunlight.
75
Repacking
Green
drum
Page 76

Settings and Printing Network
2
Maintenance and Spec.
Maintenance and Spec.
11 Replace the lower seal cover (1) and the upper one (2).
•Be sure the sealing lever of the print cartridge is exposed through the lower seal
cover.
2
76
Repacking
Lever
1
12 Insert the black print cartridge into the black plastic bag and seal the end
of the bag tightly with adhesive tape.
Page 77

Settings and Printing Network
Maintenance and Spec.
Maintenance and Spec.
13Close the print cartridge holder (1) and lock it (2). Close the right side
door (3).
11
22
33
22
Accumulator unit
77
Repacking
NOTE:
•Be sure the accumulator unit is kept in the printer.
14 Remove the media from the multi-purpose tray. Push the multi-purpose
tray (1) and close the tray cover (2).
2
1
Page 78

Settings and Printing Network
Maintenance and Spec.
Maintenance and Spec.
Repacking
15 Pull the media tray (1) out of the printer. Remove the media (2) from the
media tray and install the tray pad (3) into the media tray.
3
78
1
2
16 Install the media tray into the printer.
17 Close (1) and insert (2) the paper support into the printer.
1
2
18 Confirm all toner cartridges are completely installed in the printer.
Page 79

Settings and Printing Network
If the hard disk drive has been installed in the printer, confirm the hard disk drive is fastened with two
screws provided. If it is not installed, proceed to step 19 (see page 81).
Maintenance and Spec.
Maintenance and Spec.
! Confirming whether the hard disk drive is secured
(1) Remove the two thumb screws from the control board.
79
Repacking
(2) Pull out the control board while holding the green handle.
Page 80

Settings and Printing Network
Maintenance and Spec.
Maintenance and Spec.
(3) Reconfirm the hard disk drive is fastened with two screws. If it is not
fastened, fasten it with two screws.
(4) Install the control board back into the printer, as shown.
80
Repacking
Page 81

Settings and Printing Network
(5) Tighten the two thumb screws.
Maintenance and Spec.
Maintenance and Spec.
19 Repack the printer in the original shipping box.
•Make sure that you keep the printer upright and level when moving.
81
Repacking
SAFETY CAUTION
•The printer weighs about 30 kg (66 lbs.). It must be handled by two people.
(1) Place the printer in the plastic bag on the lower cushion and wrap the
printer with the plastic bag.
Page 82

Settings and Printing Network
Maintenance and Spec.
Maintenance and Spec.
(2) Place the middle and upper cushions on the lower cushion.
(3) Place the waste toner cartridge, black print cartridge, color print cartridge
and accessory box on the upper cushion.
Color print cartridge
Black print cartridge
Waste toner cartridge
82
Repacking
Accessory box
(4) Place the top carton and install the 4 joints.
1
2
3
Page 83

Settings and Printing Network
Maintenance and Spec.
Maintenance and Spec.
Specifications
Printer
Recording System:
Electro-Photographic, Single pass four-color (YMCK)
Tandem 4 Drum System
Accumulator Belt Transfer System
Exposure System:
Semi-Conductor Laser Beam Scanning
(4 laser beams, 1 polygon mirror)
Fixing System:
IH (Induction Heating) Fusing System
No fusing oil used or required
Developing System:
Non magnetic mono component waxed toner (magnetic toner CANNOT be used or available)
Contact Developing System
83
Specifications
Print Mode:
PCL:
Standard (Printing resolution 600 x 600 dpi)
Fine (Printing resolution 1200 x 600 dpi)
Enhance (Printing resolution 1200 x 1200 dpi)
PS:
Standard (Printing resolution 600 x 600 dpi)
Fine (Printing resolution 1200 x 600 dpi)
Enhance (Printing resolution 1200 x 1200 dpi)
It is strongly recommended to add Optional Memory when printing documents in Enhance mode.
Power Supply:
Refer to the nameplate on the back of the printer.
AC 120 V 50 / 60 Hz
Page 84

Settings and Printing Network
Operating Environment:
10°C - 32.5°C (50°F - 90.5°F) / 15% - 80%RH
Except the following unsuitable area
Maintenance and Spec.
Maintenance and Spec.
Unsuitable area
Suitable area
27˚C (80.6˚F)10˚C (50˚F)
32.5˚C (90.5˚F)
Specifications
80%RH
60%RH
15%RH
Storage Environment:
0°C - 40°C (32°F - 104°F) / 10% - 80%RH (Non-condensing)
Warm-up Time:
Approximately 30 seconds [Standard Memory without the printer’s hard disk drive at 20°C (68°F) /
65%RH / 120V, Except error and warning status]
84
Power Consumption:
On Printing Max.: 1200 W
Ave.: 460 W
Power Save Mode: 9 W (AC120 V)
First Print Time:
Print Mode
Color Print 25 seconds 15.5 seconds
Monochrome Print 25 seconds 13.5 seconds
[Standard print mode, simplex print, at 20°C (68°F) / 65%RH, measured by Panasonic’s method]
Power Save Mode “ON”
(default)
Power Save Mode “OFF”
Page 85

Settings and Printing Network
Maintenance and Spec.
Maintenance and Spec.
Continuous Print Speed:
85
Specifications
ppm (pages per minute)
Simplex
(Pages/min.)
Quality Media
Letter 21 16.9 21 16.9
A4 20 16 20 16
Standard / Fine
Transparency (Letter) 8.4 8.4 – –
Enhance
[Maximum speed on continuous printing, measured by Panasonic’s method]
Legal 17.2 13.9 17.2 13.9
Transparency (A4) 8 8 – –
Letter 8.4 8.4 8.4 8.4
A4 8888
Legal 6.9 6.9 6.9 6.9
B/W Color B/W Color
Dimensions (WxDxH):
419 x 536 x 395 mm (16.5 x 21.1 x 15.5 in.)
Auto Duplex
(Images/min.)
Weight:
(Net) Approximately 30 kg (66 lbs.) excluding packaging material
(Gross) Approximately 35 kg (77 lbs.)
Noise Level:
Less than 53 dbA (printing mode, ISO)
Less than 45 dbA (standby mode, ISO)
(except peak noise)
Tray Capacity:
Media Tray: 530 sheets [75 g/m2 (20 lb.) Paper]
Multi-Purpose Tray: 100 sheets [75 g/m
Optional Paper Feeder: 530 sheets [75 g/m
Max. Input capacity: 1,690 sheets [75 g/m
Output Tray: 250 sheets [75 g/m
2
(20 lb.) Paper]
2
(20 lb.) Paper] (Max. 2 cassettes)
2
(20 lb.) Paper] (530 + 530 x 2 + 100)
2
(20 lb.) Paper] Face Down only
Page 86

Settings and Printing Network
Maintenance and Spec.
Maintenance and Spec.
Specifications
Media
! Paper Specifications
This printer is designed to work well with most types of paper. However, differences in paper may have
significant effects on the quality of the print or the reliability of paper handling. It is strongly
recommended that you always test paper before purchasing it to make sure it provides desirable
performance. The following guidelines will be helpful.
Basic Weight:
60 to 105 g/m
Thickness:
3.7 to 7.5 mils (1 mil=1/1000″)
Moisture Content:
4% to 6%
Smoothness:
100 to 300 Sheffield
Acid Content:
5.5 PH minimum
2
(16 to 28 lb.)
86
Fusing Compatibility:
Must not scorch, melt, offset material, or release hazardous emissions when heated to 200°C (392°F)
for 0.1 second
Cutting Dimensions:
±0.0313 inch of nominal, corners 90°±4°
Grain:
Long grain
Cut Edge Conditions:
Cut with sharp blades, no paper dust
Ash Content:
Not to exceed 10%
Curl:
No allowable curl toward the side to be printed
Packing:
Polylaminated moisture proof ream wrap
NOTE:
• Please store your paper according to the recommendations of the manufacturer.
Page 87

Settings and Printing Network
Maintenance and Spec.
Maintenance and Spec.
! Available Media
For Tray 1 (Standard Media Tray)
Media Type Media Weight Media Size
Plain paper*
Bond/Letterhead
Recycled paper
Thin paper
For Multi-purpose Tray
Plain paper*
Bond/Letterhead
Recycled paper
Thin paper
Thick paper/Card
Coated Paper
Transparency*
Label*
Envelope
*1See “Recommended Media” on page 88.
2
*
Available media size : Min. 90 x 148 mm (3.5 x 5.8 in.)
1
75 - 105 g/m2 (20 - 28 lb.)
2
60 - 75 g/m
(16 - 20 lb.)
Letter, Legal, A4, B5 (JIS)
Media Type Media Weight Media Size
1
75 - 105 g/m2 (20 - 28 lb.)
60 - 75 g/m
105 - 165 g/m
120 g/m
1
1
–
–
75 - 90 g/m
2
(16 - 20 lb.)
2
2
(32 lb.)
2
(20 - 24 lb.)
(28 - 44 lb.)
: Max. 216 x 356 mm (8.5 x 14 in.)
Letter, Legal, Executive, A4, A5,
B5 (JIS), Envelope #9,
Envelope #10,
Envelope Monarch,
Envelope C5, Envelope C6,
Envelope DL, Custom*
Letter, A4
Envelope #9, Envelope #10,
Envelope Monarch,
Envelope C5, Envelope C6,
Envelope DL
87
Specifications
2
Page 88

Settings and Printing Network
Maintenance and Spec.
Maintenance and Spec.
Specifications
For Tray 2 / Tray 3 (Optional Paper Feeder)
Media Type Media Weight Media Size
Plain paper
Bond/Letterhead
Recycled paper
Thin paper
75 - 105 g/m
60 - 75 g/m
2
(20 - 28 lb.)
2
(16 - 20 lb.)
Letter, Legal, A4, B5 (JIS)
For Automatic Duplex Printing
To perform automatic duplex printing, the automatic duplex unit option must be installed in the printer.
Media Type Media Weight Media Size
Plain paper
Bond/Letterhead
Recycled paper
Thin paper
NOTE:
• Automatic duplex printing is not available from the multi-purpose tray.
75 - 105 g/m
60 - 75 g/m
2
(20 - 28 lb.)
2
(16 - 20 lb.)
Letter, Legal, A4, B5 (JIS)
88
! Recommended Media
Media Type Media Size Recommendation
Plain paper
Transparency Letter / A4 3M CG3300
Label
Letter Hammermil Laser Print 24 lb.
A4
Letter Avery 5160 - Avery 5163, Avery 5660 - Avery 5663
A4 Avery L7159 - Avery L7164
ENSO 4CC Premium 80 g/m
2
Page 89

Settings and Printing Network
Maintenance and Spec.
Maintenance and Spec.
! Media Size and Dimension
The following is the media size and dimension.
Media Size Dimension
Letter 216 x 279 mm (8.5 x 11 in.)
A4 210 x 297 mm (8.26 x 11.69 in.)
Legal 216 x 356 mm (8.5 x 14 in.)
B5 (JIS) 182 x 257 mm (7.16 x 10.11 in.)
Executive 184 x 267 mm (7.25 X 10.5 in.)
89
Specifications
A5
Envelope #9 98 x 225 mm (3.87 x 8.87 in.)
Envelope #10 105 x 241 mm (4.12 x 9.5 in.)
Envelope DL 110 x 220 mm (4.33 x 8.66 in.)
Envelope C5 162 x 229 mm (6.37 x 9.01 in.)
Envelope C6 114 x 162 mm (4.48 x 6.37 in.)
Envelope Monarch 98 x 191 mm (3.87 x 7.5 in.)
148 x 210 mm (5.82 x 8.26 in.)
Page 90

Settings and Printing Network
A
Maintenance and Spec.
Maintenance and Spec.
! Print Area
90
Specifications
C
D
B
Print area
When using PCL printer driver
Media Size A B C D
Letter 203.2 mm (8.00”) 269.2 mm (10.60”) 6.3 mm (0.25”) 4.2 mm (0.17”)
A4 198.0 mm (7.79”) 287.0 mm (11.30”) 6.0 mm (0.24”)
Legal 203.2 mm (8.00”) 345.4 mm (13.60”)
6.3 mm (0.25”) 4.2 mm (0.17”)
4.2 mm (0.17”)
B5 (JIS) 170.0 mm (6.69”) 247.0 mm (9.72”)
Executive 171.5 mm (6.75”) 256.5 mm (10.10”)
A5 136.0 mm (5.35”) 200.0 mm (7.87”)
Envelope Envelope #9 85.7 mm (3.38”) 215.3 mm (8.48”)
Envelope #10 92.1 mm (3.63”) 231.1 mm (9.10”)
Envelope DL 98.0 mm (3.86”) 210.0 mm (8.27”)
Envelope C5 149.9 mm (5.90”) 219.0 mm (8.62”)
Envelope C6 101.9 mm (4.01”) 152.0 mm (5.98”)
Envelope Monarch 85.7 mm (3.38”) 180.3 mm (7.10”)
6.0 mm (0.24”) 4.2 mm (0.17”)
6.3 mm (0.25”) 4.2 mm (0.17”)
6.0 mm (0.24”) 4.2 mm (0.17”)
6.3 mm (0.25”) 4.2 mm (0.17”)
6.3 mm (0.25”) 4.2 mm (0.17”)
6.0 mm (0.24”) 4.2 mm (0.17”)
6.0 mm (0.24”) 4.2 mm (0.17”)
6.0 mm (0.24”) 4.2 mm (0.17”)
6.3 mm (0.25”) 4.2 mm (0.17”)
Page 91

Settings and Printing Network
Maintenance and Spec.
Maintenance and Spec.
Specifications
When using PS printer driver
Media Size A B C D
Letter 206.6 mm (8.14”) 270.1 mm (10.64”) 4.6 mm (0.18”) 4.6 mm (0.18”)
A4 200.0 mm (7.86”) 287.8 mm (11.33”) 5.0 mm (0.20”)
4.6 mm (0.18”)
91
Legal 206.6 mm (8.14”) 346.3 mm (13.64”)
B5 (JIS) 171.4 mm (6.74”) 247.9 mm (9.75”)
Executive 174.2 mm (6.86”) 257.4 mm (10.14”)
A5 136.5 mm (5.36”) 201.1 mm (7.90”)
Envelope Envelope #9 89.2 mm (3.50”) 216.6 mm (8.52”)
Envelope #10 95.4 mm (3.75”) 232.0 mm (9.14”)
Envelope DL 99.8 mm (3.93”) 210.9 mm (8.30”)
Envelope C5 152.8 mm (6.00”) 220.2 mm (8.67”)
Envelope C6 104.0 mm (4.08”) 153.1 mm (6.02”)
Envelope Monarch 89.2 mm (3.50”) 181.3 mm (7.14”)
4.6 mm (0.18”) 4.6 mm (0.18”)
5.3 mm (0.21”) 4.6 mm (0.18”)
5.0 mm (0.20”) 4.6 mm (0.18”)
5.0 mm (0.20”) 4.2 mm (0.17”)
4.6 mm (0.18”) 4.6 mm (0.18”)
4.6 mm (0.18”) 4.6 mm (0.18”)
5.0 mm (0.20”) 4.6 mm (0.18”)
4.6 mm (0.18”) 4.6 mm (0.18”)
5.0 mm (0.20”) 4.2 mm (0.17”)
5.0 mm (0.20”) 4.6 mm (0.18”)
Page 92

Settings and Printing Network
Maintenance and Spec.
Maintenance and Spec.
Specifications
! Types of Paper to Avoid
• Extremely smooth or shiny paper or paper that is highly textured
• Acid paper
• Letterhead imprinted with low temperature or thermography. These materials may transfer onto the
fuser unit’s roller and cause damage. Any pre-printed paper should use inks compatible with 200°C
(392°F) for 0.1 second.
• Damaged or wrinkled paper, or paper with irregularities such as tabs, staples, etc.
• Multipart forms or carbonless paper
• Paper with a cotton and/or fiber content over 25%
• Ink jet media (paper, transparency, etc.) (It may transfer onto the fuser unit’s roller and cause
damage.)
92
Page 93

Settings and Printing Network
Maintenance and Spec.
Maintenance and Spec.
Specifications
! Transparencies and Labels
You may also print on labels and transparencies that are made for the printer. Panasonic has tested
and found that the following transparencies and labels work satisfactorily.
OHP transparencies: 3M CG3300
Labels: Avery 5160 - Avery 5163, Avery 5660 - Avery 5663
Avery L7159 - Avery L7164
• To avoid damaging the printer, do not use ink jet transparency.
• Transparencies and adhesive material of labels should be stable at 205°C (400°F), the printer’s
maximum temperature.
• Re-using transparencies that have been fed through the printer once (for example, after jams or if the
transparency is ejected without being printed) can reduce the life of the consumables and/or paper
path components.
• When using transparencies, if the print quality is poor, print on the other side.
NOTE:
• With any label stock, the labels must completely cover the backing material (see figure below).
NOYES
93
Labels cover the entire
backing material
The backing material is exposed.
Page 94

Settings and Printing Network
Maintenance and Spec.
Maintenance and Spec.
Specifications
! Envelope Specifications
It is recommended that you purchase only high quality envelopes as shown in the diagram below:
High quality envelopes have the following characteristics:
• A thin, sharply creased leading edge
• Paper weight of 90 g/m
• Flat, free of curls, wrinkles, nicks, etc.
NOTE:
• Slight “wrinkling” may occur during printing even if high quality envelopes are used. To maximize
performance and print quality, avoid printing on the folded portions and areas around the flap of the
envelope.
The following illustrates the recommended printable area when printing on envelopes.
2
(24 lb.)
94
Printable area
30 mm (1.2 in.)
30 mm (1.2 in.)
Page 95

Settings and Printing Network
It is not recommended that you use envelopes with any of the following characteristics (using these
may result in paper jams):
• Irregularly shaped envelopes
• Envelopes with curls, wrinkles, nicks, twists, dog-ears or other damage
• Envelopes with diamond cross construction
• Highly textured envelopes, or with extremely shiny surfaces
• Envelopes that seal by removing a peel-off strip
• Envelopes with more than one flap to be sealed
• Envelopes with opening on the shorter edge cannot be used.
• Envelopes that are baggy or not sharply creased
• Embossed envelopes
• Envelopes that have previously been printed with a laser printer
• Envelopes that have been previously printed inside
Maintenance and Spec.
Maintenance and Spec.
Specifications
95
Curl
Diamond cross
construction
Twist
Peel-off strip
Multiple flaps
WaveDog-ears
Opening on the
shorter edge
Bent-edge
Page 96

Settings and Printing Network
Do not attempt to print on any of the following types of envelopes. These may cause damage to your
printer.
• Envelopes with clasps, snaps or tie strings (see Figure 1)
• Envelopes with transparent windows (see Figure 2)
• Envelopes that will melt, discolour, scorch, offset or release hazardous emissions when exposed to
200°C (392°F) for 0.1 second
• Envelopes that use encapsulated types of adhesive that do not require moistening but rely on
pressure to seal them
Maintenance and Spec.
Maintenance and Spec.
Specifications
96
Figure 1
Always test a sample of the envelopes you are thinking of buying. Confirm that the envelope performs
acceptably.
For best printing results
• Avoid printing in high humidity i.e., above 70%RH.
High humidity may cause the envelope to curl and pick up excess toner.
High humidity may also cause the envelope to seal.
• Envelope storage is very important. Store them away from moisture and humid air, where they can lay
flat and their edges won’t be bent or damaged. The humidity should not exceed 70 % RH.
Figure 2
Page 97

Settings and Printing Network
Maintenance and Spec.
Maintenance and Spec.
Controller
CPU:
XPC745 (360MHz), 64-bit RISC CPU
RAM (Standard):
• PCL : 128 MB (Including System)
• PS/PCL : 128 MB (Including System)
Print Language:
PS/PCL model: PostScript 3 / PCL 5c emulation
PCL model: PCL 5c emulation (PostScript 3 Option)
Interface:
Parallel (IEEE1284) set to ECP mode
USB version 1.1
Ethernet (100Base-TX / 10Base-T)
97
Specifications
Font:
PostScript 3: 136 Fonts, PCL 5c: 45 Fonts
PS Font List or PCL Font List can be printed using the printer panel (see “Menu Table” on page 24 in
“Settings and Printing”).
Color Management
ICC compliant profile version 2.0
(Windows ICM 2.0, Mac OS ColorSync 2.0 or later)
Color Simulation
Press simulation support (SWOP, Euroscale)
Compatibility with HP utility
Compatible with HP Web Jet Admin, Jet Admin (Network except IEEE1284,USB)
Color Adjustment
• Color Calibration
• Adjustment to Media and Adjustment Utility
• PANTONE Color (DP-CL21M only): Download from Panasonic Web Site.
Page 98

Settings and Printing Network
Maintenance and Spec.
Maintenance and Spec.
HOST
Support OS
PCL Printer Driver
1
• Windows 95 / Windows 98 / Windows Me, Windows NT 4.0*
PS Printer Driver
• Windows 95 / Windows 98 / Windows Me, Windows NT 4.0*
• Mac OS 8.1, 8.5, 8.6, 9.0, 9.1, 9.2
• Mac OS X 10.1, 10.2
, Windows 2000, Windows XP (32bit)
1
, Windows 2000, Windows XP (32bit)
Utility
Remote Maintenance Function
Support OS (operating system)
Remote Maintenance Setting Tool:
Windows 95 / Windows 98 / Windows Me, Windows NT 4.0*
Windows 2000, Windows XP (32bit)
Remote Maintenance Tool:
Windows 95 / Windows 98 / Windows Me, Windows NT 4.0*
Windows 2000, Windows XP (32bit)
Interface: Network (e-mail)
Specifications
1
,
1
,
98
Web Administrative Tool
Support OS (operating system)
1
Server: Windows NT 4.0 *
Client: Windows 95 / Windows 98 / Windows Me, Windows NT 4.0*
Windows 2000, Windows XP (32bit)
Mac OS 8.1, 8.5, 8.6, 9.0, 9.1, 9.2 / Mac OS X 10.1, 10.2
Web Browser: Internet Explorer 4.x or later
Netscape Navigator 4.04 or later
Web Server: Internet Information Services 3.0 or later
Interface: Network
1
*
Windows NT 4.0 (Service Pack 3 or later - Service Pack 6 is recommended.)
, Windows 2000, Windows XP Professional (32bit)
1
,
Page 99

Settings and Printing Network
Maintenance and Spec.
Maintenance and Spec.
Status Display
Support OS (operating system)
1
Windows 95 / Windows 98 / Windows Me, Windows NT 4.0*
, Windows 2000, Windows XP (32bit)
Mac OS 8.1, 8.5, 8.6, 9.0, 9.1, 9.2 / Mac OS X 10.1, 10.2 (Classic environment)
2
Interface: Parallel IEEE1284*
USB*3, Network
Print Count Manager
Support OS (operating system)
1
Server: Windows NT 4.0*
, Windows 2000, Windows XP (32bit)
Client: Windows 95 / Windows 98 / Windows Me, Windows NT 4.0*
Windows 2000, Windows XP (32bit)
Interface: Network
**Download from Panasonic Web Site.
Print Media Test Pattern
Support OS (operating system)
1
Windows 95 / Windows 98 / Windows Me, Windows NT 4.0*
2
Interface: Parallel IEEE1284*
, USB*3, Network
, Windows 2000, Windows XP (32bit)
Specifications
1
,
99
HDD Utility (Hard Disk Drive Utility)
Support OS (operating system)
1
Windows 95 / Windows 98 / Windows Me, Windows NT 4.0*
, Windows 2000, Windows XP (32bit)
Interface: Network
(Requires the hard disk drive be installed)
Installer
For Windows
1
Windows 95 / Windows 98 / Windows Me, Windows NT 4.0*
For Mac
Mac OS 8.1, 8.5, 8.6, 9.0, 9.1, 9.2 / Mac OS X 10.1, 10.2
1
*
Windows NT 4.0 (Service Pack 3 or later - Service Pack 6 is recommended.)
2
*
Parallel IEEE1284: Windows 95 / Windows 98 / Windows Me, Windows NT 4.0, Windows 2000,
Windows XP (32bit)
3
USB: Windows 98 / Windows Me, Windows 2000, Windows XP (32bit)
*
Mac OS 8.6, 9.0, 9.1, 9.2 / Mac OS X 10.1, 10.2
, Windows 2000, Windows XP (32bit)
Page 100

Settings and Printing Network
Maintenance and Spec.
Maintenance and Spec.
Parallel (IEEE1284) Interface
Connector type: 36PIN Anphenole connector
Cable: use a shielded cable 2 meters (6.6 feet) or less in length
Pin configuration
Pin Signal Pin Signal
1 nStrobe 19 GND
2 Data 1 20 GND
3 Data 2 21 GND
4 Data 3 22 GND
5 Data 4 23 GND
6 Data 5 24 GND
7 Data 6 25 GND
8 Data 7 26 GND
100
Specifications
9 Data 8 27 GND
10 nAck 28 GND
11 Busy 29 GND
12 PError 30 GND
13 Select 31 nInit
14 nAutoFd 32 nFault
15 NC 33 NC
16 GND 34 NC
17 FG 35 NC
18 Peripheral Logic High 36 nSelectIn
Parallel (IEEE1284) interface connector (printer side)
18
36
1
19
 Loading...