

Page 1
Operating Instructions
(For Basic Operations)
Product
Overview
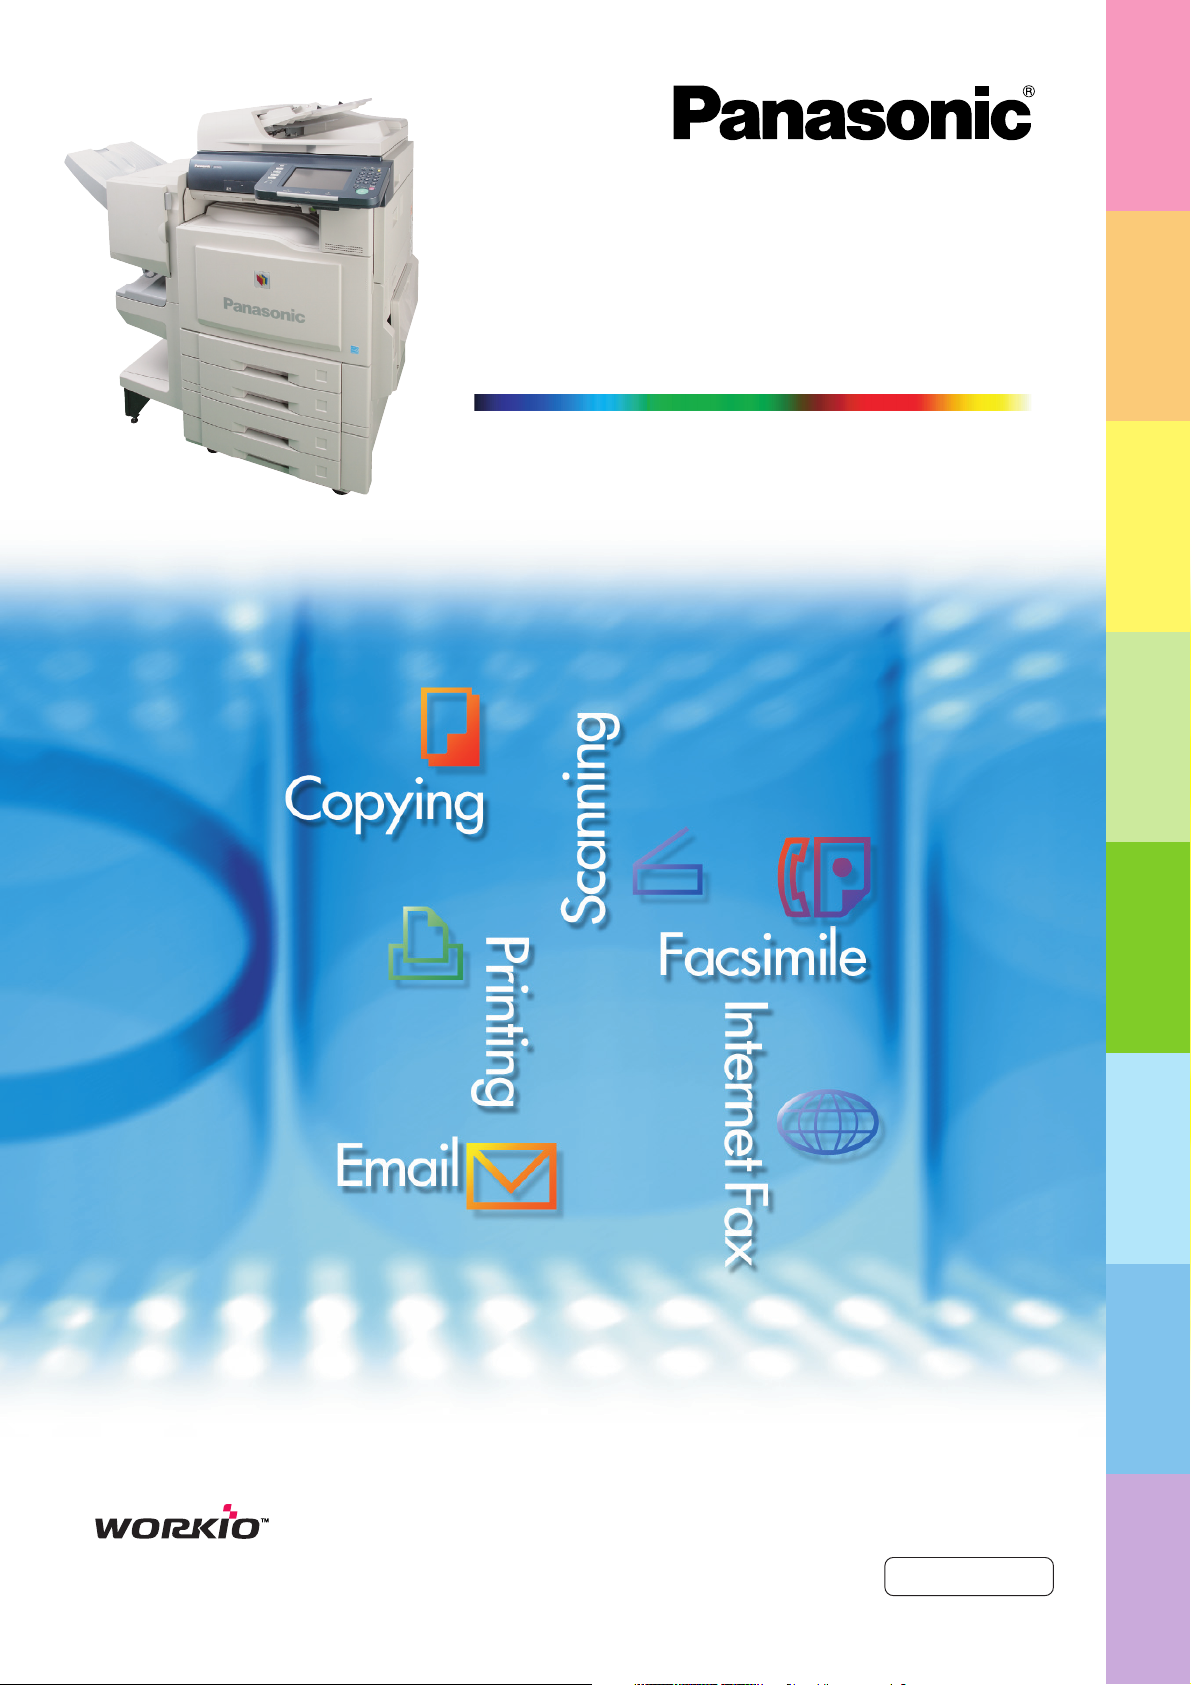
Digital Color Imaging Systems
Model No. DP-C405 / C305 / C265
CopyingPrinting
Email
Scanning /
Before operating this machine, please carefully read this manual
and keep this documentation in a safe place for future reference.
(Illustration shows optional accessories that may not be installed on your machine.)
English
(Option) /
Facsimile
Internet Fax
Problem SolvingAppendix
Replacing
Consumables
Page 2
Product Overview
Operating Instructions
The following Operating Instruction manuals are included with this machine. Please refer to the appropriate manual
and keep all manuals in a safe place for future reference. If you lose a manual, contact the authorized Panasonic
dealer.
Operating Instructions (For Setting Up)
This manual contains essential information for
setting up the machine.
Accessories
Operating Instructions CD
Copy Function
Describes how to make a Color Copy
with creative features.
Facsimile and Internet Fax Function
(The Facsimile function is available when
the optional G3 Fax Communication
Board is installed.)
Describes how to send/receive a Facsimile/
Internet Fax, and describes the course of
action to take when a trouble message
appears, etc.
Scan and Email Function
Describes how to scan and how to send
Email through the machine.
Operating Instructions (For Basic Operations)
This manual contains essential information for
proper operation of the machine.
It describes basic Copy, Print, Facsimile/Internet
Fax, Scan/Email, and other functions.
For a more detailed explanation of each function,
please refer to the Operating Instruction manuals
included on two CD-ROMs as illustrated below.
Operating Instructions CD
Contains manuals with detailed information for Copy,
Facsimile/Internet Fax, Scan/Email functions,
Function Parameters, and User Authentication.
Document Management System CD
Contains the Panasonic Document Management System
Application software, and manuals with detailed
information for the Print function, and Panasonic
Document Management System Application software.
Document Management System CD
Print Function
Describes how to print with color and
change the default printer settings, and
describes the course of action to take
when a problem message appears, etc.
Application Software
Describes how to use the application
software.
Ex: Panafax Desktop, Fax Driver, Quick
Image Navigator, Device Monitor/
Device Explorer, Network Config/
Add Editor
2
Function Parameters
Describes how to change the default
settings of each function using the
Control Panel of the machine.
User Authentication
Describes how to enable and use the
User Authentication function.
SD Logo is a trademark.
SDHC Logo is a trademark.
Page 3
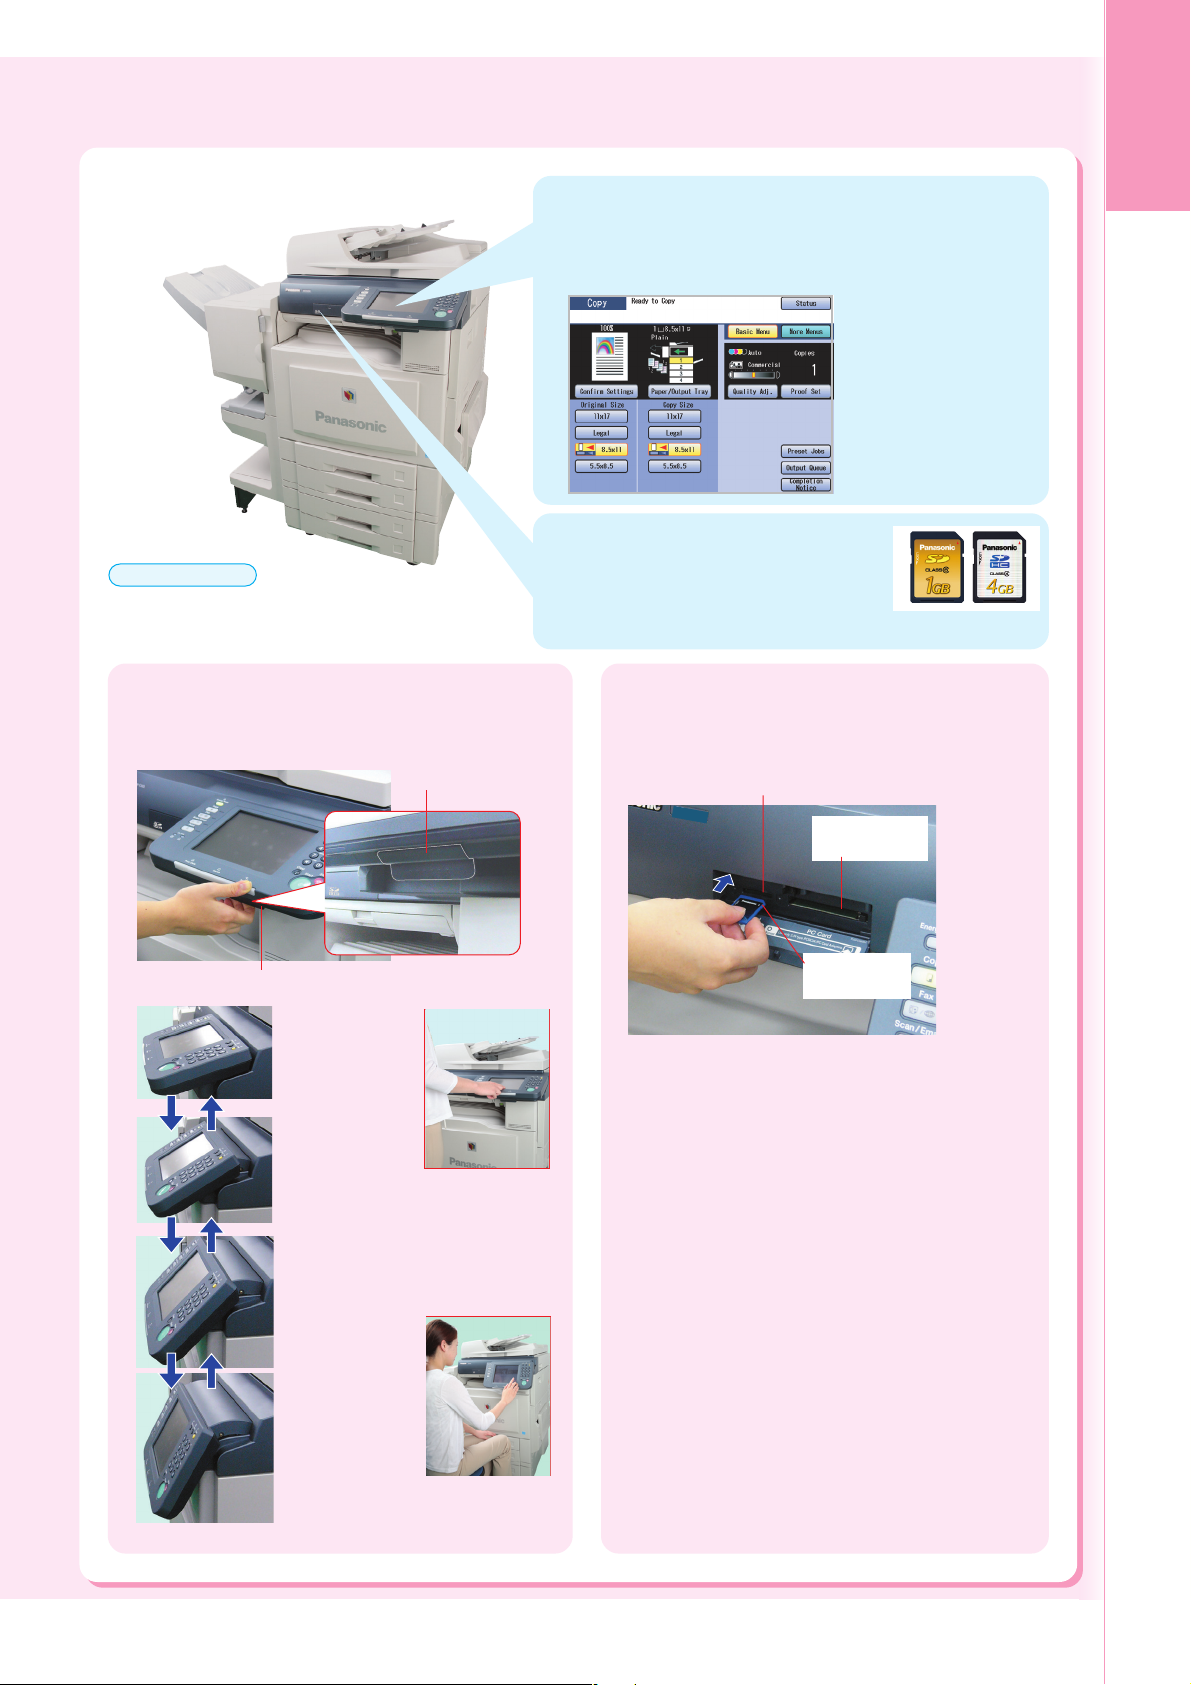
Useful Office Functions
Color Touch Panel
• Easy operation using the Color Touch Panel Display.
• Control Panel viewing angle is adjustable to 4 practical
positions.
SD Card Slot
ATTENTION
● Be sure to use only a genuine SD Memory Card
(up to 4GB). (Any commercial grade genuine SD
/ SDHC Memory Card can be used.)
• The built-in SD Card Slot provides a
quick and convenient way to print
directly from the SD Memory Card.
(Ex: Pictures taken with a digital camera)
Product
Overview
Control Panel Angle Adjustment
The Control Panel viewing angle is adjustable to 4
positions.
Release Lever
Pull the Release Lever to adjust the viewing angle.
Normal
Position
2nd Position
(Ex: Use the 2nd
or 3rd position when the reflection
from the overhead light interferes
viewing the panel.)
3rd Position
4th Position
(Ex: Use the 4th
position for viewing the panel
from a chair/wheelchair.)
SD Card Slot and PCMCIA/PC Card Slot
Standard built-in SD Card Slot and PCMCIA/PC Card
Slot are conveniently located in the front of the
machine.
SD Card Slot
PCMCIA/PC
Card Slot
SD Memory
Card
Printing from the SD Card Slot and PCMCIA/
PC Card Slot
SD Card Slot : Used for SD Memory Card*.
The files (TIFF or PDF) or pictures
(JPEG format only) stored on the
SD Memory Card are displayed
on the Touch Panel Display.
Select the desired images to print
directly from the card. (See pages
40 to 43)
PCMCIA/PC : Using a commercially available
Card Slot PCMCIA/PC Card Adapter (Type II,
3.3 V Operating Voltage Only), you
can print files (TIFF or PDF) or
pictures (JPEG format only) stored
on media other than SD Memory
Card by using the same selection
method. (See pages 40 to 43)
Scan to SD Memory Card
The data scanned by this machine can be stored
directly to the SD Memory Card.
* SD Memory Card and SDHC Memory Card are
referred to as SD Memory Card in this manual.
3
Page 4
Product Overview
Table of Contents
Product Overview
■ Operating Instructions .................................. 2
■ Useful Office Functions ................................ 3
■■
■ Safety Information ...................................... 6
■■
■ Precautions .................................................. 9
■ Security Suggestions for Key Operators ...... 12
■ Outer / Inner View......................................... 14
■ Control Panel ................................................ 15
■ Control Panel / Touch Panel Display ............. 16
■ Touch Panel Display
● Copy Function .................................................. 17
● Scan/Email Functions ...................................... 18
● Facsimile (Option)/Internet Fax Functions ....... 19
Copying
■ Placing Originals (Copy)
● How to Place Originals ..................................... 20
■ Basic Copy Operation
● Full Size/Auto Color ......................................... 22
■ Basic Menu and More Menus
● Basic Menu ...................................................... 24
● More Menus ..................................................... 26
■ Reduction / Enlargement Copy
● Copying with Preset Ratios
(Reduction/Enlargement) ................................. 28
■ 2-Sided Copy
● 1 -> 2 Copy, 2 -> 2 Copy .................................. 30
● Book -> 2 Copy ................................................. 32
■ N in 1 Copy
● N in 1 Copy ...................................................... 34
■ Sort Copy / Finishing
● Sort Copy / Finishing ....................................... 36
■ Others
● Double Exposure ............................................. 38
Printing
■ Printing from SD Memory Card / PC
● Printing Images Directly from
the SD Memory Card ....................................... 40
● Printing from PC ............................................... 40
Scanning / Email
■ Scanning
● Scan to PC, Scan to SD Memory Card
or PCMCIA/PC Card ........................................ 44
■ Address Book (Email)
● Creating an Address Book ............................... 48
■ Sending Email
● Sending the Scanned Data via Email ............. 50
Facsimile (Option) /
Internet Fax
■ Address Book (Facsimile)
● Creating an Address Book ............................... 52
■ Address Book (Internet Fax)
● Creating an Address Book .............................. 54
■ Placing Originals (Facsimile/Internet Fax)
● How to Place Originals ..................................... 56
■ Sending Originals (Facsimile)
● Sending Scanned Data via Facsimile ............. 58
■ Sending Originals (Internet Fax)
● Sending Scanned Data via Internet Fax ......... 60
Problem Solving
■ Troubleshooting ............................................ 62
● Machine Care ................................................... 63
● Displaying Status ............................................. 63
■ User (U) / Jam (J) / Machine (E) Error Codes
● User Error Codes (U Codes) /
Machine Error Codes (E Codes) ...................... 64
● Jam Error Codes (J Codes) ............................. 65
■ Removing Misfed Paper
● Paper Feed Section (Paper Tray 1) ................. 66
● ADU Section ..................................................... 67
● Fuser/Exit Section ............................................ 68
● Paper Transport Section .................................. 6 9
● Paper Feed Section (Paper Tray 2) ................. 6 9
● Paper Feed Section
(Optional Paper Tray 3 or 4) ............................. 70
● 1Bin Finisher Section ....................................... 71
● 1Bin Saddle-Stitch Finisher Section ............... 72
● ADF Section ..................................................... 74
4
Page 5
Replacing Consumables
■ Adding Paper <Printing Media>
● Paper Tray ........................................................ 76
● Sheet Bypass ................................................... 76
■ Replacing Toner Cartridge ............................. 78
■ Replacing the OPC Drum Unit ...................... 80
■ Replacing Toner Waste Container /
Cleaning the LSU Aperture Glass ................ 82
■ Replacing Staples (FQ-SS32) ...................... 84
■ Replacing Staples (DQ-SS35) ...................... 86
■ Disposal of the Punch Hole Residue ............ 90
■ Replacing the Battery ................................... 92
Appendix
■ Specifications
● Main Unit .......................................................... 94
● ADF (Standard) ................................................ 95
● PCL Printer Unit (Standard) ............................. 95
● Network Scanner (Standard) ........................... 95
● Email / Internet Fax (Standard) ........................ 95
● 3rd/4th Paper Tray (Option) ............................. 9 6
● G3 Facsimile (Option) ...................................... 96
● 1Bin Finisher (Option) ...................................... 97
● 1Bin Saddle-Stitch Finisher (Option) .............. 97
● Punch Unit (Option) ......................................... 97
● Paper Type ....................................................... 98
■ Option and Supplies ..................................... 99
■ FCC Notice ................................................... 100
■ Index ............................................................ 104
■ Glossary ....................................................... 107
Product
Overview
As an ENERGY STA R® Partner, Panasonic has determined that this product meets
the
ENERGY STA R
This voluntary program specifies certain energy consumption and usage standards.
This product will automatically “power down” after a specified period of non-use. The
use of this
ultimately benefit the environment.
The default functions can be adjusted depending on your office requirements.
Please ask your authorized Panasonic dealer for more details.
ENERGY STA R
®
guidelines for energy efficiency.
®
compliant product will reduce energy consumption and
5
Page 6
Product Overview
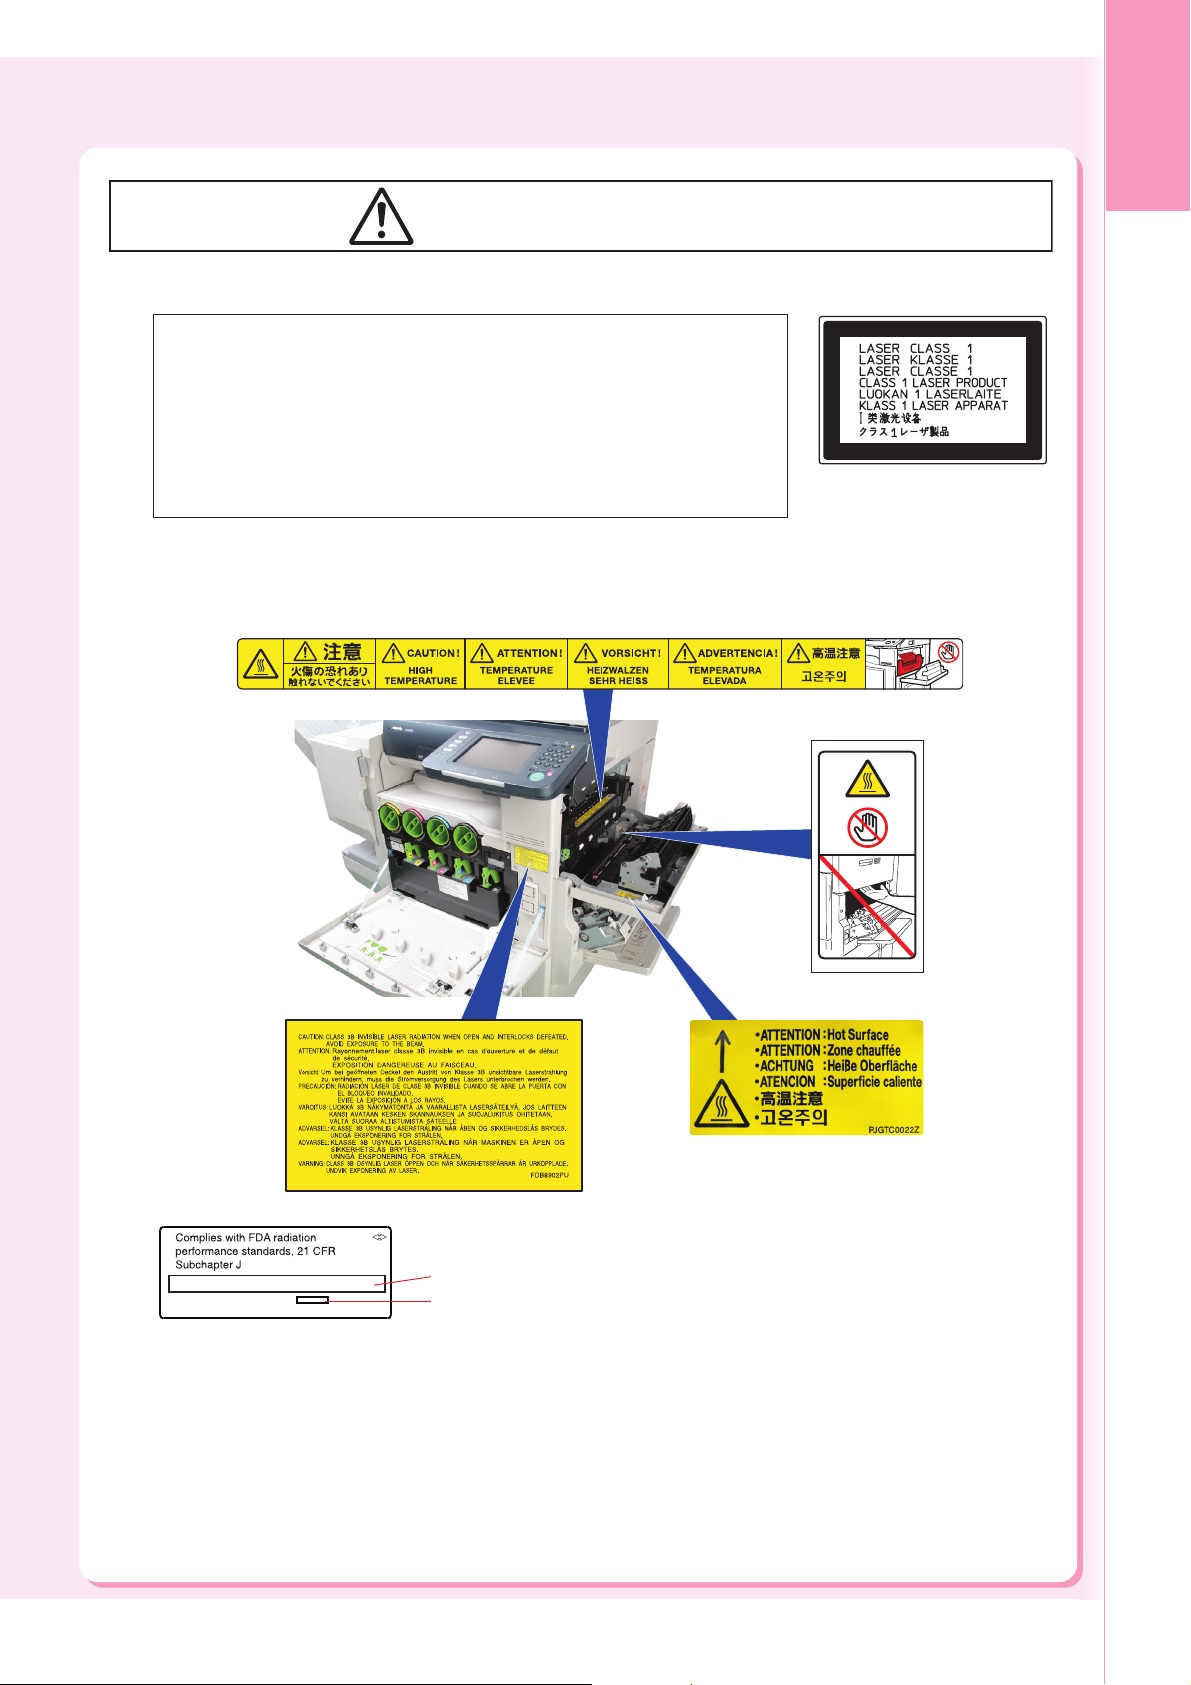
Safety Information
For Your Safety
To prevent severe injury and loss of life, read this section carefully before using the Panasonic DP-C405/C305/C265
to ensure proper and safe operation of your machine.
■ This section explains the Warnings and Cautions used in this Operating Instructions manual.
WARNING
CAUTION
■ This section also explains the graphic symbols used in this Operating Instructions manual.
These symbols are used to alert operators to a specific operating procedure that must not be
performed.
These symbols are used to alert operators to a specific operating procedure that must be
emphasized in order to operate the machine safely.
This symbol is used to alert operators to a heated surface that may cause burns and requires
close attention.
Denotes a potential hazard that could result in serious injury, or death.
Denotes hazards that could result in minor injury, or damage to the machine.
WARNING
Power and Ground Connection
Cautions
Ensure that the plug connection is free of dust.
In a damp environment, a contaminated
connector can draw a significant amount of
current that can generate heat and eventually
cause fire if left unattended over an extended
period of time.
Always use the power cord provided with your
machine. When an extension power cord is
required, always use a properly rated cord.
● 120 V / 15 A
If you use a cord with an unspecified current
rating, the machine, or plug may emit smoke,
or become hot to the touch.
Do not attempt to repair, pull, bend, chafe, or
otherwise damage the power cord. Do not place
a heavy object on the cord. A damaged cord
can cause fire, or electric shocks.
Never touch a power cord with wet hands.
Danger of electric shock exists.
Stop operation immediately if your machine
emits smoke, excessive heat, unusual noise or
smell, or if water is spilt onto the machine. These
conditions can cause fire. Immediately switch
Off and unplug the machine and contact the
authorized Panasonic dealer.
Do not disconnect, or reconnect the machine
while the power switch is in the On position.
Disconnecting a live connector can cause
arcing, consequently deforming the plug and
cause fire.
When the machine is not used over an extended
period of time, switch it Off and unplug it. If an
unused machine is left connected to a power
source for a long period, degraded insulation
can cause electric shocks, current leakage or
fire.
Be sure to switch Off and unplug the machine
before accessing the interior of the machine for
cleaning, maintenance or fault clearance.
Access to a live machine’s interior can cause
electric shock.
6
If the power cord is broken, or insulated wires
are exposed, contact the authorized Panasonic
dealer for a replacement. Using a damaged cord
can cause fire, or electric shocks.
When disconnecting the machine, grasp the
plug instead of the cord. Pulling on a cord
forcibly can damage it and cause fire, or electric
shock.
Once a month, unplug the machine and check
the power cord for the following. If you notice
any unusual condition, contact the authorized
Panasonic dealer.
● The power cord is plugged firmly into the
receptacle.
● The plug is not excessively heated, rusted,
or bent.
● The plug and receptacle are free of dust.
● The cord is not cracked or frayed.
Page 7
Operating Safeguards
Do not touch areas where these caution labels
are attached to, the surface may be very hot and
may cause severe burns.
Do not place any liquid container such as a vase
or coffee cup on the machine. Spilt water can
cause fire or shock hazard.
Do not place any metal parts such as staples
or clips on the machine. If metal and flammable
parts get into the machine, they can short-circuit
internal components and cause fire or electric
shocks.
If debris (metal or liquid) gets into the machine,
switch Off and unplug the machine immediately.
Contact the authorized Panasonic dealer.
Operating a debris-contaminated machine can
cause fire or electric shock.
Never open or remove machine covers that are
secured with screws unless specifically
instructed in the “Operating Instructions”. A highvoltage component can cause electric shocks.
Do not try to alter the machine configuration or
modify any parts. An unauthorized modification
can cause smoke or fire.
Consumable Safeguards
Never dispose of toner, Toner Cartridge or a
Toner Waste Container into an open flame.
Toner remaining in the cartridge can cause an
explosion, burns, and/or injuries. For disposal
or recycling information, contact your local
authorities, or your local waste officials.
Keep SD Memory Card/button battery/stamp
out of the reach of children. If an SD Memory
Card/button battery/stamp is swallowed
accidentally, get medical treatment immediately.
For battery disposal or recycling information,
please contact your local authorities or your
local waste officials.
Product
Overview
Installation and Relocation
Cautions
Do not place the machine near heaters or
volatile, flammable, or combustible materials
such as curtains that may catch fire.
Do not place the machine in a hot, humid, dusty
or poorly ventilated environment. Prolonged
exposure to these adverse conditions can cause
fire or electric shocks.
Place the machine on a level and sturdy
surface that can withstand a weight of
the machine. (The machine weight without
optional unit : 164 kg / 360.8 lb) If tilted, the
machine may tip-over and cause injuries.
When relocating the machine, contact the
authorized Panasonic dealer.
When moving the machine, be sure to unplug
the power cord from the outlet. If the machine
is moved with the power cord attached, it can
cause damage to the cord which could result in
fire or electric shock.
Operating Safeguards
Do not place a magnet near the safety switch
of the machine. A magnet can activate the
machine accidentally, resulting in injuries.
Do not use a highly flammable spray or solvent
near the machine. It can cause fire.
When copying a thick original, do not use
excessive force on the ADF Cover to press
the original against the Platen Glass. The
glass may break and cause injuries.
CAUTION
Never touch a labeled area. You can get burnt.
If a sheet of paper is wrapped around the heat
roller, do not try to remove it yourself to avoid
injuries or burns. Switch Off the machine
immediately and contact the authorized
Panasonic dealer.
Do not use conductive paper, ex: folding paper,
carbon paper, and coated paper. When a misfed
paper occurs, they can cause a short-circuit and
fire.
Do not place any heavy object on the machine.
An off-balance machine can tip-over or the
heavy object can fall, causing damage and/or
injuries.
Keep the room ventilated when using the
machine for an extended period of time to
minimize the ozone density in the air.
When copying with the ADF open, do not look
directly at the exposure lamp. Direct eye
exposure can cause eye fatigue or eye injury.
When removing misfed paper, make sure that
no pieces of torn paper are left in the machine.
A piece of paper remaining in the machine can
cause fire. If a sheet of paper is wrapped around
the heat roller or when clearing a misfed paper
that is difficult or impossible to see, do not try
to remove it by yourself. Doing so can cause
injuries or burns. Switch Off the machine
immediately and contact the authorized
Panasonic dealer.
If accessing the inner components of the
machine to clear misfed paper, etc., exercise
care not to touch heated areas, or you may get
burned.
7
Page 8
Product Overview
Safety Information
For Your Safety
CAUTION
Consumable Safeguards
Be sure to use the specified type of batteries
only.
Ensure that batteries are installed with correct
polarity. Incorrectly installed batteries can burst
or leak, resulting in spillage or injuries.
Caution on Toner Use
■ Avoid ingestion, inhalation, eye or skin contact.
● If ingestion occurs, drink several glasses of water
to dilute stomach contents.
● If inhalation occurs, exit the area immediately into
the fresh air.
● If skin contact occurs, wash thoroughly with soap
and water.
● If eye contact occurs, flush thoroughly with water.
● In all cases, seek medical treatment if adverse
symptoms occur.
■ When the toner cartridge is at the end of its life, do
not dispose of it into a fire. It can cause an explosion
and you can get burnt.
■ Keep the toner cartridge out of children’s reach. Store
in a cool and dry place (low humidity).
Do not unseal the toner cartridge unless you are
ready to use it.
Black Toner INGREDIENTS:
Cyan Toner
Magenta
Toner
Yellow Toner
For USA only
Distributed by Panasonic Communications Company of North
America, Unit of Panasonic Corporation of North America
One Panasonic Way
Secaucus, NJ 07094
Stylene / butylacrylate copolymer
Mn-Mg-Sr ferrite powder Polyethyele
Carbon Black (1333-86-4) Amorphous silica
INGREDIENTS:
Stylene / butylacrylate copolymer
Mn-Mg-Sr ferrite powder Polyethyele Blue,
Red or Yellow Pigment Amorphous silica
Others
■ The machine has a built-in circuit for protection
against lightning-induced surge current. If lightning
strikes in your neighborhood, maintain ample distance
from the machine and do not touch the machine until
the lightning has stopped.
If you notice flickering or distorted images or noises on your
■
audio-visual units, your machine may be causing radio
interference. Switch it Off and if the interference disappears,
the machine is the cause of the radio interference. Perform
the following procedure until the interference is corrected.
● Move the machine and the TV and/or radio away
from each other.
● Reposition or reorient the machine and the TV and/
or radio.
● Unplug the machine, TV and/or radio, and replug
them into outlets operating on different circuits.
● Reorient the TV and/or radio antennas and cables
until the interference stops. For an outdoor
antenna, ask your local electrician for support.
● Use a coaxial cable antenna.
8
CAUTION
Denotes hazards that could result in minor injury or damage to the machine.
● TO REDUCE THE RISK OF SHOCK OR FIRE, USE ONLY NO. 26 AWG OR LARGER TELEPHONE LINE CABLE.
● DISCONNECT ALL POWER TO THE MACHINE BEFORE COVER(S) ARE REMOVED. REPLACE THE COVER(S)
BEFORE THE MACHINE IS RE-ENERGIZED.
IMPORTANT SAFETY INSTRUCTIONS
When using your telephone equipment, basic safety precautions should always be followed to reduce the risk of fire,
electric shock, and injury to persons, including the following:
● DO NOT USE THIS PRODUCT NEAR WATER, FOR EXAMPLE, NEAR A BATH TUB, WASH BOWL, KITCHEN
SINK OR LAUNDRY TUB, IN A WET BASEMENT OR NEAR A SWIMMING POOL.
● AVOID USING A TELEPHONE (OTHER THAN A CORDLESS TYPE) DURING AN ELECTRICAL STORM. THERE
MAY BE A REMOTE RISK OF ELECTRIC SHOCK FROM LIGHTNING.
● DO NOT USE THE TELEPHONE TO REPORT A GAS LEAK IN THE VICINITY OF THE LEAK.
SAVE THESE INSTRUCTIONS.
Page 9
Precautions
■■
■ Laser Safety
■■
LASER SAFETY
This unit employs a laser. Only qualified service personnel should attempt to
service this device due to possible eye injury.
CAUTION:
USE OF CONTROLS, ADJUSTMENTS OR PERFORMANCE
PROCEDURES OTHER THAN THOSE SPECIFIED HEREIN MAY RESULT
IN HAZARDOUS RADIATION EXPOSURE.
■■
■ Caution Label
■■
Precautions
Product
Overview
Manufacturer’s Name and Address
Factory ID
(Rear Cover of the Machine)
This product has a fluorescent lamp that contains a small amount of mercury. It also contains lead in some
components. Disposal of these materials may be regulated in your community due to environmental considerations.
For disposal or recycling information please contact your local authorities, or the Electronics Industries Alliance:
<http://www.eiae.org>
9
Page 10

Product Overview
Precautions
Installation
Illegal Copies
■ The maximum power consumption is 1.44 kW.
A properly wired (grounded), dedicated, 15 A, 120 V
AC outlet is required. Do not use an extension cord.
The power cord on this machine must be used to
disconnect the main power.
Please ensure that the machine is installed near a
wall outlet and is easily accessible.
Caution Note: Unplug the power cord from the wall
outlet before removing covers.
■ The machine should not be installed in areas with the
following conditions:
● Extremely high or low temperature and humidity.
The machine should be installed under the
following ambient conditions:
Temperature : 50-86°F
Relative Humidity: 30-80%
● In areas with chemical fume concentration.
● With unstable or uneven conditions (floors, etc.).
● Direct exposure to sunlight or fluorescent light.
● In areas of high dust concentration.
● Directly in the air conditioning flow.
● In areas of poor ventilation.
● In areas with extreme vibration.
Caution
■ This product uses low frequency electromagnetic
fields and may cause harmful interference to
sensitive medical implant devices. If you have a
cardiac pacemaker or implantable defibrillator,
please consult your doctor for additional suggestion
or advice.
It is unlawful to make copies of certain documents.
Copying certain documents may be illegal in your
country. Penalties of fines and/or imprisonment may be
imposed on those found guilty. The following are examples of items that may be illegal to copy in your
country.
● Currency
● Bank notes and checks
● Bank and government bonds and securities
● Passports and identification cards
● Copyright material or trademarks without the consent
of the owner
● Postage stamps and other negotiable instruments
This list is not inclusive and no liability is assumed
for either its completeness or accuracy.
In case of doubt, contact your legal counsel.
Notice:
Install your machine near a supervised area to prevent
illegal copies from being made.
Others
Panasonic is not responsible for data loss and any
consequence caused by computer virus infection or
external shocks.
■ Do not use the machine near medical instruments.
Otherwise, it may cause erroneous operation and
false indications of the medical device.
■ Do not use the machine near automatic control
equipments (automatic door, fire alarm, etc.). The
electromagnetic fields may cause unintended
operation.
Supplies
■ Store the toner and paper in a cool area with low
humidity.
■ Use of other than genuine Panasonic supplies can
damage the machine. This may void the warranty of
the machine and supplies. Be sure to use only
genuine Panasonic Toner designed for the machine.
■ Dispose of Toner Cartridge and OPC Drum Unit(s)
according to your local regulations.
10
Page 11
Product
Overview
Handling
■ Control Panel
Do not lift or lean against the Control Panel. The Control
Panel can be broken which could result in injury.
■ Power Switch
Used to turn ON or OFF the Main Power Switch on
●
the rear side of the machine and to turn ON or OFF the
Power Switch on the left side of the machine.
Follow this procedure when turning OFF the Main
Power of the machine:
- Turn OFF the Power Switch on the left side of the
machine, wait a few seconds, and then turn OFF
the Main Power Switch on the rear side of the
machine.
● If you are not going to use the machine for long
periods of time, turn OFF the machine using the
procedure above.
● Do not turn OFF the Power Switch on the Left Side
of the machine, or open the Front Cover during
copying/printing.
Main Power
Switch (Rear
Side)
)
ON (
OFF (
■ Auto Reset Time
The initial setting for Auto Reset Time is 1 minute.
If you do not touch any key for 1 minute, the Touch
Panel Display will return to the initial screen of the
active function automatically. When reaching 20
seconds before resetting, the “Continue?” screen is
displayed to allow you to extend the auto reset time
for another 1 minute.
If you wish to change the Auto Reset Time, consult
with your Key Operator.
■ Dept. (Department) Code
When the Department Counter function is set up, the
Dept. (Department) Code input screen is displayed on the
Touch Panel Display. A registered Department Code (1 to
8 digits) is required to gain access to each secured
function, or the secured Copy/Scanner function(s) cannot
be used. Please consult with the Key Operator regarding
the Department Code(s) for the desired function.
)
Power Switch
(Left Side)
ON ( )
OFF ( )
■ Maximum Copies Limitation
After setting the maximum allowed number of copies
for each department, consult with your Key Operator
when the total copy count reaches the designated limit
and the message appears on the Touch Panel Display.
■ Auto Image Density/Color Registration Adjustment
Functions
This machine executes the following automatic
adjustment periodically (approximately every 105
copies or print jobs). During the automatic adjustment
process, copy job/print job will stop or jobs will be
waited approximately 20 seconds.
(1) Auto Image Density
To adjust the print density even.
(2) Color Registration Adjustment
To adjust the color registration.
■ Energy Saver (Power Save Mode, Sleep Mode)
You can set the machine to the Power Save mode or
Sleep mode while the machine is not in use. In Power
Save mode/Sleep mode, the Energy Saver key
flashes or lights. Press the Energy Saver key to
return the machine to its former operating screen. For
more details, refer to General Settings (Key
Operator Mode) in the Operating Instructions (For
Function Parameters) of provided CD-ROM.
● It is normal operation that the machine makes sounds
when switching into the Power Save mode.
Energy Saver key
Flashes: Power Save Mode
Lights : Sleep Mode
(Touch Panel Display
will be unlit)
Modes Warm Up Time
Power Save Approx. 15 sec.
Mode
Sleep Mode Approx. 15 sec.
● Press the Energy Saver key while the machine is in
the Sleep mode. The pop-up screen will be displayed
while machine is warming up to ready.
How to enter the Dept Code:
Input a registered department code (1 to 8 digits).
Select “OK”.
■ PCMCIA/PC Card Slot
PCMCIA/PC Card Connector inside the PCMCIA/PC
Card Slot is not supplied by Limited Power Sources.
11
Page 12

Product Overview
Security Suggestions for Key Operators
To keep your machine’s highly-sensitive document data
secure, the designated Key Operators are instructed to
perform the recommended security measures
described below for the initial machine installation,
network connection, network configuration, setup of
security functions, and replacement and disposal of the
machine.
1. Key Operators are required to verify the identity of
the manufacturer’s service technician, or of an
affiliated company’s staff, or marketing company, by
requesting their ID Card.
Do not give the device information by phone or
email.
2. Always connect through a Firewall when installing
your device on a network that is connected to the
Internet. When connecting this device to a client
PC, or a server, we recommend configuring your
network environment with a switching hub to
prevent your device from being wiretapped.
3. A Key Operator password is essential to
maintaining the security of the device. Key
Operators are required to change the password
from the initial setting, and keep the password
confidential and in a safe place. To change the
initial Key Operator password, refer to the
Operating Instructions (For Function Parameters)
and set up [General Settings] -> [09 Key Operator
Mode] -> [85 Key Operator Password].
4. A Web Server password is essential to maintaining
the security of the device. Change the password
from the initial setting, and keep the password
confidential and in a safe place. To change the
initial Web Server password, refer to the Operating
Instructions (Device Explorer and Embedded Web
Server).
When setting, do not leave this device unattended.
Also, when setting using a browser, do not leave
the PC unattended after logging in.
5. Change the Hard Disk Drive Lock password from
the initial setting. By setting a password, even if the
Hard Disk Drive is taken away, the password
locked device prevents illicit retrieval of the data by
unauthorized personnel.
The Hard Disk Drive Lock password is required
when the equipment is being repaired.
Furthermore, it is essential that the Key Operator
personally enter the password to maintain security
of the password and prevent unauthorized users. To
change the initial Hard Disk Drive Lock password,
refer to the Operating Instructions (For Function
Parameters) and set up [General Settings] -> [09
Key Operator Mode] -> [86 HD Drive Lock Settings].
6. To prevent illicit use by unauthorized personnel,
perform the following for ID/password settings.
1) Use the maximum number of digits.
2) Use a variety of the accepted character types.
3) Change the ID and password periodically.
Make sure that the setting screen can only be seen
by the Key Operator when setting/changing various
ID and passwords. Keep this information
confidential.
7. The documents stored in the Mail Box should be
printed immediately. Upon printing, the document
data is deleted, thus preventing unauthorized reprinting by a third party. For additional information,
please refer to MailBox of the Operating
Instructions (Printer Driver).
8. Scan data stored in the hard disk can be viewed
and deleted by anybody. Transfer to another
medium and delete from the hard disk immediately.
For additional information, please refer to the
Operating Instructions (For Basic Operations) of
provided booklet.
9. When finished, be sure to press the Reset button
and return to the standby screen. Also, do not reset
Auto Reset Time settings.
10. When disposing of this equipment, initialize the
Hard Disk Drive, and overwrite or delete the data
area stored in the Hard Disk Drive. To delete the
data area in the Hard Disk Drive, contact the
authorized Panasonic dealer for a service
technician. To initialize the Hard Disk Drive, refer to
the Operating Instructions (For Function
Parameters) and set up [General Settings] -> [09
Key Operator Mode] -> [34 Hard Disk Initialize].
11. When disposing of SD cards and other external
memory cards, destroy the card or use wiping
software to completely delete the data. Data on SD
cards and other external memory cards are your
responsibility.
12. Scanned (text and images), received and set/
registered information (addresses) are your
responsibility. If the device malfunctions and the
data are deleted, it cannot be recovered and is not
covered in the warranty.
13. Incorrect settings may leak settings or impede use
of this device. Check the details carefully when
performing settings.
❈ The security settings on this equipment are restricted
and require the input of an 8-digit Key Operator
password to set, or change them. The initial password
setting is 00000000 (8-digit). The password can be
set arbitrarily.
The Key Operator plays a critical part in maintaining
and controlling the security of the device and in
prevention of its unauthorized access, therefore, it is
of utmost importance that you understand the content
described in the Operating Instructions and that you
follow the suggestions herein.
12
Page 13

memo:
Product
Overview
13
Page 14
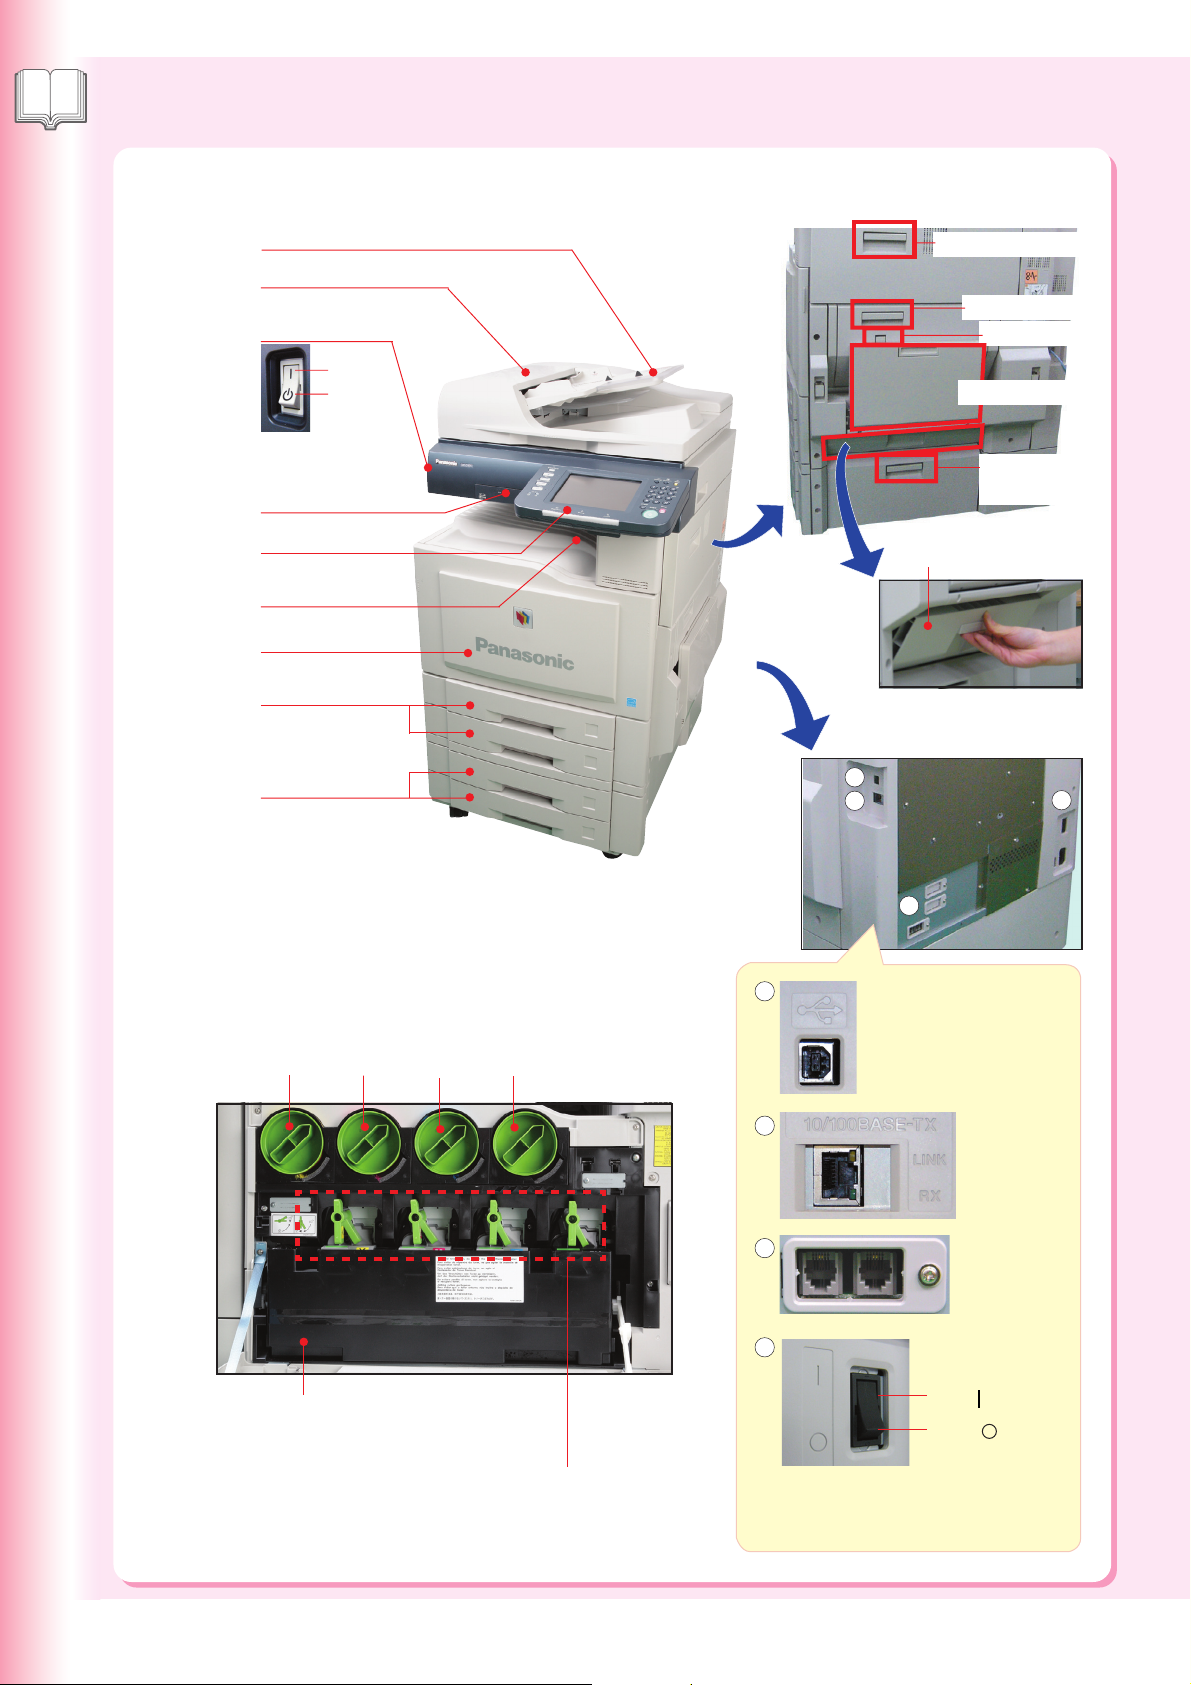
Product Overview
Outer / Inner View
<Outer>
ADF (Automatic Document Feeder)
ADF Cover
Power Switch
ON
OFF
SD Card /
PCMCIA/PC Card
Slot Cover
Control Panel
Inner Output Tray
Front Cover
Paper Tray 1, 2
Paper Tray 3, 4
(Option)
<Outer (Right Side)>
Right Side Cover
Feed Cover 1
ADU Cover
Sheet Bypass
Option
Feed Cover
Feed Cover 2
<Outer (Rear Side)>
1
2
4
<Inner>
Toner Cartridges (See pages 78 to 79)
Yellow Magenta Cyan Black
Toner Waste Container
(See pages 82 to 83)
OPC Drum Units
(Yellow/Magenta/Cyan/Black)
(See pages 80 to 81)
3
1
2
3
4
Turn the Main Power Switch OFF
when it is not used for a long
period of time.
USB 2.0 Port
Used for local printing
LAN Port
Used for
network
connection
Telephone
Jack (Option)
Used for Fax
transmissions
Main Power
Switch
)
ON (
OFF (
)
14
Page 15
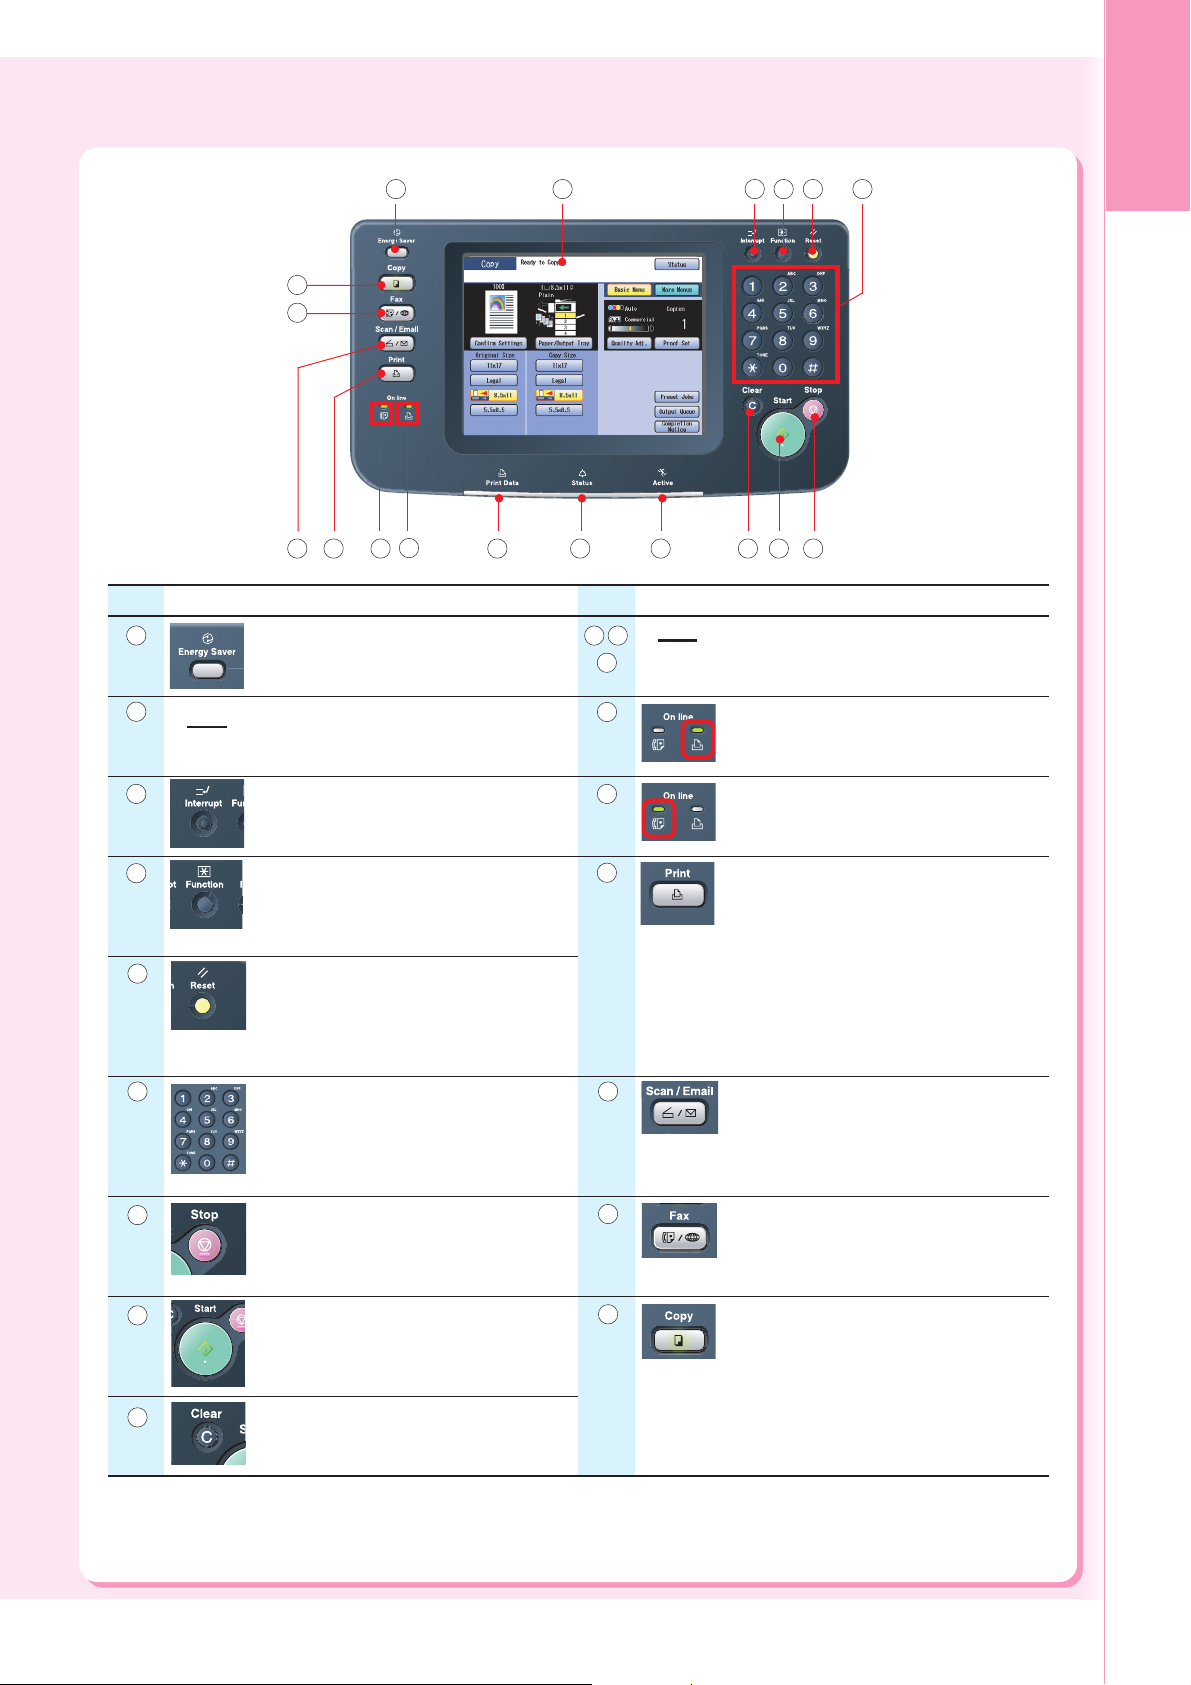
Control Panel
18
17
1 2 3 4 5 6
Product
Overview
13
Icon
1
2
3
4
5
6
Energy Saver key
Saves power while the machine is not
in use.
Touch Panel Display
Sets desired functions.
(See pages 17 to 19)
Interrupt key
Interrupts other copy job while making
copies.
Function key
Used for changing the initial function
values (default values).
Reset key
Resets all features to the initial screen
of the active function.
Keypad
Sets copy quantities, etc.
Contents
10 11
, ,
12
13
14
15
16
101112141516
IconNo. No.
Machine Condition LED
Print Data, Status, Active (See page 16)
Printer On Line LED
Lights when the Print function is
available.
Fax On Line LED
Lights when sending/receiving Facsimile
or Internet Fax.
Print key
Used for printing directly from the SD
Memory Card (see pages 40 to 43),
printing contents from the Mailbox/
Secure Mailbox, deleting/changing the
jobs waiting to print, or setting the printer
On-line/Off-line.
For more details, refer to the Document
Management System (Printer Driver) of
provided CD-ROM.
Scan / Email key
Used for Scanner or Email.
(See pages 44 to 51)
789
Contents
7
8
9
Stop key
Stops the jobs.
(Copy, Facsimile, Internet Fax, Scan,
and Email)
Start key
Starts the jobs.
(Copy, Facsimile, Internet Fax, Scan,
and Email)
Clear key
Clears the copy quantities, etc.
17
18
Fax key
Used for Facsimile or Internet Fax.
(See pages 52 to 61)
Copy key
Used for Copying.
(See pages 20 to 39)
15
Page 16
Product Overview
Control Panel / Touch Panel Display
Touch Panel Display
Warning Indications
When the following Warning Indications
appear, correct the problem according to
the displayed message and instructions in
this manual.
Flashes: The machine may stop operating.
To continue using the machine
temporarily, press any key.
Call Service
Periodical service is required.
Call the authorized Panasonic
dealer.
Machine Condition LED
Flashes: When receiving print
data.
Lights: While printing.
Lights (Red):
When the machine stops due to
the following condition(s):
● No paper in the selected tray
or toner has run out.
● Paper has misfed, etc.
Lights (Orange):
When the machine alerts of the
following condition(s):
● No paper in the Tray. (Tray is
not selected)
● Toner is getting low, etc.
Flashes: When the machine is
in operation.
Add Paper
Add paper to the Paper Tray or
Sheet Bypass.
(See pages 76 to 77)
Add Toner (Error Codes : U13)
Replace the Toner Cartridge.
(See pages 78 to 79)
Full Waste Toner (Error Codes :
U14)
Replace the Toner Waste
Container. (See pages 82 to 83)
16
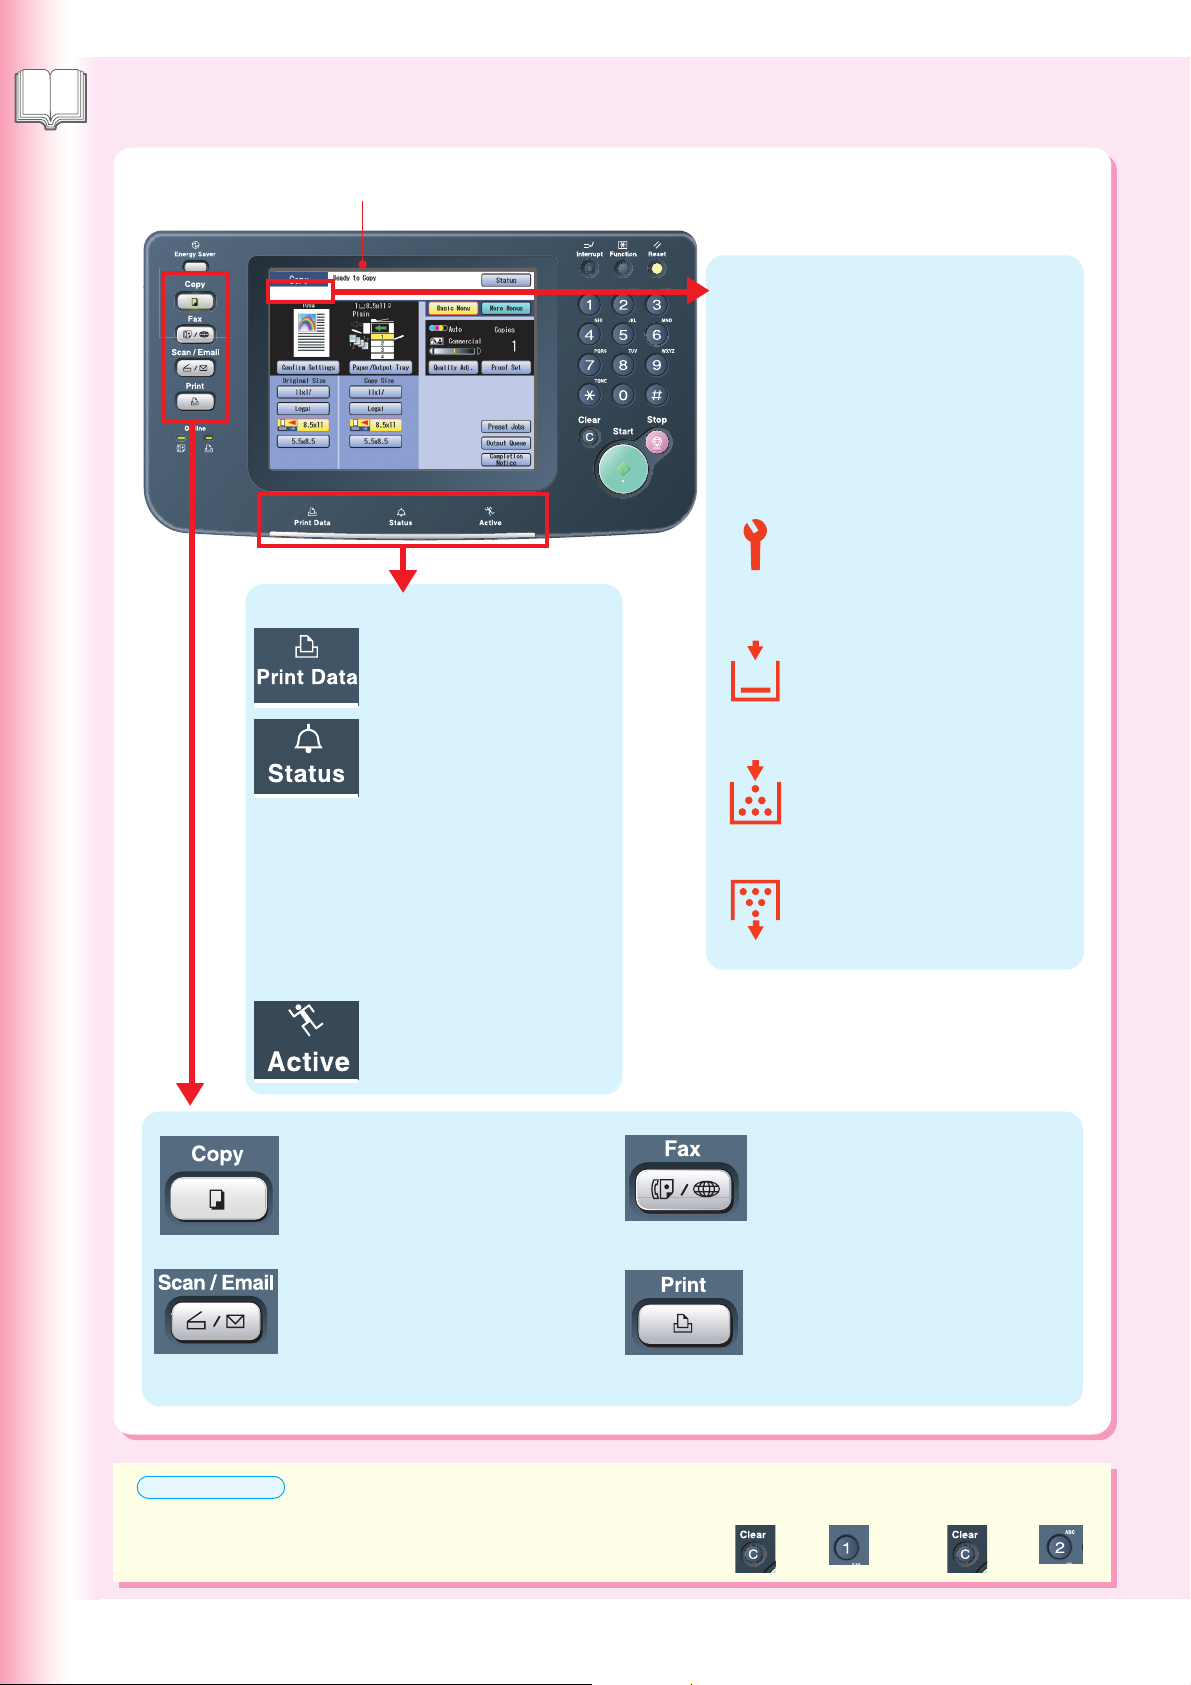
Setting for the Copy
Function
(See page 17)
Setting for the Scan/Email
Functions
(See page 18)
ATTENTION
To adjust the brightness of the Touch Panel Display, press and
hold down the Clear key, and press the 1 or 2 key on the Keypad
repeatedly until the desired brightness is achieved.
Setting for the Facsimile/
Internet Fax Functions
(See page 19)
Setting for the Printer Function
SD Card Print (See pages 40 to 43)
and Others
Refer to the Document Management
System (Printer Driver) of provided
CD-ROM.
To Brighten To Darken
and
1
Clear
and
Clear 2
Page 17
Touch Panel Display
Copy Function
1 2 3
19
18
17
16
15
Product
Overview
4
5
6
7
8
9
10
11
12
14 13
No. No.
Function Indication
1
Indicates the function mode.
(Copy, Facsimile/Internet Fax, Scan/Email, or Print)
Message Area
2
Indicates the message.
Status button
3
Indicates the problem status. (See page 63)
Basic Menu button
4
Returns to the Basic Menu screen from the More
Menus screen.
More Menus button
5
Selects additional settings.
Copy Mode Indication
6
Indicates the Copy mode and Density.
Copy Count Indication
7
Indicates the copy quantities.
Quality Adj. button
8
Sets the copy quality.
(Original type, Density, etc.)
Contents
11
12
13
14
15
16
Contents
Output Queue button
Displays the active and reserved job(s).
Completion Notice button
Displays the Job Completion Notice via a pop-up window
on your PC when the copy job is completed.
Refer to Completion Notice in the Operating
Instructions (For Copier) of provided CD-ROM.
Copy Size buttons
Selects a copy size with preset ratio.
Original Size buttons
Selects an original size manually.
Paper/Output Tray button
Selects a Paper/Output Tray of copied paper (option).
When the desired size of paper is not set in the Paper
Tray, use the Sheet Bypass.
(See pages 76 to 77)
Confirm Settings button
Displays the selected copy job(s).
Proof Set button
9
Makes one proof copy before proceeding a multiset copy with various settings.
Preset Jobs button
10
Stores or recalls the copy job(s).
Paper/Output Tray Indication
17
Optional Paper Tray or Finisher is required.
Paper Source Message
18
Indicates the selected paper size/type.
Copy Image Indication
19
Displays the copy image.
17
Page 18
Product Overview
Touch Panel Display
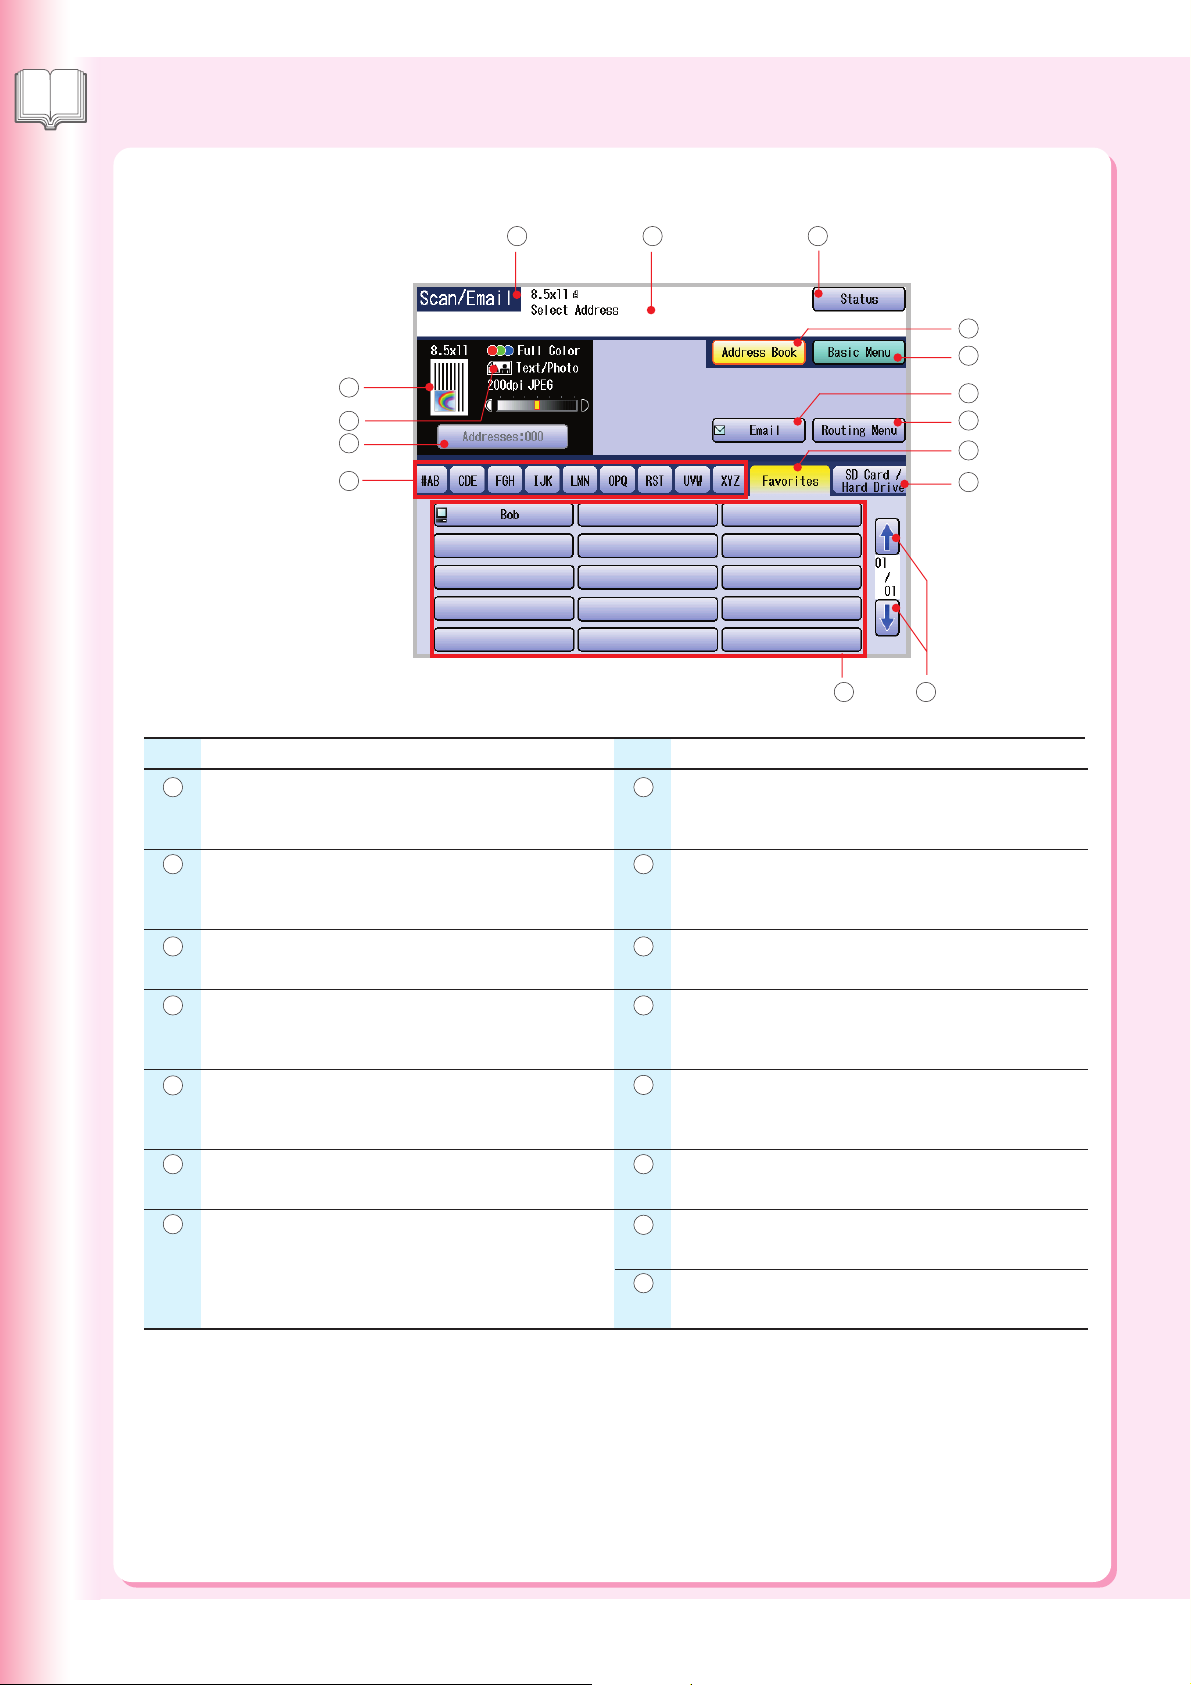
Scan/Email Functions
15
14
13
12
No. No.
Function Indication
1
Indicates the function mode.
(Copy, Facsimile/Internet Fax, Scan/Email, or Print)
Contents
8
21
3
4
5
6
7
8
9
11 10
Contents
Favorites tab
Selects a favorite group from the Address Book.
Message Area
2
Indicates the message.
Status button
3
Indicates the problem status. (See page 63)
Address Book button
4
Returns to the Address Book screen from the
Basic Menu screen.
Basic Menu button
5
Selects basic settings.
Email button
6
Selects the Email function.
Routing Menu button
7
Displays the Routing menu.
Optional Document Distribution System (DDS) is
required.
SD Card / Hard Drive tab
9
Sends scanned data to SD Memory Card, PCMCIA/
PC Card, or Hard Disk Drive directly.
Scroll buttons
10
Displays the other destination screen.
Destination buttons
11
Displays the registered destinations (PC Name).
Address tabs
12
Selects an alphabetical tab group from the Address
Book.
Addresses Indication
13
Indicates the number of selected address(es).
Scanning Mode Indication
14
Indicates the Scanning mode.
Original Image Indication
15
Displays the original image.
18
Page 19
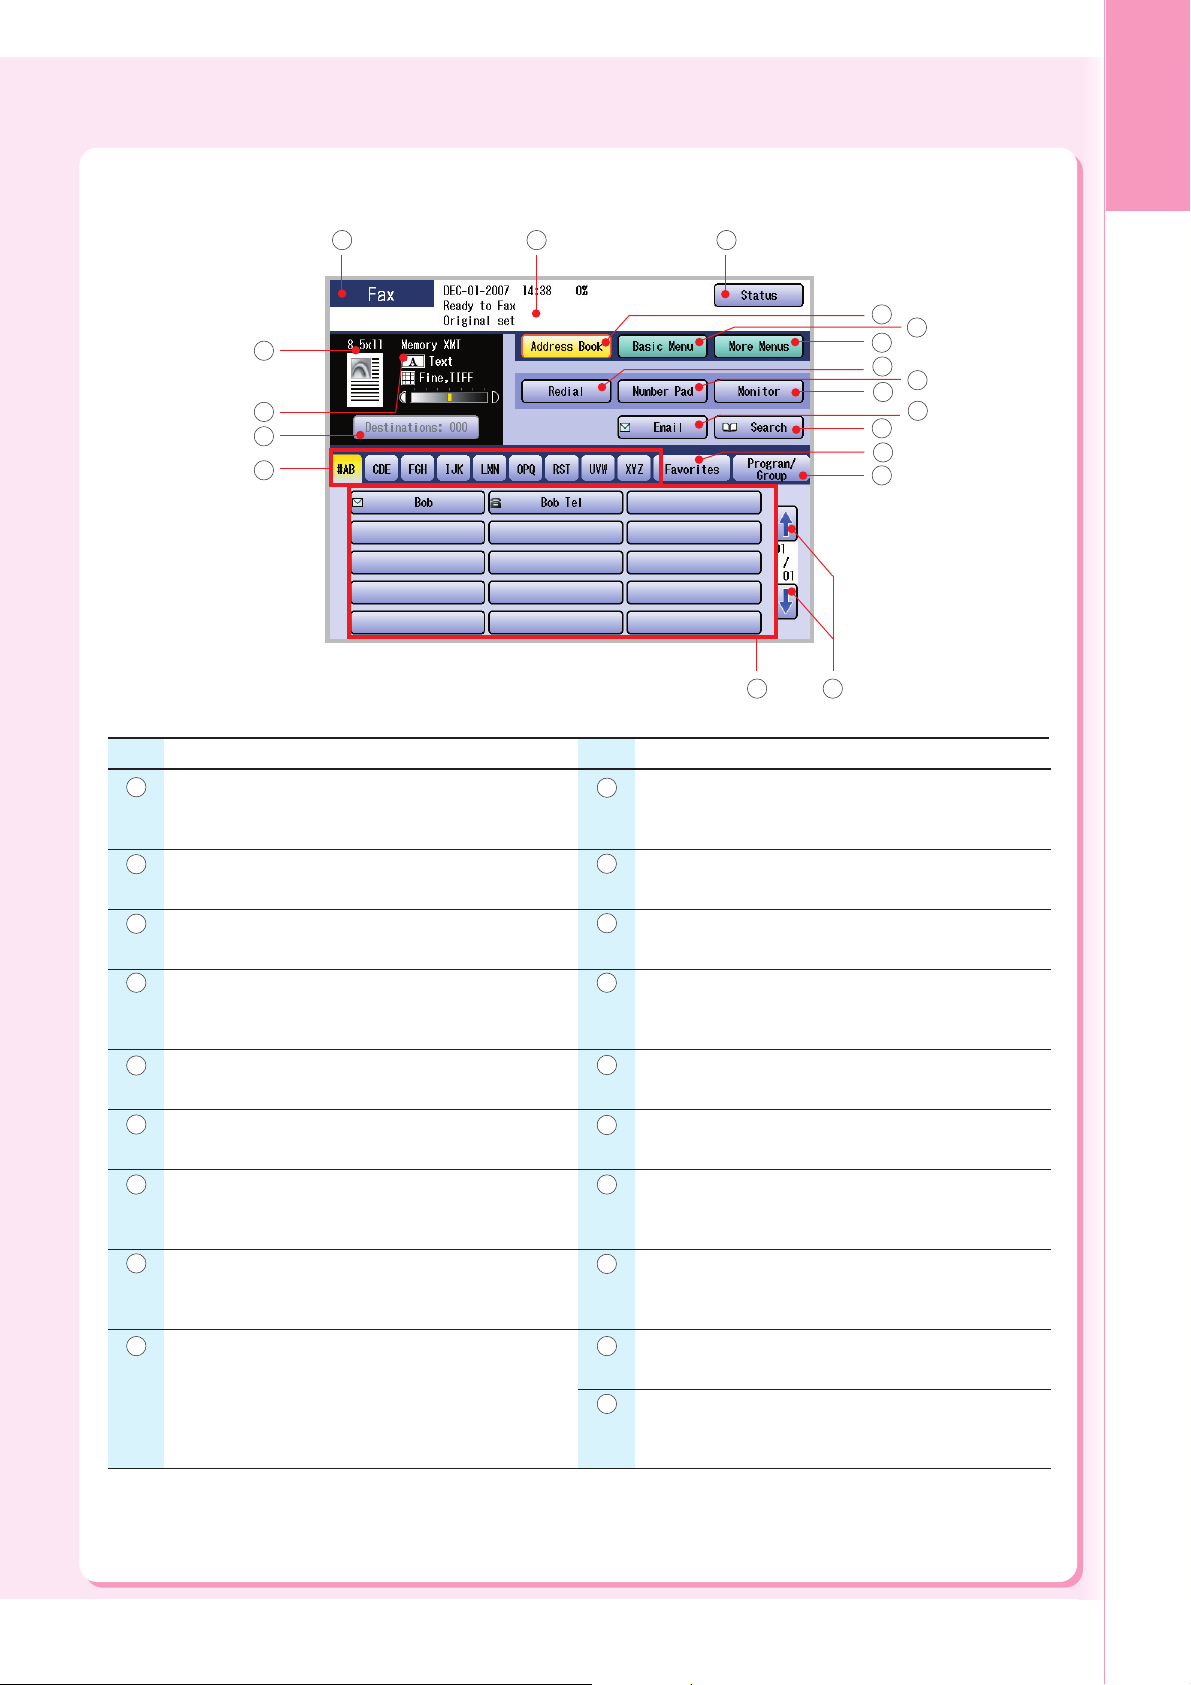
Facsimile (Option)/Internet Fax Functions
Product
Overview
1 2
19
18
17
16
No. No.
Function Indication
1
Indicates the function mode.
(Copy, Facsimile/Internet Fax, Scan/Email, or Print)
Contents
10
3
4
6
7
9
11
12
13
15 14
Contents
Email button
Selects the Internet Fax function.
5
8
10
Message Area
2
Indicates the message.
Status button
3
Indicates the problem status. (See page 63)
Address Book button
4
Returns to the Address Book screen (default)
from the Basic Menu/More Menu screen.
Basic Menu button
5
Selects basic settings.
More Menus button
6
Selects additional settings.
Redial button
7
Redials the last dialed number/Email address.
Number Pad button
8
Displays the Number Pad on the Touch Panel
Display.
Monitor button
9
Starts the On-Hook Dialing.
Search button
11
Searches the destination(s) from the Address Book.
Favorites tab
12
Selects a favorite group from the Address Book.
Program/Group tab
13
Selects a program/group dial from the Address
Book.
Scroll buttons
14
Displays the other destination screen.
Destination buttons
15
Displays the registered destinations.
Address tabs
16
Selects an alphabetical tab group from the Address
Book.
Destinations Indication
17
Indicates the number of selected destination(s).
Sending Mode Indication
18
Indicates the Sending mode.
Original Image Indication
19
Displays the original image.
19
Page 20
Copying
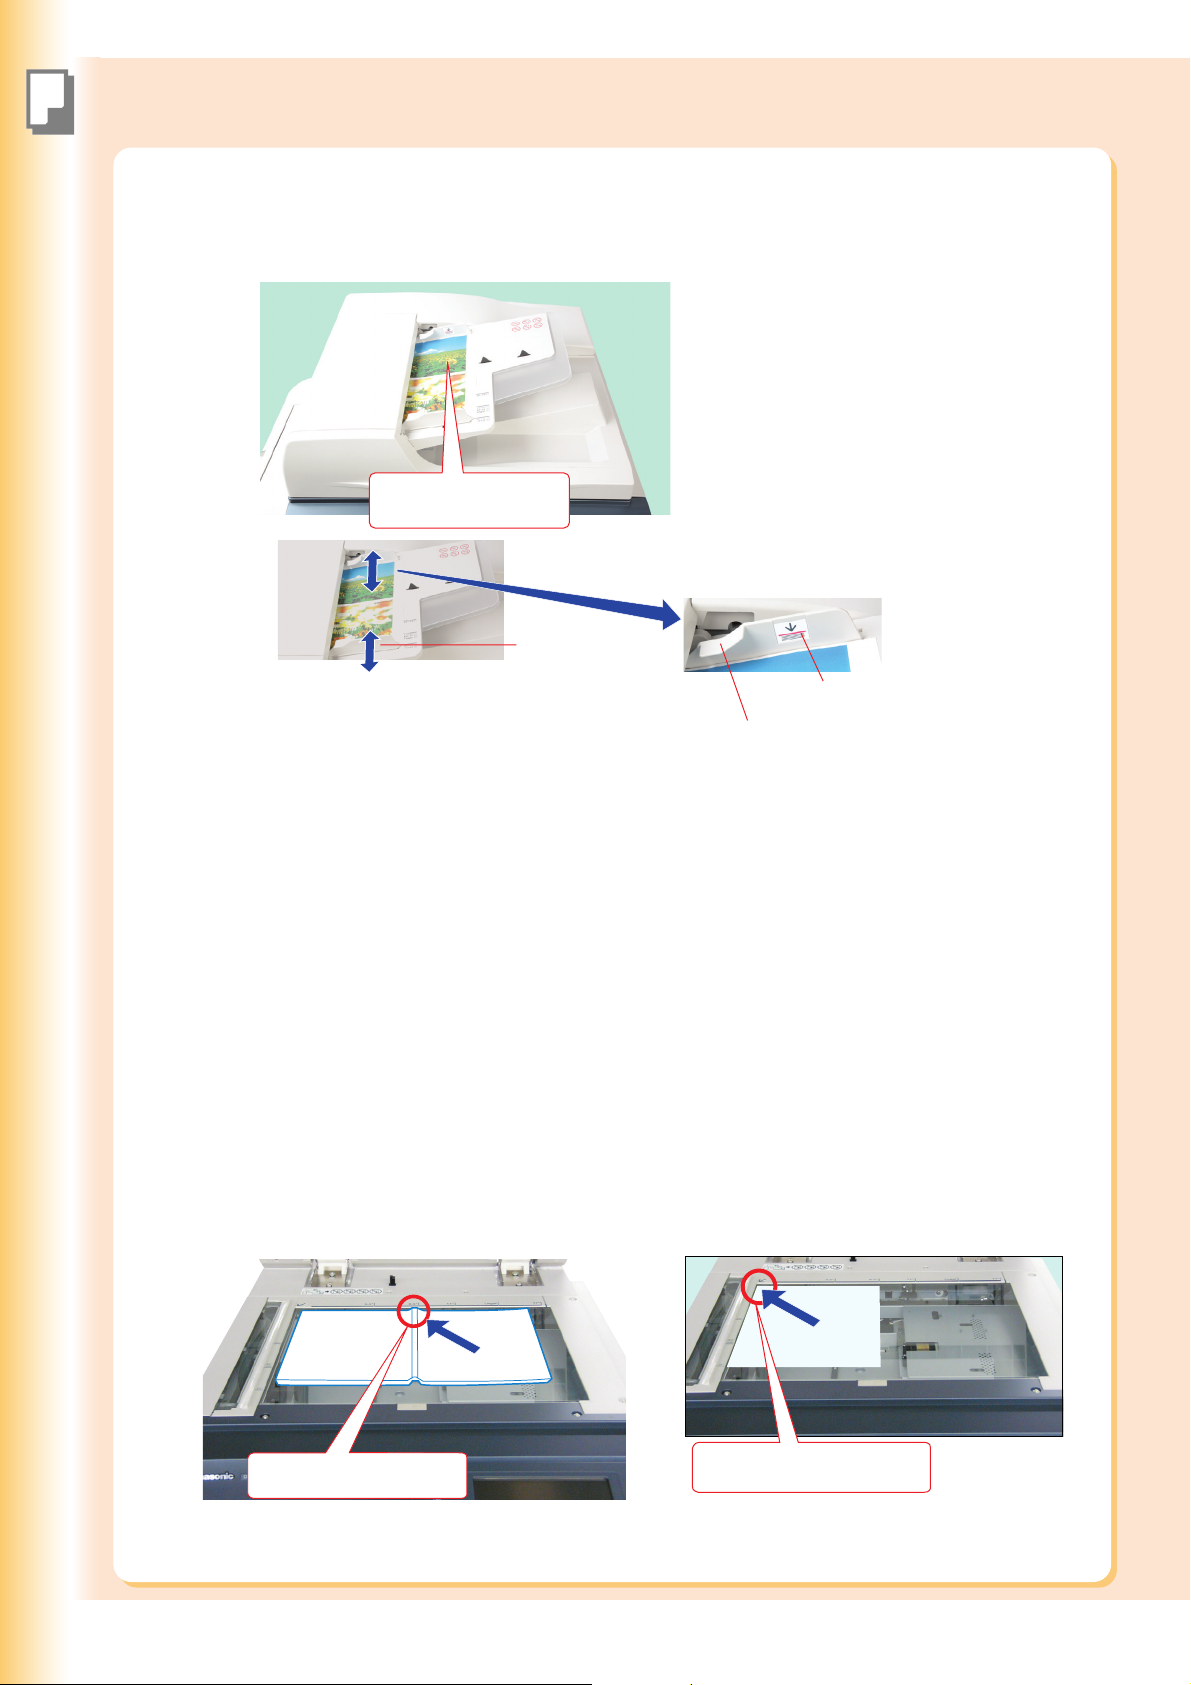
Placing Originals (Copy)
■■
■ How to Place Originals
■■
●●
● On the ADF
●●
Face up. Up to 100
sheets (20 lb/Letter)
Original Guides
Adjust the Original
Guides to the
original’s width.
Acceptable Paper Type
Originals can be set up to the
Upper Limit Indicator.
Upper Limit Indicator
Upper Guide
Original Size : A3, B4, 8" x 13", 8.5" x 13", A4, A4-R, A5, FLS (8" x 13",13" x 8"),
5.5" x 8.5" (Invoice), 5.5" x 8.5" (Invoice-R), 8.5" x 11" (Letter), 8.5" x 11" (Letter-R),
8.5" x 14" (Legal), 11" x 17" (Ledger)
Paper Weight : 1 sided : 50-105 g/m
2 sided : 64-105 g/m
Notice for ADF
Do not use the following type / flawed originals.
● Drawing papers, Transparencies, Labeling paper, Heavy weight papers, Thin Art papers, Film,
Thermal papers.
● Papers which are curled, ripped, creased, folded, punched, glued, stapled, or self-adhesive.
● Originals of assorted (mixed) width size.
● Pressure sensitive or carbon backed papers.
● Paper which is still wet with color ink or white-out.
●●
● On the Platen Glass
●●
Ex: Book Original
2
(14-28 lb)
2
(18-28 lb)
Ex: Sheet Original
20
Face down.
Align with top center.
Face down.
Align with top left corner.
Page 21
Notice for Platen Glass
Align the original to the top left corner mark ( ).
● If the original is not positioned properly, a
portion of the original may not be copied.
● For originals smaller than 5.5" x 8.5"
(Invoice) size, position the original within
the 5.5" x 8.5" area and select 5.5" x 8.5".
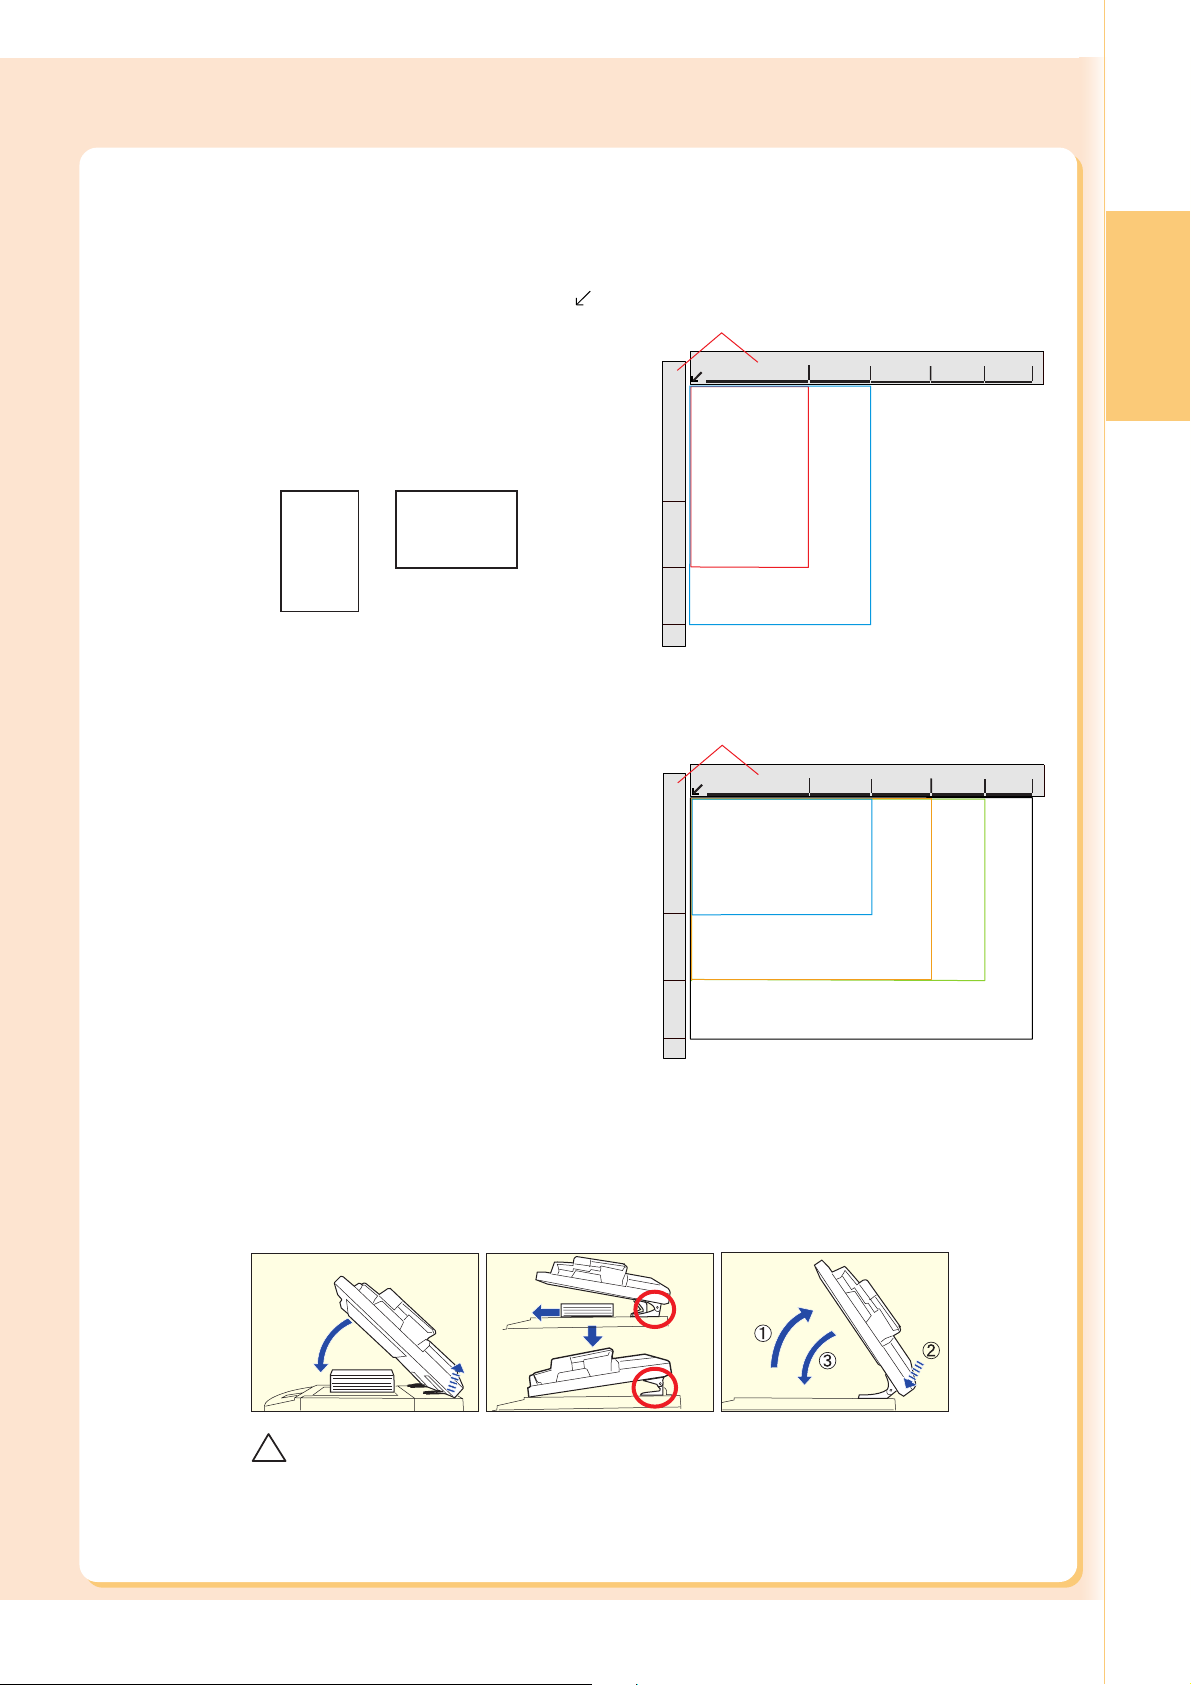
Original Orientation
Ex: 5.5" x 8.5"
A
A
5.5" x 8.5"
(Invoice-R)
5.5" x 8.5"
(Invoice)
For Portrait Orientation
Original Guides
5.5"
5.5"
8.5"
Legal
11"
For Landscape Orientation
Original Guides
5.5" x 8.5"
5.5"
8.5"
(Invoice)
8.5" x 11"
8.5"
(Letter)
Legal
11"
11"
Legal
17"
17"
Copying
5.5" x 8.5"
5.5"
8.5"
Legal
11"
Copying a thick booklet
● If there are less than 5 mm of white margin on originals, the edge of the copied paper may get
blurred in white. To avoid the problem, change the setting of “Digital Skyshot Mode” to “No”. For
setting of “Digital Skyshot Mode”, refer to Copier Settings in the Operating Instructions (For Function
Parameters) of provided CD-ROM.
● After copying a thick booklet, open the ADF and verify that the ADF Hinge was returned to
original position in order to prevent the rear of the ADF from being raised.
!
CAUTION
● When copying with the ADF open, do not look directly at the exposure lamp.
Direct eye exposure can cause eye fatigue or eye injury.
● When copying a thick original, do not use excessive force to press it against the Platen Glass.
The Glass may break and cause injuries.
(Invoice-R)
8.5" x 11"
(Letter-R)
8.5" x 14"
(Legal)
11" x 17"
(Ledger)
21
Page 22
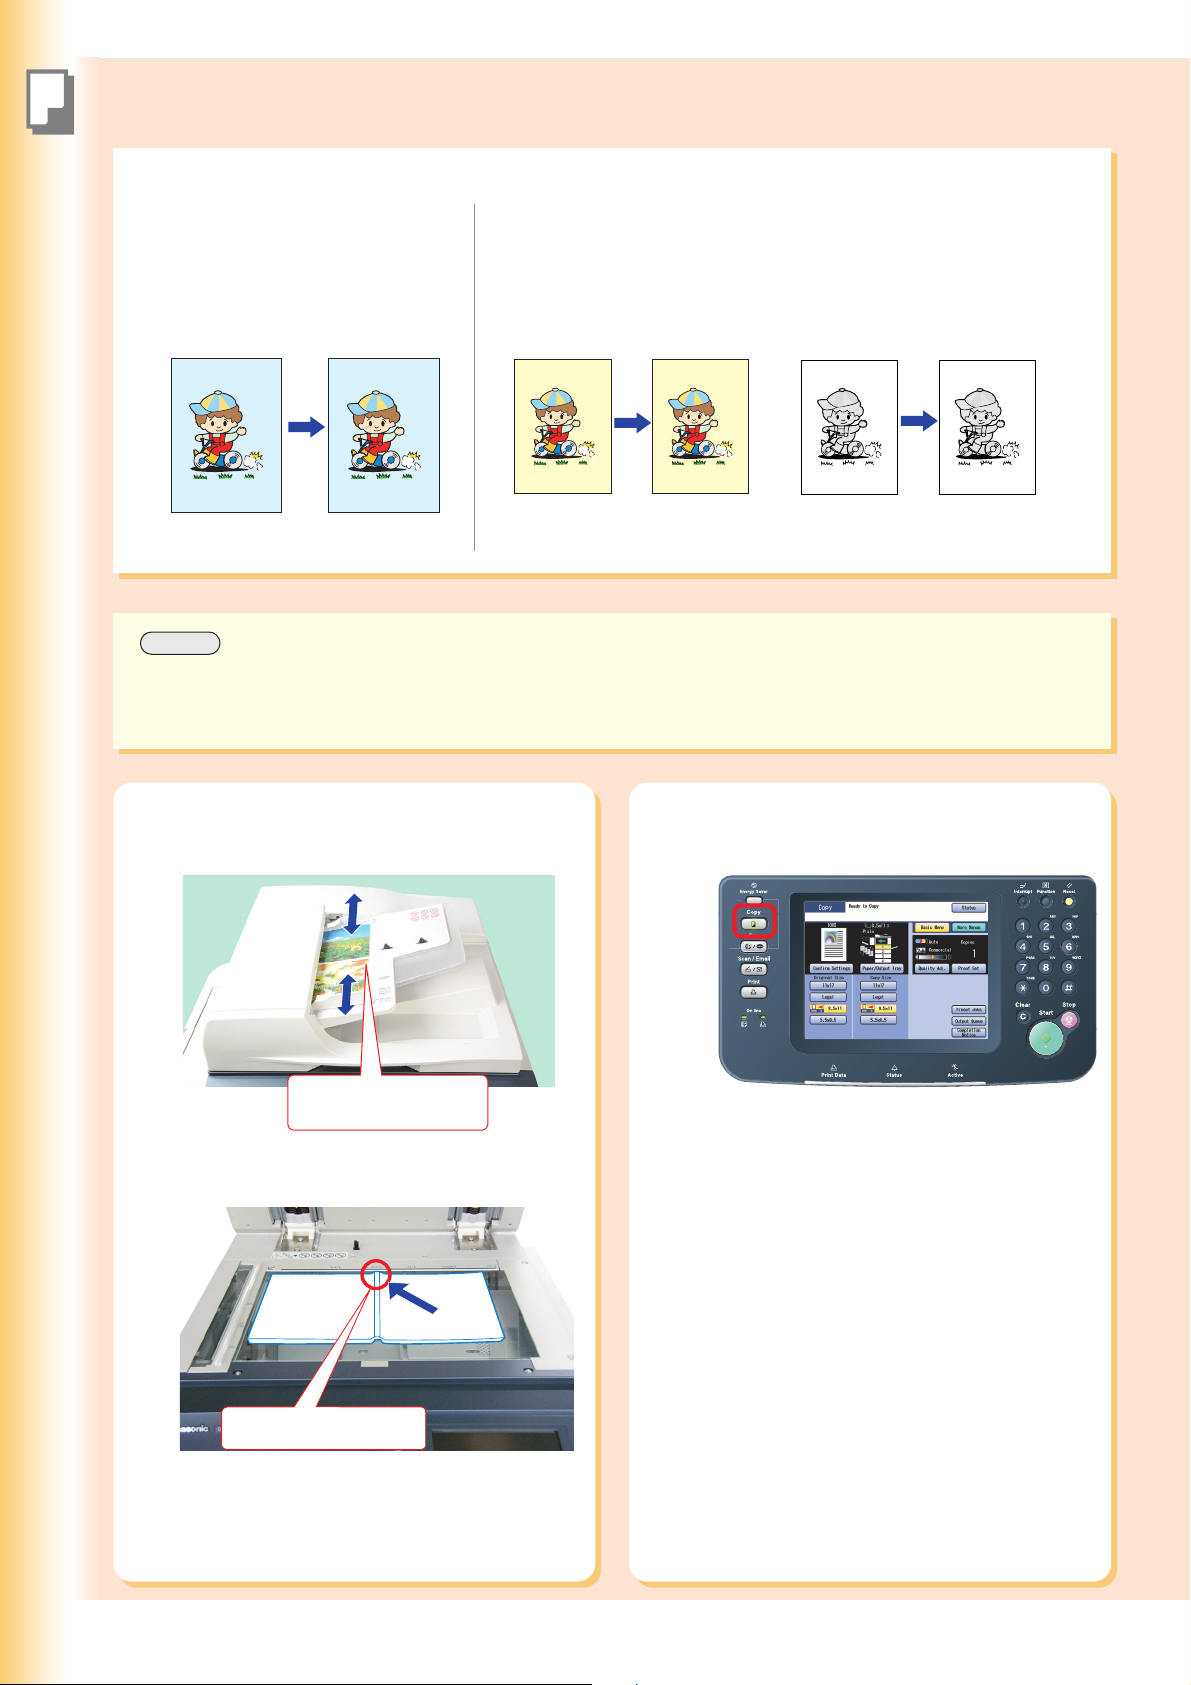
Basic Copy Operation
Copying
Full Size/Auto Color
Full Size Copy
Original Size and Copy Size are
automatically selected.
Ex: 8.5" x 11" Size
Original Size:
8.5" x 11"
NOTE
● During the copy operation and after making copies, the fan motor may spin to cool down the machine.
● When the desired size of paper is not set in the Paper Tray, use the Sheet Bypass. (See pages 76 to 77)
Copy Size:
8.5" x 11"
Auto Color Copy Mode Selection
The Color Copy mode is automatically
selected when colored originals are detected.
Color
Original
Color Copy Monochrome
Original
Monochrome
Copy
1
Place original(s) on the ADF or Platen
Glass.
Face up. Up to 100
sheets (20 lb/Letter)
● When copying from the ADF, read the notice
for ADF. (See pages 20, 56, and 57)
2
Press the Copy key if the machine is
set to other function mode.
22
Face down.
Align with top center.
● When copying from the Platen Glass, read the
notice for Platen Glass. (See pages 20, 21,
56, and 57)
Page 23

3
Select the required settings.
(See pages 24 to 39)
Copying
4
5
● Original Size and Copy Size are
automatically selected.
Enter the desired number of copies.
(Up to 999)
Press the Start key.
● Select “Yes” to cancel a Job.
● If you want to stop the job while making
copies, select “Stop” on the above screen.
NOTE
● After finishing copying, press
the Reset key to return the
machine to the initial screen of
the currently active mode.
23
Page 24
Copying
Basic Menu and More Menus
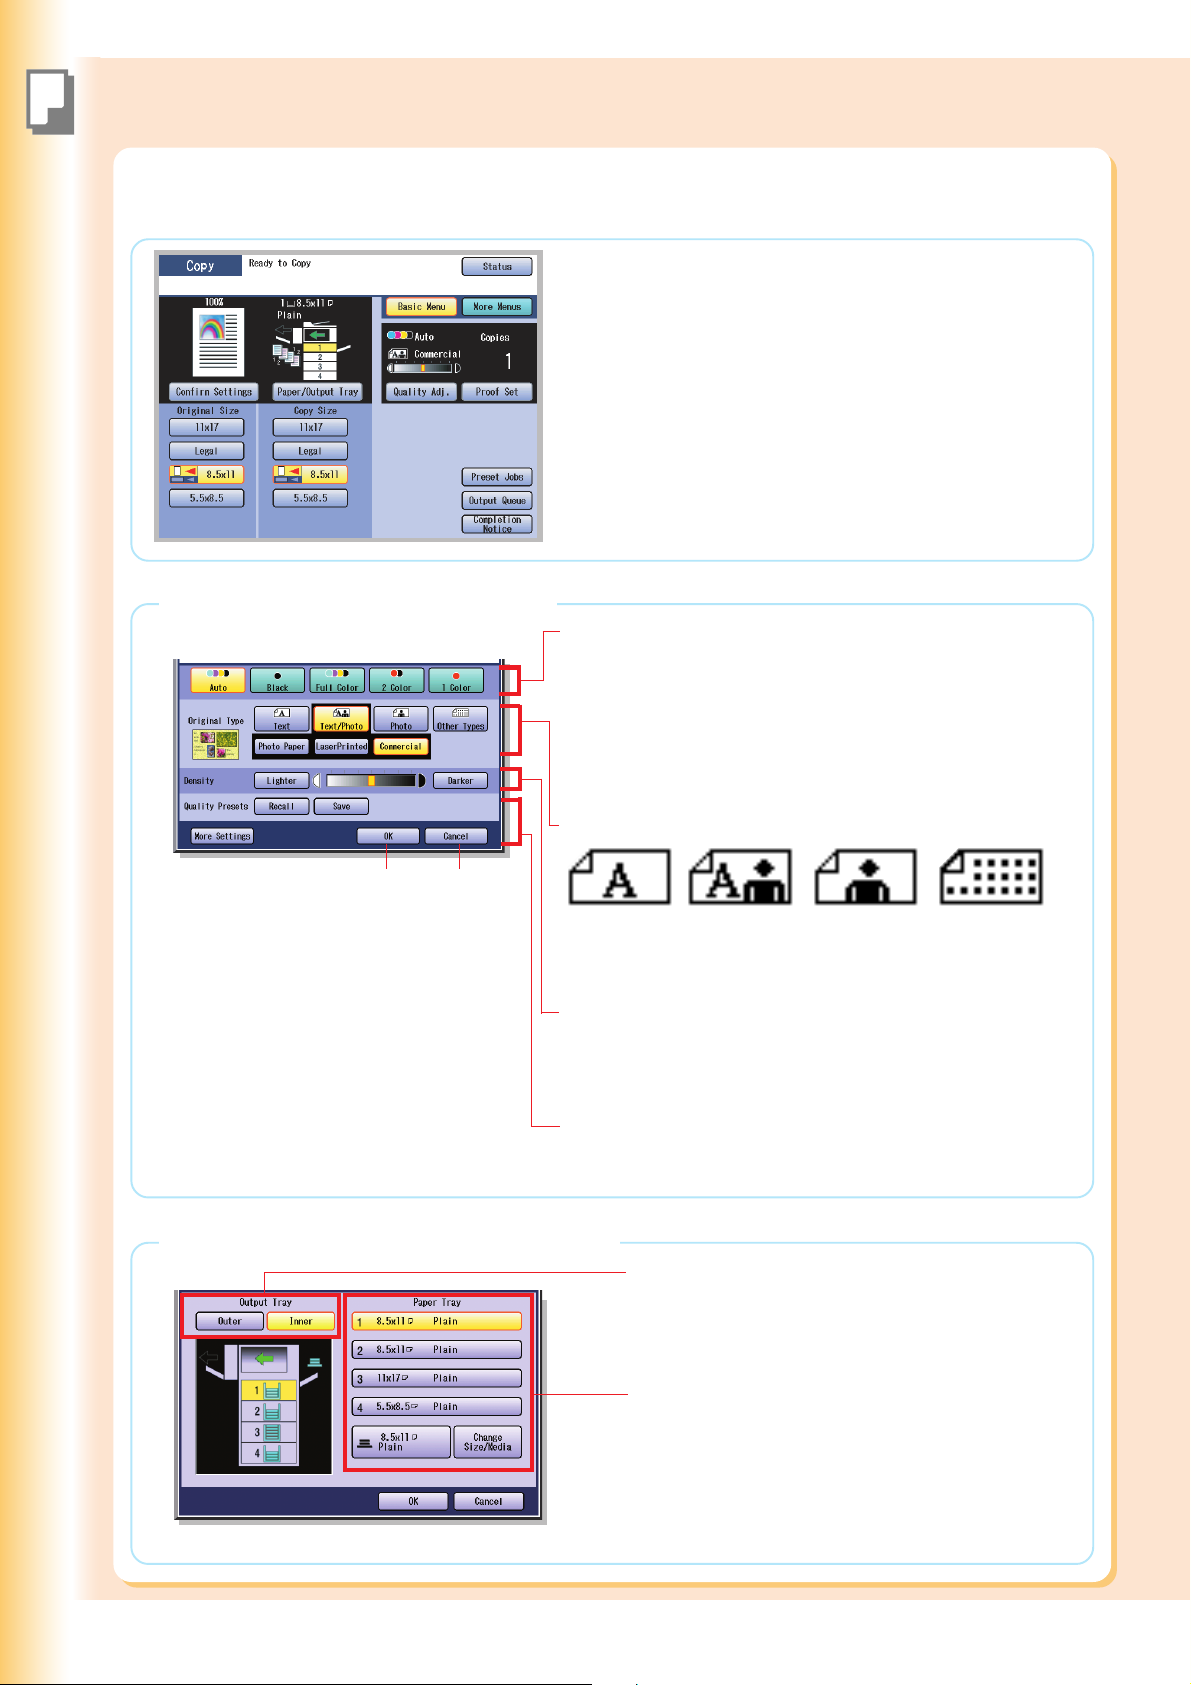
Basic Menu
● While in the Copy mode, select “Basic Menu” to configure
the following copy settings.
● For other mode settings, refer to Basic Menu Features in the
Operating Instructions (For Copier) of provided CD-ROM.
When “Quality Adj.” is selected.
Color Copy Mode
In the “Auto” mode, the machine identifies the original’s color
attributes and selects the appropriate mode, “Black” (black and
white) or “Full Color”, automatically.
The “2 Color” and “1 Color” settings must be selected
manually. Refer to Selecting the Color Mode in the Operating
Instructions (For Copier) of provided CD-ROM.
Original Type
OK
Confirms
settings.
Cancel
Cancels
settings.
Text Text and
Density (Scanning Density)
Adjusts the scanning density (7 Levels).
● Lighter : Copies a dark original image with lighter density.
● Darker : Copies a light original image with darker density.
Recall : Recalls the registered settings.
Save : Saves the settings.
More Settings : Selects additional settings.
When “Paper/Output Tray” is selected.
Photo Other Types
Photo
Selects the Output Tray (Inner/Outer).
● “Outer” is available when the optional Finisher/Exit
Tray is installed.
Selects the Paper Tray manually.
● Paper Tray 3 and 4 are available when the optional
Paper Trays are installed.
● For setting the paper size and media type for Paper
Trays 1-4, refer to General Settings (Key Operator
Mode) in the Operating Instructions (For Function
Parameters) of provided CD-ROM.
(Ex: Map,
News Paper)
24
Page 25
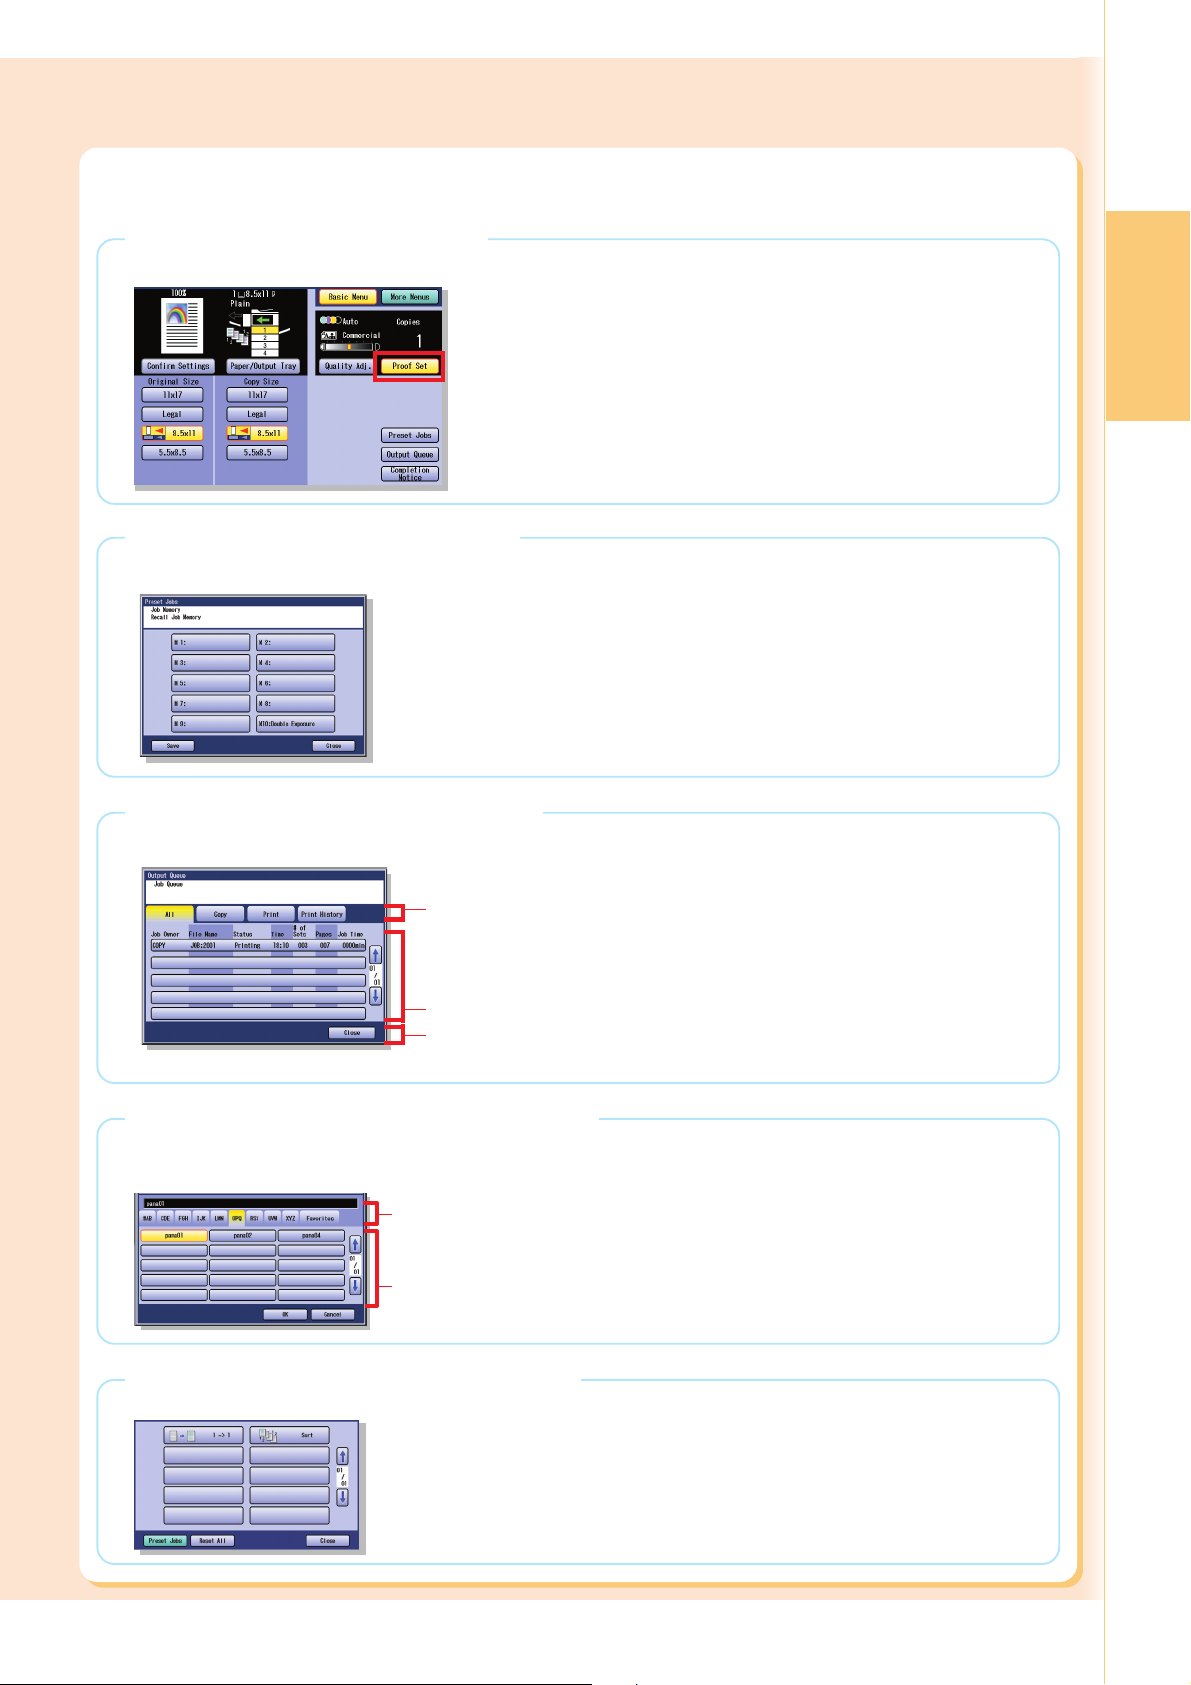
When “Proof Set” is selected.
Makes one proof copy before proceeding a multi-set copy job with various settings.
When “Preset Jobs” is selected.
Up to 10 copy jobs can be stored in Memory (M1 to M10) for recall at a later time.
● When using the Double Exposure mode, M10 is turned On and other job
requiring memory cannot be used.
When “Output Queue” is selected.
Displays a list of jobs. The jobs in the Output Queue can be deleted, and the priority of the print jobs can be changed.
Copying
Ex: All
All
Indicates
All jobs.
Indicates active and reserved jobs.
Close
Exits the Output Queue screen.
Copy
Indicates
Copy jobs.
Print
Indicates Print jobs.
(Requires 4-digit
password.)
Print History
Indicates the history
of Print jobs.
When “Completion Notice” is selected.
A Job Completion Notice is displayed via a pop-up window on the desktop of your PC when the copy job is
completed.
Select alphabetical group.
Indicates PC list in the
selected alphabetical group.
●
Before using this function, install the Panasonic
Document Management System and PCL Printer
Driver, and then set up each software.
●
Refer to Completion Notice Function in the
Operating Instructions (For Setting Up) of provided
booklet.
When “Confirm Settings” is selected.
The copy settings can be confirmed.
● Refer to Confirming/Editing the Selected Copy Features in the Operating
Instructions (For Copier) of provided CD-ROM.
25
Page 26
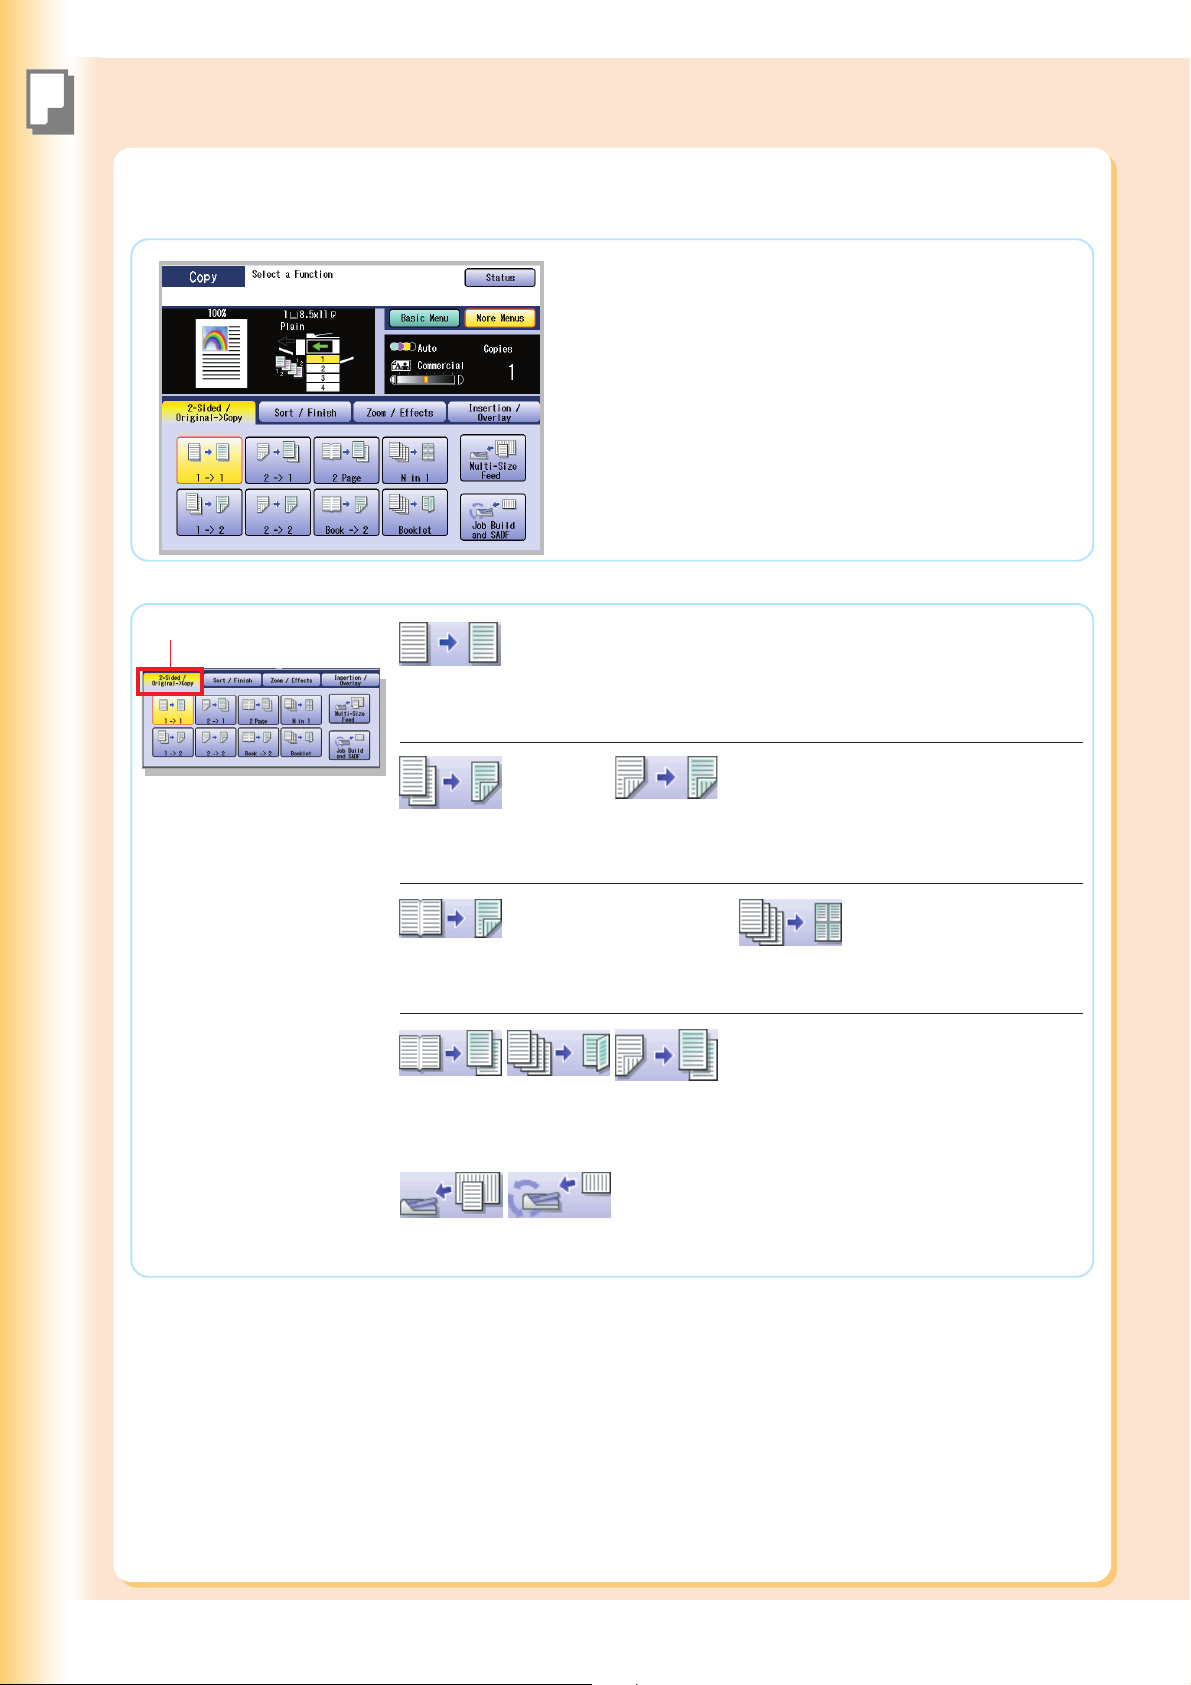
Copying
Basic Menu and More Menus
More Menus
● While in the Copy mode, select “More Menus” to configure
the following copy settings.
● For other mode settings, refer to More Menus Features in the
Operating Instructions (For Copier) of provided CD-ROM.
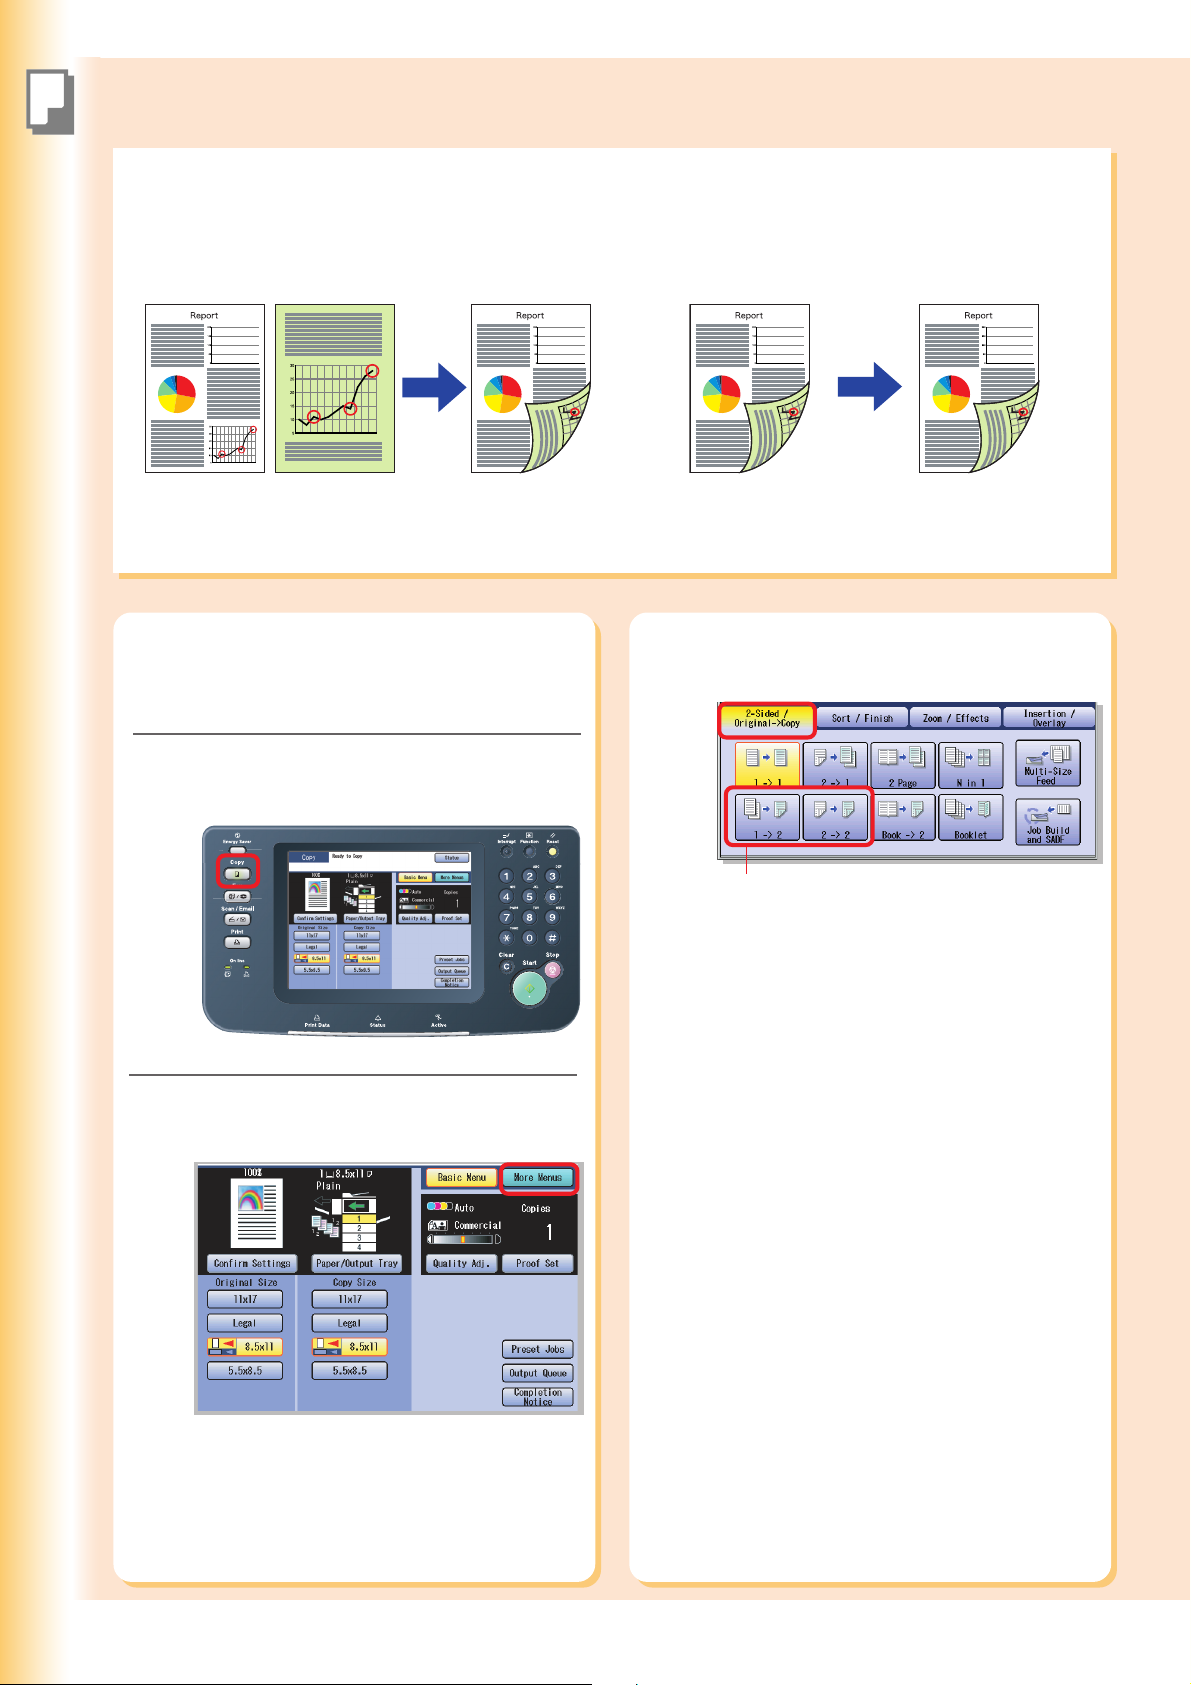
2-Sided / Original->Copy tab
1 -> 1
1-Sided Original to
1-Sided Copy (default)
1 -> 2
1-Sided Original
to 2-Sided Copy
Book -> 2
Book Original to
2-Sided Copy
2 Page
2 Page
Copy
Multi-Size
Feed
Booklet
Booklet
Copy
Job Build
and SADF
(See pages 30 to 31)
2 -> 2
2-Sided Original
to 2-Sided Copy
(See pages 32 to 33) (See pages 34 to 35)
N in 1
N in 1 Copy
Refer to 2-Sided Copy
Mode in the Operating
2 -> 1
2-Sided
Original to
1-Sided Copy
Instructions (For Copier) of
provided CD-ROM.
26
Page 27

Sort / Finish tab
Sort Non Sort Rotate-Sort Rotate-Group
Sort Non Sort
Shift-Sort Shift-Group Staple-Sort Punch
When optional Finisher is
not installed.
(See pages 36 to 37)
When optional Finisher
is installed.
(See pages 36 to 37)
Copying
Zoom / Effects tab
Insertion / Overlay tab
Zoom Auto Zoom Edge
Book Margin
Centering Image Repeat
Cover Page
Insertion
Mirror Stamping
Transparency
Interleaving
Refer to Zoom Mode and Effect
Modes in the Operating Instructions
(For Copier) of provided CD-ROM.
Inverse
Refer to Insertion Modes and
Overlay Modes in the Operating
Instructions (For Copier) of provided
CD-ROM.
Overlay Form
Overlay
File Edit
27
Page 28
Reduction / Enlargement Copy
Copying
Copying with Preset Ratios (Reduction/Enlargement)
Ex: Enlargement
8.5" x 11" (Letter-R)
11" x 17" (Ledger)
NOTE
● When changing the paper size, select “Paper/Output Tray” and select a Paper Tray. Do not try to change paper
size with the Copy Size buttons because selected copy size will be changed.
Ex: Reduction
11" x 17" (Ledger)
8.5" x 11" (Letter-R)
1
Place original(s) in Landscape
Orientation on the ADF or Platen
Glass.
From ADF
Landscape Orientation
From Platen Glass
Landscape Orientation
(See pages 20 to 21)
Portrait Orientation
2
3
Press the Copy key if the machine is
set to other function mode.
Select a Copy Size.
Ex: Enlargement
Original Size : 8.5" x 11" (Letter-R)
Copy Size : 11" x 17" (Ledger)
28
Portrait Orientation
Page 29
4
The exact ratio (%) is automatically
selected.
Original
Size
(Landscape)
11" x 17"
Legal 121 100 79 61
8.5" x 11"
5.5" x 8.5"
(Legal : 8.5" x 14")
● Paper Tray will be selected according to the
copy size.
● When the suitable paper is not in the Paper
Tray, use the Sheet Bypass.
(See pages 76 to 77)
Enter the desired number of copies.
(Up to 999)
Copy Size (Landscape)
11" x 17"
100 77 65 50
129 100 100 65
200 155 129 100
Legal
8.5" x 11"
(%)
5.5" x 8.5"
Copying
5
Press the Start key.
NOTE
● After finishing copying, press
the Reset key to return the
machine to the initial screen of
the currently active mode.
29
Page 30
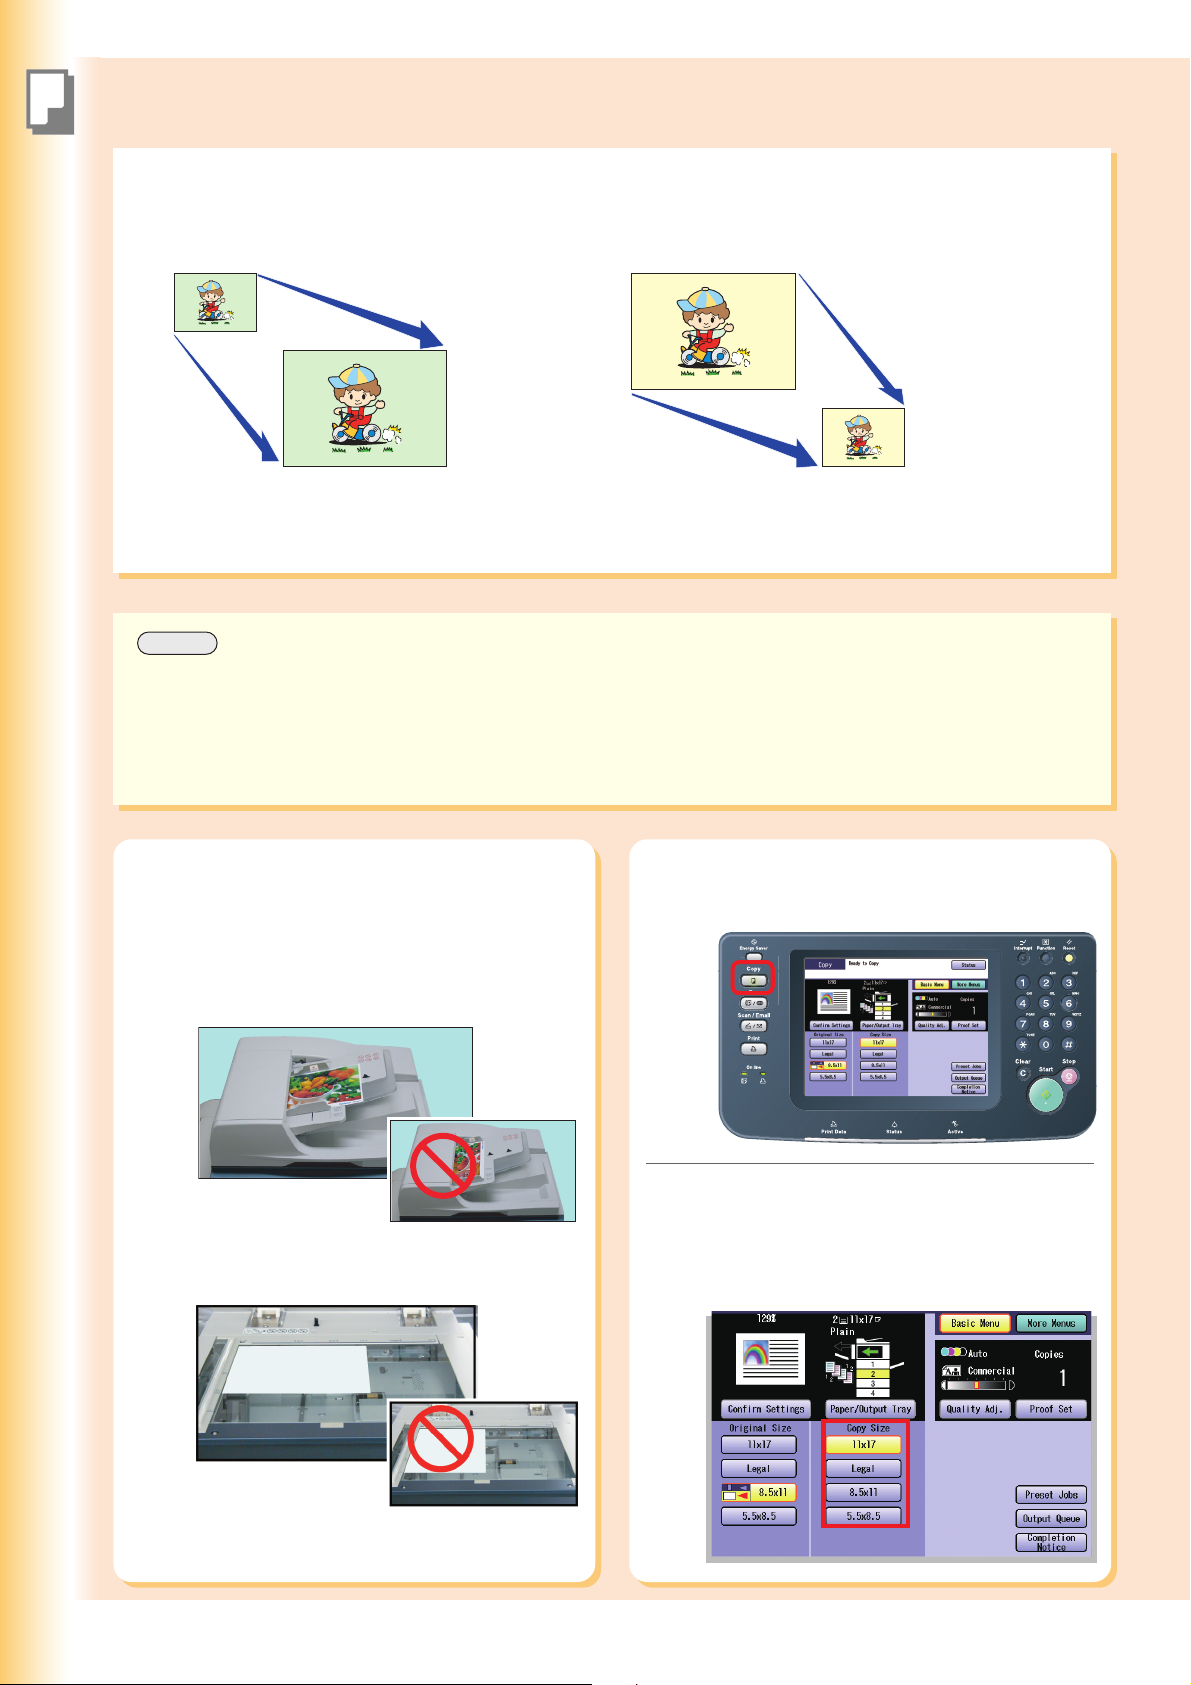
2-Sided Copy
Copying
1 -> 2 Copy
Select the “1 -> 2” copy mode when copying two 1-sided
originals onto one 2-sided copy. The 1st original’s image
is copied onto the front side and the 2nd original’s image
is copied onto the back side of the copy.
Place original(s) on the ADF or Platen
1
Glass.
(See pages 20 to 21)
2 -> 2 Copy
Select the “2 -> 2” copy mode when copying one 2sided original onto one 2-sided copy. (Same as the
original)
Select “2-Sided / Original->Copy”,
4
and then select “1 -> 2” or “2 -> 2”.
2
3
Press the Copy key if the machine is
set to other function mode.
1 -> 2:
Two 1-sided originals are copied to one 2-sided
copy.
2 -> 2 (Platen Glass is not available)
One 2-sided original is copied to one 2-sided
copy.
Select “More Menus”.
30
Page 31

5
Select an Original Orientation.
(Ex: 1 -> 2 screen)
7
Enter the desired number of copies.
(Up to 999)
Copying
6
Portrait :
Portrait orientation
denotes a media that is
taller than its width.
or
Landscape :
Landscape orientation
denotes a media that is
wider than its height.
Select a Copy Bind Position, and then
select “OK”.
(Ex: 1 -> 2 screen)
Select “OK”.
Press the Start key.
8
● When copying from the Platen Glass, place
the next original and follow the instructions
described on the Touch Panel Display.
● When setting “Edge” or “Margin” in the 2-
Sided copy mode, the printing position may
differ on each side of the paper. Refer to
Effect Modes in the Operating Instructions
(For Copier) of provided CD-ROM.
Select “Long Edge” or “Short Edge”.
Long Edge Short Edge
e
g
d
E
g
n
o
L
e
l
y
t
S
(Portrait)
Long Edge
Style
(Landscape)
Short Edge
Style
(Portrait)
E
t
S
r
h
o
S
e
l
t
y
(Landscape)
NOTE
● After finishing copying, press
the Reset key to return the
e
g
d
machine to the initial screen of
the currently active mode.
31
Page 32

2-Sided Copy
Copying
Book -> 2 Copy
Select the “Book -> 2” copy mode when copying two facing pages or a 11" x 17" size original on two separate
8.5" x 11" size sheets.
1st Page Imaged
1st Page
The 1st page is copied onto the front side and
the 2nd page is copied onto the back side of the
same paper.
2nd Page
Place a book on the Platen Glass.
1st Page
2nd Page
1
1st Page Blank
Blank2nd Page1st Page
1st Page
Blank page is copied onto the front side and the 1st page
is copied onto the back side of the same paper.
(The 2nd and 3rd pages are copied onto the next paper.)
For adding a cover page to copies, refer to More Menus
Features in the Operating Instructions (For Copier) of
provided CD-ROM.
Select “More Menus”.
Blank
3
2
Face down.
Align with top center.
Open the ADF.
Place a book on the Platen Glass.
Close the ADF.
Press the Copy key if the machine is
set to other function mode.
4
Select “2-Sided / Original ->Copy”, and
then select “Book -> 2”.
● You cannot select “Book -> 2” when the
“Multi-Size Feed” is selected.
32
Page 33

5
1
2
Select a Book Format and the
Orientation.
Select a Book Format.
Select “OK”.
7
Copying
6
1
2
1st Page
with Image
or
1st Page
Blank
Select the Orientation.
or
PortraitLandscape
Select the Page Order and the Copy
Format.
8
9
Enter the desired number of copies.
(Up to 999)
Press the Start key.
● When copying from the Platen Glass, place
the next original and follow the instructions
described on the Touch Panel Display.
Select the Page Order.
or
Select the desired Copy Format.
The first through last page are
copied.
The first page and beyond are
copied, but the last page is
not copied.
The first page is not copied,
but the rest including the last
page is copied.
The first and last page are not
copied.
NOTE
● After finishing copying, press
the Reset key to return the
machine to the initial screen of
the currently active mode.
33
Page 34

N in 1 Copy
Copying
N in 1 Copy
Select the “N in 1” copy mode when copying 2, 4 or 6 sheets of originals (printed on 1-side) onto 1 sheet of
paper.
Ex: “4 in 1” Copy
If you copy 4 sheets of originals which are printed on 1-side.
They are reduced and copied onto 1-side of a single sheet of paper.
<For Portrait orientation>
2 in 1 Copy 4 in 1 Copy 6 in 1 Copy
12
1
2
3
4
<For Landscape orientation>
2 in 1 Copy 4 in 1 Copy 6 in 1 Copy
1
2
3
4
43
2
1
A
43
1
2
3
4
1
2
3
5
6
4
5
6
123
ABC
564
1
3
5
B
2
4
A
6
C
1
2
3
Place original(s) on the ADF or Platen
Glass.
(See pages 20 to 21)
Press the Copy key if the machine is
set to other function mode.
Select “More Menus”.
4
5
Select “2-Sided / original ->Copy”, and
then select “N in 1”.
● You cannot select “N in 1” when the “Multi-Size
Feed” is selected.
Select the N in 1 mode.
(Ex: 2 in 1 screen)
2 in 1
4 in 1
Copies 2 originals
onto 1 sheet.
Copies 4 originals
onto 1 sheet.
34
6 in 1
Copies 6 originals
onto 1 sheet.
Page 35

6
7
Select an Original Orientation.
(Ex: 2 in 1 screen)
orPortrait Landscape
Select the Copy Layout Format, and
then select “OK”.
For 2 in 1
8
9
Enter the desired number of copies.
(Up to 999)
Copying
Press the Start key.
● When copying from the Platen Glass, place
the next original and follow the instructions
described on the Touch Panel Display.
For 4 in 1
For 6 in 1
NOTE
● After finishing copying, press
the Reset key to return the
machine to the initial screen of
the currently active mode.
35
Page 36

Sort Copy / Finishing
2
4
1
Copying
Sort Copy / Finishing
Sort
Rotate-Sort (Letter size only)
1
Rotate-Group (Letter size only)
1
When loading both Letter and
1
Letter-R sized paper, multiple copy
sets are sorted automatically and
stacked in alternate direction
1
(rotation of 90 degrees).
1
When loading both Letter and
3
Letter-R sized paper, multiple copies
of individual pages are stacked in
alternate direction (rotation of 90
2
degrees).
4
● The following Finishing modes are available when the optional
Finisher and Punch Unit are installed.
● For more details, refer to Sort Mode in the Operating
Instructions (For Copier) of provided CD-ROM.
Shift-Sort
1
Staple-Sort PunchSaddle-Stitch
1
1
Shift-Group
1
2
3
Place originals on the ADF or Platen
Glass.
Press the Copy key if the machine is
set to other function mode.
Select “More Menus”.
(See pages 20 to 21)
4
5
Select “Sort / Finish”.
Select a Finishing mode.
When optional Finisher is not installed
36
Sort, Rotate-Sort, Non Sort, or Rotate-Group
● When the optional Finisher is installed,
see the next page.
Page 37

When optional 1Bin Finisher is installed.
Ex: Portrait Original
6
7
Enter the desired number of copies.
(Up to 999)
Copying
Press the Start key.
Select the
Orientation.
When optional 1Bin Saddle-Stitch Finisher is
installed.
Ex: Portrait Original
For
Portrait
For
Landscape
When the
optional Punch
Unit is installed.
● When copying from the Platen Glass, place
the next original and follow the instructions
described on the Touch Panel Display.
Select the
Orientation.
Description for Icon
Ex: Portrait (1Bin Saddle-Stitch Finisher)
Staple
Staple Position Punch Position
Select the
Staple Position.
Copy
Select the
Punch Position.
Punch
NOTE
● After finishing copying, press
the Reset key to return the
machine to the initial screen of
the currently active mode.
Copy
37
Page 38

Others
Copying
Double Exposure
Select the Double Exposure copy mode when copying a 2-sided original that is smaller than 5.5" x 8.5" in size onto
a standard size media (Ex: Letter size). One side (Front) of the original is copied at the top of the page and the other
side (Back) is copied at the bottom on the copied media as illustrated below.
Ex: Name card (printed on both side)
Original Size:
(less than 5.5" x 8.5")
ABC
NOTE
● If the following situation should arise while you are copying an original with the ADF open, close the ADF and
continue copying.
- When a bright light shines on the Platen Glass, the position of the original may not be detected correctly.
- If there are less than 5 mm of white margin on originals, the edge of the copied paper may get blurred in white.
Copy Size:
(Letter)
ABC
DEF
Front Side Image
Back Side Image
1
2
Place original on the Platen Glass.
(This feature is not available when using
the ADF.)
Face down.
Align with top left corner.
● Leave the ADF open while making copies.
Press the Copy key if the machine is
set to other function mode.
Select “Preset Jobs”.
3
Select “M10:Double Exposure”.
4
38
● If the Confirmation screen “Ready for M10
Memory Copy” is displayed, select “Close”.
● When selecting “M10:Double Exposure”,
the previous settings will be cleared.
Select other settings (Ex: “Sort” copy) after
selecting “M10:Double Exposure”.
Page 39

5
6
Enter the desired number of copies.
(Up to 999)
Press the Start key.
8
9
Place the back side of the original on
the Platen Glass.
Copying
Face down.
Align with top left corner.
● Leave the ADF open while making copies.
Press the Start key.
7
Select “Yes” or “No” to copy the back side
of the original.
● The message is changed according to the
Sort mode.
For Non Sort : The message “Another
Original?” is displayed. Select
“Yes”.
For Sort : The message “Last Original?”
is displayed. Select “No”.
For Sort mode only
Select “Yes” to finish copying.
10
● To continue copying other originals, select
“No” and place the next original and follow
the instructions described on the Touch
Panel Display.
NOTE
● After finishing copying, press
the Reset key to return the
machine to the initial screen of
the currently active mode.
39
Page 40

Printing from SD Memory Card / PC
Printing
Printing Images Directly from the SD Memory Card
Printing from PC
When using the machine as printer, installation of printer driver is necessary.
For installation, refer to Installation in the Operating Instructions (For Setting Up) of provided booklet.
For configuration of printer driver, refer to Configuring the Printer Driver Settings in the Document Management System
(Printer Driver) of provided CD-ROM.
ATTENTION
● Be sure to use only a genuine SD Memory Card.
● The image data saved on the SD Memory Card or PCMCIA/PC Card cannot be printed if the Function Parameter “84
SD/PC Card Function” (General Settings > Key Operator Mode) is set to “No”.
For more details on this setting, refer to General Settings in the Operating Instructions (For Function Parameters) of
provided CD-ROM.
NOTE
● Any commercial grade genuine SD / SDHC Memory Card can be used.
● For acceptable memory card for PCMCIA/PC Card Adapter (Type II, 3.3V Operating Voltage Only), refer to the
PCMCIA/PC Card Adapter’s manual.
● The optional Printer Controller Module is required for printing text/graphic files in the PDF format.
● Some TIFF and PDF files cannot be printed directly from the SD Memory Card depending on the type of format.
● When the printing result differs from the actual photograph image, set the Printer Setting “27 Auto Contrast Mode”
to “On”. The machine will automatically adjust the print quality (the initial setting of this function is “Off”). However, the
level of improvement will vary with each photograph since the adjustment is done automatically by the machine. For
details, please refer to the Operating Instructions (For Function Parameters) of provided CD-ROM.
SD Memory Card
or PCMCIA/PC
Card
Thumbnail
Individual
● JPEG format only
File List
● JPEG
● TIFF
● PDF (Image files only)
Index
Print
Press the Print key if the machine is
set to other function mode.
1
Select “SD Print”.
2
● For details about “Mailbox” and “Job
Control”, refer to Print Operation (for
Printer) in the Document Management
System (Printer Driver) of provided CD-ROM.
NOTE
● If the setting of Function Parameter “84 SD/PC
Card Function” (General Settings > Key
Operator Mode) is set to “No”, the Confirmation
screen displays the “Function not available”
error message and beeps.
● If you do not touch any key for 3 seconds, or
select “Close” on the Touch Panel Display, the
machine will display the previous screen.
For more details, refer to General Settings in
the Operating Instructions (For Function
Parameters) of provided CD-ROM.
40
Page 41

Insert the SD Memory Card or PCMCIA/
PC Card Adapter with a memory card
3
into the Card Slot on the machine.
Slot Cover
For SD Memory Card
SD Card Slot
SD Memory
Card
For PCMCIA/PC Card Adapter (Type II,
3.3V Operating Voltage Only)
PCMCIA/PC Card Slot
The data on the SD Memory Card and
the name of the folder storing the data
4
are displayed automatically.
Ex: Thumbnail
Push the Slot
Cover to
open it.
Label side up
PCMCIA/PC
Card Adapter
(with a
memory card)
● Only JPEG files (with EXIF format ver 2.1 or
later for the digital camera) are displayed as
photo images.
When printing files in different formats or
edited by a computer, select “File List” and
print the data using the File List.
When printing image from File List
When “File List” is selected, select folder and image
on the SD Memory Card, and then select “Start”.
Printing
If the desired data and the name of the folder
are not displayed, keep pressing the button
until the desired data and folder appears.
Select “Start”. Select folder and image data.
● Only 1 image can be selected at a time.
● After printing is completed, remove the SD Memory
Card from the Card Slot. (See page 43)
● If there is no data on the SD Memory Card, nothing
is displayed.
● The default directory can be set to display either
“DCIM” (a folder for digital camera images) or “Scan
Img” by changing the setting of the Function
Parameter “28 SD/PC Card Def. Dir.” (Printer
Settings > General User Mode).
For more details on this setting, refer to Printer
Settings in the Operating Instructions (For Function
Parameters) of provided CD-ROM.
● The default display type can be set to either
“Thumbnail” or “File List” by changing the setting
of the Function Parameter “29 SD/PC Card Display
Type” (Printer Settings > General User Mode).
For more details on this setting, refer to Printer
Settings in the Operating Instructions (For Function
Parameters) of provided CD-ROM.
Folder
● If there are no photos on the SD Memory Card,
a file list is displayed instead of the Thumbnail
image.
● If the desired data and the name of the folder
are not displayed, keep pressing the
until the desired data and folder appears.
For details regarding the folder name, refer to
the Camera’s manual.
Ex: JPEG files, except from digital camera
button
Select the desired Thumbnail(s) or
5
“Select All”.
Select the desired Thumbnails. (Up to 80 images)
● The images are printed in the selected order.
● “Select All” selects all the thumbnails in the
same folder.
Continued on the next page...
Select All
41
Page 42

Printing from SD Memory Card / PC
Printing
6
For Individual
7
Select “Individual” or “Index Print”.
For Individual : Follow the steps below.
For Index Print : Go to page 43.
Select the size for the printed image.
8
Input the size for the printed frame
using “
For Fixed Size
Select the desired preset image size.
The paper should be larger than the Frame Size.
Horizontal x Vertical (inch)
Select the desired Paper Tray and/or
2-Sided print, and then select “OK”.
” or “ ”.
Changes the horizontal and
vertical frame size.
Changes the horizontal
frame size.
Changes the vertical frame
size.
4" x 6"
8" x 10"
Fit to the paper size
5" x 7"
For Variable Size
Set the Frame Size in which the image will
be printed without changing the horizontal
to vertical ratio.
The Frame Size is different from the printed
image size.
Image Size Frame Size
<Portrait Format>
X
Y
Frame
Frame
Select an orientation.
Y
X
<Landscape Format>
Y
X
or
Select “OK”.
Select a Paper Tray.
When “2-Sided” is selected, select the
bind position.
Select the bind position,
“Long Edge” or “Short Edge”.
(Go to step 9)
Select “OK”.
42
Page 43

For Index Print
For Individual / Index Print
7
8
Select a Printing Layout.
Select the desired Paper Tray and/or
2-Sided print, and then select “OK”.
9
10
Select “Start”.
● When printing from the SD Memory Card,
printed paper is output to the Inner Tray. (Output
Tray cannot be selected.)
After printing is completed, remove the
SD Memory Card or PCMCIA/PC
Card Adapter from the Card Slot.
For SD Memory Card
Access Indicator
Push the SD
Memory Card.
Printing
Select “OK”.
Select the desired Paper Tray.
● When “Index Print” is selected,
only 8.5" x 11" or A4 size Paper Tray
is selectable.
When “2-Sided” is selected, select the
bind position.
Select “OK”.
Select the bind position,
“Long Edge” or “Short Edge”.
For PCMCIA/PC Card Adapter
Eject Button
Push the Eject
Button beside
the PCMCIA/PC
Card Slot.
Pull out the SD
Memory Card or
PCMCIA/PC
Card Adapter.
Close the Slot
Cover.
Slot Cover
● Do not remove the SD Memory Card or PCMCIA/PC
Card Adapter while the Access Indicator flashes.
● When re-inserting the SD Memory Card into the slot, pull it
out completely once, and then insert the card again.
43
Page 44

Scanning
Scanning / Email
Scan to PC
Scanned data will be directly transferred to your PC. By
using installed provided software (Panasonic Document
Management System), you can view or edit the scanned
data on your PC.
ATTENTION
● Be sure to use only a genuine SD Memory Card.
● Use only Type II, PCMCIA/PC Card Adapters intended for 3.3 V operating voltage. Refer to your PCMCIA/PC Card
Adapter’s user manual for compatible memory cards and operating voltage specifications.
● The scanned image(s) cannot be saved to the SD Memory Card or PCMCIA/PC Card if the setting of Function
Parameter “84 SD/PC Card Function” (General Settings > Key Operator Mode) is set to “No”.
For more details on this setting, refer to General Settings in the Operating Instructions (For Function Parameters)
of provided CD-ROM.
NOTE
● Any commercial grade genuine SD / SDHC Memory Card can be used.
● For acceptable memory card for PCMCIA/PC Card Adapter, refer to the PCMCIA/PC Card Adapter’s manual.
● When scanning to the PCMCIA/PC Card, refer to Scan to the PCMCIA/PC Card in the Operating Instructions (For
Scanner and Email) of provided CD-ROM.
● When transferring scanned data to your PC, it is necessary first to install the Panasonic Document Management
System software and set up the scanner configuration on your PC. For more details, refer to the Operating Instructions
(For Setting Up) of provided booklet.
Scan
Scan to SD Memory Card or
PCMCIA/PC Card
Scanned data will be directly transferred to the
SD Memory Card or PCMCIA/PC Card.
Scan
SD
Memory
Card
or
PCMCIA/PC Card Adapter
with a memory card (Type II,
3.3 V Operating Voltage Only)
1
Place original(s) on the ADF or Platen
Glass.
Face up. Up to 100
sheets (20 lb/Letter)
● When scanning from the ADF, read the
notice for ADF. (See pages 20, 56, and 57)
Face down.
Align with top center.
● When scanning from the Platen Glass, read
the notice for Platen Glass. (See pages 20,
21, 56, and 57)
Press the Scan / Email key if the machine
is set to other function mode.
2
Select “Basic Menu” to select the
3
required setting mode, and then select
“OK”.
(See pages 46 to 47)
44
Page 45

4
Select “Address Book”, and then select
the destination for the scanned data.
●
When transferring the data to the SD Memory
Card, select “SD Card / Hard Drive” and
select “SD Card” for the destination.
When transferring the data to the SD
Memory Card.
Push the Slot Cover to open it.
Slot Cover
Insert the SD Memory Card as illustrated.
SD Card Slot
Label side up
Memory Card
Select “SD Card”.
SD
5
6
●
If you do not touch any key for 3 seconds, or
select “Close” on the Touch Panel Display,
the machine will display the previous screen.
For more details, refer to General Settings
in the Operating Instructions (For Function
Parameters) of provided CD-ROM.
Press the Start key.
● When scanning from the Platen Glass, place
the next original and follow the instructions
described on the Touch Panel Display.
● The scanned data is transferred to the PC,
or to the following directory of the SD
Memory Card.
Directory:
\PRIVATE\MEIGROUP\PCC\DI\IMAGE
● When the scanned data is transferred to a PC,
the scanner reception notice appears on the
PC’s monitor.
● For more details, refer to Scanner Settings
in the Document Management System
Communications Utility) of provided CD-ROM.
(
For SD Memory Card
After the transfer is completed, remove
the SD Memory Card from the Card Slot.
Access Indicator
Push the SD
Memory Card to
release it.
Email
Scanning /
● After selecting the destination, the
display will change to the “Basic
Menu” screen automatically.
● Only one storage device can be
selected at a time. When the “SD
Card” is selected as the storage
device, the scanned image cannot be
saved to the PCMCIA/PC Card and
Hard Disk Drive at the same time.
● If the setting of Function Parameter
“84 SD/PC Card Function” (General
Settings > Key Operator Mode) is set
to “No”, the Confirmation screen
displays the “Function not available”
error message and beeps.
Pull out the SD
Memory Card.
Close the Slot
Cover.
Slot Cover
● Do not remove the SD Memory Card while
the Access Indicator flashes.
● When re-inserting the SD Memory Card into
the slot, pull it out completely once, and then
insert the card again.
45
Page 46

Scanning
Scanning / Email
● While in the Scan / Email mode, select
“Basic Menu” to configure the following
scanner settings.
● For more details, refer to Scanner Settings
in the Operating Instructions (For Scanner
and Email) of provided CD-ROM.
When “Quality Adj.” is selected.
File Type and Name” is selected.
When “
Change the required settings.
Scanning Color Mode
Full Color or Monochrome (Gray scale or
Black)
Original Type
Text, Text and Photo, or Photo
Density (Scanning Density)
Lighter or Darker (7 Levels)
Resolution
200 dpi, 300 dpi, 400 dpi, or 600 dpi
Select a File Name.
Date / Time
Custom (Custom file name)
Select a File Type.
JPEG
PDF
Compressed PDF
● When choosing “Black” in the Scanning
Color mode, only PDF or TIFF is available
for selection.
● Refer to Scanner Settings in the Operating
Instructions (For Scanner and Email) of
provided CD-ROM.
46
When “Original Size” is selected.
Select an Original Size.
11" x 17"
Legal
8.5" x 11" (Portrait Orientation)
8.5" x 11" (Landscape Orientation)
5.5" x 8.5" (Portrait Orientation)
5.5" x 8.5" (Landscape Orientation)
● When scanning from ADF, “Original Size”
cannot be selected because the size is
automatically detected.
Page 47

When “2-Sided Original” is selected.
When “Job Build and SADF” is selected.
Refer to Scanner Settings in the Operating
Instructions (For Scanner and Email) of
provided CD-ROM.
Select the Original Orientation.
Long Edge:
Scans both sides of
original aligning to the long
edge of the original.
Short Edge:
Scans both sides of
original aligning to the short
edge of the original.
When “
Refer to Scanner Settings in the Operating
Instructions (For Scanner and Email) of
provided CD-ROM.
Multi-Size Feed” is selected.
Email
Scanning /
47
Page 48

Address Book (Email)
Scanning / Email
■■
■ Creating an Address Book
■■
NOTE
● For details on how to edit a registered address, refer to Adding to the Address Book in the Operating Instructions
(For Scanner and Email) of provided CD-ROM.
● Up to 200 addresses can be registered. By the service setting, up to 1000 addresses can be registered. For the
service setting, contact the authorized Panasonic dealer.
Press the Function key.
1
4
Enter the Email Address, and then
select “OK”.
Select “Scanner Settings”.
2
Select “21 Add New Email Address”.
3
Enter the Email Address.
(Up to 60 characters)
Keyboard Button Names
To input upper case
letter(s).
To input numbers and
symbols.
To select pre-registered
domain name.
To move the cursor ( | )
to the left or right side.
To erase the character
before the cursor.
To input a space
between characters.
To search address from
LDAP server by entering
the name.
Select “OK”.
48
Select “20-29”.
● For registration of Domain Name, refer to
Fax/Email Settings (User Parameters) in
the Operating Instructions (For Function
Parameters) of provided CD-ROM.
Select “21 Add New
Email Address”.
Page 49

5
Enter the Destination (PC) Name, and
then select “OK”.
8
To enter other (PC) destination
addresses:
Repeat steps 4 to 7.
To exit this setting mode:
Press the Reset key.
6
Enter the Destination Name.
(Up to 15 characters)
Enter the Key Name for the Email
address, and then select “OK”.
Enter the Key Name.
(Up to 15 characters)
● Key Names are used to select destinations
on the Touch Panel Display.
Select “OK”.
Select “OK”.
Email
Scanning /
7
Select whether you wish to add this New
Email Address to Favorites.
49
Page 50

Sending Email
Scanning / Email
Sending the Scanned Data via Email
Color
Monochrome
NOTE
● JPEG format data is different from the PDF or TIFF format, as one file is only for one page. When sending multiple
pages in the JPEG format, the same number of files as the pages is attached to an Email.
● JPEG (jpg) file is only available in the Color/Gray Scale mode.
● TIFF file is only available in the Monochrome mode.
● When selecting the destination from the Address Book, the address must be registered in advance.
(See pages 48 to 49)
● For more details, refer to Scan/Email Operations in the Operating Instructions (For Scanner and Email) of
provided CD-ROM.
Scan
Attached
JPEG (jpg) / PDF file
Attached
PDF / TIFF file
Place original(s) on the ADF or Platen
12
Glass.
Face up. Up to 100
sheets (20 lb/Letter)
● When scanning from the ADF, read the
notice for ADF. (See pages 20, 56, and 57)
Press the Scan / Email key if the
machine is set to other function mode.
50
Face down.
Align with top center.
● When scanning from the Platen Glass, read
the notice for Platen Glass. (See pages 20,
21, 56, and 57)
Page 51

3
Select “Email”, and then enter the
Email address or select an Email
address from the Address Book.
4
Select “Basic Menu” to select the
required setting mode.
(See pages 46 to 47)
Select “Email”.
Address Book
The Email address must be registered in advance.
(See pages 48 to 49)
Select “To”,
“Cc”, “Bcc”,
or “From”.
Subject : Enter the subject using the Keyboard.
Keyboard: Allows manual input of the Email
address and subject, etc.
Email Addressing
Select “Keyboard”.
Select an
Email address.
Select “Close”.
Select “Basic Menu”.
Email
Scanning /
● To check the addresses that have been
selected, select “Addresses:000” (the
“Addresses:000” button becomes active
only when an address is selected).
Press the Start key.
5
Enter the Email
address.
● After selecting “OK”, the screen returns to
the Email screen.
Address Book: Returns to the Address Book
screen.
Select “OK”.
● When scanning from the Platen Glass, place
the next original and follow the instructions
described on the Touch Panel Display.
51
Page 52

Address Book (Facsimile)
Facsimile (Option) / Internet Fax
■■
■ Creating an Address Book
■■
NOTE
● For details on how to edit a registered address, refer to Address Book in the Operating Instructions (For Facsimile
and Internet Fax) of provided CD-ROM.
● Up to 200 addresses can be registered. By the service setting, up to 1000 addresses can be registered. For the
service setting, contact the authorized Panasonic dealer.
1
Press the Function key.
3
Select “00 Address Book”.
2
Select “Fax/Email Settings”.
Select “01 Add Telephone Number”.
4
52
Page 53

5
Enter the fax number, and then select
“OK”.
7
Enter the Key Name for the Address
Book, and then select “OK”.
6
Enter a fax number.
(Up to 36 digits including
pauses and spaces)
● If you need a special access number to get
an outside line, dial it first, and then select
“Pause” to enter a pause (represented by a
“-”) before dialing the full number.
Ex: 9 Pause 5551234 -> 9-5551234
● If you are using Pulse dialing and you wish to
change to Tone dialing in the middle of dialing,
select “
The Dialing mode will change from Pulse to
Tone after dialing the digit “/”.
Ex: 9 Pause
● A “/ ” symbol appears when “Tone” is changed
to “Pulse” in “06 Dialing Method”.
Enter the name of the destination, and
then select “OK”.
” (represented by a “/”).
5551234 -> 9-/5551234
Select “OK”.
8
9
Enter the Key Name.
(Up to 15 characters)
● Key Names are used to select destinations on
the Touch Panel Display.
Select whether you wish to add the
telephone number to Favorites.
To enter other Fax numbers:
Repeat steps 5 to 8.
Select “OK”.
(Option) /
Facsimile
Internet Fax
Enter the Destination Name.
(Up to 15 characters)
● To correct a mistake, press
the cursor to the right side of the incorrect
character. Press “Back Space” to delete, and
enter the correct character. (See page 48)
Select “OK”.
or to move
To exit this setting mode:
Press the Reset key.
53
Page 54

Address Book (Internet Fax)
Facsimile (Option) / Internet Fax
■■
■ Creating an Address Book
■■
NOTE
● For details on how to edit a registered address, refer to Address Book in the Operating Instructions (For Facsimile
and Internet Fax) of provided CD-ROM.
● Up to 200 addresses can be registered. By the service setting, up to 1000 addresses can be registered. For the
service setting, contact the authorized Panasonic dealer.
1
Press the Function key.
3
Select “00 Address Book”.
2
Select “Fax/Email Settings”.
Select “02 Add Email Address”.
4
54
Page 55

5
Enter the Email address, and then
select “OK”.
Select “IFax”, and then select “OK”.
8
6
Enter the Email address.
(Up to 60 characters)
● To correct a mistake, press or to move
the cursor to the right side of the incorrect
character. Press “Back Space” to delete, and
enter the correct character. (See page 48)
Enter the name of the destination, and
then select “OK”.
Enter the Destination Name.
(Up to 15 characters)
Select “OK”.
Select “OK”.
9
Select “IFax”. Select “OK”.
● When selecting “PC”, the registered address
is displayed on both Internet Fax and Email
Address Book screen.
Select whether you wish to add the Email
Address to Favorites.
(Option) /
Facsimile
Internet Fax
7
Enter the Key Name for the Address
Book, and then select “OK”.
Enter the Key Name.
(Up to 15 characters)
● Key Names are used to select destinations on
the Touch Panel Display.
Select “OK”.
10
To enter other Email Addresses:
Repeat steps 5 to 9.
To exit this setting mode:
Press the Reset key.
55
Page 56

Placing Originals (Facsimile/Internet Fax)
Facsimile (Option) / Internet Fax
■■
■ How to Place Originals
■■
●●
● On the ADF
●●
Originals can be set up to the
Upper Limit Indicator.
Upper Limit Indicator
Upper Guide
Original Guides
Adjust the Original Guides to
the original’s width.
● When scanning from the ADF, read the notice for ADF. (See pages 20, 56, and 57)
●●
● On the Platen Glass
●●
● When scanning from the Platen Glass, read the notice for Platen Glass. (See pages 20, 21, 56, and 57)
●●
● Sending Non-Standard Size Originals
●●
When transmitting non-standard size original(s),
the machine may perform Rotate transmission
automatically and not transmit the portion of the
original that exceeds the standard size (“P” portion).
● Rotation XMT is not carried out in
Monitor Dial transmission.
● When an oversized original is sent
to another machine, it may be
reduced in accordance with the other
party’s recording paper size.
●●
● Scanning Area
●●
8 mm (0.3")
with Header Area
5 mm
Ex:
Original Width:
216 mm (8.5")
(0.2")
Scanning
Width:
206 mm
(8.1")
A
Scanning Direction
Ex:
11" x 17" size
5 mm (0.2")
The original’s border (gray area)
will be lost during scanning.
Rotation XMT
P
The portion labeled “P”
that exceeds the
standard original size is
not sent.
A
A
A
8.5" x 11" size
56
5 mm
(0.2")
Scanning Direction
Page 57

●●
● Original Size
●●
From the ADF
Maximum Size Minimum Size
2000 mm (78.7")
Scanning
Direction
From the Platen Glass
Maximum Size
432 mm (17")
279 mm (11")
279 mm (11")
140 mm (5.5")
140 mm (5.5")
Scanning
Direction
●●
● For Auto Reset
●●
When the pop-up screen is displayed while setting the
address or facsimile mode, select “Continue?” on the
Touch Panel Display, or press the Stop key on the
Control Panel.
NOTE
● The initial setting for Auto Reset Time is 1 minute.
If you do not touch any key for 1 minute, the Touch
Panel Display will be back to the initial screen of the
active function automatically. 20 seconds before
resetting, the “Continue?” screen is displayed to
extend the auto reset time for another 1 minute.
If you wish to change Auto Reset Time, consult with
your Key Operator.
(Option) /
Facsimile
Internet Fax
57
Page 58

Sending Originals (Facsimile)
Facsimile (Option) / Internet Fax
Sending Scanned Data via Facsimile
You can send originals via a telephone line by simply entering the fax number using the Keypad or the Address Book.
Scan
Telephone Line
NOTE
● When scanning full-color originals, select “Text/Photo” or “Photo” to add more details to the scanned data.
However, the scanned data is sent in black and white (Gray scale).
● When selecting the destination from the Address Book, the address must be registered in advance.
(See pages 52 to 53)
● For details on how to print the transaction journal, refer to Reading Reports/Lists in the Operating Instructions
(For Facsimile and Internet Fax) of provided CD-ROM.
Place original(s) on the ADF or Platen
Glass.
12
Face up. Up to 100
sheets (20 lb/Letter)
● When scanning from the ADF, read the notice
for ADF. (See pages 20, 56, and 57)
3
Press the Fax key if the machine is set
to other function mode.
Select “Basic Menu” or “More Menus”
to configure the desired Fax mode
settings.
(See page 59)
58
Face down.
Align with top center.
● When scanning from the Platen Glass, read
the notice for Platen Glass. (See pages 20,
21, 56, and 57)
Page 59

4
5
Select “Address Book”.
Enter the fax number.
For Manual Dialing
Enter the fax
number, and then
select “OK”.
Ex: Select “Basic Menu” and “Quality Adj.”.
OK : Settings are applied.
Cancel : Settings are canceled.
Original Type
Text : Use for text only originals
Text/Photo : Use for text and photo originals
Photo : Use for photo, or illustration originals
Density (Scanning Density)
Lighter or Darker (7 Levels)
Lighter :
Darker :
Resolution
If you wish to scan an original with lighter
contrast, select the button to reduce the
contrast level. Each time the button is
selected, the original will be scanned lighter.
If you wish to scan an original with darker
contrast, select the button to increase the
contrast level. Each time the button is
selected, the original will be scanned darker.
6
For Address Book Dialing
Select destination station(s)
● The Address Book is available only when
destinations are registered.
(See pages 52 to 53)
Press the Start key.
● When sending from
the Platen Glass, place
the next original and
follow the instructions
described on the
Touch Panel Display.
For standard originals
Std
For detailed originals
Fine
For finer detailed originals
S-Fine
For 600 dpi detailed originals
600dpi
● There is a possibility that the printing quality is
determined by the reception capability of the
remote station when using the “Photo”, “S-Fine”,
or “600dpi” mode. If this happens, use the “Fine”
Resolution.
Ex: When “Verification Stamp” is selected.
The Verification Stamp helps you to confirm successful
transmission by stamping the bottom of each
×
successfully transmitted page with a small
Stamp is turned OFF.
Stamp is turned ON.
● For more details, refer to Basic Fax Transmission
in the Operating Instructions (For Facsimile and
Internet Fax) of provided CD-ROM.
mark.
(Option) /
Facsimile
Internet Fax
59
Page 60

Sending Originals (Internet Fax)
Facsimile (Option) / Internet Fax
Sending Scanned Data via Internet Fax
You can send originals via LAN. Please check that the other party has Internet Fax capability before using this
function.
Scan
LAN/Internet
NOTE
● When scanning full-color originals, select “Text/Photo” or “Photo” to add more details to the scanned data.
However, the scanned data is sent in black and white (Gray scale).
● When selecting the destination from the Address Book, the address must be registered in advance.
(See pages 54 to 55)
● For details on how to print the transaction journal, refer to Reading Reports/Lists in the Operating Instructions
(For Facsimile and Internet Fax) of provided CD-ROM.
Place original(s) on the ADF or Platen
1
2
Glass.
Press the Fax key if the machine is set to
other function mode.
(See pages 20, 21, 56, and 57)
Select “Basic Menu” or “More Menus”
to configure the desired Internet Fax
3
mode settings.
(See page 61)
60
Page 61

4
Select “Address Book”, and then
select an Internet Fax destination.
Ex: Select “Basic Menu” and “Quality Adj.”.
OK : Settings are applied.
Cancel : Settings are canceled.
Original Type
Text : Use for text only originals
Text/Photo : Use for text and photo originals
Photo : Use for photo, or illustration originals
Density (Scanning Density)
Lighter, or Darker (7 Levels)
Lighter :
Darker : If you wish to scan an original with darker
Resolution
If you wish to scan an original with lighter
contrast, select the button to reduce the
contrast level. Each time the button is selected,
the original will be scanned lighter.
contrast, select the button to increase the
contrast level. Each time the button is
selected, the original will be scanned darker.
5
● The Address Book is available only when
destinations are registered.
(See pages 54 to 55)
Press the Start key.
● When sending from the Platen Glass, place
the next original and follow the instructions
described on the Touch Panel Display.
For standard originals
Std
For detailed originals
Fine
For finer detailed originals
S-Fine
For 600 dpi detailed originals
600dpi
● There is a possibility that the printing quality is
determined by the reception capability of the
remote station when using the “Photo”, “S-Fine”,
or “600dpi” mode. If this happens, use the “Fine”
Resolution.
Ex: When “Verification Stamp” is selected.
The Verification Stamp helps you to confirm successful
transmission by stamping the bottom of each
×
successfully transmitted page with a small
mark.
(Option) /
Facsimile
Internet Fax
Stamp is turned OFF.
Stamp is turned ON.
● For more details, refer to Basic Fax Transmission
in the Operating Instructions (For Facsimile and
Internet Fax) of provided CD-ROM.
61
Page 62

Troubleshooting
Problem Solving
Unit Does Not Operate
Is the display dark?
Check Action
Check if the Power Switches (Main Power
Switch on the rear and Power Switch on the
left side of the machine) are turned ON and if
the power cord is plugged into the AC outlet.
Does the Energy Saver key flash (or light),
and is the display turned OFF?
(See page 15)
Do any of the U## code and messages
appear on the display?
(U1, U4, U6, U7, U11....etc.)
Do the Add Staples Indicator and message
appear on the display?
Do the Add Paper Indicator and message
appear on the display? (
Do the Paper Misfeed Indicator and
message appear on the display? (J##)
Does the error message “Remove paper
from inner tray” appear on the display?
Do E#-## Indicator and message appear on
the display?
)
Press the Energy Saver key on the Control
Panel.
Perform operations in accordance with each
message. (See page 64)
Add staples. (See pages 84 to 88)
Remove all jammed staples.
(See pages 84 and 86)
Add papers. (See pages 76 to 77)
Remove the misfed paper. (See pages 66 to 75)
Remove the paper from inner tray.
(For the capacity of Inner Tray, see page 94)
Turn OFF the Power Switch on the left side
and the Main Power Switch on the rear of the
machine, and then turn them back ON. If the
error code has not been cleared, call the
authorized Panasonic dealer.
62
The machine does not accept the next job
during operation, instructed job would not be
accepted for a long time period, or job would
not be completed.
Turn OFF the Power Switch on the left side
and the Main Power Switch on the rear of the
machine, and then turn them back ON. If the
machine still does not accept the next job, call
the authorized Panasonic dealer.
Light Copies
Does the Exposure Indicator display
“Lighter”?
Do the Add Toner Indicator and message
appear on the display? (
■ If the measures outlined above do not solve the problem, call the authorized Panasonic dealer.
)
Select “Darker”.
Replace the Toner Cartridge.
(See pages 78 to 79)
Page 63

Check Action
Marked Copies
Is the White Reference Sheet, Platen Sheet,
Scanning Glass (Small), or Platen Glass
(Large) dirty?
Are there any streaks on the copy image?
■ If the measures outlined above do not solve the problem, call the authorized Panasonic dealer.
Clean the White Reference Sheet, Platen
Sheet, Scanning Glass (Small), or Platen
Glass (Large). (Refer to Machine Care
below.)
(1) Clean the LSU Aperture Glass. (See page 83)
(2) Clean the White Reference Sheet and the
Scanning Glass (Small). (Refer to Machine
Care below.)
Machine Care
White Reference Sheet
Platen Sheet
Platen Glass (Large)
White Reference Sheet, Platen Sheet,
Scanning Glass (Small), or Platen Glass (Large)
Wipe off any marks or dirt with a cloth and a
neutral detergent.
Wipe again with a dry cloth.
Scanning Glass (Small)
Displaying Status
Normally, “Status” is displayed in gray on each function screen.
“Status” is displayed in yellow if the Paper Tray is empty or toner becomes low.
Select “Status” displayed in yellow to confirm the status details.
1. Select “Status” in yellow.
(Ex: Copy function screen)
2. Check the status, and then select “Close”.
(Ex: Paper Empty)
Select “Paper Empty”. Check the empty
Select “Close”.
Paper Tray, and
then select
“Close”.
Problem Solving
63
Page 64

User (U) / Jam (J) / Machine (E) Error Codes
Problem Solving
User Error Codes (U Codes) / Machine Error Codes (E Codes)
<Outer>
ADF Cover
Finisher Top
Cover (Option)
Transport
Cover
(Option)
Battery
Holder
Front Cover
User Error (Locations)
ADF
(Automatic Document Feeder)
Section
Right Side
Cover
Feed Cover 1
ADU Cover
Feed Cover 2
Option Feed
Cover
● When a user error occurs, the location and the procedures for handling
the user error are displayed frame by frame on the Touch Panel Display.
Check the location and handle the user error according to the
displayed pictures and this manual. (See pages 78 to 83)
Ex: Front Cover is
opened.
<Inner>
Toner Cartridges
(Yellow/Magenta/Cyan/Black)
Toner Waste Container
OPC Drum Units
(Yellow/Magenta/Cyan/Black)
Ex:
Toner Waste Container
is almost full.
Ex: Toner Waste
Container is full.
Error Location Indicator
E Codes:
Call the authorized Panasonic dealer when
machine Error Code (E Code) appears on the
Touch Panel Display.
Code Check Points
U1 Front Cover is open.
U4 Finisher is pulled out.
U6 ADU Cover, Feed Cover 1, and/or Right Side
Cover is open.
U7 Feed Cover 2 & Option Feed Cover are
open.
U8 Transport Cover is open.
(When optional Paper Transport Unit is
installed)
U11 Paper remains in the Finisher Bin.
(When optional Finisher is installed)
U12 Finisher Top Cover and/or Staple Cover is
open.
(When optional Finisher is installed)
NOTE*
A. When the Maintenance and Toner/Toner Waste Container Indicators are blinking
The machine will complete the current job and stop operating. To continue using the machine temporarily while waiting for a
replacement toner/container, press any key. (Ex: For Toner Waste Container, approximately 300 additional copies can be made.)
B. When the Maintenance and Toner/Toner Waste Container Indicators light up
The machine stops and will not allow further operation until the Toner Waste Container is replaced.
Code Check Points
U13* Toner level is low, or has run out.
U14* Toner Waste Container is full.
U15 Toner Waste Container is not installed.
U20 ADF Cover is open.
U21 ADF is open while scanning from ADF.
U25 Toner is hardened. Shake Toner Cartridge
U28 OPC Drum Unit is not installed.
U29 OPC Drum Unit requires replacement.
● Select “Close” to
continue the current
job temporarily.
(See pages 16, 78, and 79)
(See pages 16, 82, and 83)
(See pages 82 to 83)
well. (See page 78)
(See pages 80 to 81)
(See pages 80 to 81)
● Machine will stop.
Replace the Toner
Waste Container.
64
Page 65

Jam Error Codes (J Codes)
Finisher
Section
(Option)
Paper
Transport
Section
(Option)
Paper Tray 1
Paper Tray 2
Paper Tray 3
Paper Tray 4
Removing a Misfed Paper (Locations)
ADF (Automatic Document Feeder)
Section
Fuser/Exit Section
Paper Feed Section
(Paper Tray 1-4 &
Sheet Bypass)
ADU Section
Sheet Bypass
Paper Feed Section
(Paper Tray 2)
Paper Feed Section
(Paper Tray 3, 4)
(Option)
● When a misfed paper occurs, the location and the procedures for
removing misfed paper are displayed frame by frame on the Touch
Panel Display.
Check the location and remove all misfed papers according to
displayed pictures and this manual. (See pages 66 to 75)
Ex: ADU Section
ATTENTION
● The display indicates the
section of the misfed paper.
Remove the misfed paper
and check to see if the
Misfeed Indicator has been
cleared.
If other locations indicate
presence of paper, remove
them and check the display
again.
● When clearing a misfed
paper that is difficult, or
impossible to see, turn OFF
the machine and contact the
authorized Panasonic
dealer.
Misfed Location Indicator
Code Check Points
J00 Sheet Bypass (Remove the misfed paper
and load the paper again.)
J01 Paper Tray 1 & Paper Feed Section (Paper
Tray 1-4 & Sheet Bypass) (See page 66)
J02 Paper Tray 2 & Paper Feed Section
(Paper Tray 2) (See page 69)
J03 Paper Tray 3 & Paper Feed Section
(Paper Tray 2-4) (See pages 69 to 70)
J04 Paper Tray 4 & Paper Feed Section
(Paper Tray 3, 4) (See page 70)
J06, J26 Paper Feed Section (Paper Tray 1-4 & Sheet
Bypass) (See pages 66, 69, and 70)
J07, J08, Paper Feed Section
J09, J27, (Paper Tray 2 & Optional Paper Tray 3 & 4)
J28 (See pages 69 to 70)
J16, J18, Paper Feed Section
J33-J35 (Paper Tray 1-4 & Sheet Bypass)
Verify that the media type selection in the Control
Panel matches the media loaded on the Trays.
Ex:Select “Transparency” when Transparencies
are loaded in the Sheet Bypass.
(See pages 66, 69, and 70)
Returns to the 1st step.
Code Check Points
J19 Paper Feed Section & ADU Section
(See pages 66, 67, 69, and 70)
J82, J83, ADU Section & Fuser/Exit Section
J88 (See pages 67 to 68)
J30-J32, Paper Feed Section & Fuser/Exit Section
J38-J40, (See pages 66, 68, 69, and 70)
J42-J45
J41, J50, Fuser/Exit Section & Paper Transport Section
J51, J52, (See pages 68 to 69)
J86
J80, J81, Fuser/Exit Section
J87 (See page 68)
J54-J56 Paper Transport Section
(See page 69)
J60-J66 Optional Finisher Section
(See pages 71 to 73)
J70-J79, ADF Section
J92-J94 (See pages 74 to 75)
Problem Solving
65
Page 66

Removing Misfed Paper
Problem Solving
■■
■ Paper Feed Section (Paper Tray 1)
■■
Open the Feed Cover 1.
1
Remove the misfed paper.
2
Feed Cover 1
Feed Cover 1
Remove the misfed paper.
4
Misfed Paper
Insert the Paper Tray 1.
5
3
Misfed Paper
ATTENTION
Do not touch the belt and the STR for optimum
copy quality and performance of the machine.
Belt STR
Pull out the Paper Tray 1.
Close the Feed Cover 1.
6
Feed Cover 1
Close the Sheet Bypass.
7
66
Sheet Bypass
Page 67

■■
■ ADU Section
■■
1
2
Open the Sheet Bypass.
Sheet Bypass
Open the ADU Cover.
ADU Cover
Close the ADU Cover.
4
ADU Cover
Close the Sheet Bypass.
5
Sheet Bypass
3
Remove the misfed paper.
Problem Solving
Misfed Paper
67
Page 68

Removing Misfed Paper
Problem Solving
■■
■ Fuser/Exit Section
■■
Open the Feed Cover 1.
1
ATTENTION
Do not touch the belt and the STR for optimum
copy quality and performance of the machine.
Feed Cover 1
Belt STR
● Misfed paper is transported downward by
turning the knob.
● Do not forcibly pull out the misfed paper
upward as toner may adhere to the transfer
unit and blot the next copy with toner. Follow
the steps below to remove the misfed paper.
Close the Right Side Cover.
4
Right Side Cover
2
3
Open the Right Side Cover.
Right Side Cover
Turn the Paper Transport Knob
counterclockwise.
5
6
Remove the misfed paper.
Misfed Paper
Close the Feed Cover 1 and Sheet
Bypass.
68
Feed Cover 1
Sheet Bypass
Page 69

■■
■ Paper Transport Section
■■
■■
■ Paper Feed Section (Paper Tray 2)
■■
1
2
Open the Transport Cover.
Transport Cover
● Press the button on the Transport Cover to
open.
Remove the misfed paper.
Misfed Paper
1
2
Open the Feed Cover 2, and
then remove the misfed paper.
Feed Cover 2
Pull out the Paper Tray 2.
3
Close the Transport Cover.
Transport Cover
3
4
Remove the misfed paper.
Misfed Paper
Problem Solving
Insert the Paper Tray 2, and then close
the Feed Cover 2.
69
Page 70

Removing Misfed Paper
Problem Solving
■■
■ Paper Feed Section (Optional Paper Tray 3 or 4)
■■
Open the Option Feed Cover.
1
Remove the misfed paper.
2
Remove the misfed paper.
4
Misfed Paper
Option Feed Cover
Insert the Paper Tray 3 or 4.
5
3
Misfed Paper
Pull out the Paper Tray 3 or 4.
Close the Option Feed Cover.
6
Option Feed Cover
70
Page 71

■■
■ 1Bin Finisher Section
■■
1
2
Slide the Finisher to the left.
Release Button
● Push the Release Button to free the Finisher
from the machine.
Remove the misfed paper.
4
5
Open the Finisher Top Cover, and then
remove the misfed paper.
Finisher Top Cover
Slowly release your hand from the
Finisher Top Cover. The cover is closed
automatically.
3
Misfed Paper
Finisher Top Cover
Slide the Finisher back until it locks into
place.
Problem Solving
71
Page 72

Removing Misfed Paper
Problem Solving
■■
■ 1Bin Saddle-Stitch Finisher Section
■■
Slide the Finisher to the left.
1
● Push the Release Button to free the Finisher
from the machine.
Open the Finisher Top Cover.
2
Release Button
Close the Finisher Top Cover.
4
Finisher Top Cover
Open the Staple Cover.
5
3
Finisher Top Cover
When optional Punch Unit is installed:
Align the mark with the Black Arrow as
illustrated below.
Black Arrow
Remove the misfed paper.
Mark
6
Staple Cover
Turn the Paper Transport Knob
clockwise.
Paper Transport Knob
72
Misfed Paper
Page 73

7
Remove the misfed paper.
Misfed Paper
Remove the misfed paper.
10
Misfed Paper
8
9
Close the Staple Cover.
Staple Cover
Open the Inner Cover.
11
12
Close the Inner Cover.
Inner Cover
Slide the Finisher back until it locks into
place.
Problem Solving
Inner Cover
73
Page 74

Removing Misfed Paper
Problem Solving
■■
■ ADF Section
■■
Open the ADF Cover, and then remove
1
2
the misfed paper.
Open the Inner Cover, and then remove
the misfed paper.
Misfed Paper
4
5
Remove the misfed paper.
Misfed Paper
Open the Exit Unit, and then remove
the misfed paper.
3
Misfed Paper
Lift the ADF Tray.
Exit Unit
Close the Exit Unit.
6
74
ADF Tray
Exit Unit
Page 75

7
Pull down the ADF Tray, and then close
the Inner Cover.
Close the ADF Cover.
10
8
ADF Tray
Open the ADF.
ADF Cover
9
Remove the misfed paper, and then
close the ADF.
Misfed Paper
Problem Solving
75
Page 76

Adding Paper <Printing Media>
Replacing Consumables
ATTENTION
● If you wish to change the preset paper size used in the Paper Tray, contact your authorized Panasonic dealer.
● Do not place the following types of printing media into the Paper Tray, use the Sheet Bypass instead.
Ex: Transparencies, Label, Envelope
● When changing the paper type (Plain, Glossy, or Recycled) in the Paper Tray, refer to General Settings (Key
Operator Mode) in the Operating Instructions (For Function Parameters) of provided CD-ROM.
● Fan the paper and straighten the stack when loading paper to avoid the double feeding or paper jam.
■■
■ Paper Tray
■■
Open the Paper Tray.
1
Fan and align papers together, and then load
2
the papers with printing side facing up.
Add Paper
Paper Tray
■■
■ Sheet Bypass
■■
Open and pull out the Sheet Bypass.
1
Sheet Bypass
Until it stops
3
Upper Limit Indicator
Paper Capacity : 550 sheets (20 lb)
Paper Weight : 18-45 lb (Bond Paper)
Close the Paper Tray.
Paper Tray
2
Load paper with printing side facing
down.
● Align papers together, and then place the
papers on the Sheet Bypass.
76
Page 77

ATTENTION
Sheet Bypass Capacity
● Weight : 15-40 lb (Bond Paper), 90-140 lb (Index Paper, Coated Paper)
● Size : 12" x 18" to 5.5" x 8.5" (Invoice)
● Paper Capacity : 100 sheets (8.5" x 11" / 20 lb)
● Suitable media : Plain Paper, Thin Paper, Glossy Paper, Recycled Paper, Thick Paper, Coated Paper, Index/Cover
Paper, Heavy Index Paper, Coated/Cover Paper, Heavy Coated Paper, Transparency, or Labels.
● For more details about media type, see page 98.
Adjust the Side Guides.
3
Side Guides
● Incorrect adjustment may cause the paper to
wrinkle, misfeed, or skew.
● If the paper size is not detected, remove the
paper and press the Reset key.
Then, load the Paper again.
● Ensure to change the media type selection
in the Control Panel when changing the
media loaded on the trays. (Ex: Select
“Transparency” when Transparencies are
loaded in the Sheet Bypass.)
If using other than plain paper, follow the steps below
to set the desired type of printing media.
Press the Copy key if the machine is
4
set to other function mode.
Select “Paper/Output Tray”.
5
6
7
8
Select “Change Size/Media”.
Select “Change Type”.
● “Auto” can detect the standard sizes of paper
(11" x 17", Legal, 8.5" x 11", 5.5" x 8.5"). When
selecting “Auto”, ensure that standard sizes
of paper are loaded in the trays before printing.
Select a printing media type, and then
select “OK”.
Select “OK”.Select the best suited
media type (see
page 98) to match
the one loaded in
step 3.
● Preprinted form is represented by a “ ”.
Replacing
Consumables
77
Page 78

Replacing Consumables
Replacing Toner Cartridge
!
WARNING
● Never dispose of toner, Toner Cartridge or a Toner Waste Container into an open flame. Toner remaining in the
cartridge can cause an explosion, burns and/or injuries. For disposal or recycling information, contact your local
authorities, or your local waste officials.
ATTENTION
● Be sure to use only genuine Panasonic Color Toner designed for this machine.
● When the display indicates that the toner is getting low, prepare the new Toner Bottle in advance.
● When the black toner runs out, all Copy/Print functions cease to operate.
● Even if one of the color toner runs out, monochrome copying/printing will be available.
1
Open the Front Cover.
Front Cover
● Make sure that the machine has stopped
before opening the Front Cover.
● The location of each color Toner Cartridge is
as shown below.
Yellow Magenta Cyan Black
3
4
Pull out the used Toner Cartridge.
Toner Cartridge
Shake the new Toner Cartridge to
loosen its contents.
New Toner
Cartridge
78
2
Gently turn the Toner Cartridge of the color
displayed on the Touch Panel Display
counterclockwise to the Unlock Mark.
Toner Cartridge
Unlock Mark
Shake it well
(10-15 times)
● Shake it up and down, and then turn the
bottom up and repeat.
Page 79

5
Gently peel the tape off in the direction
of the arrow.
7
Turn the new Toner Cartridge
clockwise gently until it stops.
6
Tape
● Do not open the Shutter, otherwise toner will
spill.
Insert the new Toner Cartridge all the
way in until it stops with the arrow label
pointing to the Unlock Mark.
Unlock Mark
New Toner Cartridge
New Toner
Cartridge
Lock Mark
Firmly close the Front Cover.
8
Front Cover
● If the Toner Cartridge is not turned to the
Lock Mark properly, you cannot close the
Front Cover.
Replacing
Consumables
79
Page 80

Replacing the OPC Drum Unit
Replacing Consumables
ATTENTION
● Replace the OPC Drum Unit of the color shown on the Touch Panel Display.
● Be sure to use only genuine Panasonic OPC Drum Unit designed for this machine.
● Do not scratch or touch the surface of the OPC Drum with bare hands.
● The OPC Drum Unit is sensitive to light. To prevent optical exposure problems, do not expose the OPC Drum Unit to
direct sunlight or bright light.
● Be careful not to soil your hands with the toner on the surface of the OPC Drum Unit.
1
Open the Front Cover.
4
Front Cover
● Make sure that the machine has stopped
printing before opening the Front Cover.
Unlock the OPC Drum Unit by turning the
Drum Release Knob counterclockwise.
Drum Release Knob
2
3
Remove the Toner Waste Container.
Toner Waste Container
● Exercise care not to incline the container, or
toner may spill.
Identify the location of the color OPC
Drum Unit requiring replacement.
Window
5
6
Pull the old OPC Drum Unit out of the
machine.
Old OPC Drum Unit
● Hold by the frame while pulling it out.
Open the box, and then pull the new
OPC Drum Unit out of the box. Remove
the plastic bag covering the new drum.
(It will be reused in step 12.)
80
Yellow Magenta Cyan Black
● When the windows are yellow, close all of the
doors and turn the Main Power Switch OFF
and ON again. After the machine completes
the warm-up routine, turn the Main Power
Switch OFF and confirm that the windows are
black prior to removing any drum.
New OPC Drum Unit
Page 81

ATTENTION
Do not remove the Drum Protective
Cover until step 8.
Drum Protective Cover
9
Carefully insert the new OPC Drum Unit
all the way in until it stops.
OPC Drum Unit
7
Do not touch or turn around the Gear
of OPC Drum Unit.
Gear
Align the Green Arrows of the new OPC
Drum Unit with the ones on the machine,
and then insert the OPC Drum Unit into
the machine up to the Black Arrow on
the Drum Protective Cover.
Green Arrows
10
11
Lock the new OPC Drum Unit by turning the
Drum Release Knob clockwise.
Paste one of the enclosed color labels matching
in color with the one on the replaced drum and
attach it to the same position on the new drum.
Drum Release Knob
Color Label
Insert the Toner Waste Container all
the way in until it stops.
Toner Waste Container
8
Black Arrows
Peel off the Orange Tape.
Remove the Drum Protective Cover.
Drum Protective Cover
12
● Exercise care not to incline the container, or
toner may spill.
Gently close the Front Cover.
Place the old OPC Drum Unit inside the
plastic bag and dispose of it according
to your local regulations.
Replacing
Consumables
81
Page 82

Replacing Toner Waste Container / Cleaning the LSU Aperture Glass
Replacing Consumables
Always clean the LSU Aperture Glass at the same time the Toner Waste Container is replaced.
ATTENTION
● Do not reuse toner from the Toner Waste Container.
● Do not use the Cleaner if it is dirty.
● When the toner adheres to the machine, wipe it off with a cloth.
1
Open the Front Cover.
4
Front Cover
Place the old Toner Waste Container
on top of the opened Front Cover.
Cover the old Toner Waste Container
with the plastic wrapping which was
removed in step 2.
2
3
Open the box and carefully unzip the
plastic bag. Pull the new Toner Waste
Container out of the box and remove
the plastic wrapping (it will be reused
in step 4) covering the new container.
Plastic Wrapping
Pull out the old Toner Waste Container
out of the machine.
Toner Waste Container (old)
5
Plastic Wrapping
Place the old Toner Waste Container
inside the box and zip the plastic bag
closed.
82
● Exercise care not to incline the container, or
toner may spill.
Close Plastic Bag
● For disposal or recycling information, contact
your local authorities or your local waste
officials.
Page 83

6
Remove the Cleaner from the inside of
the Front Cover.
8
Insert the Cleaner back inside the
Front Cover.
7
Cleaner
Clean the LSU Aperture Glass (4
Slots).
Slot
Cleaner
Insert the Cleaner (felt side down) into the
LSU Aperture Slot.
Correct
Cleaner
9
Cleaner
Insert the new Toner Waste Container
all the way in until it stops.
Toner Waste Container (new)
To the Slot
Incorrect
Insert and pull out the Cleaner several
times.
Clean the remaining 3 Slots in the same
manner as step
and .
Gently close the Front Cover.
10
Front Cover
Replacing
Consumables
83
Page 84

Replacing Staples (FQ-SS32)
Replacing Consumables
Replacing Staples
Staple Cartridge (FQ-SS32)
NOTE
● When a staple jams, an error message will be
displayed. Remove the jammed staple from the
Staple Cartridge as illustrated.
The Add Staples Indicator illuminates.
Jammed
Staple
1
Open the Stapler Cover.
Stapler Cover
Pull out the Staple Cartridge.
2
Staple Cartridge
84
Page 85

3
Replace the Staple Case with a new
one.
Select “More Menus”.
7
4
5
Staple Case
(Empty)
Insert the Staple Cartridge.
Staple Cartridge
Close the Stapler Cover.
Staple Case
(New)
8
● If the above screen is not displayed, press
the Copy key.
Select “Sort / Finish”, “Staple-Sort”,
and the Staple Position.
(See pages 36 to 37)
Select “Staple-Sort”.
6
Select “Sort / Finish”.
Press the Start key.
9
Stapler Cover
To check the stapling operation, place
original(s) on the ADF.
● Check the stapling operation.
Replacing
Consumables
Face up. Up to 100
sheets (20 lb/Letter)
85
Page 86

Replacing Staples (DQ-SS35)
Replacing Consumables
Replacing Staples
Staple Cartridge (DQ-SS35)
NOTE
● When a staple jams, an error message will be
displayed. Remove the jammed staple from the
Staple Cartridge as illustrated.
The Add Staples Indicator illuminates.
Jammed
Staple
Open the Staple Cover. Turn the Knob on the Stapler Unit
12
Staple Cover
clockwise until it stops.
Until it Stops
86
Page 87

3
4
Pull out the Stapler Unit.
Stapler Unit
Pull out the Staple Cartridge by pinching
the green buttons.
Staple Cartridge
Set the Staple Case (new).
6
Staple Case (new)
● Slide the new Staple Case into the Staple
Cartridge, and then push the cover to close.
5
Remove the tape.
7
Tape
Remove the Staple Case (empty).
Press both
sides.
Insert the Staple Cartridge.
8
Staple Cartridge
Staple Case
(empty)
● Press each side of the Cartridge, and then
remove the cover.
Replacing
Consumables
● Insert it all the way in until it locks.
Continued on the next page...
87
Page 88

Replacing Consumables
9
10
Insert the Stapler Unit until it locks.
Stapler Unit
Until it Locks
Close the Staple Cover.
Staple Cover
11
To check the stapling operation, place
originals on the ADF and select “More
Menus”.
Face up. Up to 100
sheets (20 lb/Letter)
12
13
● If the above screen is not displayed, press
the Copy key.
Select “Sort / Finish”, “Staple-Sort”,
and the Staple Position.
(See pages 36 to 37)
Select “Staple-Sort”.
Select “Sort / Finish”.
Press the Start key.
● Check the stapling
operation.
88
Page 89

memo:
89
Replacing
Consumables
Page 90

Disposal of the Punch Hole Residue
Replacing Consumables
Disposal of the Punch Hole Residue (1Bin Saddle-Stitch Finisher)
When the Container becomes full with punch hole residue, an error message is displayed.
Slide the Finisher to the left.
1
Release Button
● Push the Release Button to free the
Finisher from the machine.
Pull out the Punch Hole Residue
2
Container (full).
4
5
Insert the Punch Hole Residue
Container (empty).
Punch Hole Residue Container
(empty)
Slide the Finisher back until it locks
into place.
3
Punch Hole Residue Container (full)
Empty out the Punch Hole Residue
Container.
90
Page 91

memo:
91
Replacing
Consumables
Page 92

Replacing the Battery
Replacing Consumables
Replacing the Battery
The machine has an internal battery (Product No.: CR2032) which maintains the date and time settings.
When the battery requires replacement, the “Status” button changes from gray to yellow.
If the status indicates “Replace Battery”, replace it by following the procedures below.
The service life of the battery is approximately 1 year under normal use.
Replace Battery
!
CAUTION
● THIS PRODUCT CONTAINS A LITHIUM BATTERY. REPLACE ONLY WITH THE SAME OR EQUIVALENT TYPE.
IMPROPER USE OR REPLACEMENT MAY CAUSE OVERHEATING, RUPTURE OR EXPLOSION RESULTING IN
INJURY OR FIRE. DISPOSE OF USED BATTERIES ACCORDING TO THE INSTRUCTIONS OF YOUR LOCAL
SOLID WASTE OFFICIALS AND LOCAL REGULATIONS.
● Be sure to use the specified type of battery only.
● Ensure that the battery is installed with correct polarity.
■■
■ Notice: California only:
■■
This product contains a CR Coin Cell Lithium Battery which contains Perchlorate Material special handling may apply.
See www.dtsc.ca.gov/hazardouswaste/perchlorate
Remove the screw with a screwdriver.
1
Control Panel
2
Screw
Pull out the Battery Holder.
Battery Holder
92
● To facilitate removing the screw, adjust
the viewing angle of the Control Panel
to the normal position. (See page 3)
Page 93

3
Turn the Battery Holder upside down.
6
Turn the Battery Holder upside down,
and then insert it into the machine.
Battery Holder
4
5
Remove the old battery.
Old Battery
Insert the new battery into the holder.
New Battery
Fasten it with the screw.
7
Screw
● The “+” side of battery should be facing
upwards.
● Replace only with the same or equivalent
type of battery.
Replacing
Consumables
93
Page 94

Specifications
Appendix
Main Unit
Type:
Platen Type:
Acceptable Originals:
Copying Method:
Fusing Method:
Imaging Method:
Resolution:
Operation Panel:
Copy Size:
Warm Up Time:
(68°F / 20°C, from the Power
Save/Sleep mode)
First Copy Time:
(A4 / 8.5" x 11",
from Paper Tray 1)
Multi-Copy Speed:
(A4 / 8.5" x 11",
from Paper Tray 1)
(ppm = Pages per minute)
Semi Console Type
Fixed
Sheets, Books (Max. A3 / 11" x 17")
Laser Indirect Electrostatic
Induction Heating System
Dry-Type Dual Component Trickle
Max. 600 dpi
7.8" Full Color Touch Panel LCD
Paper Tray : A3 - A5 / 11" x 17" to 5.5" x 8.5"
Sheet Bypass : A3 - A5 / 12" x 18" to 5.5" x 8.5"
Approx. 15 seconds
(When an optional equipment is installed, the time will rise.)
Color : Less than 10.3 seconds
B & W : Less than 6.2 seconds (DP-C405)
Less than 6.7 seconds (DP-C305)
Less than 7.3 seconds (DP-C265)
Color : Up to 30 ppm (DP-C405/C305)
Up to 26 ppm (DP-C265)
B & W : Up to 40 ppm (DP-C405) / Up to 30 ppm (DP-C305)
Up to 26 ppm (DP-C265)
Enlargement Ratios:
Reduction Ratios:
Paper Feed:
Paper Weight:
Quantity Selector:
Inner Tray Output Capacity:
SD Card Slot:
PCMCIA/PC Card Slot:
Electrical Requirement:
Power Consumption:
Preset : 121%, 129%, 155%, 200%
Variable : From 101 to 400% in 1% increments
Preset : 79%, 77%, 65%, 61%, 50%
Variable : From 99 to 25% in 1% decrements
Standard Paper Tray : (550 sheets x 2) + Sheet Bypass (100 Sheets)
Optional Paper Tray : (550 sheets x 2)
Paper Tray : 64-169 g/m
Sheet Bypass : 55-150 g/m
170-256 g/m
Duplex : 64-105 g/m2 / 18-28 lb (Bond Paper)
Max. 999 sheets
Max. 250 sheets (75 g/m
With Optional Finisher, or Exit Tray : Max. 150 sheets (75 g/m
● The capacity changes according to the paper type being used. When the
paper on the inner tray exceeds the capacity, the machine stops and
displays an error message. (See page 62)
Use only a genuine SD / SDHC Memory Card (up to 4GB).
Use only Type II, PCMCIA/PC Card Adapters intended for 3.3 V operating
voltage.
AC 120 V, 60 Hz, 12 A
Less than 1.44 kW
2
/ 18-45 lb (Bond Paper)
2
/ 15-40 lb (Bond Paper),
2
/ 90-140 lb (Index / Coated Paper)
2
/ 20 lb)
2
/ 20 lb)
94
Dimensions (W x D x H):
Mass (Weight):
664 mm x 825 mm x 933 mm (26.1" x 32.5" x 36.7")
Scanner : 39 kg (85.8 lb)
Engine : 125 kg (275 lb)
Page 95

ADF (Standard)
Tray Capacity: Letter : Max. 100 sheets (75 g/m2 / 20 lb)
Invoice/Legal/Ledger : Max. 70 sheets (75 g/m2 / 20 lb)
Original Size: A3, B4, 8" x 13", 8.5" x 13", A4, A4-R, A5, A5-R , FLS (8" x 13",13" x 8")
Paper Weight: 1 sided : 50-105 g/m
Electrical Requirements: Supplied from the machine
5.5" x 8.5" (Invoice), 5.5" x 8.5"(Invoice-R), 8.5" x 11" (Letter),
8.5" x 11" (Letter-R), 8.5" x 14" (Legal), 11" x 17" (Ledger)
2
2 sided : 64-105 g/m2 (18-28 lb)
(14-28 lb)
PCL Printer Unit (Standard)
Printing Speed: Color : Up to 30 sheets/minute (DP-C405/C305)
(Plain paper, from Paper Tray 1) Up to 26 sheets/minute (DP-C265)
B & W : Up to 40 sheets/minute (DP-C405)
Up to 30 sheets/minute (DP-C305)
Up to 26 sheets/minute (DP-C265)
Resolution (dots per inch): Max. 1200 x 1200 dpi
Interface: USB 2.0, Ethernet (10Base-T/100Base-TX)
Applicable OS: Windows 2000*1, XP*2, Server 2003*3, Vista*
4
Network Scanner (Standard)
Scanning type: Three Line Color CCD Image Sensor (ADF/Platen Glass)
Resolution (dpi): 200 x 200, 300 x 300, 400 x 400, 600 x 600
Max Scanning Area: 11" x 17" (Ledger)
Scanning Mode: Text, Text/Photo, Photo
Tone Scale: 256 step for each color
Compression Format: MH, MR, MMR, JBIG, JPEG
File Format: TIFF, JPEG, PDF, Compressed PDF
Send to: PC/FTP (Single Address only), SD Memory Card, PCMCIA/PC Card,
Pop up Notification: Ye s
Protocol: LPR, TCP/IP, FTP
Applicable OS: Windows 2000*1, XP*2, Server 2003*3, Vista*
Hard Disk Drive, Email
4
Email / Internet Fax (Standard)
Standard Compliance: 10 Base-T Ethernet (IEEE 802.3), 100 Base-TX Fast Ethernet (IEEE 802.3u)
Connector Interfaces: 10/100 Base-TX port: RJ-45
Compatibility: IETF RFC3965, ITU-T T.37
Communication Protocol: TCP/IP, SMTP, POP3, MIME
File Format: TIFF [IETF RFC3949 Profile S, F, J]
PDF (Transmission only)
Email Receiving Width: Max. A3 / 11" x 17" (Ledger)
*1 Microsoft® Windows® 2000 operating system *2 Microsoft® Windows® XP operating system
3
Microsoft® Windows Server® 2003 operating system *4 Microsoft® Windows Vista® operating system
*
The specifications are subject to change without notice. Panasonic Communications Co., Ltd. reserves the right to
make improvements in the product design without reservation and without notice.
95
Appendix
Page 96

Specifications
Appendix
3rd/4th Paper Tray (Option)
Paper Size: A3, B4, A4, A4-R, A5-R, FLS1, FLS2
Paper Weight: 64-105 g/m2 / 18-28 lb (Bond Paper)
Paper Capacity: DA-DS320 : 550 sheets x 1
Electrical Requirements: Supplied from the machine
Dimensions (W x D x H): 600 mm x 750 mm x 291 mm (23.6" x 29.5" x 11.5")
Mass (Weight): DA-DS320 : 26.5 kg (58.3 lb)
5.5" x 8.5" (Invoice-R), 8.5" x 11" (Letter), 8.5" x 11" (Letter-R),
8.5" x 14" (Legal), 11" x 17" (Ledger)
DA-DS321 : 550 sheets x 2
DA-DS321 : 27.4 kg (60.4 lb)
G3 Facsimile (Option)
Compatibility: ITU-T Group 3
Coding Scheme: JBIG, MH, MR, MMR (Conforms to ITU-T Recommendations)
Modem Type: ITU-T V.34, V.17, V.29, and V.27 ter
Modem Speed: 33600-2400 bps
Document Size: A5 - A3 / 5.5" x 8.5" - 11" x 17"
Max : Platen Glass : A3 / 11" x 17"
ADF : A3 / 11" x 17" (Ledger)
Min : Platen Glass : No Minimum
ADF : A5 / 5.5" x 8.5" (Invoice)
Scanning Method: Sheet Feeding with CCD type image sensor
Effective Scanning Width: 274 mm (10.8")
Scanner Resolution: Horizontal
: 8 pels/mm (203 pels/inch) : Standard and Fine Resolution
: 16 pels/mm (406 pels/inch) : 400 dpi as Super Fine Resolution
: 600 dpi : 600 dpi as Super Fine Resolution
Vertical
: 3.85 lines/mm (98 lines/inch) : Standard Resolution
: 7.7 lines/mm (196 lines/inch) : Fine Resolution
: 15.4 lines/mm (391 lines/inch): 400 dpi as Super Fine Resolution
: 600 dpi : 600 dpi as Super Fine Resolution
Address Book Memory 200 stations
Capacity: (Additional 800 stations can be registered by the service setting. Contact your
authorized Panasonic dealer.)
NOTE
Each station can register up to 36 digits for each telephone number (including
pauses and spaces) and up to 15 characters for each station name.
Image Memory Capacity: Standard : 3 MB
FCC Registration Number: US : ACJFA02BDP-C322
Ringer Equivalence: 0.2 B
96
The specifications are subject to change without notice. Panasonic Communications Co., Ltd. reserves the right to
make improvements in the product design without reservation and without notice.
Page 97

1Bin Finisher (Option)
Paper Size: A4, B4, A3 / 8.5" x 11", 8.5" x 14" (Legal), 11" x 17"
Paper Weight: 17-24 lb
Stacking Capacity: A4 / 8.5" x 11" : 500 sheets
B4, A3 / 8.5" x 14" (Legal), 11" x 17" : 250 sheets
Staple Sort: A4 / 8.5" x 11" : 30 sheets
B4, A3 / 8.5" x 14" (Legal), 11" x 17" : 20 sheets
Electrical Requirements: Supplied from the machine
Dimensions (W x D x H): 182 mm x 498 mm x 257 mm (7.1" x 19.7" x 10.1")
Mass (Weight): 10.6 kg (23.4 lb)
1Bin Saddle-Stitch Finisher (Option)
Mode: Bin Non-sort, Sort, Staple
Tra y Saddle-Stitch
Paper Size: Bin Europe : A3, B4, A4, A4-R, A5-R, FLS1, FLS2
Tra y A3, B4, A4-R / 11" x 17" (Ledger), 8.5" x 11" (Letter-R)
Paper Weight: Non-sort mode : 64-220 g/m2 (Bond : 17-40 lb, Index : 90-121 lb)
Paper Capacity: Bin Maximum (1-Sided Copy): 1000 sheets (A5, A4 / 5.5" x 8.5", 8.5" x 11")
North America : 8.5" x 11" (Letter), 8.5" x 11" (Letter-R), 5.5" x 8.5" (Invoice),
To avoid the paper from falling out of the bin due to paper curl while copying
●
in the Duplex mode, empty the bin when the stack of paper reaches about
halfway of the maximum paper capacity.
8.5" x 14" (Legal), 11" x 17" (Ledger)
500 sheets (B4, FLS1, FLS2, A3 / Legal, 11" x 17")
30 sets (Stapling mode)
Tray Maximum: 20 sets
Staple: Paper Size Europe : A3, B4, A4, A4-R, FLS1, FLS2
Paper Weight 64-90 g/m2 (18-24 lb)
Capacity A4 (75 g/m
Point Rear 1, Front 1, Middle 2-Point Staple
Saddle-Stitch: Paper Size A3, B4, A4-R / 11" x 17" (Ledger), 8.5" x 14" (Legal), 8.5" x 11" (Letter-R)
Paper Weight 64-90 g/m2 (18-24 lb)
Stack 11-15 sheets : 10 sets* / 6-10 sheets : 10 sets / 2-5 sheets : 20 sets
Electrical Requirements: Supplied from the machine
Dimensions (W x D x H): 661 mm x 603 mm x 464 mm (24.0" x 23.7" x 18.3")
Mass (Weight): 37 kg (81.4 lb)
North America : 8.5" x 11" (Letter), 8.5" x 11" (Letter-R),
A3 (75 g/m2) / 11" x 17" (20 lb) : 2-25 sheets
* 64 g/m2 (17 lb)
8.5" x 14" (Legal), 11" x 17" (Ledger)
2
) / 8.5" x 11" (20 lb) : 2-50 sheets
Punch Unit (Option)
Paper Size: 3-hole : 8.5" x 11", 11" x 17"
2-hole : 8.5" x 11" (Letter-R), 8.5" x 14" (Legal)
Paper Weight:
Applicable Models: 1Bin Saddle-Stitch Finisher
64-200 g/m
2
(18-53 lb) (Bond : 18-40 lb, Index : 90-110 lb)
The specifications are subject to change without notice. Panasonic Communications Co., Ltd. reserves the right to
make improvements in the product design without reservation and without notice.
97
Appendix
Page 98

Specifications
Appendix
Paper Type
● Do not use the following type/flawed paper to avoid image quality related problems, mechanical
failures or misfeeding problems.
Consult with an authorized Panasonic dealer for advice regarding non-standard paper types.
Tracing paper, Pressure-sensitive paper, Transparency with white border,
Special paper for ink-jet printer, Thermal recording paper, Thermal transfer paper, Photo paper,
Light paper (up to 55 g/m2, 15 lb), Curled paper, Adhesive paper/envelope, Wet paper/envelope,
Textured paper, Stapled paper, Copied/Printed paper produced by another machine.
● For good copy/print quality, it is recommended that Hammermill* Laser Print (90 g/m2, 24 lb) is used.
(For more details, please contact the store where you purchased the machine, or your authorized
Panasonic dealer.)
* Hammermill is a registered trademark of International Paper Company in the United States and other countries.
● Commercial papers described below are acceptable, however, the standard paper Hammermill
Laser Print, etc is recommended for optimum copy quality and performance of the machine.
Paper Type Paper Weight Tray 1 - 4 Sheet Bypass 2-Sided Copy/Print
Thin 55-63 g/m2 / 15-16 lb Not Compatible Compatible Not Compatible
Plain 64-105 g/m2 / 18-28 lb Compatible Compatible Compatible
Glossy 64-105 g/m2 / 18-28 lb Compatible Compatible Compatible
Recycled 64-105 g/m2 / 18-28 lb Compatible Compatible Compatible
*1
Thick
*1
Coated
Index / Cover*1170-220 g/m2 / 90-121 lb (Index) Not Compatible Compatible Compatible
Heavy Index*1221-256 g/m2 / 122-140 lb (Index) Not Compatible Compatible Compatible
Coated/Cover*1170-220 g/m2 / 63-81 lb (Cover) Not Compatible Compatible Not Compatible
Heavy Coated*1221-256 g/m2 / 82-94 lb (Cover) Not Compatible Compatible Not Compatible
*1
Fan the paper before loading. If you are having feeding problems with Thick, Heavy Coated
paper, set one sheet at the time for each operation.
*2
Special Purpose Paper
Special
*2
106-169 g/m2 / 29-45 lb Compatible Compatible Compatible
106-169 g/m2 / 29-45 lb Not Compatible Compatible Not Compatible
Not Compatible Compatible Not Compatible
Labels : FP-111L
Envelopes : Commercial #10 (241.3 mm x 104.8 mm), Monarch 7 3/4 (190.5 mm x 98.4 mm),
DL (220 mm x 110 mm), C5 (229 mm x 162 mm)
Transparency : CG3700 3M
● The following paper type limitations correspond to the tray used.
Paper Type Inner Tray Outer Tray DA-FS402 DA-FS405
Index / Cover Compatible Compatible Not Compatible Non-Sort only
Heavy Index Compatible Compatible Not Compatible Non-Sort only
Coated Compatible Compatible Not Compatible Non-Sort only
Heavy Coated Compatible Compatible Not Compatible Non-Sort only
Labels Compatible Compatible Not Compatible Non-Sort only
Envelopes Compatible Compatible Not Compatible Not Compatible
Transparency Compatible Compatible Non-Sort only Non-Sort only
98
● Load the paper with the printing side face down in a portrait orientation.
Envelope
(Only for printing)
Face down.
Flap to the right.
OHP film / Labels
Face down.
or
Sheet Bypass Sheet Bypass
• Certain types of envelopes may get wrinkled.
● Ensure to change the media type selection in the Control Panel when changing the media loaded
on the trays. (Ex: Select “Transparency” when Transparencies are loaded in the Sheet Bypass.)
Page 99

Option and Supplies
Part Name Part No. Remarks
System Console 1 DA-DS320 3rd Paper Tray (550 sheets x 1)
System Console 2 DA-DS321 3rd and 4th Paper Trays (550 sheets x 2)
Stand for 2-tray Configuration DA1D322 For Main Unit
1Bin Saddle-Stitch Finisher DA-FS405 Optional Paper Transport Unit is required.
1Bin Finisher DA-FS402 Optional Paper Transport Unit is required.
Exit Tray (Outer) DA-XT320 Optional Paper Transport Unit is required.
Punch Unit DA-SP41 For 1Bin Saddle-Stitch Finisher
Paper Transport Unit DA-FK350
Fax Communication Board DA-FG320 G3 Fax Communication
Printer Controller Module DA-MC400 Printer Controller for Adobe® PostScript® 3
(for Adobe® PostScript® 3TM)
Data Security Kit DA-SC04
Page Memory (256 MB) DA-PMV56 For Printing with 1200 dpi
Accounting Software DA-WA10 For Accounting function
Document Distribution System (DDS)
DDS Un-Lock Module
DA-WR10 For Routing function
DA-UK10 For Document Distribution System (DDS)
Remote Operation Panel Software DA-UD320
SD Memory Card
—
Toner Cartridge (Black) DQ-TUW28K Approx. 28,000 pages (8.5" x 11" size, 5% coverage)
DQ-TUV28K Approx. 28,000 pages (8.5" x 11" size, 5% coverage)
DQ-TUW05K
DQ-TUV05K
*2
Toner Cartridge (Cyan) DQ-TUV20C Approx. 20,000 pages (8.5" x 11" size, 5% coverage)
DQ-TUV05C
Toner Cartridge (Magenta) DQ-TUV20M Approx. 20,000 pages (8.5" x 11" size, 5% coverage)
DQ-TUV05M
Toner Cartridge (Yellow) DQ-TUV20Y Approx. 20,000 pages (8.5" x 11" size, 5% coverage)
DQ-TUV05Y
OPC Drum Unit (Color) DQ-UHS30 OPC Drum (Cyan, Magenta, Yellow)
OPC Drum Unit (Black) DQ-UHS36K OPC Drum (Black)
Toner Waste Container DQ-BFN45 Toner Waste Container
Staple DQ-SS35 —
(for 1Bin Saddle-Stitch Finisher)
Staple (for 1Bin Finisher) FQ-SS32 —
Verification Stamp DZHT000027 X-Stamp for Fax Option
*1
: The yield of a Toner Cartridge varies depending on the coverage, temperature, humidity, media, etc. Therefore,
the average yield cannot be guaranteed.
*2
: Availability may differ as per destination. Please ask your sales company for detail.
(Optional System Console 1 or 2 is not installed)
For 1Bin Finisher, 1Bin Saddle-Stitch Finisher or Exit Tray
—
—
For Facsimile/Internet Fax Functions/For Scanner and
Email (Please contact your local authorized
Panasonic dealer for more details.)
(DP-C405)
(DP-C305/C265)
*2
Approx. 5,000 pages (8.5" x 11" size, 5% coverage)
(DP-C405)
Approx. 5,000 pages (8.5" x 11" size, 5% coverage)
(DP-C305/C265)
*2
Approx. 5,000 pages (8.5" x 11" size, 5% coverage)
*2
Approx. 5,000 pages (8.5" x 11" size, 5% coverage)
*2
Approx. 5,000 pages (8.5" x 11" size, 5% coverage)
TM
*1
*1
*1
*1
*1
*1
*1
*1
*1
*1
99
Appendix
Page 100

FCC Notice
Appendix
■■
■ For Users in USA
■■
!
WARNING
This equipment has been tested and found to comply with the limits for a Class A digital device, pursuant to Parts 15
and 18 of the FCC Rules. These limits are designed to provide reasonable protection against harmful interference
when the equipment is operated in a commercial environment. This equipment generates, uses, and can radiate
radio frequency energy, and if not installed and used in accordance with the Operating Guide, may cause harmful
interference to radio communications. However, Operation of this equipment in a residential area is likely to cause
harmful interference in which case the user will be required to correct the interference at his/her own expense.
Any unauthorized changes or modifications to this equipment would void the users authority to operate this device.
Warning: To assure continued compliance, use only USB shielded interface cable when connecting this product to
This device complies with Parts 15 and 18 of the FCC Rules. Operation is subject to the following two conditions:
(1) This device may not cause harmful interference and
(2) this device must accept any interference received, including interference that may cause undesired operation.
Responsible Party : Panasonic Corporation of North America
FCC Inquiries Only : Panasonic Communications Company of North America/Technical Support Department
Note: For Technical Support, please contact your Authorized Panasonic dealer.
This equipment complies with Part 68 of the FCC rules and the requirements adopted by the ACTA.
On the rear panel of this equipment is a label that contains, among other information, a product identifier in
the format US:AAAEQ##TXXXX. If requested, this number must be provided to the telephone company.
Ask your telephone company or installer to install the jack suitable for your device if such is not available.
A plug and jack used to connect this equipment to the premises wiring and telephone network must comply with the
applicable FCC Part 68 rules and requirements adopted by the ACTA. A compliant telephone cord and modular plug
is provided with this product. It is designed to be connected to a compatible modular jack that is also compliant. See
installation instructions for details.
The REN is used to determine the number of devices that may be connected to a telephone line. Excessive RENs
on a telephone line may result in the devices not ringing in response to an incoming call. In most but not all areas,
the sum of RENs should not exceed five (5.0). To be certain of the number of devices that may be connected to a
line, as determined by the total RENs, contact the local telephone company. The REN for this product is part of the
product identifier that has the format US:AAAEQ##TXXXX. The digits represented by ## are the REN without a
decimal point (e.g., 03 is a REN of 0.3).
If your telephone equipment causes harm to the telephone network, the Telephone Company may discontinue your
service temporarily. If possible, they will notify you in advance. But if advance notice isn’t practical, you will be
notified as soon as possible. You will be informed of your right to file a complaint with FCC.
host computer. Also, any changes or modifications not expressly approved by the party responsible for
compliance could void the user’s authority to operate this equipment.
One Panasonic Way, Secaucus, NJ 07094
Three Panasonic Way, Secaucus, NJ 07094
1-800-225-5329 (see Note below)
Email: consumerproducts@us.panasonic.com
100
 Loading...