

Operating Instructions
Digital Color Imaging Systems
Model No. DP-C323 / C263 / C213
Table of Contents
Installation Overview
General Installation Overview ........................2
Setting Your Machine
Network Configuration ...................................4
■ Setting up the Network Configuration ........4
Installation
■ Installing the Printer Driver and Application
Software ....................................................8
● System Requirements ........................... 8
● Software Setup Procedures ................... 8
● Installing the Printer Driver (Network Port
Connection), and the Panasonic
Document Management System ........... 9
●
To refer to ReadMe First or the Operating
Manuals on the provided CD-ROM ........
■ USB Port Connection
● Installing the Printer Driver for USB Port
Connection .......................................... 14
● Configure the Optional Device .............20
■ Fax Driver
● Installing the Fax Driver .......................22
13
(For Setting Up)
Model No. DP-C354 / C264
Setting up
■ Network Port Connection
● Configure the Shared Setting for the
Network Print Server. ........................... 25
Windows NT Server ............................ 25
Windows 2000 Server ......................... 27
Windows Server 2003 ......................... 29
● Setting up your Client PC .................... 31
■ Completion Notice Function
● Setting up the Completion Notice ........ 32
Setting up Optional Accessories
■ Network Scanner Settings (Option)
● Setting up the Scanner Configuration
using the Communications Utility ......... 33
■ Facsimile Settings (Option)
● Setting up the User Parameters...........34
■ Email/Internet Fax Settings
● Email/Internet Fax Settings
Procedure ............................................ 36
● Setting up the Network
Configuration .......................................36
Installation OverviewSetting Your Machine
Installation
Setting up
Before operating this machine, please carefully read this manual
and keep this documentation in a safe place for future reference.
(Illustration shows optional accessories that may not be installed on your machine.)
English
Setting up
Optional Accessories
General Installation Overview
Follow the guidelines in this booklet when setting up the machine and installing each software. Please read all
procedures completely before attempting to setup this machine.
1
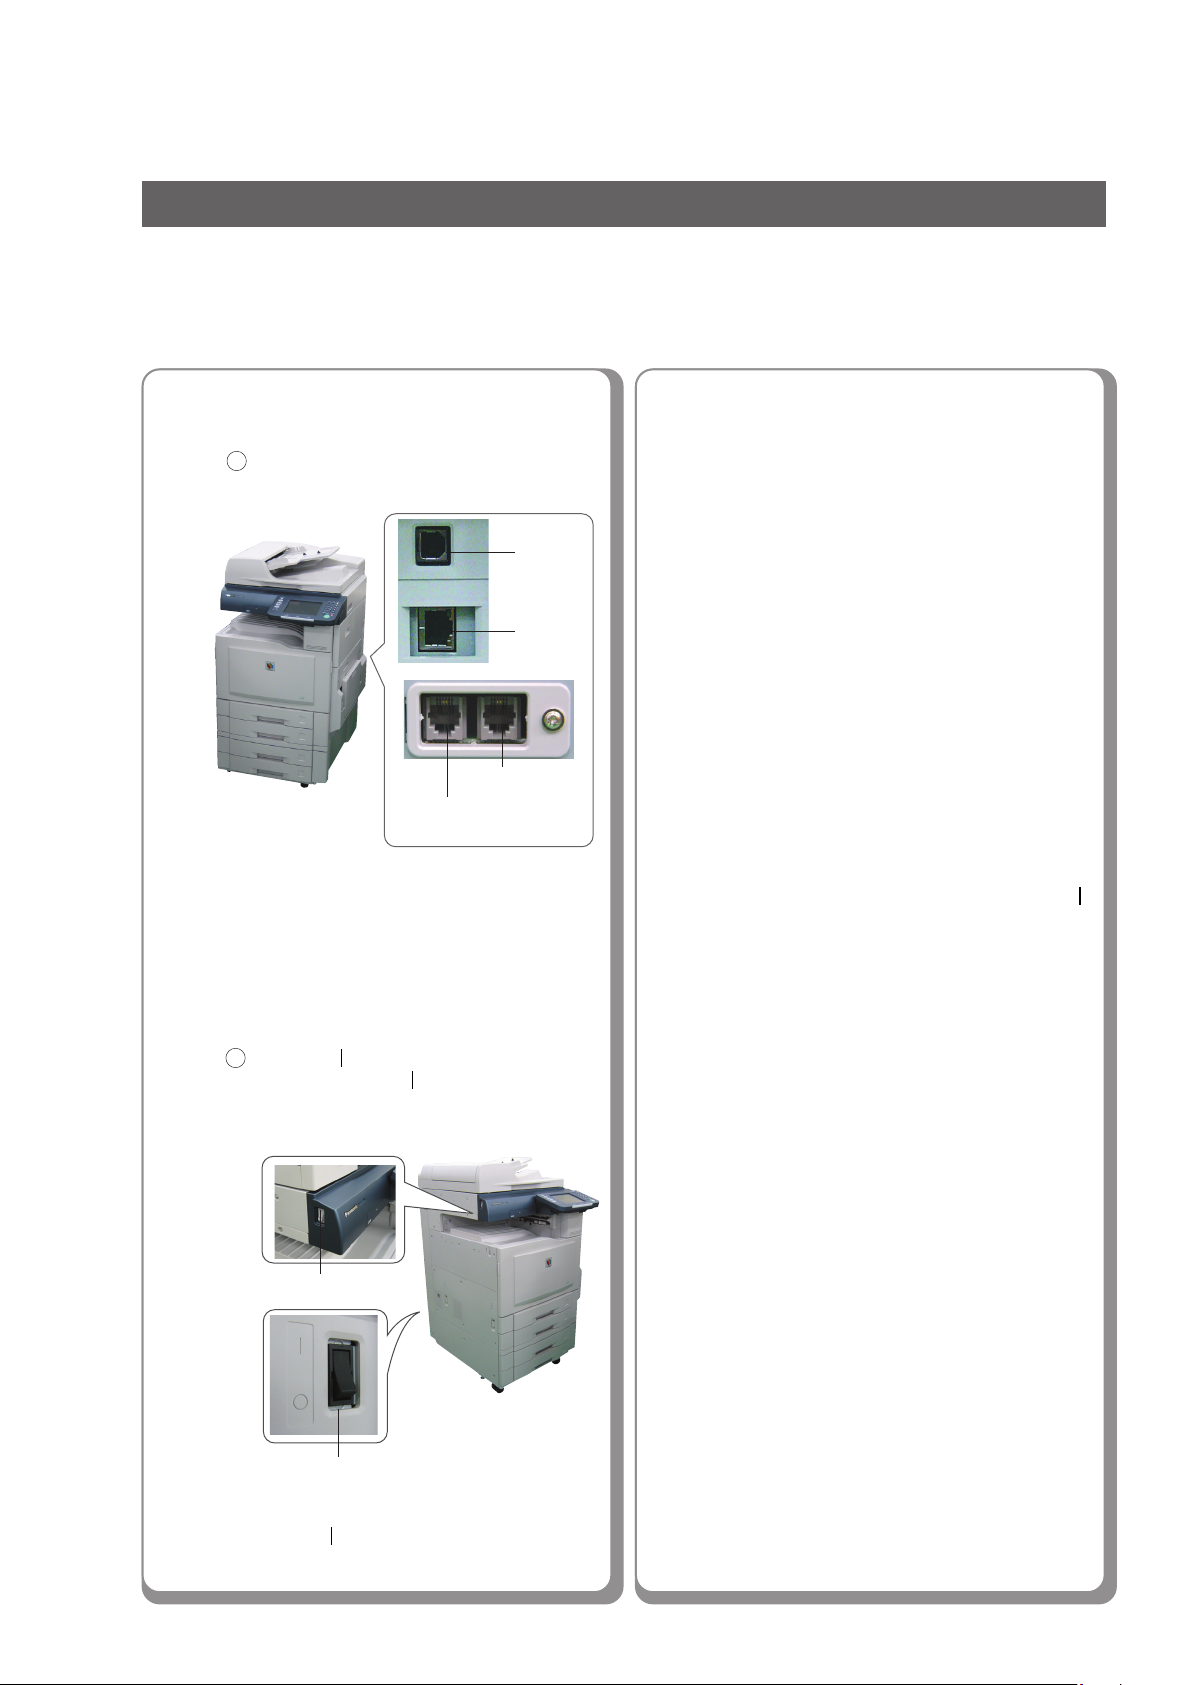
Turning the Power Switches ON.
Connect all Cables, and the Power Cord
1
to the machine.
USB
Cable
LAN
Cable
Telephone
External
Telephone Cable
● ●
● USB Cable is used for USB Port
● ●
connection.
Telephone Cable is used for connecting
the optional Fax Communication Board
(Order Number: DA-FG320 or DA-FN350)
to the telephone line.
Tu r n ON (
2
and then turn ON (
Main Power Switch : Rear of the machine.
Power Switch :
) the Main Power Switch first,
) the Power Switch.
Left side of the machine.
Line Cable
2
3
Setting up the Network Configuration.
Setup the Network Configuration using the
Control Panel of the machine. (See pages 4-7)
● ●
● Network Configuration should be setup by
● ●
the System Administrator.
Installation
■■
■ Installing the Printer Driver and
■■
Application Software
Applications selected from the Software
Selection screen will be automatically
installed. (See pages 8-13)
■■
■
Printer for USB Port Connection
■■
Installing the Printer Driver onto the USB
Port. (See pages 14-21)
●●
●
This machine is USB 2.0 compliant, and backward
●●
compatible with the standard USB revision 1.1.
●●
●
When connecting the USB Cable, do not turn the
●●
Power Switch of the machine to the ON (
position until instructed to do so on the PC screen.
●●
●
When connecting to the USB 2.0 port of your
●●
PC, use a USB 2.0 High Speed Cable for better
performance.
■■
■ Fax Driver
■■
Installing the Fax Driver on your PC.
(See pages 22-24)
Optional Fax Communication Board is
required. (Order Number: DA-FG320 or DAFN350)
)
2
Power Switch
Main Power Switch
●●
● When connecting the USB Cable, do not
●●
turn the Power Switch of the machine to
the ON ( ) position until instructed to do
so on the PC screen.
4
Setting up
■■
■ Configure the Shared Setting for
■■
the Network Print Server
Windows NT Server
Windows 2000 Server
Windows Server 2003
(See pages 25-30)
■■
■
Setting up your Client PC
■■
Connecting the Shared Printer on the
Network Print Server. (See page 31)
■■
■
Setting up the Completion Notice
■■
A Job Completion Notice will be displayed
on the PC screen when the Copy/Print
Job is completed. (See page 32)
5
NOTE
6
Setting up Optional Accessories.
■■
■ Network Scanner Function*
■■
Requires the installation of Network
Scanner/Email Module (Order Number:
DA-NS320/NS321), Hard Disk Drive Unit
(Order Number: DA-HD32), Main Memory
(Order Number: DA-EMN56) and Page
Memory (Order Number: DA-PMN56).
(See page 33)
■■
■ Facsimile Function
■■
Requires the installation of Fax
Communication Board (Order Number:
DA-FG320) or Fax Communication Board
with Internet Fax (Order Number:
DA-FN350). (See pages 34-35)
■■
■ Email Function
■■
Requires the installation of Network
Scanner/Email Module (Order Number:
DA-NS320/321 for DP-C323/C263/C213),
Hard Disk Drive Unit (Order Number:
DA-HD32 for DP-C323/C263/C213), Main
Memory (Order Number: DA-EMN56 for
DP-C323/C263/C213) and Page Memory
(Order Number: DA-PMN56).
(See pages 36-41)
■■
■ Internet Fax Function
■■
Requires the installation of Internet Fax
Module (Order Number: DA-NF320) or Fax
Communication Board with Internet Fax
(Order Number: DA-FN350). (See pages
36-41)
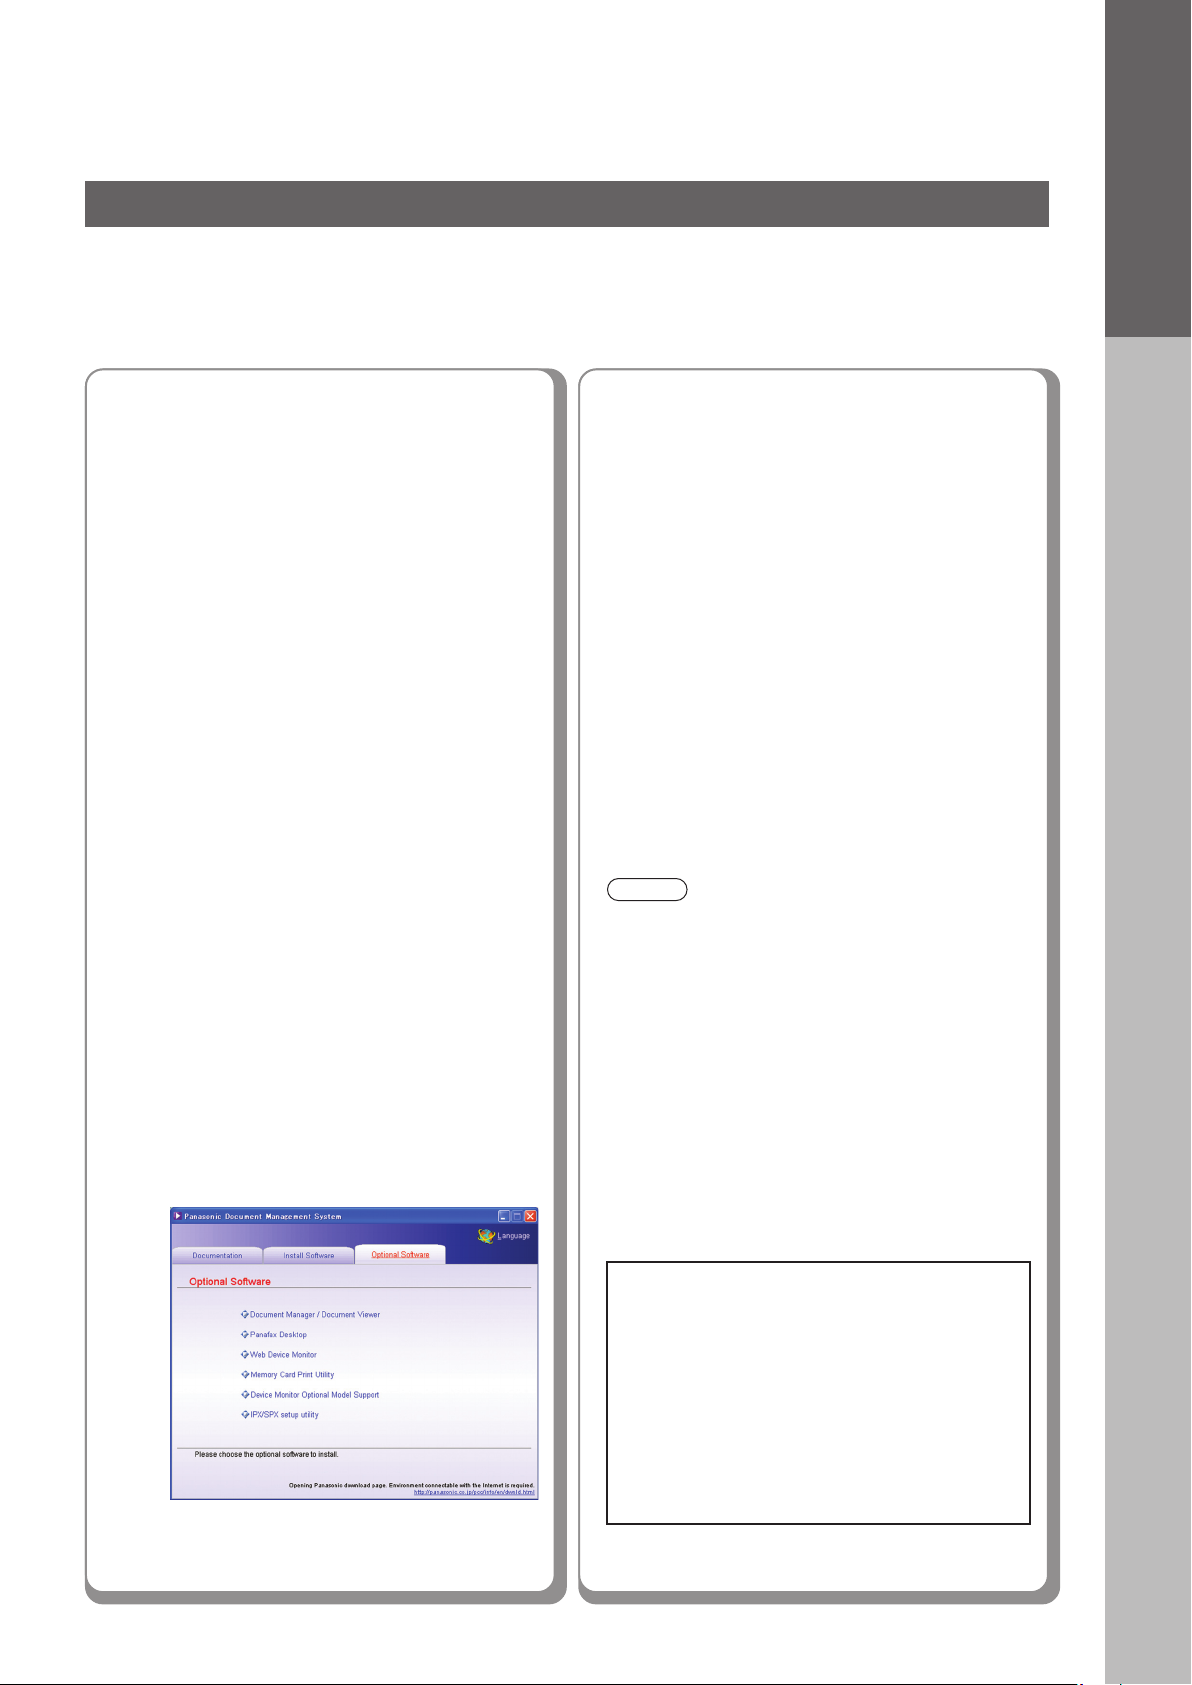
Installing Software downloaded
from the Panasonic Web site.
Panafax Desktop
●
This is the software to send / receive Fax from your
PC.
Web Device Monitor
●
By installing the Web Device Monitor, it is possible
to check the device information from a web
browser.
Memory Card Print Utility
●
When printing the desired file (Word, Power Point,
PDF) from the Memory Card (Excel file cannot be
printed).
Device Monitor Optional Model Support
●
When browsing the other Model’s Machine
Configuration with the Device Monitor.
IPX/SPX Setup Utility
●
When using the Printer on the Netware network
environment, the IPX/SPX software setup utility is
required.
* Network Scanner/Email Module, Hard Disk Drive
Unit, and Main Memory are standard for DP-C354/
C264.
● When using the Printer on the MacOS network
environment, the optional Printer Controller
Module (for Adobe® PostScript® 3™) (Order
Number: DA-MC350) is required.
● When there are two printer drivers installed (for
Windows Network Connection, and USB
Connection) for the same model, each printer driver
can be used normally.
The Printer Driver can be selected from the Printer
List of the Print Screen within the application software.
Installation Overview
Document Manager / Document Viewer
●
The software to view / edit the files
including the scanned data from the
Network Scanner.
Microsoft, Windows, Windows NT and Windows
Server are either registered trademarks or
trademarks of Microsoft Corporation in the United
States and/or other countries.
Microsoft product screen shot(s) reprinted with
permission from Microsoft Corporation.
Novell and NetWare are registered trademarks of
Novell, Inc. in the United States and other countries.
All other trademarks are the property of their
respective owners.
3
Network Configuration
Setting up the Network Configuration
Follow the procedure below if your network is not configured with the DHCP server, and the TCP/IP parameters must be
setup manually.
- IP Address
- Subnet Mask
- Default Gateway
- DNS Server
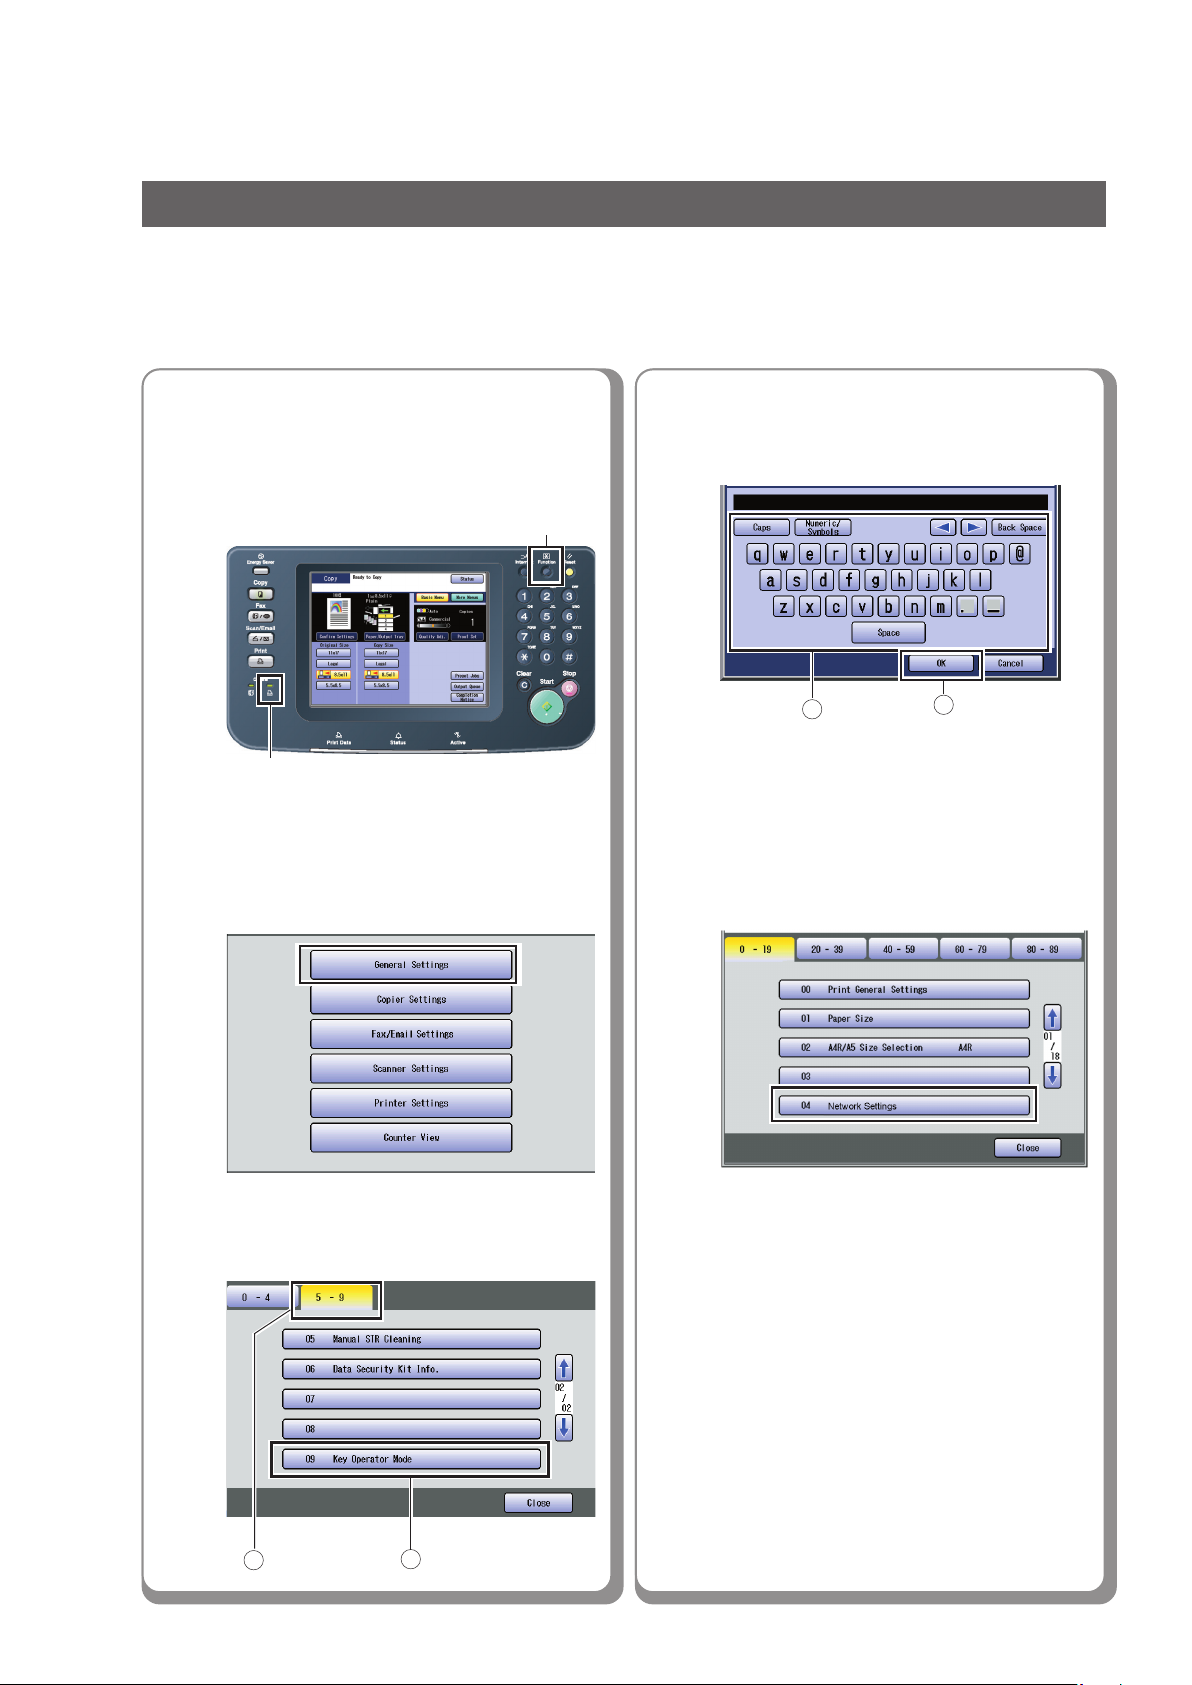
Before executing the procedures
described below, make sure the Print
On Line LED is lit.
Press the Function key.
1
Print On Line LED
● Please wait until the Print On Line LED is
ON before pressing the Function key.
Select "General Settings".
Function key
2
4
5
Enter the Key Operator's Password
(8 digits), and then select "OK".
1
● Default password is "00000000".
To change this password, open "85 Key
Operator Password" in the General
Setting (For Key Operator), and then reenter the new password.
Select "04 Network Settings".
2
4
3
Select "09 Key Operator Mode".
1
2
6
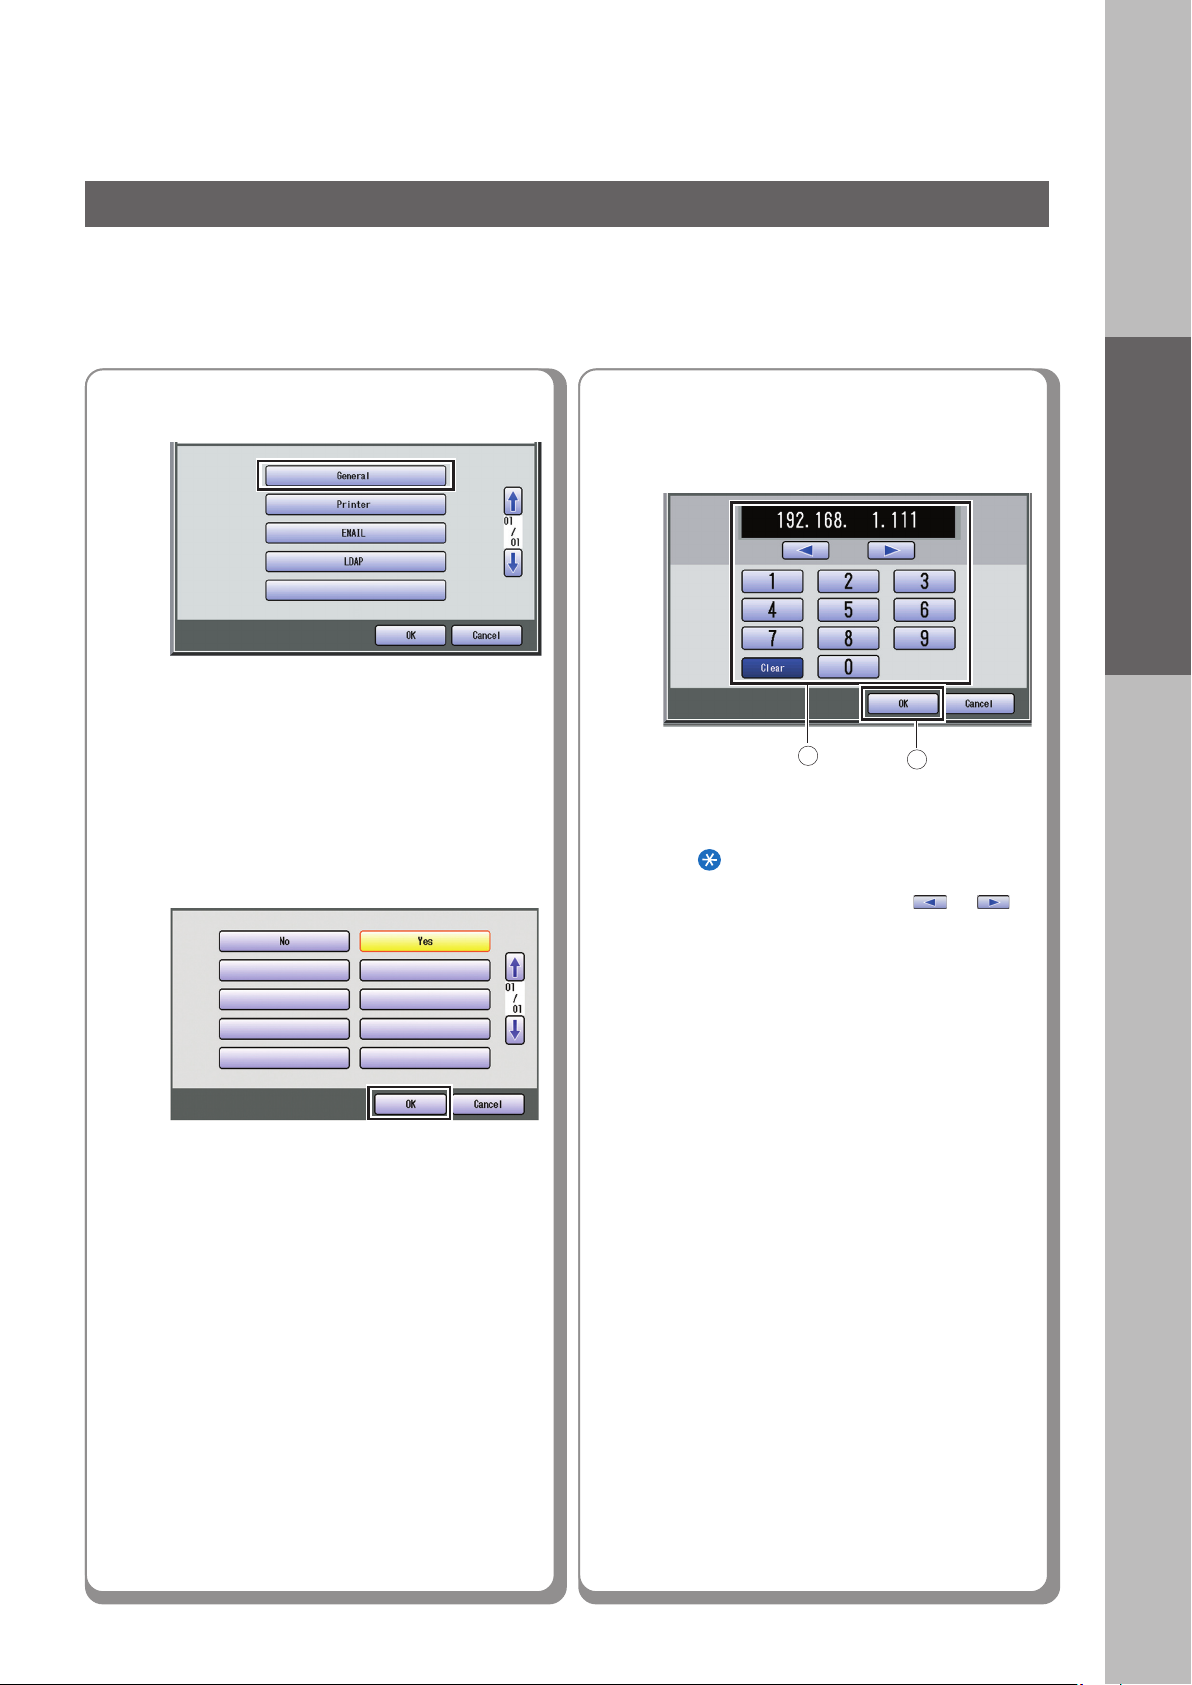
Select "General".
8
Enter the IP Address, and then
select "OK".
Ex: 192.168.1.111
Setting Your Machine
7
If DHCP Default is set to "Yes",
change the setting to "No", and
then select "OK".
1
● When entering a 1 or 2-digit number segment,
add "00" or "0" in front of the number to scroll
to the next segment of numbers, or press the
" key on the Control Panel to enter a
"
period after the number.
● To correct a mistake, press or to
move the cursor to the right side of the
incorrect address.
To delete, press "Clear", and re-enter the
correct address.
2
Continue on the next page...
5
Network Configuration
Setting up the Network Configuration
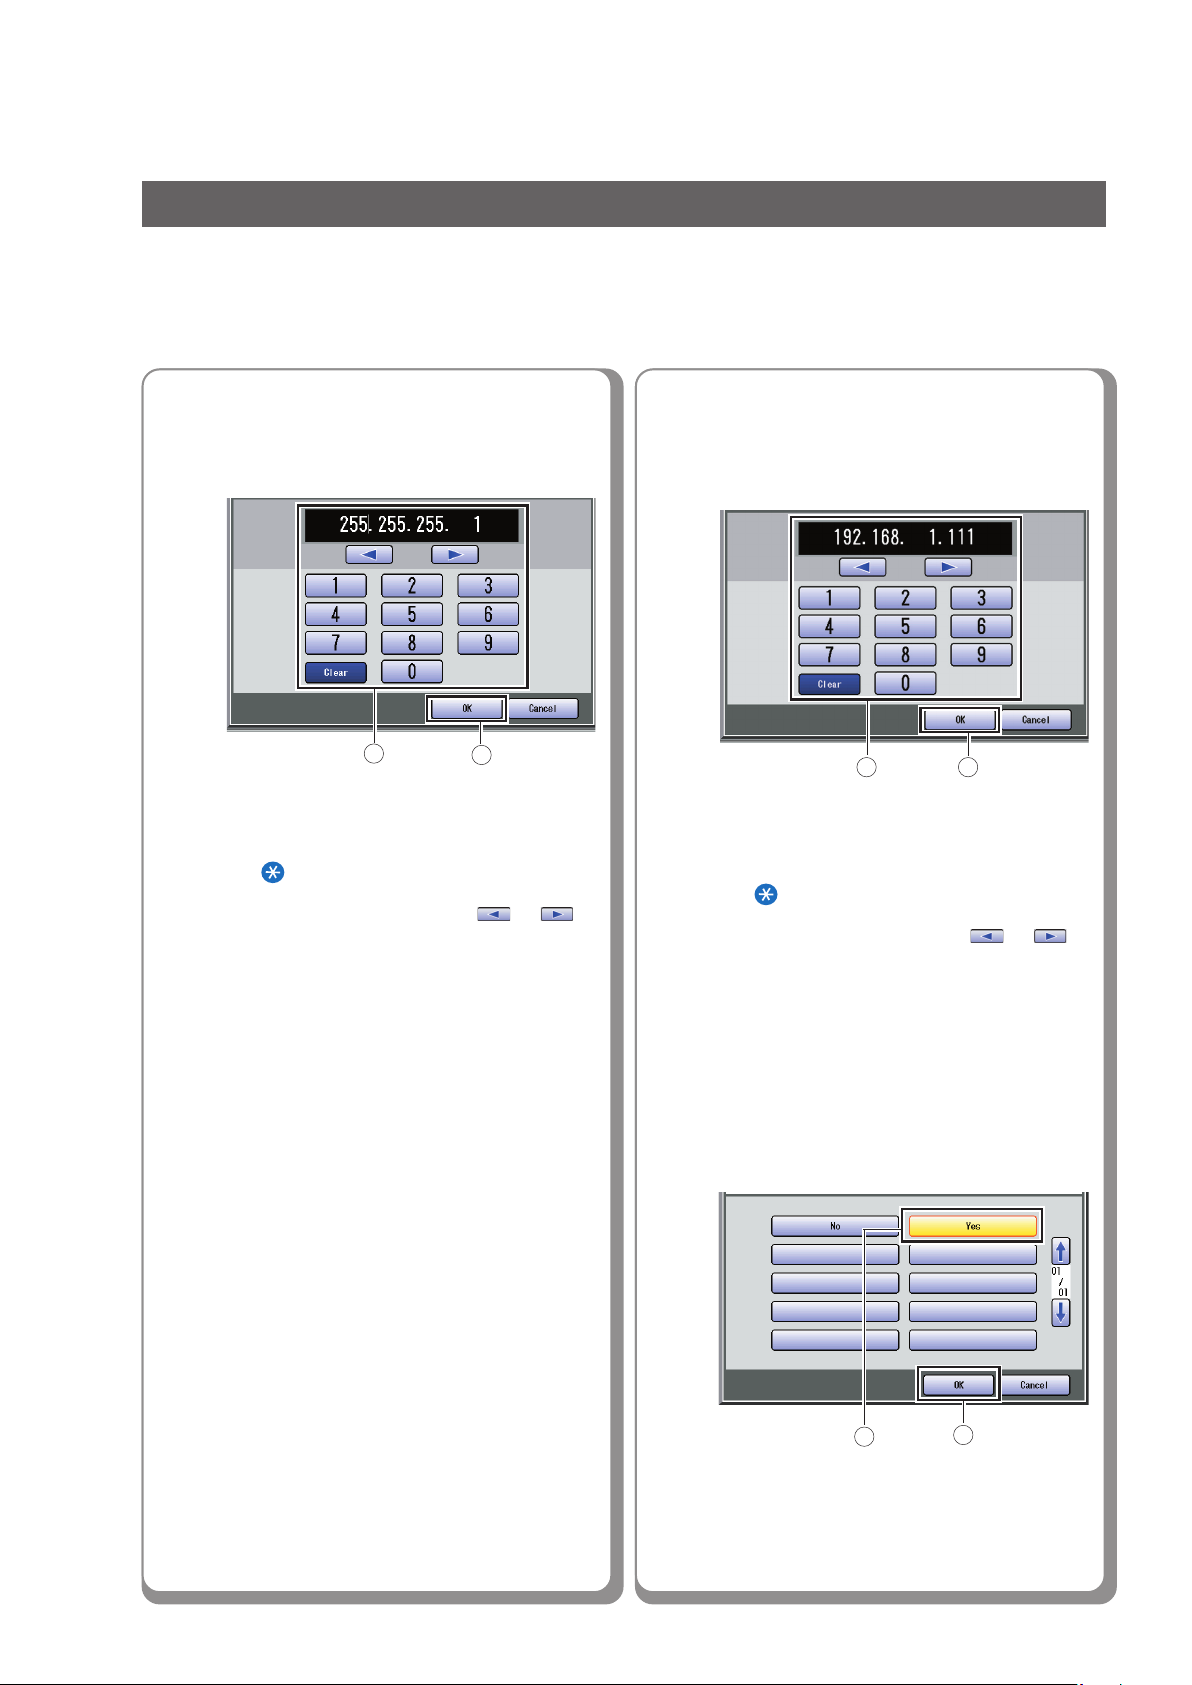
9
Enter the Subnet Mask, and then
select "OK".
Ex: 255.255.255.1
1
● When entering a 1 or 2-digit number segment,
add "00" or "0" in front of the number to scroll
to the next segment of numbers, or press the
" key on the Control Panel to enter a
"
period after the number.
● To correct a mistake, press or to
move the cursor to the right side of the
incorrect address.
To delete, press "Clear", and re-enter the
correct address.
2
10
Enter the Gateway Address, and
then select "OK".
Ex: 192.168.1.111
1 2
● When entering a 1 or 2-digit number segment,
add "00" or "0" in front of the number to scroll
to the next segment of numbers, or press the
" key on the Control Panel to enter a
"
period after the number.
● To correct a mistake, press or to
move the cursor to the right side of the
incorrect address.
To delete, press "Clear", and re-enter the
correct address.
6
11
Select "Yes" to use DNS Server,
and then select "OK".
1
2
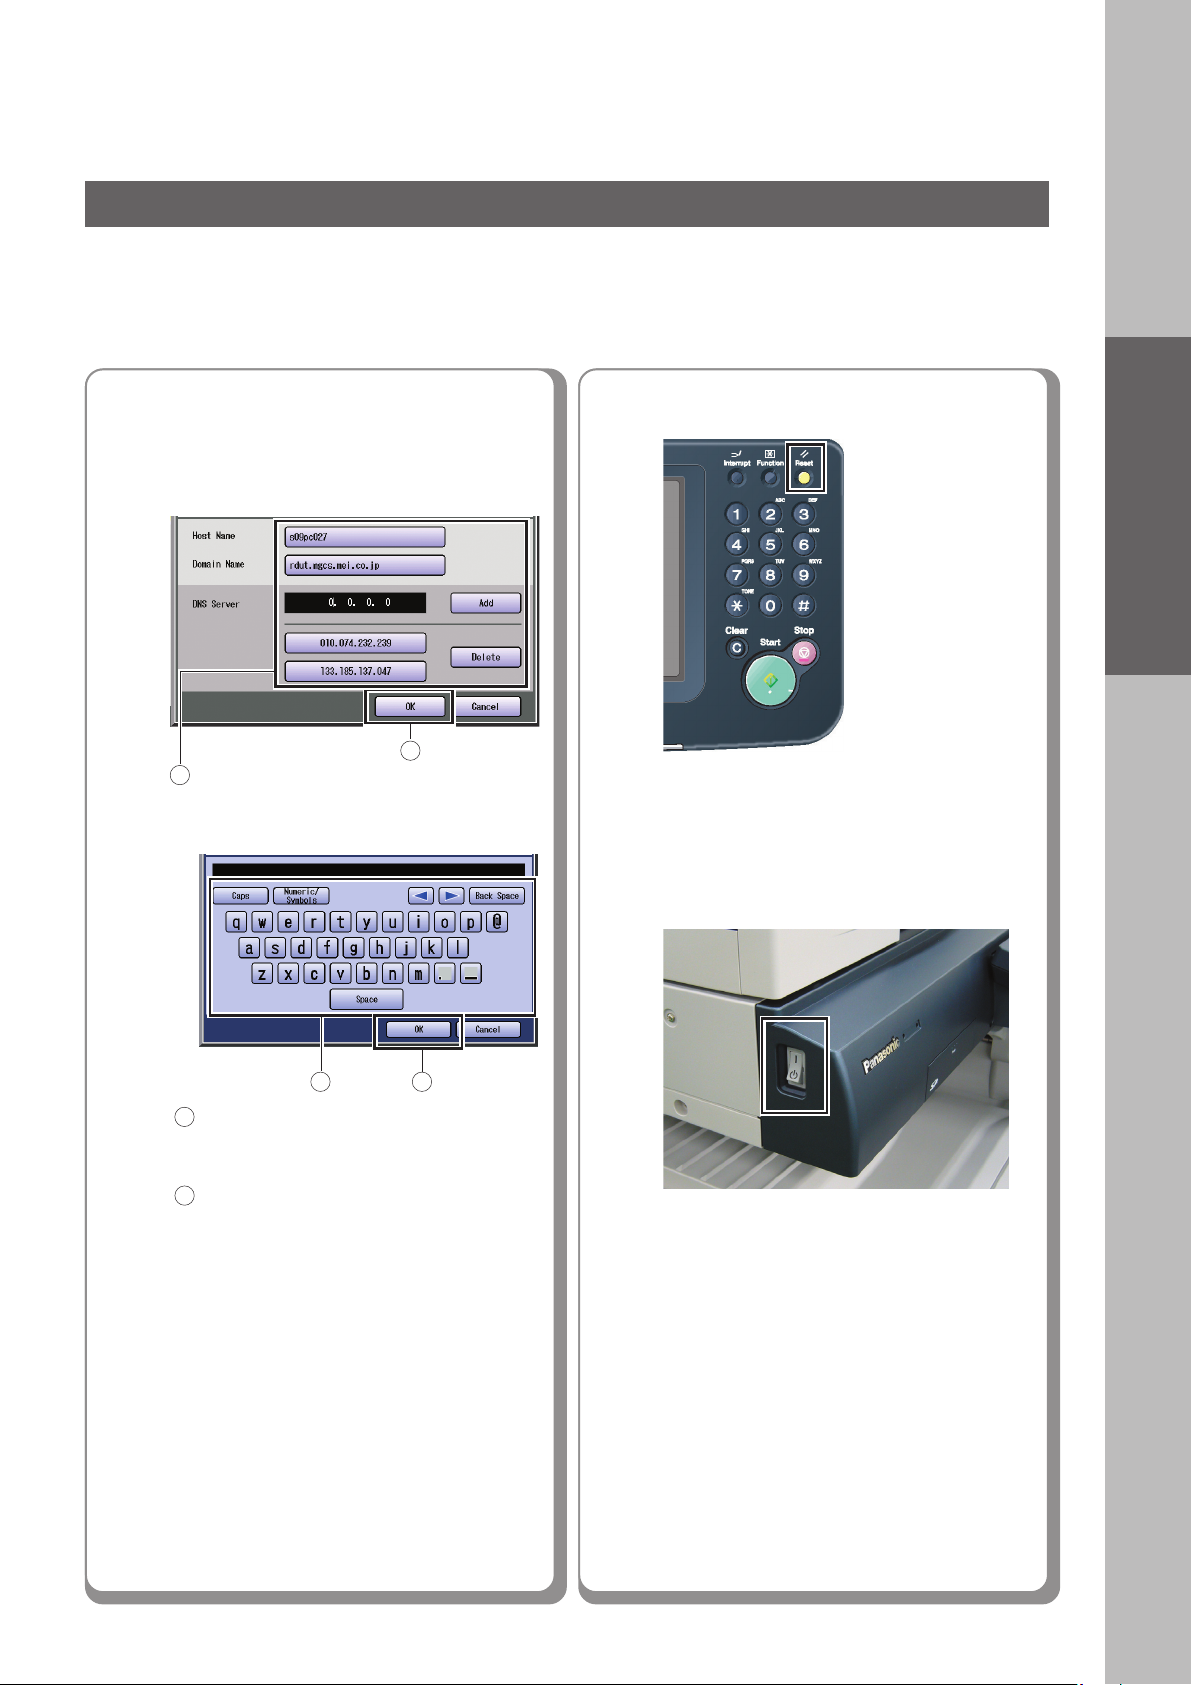
12
Enter the Host Name, Domain
Name, and DNS Server Address,
and then select "OK".
2
1
Select "Host Name" to enter a host name
using the Keyboard, and then select "OK".
(Up to 60 characters)
13
Press the Reset key.
Setting Your Machine
1 2
Select "Domain Name" to enter a domain
2
name using the
"OK". (Up to 50 characters)
Select "Add" to add a DNS server
3
address(es) using the Keypad.
(3 digits X 4)
●
You can also select the settings below as
needed.
Community Name (1)
Community Name (2)
WINS Server 1 IP
WINS Server 2 IP
Scope ID
IP Filter
IP Filter mode
IP Filter Address
User Auth. Domain
Keyboard, and then
select
14
Turn the Power Switch OFF, and
then back ON again.
●●
● The Power Switch is on the left side of the
●●
machine.
7
Installation
NOTE
Installing the Printer Driver, and Application Software
■■
■ System Requirements
■■
• Personal Computer : IBM PC/AT, and compatibles (CPU
Pentium II or greater is required,
Pentium 4 or greater is
recommended)
• Display : 800x600 Pixel or greater
(recommended), and a 16-bit High
Color video adapter or greater
(True Color is recommended)
1
• Operating System : Windows 98*
Windows NT 4.0*
Pack 3 or later is required),
Windows 2000*4, Windows XP*5,
Windows Server 2003*
• System Memory : The minimum recommended
Memory for each OS is as follows:
Windows 98, Windows Me: 128 MB
or greater
Windows 2000, Windows XP,
Windows NT 4.0,
Windows Server 2003:
256 MB or greater
• Free Disk Space : 200 MB or greater
• CD-ROM Drive : Used for installing the software,
and utilities from the CD-ROM
• Interface : 10Base-T/100Base-TX Ethernet
port, USB Port (For Printer)
• Application Software : Microsoft Internet Explorer 5.0 or
later
*1 Microsoft® Windows® 98 operating system (hereafter
Windows 98)
2
Microsoft® Windows® Millennium Edition operating
*
system (hereafter Windows Me)
3
Microsoft® Windows NT® operating system Version 4.0
*
(hereafter Windows NT 4.0)
4
Microsoft® Windows® 2000 operating system (hereafter
*
Windows 2000)
5
Microsoft® Windows® XP operating system (hereafter
*
Windows XP)
6
Microsoft® Windows ServerTM 2003 operating system
*
(hereafter Windows Server 2003)
, Windows Me *2,
3
(With Service
6
■■
■ Software Setup Procedures
■■
1.Selecting the software.
• Printer Driver
When using Print function.
• Direct Printing System
When using the Direct Printing System.
Refer to the Operating Instructions (For
Direct Printing System)
• Quick Image Navigator
When using the Network Scan function.
• Communications Utility
When using the Network Scan function.
• Device Explorer
When browsing the Machine condition.
• Device Monitor
When browsing the Machine condition.
• Embedded Web Launcher
When browsing the Machine condition.
• Configuration and Address Book
Editor
When browsing and editing the Machine
Configuration, and editing and the
Address Book.
• Fax Driver
• Job Status Utility
A Job Completion Notice pops-up on your
PC’s Desktop when the Copy/Print/Fax
Job is completed.
2. Install the software.
Selected software will be automatically
installed.
(See pages 9-12)
(See page 9)
● While installing the Printer Driver through the DHCP
server, if you turn the Power Switch of the machine OFF
and then ON again, a machine already connected to
your network will be selected automatically, and the IP
Address may change. In this case, change the setting
of the IP Address from the network sever so that the IP
Address is assigned to a fixed address.
8
3.Restart the PC.
(See page 12)
■■
■ Installing the Printer Driver (Network Port Connection), and the Panasonic
■■
Document Management System
1
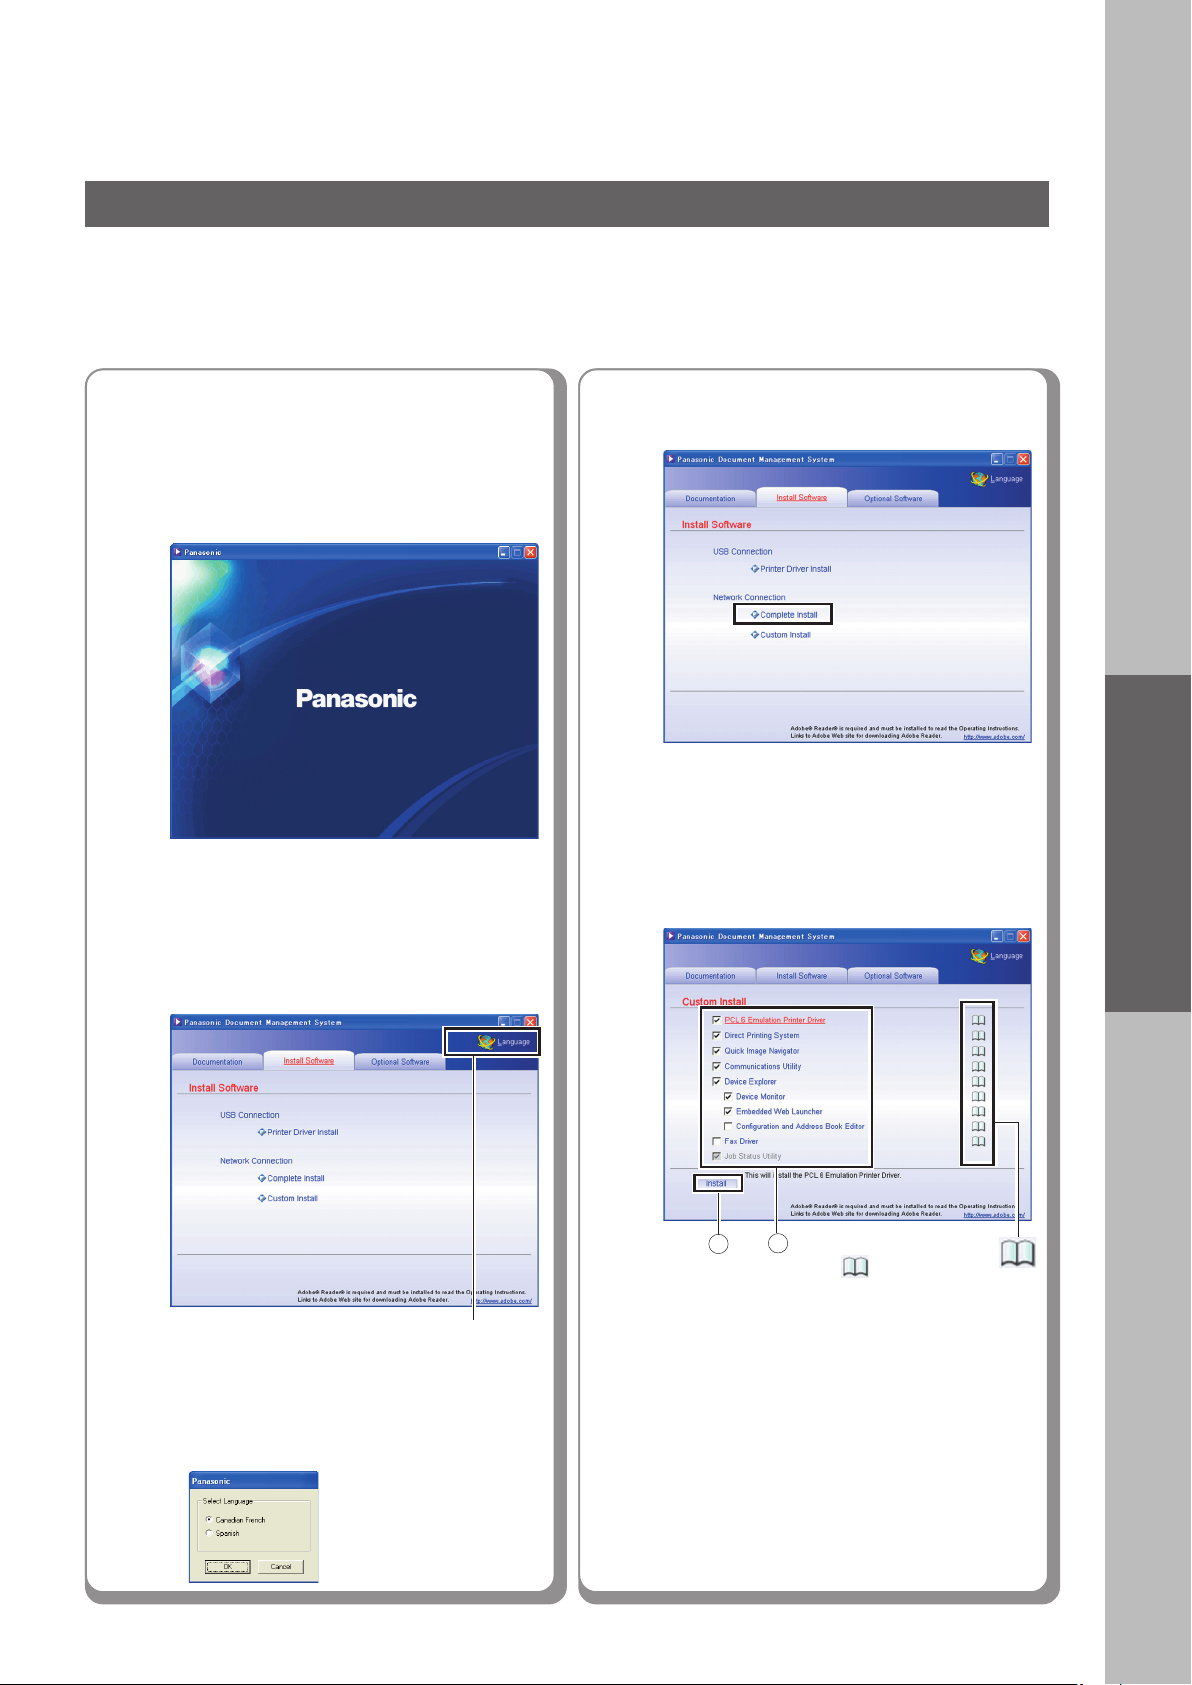
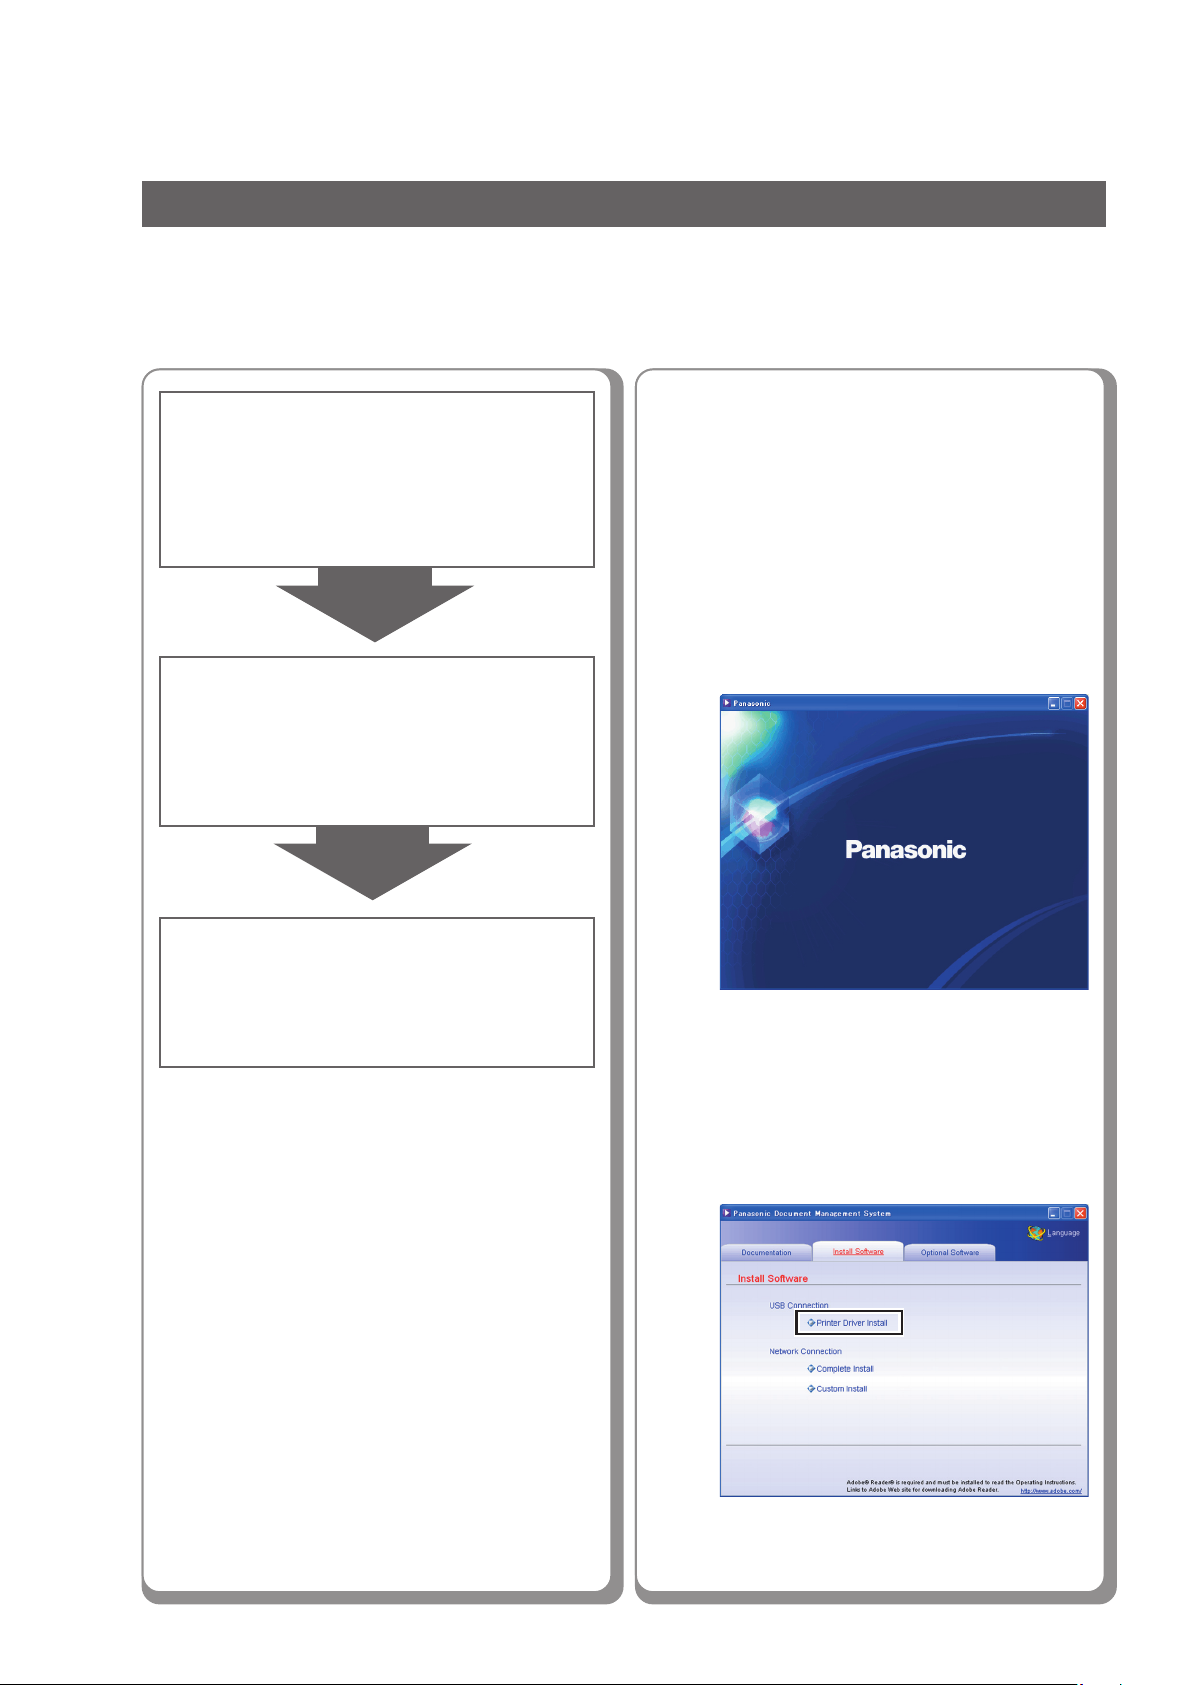
Insert the "Panasonic Document
Management System" CD-ROM.
The Panasonic opening screen is
displayed.
● If the CD-ROM does not launch automatically,
double click "My Computer" on the Desktop,
or on the Start menu, and then double click
the CD-ROM icon.
3
Select "Complete Install".
● Complete Install: All softwares are
installed, skip to step 5.
Select "Custom Install".
Select desired software, and then
click "Install".
Selected software will be installed.
Installation
2
Click "Language" if necessary.
Language Selection
● Screen Language will automatically default
to the language used by your PC.
If you want to change the language, click
"Language", and then select the preferred
language, and click "OK".
1
2
● When clicking the " ", the Operating
Instructions for the software on the left side
opens in PDF.
● The softwares below are selected by
default. If you do not want to install some
of the software, click the checkbox to
deselect the default selection.
● Select additional software you wish to
install with the default software by clicking
their respective checkbox.
Configuration and Address Book Editor:
Refer to the Operating Instructions (For
Network Configuration and Address Book
Editor) on the provided CD-ROM.
Continue on the next page...
9
Installation
Installing the Printer Driver, and Application Software
■■
■ Installing the Printer Driver (Network Port Connection), and the Panasonic
■■
Document Management System
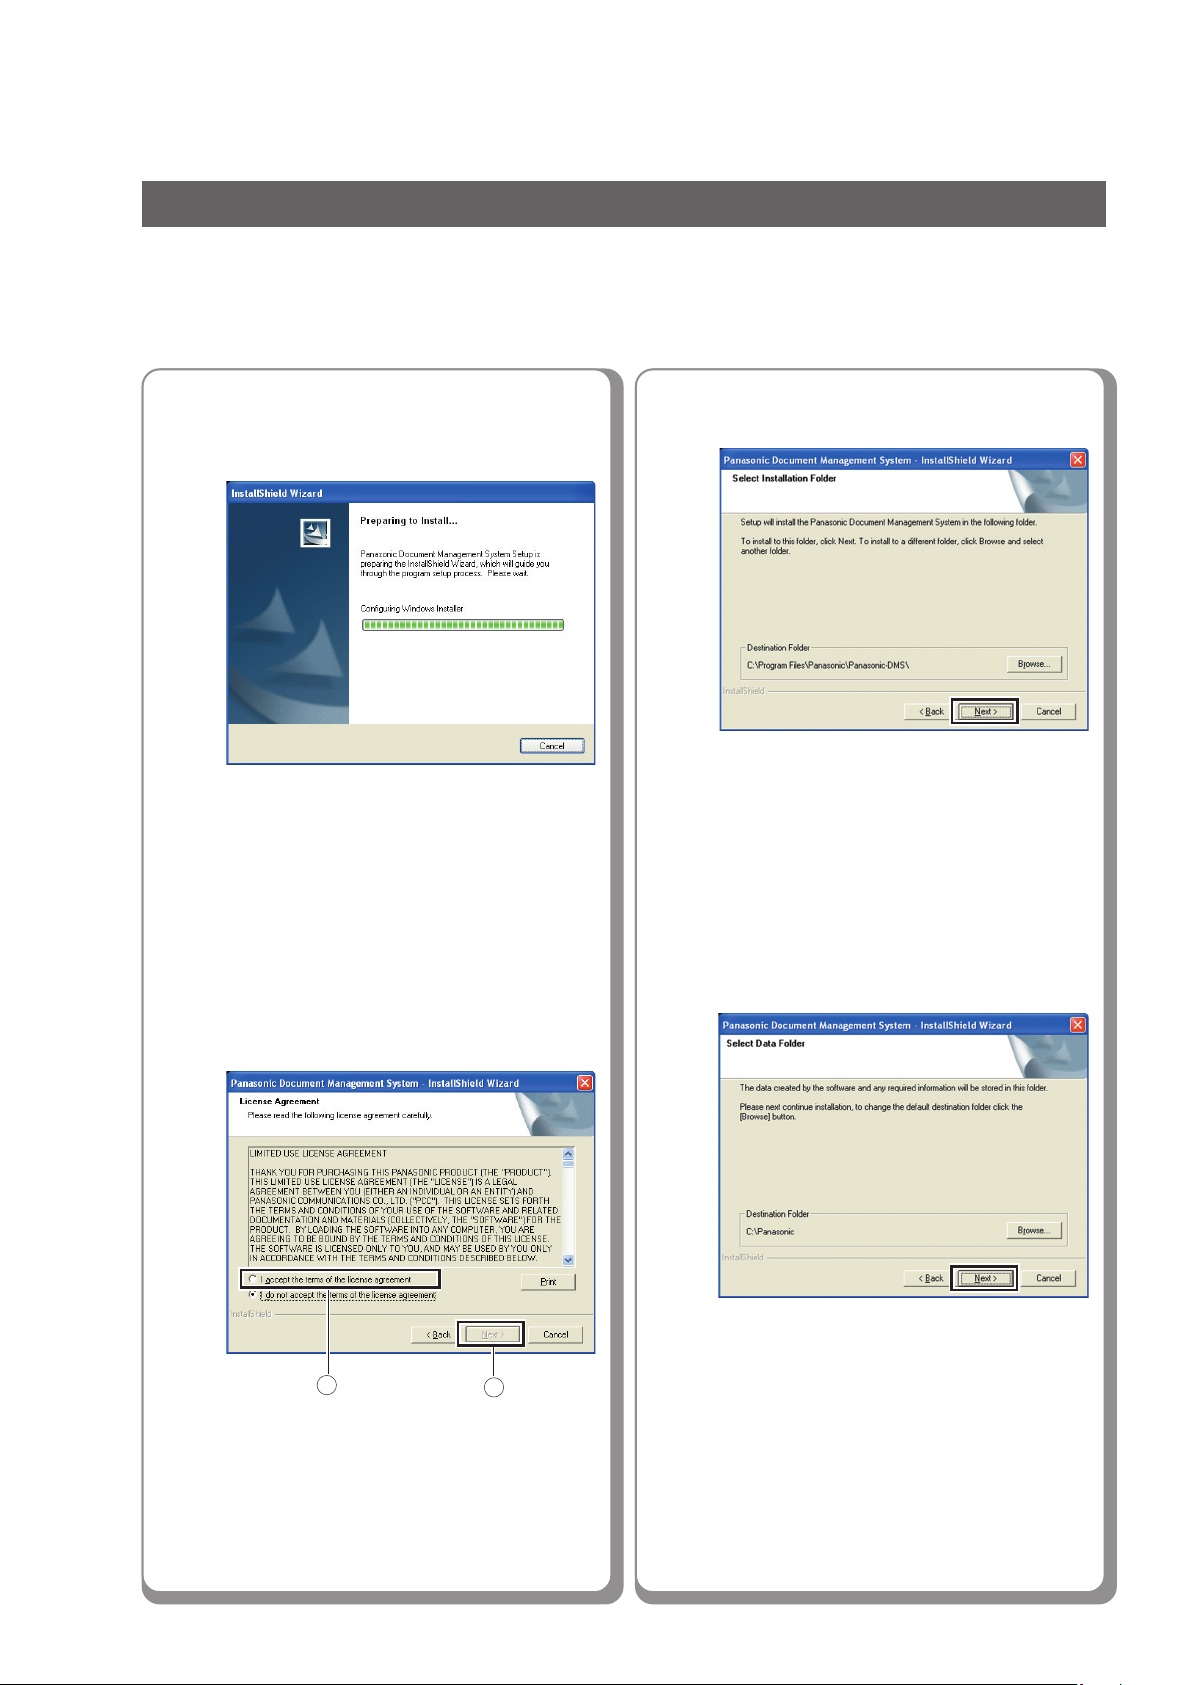
4
5
The InstallShield Wizard screen is
displayed.
Select "I accept the terms of the
license agreement", and then
click "Next".
6
7
Click "Next".
● The above Screen will not be shown if there
is another model's Panasonic Document
Management System installed.
● If you wish to change the folder, click
"Browse", and then the desired folder to
install.
Click "Next".
10
1
● Make sure that your machine is connected
to the network properly, and/or the Power
Switch is ON before clicking "NEXT".
2
● The above Screen will not be shown if there
is another model's Panasonic Document
Management System installed.
● If you wish to change the folder, click
"Browse", and then the desired folder to
install.
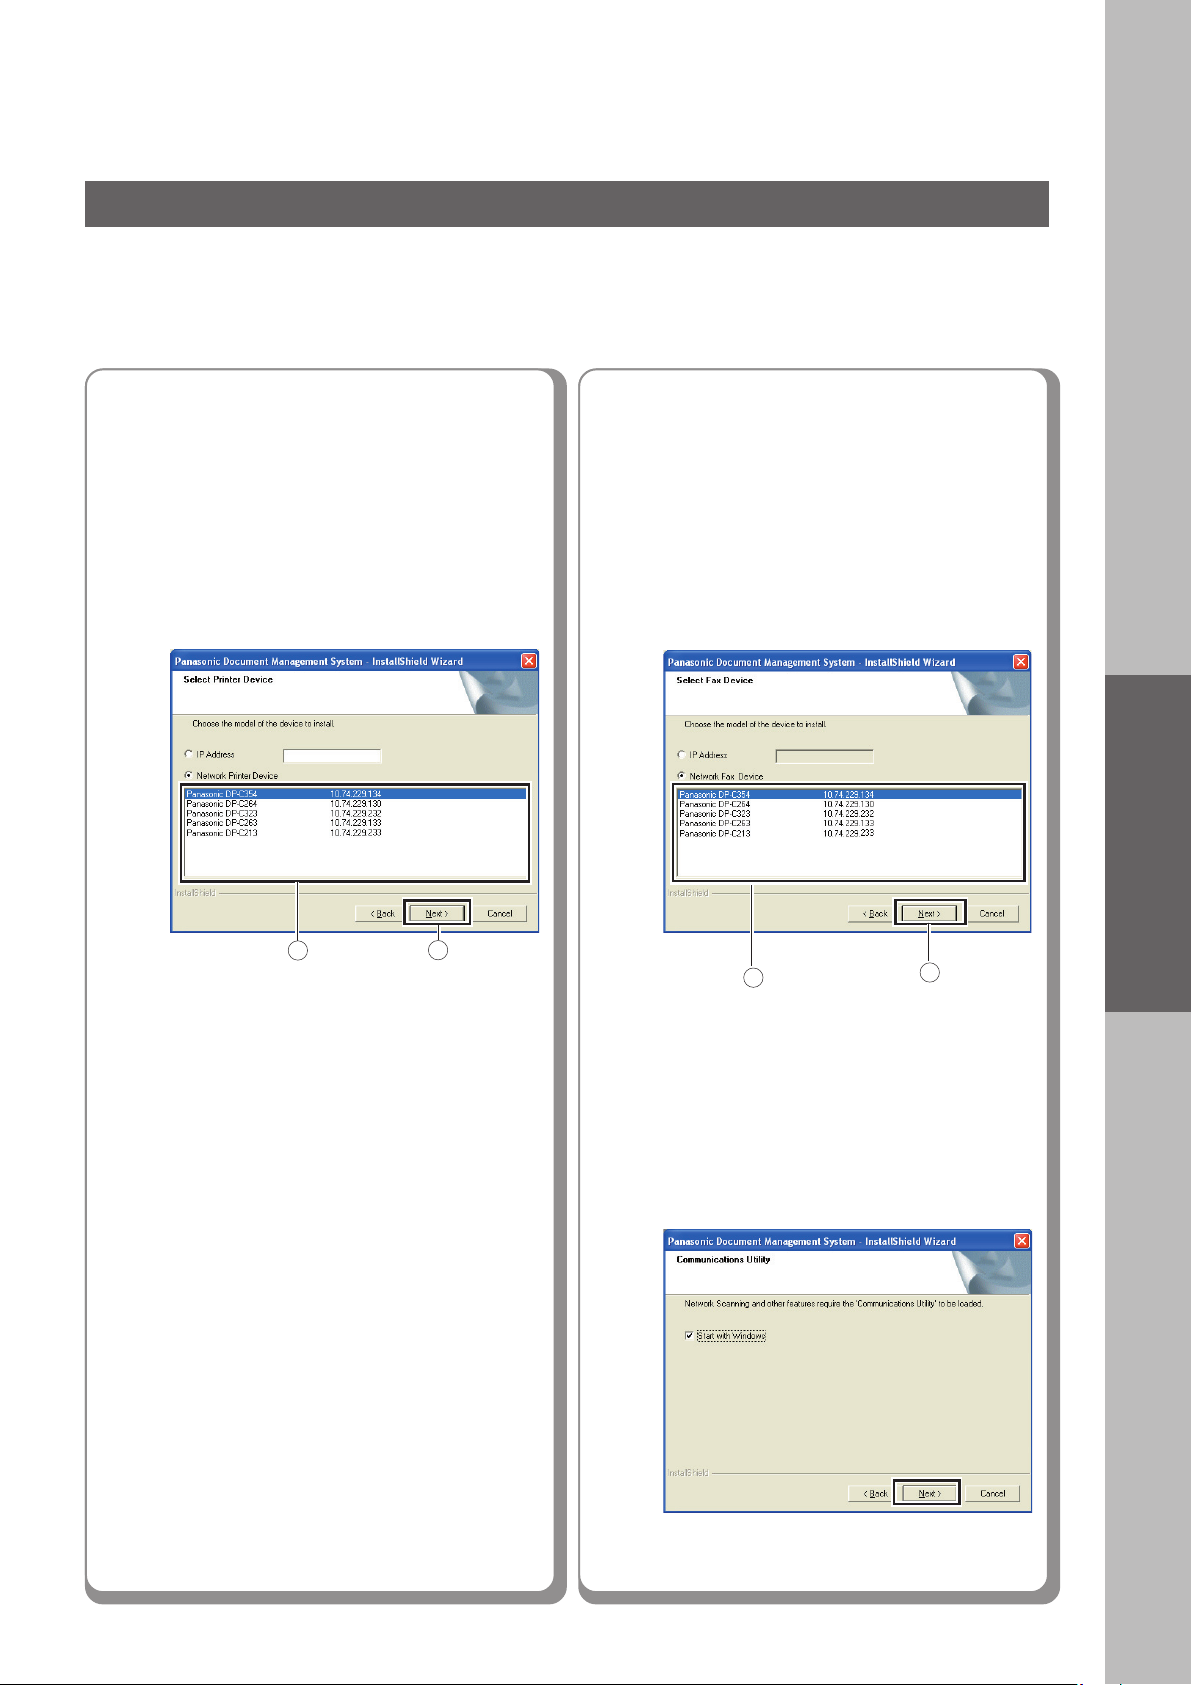
8
The Wizard automatically searches
for machines connected to your
9
The Wizard automatically searches
for machines connected to your
network, and displays the
found units in the Network Printer
Device window. Select your
Network Printer, and then click
"Next".
1
● Only the machines connected to the same
subnet can be used as a network printer.
●
If your machine has not been connected to the
network yet, enter its allocated IP Address, and
then click "Next" to proceed with the installation.
● If installing other machine of different
Subnet Mask of the Network, select
"IP Address" of the machine.
->Go to step 13
2
network, and displays the found
units in the Network Fax Device
window.
Select your network FAX, and then
click "Next".
1
● Only the machines connected to the same
subnet can be used as a network MFP.
● If your machine has not been connected to
the network yet, enter its allocated IP
Address, and then click "Next" to proceed
with the installation.
2
Installation
10
Click "Next".
Continue on the next page...
11

Installation
Installing the Printer Driver, and Application Software
■■
■ Installing the Printer Driver (Network Port Connection), and the Panasonic
■■
Document Management System
11
12
Select "Enable Communications
(Recommended)", and then click
"Next".
● For Windows XP (SP2 later) or Windows
Server 2003 (SP1 later) only.
Click "Install".
13
Select "Yes, I want to restart my
computer now.", and then click
"Finish".
● Make sure that the Printer Driver is
installed on the Network Print Server. (See
page 25)
12
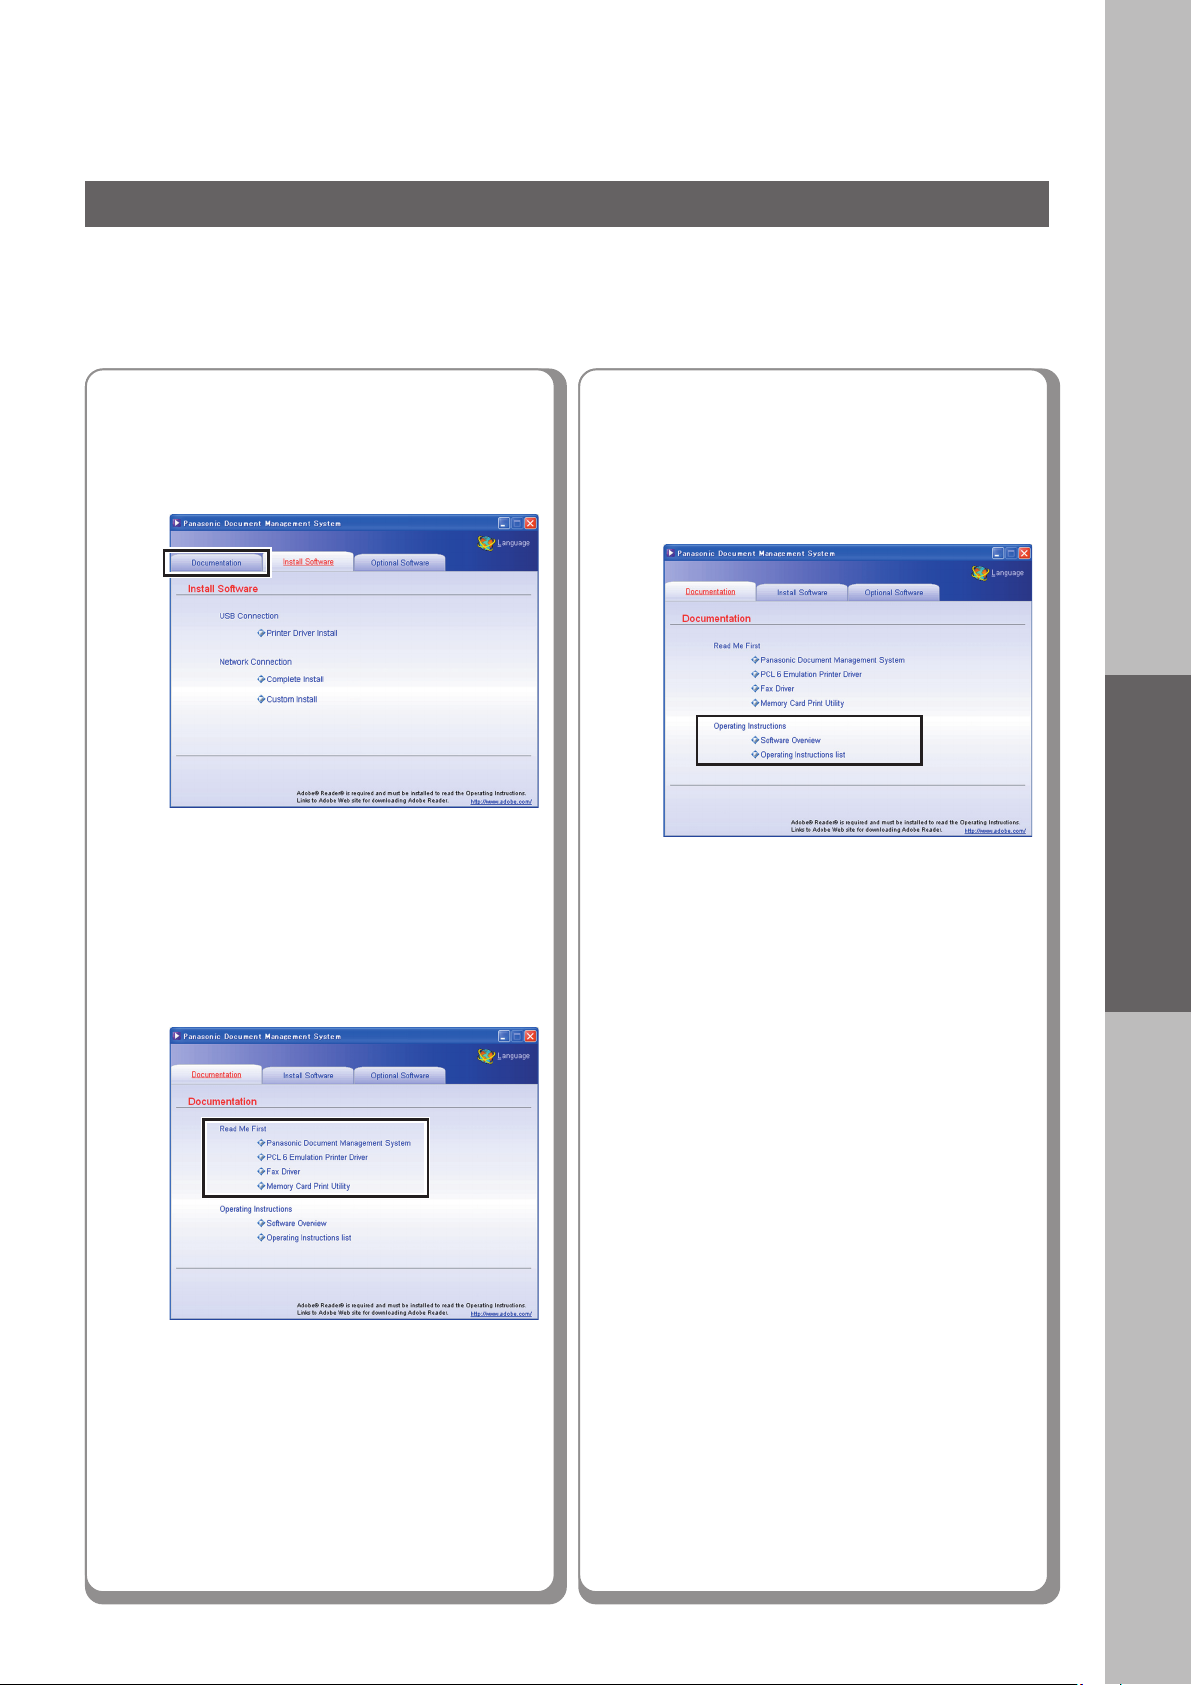
■■
■ To refer to ReadMe First or the Operating Manuals on the provided CD-ROM
■■
1
2
Clicking the "Documentation" tab
shows the list of ReadMe First and
Operating Manuals.
Click and Read the ReadMe First
text if necessary.
3
If you want to view the Operating
Instructions, select "Software
Overview or Operating
Instructions".
● When opening each OI, Adobe Reader
should be installed on your PC.
When installing the Adobe Reader, click
the "http://www.adobe.com" to the Adobe
web page, and then download the latest
version of the Adobe Reader.
Installation
13
Installation
USB Port Connection
■■
■ Installing the Printer Driver for USB Port Connection
■■
ATTENTION :
1.Select the "Printer Driver Install".
Do not turn the Power Switch ON (on the left side of
the machine) until you reach step 8 (A, B, C).
Do not connect the USB Cable until notified to do so.
(See page 14)
2.Install the Printer Driver for USB
Connection.
(See pages 14-18)
3.Restart the PC.
(See page 19)
1
Insert the "Panasonic Document
Management System" CD-ROM.
The Panasonic opening screen is
displayed.
● If the CD-ROM does not launch
automatically, double-click "My Computer"
on the Desktop, or on the Start menu, and
then double-click the CD-ROM icon.
14
2
Select "
● USB connection "Printer Driver Install" is
not selectable with Windows NT 4.0.
Printer Driver Install
".

The InstallShield Wizard screen is
displayed.
Click "Next".
53
● The above Screen will not be shown if there
is another model's Panasonic Document
Management System installed.
● If you wish to change the folder, click
"Browse", and then the desired folder to
install.
Installation
4
Select "I accept the terms of the
license agreement", and then click
"Next".
1
2
6
Select the Printer Driver that you
want to install, and then click
"Next".
Ex: DP-C354 PCL6
1
2
Continue on the next page...
15

Installation
USB Port Connection
■■
■ Installing the Printer Driver for USB Port Connection
■■
7
Click "Install".
Windows 98 / Windows Me
go to steps 8A and 9
Windows 2000
go to steps 8B and 9
8B
<Windows 2000>
Click "Yes".
Connect the USB cable to your
machine, and then turn the Power
Switch ON.
8A
Windows XP / Windows Server 2003
go to steps 8C and 9
<Windows 98 / Windows Me>
Connect the USB cable to your
machine, and then turn the Power
Switch ON.
Click "Yes".
16

8C
<Windows XP / Windows Server 2003>
Click "Continue Anyway".
● Above screen will only be displayed when
you install the Printer Driver for the first
time.
Connect the USB cable to your
Select "No, not this time", and
then click "Next".
1 2
● Above screen will be displayed when you
have installed the Windows XP Service
Pack 2.
Installation
Select "Install the software
machine, and then turn the Power
Switch ON.
automatically (Recommended)",
and then click "Next".
For Windows XP
Continue on the next page...
17

Installation
USB Port Connection
■■
■ Installing the Printer Driver for USB Port Connection
■■
Click "Continue Anyway".For Windows Server 2003
For Windows XP and Windows
Server 2003
If you have a previous version of
the Printer Driver installed, select
the latest version of the ".inf" file,
and then click "Next".
21
● Above screen will only be displayed when
you upgrade the Printer Driver.
Click "Finish".
18

9
Memo:
Select "Yes, I want to restart my
computer now.", and then click
"Finish".
Installation
19

Installation
USB Port Connection
■■
■ Configure the Optional Device
■■
1.Open the printer dialog box.
(See page 20)
2.Select a Printer and open the
Property screen.
(See pages 20-21)
3.Select the Device tab and configure
1
Select "Start" → "Printers and
Faxes" to open the Printer Dialog
Box.
the Optional Devices.
2
Right-Click the printer that you want
to configure.
(See page 21)
20

3
Click "Properties".
Memo:
4
Select "Device", and configure the
optional devices, and then click
"OK".
● Make sure that the Printer Driver is installed
on the Network Print Server. (See page 25)
Installation
21

Installation
Fax Driver
■■
■ Installing the Fax Driver
■■
1
Insert the "Panasonic Document
Management System" CD-ROM.
The Panasonic opening screen is
displayed.
● If the CD-ROM does not launch
automatically, double-click "My Computer"
on the Desktop, or on the Start menu, and
then double-click the CD-ROM icon.
3
Select "Fax Driver" only, and then
click "Install".
Remove check mark ( ) of other
selected software in the checkbox.
2
1
2
Click "Custom Install".
4
The InstallShield Wizard screen is
displayed.
22

5
Select "I accept the terms of the
license agreement", and then click
"Next".
1
2
7
Click "Next".
● The above Screen will not be shown if there
is another model’s Panasonic Document
Management System installed.
6
● Make sure that your machine is connected
to the network properly, and/or the Power
Switch is ON before clicking "Next".
Click "Next".
● The above Screen will not be shown if there
is another model’s Panasonic Document
Management System installed.
8
The Wizard automatically searches
for machines connected to your
network, and displays the found units
in the Network Fax Device window.
Select your network FAX, and then
click "Next".
1
● Only the machines connected to the same
subnet can be used as a network MFP.
● If your machine has not been connected to
the network yet, enter its allocated IP
Address, and then click "Next" to proceed
with the installation.
2
Installation
Continue on the next Page...
23

Installation
Fax Driver
■■
■ Installing the Fax Driver
■■
9
Select "Enable Communications
(Recommended)", and then click
"Next".
1
● Above screen will be displayed when you
have installed the Windows XP Service
Pack 2.
2
11
Select "Yes, I want to restart my
computer now.", and then click
"Finish".
10
Click "Install".
24

NOTE
Setting up
Network Port Connection
■■
■ Configure the Shared Setting for the
■■
Network Print Server
1.Configure the Shared Setting for
the Network Print Server.
• Windows NT Server
• Windows 2000 Server
• Windows Server 2003
(See pages 25-30)
2. Set up your Client PC.
(See page 31)
■■
■ Configure the Shared Setting for the
■■
Network Print Server (Windows NT
Server)
Click "Start".
1
2
Select "Settings".
Add the Printer Driver if your client OS is different
from the Network Print Server. (See page 30)
Installation
Click "Printers".
3
Setting up
Continue on the next Page...
25

Setting up
NOTE
NOTE
Network Port Connection
■■
■ Configure the Shared Setting for the Network Print Server (Windows NT Server)
■■
4
5
Right-Click the printer that you
want to share.
Click "Properties".
7
Select "Shared", and then enter
the Share Name.
Ex: Panasonic
If you need to install an alternative printer
driver for your client OS, select the type of OS
from the alternative driver list and click "OK".
You can manually add the Printer Driver by
following the instructions on the screen. To
easily create the Printer Drivers for various
OS, use the PrnCopy.exe before the
installation.
26
6
Click on the "Sharing" tab.
Click "OK" to close the screen.
8
Add the Printer Driver if your client OS is
different from the Network Print Server.
● Use the PrnCopy.exe before installing the
Printer Driver.
On the Panasonic Printing System CDROM, there is a tool to create the Printer
Driver for various Windows OS.
Open the CD-ROM with the Explorer, Go
"Tools" -> "PrnCopy" folder.
In the "PrnCopy" folder, double click the
PrnCopy.exe file, a folder will be created on
your Desktop.
Please select an appropriate printer driver
in the folder when you add the Printer
Driver for a client OS.
(See pages 25-28)

■■
■ Configure the Shared Setting for the Network Print Server (Windows 2000 Server)
■■
1
2
Click "Start".
Select "Settings".
4
Right-Click the printer that you
want to share.
Click "Properties".
5
3
Click "Printers".
Setting up
Continue on the next Page...
27

NOTE
NOTE
Setting up
Network Port Connection
■■
■ Configure the Shared Setting for the Network Print Server (Windows 2000 Server)
■■
6
7
Click on the "Sharing" tab.
Select "Shared as", and then
enter the Share Name.
Ex: Panasonic
8
Click "OK" to close the screen.
Add the Printer Driver if your client OS is
different from the Network Print Server.
● Use the PrnCopy.exe before installing the
Printer Driver.
On the Panasonic Printing System CDROM, there is a tool to create the Printer
Driver for various Windows OS.
Open the CD-ROM with the Explorer, Go
"Tools" -> "PrnCopy" folder.
In the "PrnCopy" folder, double click the
PrnCopy.exe file, a folder will be created on
your Desktop.
Please select an appropriate printer driver
in the folder when you add the Printer
Driver for a client OS.
(See pages 25-28)
If you need to install an alternative printer
driver for your client OS, click "Additional
Drivers". You can manually add the Printer
Driver by following the instructions
on the screen. To easily create the Printer
Drivers for various OS, use the PrnCopy.exe
before the installation.
28

■■
■ Configure the Shared Setting for the Network Print Server (Windows Server 2003)
■■
1
Click "Start".
(Category View Mode)
(Classic View Mode) (Classic View Mode)
3
Click "Printers and Faxes".
(Category View Mode)
2
Select "Settings".
(Classic View Mode)
4
Right-Click the printer that you
want to share.
Setting up
Continue on the next Page...
29

NOTE
Setting up
NOTE
Network Port Connection
■■
■ Configure the Shared Setting for the Network Print Server (Windows Server 2003)
■■
5
6
Click "Properties".
Click on the "Sharing" tab.
7
Select "Share this printer", and
then enter the Share Name.
Ex: Panasonic
If you need to install an alternative printer
driver for your client OS, click "Additional
Drivers". You can manually add the Printer
Driver by following the instructions on the
screen. To easily create the Printer Drivers for
various OS, use the PrnCopy.exe before the
installation.
Click "OK" to close the screen.
8
Add the Printer Driver if your client OS is
different from the Network Print Server.
● Use the PrnCopy.exe before installing the
Printer Driver.
On the Panasonic Printing System CDROM, there is a tool to create the Printer
Driver for various Windows OS.
Open the CD-ROM with the Explorer, Go
"Tools" -> "PrnCopy" folder.
In the "PrnCopy" folder, double click the
PrnCopy.exe file, a folder will be created on
your Desktop.
Please select an appropriate printer driver
in the folder when you add the Printer
Driver for a client OS.
(See pages 25-28)
30

■■
■ Setting up your Client PC
■■
1 4
Open the "Printers and Faxes"
window.
Click "Start", right-click "My
2
Computer", and then select
"Explore".
5
Drag-and-drop the printer icon onto
the "Printers and Faxes" window.
Verify that the Printer icon is
copied onto the window.
3
Setting up
Select the Printer shared on your
Printer Server.
● The illustrations shown for the previous steps are
for Windows XP.
The procedures for other Windows Operating
Systems are basically the same, even though the
screen displays may differ.
31

Setting up
Completion Notice Function
■■
■ Setting up the Completion Notice
■■
Ex: Copy Job
Basic Procedures:
Install the Job Status Utility located
1
on the Panasonic Document
Management System CD-ROM.
(See pages 8-12)
Confirm that the Panasonic Job
2
Status Utility icon is shown on
the task bar.
The Job Status Utility software will display the pop-up Completion Notice
on your PC screen when finishing the Print, PC Fax, Copy, and Fax jobs.
The information displayed in the Completion Notice vary according to the
type of job being performed.
Setting up for PC Fax, and PC Print:
Right-click the Panasonic Job
1
Status Utility icon on the task
bar, and select "Setup" from the
menu.
3
Panasonic Job Status Utility Icon
● If the Job Status Utility icon is not
shown on the task bar, select "All
Programs"
Status Utility"
to activate the Job Status Utility icon.
For PC Fax, and PC Print only
Setup the Completion Notice as
described in the column on the right.
For Copy, Fax, and Internet Fax only
Refer to "Setting up the Scanner
Configuration using the Communications
Utility". (See page 33)
Select your PC on the Touch Panel Display
of the machine, refer to the Completion
Notice of each relevant Operation
Instructions on the provided CD-ROM.
→→
→ "Panasonic"
→→
→→
→ "Job Status Utility"
→→
→→
→ "Job
→→
→→
→
→→
2
Panasonic Job Status Utility Icon
Choose the display condition for
the Setup window, and then click
"OK".
All : Always displays after each
transmission, or print job.
Error only : Displays only when an error
occurs.
None : Does not display.
32

Setting up Optional Accessories
Network Scanner Settings (Option)
■■
■ Setting up the Scanner Configuration using the Communications Utility
■■
1
2
Right-Click "Panasonic
Communications Utility" icon on
the Task Bar, and then select
"Scanner Configuration...".
1
Select "Auto Registration", and
then enter the Name and Key
Name to be saved into the
machine. (Up to 15 characters)
Click "Add Device" if your PC address
information is registered onto the machines
located on the different subnet.
2
Click "Add".
1
4
Click "OK".
3
1
2
Click "OK".
Refer to right column.
1
3
* Name and Key Name are automatically displayed
according to your PC’s network setting.
Name: Computer Name
Key Name: Network Login user name
4
Enter the
2
2
machine’s
Device
Name, and
IP Address.
Click "OK".
3
Setting up
Accessories
33
Setting up Optional

Setting up Optional Accessories
Facsimile Settings (Option)
■ Setting up the User Parameters
● When the machine is not connected to the network (LAN), change the DHCP Default setting to "No". (See
pages 4 and 5)
1
2
Press the Function key.
Select "Fax/Email Settings".
4
5
Enter the Key Operator's Password
(8 digits), and then select "OK".
1
● Default password is "00000000".
To change this password, open "85 Key
Operator Password" in the General
Setting (For Key Operator), and then reenter the new password.
Select "00 User Parameters".
2
34
3
Select "04 Key Operator Mode".

6
Select "01 Logo", and then enter
your company's name or your name
8
Select "03 ID No.", and then enter
your fax number as the ID No. using
as a Logo using the Keyboard.
(Up to 25 characters)
● To correct a mistake, select [ ] or [ ] to
move the cursor to the right side of the
incorrect character. To delete, select "Back
Space", and re-enter the correct character.
Your company name or your name must be
set as your Logo because it is required by
the Telephone Consumer Act of 1991.
the Keypad. (Up to 20 digits)
● To correct a mistake, "Clear" to delete
entries one digit at a time, and re-enter the
correct number.
Select "
to add a "+" symbol, followed by your Country
Code digit. Select "Space" to enter a blank
space.
Ex: +1 201 555 1212
Your fax number must be set as your ID
number because it is required by the
Telephone Consumer Act of 1991.
" in the beginning of the ID Number
(where, +1 is USA's country code)
+81 3 111 2345
(where +81 is Japan's country code)
7
Select "02 Character ID", and then
enter your Character ID using the
Keyboard. (Up to 16 characters)
● To correct a mistake, select [ ] or [ ] to
move the cursor to the right side of the
incorrect character. To delete, select "Back
Space", and re-enter the correct character.
9
Press the Reset key.
Accessories
Setting up Optional
35

Setting up Optional Accessories
Email/Internet Fax Settings
■■
■ Email/Internet Fax Settings Procedure
■■
1.Setup the Network Configuration
using the Control Panel of the
machine.
(See pages 36-41)
2.If necessary, program the Address
Book.
● Refer to the Operating Instructions (For
Basic Operations).
■■
■ Setting up the Network Configuration
■■
Press the Function key.
1
2
Select "General Settings".
● The IP Address, Subnet Mask, and Gateway
Address must be registered before setting up the
network configuration. (See pages 4-7)
3
Select "09 Key Operator Mode".
1
2
36

4
Enter the Key Operator's Password
(8 digits), and then select "OK".
6
Select "EMAIL".
5
1
● Default password is "00000000".
To change this password, open "85 Key
Operator Password" in the General
Setting (For Key Operator), and then reenter the new password.
Select "04 Network Settings".
2
7
Enter the Email address using the
Keyboard, and then select "OK".
(Up to 60 characters.)
1
Continue on the next page...
2
Accessories
Setting up Optional
37

Setting up Optional Accessories
Email/Internet Fax Settings
■■
■ Setting up the Network Configuration
■■
8
Enter the SMTP Server Name using
the Keyboard, and then select "OK".
(Up to 60 characters.)
1
● If you select "No" for DNS Server Address
in step 11 on page 6, the SMTP Server IP
address is required instead of the SMTP
Server name.
Enter the SMTP Server IP Address
using the Keypad, and then select
"OK".
2
9
10
Enter the Port Number, and then
select "OK".
1
Select "Invalid" or "Valid" for
"SMTP Authentication", and then
select "OK".
2
38
1
● When entering a 1 or 2-digit number segment,
add "00" or "0" in front of the number to scroll
to the next segment of numbers, or press the
" key on the Control Panel to enter a
"
period after the number.
● To correct a mistake, press or to
move the cursor to the right side of the
incorrect address.
To delete, press "Clear", and re-enter the
correct address.
2
1
● "SMTP Authentication" is the specification
which added the user authentication
function to SMTP. Attestation of a user
account and a password is performed
between an SMTP server and a user in the
case of e-mail reception, and only when
attested, transmission of e-mail is permitted.
● When "Valid" is selected, proceed to step
11.
● When "Invalid" is selected, proceed to step
13.
2

11
Enter the SMTP AUTH Name
using the Keyboard, and then
select "OK". (Up to 40 characters.)
13
Enter the POP Server Name using
the Keyboard, and then select "OK".
(Up to 60 characters.)
12
1
Enter the SMTP AUTH Password
using the Keyboard, and then
select "OK". (Up to 12 characters.)
1
● This setting is only available when the optional
Internet Fax Module (Order Number:
DA-NF320 or DA-FN350) is installed.
2
2
1
● If you select "No" for DNS Server Address
in step 11 on page 6, the POP Server IP
address is required instead of the POP of
POP Server name.
Enter the POP Server IP Address
using the Keypad, and then select
"OK".
1
● When entering a 1 or 2-digit number segment,
add "00" or "0" in front of the number to scroll
to the next segment of numbers, or press the
" key on the Control Panel to enter a
"
period after the number.
● To correct a mistake, press or to
move the cursor to the right side of the
incorrect address.
To delete, press "Clear", and re-enter the
correct address.
● After selecting "OK", proceed to step 15.
2
2
Continue on the next page...
Accessories
Setting up Optional
39

Setting up Optional Accessories
Email/Internet Fax Settings
■■
■ Setting up the Network Configuration
■■
14
15
Enter the Port Number, and then
select "OK".
1
Enter the POP User Name using the
Keyboard, and then select "OK". (Up
to 40 characters.)
2
16
17
Enter the POP Password using
the Keyboard, and then select
"OK". (Up to 10 characters.)
1
Select "Invalid" or "Valid" for
"POP before SMTP", and then
select "OK".
2
40
1
2
● "POP before SMTP" is one of the user
authentication methods at the time of
transmitting an E-mail. The system which
gives use permission of an SMTP server by
making the POP server specified before
transmission access beforehand.
1
2

18
Memo:
Select "Invalid" or "Valid" for
"APOP Authentication", and then
select "OK".
19
1
● APOP is the attestation method which
enciphers the password used for reception of
an E-mail. POP usually used for reception of
e-mail has the danger that a password will be
intercepted. In APOP, since a password is
enciphered and it transmits, safety is high.
● Select either settings to return to step 6.
Press the Reset key.
2
41
Accessories
Setting up Optional

IMPORTANT INFORMATION
When requesting information, supplies or service, always refer to the model and serial number of your machine.
The model and serial number plate (Main Name Plate) is located on the rear of the machine. For your
convenience, space is provided below to record information you may need in the future for reference or
troubleshooting.
Model No.: Serial No.:
Date of Purchase:
Dealer:
Address:
Telephone Number:
Supplies Telephone Number:
Service Telephone Number:
For the total system to work properly via LAN, certain information and additional parameters must be set. Please
contact your network administrator for the required information, and connection to the LAN.
(Please confirm other required Internet Parameters in General Settings. This setting list can be printed by
following these steps : Press , select , , Input the Password,
Function
General Settings
09 Key Operator Mode
and then select , , , .)
Company Name:
Address:
Dept.:
City: State: Zip Code:
Tel. No.: Fax No.:
EMAIL Address:
SMTP Server Name: or SMTP Server IP: PORT No:
SMTP AUTH Name: SMTP AUTH Password:
TCP/IP IP Address:
TCP/IP Subnet Mask:
TCP/IP Default Gateway:
DNS Server Address:
HOST NAME:
2nd DNS Server Address:
POP Server Name: or POP Server IP: PORT No:
POP User Name:
POP Password:
LDAP Server Name: or LDAP Server IP: PORT No:
LDAP User Name:
LDAP Password:
LDAP Search Base:
OK
User Information
Internet Parameters
(for security, do not write it in - but keep it in a safe place)
(for security, do not write it in - but keep it in a safe place)
OK00 Print General Settings Start
(for security, do not write it in - but keep
it in a safe place)
42

memo
43

WARRANTY
PANASONIC DIGITAL DOCUMENT COMPANY MAKES NO WARRANTIES, GUARANTEES OR
REPRESENTATIONS, EXPRESSED OR IMPLIED, TO CUSTOMER WITH RESPECT TO THIS
PANASONIC MACHINE, INCLUDING BUT NOT LIMITED TO, ANY IMPLIED WARRANTY OF
MERCHANTABILITY OR FITNESS FOR A PARTICULAR PURPOSE.
PANASONIC DIGITAL DOCUMENT COMPANY ASSUMES NO RISK AND SHALL NOT BE SUBJECT
TO LIABILITY FOR ANY DAMAGE, INCLUDING, BUT NOT LIMITED TO DIRECT, INDIRECT, SPECIAL,
INCIDENTAL OR CONSEQUENTIAL DAMAGES OR LOSS OF PROFITS SUSTAINED BY THE
CUSTOMER IN CONNECTION WITH THE USE OR APPLICATION OF THIS PANASONIC MACHINE.
SEE YOUR DEALER FOR DETAILS OF DEALER’S WARRANTY.
USA Only
■■
■ Notice: California only:
■■
This product contains a CR Coin Cell Lithium Battery which contains Perchlorate Material - special
handling may apply.
See www.dtsc.ca.gov/hazardouswaste/perchlorate
© 2006 Panasonic Communications Co., Ltd. All Rights Reserved.
Unauthorized copying and distribution is a violation of law.
The contents of these Operating Instructions are subject to change without notice.
For Service, Call:
Panasonic Digital Document Company,
Unit of Panasonic Corporation of North America
One Panasonic Way
Secaucus, New Jersey 07094
http://panasonic.co.jp/pcc/en/
Panasonic Canada Inc.
5770 Ambler Drive
Mississauga, Ontario L4W 2T3
http://www.panasonic.ca
C0606-3116(01)
PJQMC0582ZD
November 2006
Published in Japan
 Loading...