


Network Stereo Receiver
TX-8160
Instruction Manual
Thank you for purchasing an Onkyo product.
Please retain this manual for future reference.

Contents |
Supplied accessories |
Names and functions of parts |
7 |
|
0 |
Front |
7 |
0 |
Display |
8 |
0 |
Remote control |
9 |
0 |
Rear |
10 |
Connections |
11 |
|
0 |
Connecting speakers |
11 |
0 |
Connecting a player |
12 |
0 |
AM/FM antenna connections |
13 |
0 |
Network connection |
14 |
Listening to Internet radio |
16 |
|
Playing music with Bluetooth® functions |
22 |
|
Playing music with AirPlay® |
23 |
|
Playing music with Spotify |
24 |
|
Playing tracks stored on a USB storage |
|
|
device |
25 |
|
Home network functions |
26 |
|
0 |
Playing music stored on DLNA-compatible |
|
|
devices |
26 |
0 |
Music streaming from a shared folder |
|
|
(Home Media) |
27 |
Listening to the sound from a connected |
|
|
player |
29 |
|
Listening to AM/FM radio |
30 |
|
Multi-zone playback |
33 |
|
Various settings |
35 |
|
0 |
Adjusting sound quality, etc. |
35 |
0 |
Sleep timer |
35 |
0 |
Inputting characters |
36 |
0 |
Setup menu |
36 |
0 |
Firmware update |
39 |
Troubleshooting |
41 |
|
Compatible devices/media/file formats |
43 |
|
Before use, check the packaging for the main unit and the accessories below.
∫Remote control (RC-903S) k 1
∫Batteries for remote control (AAA/R03) k 2
∫AM loop antenna k1
∫Indoor FM antenna k 1
2
WARNING:
TO REDUCE THE RISK OF FIRE OR ELECTRIC SHOCK, DO NOT EXPOSE THIS APPARATUS TO RAIN OR MOISTURE.
CAUTION:
TO REDUCE THE RISK OF ELECTRIC SHOCK, DO NOT REMOVE COVER (OR BACK). NO USERSERVICEABLE PARTS INSIDE. REFER SERVICING TO QUALIFIED SERVICE PERSONNEL.
WARNING |
|
AVIS |
RISK OF ELECTRIC SHOCK |
|
RISQUE DE CHOC ELECTRIQUE |
DO NOT OPEN |
|
NE PAS OUVRIR |
The lightning flash with arrowhead symbol, within an equilateral triangle, is intended to alert the user to the presence of uninsulated “dangerous voltage” within the product’s enclosure that may be of sufficient magnitude to constitute a risk of electric shock to persons.
The exclamation point within an equilateral triangle is intended to alert the user to the presence of important operating and maintenance (servicing) instructions in the literature accompanying the appliance.
Important safety instructions
1.Read these instructions.
2.Keep these instructions.
3.Heed all warnings.
4.Follow all instructions.
5.Do not use this apparatus near water.
6.Clean only with dry cloth.
7.Do not block any ventilation openings. Install in accordance with the manufacturer’s instructions.
8.Do not install near any heat sources such as radiators, heat registers, stoves, or other apparatus (including amplifiers) that produce heat.
9.Do not defeat the safety purpose of the polarized or grounding-type plug. A polarized plug has two blades with one wider than the other. A grounding type plug has two blades and a third grounding prong. The wide blade or the third prong are provided for your safety. If the provided plug does not fit into your outlet, consult
an electrician for replacement of the obsolete outlet. 10.Protect the power cord from being walked on or
pinched particularly at plugs, convenience receptacles, and the point where they exit from the apparatus.
11.Only use attachments/accessories specified by the manufacturer.
12.Use only with the cart, stand, |
PORTABLE CART |
tripod, bracket, or table |
WARNING |
specified by the manufacturer, |
|
or sold with the apparatus. |
|
When a cart is used, use |
|
caution when moving the cart/ |
|
apparatus combination to |
|
avoid injury from tip-over. |
|
13.Unplug this apparatus during |
S3125A |
lightning storms or when unused for long periods of time.
14.Refer all servicing to qualified service personnel. Servicing is required when the apparatus has been damaged in any way, such as power-supply cord or plug is damaged, liquid has been spilled or objects have fallen into the apparatus, the apparatus has been exposed to rain or moisture, does not operate normally, or has been dropped.
15.Damage Requiring Service
Unplug the apparatus from the wall outlet and refer servicing to qualified service personnel under the following conditions:
A.When the power-supply cord or plug is damaged,
B.If liquid has been spilled, or objects have fallen into the apparatus,
C.If the apparatus has been exposed to rain or water,
D.If the apparatus does not operate normally by following the operating instructions. Adjust only those controls that are covered by the operating instructions as an improper adjustment of other controls may result in damage and will often require extensive work by a qualified technician to restore the apparatus to its normal operation,
E.If the apparatus has been dropped or damaged in any way, and
F.When the apparatus exhibits a distinct change in
performance this indicates a need for service. 16.Object and Liquid Entry
Never push objects of any kind into the apparatus through openings as they may touch dangerous voltage points or short-out parts that could result in a fire or electric shock.
The apparatus shall not be exposed to dripping or splashing and no objects filled with liquids, such as vases shall be placed on the apparatus.
Don’t put candles or other burning objects on top of this unit.
17.Batteries
Always consider the environmental issues and follow local regulations when disposing of batteries.
18.If you install the apparatus in a built-in installation, such as a bookcase or rack, ensure that there is adequate ventilation.
Leave 20 cm (8") of free space at the top and sides and 10 cm (4") at the rear. The rear edge of the shelf or board above the apparatus shall be set 10 cm (4") away from the rear panel or wall, creating a flue-like gap for warm air to escape.
3
Precautions
1.Recording Copyright—Unless it’s for personal use only, recording copyrighted material is illegal without the permission of the copyright holder.
2.AC Fuse—The AC fuse inside the unit is not userserviceable. If you cannot turn on the unit, contact your Onkyo dealer.
3.Care—Occasionally you should dust the unit all over with a soft cloth. For stubborn stains, use a soft cloth dampened with a weak solution of mild detergent and water. Dry the unit immediately afterwards with a clean cloth. Don’t use abrasive cloths, thinners, alcohol, or other chemical solvents, because they may damage the finish or remove the panel lettering.
4.Power WARNING
BEFORE PLUGGING IN THE UNIT FOR THE FIRST TIME, READ THE FOLLOWING SECTION CAREFULLY.
AC outlet voltages vary from country to country. Make sure that the voltage in your area meets the voltage requirements printed on the unit’s rear panel (e.g., AC 230 V, 50 Hz or AC 120 V, 60 Hz).
The power cord plug is used to disconnect this unit from the AC power source. Make sure that the plug is readily operable (easily accessible) at all times.
For models with [POWER] button, or with both [POWER] and [ON/STANDBY] buttons:
Pressing the [POWER] button to select OFF mode does not fully disconnect from the mains. If you do not intend to use the unit for an extended period, remove the power cord from the AC outlet.
For models with [ON/STANDBY] button only: Pressing the [ON/STANDBY] button to select Standby mode does not fully disconnect from the mains. If you do not intend to use the unit for an extended period, remove the power cord from the AC outlet.
5.Preventing Hearing Loss Caution
Excessive sound pressure from earphones and headphones can cause hearing loss.
6.Batteries and Heat Exposure Warning
Batteries (battery pack or batteries installed) shall not be exposed to excessive heat as sunshine, fire or the like.
7.Never Touch this Unit with Wet Hands—Never handle this unit or its power cord while your hands are wet or damp. If water or any other liquid gets inside this unit, have it checked by your Onkyo dealer.
8. Handling Notes
0If you need to transport this unit, use the original packaging to pack it how it was when you originally bought it.
0Do not leave rubber or plastic items on this unit for a long time, because they may leave marks on the case.
0This unit’s top and rear panels may get warm after prolonged use. This is normal.
0If you do not use this unit for a long time, it may not work properly the next time you turn it on, so be sure to use it occasionally.
For U.S. models
FEDERAL COMMUNICATIONS COMMISSION DECLARATION OF CONFORMITY
This device complies with part 15 of the FCC Rules. Operation is subject to the following two conditions:
(1)this device may not cause interference, and
(2)this device must accept any interference, including interference that may cause undesired operation of the device.
Product Name: |
Network Stereo Receiver |
Model Number: |
TX-8160 |
Responsible Party Name: Onkyo U.S.A. Corporation |
|
Address: |
18 PARK WAY, UPPER |
|
SADDLE RIVER, NEW |
|
JERSEY 07458, USA |
Phone: |
1-800-229-1687 |
FCC Information for User CAUTION:
The user changes or modifications not expressly approved by the party responsible for compliance could void the user’s authority to operate the equipment.
NOTE:
This equipment has been tested and found to comply with the limits for a Class B digital device, pursuant to Part 15 of the FCC Rules. These limits are designed to provide reasonable protection against harmful interference in a residential installation. This equipment generates, uses and can radiate radio frequency energy and, if not installed and used in accordance with the instructions, may cause harmful interference to radio communications. However, there is no guarantee that interference will not occur in a particular installation. If this equipment does cause harmful interference to radio or television reception, which can be determined by turning the equipment off and on, the user is encouraged to try to correct the interference by one or more of the following measures:
–Reorient or relocate the receiving antenna.
–Increase the separation between the equipment and receiver.
–Connect the equipment into an outlet on a circuit different from that to which the receiver is connected.
–Consult the dealer or an experienced radio/TV technician for help.
4
For Canadian Models NOTE:
CAN ICES-3 B/NMB-3 B
For models having a power cord with a polarized plug:
CAUTION:
TO PREVENT ELECTRIC SHOCK, MATCH WIDE BLADE OF PLUG TO WIDE SLOT, FULLY INSERT.
Modèle pour les Canadien REMARQUE :
CAN ICES-3 B/NMB-3 B
Sur les modèles dont la fiche est polarisée :
ATTENTION :
POUR ÉVITER LES CHOCS ÉLECTRIQUES, INTRODUIRE LA LAME LA PLUS LARGE DE LA FICHE DANS LA BORNE CORRESPONDANTE DE LA PRISE ET POUSSER JUSQU’AU FOND.
This device complies with Industry Canada licenceexempt RSS standard(s). Operation is subject to the following two conditions: (1) this device may not cause interference, and (2) this device must accept any interference, including interference that may cause undesired operation of the device.
This transmitter must not be co-located or operated in conjunction with any other antenna or transmitter.
RF Exposure Compliance
This equipment complies with FCC/IC radiation exposure limits set forth for an uncontrolled environment and meets the FCC radio frequency (RF) Exposure Guidelines in Supplement C to OET65 and RSS-102 of the IC radio frequency (RF) Exposure rules. This equipment has very low levels of RF energy that it deemed to comply without maximum permissive exposure evaluation (MPE). But it is desirable that it should be installed and operated keeping the radiator at least 20 cm or more away from person’s body (excluding extremities: hands, wrists, feet and ankles).
Precautions
DISCLAIMER
Through this device you are able to link to other services or websites which are not under the control of any company which has designed, manufactured or distributed/have distributed this device, and its affiliates (collectively, “Company”). We have no control over the nature, content and availability of those services. The inclusion of any links does not necessarily imply a recommendation or endorse the views expressed within them.
All information, content and services available through this device belong to third parties and are protected by copyright, patent, trademark and/or other intellectual property laws of applicable countries.
The information, content and services provided through this device are for your personal, noncommercial use only. Any information, content or services may not be used in any manner other than previously approved by the appropriate content owner or service provider. You may not modify, copy, republish, translate, exploit, create derivative works, upload, post, transmit, sell or distribute in any manner any information, content or
services available through this device, unless expressly permitted by the appropriate copyright, patent, trademark and/or other intellectual property owner, including, without limitation, content owner or service provider.
THE CONTENT AND SERVICES AVAILABLE THROUGH THIS DEVICE ARE PROVIDED “AS IS”. COMPANY DOES NOT WARRANT INFORMATION, CONTENT OR SERVICES SO PROVIDED, EITHER EXPRESSLY OR IMPLIEDLY, FOR ANY PURPOSE. COMPANY EXPRESSLY DISCLAIMS ANY WARRANTIES, EXPRESS OR IMPLIED, INCLUDING BUT NOT LIMITED TO, WARRANTIES OF TITLE, NONINFRINGEMENT, MERCHANTABILITY OR FITNESS FOR A PARTICULAR PURPOSE.
Company makes no representation or warranty of any kind, express or implied, about the completeness, accuracy, validity, legality, reliability, suitability or availability with respect to the information, content or services available through this device. Company shall not be liable, whether in contract or tort, including negligence and strict liability, for any direct, indirect, special, incidental or consequential damages or any other damages arising out of, or in connection with, any information contained in, or as a result of the use of any content or service by you or any third party, even if Company has been advised of the possibility of such damages, nor shall Company be liable for any third party claims against users of this device or any third party.
In no event shall Company be responsible nor liable for, without limiting the generality of the foregoing, any interruption or suspension of any information, content or service available through this device. Company is neither responsible nor liable for customer service related to the information, content and services available through this device. Any question or request for service relating to the information, content or services should be made directly to the appropriate content owners and services providers.
5

Features
A wide range of playback possibilities with Network Features
Connect to the router to the network to access a vast store of music. You can connect to the network via a wireless LAN router by Wi-Fi®.
0Many of the major Internet radio services such as TuneIn Radio are preregistered in the menu
0Supports AirPlay®. You can wirelessly play music files stored on an iPhone®, iPod touch®, or iPad®
0Supports Spotify. Play music from Spotify with high sound quality
0Home network feature that allows you to play music files from your computer (DLNA, Home Media)
Plays high-quality 192 kHz/24 bit high-res sources
You can play high-res sources in formats such as WAV, FLAC, or DSD files (*) distributed over the Internet by using the Home Network feature or connecting a USB storage device.
0Playback through the home network feature
By connecting this unit to the same router as your computer, you can play the high-res sources you downloaded to your computer using the DLNA or Home Media features with simple operations on the remote control.
0Playback from connected USB storage devices
By connecting the USB storage device containing high-res sources to this unit, you can play them with
simple operations on the remote control.
* The unit supports WAV and FLAC files up to 192 kHz/24 bit (up to 96 kHz when playing WAV files from a USB storage device). The unit can play 2.8 MHz and 5.6 MHz DSD files (only 2.8 MHz when playing from a USB storage device). See “Compatible devices/media/file formats” (> 43) for details.
High-quality, fully-fledged audio design
0High-powered discrete amplifier that can drive even a large speaker system
0WRAT (Wide Range Amplifier Technology)
0High-power transformer with silicon steel shielding to reduce leakage flux
0Closed loop circuit to stabilize the ground potential
0Heavy duty parts supported from below by the oval chassis
0Direct feature that outputs pure sound as it was intended by bypassing the tone control circuits during play
0Optimum Gain Volume Circuitry
0Two speaker terminal systems, A and B, SUBWOOFER PRE OUT jack
0DIGITAL IN and LINE IN terminals to play external players. Supports connection to a record player with a PHONO terminal or with a MM cartridge
Other functions
0Front USB port for playing music files on a USB storage device
0Bluetooth function
0AM/FM tuner capable of presetting up to 40 stations
0BGM button that gives you access to Internet radio or AM/FM radio at the touch of a button
0Opt1 In Wakeup feature that starts this unit when a player connected with a digital optical cable starts
0Multi-zone feature that allows you to enjoy music in a different room (Zone 2)
0A wide variety of music files are supported, including MP3, WAV, FLAC, DSD, WMA, MPEG4 AAC (with the Home Network feature and connection of a USB storage device)
Onkyo Remote (smartphone app)
0Input source selection, volume adjustments, and other basic operations possible on your smartphone, which serves as the unit’s remote control
0GUI screens that enable intuitive track selection operations on the Internet radio and DLNA
0Streaming of music data stored on your smartphone Supports iOS and AndroidTM devices. You will need a wireless LAN environment to use apps.
6

Names and functions of parts
Front
 Í ON/STANDBY button: Press this button to turn the unit on or put it in standby mode.
 MENU/MEMORY button: Press this button to display the menu or register a AM/FM station.
 Playback (1)/Pause (;)/TUNING MODE button:
Press this button to playback (*), pause (*), or switch the AM/FM tuning mode.
 HYBRID STANDBY LED: Lights when any of Network Standby, Bluetooth Wakeup, or Opt1 In Wakeup are on.
 Remote control signal receiver
 ZONE 2/OFF button: For use when the unit is connected with a pre-main amplifier or a power amplifier in a separate room and sound is played there.
 Display (> 8)
 SETUP button: Used to display the setup menu.
 Direction/4TUNING3/2PRESET1/ENTERbutton:
Move the cursor and confirms the selection. When listening to AM/FM broadcasting, tune in to the station with 4TUNING3 or select the registered station with 2PRESET1.
 RETURN button: Returns the display to the previous state during setting or operation.
 VOLUME control: Used to adjust the volume.
 PHONES terminal: Connect headphones with a standard plug.
 DIMMER button: Use this button to switch the display’s brightness between normal, moderately dark and dark.
 SPEAKER A/B button: Select the terminals to output audio from between SPEAKERS A/B.
 INPUT control: Selects the source to playback.Turn the control to switch the source in the following order; BD/DVD#CBL/SAT#PC#GAME#CD#PHONO# TV/TAPE#AM#FM#NET#BLUETOOTH
 BASS control: Adjusts the bass level.
 TREBLE control: Adjusts the treble level.
 BALANCE control: Adjusts the audio output balance between the left and right speakers.
 BGM 1/2/3/4 buttons: Preset your favorite Internet radio or AM/FM radio stations.
 USB port: A USB storage device is connected so that music files stored in it can be played.
*Operate with USB storage device play or the home network feature (DLNA, Home Media).
7

Names and functions of parts
|
|
|
|
|
|
|
|
|
|
|
|
Display
 DIRECT indicator: This indicator appears when Direct of the audio quality setup is on.
 Z2: Lights when Zone 2 output is on.
 Speaker selection display (A/B): Displays the selected speaker terminals.
 PCM/DSD: Lights according to the type of input digital signals.
 Playback/Pause/Cursor display
 AM/FM reception statuses
AUTO: This indicator appears when Auto Tuning Mode is selected.
FM STEREO: This indicator appears when the unit is tuned into a stereo FM broadcast.
1TUNED2: This indicator appears when the unit is tuned into a radio station.
 Headphone indicator: Stays lit when headphones are connected.
 NET: Lights when “NET” is selected as the input source. It will flash if the connection is not correct.
 MUTING indicator: This indicator flashes when audio is muted temporarily.
 Volume level
 USB: Lights when “USB” is selected as the input source. It will flash if the connection is not correct.
 SLEEP indicator: This indicator appears when the sleep timer is set.
 DIGITAL: Lights when the selected input source is digital.
 Message display area: Track information and menus appear here.
The following icons appear.


 : Folder


 : Track/Broadcast station name


 : Playing back

 : Paused


 : Searching forward


 : Searching backward


 : Artist name


 : Album name


 : Repeat all tracks


 : Repeat one track


 : Repeat tracks in the folder or playlist (DLNA)


 : Random
8

Names and functions of parts
Remote control
 Í button: Press this button to turn the unit on or put it in standby mode.
 INPUT SELECTOR buttons: Use these buttons to select the source.
 Skip (:/9) buttons (*)
 Search (6/5) buttons (*)
 REPEAT button: Turns repeat play on and off and selects the mode. (*)
 SPEAKER A/B button: Select the terminals to output
audio from between SPEAKERS A/B.
 Direction (
 /
/ /
/  /
/  )/ENTER buttons: Select items with the direction buttons and press the ENTER button to confirm.
 SETUP button: Used to display the setup menu.
 CH (i/j) buttons: Select registered stations.
 Number buttons
 DISPLAY button: Change the information shown.
 DIMMER button: Use this button to switch the display’s brightness between normal, moderately dark and dark.
 REMOTE MODE MAIN button: Switches the remote control to the mode for operating this unit.
 REMOTE MODE ZONE 2 button: For use when the unit is connected with a pre-main amplifier in a separate room and sound is played there.
 Pause (;) button (*)
 Playback (1) button (*)
 Stop (∫) button (*)
 RANDOM button: Plays tracks in the folder or playlist (DLNA) randomly. (*)
 MENU button: Press this button to display the menu.
 RETURN button: Returns the display to the previous
state during setting or operation.
 VOLUME 3/4 button
 AUDIO button: Use this button to adjust sound quality, etc.
 MUTING button: Temporarily mutes audio.
 CLR button: Use this button to clear the characters that you have input.
 SLEEP button: Press this button to set the sleep timer.
*Operate with USB storage device play or the home network feature (DLNA, Home Media).
Remote control sensor
Batteries |
5 m (Approx. |
(AAA/R03) |
16 ft.) or less |
*If you intend not to use the remote control for a long time, remove the batteries to prevent damage from leakage or corrosion. Expired batteries should be removed as soon as possible to prevent damage from leakage or corrosion.
9
Names and functions of parts
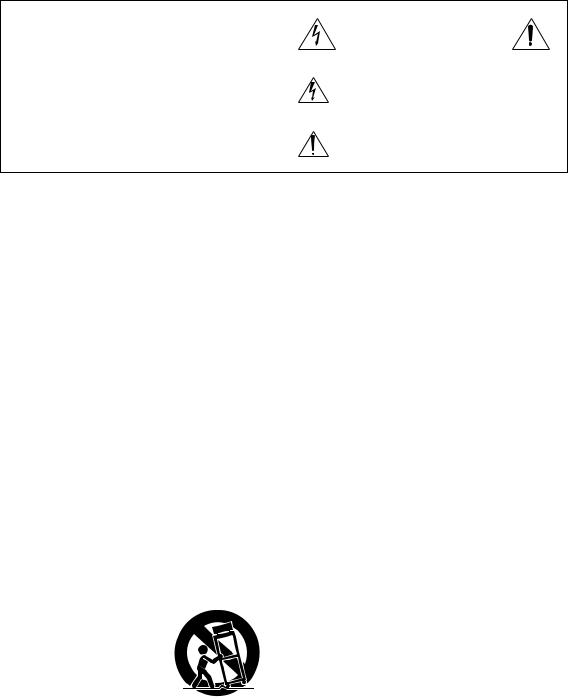
Rear


 REMOTE CONTROL jack: An Onkyo product with RI jack can be connected and synchronized with this unit.
 FM 75h and AM ANTENNA terminals: The supplied antennas are connected.
 ETHERNET port: Connect to the router with an Ethernet cable.
 IR IN/OUT terminals: Connected to the multi-room remote control kit. Special devices or cables are necessary. For more information about preparation, contact the specialized stores.
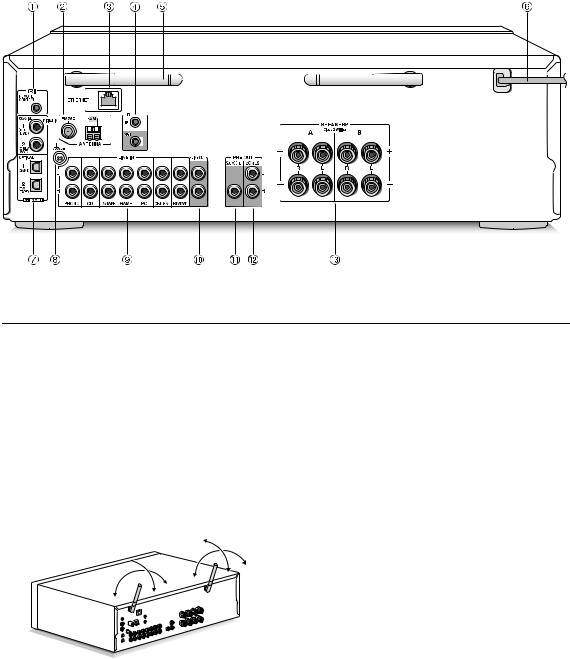
 Wireless antenna: Used for Wi-Fi connection or when using a Bluetooth enabled device. Adjust their angles according to the connection status.
90°
180°
90°
180°
 Power cord: Connect the power cord to an AC outlet. Disconnect the power cord only after putting the unit into standby mode.
*Turning on the unit may cause a momentary power surge that might interfere with other electrical equipment on the same circuit. If this is a problem, plug the unit into a different branch circuit.
 DIGITAL IN OPTICAL/COAXIAL terminals:
Connected to players. Use a digital optical cable or digital coaxial cable for connection with the digital audio output jack of a player.
 GND terminal: Connect if the record player has a ground wire.
 LINE IN terminals: Connected to players. Use an RCA cable for connection with the LINE OUT terminal of a player.
 LINE OUT terminals: Use when connecting recording devices, such as a cassette tape deck. Use an RCA cable to connect to the LINE IN terminal on a recording device.
 SUBWOOFER PRE OUT jack: Connect a subwoofer with a built-in amplifier to amplify bass output.
 ZONE 2 PRE OUT terminals: Audio output jack connected to the pre-main amplifier or the power amplifier for multi-zone playback in a separate room.
 SPEAKERS A/B terminals: You can connect a set of left and right speakers to each of the A/B terminals.
10
Connections
¥ The power cord must be connected only after all other |
|
cable connections are completed. |
12 - 15 mm (1/2” - 5/8”) |
Connecting speakers
It
De
Left speaker
Right speaker
When connecting only one set of speakers, connect to the SPEAKERS A terminals as shown in the illustration. Make correct connection between the unit’s jacks and speaker’s jacks (i to i and j to j) for each channel. If connection is wrong, a bass sound may become poor due to reverse phase.
0Connect speakers with 4 h to 16 h impedance. You have to change the impedance setting if any of the speakers have 4 h or more to less than 6 h impedance. See setup menu “3. Hardware” - “Speaker Impedance” (> 37).
Twist the wires of the speaker cable tightly before inserting into the terminals. After inserting the cables, tighten the terminals firmly by turning to the right. Note that when using commercially available banana plugs, first tighten the speaker terminals and then insert the banana plugs. It is not possible to connect by inserting the core of the speaker cable directly into the hole for a banana plug.
Banana plug
When also connecting to the SPEAKERS B terminals:
Connect using the same method described for SPEAKERS A. Connect speakers with 8 h to 16 h impedance to the both A/B terminals. In this case, change the impedance setting on this unit. See setup menu “3. Hardware”-“Speaker Impedance” (> 37).
0Press the SPEAKER A/B button on the unit or the remote control to switch the speakers. (The selection changes in the order SPEAKER A#SPEAKER B#SPEAKER AiB.)
11

When connecting a subwoofer:
Subwoofer with a built in amplifier
Use a subwoofer cable to connect the SUBWOOFER PRE OUT jack to the LINE INPUT terminal on a subwoofer with a built in amplifier.
0Audio is output from the SUBWOOFER PRE OUT jack when you set either SPEAKER A or SPEAKER AiB as the speakers to output audio.
The following connections can cause damage so please be careful.
Short-circuiting the i cable and j 

 cable
cable
Contacting the cable core to the rear panel of the unit
Connecting two or more cables to one speaker terminal of this unit
Connecting two or more cables to one terminal of a speaker
Connections
Connecting a player
You can enjoy the audio from players such as televisions, Blu-ray disc players, and game consoles.
DIGITAL IN connection
If the player has an optical or coaxial digital output terminal, connect using either a digital optical cable or digital coaxial cable to one of the DIGITAL IN terminals. To play, select the terminal name with the INPUT SELECTOR.
Note that this unit is equipped with an “Opt1 In Wakeup feature” so that when play starts on a player connected to the OPTICAL 1 (GAME) terminal, this unit comes on and the INPUT SELECTOR automatically changes. (> 37)
0The DIGITAL IN terminals can only handle PCM signals.
0As the digital in optical jack of the unit has a cover, push in the cable straight against the cover as it is turned inside.
12

LINE IN connection
Use an RCA cable to connect to the LINE OUT terminal on the player to one of the LINE IN terminal on this unit. To play, select the terminal name with the INPUT SELECTOR.
Connections
AM/FM antenna connections
Connect the antennas to listen to AM/FM broadcast.
0You may be unable to receive radio transmissions in some areas even if you connect an antenna.
AM antenna
0Connect the record player (MM cartridge) to the LINE IN PHONO terminal. If the record player has a ground wire, connect it to the GND terminal of this unit. Note that if the connected record player has a built-in audio equalizer, connect it to a LINE IN terminal other than PHONO.
Assemble the AM loop antenna (supplied) and connect it to the AM terminal.
FM antenna
Connect the supplied FM antenna to the FM 75h terminal. Make sure the plug is pushed in all the way. Use a tack or similar to fix the antenna to a wall.
13

Network connection
This enables you to enjoy Internet radio services (*), AirPlay, Spotify, and the home network features. Connect to the same router as the smartphone, computer, or NAS you are going to use.
* You need to be able to connect to the Internet.
Wired connection
Connections
Wi-Fi® connection
Set up the Wi-Fi connection with the access point (a wireless LAN router, for example). Set with the remote control while watching the display on the main unit.
Make the following preparations.
Write down the SSID and password (key) of the access point if they are shown in the label of the main body.
*The unit supports Wi-Fi connection with 2.4 GHz access point.
Connect to the router to this unit’s ETHERNET port with an Ethernet cable (*).
* Use a shielded CAT5 Ethernet cable (straight-type).
 ,
, ,
, ,
,  ,
,
ENTER
SETUP |
RETURN |
1.Turn on the unit.
2.Press the SETUP button.
The setup menu appears on the display.
3.Use the direction (  /
/ ) buttons to select “6. Network” on the display and press the ENTER button.
0 If it is not displayed, wait for a moment until the network feature starts.
4.Use the direction ( /
/ ) buttons to select “Wi-Fi” on
the display, and then use the direction ( /
/ ) buttons to select “On”.
14

5.Use the direction ( /
/ ) buttons to select “Wi-Fi Setup”, and then press the ENTER button when “Start” is displayed.
6.Use the direction ( /
/ ) buttons to select the method of Wi-Fi connection and press the ENTER button. Scan Networks: Use this unit to search for and connect to a wireless LAN router or other access point. Use iOS Device: If you are using a device using iOS 7 or later, you can connect easily with Wi-Fi just by sharing the iOS device’s Wi-Fi settings with this unit.
∫ If you selected “Scan Networks”
7.Use the direction ( /
/ ) buttons to select the SSID of the access point and press the ENTER button.
SSID
0If you changed the initial setting of the access point to skip password entry, step 8 is unnecessary.
0If you changed the initial setting of the access point to hide the SSID, see “When the access point is not displayed”.
8.Press the direction ( /
/ ) buttons to select an authentication method from the following and press the ENTER button.
Enter Password: Enter the password of the access point to establish connection.
Enter the password on the display.
0For information on how to input characters, see “Inputting characters” (> 36) under “Various settings”.
Push Button: Use the automatic setting button of the access point to establish connection.
Hold down the automatic setting button of the access point for the necessary seconds, select “OK” on the display and press the ENTER button.
PIN code: Select this method when the automatic setting button of the access point is beyond the reach. The 8-digit PIN code is displayed. Register the displayed PIN code to the access point, select “OK” on the display and press the ENTER button. For how to register the PIN code to the access point, refer to its instruction manual.
Connections
When the access point is not displayed
Use the direction (  ) button to select the “Other...” on the display and press the ENTER button. Input the SSID. When “Security” is displayed on the display, make the following settings according to the router setting.
0For information on how to input characters, see “Inputting characters” (> 36) under “Various settings”.
∫ WPA/WPA2 method
Use the direction ( /
/  ) buttons to select the “WPA” or “WPA2” on the display and press the ENTER button. Input the password.
∫ WEP method
Use the direction (  /
/  ) buttons to select the “WEP” on the display and press the ENTER button. Input the password. When “Default Key” is displayed on the display, select the Default Key ID and press the ENTER button.
0If encryption setting has not been made on the wireless LAN router, use the direction ( /
/ ) buttons to select the “None” on the “Security” display and press the ENTER button.
∫If you selected “Use iOS Device”
7.On the iOS device, go to “Settings”-“Wi-Fi” and turn on the setting, then select this unit in “SETUP NEW AIRPLAY SPEAKER”.
8. Tap “Next”.
When connection is successful: The setup menu ends automatically.
0You can confirm the connection status by pressing the SETUP button and selecting “6. Network”-“Status”.
15

Listening to Internet radio
Router
This unit
Some Internet radio services are registered to the unit by default. You can display the desired service, menu or radio station on the display and play the radio with simple remote control operation.
TuneIn Radio
With the radio stations and the on-demand programs registered, TuneIn Radio is a service where you can enjoy music, sports and news from all over the world.


 NET
NET
 MENU
MENU
 ,
, ,
, ,
,  ,
,
ENTER
 RETURN
You can also listen to broadcast stations that are not included in the preset services by registering them to “My Favorites”, which appears when you press the NET button.
0Services available may vary depending on the region. If service from the service provider stops, use of that network services and contents might cease to be possible.
Playing back
1.Press the NET button.
2.Use the direction ( /
/ ) buttons to select “TuneIn Radio” on the display and press the ENTER button.
3.Press the direction ( /
/ ) buttons to select a folder or menu item from the “TuneIn Radio” top list, and press the ENTER button.
0 The folders and menu items displayed on the top list are provided by the Internet radio service and categorised by genre, etc.
4.Use the direction ( /
/ ) buttons to select a radio station and press the ENTER button.
Playback starts.
0If there are more than 10 items when you select a folder or menu, you can move through the list numbers
10 at a time each time you press the direction ( /
/ ) buttons.
16
 Loading...