


R
INSTRUCTION MANUAL
AUTOMATIC INFLATION BLOOD PRESSURE MONITOR
Model HEM-712C
ENGLISH ESPAÑOL

TABLE OF CONTENTS
Introduction …………………………………………………………… 3 Important Safety Notes ……………………………………………… 4 Know Your Unit ……………………………………………………… 5 Suggestions Before Taking A Measurement ………………………… 6 Battery Installation/Replacement …………………………………… 7 Care and Maintenance ……………………………………………… 8
How To Apply The Arm Cuff |
…………………………………… 9-10 |
How To Take A Measurement |
………………………………… 11-12 |
How To Use The Memory Function ………………………………… 13 Error Indicators ……………………………………………………… 14 FCC Statement ……………………………………………………… 15 Warranty Information ………………………………………… 16-17 Specifications ………………………………………………………… 18 Notes ………………………………………………………………… 19
2

INTRODUCTION
Thank you for purchasing the Omron HEM-712C Automatic Inflation Blood Pressure Monitor.
Fill-in for future reference
DATE PURCHASED: ______________
SERIAL NUMBER: ________________
Staple your purchase receipt here.
This completely automatic instrument quickly measures your blood pressure and pulse rate. The measurement reading is clearly displayed on a large digital panel.
Your new digital blood pressure monitor uses the oscillometric method of blood pressure measurement. This means the monitor detects
your blood’s movement through your brachial artery and converts the movements into a digital reading. An oscillometric monitor does not need a stethoscope so the monitor is simple to use.
The Omron HEM-712C Automatic Inflation Blood Pressure Monitor is intended for home use.
SAVE THESE INSTRUCTIONS
3

IMPORTANT SAFETY NOTES
To assure the correct use of the product basic safety measures should always be followed including the precautions listed below:
Read all information in the instruction book and any other literature included in the box before using the unit.
Contact your physician for specific information about your blood pressure. Follow the instructions of your healthcare provider.
Operate the unit only as intended. Do not use for any other purpose.
The unit is intended for use in measuring blood pressure and pulse rate in adult patient population. Do not use on infants.
Do not use a cellular phone near the unit. It may result in operational failure.
Changes or modifications not approved by Omron Healthcare will void the user warranty. Do not disassemble or attempt to repair the unit or components.
4

KNOW YOUR UNIT |
||
Systolic Blood Pressure |
|
|
Display |
|
|
Diastolic Blood Pressure |
Heart Symbol |
|
/Pulse Display |
||
|
-712C |
|
|
HEM |
|
Air Jack |
AC Adapter Jack |
|
Air Plug |
||
ON/OFF Button |
||
|
||
|
START Button |
|
|
MEMORY Button |
|
|
Cuff Tube |
Arm Cuff |
Cuff Tab |
|
5

SUGGESTIONS BEFORE TAKING
AMEASUREMENT
1.Avoid eating, smoking, and exercising for 30 minutes before taking a measurement. Rest for at least 15 minutes before taking the measurement.
2.Stress raises blood pressure. Avoid taking measurements during stressful times.
3.Remove tight-fitting clothing from your left arm.
4.Measurements should be taken in a quiet place.
5.Sit in a chair with your feet flat on the floor. Rest your left arm on a table so that the cuff is at the same level as your heart.
6.Remain still and do not talk during the measurement.
7.Keep a record of your blood pressure and pulse readings for your physician. A single measurement does not provide an accurate indication of your true blood pressure. You need to take and record several readings over a period of time. Try to measure your blood pressure at the same time each day for consistency.
8.Wait 2-3 minutes between measurements. The wait time allows the arteries to return to the condition prior to taking the blood pressure measurement. You may need to increase the wait time depending on your individual physical characteristics.
6
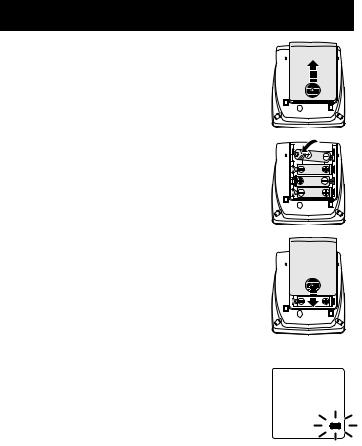
BATTERY INSTALLATION / REPLACEMENT
1. Slide the battery cover off in the direction of the arrow.
2. Install 4 “AA” size batteries so + (positive)
and – (negative) polarities match the polarities of the battery compartment as indicated.
3. Replace the battery cover.
NOTE: If the Low Battery Indicator appears on the display, replace all four batteries. Long-life alkaline batteries are recommended.
7

CARE AND MAINTENANCE
To keep your digital blood pressure monitor in the best condition and protect the unit from damage follow the directions listed below:
Clean the monitor with a soft dry cloth. Do not use any abrasive or volatile cleaners. Do not attempt to clean the cuff. Never immerse the monitor or any components in water.
Store the monitor in a safe and dry location. Do not fold the cuff and tubing tightly. Do not subject the monitor to extreme hot or cold temperatures, humidity and direct sunlight.
Avoid subjecting the monitor to strong shocks, such as dropping the unit on the floor.
Remove the batteries if the unit will not be used for three months or longer. Always replace all the batteries with new ones at the same time.
Use the unit consistent with the instruction provided in this manual.
Use only authorized parts and accessories.
8

HOW TO APPLY THE ARM CUFF
1.If the cuff is assembled correctly, the sewn hook material will be on the outside
of the cuff loop and the metal D-ring will not touch your skin.
2.Pass the end of the cuff furthest from the tubing through the metal D-ring to form a loop. The smooth cloth should be on the inside of the cuff loop.
Smooth Cloth
Pile Material
Sewn Hook
Material
D-Ring
3.Put your left arm through the cuff loop. The bottom of the cuff should be approximately 1/2 inch above the elbow. The cuff tab on the cuff
should lie over the brachial artery on the inside of the arm.
The cuff tube should run down
center of arm even with middle finger.
1/2 inch (12.7 mm)
Cuff tab
9

HOW TO APPLY THE ARM CUFF
4. Pull the cuff so that the top and bottom edges are tightened evenly around your arm.
5. When the cuff is positioned correctly, press the sewn hook material FIRMLY against the pile side of the cuff.
6. Make certain the cuff fits snugly around your arm. The cuff should make good contact with your skin.
7.Sit in a chair with your feet flat on the floor and place your arm on a table so that the cuff is at the same level as your heart.
8. Relax your arm and turn your palm upward.
9. Be sure there are no kinks in the air tubing.
10
HOW TO TAKE A MEASUREMENT
Be sure to read “How to Apply the Arm Cuff” before taking a reading
1. Press the ON/OFF button.
a) All display symbols appear for approximately |
|
one second. This is the initial LCD test. |
|
b) The display symbols disappear and the Deflation |
|
Indication symbol ( |
) starts to flash. |
c) When the monitor completes the necessary |
|
preparations before measurement, the Heart Symbol |
|
( ) appears in the screen. |
|
2. By pressing the START button the unit automatically inflates the cuff to 170 mmHg.
a) If during your measurement the monitor determines that a higher pressure value is required, it will automatically increase the pressure value by 40 mmHg.
b) To inflate higher than 210 mmHg, press and hold the START button until the desired pressure value is reached (approximately 40 mmHg higher than your estimated systolic blood pressure).
Do not inflate higher than 280 mmHg
Initial
LCD Test
Deflation
Indication
Ready to Measure
11
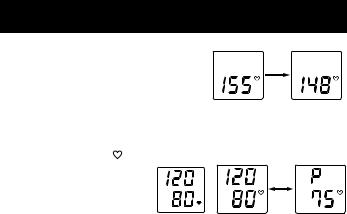
HOW TO TAKE A MEASUREMENT
3.When the correct pressure value is reached, the cuff starts to deflate automatically. As the cuff deflates, decreasing numbers appear on the
display. The Heart Symbol
(  ) flashes at every heartbeat.
4.When the measurement is complete,
the Heart Symbol ( ) stops flashing and your blood pressure and pulse
rate are displayed alternately. Results will be displayed until you turn the unit off. The unit will automatically shut off
in approximately 5 minutes.
Indicated |
Measuring |
Value Drops |
|
Blood Pressure |
Pulse Reading |
Reading Display |
Display |
NOTE: Wait 2-3 minutes before taking another blood pressure measurement. Waiting between readings allows the arteries to return to the condition prior to taking
the blood pressure measurement.
12
 Loading...