


 N90/N9
Instructions for use
Art. Nr. 63771
1/05

JURA


 N90/N9
English . . . . . . . . . . . . . . . . . . . . . . . . . . . . . . . . . . . . . . . . . . . . . . . . . . . . . . . . . . . . . . . . . . . . . . . . . . . . . . . . . . . . . . . . . . . . . . . . . . . . . . . . . . . . . . . . . |
5 – 22 |
Legend:
 DISPLAY: serves as information.
 DISPLAY: please follow the instructions shown.
|
|
= Note |
|
= Important |
|
= Tip |
JURA Elektroapparate AG, CH-4626 Niederbuchsiten, |
|
|
|
|
||||
|
|
|
|
||||
|
|
|
|
Internet http://www.jura.com |
|||
|
|
|
|
||||
|
|
|
|

|
|
Fig. 1 |
|
|
|
|
Fig. 2 |
|
|
|
Fig. 3 |
|
|
|
|
|
|
|
|
|
|||
|
|
|
|
|
|
|
|
|
|
|
|
|
|
|
|
|
|
|
|
|
|
|
|
|
|
Fig. 4 |
|
|
|
Fig. 5 |
|
|
|
Fig. 6 |
|
|
|
|
|
|
|
|
|
|
|
Fig. 7 |
|
Fig. 8 |
|
Fig. 9 |
2
1
3
4 5 6 7 8 |
9 |
|
10 |
3 |
|
2 |
11 |
|
12/13 |
1 |
14 |
|
|
|
15 |
|
16 |
18 |
17 |
|
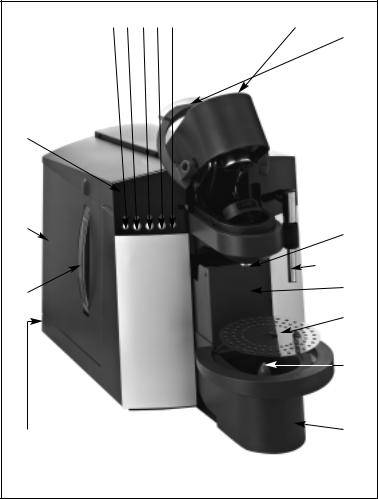
Description of machine:
1.Water tank filling level indicator
2.Water tank with handle
3.Display dialogue system / control panel
4.ON/OFF key
5.Draw-off key small cup (arrow key)
6.Draw-off key large cup
7.Steam selection key (arrow key)
8.Programming key
9.Hot water / steam valve (Fig.3/4)
10.Shackle
11.Coffee spout
12.Replaceable steam / frothing jet (Fig. 7)
13.Replaceable hot water jet
14.Capsule container
15.Drip grate
16.Water filling level indicator
17.Drip tray
18.Power switch
Contents
JURA NESPRESSO N90/N9
1. |
Description of the machine................................ |
page |
6 |
13. |
Switching off machine ..................................... |
page 12 |
|
|
||
2. |
Safety information .......................................... |
page |
6 |
14. |
Adjusting the water quantity for coffee ................ |
page 12 |
|
|
||
|
2.1 |
Warning .............................................. |
page |
6 |
15. |
Programming ................................................ |
page 12 |
|
|
|
|
2.2 |
Precautions .......................................... |
page |
6 |
|
15.1 |
Programming the filter ........................... |
page 12 |
|
|
|
2.2 |
Power switch ........................................ |
page |
7 |
|
15.2 |
Programming the water hardness............... |
page 12 |
|
|
3. |
First steps..................................................... |
page |
7 |
|
15.3 |
Programming the steam portion ................ |
page 13 |
|
|
|
|
3.1 |
Check the mains voltage .......................... |
page |
7 |
|
15.4 |
Programming the water portion ................ |
page 13 |
|
|
|
3.2 |
Check electrical fuse............................... |
page |
7 |
|
15.5 |
Programming the time ............................ |
page 13 |
|
|
|
3.3 |
Refill water .......................................... |
page |
7 |
|
15.6 |
Programming the automatic switch-on time .page 14 |
|
|
|
4. |
Commissioning ............................................... |
page |
7 |
|
15.7 |
Programming the automatic switch-off time .page 15 |
|
|
||
5. |
Adjustment of water hardness |
page |
7 |
|
15.8 |
Cup counter |
page 15 |
|
|
|
|
|
|
||||||||
6. |
Installation of Claris plus filter cartridges ............ |
page |
8 |
|
15.9 |
Number of de-scaling operations................ |
page 16 |
|
E |
|
|
6.1 |
Installing the filter................................. |
page |
8 |
|
15.10 |
Programming the language ...................... |
page 16 |
|
|
|
6.2 |
Replacing the filter ................................ |
page |
9 |
16. Maintenance.................................................. |
page 16 |
|
|||
7. |
................................Rinsing the coffee machine |
page |
9 |
|
16.1 |
......................................Refilling water |
page 16 |
|
|
|
8. |
.......................................Drawing off espresso |
page 10 |
|
16.2 |
..................................Emptying the tray |
page 17 |
|
|
||
9. |
Drawing off hot water...................................... |
page 10 |
|
16.3 |
Replacing the filter ................................ |
page 17 |
|
|
||
10. |
Drawing off steam .......................................... |
page 11 |
|
16.4 |
Unit calcified........................................ |
page 17 |
|
|
||
11. |
Returning to Coffee Ready ................................ |
page 11 |
|
16.5 |
General cleaning instructions .................... |
page 17 |
|
|
||
12. |
Professional Cappuccino Frother (optional N90)..... |
page 11 |
17. |
De-scaling..................................................... |
page 17 |
|
|
|||
|
12.1 |
Drawing off hot milk using the |
|
|
18. |
Disposal ....................................................... |
page 19 |
|
|
|
|
|
Professional Cappuccino Frother ............... |
page 11 |
19. |
Tips for perfect coffee...................................... |
page 19 |
|
|
||
|
12.2 |
Drawing off cappuccino using the |
|
|
20. |
Messages ...................................................... |
page 20 |
|
|
|
|
|
Professional Cappuccino Frother ............... |
page 12 |
21. |
Problems ...................................................... |
page 21 |
|
|
||
|
12.3 |
Cleaning the Professional Cappuccino |
|
|
22. |
Legal information ........................................... |
page 22 |
|
|
|
|
|
Frother ............................................... |
page 12 |
23. |
Technical Data ............................................... |
page 22 |
|
|
||
5

Important information
Thank you very much for purchasing this NESPRESSO coffee machine.
Before using your new machine for the first time, carefully read this operating manual and keep it for future reference.
Should you need more information or if you meet with particular problems not specified in these operating instructions in sufficient detail, either contact us directly or contact your local authorized dealer.
You will also find useful tips on operation and maintenance of your NESPRESSO N90/N9 on the website at www.jura.com
Don’t forget to check out the Knowledge Builder our animated operating instructions. LEO, our assistant, will take you through all the functions.
1. Description of the machine
The JURA NESPRESSO N90/N9 was specially developed for the large number of coffee enthusiasts customers who prefer the strong flavour of a perfect espresso. The machine distinguishes itself by its elegant design and its compact dimensions. Its sophisticated and innovative design ensures an easy use: You can program the water quantity individually and make your espresso at the push of a button. This and the proven dialog system are just some of the advantages of this machine. The interaction between the aroma capsule and the machine ensure extraordinary espresso flavour cup after cup.
2. Safety information
2.1 Warning
Children do not realize the dangers involved in using electric appliances, for this reason always keep an eye on children when they use electric appliances.
The machine may only be used by instructed persons.
Never use a defective machine or a machine with a defective mains cable.
Never immerse the machine in water.
2.2 Precautions
Never expose the machine to weather (rain, snow, frost), never touch the machine when your hands are wet.
Place the IMPRESSA on a firm, level base that is resistant to any water that may leak. Never stand on hot or warm surfaces (oven hobs). Keep out of the reach of children.
If you don’t use the machine for a longer time (holidays, etc.) always disconnect the mains cable.
Always disconnect mains cable before cleaning the machine.
When disconnecting the mains cable never pull on the mains cable or the machine itself.
Never repair or open the coffee machine yourself.
Any repairs may only be carried out by authorized service shops using original spare parts and accessories.
The machine is connected to mains supply via a mains cable. Make sure nobody can trip over the mains cable to prevent injuries and protect the machine against damage. Make sure children and pets cannot reach the machine
Never put the machine or individual parts of it into a dishwasher.
Make sure to install the machine at a place with sufficient air circulation, to prevent overheating of the machine.
6
2.3 Power switch
Actuate the power switch (18) on your NESPRESSO N90/N9 before using the machine for the first time.
We recommend that you switch off your NESPRESSO N90/N9 with the power switch (18) if you intend not to use the machine for longer periods of time (e.g.during holidays)
To ensure perfect operation, please switch the ON/OFF key on your NESPRESSO N90/N9 to standby mode. Then switch the machine off with the power switch (18).
3. First steps
3.1 Check the mains voltage
The machine is preset in the factory to the correct mains voltage. Check if your local mains supply voltage complies with the information given on the type plate on the underside of the machine.
3.2 Check electrical fuse
The machine is designed for an electric current if 10 Ampères. Check if the electrical fuse has sufficient capacity.
3.3 Refill water
Only use fresh, cold water. Never fill in milk, mineral water or other liquids.
Take out the water tank and thoroughly rinse it with cold tap water (Fig. 1)
Then, fill the water tank and reinstall it. Make sure the tank is installed correctly and that it engages properly.
4. Commissioning
Fill the water tank.
Use the ON/OFF key to switch on the machine.
 SPRACHE / DEUTSCH
Now, use the arrow keys to select the required language.
 LANGUAGE / ENGLISH
Finally, press the programming key to save the language settings.
 FILL SYSTEM – PRESS P
Press programming key.
 SYSTEM FILLING
 MACHINE HEATING
 RINSE – PRESS DRAW-OFF KEY
Place a cup under the coffee spout and press one of the draw-off
|
keys (SMALLCUP or LARGECUP). |
E |
|
RINSING |
|
|
READY |
|
5. Adjustment of water hardness
In the machine water is heated up. As a result, calcification occurs during normal use and is indicated automatically. Before using the machine for the first time the hardness of the water used must be adjusted. Use the supplied test sticks for this.
1° German hardness is equivalent to 1.79° French hardness.
The machine has 5 hardness degrees which can be used and are displayed while you are adjusting the water hardness.
7
 Loading...