

Page 1
WELCOME TO TRAKTOR!
Thank you very much for choosing TRAKTOR! This document will guide you to
sources of information and support that will help you to get the best out of your
Native Instruments product.
ADDITIONAL DOCUMENTATION
For detailed information about setting up and using TRAKTOR, please refer to the
corresponding operation manual included in the product package. A PDF le version
of this operation manual has been copied to your hard disk as part of the product
installation. Unless otherwise specied, the folder containing the appropriate PDF
les is located here:
Windows
C:\Program Files\Native Instruments\Traktor\Documentation
Mac OS X
Macintosh HD/Applications/Native Instruments/Traktor/Documentation
To nd out more about recent changes and additions, please read the Readme.txt
le placed in your TRAKTOR installation folder.
Page 2
PRODUCT ACTIVATION
In order to gain access to product updates as well as customer support, you need to
activate your TRAKTOR software. The Native Instruments Service Center application, installed along with the TRAKTOR software, will guide you through the product
activation procedure. For a detailed explanation regarding product activation, please
read the Service Center Quick Start Guide and operation manual. Unless otherwise
specied, the corresponding PDF les were copied to these folders as part of the
Service Center installation:
Windows
C:\Program Files\Native Instruments\Service Center\Documentation
Mac OS X
Macintosh HD/Applications/Native Instruments/Service Center/Documentation
SOFTWARE UPDATES
TRAKTOR is constantly being improved. Please make sure that you are always using
the latest version of TRAKTOR. After you have created a Native Instruments User
Account and activated TRAKTOR, you can conveniently download updates using
the Native Instruments Service Center application. For more information about
downloading updates, please refer to the Service Center Quick Start Guide and the
Service Center operation manual.
Page 3
SUPPORT
If you are experiencing problems related to your Native Instruments product that the
supplied documentation does not cover, there are several ways of getting help:
If problems occur during the product activation procedure, please contact our
►
Registration Support Team via the Registration Support Form.
As a registered user, you can access the NI Knowledge Base that contains
►
helpful product-specic information.
If the hints given there do not help you solve the problems, you can contact
►
our Technical Support Team via the Technical Support Form.
CONTACT
For more information about other Native Instruments products please visit our
homepage www.native-instruments.com
or contact us at ww w.native-instruments.com/contact.info
Page 4

USER MANUAL
Page 5

The information in this document is subject to change without notice and does not represent a commitment on the part of
NATIVE INSTRUMENTS
GmbH. The software described by this document is
subject to a License Agreement and may not be copied to other media. No part of this publication
may be copied, reproduced or otherwise transmitted or recorded, for any purpose, without prior written permission by
NATIVE INSTRUMENTS
GmbH, hereinafter referred to as
NATIVE INSTRUMENTS
.
All product and company names are ™ or ® trademarks of their respective owners.
Users Guide written by André Benedix, Friedemann Becker, Irmgard Bauer
Version: 1.0 (0)/2008)
Special thanks to the members of the Beta Test Team, who were invaluable not just in tracking down
bugs, but in making this a better product.
Page 6

Germany
NATIVE INSTRUMENTS GmbH
Schlesische Str. 28
D-10997 Berlin
Germany
info@native-instruments.de
www.native-instruments.de
USA
NATIVE INSTRUMENTS North America, Inc.
5631 Hollywood Boulevard
Los Angeles, CA 90028
USA
sales@native-instruments.com
www.native-instruments.com
© Native Instruments GmbH, 2008. All rights reserved.
Page 7

1. Welcome Words
Thank you for choosing TRAKTOR!
As legal owner of this software you contribute to its maintenance and to the creation of
future updates.
TRAKTOR PRO and TRAKTOR SCRATCH PRO introduce a new level of usability and cre-
ativity into software based DJing.
NATIVE INSTRUMENTS wishes you a great and successful time working with TRAKTOR!
TRAKTOR PRO / TRAKTOR SCRATCH PRO – 4
Page 8

2. System Requirements
For latest system requirements, compatibility and support of the latest operating systems
please see our website at:
www.native-instruments.com/traktor
TRAKTOR PRO / TRAKTOR SCRATCH PRO – 5
Page 9

3. Installation
This chapter describes in an easy step-by-step explanation how to install TRAKTOR on
your computer.
3.1 Software Installation
3.1.1 Windows Installation
These sections describe the installation procedure on Windows XP.
Double-click “My Computer” then double-click the
1.
content of the CD.
Double-click “Traktor Setup.exe”.
2.
A dialog opens that welcomes you to the installation of TRAKTOR.
3.
The setup program will lead you through the installation procedure. Please follow the
4.
onscreen instructions.
TRAKTOR
CD icon to open the
3.1.2 Mac OS X Installation
These sections describe the installation procedure on Mac OS X.
On Mac, the
1.
tent of the CD.
Double-click “Traktor Installer”.
2.
TRAKTOR
CD icon is displayed on the desktop. Click it to open the con-
Please always refer to the
Please always refer to the
!
!
tion CD as it contains last minute in-
tion CD as it contains last minute information not available in the printed
formation not available in the printed
manual.
manual.
%
%
will be installed by default. You can un-
will be installed by default. You can unselect the Audio 8 DJ by choosing the
select the Audio 8 DJ by choosing the
custom installation.
custom installation.
!
!
tion CD as it contains last minute in-
tion CD as it contains last minute information not available in the printed
formation not available in the printed
manual.
manual.
“Readme” le on the installa-
“Readme” le on the installa-
If you choose a complete instal-
If you choose a complete installation, the Audio 8 DJ drivers
lation, the Audio 8 DJ drivers
Please always refer to the
Please always refer to the
“Readme” le on the installa-
“Readme” le on the installa-
A dialog opens that welcomes you to the installation of TRAKTOR.
3.
The setup program will lead you through the installation procedure. Please follow the
4.
onscreen instructions.
If you choose a complete instal-
If you choose a complete instal-
%
%
will be installed by default. You can un-
will be installed by default. You can unselect the Audio 8 DJ by choosing cus-
select the Audio 8 DJ by choosing custom installation.
tom installation.
TRAKTOR PRO / TRAKTOR SCRATCH PRO – 6
lation, the Audio 8 DJ drivers
lation, the Audio 8 DJ drivers
Page 10

3.2 Audio Device Driver Installation
You have to install the drivers of your audio interface before starting TRAKTOR.
The following chapter describes how to install the drivers of NATIVE INSTRUMENTS’ audio
interface AUDIO 8 DJ.
If you own an audio interface of another manufacturer, please refer to its documentation
to install the drivers.
3.2.1 Windows Installation
Windows Vista Installation
Connect the AUDIO 8 DJ to an available USB port on your computer.
1.
A window will be opened showing the message “Installing device driver software”.
2.
A screen shows up telling you that the Windows Logo Test has not been passed. Click
3.
on “Install anyways” to proceed with the installation.
You cannot install the
You cannot install the
!
!
2.0 port is required.
2.0 port is required.
DJ on a USB 1.1 port – a USB
DJ on a USB 1.1 port – a USB
AUDIO 8
AUDIO 8
When nished, it will display “Your devices are ready to use”.
4.
Windows XP Installation
Connect the AUDIO 8 DJ to an available USB port on your computer.
1.
Windows XP will identify the
2.
the Internet for a driver.
A screen shows up telling you that the Windows Logo Test has not been passed. Click
3.
on “Install anyways” to proceed with the installation.
Your computer will display a “New Hardware found” message.
4.
When nished, it will display “Your devices are ready to use”.
5.
AUDIO 8 DJ
. Choose “No” if Windows asks you to search
TRAKTOR PRO / TRAKTOR SCRATCH PRO – 7
Page 11

3.2.2 Mac OS X Installation
Connect the AUDIO 8 DJ to an available USB port on your computer.
1.
You can make sure if the device shows up correctly by checking the “Audio MIDI
2.
Setup” of Mac OS X – the Audio 8 DJ should be listed there.
3.3 Uninstalling TRAKTOR
3.3.1 Windows
To uninstall TRAKTOR from your computer, use the following steps:
►
►
►
Go to “Windows Start > Control Panel > Software”.
Navigate to the entry “Native Instruments Traktor”.
Click “Remove” and follow the onscreen instructions.
3.3.2 Mac OS X
To uninstall TRAKTOR from your Mac, please delete the TRAKTOR folder located in the
Applications folder.
To uninstall Traktor completely including all settings and the collection les, delete the
following les and folders manually:
►
►
►
►
~/Library/Preferences/com.native-instruments.Traktor Pro.plist
~/Traktor Pro
~/Musik/Traktor
~/Library/Application Support/Native Instruments/Traktor
TRAKTOR PRO / TRAKTOR SCRATCH PRO – 8
Page 12

4. First Steps with TRAKTOR
This chapter helps you to get started with TRAKTOR, especially when you are new to it.
4.1 Starting the Software
For starting TRAKTOR, do the following:
Windows:
►
program icon.
Mac OS X:
►
program icon.
Go to “Start > All Programs > Native Instruments > Traktor” and click the TRAKTOR
Go to “Macintosh HD > Applications > Traktor” and double click on the
TRAKTOR
4.2 Product Authorization
Before you can use TRAKTOR without any restrictions you have to activate the software.
As long as
lowing screen:
TRAKTOR
is not activated, you will be greeted on every startup with the fol-
TRAKTOR PRO / TRAKTOR SCRATCH PRO – 9
Page 13
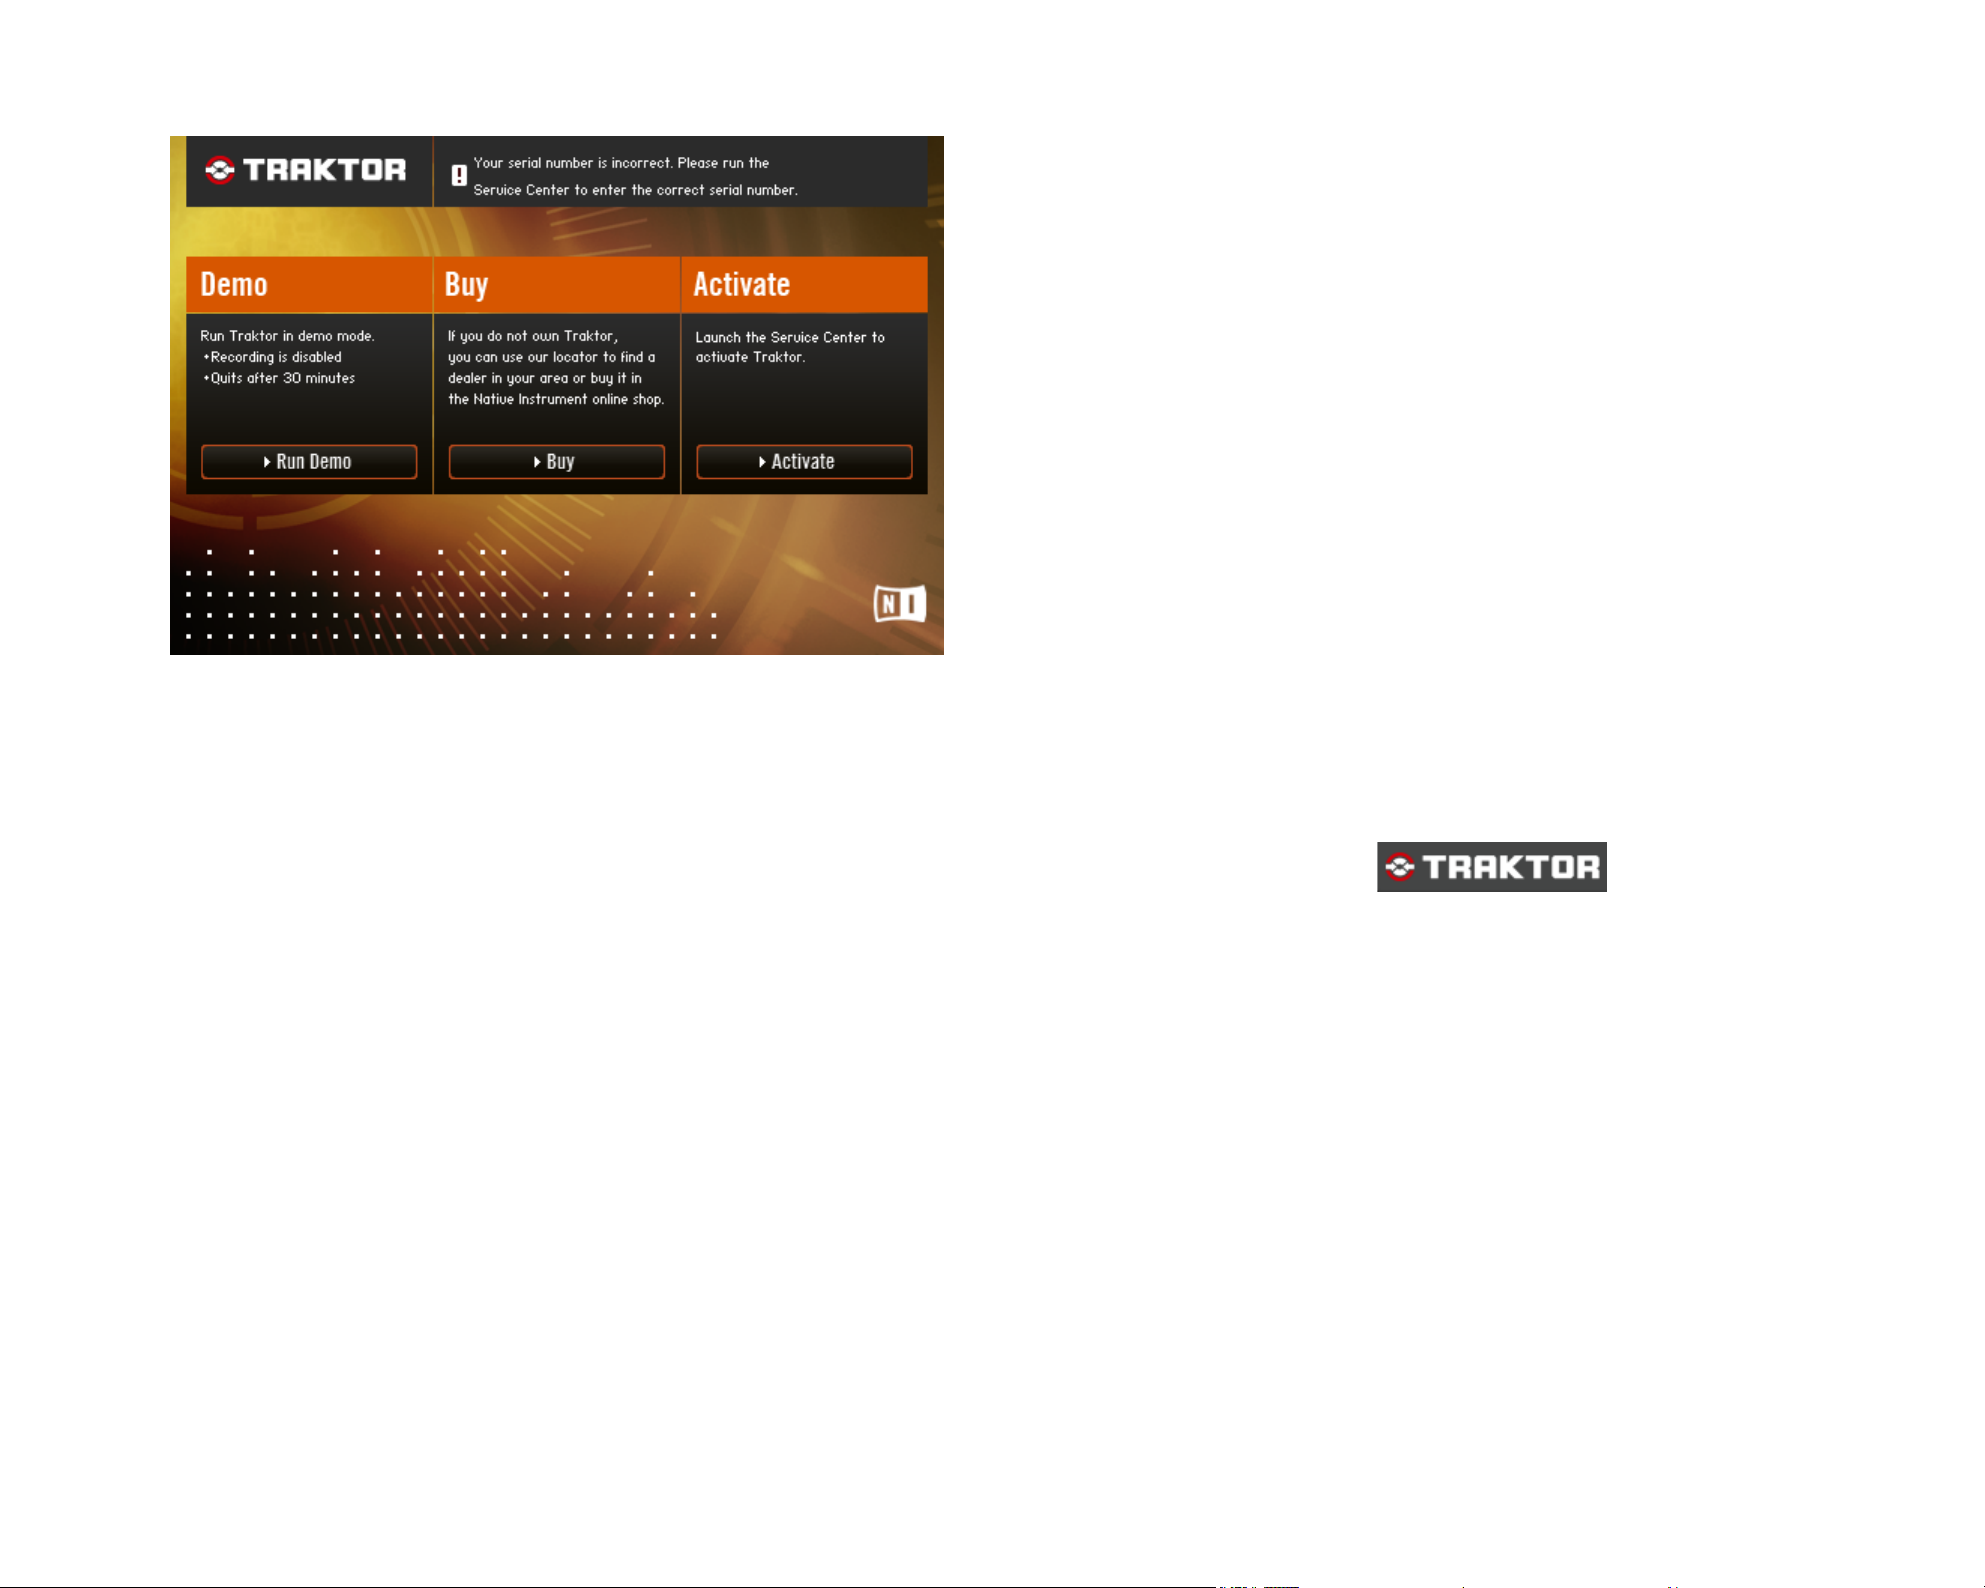
Choose ActivAte to start activation using the NI SERVICE CENTER right away. TRAKTOR
►
will shut down automatically before launching NI SERVICE CENTER. Consult the
separate “Setup Guide” booklet included in your TRAKTOR package for more information about the NI SERVICE CENTER and activating TRAKTOR.
Click on Buy to purchase a copy of
►
shop. Your standard Internet browser will be opened and the NATIVE INSTRUMENTS
website will be loaded.
Choose Run D
►
Demo Mode from the Demo Mode graphic in the TRAKTOR Header.
emo
to run TRAKTOR in Demo Mode. You can see whether you are in
TRAKTOR
in the
NATIVE INSTRUMENTS
4.3 Setup Wizard
When restarting
Mode, the “Setup Wizard” appears. It offers useful options for
ration.
TRAKTOR
after successful activation or when starting
TRAKTOR
TRAKTOR
s initial congu-
in Demo
online
The Demo Mode has the follow-
The Demo Mode has the follow-
!
!
audio processing stops after 30 minutes
audio processing stops after 30 minutes
and audio recording is disabled.
and audio recording is disabled.
ing restrictions:
ing restrictions:
TRAKTOR PRO / TRAKTOR SCRATCH PRO – 10
Page 14

The wizard offers different setup options for users of
TRAKTOR PRO
(described in section
4.3.1 Setting up TRAKTOR PRO) and users of
section 4.3.2 Setting up TRAKTOR SCRATCH PRO).
When starting
►
ask you to select either the TRAKTOR PRO or the TRAKTOR SCRATCH PRO Demo.
For authorized copies of
►
the very rst start of TRAKTOR. Once you have selected your initial setup, the wizard
will not show up again.
You can retrigger the wizard at any time via the Help tab of the Application Menu.
►
TRAKTOR
in Demo Mode, the rst screen of the “Setup Wizard” will
TRAKTOR
, the “Setup Wizard” will show up only once during
TRAKTOR SCRATCH PRO
(described in
4.3.1 Setting up TRAKTOR PRO
When registering the software with a TRAKTOR PRO serial number or when choosing the
TRAKTOR PRO
detail below.
►
Built-In Sound Card
Demo, the “Setup Wizard” offers the following options described more in
►
►
External Audio Interface
External Mixer
TRAKTOR PRO / TRAKTOR SCRATCH PRO – 11
Page 15
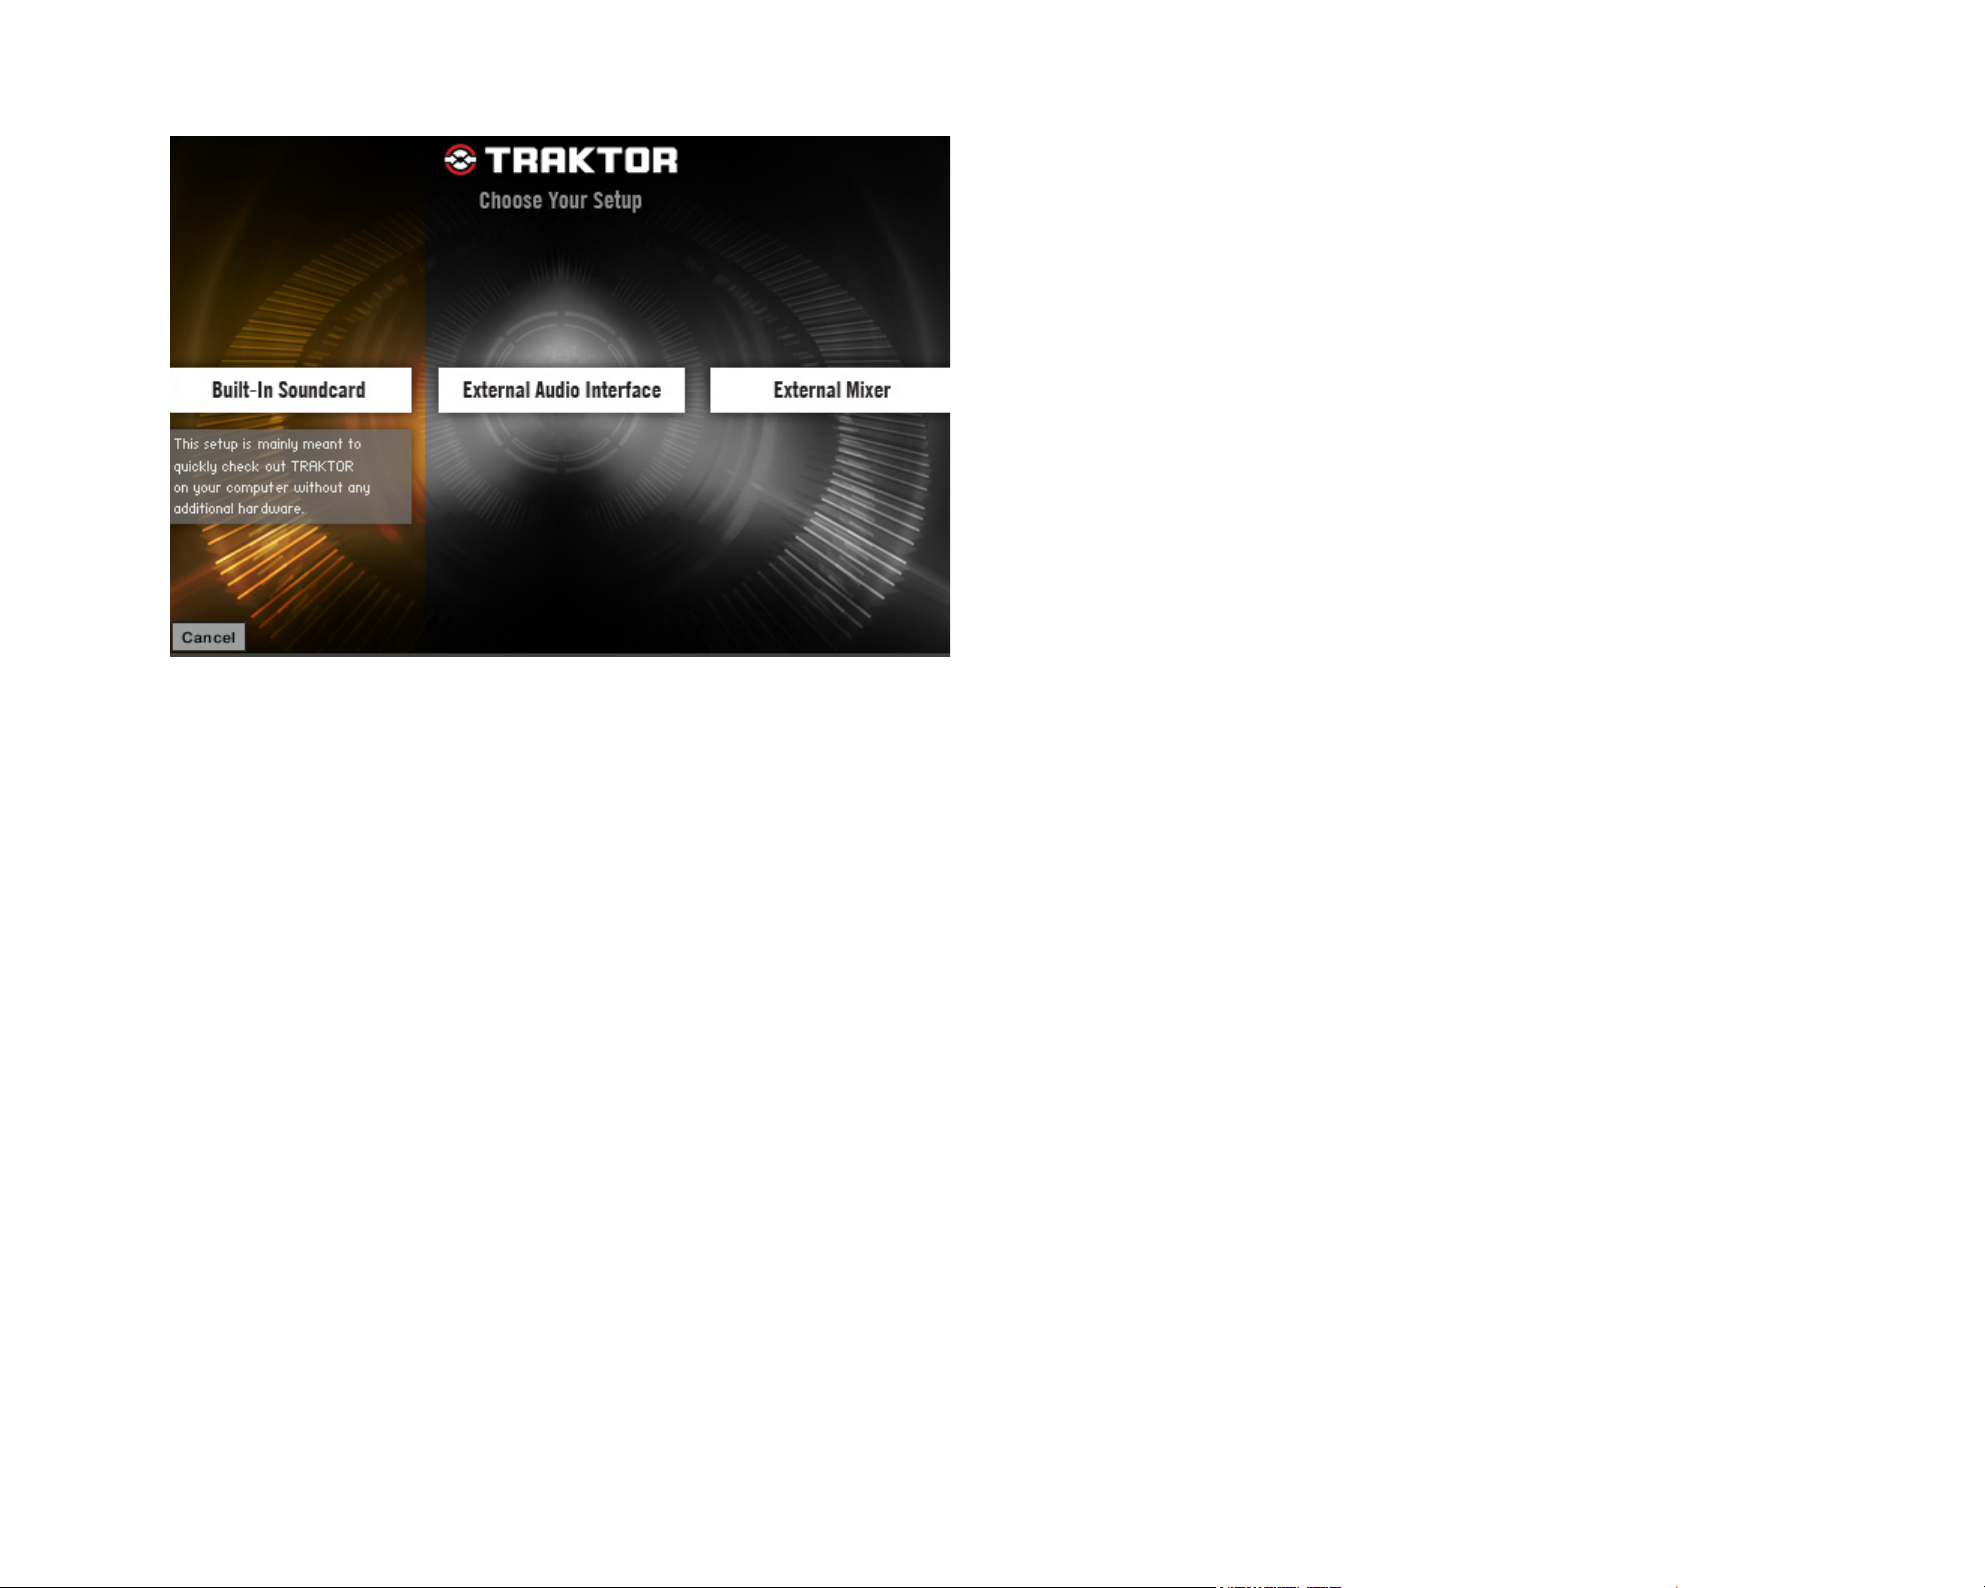
TRAKTOR PRO with Built-In Sound Card
This setup is mainly meant to quickly check out
TRAKTOR PRO
on your computer without
any additional hardware. Be aware that with the built-in sound card you will not be able
to prelisten tracks.
Physical Setup
Make sure that the speakers of your computer are turned on and that the volume con-
1.
trol of your operating system is turned up to a reasonable volume.
Optionally connect a pair of headphones to the headphones output of your computer
2.
and put them on your head.
TRAKTOR PRO / TRAKTOR SCRATCH PRO – 12
Page 16
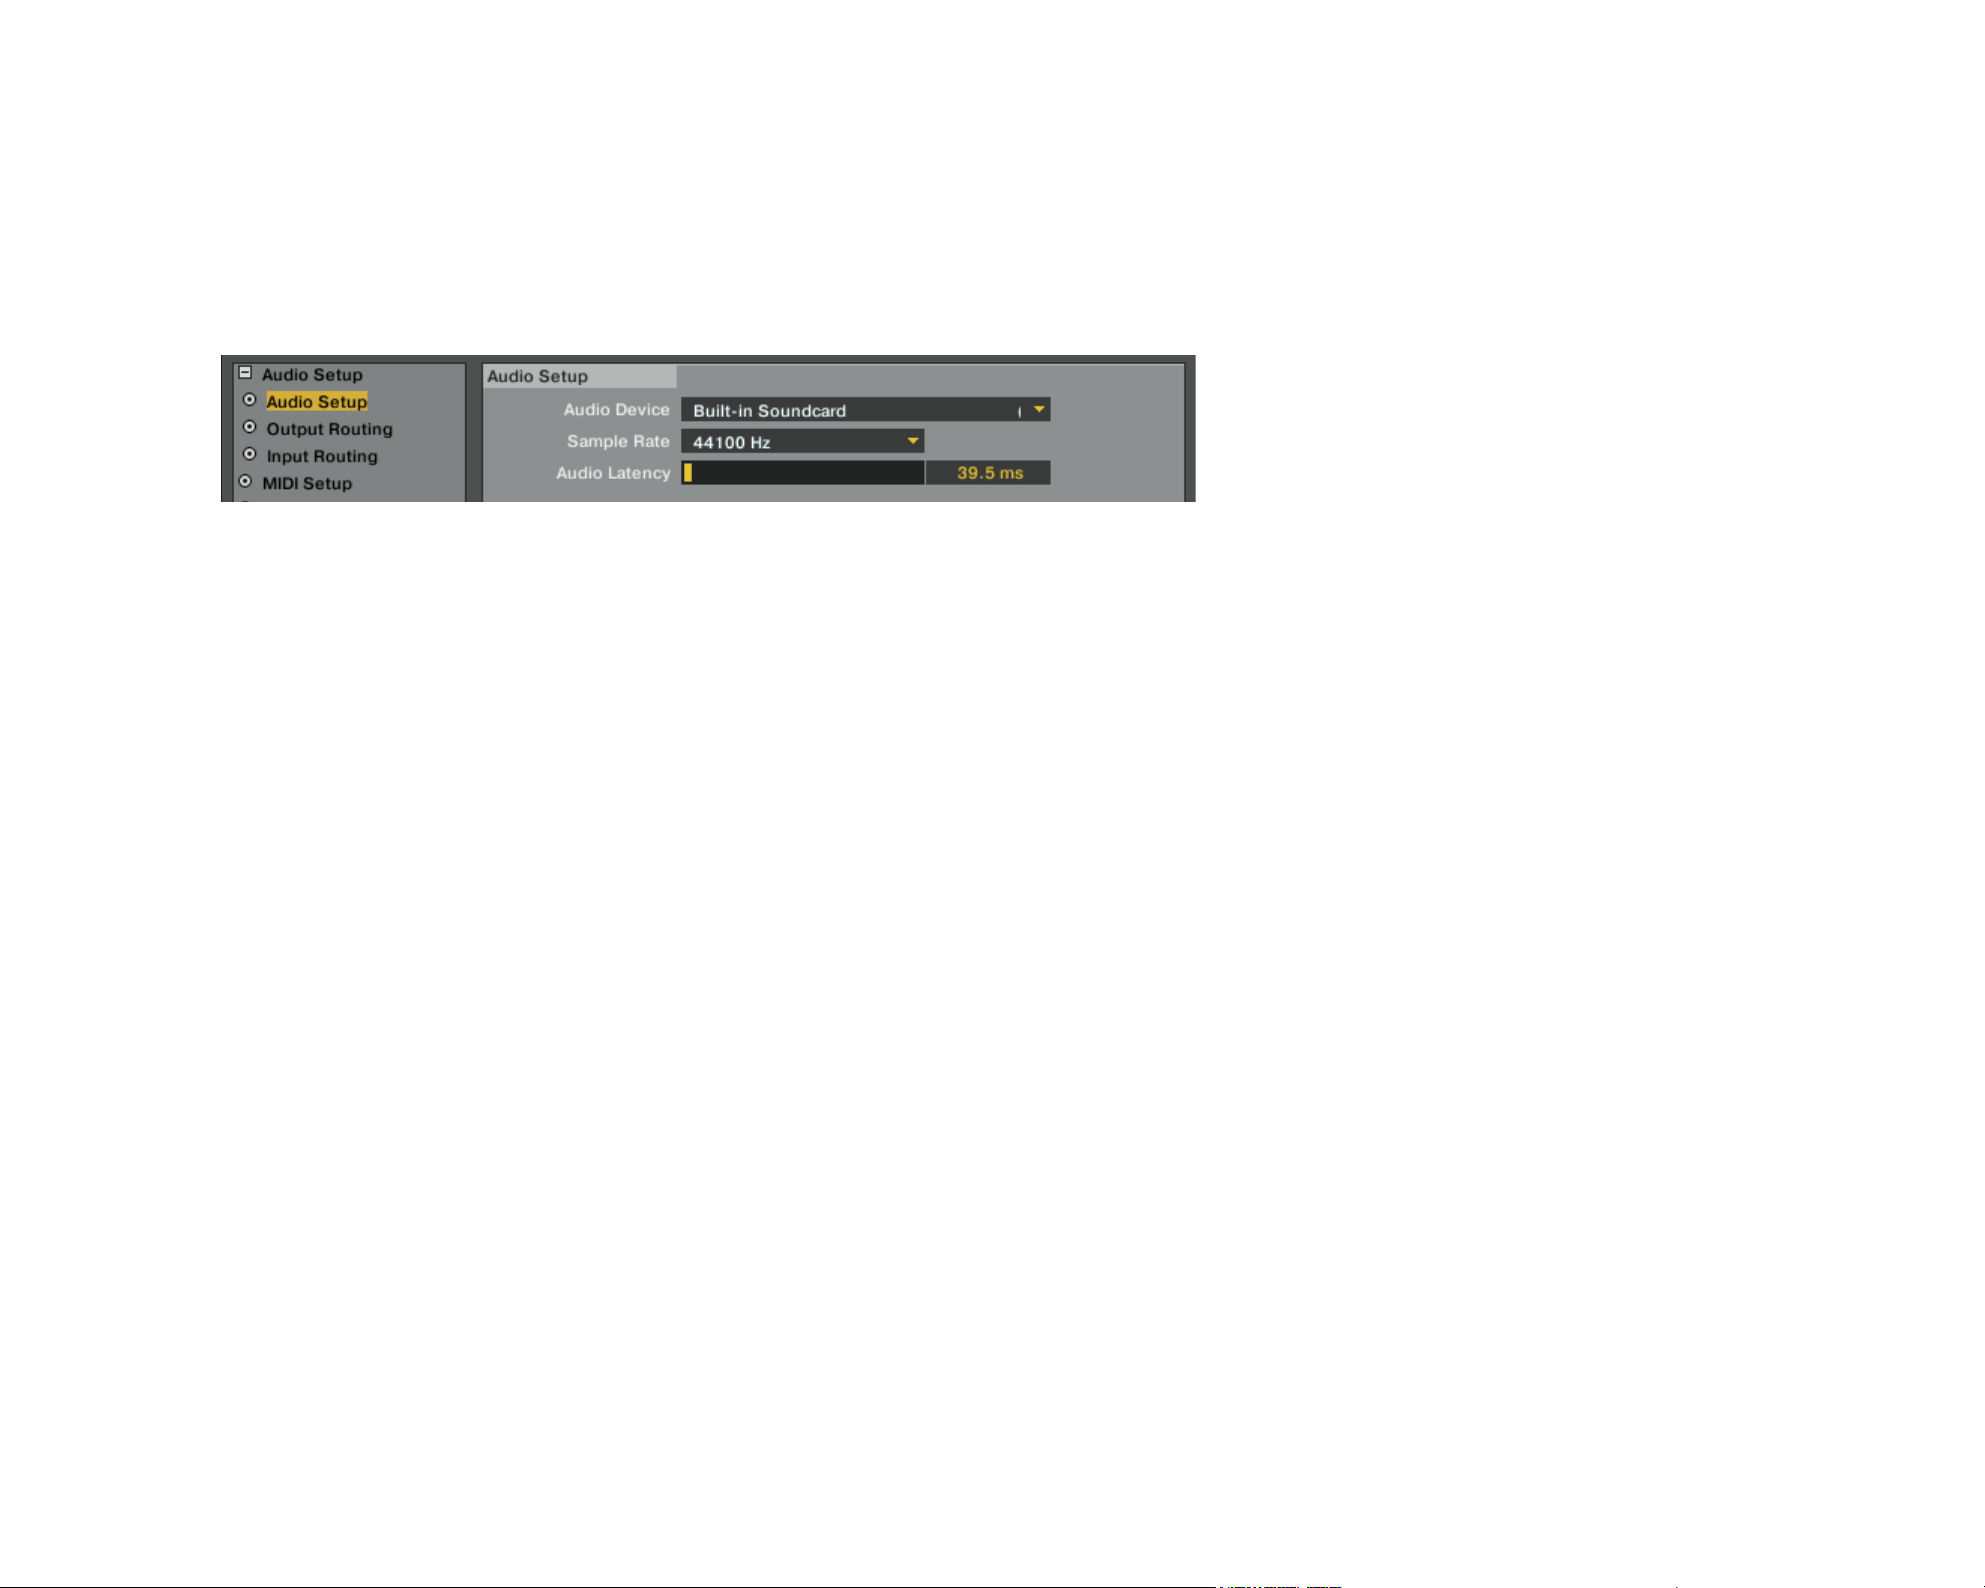
Software Setup
1.
In the “Setup Wizard” select the option Built-In Sound Card.
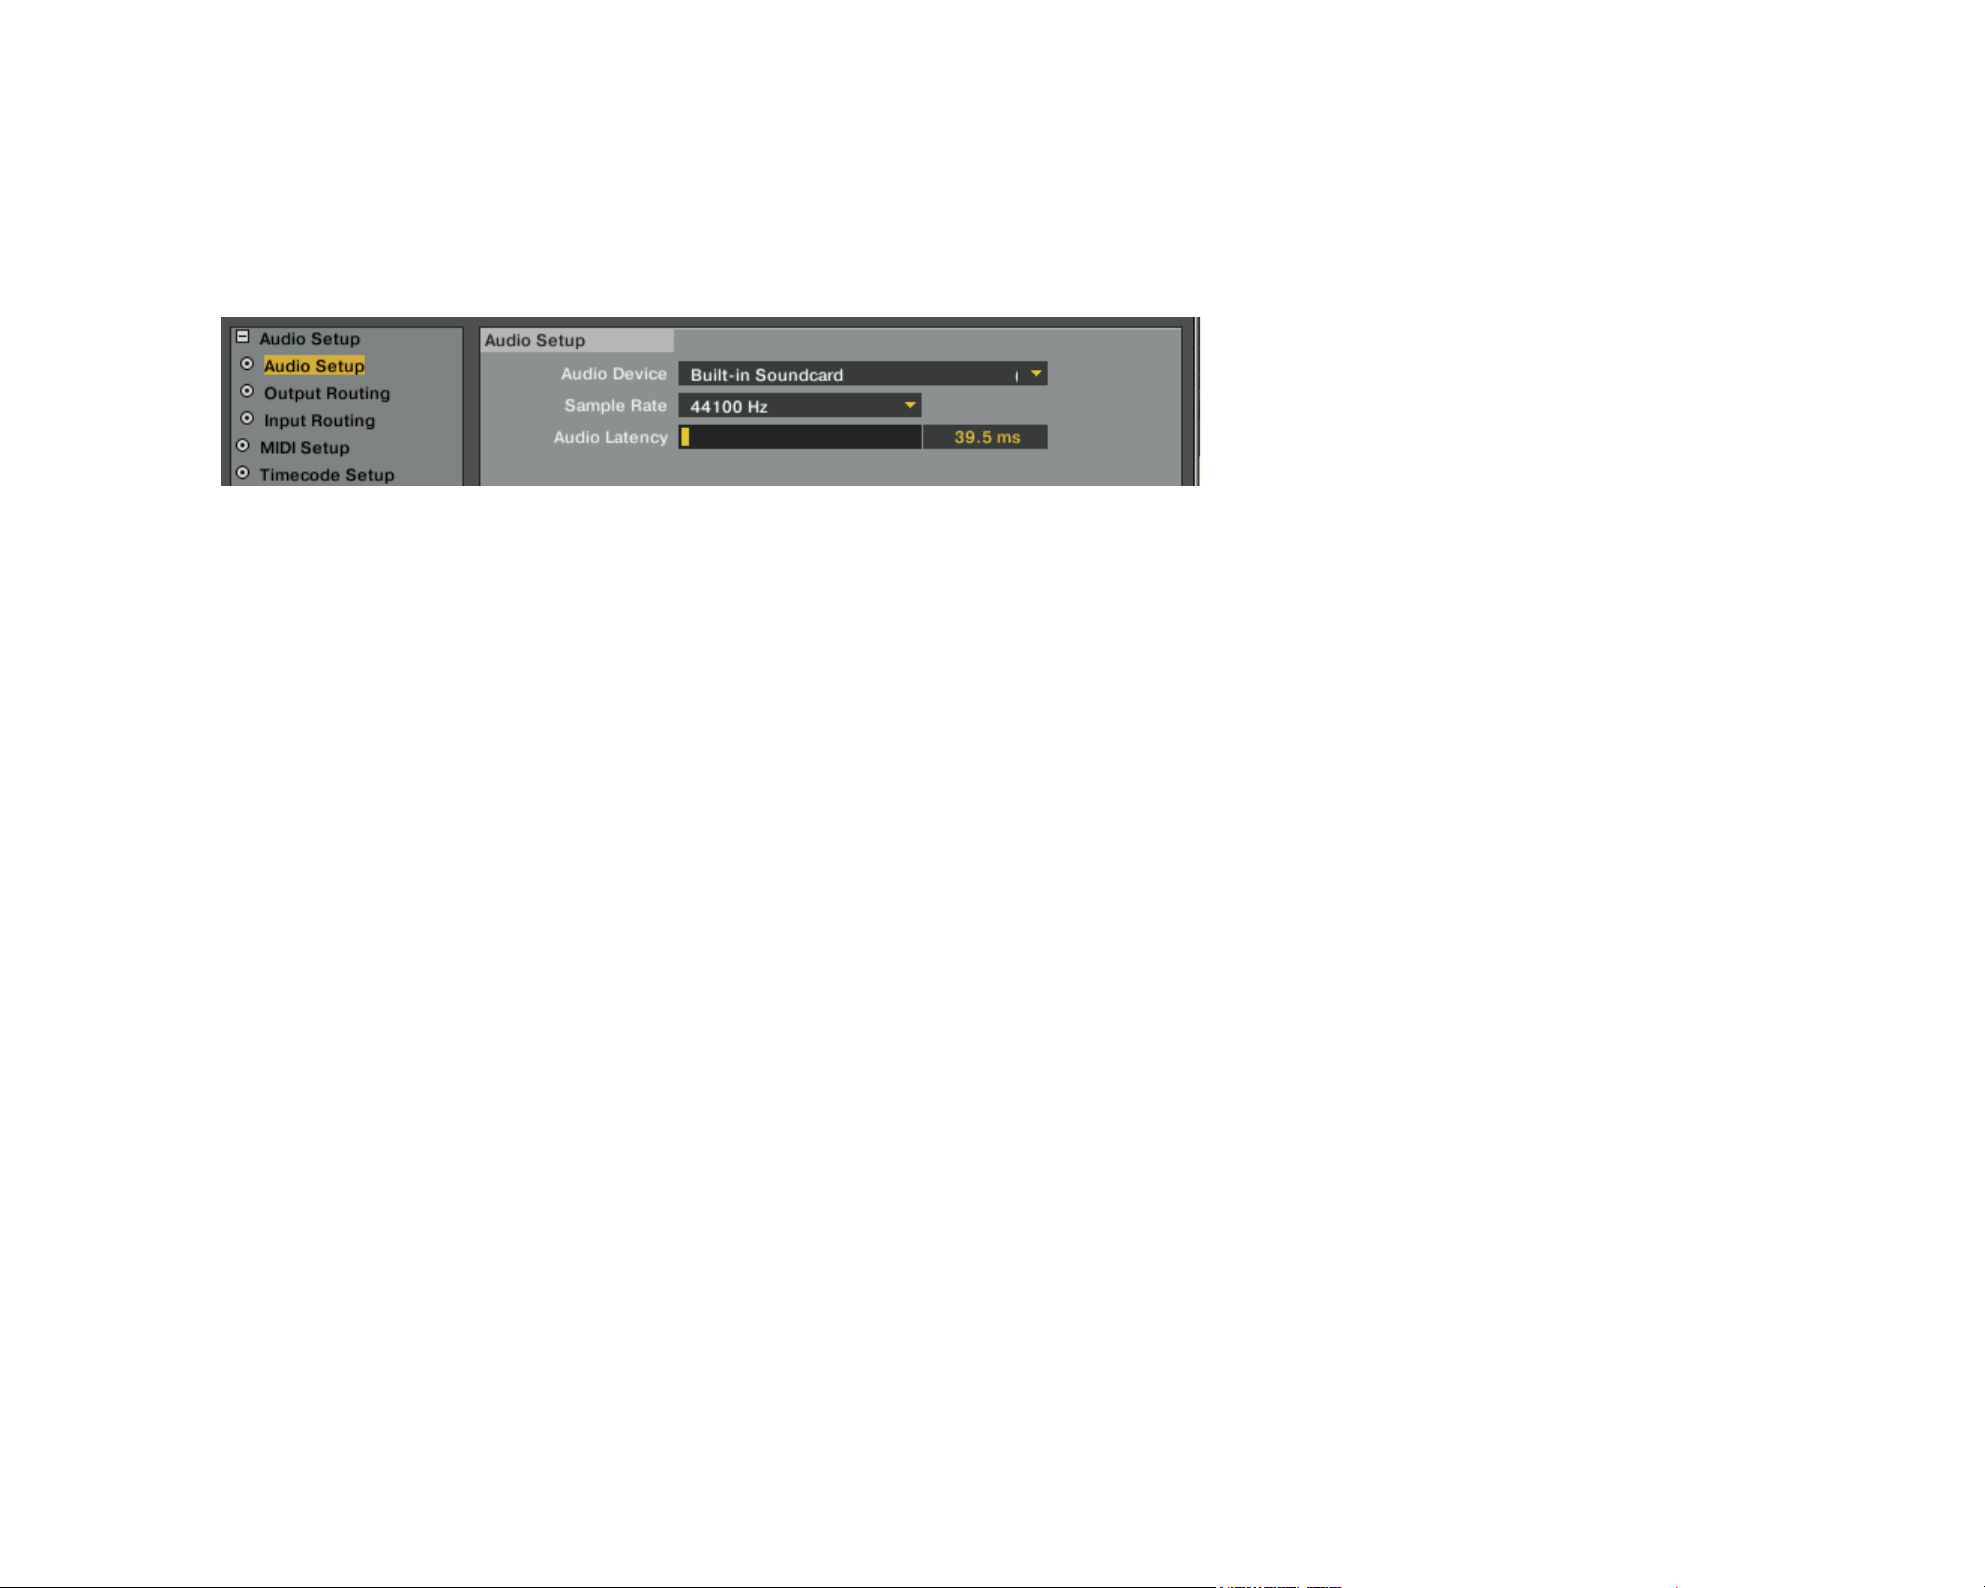
Conrm your choice by pressing OK. This opens the Audio Setup page of the
2.
Preferences.
3. Drop down the Audio Device list and select your built-in sound card.
4. Usually, your computer chooses a latency value automatically. If so, use this latency
and sample rate settings. If not, choose a latency value between 30 and 50 ms and
a sample rate of 44.100 Hz.
5. Close the Preferences by clicking the close button.
TRAKTOR PRO with External Audio Interface
For the professional use of TRAKTOR PRO you will need an external audio interface with
at least two stereo outputs. The additional stereo output serves for prelistening tracks on
your headphones while the main track is playing on the speaker system.
TRAKTOR PRO / TRAKTOR SCRATCH PRO – 13
Page 17
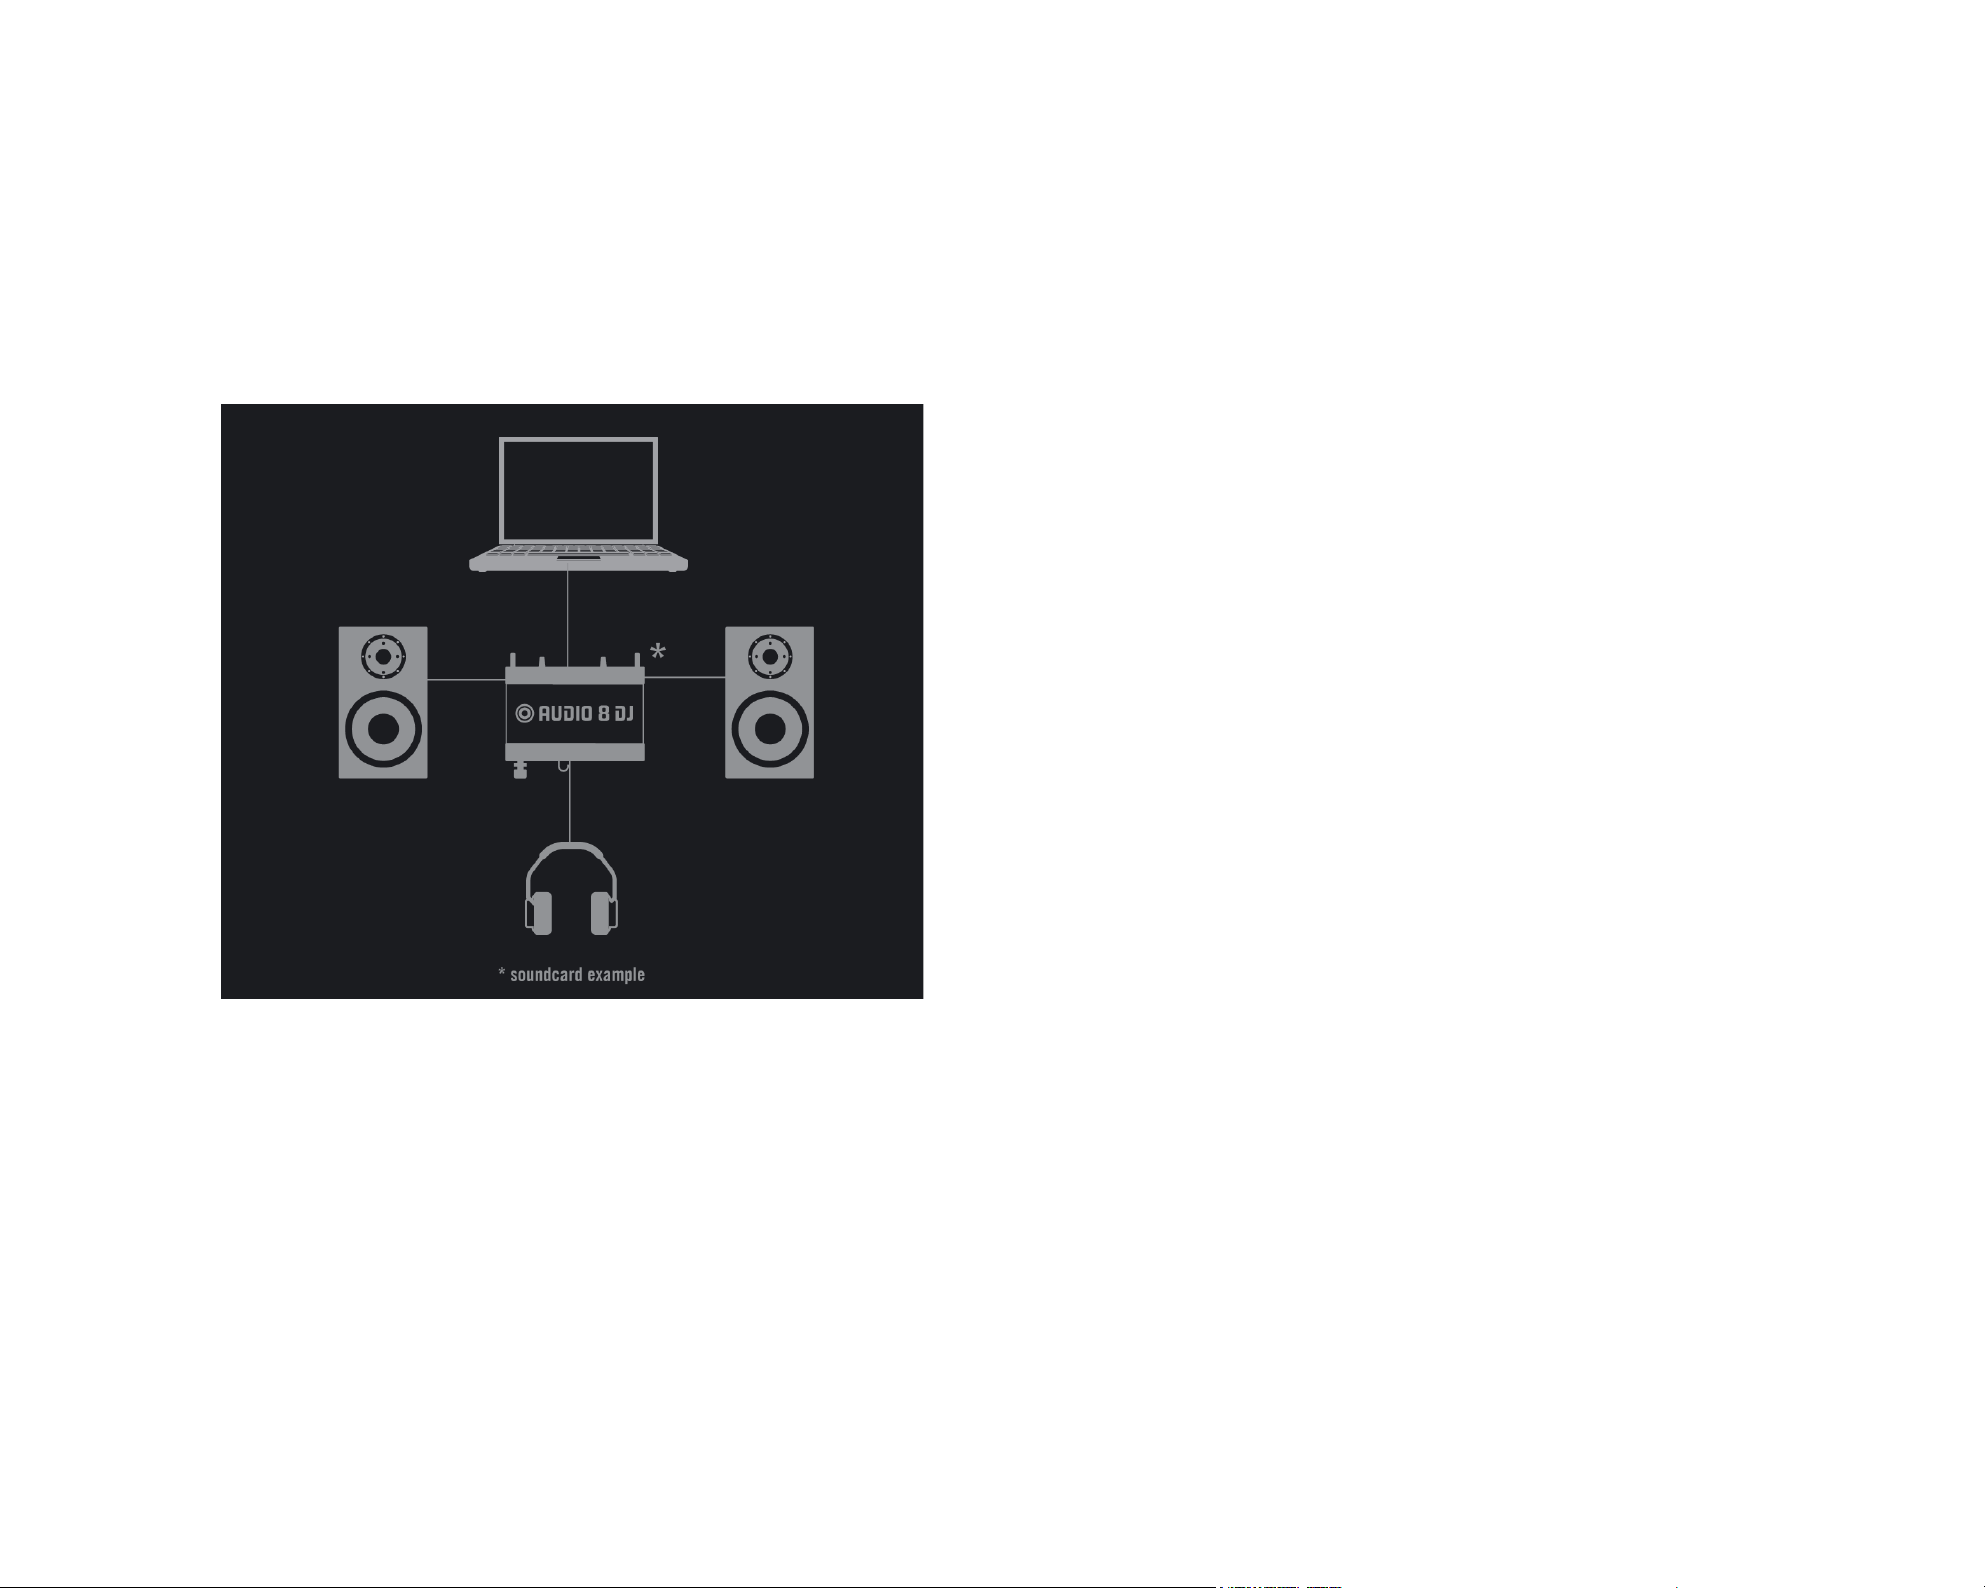
Physical Setup
Before starting
1.
TRAKTOR PRO
, make sure that the external audio interface is correctly
installed, connected and fully functional on your computer.
Connect the primary outputs of the external audio interface to the amplier system
2.
driving your speakers.
Connect your headphones to the secondary outputs of the external audio interface.
3.
TRAKTOR PRO / TRAKTOR SCRATCH PRO – 14
Page 18
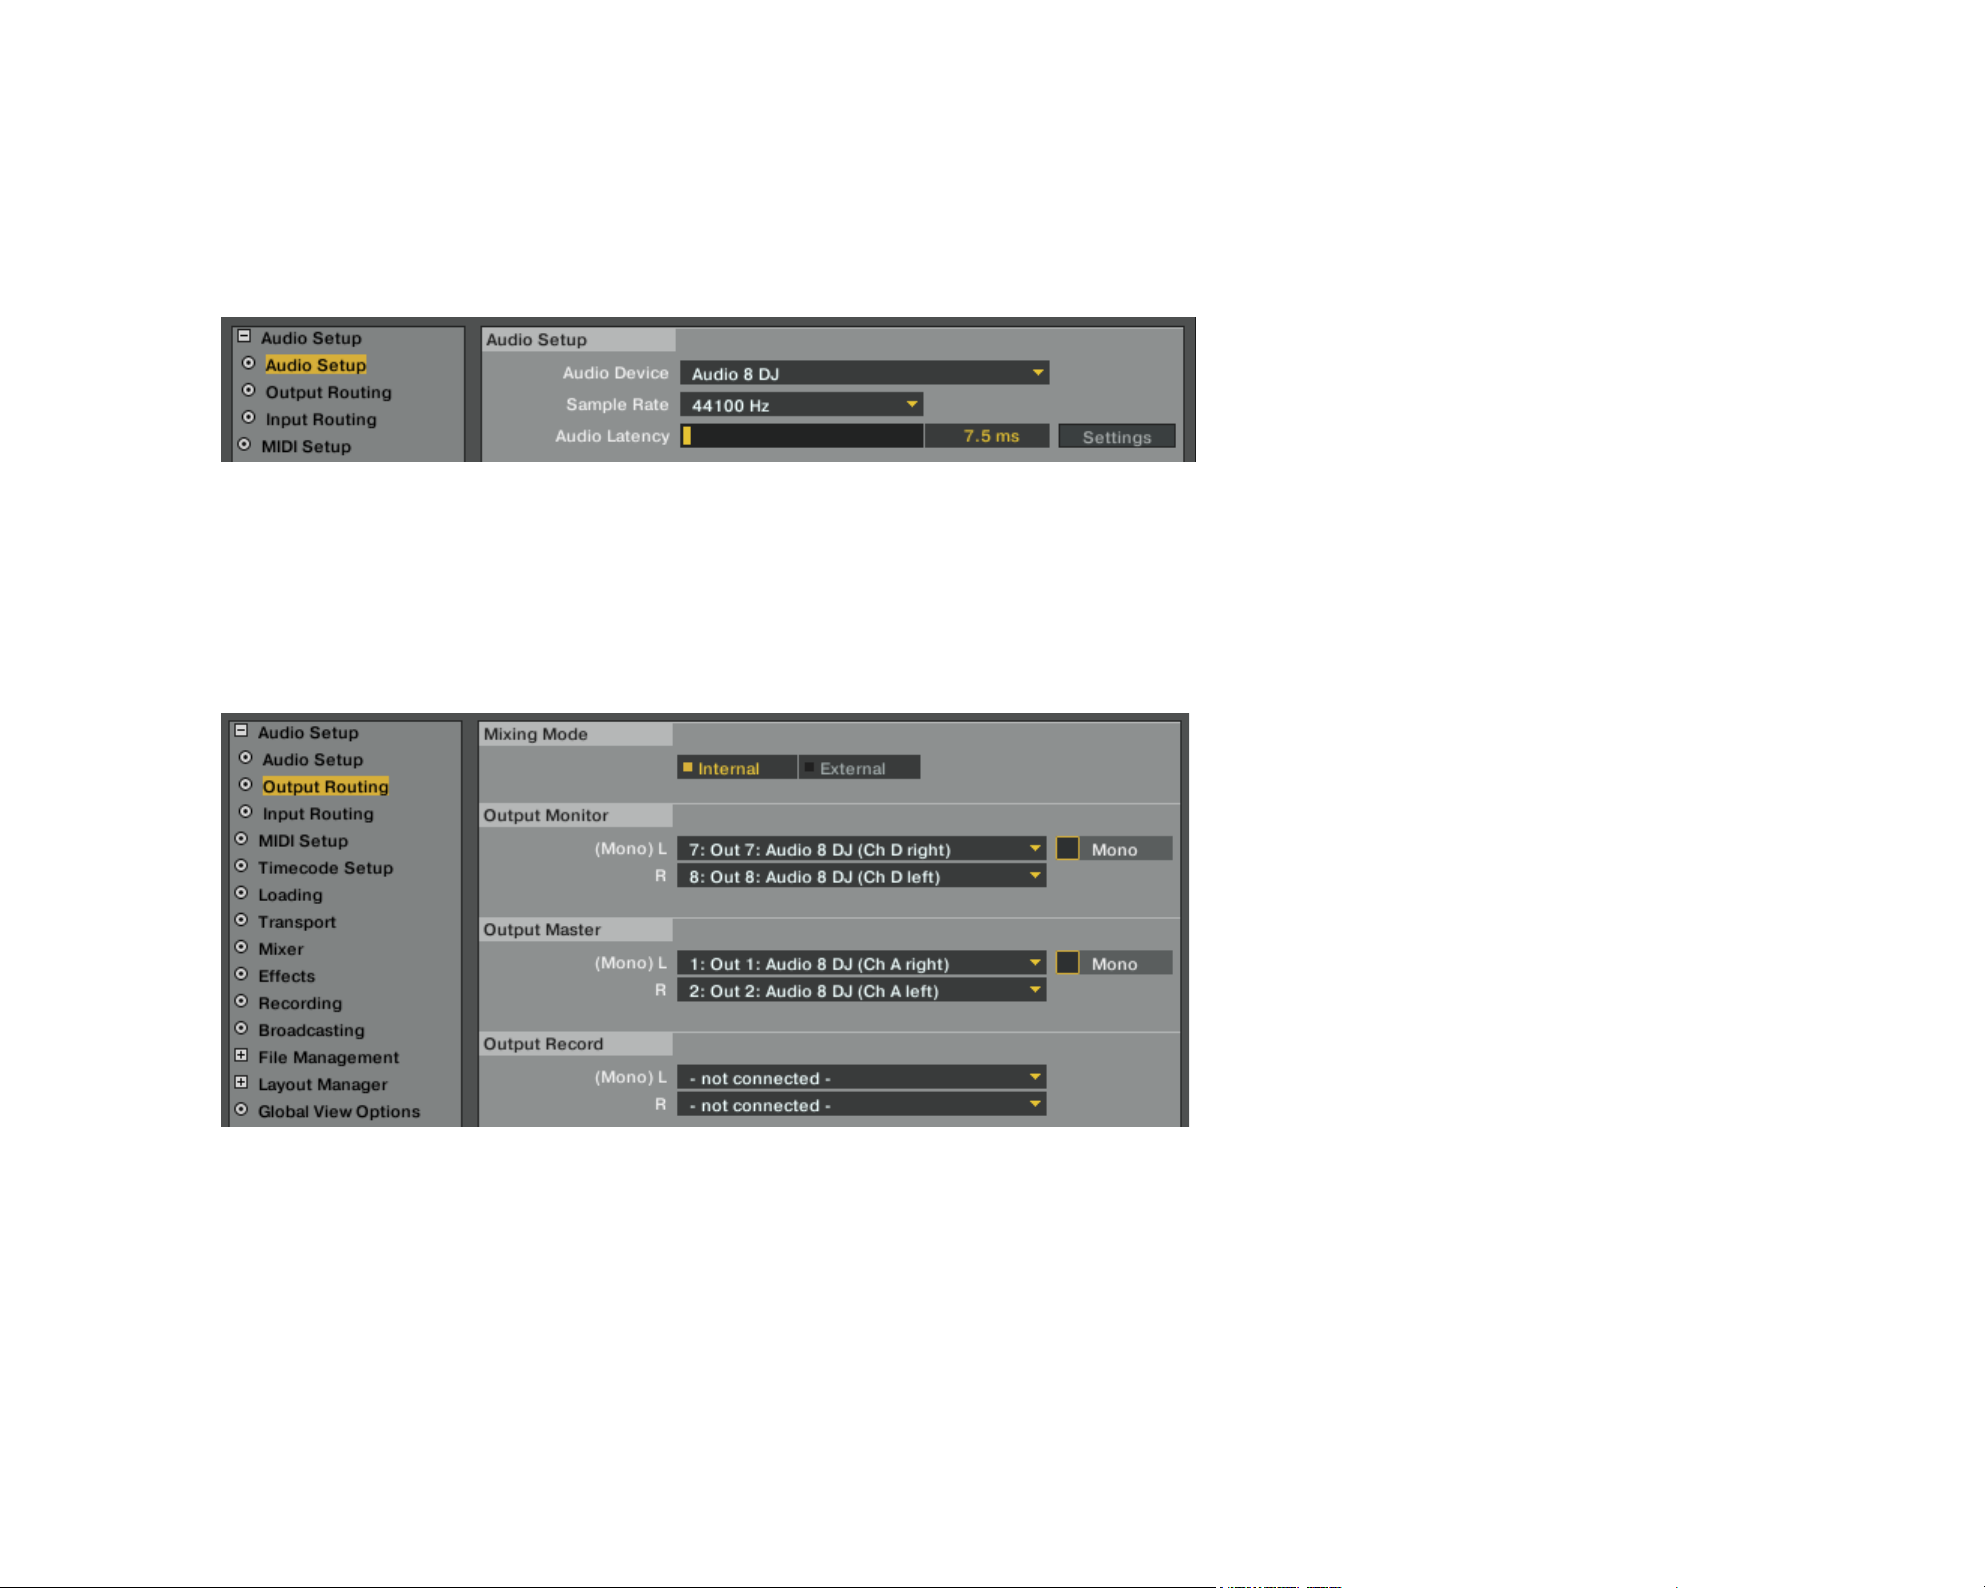
Software Setup
In the “Setup Wizard” select the option External Audio Interface.
1.
Conrm your choice by pressing OK. This opens the Audio Setup page of the
2.
Preferences.
3. Drop down the Audio Device list to select the external audio interface.
4. Set a latency and sample rate your system can handle. Typically use a higher latency
at rst, such as 15 ms.
5. Open the Output Routing page to assign the outputs of
TRAKTOR PRO
to the physical
outputs of your audio interface.
6. Verify that Internal Mixer Mode is chosen.
7. If not automatically assigned, assign the Monitor outputs to the secondary outputs
of the external audio interface connected to the headphones and the Master outputs
to the primary outputs of the external audio interface connected to the amplier system.
8. Close the Preferences by clicking the close button.
TRAKTOR PRO / TRAKTOR SCRATCH PRO – 15
Page 19
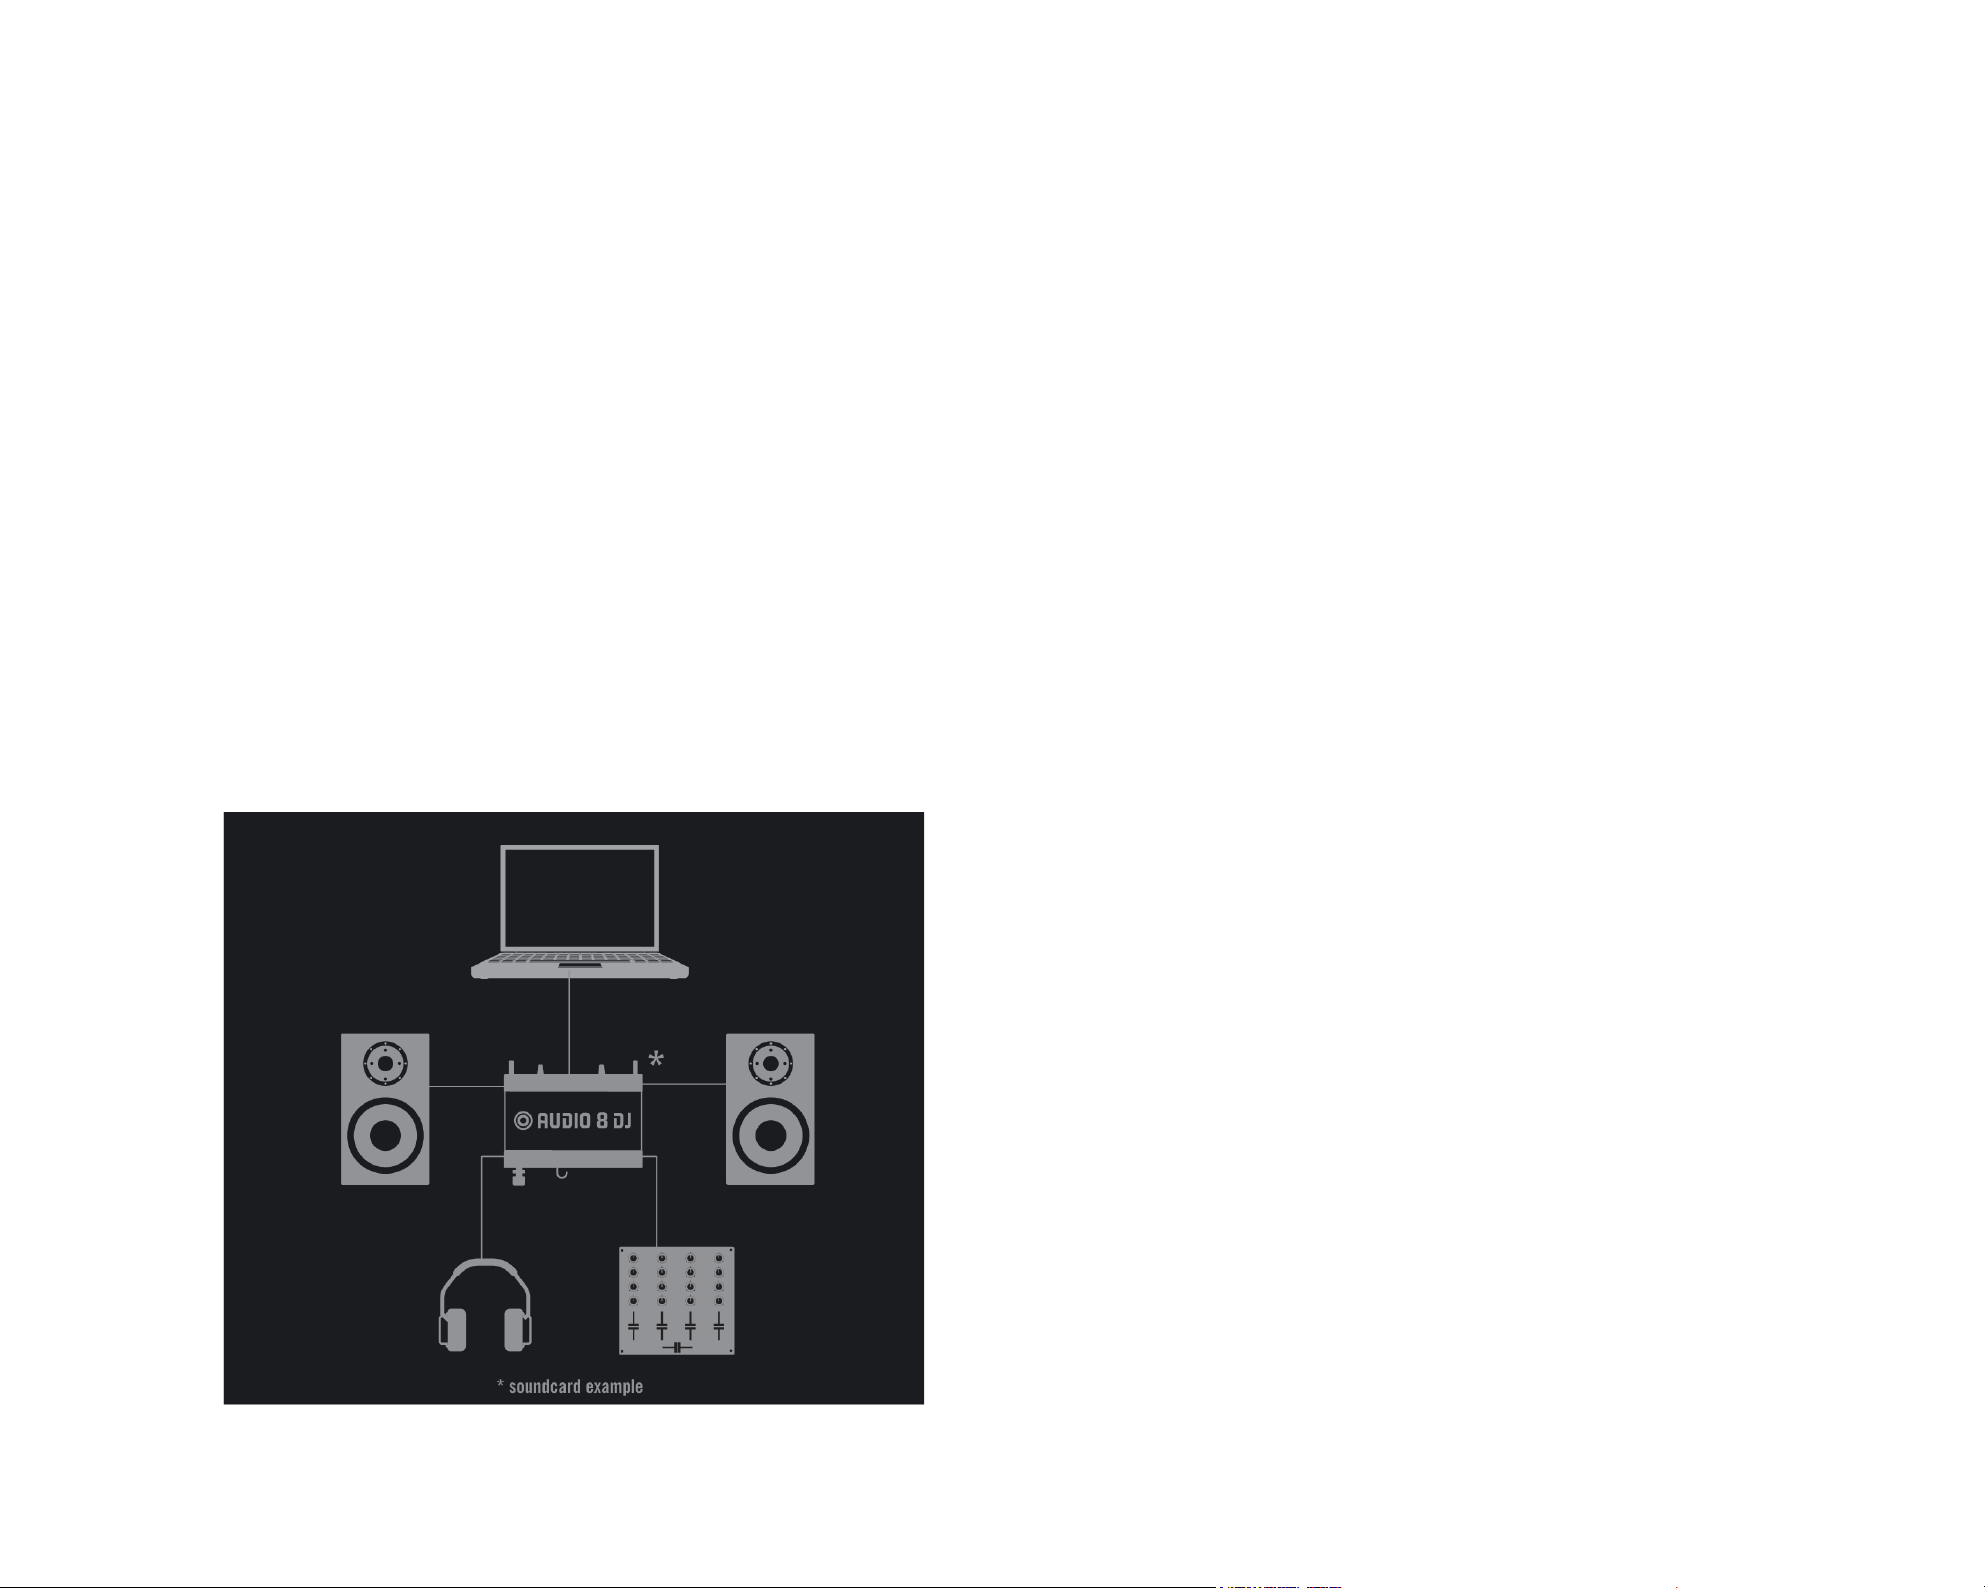
TRAKTOR PRO with External Mixer
For using
TRAKTOR PRO
with an external mixer, you need an external audio interface with
at least two stereo outputs. When mixing four decks an audio interface with four stereo
outputs such as the AUDIO 8 DJ is required.
The output of each
TRAKTOR
deck is routed to a separate output of the external audio
interface, each of them connected to another input channel of the mixer. The mixing and
prelistening is entirely done with the mixer.
Physical Setup
Before starting TRAKTOR PRO, make sure that the audio interface is correctly installed,
1.
connected and fully functional on your computer.
Connect the outputs of the external audio interface to the mixer inputs. Each stereo
2.
output channel of the external audio interface connects to one of the stereo channel
inputs of the mixer.
Connect your headphones to the mixer and the mixer-outputs to the amplier system
3.
driving your speakers.
TRAKTOR PRO / TRAKTOR SCRATCH PRO – 16
Page 20
Software Setup
In the “Setup Wizard” select the option External Mixer.
1.
Conrm your choice by pressing OK. This opens the Audio Setup page of the
2.
Preferences.
Drop down the Audio Device list and select the external audio interface.
3.
Set a latency and sample rate your system can handle. Typically use a higher latency
4.
at rst, such as 15 ms.
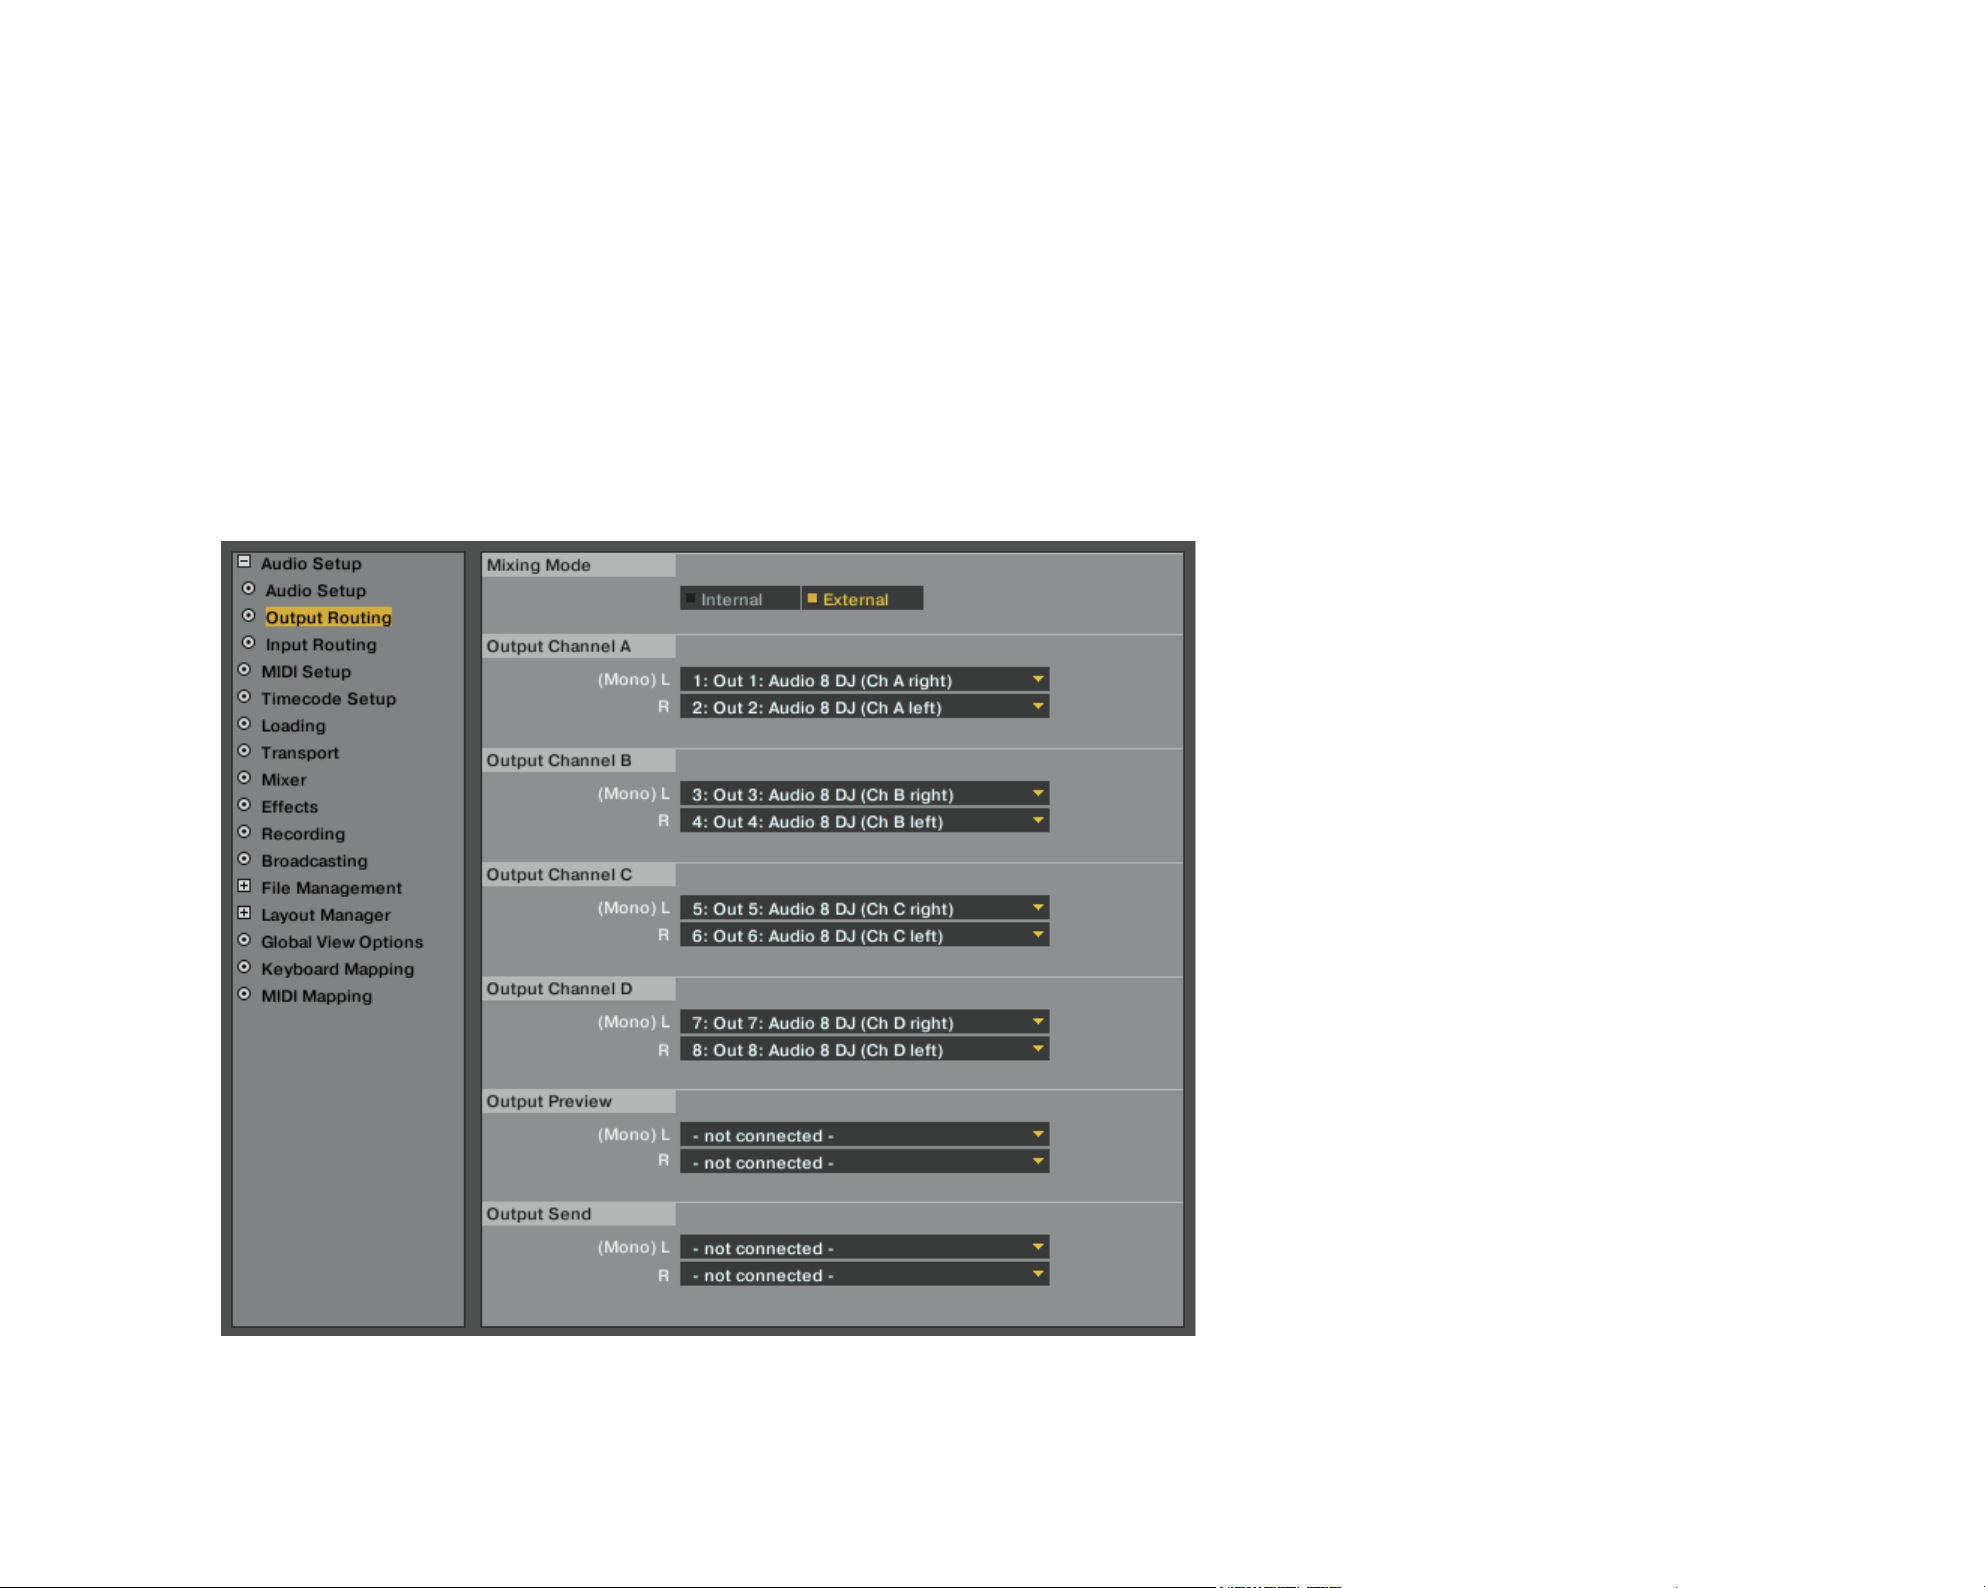
Open the Output Routing page to assign the outputs of
5.
outputs of your audio interface.
TRAKTOR PRO
to the physical
For now use a moderate set-
For now use a moderate set-
%
%
and test out, what your system is able
and test out, what your system is able
to perform.
to perform.
ting. You can change this later
ting. You can change this later
6. Verify that External Mixer Mode is chosen.
TRAKTOR PRO / TRAKTOR SCRATCH PRO – 17
Page 21

7. If not automatically assigned, assign Out Channel A, B, C and D to all outputs of the
external audio interface that are connected to the mixer.
8. Close the Preferences by clicking the close button.
4.3.2 Setting up TRAKTOR SCRATCH PRO
Assigning Decks C/D, Out
Assigning Decks C/D, Out
%
%
tional depending on your hardware set-
tional depending on your hardware setup.
up.
Preview and Out Sent are op-
Preview and Out Sent are op-
When registering the software with a
choosing the TRAKTOR SCRATCH PRO Demo, the software starts with a default congu-
ration suited for using TRAKTOR with Timecode records or CDs.
TRAKTOR SCRATCH PRO Setup
The setup for TRAKTOR SCRATCH PRO gives you all you need for playing with two turn-
tables/CD-Players.
Physical Setup
Before starting
1.
TRAKTOR SCRATCH
computer.
Connect the outputs and inputs of the
2.
CD-Players with the Multicore Cables as described in chapter 13 (TRAKTOR SCRATCH
PRO Functionality), or, alternatively, connect your TRAKTOR SCRATCH PRO Certied
TRAKTOR SCRATCH PRO
Certied Mixer) is correctly installed and fully functional on your
TRAKTOR SCRATCH PRO
, make sure that the
AUDIO 8 DJ
to the mixer and to the turntables/
serial number or when
AUDIO 8 DJ
(or your
Mixer with your computer and your turntables/CD-Players as described in the mixers’
manual.
Connect your headphones to the mixer and the mixer-outputs to the amplier system
3.
driving your speakers.
TRAKTOR PRO / TRAKTOR SCRATCH PRO – 18
Page 22
Software Setup
When exploring Demo Mode, select the option TRAKTOR SCRATCH PRO Setup in the
1.
“Setup Wizard”.
Conrm your choice by pressing OK. This opens the Audio Setup page of the
2.
Preferences.
3. Verify that the
the drop-down menu. Alternatively, choose your
AUDIO 8 DJ
is preselected in the eld Audio Device. If not, select it from
TRAKTOR SCRATCH PRO
Certied
Mixer.
4. Set a latency and sample rate your system can handle. Typically use a higher latency
at rst, such as 15 ms.
5. Open the Output Routing page to assign the outputs of TRAKTOR SCRATCH PRO to
the physical outputs of the AUDIO 8 DJ or your TRAKTOR SCRATCH PRO Certied
Mixer.
6. Verify that External Mixer Mode is chosen.
7. If not automatically assigned, assign Out Channel A, B, C and D to all outputs of the
AUDIO 8 DJ that are connected to the mixer, respectively assign these channels to
the outputs of your TRAKTOR SCRATCH PRO Certied Mixer.
8. Open the Input Routing page and verify that the input channels are correctly as-
signed.
9. Close the Preferences by clicking the close button.
TRAKTOR PRO / TRAKTOR SCRATCH PRO – 19
Page 23

4.4 Test Drive TRAKTOR
Now that the sound card is congured and
TRAKTOR
is up and running, let’s have a test.
For this, we use the Demo Tracks that come with TRAKTOR.
We start by loading tracks in Deck A and B and letting them play:
Click and hold a Demo Track in the Browser List and drag it into Deck A. The se-
1.
lected track will load in Deck A and the track Waveform will appear in the Waveform
Display.
Click and hold a second Demo Track in the Browser List and drag it into Deck B.
2.
Start the Decks by clicking P
3.
lAy/PAuse
or if you are using
TRAKTOR SCRATCH PRO
start your Timecode Record/CD.
The Waveform starts moving from right to left. If this does not happen, verify if you
4.
have selected the correct audio interface and if you have correctly mapped the outputs
to the audio interface channels. If you are using TRAKTOR SCRATCH PRO, check if
the Timecode graphic (Scope) looks correct.
Once the waveform is moving, the music becomes audible on your speakers. If this is
5.
not the case, verify if the Master Level Meter is showing any activity. If not check the
faders and knobs on the internal or external mixer.
If the Master Level Meter shows an output signal but there still is no audio on your
6.
speakers, check if the speaker system is correctly hooked up and turned on. Some
audio interfaces have monitor LEDs that can further help in nding the reason for the
absence of sound.
Once you got sound, move the cRossfADeR left and right to blend from one track to
7.
the other.
For prelistening the tracks on the Internal Mixer, click the cue B
8.
utton
in the Mixer Strip
of the Deck. When using an external mixer cueing is done there.
The two tracks will most likely have different tempos and you will need to synchronize
9.
their tempo and beat. You can observe current beat offset in the PhAse meteR above
the Waveforms of both Decks.
Click the sync button for automatic synchronization or use the Pitch Fader (either on
10.
the software or the hardware deck) for manual synchronization.
TRAKTOR PRO / TRAKTOR SCRATCH PRO – 20
Page 24
5. User Interface
This chapter provides a basic run-through the graphical user interface of TRAKTOR and
explains its basic features.
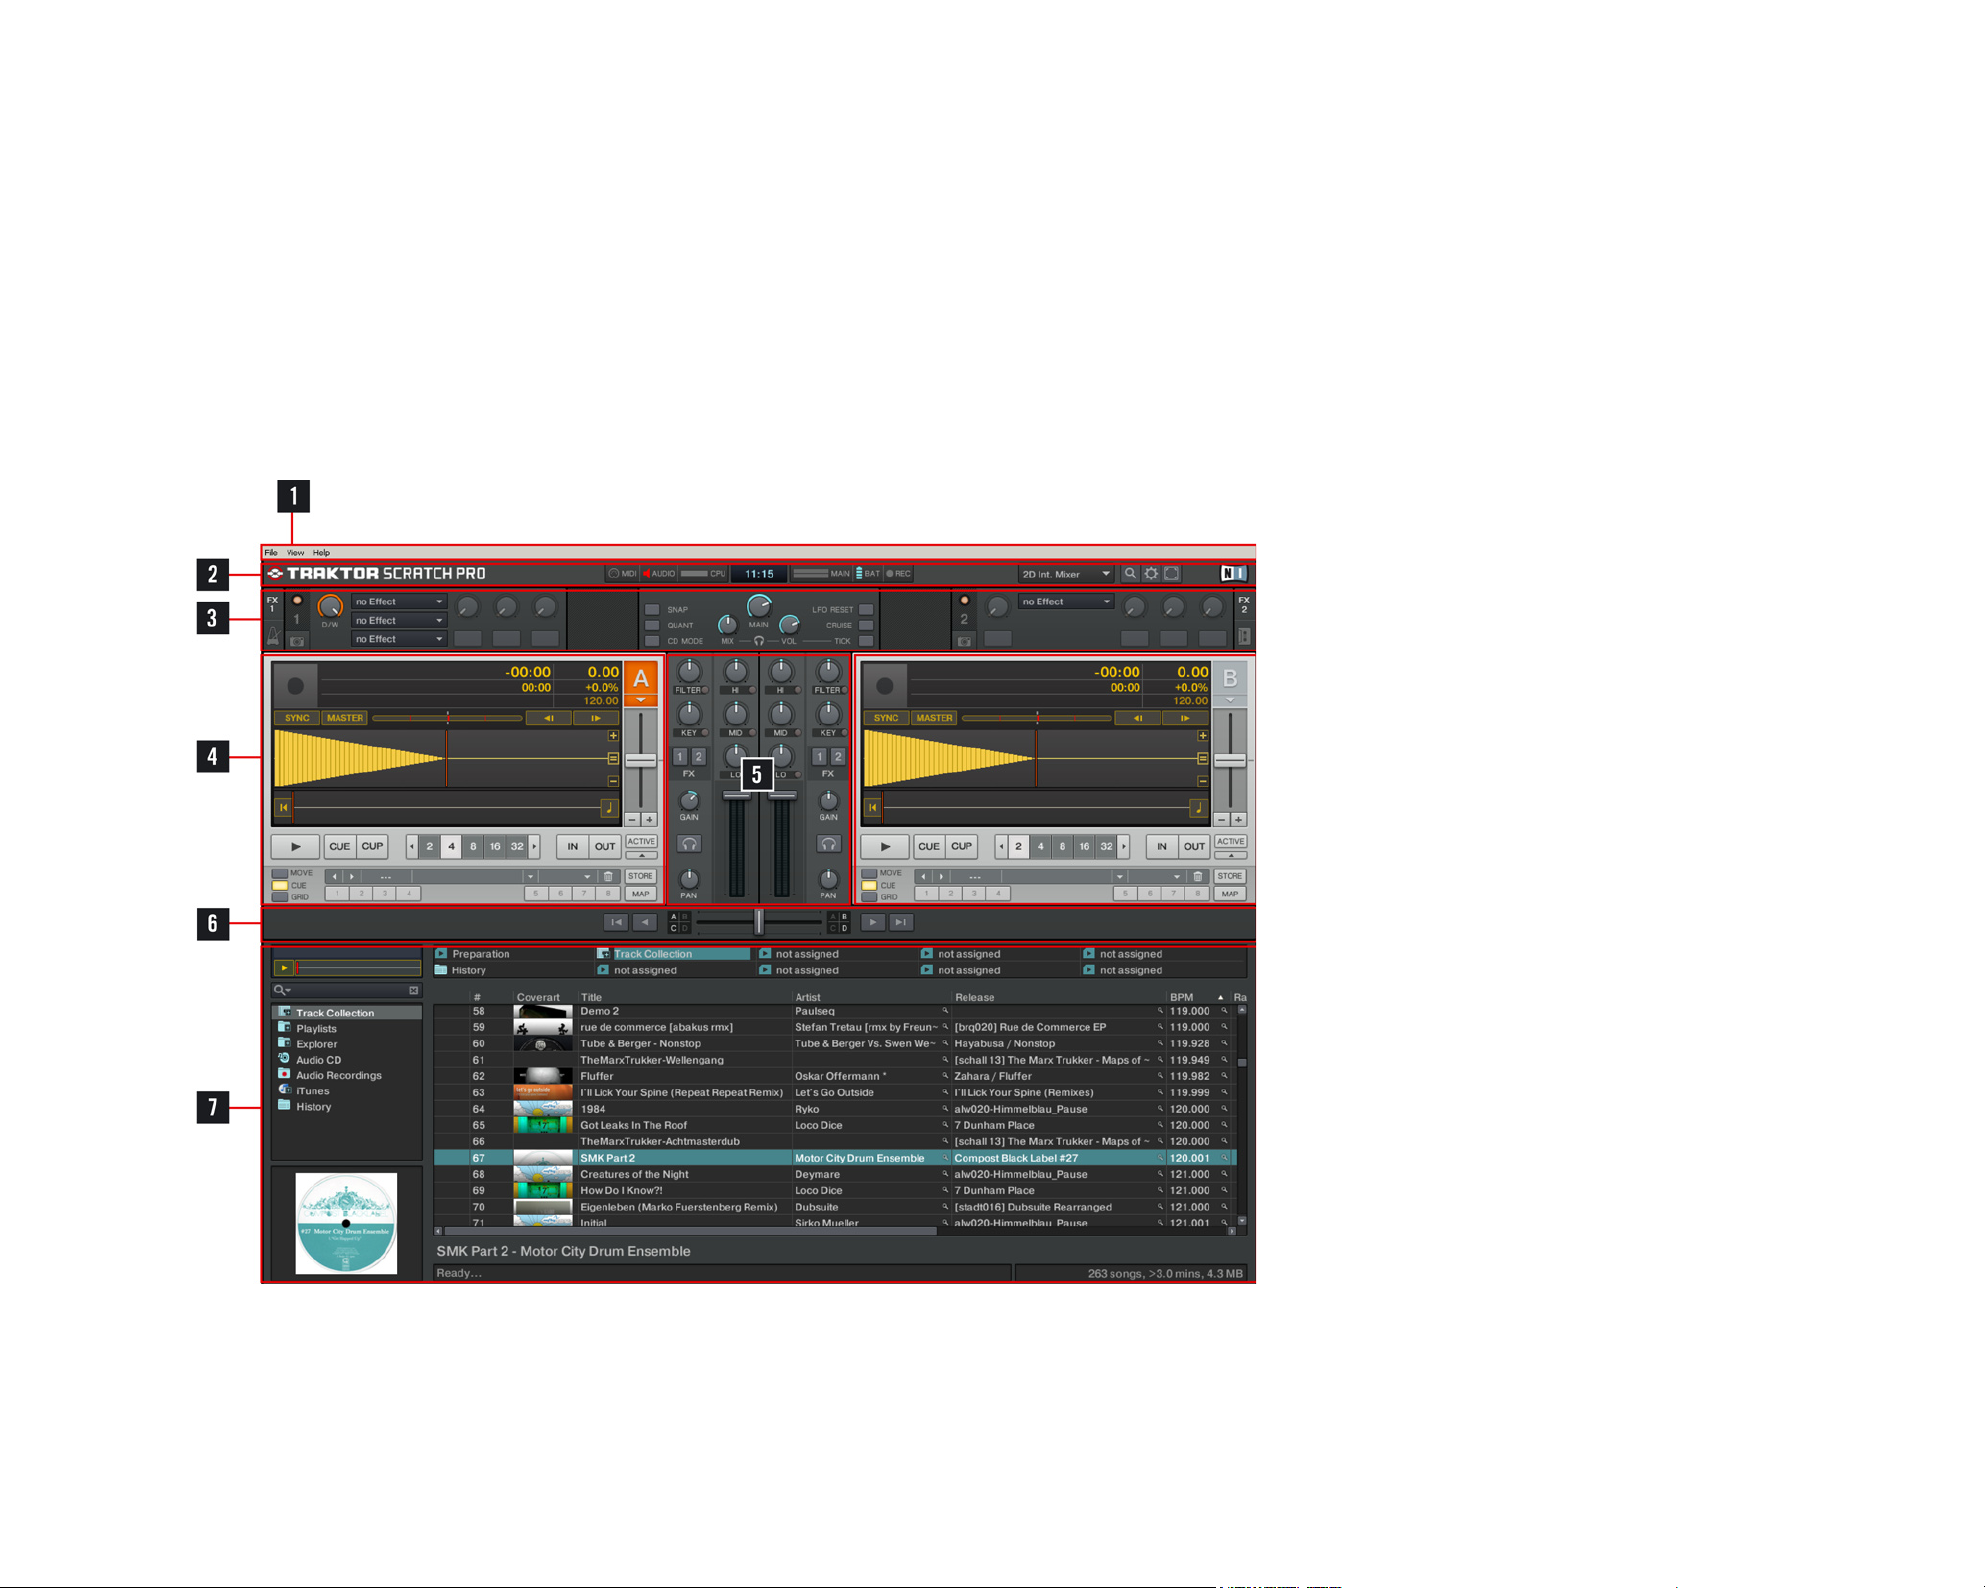
5.1 Overview
Application Menu
1.
Application Menu
1.
Header
2.
Header
2.
Global Section
3.
Global Section
3.
Decks
4.
Decks
4.
Mixer
5.
Mixer
5.
Crossfader
6.
Crossfader
6.
Browser
7.
Browser
7.
TRAKTOR PRO / TRAKTOR SCRATCH PRO – 21
Page 25

5.2 Application Menu
The Application Menu gives access to basic functions and information about the software.
File (Windows)
►
Preferences: Opens the Traktor Preferences window.
Audio Setup: Opens the Soundcard sub-menu of the Preferences.
►
MIDI Setup: Opens the MIDI Interfaces sub-menu of the Preferences.
►
Exit: Closes the program. If there is audio on the Master Output playing, you will have
►
to conrm the closing after a warning message.
Traktor (Mac)
About: Opens a window with the version number, license type, serial number and the
The Application Menu is not
The Application Menu is not
!
!
therefore all File and View options can
therefore all File and View options can
be reached directly from the TRAKTOR
be reached directly from the TRAKTOR
graphical user interface. However, the
graphical user interface. However, the
Help menu can only be accessed from
Help menu can only be accessed from
the Application Menu.
the Application Menu.
visible in full screen mode,
visible in full screen mode,
credits. You can close it by clicking on it.
Preferences: Opens the Traktor Preferences window.
View
Layouts: Lets you choose one of the available layouts.
►
Fullscreen: Switches to Full Screen Mode.
►
Help
Launch Service Center: Opens the NI Service Center, where you can download updates
►
and register your products.
Open Manual: Opens the TRAKTOR user manual.
►
Visit TRAKTOR on the web: Opens the TRAKTOR website on the Native Instruments
►
website.
About TRAKTOR: Opens a window with the version number, license type, serial num-
►
ber and the credits. You can close it by clicking on it.
To switch back to windowed
To switch back to windowed
!
!
Fullscreen Mode Button in the Header.
Fullscreen Mode Button in the Header.
%
%
TRAKTOR logo.
TRAKTOR logo.
mode, click on the highlighted
mode, click on the highlighted
You can also open the About
You can also open the About
Win do w by cli ckin g th e
Win do w by cli ckin g th e
TRAKTOR PRO / TRAKTOR SCRATCH PRO – 22
Page 26
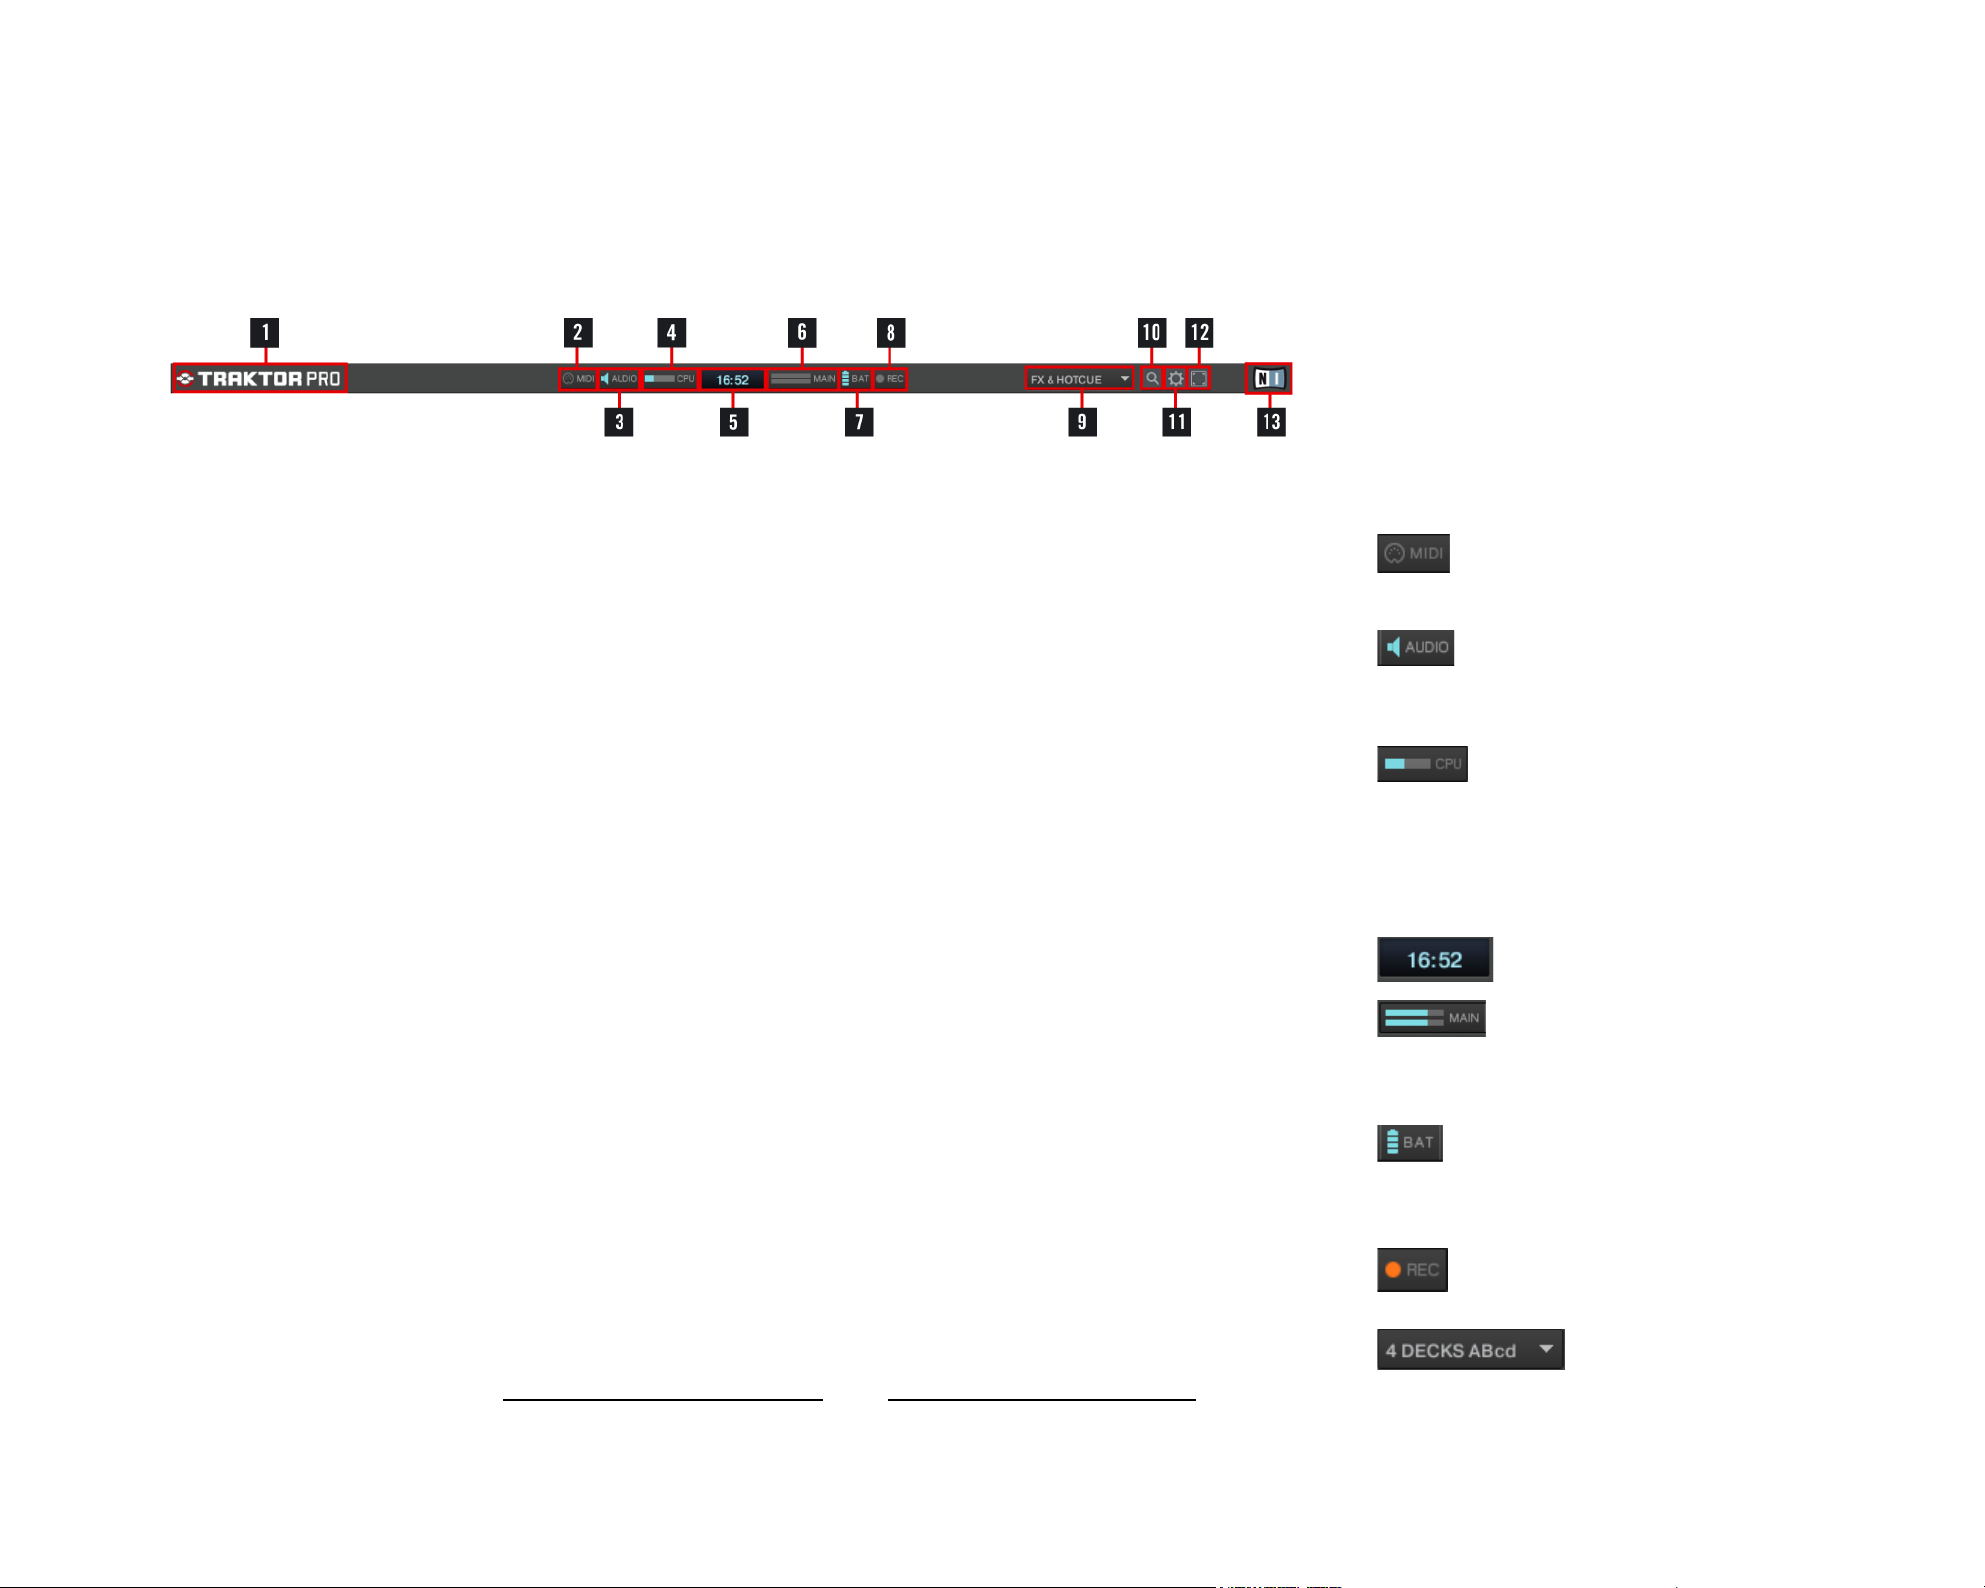
5.3 Header
The elements contained in the Header give access to basic functions of the application
and provide useful status information.
TRAKTOR Logo: Opens the About Window.
1.
MIDI Indicator: Displays the incoming MIDI-commands. It ashes blue while receiving a
2.
signal.
Audio Indicator: Displays the status of your sound card (blue: sound card is connected
3.
and working; red: no soundcard congured, no soundcard connected or soundcard is
not working properly).
CPU Meter: Indicates how much of the CPU-capacity is available in TRAKTORs internal
4.
audio engine. Gives information about how stressed the system is, and how much
headroom is left until you reach the capacity limit. The more the meter is lit, the more
likely you may experience audio dropouts with increasing frequency for values above
80%.
Clock: Displays the time depending on the system time.
5.
Master Out: Displays the master output level. The tips of the meters turn red when sig-
6.
nal clipping occurs or when the built-in Limiter starts compressing the signal (if
switched on in the Preferences).
Battery Indicator: Gives quick information about how much power your battery has left.
7.
If you are using a power supply, the indicator is blue. If you are running from battery,
the indicator turns red.
Recording Indicator: Displays the status of the Traktor Audio Recorder. If lit red, Traktor
8.
is recording.
Layout Selector: Gives direct access to the Screen Layouts congured with the Layout
9.
Manager (see chapter 16.1.2 – Layout Manager and 14.11 – Layout Manager).
TRAKTOR PRO / TRAKTOR SCRATCH PRO – 23
Page 27
Maximize Browser Button: Expands the browser to full window size.
10.
Preferences Button: Opens the Traktor Preferences menu (see chapter 14 – Preferences).
11.
Full Screen Button: Toggles Full Screen Mode on and off.
12.
NI Logo: Opens the About Window.
13.
5.4 Global Section
The Global Section offers ve panels which are explained in detail below.
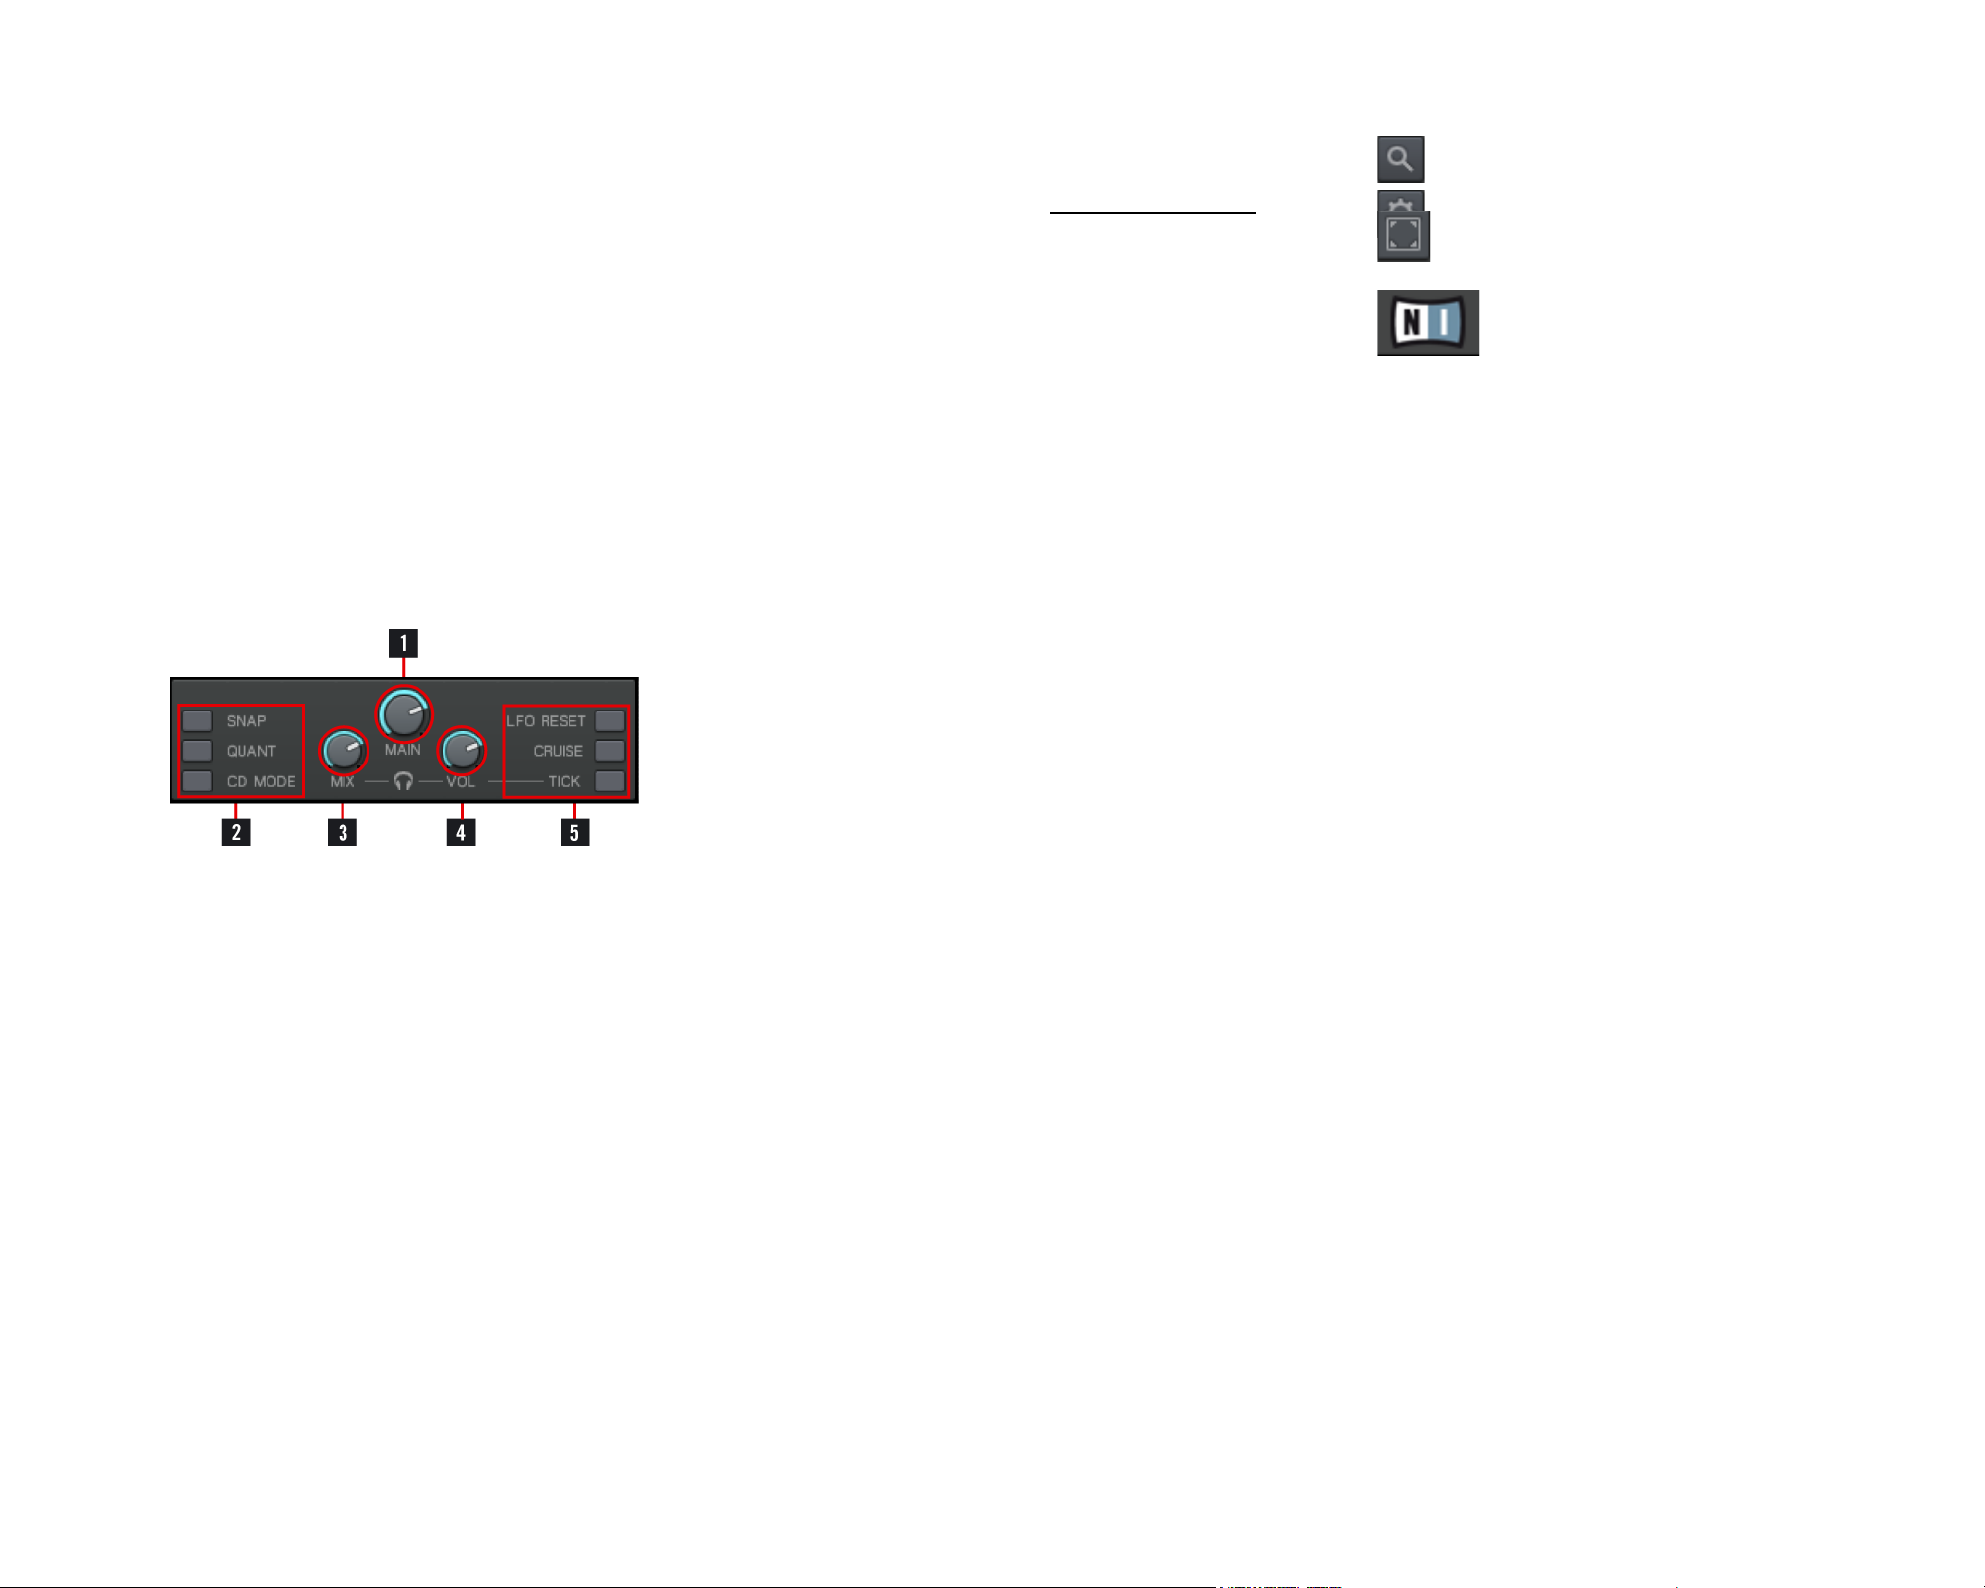
5.4.1 Master Panel
Master Volume: Controls the Master Output Level.
1.
Mouse Mode selection:
2.
snAP: snaps to the closest beat when setting Cue Points and Loops or clicking in the
Waveform Display.
QuAnt: makes skips between Hotcues and Hotloops beat-accurate for real-time re-
mixing.
cD moDe: plays a short Stutter Loop when the Deck is paused for cueing up a beat
similar to stutter loops of CD players.
Headphones Mix: Controls the mix between the master and the cued signal in the head-
3.
phones.
Headphones Volume: Controls the level of the Monitor Output for your headphones.
4.
TRAKTOR PRO / TRAKTOR SCRATCH PRO – 24
Page 28
Global Audio Options:
5.
lfo Reset: resets the LFO of all LFO based effects.
►
cRuise: activates automatic playback of an entire playlist (Autoplay).
►
t
ick
►
: toggles an audible Beat Tick on and off that works like a metronome. Select
the channel via the channel headphones Cue button.
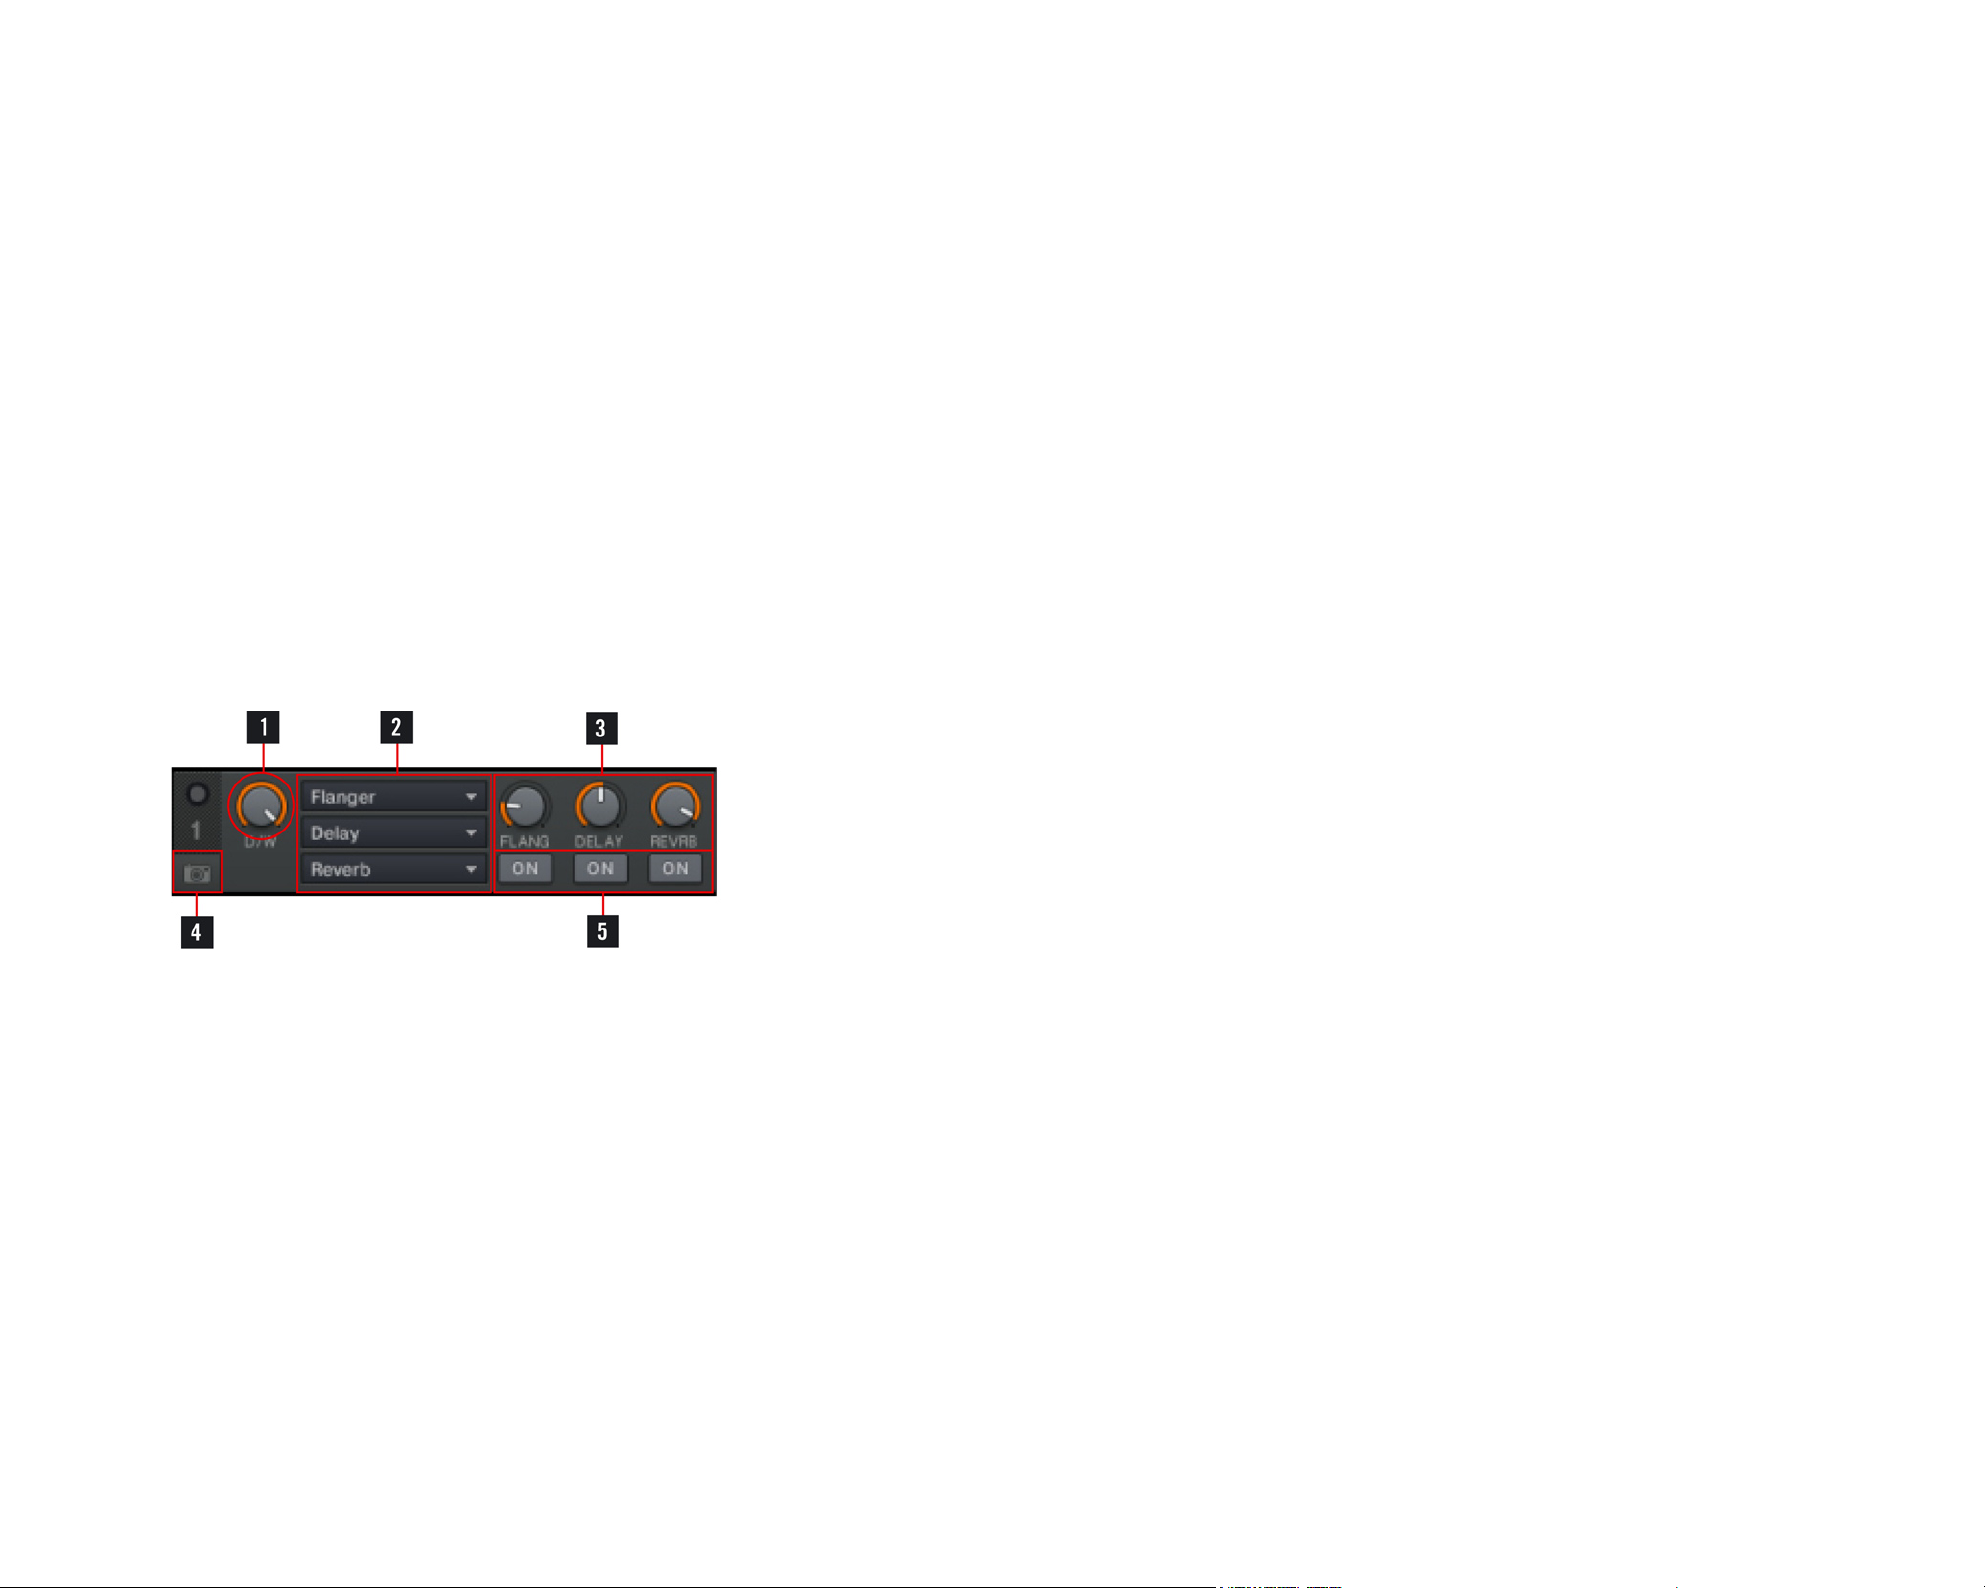
5.4.2 FX 1 Panel / FX 2 Panel
Each of the two Effect Panels represents one of the effect slots of Traktor. The effect
slots can either host three chained effects (Chained Mode) for creating interesting effect
combinations or host a single advanced effect (Advanced Mode) for in-depth effect control
over a single effect.
Chained Mode:
Dry/Wet Control: Controls the main-signal-to-effect-signal-ratio for the entire effects
1.
chain.
Effect Selector: Selects the effects from the dropdown menu of preselected effects
2.
dened in the Preferences.
Effect Amount Knobs: Each knob controls the individual effect amounts.
3.
Snapshot: Saves the current effect settings as default setting. The settings are recalled
4.
individually for each of the selected effects.
Effect On Buttons: Switch the individual effects on and off.
5.
TRAKTOR PRO / TRAKTOR SCRATCH PRO – 25
Page 29
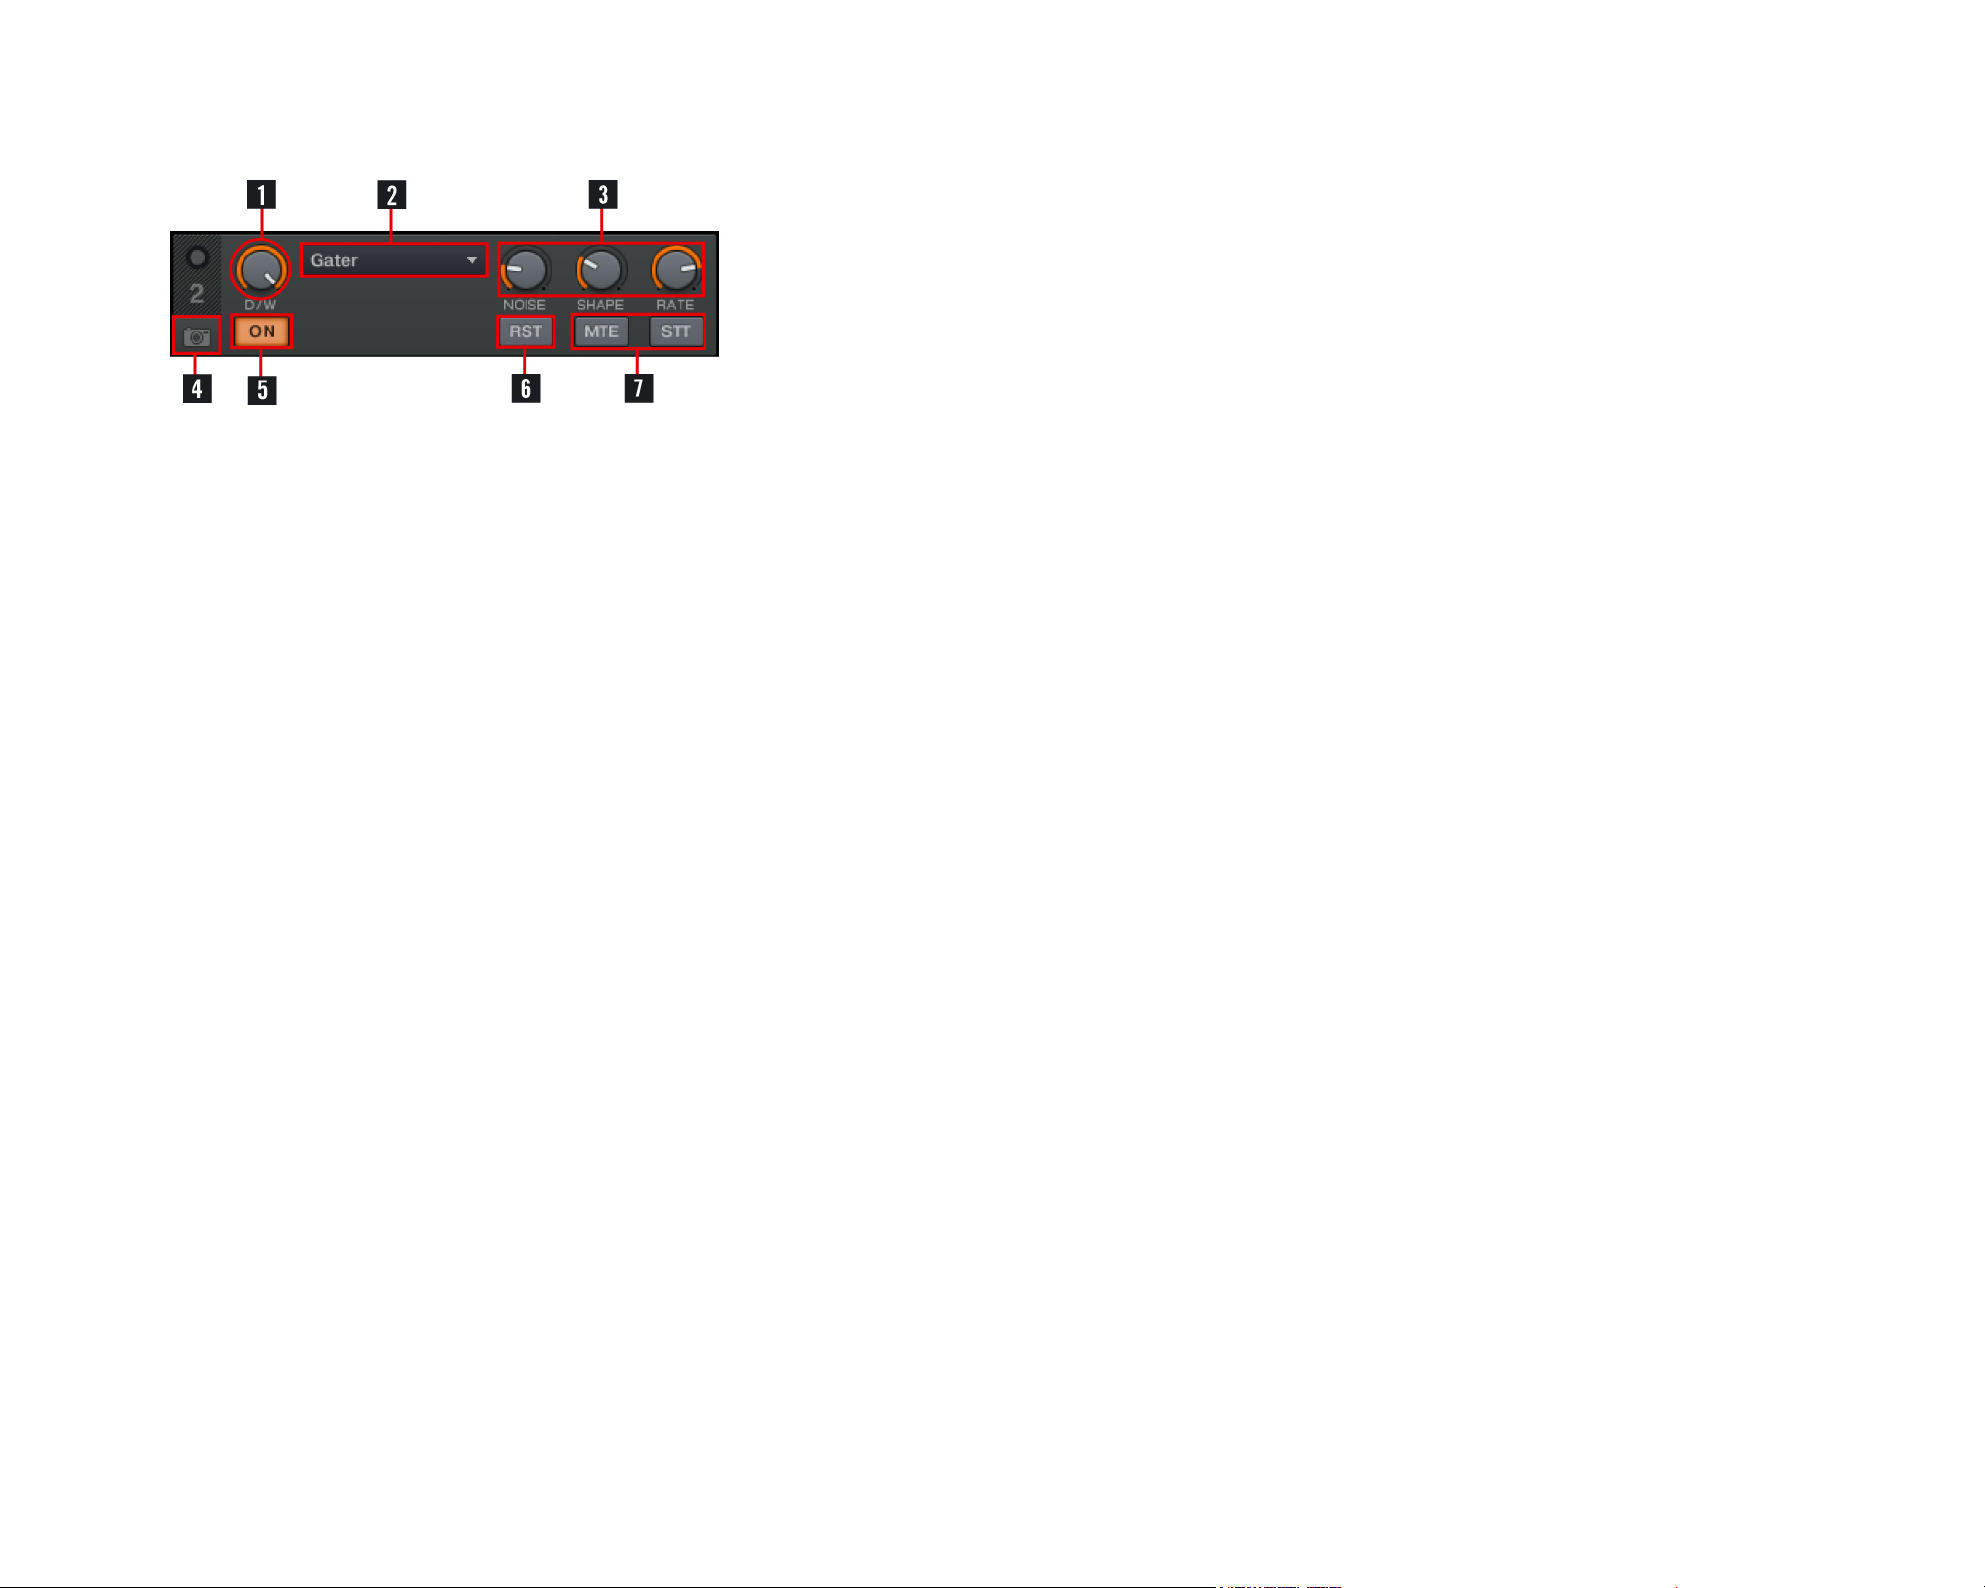
Advanced:
Dry/Wet Control: Controls the main-signal-to-effect-signal-ratio for the selected effect.
1.
Effect Selector: Selects the effect from the dropdown menu of preselected effects de-
2.
ned in the Preferences.
Effect Parameter Knobs: Control the different parameters of the selected effect.
3.
Snapshot: Saves the actual effect settings as default setting.
4.
Effect On: Globally switches the selected effect on and off.
5.
Effect Parameter Reset: Resets all effect parameters to the default setting.
6.
Effect Buttons 1/2: Control the selected effect. The exact function depends on which
7.
effect is selected.
TRAKTOR PRO / TRAKTOR SCRATCH PRO – 26
Page 30
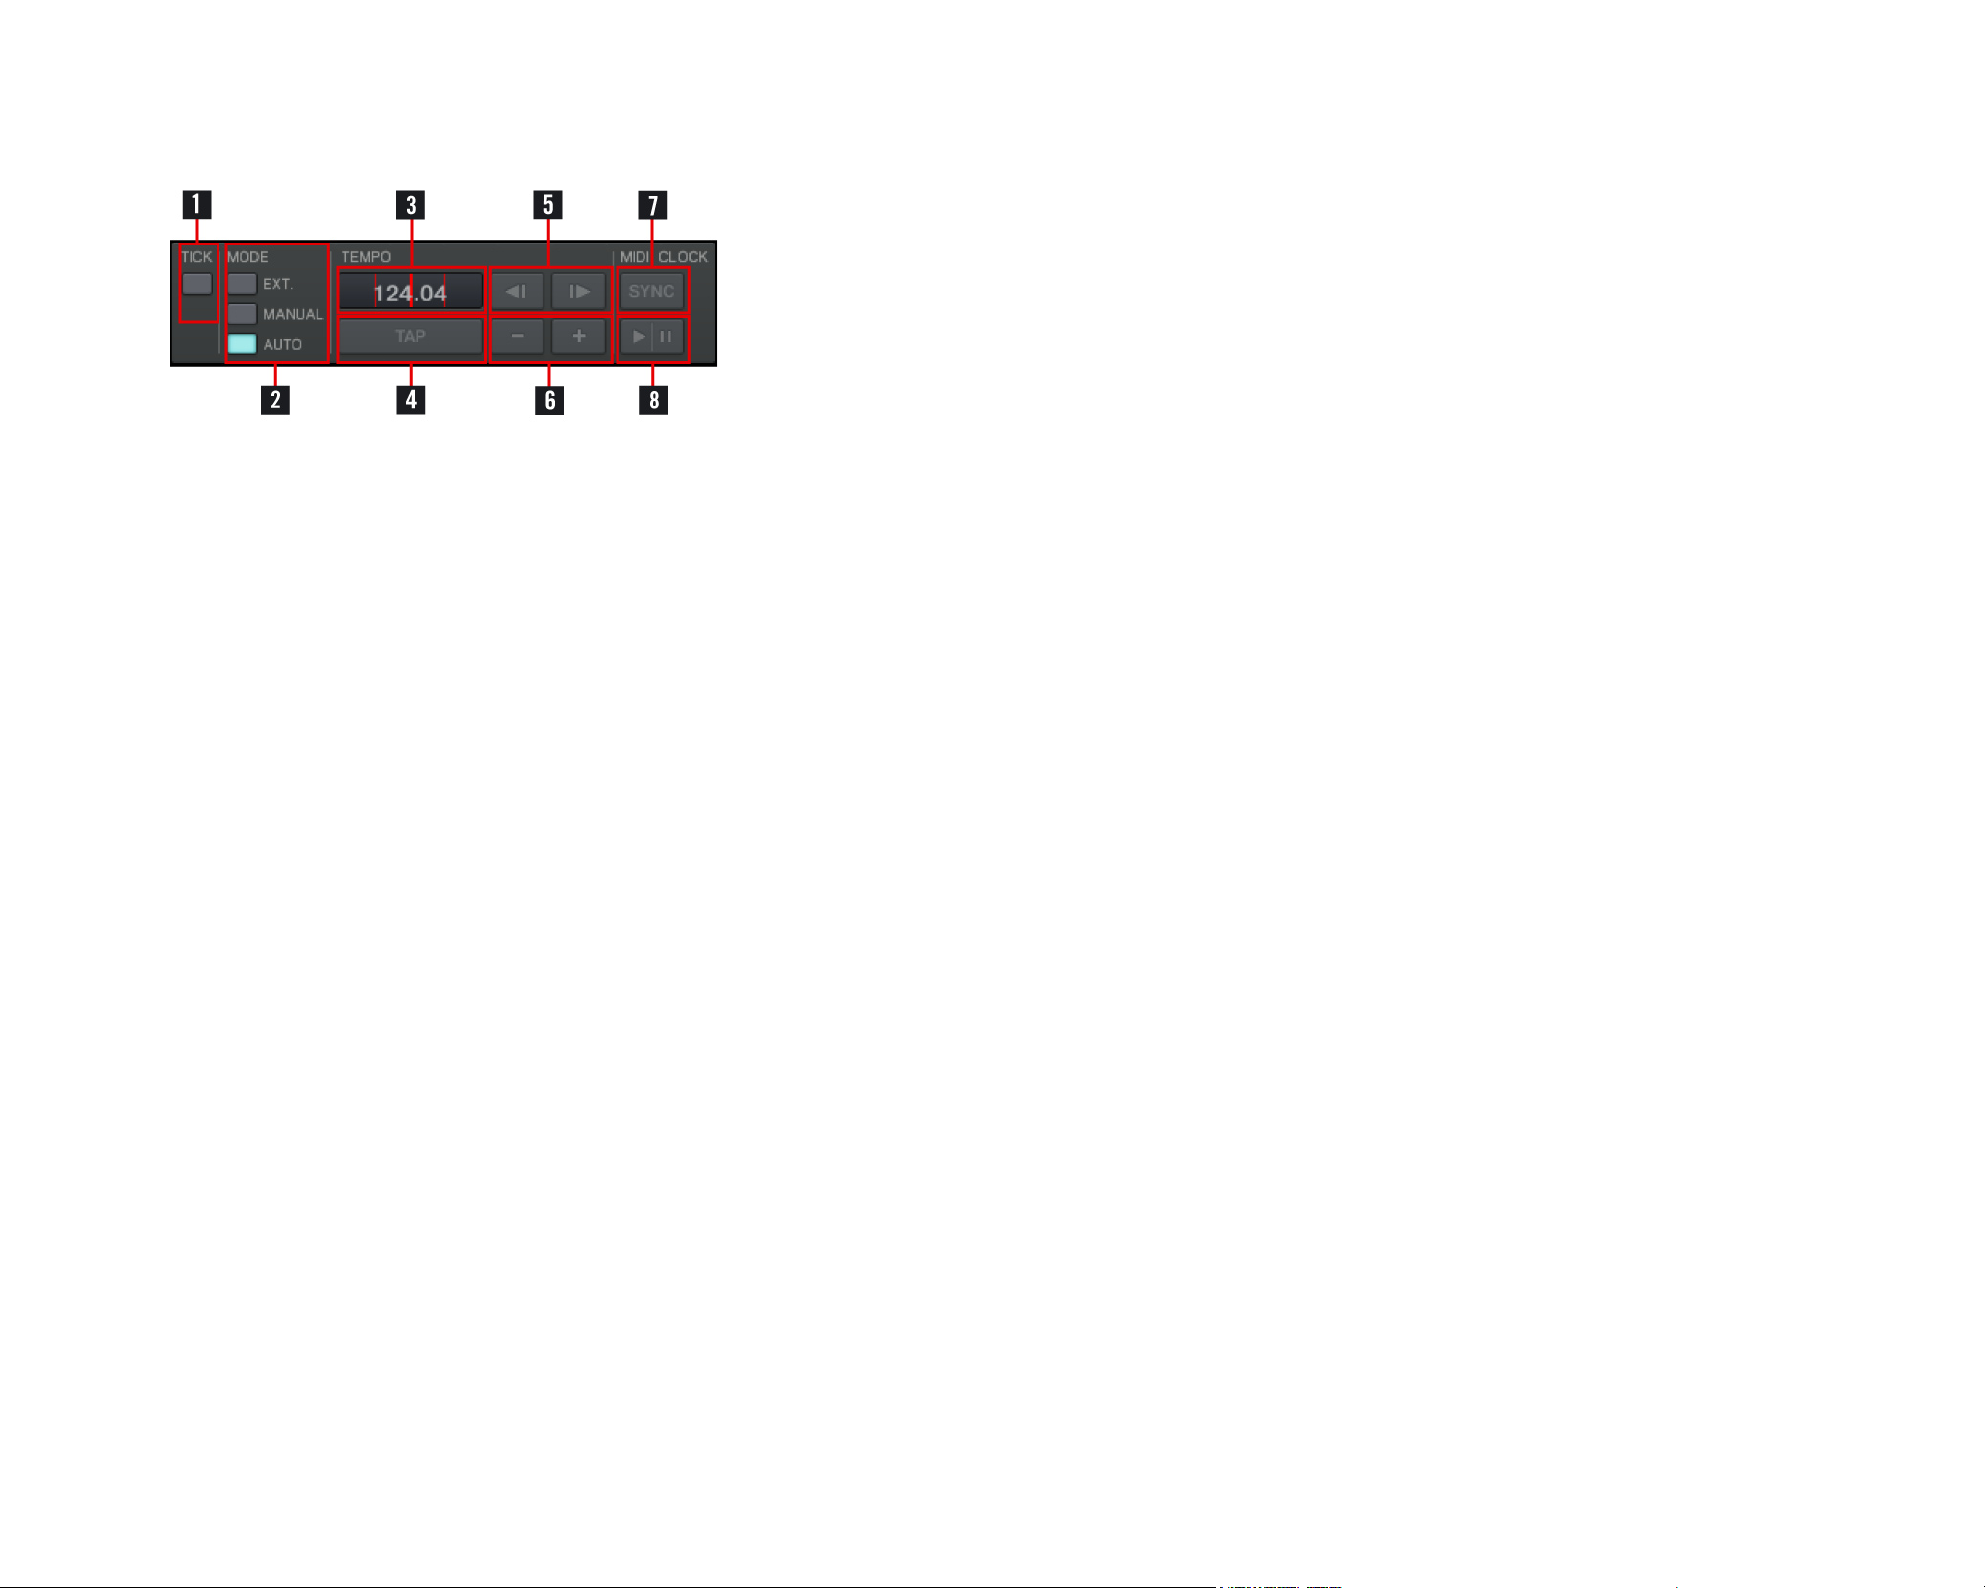
5.4.3 Master Clock
Master Clock Tick: Toggles an audible, metronome-like Beat Tick with the Master Clock
1.
as source on and off.
Mode:
2.
mAnuAl: allows manual selection of the Master Clock or a Deck as tempo
►
source.
Auto: automatically selects one of the Decks as tempo source. The Master Clock
►
automatically syncs to the Master Deck.
3. Tempo Display: Displays the current tempo and offset of the Master Clock.
4. Tap: Sets the Master Tempo manually by tapping to the beat.
5. Master Clock Pitch Bend: Slows down and speeds up the Master Tempo momentarily.
6. Master Tempo Adjust: Increases (+) and decreases (-) the Master Tempo stepwise.
7. MIDI Clock Reset: Resets the external slaves connected via MIDI Clock.
8. MIDI Clock Send: Activates or deactivates MIDI-Clock for external synchronization.
TRAKTOR PRO / TRAKTOR SCRATCH PRO – 27
Page 31

5.4.4 Recorder
Rec On/Off: Starts and stops recording.
1.
Broadcasting On/Off: Starts and stops broadcasting.
2.
Gain: Controls the volume of the recording.
3.
Recorder Display: Displays the length and le size of the recording.
4.
Rec Meter: Displays the level of the recording signal.
5.
Delete: Deletes the current recording.
6.
Cut: Cuts the current recording and seamlessly starts a new recording le.
7.
TRAKTOR PRO / TRAKTOR SCRATCH PRO – 28
Page 32

5.5 Decks
Track Cover Icon: Displays the cover of the loaded track.
1.
Track-Info: Displays information about the loaded track. Customize displayed informa-
2.
This screenshot shows nearly all
This screenshot shows nearly all
%
%
the layout some of them may be hidden
the layout some of them may be hidden
or can be shown additionally, e.g. the
or can be shown additionally, e.g. the
Scratch Panels in TRAKTOR SCRATCH
Scratch Panels in TRAKTOR SCRATCH
PRO.
PRO.
Deck-elements. Depending on
Deck-elements. Depending on
tion in Preferences > Layout Manager > Deck Details > Deck Header.
Sync-Controls:
3.
►
sync Button: synchronizes the playing track to the current tempo source (another
Deck or the Master Clock)
►
mAsteR Button: denes the Deck as Master for syncing.
►
P
hAse meteR
Master Deck or to the Master Clock ticks. The Phase Meter has to be centered for
matching the beats.
►
Pitch BenD Buttons: slows down or speeds up the playing track temporarily.
4. Waveform:
►
Visually represents the local part of the playing track. The brighter color shade
represents high frequencies, the darker color shade represents low frequencies.
Zoom in or out by using the “+” and “-“ buttons.
►
: shows the offset of the beats in the playing track to the beats in the
synced
synced
shifted phase
shifted phase
5. Skip to Start: Moves the play position to the beginning of the loaded track.
TRAKTOR PRO / TRAKTOR SCRATCH PRO – 29
Page 33

6. Stripe:
Displays the complete waveform of the loaded track including Cue Points and
Loops.
Displays the cached part of the track required for seamless jumps as yellow lines above
and below the Stripe.
7. Input Selector: Selects the Input Mode for the engaged Deck. Use to switch between
Internal Playback, Scratch Control or External Input.
8. Pitch Fader: Decreases and increases the tempo of the playing track by moving it up or
down.
9. Key-Lock: Activates or deactivates the Key Lock feature.
10. Pitch Adjust: Increases and decreases the tempo of the playing track stepwise. The
sensitivity of the steps can be customized via right/ctrl-click.
11. Transport Controls: P
lAyBAck
and c
uRRent cue Point
control. See chapter 5.5.1 (Transport
Controls) and 6.4 (Transport Controls).
12. Loop Controls: Sets automatic and manual Loops. See chapter 5.5.2 (Loop Controls)
and 6.5 (Loop Controls).
13. Open/Close Advanced Panel: Opens or closes the Advanced Control Panels. See chapter
5.5.3 (Advanced Panels) and 6.7 (The Advanced Panels).
TRAKTOR PRO / TRAKTOR SCRATCH PRO – 30
Page 34

5.5.1 Transport Controls
Play/Pause:
1.
Starts and stops playback.
►
Stopping does not set a Current Cue Point when playback is paused.
►
2. Cue:
During playback, it skips back to the Current Cue Point.
►
On a paused Deck, a new Current Cue Point is set at the current position and the
►
track will be played back from there as long as the button is pressed. When released, the track skips back to the Current Cue Point.
3. Cue Play/Pause:
During playback it skips back to the Current Cue Point and keeps the track play-
►
ing. Playback resumes when releasing the button.
On a paused Deck it sets a new Current Cue Point and starts playback from there
►
when releasing the button.
5.5.2 Loop Controls
Loop Size Control:
1.
Sets Auto Loops and changes their size.
►
The chosen loop size is highlighted yellow.
►
Use the A
►
RRow
buttons on each end of the range to see higher or lower values.
The ARRow buttons ash if the selected length is out of range.
TRAKTOR PRO / TRAKTOR SCRATCH PRO – 31
Page 35

2. Loop In Button
Manually sets a Loop In Cue Point.
►
The looP in Button can also be used to set a Current Cue Point on the y during
►
playback.
Pressing in while a loop is active selects the “Loop In” Move Mode (see below).
►
3. Loop Out Button
Manually sets a Loop Out Point and activates the loop.
►
Pressing out while a loop is active selects the “Loop Out” Move Mode (see be-
►
low).
Pressing in and out while a loop is active selects the “Loop” Move Mode to move
►
the loop as a whole.
4. Loop Active Button: This button shows that a loop is active and running. It Can be used
to leave (deactivate) the loop. If turned on when no loop is running, the next stored
loop encountered during playback is activated.
TRAKTOR PRO / TRAKTOR SCRATCH PRO – 32
Page 36

5.5.3 Advanced Panels
To open the Advanced Panels, click on the small downwards pointing arrow button below
the Pitch Fader.
There are three Advanced Panels. Select them by clicking on the Move, Cue or Grid Buttons
on the left side.
Loop Move and Beat Jump Panel (Move):
Mode Selector: Switch between Beat Jump, Loop, Loop In and Loop Out Mode.
1.
Amount Controls: Select the step size in beats. The yellow arrow marks the chosen step
2.
size. Scroll through the predened move sizes with the buttons on the left and right
and click on a value to choose one.
Move Buttons: Depending on the mode selected in the Mode Selector, the play position
3.
(Beat Jump), the complete Loop, the Loop In Point or the Loop Out Point is moved
about the selected step size forward or backward.
Loop Button:
4.
This button selects a step size that is based on the current loop size for the move-
►
ment.
With Loop Mode selected, the loop will be moved backwards or forwards about
►
exactly one loop length.
With Loop In or Loop Out Mode selected, the loop will be resized by doubling or
►
halving the current loop length.
5. Fine Button: Selects a ne step size for the movement. Use this for ne adjustments.
TRAKTOR PRO / TRAKTOR SCRATCH PRO – 33
Page 37

Cue Point and Loop Management Panel (Cue):
1.
Next/Previous Cue Point: Use these to skips backward or forward to the previous or next
Stored Cue Point in the track.
2.
Cue Position Display: Displays the position of the selected Cue/Loop In Point in mm:ss:
ms.
3.
Cue Name Display: The Display shows the name of the selected Cue/Loop In Point. Click
inside the eld to edit the name. Click on the downwards pointing arrow to select another stored Cue/Loop In Point.
4.
Cue Type Selector: Click on the downwards pointing arrow to select the type of Cue Point.
Available types are described in chapter 6.7.3 (Cue Point Types).
5.
Delete: Deletes the selected Cue/Loop In Point.
6. Store:
►
Stores the Current Cue Point and maps it to the next free hotcue Button.
►
Up to 32 cue points or loops can be stored per track.
7. Hotcue Buttons:
►
These provide direct access to up to 8 Cue/Loop In Points per track.
►
Their background color reects the chosen Cue Point Type.
8. Map: This button enables Hotcue Mapping Mode. When active, pressing a h
otcue Button
maps the currently displayed Cue/ Loop In point to it. This works for stored Cue/ Loop
In Points only.
TRAKTOR PRO / TRAKTOR SCRATCH PRO – 34
Page 38

Beatgrid Panel (Grid):
Adjust Beatmarker Buttons:
1.
These Buttons adjust the position of the Beatmarker. As a result the whole Beatgrid
►
gets shifted to the left or right.
Use this to move the Beatmarker to the desired starting point.
►
2. Lock Beatgrid: Locks the Beatgrid (all buttons in the Grid Panel are disabled).
3. BPM Adjust Buttons:
These buttons change the BPM of a track. As a result, the Beatgrid gets expand-
►
ed or compressed.
tighten Beatgrid
tighten Beatgrid
Use this to match the grid with the beats during the whole track.
►
4. Auto Grid: Click on this button to set a Beatmarker at the Current Cue Point.
5. Tempo Display: This display shows the tempo of the loaded Track in BPM.
6. ÷2 / x2: Click on these buttons to halve/double the tempo.
7. Tap: Sets the tempo based on how fast or slow you tap on the button. The tempo will
be adjusted after the fourth tap.
widen Beatgrid
widen Beatgrid
TRAKTOR PRO / TRAKTOR SCRATCH PRO – 35
Page 39

5.6 Mixer
Equalizer:
1.
Provides a 3-band-EQ (default) for adjusting the sound of the playing track.
►
Clicking the small buttons next to the knobs kills the related frequencies.
►
For other EQ Types go to Preferences > Mixer EQ Selection.
►
2. Channel Fader:
Controls the channel volume.
►
The Channel Level Meters show the pre-fader level of the Decks’ signal and can
►
be adjusted with the Gain Knob.
TRAKTOR PRO / TRAKTOR SCRATCH PRO – 36
Page 40

3. Filter:
This knob provides control over the bipolar Channel Filter.
►
Enable the lter by clicking the small button next to the knob.
►
Center position is neutral. Turn left for a low pass lter and turn right for a high
►
pass lter.
4. Key Lock:
Provides control over the track key. Turn right to raise the key, turn left to lower
►
the key.
Enable Key Lock by clicking the small button next to the knob.
►
5. Effect Assign Buttons: Click on 1 or 2 to assign a channel to Effect Slot 1 or 2.
6. Gain: Adjusts the gain of a track. Use this to match the levels of the tracks before mix-
ing them with the faders.
7. Cue Button:
Pre-listen to a track over the internal Traktor Mixer.
►
If t
ick
►
deck.
8 . Pan Button: Controls the channel balance between the left and the right stereo channel.
9. Automatic Crossfade Buttons:
Clicking on these buttons lets the Crossfader move automatically to the left or
►
right.
Click again to stop transition.
►
9. Incremental Crossfade Buttons: Clicking on these buttons lets the Crossfader move step-
wise to the left or right.
11. Deck Assign Buttons: Assigns the Decks to the Crossfader. The buttons for the assigned
Deck(s) are lit.
12. Crossfader: Move the Crossfader to the left or right to perform transitions between the
is activated , click the Cue Button to make the beat-tick audible on that
Decks.
TRAKTOR PRO / TRAKTOR SCRATCH PRO – 37
Page 41

5.7 Browser
Preview Player: Click the P
1.
Preview Player or drag-and-drop a track on it.
Favorites: The Favorites provide direct access to Playlists or folders. To map them,
2.
simply drag-and-drop a folder or a Playlist onto one of the 10 Favorite slots.
Browser List:
3.
Shows tracks depending on the source that is selected (folder, playlist, search
►
results or tag based).
Right-/Ctrl-Click on the headline to switch columns on and off.
►
Drag-and-drop columns to the left or to the right to re-arrange the order of the
►
columns.
4. Track Info: Displays the title and the artist of the currently in the Browser List marked
track.
5. Search Field: Provides a live search based on the tags of the tracks in the Collection.
Read more in chapter 7.2, Finding Tracks (Search).
Review PlAyeR icon
in the Browser List to load a track into the
Dragging another Playlist on
!
will replace the Favorite Playlist with the
new Playlist.
!
will merge the content of the Favorite
Playlist with the content of the shiftdragged Playlist.
an already assigned Favorite
Shift-dragging another Playlist
on an already assigned Favorite
TRAKTOR PRO / TRAKTOR SCRATCH PRO – 38
Page 42

6. Browser Tree:
Track Collection: contains all Tracks imported to your Collection, sorted by Artist,
►
Release, Label or Genre.
Playlists: contains all your TRAKTOR Playlists.
►
Explorer: browse your hard drive for music tracks, useful for not imported
►
tracks.
Audio Recordings: contains all recordings done with the Traktor Audio Recorder.
►
iTunes: provides direct access to your iTunes Library including all playlists.
►
History: contains the history playlist, which Traktor automatically stores after every
►
session. You can nd History Playlists from former sessions in My Documents\
Native Instruments\Traktor\History.
7. Cover View: Displays the cover of the currently in the Browser List marked track.
8. Status Bar/ Error Messages: Displays the progress of analyzing jobs, error messages and
the overall status of TRAKTOR.
TRAKTOR PRO / TRAKTOR SCRATCH PRO – 39
Page 43

6. Using the Decks
TRAKTOR
Preferences independently of your decision in the Setup Wizard.
TRAKTORs Decks have all features and more you need for a professional DJ-perfor-
mance.
provides up to 4 Decks. You can choose between 2 or 4 Deck Mode in the
6.1 Loading Tracks
To load a track into a Deck, select the track in the Browser List with the up/down arrow
keys on your computer keyboard, then:
Press Ctrl + Arrow Left/Right to load the selected track into Deck A or Deck B or
1.
Drag-and-Drop a track from the Browser List into the Deck you want or
2.
Right-/Ctrl-Click on the track and choose Load Track in Deck A/B/C/D.
3.
To use TRAKTOR on smaller
%
Decks. A Mini Deck shows only two rows
in the Header and has no Waveform
Display.
displays, too, it provides Mini
6.2 The Deck Heading
The Deck Heading gives you information about the loaded track.
With full size Decks there are three rows and three columns you can use.
►
You can customize the displayed information to your likings in Preferences > Layout
►
Manager > Deck Details > Deck Header.
If you use Mini Decks only the rst row is shown.
►
To activate Mini Decks go to Preferences
> Layout Manager > Deck Style and set
the size for the Decks to Mini.
TRAKTOR PRO / TRAKTOR SCRATCH PRO – 40
Page 44

6.3 The Waveform Display and Stripe View
The Waveform and the Stripe are visual representations of the loaded track. The Waveform
is instantly visible; the Stripe is displayed as soon as the track is analyzed. Once a track
is analyzed, the Stripe is also instantly displayed. Read more about the analyzation in
chapter 7.8.2 (Analysis).
6.3.1 Waveform
The Waveform Display gives a detailed view about a few bars before and after the current
playback position.
You can zoom in and out by clicking the “+” and “-“ buttons next to the Waveform.
►
A brighter color shade represents high frequencies; a darker color shade represents
►
low frequencies.
The behavior of dragging the waveform with the mouse depends on the Snap Mode,
►
which is activated in the Master Panel of the Global Section. Read more about Mouse
Modes in chapter 11 (Mouse Control for Faders and Knobs).
6.3.2 Stripe
The Stripe View gives an overview about the whole track. It also displays the play position
and all Cue Points and Loops.
When the congured Track End Warning Time (Preferences > Global View Options >
►
Decks) is reached, it ashes red.
The behavior when clicking inside the Stripe Display depends on Quant Mode, which
►
is activated in the Master Panel of the Global Section. Read more about Mouse Modes
in chapter 11 (Mouse Control for Faders and Knobs).
The yellow bars on top and bottom of the Stripe indicate which part of the track is loaded
into the cache. Jumps in cached parts of a track are absolutely seamless.
You can setup the cache size for
%
> Loading > Deck Cache Size. For more
see chapter 14.4 (Loading).
TRAKTORs Decks in Preferences
As long as these bars are ashing TRAKTOR writes parts of the track into the cache.
►
The yellow bars stop ashing, when the whole track is loaded into the cache.
►
TRAKTOR PRO / TRAKTOR SCRATCH PRO – 41
Page 45

6.4 Transport Controls
The Transport Controls are the main buttons for playing tracks with TRAKTOR.
6.4.1 Play
Click PlAy/PAuse to start and stop playback.
►
6.4.2 Cue
This button has multiple functions depending on the playback state of the track.
Clicking cue when playback is paused sets a new Current Cue Point at the current play
►
position respectively on the beat next to the play position in Snap Mode).
When the track is paused and already cued up to the Current Cue Point, the same
►
button serves to prelisten the Cue Point by playing the track as long as the button is
pressed.
Clicking cue during playback jumps back to the previously set Current Cue Point and
►
stops playback.
6.4.3 Cup (Cue/Play)
This button behaves similar to cue but stops playback as long as held down.
On a paused Deck, clicking cuP sets a Current Cue Point position and starts playback
►
from there when releasing the button.
Clicking cuP during playback skips back to the Current Cue Point and pauses the
►
playback until the button is released.
TRAKTOR PRO / TRAKTOR SCRATCH PRO – 42
Page 46

6.5 Loop Controls
The main loop controls offer all functions required for the creative use of loops in your
mix.
6.5.1 Auto Looping
Click on a number in the l
►
represent the loop length in beats. The looP Active Button will be highlighted in yel-
low.
The chosen loop size is also lit yellow, as long as the loop is active. When the loop is
►
not active it is shown as a light-grey button.
To leave the loop, click on the selected loop length again or, alternatively, click on the
►
highlighted Active Button.
To change the size of an active loop on the y, click on another length in the l
►
contRol.
Click on the A
►
lower values. The ARRow Buttons ash if the selected length is out of range.
RRow Buttons
ooP size contRol
on each end of the l
to set a loop of this size. The numbers
ooP size contRol
to see higher or
6.5.2 Manual Looping
Click on the looP in Button to set the start point of the loop.
►
ooP size
For more option for working with
%
loops, see chapter 16.5 (Transport).
loops, like storing and editing
Click on the l
►
loop the respective amount. The looP Active Button will be highlighted.
To leave the loop, click on the highlighted Active Button.
►
ooP out Button
to set the end point of the loop. Your track will begin to
TRAKTOR PRO / TRAKTOR SCRATCH PRO – 43
Page 47

6.6 Tempo Controls
TRAKTOR
as well as a variety of automated syncing functions that will make your mixes faster than
ever before.
provides a P
itch fADeR
with customizable range, a pair of P
itch BenD Buttons
6.6.1 Manual Tempo Controls
Pitch Fader
By moving the Pitch fADeR up or down you can speed up or slow down the tempo of the
track.
dard DJ turntable or pitchable CD player.
►
►
►
TRAKTOR
To adjust the tempo stepwise, use the “+” and “-“ Buttons.
You can also use the scroll wheel of your mouse to move the Pitch fADeR up or down
in steps.
The sensitivities of the “+” and “-“ Buttons and the scroll wheel of the mouse can be
s P
itch fADeR
has just the same functionality as a pitch fader on any stan-
adjusted by right-/ ctrl-clicking on the “+” or “-“ Button and selecting one of the sen-
sitivity options.
Pitch Bend Buttons
The Pitch BenD Buttons are used if two tracks are running with the same tempo, but their
phase is shifted slightly. This corresponds to a soft touching of the vinyl to slow down or
fasten the tracks that go slightly out of sync.
►
Click the button with the left pointing arrow to slow down the track a bit and click the
button with the right pointing arrow to fasten the track a bit. The tempo change is only
momentary. If you release the mouse button, the track continues in its normal tempo.
Use Beatgrids for perfect ac-
%
See chapter 6.7.5, Beatgrid Panel (Grid
Panel).
curacy of the PhAse meteR.
TRAKTOR PRO / TRAKTOR SCRATCH PRO – 44
Page 48

6.6.2 Phase Meter
The P
sync or if it plays with a beat offset compared to the Master Deck or the Master Clock.
►
►
►
►
►
►
hAse meteR
If two tracks’ Phases are synchronized, the meter stays in the middle.
If one tracks’ Phase is shifted backward, a yellow stripe is seen on the left side of the
middle position.
If a tracks’ Phase is shifted forward, a yellow stripe is seen on the right side of the
middle position.
You can globally activate or deactivate the PhAse meteR in Preferences > Layout
Manager > Deck Details > Pitch Controls.
Shift the Phase by click, hold and dragging it with the mouse.
Shift the Phase by using the scroll wheel of your mouse.
is a visual reference for track synchronization. It shows you if a track is in
6.6.3 Beat Synchronization
Automatic Beat Synchronization is one of the central features of
a single click!
Sync Button
The sync button provides the fastest way for beatmatching.
Click on sync to automatically match the tempo and the Phase of the playing track to
the Master Deck
►
or
the Master Clock, if no Deck is selected as Master Deck.
►
Master Deck
The Master Decks gives the target tempo for syncing other Decks.
Master Deck automatically.
TRAKTOR
TRAKTOR
and works with
sets the
Automatic Master Deck!
&
mAsteR button - Master Deck
TRAKTOR PRO / TRAKTOR SCRATCH PRO – 45
Page 49

The Master Deck is automatically set by TRAKTOR depending on which track has the
►
longest uninterrupted playtime.
You can change the selected Master Deck by clicking the m
►
AsteR
button of another
Deck.
If
►
TRAKTOR
does not automatically set the Master Deck, activate Auto Mode in the
Master Clock Panel of the Global Section (see chapter 5.4.3 (Master Clock)).
When switching the Master Clock to Manual Mode, you have to select manually which
Deck is the Master by clicking on the mAsteR button of this Deck.
If no Deck is selected as Master, the Master Clock itself denes the target tempo.
►
6.6.4 Key Lock
With
When you play a track at a higher or lower tempo, the tone pitch will often sound unnatural. To avoid this, you can lock the key of this track so that tempo changes do not affect
it (often also called “Master Tempo”).
TRAKTOR
it is possible to change the tempo of a track while keeping its original key.
mAsteR button - slaved Deck
Key Lock active
Click the key l
►
ock Button
on the right side of the Stripe for playing a track at original
pitch.
Use the small button next to the key k
►
without altering the current pitch.
Both buttons are lit, when Key Lock is active.
►
noB
in the Mixer for enganging Key Lock mode
TRAKTOR PRO / TRAKTOR SCRATCH PRO – 46
Page 50

6.7 The Advanced Panels
The Advanced Panels provide additional editing and storing functions for Loops or Cue
Points, Hotcueing, Beatjumping and for preparing your tracks with Beatgrids.
To open the Advanced Panels click the button underneath the Active button.
►
Alternatively activate the Advanced Panels in Preferences > Layout Manager > Deck
►
Details > Deck Style.
Once the panel is open the buttons labeled m
►
one of the three available subpanels.
ove
, cue and G
RiD
each give access to
6.7.1 Beatjump and Loop Move Panel (Move Panel)
The Beatjump and Loop Move Panel (short: m
and jump inside the track by a predened number of beats.
ove
Panel) lets you edit already set loops
You cannot open the Advanced
!
%
absolutely seamless.
Panels in Mini Deck Mode
With QuAnt activated in the
Master Panel, all moves are
There are four modes available described below. To change the modes use the moDe
►
selectoR.
The A
►
ing in beats. The yellow arrow under a value marks the selected size. Scroll through
the predened move sizes with the buttons on the left and right.
Beatjump Mode
With Beatjump mode you can jump forwards or backwards in the track.
Choose a move size by using the Amount contRol.
►
Click the move Buttons to jump forward or backward by the selected move size.
►
With the fine Button activated you can jump by a very ne amount. The Amount
►
c
by choosing xfne inside the Amount contRol.
mount contRol
ontRol
automatically switches to f
applies to all modes. With this you can select the size of the mov-
ine
. There is an even more precise amount possible
TRAKTOR PRO / TRAKTOR SCRATCH PRO – 47
Page 51

Loop Mode
In Loop Mode you can move the whole loop.
Choose a move size by using the Amount contRol.
1.
Click the move Buttons to move the loop by the chosen move size.
2.
With looP activated the loop will be moved for a full Loop length. The Amount
►
contRols automatically switches to looP, when clicking the looP Button.
With the fine Button activated you can move the Loop by a very ne amount. The
►
Amount contRol automatically switches to fine. There is an even more precise
amount possible by choosing xfne inside the Amount contRol.
Loop In Mode
Loop In Mode edits the Loop In Point.
Choose a move size by using the Amount contRol.
1.
Move the Loop In Point by the chosen amount with the move Buttons.
2.
►
With l
ooP
activated the Loop Length is halved or doubled when using the m
Buttons.
With the fine Button activated you can edit the Loop Size by moving the Loop In
►
Point with a very ne amount. The Amount contRol automatically switches to fine.
The amount xfne is even more precise.
Loop Out Mode
Loop Out Mode edits the Loop Out Point.
1.
2.
►
►
Choose a move size by using the Amount contRol.
Move the Loop Out Point by the chosen amount with the move Buttons.
With looP activated the Loop Length is halved or doubled when using the move Buttons.
With the f
ine Button
activated you can edit the Loop Size by moving the Loop In Point
with a very ne amount. The Amount contRol automatically switches to fine. The
ove
amount xfne is even more precise.
TRAKTOR PRO / TRAKTOR SCRATCH PRO – 48
Page 52

6.7.2 Cue Point and Loop Management Panel (Cue Panel)
The Cue Point and Loop Management Panel (short: cue Panel) gives you the ability to
store and map Cue Points and Loops.
With Stored Cue Points you can mark specic positions in your tracks, e.g. beginning
vocals, instruments or breaks. To store a Cue Point, do as follows:
Set the Cue Point with the cue button in the Transport Controls.
1.
Click stoRe.
2.
The Current Cue Point always is
%
with cue points and for storing loops.
%
your starting point for working
You can store up to 32 Cue
points and Loops
You can skip from one Stored Cue Point to the next by using the n
►
cue Point buttons.
The cue P
►
track.
You can assign a name to a Cue Point right next to the P
►
nAme DisPlAy; click in the display, highlight the name and rename it.
You can skip to a Stored Cue Point directly with the dropdown menu next to the
►
cue nAme DisPlAy or with the hotcue Buttons.
You can assign a special action to a Cue Point by changing its type in the cue t
►
selectoR.
The following Cue Point Types are available:
Cue (standard Cue Point)
►
In (Fade In Cue Point)
►
osition DisPlAy
shows the position of the Stored Cue Point within the
ext/PRevious
osition DisPlAy
in the cue
yPe
Out (Fade Out Cue Point)
►
Load (Load Cue Point)
►
Grid (Beatmarker)
►
Loop (Loop In Point)
►
TRAKTOR PRO / TRAKTOR SCRATCH PRO – 49
Page 53

6.7.3 Cue Point Types
This section describes the special functions of the different Cue Point Types in detail.
Fade In/Fade Out Cue Points
The Fade In and Fade Out Cue Points are used for automated Cue/Play of two tracks. For
this to work, you have to set a Fade In Cue Point in one Deck and a Fade Out Cue Point
in the other.
Additionally, you have to enable this option in Preferences > Loading > Loading.
►
How they work:
Load a track into Deck A.
1.
Scroll towards the end of the track and click cue to move the Cue Point to this posi-
2.
tion.
Click stoRe to convert the Cue Point into a Stored Cue Point.
3.
Dropdown the cue tyPe selectoR and select Out from the menu.
4.
A red Fade Out Cue Point will appear in the Waveform Display and the Stripe View.
5.
Now load a track into Deck B.
6.
Set a Stored Cue Point at the beginning of the track by clicking stoRe.
7.
Fade In
Fade out
Dropdown the cue tyPe selectoR and select In from the menu.
8.
A red Fade In Cue Point will appear in the Waveform Display and Stripe View.
9.
Click the cRuise Button in the Global Section to activate Autoplay Mode.
10.
Start the playback of the track in Deck A shortly before the Fade Out Cue Point.
11.
When the Fade Out Cue Point in Deck A crosses the play position, the track in Deck
12.
B will automatically begin playing from its Fade In Cue Point.
TRAKTOR PRO / TRAKTOR SCRATCH PRO – 50
Page 54

Load Cue Point
A Load Cue Point causes a track to automatically cue to this point when it is loaded into
a Deck, saving you from the need to manually cue your track to this point.
If you want to make use of the Load Cue Points, enable the option Initially cue to Load
►
Marker in Preferences > Loading > Loading.
Beatmarker
A Beatmarker sets the starting point for a Beatgrid. This is a special cue point from which
a regularly spaced grid of reference lines is created, used to synchronize tracks. Please
read chapter 6.7.5, Beatgrid Panel (Grid Panel), for a detailed explanation of Beatmarker
and Beatgrids.
Stored Loops
The same functionality for storing cue points applies to Loops, too.
Set a loop with the Loop Panel (see chapter 6.5. Loop Controls).
1.
Click stoRe.
2.
The loop markers change to green Loop In and Loop Out Points and the loop is now
3.
a Stored Loop.
Load
Grid
Loop In
The Loop In Point is now reachable like a Stored Cue Point.
4.
Deleting a Stored Cue Point or Loop
If you want to delete a Stored Cue Point or Loop permanently, do as follows:
Go to the Cue Point or Loop by using the n
1.
ext/PRevious cue Buttons
or choose it from
the dropdown menu under the cue nAme DisPlAy.
Click on Delete.
2.
The Cue Point or Loop now is deleted. There is no undo for this!
3.
Loop Out
TRAKTOR PRO / TRAKTOR SCRATCH PRO – 51
Page 55

6.7.4 Hotcues and Hotcue Mapping
In TRAKTOR you an assign any Stored Cue Point or Loop to one of the 8 hotcue Buttons
that allow instant and fast access to the most important Cue Points and Loops of a
track..
Storing a Cue Point instantly maps it to the next available Hotcue. Click a second time
►
on stoRe to duplicate the Hotcue.
If you want to change the assignment, click on the assigned Hotcue, then click on
►
Map and then on the new Hotcue.
Select a Cue/Loop In point, then click on the w
►
Point. This deletes the Cue/Loop In Point permanently.
How to use Hot Cues
hot cue Buttons behave differently depending on if the track is playing or not:
Clicking a hot cue B
►
mapped Cue/ Loop In Point. The track is continuing playback from there.
utton
while playback is running skips the play position to the
AsteBin
Icon to delete a Cue/Loop In
This feature also enables you to
%
a non-chronological order.
Grid Fade In/Out
Cue
Load Loop
store Cue Points and Loops in
While playback is paused, the hot cue B
►
Clicking it skips the play position to the mapped Cue/ Loop In Point and holding it lets
playback run as long as you hold it. By releasing the button, the play positions skips
back to the Cue/Loop In and playback is still paused.
uttons
act like cue in the Transport Panel.
6.7.5 Beatgrid Panel (Grid Panel)
The Beatgrid is the basis for syncing multiple tracks and setting perfect loops. It is a visual
reference for the DJ, which shows the tempo structure of a track.
The Beatgrid Panel (short: G
the stored BPM of a track.
RiD
Panel) gives control over the Beatmarker, Beatgrid and
Activate QuAnt in the Master
%
Hot Cue Jumping..
Panel to get absolute seamless
TRAKTOR PRO / TRAKTOR SCRATCH PRO – 52
Page 56

Working with Beatgrids
To guarantee that all Tempo, Loop and Move Controls work exactly, you have to verify the
Beatgrid for your tracks.
Analyze a track (see chapter 7.8.2, Analysis) and load it into a Deck.
1.
Click the “+” in the Waveform Display to get a more precise view.
2.
At the beginning of the track, check the Beatmarker: if it is not set correctly on the
3.
beat, use the m
set a Beatmarker at the position of your choice by using the Cue Panel. To set an
ove BeAtmARkeR Buttons
to correct it. Alternatively, you can manually
Left mouse-click moves the
%
/ctrl-click in coarse steps.
%
click in coarse steps.
Beatmarker in ne steps, right-
Left mouse-click changes the
Grid in ne steps, right-/ctrl-
Auto-Beatmarker manually click the Auto Button.
Go from the Beatmarker slowly forward in the track and check if the Beatgrid sits cor-
4.
rectly on the beat. In Snap Mode you can click in the Waveform to audibly check the
position of the Grid. You can turn on t
ter audible feedback while playback. If it is not set correctly, adjust it with the wiDen
and tiGhten BeAtGRiD buttons, the “x2”/”÷2” buttons or the tAP button. You can type in
a tempo into the temPo DisPlAy after double-clicking into it, too. All adjustments affect
the stored tempo of the track and edit the Grid, which depends on the tempo.
Go on until you reach the end of the track. When the Beatgrid sits correctly on the
5.
beat during the whole track, click the l
dened a very precise tempo permanently for this track.
Example Pictures
ick
in the Master Panel (Global Section) for a bet-
ock BeAtGRiD
button and you are done – you
If no Beatmarker is set, en-
%
Preferences > File Management > File
Management > Analyze BPM Range.
able Place AutoGrid-Marker in
The Beatgrid is too tight, so you have to widen it.
The Beatgrid is too wide, so you have to tighten it.
TRAKTOR PRO / TRAKTOR SCRATCH PRO – 53
Page 57

This Beatgrid is perfect.
Auto-Beatmarker
TRAKTOR
analysis. So when you analyze your tracks a rst Beatgrid is built based on the tempo
TRAKTOR has determined.
To rebuild the automatically set Beatgrid click on the Auto Button.
►
Manual Beatmarker
Aside from using the Auto-Beatmarker function you can manually set a Beatmarker with
the Cue Panel:
Search for a good downbeat in the track and move the play position exactly on it.
1.
Click the cue button (Transport Controls).
2.
In the Cue Panel choose stoRe and then the Cue Type Grid.
3.
Optionally type in a name into the cue nAme DisPlAy for the Beatmarker.
4.
Deleting Beatmarkers
automatically sets a Beatmarker on the rst bass drum it detects during the
Use Snap Mode to position the
%
the beat is not detected correctly, deactivate Snap Mode.
marker exactly on the beat. If
Deleting a Beatmarker has to be done in the Cue Panel:
Navigate to the Beatmarker by using the n
1.
menu next to the cue nAme DisPlAy or by clicking the white Gridmarker in the Stripe.
Click the Delete button to delete the Beatmarker permanently.
2.
ext/PRevious cue Point Buttons
, the dropdown
TRAKTOR PRO / TRAKTOR SCRATCH PRO – 54
Page 58

Lock the Beatgrid
If Beatmarker and Beatgrid are set, you can lock your result by clicking the lock Button.
After clicking lock all buttons in the Grid Panel are deactivated.
►
The stored tempo (BPM) is locked and cannot be changed until you unlock it by click-
►
ing lock again.
All tracks with locked Beatgrid get a small lock icon as Browser Icon.
►
Tick (Audible Beatgrid)
To get an audible feedback of the tempo and where the Beatgrid is set you can activate
a ticking sound similar to a metronome. It should tick simultaneously to the beat.
Click on the cue Button.
►
Click on the tick button in the Master Panel.
►
Click the tick button again to deactivate it.
►
In External Mixer Mode you also
%
ton inside the Internal Mixer to hear the
Tick.
have to activate the Cue but-
TRAKTOR PRO / TRAKTOR SCRATCH PRO – 55
Page 59

7. Using the Browser
The Track Browser is designed to help manage your songs, giving you easy and fast access
to them and to your playlists.
7.1 Importing Tracks and Playlists
Most probably you already have tracks and playlists on your computer. This chapter describes how to import them into the TARKTOR Track Collection.
7.1.1 Compatible Music File Formats
TRAKTOR supports the following music le formats:
MP3
►
You have to install Windows
!
WMA les in TRAKTOR.
Media Player to be able to use
AAC (M4A)
►
WAV
►
AIFF
►
WMA
►
FLAC
►
OGG Vorbis
►
7.1.2 Importing Music Folders
TRAKTOR offers an easy import function for tracks stored on your hard drive:
Right-/ctrl-click on the collection icon in the Browser Tree.
1.
Choose Import Music Folders from the menu.
2.
Music les that are DRM-pro-
!
TRAKTOR. This affects e.g. AAC-tracks
bought in the iTunes store.
tected cannot be played back in
By default this process imports all music les contained in the “My Music” folder of your
operating system.
TRAKTOR PRO / TRAKTOR SCRATCH PRO – 56
Page 60

If you have stored your tracks in other folders or on external storage devices, you can add
these folders to the list of TRAKTOR Music Folders as follows:
Open Preferences > File Management > Data Location.
1.
Click Add on the bottom of the right window.
2.
Browse to your Music Folders.
3.
Conrm with OK.
4.
Repeat to add all of your Music Folders.
5.
7.1.3 Playing Tracks managed by iTunes
If you have organized your tracks with iTunes the TRAKTOR browser offers direct access
to your iTunes Library and your iTunes playlists:
Click on the itunes icon in the Browser Tree.
1.
Browse through the Library and the playlists as you would do in iTunes.
2.
Subfolders are automatically
!
need to add subfolders to this list.
included in the scan. You don’t
Load a track into the Deck, as you would do from a normal TRAKTOR playlist.
3.
Note
The iTunes Tree Node represents a read-only view of your iTunes Library and playlists. All
editing functions are not available in this view.
When playing a track from the iTunes Node it is automatically imported into the
Collection.
TRAKTOR
7.1.4 Importing a Selection of Tracks from iTunes
Click on the itunes icon in the Browser Tree.
1.
Select the track to import into the Track Collection.
2.
Drag the selection onto the collection icon.
3.
Alternatively right-/ctrl-click the selection and choose Add to Collection.
4.
TRAKTOR PRO / TRAKTOR SCRATCH PRO – 57
Page 61

7.1.5 Importing iTunes Playlists
Click on the itunes icon in the Browser Tree.
►
Select the playlist to be imported.
►
Drag the playlist onto the PlAylists tRee icon.
►
Alternatively right-/ctrl-click the selection and choose Import to Playlists.
►
7.1.6 Alternative Import Methods
TRAKTOR offers other alternative methods to import single tracks or a special folder that
is not part of your conventional Music Folder structure:
Drag and drop a track or a folder from your Mac Finder or Windows Explorer onto the
►
collection icon in the TRAKTOR Browser Tree.
Drag and drop a track or a folder from the tree structure below the
►
icon representing all drives connected to your computer onto the collection icon.
TRAKTOR
e
xPloReR
Any track that is played in
!
Collection.
a Deck is also added to the
In the same manner you can right-/ctrl-click on a subfolder of the TRAKTOR exPloReR
►
i
con
or on a track listed in the window on the right side and choose Add to Collection
from the menu.
TRAKTOR PRO / TRAKTOR SCRATCH PRO – 58
Page 62

7.2 Finding Tracks (Search)
By entering text into the Search Field, the currently displayed list is dynamically narrowed
down to the entries containing the typed string. Note following Hotkeys:
7.2.1 Filtering Playlists
Click in the Search Field or hit Ctrl/Cmd+F
1.
Type a few characters contained in any of the track attributes (i.e. the rst characters
2.
of the track title).
As you type, the list displayed on the right side is narrowed down to the tracks con-
3.
taining the typed search string.
Hitting the TAB key leaves text typing mode and turns back to Hotkey control, required
4.
for scrolling the list of results.
Note
Hitting the Enter key on your computer keyboard after entering the search string ex-
►
tends the search to the entire Track Collection.
Pressing ESC clears the search string and terminates the text entry mode.
►
Search strings are recalled for each playlist individually. They have to be explicitly
►
deleted for displaying the entire playlist.
7.2.2 Rening a Search
You can rene a search to a specic subset of metadata elds by selecting one of the
options in the Rene List.
If the focus is moved into the
!
working until you leave the search eld!
search eld, all Hotkeys stop
Type a word into the seARch fielD.
1.
Click the Refine Button behind the seARch fielD and choose a eld from the drop-down
2.
menu.
The list is narrowed down to tracks containing the typed search string in the selected
3.
metadata eld.
TRAKTOR PRO / TRAKTOR SCRATCH PRO – 59
Page 63

7.2.3 Searching for Similar Tracks
In the Browser List, you will notice a small m
elds. This is used to search for tracks sharing the same content in that specic metadata
eld.
In the Browser List, click the mAGnifyinG GlAss next to an artist name.
►
TRAKTOR will search for tracks sharing the same content in the Artist eld.
►
To extend the search to the entire Collection, right/ctrl-click the mAGnifyinG GlAss.
►
AGnifyinG GlAss
in some of the track metadata
7.2.4 Search in Playlists
You can call up a list with all Playlists containing a certain track.
In the Browser List, right-/ctrl-click on a track and choose Show in Playlists.
►
A list is shown with all Playlists containing this track.
►
Click on an entry to select a Playlist. Its entries are displayed in the Browser List.
►
7.3 Working with Playlists
Playlists are a good way to organize your tracks and for preparing a set. They represent a
way of grouping tracks and putting them into an order with several advantages over physical record crates:
One track can be contained in multiple playlists.
►
A playlist can be re-ordered and you can reset it to the original order.
►
Further advantages are e.g. saving, loading and exporting a playlist.
►
TRAKTOR PRO / TRAKTOR SCRATCH PRO – 60
Page 64

7.3.1 Creating a Playlist
Method I:
Right-/ctrl-click on the PlAylist folder icon in the Browser Tree.
1.
Choose Create Playlist from the context menu.
2.
Choose a name for your new playlist and type it in the following window.
3.
Conrm with OK.
4.
Your new playlist will appear under the PlAylist folder.
5.
Method II:
Select one or more tracks in the Browser List.
1.
Drag these tracks onto the PlAylist folder in the Browser Tree.
2.
A dialog opens, asking for the playlist name. Type in a name for your new playlist.
3.
Conrm with OK.
4.
Your new playlist will now appear under the PlAylist folder.
5.
7.3.2 Adding Tracks to Playlists
Click and hold one or more tracks, drag it onto a playlist of your choice and keep hold-
►
ing the mouse button. The view of the Browser List changes and shows the destination
playlist. If you move your mouse now over the content of the playlist, you will see a
red line indicating where the track(s) will be inserted when releasing the mouse button.
This behavior is shown if the play-
!
!
list follows its original order.
This behavior is shown if the playlist follows a sorted order.
TRAKTOR PRO / TRAKTOR SCRATCH PRO – 61
Page 65

7.3.3 Deleting Tracks from Playlists
Deleting Tracks From One Playlist
There are two ways for deleting tracks. Navigate to the respective playlist, then do as follows:
Click on one or more track(s) and press the DEL or Backspace key of your computer
►
keyboard.
Right-/ctrl-click on one or more tracks and choose Delete.
►
Deleting Tracks From All Playlists and the Collection:
Click on the tRAck collection icon in the Browser Tree.
1.
Right-/ctrl-click on one or more track(s) and choose Delete.
2.
The tracks will be removed from your Collection and every playlist.
3.
Deleting Tracks From The Hard Disk
Right-/ctrl-click on a track and choose Show in Finder (Mac) or Show in Explorer
1.
(Windows).
Deleting one or more track(s)
!
it from all playlists!
from the c
ollection
also deletes
Then delete the track like you would delete any other le on your hard drive.
2.
Repeat this for all tracks you want to delete.
3.
To remove the tracks from the Collection, too, right-/ctrl-click on the tRAck collection
4.
in the Browser Tree and trigger a Consistency Check. In the appearing window choose
Remove.
7.3.4 Sorting Playlists
Playlists can be sorted and rearranged in various ways. The new sorting order is not permanent and can be undone with one click on the header of the #-header.
TRAKTOR PRO / TRAKTOR SCRATCH PRO – 62
Page 66

Sorting by Columns
►
Click on the Headline of a browser column to sort the Playlist by this column. Click
another time on the Headline to invert the sorting.
►
Click on the Headline of the #-column to restore the Playlist to its original order.
►
After restarting TRAKTOR all Playlists will be reset to their original order.
Consolidating a new Sorting Order
►
Click on the Headline of a browser column to sort the Playlist by this column.
►
To make the new order permanent, right-/ctrl-click on the tree icon of the playlist or
right-/ctrl-click on any track and choose the option Consolidate.
Permanently Changing the Position of Selected Tracks within Playlists
►
Reset a Playlist to its original order by clicking on the Headline of the #-column.
►
Select on one or more track(s) and drag them up or down in the Playlist.
►
The red line indicates where the selection drops when releasing the mouse button.
►
This changes the order permanently.
7.3.5 Organizing Playlists in Folders
To keep a better overview you may want to organize your Playlists in folders and group
them together logically, e.g. in a folder called Live Gigs or Mixtapes. To create a Playlist
Folder, do as follows:
1.
Right-/ctrl-click on the PlAylist folder icon in the Browser Tree.
2.
Choose Create Folder from the context menu.
3.
Choose a name for your new Playlist Folder and type it in the following dialog.
4.
Conrm with OK.
This is only possible if the playl-
!
you get by clicking on the header of the
#-c
ist is in its original order, which
olumn.
5.
Your new Playlist Folder will appear under the PlAylist folder icon.
6.
You can now add Playlists to this folder via drag-and-drop.
TRAKTOR PRO / TRAKTOR SCRATCH PRO – 63
Page 67

7.3.6 Collection Subfolders
The subfolders below the collection icon contain views of your Collection grouped by
►
Artists, Releases, Labels or Genres. A number indicates the current number of entries
in this category.
Double-click to expand them and get access to your Collection grouped by the respec-
►
tive entries.
Example:
Double-clicking A
►
their tracks inside your Collection.
Click on an artist name to show all tracks from this artist in the Browser List.
►
Rtists
expands the Playlist and lists all artists and the number of
7.3.7 Favorites
The Favorites Window is a navigational tool and is located at the top of the Browser. If you
do not see the Favorites, go to Preferences > Layout Manager > Browser Details and ac-
tivate Show Playlist Favorites.
Three of the Favorites are pre-assigned:
Track Collection
►
History Playlist
►
Preparation
►
Do the following to create and use a Favorite:
You can assign any of the le
%
a Favorite.
!
replace the favorite playlist with the new
playlist.
browser folders or a playlist to
Dragging another playlist on an
already assigned favorite will
Click the PlAylists folder to browse its contents.
1.
Click, hold and drag the playlist name onto a free fAvoRite icon.
2.
From now on, you can access this playlist at any time by clicking on the fAvoRite icon
3.
with the mouse.
TRAKTOR PRO / TRAKTOR SCRATCH PRO – 64
Page 68

7.3.8 Exporting Playlists
By exporting a Playlist you create a folder containing the tracks in the Playlist along with
the Playlist le.
To export a playlist proceed as follows:
Right-/ctrl-click on the Playlist and select Export Playlist from the context menu.
1.
Enter a name for the exported playlist.
2.
Enter a destination path.
3.
Conrm with OK.
4.
7.3.9 Importing Playlists
Importing Playlists can be done in several ways:
Method I
Locate the Playlist in the TRAKTOR exPloReR inside the Browser Tree.
1.
Drag-and-drop the playlist le onto the PlAylists folder in the Browser Tree or onto a
2.
Playlist Folder you have created.
The playlist and all contained tracks will be added to your Track Collection.
3.
Method II
Locate the playlist le (*.nml) in the Windows Explorer or Mac Finder.
1.
Drag-and-drop the playlist le onto the PlAylists folder in the Browser Tree or onto a
2.
Playlist Folder you have created.
The Playlist and all contained tracks will be added to your Track Collection.
3.
Method III
Right-/ctrl-click on the
1.
and choose Import Playlist.
TRAKTOR
P
lAylists
folder or a Playlist Folder you have created
With this functionality you also
%
ous TRAKTOR versions after you have
exported them from there.
can import playlists from previ-
129. The Playlist and all contained tracks will be added to your Track Collection.
2.
TRAKTOR PRO / TRAKTOR SCRATCH PRO – 65
Page 69

7.3.10 Printing Playlists
For creating printable versions of playlists TRAKTOR offers a function to export Playlists
in a web browser readable format (HTML).
Right-/Ctrl-Click on the Playlist in the Browser Tree.
1.
Choose Save as Webpage.
2.
Enter a name for the Playlist.
3.
Enter a destination for the exported le.
4.
From the List Options select the columns you want to add to the le.
5.
Conrm with OK.
6.
7.3.11 More Playlist Functions
Right-/ctrl-click on a Playlist to nd the following additional options:
Analyze: This analyzes the tracks contained in the selected Playlist.
►
Rename: This allows you to rename the selected Playlist.
►
Clear Playlist: This removes all tracks from the selected Playlist.
►
Delete Playlist: This deletes the selected playlist. It will not delete the tracks from your
►
Track Collection.
Reset Played State: This removes all Track Icons from the Icon Column in the Browser
►
List.
7.3.12 History Playlist
The History Playlist is a special playlist that gives you information about what tracks you
have played during a gig.
It is very useful if you have a Playlist of the actually played tracks of an evening or just to
review, what you were doing last night.
TRAKTOR PRO / TRAKTOR SCRATCH PRO – 66
Page 70

Creating a History Playlist
You don’t need to do that – TRAKTOR does that for you!
►
After closing and re-opening TRAKTOR the History Playlist in the Browser Tree is
►
cleared, but it’s stored in the folder “My Documents\Native Instruments\Traktor\History”
(Win) and “~/Native Instruments/Traktor /History (Mac)”.
Each History Playlist is named with the date and time you end your session and will
►
be created after every session you make.
Tips On Using History Playlist
It’s a good habit to re-import History Playlists of successful evenings to use them for your
next gigs.
If you are already working with TRAKTOR months (or years!), the list of History Playlists
can become very large, often containing playlists with only a few tracks. This little trick
might help:
In the Windows Explorer/Mac Finder navigate to your
1.
History (Windows: My Documents\Native Instruments\Traktor\History; Mac: ~//Native
Instruments/Traktor)
You will see all your History Playlists.
2.
As a rule of thumb, every track in a list equals around 1 kb. This means, all Playlists
3.
with 5 kb or below will have most likely not more than 4-6 tracks contained in
them.
These can usually be deleted, making browsing in the History Playlists more conve-
4.
nient.
Another good hint is to drag the History folder onto one of the Favorite Playlists for faster
access.
TRAKTOR
folder and open the
TRAKTOR PRO / TRAKTOR SCRATCH PRO – 67
Page 71

7.4 Editing Track Metadata
Whether you are performing live or working in the studio,
keep your Track Collection organized.
Each track in your Collection has track properties (“tags” or “metadata”) such as Song
Title, Artist Name, Album Name, Cover Artwork, etc.
track properties with two methods.
TRAKTOR
TRAKTOR
allows you to edit and add
gives you the tools to
7.4.1 Editing Track Properties via Inline Editing
In the Browser List, click on a track to highlight it.
1.
Click again in the eld you want to edit, e.g. the artist name.
2.
A cursor will be placed inside the property eld.
3.
Edit the artists’ name.
4.
Click once in another property eld to edit its contents.
5.
Hit the Enter key on your keyboard to exit Inline Editing Mode and conrm your entries
6.
TRAKTOR PRO directly writes the
&
!
the tags of your tracks only in iTunes!
le tags into your music les!
If you are using the iTunes functionality we recommend editing
or hit Escape to abort editing.
7.4.2 Editing Track Properties via the Edit Dialog
Not all properties of a track are visible in the Browser List. To get access to all available
properties of a track, use the Edit Dialog. This dialog also allows to contemporarily editing
a selection of tracks, as described in the next section.
TRAKTOR PRO / TRAKTOR SCRATCH PRO – 68
Page 72

Edit Dialog
Editing a Single Track
Select a track in the Browser List by clicking it.
1.
Right-/Ctrl-Click the selected track and choose Edit from the context menu.
2.
The Browser List turns into the track Edit Dialog.
3.
Edit the desired information for your track.
4.
Use the drop-down menu next to a track property to select a property already stored
5.
in your Track Collection.
At the bottom of the dialog you nd a button called Restore to undo any changes you
6.
have made. To apply the changes, click the button labeled A
PPly
or ok. You can abort
editing by clicking cAncel.
Editing a Selection of Tracks
If you want to edit a selection of tracks (e.g. all tracks of an album), select them and
1.
choose Edit from the context menu, (just as you did for editing a single track).
In the Edit Dialog you will notice that most of the checkboxes beneath the attributes
2.
are unchecked and most of the elds void.
At the bottom of the Edit Dialog you will notice 3 new buttons called P
3.
Revious
All and next. The buttons are used to browse your selection of tracks.
, s
elect
TRAKTOR PRO / TRAKTOR SCRATCH PRO – 69
Page 73

The checkboxes indicate which of the attributes have the same value among the se-
4.
lected tracks. At the same time they indicate that the eld will be written into the
metadata of the selected tracks when applying the changes.
If you want to change an attribute globally for all selected tracks (e.g. to write an Artist
5.
Name), edit this eld, make sure that the box beneath is checked and press APPly or
ok.
If you want to edit the tracks of your selection one by one, use the PRevious and next
6.
buttons at the bottom of the dialog to step through the list.
Clicking RestoRe will undo your changes.
7.
To abort editing click cAncel.
8.
7.5 Track Icons
It is important to overview your set with one look when you are performing in front of an
audience.
The icon column gives valuable information about the history of a track and can be sorted
to align the tracks in their historical sequence. Here is a list of each icon and its meaning.
The letters A, B, C and D identify the tracks currently loaded into the Decks.
►
A Check Mark means that the track has been played in one of the Decks.
►
An Exclamation Mark identies tracks not found at the les’ previous location. A rea-
►
son for this could be that a storage medium is unavailable, the location of the track
has been changed or the track has been renamed.
A Lock marks tracks with a locked Beatgrid and Tempo.
►
TRAKTOR PRO / TRAKTOR SCRATCH PRO – 70
Page 74

Sorting by this column orders the tracks as follows:
Already played tracks on top.
►
Currently playing tracks in the center.
►
Not played tracks below.
►
Missing tracks at the bottom.
►
7.6 The Preview Player
TRAKTORs Browser provides a small Preview Player to prelisten to tracks without loading
them into a Deck. This functionality especially is designed for Internal Mixer Mode. The
preview signal is sent to the Monitor Output. To prelisten a track in the Preview Player you
can:
Drag-and-drop a track from the Browser List onto the Preview Player.
►
or
To use the Preview Player you
!
card and setup an output for Out Preview
in Preferences > Audio Setup > Output
Routing.
need a multi-channel sound-
Click the small heADPhones icon in the Prelisten column of the Browser List.
►
The advantage of using the Preview Player is that you do not need an additional Deck.
Also the Played State and Play Count of the tracks will not change.
You can pause the Preview Player by clicking on the small PlAy/PAuse Button.
►
Skip through the track by clicking the small stRiPe.
►
TRAKTOR PRO / TRAKTOR SCRATCH PRO – 71
Page 75

7.7 Cover Art
TRAKTOR
it, you also can assign cover art to your tracks from image les on your hard drive.
has several features for working with cover art for your tracks. It not only shows
7.7.1 Show Cover Art
Cover Art Window
TRAKTOR provides a Cover Art Window underneath the Browser Tree. You can activate or
deactivate it in the preferences:
►
Go to Preferences > Layout Manager > Browser Details and check or uncheck Show
Cover Art.
List Window
There is a column for cover art in the Browser List. To activate or deactivate it do as follows:
►
Right-/Ctrl-Click on the Headline of the Browser List and check or uncheck Cover Art.
7.7.2 Editing Cover Art
TRAKTOR
assigned cover art of the tracks in your Track Collection.
It works as follows:
Import
Right-/Ctrl-Click on a track and choose Import Cover.
1.
2.
A dialog appears and you have to show
is stored.
Select it and conrm the dialog.
3.
can import cover art from JPEG-les on your hard drive and even delete already
TRAKTOR
where the image le for cover art
TRAKTOR PRO / TRAKTOR SCRATCH PRO – 72
Page 76

The cover art now is stored inside track le.
4.
You also can mark several tracks and import cover art for all selected tracks at
5.
once.
Delete
Right-/Ctrl-Click on a track and choose Delete Cover.
1.
The cover art is now completely deleted.
2.
You also can mark several tracks and delete the cover art for all selected tracks at
3.
once.
7.8 Collection Maintenance
Working with the browser before the gig or in a life situation can be very intense. You need
to keep track of many things such as removing obsolete tracks, relocating tracks that have
been moved to another folder on your HD and much more.
7.8.1 Consistency Check
The Consistency Check Report provides an overview of the current state of your Track
Collection, providing options to help you managing it.
In the Browser Tree, right-/ctrl-click the tRAck collection icon and select Check
►
Consistency from the menu.
Once TRAKTOR has checked consistency, the Consistency Check Report will appear
►
showing the totals of its ndings.
TRAKTOR PRO / TRAKTOR SCRATCH PRO – 73
Page 77

Show Overview/Missing Tracks/Tracks to Analyze
The Consistency Check Report gives you information about the following:
Total Tracks: The total number of tracks in your Collection.
►
Tracks Missing: The total number of tracks that have been deleted from your hard
►
drive or moved from their original location.
Tracks Not Analyzed: The total number of tracks that have not been analyzed.
►
Tracks Missing Stripe: The total number of tracks that have been imported and ana-
►
lyzed but their Overview Waveform (Stripe) has been moved or deleted.
Total Tracks To Analyze: The total sum of Tracks Missing Stripe and Tracks Not
►
Analyzed. This is the total amount of tracks you need to analyze.
Relocate Missing Tracks
The Consistency Check Report allows you also to relocate the references to tracks that are
missing from your Collection.
Click the RelocAte Button.
1.
Relocating tracks in a folder that contains many subfolders can be a lengthy process.
2.
Don’t hesitate to interrupt relocation - this will not damage your Collection consistency.
A standard operating system dialog window will appear.
3.
Use it to browse your hard drive for the folder where to your missing tracks have been
4.
moved.
To nd multiple tracks in different folders, choose the top-level folder where they are
5.
stored. You can even choose your main hard drive folder.
Remove Missing Tracks
If you no longer want these missing tracks to be referenced in your Collection, delete
►
their references by clicking the clicking on Remove Button.
TRAKTOR PRO / TRAKTOR SCRATCH PRO – 74
Page 78

Analyze Tracks
If you have tracks in the Collection that are not analyzed yet, you can analyze these
►
now by clicking the AnAlyze Button.
Show Consistency Check on Startup
The Consistency Check Report can be set to display each time you open TRAKTOR. Please
be aware that this function could be unpractical if you are using
ing live and you want keep the startup time to a minimum.
Go to Preferences > File Managemen > File Managementt.
1.
Put a check in the box labeled Show Consistency Check Report on Startup and close
2.
the Preferences.
The Consistency Check Report will now open each time you start TRAKTOR.
3.
TRAKTOR
whilst perform-
7.8.2 Analysis
Traktor has an analyze process to collect all important information of your tracks. The
analysis scans the track and returns the following information:
BPM Estimate
The BPM Estimate is more or less accurate according to the type of music. Read more
►
about verifying the BPM Estimate and about how to create a Beatgrid in chapter 6.7.5,
Beatgrid Panel (Grid Panel).
Gain Value
Each track has a perceived loudness, based on its musical properties of the track and
►
on the involved mastering techniques. The Gain Value established during the analysis
is a very accurate estimation of the optimal setting of the channel Gain knob to match
the loudness of a track to 0dB.
To use this gain estimation when loading a track into a Deck, enable the Auto Gain
►
function, available in the Preferences.
TRAKTOR PRO / TRAKTOR SCRATCH PRO – 75
Page 79

Stripe
The analysis process creates the small representation of the Waveform underneath the
►
wave display (Stripe). If the Stripe of a track is missing it has not yet been analyzed.
Auto Analysis
Traktor can start the analysis automatically when loading a track into a Deck or directly
after importing it into your Collection:
Open Preferences > File Management > File Management for options on background
►
track analysis.
Read more about the analysis options in chapter 14.10.1 (File Management).
►
7.8.3 Data Location
TRAKTOR has functions that create and reference certain le types. These le types are
stored in their own default directories. However, you can change the directory paths by
using the Data Location Preferences menu.
Open Preferences > File Management > Data Location.
►
You can change the directory path for the following le types by clicking on the button
with the exclamation mark (…!) after the current path:
Root Directory: the le path TRAKTOR follows for loading and storing Collection infor-
►
mation and settings.
iTunes: the le path to your iTunes Library (this path has to be identical with the set-
►
tings in iTunes).
Music Folders: here you can specify the location of folders and hard drives to be
►
scanned for supported music les during the Music Folders import.
TRAKTOR PRO / TRAKTOR SCRATCH PRO – 76
Page 80

7.8.4 Other Maintenance Functions
Reset Played State: Resets the play count and the Track Icon next to any track that
►
has been played.
Relocate: Opens a dialog in which you can navigate to the folder containing the miss-
►
ing track(s). Very useful, if you e.g. restructured your Music Folder.
Analyze (Async): Starts analysis for the selected track(s).
►
Show in Explorer/Finder: This will display the track in the Windows Explorer or Mac
►
Finder, according to your operating system.
Search in Playlists: Searches the selected track(s) in all playlists and returns a list with
►
all playlists containing the selected track(s).
7.9 Working with Audio CDs
7.9.1 CD Text
In the past, tracks of Audio CDs were displayed as Track01, Track02, etc.
But now, if you insert an Audio CD that shows CD-text, you will be able to see this data
in TRAKTOR, e.g. the correct track title or the artist name.
7.9.2 Audio CDs and Favorites
If you drag the AuDio cD Icon onto a Favorite, this Favorite keeps assigned to the au-
►
dio CD drive, even if you remove a CD.
If you do not have an audio CD loaded in your CD drive, the Favorite will be displayed
►
with a Missing Icon, shown as red cross.
7.9.3 Eject CD
You can eject a CD also from within TRAKTOR.
Not all commercial Audio CDs
!
texts.
show these additional info
Right-/ctrl-click on the AuDio cD icon and choose Eject CD to eject the CD.
►
TRAKTOR PRO / TRAKTOR SCRATCH PRO – 77
Page 81

7.10 Working with MP3-Players
TRAKTOR allows you to play tracks from your MP3 player.
Start TRAKTOR and plug your MP3 player into your computer. TRAKTOR will then
►
recognize your MP3 player as hard drive and display the hard drive icon in the Browser
Tree - this may take up to 10 seconds.
When rst selecting the MP3 player, the message Loading will appear to let you know
►
that TRAKTOR is reading the track information.
When nished, you will be able to select any track to play as you normally would from
►
your hard disk drive.
7.10.1 iPod
The Apple iPod uses a unique le system for storing music. When you connect an iPod
to your computer
name.
Double-click the iPod to get access to the playlists and tracks stored on the iPod.
►
TRAKTOR
will recognize it and shows the iPod in the Browser with its
Plugging and un-plugging the
!
playing may cause the audio to stop
briey. Take extreme care not to unplug
the MP3 player when playing a track
from it!
MP3 player while tracks are
Note:
You can’t play protected les that you have bought in the iTunes Store.
TRAKTOR PRO / TRAKTOR SCRATCH PRO – 78
Page 82

8. Using the Internal Mixer & the Crossfader
The Internal Mixer is the nerve center of
the mix and modulate the sound of your tracks for smooth transitions.
TRAKTOR
. With the Internal Mixer you can control
8.1 Channel Faders
The c
adjust the volume of the next track with the currently running track.
►
hAnnel fADeRs
The chAnnel fADeRs are only visible, if full size Decks are activated.
adjust the channel volume. Their Channel Level Meters help you to
8.2 Crossfader
The cRossfADeR enables you to make transitions between Decks by dragging it from one
side to the other.
Advanced control features are
!
Control for Faders and Knobs).
described in chapter 11 (Mouse
8.2.1 Crossfader Assign Buttons
With the c
right position of the cRossfADeR.
A Deck that is not assigned to one side of the c
►
chAnnel fADeR.
RossfADeR AssiGn Buttons
you dene, which Decks are audible on the left and
RossfADeR
is only controlled by the
8.2.2 Manual Crossfade
Click, hold and drag the cRossfADeR from one side to the other.
►
Alternatively, you can use the cRossfADeR switch Buttons. With every click they move
►
the Crossfader stepwise in the dedicated direction.
Double-clicking the cRossfADeR resets it to the middle position.
►
TRAKTOR PRO / TRAKTOR SCRATCH PRO – 79
Page 83

8.2.3 Automatic Crossfade
Crossfading can also be automated by using the cRossfADeR move Buttons.
If you click a c
►
respective side.
To stop the transition, click the cRossfADeR move Button again.
►
You can adjust the Auto Crossfade Time in Preferences > Mixer > Crossfader.
►
RossfADeR move Button
and the c
RossfADeR
will automatically fade to the
8.3 Equalizer
The Equalizer is an important mixing tool. It modulates the sound of your mix separated
by frequency.
The eQ k
for Faders and Knobs).
8.3.1 Equalizer Types
TRAKTOR offers 4 different types of EQ, modeled after today’s top DJ mixers.
To change the EQ type go to Preferences > Mixer > EQ Selection.
Classic
noBs
have all the advanced functionality described in chapter 11 (Mouse Control
It’s always a good idea to use
%
avoid clipping that can happen easily
when two tracks play together with full
volume.
the EQs during a transition to
The Classic Equalizer is the standard, classic TRAKTOR 3-Band EQ. It offers controls for
adjusting the low, miD and hiGh range frequencies of each deck.
Each knob controls its frequency band by +12/-24 db. It also offers Kill Switches that cut
the frequency entirely when activated.
P600
The P600 is a standard club DJ mixer EQ with 3 bands (low, mid and high). It works like
the Classic EQ, but offers a range of +12/-26 dB and the Kill Switches cut the frequencies to -26 dB.
TRAKTOR PRO / TRAKTOR SCRATCH PRO – 80
Page 84

Nuo4
Nuo4 is an emulation of the EQ found on the Ecler Nuo4 four channel DJ mixer. It offers
3-band equalization (low, mid, high). The adjustment range for low and mid frequencies
is +10/ -30 dB and for high frequencies +10/ -25 dB. Like the Classic and P600 Mixer
Types it offers Kill Switches for all frequencies, but set them to -30/-25 dB.
XONE:92
XONE:92 is an emulation of the EQ found on the Allen & Heath XONE:92 DJ mixer. It is
unique that it offers 4-band EQ controls (low, mid-low, mid-high and high). The high and
low bands have innite attenuation (total kill) with a sharp 12 dB/oct roll-off. The mid
bands offer -30 dB of cut.
8.4 Gain, Cue and Pan
8.4.1 Gain
With the GAin knoB you can control the pre-fader level of each channel shown in the Level
Meters of the chAnnel fADeRs.
GAin is only visible, when full size Decks are activated.
►
TRAKTOR
►
function relies on the gain values extracted from the Analysis process.
offers a powerful Autogain function enabled in Preferences > Mixer. This
8.4.2 Cue
With the cue Button you can pre-listen the Deck via the Monitor Outputs.
TRAKTOR PRO / TRAKTOR SCRATCH PRO – 81
Page 85

8.4.3 Pan
With the PAn knoB you can control the balance between the left and right stereo channel
for each Deck individually.
The PAn knoB is only visible, when the Advanced Panels are activated.
►
8.5 Filter, Key and Effect Insert8.2
8.5.1 Filter
The filteR knoB provides a bipolar lter.
In center position, the lter is inactive.
►
Turning the knob to the right activates a high-pass-lter. The more you move it to the
►
right, the more low and middle frequencies are cut out.
Turning it to the left activates a low-pass-lter. The more you move it to the left, the
►
more high and middle frequencies are cut out.
To use the cue functionality a
!
required. cue is only visible, when full
size Decks are activated.
multi channel audio device is
In Preferences > Mixer > Filter Selection you can choose between Filter:92, emulating
►
Allen & Heaths Xone Series’ lters and Filter for a regular ladder lter.
8.5.2 Key
With the key knoB you can control the tone pitch of a playing track without affecting its
tempo. Key control has to be activated by pressing the small button underneath the
knob.
In center position, the track is played at original pitch.
►
Turning it left or right pitches the tone down or up.
►
TRAKTOR PRO / TRAKTOR SCRATCH PRO – 82
Page 86

8.5.3 Effect Insert
The two effect inseRt Buttons in each channel insert the effect units into the signal
chain.
You can insert both Effect Units in one channel.
►
You can insert the same Effect Unit in more than one channel.
►
Insert an Effect Unit on all channels to simulate a Master Effect.
►
When switching an Effect Unit to External Send Mode, the according inseRt Button is
►
disabled.
8.6 The Internal Mixer in External Mixer Mode
TRAKTOR can be used with an external mixer that replaces the Internal Mixer. However,
you can use certain features of the Internal Mixer also in External Mixer Mode.
The controls of the Internal Mixer that are not used when using an external mixer are
placed on the inner strip (eQ and c
in External Mixer Mode.
hAnnel fADeRs
). These controls are disabled and hidden
Turning off an effect with the
%
ing of this effect instance and therefore
saves CPU power.
i
nseRt Buttons
stops process-
The controls of the Internal Mixer that can be combined with an external mixer are placed
on the outer Strip of the Internal Mixer:
The filteR can effectively be combined with the EQ’s on the external mixer.
►
key and fx can also be used in combination with an external mixer.
►
The GAin knoB allows you to apply an additional volume boost to your tracks.
►
The headphone cue Button is used to make the beat tick audible on that channel if
►
tick in the Master Panel is activated.
The PAn knoB is useful as not all hardware mixers have an individual panning per
►
channel.
The Master Volume Knob in
!
External Mixer Mode and can be used to
raise or lower the overall volume.
the Master Panel works also in
TRAKTOR PRO / TRAKTOR SCRATCH PRO – 83
Page 87

9. Using TRAKTOR with an External Mixer
TRAKTOR can either replace an entire DJ setup or it can just replace your decks. In this
case you will be using
mix your digital tracks with the analog feel of the knobs and faders of the mixer.
TRAKTOR
in combination with an external mixer. This allows you to
9.1 Requirements
The requirements of your hardware depend on the complexity of your setup.
9.1.1 Mixer
In External Mixer Mode, each deck of TRAKTOR is routed to one of the channels of your
mixer. The inputs required for TRAKTOR decks are LINE level inputs - the same as for
CD players.
The most basic TRAKTOR setup uses two playback decks and therefore requires a two-
channel-mixer.
Adding a third and fourth deck can extend this setup. Each additional source requires an
additional input on your mixer.
An even more advanced setup integrates the
TRAKTOR
send effects. Using them not only
You also can use the Preview
%
in External Mixer Mode. This requires an
additional channel on the mixer.
Player function of the Browser
requires one more channel on your mixer but also an effects send output on the mixer to
feed the effects directly from the mixer. Usually this output can be controlled either via
FX send knobs or buttons on each channel of the mixer.
9.1.2 Audio Device
For connecting all decks to the mixer an audio interface with as many stereo channels as
used decks is required. TRAKTOR does not support two sound cards side by side, but
there are ways to aggregate sound cards to make them appear as single audio device in
TRAKTORs audio setup.
TRAKTOR PRO / TRAKTOR SCRATCH PRO – 84
NATIVE INSTRUMENTS AUDIO
%
the requirements of Traktor!
8 DJ
is specially designed to t
Page 88

If you want to use the send effect feature, the audio interface also must have an additional
stereo input for the effects send signal coming from the mixer.
If you have enough available channels on your hardware also the Preview Player can be
connected to a separate output of the soundcard.
Traktor Scratch Pro
If you are using
Certied Mixer is required!
TRAKTOR SCRATCH PRO
the
AUDIO 8 DJ
or a
TRAKTOR SCRATCH PRO
9.2 Physical Setup
This part describes the setup of the hardware in a general way. The exact setup depends
on the hardware you use.
At rst make sure that the audio interface is correctly installed, connected and fully
1.
functional on your computer.
Connect the outputs of the external audio interface to the mixer inputs. Each stereo
2.
output channel of the external audio interface connects to one of the stereo channel
inputs of the mixer. With Traktor Scratch Pro use the Multicore Cables like described
in chapter 13 (TRAKTOR SCRATCH PRO Functionality).
Connect your headphones to the mixer and the mixer-outputs to the amplier system
3.
driving your speakers.
TRAKTOR PRO / TRAKTOR SCRATCH PRO – 85
Page 89

9.3 Software Setup
At the rst start of
External Mixer Mode. But it is also possible to do the adjustments directly in the
Preferences. To do so, open Preferences > Audio Setup by clicking the dedicated PRefeRences
Button or use the Application Menu and continue directly with step 3.
In the Setup Wizard select the option External Mixer.
1.
Conrm your choice by pressing OK. This opens the Audio Setup page of the
2.
Preferences.
3. Drop-down the Audio Device list and select your external audio interface.
TRAKTOR
the “Setup Wizard” lets you choose the basic setup for
If you have already passed the
%
External Mixer Mode, you can re-trigger
it by clicking on Setup Wizard in the Help
tab of the Application Menu.
Wizard and did not choose the
TRAKTOR PRO / TRAKTOR SCRATCH PRO – 86
Page 90

4. Set a latency and sample rate your system can handle. Typically use a higher latency
at rst, such as 15 ms.
For now use a moderate set-
%
and test out, what your system is able
to perform.
ting. You can change this later
5. Open the Output Routing page to assign the outputs of
outputs of your audio interface.
TRAKTOR PRO
to the physical
Verify that External Mixer Mode is chosen.
Assign Out Channel A, B, C and D to all outputs of the external audio interface that are
1.
connected to the mixer. Note that you have to connect a pair of outputs to each channel,
so Channel A typically connects to Outputs 1 and 2 of your audio interface, Channel B
to Outputs 3 and 4, and so on. To use send effects you have to assign the Out Send,
too (typically to the channel that is connected to the fx return of the mixer).
If you want to use the send effects, go further to the Input Routing page and assign
2.
the Input Send. Typically this is fed by the fx send out of the mixer.
TRAKTOR PRO / TRAKTOR SCRATCH PRO – 87
Page 91

Close the Preferences by clicking on the close button.
3.
Traktor Scratch Pro
When using TRAKTOR SCRATCH PRO you also have to add the Timecode Setup (see
chapter 14.3, Timecode Setup).
TRAKTOR PRO / TRAKTOR SCRATCH PRO – 88
Page 92

10. Using the Global Section
The Global Section in TRAKTOR contains the Master controls. It also lets you control the
effects, the Master Clock and allows audio recording of your mixes.
10.1 Master Panel
The Master Panel in the center of the Global Section provides the main volume and playback mode controls.
10.1.1 Master Volume Control
The mAsteR volume knoB controls the main output.
►
Default position (no boosting, no attenuation) is at 2’o’clock.
►
Adjust it so that the Master Level Meter in the Header uses the full available range.
►
In External Mixer Mode the mAsteR volume knoB serves as an overall gain to adjust the
►
output of TRAKTOR to the input requirements of the external mixer.
10.1.2 Headphone Controls
PH Vol
The vol knob controls the volume of the Monitor Output for your headphones.
►
Mix
The mix knob lets you mix the cued signal with the master signal in your head-
►
phones.
TRAKTOR PRO / TRAKTOR SCRATCH PRO – 89
Page 93

Tick
With the t
►
ick
button you can activate an audible beat tick that works like a metronome
and helps you editing Beatgrids.
It is only audible on signals cued over the headphones (Internal Mixer Mode).
►
In External Mixer Mode it is laid over the channel signal, when Headphone cue on the
►
Internal Mixer is active.
10.1.3 Control Modes
TRAKTOR
allowing synced navigation in the track and accurately set Cue Points.
All modes can be activated independently. They work globally for all Decks. When activated, the moDe Buttons (snAP, QuAnt, cD moDe) are lit blue.
Vinyl Mode
None of the m
s Control Modes affect the mouse click and cue point behavior during playback,
oDe Buttons
is activated. Start and stop playback at any position. Click and
drag the waveform back and forth like a record.
Snap Mode
In Snap Mode, the playback position jumps always to the next detected beat. Activating
snAP helps you to work exactly on a beat while setting up Cue Points and Loops.
With snAP activated you can set Cue Points and Loops only on detected beats.
►
Quantized Mode
Quant Mode lets you jump between Cue Points and Stored Loops seamless and without
losing sync and works also with Hot Cues.
Skipping in the track in Quantized Mode brings the play position next to the destina-
►
tion, but without losing sync.
TRAKTOR PRO / TRAKTOR SCRATCH PRO – 90
Page 94

CD Mode
CD Mode emulates the behavior of CD players (before the invention of the touch sensitive
jog wheel).
When pausing the deck, a short stutter loop is played at the current playback position.
This loop can be moved forward and backward to adjusts its position. Finally pressing cue
sets a Cue Point at that position. It works like this:
Activate cD moDe in the Master Panel.
1.
Play a track and navigate near the play position where you want to set a Cue Point.
2.
Pause the track by clicking on PlAy/PAuse. The short stutter loop is active.
3.
Go to the Move Panel, chose Beat Jump Mode and activate fine.
4.
Use the move Buttons in the Move Panel to change the position of the stutter loop.
5.
When you found the position for the Cue Point nally click cue in the Transport
6.
Controls. The loop stops playing and the Current Cue Point is set to this position.
10.1.4 Cruise Mode
Cruise Mode serves for automatically playing one track after the other from a playlist or
your track collection.
Engaging cRuise seamlessly takes over playback control:
The currently playing track continues to play.
►
The next song from the playlist will be loaded in the opposite deck and started by
►
TRAKTOR automatically when the rst track reaches its end.
Then the next song of the Playlist will be loaded and played automatically and so
►
forth.
Note:
At least one track has to be playing when engaging Cruise Mode.
To activate it click the cRuise Button in the Master Panel.
►
The cRossfADeR is set automatically to center position.
►
TRAKTOR PRO / TRAKTOR SCRATCH PRO – 91
Page 95

The chAnnel fADeR of the playing track is open while the other is closed. At the end of
►
the playing track it will fade out and the next track will fade in.
Use a playlist to create an order for the automatic played tracks.
►
You can automate Cruise Mode when using it in combination with Fade and Load
►
Markers to control the transitions. First you have to activate Use Fade In & Out Markers
in Preferences > Loading > Loading.
You can manually trigger the transition to the next song at any moment by pulling
►
down the channel fader of the currently playing track.
10.2 Master Clock Panel
The Master Clock is a central organ of
effects and for the sync function. It also sends a MIDI-Clock signal to external hardware
and software.
To show the Master Clock Panel, click on the m
►
Global Section.
TRAKTOR
and works as tempo reference for the
etRonome icon
on the left side of the
10.2.1 Modes
The Master Clock has three operation modes activated by the mAnuAl, Auto and ext. but-
tons. In Manual Mode, the Master Clock runs independently from the Decks, in Auto Mode
the Master Clock automatically follows the tempo of one of the playing decks. External
Mode switches the MDI Clock to a receptor for syncing TRAKTOR to a MIDI Clock Signal
coming from an external source.
Auto Mode (Default)
Cruise Mode will also work when
%
using an external mixer.
In Auto Mode the Master Clock always follows the tempo of one of the playing
►
Decks.
All manual tempo controls of the Master Clock are disabled in Auto Mode.
►
TRAKTOR PRO / TRAKTOR SCRATCH PRO – 92
Page 96

The Master Clock automatically determines which Deck is the best candidate for being
►
the tempo reference. On this Deck the mAsteR button is activated automatically.
The automatic choice of the Deck chosen as tempo reference can manually be changed
►
by clicking on the mAsteR button of another deck.
When using the Master Clock in Auto Mode, no interaction with the Master Clock
►
panel is required, so that the panel does not need to be visible.
Manual Mode
In Manual Mode the Master Clock you keep manual control.
►
The Tempo Display shows the tempo of the Master Clock in BPM.
►
The yellow area in the Tempo Display shows the offset of the Master Clock towards
►
the Deck that was manually set to be the Tempo Master by pressing the m
AsteR
on that Deck.
To adjust the tempo manually, drag the displayed value with the mouse, use the “+”
►
and “-“ buttons or tap the tempo with the tAP button.
The Pitch BenD buttons can be used like on regular Decks to nudge the tempo of the
►
Master Clock.
►
The t
ick
option gives an audible reference about the tempo of the Master Clock on
your headphones.
External Mode
In External Mode the Master Clock is remotely controlled by a MIDI Clock Signal re-
►
ceived from an external source.
The Tempo of the Master Clock displayed in the t
►
emPo DisPlAy
may need a few seconds
to lock onto the MIDI Clock Signal.
button
In this mode, all manual tempo controls of the Master Clock are disabled.
►
The Decks of TRAKTOR can be synced to the Master Clock like in Manual Mode by
►
pressing the sync button on the Deck.
TRAKTOR PRO / TRAKTOR SCRATCH PRO – 93
Page 97

To match the beats between the sending and the receiving
►
the MIDI Clock sending offset must be adjusted in the sending application.
TRAKTOR PRO
application,
10.2.2 MIDI Clock Send
The MIDI Clock feature gives you the ability to synchronize external hardware to the tempo of the tracks playing in TRAKTOR.
To start sending a MIDI Clock signal, click the s
►
sending. When MIDI Clock is active the stARt/stoP Button is lit blue.
By clicking the sync button, TRAKTOR triggers a MIDI Clock Stop Message immedi-
►
ately; followed by a MIDI Clock Start Message to re-sync the external hardware.
Before you can send the MIDI Clock signal you have to activate Send MIDI Clock for
►
your MIDI device(s) in Preferences > MIDI Setup.
To match the beats between the sending and the receiving TRAKTOR application, the
►
MIDI Clock sending offset must be adjusted in the sending application.
tARt/stoP
button. Clicking it again stops
10.3 Effect Panels
TRAKTOR has two individual Effect Units. Their Control Panels are located on the left and
the right side of the Global Section. For switching from either the Master Clock or the
Audio Recorder to the respective Effect Panel, click on the tabs labeled fx1 and fx2 on
For synchronizing external hard-
%
Master Clock has to be set as Master
Tempo Source.
ware with the MIDI Clock, the
either end of the Global Section.
Each of the Effects Units can be inserted to any of the
contemporarily to more than one Deck at a time by clicking on the fx AssiGn Buttons found
in the mixer strip of each Deck.
As default
too.
Each of the Effects Units can be used in 2 modes - Chained and Advanced, described
hereafter. The mode can be switched in Preferences > Effects > FX Panel Mode.
TRAKTOR
s effects are insert effects, but you can use them as send effects,
TRAKTOR
Decks individually or
TRAKTOR PRO / TRAKTOR SCRATCH PRO – 94
Page 98

10.3.1 Chained Mode
In Chained Effect Mode you can use and control up to three effects in one Panel. It works
as follows:
Choose the effect(s) you want to use with the effect selectoR (2).
►
You can switch on and off every effect in the chain with the 3 effect on Buttons (4)
►
and control its amount with the effect Amount knoBs (3).
For the whole effect chain you can control the main-signal-to-effect-signal-ratio with
►
the DRy/wet knoB (1).
You can save a specic setting as default with the snAPshot Button (5).
►
To recall the default setting of an effect, double-click the effect knob.
►
10.3.2 Advanced Mode
In Advanced Effect Mode you get full control over all parameters of a single effect:
Choose an effect with the effect selectoR (2).
►
TRAKTOR PRO / TRAKTOR SCRATCH PRO – 95
Page 99

With the effect PARAmeteR knoBs 1 to 3 (3) and effect Buttons 1, 2 (4) you can mod-
►
ulate the behavior of the selected effect. Available options depend on the chosen effect (see 15.5, Effects in Detail).
With the effect on Button (6) you can switch the effect on and off.
►
The DRy/wet knoB (1) controls the main-signal-to-effect-signal-ratio.
►
You can save a specic setting as default with the snAPshot Button (7).
►
The Reset Button (5) resets all effect settings inside the Panel to the default.
►
10.3.3 Send Effects
The Effect Units can also be used in Send Effect Mode. This is only available in External
Mixer Mode (with a multichannel soundcard) and has to be set up in the Preferences:
Go to Preferences > Audio Setup > Output Routing and set Mixing Mode to exteRnAl.
►
Also set an output of your audio device as outPut senD. This output typically shall be
connected to the FX return input of the external mixer.
Go further to the Input Routing page and set an input of your audio device as i
►
senD. This input typically is connected to the FX send output of the mixer.
Now open the Effects page of the Preferences and set Effect Routing for at least one
►
Effect Unit to exteRnAl senD.
The audio signal that is sent to the Effect Slots is now entirely controlled by the FX
►
Send knobs or buttons of the external mixer.
10.3.4 General Notes
You may want to use only a selection of available effects. You can pre-select them in
►
Preferences > Effects > Effect Pre-Selection. Only the pre-selected effects are accessible from the Effect Panels.
More information about the TRAKTOR Effects is documented in chapter 15.5 (Effects
►
in Detail).
nPut
TRAKTOR PRO / TRAKTOR SCRATCH PRO – 96
Page 100

10.4 Audio Recorder Panel
The Audio Recorder in TRAKTOR is used for recording your mixes or an external source
like e.g. your mix with an external mixer, a microphone or turntable. It also is used for
activating Broadcasting.
10.4.1 Recording your Mix
Before you start recording you have to adjust the settings in Preferences > Recording,
►
especially to dene on which channel you want to record and where the recording shall
be saved (see chapter 14.8, Recording).
To activate the Audio Recorder, click the tAPe icon on the right side of the Global
►
Section.
With the G
►
you to set the right level.
Start recording by clicking the red RecoRDeR Button. Clicking it again stops recording
►
and saves the recorded le in the Audio Recordings folder.
The display shows the actual le size and recorded time.
►
By clicking cut, TRAKTOR saves the current recording and seamlessly starts a new
►
le for recording.
To delete the current recording click on the Delete Button.
►
Ain
knob you can adjust the level for recording. The Recording Meter helps
10.4.2 Broadcasting
TRAKTOR gives you the ability to broadcast your mix or a radio show over the internet.
To start broadcasting, activate the Audio Recorder Panel and click the BRoADcAst
►
Button.
Broadcasting needs to be set up in the Preferences > Broadcasting. The required set-
►
tings depend on your network and server settings.
For more information see chapter 15.4 (Broadcasting).
►
TRAKTOR PRO / TRAKTOR SCRATCH PRO – 97
 Loading...