

Page 1

TRAKTOR SCRATCH
Operation Manual
Page 2

The information in this document is subject to change without notice and does
not represent a commitment on the part of NATIVE INSTRUMENTS GmbH. The
software described by this document is subject to a License Agreement and may not
be copied to other media. No part of this publication may be copied, reproduced or
otherwise transmitted or recorded, for any purpose, without prior written permission
by NATIVE INSTRUMENTS GmbH, hereinafter referred to as NATIVE INSTRUMENTS.
All product and company names are trademarks of their respective owners.
Furthermore, the fact that you are reading this text means you are the owner of
legal version rather than an illegal, pirated copy. It is only through the loyalty and
honesty of people like yourself that NATIVE INSTRUMENTS GmbH can continue
to develop and create innovative audio software. On behalf of the entire company,
thank you very much.
Authors and Revisions: Irmgard Bauer, Friedemann Becker, Jan Hennig, David
Tinning - other valuable input from: Phil Lewis, Hobbes, Quartz, AudioRapture and
all TRAKTOR Forum Users!
Special thanks to the Beta Test Team, who were invaluable not just in tracking down
bugs, but in making this a better product.
© NATIVE INSTRUMENTS GmbH, 2007. All rights reserved.
Germany USA
NATIVE INSTRUMENTS GmbH NATIVE INSTRUMENTS North America, Inc.
Schlesische Str. 28 5631 Hollywood Boulevard
D-10997 Berlin Los Angeles, CA 90028
Germany USA
info@native-instruments.de sales@native-instruments.com
www.native-instruments.de www.native-instruments.com
Page 3

Table Of Contents
1. Audio 8 DJ and TRAKTOR Scratch Software Installation .................... 7
1.1 Installing the AUDIO 8 DJ drivers under Mac OS X ........................ 7
1.2 Installing TRAKTOR Scratch under Mac OS X ............................... 8
1.3 Installing the AUDIO 8 DJ under Windows .................................... 9
1.4 Installing TRAKTOR Scratch under Windows ................................10
2. Hardware Setup ............................................................................11
2.1 Multicore Cables.......................................................................11
2.2 Detailed Instructions for Hooking up your
Turntables with the Multicore Cables ..........................................13
2.3 Detailed Instructions for Hooking up your
CD-Players with the Multicore Cables .........................................14
3. First Steps with TRAKTOR Scratch .................................................15
3.1 Starting the Software ................................................................15
3.2 Registration and Product Authorization .......................................15
3.3 Verifying the Connection to the AUDIO 8 DJ ................................16
3.4 Testing the Outputs of the AUDIO 8 DJ with a Demo Track ...........16
3.5 Testing the Inputs of the AUDIO 8 DJ with
Control Vinyl or Control CD........................................................17
3.6 Playing a Track with Vinyl or CD Control ......................................18
3.7 Internal, Relative and Absolute Playback Tracking Modes ..............19
3.8 The Control Zones on Vinyl ....................................................... 20
3.9 The Control Zones on CD ...........................................................21
3.10 Test Driving on Your own Music ................................................21
4. Understanding the Scratch Panel ................................................... 23
4.1 The Calibration Process ............................................................ 23
4.2 Sticker View .............................................................................25
5. More about the AUDIO 8 DJ ......................................................... 26
5.1 Back View and Connections ...................................................... 26
5.2 Front View and Connections .......................................................27
5.3 Advanced Setups .................................................................... 28
5.4 Status LEDs ............................................................................31
5.5 Control Panel .......................................................................... 32
5.6 Audio Statistics ....................................................................... 33
5.7. Technical Specication ............................................................ 33
6. Beatport™ - Online Dance Music Store™ ...................................... 35
7. The User Interface of TRAKTOR Scratch ..........................................37
7.1 Terminology..............................................................................37
7.2 Knob and Fader Control .............................................................41
7.3 Adjusting the Look of Traktor .................................................... 43
TRAKTOR SCRATCH – 3
Page 4

4 – TRAKTOR SCRATCH
8. Using the Track Browser ............................................................... 50
8.1 Preparing the Set .................................................................... 50
8.2 Searching for tracks................................................................. 54
8.3 Editing tracks ......................................................................... 59
8.4 Working with the Collection and Playlists .................................... 64
9. Backup and Transfer of your Collection ............................................70
9.1 TRAKTOR File Formats and TRAKTOR Folder ..............................70
9.2 Complete Backup .....................................................................70
9.3 Automatic Backup (Security Backup) ..........................................71
10. Controlling the Decks...................................................................72
10.1 General Deck Behavior ............................................................72
10.2 Regular Cue Points ............................................................... 77
10.3 Special Cue Points ..................................................................78
10.4 Dening and Using Beatgrids ...................................................79
10.5 Details Pages and Panels ....................................................... 84
11. Advanced Playback Functions ..................................................... 87
11.1 Beatjump ............................................................................. 87
11.2 Duplicate Deck ...................................................................... 88
11.3 Loops .................................................................................. 89
12. Effects ...................................................................................... 90
12.1 Effects Routing ..................................................................... 90
12.2 Available Insert Effects ..........................................................91
12.3 Available Send Effects .......................................................... 93
13. Recording .................................................................................. 98
13.1 Understanding Audio Recording............................................... 98
14. MIDI and Hotkeys .....................................................................101
14.1 Controlling TRAKTOR with MIDI and Hotkeys ...........................101
14.2 Keyboard Hotkeys ................................................................. 101
14.3 Midi Hotkeys ........................................................................102
14.4 Managing your MIDI and Hotkey Files .....................................103
15. Preferences ..............................................................................109
15.1 Audio Setup .........................................................................109
15.2 Deck Preferences .................................................................110
15.3 Browser Preferences .............................................................112
15.4 Recording ............................................................................113
15.5 Hotkey and MIDI Setup .........................................................114
15.6 Appearance .........................................................................115
16. Tips & Tricks.............................................................................116
16.1 Playing in Reverse ................................................................116
16.2 Organizing Playlists ............................................................... 116
16.3 Using the Beatmasher in Musical Values ................................. 117
Page 5

16.4 Stickering the Control Record .................................................118
16.5 Airplane Mode ......................................................................120
17. Troubleshooting .........................................................................121
17.1 What is Latency? ...................................................................121
17.2 Hardware Troubleshooting ......................................................122
17.3 How to check if the driver is installed correctly?........................123
17.4 How to avoid Ground Loops ....................................................125
17.5 How to use the AUDIO 8 DJ with a Laptop ...............................125
17.6 TRAKTOR Scratch won’t start (or crashes upon start): ..............127
17.7 Tracks load but won’t play! .....................................................127
17.8 Decks Play, Master Level Flashes, but no Sound! ......................129
17.9 Audio Pops, Clicks and/ or Distortions! ....................................130
17.10 The Waveforms (or other Graphics) Pause or Stutter! ..............131
17.11 I get no Response from my MIDI-Controller ............................ 131
18. Optimizing your Computer ..........................................................133
18.1 Macintosh Optimization .........................................................133
18.2 Windows Optimization ...........................................................134
19. Getting Help .............................................................................136
19.1 Knowledge Base/ Readme/ Online Support ..............................136
19.2 Forum .................................................................................136
19.3 Updates ..............................................................................137
20. Hotkeys ....................................................................................137
21. Index .......................................................................................139
TRAKTOR SCRATCH – 5
Page 6

Dear Customer,
Thank you for purchasing TRAKTOR Scratch, and for trusting in the quality
of NATIVE INSTRUMENTS products.
TRAKTOR Scratch is an integrated software and hardware system for DJ's
made of several components:
• AUDIO 8 DJ, your new professional 8 In 8 Out USB 2.0 audio
interface
• Control Vinyls and CD's
• The Multicore Audio Cable, for connecting your turntables, AUDIO 8
DJ and mixer
• TRAKTOR Scratch, the software connecting these components to your
digital music archive
Years of experience in the domain of vinyl control for digital music and the fast
AUDIO 8 DJ interface have allowed us create an astonishingly tight system,
that really feels like a Native Instrument.
Our thanks go to the fathers of the idea of digital vinyl control, and to the
minds that have brought the system to this level of quality.
Enjoy it!
NATIVE INSTRUMENTS
6 – TRAKTOR SCRATCH
Page 7

1. Audio 8 DJ and TRAKTOR Scratch Software Installation
TRAKTOR Scratch is an integrated Hardware and Software System. Please
proceed as follows for installing the components of this system.
The correct order of installation is:
• Installing the AUDIO 8 DJ drivers (software)
• Connecting the AUDIO 8 DJ hardware
• Installing the TRAKTOR Scratch software
• Authorizing TRAKTOR Scratch
Do not connect the audio interface before the installer prompts you as
the operating system may install the wrong drivers.
1.1 Installing the AUDIO 8 DJ drivers under Mac OS X
Installation of the AUDIO 8 DJ
Place the installation CD in the CD-ROM drive of your computer.
Double-click on the TRAKTOR CD icon to open the contents of the CD.
Double-click the AUDIO 8 DJ Driver installer.
First, the installer shows a start image. When you click Continue, a dialog
will open in which you can choose the mode of installation as well as the
destination folder.
The default installation path is the Applications/Audio 8 DJ Driver folder.
Please follow the onscreen installation instructions provided.
Note: You cannot install the AUDIO 8 DJ on a USB 1.1 port – a USB
2.0 port is required.
TRAKTOR SCRATCH – 7
Page 8

Uninstalling the AUDIO 8 DJ
To uninstall the AUDIO 8 DJ drivers from your computer, proceed as
follows:
• Delete the folder Applications/Audio 8 DJ Driver.
• Delete the le TraktorScratch.plist in Root/ Library/ Preferences.
• Delete the le TraktorScratch.plist in User/ Library/ Preferences.
Afterwards, empty the trash bin to completely erase the program.
Note: Please always refer to the Readme le on the installation CD as
it contains last minute information that may not be available in the
printed manual.
1.2 Installing TRAKTOR Scratch under Mac OS X
System requirements
To use the TRAKTOR Scratch software on a Macintosh Computer, your system
must meet the following requirements:
• G4 1.4 GHz, Mac OS 10.4.8 or Intel® Core™ Duo Family, 512 MB
RAM
• USB 2.0 Interface
Installation of TRAKTOR Scratch
Place the installation CD in the CD-ROM drive of your computer.
Double-click on the TRAKTOR CD icon to open the contents of the CD.
Double-click the TRAKTOR installer.
First, the installer shows a start image. When you click Continue, a dialog
will open in which you can choose the mode of installation as well as the
destination folder.
The default installation path is the Applications/Traktor Scratch folder.
Please follow the onscreen installation instructions provided.
8 – TRAKTOR SCRATCH
Page 9
Uninstalling TRAKTOR Scratch
To uninstall TRAKTOR Scratch from your computer, proceed as follows:
• Delete the folder Applications/Traktor Scratch.
• Delete the le TraktorScratch.plist in Root/ Library/ Preferences.
• Delete the le TraktorScratch.plist in User/ Library/ Preferences.
Afterwards, empty the trash bin to completely erase the program.
Note: Please always refer to the Readme le on the installation CD as
it contains last minute information that may not be available in the
printed manual.
1.3 Installing the AUDIO 8 DJ under Windows
Installation of the AUDIO 8 DJ
• Place the installation CD in the CD-ROM drive of your computer.
• Use the Windows Explorer to browse the contents of the CD.
• Start the installation by double-clicking on Audio 8 DJ Driver Setup.
exe.
• Follow the onscreen instructions.
The setup program will lead you through the installation process. As the path
for installation the setup will suggest C:\Program Files\NATIVE INSTRUMENTS\
Audio 8 DJ Driver. You can also choose another destination folder if you
wish.
Note: You cannot install the AUDIO 8 DJ on a USB 1.1 port – a USB
2.0 port is required.
Uninstalling the AUDIO 8 DJ
To uninstall the AUDIO 8 DJ drivers from your computer, use the following
steps:
• Open C:\Program Files\NATIVE INSTRUMENTS\Audio 8 DJ Driver.
• Double-click the Unwise tool to begin un-installation.
• Choose Automatic from the following dialog.
TRAKTOR SCRATCH – 9
Page 10

Note: Please always refer to the Readme le on the installation CD as it
contains last minute information not available in the printed manual.
1.4 Installing TRAKTOR Scratch under Windows
System requirements
To use the TRAKTOR Scratch software on a PC computer, your system must
meet the following minimum requirements:
• Pentium/ Athlon 1.4 GHz, Windows XP Service Pack 2, 512 MB
RAM
• USB 2.0 Interface
Installation of TRAKTOR Scratch
• Place the installation CD in the CD-ROM drive of your computer.
• Use the Windows Explorer to browse the contents of the CD.
• Start the installation by double-clicking on Setup.exe.
• Follow the onscreen instructions.
The setup program will lead you through the installation process.
Uninstalling TRAKTOR Scratch
To uninstall TRAKTOR Scratch from your computer, use the following steps:
• Open C:\Program Files\NATIVE INSTRUMENTS\Traktor Scratch.
• Double-click the Unwise tool to begin un-installation.
• Choose Automatic from the following dialog.
Note: Please always refer to the Readme le on the installation CD as it
contains last minute information not available in the printed manual.
10 – TRAKTOR SCRATCH
Page 11
2. Hardware Setup
OUT 1|2
GROUND
OUT
MIDI
IN
USB
OUT7 |8
CH. A
CH. B
CH. C
CH. D
OUT5| 6
OUT3| 4
IN 3|4
IN1| 2
OUT1|2
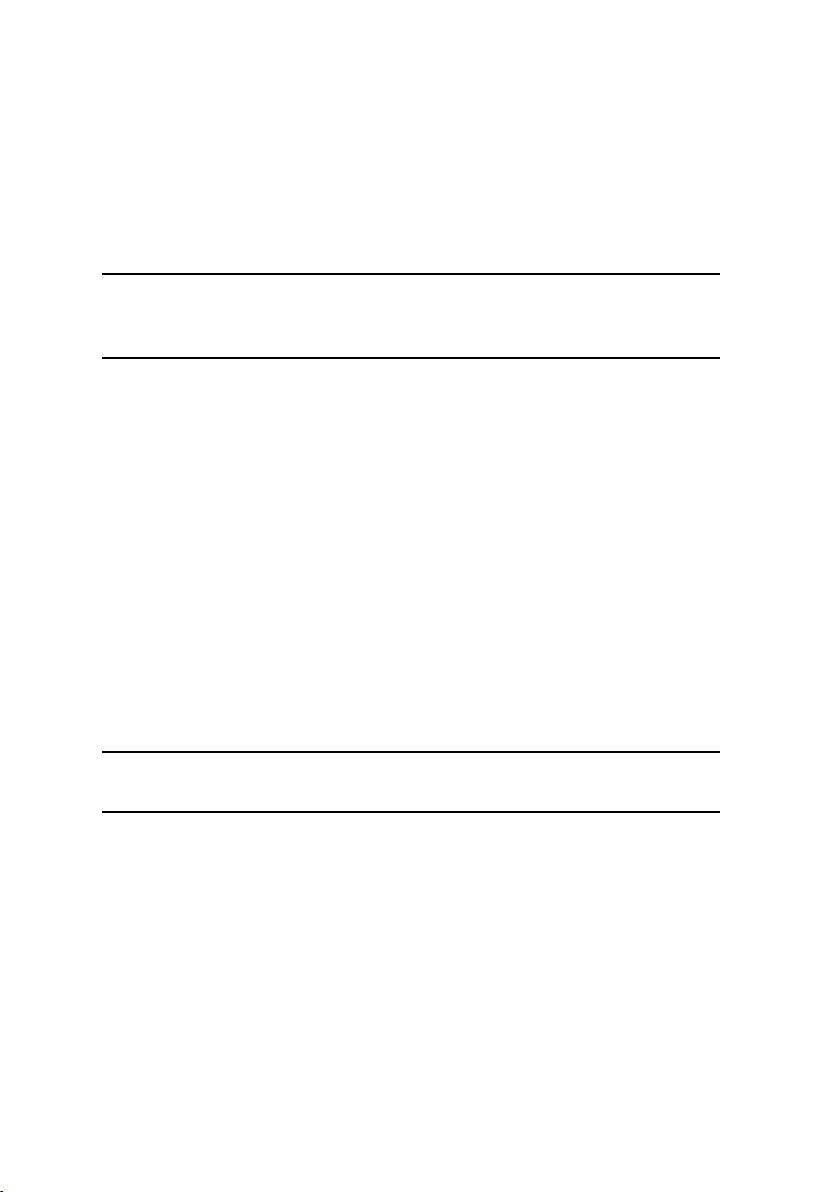
2.1 Multicore Cables
TRAKTOR Scratch goes one step beyond all current digital vinyl systems in
offering an innovative way of connecting your audio interface to the turntables.
The Multicore cables provided in the package unify the following functions
into one unique solution:
• Connecting the turntables to the inputs of the AUDIO 8 DJ
• Connecting the outputs of the AUDIO 8 DJ to the mixer
• Connecting the turntables to the mixer, for playing regular vinyl
• The color coding of the multi-pin XLR connectors make cabling errors
impossible and allows connection with 2 clicks when switching DJ’s
• Long cables allow the AUDIO 8 DJ to be placed on either side of the
turntables
Standard connection with turntables
TRAKTOR SCRATCH – 11
Page 12
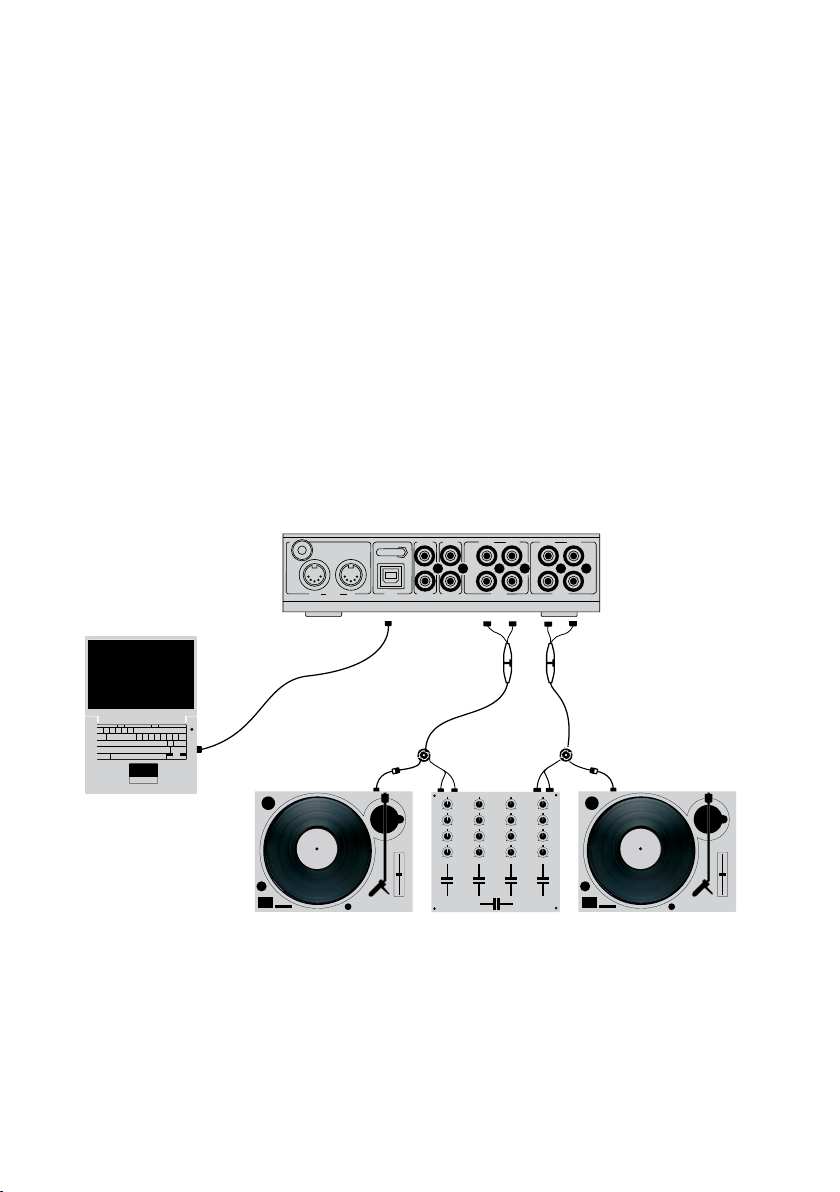
The male part of each Multicore cable (XLR-connector with pins) has 4
colored RCA connectors. Each of the cables is for one deck and provides the
Control Signal to the audio interface via the black and red connector, whilst
picking up audio from the TRAKTOR Scratch decks via the white and yellow
connector.
The female part of each Multicore cable has six RCA connectors: 2 female
and 4 male. Each of the cables is for one Deck and picks up the Control
Signal from the turntable or CD player via the red and white female connectors
labeled Player (TT/CD). It then splits it into one signal to the AUDIO 8 DJ via
the XLR connector, and one signal to the mixer via the male RCA connectors
labeled Mixer TT/CD. At the same time it provides audio from the TRAKTOR
Scratch line input of the mixer via the second pair of male RCA connectors
labeled Mixer Line In.
The cable is suited for pre-installation as it leaves the turntables connected
to the mixer and therefore fully operational for DJ’s playing regular vinyl or
CDs. To insert the cable into an existing setup, unplug the turntables from
12 – TRAKTOR SCRATCH
Page 13

the mixer one by one, connect them with the female RCA connectors and
plug the RCA connectors labeled Mixer TT/CD into the previous inputs of the
turntables that you just unplugged. Check if the turntable can still be heard
on the same channel of the mixer after installation of the cable.
2.2 Detailed Instructions for Hooking up your Turntables with the Multicore Cables
Connecting the Multicore Cables with the AUDIO 8 DJ
• Take the male part of the rst Multicore cable with the four RCAs that
are all having different colors.
• Connect the four RCAs with the respective colored plugs of the Ch. A
section of your AUDIO 8 DJ. This corresponds to connecting the RCA
pair labeled AUDIO 8 DJ Output with the Out 1/2 of your AUDIO 8 DJ,
and the RCA pair labeled Audio DJ Input with the Input 1/2 of the AUDIO
8 DJ.
• Take the male side of the second Multicore cable (with the four RCAs
all having a different color).
• Connect the four RCAs with the respective colored plugs of the Ch. B
section of your AUDIO 8 DJ. This corresponds to connecting the RCA
pair labeled AUDIO 8 DJ Output with the Out 3/4 of your AUDIO 8 DJ,
and the RCA pair labeled Audio DJ Input with the Input 3/4 of the AUDIO
8 DJ.
Connecting the Multicore Cables with Your Turntables and Your Mixer
• Take the female part of the rst Multicore cable with six RCA cables
- four male and two female plugs.
• Plug the left turntable (Deck A) into the two female RCAs, labeled with
Player TT/CD.
• Plug the two RCAs labeled Mixer TT/CD into the Phono Inputs of Deck
A (left turntable) of your hardware mixer.
• Plug the two RCAs labeled Mixer Line/In into the Line Inputs of Deck
A (left turntable) of your hardware mixer.
• Take the female part of the second Multicore cable with six RCA cables
- four male and two female plugs.
• Plug the right turntable (Deck B) into the two female RCAs, labeled
with Player TT/CD.
TRAKTOR SCRATCH – 13
Page 14

• Plug the two RCAs labeled Mixer TT/CD into the Phono Inputs of Deck
B (right turntable) of your hardware mixer.
• Plug the two RCAs labeled Mixer Line/In into the Line Inputs of Deck
B (right turntable) of your hardware mixer.
2.3 Detailed Instructions for Hooking up your CD-Players with the Multicore Cables
Connecting the Multicore Cables with the AUDIO 8 DJ
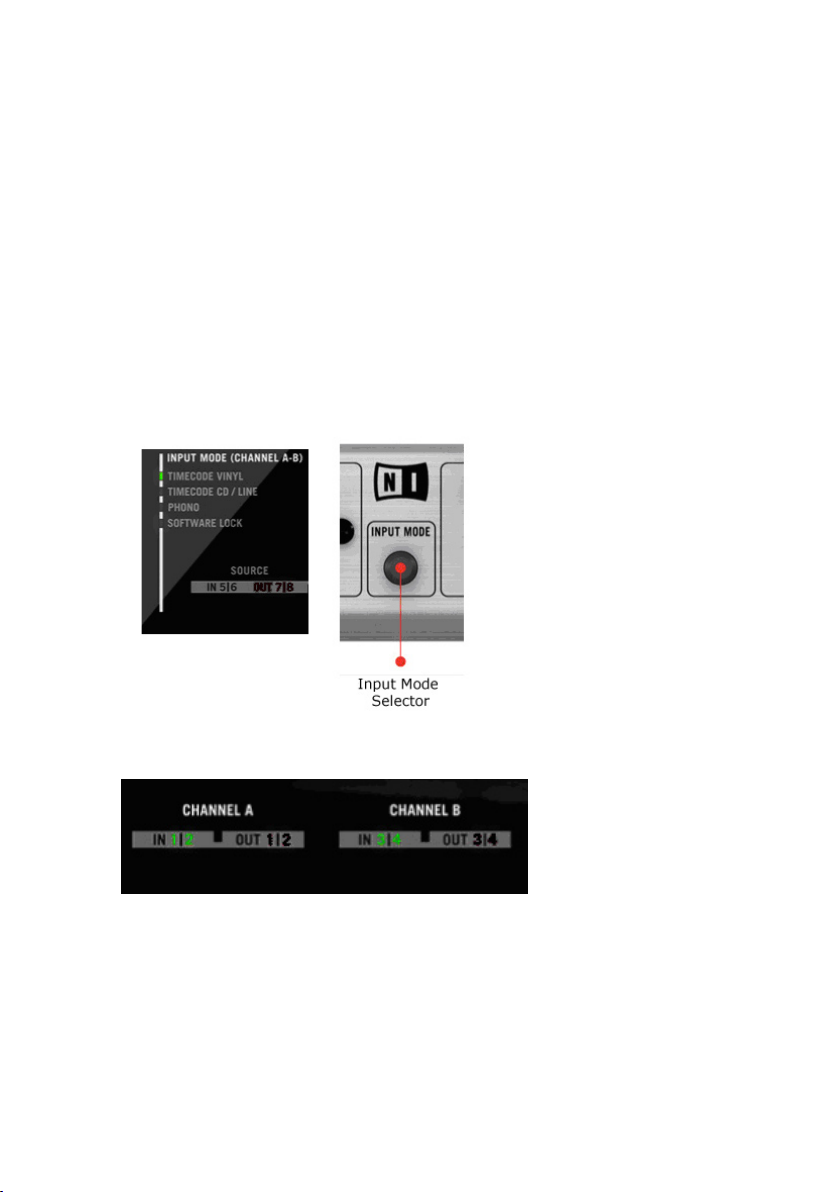
• Connect the Multicore cable with the AUDIO 8 DJ as described above
for turntables but switch the Input Mode on the AUDIO 8 DJ to Timecode
CD/ Line (see chapter 5; More about the AUDIO 8 DJ).
Connecting the Multicore Cables with Your CD-Players and Your Mixer
• Take the female part of the rst Multicore cable with six RCA cables
- four male and two female plugs.
• Plug the left CD-Player (Deck A) into the two female RCAs, labeled with
Player TT/CD.
• Plug the two RCAs labeled Mixer Line/In into the Line Inputs of Deck
A (left CD-Player) of your hardware mixer.
• Plug the two RCAs labeled Mixer TT/CD into another Line Input of Deck
A (left CD-Player) of your hardware mixer.
• Take the female side of the second MultiCore cable with six RCA cables,
- four male and two female plugs.
• Plug the right CD-Player (Deck B) into the two female RCAs, labeled
with Player TT/CD.
• Plug the two RCAs labeled Mixer Line/In into the Line Inputs of Deck
B (right CD-Player) of your hardware mixer.
• Plug the two RCAs labeled Mixer TT/CD into another Line Input of Deck
B (right CD-Player) of your hardware mixer.
Note: Some mixers don’t have two Line Inputs per channel. To use the
Control Signal control, it is only necessary to have the RCAs called
Mixer Line/In connected. The other pair (Mixer TT/CD) can be plugged
in another Line Input, since this connection is only needed for playing
regular CDs or can be left out completely.
14 – TRAKTOR SCRATCH
Page 15
3. First Steps with TRAKTOR Scratch
3.1 Starting the Software
• Mac OS X: Go to Macintosh HD > Applications > Traktor Scratch and
double-click on the TRAKTOR Scratch program icon.
• Windows: Go to Start > Programs > NATIVE INSTRUMENTS Traktor
Scratch and click the TRAKTOR Scratch program icon.
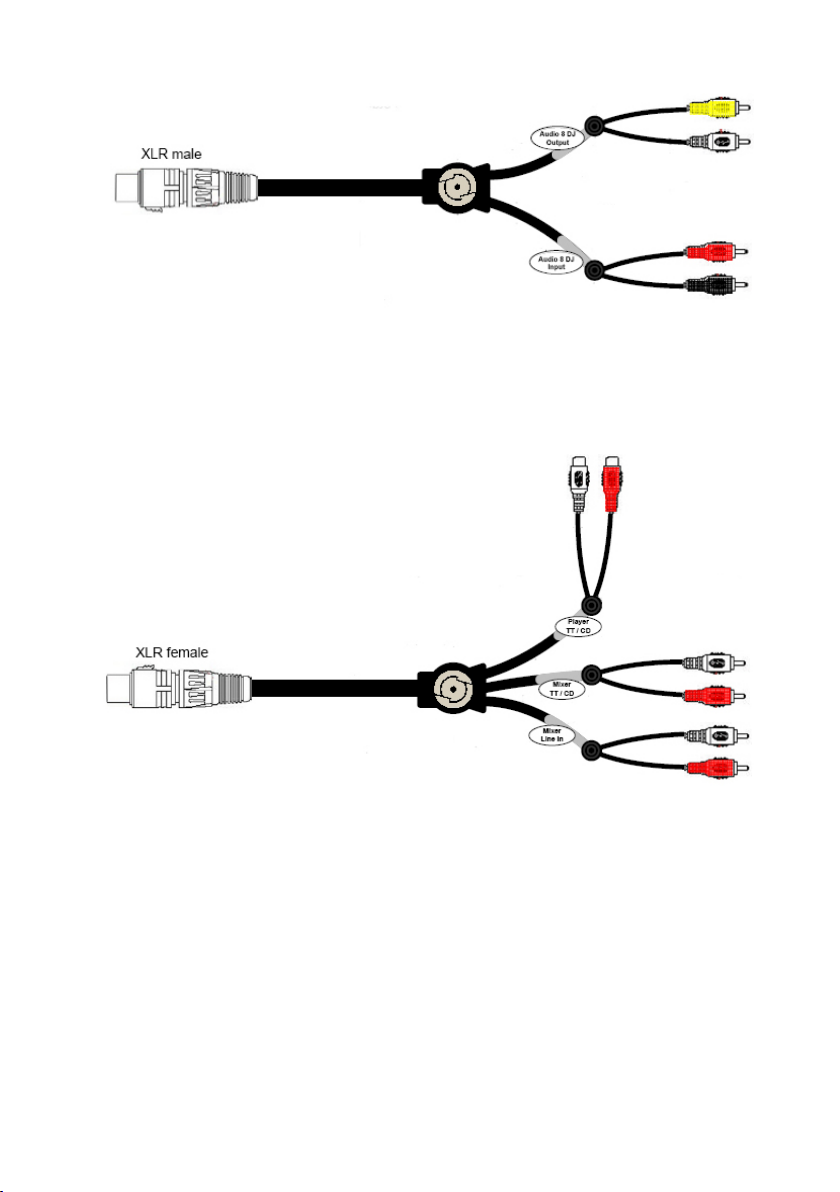
3.2 Registration and Product Authorization
When starting TRAKTOR Scratch for the rst time, you will see the following
screen:
• Choose Activate to start the NI Service Center for authorizing the
software. This will start the Service Center, which gives you a comfortable
step-by-step walk through the authorization process. You nd more
information about the Service Center in a separate Setup Guide booklet
included in your TRAKTOR Scratch package. Service Center also includes
an Update Manager that helps you download the most recent version
of TRAKTOR. You should check regularly for updates to TRAKTOR for
best performance and compatibility with other audio applications.
TRAKTOR SCRATCH – 15
Page 16
• Choose Run Demo to run TRAKTOR Scratch in Demo Mode. Once you
have decided to purchase a product, all you need do is unlock the demo
version by entering a valid serial number – it then instantly becomes the
full version. Demo Mode has the following restrictions: audio processing
stops after 30 minutes, audio recording disabled, no saving of hotkey
and midi assignments.
Note: you have to restart TRAKTOR Scratch to change from Demo Mode
into Full Mode.
3.3 Verifying the Connection to the AUDIO 8 DJ
Verify if the AUDIO monitor LED in the header of TRAKTOR Scratch is green.
This color indicates the correct connection with the audio interface. If the
LED is red or grey you have to verify the connection to the AUDIO 8 DJ. You
may have to restart TRAKTOR Scratch to get the connection to work. In case
of problems, please refer to chapter 17 (Troubleshooting).
3.4 Testing the Outputs of the AUDIO 8 DJ with a Demo Track
• Open the Demo Playlist by double-clicking the Playlist/ Mixes folder in
the Tree Window and then opening the Demo Playlist.
• Right-/ Ctrl-click on one of the tracks in the List and choose Load Track
in Deck A. This will load the track in Deck A, and the track Waveform
will be displayed.
• Click the Play button underneath Deck A.
• The Waveform of the track will start to move from right to left and the
Master Level Meter in the header will start to ash with the music.
• If the Waveform does not scroll from left to right, you’re having a
soundcard problem.Read more in chapter 17 ( Troubleshooting).
• On the AUDIO 8 DJ hardware the LEDs labeled OUT 1|2 will start ashing
green.
• If you hear no sound, but all indicators are functional and lit, you may
have accidentally moved a knob or fader on your hardware mixer, or
something may be wrong with your cable connections. Please verify
your setup as described in chapter 17 (Troubleshooting).
16 – TRAKTOR SCRATCH
Page 17
3.5 Testing the Inputs of the AUDIO 8 DJ with Control Vinyl or Control CD
Now that the outputs of the AUDIO 8 DJ are working properly, we have to
check the inputs required for turntable control of TRAKTOR Scratch. Proceed
as follows:
• Put the Control Records on your turntable (or the Control CDs in your
CD-Player) and play it back.
• If you are playing Control Records on turntables, set the AUDIO 8 DJ
Input Mode for channels A and B to Timecode Vinyl by toggling through
the modes with the INPUT MODE button on the front panel.
• If you are playing Control CDs, set the AUDIO 8 DJ Input Mode for channels
A and B to Timecode CD by toggling through the modes with the INPUT
MODE button on the front panel.
• Check the Input LEDs on channels A and B labeled IN 1|2 and IN 3|4.
They should icker green.
• If the LEDs are ickering red, the inputs are clipping. This happens
when the wrong Input Mode is selected (connecting CD players in Vinyl
Mode).
• If the LEDs don’t icker at all, the signal is too weak or missing. This
can either be due to the wrong Input Mode (connecting turntables in
CD Mode) or to loose or broken cables.
TRAKTOR SCRATCH – 17
Page 18

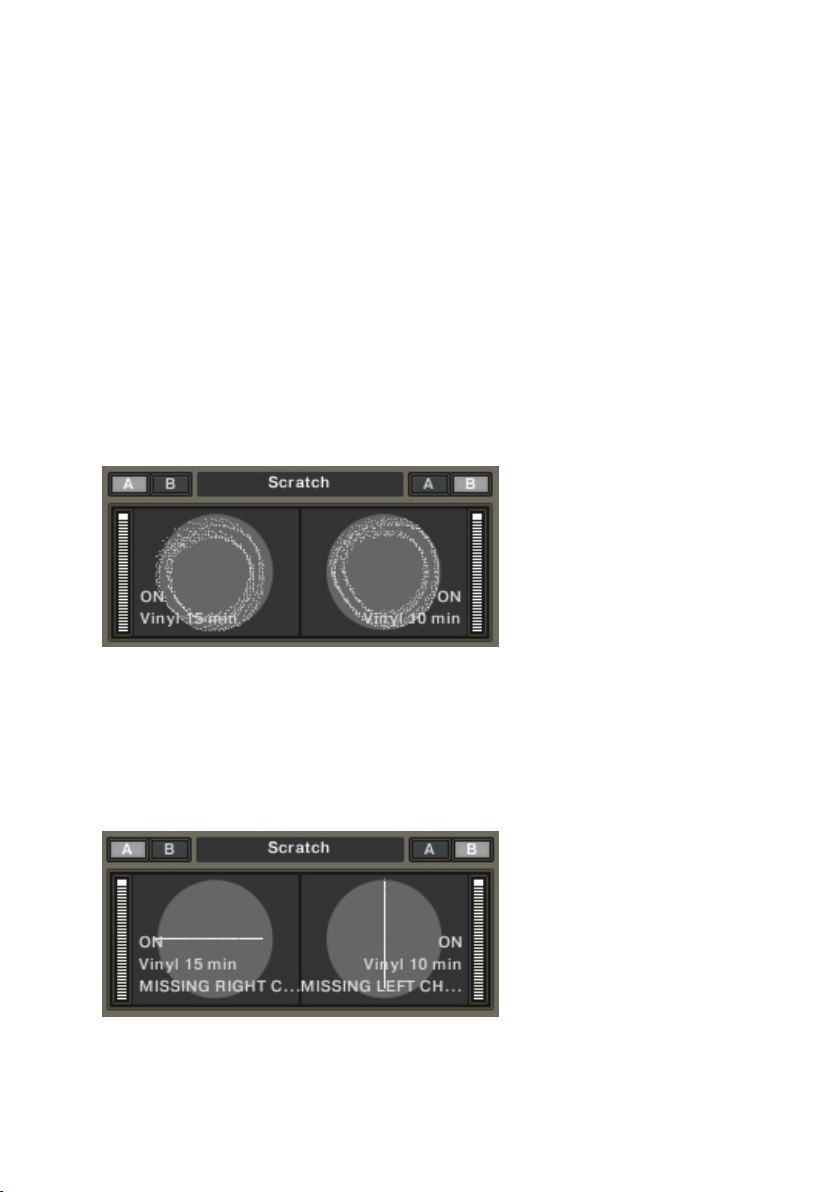
• Next, check if the control signal of both players are showing up in the
scopes. The message in the scope should say ON and the scope gures
should look like this:
• If the figures do not show up or look different, or the displayed
message does not say ON, please refer to section 4.1 (The Calibration
Process).
• Finally make sure that the Deck Assignment buttons labeled A and
B above each scope are lit like in the above picture: the left input is
assigned to Deck A and the right input to Deck B.
• The Absolute Tracking button underneath the waveform is highlighted
in yellow indicating that the deck is ready to go:
3.6 Playing a Track with Vinyl or CD Control
Using Control Vinyl:
• Load a track in Deck A as described before.
• Place the needle at the beginning of the record and start your
turntable.
• The track in the deck will start to play and you will hear it over the
speakers.
• Put your hand on the record and move the record back and forth. Notice
your manual control over the speed.
• Pick up the needle and drop it somewhere else on the records to cue
within the track.
• Load a second track in Deck B and start mixing as you would using
regular turntables.
18 – TRAKTOR SCRATCH
Page 19
• Move the Pitch Fader of the second turntable to match the beats.
• Use the channel- and crossfader on your mixer as normal.
Using Control CD:
• Load a track in Deck A as described in the section before.
• Start your CD-Player – it will shortly play track #1 (called Lead In) and
then start to play track #2. This track is used for regular playback.
• The track in the deck will start to play and you will hear it over the
speakers.
• Put your hand on the jog wheel and move the platter back and forth.
Notice your manual control over the speed.
• Seek through the track using the Track Search button on the CD
player.
• Load a second track in Deck B and start mixing as you would using
regular DJ CD players.
• Move the Pitch Fader of the second CD player to match the beats.
• Use the channel- and crossfader of your mixer as normal.
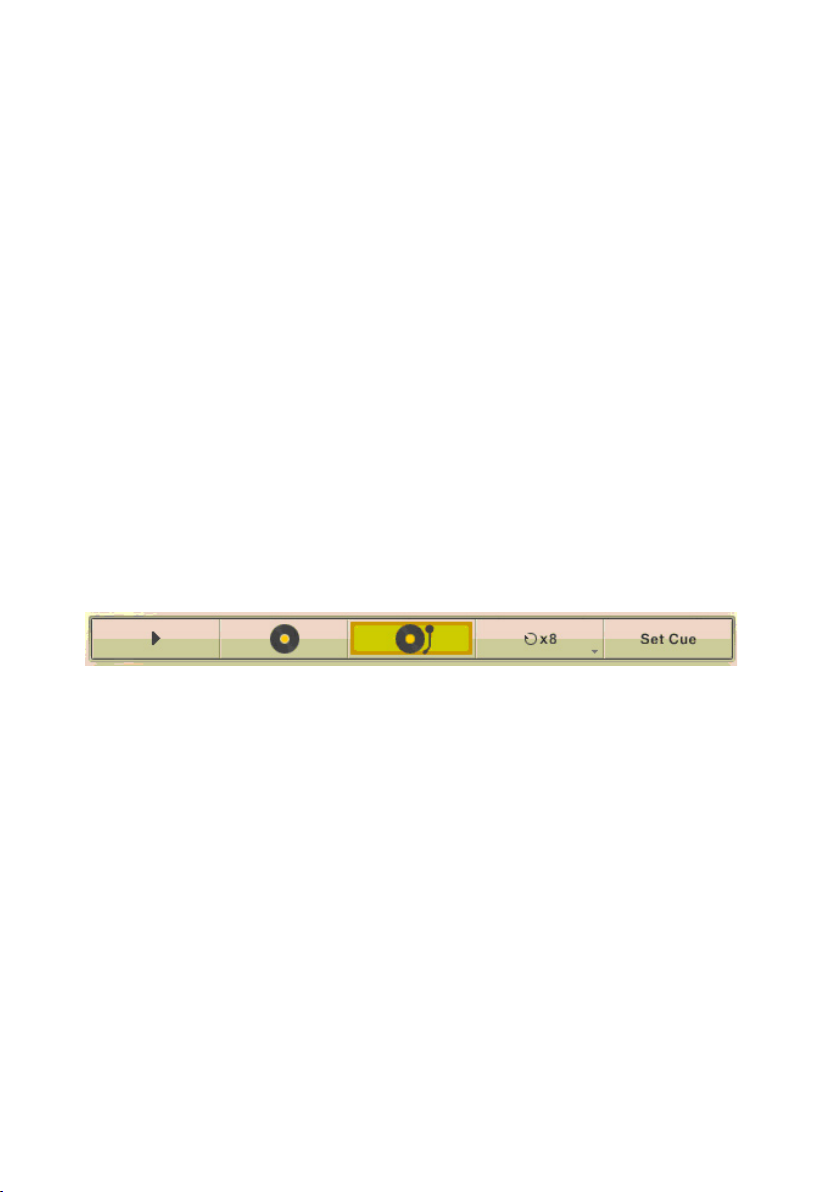
3.7 Internal, Relative and Absolute Playback Tracking Modes
From left to right: Internal, Relative and Absolute Mode buttons, then Loop and Set Cue
buttons.
We have already encountered Internal Playback mode when testing the
soundcards outputs. Internal Playback means that you control playback via
the Play button and the software pitch fader, regardless of your external
turntables or CD players
Absolute Playback Tracking mode is activated by pressing the button with the
representation of a record and a tonearm. This absolutely links the position
of the tonearm on the record to the playback position of your track. Each
action on the tonearm has direct effect on playback of the track in TRAKTOR
Scratch, be it moving of the record back and forth or placing the needle on
another part of the record (Needle Drop)
While in Absolute Tracking Mode, press the Loop button on the right of the
Absolute Tracking button. You will notice the following:
• Playback of the track starts looping the current part of the song
TRAKTOR SCRATCH – 19
Page 20

• Playback mode has switched to the button showing only a record. This
mode is called Relative Tracking Mode.
Touch the record or jog wheel to see that you still have control over the track,
but when you lift the needle and place it somewhere else on the records, you
will notice that the software still plays the loop.
This happens because when setting a Loop the software stops to lock to the
position of the needle. While the software starts to repeat the same part of
the song, the needle on the record moves forward creating a growing offset
to the software. The software therefore ignores the position of the needle and
only tracks the rotational speed of the record.
The position of the needle is ignored except in one special area of the records:
the Lead In. Dropping the needle into the Lead In will skip back to the beginning
of the song, also when in Relative Tracking Mode.
3.8 The Control Zones on Vinyl
The Control Vinyl consists of the following three zones, each with different
playback functions :
Lead In – The rst few Rounds of the Record
Dropping the needle into the Lead In Zone of the record will skip to the beginning of the track. Use this to skip back to the beginning of a track when
playing in the Relative Tracking Mode.
Note: Find options to customize the automatic absolute mode in
Preferences > Deck Preferences > Loading and Preferences > Deck
Preferences > Transport.
Playback Zone - Main Part of the Record
This is subdivided into 10 tracks on side A and 15 tracks on side B. This zone
is used for regular playback. The divisions are visual markers of time, which
do not affect the continuous playback of the loaded track.
Scroll Zone – Last two Tracks of the Record.
Dropping the needle in the Scroll Zone allows you to scroll up and down through
your playlist by manually spinning the record forward or backward. To play the
selected track, simply place the tonearm back into the Playback Zone.
20 – TRAKTOR SCRATCH
Page 21

Note: If your track exceeds the 10 minutes Playback Zone it will continue
playing normally in the Scroll Zone – you have to lift and drop the needle
again to stop the playback and switch to Scroll Mode. Even if you reach
the end of the record, the track will continue to play as there is an
endless groove at the end of the record!
3.9 The Control Zones on CD
The control CD consists of the following three tracks, each with different
playback functions:
CD Track #1: Lead In – (0:04 min)
Skipping to CD Track #1 will skip into the Lead In of the loaded track. Use
to skip back to the beginning of a track when playing in Relative Tracking
Mode.
CD Track #2: Playback Zone – (27:30)
This track is used for regular playback.
CD Track #3: Scroll Zone – (2:30)
Skipping to CD track #3 allows you to scroll up and down through your playlist
by manually spinning the jog wheel of your CD player. To play the selected
track, simply skip back to CD track # 1.
Note: If your track exceeds the 27:30 minutes Playback Zone it will
continue playing back normally in the Scroll Zone – you have to skip
manually to track #3 again to switch to Scroll Mode. And even if your
track exceeds the whole 30 minutes, it will continue playing in Internal
Mode!
3.10 Test Driving on Your own Music
As you probably already have a collection of music les on your hard drive,
you might want to test drive TRAKTOR Scratch with your own music.
• Open a window of the Mac Finder or Windows Explorer containing the
tracks that you want to play.
• Click and hold one of your tracks and drag it from the external window
to the TRAKTOR Scratch window and into Deck A.
TRAKTOR SCRATCH – 21
Page 22

• After a short loading time you should see the Waveform of your track
building up in the display.
• Click and hold one of your tracks and drag it from the external window
to the TRAKTOR Scratch window and into Deck B.
• Play and mix the tracks as you have learned in the previous section.
22 – TRAKTOR SCRATCH
Page 23
4. Understanding the Scratch Panel
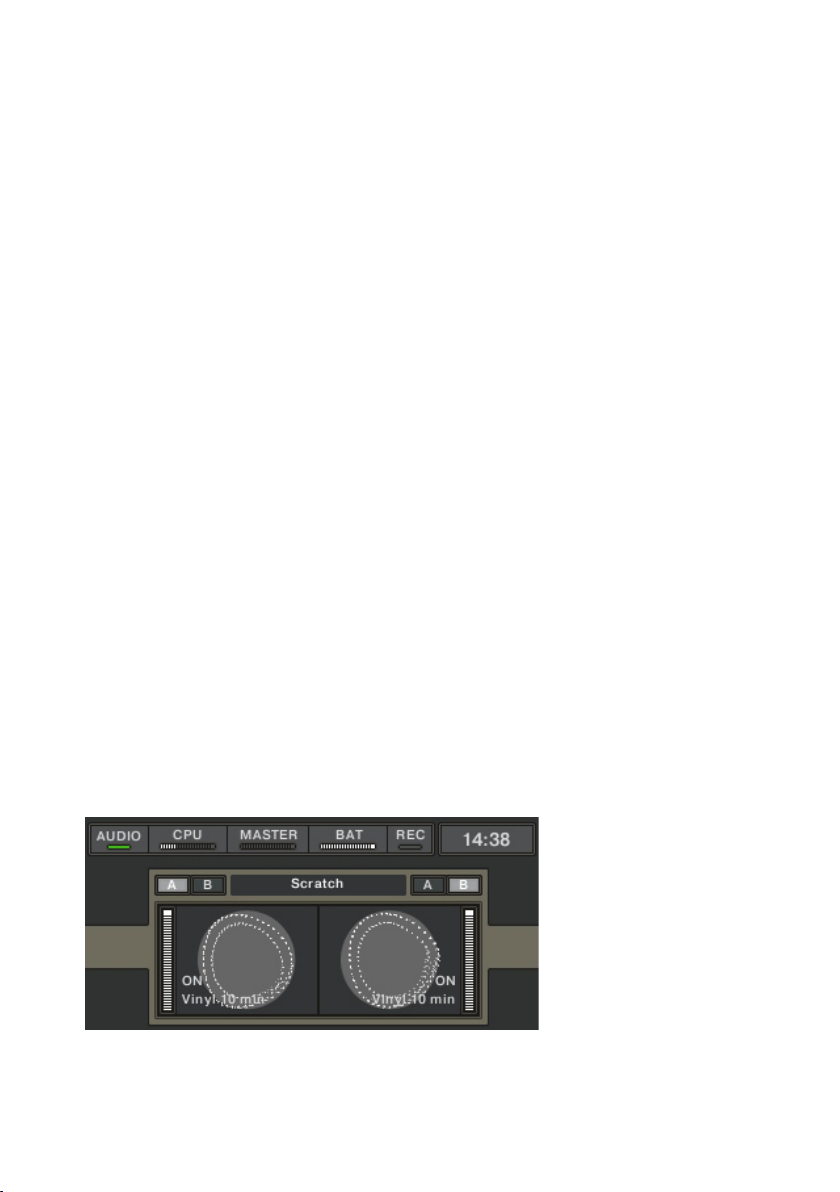
4.1 The Calibration Process.1 The Calibration ProcessCalibration Process
The Calibration is triggered when you assign an input to a deck in TRAKTOR
Scratch by pressing one of the Deck Assign buttons labeled A or B above the
scopes.
Calibration is required for the following reasons:
• Detection of the type of media (vinyl or CD), as well as the side of the
played vinyl
• Detection of the input level of the control signal
• Detection of the connection and the quality of the signal and if it is
sufcient for tracking
• Correction of reversed channels
When you start the calibration by pressing one of the buttons labeled A or
B (while letting the record/ CD play), the decoder evaluates the signal that
is shown by the Position Meters on each side of the scopes. The Position
Meters indicate how many valid position readouts have been transmitted by
the turntable or CD player.
If the meters do not turn white, something is wrong with your control signal.
The decoder outputs a series of messages, qualifying the result of the calibration process:
ON
If the calibration was successful, you will nd the message ON along with
your currently used medium (Vinyl 10, Vinyl 15 or CD) in the Control Signal
graphic as shown below:
Example of a good Control Signal
TRAKTOR SCRATCH – 23
Page 24
Browsing
You dropped the needle in the Scroll Zone (see chapter 3.8 (The Control(see chapter 3.8 (The Control
Zones on Vinyl) and 3.9 (The Control Zones on CD). You should see in the
List Window how you scroll through your playlist backwards and forwards according to the movement of the record/ CD.
Whenever you stop the movement, the respective track will be loaded into
the deck you’re scrolling in.
Calibration Failed
No valid positions detected, or in other words: the calibration was not successful. TRAKTOR Scratch will nevertheless work in Relative Tracking Mode.
A reason for a failed calibration can be deterioration of pick-ups and records.
The status of records and needles can be judged by observing the Scope gures. The more the circles are distorted and fuzzy the higher the degradation
of the records and pick-ups.
Example of a bad Control Signal.
MISSING RIGHT CHANNEL or MISSING LEFT CHANNEL
The left or right channel is10% quieter than the other channel. A backward
movement of the Control Vinyl/ CD cannot be computed, but tempo variations
and needle dropping should still be possible. A missing channel can be seen
easily seen on the Control Signal panel:
Example of missing channels.
24 – TRAKTOR SCRATCH
Page 25
CHANNEL SWAP
The decoder exchanges the stereo channels internally. There are three possible causes:
• Incorrect wiring- the stereo channels are swapped.
• One of the channels has a phase invertion. If you’re sure that the
channels have not been swapped you should check the needle, as the
detection of the absolute position is slower and less reliable.
• The Control Vinyl/ CD was spinning backwards during the calibration. The
calibration failed and you should see the message Calibration Failed
Skipping
This shows up when the needle skips on the record.
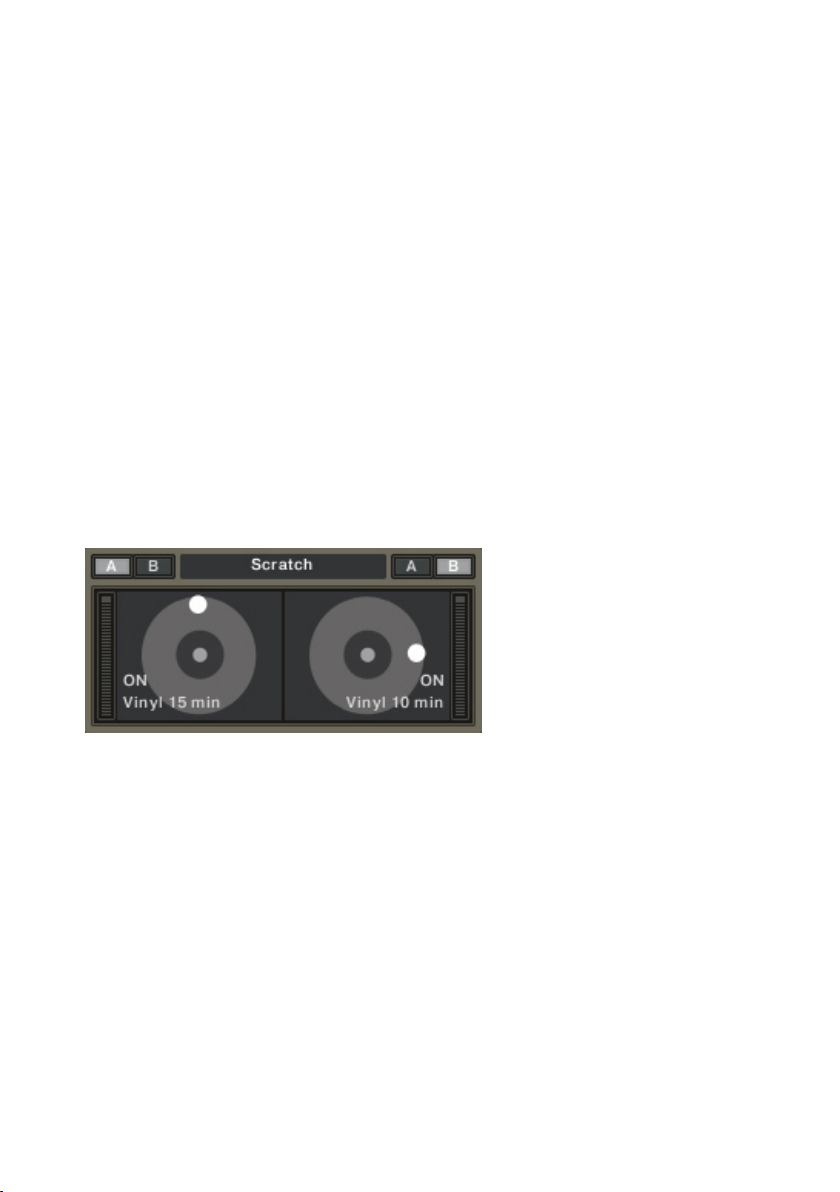
4.2 Sticker ViewSticker View
Besides showing the incoming signal in the Scope View, the Scratch Panel can
be switched to showing the motion of the records as rotating labels. Toggle
between the Scope and the Sticker View by clicking on the Scratch panel:
Sticker View
Find out more about placing stickers on your records that reect the white
dots in the Sticker View in chapter 16.4 (Stickering the Control Record).Stickering the Control Record).).
TRAKTOR SCRATCH – 25
Page 26
5. More about the AUDIO 8 DJ
8 Outputs / 4 Stereo ChannelsUSB Security HookGround Screw
MIDI
Input/Output
4 Inputs/2 Stereo
[4 more on front]
USB 2.0
Bus-Powered
The AUDIO 8 DJ combines high end audio quality with unmatched connectivity
and a rock-solid mobile design. It is destined to be the beating heart of your
DJ set-up and provides a professional level interface between your preferred
software and your audience:
• Cirrus-Logic™ AD-DA converters guarantee a sound quality that will
impress even the most discerning audiophiles.
• Low latency drivers along with hi-gain output levels on all channels
prove the AUDIO 8 DJ's professional credentials.
• 8 inputs, 8 outputs, MIDI I/O, 1/4" headphone connector, and 20 status
LEDs for full visual control.
5.1 Back View and Connections
• IN 1/2 – OUT 1/2 (CH A): Connect here the male XLR part of the Multicore
cable to control Deck A.
• IN 3/4 – OUT 3/4 (CH B): Connect here the female XLR part of the
Multicore cable to control Deck B.
• OUT 5/6 (CH C): Connect to auxiliary input of your mixer when using
send effects.
• OUT 7/8 (CH D): Connect to auxiliary input of your mixer when using
send effects.
26 – TRAKTOR SCRATCH
Page 27
• USB: Connect here your computer via USB 2.0.
MIC
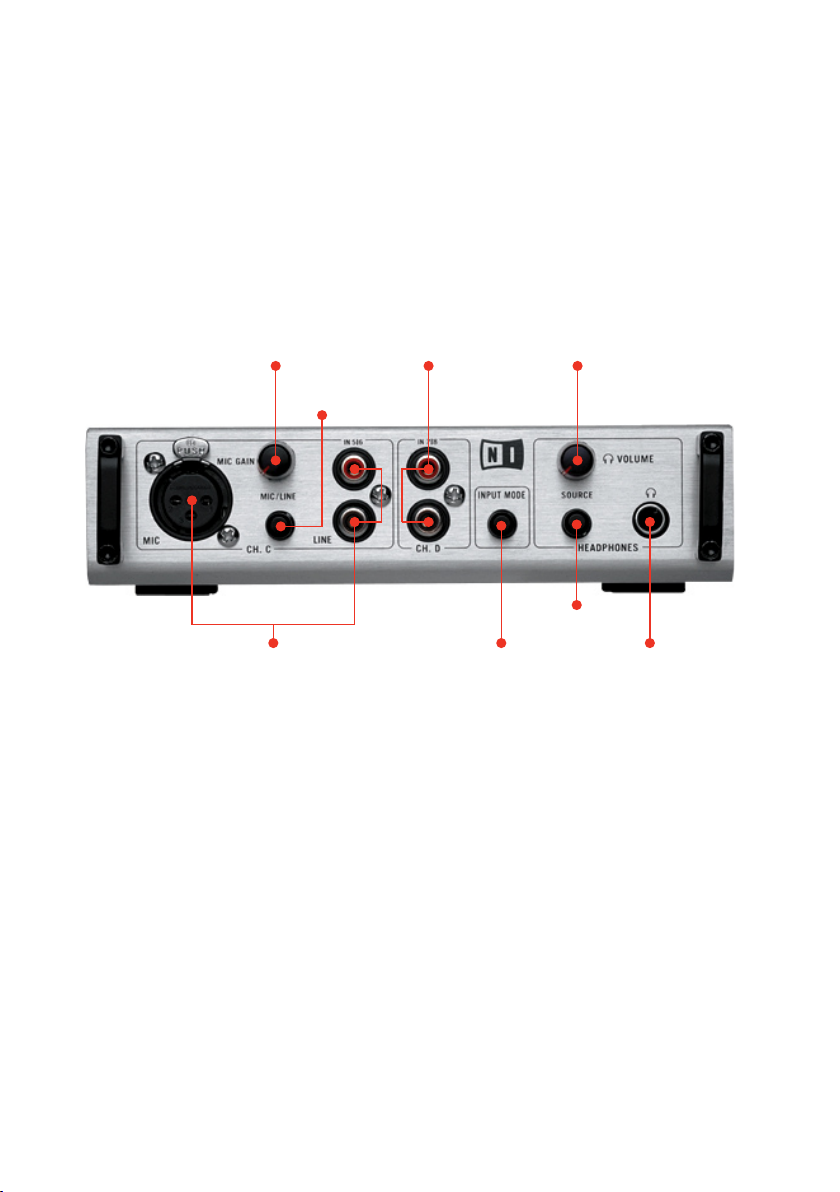
Level Control HP LevelInput 7/8
XLR MIC or
Input 5/6
Input Mode
Selector
Monitor
In 5/6 or Out 7/8
Headphone
Output
MIC/Channel
Selector
• USB Security Hook: Wrap your USB cable around this to prevent
accidental disconnection.
• MIDI IN/ OUT: Connect your MIDI device here.
• GROUND: If connecting the turntable grounds to the mixer gives
unsatisfactory results, ground your turntables here.
5.2 Front View and Connections
• MIC: Connect a microphone via XLR here.
• IN 5/6 (CH C): Connect to effects output of your mixer for using send
effects.
• MIC GAIN: Control the microphone volume here.
• MIC/ LINE Selector: Select your input source.
• IN 7/8 (CH D): Connect to second output of your mixer, e.g. for recording
purposes.
• INPUT MODE: Toggle between the input modes of Deck A and B (Control
Vinyl, Control CD/ LineCD/ Line, Phono)
• HEADPHONES: Connect your headphones here if you don’t want to con-
nect them at the mixer.
• SOURCE: Toggle between IN 5/6 and OUT 7/8 as sources.
• VOLUME: Controls the headphones volume.
TRAKTOR SCRATCH – 27
Page 28
5.3 Advanced Setups
The architecture of the AUDIO 8 DJ is very versatile and can be used in very
advanced setups. Here is a selection of the most common setups that go
beyond the basic setup dicussed so far.
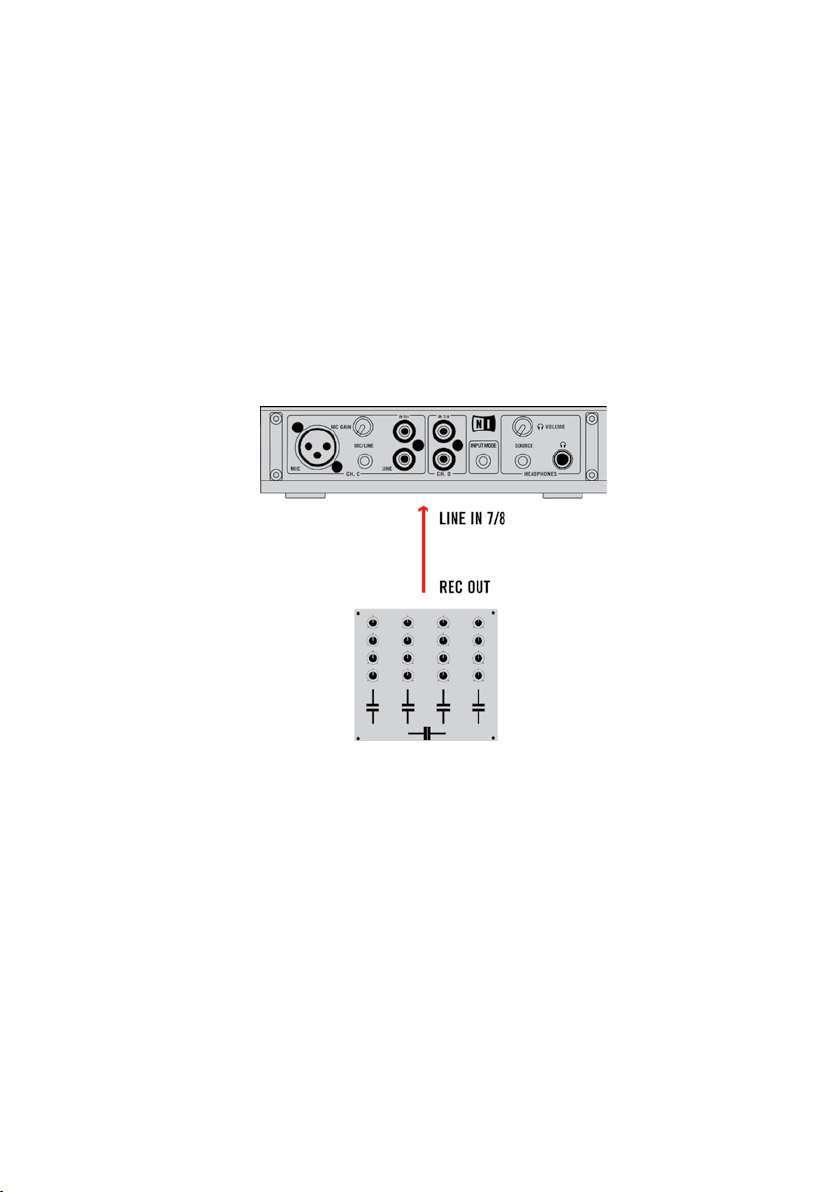
Recording Setup
The built-in recorder of TRAKTOR Scratch allows you to record your performance. This setup requires a second output on the mixer, often labeled REC or
OUT 2. Connect this output to Inputs 7|8 (= Channel D) of the AUDIO 8 DJ.
In the software, set the recording input to Channel D, as described in chapter
15.4 (Recording).
Recording Setup
28 – TRAKTOR SCRATCH
Page 29
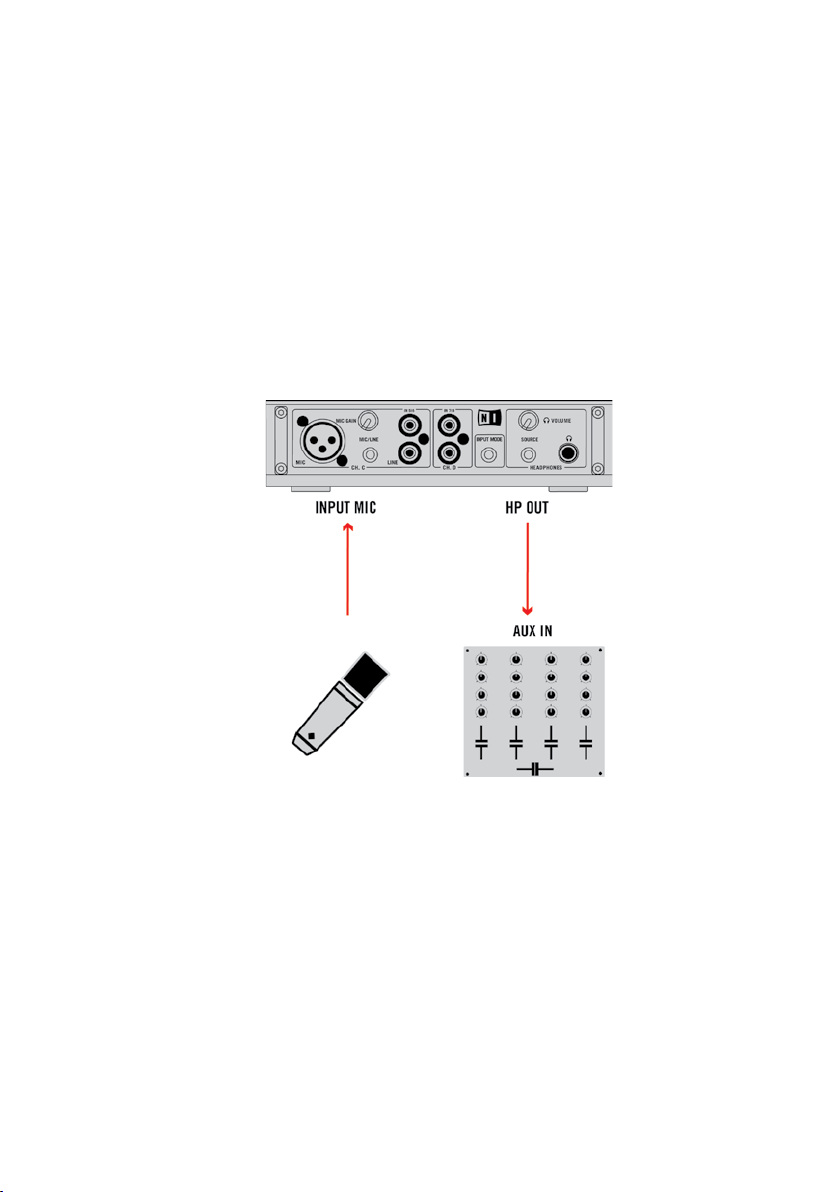
Using a Microphone
If you want to record a microphone within TRAKTOR Scratch, you need to
route the sound of the microphone through the audio interface before feeding
it into the mixer. The following scheme describes how to achieve this:
• Connect the microphone to the Mic In on the AUDIO 8 DJ
• Switch the Input Selector of Channel C to MIC
• Adjust the microphone input level
• Switch the Headphone Source to IN 5|6
• Connect the Headphone Output of the AUDIO 8 DJ with an available
auxiliary input of your mixer.
Microphone Setup
TRAKTOR SCRATCH – 29
Page 30
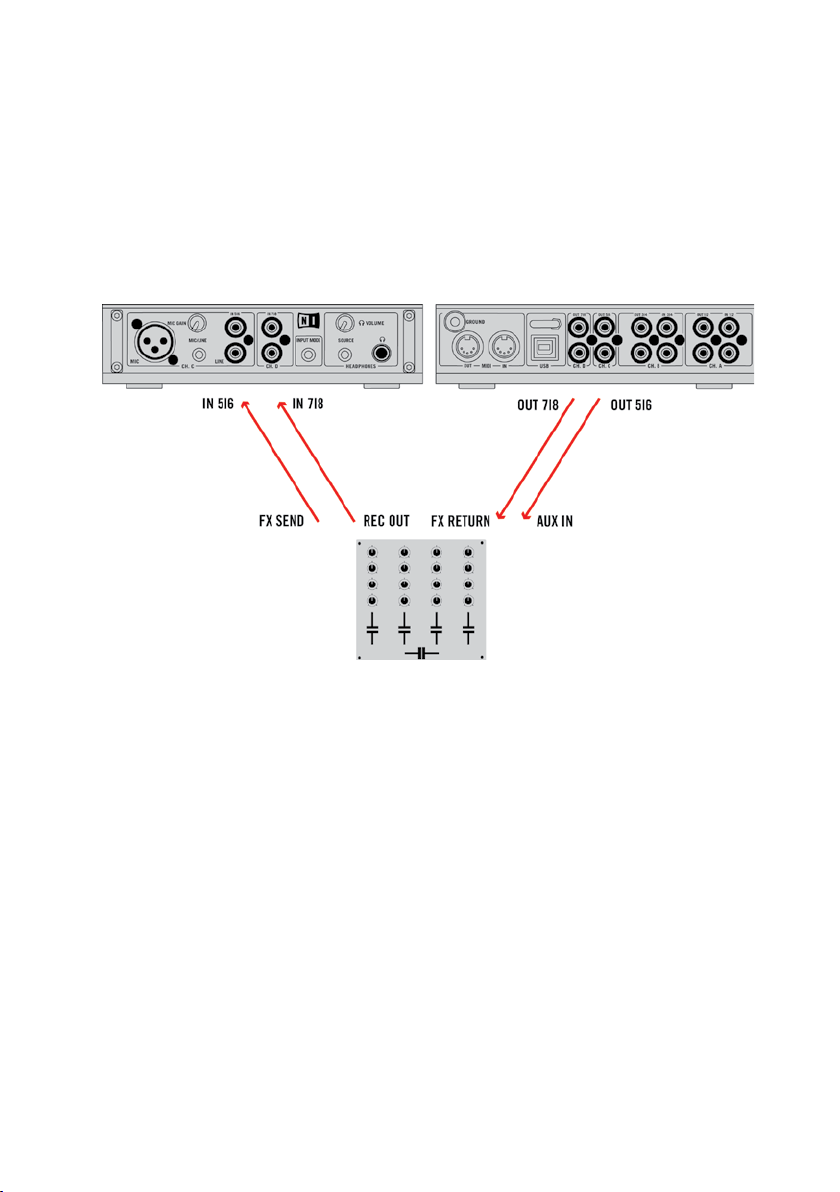
Using Send Effects
The Send Effects of TRAKTOR Scratch can process sound from the inputs
of the soundcard. This allows you to route a microphone through the effects,
and also to route the FX Send output of your mixer through the effects of
TRAKTOR Scratch.
The following diagram shows how to connect your mixer to the AUDIO 8 DJ
for using the Send Effects.
Effects Setup
Mix Mode
The Audio Preferences of TRAKTOR Scratch offer a special output called
Mix Mode. In this mode the outputs of Send Effects and Preview Player are
all merged into OUT 5|6 allowing the connection to mixers that have only one
single auxiliary input.
Here is how the outputs are routed within TRAKTOR Scratch.
Mix Mode ON:
• SFX 1 to OUT 5|6
• SFX 2 to OUT 7|8
• Preview to OUT 7|8
30 – TRAKTOR SCRATCH
Page 31

Mix Mode OFF:
Activity LEDs
Protective Brackets
• SFX 1 to OUT 5|6
• SFX 2 to OUT 5|6
• Preview to OUT 5|6
5.4 Status LEDs
The AUDIO 8 DJ gives you a visual feedback of the connected channels and
input modes, so you can easily see and determine which channels are connected or which source or input mode is chosen. Active channels/ sources
are lit.
TRAKTOR SCRATCH – 31
Page 32

5.5 Control Panel
Close TRAKTOR Scratch, then click on All Programs > Native Instruments
AUDIO 8 DJ Driver > Control Panel to open the Control Panel.
You can nd here options to adjust the latency of the AUDIO 8 DJ.
Any signal going into the computer has to go through two buffers - once through
the USB bus and once through the ASIO driver. On every path, latency is
created. As a rule of thumb, you can calculate the overall latency (in and out)
by 2 * USB Buffersize + 2 * ASIO Buffersize + 2.
Small USB and Audio Buffer settings stress your computer more. Read more
on latency in chapter 17.1 (What is Latency?).
• Presets: Select a preset that has already precongured values for the
USB and the Audio Buffersize.
• Choosing User dened Settings allows you to choose an USB Buffersize
independantly from the Audio Buffersize.
• Sample Rate: Choose a sample rate. 44.100 Hz is the most common
setting.
32 – TRAKTOR SCRATCH
Page 33

5.6 Audio Statistics
Click on All Programs > Native Instruments AUDIO 8 DJ Driver > Audio Statistics
to open the Audio Statistics tool.
This analyzes what happens on the USB Bus, and records every small error
which you can then see in the lower right corner (ThreadMissedEvents).
Since the Audio Statistics tool is mainly a diagnosis tool, you might be asked
from by TRAKTOR Scratch Support to report certain data in the case of
problems.
5.7. Technical Specication
Miscellaneous Specications
• MIDI Interface: 1 Input, 1 Output
• Computer Connection: USB 2.0, Bus-Powered
• Dimensions: 45mm x 174mm x 103mm (141mm overall) (HxWxD)
• Weight: 825g
TRAKTOR SCRATCH – 33
Page 34

General Interface Specications
Input (A/D) Output (D/A)
Channels 8 8
Sampling Rate 44.1, 48, 96 KHz 44.1, 48, 96 KHz
Bit Resolution 16, 24 16, 24
Converter Cirrus Logic Cirrus Logic
Input Specications
Line Microphone Phono
Cross Talk -87 dBu -87 dBu -87 dBu
Impedance 47 kOhm > 1 MOhm 47 kOhm/1 MOhm
Full Sc a l e Level
(max. gain)
THD + N 0.007 % 0.007 % 0.062 %
SNR 100 dB
Frequency
Response
12 dBu -55 dBu -23,5 dBu
(A-weighted)
10 - 40kHz
±0.5 dB
100 dB
(A-weighted)
10 - 40kHz
±0.5 dB
100 dB
(A-weighted)
10 - 40kHz
±0.5 dB
Output Specications
Line Headphone
Cross Talk 87 dBu 87 dBu
Impedance 100 Ohm Unbalanced 8 Ohm (min load)
Ma ximum Output
Level
THD + N 0.007 % 0.012 %
SNR 101 dB
Frequency Response 10 - 40kHz ±0.5 dB 10 - 40kHz ±0.5 dB
34 – TRAKTOR SCRATCH
9,6 dBu 12 dBu, 3V rms,
100 mW @ 100 Ohm
95 dBu
(A-weighted)
(A-weighted)
Page 35

6. Beatport™ - Online Dance Music Store™
Up until recently it was difcult to purchase new tracks in MP3 format for
DJs working with TRAKTOR. Cutting-edge club music has been predominantly
released on vinyl, and recording tracks from a 12” to hard disk is a timeconsuming process. However, more and more labels are distributing their music
in the digital domain and it’s nally possible to buy music in digital format at
the same time that it is released on vinyl. Sometimes, certain tracks are even
available earlier as MP3 or there is additional content available for download
that didn’t make it to the vinyl release.
In order to give TRAKTOR users a quick and easy way to purchase new tracks,
NATIVE INSTRUMENTS joined forces with Beatport. Beatport is the rst
authentic digital music store designed to service the evolution of the digital
music culture, redening how DJs and enthusiasts acquire their music. Beatport.
com allows users to access the world of club music through secure, legal,
hi-speed, high quality downloads in MP3, MP4 and WAV formats on a pay-perdownload basis. With hundreds of labels and thousands of users worldwide,
Beatport is recognized as the leader in online digital dance music.
To access the store, simply select the path Beatport in the Tree Window.
Your computer will now access the Beatport server and download information
that is being displayed in the List Window. In order to navigate the interface,
just click the relevant buttons and links. If you have not been a member of
TRAKTOR SCRATCH – 35
Page 36

Beatport until now, simply click the button labeled First Time? Start Here and
follow the instructions on the screen.
There are a lot of advantages when buying your music through the Beatport
store integrated in TRAKTOR:
• It is possible to preview any track available in the store through the
integrated Preview Player of TRAKTOR.
• While previewing a track, you can see the actual Waveform in the
Preview Player and browse the track by moving the cursor through.
• Entering a search string in the TRAKTOR Search eld to search
Beatport.
• Searching for Tracks with the same Title, from the same Label or Artist
with the Find More button (Read more about the Find More button in
chapter 8.2 (Searching for tracks).
• It is possible to transfer multiple les with the help of a Download
Manager.
• All tracks you have bought through the store interface are added to a
Playlist called Purchased Tracks.
• Purchased tracks contain extensive metadata, so there is hardly any
need to edit their tags.
• Any track you have purchased is saved automatically in your TRAKTOR
Track Collection.
• Interrupted transfers can be resumed at any time.
Important: Please keep in mind that you need to be connected to the
internet in order to use the Beatport store. For further information on
registration, please refer to the website http://www.beatport.com.
Beatport Browser Buttons
The Browser Buttons related to Beatport are explained in detail in chapter
8.3 (Editing tracks).
36 – TRAKTOR SCRATCH
Page 37

7. The User Interface of TRAKTOR Scratch
7.1 Terminology
Before we dive into the wealth of features and options, let’s get an overview
about the most important elements of TRAKTOR's interface and where to
nd the most basic features!
Application Menu
The Application Menu gives access to basic functions and information about
the software, explained in detail below.
Important: The Application Menu is not visible in Fullscreen mode,
therefore all File and View options can be reached directly from the
TRAKTOR Scratch graphical user interface. However, the Help menu
can only be accessed from the Application Menu.
File
• Preferences: Opens the Preferences window.
• Audio Setup: Opens the Soundcard sub-menu of the Preferences.
• MIDI Setup: Opens the MIDI Interfaces sub-menu of the Preferences.
• Exit: Closes the program after showing a warning message to prevent
from accidentally closing the application.
View
• Layouts: Choose from 3 different layouts.
• Fullscreen: Switches to Fullscreen Mode. Read more about Fullscreen
mode in chapter 7.3 (Adjusting the Look of Traktor).
TRAKTOR SCRATCH – 37
Page 38

Help
• Launch Service Center: Opens the NI Service Center, where you can
download updates and register your products. Read more about the NI
Service Center in the separate Setup Guide installed in the NI Service
Center program folder.
• Open Manual: Opens the TRAKTOR Scratch user manual.
• Visit TRAKTOR Scratch on the web: Opens the TRAKTOR Scratch website
on the NATIVE INSTRUMENTS website.
• About TRAKTOR Scratch: Opens the About window. It contains valuable
information about the software such as the exact version number, the
serial number and the license type as well as the credits. You can close
it by clicking on it.
Note: You can also open the About window by clicking on the TRAKTOR
Scratch Logo.
Header
The Header of TRAKTOR Scratch is located directly beneath the Application
Menu. The elements contained in the Header give access to basic functions
of the application.
TRAKTOR Scratch Logo
Clicking on the TRAKTOR Scratch Logo opens the About window. It contains
valuable information about the software such as the version number, the
serial number and the license type as well as the credits. You can close it by
clicking on it.
38 – TRAKTOR SCRATCH
Page 39

Note: You can also open the About window in the Help section of the
Application Menu.
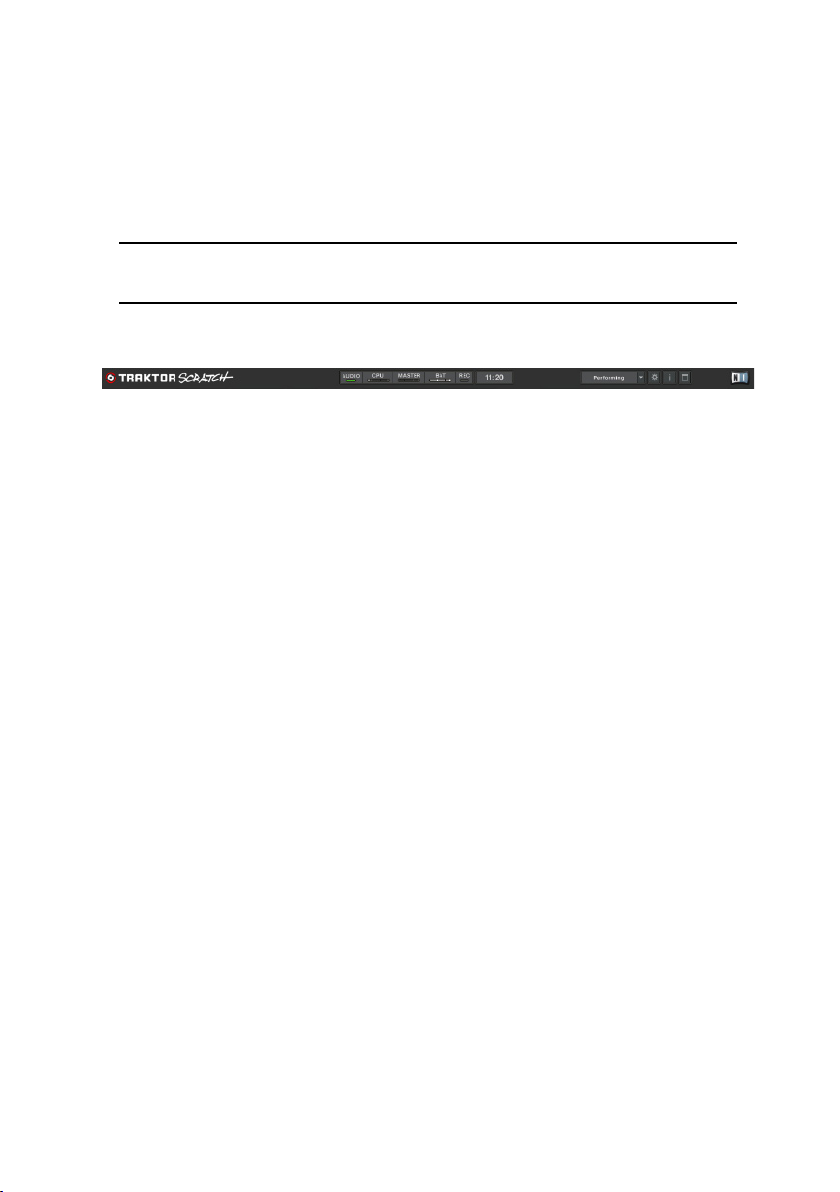
System Monitor
In the middle of the Header you’ll see several displays that give you valuable
information about the status of your system:
• AUDIO: Displays the Status of the AUDIO 8 DJ (yellow color means no
audio device connected, green means AUDIO 8 DJ connected, and red
signies the AUDIO 8 DJ has connection problems.
• CPU: Indicates how much of the CPU-Capacity is available in TRAKTOR’s
internal audio engine. It gives you information about how stressed
your system is, and how much headroom you have until you reach the
capacity limit. If the bar is fully lit, you most likely will experience
audio dropouts.
• Master: Displays the Master Output Level.
• Bat: Gives you a quick information about how much power your battery
has left; useful if you’re working in Fullscreen mode.
• Rec: If you’re recording it turns green. If the input is clipping it turns
red. Reduce the recording gain if the input is clipping.
TRAKTOR SCRATCH – 39
Page 40

• Clock: Displaying the time depending on your computers time; useful
if you’re working in Fullscreen mode.
Layout Selector
This drop-down menu is used to switch between different screen Layouts in
TRAKTOR Scratch. Read more about Layouts in chapter 7.3 (Adjusting the
Look of Traktor).
Preferences Button
This button opens the Preferences dialog, which allows you to congure
TRAKTOR Scratch to your personal needs. Read more in chapter 15
(Preferences).
Tooltips/ Console
This button toggles the Tooltips/ Console window on and off.
Fullscreen Button
Use this button to switch to Fullscreen mode. Read more about how to
congure Fullscreen mode in chapter 7.3 (Adjusting the Look of Traktor).
NI Logo
Clicking on the NI Logo opens the About window, like clicking on the TRAKTOR
Scratch Logo.
Details Section
The Details Section is the part directly underneath the Header. This window
is used to display the messages window as well as many different Panels
controlling TRAKTOR Scratch.
Find an detailed explanation of all Details Panels in chapter 10.5 (Details
Pages and Panels).
40 – TRAKTOR SCRATCH
Page 41

Decks
The Decks have a header showing File Info, Phase Meter, a detailed waveform, a
graphical track overview (Stripe) and a few playback control buttons underneath.
They are referred to as Deck A for the left deck and Deck B for the right
deck.
Read more about the Decks in chapter 10 (Controlling the Decks).
Browser
On the left you see the Browser Tree Window, which contains – top down – the
Search Window and the Undo Buttons, the Preview Player, the Browser Tree
and the Browser Buttons as well as the Status Bar and the Progress Bar.
On the right you see the Browser Window with the customizable Browser
Colums and the Favorites.
All detailed information about the browser can be found in chapter 8 (Using
the Track Browser).
7.2 Knob and Fader Control
Although each knob and slider in TRAKTOR has its own unique purpose, their
behavior is generally the same. You can control each knob or slider with your
mouse or by using a MIDI controller or Keyboard-Shortcuts -called Hotkeys,
explained later in chapter 14 (MIDI and Hotkeys).
TRAKTOR SCRATCH – 41
Page 42

Knob and Fader Control
All knobs and faders in TRAKTOR are either controlled by
dragging the mouse, by using the mouse wheel or by clicking
the small Plus and Minus buttons next to the knob. Dragging
the mouse is a good way to make dynamic changes, whereas
the Plus and Minus buttons allow more subtle changes and are
better suited to set a knob to a specic value. Using the scroll
wheel can be used for very ne adjustments or for changing
the parameter by steps.
Basic Control
Mouse Drag
• Hold your mouse arrow over a knob, then click + hold and drag the
mouse up or down. This will move to the knob clockwise or counterclockwise.
• Click + hold and drag a knob horizontally. The knob will adjust within
a ner range.
• Double-Click the knob to return it to its default setting.
Advanced Control
Besides the standard mouse click functions explained above, TRAKTOR
Scratch offers advanced functions utilizing Plus and Minus buttons, the mouse
wheel and the right mouse button. If you have a track pad or mouse without
a second button, you can utilize these functions by pressing and holding the
Ctrl-Key while clicking.
Plus and Minus Buttons and Mouse Wheel
• Each click on the Plus (+) button next to a knob moves the value of
the knob incrementally up.
• Each click on the Minus (-) button next to a knob moves the value of
the knob incrementally down.
• Turning the mouse wheel will adjust the parameter by one increment
for each step of the wheel.
42 – TRAKTOR SCRATCH
Page 43

Sensitivities
TRAKTOR Scratch offers ve sensitivities for the incremental control of
parameters.
• Right-/ Ctrl-Click the Plus button to open a menu of ve sensitivity
options: min, ne, default, coarse, switch.
• Select one of the options.
• Click the Plus and Minus buttons or use the mouse wheel to see how
the behavior of the knob has changed.
• The small bar of dots below the knob – only visable, when you hover
over the control – change accordingly.
• One single dot remains if you have chosen min, the full bar of 9 dots
appears, if you have chosen switch.
Right-/ Ctrl-Click Functions
• Right-/ Ctrl-Click + hold and drag a knob. A Ghost Pointer will appear
in red, although the knob itself will not move.
• Keep holding the right mouse button, then left-click and hold. This will
bring the knob to the value of the Ghost Pointer.
• Keep holding the right mouse button and let go the left mouse button.
The knob will return to its last position and the red Ghost Pointer remains
visible.
• If you want the knob to stay at the value of the Ghost Pointer, simply
release the right mouse button after the knob has reached the value
of the Ghost Pointer. The red Ghost Pointer will disappear, and you can
depress the left mouse button as well.
This function is good for jumping quickly between two values.
7.3 Adjusting the Look of Traktor
Whether you would like to take advantage of advanced features or simply
wish to perform basic mixing, the TRAKTOR interface can be adjusted for
your specic needs.
Scalability
The TRAKTOR Scratch interface can be scaled to the size of your liking.
• Click + hold and drag the bottom-right corner of the TRAKTOR
window. This will expand and/ or contract the TRAKTOR interface
while simultaneously resizing all TRAKTOR sections.
TRAKTOR SCRATCH – 43
Page 44

Layouts
A Layout is the way in which the TRAKTOR interface is congured. With
TRAKTOR Scratch, you are able to switch between 3 different layouts.
Switching between Layouts
Click on the Layout box for opening the drop-down menu showing the available
layouts.
Select one of the available Layouts and observe the changes in the
interface.
The 3 Layouts are optimized for typical situations:
• Performing: Standard Layout for going live. You can see the Details panels
and the Favorites for fast access to your most important playlists.
• Playback: Plain and simple – the Details panels are off as well as the
Favorites, this space helps you to see more of your playlist.
• Browsing: The Details are switched off and the Decks are minimized,
leaving the space for the Browser. Ideal for browsing through your Track
Collection and sorting tracks in your Favorites Playlists.
Note: You can always minimize or maximize the Decks by double-clicking
on the Header of one of the Decks (where the letters A and B are
located).
Details Section
The Details Section has 4 individual pages. TRAKTOR Scratch is precongured
for screens having a width of 1024 pixels. On many current screens the Details
Section will therefore be only partly lled.
Following Panels are available:
• Page: Select here one of the four Details Pages.
• Cue Edit: Set, save and rename Cue Points, delete them or navigate
between them.
44 – TRAKTOR SCRATCH
Page 45

• Cue List: Direct access to the rst six Cue Points of a track for easier
navigation.
• BeatJump: Performs BeatJumps forward and backward depending on
the jump size.
• BPM: Tempo adjustment functions like setting a Beatmarker and
establishing a Beatgrid.
• Master: Master audio section for controlling main mixer functions
• Audio Recorder: Record audio from internal mix, microphone or external
mixer sum.
• Key: Contains controls for changing the Key of your tracks and performing
time stretching.
• Send 1 and 2: Switch between TRAKTOR Scratch send effects.
• SCRATCH: Find here SCRATCH related information, like the calibration
status and the assignment of the decks. Click on the circle to switch
from Scope to Sticker View.
• Tooltips/ Console: In Tooltip Mode it displays information about a
particular feature and is especially useful for the new user. Hover your
mouse arrow over any control feature of the TRAKTOR Scratch interface
to get information about a feature. In Console Mode it displays software
status information. Different to the other panels, you can open and
close the Tooltips individually via the Tooltip button in the Header.
File Info
• The upper left part of each Deck displays the title and artist name of the
playing track. On the right side, two more elds display the remaining
time and the actual BPM of the track.
Wave Display Options
The Waveform of a track can be customized in the following section of the
preferences: Open Preferences > Appearance > Wave Display Options.
Highlight Beatmarkers
With this option checked, the small white line s on every beat get
highlighted.
• Load a track in Deck A.
• Move the Preferences window beneath the Deck.
• Check the option Highlight Beatmarkers
• Click on Apply.
TRAKTOR SCRATCH – 45
Page 46

• Observe that the white, vertical lines on every beat are now brighter
than before.
Show Minute-Markers
With this option checked, every minute will be marked with a small, vertical,
white line in the overall waveform (Stripe), giving you a visual hint of how long
your track will go on.
• Load a track in Deck A.
• Move the Preferences window beneath the Deck.
• Check the option Show Minute-Markers.
• Click on Apply.
• Observe that the white, vertical lines every minute of the track in the
overall waveform (Stripe).
Channels
This option changes the appearance of the waveform.
• Load a track into a Deck.
• Move the Preferences window beneath the Deck.
• Beats uses a single color to display the beats of the track.
• Beats and Highs uses two color shades to display beats and highs. The
lighter, semi-transparent shade represents the highs, the solid color
the beats.
• Beats and Envelope displays the beats and their envelopes to give a
better impression of the rhythmic structure of a track.
• Press Apply to preview the change.
Colors
It is possible to select a color scheme for the Waveforms that ts your personal
taste and working environment. When using TRAKTOR in daylight or with
reections on the screen it makes sense to use the highest contrast between
Waveform and background, whereas it might be easier for the eyes if you
use a more subdued color variation if you are working in a dark DJ booth or
at home.
• Load a track into a Deck.
• Move the Preferences window beneath the Deck.
• Choose Yellow, Blue or Brown as Color.
• Press Apply to preview the change.
46 – TRAKTOR SCRATCH
Page 47

Track End Warning Time
By setting a Track End Warning Time, TRAKTOR will ash the Waveform Stripe
up to 60 seconds before a Deck stops playing. This is very helpful preventing
a track running out unnoticed.
• Open Preferences > Wave Display Options.
• Set the desired amount of seconds by moving the slider next to Track
End Warning Time.
• Click Apply to apply the changes.
PlayMarker Position
This slider adjusts the position of the vertical, red line called Playmarker. This
is where your track starts to play from.
• Load a track into a Deck.
• Move the Preferences window beneath the Deck.
• Move the slider to a different value.
• Click Apply to preview the result.
Miscellaneous Display Options
Other adjustable settings of TRAKTOR’s appearance can be found in Preferences
> Appearance > Miscellaneous.
Fullscreen Mode
You can use the scale method to stretch TRAKTOR to t your whole screen or
you can use Fullscreen mode. The advantage of using Fullscreen mode is that
nothing on your computer screen will be visible (or controllable) other than the
TRAKTOR interface. For instance: If using a Mac, the dock will not be visible.
If using Windows, the taskbar and start menu will not be visible.
This looks great if you’re performing live!
• To enter and exit Fullscreen mode: Click the Fullscreen button located
at the top of the TRAKTOR interface. This will ll your entire screen
with the TRAKTOR interface.
• If your screen resolution is higher than 1024x768, the controls of
TRAKTOR may seem too small for you. In this case you can select
1024x768 in the TRAKTOR Preferences menu. With this selected,
Fullscreen mode will ll your screen with the TRAKTOR interface at
1024x768 resolution, making the controls larger and more visible.
• In the same Preferences page you can also set Fullscreen mode to
default by selecting the option Switch to Fullscreen on Startup.
TRAKTOR SCRATCH – 47
Page 48

Show value when over control
With this option checked, hovering with your mouse over a control displays
the current value, if it’s not checked you can only see the name of the button,
e.g. Amt for amount.
• Check the option Show value when over control.
• Click on Apply.
• Hover over control buttons like the ef fect knobs and see the
difference.
Font Size
You can customize the Font Size used in the Browser Tree and the Playlist
windows.
• Click on Font Size to choose between the font sizes from Small to
Huge.
• Click Apply to preview the change.
Hide Beatport
With this option checked, all Beatport related things are taken away from
the GUI. This means the Beatport Find More button as well as the Beatport
shop.
• Check the option Hide Beatport.
• Click on Apply.
• Look at the List Window of the track browser to see the difference.
Reset hidden dialogs
Whenever a dialog in TRAKTOR opens, e.g. if you try to delete a track, you
can put a checkmark in the eld “Do not show again”. If you do so you won’t
see this dialog again.
Use this option whenever you want to reset this, so that all security dialogs
show up again.
Customizing the List Window of the Browser
The content of the List Window can be sorted by any of the visible columns.
Clicking a header inverts the sorting sequence of the column.
48 – TRAKTOR SCRATCH
Page 49

You can hide and show 27 attributes of a track:
• Right-/ Ctrl-Click on a header of the List Window.
• Check an attribute that you would like to have represented as column
in the List Window.
• Uncheck those attributes that you want to hide.
• Repeat this action until you have congured the headers you want to
be visible.
• To change the size of a column, drag the line next to it.
• To change the relative position of a column, click + hold and drag it
horizontally.
• Observe the red line indicating where the column will be inserted when
releasing the mouse button.
TRAKTOR SCRATCH – 49
Page 50

8. Using the Track Browser
Whether you are at home, in the studio or DJing at a live gig, the Track Browser
is designed to help manage your songs, giving you the easiest, quickest access
to your songs, Playlists and Favorites.
8.1 Preparing the Set
Importing your Tracks
Managing your tracks in the TRAKTOR Collection represents a huge advantage
compared to simply organizing your tracks in folders. The Track Collection
is a le that categorizes and provides references to the music les on your
computer, making them easily accessible through various browser features.
Importing a track into your Collection does not actually copy the music le -
instead it adds the le to the Track Collection list making it easily manageable
and searchable. Each row in your Collection references a track on your hard
drive and contains information about the track such as its location (File
Path) on your computer and standard ID3 tag properties such as Artist, Title,
Album, etc. However, the TRAKTOR Collection allows for even more specic
information such as BPM (beats per minute), original song Key, personal
Rating and more.
If you have organized your music in a set of special folders like My Music, it is
advisable to reveal these directories to TRAKTOR Scratch. Hereafter you can
use the function Import Music Folders to synchronize TRAKTOR with recently
added tracks or with a changed folder structure within this set of folders.
• Open Preferences > Browser Preferences > Data Location.
• Click Add on the bottom of the right window.
• Browse to your Music Folders.
• Conrm with OK.
• Repeat to add all of your Music Folders.
50 – TRAKTOR SCRATCH
Page 51

Note: Subfolders are automatically included in the scan. You don't need
to add subfolders to this list.
Do the following to import your Music Folders:
• Right-/ Ctrl-Click the Collection icon in the Browser Tree.
• Choose Import Music Folders from the menu.
TRAKTOR Scratch offers other alternative methods to import single tracks or
a special folder that is not part of your conventional Music Folder structure:
• Drag and drop a track or a folder from your Mac Finder or Windows
Explorer onto the Collection icon in the TRAKTOR Browser Tree.
• Drag and drop a track or a folder from the tree structure below the
TRAKTOR Explorer icon representing all drives connected to your
computer onto the Collection icon.
• In the same manner you can right-/ ctrl-click on a sub folder of the
TRAKTOR Explorer icon or on a track listed in the window on the right
side and choose Add to Collection from the menu.
• Any track that is played in a Deck or added to the Current Playlist is
also added to the Collection.
Within the Collection, the tracks are detached from their physical location on
the hard drive and can be represented in several independent and overlapping
ways:
• Underneath the Collection icon, you can see the tracks grouped by
Artists, Releases, Labels or Genres. A number indicates the current
number of tracks within this category.
• A track can be contemporarily listed in several Playlists. Playlists
represent a personalized sorting method often related to the
circumstances for playing these particular tracks. They can be seen
as your virtual record crates.
• Search results are a further way of displaying your Collection.
• Finally in the List Window on the right, tracks can be sorted by various
criteria, such as BPM, Release Dates or Ratings, giving an additional
value to search results.
Data Location
As you will learn, TRAKTOR Scratch has functions that create and reference
certain le types. These le types are stored in their own default directories.
However, you can change the directory paths by using the Data Location
TRAKTOR SCRATCH – 51
Page 52

Preferences menu.
• Open Preferences > Browser Preferences > Data Location.
• You can change the directory path for the following le types by clicking
on the button with the exclamation mark (!) after the current path:
• Collection: the le path TRAKTOR Scratch follows for loading and
storing Collection information.
• Playlists: the file path TRAKTOR Scratch follows for Playlist s
(described in the next section).
• Recordings: the le path in which TRAKTOR Scratch stores the
Recordings you make in audio format.
• iTunes: the le path to your iTunes Library (this path has to be identical
with the settings in your iTunes).
• Beatport: the le path in which TRAKTOR Scratch physically stores all
songs downloaded from Beatport through the TRAKTOR interface.
• Music: Here you can specify the location of folders and hard drives
to be scanned for les such as MP3, AIFF, WAV, M4A, and more
during the Music Folders Import.
Analysis
The analysis scans the entire track and returns the following information:
• BPM Estimate: The BPM Estimate is more or less accurate according
to the type of music. Read more about verifying the BPM Estimate and
about how to create a Beatgrid in the next chapter.
• Gain Value: each track has a perceived loudness, based on its musical
properties of the track and on the involved mastering techniques. The
Gain Value established during the analysis is a very accurate estimation
of the optimal setting of the channel Gain knob to match the loudness
of a track to 0dB. To use this Gain estimation when loading a track
into a Deck, enable the Auto Gain function, available in each channel
Details panel and in the Master Details panel.
• Stripe: The small representation of the Waveform underneath the wave
display is created by the analysis process. If the Stripe of a track is
missing it has most likely not yet been analyzed.
Auto Analysis
Open Preferences > Browser Preferences > Collection Preferences for options
on automatic track analyzation.
Read more about the Analyze options in chapter 15 (Preferences).
52 – TRAKTOR SCRATCH
Page 53

Pre-listening to a Track from your Collection
Usually you will pre-listen to a track in TRAKTOR SCRATCH using a Cue Button
or Switch on your external hardware mixer to pre-listen the opposite Deck.
However, the AUDIO 8 DJ also offers a Headphones Output that you can use
for pre-listening.
This can be done while one or both Decks are playing. Sound from the Preview
Player will be heard through the Headphone Outputs 7/8.
• Load a track into the Preview Player by clicking the Headphone Icon in
the List Window, double-clicking on the track or using drag-and-drop.
• The Preview Player will display the Waveform of the track.
• Scroll through the track by dragging the red slider through the
Waveform.
• Press the Play button to the right of the player to pause and restart
playback.
• If you like the track, load it into Deck A by dragging & dropping it from
the Preview Player onto Deck A or by right-/ ctrl-clicking the track title
in the List Window and selecting Load to Deck A from the menu.
Note: To hear tracks played in the Preview Player over your headphones,
make sure that your headphones are connected to the Headphones
Outputs of your AUDIO 8 DJ and that the Headphones Volume knob
is turned up. Also check that the Source knob on the AUDIO 8 DJ is
switched to Out 7/8 so you can monitor on the AUDIO 8 DJ.
Note: If you don't see the column with the Preview Icon, right-/ ctrl-click
the header of the List Window and make sure that the option 'Prelisten'
is checked.
To remove a track from the Preview Player, click again on the Headphones
Icon in the List Window or double-click again on the track.
TRAKTOR SCRATCH – 53
Page 54

8.2 Searching for tracks
One of the quickest ways to nd a specic track is to use the Search function.
Rather than browsing through folders, you can type a key word into the Search
eld and let TRAKTOR search your Collection.
Simple Search
• Click in the Quick Search eld.
• Type anything related to the track you are searching for in the Search
eld such as Track Name, Artist Name, Album Name, etc. Hit the Enter
key on your computer keyboard. TRAKTOR Scratch will search your
entire Collection and display all matching les in the List Window.
• Entering more than one word will return the tracks containing all these
words.
Rene
A search completed with the Enter key searches the whole Collection. You
can rene a search to a specic subset of the Collection by completing the
search with the selection of one category in the Rene menu:
• Type a word into the Search eld.
• Click the Rene button behind the Search eld and choose a eld from
the drop-down menu.
54 – TRAKTOR SCRATCH
Page 55

The available options reect the relevant Browser Columns:
• Playlist: Searches within the currently displayed Playlist only. This
option can also be used for rening a search by searching only within
a search result.
• All: Searches the whole Collection.
• Artists: Tries to match the search string with the Artist elds only.
• Same for Title, Genre, etc.
Note: A search for BPM gives back tracks with similar values, which
means a range of +/- 2.5 BPM of the entered value.
Magnifying Glass
In the List Window, you will notice a small Magnifying Glass in many of the
track property elds. This is used to search tracks in your collection with the
same entry in that eld.
• In the List Window, click the Magnifying Glass next to an Artist Name.
• TRAKTOR will search your entire collection for tracks of the same
Artist.
Important: Clicking the Magnifying Glass next to a BPM value gives back
tracks with similar BPM values, which means a range of +/- 2.5 BPM.
Beatport “Find More” Button
In the List Window, you will notice a small downwards pointing arrow in many
of the track property elds. This is the Find More button, used to search tracks
within the Beatport store that have the same entry in that eld.
TRAKTOR SCRATCH – 55
Page 56

• In the List Window, click the Find More Button next to an artist’s
name.
• TRAKTOR Scratch will search the Beatport store for tracks of the same
artist.
Note: If you don’t see the Find More button, turn on the Beatport store
in Preferences > Appearance > Miscellaneous by unchecking the box
Hide Beatport.
Search History
During a TRAKTOR session, the Search function recalls each search expression
you have searched for in a temporary list.
• Type in a few search expressions and conrm with Enter.
• Repeat this a few times.
• Click the small downwards-pointing arrow left to the Search Field to
see the list of your search expressions.
Track Icons
It is especially important to keep an overview of your set with one look when
you are performing in front of an audience.
The Icon column gives valuable information about the history of a track and
can be sorted to align the tracks in their historical sequence. Here is a list of
each Icon and its meaning.
• A Diamond shows that the track is listed in the Current Playlist but
hasn't been played yet. This is modeled after the common habit of
vinyl DJs who place the records they want to play in the near future at
a 90 degree angle in their crate.
• The letters A and B identify the tracks currently loaded into the
Decks.
• A Check Mark means that the track had been played in one of the two
Decks.
56 – TRAKTOR SCRATCH
Page 57

• An Exclamation Mark identies tracks not found at the les’ previous
location. A reason for this could be that a storage medium is unavailable,
the location of the track has been changed or the track has been
renamed.
• The right-pointing Arrow indicates that this is the next track in the
current playlist.
Sorting by this column orders the tracks as follows:
• Already played tracks on top.
• Currently playing tracks in the center.
• Queued tr acks waiting in the Current Pla ylist to be played
underneath.
• Non queued tracks below.
• Missing tracks at the bottom.
Consistency Check Report
The Consistency Check Report provides an overview of the current state of
your Track Collection, providing options to help you in managing it.
• In the Tree Window, right-/ ctrl-click on the Track Collection and select
Check Consistency from the menu.
• Once TRAKTOR has checked consistency, the Consistency Check Report
will appear showing the totals of its ndings.
Show Overview
• Total Tracks: The total number of tracks in your Collection.
• Tracks Missing: The total number of tracks that have been deleted from
your hard drive or moved from their original location.
• Tracks Not Analyzed: The total number of tracks that have not been
analyzed.
• Tracks Missing Stripe: The total number of tracks that have been
imported and analyzed but their Overview Waveform (Stripe) has been
moved or deleted.
• Total Tracks To Analyze: The total sum of Tracks Missing Stripe and
Tracks Not Analyzed. This is the total amount of tracks you need to
analyze.
You can also view a list of Missing Tracks or a list of your Not Analyzed Tracks
only.
TRAKTOR SCRATCH – 57
Page 58

Missing Tracks
• Click on the Missing Tracks tab.
• The Consistency Check Report window will display each missing track
and its attributes.
• Use the horizontal scroll bar to expose more property elds.
• If you no longer want these missing tracks to be referenced in your
Collection, delete their references by clicking the Remove Missing Tracks
button.
The Consistency Check Report allows you to relocate the references to tracks
that are missing from your Collection.
• Click the Relocate Missing Tracks button.
• A standard operating system dialog window will appear.
• Use this to browse your hard drive for the folder in which your missing
tracks were moved.
• To nd multiple tracks in different folders, choose the top level folder
in which they are stored. You can even choose your main hard drive
folder.
Note: Relocating tracks in a folder that contains many subfolders can
be a lengthy process. Don't hesitate to interrupt relocation - this will
not damage your Collection consistency.
Tracks to Analyze
• Click on the tab labeled Tracks To Analyze.
• The Consistency Check Report window will display each track that has
not been analyzed.
• After viewing the list totals, you can choose to either Relocate your
Missing Tracks or Remove the Missing Tracks from your Collection.
Show Consistency Check on Startup
The Consistency Check Report can be set to display each time you open
TRAKTOR. Please be aware that this function could be unpractical if you are
using TRAKTOR Scratch whilst performing live and you want keep the startup
time to a minimum.
• Go to Preferences > Browser Preferences > Collection Preferences.
• Put a check in the box labeled Show Consistency Check Report on
Startup and choose OK.
58 – TRAKTOR SCRATCH
Page 59

• The Consistency Check Report will now open each time you start
TRAKTOR Scratch.
8.3 Editing tracks
Whether you are performing live or working in the studio, TRAKTOR Scratch
gives you the tools to keep your Track Collection completely organized.
Track Properties
Each track in your Collection has Properties such as Song Title, Artist Name,
Album Name, etc. TRAKTOR Scratch allows you to edit and add Track Properties
with two methods:
Inline editing Track Properties directly in the List Window
• In the List Window, click on a track to highlight the track.
• Click again in the eld you want to edit, e.g. the Artist Name.
• A cursor will be placed inside the text of the eld.
• Edit the Artist Name and hit the Enter key on your keyboard to exit
Inline Editing mode.
Editing Track Properties in the Edit Dialog
Not all Properties of a track are visible in the List Window. To get access to
all available Properties of a track, use the Edit Dialog. This dialog also allows
to contemporarily edit a selection of tracks, as described further below.
Editing a Single Track
• Select a track in the List Window by clicking it.
• Right-/ Ctrl-Click on the selected track and choose Edit from the pop-up
menu or use the respective Browser Button.
TRAKTOR SCRATCH – 59
Page 60

• The List Window turns into the track Edit Dialog.
• Edit the desired information for your track.
• Use the drop-down menu next to a track Property to select a Property
already stored in your Track Collection.
• At the bottom of the dialog you nd a button called Restore to undo
any changes you have made. To apply the changes, click the button
labeled Apply or use the respective Browser Button.
• When you are done either conrm with OK or abort by pressing Cancel.
Of course you can use the the respective Browser Buttons here as
well.
Editing a Selection of Tracks
• If you want to edit all tracks of an Album or of a Playlist, select them
and choose Edit from the context menu, (just as you did for editing a
single track) or use the respective Browser Button.
• In the Edit dialog you will notice that most of the checkboxes beneath
the attributes are unchecked and most of the elds void.
• At the bottom of the Edit dialog you will notice 3 new buttons called
Previous, Select All and Next. The buttons are used to browse your
selection of tracks.
• The checkboxes indicate which of the attributes have the same value
among the selected tracks. At the same time they indicate that the
eld will be written into the Collection properties when applying the
changes.
• If you want to change an attribute globally for all selected tracks (for
example the way to write an Artist Name), edit the Artist eld, make
sure that the box beneath is checked and press the Apply button.
• If you want to edit the tracks of your selection one by one, use the
Previous and Next buttons at the bottom of the dialog to step through
the list.
• Clicking Restore will undo your changes.
• Clicking OK will conrm all your changes.
Writing Attributes into Music Files - ID3 Tags
As described in the introduction, the TRAKTOR Collection is a database
containing references to the physical location of your tracks as well as all
attribute information about them. Many music le formats, such as MP3,
60 – TRAKTOR SCRATCH
Page 61

allow you to store information about the track in the le itself. This is done
by special text tags embedded at the beginning or at the end of the music
portion of the le.
TRAKTOR Scratch does not need these kinds of tags because all relevant
information is stored in the Collection le, but as soon as you move a track
to another computer the attributes of the track get detached from the music
le itself.
It can therefore be useful to additionally write the properties into the track
itself. Not all le types support this kind of embedded information, for instance
AIFF and WAV les do not support it.
Other le types support a proprietary format of tags, such as FLAC that
TRAKTOR Scratch does not fully support yet. ID3v2, which is the name for the
most common type of embedded tags used in MP3 les, is fully supported by
TRAKTOR Scratch. More le types will be supported with future updates.
Find a complete list with all supported le formats here:
http://www.native-instruments.com/traktor.info
Writing Collection attributes into le tags should be used for:
• Transferring tracks to other computers.
• As backup of the information contained in the Collection.
Reading tags from les is automatically done when importing tracks into
the Collection or when browsing tracks in the TRAKTOR Explorer. Manually
triggering the readout of tags from the les is mainly used for restoring
unwanted changes made in the TRAKTOR Scratch Collection.
Browser Buttons
Even though all functions that can be applied to tracks or selections of tracks
are available in the context menu - accessed by right-/ ctrl-clicking on the
selected tracks - the most important functions have been provided also as
buttons in a special section between the Browser Tree and the List Window,
called Browser Buttons.
The Browser Buttons are not always the same - the functions of the buttons
change according to the currently selected view in the List Window.
TRAKTOR SCRATCH – 61
Page 62

Edit
Clicking on Edit opens the Track Edit dialog for the selected set of tracks as
described above.
Analyze
Triggers the analysis of the selected tracks. The analysis scans the entire
track and returns several pieces of information about it. The analysis scans
the entire track and returns several pieces of information about it. Read more
about Analyzation in chapter 15 (Preferences).
Delete
Clicking on Delete will remove the selected track from your Track Collection
or Playlist.
• Click on a track in the List Window to select it.
• Click on the Delete button.
• To remove more than one track, select multiple tracks in the List Window
and click the Delete button.
Note: This will remove the track from the Playlist only. It will not delete
the track from your hard drive!
The following Browser Buttons can only be accessed after clicking the Edit
button or chosing Edit from the context menu:
Conrm Editing
Conrms all editing changes and returns to the playlist view.
Cancel Editing
Cancels the editing operation. All changes made after the last Apply action
are discarded.
62 – TRAKTOR SCRATCH
Page 63

Restore Metadata
Aborts current changes and restores track attributes from collection.
This is especially useful if you accidentally deleted entries in one of the
attributes’ elds.
Read Metadata
Imports metadata from selected music les into the Collection.
Note: Not all le types are supported by this operation.
Write Metadata
Writes metadata information into music les. Choose from 3 writing modes
in Preferences > Browser Preferences > Collection Preferences.
Note: Not all le types are supported by this operation.
Apply
The editing changes are applied and stored in the Collection.
The following Browser Buttons can only be accessed from the Beatport icon.
If you don’t see the Beatport icon, uncheck Hide Beatport in Preferences >
Appearance > Miscellaneous:
Buy Previewed Track
Buy the track currently loaded into the preview deck.
Check Downloads
Checks your download queue for uncompleted downloads.
Refresh Beatport
Refreshes the Beatport shop. Use after connection problems.
Other Track Options
Relocate
Opens a dialog in which you can navigate to the folder containing the missing
track(s). Very useful if you restructured your Music Folder.
Search in Playlists
Searches the selected track(s) in all playlists and returns a list with all playlists
containing the selected track(s).
TRAKTOR SCRATCH – 63
Page 64

Add to Playlist as Next
Adds the selected track(s) as next to the Current Playlist.
Add to Playlist at End
Adds the selected track(s) at the end of the Current Playlist.
Reset Played
Clicking Reset Played will reset the Display Icon next to any track that has
been played. It will then appear as not played. This can be used if you want
to replay a track later in your set, avoiding confusion of it being marked as
having already been played.
Note: The played state of your tracks will be reset automatically after
every session, i.e. closing and re-opening TRAKTOR Scratch will reset
the played state.
Show in Explorer/ Finder
By right-/ ctrl-clicking on a track you can choose Show in Explorer/ Finder from
the context menu. This will display the track in the Windows Explorer or Mac
Finder, according to your operating system.
Deleting Tracks from your Hard Drive
The TRAKTOR Scratch Browser has no features allowing the physical deleting
of tracks from your hard drive.
8.4 Working with the Collection and Playlists
Playlists are an alternative way of organizing your Collection. Instead of creating
tags for tracks and retrieving them via search strings, you can create groups of
tracks inside your Collection by creating Playlists. These can be seen as virtual
record crates, but contrary to a physical track contained on a vinyl record, a
virtual track can be contained in as many Playlists as you want and you won't
have to put it back into the shelf. A Playlist can be shufed or ordered in any
way you like. Further advantages are saving and loading as well as exporting
a playlist to transfer it to another computer.
• Right-/ Ctrl-Click on the Playlist/ Mixes folder icon in the Browser
Tree.
• Choose Create Playlist from the context menu.
• Type the name of your Playlist in the following window.
• Choose OK.
64 – TRAKTOR SCRATCH
Page 65

• Your new Playlist will appear as a subfolder under the Playlist / Mixes
folder.
Playlist Options
By right-/ ctrl-clicking on a playlist you nd the following options in the popup
menu:
• Lock/ unlock the playlist. Changes in a locked playlist are only temporary
and will not be saved. A locked playlist has a Lock Icon next to it. To
save changes to a locked playlist you have to unlock it beforehand.
• Analyze the tracks contained in the selected playlist.
• Relocate the tracks contained in the selected playlist.
• Save the selected playlist.
• Rename the selected playlist.
• Clear the selected playlist, i.e. remove all tracks from the playlist.
• Delete the selected playlist. This will not actually delete the tracks from
your track collection, it will only delete the playlist le.
• Reset Played State removes all track icons (played, cued etc.) from the
icon column in the track browser.
• Add to Collection adds all tracks contained in the playlist to the
collection.
• Read File Tags (Async) reads out the ID3 tags of the contained tracks. This
is going on in the background and does not affect the performance.
• Write File Tags (Async) writes ID3 tags to the contained tracks, depending
on the setting in Preferences > Browser Preferences > Collection
Preferences > ID3 Tag Mode. This is going on in the background and
does not affect the performance.
• Add to Playlist as Next places all tracks contained in the playlist as next
in the current playlist.
• Add to Playlist at End places all tracks contained in the playlist at the
end of the current playlist
• Export Playlist exports the tracks contained in the selected playlist along
with the playlist le (playlist_name.nml) to a place of your destination.
This way you can transport a playlist to another TRAKTOR Scratch
computer without losing data.
• Export Printable exports a HTML-le containing a list with the tracks
of the selected playlist with customizable columns.
TRAKTOR SCRATCH – 65
Page 66

Sorting your Playlist
You can sort the Playlist by any column of the Browser.
When sorting a Playlist for example by the BPM column, it will be sorted in
ascending or descending order by BPM.
Rearranging Playlists by Drag &Drop
• Click-hold and drag a track in the Playlist up or down
• Observe the red line showing where the track will drop when you release
the mouse button.
Note: To perform a rearrangement by drag & drop, the playlist needs
to be unlocked. If you observe a Forbidden sign when trying to drag &
drop a track to another place within the playlist, you need to unlock
it before.
Favorites
The Favorites window is a navigational tool and is located at the bottom of
the interface. If you don’t see the Favorites, you’re probably in the Layout
Playback. Choose the Layout Performing or Browsing via the Layout Selector
in the Header.
Each Favorite can be assigned to a hotkey - by default these are the rst 10
F-keys.
Three of the Favorites are pre-assigned and cannot be changed:
• F1: Current Playlist
• F2: Track Collection
• F9: Audio Recording
You can assign any of the File Browser folders or a playlist to the remaining
seven Favorites (F3 – F8 and F10).
Do the following to create and use a Favorites’ folder:
• Click the Playlists folder to browse its contents.
• Click on the Demo Content folder to expose the Demo Playlist.
• Click, hold and drag the Demo Playlist name on top of the F3 Favorite
icon.
66 – TRAKTOR SCRATCH
Page 67

• F3 will now display the Demo Playlist icon.
• From now on, you can access this folder at any time by pressing the
F3 key on your computer keyboard or by clicking on the Favorite icon
with the mouse.
• The contents of the Demo Playlist will then appear in the List
Window.
Note: Dragging another playlist on an already assigned favorite will
replace the favorite playlist with the new playlist.
Shift-dragging another playlist on an already assigned favorite will merge
the content of the favorite playlist with the content of the shift-dragged
playlist.
Note: Some computer keyboards require you to hold down the Function
(fn) key in order to use the F Keys.
History Playlist
The History Playlist is a special Playlist that gives you information about what
tracks you played during a gig.
It has a timestamp and will be created after every session you make, so that
every time you close TRAKTOR you’ll nd the history of what you’ve done the
next time you open TRAKTOR.
It is very useful, if you have to handout a Playlist of the actual played tracks
of an evening or just to review, what you were doing last night.
• In the Tree Window, double-click on the Playlist/ Mixes folder and then
another double-click on the History folder.
• If this was not the rst time you opened TRAKTOR, you’ll see several
Playlists with a timestamp at the beginning for every session you made
with TRAKTOR.
• History Playlists are locked by default.
If you’re working with TRAKTOR several months, this list can become very
large, often containing Playlists with only a few tracks.
It’s a good habit to rename History Playlists of successful evenings, which
makes nding them way easier than only with the timestamp name.
TRAKTOR SCRATCH – 67
Page 68

You can do everything you’re used to do with Playlists, including deleting
a Playlist, but for the History Playlists, the following trick might suit you
better:
• In the Windows Explorer/ Mac Finder, navigate to your TRAKTOR folder
and open the Playlists folder, and in there the History Folder.
• You see the list of your History Playlists so far.
• As a rule of thumb, every track in a list equals around 1 kb. This means,
all Playlists with 5 or below kb will have most likely not more than 4-6
tracks contained in them.
• And usually they can be deleted, making browsing in the History Playlists
more convenient.
Current Playlist
The Current Playlist is a special Playlist in which you nd tracks that were
played recently or you plan to play in near future.
Whenever you play a track it will be placed automatically in the Current
Playlist.
• If you found some tracks you want to play not as next track, but in the
near future, drag-and-drop them onto the Current Playlist for quicker
access.
• Drag the tracks in the Current Playlist in the desired order, see a red
line indicating, where the track will drop in.
• Right-/ Ctrl-Click on the Current Playlist and choose Clear to remove
all tracks from the Current Playlist.
Track Collection
The Track Collection is a special Playlist that contains every imported track,
regardless of the folder structure of your harddrive.
This makes it sometimes easier to search for tracks or get an general overview
while browsing for tracks you want to put in a Playlist.
The Track Collection is the heart of TRAKTOR, containing every song of yours
in its database, making it easy to search – and to nd!
68 – TRAKTOR SCRATCH
Page 69

iTunes Import
TRAKTOR Scratch allows you to import your iTunes library as well as individual
iTunes playlists.
Make sure your iTunes library path is identical with the le path chosen in
Preferences > Browser Preferences > Data Location.
And all you have to do now is to click on the iTunes icon in the Tree Window
of the Browser!
Connecting your iPod
TRAKTOR Scratch allows you to not only play non-DRM protected tracks from
your iPod, but also from playlists stored on your iPod.
Start TRAKTOR Scratch, and plug your iPod into your computer. TRAKTOR
will then recognize your iPod and display the iPod icon in the browser tree
- this may take up to 10 seconds. When rst selecting the iPod, Loading will
appear to let you know that TRAKTOR Scratch is reading the track and playlist
information. The word Queued next to an iPod playlist means that it will be
read next. When nished, you will be able to select any non-DRM protected
track to play as you normally would from your hard disk drive.
Note: Plugging and un-plugging the iPod while tacks are playing may
cause the audio to stop briey. Take extreme care not to unplug the
iPod when playing a track from it!
TRAKTOR SCRATCH – 69
Page 70

9. Backup and Transfer of your Collection
9.1 TRAKTOR File Formats and TRAKTOR Folder
TRAKTOR creates the following le types on your harddrive:
• *.nml = all playlists have this extension, the Collection, the History
playlists and user-created playlists
• *.tks = extension for keyboard or midi hotkey settings
• *.nmx = extension for native mix recordings
• *.wav = extension for the audio le created from the audio recorder
• *.xml = extension for the settings les. The way the details section is
customized is stored in there as well as the chosen le paths.
• *.log = extension of the log-les that get created when opening TRAKTOR
Scratch.
If you’re using the default paths of TRAKTOR, you’ll nd all TRAKTOR les
in the folder My Documents\Traktor3 (PC) or HD/[User]/Traktor3 (Mac).
You can change the default paths in Preferences > Browser Preferences >
Data Location.
9.2 Complete Backup
The easiest way to backup your whole TRAKTOR data is to use the default
paths for the TRAKTOR folder and save the whole folder somewhere else as
backup.
If you re-install your operating system and then TRAKTOR, just copy the
whole TRAKTOR folder to the default folder before starting TRAKTOR the
rst time.
If you choose to point TRAKTORs le paths to another location, e.g. because
you want to store all your data on a second partition or an external harddisk
for security reasons, it’s the easiest to organize the TRAKTOR les in a folder
called Traktor3 and a le structure like in the default folder.
It’s important to know that even if you changed all paths to another destination,
the *.log and the *.xml les get saved always to the default Traktor3 folder
anyways, so you have to copy these manually from time to time as backup
to the folder you store all other TRAKTOR les in and obviously before you
re-install your operating system.
70 – TRAKTOR SCRATCH
Page 71

If you have re-installed your operating system and TRAKTOR, copy the *.log
and *.xml les to the default TRAKTOR folder before you start TRAKTOR
the rst time.
If the drive letter of your customized location didnt change, you should nd
everything as it was before the re-install.
If the drive letter of your customized location did change, you will nd all
tracks with an exclamation mark (!), that indicates that the links are broken.
Use the Relocate function to nd these les again.
9.3 Automatic Backup (Security Backup)
Each time you change something in your Collection and close TRAKTOR
Scratch, a backup of your Collection is created in the folder Backups contained
in your TRAKTOR Scratch folder. If you delete or partly ruin your Track
Collection by mistake proceed as follows:
• In TRAKTOR Scratch’s Tree Window, open the Explorer and navigate to
your Traktor3 folder, found in your User folder (Mac) or in My Documents
(PC).
• Click on the Backup folder.
• Click on one of the most recent backups and verify the integrity of the
Collection.
• If the backup seems to be corrupt, check an earlier backup.
• If you have found an integer backup, drag & drop the folder onto the
Collection icon to import the backup into the current Collection.
Note: TRAKTOR Scratch only saves 10 backups, after which it replaces
the oldest backup with the second oldest one. You should therefore make
a manual backup of the current status of the Collection by copying such a
backup le to a separate folder, not accessed by TRAKTOR Scratch.
A corrupted Collection might cause TRAKTOR Scratch to crash during start-
up. If you suspect this might be the case do the following:
• Close TRAKTOR Scratch.
• Make a backup of the le collection.nml found in the folder user/Traktor3
(Mac), My Documents/Traktor3 (PC) before deleting it.
• Restart TRAKTOR Scratch with an empty Collection.
• Import the backup of the Collection as described above.
TRAKTOR SCRATCH – 71
Page 72

Note: Although TRAKTOR gives you the choice to store your Track
Collection and Playlists in different directories, it is best to keep these
les organized in the default manner, as this makes it much easier to
track down problems.
Important: The le Traktor Scratch Settings.xml contains your layout
settings and is saved always to your Traktor3 folder. Backup this le
as well!
10. Controlling the Decks
10.1 General Deck Behavior
• In Internal Mode, click and hold the track Waveform. This is like putting
your hand on a Vinyl record to pause playback.
• While holding the mouse button, move the mouse backward and forward.
This moves the Waveform similar to scratching a Vinyl record.
• Release the mouse button. The track will begin playing from the point
at which you release it.
• Right-/ Ctrl-Click on the Waveform to start and stop playback.
Play
Hit on the Play button to start and stop the playback of the track.
Cue/ Play
Clicking with the left mouse button on the Cue/ Play button lets the track
jump back to the last Cue Point immediatly and continueing from there the
playback.
Clicking and holding the Cue/ Play button with the right mouse button lets
the track jump back to the previous Cue Point and stop there until you release
the right mouse button again.
72 – TRAKTOR SCRATCH
Page 73

Cue/ Pause
Clicking on Cue/ Pause while the track is running lets the track jump back to
the previous Cue Point and stop there.
If you click a second time on the Cue/ Pause button and hold it, the Play
button lits as well and the track begins to play again from the Cue Point
– until you release the mouse button again, then it snaps back again to the
previous Cue Point.
If you are clicking and holding the left mouse button and then additionally
pressing the right mouse button, the track will continue to play if you release
both mouse buttons.
If you press the right mouse button while the track is running, it jumps back
to the previous Cue Point and continues with the playback when you release
the mouse button.
Deck Loop
If you click on Deck Loop button an instant Loop gets created with the amount
beats that are displayed.
Right-/ Ctrl-Click on the Deck Loop button to dene the Loop Length.
Set Cue
Clicking on this button creates a Floating Cue Point as a visual reference or
to make use of the Cue/ Play and Cue Pause buttons.
Opposite to Cue Points set with the Cue Edit Panel the Floating Cue Point will
not be stored. The next time you hit Set Cue or you stop the track, a new
Floating Cue Point is generated.
Read more about Cue Points in chapter 10.2 (Regular Cue Points).
TRAKTOR SCRATCH – 73
Page 74

Waveform Zoom
Each Deck offers the ability to zoom in or out on a track Waveform. Zooming in
on a Waveform can be helpful in nding a more accurate Cue Point. Zooming
out will give you a broader view of the Waveform.
• Click the Plus (+) sign button in the upper corner of the main Deck
Waveform display. This Zooms in on the track Waveform.
• Now click the Equal (=) sign. This zooms to TRAKTORs default view of
the track Waveform.
• Now click the Minus (-) sign. This zooms out, giving a broader view of
the track Waveform.
Note: Waveform Zoom can also be performed with the scroll wheel of
your mouse. Hold the mouse over the Waveform and scroll up or down
to zoom in or out.
Waveform Cache
You will notice a growing, yellow bar beneath and below the overall waveform
(Stripe) that indicates how much of a track is cached. Read more about the
Cache adjustment in chapter 15.2 ( Deck Preferences).
Manually Adjusting the Track Tempo (Pitch)
Pitch Fader
74 – TRAKTOR SCRATCH
Page 75

By moving the Pitch Fader up or down, you can speed up or slow down the
Tempo of the track. The Pitch Fader has just the same functionality as a pitch
fader on any standard DJ record player or pitchable CD player.
• Load and play a track in Deck A.
• To slow down the tempo, click + hold and drag upward on the Pitch
Fader.
• Double-Click the Pitch Fader to reset it to 0%.
• Use the +/- buttons to change the tempo in steps.
• Use the scroll wheel of your mouse to move the Pitch Fader up or down
in steps as well.
• Assign different sensitivities to the Pitch Fader by right-/ ctrl-clicking
on the + button.
Advanced Pitch Fader functionality
• Right-/ Ctrl-Click + hold and drag the Pitch Fader up (or down).
• While holding the right mouse button, click and hold the left mouse
button. This will temporarily slow down the tempo (or quicken it).
• This is a special method for pitch bending.
Pitch Range
The Pitch Range denes how far you can pitch the tempo up and/ or down.
TRAKTOR Scratch allows you to adjust the Pitch Range by plus or minus 8%,
35%, 50% or 100%. Choosing a Pitch Range of +/- 100% will give you the
largest possible Pitch Range, allowing you to slow a track all the way down to
a complete stop. Choosing +/-35% will only allow you to slow a track down,
or speed it up by 35%.
• Click on the Preferences > Deck Preferences > Transport.
• Click on one of the Pitch Range buttons and choose OK.
Using the Phase Meter
Two (or more) tracks can have the same tempo, but still sound silly together,
because the Phase is shifted. The Phase is represented in the horizontal meter
beneath the Pitch Bend buttons.
• If two tracks’ phases are synchronized, the meter stays in the
middle.
• If one tracks’ phase is shifted aback, a yellow stripe is seen on the left
side of the middle position.
TRAKTOR SCRATCH – 75
Page 76

• If a tracks’ phase is shifted forward, a yellow stripe is seen on the right
side of the middle position.
Note: You should use Beatgrids to get reliable results!
There are several ways to manipulate the phase:
• Double-Click on the Phase Meter to synchronize the phase.
• Shift the Phase by clicking on it, holding and dragging it with the
mouse.
• Shift the Phase by using the scrollwheel of your mouse.
• Shift the Phase by clicking on the white little arrows that appear when
you hover over the edges of the Phase Meter.
Hint: If you don’t like the Phase Meter, you can turn it off (and back on)
in Preferences > Appearance > Wave Display Options.
Matching the Key of your Tracks
With TRAKTOR Scratch it’s possible to change the tempo of a track while
keeping its original pitch. When you play a vocal track at a higher tempo, the
voice will often sound unnatural. To avoid this, you can lock the Key of this
track so that tempo changes do not affect it (also called Master Tempo).
• Click the Key Lock button beneath the Pitch Fader.
• Drag the Pitch Fader slowly upwards. You will hear the track in Deck B
lower its tempo. However, its Key will remain the same.
Time Stretching Quality
The TRAKTOR Scratch Key Lock function uses Time Stretching as its method
of effect. There are three types of Time Stretching, each with its own sound
quality and requirement for processor power.
76 – TRAKTOR SCRATCH
Page 77

Open the TRAKTOR Preferences > Deck Preferences > Sound and Mixer.
• Next to Time Stretching, select Non-Adaptive. This will sound less
natural but will use much less CPU. It is the best mode for computers
with slower processors.
• Selecting PSOLA will sound more natural, using more CPU. This mode
is recommended for medium fast processors.
• Selecting Phase Vocoder will give the highest quality sound. This mode
is recommended for very fast processors, since it is using far more
CPU.
10.2 Regular Cue Points
Floating Cue Point
Each time a Deck is stopped it sets a oating (momentary) Cue Point. When
playback resumes, the Cue Point remains at the last point of interruption. The
Cue/ Pause and the Cue/ Play button in the Cue Edit Panel can be used to
skip back to the last oating Cue Point during playback.
During playback you can press Set Cue underneath the Waveform at any time
to move the Floating Cue Point to the current position.
Storing Cue Points
TRAKTOR Scratch can store up to 10 Cue Points per track. You can store the
current Floating Cue Point in the Cue Edit panel in the Details section:
This panel offers all functions needed to manage the Cue Points of a track:
• A drop-down box with a list of all Cue Points stored for this track.
• Two buttons to cue to the previous and to the next Cue Point.
• A drop-down box to assign a special property to a Cue Point.
• A Cue/ Play and a Cue/ Pause button for test-playing your Cue Points.
• A Lock button to store and to remove the current Cue Point.
TRAKTOR SCRATCH – 77
Page 78

Locking a Cue Point
• If you want to recall a Cue Point for later use, you have to use the Lock
button to store it.
• To remove a Cue Point from the list of permanent Cue Points, select it
and release the lit Lock button.
Note: Whenever you select a Cue Point from the Cue Edit Panel, it gets
locked by default (except the Floating Cue Point, obviously).
Naming Your Cue Points
After you have locked a Cue Point, you can name it. This way it is easy to nd
it in the Cue List panel.
• Skip to the Cue Point by selecting it from the list in the upper drop-
down box.
• Double-Click on the display to place the text cursor in the name
eld.
• Type the new name and conrm with Enter.
Jumping between Cue Points
In TRAKTOR 3 you have several options for jumping to Cue Points:
• Clicking on the Cue Point symbol in the Stripe Window or in the Wave
Window.
• Using the Backward Cue and Forward Cue buttons in the Cue Edit panel
(or the respective Hotkey).
• Selecting an entry of the upper drop-down menu of the Cue Edit
panel.
• Clicking one of the 6 buttons in the Cue List details panel.
10.3 Special Cue Points
While regular Cue Points help establish points in a track from which to play
or cue, there are three other types of Cue Points you can set, each with their
own special function.
Assigning a different type to a Cue Point is done by selecting the desired type
in the drop-down box in the Cue Edit details panel.
78 – TRAKTOR SCRATCH
Page 79

• Select a Cue Point by skipping to it.
• In the Cue Edit details panel, click on the Cue Type display above the
Lock button.
• Select a new Type for the current Cue Point.
Load Cue Point
A Deck Load Cue Point causes a track to automatically cue to this point when
it is loaded into a Deck, saving you from the need to manually Cue your track
to this Cue Point.
Grid Cue Point
A grid is dened by a Beatmarker. This is a special Cue Point from which a
regularly spaced grid of reference lines is created, used to synchronize tracks.
Read more about Beatmarkers and grids in the following section.
10.4 Dening and Using Beatgrids
General Information about the Beatgrid
The tempo detection of TRAKTOR Scratch simplies beatmatching, giving
you more time to express your creativity. But although TRAKTOR Scratch’s
tempo detection is very precise, Gridmarker and Beatgrids are still an important
tool to synchronize your music in TRAKTOR Scratch. The analysis of a track
produces a BPM estimation that is not sufciently precise enough to guarantee
synchronous playback of two tracks over the duration of several minutes.
Tracks that have a correct Beatgrid don’t go out of sync in the mix – ever. Tracks
with a Beatgrid loop perfectly, will let you mix on obscure intros, and will enable
you to get busy on the other features that TRAKTOR has to offer. Before we
talk about setting them, it’s useful to understand a bit about them.
When TRAKTOR analyses a track, it ‘nds’ beats in the Waveform (the little
white lines on the beats). The problem is that these ‘sensed’ beats are not
always an even distance apart (like in Hip-Hop or Breakbeats). This means
TRAKTOR SCRATCH – 79
Page 80

that when you try to synchronize two tracks, TRAKTOR tries to lay one ‘sensed’
beat on top of one in the other track, causing the Phase Meter to jump around
as it tries to mash things together.
Setting a Beatgrid xes this by placing a tempo structure on a track that
supersedes the actual beats. This means that a regular pattern is used,
stopping the Phase Meters from jumping around and ruining the mix. The
grid represents quarter notes or beats.
The following sections give you a step-by-step explanation to this very powerful
tool. Although it may sound somewhat complicated, if you’re reading this
chapter the rst time, it’s denitely worth the time and you will very soon get
very fast at setting Beatgrids!
First: Choosing a BPM Range
You can nd this general setting in the Preferences. Use this to limit the
possible BPM range to a value that ts your musical style, e.g. if you’re a
Hiphop DJ, you will most likely choose a range between 70 and 120 BPM,
if you’re a Techno DJ, you’ll choose limits more in between 110 and 160
bpm.
• Open Preferences > Browser Preferences > BPM Ranges.
• Ideally, choose a range without doubling a value, e.g. choose a minimum
of 80 BPM and a maximum of 159 BPM.
Second: Analyzing your track tempo
If your tracks are not analyzed already, analyze now your track tempo. The
analyzation gives back an estimated BPM value as well as several other values
and builds the overall waveform (Stripe).
Find more about analyzation in chapter 15 (Preferences).
• Select one (ore more) track(s) and click on the Analyze button or choose
Analyze via right-/ ctrl-click ing and chosing Analyze.
Third: Setting the Gridmarker (Grid Cue Point)
• Load a track into Deck A.
• Click on the small Plus (+) button in the waveform to switch to the
largest possible zoom.
• Let the track play in Internal Mode and wait for the rst Beat in the
Waveform.
• Place a Floating Cue Point exactly right before the beat by dragging the
Waveform (Vinyl Mode) exactly there
80 – TRAKTOR SCRATCH
Page 81

• Audition the position of the Floating Cue Point by pushing and holding
the Cue/ Pause button in the Cue Edit panel.
• If you are satised with the location of the Cue Point, transform it into
a Gridmarker. Use the dropdown menu Type in the Cue Edit panel and
choose Grid.
Forth: Adjusting the Grid
In TRAKTOR Scratch, adjusting the tempo of the track to the reference clock
is done by moving forward in the track and comparing the drift of the Grid
to the beats.
While advancing in the song, you can ne tune the track tempo just as you
would do in a mix with two turntables, with the difference that your result
will be ultra precise and can be stored in the track and therefore needs to be
done only once per track.
There are two methods for setting up the Betgrid, use the method that suits
you more!
Visible Adjusting of the Beatgrid:
• Skip to the Gridmarker and play the track.
• Observe the drift of the white, vertical lines relatively to the beats of
the track.
• You should correct any kind of emerging offset with the buttons
underneath the BPM display in the BPM details panel. This will adjust
the offset by recalculating if, based on a different tempo value for the
track.
• In other words: The white, vertical lines should be in time with the beat
of your track, using the both buttons beneath the BPM eld to align
the Grid lines with the visualization of the beats in the waveform.
• When the Grid lines and the beats of the track run perfectly in time,
you can fast forward through the track to preview the drift later on in
the track.
• The further away you get from the Gridmarker, the more precise the
tempo value has to be for the Grid lines to stay aligned with the beats
in the waveform.
• When you have reached the end of the track and it still is aligned
perfectly with the Grid lines, you can be sure that the Beatgrid is precise.
Any mix using this track will run smooth for its entire duration.
TRAKTOR SCRATCH – 81
Page 82

Note: Be very careful during this procedure as you can easily skip one
beat when aligning the Grid. Even if TRAKTORs tempo detection is very
precise, use at least 3 points in a track to observe the drift.
Audible adjusting of the Beatgrid:
• Skip to the Gridmarker and play the track.
• Observe the drift of the Tick relatively to the beats of the track.
• You should correct any kind of emerging offset with the buttons
underneath the BPM display in the BPM details panel. This will adjust
the offset by recalculating if, based on a different tempo value for the
track.
• In other words: The Tick should be in time with the beat of your track,
using the both buttons beneath the BPM eld to beatmatch the track
with the Tick.
• When the Ticks of the grid and the beats of the track run perfectly in
time, you can fast forward through the track to preview the drift later
on in the track.
• The further away you get from the Gridmarker, the more precise the
tempo value has to be for the track to stay in Sync with the Tick.
• When you have reached the end of the track and it still runs in perfect
time with the Tick, you can be sure that the Beatgrid is precise. Any
mix using this track will run smooth for its entire duration.
Note: Be very careful during this procedure as you can easily skip one
beat when aligning the Grid. Even if TRAKTORs tempo detection is very
precise, use at least 3 points to observe the drift.
Difcult tracks and easy solutions
Rough Tempo Estimation
If you have the feeling that you or the TRAKTOR Scratch analyzer have
messed it up and the BPM does not correspond to a correct value, you have
the following possibilities to solve the situation:
• Click on the arrow beneath the BPM value in the BPM details panel and
select Restore to reload the BPM value stored in the Collection for this
track.
• Select a BPM-Range by clicking on the downwards pointing arrow next
to the BPM value and choosing one of the offered options to transform
the automatically generated BPM value into the selected interval.
82 – TRAKTOR SCRATCH
Page 83

• Tap 4-7 times to the rhythm of the beat to transform the automatically
detected BPM value into a value close to the tempo of your tapping.
• Tap over 8 times to enter the BPM manually based on the tempo of
your tapping.
Beatless Intros and tracks with different tempi
Sometimes you might have tracks that come with an beatless intro that irritates
and inuences TRAKTORs BPM detection. For these you can generate a Local
BPM value by just one click, giving you a very precise tempo at a certain point,
e.g. when the bass drum of the track starts.
• In the overall waveform (Stripe), click on the part where you want to
get the tempo from.
• In the BPM panel, click on the downwards pointing arrow and choose
Local BPM.
• You’ll get a very precise tempo value back for this part of the track.
Setting a Beatgrid for Tracks recorded from Vinyl
Since a turntable’s tempo always uctuates a little bit, a vinyl-ripped track may
drift over the time, making it impossible to set a perfectly aligned beatgrid
over the whole track.
While the drift on a professional direct-driven turntable may only be small and
negligible, the drift on a belt-driven turntable may be unacceptable.
However, in this case it is recommended to establish several Grid Cue Points
during the track.
• Set a new Grid Point on a beat that has not aligned to the Tick or the
white, vertical Grid lines
• See how the phase of the tempo is being restarted.
• This helps only to create a Beatgrid for tracks that have a drifting, but
not an unsteady tempo.
Note: You can only assign one BPM value to a track in TRAKTOR. Setting
several Grid Points do not help, if your track has 2 different tempi, e.g.
a value of 110 BPM in the beginning and 120 in the end.
Fine Tuning the Position of the Gridmarker
Usually a visual setting of the Gridmarker is precise enough, however, you have
the opportunity to set the origin of the Beatgrid even more precisely, which
comes in especially handy if you have a track whose visual waveform doesn’t
show the beats very clearly.
TRAKTOR SCRATCH – 83
Page 84

• Cue to the Gridmarker.
• Set a Loop with the Deck Loop button.
• Turn on the Tick button in the BPM details panel to make the grid lines
audible as ticks added to the track.
• To hear the Tick you have to turn on the Headphone Cue button in the
mixer channel.
• Fine tune the position of the Tick relatively to the beats of the track
with the two buttons above the BPM value in the BPM Details.
• If the Ticks are perfectly matching the beats, you have a set a very
precise origin for the Beatgrid.
10.5 Details Pages and Panels
TRAKTOR Scratch offers you 4 different Details Pages that offer you several
Panels offering various functions. Read here in this chapter a short description
about every Panel.
Some Panels can be assigned to a specic Deck or to the Focus Deck. For
this, click on the small square in the upper right corner of a Panel and assign
it to your preference.
The Scratch and Page Panels are inserted on every Page.
Page:
Here you nd the four buttons to the four Details pages.
Scratch:
This panel offers you the graphical representation of the Control Signal and
the calibration status. Read more about calibration and the Control Signal in
chapter 4 (Understanding the Scratch Panel).
Send 1/2:
This panel allows you to adjust the different Send Effects. Read more about
the effects in chapter 12 (Effects).
BeatJump:
Lets you jump forward and backward through the track.
Right-/ Ctrl-Click on the Forward Jump buttons to adjust the Jump Length.
84 – TRAKTOR SCRATCH
Page 85

Right-Ctrl-Clicking on the Backward Jump buttons lets you jump forward
through the track.
Find a detailed explanation of the Beatjump feature in chapter 11.1
(Beatjump).
Cue List:
The Cue List panel offers you six HotJump buttons that let you go immediatly
to the rst six stored Cue Points.
Key:
The Key panel lets you handle the key of a track different from its tempo.
Click on the Lock button to activate it. Now you can adjust the tempo with
the internal pitch fader or the pitch fader on your turntable (or CD player)
without changing its key.
Turning the knob clockwise increases the key, turning the knob counterclockwise decreases the key.
Cue Edit:
This panel handles everything related to Cue Point actions. Set Cue Points,
change them to special Cue Points like Beat Marker (Grid), step through stored
Cue Points with the Previous and Next Cue Point buttons or rename them.
BPM:
The BPM panel allows you tempo related actions. The BPM panel is described
in detail in chapter 10.4 (Dening and Using Beatgrids).
Audio Recorder:
The Audio Recorder panel gives you controls for performing and editing your
audio recordings. Read more about recording in chapter 13 (Recording).
Master
The Master detail panel controls the overall Volume and Balance (Left/ Right)
of TRAKTOR Scratch. It also features aTRAKTOR Scratch. It also features a. It also features a 3-Band Limiter for preventing clipping
of the digital signal in the D/A converters of the sound card.
• Find the Master panel on Details Page 4.
• Click + hold and drag the Volume knob to adjust overall Main output
volume. The level will be displayed in the meter next to it. If the level
TRAKTOR SCRATCH – 85
Page 86

reaches the top of the meter - which can happen easily if two or more
tracks are playing together - it will result in unpleasant signal clipping.
• In this case you can use the Master Limiter function by clicking the
Lim button. This limits the main output signal of TRAKTOR Scratch,TRAKTOR Scratch,,
preventing clipping or distortion.
• Use the Gain button for enabling Autogain as described earlier.
• To adjust the Left/ Right Balance of your main output signal, click + hold
and drag the Bal (Balance) knob clockwise or counter-clockwise.
Note: When using the Limiter, the red LEDs in the level meters indicate
when the Limiter is actively reducing the signal. The signal will not
audibly clip, but a Limiter in action can have negative effects on parts
of the sound, as it reduces the part of the spectrum that exceeds the
limits. Often it's the bass frequencies that need to be limited to avoid
clipping of the soundcard and a limited signal of this kind will therefore
sound atter. To preserve the original full sound, it is therefore important
that even when using the Limiter you avoid permanent Limiter action. If
you keep the output signal below the clipping level while adding volume
on the analog mixer or on the PA gain, this will result in a much better
sound.
86 – TRAKTOR SCRATCH
Page 87

11. Advanced Playback Functions
The following chapters will give you the ammunition to expand your creativity.
Load your tracks, experiment with the following features and re up your
tracks with some hot new moves!
11.1 Beatjump
The Beatjump feature allows you to jump through the track in sections of beats.
You can specify how many beats forward or backward you want to jump. This
can be useful for scrolling through a track, but also has an added effect of
remixing when performed while the track is playing.
• Load and play a track in Deck A.
• You’ll nd the BeatJump panel on Details Page 2.
• Listen to the beat of the track and click the 1/2 > button on-beat. This
will move the song forward 1/2 beat.
• Now click the < 4 button. This will move the song backward 4 whole
beats.
• Using the Beatjump buttons on-beat can give the effect of Beat Juggling,
allowing you to remix the beat on-the-y.
TRAKTOR SCRATCH – 87
Page 88

Customize the Jump Length
By default, the four Beatjump buttons are set for 1, 4, and 16 beats. TRAKTOR
Scratch lets you customize the length of any of the three Beatjump button
pairs.
• Right-/ Ctrl-Click the button labeled 1>.
• A menu will appear with length selections. Select 1/4.
• The Beatjump buttons will now be labeled 1/4. Allowing your track to
jump 1/4th of a beat.
Two Button Mouse control
The Beatjump button offers a special functionality for dual button mice and
for dual button track pads. The left row of the Beatjump buttons can be right-/
ctrl-clicked to achieve a jump in the opposite direction. With this feature you
can beat juggle with your two nger tips.
11.2 Duplicate Deck
This feature allows you live remixing like you never could before with TRAKTOR
- you can create an instant, exact and synchronized copy of a track, that even
copies the Loops that were in the original tracks!
It’s as easy as loading a track:
• Load a track in Deck A and let the track run either by hitting Play in the
Internal Mode or letting the Control Vinyl/ CD play on your Turntable/
CD Player.
• Click and hold on the Header of the deck, that’s where you see the File
Information and the letter of the deck - here the big A.
• Now hold and drag the mouse onto Deck B.
• Both tracks are now running in exactly in the same position and
synchronized.
Note: If you don’t want to use the mouse, you can assign the respective
Hotkeys in Add -> Deck > Load Tracks > Deck duplicate Deck A or B
in the Preferences. Read more about Hotkeys in chapter 14 (MIDIMIDI and
Hotkeys).).
88 – TRAKTOR SCRATCH
Page 89

11.3 Loops
Setting a Loop
TRAKTOR has the ability to set points in a track that will loop sections of the
track seamlessly. Once the Loop is set, its start and end points can be adjusted,
and the entire Loop can be moved, even while the track is playing.
Looping From the Deck
• Load and play a track in Deck A.
• Click the Loop button next to the Play button. Your track will begin
looping.
• By default, the Loop button should be set to 4. This means your track
will loop 4 beats.
• To change the loop length, right-/ ctrl-click the Loop button underneath
the deck and choose a different loop length number from the drop-down
menu.
• The Loop will automatically change length and continue looping.
• Click the Loop button again to continue playing the track.
Loop Preferences
Preferences for looping can be found by clicking TRAKTOR Preferences >
Deck Preferences > Transport.
Seamless Looping: Makes a short crossfade between Loop End to Loop Start
for avoiding clicks. When setting a loop in a quiet part directly before a beat,
in seamless mode a small portion of the beat might blend into the loop.
TRAKTOR SCRATCH – 89
Page 90

Loop Autodetect Size
DEC K A
INS FX A
OUT A
IN C H A
DEC K A
SEND FX 1
OUT C
SFX 1
INPU TS:
- DECK A
- DECK B
- IN A
- IN B
- IN C
- IN D
- SFX 2
SEND FX 1
OUT D
SFX 2
DEC K B
INS FX A
OUT A
IN C H B
DEC K A
INPU TS:
- DECK A
- DECK B
- IN A
- IN B
- IN C
- IN D
- SFX 1
TRAKTOR Scratch will automatically loop the loaded track, if its length iswill automatically loop the loaded track, if its length is
below a certain value. The length of this detection has a range of 0-60
seconds, adjustable with the horizontal slider. If you have set the track Loop
Autodetect Size to 30 seconds, any track shorter than 30 seconds in length
will automatically loop.
12. Effects
12.1 Effects Routing
TRAKTOR Scratch offers two kinds of effects: Inser t Effects and Send
Effects.
90 – TRAKTOR SCRATCH
Page 91

The Insert Effects are found beneath the decks. The control panel is a vertical
strip. The type of effect can be selected with a dropdown menu in the header
of the effect. The Insert Effect receives audio directly from the deck next to
it. The amount of the effects is controlled with the knob labeled Amt and a
button for switching the effect input on or off.
An Insert Effect inserts into the sound of a deck in opposition to the Send Effect,
that adds to the sound of a deck, because is uses an additional output of the
soundcard. Send Effects can be used in a much more variable way, as they
have a congurable input. Any decks output, any input of the soundcard and
even the output of the other Send Effect can be selected as input sources.
This way it is possible to route a microphone connected to the AUDIO 8 DJ’s
microphone input through the TRAKTOR Scratch effects.
12.2 Available Insert Effects
The Insert Effects in TRAKTOR Scratch features 3 types of lters:
• F:92 LP - Lowpass Filter, progressively cutting off high frequencies
• F:92 BP - Bandpass Filter, passing just a band of the frequencies
• F:92 LP - Highpass Filter, progressively cutting off low frequencies
The lters are named and modeled after the lters found in Allen&Heaths
Xone:92 club mixer. It has a Low Frequency Oscillator (LFO) controlling the
cutoff which allows you to set a speed at which the LFO will modulate the
lter rhythmically.
TRAKTOR SCRATCH – 91
Page 92

Note: The lters are visible beside each deck in the Performance View.
If you don’t see the lters, choose Performance from the Layout Selector
in the Header of the application.
To select a type of lter, click on the header of the lter containing the name
of the lter. This will open a pull down menu with the available lter types.
How to use the Filters:
• Load and play a track in Deck A.
• Select F:92 LP from the drop-down menu in the header of the lter.
• Click the button On.
• Turn up the amount knob (labelled Amt) to full clockwise position.
• Set the Resonance/LFO knob (labeled Q/L) to center position.
• Turn the Frequency button (labeled Frq) clockwise and anti-clockwise
and observe how the sound of the music is lterered the more you turn
the knob to the right.
• Select F:92 HP from the dropdown menu in the header of the lter and
compare the difference.
How to use the LFO (Low Frequency Oscillator)
• Select on of the lters as described before.
• Turn up the Resonance/ LFO knob (labeled Q/L) fully clockwise.
• Turn the Frequency button (labeled Frq) clockwise and anti-clockwise
and observe how the sound of the music is rythmically lterered.
• Change the speed by by tweaking the Speed knob (labeled Sync)
• Dene a new reference speed by tapping the Tap button.
Detailed knob description
Header
Use to select the type of the lter.
On
On/Off switch for the lter. Use to punch in a lter that you have previously
adjusted.
Amt
Controls the amount of the ltered signal in relation to the original signal.
92 – TRAKTOR SCRATCH
Page 93

• Fully counter-clockwise position represents 100% original signal.
• Fully clockwise position represents 100% ltered signal.
Q/L
Controls Resonance (Q) giving more color to the to the movement and thegiving more color to the to the movement and theand the
amount of the low frequency oscillator (LFO).
• Fully counter-clockwise position represents mimal lter color.
• Center position represents maximum filter color but zero LFO
amount.
• Fully clockwise position represents maximum lter color with maxiumum
LFO amount.
Frq
Controls the cutoff frequency of lter.
Spd
Controls the amount of LFO that is modulating the lter cutoff. The shape
of the LFO is a sine wave, and it is generating positive and negative values.
This means that the lter cutoff will modulate above and below the cutoff
frequency.
Tap
Adjusts the tempo at which the LFO is running.
The tapped tempo refers to the center position of the Speed knob.
12.3 Available Send Effects
In the Send Effects Panel in the Details Section on Page 1 you can select
among 6 different effects, described hereafter.
Features Common to all Send Effects
Selecting the Type of effect is done via the dropdown menu in the header of
the effect.
TRAKTOR SCRATCH – 93
Page 94

Send Effects have a freely assignable input. Select the input via the dropdown
menu at the left of the panel. You can assign the input to the following
sources:
• Deck A, Deck B – use for processing the sound played back in Deck A
or Deck B.
• In A – In D – use for processing the sound connected to one of the inputs
of your soundcard. This option is most commonly used for sending
sound from a microphone through an effect (In C) or for processing
sound from a FX SEND output from your mixer.
• Send 1, Send 2 – this allows you to chain the two Send Effects by
selecting the rst effect as the source of the second effect.
The Amount knob controls the volume of the effect. This knob is needed if the
return channel in the mixer - used to feed the effect back into the mix - has
no fader or volume knob. If the mixer has analog volume control for the signal
returning from the effect, you can leave the Amount knob fully turned up.
The On button is used to open and close the effects input. Certain effects,
such as the Reverb and the Delay continue to produce even when their input
is turned off. Very interesting effects can be created when leaving the output
of such effects open, while turning on and off their input.
The Speed knob controls the speed of the time-dependent parameters of an
effect. The speed parameter behave differently depending on the type of input
and of the staus of the Quantize button.
The Input dropdown menu offers 7 input options, each one indicating the
sound source for the effect and the tempo reference of the effect:
• Sound: Deck A, Tempo: Deck A
• Sound: Deck B, Tempo: Deck B
• Sound: Ext 3|4, Tempo: Deck A
• Sound: Ext 3|4, Tempo: Deck B
• Sound: Ext 7|8, Tempo: Deck A
• Sound: Ext 7|8, Tempo: Deck B
• Sound: Send 1, Tempo: Send 1
In center position of the Speed knob, the effect matches the BPM of the
selected tempo source 1:1. This is the Base Tempo of the effect. Towards
the left the effect speed slows down until reaching 1/8th of the track speed.
Towards the right, the speed increases until reaching 8 times track speed.
94 – TRAKTOR SCRATCH
Page 95

With Quantize enabled, the speed changes in discreet steps of 1/8, ¼, 1/3,
¾, 1/1, 3/2, 2/1, 4/1, 8/1.
With Quantize not enabled, speed moves through the same range but without
quantized steps.
By tapping on the Tap button you can multiply or divide the base tempo of
the speed knob. Tapping fast will give a fast base tempo to the speed knob,
tapping slow will give a slow base tempo to the speed knob. The tempo is
always tied to the deck which is selected as input. When speeding up or
slowing down the track, the effect speed will follow.
Note: It is essential that your tracks have correct BPM information to
guarantee that the effects match the tempo of the track.
Controls Specic to the Delay
A Delay effect adds one or more timed repetitions of the original signal back
into the mix. It is very useful to create new rhythmic patterns and works
especially well with short percussive sounds.
Feedback controls how much the signal is returned into the delay. Turn counterclockwise for short delays. Turn clockwise for long delays.
Frequency controls the lter in the feedback loop. With this knob you can
control the color of the delay.
• Turned counter-clockwise the high frequencies are damped
• Center position for no damping
• Turned clockwise the lower frequencies are damped
Freeze loops the delay signal for the note length selected with the Time knob
while muting the original signal.
Controls Specic to the Reverb
Reverb is an effect that can add depth and dimension to your mixes. TRAKTOR
Scratch allows you to use the Reverb either static or dynamic, so it’s possible
to treat only certain elements of a track with Reverb.
High and Low control the color of the reverbrating room.
Size denes the size of the reverb room.
If you drag the knob all the way to the left, the reverb time is the shortest and
if you set the value to 100% the reverb time is at maximum.
TRAKTOR SCRATCH – 95
Page 96

Freeze freezes the reverb by muting the input and maximizing the size of the
reverberating room.
Controls Specic to the Flanger
A Flanger is a modulation effect that is great for creating tension. It got popular
in the 1970’s and was used extensively by guitarists and keyboard players.
Essentially a Flanger is doubling the original signal and mixing it back in with
a little delay, creating the ever popular wooosh-sound!
Depth sets the amount of frequency modulation.
Mid denes the frequency that is being modulated with the amount set by
Depth.
Reset re-triggers the LFO of the anger.
Controls Specic to the BeatMasher
The BeatMasher is a unique effect that isn’t based on any classic effect
type. It essentially samples a bar of music into a buffer which can then be
transformed, and mashed!
The only way to understand this effect is to hear it in action, so let’s have a
try:
Select BeatMasher from the drop-down menu found inside the Channel Effect
panel.
• Click the button Quant and the speed is synchronized to the deck.
• Click and hold the On button. The The BeatMasher effect is audible.
• Drag the knob Length counter clockwise and repeat step 3.
• Compare how the effect sounds at different lengths to understand how
the BeatMasher works.
More than any other effect presented earlier, the buttons and knobs of this
effect have to be explained thoroughly and in detail:
On starts the sampling until the buffer is full. Then, it repeats the recorded
audio and warps it accordingly to the settings of the effect.
Length denes the length of the Loop recorded in the buffer. The amount is
always based on beats, and from left to right the values are: 1/32th (minimum
value), 1/16th, 2/16th, 3/16th, 1/8th (centre position), 3/8th, 2/4th, 3/4th and
one bar (maximum value).
Rotate changes the position of the Loop within the sampled bar. This function
is most effective at short to minimum setting.
96 – TRAKTOR SCRATCH
Page 97

Reverse plays the Loop backwards. If this is combined with a Gate value setset
between 8 am and 10 am the effect is very obvious because the original signal
is being punctured by short bursts of the reversed Loop.
Gate works in two different modes. If you move it from the centre towards the
maximum value, it works as threshold, progressively muting sections of the
Loop until only one 16th of the Loop is audible at 100%. If Gate is in the centre
position, it plays the Loop exactly as dened by the Length knob. When moved
from the centre towards minimum value, the original signal is being mixed
into the loop, resulting in a 100% unaffected or dry signal at the minimum
position and a 100% processed or wet signal at the center position.
Note: You will have to control the BeatMasher effect with hotkeys or with
the help of a MIDI controller, as this effect develops its character only
when several parameters are being tweaked at the same time.
TRAKTOR SCRATCH – 97
Page 98

13. Recording
13.1 Understanding Audio Recording
By using the Audio Recording feature it is possible to record your TRAKTORTRAKTOR
Scratch set in real time. You can also record external sources connected to theset in real time. You can also record external sources connected to the
sound card such as vinyl records or a microphone in case you are performing
together with a vocalist. It’s even possible to use an recorded audio le and
play it back in a deck just as you do with the tracks from your collection!
Conguration
Assign one of the four available channels as Recording source.
• Connect the device you want record from as described in chapter 5.3
(Advanced Setups).
• Open TRAKTOR Scratch Preferences > Recording.
• Select the channel (A, B, C, or D) that you have connected to the record
ing signal.
• Open Page 4 and find the Audio Recorder panel in the Details
Section.
-
Example: If you want to record the sum coming out of your hardware
mixer, connect the record output of the mixer with input IN 5/6 of the
AUDIO 8 DJ. Make sure you have selected Line on the MIC/LINE Selector
and IN 5/6 on the SOURCE switch.
Adjusting the Input Level
Once you have selected your input channel, you should test your input signal
level. This requires the use of the Audio Recorder panel in the Details Section.
You can nd it on Details Page 4.
98 – TRAKTOR SCRATCH
Page 99

• Play a track from any of your input sources or, if using a microphone,
talk some words.
• Your input level will be displayed in the level meters of the Audio
Recorder panel.
• Use the Gain knob for adjusting the recording level – the meter range
should show peaks in the upper third.
• To avoid distortion or clipping, make sure the level doesn’t reach the
maximum amount at the top of the meter range.
Recording your Input Signal
• Open the Audio Recorder folder icon in the Track Browser.
• Click on the Record button in the Audio Recorder panel.
• TRAKTOR Scratch will begin recording your input signal. The le sizewill begin recording your input signal. The le size
of your recording and time elapsed will be displayed in the Display
Window of the Audio Recorder module.
• The recording will appear as track in the Audio Recorder folder and will
have a time-stamp in its name.
• Click on the Record button in the Audio Recorder panel to stop record-
ing.
• You can instantly drag the recording into a deck and play it.
Using Cut & Continue
While recording, you can separate the recording into individual *.wav les. If
you are recording your mix as audio, this allows you to separate your recording
at points you determine on-the-y.
During recording, click the Cut button in the Audio Recorder panel.
• The recording will cut at this point and begin a new *.wav le.
• The *.wav les will be displayed in the Audio Recording List Window
view.
Split at le size
Another way to separate your recording is by utilizing the Split at File Size
preference. This allows you to specify a le size (in megabytes) at which the
recording will be separated. This function is extremely useful in cutting down
your recordings into CD-size sections that can later be burned without any
problem.
TRAKTOR SCRATCH – 99
Page 100

• Open TRAKTOR Preferences > Recording.
• Click the arrow to drop down the Split at File Size menu and choose a
le size.
• Each time the Audio Recording reaches this le size, it will be split into
a separate audio le.
Deleting the Last Recording
If you are not satised with your Audio Recording, you can delete it.
• Click on the Audio Recordings folder icon in the Track Browser.
• Select the recording you wish to delete.
• Click on the Delete button in the Audio Recorder panel. You can also
click the Delete button next to the List Window.
• A menu will pop up asking you to conrm.
• Choose OK.
• The recording will disappear from the List Window.
Note: If you do not want the popup menu to appear each time you choose
Delete, put a check mark in the box labelled Do not show again.
Editing Properties of the Recording
Track properties for the Audio Recording can be edited just like any track
in your Collection, either inline in the List Window, by using the Edit button
or through the Edit context menu option. Additionally there is a shortcut to
the Edit dialog of the currently recording track in the Audio Recorder panel,
called Edit.
100 – TRAKTOR SCRATCH
 Loading...