Mitsubishi WS-65315, WS-55315, WS-48315, V24, WS-65813 Service Manual
...
V22 Chassis
WS-48313 WS-55313 WS-65313 WS-48413 WS-55413 WS-65413
V24 Chassis
WS-48315 WS-55315 WS-65315
V23 Chassis
WS-48513 WS-65513 WS-73513 WS-48613 WS-65613 WS-73713 WS-55513 WS-65713
WS-55613 WS-65813 WS-55813

Down To 1 - High Speed Troubleshooting
|
CONTENTS |
INTRODUCTION ..................................................................................................................................................................................... |
2 |
SAFETYPRECAUTIONS ......................................................................................................................................................................... |
3 |
V22/V24 - PWB FUNCTIONSAND LOCATIONS ................................................................................................................................. |
4 |
V23 - PWB FUNCTIONS AND LOCATIONS ......................................................................................................................................... |
5 |
PWB PART NUMBERS ........................................................................................................................................................................... |
6 |
TROUBLESHOOTINGCHARTS |
|
V22/V24 & V23 Audio .................................................................................................................................................................. |
7 |
V22/V24 Video/Color ................................................................................................................................................................... |
8 |
V23 Video/Color ........................................................................................................................................................................... |
9 |
V22/V24 & V23 Power ............................................................................................................................................................... |
10 |
V22/V24 & V23 Convergence .................................................................................................................................................... |
12 |
1

INTRODUCTION
DOWN to 1™ Goal: Isolate the faulty component 9 out of 10 times.
Required tools: Signal Generator such as Sencore VP300 or VP301
DOWN to 1™ High Speed Troubleshooting
The troubleshooting of any PTV chassis involves one of two methods. The first involves an exhaustive checking of all suspect DC and AC voltages, waveforms, and the like. This is all possible given the necessary time and equipment. The second occurs most frequently in field service, where time is often insufficient and equipment unavailable or impractical. It is then that all of a technician’s practical experience must be brought to bear in order to make an educated guess as to where the product failure or difficulty may lie.
This second method is the focus of this publication and the DOWN to 1™ discipline.
Color, Pattern and Perception
Observation is key to an overall evaluation strategy. The details gathered from a precise observation can go a long way toward arriving at a repair solution in a timely and efficient manner. With this understanding, MDEA has brought the combined technical expertise of its years to bear in creation of the DOWN to 1™ method. For simplicity and easy memorization, color, pattern and perception are employed as the primary tools.
Color
∙Each component has its corresponding unique color.
Pattern
∙For each troubleshooting case, the component to replace is identified by an oval color pad at the terminating end of its path.
Perception
∙A perceived problem provides deductive reasoning clues to its solution.
Main |
Power |
Signal |
Terminal |
Doubler |
CRT(s) |
DM |
2

SAFETYPRECAUTIONS
NOTICE: Observe all cautions and safety related notes located inside the receiver cabinet and on the receiver chassis.
WARNING:
1.Operation of this receiver outside the cabinet or with the cover removed presents a shock hazard from the receiver's power supplies. Work on the receiver should not be attempted by anyone who is not thoroughly familiar with the precautions necessary when working on high voltage equipment.
2.Do not install, remove or handle the picture tubes in any manner unless shatterproof goggles are worn. People not so equipped should be kept away while the picture tube is being handled. Keep the picture tube away from the body while handling.
3.When service is required, observe the original lead dress. Extra precaution should be taken to assure correct lead dress in the high voltage area. Where a short-circuit has occurred, replace those components that indicate evidence of overheating.
X-Radiation warning
The surface of the cathode ray tubes (CRTs) may generate X-Radiation, so take proper precautions when servicing. It is recommended that a lead apron be used for shielding while handling the CRT. Use this method if possible.
When replacing the CRTs, use only the designated replacement part since it is a critical component with regard to X-Radiation. High voltage must be set as prescribed in the Service Manual under the section titled Electrical Adjustments.
Leakage current check
Before returning the receiver to the customer, it is recommended that leakage current be measured according to the following methods.
Cold Check - With the AC plug removed, place a jumper across the two AC plug prongs. Connect one lead of an ohm meter to the AC plug and touch the other lead to each exposed metal part (i.e. antennas, handle bracket, metal cabinet, screw heads, metal overlay, control shafts,
(etc.), particularly any exposed metal part that has a return path to the chassis. The resistance of the exposed metal parts having a return path to the chassis should be a minimum of 1Mega Ohm. Any resistance below this value indicates an abnormal condition and requires corrective action.
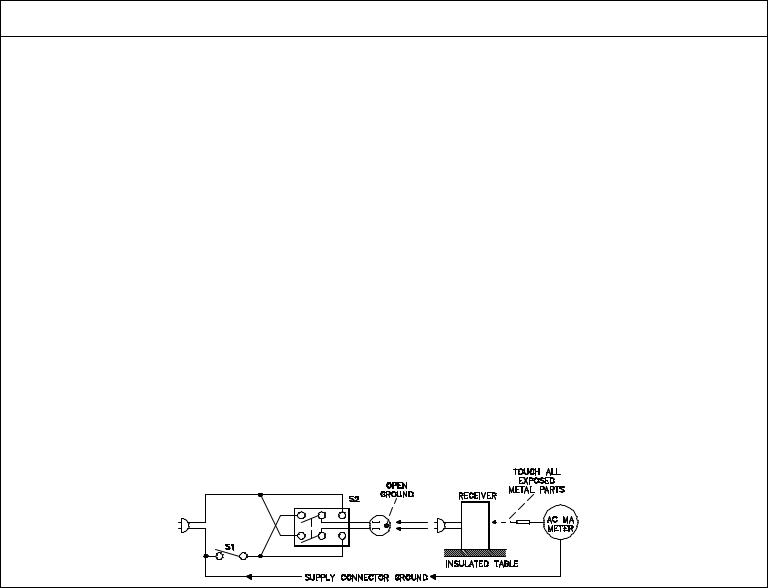
Hot Check... Use the circuit shown below to perform the hot check test.
1.Keep switch S1 open and connect the receiver to the measuring circuit. Immediately after connection, and with the switching devices of the receiver in their operating positions, measure the leakage current for both positions of switch S2.
2.Close switch S1, energizing the receiver. Immediately after closing switch S1, and with the switching devices of the receiver in their operating positions, measure the leakage current for both positions of switch S2. Repeat the current measurements of items 1 and 2 after the receiver has reached thermal stabilization. The leakage current must not exceed 0.5 milliampere (mA).
3
 Loading...