


WT04474X01
CITY MULTI Control System
and Mitsubishi Mr. SLIM Air Conditioners
MA Remote Controller
PAR-21MAA
Instruction Book
TEMP. |
ON/OFF |
Please read these instructions carefully and take care to use this equipment correctly. Store these instructions safely for future reference.
Be sure to pass these instructions and the corresponding installation instructions to anyone subsequently appointed to maintain this equipment. Installation and relocation of this equipment should be carried out by qualified persons only. Attempts by end users to install or move this equipment may lead to unsafe conditions or improper operation.
Contents
1. |
Safety Precautions ........................................................................ |
2 |
|
2. |
Parts Names .................................................................................. |
4 |
|
3. |
Screen Configuration ..................................................................... |
6 |
|
4. |
Setting the Day of the Week and Time .......................................... |
6 |
|
5. |
Using the Remote Controller ......................................................... |
7 |
|
|
(1) |
How to Start, Stop, Change the Mode, and Adjust the Temperature .. |
7 |
|
(2) |
Fan Speed, Airflow Direction, and Ventilation ................................ |
9 |
|
(3) |
Using the Timer ............................................................................ |
11 |
|
|
1 Using the Weekly Timer .......................................................... |
11 |
|
|
2 Using the Simple Timer .......................................................... |
13 |
|
|
3 Using the Auto Off Timer ........................................................ |
15 |
|
(4) |
Locking the Remote Controller Buttons |
|
|
|
(Operation function limit controller) .............................................. |
17 |
|
(5) |
Other Indications .......................................................................... |
18 |
6. |
Function Selection ....................................................................... |
20 |
|
7. |
Specifications .............................................................................. |
24 |
|
English
Deutsch
Français
Español
Italiano
Nederlands

1Safety Precautions
●Precautions are classified as follows, according to the level of potential danger.
 WARNING Denotes a condition or operation which, if handled incorrectly, may lead to serious injury or death.
 CAUTION Denotes a condition or operation which, if handled incorrectly, may lead to bodily injury or property damage.
 WARNING
Do not attempt to install this equipment yourself.
Please have your dealer or a qualified engineer install this equipment. Improper installation may result in fire, electric shock, or other severe accident.
Be sure that the equipment has been fastened securely.
Be sure that equipment is securely fastened to a sturdy support so that there is no risk that it will fall.
Be sure that you are supplying the rated voltage.
Supply of an incorrect voltage may lead to fire or equipment failure.
Turn off this equipment immediately if operation becomes abnormal.
Continued use may lead to equipment failure, electric shock, or fire.
If you notice a burning smell or other abnormality, turn off the power switch immediately and consult your dealer.
Do not attempt to relocate this equipment yourself.
Improper reinstallation may result in fire, electric shock, or other severe accident.
Please have your dealer or a qualified engineer carry out relocation.
Do not dispose of this equipment yourself.
Please consult the dealer when it comes time to discard this equipment.
Do not attempt to modify or repair this equipment yourself.
Attempted modification or repair may lead to fire, electric shock, or other severe accident. Please consult with your dealer if repair is required.
Stop using this equipment if it fails to operate correctly (if error messages recur and the unit does not run as expected).
Continued use or attempted use of this equipment may lead to fire or equipment failure. Consult your dealer for advice.
– 2 –

 CAUTION
Keep hazardous materials away from this equipment.
Do not install this equipment in locations where there is risk of combustible gas leakage. The presence of combustible gas may result in explosion or fire.
Do not wash this equipment with water.
Washing with water may result in electric shock or equipment failure.
Do not touch buttons when hands are wet.
Doing so may result in electric shock or equipment failure.
Do not use this equipment for purposes for which it was not intended.
This equipment is for use with Mitsubishi Building Air Control systems. Please do not use it with any other systems, or for any other purpose, as such usage may result in improper operation.
Do not spray insect repellant or combustible substances on the equipment.
Keep combustible sprays and substances away from this equipment, and never spray them directly onto this equipment. Contact with or proximity to such substances poses risk of explosion or fire.
Do not use this equipment in improper environments.
Do not use in areas where there may be large quantities of oil (machine oil, etc.), exhaust gas, or sulfide gas. Such environments may degrade the performance or cause equipment failure.
Do not use sharp-tipped objects to press the buttons.
Use of sharp tips may lead to electric shock or equipment failure.
Do not use under extreme temperatures.
Use only when ambient temperature is within the limits indicated in the instructions. (If the instructions do not indicate limits, use only at temperatures between 0 °C and 40 °C.) Use of this equipment at temperatures outside of this range may result in major equipment failure.
Do not pull or twist the communication cables.
Pulling or twisting a cable may result in fire or equipment failure.
Do not disassemble.
Attempted disassembly may result in injury from contact with internal parts, or may lead to fire or equipment failure.
Do not wipe this equipment with benzene, paint thinner, or chemical cleaning cloths.
These substances may cause discoloration or equipment failure. If the equipment becomes noticeably dirty, clean it with a wrung-out cloth that has been moistened with water-diluted neutral solvent, and then wipe it with a dry cloth.
– 3 –

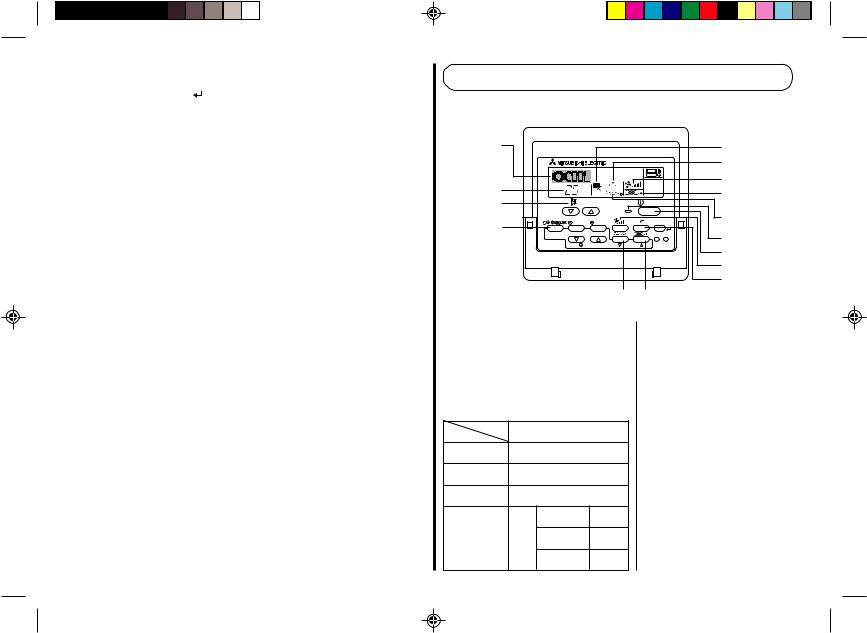
2 Parts Names
Display Section
For purposes of this explanation, all parts of the display are shown as lit. During actual operation, only the relevant items will be lit.
Identifies the current operation
Shows the operating mode, etc.
*Multilanguage display is supported.
“CentrallyControlled”indicator
Indicates that operation of the remote controller has been prohibited by a master controller.
“Timer Is Off” indicator
Indicates that the timer is off.
Temperature Setting
Shows the target temperature.
Day-of-Week
Shows the current day of the week.
Time/Timer Display
Shows the current time, unless the simple or Auto Off timer is set.
If the simple or Auto Off timer is set, shows the time remaining.
TIME SUN MON TUE WED THU FRI SAT |
||
TIMER |
Hr |
ON |
AFTER |
AFTER |
OFF |
ERROR CODE |
|
FUNCTION |
˚F˚C |
|
FILTER |
˚F˚C |
|
|
|
WEEKLY |
|
ONLY1Hr. |
|
SIMPLE |
|
AUTO OFF |
|
Up/Down Air Direction indicator
The indicator  shows the direction of the outcoming airflow.
“One Hour Only” indicator
Displayed if the airflow is set to weak and downward during COOL or DRY mode. (Operation varies according to model.)
The indicator goes off after one hour, at which time the airflow direction also changes.
Room Temperature display
Shows the room temperature.
Louver display
Indicates the action of the swing louver. Does not appear if the louver is stationary.
 (Power On indicator)
Indicates that the power is on.
“Sensor” indication
Displayed when the remote controller sensor is used.
“Locked” indicator
Indicates that remote controller buttons have been locked.
“Clean The Filter” indicator
Comes on when it is time to clean the filter.
Timer indicators
The indicator comes on if the corresponding timer is set.
Fan Speed indicator
Shows the selected fan speed.
Ventilation indicator
Appears when the unit is running in Ventilation mode.
– 4 –

Operation Section
Set Temperature buttons |
|
|
|
Down |
|
|
|
Up |
|
|
|
Timer Menu button |
|
|
|
(Monitor/Set button) |
|
|
|
Mode button (Return button) |
|
|
|
|
|
TEMP. |
|
Set Time buttons |
|
|
|
Back |
|
MENU |
ON/OFF |
Ahead |
BACK |
MONITOR/SET |
DAY |
|
|||
Timer On/Off button |
PAR-21MAA |
CLOCK |
|
|
|||
(Set Day button) |
|
|
|
Opening the |
|
|
|
door. |
|
|
|
|
|
ON/OFF button |
|
|
|
Fan Speed button |
|
|
|
Filter |
button |
|
|
(<Enter> button) |
|
|
ON/OFF |
Test Run button |
|
|
|
|
|
|
|
Check button (Clear button) |
|
|
FILTER |
|
|
|
CHECK |
TEST |
|
OPERATION |
|
Airflow Up/Down button |
|
CLEAR |
|
|
|
|
|
Louver button |
|
|
|
( |
Operation button) |
|
|
|
To preceding operation |
|
|
|
number. |
Ventilation button
( Operation button)
To next operation number.
Note:
●If you press a button for a feature that is not installed at the indoor unit, the remote controller will display the “Not Available” message.
If you are using the remote controller to drive multiple indoor units, this message will appear only if the feature is not present at the parent unit.
–5 –

3 Screen Configuration
<Screen Types>
● Function Selection of remote controller:
|
Set the functions and ranges available to the remote |
|
controller (timer functions, operating restrictions, etc.) |
● Set Day/Time: |
Set the current day of the week or time. |
● Standard Control Screens: View and set the air conditioning system’s operating status
● Timer Monitor: |
View the currently set timer (weekly timer, simple timer, |
||||||||||||
|
|
|
|
|
|
or Auto Off timer) |
|
|
|
|
|
|
|
● Timer Setup: |
Set the operation of any of the timers (weekly timer, |
||||||||||||
|
|
|
|
|
|
simple timer, or Auto Off timer). |
|||||||
|
|
|
|||||||||||
Function Selection of remote controller |
|
Set Day/Time |
|||||||||||
|
|
|
|
|
|
|
|
|
|
|
TIME SUN |
|
|
|
|
|
|
|
|
|
|
|
|
|
|
||
|
|
|
|
|
|
|
|
|
|
|
|
|
|
|
|
|
|
|
|
|
|
|
|
|
|
|
|
|
|
|
|
|
|
|
|
|
|
|
|
|
|
|
|
|
|
|
|
|
|
|
|
|
|
|
|
AD C
Standard Control Screens

 ˚F˚C
˚F˚C
˚C
OFF |
ON |
BC
Timer Monitor |
Timer Setup |
MON |
SUN MON TUE WED THU FRI SAT |
TIMER
|
OFF |
˚F˚C |
B |
WEEKLY |
WEEKLY |
<How to change the screen>
A : Hold down both the Mode button and the Timer On/Off button for 2 seconds. B : Press the Timer Menu button.
C : Press the Mode (Return) button.
D : Press either of the Set Time buttons ( or
or  ).
).
4Setting the Day of the Week andTime
■Use this screen to change the current day of the week and time setting.
Note:
The day and time will not appear if clock use has been disabled at Function Selection of remote controller.
2
A
|
TIME SUN |
|
|
|
|
|
˚C |
|
˚C |
|
|
|
|
|
|
|
|
|
TEMP. |
|
|
ON/OFF |
|
|
MENU |
ON/OFF |
|
FILTER |
|
BACK |
MONITOR/SET |
DAY |
|
CHECK |
TEST |
PAR-21MAA |
CLOCK |
OPERATION |
CLEAR |
|
|
1
Day of the Week & Time display
9
4
<How to Set the Day of the Week and Time...>
3 Day of the Week Setting
2 |
TIME SUN |
|
4 Time Setting |
1.Press the  or
or  Set Time button A to show display 2.
2.Press the Timer On/Off (Set Day) button 9 to set the day.
* Each press advances the day shown at 3 : Sun → Mon → ... → Fri → Sat.
3.Press the appropriate Set Time button A as necessary to set the time.
* As you hold the button down, the time (at 4) will increment first in minute intervals, then in ten-minute intervals, and then in one-hour intervals.
4.After making the appropriate settings at Steps 2 and 3, press the Filter  button 4 to lock in the values.
– 6 –
Note: |
5 |
Using the Remote Controller |
|
Your new entries at Steps 2 and 3 will be cancelled if you press the Mode (Return) button |
|
||
2 before pressing the Filter button 4. |
|
|
|
|
|
|
(1) How to Start, Stop, Change the Mode, and Adjust the Temperature
5. Press the Mode (Return) button 2to complete the setting procedure. This will return |
|
|
|
|
|
|
|
the display to the standard control screen, where 1 will now show the newly set day |
|
|
|
|
|
|
|
and time. |
2 |
|
|
|
|
|
6 |
|
|
|
|
|
|
||
|
|
|
|
|
|
|
4 |
|
3 |
˚C |
|
˚C |
|
|
5 |
|
|
|
|
|
8 |
||
|
|
|
|
|
|
||
|
3 |
|
|
|
|
|
|
|
TEMP. |
|
|
ON/OFF |
|
|
|
|
2 |
MENU |
ON/OFF |
|
FILTER |
7 |
|
|
|
|
|||||
|
|
|
|
|
|
|
|
|
BACK |
MONITOR/SET |
DAY |
|
CHECK |
TEST |
1 |
|
PAR-21MAA |
CLOCK |
OPERATION |
CLEAR |
|
||
|
|
1 |
|||||
|
|
|
|
|
|
|
|
|
|
|
|
|
|
|
5 |
|
|
|
|
|
|
|
6 |
|
|
|
|
7 8 |
|
|
|
|
<To Start Operation> |
|
|
|
<To Stop Operation> |
||
■ Press the ON/OFF button 1. |
■ Press the ON/OFF button 1again. |
• The ON lamp 1 and the display area |
• The ON lamp 1and the display |
come on. |
area go dark. |
Note:
● When the unit is restarted, initial settings are as follows.
|
Remote Controller settings |
|||
Mode |
|
Last operation mode |
||
Temperature |
Last set temperature |
|||
setting |
||||
|
|
|
||
Fan speed |
|
Last set fan speed |
||
|
|
COOL or DRY |
Horiz. |
|
|
|
outlet |
||
|
|
|
||
Airflow up/ |
Mode |
HEAT |
Last |
|
down |
setting |
|||
|
|
|||
|
|
FAN |
Horiz. |
|
|
|
outlet |
||
|
|
|
||
– 7 – |
|
|
|
|

<Selecting the Mode>
■With the unit running, press the Mode button 2 as many times as necessary.
•Each press switches operation to the next mode, in the sequence shown below. The currently selected mode is shown at 2.
→ COOL → DRY → FAN → AUTO → HEAT → Ventilate |
|||
*1 |
*1,*3,*4 |
*1 |
*1,*2 |
Note:
*1 Availability of this mode depends on the type of unit connected.
*2 Appears only on Mr. Slim units with installed ventilation functionality.
*3 Does not appear if Auto Mode has been disabled at the Function Selection of remote controller. For information about how to set this function, refer to section 6, item [4]– 2 (2).
*4 HEAT and COOL do not appear during AUTO mode if Auto mode display has been disabled at the Function Selection of remote controller. For information about how to set this function, refer to section 6, item [4]–4 (3).
<To Change the Room Temperature Setting...>
■To lower the temperature: Press the  Set Temperature button 3.
■To raise the temperature: Press the  Set Temperature button 3.
•Each press changes the setting by 1 °C. The current setting is displayed at 3.
•The available ranges are as follows. *1, *2
COOL or DRY |
HEAT mode |
AUTO mode |
FAN |
|
mode |
||||
|
|
|
||
19 - 30 °C |
17 - 28 °C |
19 - 28 °C |
Cannot be set. |
|
(67 - 87 °F) *3 |
(63 - 83 °F) *3 |
(67 - 83 °F) *3 |
||
|
||||
|
|
|
|
Note:
*1 Available ranges vary according to the type of unit connected (Mr. Slim, CITY MULTI, etc.).
*2 If temperature range limits have been set at Function Selection of remote controller, the available ranges will be narrower than shown above. If you attempt to set a value outside of the restricted range, the display will show a message indicating that the range is currently restricted.
For information about how to set and clear these range limits, refer to section 6, item [4]–2 (3).
*3 If Function Selection of remote controller are set to display the temperature in Fahrenheit. For information about how to select °C or °F , refer to section 6, item [4]– 4 (1).
<Room Temperature Display>
During operation, the intake temperature is shown at 4.
Note:
●To display range is 8 °C to 39 °C. If the temperature is below 8 °C or above 39 °C, the corresponding value (8 °C or 39 °C) will blink on the display.
●If you are using the remote controller to drive multiple indoor units, the display will show the temperature at the master unit.
●You can select which temperature sensor to use to detect the temperature: either the sensor at the indoor unit (“At Unit”), or else the sensor at the remote controller (“At Remote”). The default setting is “At Unit”.
To change the location of the sensor at the indoor unit:
• CITY MULTI models: |
Consult your dealer. |
• Mr. Slim models: |
Refer to the installation instructions. |
●If room temperature display is disabled in Function Selection of remote controller, the room temperature will not appear. For information about how to enable or disable this feature, refer to section 6, item [4]–4 (2).
●If Fahrenheit display is selected at Function Selection of remote controller, the display will show the °F mark. For information about how to select °C or °F, refer to section
6, item [4]–4 (1).
– 8 –

(2) Fan Speed, Airflow Direction, and Ventilation
<To Change the Fan Speed...>
■ Press the Fan Speed button 5 as many times as necessary while the system is running.
•Each press changes the force. The currently selected speed is shown at 5.
•The change sequence, and the available settings, are as follows.
FAN |
|
Display |
|
|
SPEED |
|
|
|
|
|
|
|
|
|
Auto |
Speed 1 |
Speed 2 |
Speed 3 |
Speed 4 |
4-speed |
|
|
|
|
model |
|
|
|
|
3-speed |
|
|
|
|
model |
|
|
|
|
2-speed |
|
|
|
|
model |
|
|
|
|
Note:
●The number of available fan speeds depends on the type of unit connected. Note also that some units do not provide an “Auto” setting.
●In the following cases, the actual fan speed generated by the unit will differ from the speed shown the remote controller display.
1.While the display is showing “STAND BY” or “DEFROST”.
2.Immediately after starting HEAT mode (while the system is waiting for the mode change to take effect).
3.In HEAT mode, when room temperature is higher than the temperature setting.
4.When the unit is in DRY mode.
<To Change the Airflow’s Up/Down Direction>
■With the unit running, press the Airflow Up/Down button 6 as necessary.
•Each press changes the direction. The current direction is shown at 6.
•The change sequence, and the available settings, are as follows.
Auto |
Horiz. |
1 |
2 |
3 |
4 |
Swing |
Display
*Note that during swing operation, the directional indication on the screen does not change in sync with the directional vanes on the unit.
*Some models do not support directional settings.
Note:
●Available directions depend on the type of unit connected. Note also that some units do not provide an “Auto” setting.
●In the following cases, the actual air direction will differ from the direction indicated on the remote controller display.
1.While the display is showing “STAND BY” or “DEFROST”.
2.Immediately after starting heater mode (while the system is waiting for the mode change to take effect).
3.In heat mode, when room temperature is higher than the temperature setting.
<To Change the Right/Left Air Direction>
■Press the louver button 7 as necessary.
•The louver image 7 appears.
Each press of the button switches the setting as follows.
|
|
|
|
No display |
During swing operation, the arrow display |
|
|
|
|||
|
|
|
|
(Stop) |
|
|
|
|
|
move to the left and right. |
|
(ON) |
|
|
|
(OFF) |
|
|
|
|
|
– 9 –
<Using Ventilation>
On Mr. Slim models
●To run the ventilator together with the indoor unit:
■Press the ON/OFF button 1.
•The Vent indication appears on the screen (at 8). The ventilator will now automatically operate whenever the indoor unit is running.
●To run the ventilator independently:
■Press the Mode button 2until 
 appears on the display. This will cause the ventilator to start.
●To change the ventilator force:
■Press the Ventilation button 8 as necessary.
•Each press toggles the setting, as shown below.
|
▲ |
|
▲ |
Low |
High |
On CITY MULTI models
●To run the ventilator together with the indoor unit:
■Press the ON/OFF button 1.
•The Vent indication appears on the screen (at 8). The ventilator will now automatically operate whenever the indoor unit is running.
●To run the ventilator only when the indoor unit is off:
■Press the Ventilation button 8 while the indoor unit is off.
•The On lamp (at 1) and the Vent indication (at 8) come on.
●To change the ventilator force:
■Press the Ventilation button 8 as necessary.
•Each press toggles the setting, as shown below.
▲ |
▲ |
▲ |
No display |
|
(Stop) |
||||
|
|
|
||
(Low) |
(High) |
|
(OFF) |
Note:
● With some model configurations, the fan on the indoor unit may come on even when you set the ventilator to run independently.
– 10 –
(3) Using the Timer
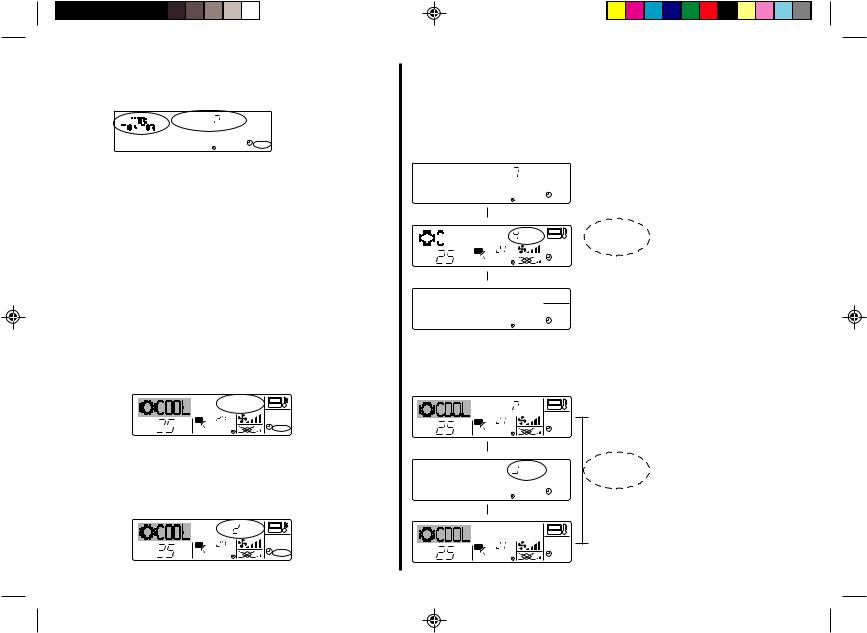
This section explains how to set and use the timer. You can use Function Selection of remote controller to select which of three types of timer to use: 1 Weekly timer, 2 Simple timer, or 3 Auto Off timer.
For information about how to set the Function Selection of remote controller, refer to section 6, item [4]–3 (3).
1Using the Weekly Timer
■The weekly timer can be used to set up to eight operations for each day of the week.
•Each operation may consist of any of the following: ON/OFF time together with a temperature setting, or ON/OFF time only, or temperature setting only.
•When the current time reaches a time set at this timer, the air conditioner carries out the action set by the timer.
■Time setting resolution for this timer is 1 minute.
Note:
*1. Weekly Timer/Simple Timer/Auto Off Timer cannot be used at the same time.
*2. The weekly timer will not operate when any of the following conditions is in effect.
The timer feature is off; the system is in an malfunction state; a test run is in progress; the remote controller is undergoing self-check or remote controller check; the user is in the process of setting a function; the user is in the process of setting the timer; the user is in the process of setting the current day of the week or time; the system is under central control. (Specifically, the system will not carry out operations (unit on, unit off, or temperature setting) that are prohibited during these conditions.)
Operation No.
4 |
2 |
3 Day Setting |
|
|
|
|
|
|
SUN |
|
|
|
|
|
|
|
ON |
|
|
|
|
|
|
˚C |
|
|
1 |
|
|
|
|
WEEKLY |
|
|
|
TEMP. |
|
|
ON/OFF |
|
3 |
|
|
|
|
1 |
||
|
|
|
|
|
|
|
|
|
|
|
|
|
B |
|
MENU |
ON/OFF |
|
FILTER |
4 |
|
|
|
|
|
|
|
|
BACK |
MONITOR/SET |
DAY |
|
CHECK |
TEST |
0 |
|
CLOCK |
OPERATION |
|
|
||
PAR-21MAA |
CLEAR |
|
|
|||
2 |
A |
9 |
78 |
|
|
|
<How to Set the Weekly Timer>
1.Be sure that you are at a standard control screen, and that the weekly timer indicator 1 is shown in the display.
2.Press the Timer Menu button B, so that the “Set Up” appears on the screen (at 2). (Note that each press of the button toggles the display between “Set Up” and “Monitor”.)
3.Press the Timer On/Off (Set Day) button 9to set the day. Each press advances the display at 3to the next setting, in the following sequence: “Sun Mon Tues Wed Thurs Fri Sat” → “Sun” → ... → “Fri” → “Sat” → “Sun Mon Tues Wed Thurs Fri Sat”...
4.Press the  or
or  Operation button (7 or 8) as necessary to select the appropriate operation number (1 to 8) 4.
* Your inputs at Steps 3 and 4 will select one of the cells from the matrix illustrated below. (The remote-controller display at left shows how the display would appear when setting Operation 1 for Sunday to the values indicated below.)
Setup Matrix
Op No. |
Sunday |
Monday |
… |
Saturday |
|
<Operation 1 settings for Sun- |
|
|
|
|
|
|
day> |
No. 1 |
• 8:30 |
|
|
|
▲ |
Start the air conditioner at 8:30, |
• ON |
|
|
|
with the temperature set to |
||
|
• 23 °C |
|
|
|
|
23 °C. |
No. 2 |
• 10:00 |
• 10:00 |
• 10:00 |
• 10:00 |
▲ |
|
|
||||||
• OFF |
• OFF |
• OFF |
• OFF |
|
<Operation 2 settings for every |
|
|
|
day> |
||||
… |
|
|
|
|
|
Turn off the air conditioner at |
|
|
|
|
|
|
10:00. |
No. 8 |
|
|
|
|
|
|
|
|
|
|
|
|
|
|
|
|
|
|
|
Note:
By setting the day to “Sun Mon Tues Wed Thurs Fri Sat”, you can set the same operation to be carried out at the same time every day.
(Example: Operation 2 above, which is the same for all days of the week.)
– 11 –

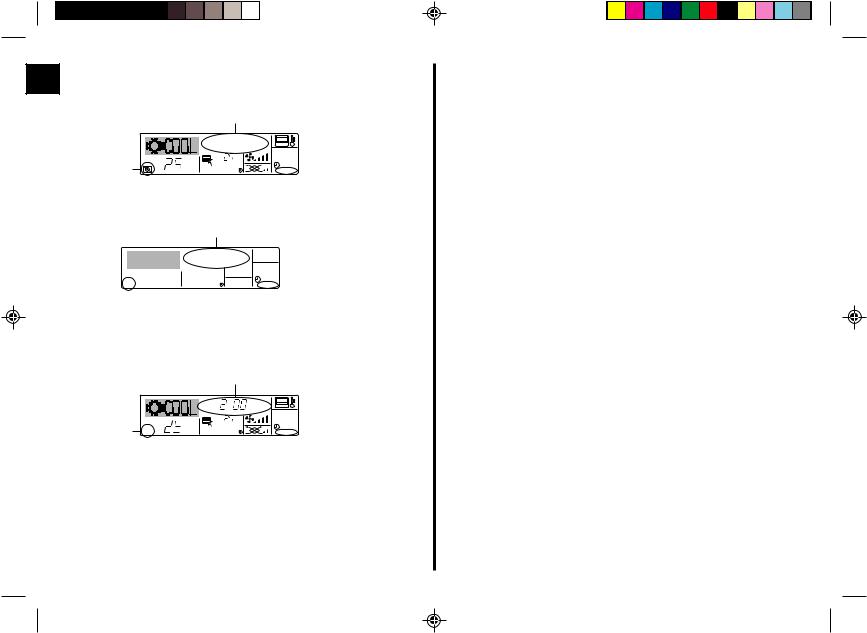
<Setting the Weekly Timer> |
|
<How to View the Weekly Timer Settings> |
||
Shows the time setting |
5 |
6 Shows the selected operation (ON or OFF) |
8 |
9 Timer Settings |
|
|
* Does not appear if operation is not set. |
|
|
|
|
|
|
SUN |
|
|
|
TIMER |
ON |
SUN |
|
|
|
OFF |
|
|
ON |
|
˚C |
|
|
|
|
|
˚C |
WEEKLY |
1 |
WEEKLY |
7 Shows the temperature setting |
|
|
* Does not appear if temperature is not set. |
|
5. Press the appropriate Set Time button A as necessary to set the desired time (at 5). |
1. Be sure that the weekly timer indicator is visible on the screen (at 1). |
|||||
2. Press the Timer Menu button Bso that “Monitor” is indicated on the screen |
||||||
* As you hold the button down, the time first increments in minute intervals, then in ten- |
||||||
(at 8). |
|
|
|
|||
minute intervals, and then in one-hour intervals. |
|
|
|
|
||
|
3. Press the Timer On/Off (Set Day) button 9 as necessary to select the day |
|||||
6. Press the ON/OFF button 1 to select the desired operation (ON or OFF), at 6. |
||||||
you wish to view. |
|
|
||||
* Each press changes the next setting, in the following sequence: No display (no setting) → |
|
|
||||
4. Press the |
or |
Operation button (7 or 8) as necessary to change the |
||||
“ON” → “OFF” |
|
|||||
|
timer operation shown on the display (at 9). |
|||||
7. Press the appropriate Set Temperature button 3 to set the desired temperature (at 7). |
||||||
* Each press will advance to the next timer operation, in order of time |
||||||
* Each press changes the setting, in the following sequence: No display (no setting) |
||||||
setting. |
|
|
|
|||
24 25 ... 29 30 12 ... 23 No display. |
|
|
|
|
||
|
5. To close the monitor and return to the standard control screen, press the |
|||||
(Available range: The range for the setting is 12 °C to 30 °C. The actual range over which |
||||||
Mode (Return) button 2. |
|
|||||
the temperature can be controlled, however, will vary according to the type of the |
|
|||||
|
|
|
|
|||
connected unit.) |
|
|
|
|
|
|
8. After making the appropriate settings at Steps 5, 6. and 7, press the Filter |
button 4to lock |
|
|
|
|
|
in the values. |
|
<To Turn Off the Weekly Timer> |
||||
To clear the currently set values for the selected operation, press and quickly release the |
Press the Timer On/Off button 9 so that “Timer Off” appears at 0. |
|||||
Check (Clear) button 1 once. |
|
|
|
|
|
|
* The displayed time setting will change to “—:—”, and the On/Off and temperature settings |
|
|
TIME |
SUN |
||
will all disappear. |
|
|
|
|
|
|
(To clear all weekly timer settings at once, hold down the Check (Clear) button 0 for two |
|
|
˚C |
˚C |
||
0 |
|
WEEKLY |
||||
seconds or more. The display will begin flashing, indicating that all settings have been |
|
|
|
|||
cleared.) |
|
|
|
|
|
|
Note: |
|
<To Turn On the Weekly Timer> |
|
|
|
|
||||||||||
Your new entries will be cancelled if you press the Mode (Return) button 2before pressing the |
|
|
|
|
||||||||||||
Press the Timer On/Off button 9so that the “Timer Off” indication (at 0) goes |
||||||||||||||||
Filter |
button 4. |
|||||||||||||||
dark. |
|
|
|
|
||||||||||||
If you have set two or more different operations for exactly the same time, only the operation with |
|
|
|
|
||||||||||||
|
|
|
|
|
|
|
|
|
|
|
|
|
|
|||
the highest Operation No. will be carried out. |
|
|
|
|
|
|
|
|
|
TIME SUN |
|
|
|
|
||
9. Repeat Steps 3 to 8 as necessary to fill as many of the available cells as you wish. |
|
|
|
|
|
|
|
|
|
|
˚C |
|
|
|
||
10. Press the mode (Return) button 2to return to the standard control screen and complete the |
|
|
|
|
|
|
|
|
|
|
|
|
|
|||
0 |
|
|
|
|
|
|
˚C |
|
|
WEEKLY |
||||||
|
|
|
|
|
|
|
|
|
||||||||
|
|
|||||||||||||||
setting procedure. |
|
|
|
|
|
|
|
|
|
|
|
|
|
|||
|
|
|
|
|
|
|
|
|
|
|
|
|
||||
11.To activate the timer, press the Timer On/Off button 9, so that the “Timer Off” indication disappears from the screen. Be sure that the “Timer Off” indication is no longer displayed.
* If there are no timer settings, the “Timer Off” indication will flash on the screen.
–12 –

2Using the Simple Timer
■ You can set the simple timer in any of three ways.
• |
Start time only: |
The air conditioner starts when the set time has elapsed. |
• |
Stop time only: |
The air conditioner stops when the set time has elapsed. |
• |
Start & stop times: The air conditioner starts and stops at the respective elapsed |
|
|
|
times. |
■The simple timer (start and stop) can be set only once within a 72-hour period. The time setting is made in hour increments.
Note:
*1. Weekly Timer/Simple Timer/Auto Off Timer cannot be used at the same time. *2. The simple timer will not operate when any of the following conditions is in effect.
The timer is off; the system is in malfunction state; a test run is in progress; the remote controller is undergoing self-check or remote controller check; the user is in the process of selecting a function; the user is in the process of setting the timer; the system is under central control. (Under these conditions, On/Off operation is prohibited.)
|
|
|
Hr |
ON |
|
|
|
|
|
|
AFTER |
|
|
|
|
|
|
|
|
|
SIMPLE |
|
|
|
TEMP. |
|
|
|
ON/OFF |
|
1 |
|
MENU |
ON/OFF |
|
|
|
|
B |
|
|
|
FILTER |
4 |
|||
|
|
|
|
|
|
|
|
BACK |
MONITOR/SET |
DAY |
|
|
CHECK |
TEST |
0 |
|
CLOCK |
OPERATION |
|
|
|||
PAR-21MAA |
CLEAR |
|
|
||||
2 |
A |
9 |
|
|
|
|
|
<How to Set the Simple Timer>
24 Timer Setting
AFTER |
ON |
3 Action (On or Off) |
Hr |
|
* “— —” is displayed if there is no
1 setting.
SIMPLE
1.Be sure that you are at a standard control screen, and that the simple timer indicator is visible in the display (at 1).
When something other than the Simple Timer is displayed, set it to SIMPLE TIMER using the function selection of remote controller (see 6.[4]–3 (3)) timer function setting.
2.Press the Timer Menu button B, so that the “Set Up” appears on the screen (at 2). (Note that each press of the button toggles the display between “Set Up” and “Monitor”.)
3.Press the ON/OFF button 1 to display the current ON or OFF simple timer setting. Press the button once to display the time remaining to ON, and then again to display
the time remaining to OFF. (The ON/OFF indication appears at 3).
• “ON” timer: The air conditioner will start operation when the specified number of hours has elapsed.
• “OFF” timer:The air conditioner will stop operation when the specified number of hours has elapsed.
4.With “ON” or “OFF” showing at 3: Press the appropriate Set Time button A as necessary to set the hours to ON (if “ON” is displayed) or the hours to OFF (if “OFF” is displayed) at 4.
• Available Range: 1 to 72 hours
5.To set both the ON and OFF times, repeat Steps 3 and 4.
* Note that ON and OFF times cannot be set to the same value.
6.To clear the current ON or OFF setting: Display the ON or OFF setting (see step 3) and then press the Check (Clear) button 0 so that the time setting clears to “—” at 4. (If you want to use only an ON setting or only an OFF setting, be sure that the setting you do not wish to use is shown as “—”.)
7.After completing steps 3 to 6 above, press the Filter  button 4to lock in the value.
Note:
Your new settings will be cancelled if you press the Mode (Return) button 2 before pressing the Filter  button 4.
8.Press the Mode (Return) button 2 to return to the standard control screen.
9.Press the Timer On/Off button 9 to start the timer countdown. When the timer is running, the timer value is visible on the display. Be sure that the timer value is visible and appropriate.
– 13 –
|
|
<Viewing the Current Simple Timer Settings> |
Examples |
|
|
|
|
|
|
|
|
|
|
||||||||||||||||||
|
5 |
|
|
|
6 Timer Setting |
If ON and OFF times have both been set at the simple timer, operation and display are as |
|||||||||||||||||||||||||
|
|
|
|
indicated below. |
|
|
|
|
|
|
|
||||||||||||||||||||
|
|
|
|
|
|
|
|
||||||||||||||||||||||||
|
|
|
|
|
|
|
TIMER |
|
|
Hr ON |
|
|
|
Example 1: |
|
|
|
|
|
|
|
|
|
|
|||||||
|
|
|
|
|
|
|
|
|
|
|
|
|
Start the timer, with ON time set sooner than OFF time |
|
|||||||||||||||||
|
|
|
|
|
|
|
|
|
|
AFTER OFF |
|
|
1 |
|
ON Setting: |
3 hours |
|
|
|
|
|
|
|
||||||||
|
|
|
|
|
|
|
|
|
|
|
|
SIMPLE |
|
|
|
|
|
|
|
|
|
||||||||||
|
|
|
|
|
|
|
|
|
|
|
|
|
|
|
|
|
|
|
|
|
|||||||||||
|
|
|
|
|
|
|
|
|
|
|
|
|
|
OFF Setting: 7 hours |
|
|
|
|
|
|
|
||||||||||
|
|
|
|
|
|
|
|
|
|
|
|
|
|
|
|
|
|
|
|
|
|||||||||||
|
|
|
|
|
|
|
|
|
|
|
|
|
|
|
|
|
|
|
|
|
|
|
|||||||||
|
|
1. Be sure that the simple timer indicator is visible on the screen (at 1). |
|
|
|
|
|
|
|
|
|
Hr ON |
|
|
|
|
|
|
|
||||||||||||
|
|
|
|
|
|
|
|
|
|
|
|
|
|
|
|
|
|
||||||||||||||
|
|
|
|
|
|
|
|
|
|
|
AFTER |
|
|
|
|
|
|
|
|||||||||||||
|
|
2. Press the Timer Menu button B, so that the “Monitor” appears on the screen |
|
|
|
|
|
|
|
|
|
|
|
|
|
|
|
At Timer Start |
Display shows the timer’s ON set- |
||||||||||||
|
|
(at 5). |
|
|
|
|
|
|
|
|
|
|
|
|
|
|
|
|
|
SIMPLE |
|
ting (hours remaining to ON). |
|||||||||
|
|
|
|
|
|
|
|
|
|
|
|
|
|
|
|
|
|
|
|
|
|
|
|
|
|
||||||
|
|
• If the ON or OFF simple timer is running, the current timer value will |
|
|
|
|
|
|
|
▲ |
|
|
|
|
|
|
Display changes to show the tim- |
||||||||||||||
|
|
appear at 6. |
|
|
|
|
|
|
|
|
|
|
|
|
|
|
|
|
|
|
|
At 3 hours |
|||||||||
|
|
|
|
|
|
|
|
|
|
|
|
|
|
|
|
|
|
|
|
|
|
|
|
||||||||
|
|
• If ON and OFF values have both been set, the two values appear |
|
|
|
|
|
|
|
|
|
Hr |
|
|
|
|
|
after timer |
er’s OFF setting (hours remaining |
||||||||||||
|
|
|
|
|
|
|
|
|
|
|
AFTER OFF |
|
|
|
|
|
to OFF). |
||||||||||||||
|
|
|
|
|
|
|
|
|
|
|
|
||||||||||||||||||||
|
|
alternately. |
|
|
|
|
|
|
|
|
|
|
|
|
|
|
|
˚C |
|
|
|
|
|
|
start |
|
|||||
|
|
|
|
|
|
|
|
|
|
|
|
|
|
˚C |
|
|
|
The time displayed is OFF setting |
|||||||||||||
|
|
3. Press the Mode (Return) button 2 to close the monitor display and return |
|
|
|
|
|
|
|
|
SIMPLE |
|
|
|
|||||||||||||||||
|
|
|
|
|
|
|
|
|
|||||||||||||||||||||||
|
|
|
|
|
|
|
|
|
|
|
|
|
|
|
(7 hours) – ON setting (3 hours) = |
||||||||||||||||
|
|
to the standard control screen. |
|
|
|
|
|
|
|
|
|
|
|
|
|
|
|
|
|||||||||||||
|
|
|
|
|
|
|
|
|
▲ |
|
|
|
|
|
|
4 hours. |
|||||||||||||||
|
|
|
|
|
|
|
|
|
|
|
|
|
|
|
|
|
|
|
|
|
|
|
|
|
|
|
|
||||
|
|
|
|
|
|
|
|
|
|
|
|
|
|
|
|
|
|
|
|
|
|
|
|
|
|
|
At 7 hours after |
The air conditioner goes off, and |
|||
|
|
|
|
|
|
|
|
|
|
|
|
|
|
|
|
|
|
|
|
|
|
|
|
|
|
|
|
|
|
||
|
|
|
|
|
|
|
|
|
|
|
|
|
|
|
|
|
|
|
|
|
|
|
|
|
|
|
|
|
|
||
|
|
|
|
|
|
|
|
|
|
|
|
|
|
|
|
|
|
|
|
|
|
|
|
|
|
|
|
|
|
timer start |
will remain off until someone re- |
|
|
|
|
|
|
|
|
|
|
|
|
|
|
|
|
|
|
|
|
|
|
|
|
|
SIMPLE |
starts it. |
|||||
|
|
<To Turn Off the Simple Timer...> |
|
|
|
|
|
|
|
|
|
|
|
|
|
|
|
|
|||||||||||||
|
|
|
|
|
|
|
|
|
|
|
|
|
|
|
|
|
|
|
|||||||||||||
|
|
Press the Timer On/Off button 9 so that the timer setting no longer appears |
Example 2: |
|
|
|
|
|
|
|
|
|
|
||||||||||||||||||
|
|
on the screen (at 7). |
|
|
|
|
|
|
|
|
Start the timer, with OFF time is sooner than ON time |
|
|||||||||||||||||||
|
|
|
|
|
|
|
|
7 |
|
|
|
ON Setting: |
5 hours |
|
|
|
|
|
|
|
|||||||||||
|
|
|
|
|
|
|
|
|
|
|
OFF Setting: 2 hours |
|
|
|
|
|
|
|
|||||||||||||
|
|
|
|
|
|
|
|
|
|
|
|
|
|
|
|
|
|
|
|
|
|
|
|
|
|
|
|
|
|
|
|
|
Hr |
|
|
|
AFTER OFF |
At Timer Start |
Display shows the timer’s OFF |
˚C |
˚C |
||
˚C |
˚C |
|
setting (hours remaining to OFF). |
SIMPLE |
SIMPLE |
|
▲ |
Display changes to show the tim- |
<To Turn On the Simple Timer...> |
|
|
|
Hr |
ON |
|
|
|
|
|
At 2 hours |
er’s ON setting (hours remaining |
|
Press the Timer On/Off button 9 so that the timer setting becomes visible at |
|
|
|
AFTER |
|
|
|
|
|
|
after timer |
to ON). |
|
|
|
|
|
|
|
|
|
|
|
start |
|||
7. |
|
|
|
|
|
|
|
SIMPLE |
The time displayed is ON setting |
||||
|
|
|
|
|
|
|
|||||||
|
|
|
|
|
|
|
|
(5 hours) – OFF setting (2 hours) = |
|||||
7 |
|
|
|
|
|
|
|
|
|
|
|
||
|
|
▲ |
|
|
|
|
|
|
|
3 hours. |
|||
|
|
|
|
|
|
|
|
|
|
|
|||
|
|
|
|
|
|
|
|
|
|
|
|
||
|
|
|
|
|
|
|
|
|
|
|
|
||
Hr |
ON |
AFTER |
|
At 5 hours after |
|
|
˚C |
|
The air conditioner comes on, and |
||
˚C |
|
˚C |
|
|
˚C |
timer start |
will continue to run until someone |
||
SIMPLE |
||||
|
|
SIMPLE |
turns it off. |
|
|
|
|
– 14 –

3Using the Auto Off Timer
■This timer begins countdown when the air conditioner starts, and shuts the air conditioner off when the set time has elapsed.
■Available settings run from 30 minutes to 4 hours, in 30-minute intervals.
Note:
*1. Weekly Timer/Simple Timer/Auto Off Timer cannot be used at the same time. *2. The Auto Off timer will not operate when any of the following conditions is in effect.
The timer is off; the system is in malfunction state; a test run is in progress; the remote controller is undergoing self-check or remote controller check; the user is in the process of selecting a function; the user is in the process of setting the timer; the system is under central control. (Under these conditions, On/Off operation is prohibited.)
|
AFTER |
OFF |
|
|
|
|
|
|
|
|
AUTO OFF |
|
|
|
TEMP. |
|
|
ON/OFF |
|
|
|
MENU |
ON/OFF |
|
|
|
B |
|
|
FILTER |
4 |
|||
|
|
|
|
|
|
|
BACK |
MONITOR/SET |
DAY |
|
CHECK |
TEST |
|
PAR-21MAA |
CLOCK |
OPERATION |
CLEAR |
|
|
|
2 |
A |
9 |
|
|
|
|
<How to Set the Auto Off Timer>
23 Timer Setting
AFTER |
OFF |
AUTO OFF 1
1.Be sure that you are at a standard control screen, and that the Auto Off timer indicator is visible in the display (at 1).
When something other than the Auto Off Timer is displayed, set it to AUTO OFF TIMER using the function selection of remote controller (see 6.[4]–3 (3)) timer function setting.
2.Hold down the Timer Menu button Bfor 3 seconds, so that the “Set Up” appears on the screen (at 2).
(Note that each press of the button toggles the display between “Set Up” and “Monitor”.)
3.Press the appropriate Set Time button A as necessary to set the OFF time (at 3).
4.Press the Filter  button 4 to lock in the setting.
Note:
Your entry will be cancelled if you press the Mode (Return) button 2before pressing the Filter  button 4.
5.Press the Mode (Return) button 2 to complete the setting procedure and return to the standard control screen.
6.If the air conditioner is already running, the timer starts countdown immediately. Be sure to check that the timer setting appears correctly on the display.
<Checking the Current Auto Off Timer Setting>
45 Timer Setting
TIMER
AFTER |
OFF |
AUTO OFF 1
1.Be sure that the “Auto Off” is visible on the screen (at 1).
2.Hold down the Timer Menu button Bfor 3 seconds, so that “Monitor” is indicated on the screen (at 4).
• The timer remaining to shutdown appears at 5.
3.To close the monitor and return to the standard control screen, press the Mode (Return) button 2.
– 15 –
<To Turn Off the Auto Off Timer...>
●Hold down the Timer On/Off button 9for 3 seconds, so that “Timer Off” appears (at 6) and the timer value (at 7) disappears.
|
7 |
|
˚C |
6 |
˚C |
AUTO OFF |
●Alternatively, turn off the air conditioner itself. The timer value (at 7) will disappear from the screen.
7
AUTO OFF
<To Turn On the Auto Off Timer...>
●Hold down the Timer On/Off button 9 for 3 seconds. The “Timer Off “ indication disappears (at 6), and the timer setting comes on the display (at 7).
●Alternatively, turn on the air conditioner. The timer value will appear at 7.
|
7 |
AFTER |
OFF |
˚C |
˚C |
|
|
6 |
AUTO OFF |
– 16 –

(4)Locking the Remote Controller Buttons (Operation function limit controller)
■If you wish, you can lock the remote controller buttons. You can use the Function Selection of remote controller to select which type of lock to use. (For information about selecting the lock type, see section 6, item [4]–2 (1)).
Specifically, you can use either of the following two lock types.
1Lock All Buttons: Locks all of the buttons on the remote controller. 2Lock All Except ON/OFF: Locks all buttons other than the ON/OFF button.
Note:
The “Locked” indicator appears on the screen to indicate that buttons are currently locked.
|
|
|
|
|
1 |
|
|
|
|
|
Lock Indicator |
|
|
TIME SUN |
|
|
|
|
|
|
˚C |
FUNCTION |
|
|
˚C |
|
|
|
|
|
|
|
|
|
|
|
TEMP. |
|
ON/OFF |
|
|
|
|
|
|
|
1 |
|
MENU |
ON/OFF |
|
FILTER |
|
BACK |
MONITOR/SET |
DAY |
|
|
4 |
|
CHECK |
TEST |
|||
PAR-21MAA |
CLOCK |
OPERATION |
CLEAR |
|
|
<How to Lock the Buttons>
1.While holding down the Filter button 4, press and hold down the ON/OFF button 1 for 2 seconds. The “Locked” indication appears on the screen (at 1), indicating that the lock is now engaged.
* If locking has been disabled in Function Selection of remote controller, the screen will display the “Not Available” message when you press the buttons as described above.
 1
1
FUNCTION
˚C
˚C
• If you press a locked button, the “Locked” indication (at 1) will blink on the display.
 1
1
FUNCTION
˚C
˚C
<How to Unlock the Buttons>
1.While holding down the Filter button 4, press and hold down the ON/OFF button 1 for 2 seconds—so that the “Locked” indication disappears from the screen (at 1).
 1
1
˚C
˚C
– 17 –

(5) Other Indications
<Centrally Controlled>
˚C
˚C
TEMP. |
ON/OFF |
●Displayed when operation is controlled by central controller, etc. Restricted operations are shown below.
•ON/OFF (including timer operation)
•Operation mode
•Set temperature
Note:
May also be individually restricted.
<Flashing Mode Indicator>
˚C
˚C
 TEMP.
TEMP.  ON/OFF
■ When flashes continuously
Displayed when another indoor unit connected to the outdoor unit is already operating in a different operation mode.
Match with the operation mode of the other indoor unit.
■When mode switched after display flashes
Displayed when operation mode is restricted for each season by central controller, etc.
Use another operation mode.
<Flashing “Filter”>
˚C |
˚C |
FILTER |
|
||
|
|
 TEMP.
TEMP.  ON/OFF
■ Indicates that the filter needs cleaning. Clean the filter.
■When resetting “FILTER” display
When the [FILTER] button is pressed two times successively after cleaning the filter, the display goes off and is reset.
Note:
●When two or more different types of indoor unit are controlled, the cleaning period differs with the type of filter. When the master unit cleaning period arrives, “FILTER” is displayed. When the filter display goes off, the cumulative time is reset.
●“FILTER” indicates the cleaning period when the air conditioner was used under general indoor air conditions by criteria time. Since the degree of dirtiness depends on the environmental conditions, clean the filter accordingly.
●The filter cleaning period cumulative time differs with the model.
– 18 –

<Flashing Error Codes>
On CITY MULTI Models |
|
|
On Mr. Slim Models |
|
||||||||||||||||
|
|
|
|
|
|
|
|
|
|
|
|
|
|
|
|
|
|
|
|
|
|
|
|
|
|
|
|
|
|
|
|
|
|
|
|
|
|
|
|
|
|
|
|
|
|
|
|
|
|
|
|
|
|
|
|
|
|
|
|
|
|
|
|
|
|
|
|
|
|
|
|
|
|
|
|
|
|
|
|
|
|
|
|
|
|
|
|
|
|
|
|
|
|
|
|
|
|
|
|
|
|
|
|
|
ERROR CODE |
ERROR CODE |
|
|
|
|
|
|
|
|
ON lamp |
|
|
|
|
|
|
|
|
ON lamp |
|
|
|
|
|
|
|
|
|
|
|
|
|
|
|
|
|
|||
|
|
|
|
|
|
|
|
|
|
|
|
|
|
|
|
|||
|
|
|
|
|
|
|
|
|
|
|
|
|
|
|
|
|||
|
|
|
|
|
|
|
ON/OFF |
(Flashing) |
|
|
|
|
|
|
|
ON/OFF |
(Flashing) |
|
|
|
|
|
|
|
|
|
|
|
|
|
|
|
|
|
|
|
|
|
|
Error Code |
Indoor Unit’s Refrig- |
Error Code |
Indoor Unit No. |
|
||||||||||||
|
|
|||||||||||||||||
Indoor Unit No. |
|
|||||||||||||||||
|
|
|
|
|
|
|
|
erant Address |
|
|
|
|
|
|
|
|
|
|
|
|
|
|
|
|
|
|
|
|
|
|
Alternating Display |
|
|||||
If you have entered contact number to be called in the event of a problem, the screen displays this number. |
|
|
|
|
||||||||||||||
|
|
|
|
|
|
|
|
|
|
|||||||||
(You can set this up under Function Selection of remote controller. For information, refer to section 6.) |
|
|
|
|
|
|
|
|
|
|
||||||||
|
|
|
|
|
|
|
|
|
|
|
|
|
|
|
|
|
|
|
●If the ON lamp and error code are both flashing: This means that the air conditioner is out of order and operation has been stopped (and cannot resume). Take note of the indicated unit number and error code, then switch off the power to the air conditioner and call your dealer or servicer.
On CITY MULTI Models |
On Mr. Slim Models |
|
ERROR CODE |
|
˚C |
˚C |
˚C |
|
ON/OFF |
|
When the Check button is pressed: |
|
CALL:XXXX |
ERROR CODE |
XXX:XXX |
˚C |
|
ON/OFF |
ON/OFF |
Error Code |
Error Code |
●If only the error code is flashing (while the ON lamp remains lit): Operation is continuing, but there may be a problem with the system. In this case, you should note down the error code and then call your dealer or servicer for advice.
*If you have entered contact number to be called in the event of a problem, push the Check button to display it on the screen. (You can set this up under Function Selection of remote controller. For information, refer to section 6.)
–19 –
6 Function Selection
Function selection of remote controller
The setting of the following remote controller functions can be changed using the remote controller function selection mode. Change the setting when needed.
Item 1 |
|
Item 2 |
Item 3 (Setting content) |
|
|
|
|
||
1. Change Language |
Language setting to display |
• Display in multiple languages is possible |
||
(“CHANGE |
|
|
|
|
LANGUAGE”) |
|
|
|
|
|
|
|
|
|
2. Function limit |
(1) |
Operation function limit setting (operation lock) (“LOCKING |
• Setting the range of operation limit (operation lock) |
|
(“FUNCTION |
|
FUNCTION”) |
|
|
SELECTION”) |
|
|
|
|
(2) |
Use of automatic mode setting (“SELECT AUTO MODE”) |
• Setting the use or non-use of “automatic” operation mode |
||
|
||||
|
|
|
|
|
|
(3) |
Temperature range limit setting (“LIMIT TEMP FUNCTION”) |
• Setting the temperature adjustable range (maximum, minimum) |
|
|
|
|
|
|
3. Mode selection |
(1) |
Remote controller main/sub setting (“CONTROLLER MAIN/ |
• Selecting main or sub remote controller |
|
(“MODE SELEC- |
|
SUB”) |
* When two remote controllers are connected to one group, one controller |
|
TION”) |
|
|
must be set to sub. |
|
|
|
|
|
|
|
(2) |
Use of clock setting (“CLOCK”) |
• Setting the use or non-use of clock function |
|
|
|
|
|
|
|
(3) |
Timer function setting (“WEEKLY TIMER”) |
• Setting the timer type |
|
|
|
|
|
|
|
(4) |
Contact number setting for error situation (“CALL.”) |
• Contact number display in case of error |
|
|
|
|
• Setting the telephone number |
|
|
|
|
|
|
4. Display change |
(1) |
Temperature display °C/°F setting (“TEMP MODE °C/°F”) |
• Setting the temperature unit (°C or °F) to display |
|
(“DISP MODE |
|
|
|
|
(2) |
Suction air temperature display setting (“ROOM TEMP DISP |
• Setting the use or non-use of the display of indoor (suction) air temperature |
||
SETTING”) |
||||
|
SELECT”) |
|
||
|
|
|
||
|
|
|
|
|
|
(3) |
Automatic cooling/heating display setting (“AUTO MODE |
• Setting the use or non-use of the display of “Cooling” or “Heating” display |
|
|
|
DISP C/H”) |
during operation with automatic mode |
|
|
|
|
|
|
– 20 –
[Function selection flowchart]
[1] Stop the air conditioner to start remote controller function selection mode. → [2] Select from item 1. → [3] Select from item 2. → [4] Make the setting. (Details are specified in item 3) → [5] Setting completed. → [6] Change the display to the normal one. (End)
Normal display (Display when the air condition is not running)
(Hold down the E button and press the D button for two |
(Hold down the E button and press |
seconds.) |
the D button for two seconds.) |
* The display cannot be changed during the unit function |
* The remote controller records the |
selection, the test run and the self diagnosis. |
setting that is made in this way. |
Item 1 |
|
Remote Controller Function Se- |
|
|
|
Press the G button. |
lection Mode |
|
Change Language |
|
|
|
(“CHANGE LANGUAGE”) |
|
|
|
|
|
|
Press the
E button.
Function limit
(“FUNCTION SELECTION”) Press the
G button.
Press the Press the E button. E button.
Press the
Mode selection G button. (“MODE
SELECTION”)
Press the
E button.
Press the
Display change G button. (“DISP MODE
SETTING”)
Item 2
→ Operation function limit setting (“LOCKING FUNCTION”)
→ |
Press the G button. |
Use of automatic mode setting (“SELECT AUTO MODE”) →
Temperature range limit setting (“LIMIT TEMP FUNCTION”)
→ Remote controller main/sub setting (“CONTROLLER MAIN/SUB”)
|
|
→ |
Press the G button. |
Use of clock setting (“CLOCK”) |
|
→ |
|
Timer function setting (“WEEKLY TIMER”) |
|
→ |
|
Contact number setting for error situation (“CALL.”)
→ |
|
|
Temperature display °C/°F setting (“TEMP MODE °C/°F”) |
||
|
→ |
Press the G button. |
|
Suction air temperature display setting (“ROOM TEMP DISP SELECT”) |
|
|
→ |
|
Automatic cooling/heating display setting (“AUTO MODE DISP C/H”)
 See [4]–1
|
Item 3 |
|
(Setting content) |
Press the |
See [4]–2. (1) |
|
|
D button. |
See [4]–2. (2) |
|
|
|
See [4]–2. (3) |
Press the
D button. See [4]–3. (1)
See [4]–3. (2)
See [4]–3. (3)
See [4]–3. (4)
Press the
D button.
See [4]–4. (1)
See [4]–4. (2)
See [4]–4. (3)
NOTE
Timer operation stops when the display for remote controller function selection is changed to the normal one.
Dot display
The language that is selected in CHANGE LANGUAGE mode appears on this display. English is set in this manual.
F |
|
|
|
|
|
|
|
TEMP. |
|
|
ON/OFF |
|
I |
|
|
|
|
|
|
|
E |
MENU |
ON/OFF |
|
FILTER |
A |
|
|
|
|
|
|
||
|
|
|
|
|
|
|
BACK |
MONITOR/SET |
DAY |
|
CHECK |
TEST |
|
PAR-21MAA |
CLOCK |
OPERATION |
CLEAR |
|
B |
|
G |
|
|
|
|
|
|
|
|
|
|
|
|
H |
|
C |
|
D |
|
|
|
– 21 –

[Detailed setting]
[4]–1. CHANGE LANGUAGE setting
The language that appears on the dot display can be selected.
•Press the [  MENU] button G to change the language.
1 Japanese (JP), 2 English (GB), 3 German (D), 4 Spanish (E), 5 Russian (RU), 6 Italian (I), 7 Chinese (CH), 8 French (F)
[4]–2. Function limit
(1)Operation function limit setting (operation lock)
•To switch the setting, press the [  ON/OFF] button D.
1 no1 : Operation lock setting is made on all buttons other than the [ ON/
ON/
OFF] button.
2 no2 : Operation lock setting is made on all buttons.
3 OFF (Initial setting value) : Operation lock setting is not made.
*To make the operation lock setting valid on the normal screen, it is necessary to press buttons (Press and hold down the [FILTER] and [ ON/OFF] buttons at the same time for two seconds.) on the normal screen after the above setting is made.
(2)Use of automatic mode setting
When the remote controller is connected to the unit that has automatic operation
mode, the following settings can be made.
• To switch the setting, press the [  ON/OFF] button D.
1 ON (Initial setting value) : The automatic mode is displayed when the
operation mode is selected.
2 OFF : The automatic mode is not displayed when the operation mode is selected.
(3)Temperature range limit setting
After this setting is made, the temperature can be changed within the set range.
• To switch the setting, press the [  ON/OFF] button D.
1LIMIT TEMP COOL MODE :
The temperature range can be changed on cooling/dry mode.
2LIMIT TEMP HEAT MODE :
The temperature range can be changed on heating mode.
3LIMIT TEMP AUTO MODE :
The temperature range can be changed on automatic mode.
4OFF (initial setting) : The temperature range limit is not active.
*When the setting, other than OFF, is made, the temperature range limit setting on cooling, heating and automatic mode is made at the same time. However, the range cannot be limited when the set temperature range has not changed.
•To increase or decrease the temperature, press the [  TEMP. (
 ) or (
 )] button F.
•To switch the upper limit setting and the lower limit setting, press the [

 ] button H. The selected setting will flash and the temperature can be set.
•Settable range
Cooling/Dry mode : Lower limit: 19°C ~ 30°C |
Upper limit: 30°C ~ 19°C |
|
Heating mode : |
Lower limit: 17°C ~ 28°C |
Upper limit: 28°C ~ 17°C |
Automatic mode : |
Lower limit: 19°C ~ 28°C |
Upper limit: 28°C ~ 19°C |
*The settable range varies depending on the unit to connect (Mr. Slim units, CITY MULTI units, and intermediate temperature units).
[4]–3. Mode selection setting
(1)Remote controller main/sub setting
•To switch the setting, press the [  ON/OFF] button D. 1Main: The controller will be the main controller.
2Sub : The controller will be the sub controller.
(2)Use of clock setting
•To switch the setting, press the [  ON/OFF] button D. 1ON : The clock function can be used.
2OFF : The clock function cannot be used.
(3)Timer function setting
•To switch the setting, press the [  ON/OFF] button D (Choose one of the
followings.).
1WEEKLY TIMER (initial setting value): The weekly timer can be used. 2AUTO OFF TIMER: The auto off timer can be used.
3SIMPLE TIMER: The simple timer can be used.
4TIMER MODE OFF: The timer mode cannot be used.
*When the use of clock setting is OFF, the “WEEKLY TIMER” cannot be used.
– 22 –

(4) Contact number setting for error situation |
|
|
||
• To switch the setting, press the [ ON/OFF] button D. |
|
|
||
1CALL OFF |
: Thesetcontactnumbersarenotdisplayedincaseoferror. |
|
||
|
||||
2CALL **** *** **** : The set contact numbers are displayed in case of error. |
|
|||
CALL_ |
: The contact number can be set when the display is as |
|
||
|
|
shown on the left. |
|
|
• Setting the contact numbers |
|
|
||
To set the contact numbers, follow the following procedures. |
|
|
||
Move the flashing cursor to set numbers. Press the [ TEMP. ( |
) and |
|
||
( |
)] button F to move the cursor to the right (left). Press the [ |
CLOCK |
|
|
( |
) and ( |
)] button C to set the numbers. |
|
|
[4]–4. Display change setting
(1)Temperature display °C/°F setting
•To switch the setting, press the [  ON/OFF] button D. 1 °C: The temperature unit °C is used.
2 °F: The temperature unit °F is used.
(2)Suction air temperature display setting
•To switch the setting, press the [  ON/OFF] button D.
1ON : The suction air temperature is displayed.
2 OFF : The suction air temperature is not displayed.
(3)Automatic cooling/heating display setting
•To switch the setting, press the [  ON/OFF] button D.
1ON : One of “Automatic cooling” and “Automatic heating” is displayed under the automatic mode is running.
2 OFF : Only “Automatic” is displayed under the automatic mode.
– 23 –

|
7 |
|
Specifications |
||
|
|
|
|
|
|
|
|
|
|
Item |
Details |
|
|
|
|
||
|
|
Dimensions |
120 (H) × 130 (W) × 19 (D) mm |
||
|
|
|
|
|
|
|
|
Weight |
|
0.2 kg |
|
|
|
|
|
||
|
|
Power Source |
10 to 13V DC (Supplied from indoor unit) |
||
|
|
|
|
||
|
|
Power Consumption |
0.3 W |
||
|
|
|
|
||
|
|
Ambient Usage Environment |
0° to 40°C, 30% to 90% relative humidity |
||
|
|
|
|
||
|
|
Composition |
PS |
||
|
|
|
|
|
|
– 24 –
Deutsch
CITY MULTI Steuersystem
und Mitsubishi Mr. SLIM Klimaanlagen
MA-Fernbedienung
PAR-21MAA
Bedienungshandbuch
TEMP. |
ON/OFF |
Bitte lesen Sie diese Anleitung sorgfältig durch und achten Sie darauf, dieses Gerät richtig zu verwenden. Bewahren Sie diese Anleitung für den zukünftigen Gebrauch sicher auf.
Geben Sie diese Anleitung und die dazugehörige Einbauanleitung an Personen weiter, die später dieses Gerät warten. Der Einbau und ein Standortwechsel dieses Geräts sollte nur von qualifizierten Personen durchgeführt werden. Wenn Endbenutzer versuchen, dieses Gerät einzubauen oder zu versetzen, kann dies zu unsicheren Bedingungen oder einem nicht ordnungsgemäßen Betrieb führen.
INHALT
1. |
Sicherheitsvorkehrungen ............................................................. |
26 |
|
2. |
Bezeichnungen der Teile ............................................................. |
28 |
|
3. |
Bildschirmkonfiguration ............................................................... |
30 |
|
4. |
Einstellen des Wochentags und der Zeit ..................................... |
30 |
|
5. |
Verwenden der Fernbedienung ................................................... |
31 |
|
|
(1) |
So starten, stoppen, ändern Sie den Modus und stellen die |
|
|
|
Temperatur ein ............................................................................. |
31 |
|
(2) |
Lüftergeschwindigkeit, Richtung des Luftstroms und Belüftung .. |
33 |
|
(3) |
Verwenden des Timers ................................................................. |
35 |
|
|
1 Verwenden des wöchentlichen Timers ................................... |
35 |
|
|
2 Verwenden des einfachen Timers .......................................... |
37 |
|
|
3 Verwenden des Auto-Off-Timers ............................................. |
39 |
|
(4) |
Sperren der Fernbedienungstasten |
|
|
|
(Beschränkung der Betriebsfunktionen) ....................................... |
41 |
|
(5) |
Weitere Anzeigen ......................................................................... |
42 |
6. |
Funktionsauswahl ........................................................................ |
44 |
|
7. |
Technische Daten ........................................................................ |
48 |
|

1Sicherheitsvorkehrungen
●Vorsichtsmaßnahmen werden wie folgt gemäß der potentiellen Gefahrenstufe klassifiziert:
WARNUNG |
Kennzeichnet eine Bedingung oder einen Betrieb, die/der bei falschem Umgang zu schweren Verletzungen oder zu |
|
Todesfällen führen kann. |
||
|
||
VORSICHT |
Kennzeichnet eine Bedingung oder einen Betrieb, die/der bei falschem Umgang zu Verletzungen oder zu Vermögensschäden |
|
führen kann. |
||
|
||
|
|
|
|
WARNUNG |
Versuchen Sie nicht, das Gerät selbst einzubauen.
Lassen Sie dieses Gerät von Ihrem Händler oder einem qualifizierten Techniker einbauen. Ein nicht ordnungsgemäßer Einbau kann zu Bränden, Stromschlägen oder anderen schweren Unfällen führen.
Achten Sie darauf, daß das Gerät richtig befestigt ist.
Achten Sie darauf, daß das Gerät richtig an einem stabilen Träger befestigt ist, damit nicht die Gefahr besteht, daß es herunterfällt.
Achten Sie auf die korrekte Nennspannung.
Eine falsche Spannung kann zu Bränden oder einem Ausfall des Geräts führen.
Schalten Sie dieses Gerät sofort ab, wenn der Betrieb ungewöhnlich verläuft.
Fortgesetzter Gebrauch kann zum Ausfall des Geräts, Stromschlägen oder Bränden führen.
Wenn Sie einen Brandgeruch oder eine andere Unregelmäßigkeit bemerken, schalten Sie den Netzschalter sofort aus und wenden Sie sich an Ihren Händler.
Versuchen Sie nicht, den Standort des Geräts selbst zu ändern.
Ein nicht ordnungsgemäßer Neueinbau kann zu Bränden, Stromschlägen oder anderen schweren Unfällen führen.
Lassen Sie den Standort dieses Geräts von Ihrem Händler oder einem qualifizierten Techniker ändern.
Entsorgen Sie dieses Gerät nicht selbst.
Bitte wenden Sie sich an den Händler, wenn Sie dieses Gerät wegwerfen möchten.
Versuchen Sie nicht, das Gerät selbst zu modifizieren oder zu reparieren.
Der Versuch einer Modifikation oder Reparatur kann zu Bränden, Stromschlägen oder schweren Unfällen führen. Bitte wenden Sie sich an Ihren Händler, wenn eine Reparatur erforderlich ist.
Stoppen Sie die Verwendung dieses Geräts, wenn es nicht richtig funktioniert (falls Fehlermeldungen erneut auftreten und das Gerät nicht wie erwartet läuft).
Fortgesetzter Gebrauch oder versuchter Gebrauch dieses Geräts kann zu Bränden oder einem Ausfall des Geräts führen. Fragen Sie Ihren Händler um Rat.
– 26 –
 VORSICHT
Halten Sie gefährliche Materialien von diesem Gerät entfernt.
Bauen Sie dieses Gerät nicht an Orten ein, wo die Gefahr von leicht entzündlichen Gaslecks besteht. Das Vorhandensein von leicht entzündlichem Gas kann zur Explosionen oder Bränden führen.
Waschen Sie dieses Gerät nicht mit Wasser ab.
Das Abwaschen mit Wasser kann zu Stromschlägen oder einem Ausfall des Geräts führen.
Berühren Sie die Tasten nicht mit nassen Händen.
Dies kann zu Stromschlägen oder einem Ausfall des Geräts führen.
Verwenden Sie dieses Gerät nicht für Zwecke, für die es nicht gedacht ist.
Das Gerät ist für die Verwendung mit den Mitsubishi Air-Control-Systemen für Gebäude gedacht. Verwenden Sie es nicht mit anderen Systemen oder für einen anderen Zweck, da ein solcher Gebrauch zu einem nicht ordnungsgemäßen Betrieb führen kann.
Sprühen Sie kein Insektenabwehrmittel oder brennbare Substanzen auf das Gerät.
Halten Sie brennbare Sprays und Substanzen von diesem Gerät entfernt und sprühen Sie sie niemals direkt auf dieses Gerät. Der Kontakt mit oder die Nähe zu solchen Substanzen stellt eine Explosionsund Brandgefahr dar.
Verwenden Sie dieses Gerät nicht in ungeeigneten Umgebungen.
Verwenden Sie es nicht in Bereichen, in denen sich große Mengen Öl (Maschinenöl, usw.), Abgase oder Sulfidgase befinden. Solche Umgebungen können die Leistung verschlechtern oder den Ausfall des Geräts verursachen.
Verwenden Sie keine spitzen Gegenstände zum Drücken der Tasten.
Die Verwendung von spitzen Gegenständen kann zu Stromschlägen oder einem Ausfall des Geräts führen.
Verwenden Sie das Gerät nicht bei extremen Temperaturen.
Verwenden Sie es nur, wenn die Umgebungstemperatur sich innerhalb der in dieser Anleitung angegebenen Grenzen befindet. (Wenn die Anleitung keine Grenzen angibt, verwenden Sie es nur bei Temperaturen zwischen 0 °C und 40 °C.) Die Verwendung dieses Geräts bei Temperaturen außerhalb dieses Bereichs kann zu einem größeren Ausfall des Geräts führen.
Ziehen Sie nicht an den Kommunikationskabeln und verdrehen Sie sie nicht.
Ziehen an oder Verdrehen der Kabel kann zu Bränden oder einem Ausfall des Geräts führen.
Zerlegen Sie das Gerät nicht.
Wenn Sie versuchen, das Gerät zu zerlegen, kann dies zu Verletzungen aufgrund des Kontakts mit internen Teilen oder zu Bränden oder einem Ausfall des Geräts führen.
Wischen Sie das Gerät nicht mit Benzol, Lackverdünner oder chemischen Reinigungstüchern ab.
Diese Substanzen können zu Verfärbungen oder einem Ausfall des Geräts führen. Falls das Gerät erkennbar schmutzig ist, reinigen Sie es mit einem ausgewrungenen Tuch, das mit einer Neutralreinigerlösung angefeuchtet wurde, und wischen Sie es dann mit einem trockenen Tuch ab.
– 27 –
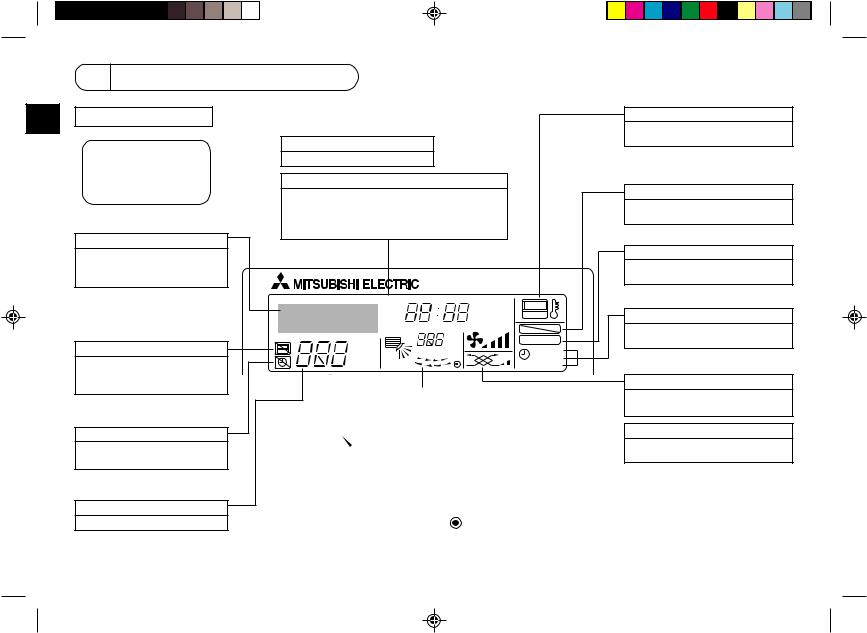
2 Bezeichnungen der Teile
Display-Bereich
Für diese Erklärung werden alle Teile des Displays als beleuchtet dargestellt. Während dem tatsächlichen Betrieb sind nur die relevanten Elemente beleuchtet.
Zeigt den aktuellen Betrieb
Zeigt den Betriebsmodus, usw.
*Anzeige in mehreren Sprachen wird unterstützt.
Anzeige“CentrallyControlled”
Gibt an, daß der Betrieb der Fernbedienung durch eine MasterSteuerung deaktiviert wurde.
Anzeige “Timer is Off”
Gibt an, daß der Timer ausgeschaltet ist.
Temperatureinstellung
Zeigt die Zieltemperatur an.
Wochentag
Zeigt den aktuellen Wochentag an.
Zeit-/Timer-Anzeige
Zeigt die aktuelle Zeit an, außer der einfache oder der Auto-Off-Timer ist eingestellt.
Falls der einfache oder der Auto-Off-Timer eingestellt ist, wird die Restzeit angezeigt.
TIME SUN MON TUE WED THU FRI SAT
TIMER |
Hr |
ON |
AFTER |
AFTER |
OFF |
ERROR CODE |
FUNCTION |
|
˚F˚C |
FILTER |
|
˚F˚C |
||
WEEKLY |
||
ONLY1Hr. |
SIMPLE |
|
AUTO OFF |
|
|
|
|
|
|
Anzeige der Luftrichtung nach |
|
|
Anzeige der Umgebungs- |
||
oben/nach unten |
|
|
temperatur |
||
Die Anzeige |
gibt die Richtung |
|
|
Zeigt die Umgebungstemperatur an. |
|
der herausströmenden Luft an. |
|
|
|
|
|
|
|
|
|
||
|
|
|
|
Anzeige der Luftklappen |
|
Anzeige “One Hour Only” |
|
|
Gibt die Aktion der Schwing- |
||
Wird angezeigt, wenn der Luftstrom |
|
|
luftklappen an. Erscheint nicht, |
||
im Modus COOL oder DRY auf |
|
|
wenn die Luftklappe stationär ist. |
||
schwach und abwärts eingestellt ist. |
|
|
|||
|
|
|
|
||
|
|
|
|
||
(Der Betrieb unterscheidet sich je |
|
|
|
|
|
|
|
(Netz-Ein-Anzeige) |
|||
nach Modell.) |
|
|
|
||
|
|
|
Gibt an, daß der Netzschalter ein- |
||
Die Anzeige schaltet sich nach einer |
|
|
|||
|
|
geschaltet ist. |
|||
Stunde aus, wenn sich die Richtung |
|
|
|||
des Luftstroms ebenfalls ändert. |
|
|
|
|
|
|
|
|
|
||
|
|
|
|
|
|
|
– 28 – |
|
|
||
Anzeige “Sensor”
Wird angezeigt, wenn die Fernbedienung verwendet wird.
Anzeige “Locked”
Gibt an, daß die Tasten der Fernbedienung gesperrt wurden.
Anzeige “Clean The Filter”
Erscheint, wenn der Filter gereinigt werden muß.
Timer-Anzeigen
Die Anzeige erscheint, wenn der entsprechende Timer eingestellt ist.
Anzeige der Lüftergeschwindigkeit
Zeigt die ausgewählte Lüftergeschwindigkeit an.
Belüftungsanzeige
Erscheint, wenn das Gerät im Belüftungsmodus läuft.

Kontrollbereich |
|
|
|
Tasten zum Einstellen der Temperatur |
|
|
|
Nach unten |
|
|
|
Nach oben |
|
|
|
Taste Timer-Menü |
|
|
|
(Taste Monitor/Einstellen) |
|
|
|
Taste Modus (Taste Zurück) |
|
|
|
|
|
TEMP. |
|
Taste Zeit einstellen |
|
|
|
Zurück |
|
MENU |
ON/OFF |
Vorwärts |
BACK |
MONITOR/SET |
DAY |
|
|||
Taste Timer Aus/Ein |
PAR-21MAA |
CLOCK |
|
|
|||
(Taste Tag einstellen) |
|
|
|
Öffnen der |
|
|
|
Tür. |
|
|
|
Hinweis:
|
|
|
Taste Start/Stop |
|
|
|
|
|
Taste Lüftergeschwindigkeit |
||
|
|
|
Taste Filter |
|
|
|
|
|
(Taste |
) |
|
|
ON/OFF |
|
Taste Testlauf |
|
|
|
|
|
|
|
|
|
|
|
Taste Check (Taste Löschen) |
||
|
FILTER |
|
|
|
|
|
CHECK |
TEST |
Taste Luftstrom nach oben/ |
||
|
|
|
|||
OPERATION |
CLEAR |
|
nach unten |
|
|
|
|
|
|
||
|
|
|
Taste Luftklappe |
|
|
|
|
|
(Taste Betrieb |
) |
|
|
|
|
|
Zur vorherigen Betriebs- |
|
|
|
|
|
nummer. |
|
Taste Belüftung
(Taste Betrieb  )
)
Zur nächsten Betriebsnummer.
●Wenn Sie eine Taste für eine Funktion drücken, die nicht im Innengerät installiert ist, zeigt die Fernbedienung die Meldung “Not Available”.
Wenn Sie die Fernbedienung verwenden, um mehrere Innengeräte zu steuern, erscheint diese Meldung nur, wenn die Funktion auf dem übergeordneten Gerät nicht vorhanden ist.
–29 –
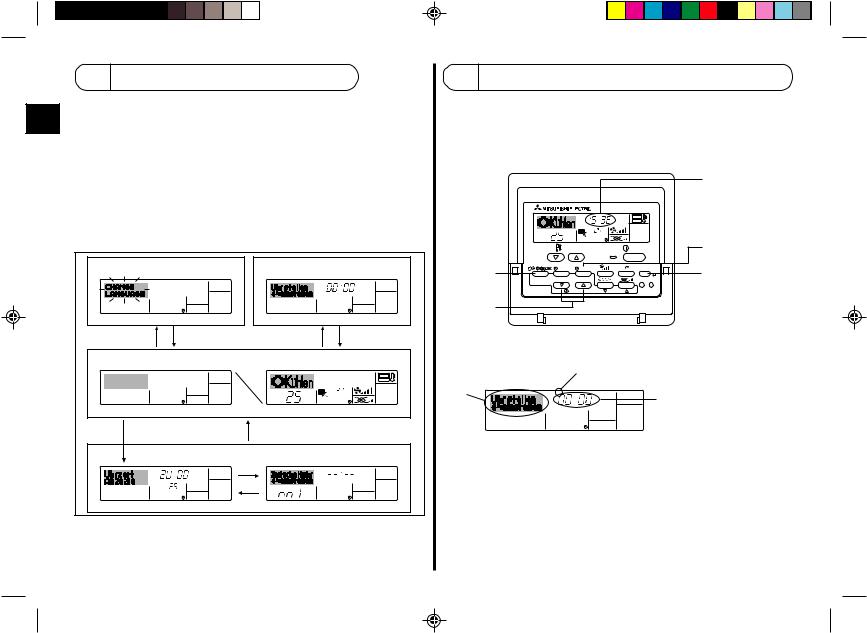
3 Bildschirmkonfiguration
Die Anzeigen in dieser Anleitung beziehen sich auf den Zustand, nachdem die Spracheinstellung mithilfe der Funktionsauswahl der Fernbedienung geändert wurde. In Abschnitt 6, Punkt [4]-1 sehen Sie, wie Sie die Spracheinstellung ändern. Die anfängliche Einstellung ist Englisch.
<Bildschirmtypen> |
|
● Funktionsauswahl: |
Stellt die verfügbaren Funktionen und Bereiche auf |
|
der Fernbedienung ein (Timer-Funktionen, Betriebs- |
|
beschränkungen, usw.). |
● Tag/Zeit einstellen: |
Stellt den aktuellen Wochentag oder die Zeit ein. |
● Standard-Kontrollbildschirme: Zeigt den Betriebsstatus des Klimaanlagensystems
|
und stellt ihn ein. |
● Timer-Monitor: |
Zeigt den aktuell eingestellten Timer an (wöchentli- |
|
cher Timer, einfacher Timer oder Auto-Off-Timer). |
● Timer-Setup: |
Stellt den Betriebs eines der Timer ein (wöchentlicher |
|
Timer, einfacher Timer oder Auto-Off-Timer). |
Funktionsauswahl |
Tag/Zeit einstellen |
|
|
TIME SUN |
|
A |
D |
C |
Standardkontrollbildschirme |
|
|
|
˚C |
˚F˚C |
|
|
|
OFF |
|
ON |
B |
C |
|
Timer-Monitor |
Timer-Setup |
|
MON |
|
SUN MON TUE WED THU FRI SAT |
TIMER |
|
|
OFF |
|
|
˚F˚C |
B |
|
WEEKLY |
|
WEEKLY |
<So wechseln Sie den Bildschirm>
Zu A : Halten Sie sowohl die Taste Modus als auch die Taste Timer Ein/Aus 2 Sekunden lang gedrückt. Zu B : Drücken Sie die Taste Timer-Menü.
Zu C : Drücken Sie die Taste Modus (Zurück).
Zu D : Drücken Sie eine der Tasten Zeit einstellen ( oder
oder  ).
).
4Einstellen desWochentags und der Zeit
■Verwenden Sie diesen Bildschirm um den aktuellen Wochentag und die Zeiteinstellung zu ändern.
Hinweis:
Der Tag und die Zeit erscheinen nicht, wenn die Uhr in der Funktionsauswahl deaktiviert wurde.
2
A
|
TIME SUN |
|
|
|
|
|
˚C |
|
˚C |
|
|
|
|
|
|
|
|
|
TEMP. |
|
|
ON/OFF |
|
|
MENU |
ON/OFF |
|
FILTER |
|
BACK |
MONITOR/SET |
DAY |
|
CHECK |
TEST |
PAR-21MAA |
CLOCK |
OPERATION |
CLEAR |
|
|
1
Anzeige des Wochentags und der Zeit
9
4
<So stellen Sie den Wochentag und die Zeit ein…>
3 Einstellung des Wochentags
2 |
TIME SUN |
|
4 Zeit-Einstellung |
1.Drücken Sie die Taste Zeit einstellen  oder
oder  A, um 2 anzuzeigen.
2.Drücken Sie die Taste Timer Ein/Aus (Tag einstellen) 9, um den Tag einzustellen.
*Mit jedem Drücken rückt die Anzeige unter 3 einen Tag vor: Sun →Mon →... → Fri → Sat.
3.Drücken Sie die entsprechenden Taste Zeit einstellen A nach Bedarf, um die Zeit einzustellen.
*Wenn Sie die Taste gedrückt halten, rückt die Zeit (unter 4) zuerst in Minutenintervallen vor, dann in Zehn-Minuten-Intervallen und dann in Ein-Stunden-Intervallen.
4.Nachdem Sie die entsprechenden Einstellungen unter Schritt 2 und 3 durchgeführt haben, drücken Sie die Taste Filter  4, um die Werte zu speichern.
– 30 –
 Loading...