


 Loading...
MITSUBISHI
Mitsubishi Industrial Robot
RV-1A/2AJ Series INSTRUCTION MANUAL
ROBOT ARM SETUP & MAINTENANCE
 BFP-A8052-D


 Safety Precautions
Always read the following precautions and the separate "Safety Manual" before starting use of the robot to learn the required measures to be taken.
|
|
CAUTION |
All teaching work must be carried out by an operator who has received special training. |
|
|||
|
|
||
|
|
|
(This also applies to maintenance work with the power source turned ON.) |
|
|
|
→ Enforcement of safety training |
|
|
CAUTION |
For teaching work, prepare a work plan related to the methods and procedures of oper- |
|
|
||
|
|
||
|
|
||
|
|
|
ating the robot, and to the measures to be taken when an error occurs or when restart- |
|
|
|
ing. Carry out work following this plan. (This also applies to maintenance work with the |
|
|
|
power source turned ON.) |
|
|
|
→ Preparation of work plan |
|
|
WARNING |
Prepare a device that allows operation to be stopped immediately during teaching work. |
|
|
||
|
|
||
|
|
||
|
|
|
|
|
|
|
(This also applies to maintenance work with the power source turned ON.) |
|
|
|
→ Setting of emergency stop switch |
|
|
CAUTION |
During teaching work, place a sign indicating that teaching work is in progress on the |
|
|
||
|
|
||
|
|
||
|
|
|
start switch, etc. (This also applies to maintenance work with the power source turned |
|
|
|
ON.) |
|
|
|
→ Indication of teaching work in progress |


 WARNING


 CAUTION


 CAUTION
Provide a fence or enclosure during operation to prevent contact of the operator and robot.
→ Installation of safety fence
Establish a set signaling method to the related operators for starting work, and follow this method.
→ Signaling of operation start
As a principle turn the power OFF during maintenance work. Place a sign indicating that maintenance work is in progress on the start switch, etc.
→ Indication of maintenance work in progress
|
|
CAUTION |
Before starting work, inspect the robot, emergency stop switch and other related |
|
|||
|
|
||
|
|
|
devices, etc., and confirm that there are no errors. |
|
|
|
→ Inspection before starting work |

The points of the precautions given in the separate "Safety Manual" are given below. Refer to the actual "Safety Manual" for details.


 CAUTION Use the robot within the environment given in the specifications. Failure to do so could lead to a drop or reliability or faults. (Temperature, humidity, atmosphere, noise environ- ment, etc.)


 CAUTION


 CAUTION


 CAUTION


 CAUTION


 CAUTION


 WARNING


 WARNING

 CAUTION


 WARNING


 CAUTION


 CAUTION


 CAUTION


 CAUTION


 WARNING
Transport the robot with the designated transportation posture. Transporting the robot in a non-designated posture could lead to personal injuries or faults from dropping.
Always use the robot installed on a secure table. Use in an instable posture could lead to positional deviation and vibration.
Wire the cable as far away from noise sources as possible. If placed near a noise source, positional deviation or malfunction could occur.
Do not apply excessive force on the connector or excessively bend the cable. Failure to observe this could lead to contact defects or wire breakage.
Make sure that the workpiece weight, including the hand, does not exceed the rated load or tolerable torque. Exceeding these values could lead to alarms or faults.
Securely install the hand and tool, and securely grasp the workpiece. Failure to observe this could lead to personal injuries or damage if the object comes off or flies off during operation.
Securely ground the robot and controller. Failure to observe this could lead to malfunc- tioning by noise or to electric shock accidents.
Indicate the operation state during robot operation. Failure to indicate the state could lead to operators approaching the robot or to incorrect operation.
When carrying out teaching work in the robot's movement range, always secure the pri- ority right for the robot control. Failure to observe this could lead to personal injuries or damage if the robot is started with external commands.
Keep the jog speed as low as possible, and always watch the robot. Failure to do so could lead to interference with the workpiece or peripheral devices.
After editing the program, always confirm the operation with step operation before starting automatic operation. Failure to do so could lead to interference with peripheral devices because of programming mistakes, etc.
Make sure that if the safety fence entrance door is opened during automatic operation, the door is locked or that the robot will automatically stop. Failure to do so could lead to personal injuries.
Never carry out modifications based on personal judgments, or use non-designated maintenance parts.
Failure to observe this could lead to faults or failures.
When the robot arm has to be moved by hand from an external area, do not place hands or fingers in the openings. Failure to observe this could lead to hands or fingers catching depending on the posture.


 CAUTION Do not stop the robot or apply emergency stop by turning the robot controller's main power OFF.
If the robot controller main power is turned OFF during automatic operation, the robot accuracy could be adversely affected.

C.Precautions for the basic configuration are shown below.(When CR1-571 is used for the controller.)


 CAUTION Provide an earth leakage breaker that packed together on the primary power supply of the controller as protection against electric leakage. Confirm the set- ting connector of the input power supply voltage of the controller, if the type which more than one power supply voltage can be used. Then connect the power supply.
Failure to do so could lead to electric shock accidents.
Power supply *RV-1A/2AJ series and RP-1AH/3AH/5AH series: Single phase 90-132VAC, 180-253VAC. *Except the above: Single phase 180-253VAC.
Rear side of controller
Earth leakage breaker
(NV)
Cover
Terminal
Cover
Terminal cover
Protective earth terminal
(PE)
Revision history
Date of Point |
Instruction Manual No. |
Revision Details |
|
|
|
|
|
|
2000-02-17 |
BFP-A8052Z |
First print |
|
|
|
2000-04-05 |
BFP-A8052 |
Formal style |
|
|
|
2000-05-10 |
BFP-A8052-A |
Error in writing correction. |
|
|
|
2000-07-12 |
BFP-A8052-B |
Spare parts (option) list was added. |
|
|
Error in writing correction. |
|
|
|
2001-03-21 |
BFP-A8052-C |
Error in writing correction. |
|
|
|
2002-06-05 |
BFP-A8052-D |
RV-1AC-SB, RV-2AJC-SB (Clean specification) was added. |
|
|
Error in writing correction. |
|
|
|
|
|
|

■ Introduction
Thank you for purchasing the Mitsubishi industrial robot.
This instruction manual explains procedures to be taken for unpacking, installing, servicing and inspecting the robot arm.
Always read through this manual before starting use to ensure correct usage of the robot.
No part of this manual may be reproduced by any means or in any form, without prior consent from Mitsubishi.
The details of this manual are subject to change without notice.
An effort has been made to make full descriptions in this manual. However, if any discrepancies or
unclear points are found, please contact your dealer.
The information contained in this document has been written to be accurate as much as possible. Please interpret that items not described in this document "cannot be performed.".
Please contact your nearest dealer if you find any doubtful, wrong or skipped point.
Copyright(C) 2001 MITSUBISHI ELECTRIC CORPORATION
|
|
CONTENTS |
|
|
|
|
Page |
1 Before starting use ......................................................................................................................................................................... |
1-1 |
||
1.1 Using the instruction manuals ............................................................................................................................................ |
1-1 |
||
1.1.1 The details of each instruction manuals ................................................................................................................ |
1-1 |
||
1.1.2 Symbols used in instruction manual ........................................................................................................................ |
1-2 |
||
1.2 |
Safety Precautions ................................................................................................................................................................. |
1-3 |
|
1.2.1 Precautions given in the separate Safety Manual ............................................................................................. |
1-4 |
||
2 Unpacking to Installation .............................................................................................................................................................. |
2-5 |
||
2.1 |
Confirming the product ......................................................................................................................................................... |
2-5 |
|
2.2 |
Installation .................................................................................................................................................................................. |
2-6 |
|
2.2.1 Unpacking ............................................................................................................................................................................ |
2-6 |
||
2.2.2 Transportation procedures .......................................................................................................................................... |
2-7 |
||
2.2.3 Installation procedures .................................................................................................................................................. |
2-8 |
||
2.2.4 Grounding procedures .................................................................................................................................................... |
2-9 |
||
|
(1) Grounding methods ..................................................................................................................................................... |
2-9 |
|
|
(2) |
Grounding procedures ............................................................................................................................................... |
2-9 |
2.2.5 Connecting with the controller ................................................................................................................................ |
2-10 |
||
2.3 |
Setting the origin ................................................................................................................................................................... |
2-11 |
|
2.3.1 Installing the teaching pendant (T/B) ................................................................................................................... |
2-11 |
||
|
(1) Installing with the control power OFF .............................................................................................................. |
2-11 |
|
2.3.2 Setting the origin with the origin data input method ...................................................................................... |
2-12 |
||
|
(1) Confirming the origin data ..................................................................................................................................... |
2-12 |
|
|
(2) |
Turning ON the control power ............................................................................................................................. |
2-12 |
|
(3) |
Preparing the T/B ..................................................................................................................................................... |
2-13 |
|
(4) |
Selecting the origin setting method ................................................................................................................... |
2-14 |
|
(5) |
Inputting the origin data ......................................................................................................................................... |
2-15 |
|
(6) |
Installing the connector box cover .................................................................................................................... |
2-16 |
2.4 |
Confirming the operation .................................................................................................................................................... |
2-17 |
|
|
(1) JOINT jog operation ................................................................................................................................................. |
2-20 |
|
|
(2) |
XYZ jog operation ...................................................................................................................................................... |
2-22 |
|
(3) |
TOOL jog operation .................................................................................................................................................. |
2-24 |
|
(4) |
3-axis XYZ jog operation ....................................................................................................................................... |
2-26 |
|
(5) |
CYLNDER jog operation ......................................................................................................................................... |
2-28 |
3 Installing the option devices ..................................................................................................................................................... |
3-31 |
||
3.1 |
Installing the solenoid valve set (1E-VD01/VD01E/VD02/VD02E) ................................................................ |
3-31 |
|
3.2 |
Installation the pneumatic hand set 4A-HP01/HP01E ................................................................................... |
3-33 |
|
3.3 |
Installation the motorized hand set 4A-HM01 .................................................................................................... |
3-35 |
|
3.4 |
Hand output cable (1E-GR35S) ...................................................................................................................................... |
3-36 |
|
3.5 |
Installing the hand input cable (1A-HC20) and hand curl tube (1A-ST040*C) .......................................... |
3-36 |
|
3.6 |
Installing the hand adaptor (1A-HA01) ........................................................................................................................ |
3-36 |
|
4 Basic operations ............................................................................................................................................................................ |
4-37 |
||
5 Maintenance and Inspection ..................................................................................................................................................... |
5-39 |
||
5.1 |
Maintenance and inspection interval ............................................................................................................................. |
5-39 |
|
5.2 |
Inspection items ..................................................................................................................................................................... |
5-40 |
|
5.2.1 Daily inspection items .................................................................................................................................................. |
5-40 |
||
5.2.2 Periodic inspection ........................................................................................................................................................ |
5-41 |
||
5.3 |
Maintenance and inspection procedures ..................................................................................................................... |
5-42 |
|
5.3.1 Robot arm structure ..................................................................................................................................................... |
5-42 |
||
5.3.2 Installing/removing the cover ................................................................................................................................... |
5-44 |
||
5.3.3 Inspection, maintenance and replacement of timing belt .............................................................................. |
5-46 |
||
|
(1) |
Timing belt replacement period ......................................................................................................................... |
5-46 |
|
(2) |
Inspection, maintenance and replacement of J2-axis timing belt ........................................................ |
5-47 |
|
(3) |
Inspection, maintenance and replacement of J3-axis timing belt ........................................................ |
5-48 |
i
|
|
Page |
(4) |
Inspection, maintenance and replacement of J4-axis timing belt |
........................................................ 5-49 |
(5) |
Inspection, maintenance and replacement of J5-axis timing belt ........................................................ |
5-50 |
(6) |
Timing belt tension ................................................................................................................................................... |
5-51 |
5.3.4 Lubrication ........................................................................................................................................................................ |
5-52 |
|
(1) Lubrication position and specifications ............................................................................................................ |
5-52 |
|
(2) |
Lubrication method ................................................................................................................................................... |
5-53 |
5.3.5 Replacing the backup battery ................................................................................................................................... |
5-54 |
|
(1) Replacing the robot arm battery ......................................................................................................................... |
5-54 |
|
5.4 Maintenance parts ................................................................................................................................................................. |
5-55 |
|
5.5 Resetting the origin .............................................................................................................................................................. |
5-56 |
|
5.5.1 Mechanical stopper method ...................................................................................................................................... |
5-57 |
|
(1) Select the T/B ........................................................................................................................................................... |
5-57 |
|
(2) |
J1 axis origin setting ................................................................................................................................................ |
5-58 |
(3) |
J2 axis origin setting ................................................................................................................................................ |
5-59 |
(4) |
J3 axis origin setting ................................................................................................................................................ |
5-60 |
(5) |
J4 axis origin setting (Only 6-axis type) ......................................................................................................... |
5-62 |
(6) |
J5 axis origin setting ................................................................................................................................................ |
5-64 |
(7) |
J6 axis origin setting ................................................................................................................................................ |
5-65 |
(8) |
All axis origin setting ................................................................................................................................................ |
5-67 |
5.5.2 User origin method ........................................................................................................................................................ |
5-69 |
|
5.5.3 Recording the origin data ........................................................................................................................................... |
5-70 |
|
(1) Confirming the origin data label ........................................................................................................................... |
5-70 |
|
(2) |
Confirming the origin data ..................................................................................................................................... |
5-70 |
(3) |
Recording the origin data ....................................................................................................................................... |
5-70 |
(4) |
Installing the cover ................................................................................................................................................... |
5-70 |
6Appendix ............................................................................................................................................................................... |
|
Appendix-71 |
Appendix 1 Configuration flag ............................................................................................................................ |
Appendix-71 |
|
ii

1Before starting use
1 Before starting use
This chapter explains the details and usage methods of the instruction manuals, the basic terminology and the safety precautions.
1.1 Using the instruction manuals
1.1.1 The details of each instruction manuals
The contents and purposes of the documents enclosed with this product are shown below. Use these documents according to the application.
For special specifications, a separate instruction manual describing the special section may be enclosed.
Safety Manual
Explains the common precautions and safety measures to be taken for robot handling, system design and manufacture to ensure safety of the operators involved with the robot.
Standard
Specifications
Robot Arm
Setup &
Maintenance
Controller
Setup, Basic
Operation and
Maintenance
Detailed
Explanation of
Functions and
Operations
Explanations of MOVEMASTER COMMANDS
Explains the product's standard specifications, factory-set special specifications, option configuration and maintenance parts, etc. Precautions for safety and technology, when incorporating the robot, are also explained.
Explains the procedures required to operate the robot arm (unpacking, transportation, installation, confirmation of operation), and the maintenance and inspection procedures.
Explains the procedures required to operate the controller (unpacking, transportation, installation, confirmation of operation), basic operation from creating the program to automatic operation, and the maintenance and inspection procedures.
Explains details on the functions and operations such as each function and operation, commands used in the program, connection with the external input/output device, and parameters, etc.
Explains details on the MOVEMASTER commands used in the program. (For RV-1A/2AJ and RV-2A/3AJ series)
|
Troubleshooting |
Explains the causes and remedies to be taken when an error occurs. Explanations are |
|
|
given for each error No. |
|
|
|
|
|
|
Using the instruction manuals 1-1

1Before starting use
1.1.2 Symbols used in instruction manual
The symbols and expressions shown in Table 1-1 are used throughout this Instruction Manual. Learn the meaning of these symbols before reading this instruction manual.
Table 1-1 Symbols in instruction manual
Symbol |
Meaning |
Precaution indicating cases where there is a risk of operator fatality or seri- DANGER ous injury if handling is mistaken. Always observe these precautions to safely
use the robot.
Precaution indicating cases where the operator could be subject to fatalities WARNING or serious injuries if handling is mistaken. Always observe these precautions to
safely use the robot.
|
|
|
CAUTION |
|
Precaution indicating cases where operator could be subject to injury or |
||
|
|
|
|
physical damage could occur if handling is mistaken. Always observe these |
|||
|
|
|
|
|
|
||
|
|
|
|
|
|
precautions to safely use the robot. |
|
|
|
|
|
|
|
||
|
|
|
|
|
|
|
|
|
|
|
JOINT |
|
If a word is enclosed in brackets or a box in the text, this refers to a key on |
||
|
|
|
|
the teaching pendant. |
|||
|
|
|
|
|
|
||
|
|
|
|
|
|
|
|
|
This indicates to press the (B) key while holding down the (A) key. |
||||||
In this example, the [+/Forward] key is pressed while holding down the [+X/ |
|||||||
|
|
|
|
|
|||
|
|
|
+Y] key. |
||||
|
|
|
|
|
|
||
|
|
|
|
|
|
|
|
([ ] → [ ↓ ] |
This indicates to hold down the (A) key, press and release the (B) key, and |
||||||
then press the (C) key. In this example, the [Step/Move] key is held down, the |
|||||||
|
|
|
[Condition] key is pressed and released, and the [Replace ↓ key is pressed. |
||||
|
|
|
|
|
|
||
|
|
|
|
|
|
|
|
|
|
|
|
|
|
This indicates the teaching pendant. |
|
1-2 Using the instruction manuals
1Before starting use
1.2 Safety Precautions
Always read the following precautions and the separate "Safety Manual" before starting use of the robot to learn the required measures to be taken.


 CAUTION


 CAUTION


 WARNING


 CAUTION
All teaching work must be carried out by an operator who has received special training. (This also applies to maintenance work with the power source turned ON.)
→ Enforcement of safety training
For teaching work, prepare a work plan related to the methods and procedures of oper- ating the robot, and to the measures to be taken when an error occurs or when restart- ing. Carry out work following this plan. (This also applies to maintenance work with the power source turned ON.)
→ Preparation of work plan
Prepare a device that allows operation to be stopped immediately during teaching work. (This also applies to maintenance work with the power source turned ON.)
→ Setting of emergency stop switch
During teaching work, place a sign indicating that teaching work is in progress on the start switch, etc. (This also applies to maintenance work with the power source turned ON.)
→ Indication of teaching work in progress

 DANGER


 CAUTION


 CAUTION


 CAUTION
Provide a fence or enclosure during operation to prevent contact of the operator and robot.
→ Installation of safety fence
Establish a set signaling method to the related operators for starting work, and follow this method.
→ Signaling of operation start
As a principle turn the power OFF during maintenance work. Place a sign indicating that maintenance work is in progress on the start switch, etc.
→ Indication of maintenance work in progress
Before starting work, inspect the robot, emergency stop switch and other related devices, etc., and confirm that there are no errors.
→ Inspection before starting work
Safety Precautions 1-3

1Before starting use
1.2.1 Precautions given in the separate Safety Manual
The points of the precautions given in the separate "Safety Manual" are given below. Refer to the actual "Safety Manual" for details.


 CAUTION


 CAUTION


 CAUTION


 CAUTION


 CAUTION


 CAUTION


 WARNING

 WARNING

 CAUTION


 WARNING


 CAUTION


 CAUTION


 CAUTION


 CAUTION


 WARNING


 CAUTION
Use the robot within the environment given in the specifications. Failure to do so could lead to a drop or reliability or faults. (Temperature, humidity, atmosphere, noise envi- ronment, etc.)
Transport the robot with the designated transportation posture. Transporting the robot in a non-designated posture could lead to personal injuries or faults from drop- ping.
Always use the robot installed on a secure table. Use in an instable posture could lead to positional deviation and vibration.
Wire the cable as far away from noise sources as possible. If placed near a noise source, positional deviation or malfunction could occur.
Do not apply excessive force on the connector or excessively bend the cable. Failure to observe this could lead to contact defects or wire breakage.
Make sure that the workpiece weight, including the hand, does not exceed the rated load or tolerable torque. Exceeding these values could lead to alarms or faults.
Securely install the hand and tool, and securely grasp the workpiece. Failure to observe this could lead to personal injuries or damage if the object comes off or flies off during operation.
Securely ground the robot and controller. Failure to observe this could lead to mal- functioning by noise or to electric shock accidents.
Indicate the operation state during robot operation. Failure to indicate the state could lead to operators approaching the robot or to incorrect operation.
When carrying out teaching work in the robot's movement range, always secure the priority right for the robot control. Failure to observe this could lead to personal inju- ries or damage if the robot is started with external commands.
Keep the jog speed as low as possible, and always watch the robot. Failure to do so could lead to interference with the workpiece or peripheral devices.
After editing the program, always confirm the operation with step operation before starting automatic operation. Failure to do so could lead to interference with periph- eral devices because of programming mistakes, etc.
Make sure that if the safety fence entrance door is opened during automatic opera- tion, the door is locked or that the robot will automatically stop. Failure to do so could lead to personal injuries.
Never carry out modifications based on personal judgments, or use non-designated maintenance parts.
Failure to observe this could lead to faults or failures.
When the robot arm has to be moved by hand from an external area, do not place hands or fingers in the openings. Failure to observe this could lead to hands or fingers catching depending on the posture.
Do not stop the robot or apply emergency stop by turning the robot controller's main power OFF.
If the robot controller main power is turned OFF during automatic operation, the robot accuracy could be adversely affected.
1-4 Safety Precautions

2Unpacking to Installation
2 Unpacking to Installation
2.1 Confirming the product
The standard configuration of the robot arm, part of the purchased product, is shown in Table 2-1. Confirm the parts.
Users who have purchased optional products should refer to the separate "Standard Specifications".
Table 2-1 Standard configuration
No. |
Part name |
Type |
Qty. |
Remarks |
|
|
|
|
|
|
|
|
|
|
|
|
|
1 |
Robot arm |
RV-1A, RV-2AJ, |
Either |
|
|
|
|
RV-1AC-SB or |
|
||
|
|
1 unit |
|
||
|
|
RV-2AJC-SB |
|
||
|
|
|
|
||
|
|
|
|
|
|
2 |
Guarantee card |
|
1 copy |
|
|
|
|
|
|
|
|
3 |
Installation bolts |
M8x30 |
4 pcs. |
|
|
|
|
|
|
|
|
4 |
Spring washer for installation bolts |
For M8 |
4 pcs. |
For robot arm installation |
|
|
|
|
|
|
|
5 |
Plain washer for installation bolts |
For M8 |
4 pcs. |
|
|
|
|
|
|
|
|
6 |
Suspension fitting |
|
1 pcs. |
|
|
|
|
|
|
For robot arm transportation |
|
7 |
Suspension fitting installation bolt |
M5x10 |
4 pcs. |
||
|
|||||
|
|
|
|
|
|
8 |
Nylon clamp Three kinds one each |
|
3 pcs. |
|
|
|
|
|
|
For wiring and piping for optional |
|
9 |
Nylon clamp installation bolts |
M3x22 |
1 pcs. |
||
hand |
|||||
|
|
|
|
||
10 |
Plain washer for Nylon clamp installation bolts |
For M3 |
1 pcs. |
|
|
|
|
|
|
|
Note The number 3 - 5, 8-10 are in the plastic bag of the robot arm attachment.
Confirming the product 2-5
2Unpacking to Installation
2.2 Installation
2.2.1 Unpacking
L |
|
|
Pull out |
|
|
|
|
|
|
|
|
|
|
||||||||
|
|
|
|
|
|
|
|
|
|
|
|
( a ) |
|
|
|
|
|
|
|
|
( b ) |
|
|
|
|
|
|
|
|
|
||
|
|
|
|
|
|
|
|
|
|
|
|
|
|
|
|
|
|
|
|
|
|
|
|
|
|
|
|
|||||
|
|
|
( c ) |
|||||||
|
|
|
|
|
|
|||||
|
|
|
|
|
|
|||||
|
|
|
Arm fixing |
|||||||
|
Robot arm |
|
plate |
|||||||
|
|
|
|
|
|
|
|
|
|
|
! CAUTION |
|
|
|
|
|
|
|
|
|
|
! |
|
|
|
|
|
|
|
|
|
|
Always unpack the |
|
|
|
|
|
|
|
|
|
|
robot at a flat place. |
|
|
|
|
|
|
|
|
|
|
|
|
|
|
|
|
|
|
|
|
|
|
|
|
|
|
|
|
|
|
|
|
The robot could tilt |
|
|
|
|
|
|
|
( e ) |
||
over if unpacked at an |
|
( d ) |
|
|
|
|
|
|||
|
|
|
|
|
|
|
|
|
||
unstable place. |
|
|
|
|
|
|
|
|
|
|
Note) The cushioning material will be required if the robot is transported again , so save it in a safe place.
Fig.2-1 Unpacking the robot arm
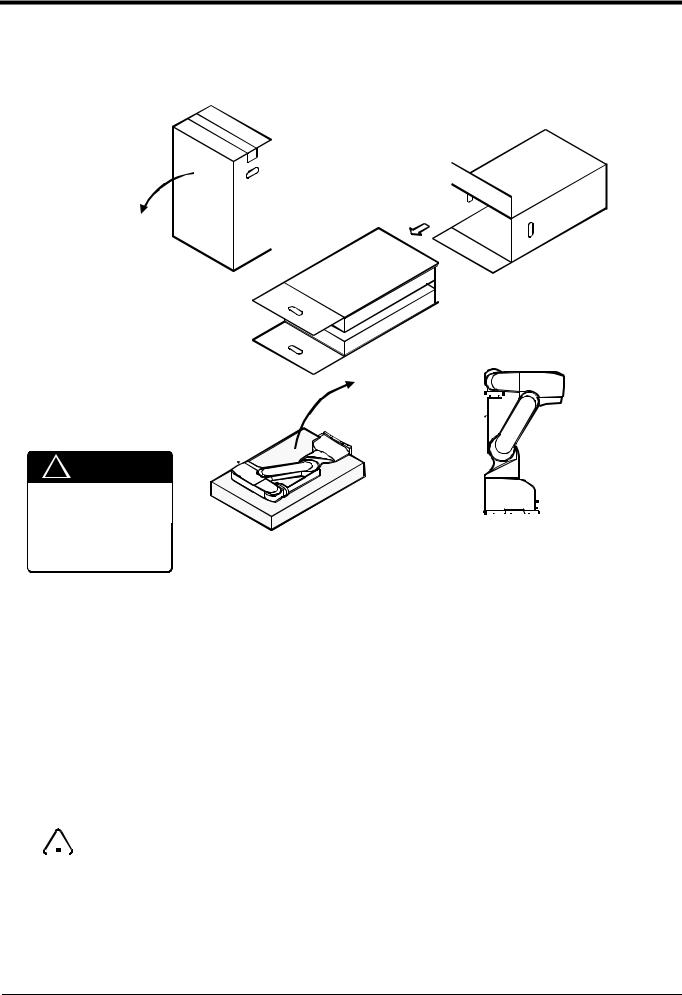
The robot is shipped from the factory in cardboard packing. Always refer to Fig. 2-1 and unpack the robot. Handle the robot arm according to"2.2.2 Transportation procedures"
The unpacking process is shown below.
1) Carefully lay the cardboard box on its side while taking care not to apply impacts. (Fig. 2-1 (a))
2)Using a knife, cut the tape fixing the opening of the cardboard box. (Fig. 2-1 (b))
3)Horizontally pull out the inner box onto the floor. (Fig. 2-1 (c))
4)Remove the inner box and upper cushioning material. (Fig. 2-1 (d))
5)Pull up the robot arm together with the lower cushioning material. (Fig. 2-1 (e))
|
|
CAUTION |
When repackaging the robot in the cardboard box, always use the fixing plates. |
|
|||
|
2-6 Installation

2Unpacking to Installation
2.2.2 Transportation procedures
Forearm
Arm fixing plate

Upper arm
6-axis type
Front |
Base |
|
|
|
|


Note) The figure shows the 6-axis type, but this also applies for the 5-axis type.
5-axis type
Fig.2-2 Transportation of robot arm
1) The robot must be transported by two workers. Place the robot on a dolly, etc., and move it to near the installation place. Transporting the robot with the following grips should be limited to placing the robot on the frame or dolly, and to positioning.
2)When transporting with the grips, one worker should hold the grip (A) at the base, and support the arm from the front with his body. The other worker should support the back of the upper arm (B). If the robot is held from the left/right sides or if a cover is held, the robot could tilt over, the cover could be damaged, or accidents such as dropping could occur.
3)When transporting the robot, do not apply force on the cover, or apply a strong impact on the robot
4)Remove the fixing plates after installing the robot.

 CAUTION

 CAUTION
To prevent accidents, do not hold the robot from the left/right sides, or hold covers that have no grips.
When installing the fixing plates again, set each axis of the robot to J1=0 degree, J2=-30 degree, J3=120 degree, J4=0 degree (6-axis type only), J5=90 degree, and J6=0 degree.
Installation 2-7

2Unpacking to Installation
2.2.3 Installation procedures
4-M8×30 (Four positions)
Spring washer Plain washer
|
|
(4-Φ9 installation hole ) |
Base bottom |
|
|
(installation bolt M8×35) |
|
|
|
|
1 |
|
|
|
8 |
|
|
|
φ |
|
|
(Front of robot ) |
|
188 |
186 |
160 |
*1 |
|
|
95 |
|
|
|
|
|
|
|
6.3a |
|
|
2 |
15 |
60 |
|
|
|
|
|
Installation |
82 |
|
|
|
||
|
reference surface |
205 |
|
|
|
3a.6 |
|
|
|
250 |
|
Installation dimension details
The contact section shown with shading on the robot installation surface must be finished to 6.3a.
The section marked with *1 must be contacted against the installation surface to ensure the robot rigidity.
Fig.2-3 Installation dimensions
1) The robot installation surface has been machine finished. Use the installation holes (4-φ18 holes) opened at the four corners of the base, and securely fix the robot with the enclosed installa- tion bolts (M8 x 30 hexagon socket bolts).
2)Install the robot on a level surface.
3)It is recommended that the surface roughness of the table onto which the robot is to be installed by 6.3a or more. If the installation surface is rough, the contact with the table will be poor, and positional deviation could occur when the robot moves.
4)When installing, use a common table to prevent the position of the devices and jigs subject to robot work from deviating.
5)The installation surface must have sufficient strength to withstand the arm reaction during operation, and resistance against deformation and vibration caused by the static (dynamic) load of the robot arm and peripheral devices, etc.
6)When installing on the ceiling, use the ceiling sus- pension jig available from Mitsubishi. Contact Mit- subishi or your dealer for the ceiling suspension jig.
7)Remove the fixing plates after installing the robot.
2-8 Installation

2Unpacking to Installation
2.2.4 Grounding procedures (1) Grounding methods
|
Controller |
|
Controller |
|
Controller |
|
Robot arm |
and |
Robot arm |
and |
Robot arm |
and |
|
personal |
personal |
personal |
||||
|
|
|
||||
|
computer |
|
computer |
|
computer |
(a) Dedicated grounding |
(b) Common grounding |
(c) Common grounding |
(Optimum) |
(Good) |
(Normal) |
Fig.2-4 Grounding methods
(2) Grounding procedures
Robot arm
M4×10, SW, PW
A
Robot grounding cable (AWG#14 2mm2) or morePrepared by customer
1) There are three grounding methods as shown in Fig. 2-4, but the dedicated grounding (Fig. 2-4 (a)) should be used for the robot arm and controller when possible. (Refer to the separate " Controller Setup, Basic Operation and Maintenance" for details on the controller grounding.)
2)Use Class D grounding (grounding resistance 100Ω or less).
Dedicated grounding separated from the other devices should be used.
3)Use a AWG#14(2mm2) or more stranded wire for the grounding wire. The grounding point should be as close to the robot arm and controller as possi- ble, and the length of the grounding wire should be short.
1) Prepare the grounding cable (AWG#14(2mm2) or more) and robot side installation screw and washer.
2)If there is rust or paint on the grounding screw section (A), remove it with a file, etc.
3)Connect the grounding cable to the grounding screw section.
Fig.2-5 Connecting the grounding cable
Installation 2-9
2Unpacking to Installation
2.2.5 Connecting with the controller
Robot arm
Controller
Motor power
CN1


 CN1
CN1
CN2 

Motor signalCN2
Motor power cable 5m
Motor signal cable 5m
Fig.2-6 Connecting the machine cables
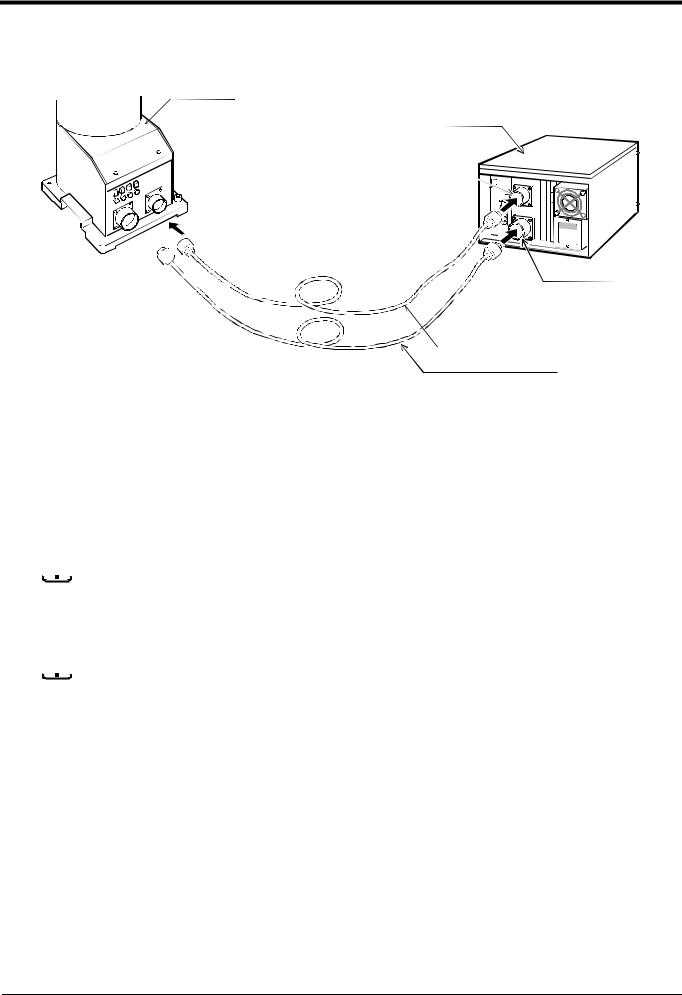
Carry out the following procedure after installing the controller referring to the separate "Controller Setup, Basic Operation and Maintenance" manual.
1) Make sure that the power switch on the front of the controller is turned OFF.
2) Connect the machine cable to the robot arm and the corresponding connector on the controller

 CAUTION

 CAUTION
The machine cable connectors are dedicated for the controller side and robot arm side, so take special care when connecting.
If connected incorrectly, the connector pins could bend or break. Thus, even if connected correctly, the robot will not operate correctly, creating a dangerous situation.
Take special care to the leading of the connection cable. If the cable is pulled with force or bent excessively, wires could break or the connector could be damaged.
2-10 Installation

2Unpacking to Installation
2.3 Setting the origin
The origin is set so that the robot can be used with a high accuracy. After purchasing the robot, always carry out this step before starting work. This step must also be carried out if the combination of robot and controller being used is changed.
There are several methods for setting the origin, but the origin data input method will be explained here. Refer to "5.5 Resetting the origin" on page 56 for the other methods.
The teaching pendant is required for this operation.
2.3.1 Installing the teaching pendant (T/B)
By using the "REMOVE T/B" switch, the T/B can be installed and removed while the controller's control power is ON. However, in this procedure, the teaching pendant will be installed with the control power OFF.
Refer to the separate "Controller setup, basic operation, and maintenance" for details on installing the teaching pendant with the control power ON.
(1) Installing with the control power OFF
Display LCD |
ENABLE/DISABLE switch |
|
Emergency stop switch |
|
Operation keys |
|
Appearance of teaching pendant |
Connector |
REMOVE T/B switch |
Teaching pendant (T/B)
1) Confirm that the controller's power supply switch is OFF.
2)Connect the T/B connector to the RS-422 (T/B) connector on the controller.
3)Do not pull the cable with force or bend it excessively, as the cable could break or the connector could be damaged.
4)Confirm that the [REMOVE T/B] switch on the side of the controller is not depressed (is projected).
5)Set the T/B [ENABLE/DISABLE] switch to "DISABLE".
Fig.2-7 Installing the T/B (control power OFF)
[REMOVE T/B] switch
When using the robot with the T/B, this switch is used to invalidate the emergency stop from the T/B. This is also used to install the T/B with turning the controller's power supply ON.
Setting the origin 2-11

2Unpacking to Installation
2.3.2 Setting the origin with the origin data input method (1) Confirming the origin data
● Origin data history table (Origin Data History) Serial No.ES804008
Date |
Default |
. . . |
. . . |
. . . |
|
|
|
|
|
|
|
|
|
|
|
V!#S29 |
|
|
|
|
|
|
|
|
|
06DTYY |
|
|
|
|
|
|
|
|
|
2?HL9X |
|
|
|
|
|
|
|
|
|
1CP55V |
|
|
|
|
|
|
|
|
|
T6!M$Y |
|
|
|
|
|
|
|
|
|
Z2IJ%Z0 |
|
|
|
|
|
|
|
|
|
A12%Z0 |
|
|
|
|
|
|
|
|
Method |
|
|
|
|
|
|
|
|
|
|
|
|
|
|
|
(O: AlphabetO, 0: Zero) |
|
|
|
Note) Meanings of symbols in method column
E: Jig method
N: Not used
SP: Not used
Fig.2-8 Origin data label (an example)
The origin data to be input is noted in the origin data sheet enclosed with the arm, or on the origin data history table attached to the back side of the con- nector box cover. (Refer to Fig. 2-8).
Referring to "5.3.2 Installing/removing the cover" on page 44, remove the con- nector box cover, and confirm the value.
The value given in the default setting column is the origin settings set with the calibration jig before shipment.
Note that the 5-axis type does not have the J4 axis.
WARNING Always install/remove the cover with the controller control power turned OFF. Failure to do so could lead to physical damage or personal injury should the robot start moving due to incorrect operations.
(2) Turning ON the control power
CAUTION Confirm that there are no operators near the robot before turning the power ON.
1) Turn the controller [POWER] switch ON.
The control power will be turned ON, and " □ . 100" will appear on the STATUS NUMBER display on the front of the controller.
2-12 Setting the origin
2Unpacking to Installation
(3) Preparing the T/B
|
STATUS NUMBER |
CHANG DISP |
|
|
EMG.STOP |
|||||
|
|
|
|
|
|
|
|
|
|
|
|
MODE |
|
SVO ON |
|
START |
RESET |
|
|
||
|
TEACH |
|
|
|
|
|
|
|
|
|
AUTO |
AUTO |
|
|
|
|
|
|
|
||
(Op.) |
(Ext.) |
|
|
|
|
|
REMOVE T/B |
|||
|
|
|
SVO OFF |
|
STOP |
END |
|
|||
|
|
|
|
|
|
|
|
|
|
|
Next, prepare to use the T/B
1) Set the [MODE] switch on the front of the controller to "TEACH".
|
MODE |
|
TEACH |
AUTO |
AUTO |
(Op.) |
(Ext.) |
DISABLE ENABLE
DISABLE ENABLE
P8TB-TE
EMG.STOP
2)Set the T/B [ENABLE/DISABLE] switch to "ENABLE". The menu selection screen will appear.
The following operations are carried out with the T/B.
Operating from the T/B
Always set the [MODE] switch (mode selection key switch) on the front of the controller to "TEACH", and then set the T/B [ENABLE/DISABLE] switch to "ENABLE".
When the T/B is valid, only operations from the T/B are possible. Operations from the controller or external signals will not be accepted.
When T/B operations are mistaken
The displayed screen will return to the "menu selection screen" when the [MENU] key is pressed. Carry out the operations again from this screen. Operations can also be carried out again by setting the T/B [ENABLE/ DISABLE] switch to "DISABLE" once and then setting to "ENABLE".
Setting the origin 2-13

2Unpacking to Installation
(4) Selecting the origin setting method
<T/B screen> |
[Keys used] |
1) Press the [5] key on the menu screen, and display the maintenance screen.
+C (J6)
5 STU
<ORIGIN> SERVO OFF OK?(1) 


 1:EXECUTE
-Y (J2)
4 MNO
-B |
INP |
|
(J5) |
|
|
EXE |
||
1 DEF |
||
|
-B |
INP |
|
(J5) |
|
|
EXE |
||
1 DEF |
||
|
2)Press the [4] key on the maintenance screen, and display the origin setting method selection screen.
3)Press the [1] key on the origin setting method selection screen, and select the data input method.
The origin data input method will be selected, and the screen for turning OFF the servo power will appear.
4)Press the [1] and [INP] keys to turn OFF the servo power. The screen for inputting the origin data will appear.
Selecting a menu
The menu can be selected with one of the following methods.
A:Press the numeral key for the No. of the item to be selected.
B:Using the [ ↓ ] and [ ↑ ] keys, etc., move the cursor to the item to be selected, and then press the [INP] key.
2-14 Setting the origin

2Unpacking to Installation
(5) Inputting the origin data
T/B screen |
Origin data label |
||||||
(D,J1,J2,J3,J4,J5,J6) |
|||||||
|
|
|
|
|
|
||
<DATA> D( D ) |
|
||||||
1: J1 |
|
|
|
|
|
||
J2 |
|
|
|||||
3: |
J3 |
J4 |
|
|
|||
5: |
J5 |
J6 |
|
|
|||
Input the value confirmed in section "(1) Confirming the origin data" on page 12.
The correspondence of the origin data label value and axis to be input is shown in Fig. 2-9.(For the 5-axis robot, the J4 axis is meaningless.)
Fig.2-9 Correspondence of origin data label and axis
The method for inputting the origin data is explained below. The value shown in Fig. 2-8will be input as an example. <T/B screen> [Keys used]
<DATA>D(000000) 1:000000 000000 3:000000 000000 5:000000 000000
1) Confirm that the cursor is at the "D" position on the T/B display screen.
<DATA>D( |
V |
00000) |
|
|
|
||||
1:000000 000000 |
|
|
|
||||||
3:000000 000000 |
POS |
|
+B |
||||||
5:000000 000000 |
(J5) |
||||||||
CHAR |
|||||||||
VWX |
|||||||||
|
|
|
|
|
|
|
6 |
||
|
|
|
|
|
|
||||
<DATA>D(V |
! |
0000) |
|
|
|
||||
1:000000 000000 |
|
SPD |
|||||||
3:000000 000000 |
POS |
#%! |
|||||||
5:000000 000000 |
CHAR |
||||||||
|
|
|
|||||||
|
|
|
|||||||
<DATA>D(V! |
0 |
000) |
POSCHAR |
SPD |
|||||
|
|
|
|||||||
1:000000 000000 |
#%! |
||||||||
3:000000 000000 |
|
|
|||||||
|
|
+C |
|||||||
5:000000 000000 |
POS |
|
|||||||
(J6) |
|||||||||
|
|
|
|
|
|
CHAR |
5 |
STU |
|
|
|
|
|
|
|
|
|||
|
|
|
|
|
|
-A |
|
+Y |
|
|
|
|
|
|
|
(J4) |
|
(J2) |
|
|
|
|
|
|
|
2 GHI |
9 |
&<> |
|
2) Input the D value V!%S29. Inputting "V"
Press the [VWX] key once while holding down the [CHAR] key. "V" will appear, so release the [CHAR] key. "V" will be set.
Inputting "!"
Press the [#%!] key three times while holding down the [CHAR] key. "!" will appear, so release the [CHAR] key. "!" will be set.
In the same manner, while holding down the [CHAR] key, press the ["%"] key twice, and the [STU] key once (input "S").
Release the [CHAR] key, and press the [2] key (input "2") and then the [9] key (input "9").
V!%S29 will appear at the "D" data on the teaching pendant screen.
<DATA>D(V!%S29) |
|
||
1:0 |
00000 000000 |
RPL |
|
3:000000 000000 |
|||
↓ |
|||
5:000000 000000 |
|||
|
|||
|
|
INP |
|
|
|
|
|
|
|
EXE |
|
<DATA>D(V!%S29) CHANGES TO ORIGIN
OK? (1) |
|
-B |
INP |
|
|
(J5) |
|
||
|
EXE |
|||
|
1:EXECUTE |
|
1 DEF |
|
|
|
|
||
3)Press the [ ↓ ] key, and move the cursor to the J1 input position.
4)Input the J1 value in the same manner as above.
5)Input the J2, J3, J4, J5 and J6 values in the same manner. Note that the J4 axis is not required for the 5-axis type.
6)After inputting all of the values, press the [INP] key. The origin setting confirmation screen will appear.
7)Press [1] (-B/-P) and [INP] key to end the origin setting
Setting the origin 2-15

2Unpacking to Installation
Moving the cursor
Press the [ ↑ ], [ ↓ ], [ ← ] and [ → ] keys.
Inputting characters
Hold down the [CHAR] key and press the key with the character to be input on the lower right. Three characters w scroll each time the character key is pressed.
Correcting an input
After returning one character by pressing the [DEL] key, input the character again.
(6) Installing the connector box cover
Return the connector box cover, removed in section "(1) Confirming the origin data" on page 12 to its original position.
This completes the setting of the origin with the origin data input method.
Always remove and install the cover with the controller power turned OFF. Failure WARNING to do so could lead to the robot moving because of incorrect operations, or to
physical damage or personal injury.
If the origin input data is incorrect
If the origin input data is incorrect, the alarm No. 1760 (origin setting data illegal) will occur when origin data input. In this case, reconfirm the value input for the origin data.
2-16 Setting the origin

2Unpacking to Installation
2.4 Confirming the operation
In this section, the robot will be moved manually using the T/B to confirm that the operation is correct.
Moving the robot manually is called "jog operation". This operation includes the JOINT jog that moves each axis, the XYZ jog that moves along the base coordinate system, the TOOL jog that moves along the tool coordinate system, and the CYLNDER jog that moves along the circular arc.
This operation is carried out while pressing the deadman switch on the back of the T/B.
CAUTION The robot will move during this operation. Make sure that there are no operators near the robot, and that there are no obstacles, such as tools, in the robot operation range.
CAUTION To immediately stop the robot, release the deadman switch on the back of the T/B. The servo power will turn OFF, and the robot will stop.
The robot will also stop if the [EMG.STOP] switch (emergency stop switch) on the front of the T/B or the [EMG.STOP] switch (emergency stop) on the front of the controller is pressed.
CAUTION Confirm that the origin has been set. If the origin has not been set, "****" will appear at the current position display on the teaching pendant, the JOINT jog oper- ation will take place in any jog mode selected.
Refer to "2.3 Setting the origin" on page 11 for details on setting the origin.
|
|
|
|
|
|
|
|
J4 axis |
||
|
|
|
|
|
|
|
|
|
|
|
|
|
|
J3 axis |
|
|
|
|
|
J3 axis |
|
|
|
|
|
|
|
|
|
|||
|
|
|
|
J5 axis |
|
|
|
|
|
|
|
|
|
|
|
|
|
|
|||
|
|
|
|
|
|
|
|
|
|
|
|
|
|
|
|
|
|
|
|
|
|
|
|
|
|
|
|
|
|
|
|
|
|
|
|
|
|
|
|
|
|
|
|
|
|
|
|
J6 axis |
|
|
|
|
|
|
J5 axis |
|
|
|
J2 axis |
|
|
|
|
J2 axis |
|
|
|
|
|
|
|
|
|
|
|
|
|
|
|
|
|
|
|
|
|
|
|
|
|
|
|
|
||||||
|
|
|
|
|||||||
|
|
|
|
|
|
|
|
|
|
|
J6 axis |
|
|
|
|
|
|
|
|
|
|
|
J1 axis |
|
|
|
|
|
J1 axis |
|||
|
|
5-axis type |
|
|
|
|
|
6-axis type |
||
|
|
|
|
|
|
|
|
|
|
|
* Each axis moves independently.
The 5-axis type does not have the J4 axis.
Fig.2-10 JOINT jog operation
Confirming the operation 2-17
Loading...