


 Loading...
Operating instructions
Washing machine
To avoid the risk of accidents or damage to the appliance, it is essential to read these instructions before it is installed and used for the first time.
en-AU, NZ |
M.-Nr. 11 010 871 |

Contents |
|
|
Caring for the environment .................................................................................. |
6 |
|
Warning and Safety instructions ......................................................................... |
7 |
|
Operating the washing machine ........................................................................ |
14 |
|
Control panel......................................................................................................... |
14 |
|
Display................................................................................................................... |
16 |
|
Examples on how to operate the appliance.......................................................... |
16 |
|
Before using for the first time ............................................................................ |
17 |
|
1. |
Setting the language ......................................................................................... |
18 |
2. |
Setting up Miele@home .................................................................................... |
18 |
3. |
Removing the transit bars ................................................................................. |
20 |
4. |
Commissioning TwinDos................................................................................... |
20 |
5. |
Starting the calibration programme................................................................... |
23 |
Washing environmentally and economically .................................................... |
24 |
|
EcoFeedback ................................................................................................... |
25 |
|
1. |
Preparing the laundry...................................................................................... |
26 |
2. |
Selecting a programme .................................................................................. |
27 |
3. |
Loading the washing machine ....................................................................... |
29 |
4. |
Selecting programme settings....................................................................... |
30 |
Selecting a temperature/spin speed ..................................................................... |
30 |
|
Selecting Extras..................................................................................................... |
30 |
|
Level of soiling.................................................................................................. |
30 |
|
Delay start/SmartStart ..................................................................................... |
31 |
|
5. |
Adding detergent............................................................................................. |
33 |
TwinDos................................................................................................................. |
33 |
|
Detergent dispenser drawer .................................................................................. |
35 |
|
CapDosing............................................................................................................. |
37 |
|
6. |
Starting the programme - the end of the programme ................................. |
39 |
Spinning................................................................................................................ |
40 |
|
Final spin speed in the programme....................................................................... |
40 |
|
Rinse and interim spin........................................................................................... |
41 |
|
Omitting the final spin (Rinse hold)........................................................................ |
41 |
|
Omitting rinse and interim spin and the final spin................................................. |
41 |
|
2

|
Contents |
Programme chart ................................................................................................ |
42 |
Extras.................................................................................................................... |
48 |
Short...................................................................................................................... |
48 |
Water +.................................................................................................................. |
48 |
Additional Extras can be selected using the “Extras” sensor control ................... |
49 |
Stains................................................................................................................ |
49 |
Pre-wash .......................................................................................................... |
49 |
Soak ................................................................................................................. |
49 |
Intensive ........................................................................................................... |
49 |
Extra quiet ........................................................................................................ |
49 |
Extra gentle ...................................................................................................... |
49 |
AllergoWash ..................................................................................................... |
49 |
Wash programme chart - Extra options ................................................................ |
50 |
Garment care label symbols............................................................................... |
51 |
Programme sequence......................................................................................... |
52 |
Changing the programme sequence ................................................................. |
54 |
Cancelling a programme ....................................................................................... |
54 |
Interrupting a programme...................................................................................... |
54 |
Changing a programme......................................................................................... |
54 |
Safety lock............................................................................................................. |
55 |
Adding or removing laundry .................................................................................. |
55 |
Detergent ............................................................................................................. |
56 |
The correct detergent............................................................................................ |
56 |
Detergent dispensing aids..................................................................................... |
56 |
Fabric softeners and liquid starch ......................................................................... |
56 |
Miele recommended detergents ........................................................................... |
58 |
Cleaning and care ............................................................................................... |
60 |
Cleaning the drum (Hygiene info) .......................................................................... |
60 |
External casing and fascia panel........................................................................... |
60 |
Cleaning the detergent dispenser drawer ............................................................. |
60 |
TwinDos maintenance ........................................................................................... |
62 |
Cleaning the water inlet filter................................................................................. |
63 |
3

Contents |
|
Problem solving guide ........................................................................................ |
64 |
The programme does not start.............................................................................. |
64 |
Fault messages after a programme has been cancelled....................................... |
65 |
Fault messages at the end of a programme.......................................................... |
66 |
Messages or faults with the TwinDos system ....................................................... |
67 |
General problems with the washing machine ....................................................... |
68 |
An unsatisfactory wash result ............................................................................... |
70 |
The door will not open........................................................................................... |
71 |
Opening the door in the event of a blocked drain outlet and/or power cut .......... |
72 |
Service.................................................................................................................. |
74 |
Contact in case of fault ......................................................................................... |
74 |
Optional accessories............................................................................................. |
74 |
Warranty ................................................................................................................ |
74 |
Installation and connection ................................................................................ |
75 |
Front view .............................................................................................................. |
75 |
Rear view............................................................................................................... |
76 |
Installation surface ................................................................................................ |
77 |
Transporting the washing machine to its installation site...................................... |
77 |
Removing the transit bars ..................................................................................... |
77 |
Refitting the transit bars ........................................................................................ |
79 |
Levelling the machine............................................................................................ |
80 |
Screwing out and adjusting the feet................................................................. |
80 |
Building under a continuous worktop / in a kitchen run................................... |
81 |
Washer and dryer stack ................................................................................... |
81 |
The Miele water protection system ....................................................................... |
82 |
Connection to the water supply ............................................................................ |
83 |
Hot water.......................................................................................................... |
84 |
Drainage ................................................................................................................ |
85 |
Electrical connection ............................................................................................ |
86 |
Technical data...................................................................................................... |
87 |
Consumption data............................................................................................... |
88 |
Consumption data for the nominated energy labelling programme according to |
|
AS/NZS 2040.1 & AS/NZS 2040.2 ........................................................................ |
88 |
Settings ................................................................................................................ |
90 |
Calling up settings................................................................................................. |
90 |
Selecting settings.................................................................................................. |
90 |
Changing a setting ................................................................................................ |
90 |
Closing the settings menu..................................................................................... |
90 |
Language ........................................................................................................... |
91 |
4

|
Contents |
TwinDos................................................................................................................. |
91 |
Degree of soiling.................................................................................................... |
92 |
Buzzer volume....................................................................................................... |
92 |
Keypad tone .......................................................................................................... |
92 |
Welcome tone ....................................................................................................... |
92 |
Consumption......................................................................................................... |
92 |
Code...................................................................................................................... |
93 |
Units ...................................................................................................................... |
93 |
Brightness ............................................................................................................. |
93 |
Disp. switch-off stat. ............................................................................................. |
94 |
Programme info..................................................................................................... |
94 |
Memory ................................................................................................................. |
94 |
Water intake .......................................................................................................... |
94 |
Long p-wash Cotton ............................................................................................. |
95 |
Soak duration ........................................................................................................ |
95 |
Gentle action ......................................................................................................... |
95 |
Temp. reduction..................................................................................................... |
95 |
Water plus ............................................................................................................. |
96 |
Water plus level ..................................................................................................... |
96 |
Maximum rinse level.............................................................................................. |
96 |
Suds cooling.......................................................................................................... |
96 |
Low water pressure ............................................................................................... |
97 |
Anti-crease ............................................................................................................ |
97 |
Miele@home .......................................................................................................... |
97 |
Remote control...................................................................................................... |
98 |
SmartGrid .............................................................................................................. |
98 |
RemoteUpdate ...................................................................................................... |
99 |
Running a RemoteUpdate................................................................................ |
99 |
Optional accessories ........................................................................................ |
100 |
Detergent............................................................................................................. |
100 |
Specialist detergents........................................................................................... |
101 |
Fabric care........................................................................................................... |
101 |
Additives.............................................................................................................. |
102 |
Machine care products........................................................................................ |
102 |
5
Caring for the environment
Disposal of the packing
material
The transport and protective packaging has been selected from materials which are environmentally friendly for disposal, and can normally be recycled.
Recycling the packaging reduces the use of raw materials in the manufacturing process and also reduces the amount of waste in landfill sites. Ensure that any plastic wrappings, bags etc. are disposed of safely and kept out of the reach of babies and young children. Danger of suffocation.
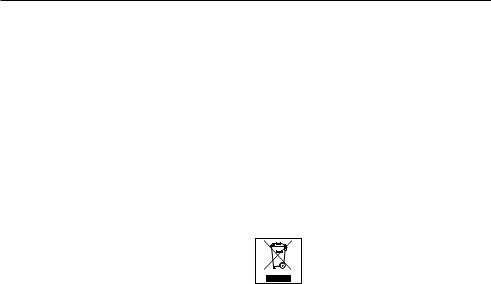
Disposing of your old
appliance
Electrical and electronic appliances often contain valuable materials. They also contain specific materials, compounds and components, which were essential for their correct function and safety. These could be hazardous to human health and to the environment if disposed of with your domestic waste or if handled incorrectly. Please do not, therefore, dispose of your old appliance with your household waste.
Please dispose of it at your local community waste collection / recycling centre for electrical and electronic appliances. You are also responsible for deleting any personal data that may be stored on the appliance prior to disposal. Please ensure that your old appliance poses no risk to children while being stored prior to disposal.
6

Warning and Safety instructions
This washing machine complies with current safety requirements. Inappropriate use can, however, lead to personal injury and damage to property.
To avoid the risk of accidents and damage to the machine, please read these instructions carefully before using it for the first time. They contain important information on its safety, use and maintenance.
Keep these instructions in a safe place and ensure that new users are familiar with the content. Pass them on to any future user.
Correct application
This washing machine is designed for domestic use and for use in similar environments by guests in hotel or motel rooms, bed & breakfasts and other typical living quarters. This does not include common/shared facilities or commercial facilities within hotels, motels or bed & breakfasts.
The washing machine is not suitable for outdoor use.
It must only be used to wash garments which have been declared suitable for washing by the manufacturer indicated on the garment care label. Any other use is not permitted. Miele cannot be held liable for damage resulting from incorrect or improper use or operation.
This washing machine is not intended for use by persons (including children) with reduced physical, sensory or mental capabilities, or lack of experience and knowledge, unless they have been given supervision or instruction concerning its use by a person responsible for their safety.
7

Warning and Safety instructions
Safety with children
Young children must not be allowed to use this appliance.
Older children may only use the appliance when its operation has been clearly explained to them and they are able to use it safely, recognising the dangers of misuse.
Cleaning work may only be carried out by older children under the supervision of an adult.
Please supervise children in the vicinity of the washing machine and do not let them play with it.
Technical safety
Please observe the instructions in “Installation and connection” and “Technical data”.
Before setting up the washing machine, check it for any externally visible damage. Do not install or use a damaged machine.
Before connecting the washing machine, ensure that the connection data on the data plate (fuse rating, voltage and frequency) matches the mains electricity supply. If in any doubt, consult a qualified electrician.
Reliable and safe operation of this washing machine can only be assured if it has been connected to the mains electricity supply.
8

Warning and Safety instructions
The electrical safety of this washing machine can only be guaranteed when continuity is complete between it and an effective earthing system which complies with current local and national safety regulations. It is most important that this basic safety requirement is present and regularly tested and, where there is any doubt, the household wiring system should be inspected by a qualified electrician. Miele cannot be held liable for the consequences of an inadequate earthing system (e.g. electric shock).
Do not connect the washing machine to the mains electricity supply by a multi-socket adapter, extension lead or similar. These do not guarantee the required safety of the machine (fire hazard due to the risk of overheating).
Faulty components must only be replaced by genuine Miele spare parts. Miele can only guarantee the safety of the appliance when Miele replacement parts are used.
The electrical socket must be easily accessible after installation so that the machine can be disconnected from the electricity supply if necessary.
Unauthorised repairs could result in unforeseen dangers for the user, for which Miele cannot accept liability. Repairs should only be undertaken by a Miele authorised service technician, otherwise any subsequent damage will not be covered by the warranty.
If the connection cable is faulty, it must only be replaced by a Miele approved service technician to protect the user from danger.
9

Warning and Safety instructions
In the event of a fault or for cleaning purposes, the washing machine is only completely isolated from the electricity supply when:
–it is switched off at the wall socket and the plug is withdrawn, or
–it is switched off at the mains circuit breaker.
The machine must only be connected to the on-site water supply using a new hose kit. Old hose kits must not be re-used. Check the condition of the hoses regularly so that you can replace them in good time and avoid the risk of any water damage.
The water flow pressure must be at least 100 kPa and should not exceed 1000 kPa.
This washing machine must not be installed and operated in mobile installations (e.g. on a ship).
Do not make any alterations to the machine, unless authorised to do so by Miele.
In areas which may be subject to infestation by cockroaches or other vermin, pay particular attention to keeping the machine and its surroundings in a clean condition at all times. Any damage which may be caused by cockroaches or other vermin will not be covered by the machine warranty.
10
Warning and Safety instructions
Correct use
Do not install the washing machine in a room where there is a risk of frost. Frozen hoses may burst or split. The reliability of the electronic control unit may be impaired at temperatures below freezing point.
Before using the machine for the first time, check that the transit bars at the rear of the machine have been removed (see “Installation and connection - Removing the transit bars”). During spinning, a transit bar which is still in place may result in damage to both the machine and adjacent furniture or appliances.
Turn off the tap if the machine is to be left for any length of time (e.g. holiday), especially if there is no floor drain (gully) in the immediate vicinity.
Flooding danger.
If hooking the drain hose into a wash basin, check that the water can drain off quickly enough to prevent the sink from overflowing. Make sure the drain hose is secure, so that the force of the water flowing out of the hose does not dislodge it.
Take care to ensure that foreign objects (e.g. nails, pins, coins, paper clips) do not find their way into the machine with the laundry. These may damage components of the machine (e.g. suds container, drum), which in turn can result in damage to the laundry.
11

Warning and Safety instructions
Take care when opening the drum door after using the steam function. There is a danger of burning due to escaping steam and the high temperature of the surface of the drum as well as the porthole glass. Stand back away from the machine and wait until the steam has dissipated.
The maximum load for this washing machine is 9 kg (dry weight). See the “Programme chart” for the maximum recommended loads for individual programmes.
If the correct amount of detergent is dispensed, the machine should not need to be descaled. If, however, you do wish to descale it, only use a proprietary natural citric acid based descaling agent. Miele recommends using Miele descaler for washing machines which is available to order online at shop.miele.com (depending on country) or from Miele. Strictly observe the instructions on the packaging.
Textiles which have been pre-treated in solvent based cleaning agents must be thoroughly rinsed in clean water before being washed in the machine.
Do not use solvent based cleaning agents, e.g. those containing benzine, in this machine, as this may result in damage to component parts and create toxic fumes. Such agents also pose a fire and explosion hazard.
Do not use solvent based cleaning agents, e.g. those containing benzine, to clean the external surfaces of the machine. They can cause damage to plastic surfaces.
Only use dyes specified by the manufacturer as being suitable for use in a domestic washing machine. Always observe the manufacturer's instructions carefully.
12

Warning and Safety instructions
Colour run and dye removers contain sulphur compounds which can cause damage such as corrosion. Do not use these products in this machine.
If detergent comes into contact with the eyes, rinse them thoroughly with lukewarm water immediately. If swallowed, seek medical assistance immediately and retain the packaging or label for reference. Those with skin problems or sensitive skin should avoid their skin coming into contact with detergent.
Accessories
Only use genuine Miele spare parts and accessories with this appliance. If spare parts or accessories from other manufacturers are used, this will invalidate the warranty, and Miele cannot accept liability.
A Miele tumble dryer can be stacked on top of a Miele washing machine using the appropriate stacking kit (available as an optional accessory). Please make sure you order the correct one for the Miele washing machine and Miele tumble dryer.
Miele cannot be held liable for damage caused by non-compliance
with these Warning and Safety instructions.
13
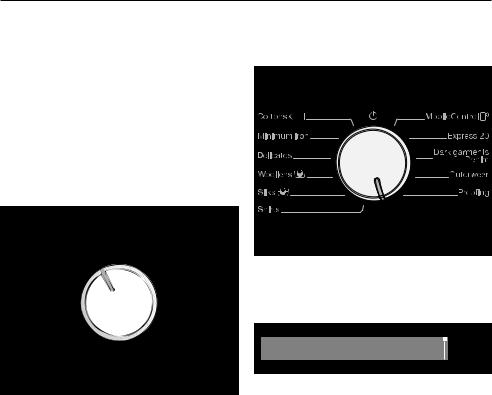
Operating the washing machine
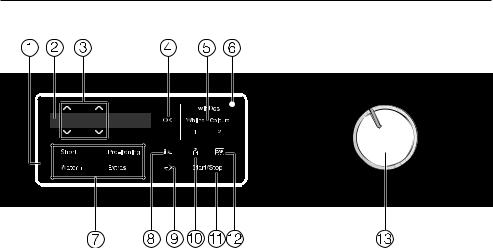
Control panel
a Control panel
The control field consists of a display and various sensor controls. The individual sensors are explained in the following sections.
bDisplay
The following values are shown in the display and/or selected from it:
1.The temperature, spin speed and time left for the selected wash programme.
2.The individual values of the selection lists for Extras and settings.
cSensor controls
Values shown in the display can be changed with the sensors. The
sensor increases the value or moves the selection list up; the sensor decreases the value or moves the selection list down.
d OK sensor
Confirm selected values with the OK sensor.
e TwinDos sensors with options for Whites and Colours
The TwinDos sensor is used for deactivating and activating automatic detergent dispensing. Depending on the colour mix of your load, you can control the detergent combination by selecting Whites or
Colours.
Further information can be found in the “TwinDos” chapter.
f Optical interface
For service technicians.
14

Operating the washing machine
g Sensor controls for Extras
You can supplement wash programmes with Extras.
If a wash programme has been selected, the sensor controls for the possible Extras light up dimly.
h Sensor
You can view information about the energy and water consumption of your washing machine with the sensor.
See “Washing environmentally and economically - EcoFeedback” for more information.
The following information will appear in the display:
–An estimate of the energy and water consumption before the programme begins.
–The actual energy and water consumption during the programme or at the end of the programme.
iSensor
The sensor starts the Delay start function. With Delay start you can delay the start of the programme. The start of the programme can be delayed from 15 minutes up to a maximum of 24 hours. This allows you to make use of night-time economy electricity rates, for example.
See “4. Selecting programme settings”, section “Delay start” for more information.
j Sensor
You can specify the level of soiling of the load in three settings. This sensor is only active with the TwinDos option activated.
k Start/Stop sensor
Touching the Start/Stop sensor starts the selected programme or cancels a programme that has already been started. The sensor flashes slowly as soon as it is possible for a programme to be started and then lights up constantly after the programme has started.
l Sensor
The sensor can be used to activate detergent dispensing with a capsule.
m Programme selector
This is used for selecting programmes and for switching off the appliance. The washing machine is switched on by selecting a programme, and switched off by turning the programme selector to the position.
15

Operating the washing machine
Display
The standard display shows the following from left to right:
|
|
|
|
|
|
1600 |
2:59 |
OK |
|
|
|
|
|
|
–the selected wash temperature
–the selected spin speed
–the programme duration
Examples on how to operate
the appliance
Scrolling through a list
The scroll bar in the display indicates that a list of choices is available.
Language |
|
OK |
|
Scroll down the list with the sensor. Scroll up the list with the sensor. The
OK sensor is used to activate the option shown in the display.
Identifying the selected option
|
|
|
|
|
|
Cap |
OK |
||
|
|
|
|
|
An activated option in a list will have a
tick next to it.
Setting numerical values
Start in |
00 |
:00 h |
OK |
The numerical value is highlighted in white. Touching the sensor decreases the value. Touching the sensor increases the value. The OK sensor is used to activate the value shown in the display.
Leaving a submenu
Select Back to exit a submenu.
16
Before using for the first time
Before using the machine for the first time, ensure that it is correctly installed and connected. See “Installation and connection”. Also check that the filters are securely tightened to prevent the risk of water leaks during use.
Remove the detergent
cartridges and the drain hose
elbow from the drum
Two detergent cartridges for automatic detergent dispensing and an elbow piece for the drain hose are stored in the drum.
Removing the protective foil
and stickers
Please remove
–the protective foil from the door.
–any stickers from the front and the lid (Exception: warning labels must not be removed).
Please do not remove any labels (e.g. the data plate) which are visible when you open the door.
This washing machine has undergone a complete functional test at the factory and there will be some residual water in the drum from this process.
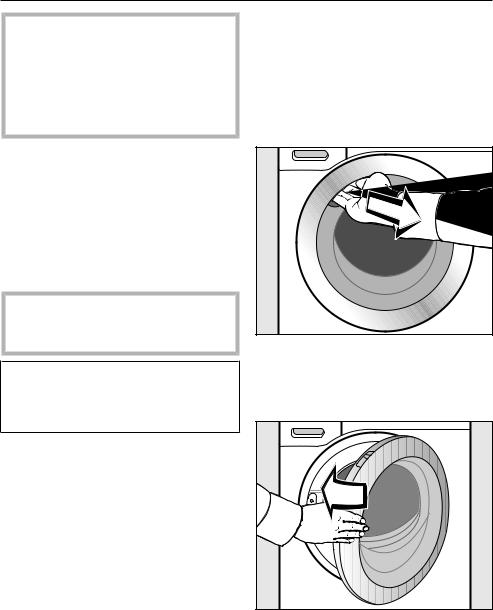
Reach under the door grip and pull the door open.
Take the two cartridges and the elbow piece out of the drum.
Shut the door with a gentle swing.
17

Before using for the first time
Switching on the washing
machine
Turn the programme selector to the
Cottons programme.
The welcome tone will sound and the welcome screen will light up.
The display will guide you through the
5 steps of the initial commissioning process.
1. Setting the language
You will be asked to select the language you require for the display. It is possible to change the language at any time by turning the programme selector to the
Further programmes/ position and then selecting the Settings sub-menu.
|
|
|
|
|
|
english (AU) |
OK |
||
|
|
|
|
|
Touch the sensors until the language you require appears in the display.
Confirm your choice of language by touching the OK sensor.
2. Setting up Miele@home
Your washing machine is equipped with an integrated Wi-Fi module. The washing machine can be connected to the household Wi-Fi network.
You will then be able to operate the washing machine via the Miele@mobile app.
The following message appears in the display:
Miele@home
Confirm with OK.
The following message appears in the display:
Set up now
To set up Miele@home now: Touch the OK sensor.
To postpone setup until later: Touch the sensor until the following appears in the display: Set up later and press OK to confirm.
Select the required connection type from the display.
1. Connect via WPS
2. Connect via App
Before installing the washing machine in its final location, ensure the signal strength is sufficient for your Wi-Fi network.
18
Before using for the first time
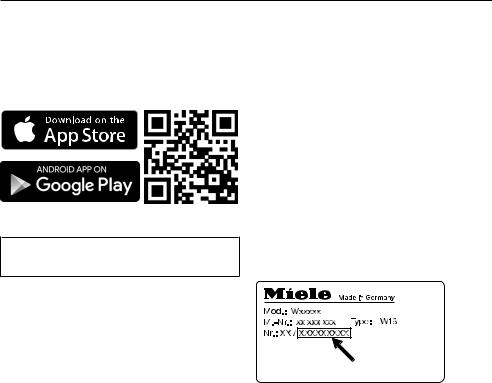
Miele@mobile App
You can download the Miele@mobile App from the Apple App Store® or the Google Play Store™ free of charge (only functional in selected countries).
Connecting via WPS
Your Wi-Fi router must support WPS (Wi-Fi Protected Setup).
Follow the instructions in the display.
If the connection fails, you have probably not connected WPS on your router quickly enough. Repeat the steps above.
Useful tip: If your Wi-Fi router does not support WPS, please connect via the Miele@mobile app.
Connecting via the app
The Miele@mobile app can be used to connect to your network.
Install the Miele@mobile app on your mobile device.
Follow the instructions in the app. To log in you will need:
1. Your Wi-Fi network password
2. Your washing machine password
The password for your washing machine consists of the last nine digits of the serial number, which can be found on the machine's data plate.
If the connection is successful, the following will appear in the display:
|
|
|
|
|
Connect. successful |
OK |
|
|
|
|
|
Confirm with the OK sensor.
19
Before using for the first time
3.Removing the transit bars
Failure to remove the transit bars can result in damage to the washing machine and to adjacent cabinetry or appliances.
Remove the transit bars as described in “Installation and connection”.
The following message appears in the display:
Remove transit bars
Confirm with the OK sensor.
4. Commissioning TwinDos
The UltraPhase 1 and UltraPhase 2 values are pre-set in the standard settings and only need to be confirmed.
The following message appears in the display:
TwinDos
Confirm with OK.
The following message appears in the display:
Set now
To set up TwinDos now, touch the OK sensor.
To postpone setup until later: Touch the sensor until the following appears in the display: Set later and press OK to confirm.
Settings for compartment
The UltraPhase 1 values are pre-set in the standard settings.
|
|
|
|
|
Agent for |
OK |
|
|
|
|
|
Confirm with the OK sensor.
Miele UltraPhase 1 |
|
|
OK |
|
Confirm with the OK sensor.
The following will appear in the display:
Set the dosage. Observe water hardness
level
Confirm with the OK sensor.
The dispensing quantity for
UltraPhase 1 for (hardness range I) is pre-set.
Per load |
48 |
ml |
OK |
Confirm the pre-set value with the OK sensor or correct the value with the
sensors and confirm this with the
OK sensor.
UltraPhase 1
Hardness level I |
48 ml |
Hardness level II |
60 ml |
Hardness level III |
72 ml |
20
Before using for the first time
The following appears in the display:
Insert
Remove the foil or the stopper from the detergent cartridge.
Open the access panel for TwinDos. |
Push the UltraPhase 1 detergent |
cartridge into compartment 1 until it
locks into position.
21
Before using for the first time
Settings for compartment
The UltraPhase 2 values are pre-set in the standard settings.
After the UltraPhase 1 cartridge has been pushed in, the display message switches to:
|
|
|
|
|
Agent for |
OK |
|
|
|
|
|
Confirm with the OK sensor. |
|
||
|
|
|
|
|
Miele UltraPhase 2 |
OK |
|
|
|
|
|
Confirm with the OK sensor.
The dispensing quantity for
UltraPhase 2 for (hardness range I) is pre-set.
Per load |
36 |
ml |
OK |
Confirm the pre-set value with the OK sensor or correct the value with the
sensors and confirm this with the
OK sensor.
UltraPhase 2
Hardness level I |
36 ml |
Hardness level II |
45 ml |
Hardness level III |
54 ml |
The following appears in the display:
Insert
Remove the foil or the stopper from the detergent cartridge.
Push the UltraPhase 2 detergent cartridge into compartment 2 until it locks into position.
When the cartridge is pushed in, the display message switches to:
"TwinDos" is set. Can be changed in
'Settings'
Confirm with the OK sensor.
Close the TwinDos access panel.
22
Before using for the first time
Using other detergents with TwinDos Set up completed
The TwinDos dispenser can be used for other liquid detergents. Refillable TwinDos containers (optional accessories) are required for this. See “Settings - TwinDos” for more detailed information.
5. Starting the calibration
programme
For optimum water and energy consumption and excellent wash results, it is important to calibrate the washing machine.
To do this, the Cottons programme must be run without laundry and without detergent.
No other programmes can be started until calibration has been carried out.
The following message appears in the display:
Open and run 'Cottons' 90°C without
laundry
Touch the sensor until the OK sensor lights up and confirm this with
OK.
|
|
|
|
|
|
90° |
1600 |
1:55 |
OK |
|
|
|
|
|
Turn on the tap.
Touch the Start/Stop sensor.
The calibration programme is started. It will take approximately 2 hours.
At the end of the programme the following message will appear in the display:
Reach under the door grip and pull the door open.
Useful tip: For safety reasons, close the door when the washing machine is not in use. Otherwise there is a danger of objects being placed inadvertently in the drum. If these remain unnoticed and were washed in the next load, they could damage the laundry. An open door is also a danger to pets and children.
Turn the programme selector to the
position.
23

Washing environmentally and economically
Energy and water consumption
–To get the most out of your machine, load the maximum dry load for the programme you are using.
The energy and water consumption will be the lowest in relation to the size of the load.
–When smaller amounts of laundry are washed, the Auto load control system will reduce the amount of water and energy used.
–Use the Express 20 programme for small, lightly soiled loads.
–Modern detergents make it possible to wash at lower temperatures (e.g.
20°C). Using lower temperature settings will save energy.
–Washing at low temperatures and/or using liquid detergents can cause bacteria and odours to build up in the washing machine. Miele therefore recommends cleaning the washing machine once every month.
The washing machine reminds you to do so with the following message in
the display: Hygiene info: Run a
programme at min. 75°C or "Clean
machine'" programme.
–Use the hot water connection to save energy.
Detergent consumption
–For precise dispensing, use automatic detergent dispensing.
–Adjust the dosage to the degree of soiling of the laundry.
–Do not exceed the amounts of detergent recommended by the manufacturer on the packaging.
When drying with a tumble dryer
Selecting the highest possible spin speed for the wash programme will save energy when drying in a tumble dryer afterwards.
24

Washing environmentally and economically
EcoFeedback
You can view information about the energy and water consumption of your washing machine with the sensor.
The following information will appear in the display:
–An estimate of the energy and water consumption before the programme begins.
–The actual energy and water consumption during the programme or at the end of the programme.
1. Estimate
After selecting a programme, touch the sensor.
The estimated energy and water consumption levels will be displayed as a bar chart.
|
|
|
|
OK |
|
|
|
||
The more bars visible (), the higher the energy or water consumption.
The estimate will vary depending on the wash programme, temperature and any options selected.
Touch the OK sensor or wait until the display automatically returns to the standard display.
2. Actual consumption
You can view the actual amount of energy and water used by a programme both during and at the end of the programme.
Touch the sensor.
Energy |
< 0.1 kWh |
OK |
Use the sensors to change to the estimated water consumption levels.
The consumption will alter as the programme progresses.
If the door is opened or the machine has switched off automatically at the end of the programme, the data will revert to the estimated consumption.
Useful tip: You can view the consumption data for the last wash programme in Settings under
Consumption.
25
1. Preparing the laundry
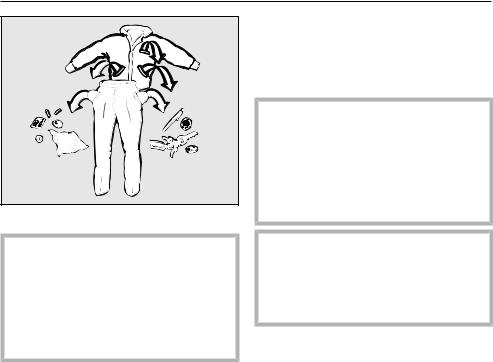
Empty all pockets.
Foreign objects (e.g. nails, coins, paper clips, etc.) can cause damage to garments and components in the machine.
Check the laundry before washing and remove any such foreign objects.
Sorting the laundry
Sort the laundry by colour and by care label. Most garments have a textile care label in the collar or side seam.
Useful tip: Dark textiles often contain excess dye and should be washed separately several times before being included in a mixed load. Always wash white and coloured items separately.
Pre-treating stains
Badly soiled areas, stains etc. should be cleaned as soon as possible, preferably while still fresh. Spillages should be carefully dabbed off using a soft, colourfast cloth. Do not rub.
Useful tip: Stains can be pre-treated using some handy tricks, which can be found in “Miele's guide to laundry care”. Please contact Miele to obtain a copy of this booklet.
Solvent-based cleaners (e.g. one containing benzine) can damage plastic parts.
When pre-treating garments, make sure that any plastic parts (e.g. buttons) do not come into contact with cleaning agent.
Chemical (solvent-based) cleaning agents can cause severe damage to the washing machine. Do not use solvent-based cleaning agents in this machine.
General tips
–Curtains: Remove lead weights first or place in a laundry bag.
–Underwiring and collar stiffeners: Any loose wiring in bras, shirt collar stiffeners, etc. should be removed or sewn in.
–Close any zips, attach velcro fasteners, fasten hooks and eyes etc. before washing.
–Fasten duvet covers and pillow cases to prevent small items from being rolled up inside them.
Do not wash any items in this machine which are specified by the manufacturer as not washable on the care label ( symbol).
26
2. Selecting a programme
Switching on the washing
machine
Turn the programme selector to a programme.
Programme selection
There are three possible ways to select a programme:
1. Selecting standard programmes via the programme selector
Turn the programme selector to the required programme.
The selected programme will appear in the display. This will then be replaced by the standard display.
2. Selecting further programmes via the “Further programmes/ ” position and the display:
Turn the programme selector to the
Further programmes/ position.
The following appears in the display:
Sportswear OK
Touch the sensors until the programme you want appears in the display.
Confirm the programme with the OK sensor.
Preset programme parameters will be displayed, depending on the programme selected.
27
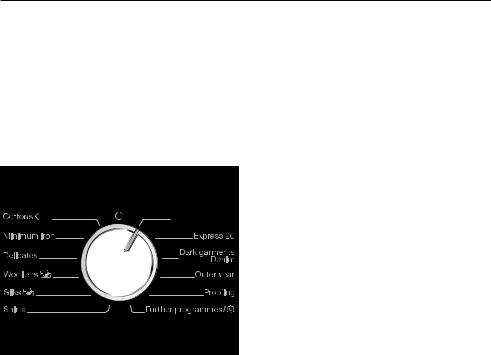
2.Selecting a programme
3.Selecting programmes via the
MobileControl programme selector position and the Miele@mobile app
Useful tip: In order to use MobileControl , the washing machine must be logged on to the Wi-Fi network and Remote control must be switched on.
Turn the programme selector to the
MobileControl position.
The following appears in the display:
Load laundry, close the door and press
'Start'. Appliance can be remotely controlled
Follow the instructions in the display and start the programme.
The following appears in the display:
MobileControl
The washing machine can now be operated with the Miele@mobile app.
28

3. Loading the washing machine
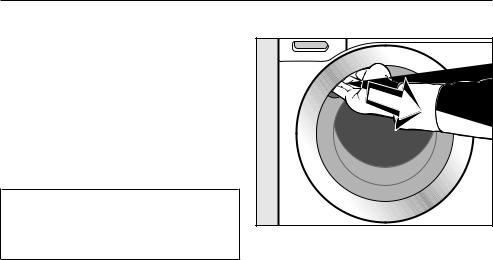
Opening the door |
Closing the door |
Reach under the door grip and pull the door open.
Check the drum for pets or foreign objects before loading it with laundry.
The most efficient use of energy and water is achieved when a full load is washed. However, do not overload as this reduces cleaning efficiency and causes creases.
Unfold the laundry and load loosely in the drum.
Mixing both large and small items gives better wash results and also helps distribute the load evenly during spinning.
Useful tip: Please note the maximum load for the different wash programmes. The relevant programme load is always shown in the display when you select a programme.
Make sure that no items are caught between the door and the seal.
Shut the door with a gentle swing.
29

4. Selecting programme settings
Selecting a temperature/spin
speed
You can alter the preset temperature/ spin speed of a wash programme, if this option is permitted for that programme.
|
|
|
|
|
|
1600 |
2:59 |
OK |
|
|
|
|
|
|
Touch the sensors above or below the temperature or spin speed value in the display until the temperature/spin speed you want appears in the display.
Selecting Extras
Extras sensor control
You can select additional Extras using the Extras sensor.
Touch the Extras sensor.
The following appears in the display:
|
|
|
|
|
|
No Extras |
OK |
||
|
|
|
|
|
Touch the sensors until the Extra you want appears in the display.
Confirm the Extra with OK.
Level of soiling
The sensor is only active with the
TwinDos option activated. See
“5. Adding detergent - TwinDos” for
more information.
Touch the sensor for the Extra you want. It then lights up brightly.
Useful tip: You can select multiple Extras for a wash programme.
Not all the Extras can be used with every programme. If an Extra is not dimly lit, this option is not permitted for the wash programme (see “Extras”).
30
Loading...