

Page 1
Metrohm Ltd.
CH-9101 Herisau / Suiza
Teléfono +41 71 353 85 85
Fax +41 71 353 89 01
Internet www.metrohm.ch
E-Mail info@metrohm.ch
784 KFP Titrino
Instrucciones para el uso
8.784.1005 00.05 sn/bs
Page 2

Page 3

Contenido
Contenido
1 Vista del conjunto .................................................................................................... 2
2 Man ejo manual ......................................................................................................... 6
2.1 Teclado .......................................................................................................................... 6
2.2 Principio de la entrada de datos ................................................................................... 7
2.3 Entrada de textos .......................................................................................................... 8
2.4 Configuración, tecla <CONFIG> ................................................................................ 9
2.5 Tecla <MODE> ..........................................................................................................14
2.6 Parámetros, tecla <PARAM> ....................................................................................15
2.6.1 Parámetros para KFT ...........................................................................................15
2.7 Cálculos del resultado ................................................................................................25
2.8 Cálculos estadísticos ..................................................................................................28
2.9 Variables comunes ......................................................................................................30
2.10 Emisión de datos ......................................................................................................31
2.10.1 Definiciones del informe para la emisión al final de la determinación .............31
2.10.2 Indicación de la curva ........................................................................................33
2.11 Nombre del usuario, tecla <USER> .......................................................................34
2.12 Memoria de métodos, tecla <USER METH> .........................................................35
2.13 Datos de la muestra actual, tecla <SMPL DATA> .................................................37
2.14 Memoria silo para datos de muestras ......................................................................38
2.15 Memorización de resultados y cálculos silo ............................................................41
2.15.1 Memorización de resultados..............................................................................41
2.15.2 2.17.2 Cálculos silo ............................................................................................42
2.16 Dosificación manual ..................................................................................................44
3 Op eratio n via RS232 Interface ( páginas ver des, en inglés) ................................ 45
3.1 General rules ...............................................................................................................45
3.1.1 Call up of objects..................................................................................................46
3.1.2 Triggers .................................................................................................................47
3.1.3 Status messages ..................................................................................................48
3.1.4 Error messages ....................................................................................................49
3.2 Remote control commands ........................................................................................52
3.2.1 Overview ...............................................................................................................52
3.2.2 Description of the remote control commands .....................................................67
3.3 Properties of the RS 232 Interface ..............................................................................90
3.3.1 Handshake ...........................................................................................................90
3.3.2 Pin Assignment.....................................................................................................93
3.3.3 ¿Qué hacer si la transmisión de datos no funciona? ..........................................95
4 Men sajes de erro res, co rrección de averías ........................................................ 97
4.1 Mensajes de errores y mensajes especiales .............................................................97
4.2 Diagnóstico .............................................................................................................. 100
4.2.1 Introducción ....................................................................................................... 100
4.2.2 Procedimiento .................................................................................................... 100
4.2.3 Aparatos necesarios .......................................................................................... 101
4.2.4 Pasos de diagnóstico ........................................................................................ 101
4.3 Inicialización y prueba RAM ..................................................................................... 110
4.4 Desbloqueo de un eje bloqueado con Unidad intercambiable ............................. 111
784 KFP Titrino
Page 4

Contenido
5 Preparaci ones....................................................................................................... 112
5.1 Instalación y conexiones de instrumentos ............................................................... 112
5.1.1 Titrino con agitador o Ti Stand ........................................................................... 112
5.1.2 Conexión de una impresora .............................................................................. 113
5.1.3 Conexión de una balanza .................................................................................. 114
5.1.4 Conexión de un horno KF .................................................................................. 115
5.1.5 Conexión de un cambiador de muestras .......................................................... 116
5.1.6 Conexión del Oven Sample Processor 774 ...................................................... 117
5.1.7 Conexión de un ordenador ................................................................................ 118
5.1.8 Conexiones en la caja Remote .......................................................................... 118
5.2 Conexión de electrodos, instalación del recipiente de titración .............................. 122
6 Apéndice ............................................................................................................... 123
6.1 Características técnicas ............................................................................................ 123
6.2 Asignación de las tomas de la ficha "Remote" ........................................................ 125
6.2.1 Estado de las líneas de la ficha "Remote" ......................................................... 127
6.2.2 Configuraciones posibles del "puls.activación" en modo KFT ......................... 128
6.3 Métodos de usuario ................................................................................................. 129
6.3.1 Generalidades .................................................................................................... 129
6.3.2 Título KF con agua o metanol estándar "H2OTiter" .......................................... 130
6.3.3 Título KF con tartrato sódico "TarTiter" .............................................................. 131
6.3.4 Valor en blanco para KFT "Blank_KF" ................................................................ 132
6.3.5 Titración KF con deducción de un valor en blanco .......................................... 133
6.3.6 Titración KF sin deducción de un valor en blanco "KF" .................................... 135
6.3.7 Titraciones KF con diferentes reactivos KF ....................................................... 137
6.3.8 Determinación del índice de bromo "BrNumber" .............................................. 138
6.4 Validación del Titrino ................................................................................................. 139
6.4.1 Pruebas electrónicas.......................................................................................... 139
6.4.2 Pruebas en húmedo ........................................................................................... 139
6.4.3 Mantenimiento y reajuste del Titrino .................................................................. 139
6.5 Garantía y certificados .............................................................................................. 140
6.5.1 Garantía .............................................................................................................. 140
6.5.2 Certificate of Conformity and System Validation ............................................... 141
6.6 Referencias de pedido, accesorios .......................................................................... 143
Indice ........................................................................................................................ 147
784 KFP Titrino
Page 5

Page 6

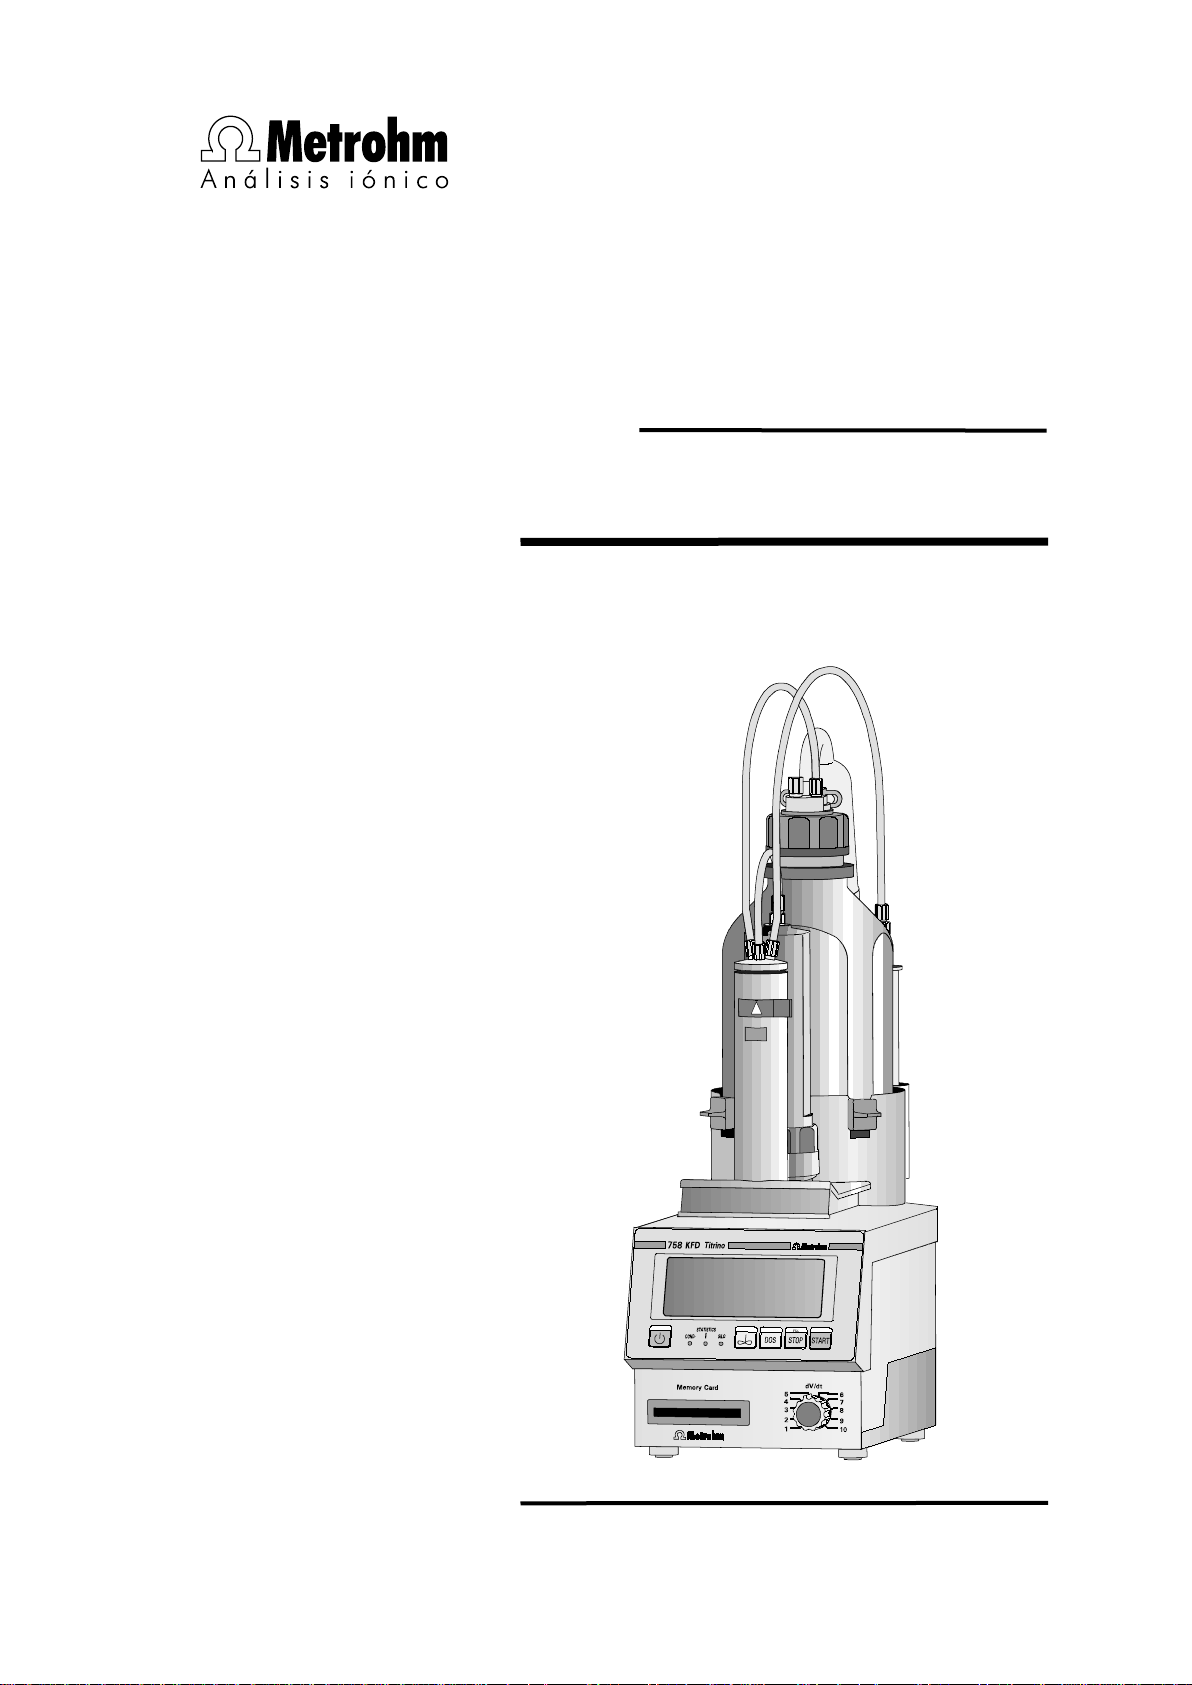
Vista del conjunto
784 KFP Titrino
Instrucciones para el uso
784 KFP Titrino
1
Page 7
Vista del conjunto
4
1
3 2 5
1 Vista del conjunto
Parte an terior del aparato:
784 KFP Titrino
2
Page 8

Vista del conjunto
1 Unidad intercambiable
2 Pantalla
3 Teclas y pilotos i ndicadores del Titrino
Tecla < > Interruptor de la red
Tecla < > Conectar/desconectar el agitador
Tecla <DOS> Se está dosificando mientras <DOS> está
pulsada. Se utiliza p.ej. para preparar la Unidad
intercambiable. La velocidad de dosificación se
ajuste con el potenciómetro (
Tecla <STOP/FILL> - Para parar operaciones, p.ej. titraciones,
acondicionamientos.
- Orden de llenado después de <DOS>.
Tecla <START> Inicia operaciones, p.ej. titraciones,
acondicionamientos.
Idéntica a la tecla <START> del teclado
separado.
Pilotos indicadores:
"COND." La luz está encendida de forma intermitente
durante el acondicionamiento; cuando está
acondicionada, la luz está encendida de forma
continuada.
"STATISTICS" La luz está encendida cuando la función
"estadística" (cálculo de la media y desviación
standard) está conectada.
"SILO" La luz está encendida cuando la memoria silo
(para datos de muestras) está conectada.
5).
4 Ajuste del contraste de la pantalla
5 Control de la velocidad de la dosificación manual con la tecla
<DOS> y el llenado posterior
784 KFP Titrino
3
Page 9
Vista del conjunto
Remote
1.784
Nr.
E
B
Made by Metrohm
Herisau Switzerland
100 - 240 V
f = 50 - 60 Hz
S = 15 W
Pol
Keyboard
C
A
1
A
2
RS 232
8 12
11 9 6
10
7
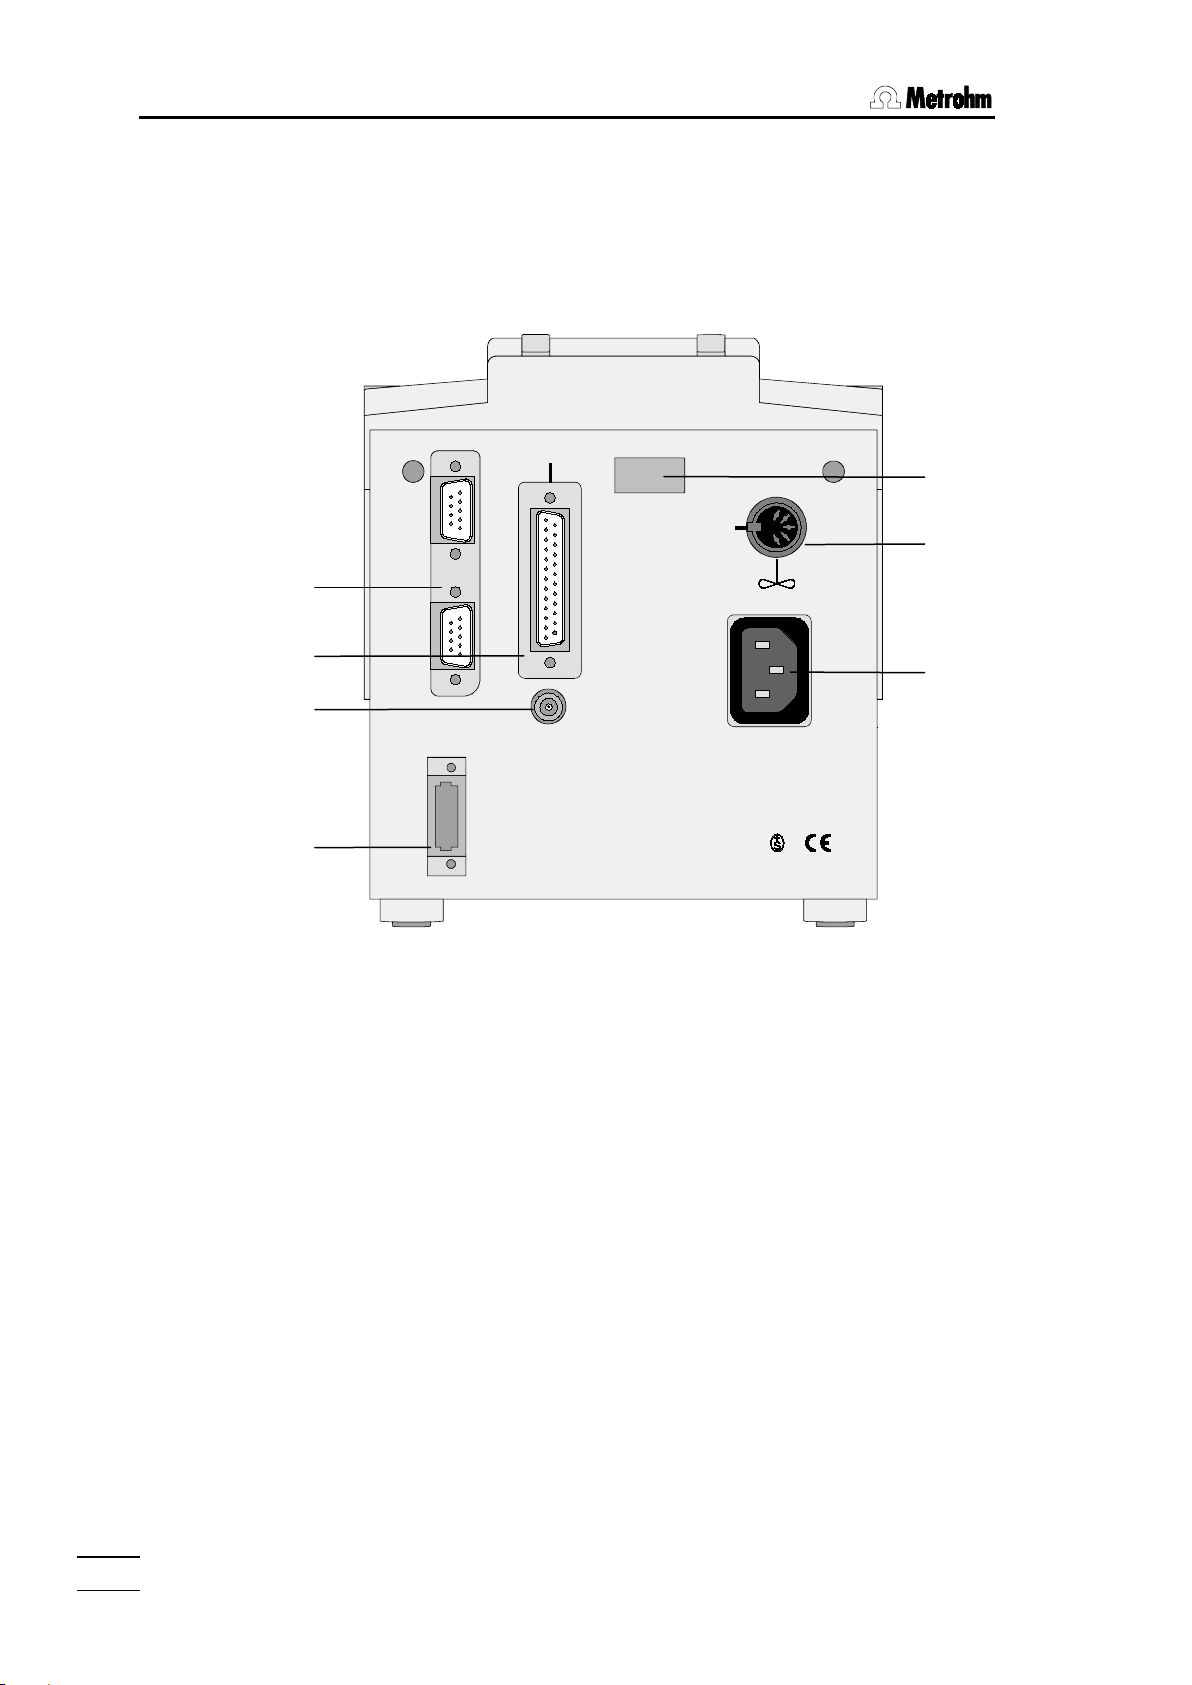
Parte p osterior del aparato:
784 KFP Titrino
4
Page 10

Vista del conjunto
6 Interfaces RS232
2 interfaces separados para la conexión de una impresora, balanza y
un ordenador
7 Lí neas "Remote" (Input/Output)
para la conexión de una caja Remote, un cambiador de muestras,
robot...
8 Conexión de electrodo
1 entrada para electrodos polarizados, p.ej. electrodo KF
9 Conexión para el teclado separado
10 Conexión de la red
En el caso de redes en las que el voltaje esté sujeto a fuertes
interferencias HF, hay que conectar el Titrino por medio de un filtro de
la red adicional, p.ej. el modelo Metrohm 615.
11 Conexión para el agitador
Agitador 728, Varilla agitador 722, Ti Stand 703 o 727
Voltaje de alimentación: 10 VDC (I ≤ 200 mA)
12 Pl aca de identif icaci ón
con número de fabricación, serie e instrumento
784 KFP Titrino
5
Page 11
2.1 Teclado
→ ↑ ←
↓
STOP
START
USER METH
DEF
C-FMLA
MODE
REPORTS
PRINT
Conexión/desconexión de la memoria
2 Manejo manual
2.1 Teclado
CONFIG
STATISTICS
7
4
PARAM
SMPL
DATA
EP
MEAS/HOLD
+
8
SILO
9
5
*
6
RS
CONFIG Configuración.
PARAM Parámetros.
SMPL DATA Datos de muestras.
STATISTICS Conexión/desconexión de cálculos
–
MEAS/HOLD Conexión/desconexión de medidas
/
SILO
C
1
2
MN
0
.
USER
(
ABC
3
–
CURVE
)
C-FMLA Constantes de cálculo, vea página 27.
DEF Fórmulas y información para la
;
USER METH Memoria interna, vea página 35.
PRINT Impresión de informes, vea página 33.
REPORTS Impresión de los resultados.
MODE Diálogo del modo, vea página 14.
CLEAR ENTER
QUIT
6.2130.050
USER Selección del usuario, vea página 34.
CURVE Cambiar indicación de los resultados,
←,→ Selección de valores especiales
↑,↓ Cursores de navegación.
CLEAR Borra valores y ajusta valores
ENTER Acepte valores.
STOP Para métodos.
QUIT Salida de consultas, de pausas y de
START Inicia métodos.
Las terceras funciones de las teclas (inscripción superior) del teclado se utilizan para
introducir fórmulas, vea página 25.
estadísticos, vea página 28.
entre titraciones y función "hold"
durante titraciones.
silo para datos de muestras, vea
página 38.
emisión del resultado, vea página 25ff.
vea página 33.
(marcado con ":" en el diálogo).
especiales.
impresiones.
784 KFP Titrino
6
Page 12
2.2 Principio de la entrada de datos
2.2 Principio de la entrada de datos
• Pulsando una tecla se ve un grupo de consultas en
la pantalla.
configuration
>control
>aparatos periféricos
>ajustes varios
>ajustes para RS232-COM1
>ajustes para RS232-COM2
>variables comunes
configuration
>aparatos periféricos
transm.a COM1: IBM
transm.a COM2: IBM
impresión man.en COM: 1
balanza: Sartorius
control agitador: no
remote-box: no
configuration
>control
>aparatos periféricos
>ajustes varios
>ajustes para RS232-COM1
>ajustes para RS232-COM2
>variables comunes
Ejemplo tecla <CONFIG>:
En la primera línea se encuentra el "lugar" donde
está. Ha pulsado la tecla <CONFIG> entonces se
encuentra en las consultas "configuration".
• El cursor se muestra inverso. En el ejemplo, está en
">control". El cursor se mueve con las teclas <↑>
y <↓>.
• Cuando el texto de diálogo está marcado con ">",
es el título de un grupo de consultas. Puede pasar
con <ENTER> a estas consultas.
Ejemplo de las consultas en ">aparatos
periféricos":
Las dos primeras líneas le dan el "lugar" donde
está. Después hay las consultas.
Cuando el texto de diálogo está marcado con ":", se
puede elegir el valor con las teclas <←> y <→>
(gira hacia delante/atrás).
• Se acepte un valor con <ENTER> y el cursor pasa
a la próxima consulta.
• Con <QUIT> se salga de la consulta y llega al
siguiente nivel superior. En el ejemplo a ">aparatos
periféricos";
Pulsando <QUIT> otra vez se salga de las
consultas "configuration".
• Las flechas a la derecha indican cuando se puede
girar la pantalla (scroll) hacia abajo o arriba.
784 KFP Titrino
7
Page 13
2.3 Entrada de textos
2.3 Entrada de textos
Ejemplo memorizar método:
user methods
>memorizar método
método: ********
<CLEAR>
REPORTS
ABC
.
user methods
>memorizar método
método:
ABCDEFGHIJKLMNOPQRSTUVWXYZ
abcdefghijklmnopqrstuvwxyz
µ°!"#$&'()*+,-./ 0123456789
<QUIT>
user methods
>memorizar método
método: Texto
<ENTER>
• Pulse la tecla <USER METH>.
Ponga el cursor en ">memorizar método" y pulse
<ENTER>.
Se ve el nombre del método actual en la pantalla.
• Borre el nombre con <CLEAR>.
• Empiece la entrada de textos con <ABC>.
Se puede elegir el carácter con las teclas cursor y
aceptarlo con <ENTER>. Elija el próximo
carácter...
Cuando ha aceptado el último carácter, es decir
cuando su texto está completado, salga de la
entrada de textos con <QUIT>.
Acepte el nombre con <ENTER>.
• Durante la entrada de textos, se puede corregir
faltas con <CLEAR>:
<CLEAR> borre los caracteres de atrás hacia
delante.
• Cuando sólo quiere modificar un texto (sus
nombres son p.ej. Texto 1, Texto 2, Texto 3), no
debe borrar el nombre antes de abrir la entrada de
textos. Proceda según lo siguiente:
1. Pulse <USER METH>, ponga el cursor en
">memorizar método" y pulse <ENTER>.
2. Empiece la entrada de textos directamente,
pulsando <ABC>.
3. Se puede borrar los caracteres de atrás hacia
delante con <CLEAR> o añadir más
caracteres.
4. Cuando el texto está completado, deje su
entrada con <QUIT> y acepte el nuevo nombre
con <ENTER>.
784 KFP Titrino
8
Page 14
2.4 Configuración, tecla <CONFIG>
Funciones de control:
Aparatos periféricos:
Ajustes varios:
Ajustes para RS232-COM1 y 2:
Variables comunes:
Funciones de control
configuration
>control
>aparatos periféricos
>ajustes varios
>ajustes para RS232-COM1
>ajustes para RS232-COM2
>variables comunes
>control
validación: no
interv.tiempo 365 d
contador tiempo 0 d
servicio: no
próximo serv. AAAA-MM-DD
2.4 Configuración, tecla <CO NFIG>
La tecla <CONFIG> sirve para introducir datos
CONFIG
específicos al instrumento. Los valores establecidos
son válidos para todos los modos.
Control del intervalo de validación, de calibración, del
servicio y de la impresión del informe del sistema.
Preselección para impresora, balanza, control del
agitador y COM para la salida de informes manuales.
p.ej. la lengua del diálogo, fecha, hora, tipo de la
indicación del resultado.
Parámetros para los interfaces.
Valores de las variables comunes.
Las pantallas del Titrino están representadas a la
izquierda. Los valores son los valores iniciales.
Control del intervalo de validación (sí, no)
El control se efectúa al final de la titración y tras
conectar el Titrino. Si entra en función de control se
emite el mensaje "valide aparato". El mensaje
desaparece con <CLEAR>. Al mismo tiempo el
contador se pone a cero.
Si está ajustado a "sí":
Intervalo de tiempo para la validación (1...9999 d)
véase también página 139.
Contador de días (0...9999 d)
Cuenta el número de días desde la última puesta a
cero del contador.
Control del intervalo de servicio (sí, no)
El control se efectúa tras conectar el Titrino. Si entra en
función de control se emite el mensaje "haga el
servicio ". El mensaje desaparece con <CLEAR>.
Si está ajustado a "sí":
Fecha del próximo servicio (AAAA-MM-DD)
784 KFP Titrino
9
Page 15

2.4 Configuración, tecla <CO NFIG>
Ajustes para aparatos p eriféricos
imp.prueba sistema: no
>aparatos periféricos
transm.a COM1: IBM
transm.a COM2: IBM
impresión man.en COM: 1
balanza: Sartorius
control agitador: no
remote-box: no
teclado: US
Impresión de la prueba del sistema (sí, no)
Con "sí" se imprime el informe de la prueba del sistema
tras conectar el Titrino, vea también pág. 139. Se emite
el informe por el mismo COM como los informes
desencadenados de manera manual.
Selección del tipo de impresora a COM1 del Titrino
(Epson, Seiko, Citizen, HP, IBM)
"Epson" para modo Epson.
"Seiko" por ej., para DPU-414
"Citizen" por ej., para iDP 562 RS
"HP" p.ej. Desk Jet. Las curvas no se compaginan
correctamente. Coloque las curvas al principio de la
página.
"IBM" para todas las impresoras con tabla de juegos
de caracteres 437 y gráfica IBM, así como para la
transmisión de datos a un ordenador o a un sistema
de datos.
Selección del COM del Titrino para la salida de
informes manuales (1, 2 1&2)
Informes desencadenados de manera manual (p.ej.
con <PRINT>...).
Excepto <PRINT><REPORTS>: En el mismo COM
como ajustado en el método actual.
Selección del tipo de balanza (Sartorius, Mettler, Mettler
AT, AND, Precisa)
Sartorius: Interface MP8, MC1
Mettler: Modelos AM, PM y balanzas con
interfaces 011, 012 y 016
Mettler AT: Modelo AT
AND: Modelos ER-60, 120, 180, 182, FR-200,
300 y FX-200, 300, 320
Precisa: Modelos con interface RS232C
Conexión/desconexión automática del agitador en el
desarrollo de la titración (sí, no)
Con "sí", el agitador está conectado al empiezo y
desconectado al final del método. En KFT con
acondicionamiento, el agitador está desconectado en
el estado inactivo. El interruptor del agitador debe ser
en "ON".
Conexión de una caja Remote (sí, no)
a la ficha Remote para el teclado del ordenador y
lector de código de barras, vea pág. 118.
Si está en "sí":
Tipo de teclado del ordenador (US, deutsch, francais,
español, schweiz.)
El teclado sirve como ayuda de entradas, vea pág.
119.
784 KFP Titrino
10
Page 16
2.4 Configuración, tecla <CO NFIG>
Ajustes vario s
código barras: consulta
Objetivo de entrada del lector de código de barras
(consulta, método, id1, id2, id3, peso)
El lector de código de barras sirve como ayuda de
entradas, vea pág. 118.
Consulta: La línea del código de barras va al campo
de consultas en que se encuentra el cursor.
Método: La línea del código de barras va al campo
de consultas "método" de la memoria silo.
Id1: La línea del código de barras va al campo
de consultas "Id1". Análogo para Id2 e Id3.
Peso: La línea del código de barras va al campo
de consultas "peso".
>ajustes varios
diálogo: english
fecha 1999-08-15
hora 08:13
n.de muestra 0
comienzo auto no
t(espera) 0 s
ind.resultados: en negr.
dirección
programa 784.0010
Selección de la lengua del diálogo (english, deutsch,
francais, español, italiano, portugese, svenska)
Fecha actual (AAAA-MM-DD)
Año-mes-día, entrada con ceros precedentes.
Tiempo actual (HH:MM)
Horas: minutos, entrada con ceros precedentes.
Número de la muestra actual (0...9999)
El número de la muestra está situado a 0 cuando el
instrumento está conectado.
Comienzo automático, interno del instrumento
(1...9999, no)
Número de comienzos automáticos ("número de
muestras"). Usado para conexiones de instrumentos
en las que el aparato externo no activa el comienzo.
No es aconsejable en trabajos con un Cambiador de
muestras.
Tiempo de espera (0...999999 s)
Tiempo de espera después del comienzo antes de
que el método empiece. El tiempo de espera se puede
interrumpir con <QUIT>.
Tipo de la indicación del resultado en la pantalla (en
negr., standard)
en negr: Los resultados calculados en negrito.
standard: La información completa, es decir,
resultados, puntos finales, mensajes etc.
Designación para la identificación de instrumentos en
el acoplamiento (hasta 8 caracteres ASCII ).
Se encuentra en el informe de resultados, vea pág. 32.
Indicación de la versión del programa
784 KFP Titrino
11
Page 17
2.4 Configuración, tecla <CO NFIG>
Ajustes para el interfac e RS232 COM 1
Valores de las var iables comunes
Bloquear:
Curva:
Bloquear
>ajustes para RS232-COM1
baud rate: 9600
data bit: 8
stop bit: 1
paridad: ninguna
handshake: HWs
vea también página 90. Idéntico para COM2.
Baud rate (300, 600, 1200, 2400, 4800, 9600, 19200,
38400, 57600, 115200)
Data Bit (7, 8)
Stop Bit (1, 2)
Paridad (par, impar, ninguna)
Handshake (HWs, SWlínea, SWcar, ninguno)
vea página 90.
>variables comunes
C30 0.0
etc.
Variables comunes C30...C39 (0...
Los valores de todas las variables comunes están
±
999999)
indicados. Para la determinación vea página 30.
Ajustes con la tecla <CONFIG> y conexión del Titrino
Proceda según lo siguiente:
1. Desconecte el Titrino.
2. Pulse <CONFIG> y deje pulsando la tecla durante la conexión del Titrino.
La pantalla indica lo siguiente:
Setup
>bloquear
>curva
>bloquear
<configuration>: no
<parameters>: no
<smpl data>: no
cargar método: no
memorizar método: no
borrar método: no
Se puede bloquear las teclas <CONFIG>, <PARAM>
y <SMPL DATA> y las funciones "cargar, memorizar,
borrar métodos" en la memoria interna del Titrino.
Modificar la impresión de las curvas.
"sí" significa que la función correspondiente no es
accesible.
La tecla correspondiente está bloqueada.
La función correspondiente de la memoria interna del
Titrino está bloqueada.
784 KFP Titrino
12
Page 18

2.4 Configuración, tecla <CO NFIG>
Curva
>curva
red: sí
armazón: sí
escala: Full
anchura 0.5
longitud 0.05
Los ajustes son válidos para COM1 y COM2.
Cuando cambia el tipo de impresora, los ajustes son
inicializados según la impresora.
Red en la curva (sí, no)
Armazón de la curva (sí, no)
Tipo de escala (Full, auto)
Full: Escala del valor mayor hacia el valor menor.
auto: Escala con "ticos completos", es decir que el
valor mayor/menor está en el primer/último tico.
Anchura (0.2...1.00)
1 es la mayor anchura. En este caso se puede perder
la escritura del eje en la margen derecha.
Longitud (0.01...1.00)
Eje del tiempo:
Longitud de la curva
0.01 100 cm
0.1 10 cm
0.5 2 cm
1 1 cm
784 KFP Titrino
13
Page 19

2.5 Tecla <MODE>
K
2.5 Tecla <MODE>
MODE
;
–
mode
mode: KFT
cantidad medida: Ipol
Con la tecla <MODE> se abre el diálogo “mode“.
El Titrino 784 es un aparato especial para la
determinación del agua según Karl Fischer. Se trabaja
solamente con el modo KFT (
arl Fischer Titration).
Pulsando <ENTER> se pasa a la consulta cantidad
medida. Elija la cantidad medida (Ipol o Upol) y
acéptela con <ENTER>.
El modo KFT se carga con un juego de parámetros
estándares y está así casi preparado para su uso
inmediato.
784 KFP Titrino
14
Page 20
2.6 Parámetros, tecla <PARAM>
Parámetro s de regulación:
Parámetro s de ti tración
Condiciones de parada:
Estadística:
Preselecciones:
Parámetros de regulación para el punto final
2.6 Parámetros, tecla <PARAM>
La tecla <PARAM> se utiliza para la entrada de
PARAM
2.6.1 Parámetros para KFT
parameters
>parámetros de regul.
>parámetros de titración
>condiciones de parada
>estadística
>preselecciones
valores que conciernan el modo KFT. Las consultas
marcadas con "cond." quedan accesibles durante el
acondicionamiento, y "**titr." indica que estos valores
se pueden cambiar durante la titración. Tienen una
influencia en la determinación que se está realizando.
Las otras consultas se pueden modificar sólo en el
estado inactivo.
Las pantallas del Titrino están representadas a la
izquierda. Los valores indicados son los valores
iniciales.
Parámetros de regulación para el EP.
reglan el desarrollo global de la titración.
Parámetros para la parada de la titración.
Cálculo de la media y de la desviación standard, vea
página 28.
Conectar/desconectar varias funciones auxiliares
como llamadas después del comienzo o impulso de
activación.
>parámetros de regul.
punto final EP U 250 mV
**cond.
gama regulación 100 mV
**titr.
784 KFP Titrino
Punto de titración (la gama de entrada depende de la
cantidad medida:
U, en Ipol: 0...±2000 mV
µ
I, en Upol: 0...±200.0
A)
Gama de regulación (la gama de entrada depende de
la cantidad medida:
U, en Ipol: 1......2000 mV
µ
I, en Upol: 0.1...200.0
A)
Fuera de la gama de regulación se dosifica
continuamente, vea página 21.
15
Page 21
2.6 Parámetros, tecla <PARAM>
Velocidad máxima de titración (0.01...150 mL/min,
Parámetro s de ti tración
veloc.max. max. ml/min
**titr.
incremento min. min. µl
**titr.
crit.parada: deriva
**titr.
deriva parada 20 µl/min
**titr.
t(espera) 10 s
**titr.
tiempo de parada no s
**titr.
max.)
<CLEAR> pasa a "max.".
Este parámetro determina principalmente la velocidad
de adición fuera de la gama de regulación, vea
también página 21.
La velocidad máxima depende de la Unidad
intercambiable:
Unidad intercamb. max.
5 mL 15 mL/min
10 mL 30 mL/min
20 mL 60 mL/min
50 mL 150 mL/min
Incremento min. (0.1...9.9
<CLEAR> pasa a "min".
Este parámetro determina la velocidad de adición al
principio y al final de la titración, vea página 21.
Asimismo influye poderosamente en la velocidad de la
titración y en su exactitud: un incremento mínimo bajo
da una titración lenta.
Tipo de criterio de parada (deriva, tiempo)
Desconecte la titración cuando se haya alcanzado ya el
punto final y la deriva de parada (1...999
Tiempo de espera (0...999 s, inf.)
<CLEAR> pasa a "inf.".
Desconecte la titración cuando se haya alcanzado el
punto final y se haya esperado este tiempo tras la
última dosificación.
Si está ajustado a "inf", aparece la consulta sobre el
tiempo de parada.
Tiempo de parada (0...999999 s, no)
<CLEAR> pasa a "no".
Parada después del tiempo transcurrido desde hace el
comienzo de la titración. "no" significa sin interrupción,
es decir, titración "infinitamente" larga.
>parámetros de titración
sentido de titración: –
pausa 1 0 s
**titr.
Sentido de la titración (+, –, auto)
auto: El sentido queda establecido automáticamente
+: En el sentido de voltaje alto (más "positivo"),
– : En el sentido de voltaje bajo, pequeñas
Pausa 1 (0...999999 s)
Tiempo de espera, por ejemplo, para el equilibrado del
electrodo después del inicio. Se puede interrumpir la
pausa con <QUIT>.
µ
por el Titrino (signo [U
corrientes grandes.
corrientes.
L/min)
– EP]).
1
µ
L/min)
784 KFP Titrino
16
Page 22
2.6 Parámetros, tecla <PARAM>
**titr.
**titr.
**titr.
V inicial: no
cond.
V inicial 0.0 ml
cond.
factor 0
cond.
veloc.dos. max. ml/min
pausa 2 0 s
Tipo de volumen inicial (no, abs. rel)
"no": Volumen inicial desconectado.
"abs": Volumen inicial absoluto en mL.
"rel": Volumen inicial relativo al peso.
Si está en "abs":
Volumen inicial absoluto (0...999.99 mL)
Si está en "rel":
Factor para el cálculo del volumen inicial relativo
(0...±999999)
Calculado según: Volumen inicial en mL = factor*peso
Velocidad de dosificación para el volumen inicial
(0.01...150 mL/min, max.)
<CLEAR> pasa a "max."
La velocidad máxima depende de la Unidad
intercambiable:
Unidad intercamb. max.
5 mL 15 mL/min
10 mL 30 mL/min
20 mL 60 mL/min
50 mL 150 mL/min
Pausa 2 (0...999999 s)
Tiempo de espera para el equilibrado del electrodo
después del inicio o tiempo de reacción después de
tiempo extracción 0 s
I(pol) 1 µA
U(pol) 400 mV
prueba electrodo: no
temperatura 25.0 °C
cond.
interv.tiempo 2 s
cond.
dosificar un volumen inicial. Se puede interrumpir la
pausa con <QUIT>.
Tiempo de extracción (0...999999 s)
En este tiempo se titula, pero la titración no se termine
antes de haber transcurrido el tiempo de extracción (si
aún el punto final está alcanzado). Se puede
interrumpir el tiempo de extracción con <QUIT>.
Corriente de polarización en Ipol (-127...127 µA),
o
Voltaje de polarización en Upol(-1270...1270 mV,
entrada por pasos de 10 mV)
Prueba de electrodo (no, sí)
Prueba para electrodos polarizados. Se efectúa en el
cambio del estado inactivo a una medición. "no"
significa que la prueba no se realiza.
Temperatura de la titración (-170.0...500.0 °C)
Se puede introducir la temperatura manualmente.
Intervalo de tiempo (1...999999 s)
para la adquisición de un valor medido en la lista de
puntos medidos.
784 KFP Titrino
17
Page 23

2.6 Parámetros, tecla <PARAM>
**titr.
**titr.
**titr.
**titr.
Condiciones para la parada de la titración
cond.
cond.
cond.
cond.
Preselecciones para la secuencia de la t itrac ión
>condiciones de parada
V parada: abs.
V parada 99.99 ml
factor 999999
veloc.rell. max. ml/min
En caso de no ser "normal", es decir, tras alcanzar el
punto final.
Tipo de volumen de parada como volumen de
seguridad (abs., rel., no)
"abs.": Volumen de parada absoluto en mL.
"rel.": Volumen de parada relativo al peso.
"no": Volumen de parada desconectado. El volumen
Si está en "abs.":
Volumen absoluto de parada (0...9999.99 mL)
Si está en "rel.":
Factor para el cálculo del volumen de parada relativo
(0...±999999)
Calculado según: Volumen de parada en mL = factor
* peso
Velocidad de llenado después de la titración (0.01...150
mL/min, max.)
<CLEAR> pasa a "max.".
La velocidad máxima depende de la Unidad
intercambiable:
Unidad intercamb. max.
5 mL 15 mL/min
10 mL 30 mL/min
20 mL 60 mL/min
50 mL 150 mL/min
>preselecciones
acondición: sí
indicar deriva: sí
corr.deriva: no
valor deriva 0.0 µl/min
llamada ident: no
784 KFP Titrino
18
Acondicionamiento (sí, no)
Si el acondicionamiento está en "sí", se mantiene la
solución de la titración al punto final entre titraciones.
Cuando se acondiciona, la deriva del volumen se
puede visualizar:
Indicar deriva (sí, no)
Deriva del volumen.
Corrección de la deriva (auto, man. no)
auto: El valor de la deriva está tomado
automáticamente en el momento del comienzo.
Valor de la deriva para la corrección de la deriva
manual (0...99.9
Consulta de la identificación después del comienzo de
la titración (id1, id1&2, todas, no)
de parada no está controlado.
µ
L/min)
Page 24

2.6 Parámetros, tecla <PARAM>
cond.
cond.
cond.
cond.
cond.
cond.
Después del comienzo se puede consultar las
llamada peso: no
límites peso: no
límite inf. 0.0
límite sup. 999999
horno: no
puls.activación: no
identificaciones de la muestra: sólo id1, id1&2, todas o
ninguna.
Consulta del peso después del comienzo de la titración
(val, unidad, todos, no)
Con "todos" se consulta primero el valor, después la
unidad.
Control de los límites del peso (sí, no)
Con "sí" se emite el mensaje "peso fuera" si hay
entradas fuera de los límites. Los límites se muestran
en una ventana de entradas.
El valor absoluto de los valores límite se verifican
durante la entrada de peso y el cálculo del resultado.
Si está ajustado a "sí":
Límite inferior para el peso (0.0...999 999)
Límite superior para el peso (0.0...999 999)
Horno conectado (COM1, COM2, no)
El COM del Titrino está conectado al horno.
Si se conecta un horno por medio del RS232, se
consultan los resultados del horno y se añaden al
informe del resultado del Titrino. La emisión del
informe del horno ha de estar desconectada (vea
página 159).
Ajústelo a "no" si no ha conectado un horno al Titrino o
si no lo ha hecho con un RS232.
Salida del pulso en la línea "activate" (L6, pin 1) de la
ficha "Remote" (prim., todo, acond., no)
vea página 126.
784 KFP Titrino
19
Page 25
2.6 Parámetros, tecla <PARAM>
(Desconectar agitador)
Secuencia de la ti tración en KFT
<START>
(Salida puls.activación)
(Conectar agitador)
Después del comienzo el pulso de activación está emitido
y el agitador conectado.
(t(espera))
Se espera el tiempo de espera.
(Preacondicionamiento)
(<START>)
(Salida puls.activación)
(t(espera))
Si el acondicionamiento está conectado, el recipiente de
titración está acondicionado. Si el acondicionamiento ha
acabado, se indica en la pantalla
deriva OK 2.3 µl/min
o
KFT acondición.
El recipiente está acondicionado y se puede comenzar la
titración con <START>.
(Llamada ident.)
(Llamada peso)
Se llaman las identificaciones y el peso.
Se espera la pausa 1, el volumen inicial se dosifica sin
(Condiciones iniciales)
adquisición de valores medidos y se espera la pausa 2.
(Tiempo de extracción)
Titración con prueba
de parada
La titración se lleva a cabo al primer punto final y después
al segundo.
Si después de alcanzar el punto final el tiempo de
extracción no está terminado, se espera y se termina la
titración cuando el tiempo de extracción sea terminado.
Se desconecta el agitador.
Cálculos
Se efectúan el cálculo.
Salida de datos
Se emiten los datos.
(Reacondicionamiento)
Después de la titración se procede al nuevo
acondicionamiento (si está seleccionado).
784 KFP Titrino
20
Page 26
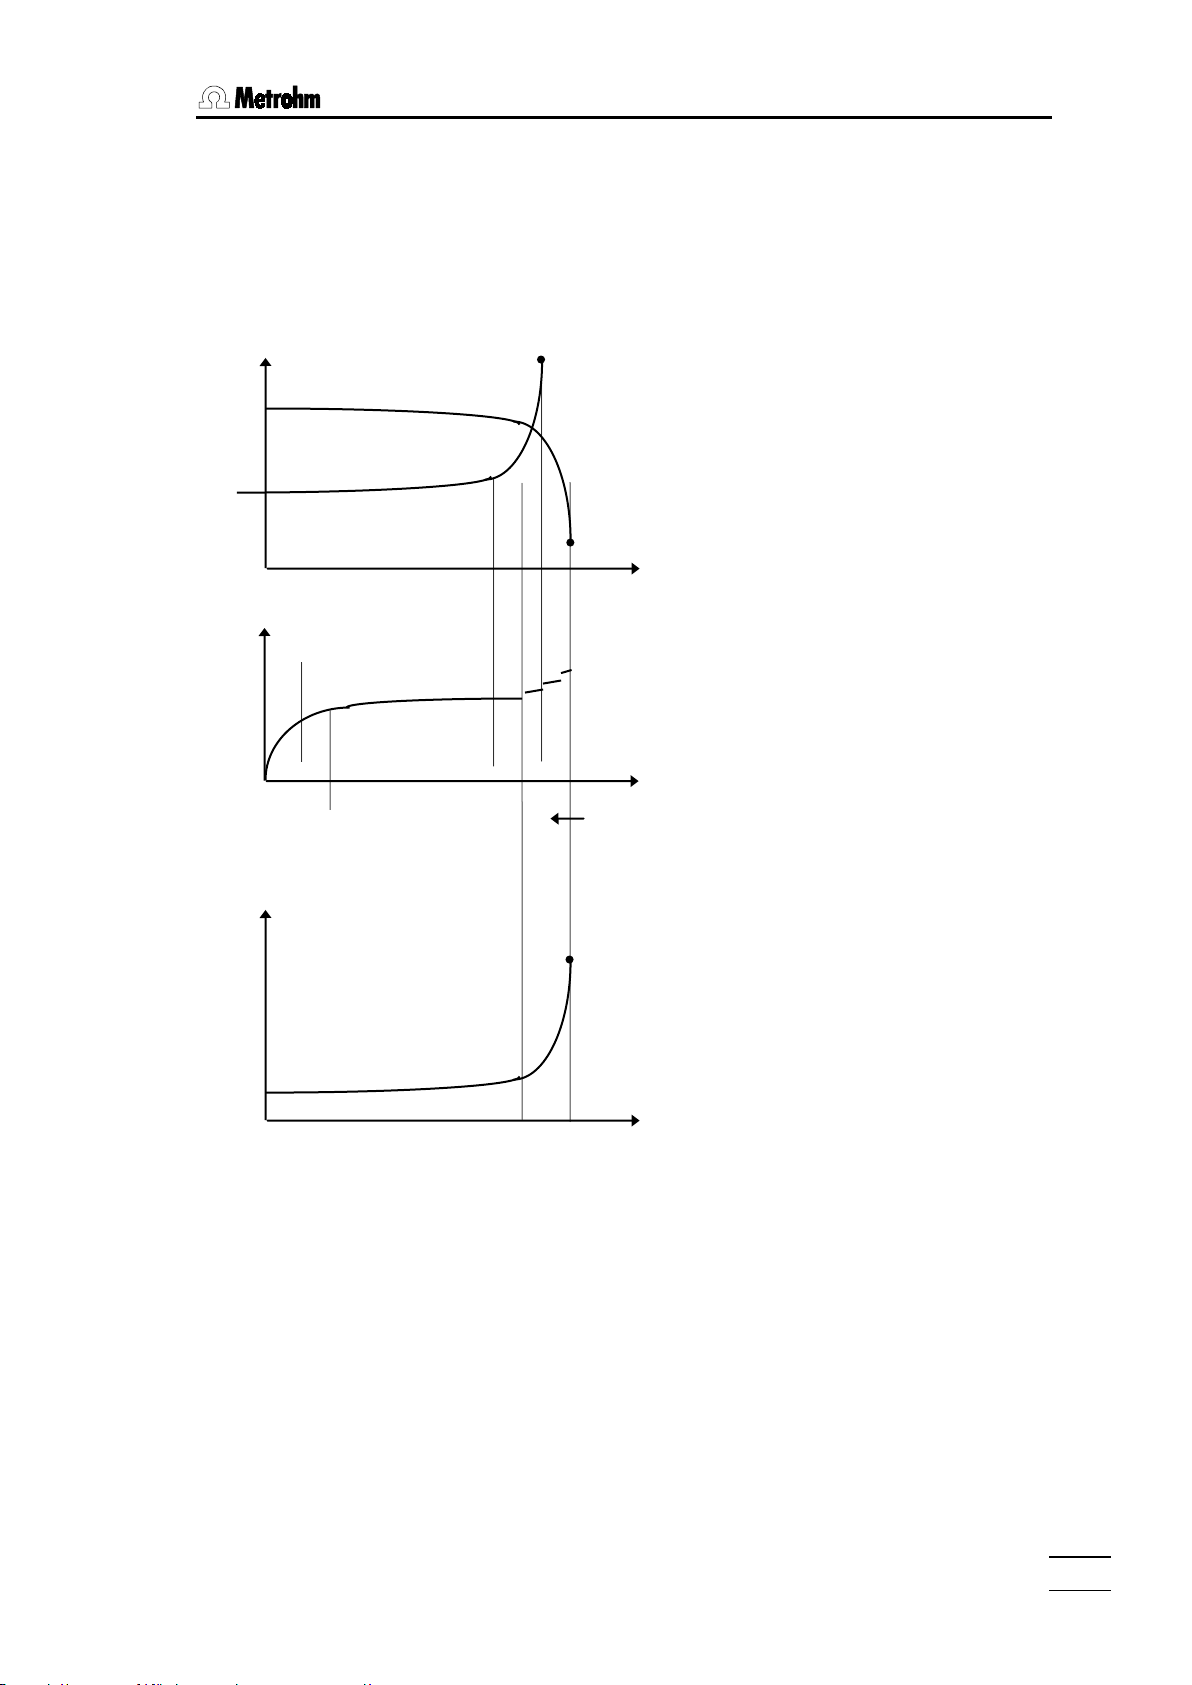
2.6 Parámetros, tecla <PARAM>
EP
U/mV
V/mL
t/s
EP
I/uA
V/mL
EP
KFT Ipol
KFT Upol
Parámetro s de regulación KFT
Los parámetros de regulación pueden seleccionarse libremente. Ya con los ajustes
estándares se consiguen excelentes resultados. Optimice los parámetros para muestras
problemáticas.
Durante la titración, la dosificación del reactivo se realiza en 3 fases:
1. Dosificación inicial:
Durante esta fase la
velocidad de dosificación se
aumenta constantemente
hasta la "velocidad max.".
2. Dosificación continua:
La dosificación se realiza a la
"velocidad max." hasta que
alcanza la gama de
regulación.
3. Gama de regulación:
En esta gama se dosifica en
pasos individuales. Los
últimos pasos son controlados por "incremento min.".
Dosificación
inicial
Dosificación
continua
V/mL
Gama
regul.
Nota:
• Las determinaciones del título deberían realizarse no sólo en el mismo modo como
para las muestras sino también con los mismos parámetros.
• Los parámetros estándares se recomiendan para la mayoría de titraciones KFT.
• Con Ipol resultan curvas más pendientes que con Upol.
784 KFP Titrino
21
Page 27

2.6 Parámetros, tecla <PARAM>
I/uA
+
EP en U
Secuencia de titración
Secuencia de titración
Excedente de H2O
Excedente de yodo
Solución
Modo operativo del parámetro KFT con Ipol
U/mV
+
(titración directa)
(Retitración)
más oscura
I(pol)
• La situación y el recorrido exacto de la curva entre el sector H2O y el de yodo depende
de la composición de la muestra.
• Se debería seleccionar el EP lo más cerca posible a la curva pero siempre en el sector
de yodo. Si el punto final elegido se encuentra demasiado cerca a la curva, hay riesgo
de titración excesiva. Con curvas muy acentuadas es difícil ajustar el EP para detener
resultados estables y reproducibles. En el caso de muestras problemáticas, los
parámetros deben optimarse mediante ensayos. Un punto de referencia muy útil es el
color de la solución al alcanzarse el punto final.
Observación: los valores estándares preestablecidos de los métodos KFT Ipol y KFT
Upol suministran, en la mayoría de los casos, resultados correctos y reproducibles.
• Si se selecciona valores negativos para los diferentes parámetros, todos los valores
correspondientes a I o U deben estar provistos con el prefijo negativo ya que, de lo
contrario, sólo resultan unas combinaciones de valores sin sentido alguno.
• Para el modo KFT Upol rigen, analógicamente, las mismas leyes que para KFT Ipol.
784 KFP Titrino
22
Page 28

2.6 Parámetros, tecla <PARAM>
El análisis de agua libre no presenta ningún problema siempre que se tengan en cuenta
las especificaciones del fabricante del reactivo con respecto a la "capacidad del agua".
Pueden surgir problemas con matrices de muestras especiales. La literatura pertinente
contiene gran número de instrucciones concretas de análisis.
Adición de la muestra
Para la adición de la muestra se dispone de diferentes medios como, p.ej., jeringas,
cuchara de pesar de vidrio, etc.
En todo caso, se recomienda emplear la técnica de la pesada hacia atrás (excepción:
empleo de jeringas microlítricas para pruebas con un elevado contenido de agua).
Cargue la jeringuilla o cuchara de pesar antes de proceder a la titración (es decir,
durante el acondicionamiento) con la muestra a determinar y tárela en la balanza que, en
caso ideal, debería encontrarse conectada con el Titrino. Siempre debería activarse la
llamada del peso (vea página 19).
Se puede añadir la muestra durante la llamada del peso y pesar después el recipiente
utilizado. Siempre que fuese posible, sírvase de la adopción automática del peso. La
balanza debe transmitir el peso en gramos. Si el peso está transmitido automáticamente
al Titrino la titración continúa. Sin balanza conectada al Titrino, se introduzca el peso y la
unidad del peso manualmente al Titrino.
Si no hay ninguna llamada, ni del peso, ni de las identificaciones, y si hay elegido
acondicionamiento, se encuentra en la pantalla del Titrino "añadir muestra" durante 6
segundos. Este periodo de espera puede prolongarse a discreción con
<MEAS/HOLD>.
Mu estras sóli das
Sírvase de una cuchara de vidrio 6.2412.000 e introduzca la muestra por la apertura
provista a este fin después de retirar el tapón para septo.
Muestras líquidas
Emplee una jeringa de un solo uso (2...20 mL) o una jeringa microlítrica con una aguja
larga. Perforando el septo provisto se puede introducir la muestra sin que penetre
humedad del aire. Si se utiliza jeringas de un solo uso, introduzca la muestra sin
inmersión en el líquido de titración y reaspire en la aguja la última gota antes de retirar la
aguja por el septo. En el caso de una jeringa microlítrica con cuya se dosífica un volumen
determinado, la aguja debería penetrar en el disolvente acondicionado para añadir así la
muestra. En este caso, no necesita reaspirar el líquido adherido a la aguja.
Preste atención a recambiar el septo en el momento en que este presente varias
perforaciones de tipo mayor donde humedad podría entrar en la célula.
Muestras pastosas, viscosas
Se puede utilizar una jeringa a volumen elevado sin aguja. La muestra se añade por la
apertura del tapón para septo. Preste atención a limpiar a fondo el exterior de la jeringa
de posibles adhesiones de la sustancia a analizar.
Nota
En todo caso, preste atención a que no penetre humedad del aire en el recipiente de
titración durante la adición de la muestra. Si tiene que abrir la célula de titración KF a
cada adición de la muestra, determine un valor en blanco y considérelo en el cálculo del
resultado (vea página 132).
784 KFP Titrino
23
Page 29

2.6 Parámetros, tecla <PARAM>
Problema
Posibles causas y correcciones
En la siguiente tabla le intentamos mostrar soluciones relacionadas con el aparato:
Qu é hacer si...
La dosificación es muy lenta al
final y los incrementos muy
pequeños. "Nunca se termina".
Al final de la titración los
incrementos son demasiado
grandes. "Sobresaturación".
La solución se vuelve
demasiado marrón al final de la
titración.
• Aumente el "incremento min.".
• Cambie el criterio de parada. Intente elevar la deriva
de parada o utilizar un tiempo de espera más corto
como criterio de parada.
• Con muestras problemáticas cambie el disolvente,
por ejemplo con cetonas o aldehidos 2-metoxietanol
o con aminas mixtura de metanol/ácido acético
glacial, vea en la literatura
• Reduzca la velocidad máxima. El siguiente
experimento le ofrece un punto de referencia para
una óptima velocidad máxima: Visualice la deriva
durante el acondicionamiento y añada la muestra sin
haber comenzado la titración. Seleccione un valor
por debajo de la deriva máxima como "veloc. máx.".
• Mejore la colocación del electrodo y de la punta de la
bureta y también la agitación.
• La cantidad de metanol en el disolvente es
demasiado baja. Cambie el disolvente.
• El electrodo podría estar sucio. Límpielo con acetona
La solución se vuelve más
oscura con cada titración.
La deriva se incrementa con
cada titración.
El punto final se alcanza
"demasiado rápidamente".
El tiempo de las titraciones es
cada vez más largo.
• Renueve el disolvente.
• El electrodo podría estar sucio. Límpielo con acetona
• Desprende su muestra el agua demasiado
lentamente? Utilice el Horno KF.
• Están los ácidos de su muestra esterificados?
Cambie la solución más frecuentemente. Aumente la
capacidad del tampón del disolvente.
• Contiene su muestra cetonas o aldehídos? Utilice
reactivos especiales adecuados para las cetonas y
aldehídos.
• Reduzca la velocidad máxima.
• Con reactivos de 2 componentes se puede haber
agotado la capacidad del tampón del disolvente.
Cambie la solución.
• Si aumenta al mismo tiempo la deriva, vea allí.
784 KFP Titrino
24
Page 30
2.7 Cálculos del resultado
Fórmulas
Entrada de la fórmula
DEF
Entrada de fórmulas, tecla <DEF>
def
>fórmula
>cálculo silo
>variables comunes
>impresión
>media
>fórmula
RS?
RS1=
RS1=EP1*C01/C00
2.7 Cálculos del resultado
(
2
Con la tecla <DEF> se puede introducir fórmulas para
el cálculo del resultado y instrucciones para la salida
de los datos.
Las introducciones son específicas al método y se
memorizan en la memoria de métodos.
para el cálculo de los resultados.
Las pantallas del Titrino están representadas a la
izquierda. Los valores son los valores iniciales.
¿Número del resultado ? (1...9)
Puede calcular hasta 9 resultados por método.
Introduzca un número 1...9.
Entrada de la fórmula
Ejemplo:
RS1=EP1*C01/C00
Cuando introduzca una fórmula preste atención a la
tercera función de las teclas, en donde encontrará
operandos, operaciones matemáticas y paréntesis.
Los operandos requieren un número como
identificación. Puede utilizar los siguientes operandos:
EPX: Puntos finales. X = 1...9
RSX: Resultados ya calculados con fórmulas previas.
X = 1...9.
CXX: Constantes de cálculo. XX = 00...45.
Reglas:
• Las operaciones de cálculo se realizan en jerarquía
algebraica: * y / antes de + y -.
• Memorización de la fórmula con <ENTER>.
• Operaciones y variables de cálculo se borran con
<CLEAR> de atrás hacia adelante.
• Para borrar la fórmula completa, pulse <CLEAR>
hasta que sólo RSX se encuentre en la pantalla y
pulse <ENTER>.
Si se memoriza una fórmula con <ENTER>, se
consulta a continuación el texto, el número de
decimales, la unidad y los ajustes del control de los
valores límites.
784 KFP Titrino
25
Page 31

2.7 Cálculos del resultado
RS1 texto RS1
RS1 num.decimales 2
RS1 unidad: %
RS1 control límites: no
RS1 límite inf. 0.0
RS1 límite sup. 0.0
RS1 línea L13: no
Texto para la salida del resultado (hasta 8 caracteres)
Entrada de textos vea página 8.
Número de decimales para el resultado (0...5)
Unidad para el resultado (%, ppm, g/L, mg/mL, mol/L,
mmol/L, g, mg, mL, mg/pc, s, mL/min, ninguna o hasta
6 caracteres).
Control de los valores límite para el resultado (sí, no)
Los valores límite se comprueban con cada cálculo del
resultado.
Si está ajustado a "sí":
Límite inferior (0.0...999 999)
Límite superior (0.0...999 999)
Ajuste de la línea L13 de la ficha Remote (no, activa,
pulso)
si el resultado está fuera de los límites.
Ahora ya se puede introducir la siguiente fórmula, por
ejemplo, RS2
Significado de las variables de cálculo CXX:
C00 Peso, vea página 37.
C01...C19 Variables especificas al método, vea página 27. Están memorizadas en la
memoria de métodos.
C21...C23 Variables especificas a la muestra, vea página 37ff.
C26, C27 Medias del cálculo silo, vea página 41ff.
C30...C39 Variables comunes.
C40 Valor medido inicial de la muestra.
C41 Volumen final.
C42 Tiempo de la determinación.
C43 Deriva del volumen al comienzo de la titración (en KFT con
acondicionamiento).
C44 Temperatura.
C45 Volumen inicial dosificado.
784 KFP Titrino
26
Page 32

2.7 Cálculos del resultado
Entrada de operandos específ icos al méto do C01...C19, tecl a < C-FMLA>
C-FMLA
1
C
Con la tecla <C-FMLA> puede introducir los valores
de los operandos C01...C19. Sólo se consultarán las
constantes que haya utilizado en las fórmulas.
Las entradas son específicas al método y se
memorizan en la memoria de métodos.
La impresión del informe de cálculo se puede llevar a cabo por medio de la secuencia de
las teclas
<PRINT><←/→> <ENTER>
(pulse las teclas "Cursor" repetidamente hasta que aparezca "calc" en la pantalla).
Ejemplo para un informe de cálculo:
'fm
784 KFP Titrino 02134 784.0010
usuario sn
fecha 1999-08-15 hora 15:03 3
KFT Ipol KF-Blank
>cálculos
Water=(EP1-C38)*C39*C01/C00/C02;2;%
Titer=C39;4;mg/ml
Blank=C38;4;ml
C00= 1.0
C01= 0.1
C02= 1
C38= 0.0
C39= 0.0
------------
Informe de cálculo
Modo y nombre del método
Fórmulas:
Nombre del resultado=fórmula; número de
decimales; unidad del resultado
Peso
Constantes de cálculo específicas al
método
Valores de las variables comunes utilizadas
784 KFP Titrino
27
Page 33

2.8 Cálculos estadísticos
Media:
Asignación para cálculos estadísticos
Cálculos estadísticos
2.8 Cálculos estadísticos
Se calculan medias y desviaciones estándares absolutas y relativas.
DEF
(
2
def
>fórmula
>cálculo silo
>variables comunes
>impresión
>media
La tecla <DEF> sirve para asignar resultados para
cálculos estadísticos.
Las entradas son específicas al método y se
memorizan en la memoria de métodos.
Asignación de variables para el cálculo estadístico.
Las pantallas del Titrino están representadas a la
izquierda. Los valores son los valores iniciales.
>media
MN1=RS1
MN2=
:
MN9=
PARAM
>estadística
status: no
media n= 2
tab.res: original
borrar n= 1
784 KFP Titrino
28
Número de media 1...9 (RSX, EPX, CXX)
Puede realizar cálculos estadísticos utilizando hasta 9
resultados (RSX), puntos finales (EPX) o variables
(CXX). Para MN1, el valor estándard es RS1.
Para borrar la asignación: <CLEAR>+<ENTER>
Se encuentra en la tecla <PARAM> un grupo de
consultas ">estadística" en cada modo.
Cálculos estadísticos conectados/desconectados (no,
sí)
Si el cálculo estadístico está desconectado, no se
visualizan las siguientes consultas relativas a la
estadística.
Cálculo de la media a partir de n resultados
individuales (2...20)
Tabla de resultados para estadísticas (original, borrar n,
borrar todo)
"original": Se utiliza la tabla original. Los resultados
borrados se incorporan de nuevo a la
evaluación.
"borrar n": Anulación de resultados individuales con
índice n.
"borrar todo": Se borra la tabla completa.
Índice n del resultado que va a ser borrado (1...20)
El resultado borrado se elimina del cálculo estadístico.
Page 34

2.8 Cálculos estadísticos
¿Cómo obtener cálculos estadísticos?
1) Introduzca las asignaciones para los cálculos estadísticos, vea página 28.
2) Conecte los cálculos estadísticos: Con la tecla <STATISTICS> o ajuste el status bajo
la tecla <PARAM>, ">estadística" a "sí". La "STATISTICS" LED está encendida. Al
memorizar el método en la memoria de métodos, el status de los cálculos estadísticos
permanece.
3) Cambie el número de los valores individuales n, si fuera necesario, en "media n".
4) Realice, al menos, 2 titraciones. Los cálculos estadísticos se actualizan
constantemente y se emiten. Los valores quedan impresos.
5) Se puede imprimir los resultados individuales del cálculo estadístico con
<PRINT><STATISTICS><ENTER>.
Reglas:
• Los resultados recalculados se incorporan al cálculo estadístico.
• Si no se puede calcular el resultado de una determinada titración, no se incorpora
ningún resultado de esta determinación al cálculo estadístico. No obstante, el
contador de muestras continúa operando, es decir, los cálculos estadísticos vuelven a
empezar de nuevo cuando se haya efectuado el número de determinaciones
individuales requeridas.
• Si está desconectado "estadísticas" ("STATISTICS" LED no está encendido), no se
entran más resultados en la tabla de estadísticas. La tabla permanece sin ningún
cambio. Cuando vuelva a conectar estadísticas, puede continuar trabajando en el
lugar en el que se haya quedado.
• Si borra resultados todos los resultados de la determinación con índice n
desaparecen de la evaluación estadística.
• Con un cambio de método, la antigua tabla de estadísticas se borra y siguen las
instrucciones estadísticas para el nuevo método.
• Los antiguos resultados en la tabla estadística que ya no se necesiten se pueden
borrar con "borrar todo" (en la tecla <PARAM>, ">estadística", "tab.res:").
784 KFP Titrino
29
Page 35

2.9 Variables comunes
Variables comunes:
Asignación para variables comunes
2.9 Variables comunes
Una variable común puede ser útil, por ejemplo, en las siguientes aplicaciones:
• Determinación de un título con un método A. Dicho título se memoriza como C3X. La
variable C3X se puede utilizar en varios otros métodos.
• Determinación de un valor en blanco con un método A. Utilización de dicho valor en
blanco en varios otros métodos.
• Determinación de un resultado con un método A. Cálculo con dicho resultado en
varios otros métodos.
Se pueden visualizar y entrar los valores de las variables comunes con la tecla
<CONFIG>.
DEF
2
def
>fórmula
>cálculo silo
>variables comunes
>impresión
>media
(
Con la tecla <DEF>, los resultados (RSX), puntos
finales (EPX) , variables (CXX) o las medias (MNX) se
asignan a las variables comunes.
Las entradas son específicas al método y se
memorizan en la memoria de métodos.
Asignación de un valor como variable común.
Las pantallas del Titrino están representadas a la
izquierda. Los valores son los valores iniciales.
>variables comunes
C30=
C31
:
C39=
Variable común C30...C39 (RSX, EPX, CXX, MNX)
Asignación de una cantidad RSX (resultados), EPX
(puntos finales), CXX (variables), MNX (medias).
Los valores de las variables comunes permanecen
para todos los métodos hasta que se sobreescriban o
se borren. Se pueden visualizar los valores con la tecla
<CONFIG>.
Para borrar la asignación: <CLEAR>+<ENTER>
784 KFP Titrino
30
Page 36

2.10 Emisión de datos
Impresión:
Secuencia del informe
2.10 Emisión de datos
2.10.1 Definición de la secuencia de bloques de datos para una
impresora al final de la determinación
DEF
(
2
def
>fórmula
>cálculo silo
>variables comunes
>impresión
>media
Con la tecla <DEF> se define la secuencia de
bloques de datos para la emisión al final de la
determinación.
Las entradas son específicas al método y se
memorizan en la memoria de métodos.
Bloques de datos para la emisión al final de la
determinación.
Las pantallas del Titrino están representadas a la
izquierda. Los valores son los valores iniciales.
>impresión
impresión COM1:
impresión COM1:compl;curva
Secuencia del informe en COM1:
compl, breve, p.med, curva, cs cmpl, cs breve, param,
calc, ff
Elija un bloque con las teclas <←> y <→>. Si desea
más de un bloque de impresión, introduzca un ";" entre
los bloques.
Idéntico para COM2.
Los bloques individuales tienen el siguiente significado:
param Informe de parámetros.
compl Impresión completa del resultado con lista EP, resultados y cálculos
estadísticos.
breve Informe breve del resultado con resultados y cálculos estadísticos.
p.med Lista de puntos medidos.
curva Curva volumen vs. tiempo.
cs cmpl Cálculo silo informe completo.
cs breve Cálculo silo informe breve.
calc Informe de cálculo con fórmulas y variables.
ff Form Feed para la impresora.
784 KFP Titrino
31
Page 37

2.10 Emisión de datos
Los informes originales, los cuales se emiten automáticamente al final de la titración, se
pueden imprimir en cualquier momento con valores recalculados. Secuencia de las
teclas:
<PRINT><REPORTS><ENTER>.
Los informes se emiten en el COM que está definido en el método.
Los informes originales tienen guiones dobles ====, mientras que los recálculos están
señalizados con guiones simples ----.
La emisión de los informes se puede detener con <QUIT>.
Ejemplo para una impresión:
'fr
784 KFP Titrino 02134 784.0010
usuario sn
fecha 1999-08-15 hora 15:03 3
KFT Ipol KF
peso 0.879 g
EP1 2.5725 ml
agua 1.44 %
titr 4.9372 mg/ml
medio( 3) +/–s s/%
agua 1.46 0.027 % 1.86
dirección Titr 1 firma:
============
Informe completo de los resultados
Usuario (sólo cuando entrado)
Dirección del aparato, vea página 11 y firma
manual
'cu
784 KFD Titrino 02134 784.0010
usuario sn
fecha 1999-08-15 hora 15:03 3
KFT Ipol KF
5.0 s/div dV=0.5 ml/div
Curva
Escala del eje volumen
============
784 KFP Titrino
32
Page 38

2.10 Emisión de datos
Impresión
<tecla X>
Otras posibilidades para la impresión de infor m es
Además de los informes que se realizan al final de la titración, también se pueden llevar a
cabo otro tipo de informe. Hay 2 posibilidades de elegir los informes:
1) <PRINT><←/→><ENTER> Pulse las teclas "Cursor" repetidamente hasta que
aparezca el informe deseado en la pantalla.
2) <PRINT><Tecla X><ENTER> X es la tecla bajo la cual se introducen los datos
correspondientes.
Lista de las teclas X:
Informe de la configuración CONFIG
Informe de los parámetros PARAM
Datos de la muestra actual SMPL DATA
Informe estadístico con resultados individuales STATISTICS
Todos los datos de la memoria silo SILO
Operandos C01...C19 C-FMLA
Contenido de la tecla <DEF> DEF
Contenido de la memoria de métodos con indicación de la
USER METH
memoria necesaria para cada método y de los bytes
disponibles
Los bloques, como están definidos en la tecla <DEF> REPORTS
Indicación de los resultados sin impresora conectada
Cuando trabaja sin impresora conectada, podría elegir la indicación de los resultados en
caracteres estándares (ajuste con tecla <CONFIG>, ">ajustes varios", vea página 11).
Así se ve la información completa en la pantalla: Resultados calculados, puntos finales,
mensajes etc.
2.10.2 Indicación de la curva
Después de la titración se puede conmutar entre la indicación de los resultados y de la
curva con la tecla <CURVE>.
Con las teclas <↑> y <↓> se puede trazar la curva. A
la izquierda se ve el índice del punto en la primera
línea. Después se encuentran los valores medidos.
784 KFP Titrino
33
Page 39

2.11 Nombre del usuario, tecla <USER>
Nombre:
Borrar:
Borrar el nombre del usuario
2.11 Nombre del usuario, tecla <USER>
DEF
(
2
user
nombre: Jefe
>borrar
Con la tecla <USER> se administran los nombres de
los usuarios.
Los nombres de los usuarios se puede introducir
directamente o elegir con las teclas <←> y <→>.
Selección o entrada del nombre del usuario.
Borrar el nombre del usuario.
Las pantallas del Titrino están representadas a la
izquierda.
nombre:
>borrar
nombre:
Nombre del usuario (hasta 10 caracteres ASCII)
El nombre del usuario se puede introducir
directamente o elegir con las teclas <←> y <→>.
Se emite el nombre del usuario en el informe.
Los nombres de los usuarios se quedan en el aparato
hasta que se borran (o hasta que se inicializa el RAM).
Si no se desea que se imprima el nombre, se puede
elegir „vacio“ como usuario.
Introducir el nombre directamente o elegir con las
teclas <←> y <→>. Con <ENTER> se borra el
nombre de la lista de nombres de usuarios.
34
784 KFP Titrino
Page 40

2.12 Memoria de métodos, teclas <USER METH>
Cargar método:
Memorizar método:
Borrar método:
Cargar mét odo
Memorizar método
2.12 Memoria de métodos, teclas <USER METH>
USER METH
3
user methods
>cargar método
>memorizar método
>borrar método
)
Con la tecla <USER METH> se controla la memoria
de métodos interna.
Las identificaciones de los métodos se pueden
introducir directamente o elegirlas del contenido de la
memoria con las teclas <←> y <→>.
Carga un método de la memoria interna en la memoria
de trabajo.
Memoriza el método actual de la memoria de trabajo
en la memoria interna.
Borra un método de la memoria interna.
Las pantallas del Titrino están representadas a la
izquierda. Los valores son los valores iniciales.
>cargar método
método:
>memorizar método
método:
Carga un método de la memoria interna en la memoria
de trabajo (entrada de la identificación de un método
contenido en la memoria)
Si se introduce una identificación que no se encuentra
en la memoria interna, el valor introducido parpadea.
El método de la memoria de trabajo se memoriza en la
memoria de métodos (hasta 8 caracteres ASCII)
Si ya hay un método memorizado con la identificación
dada, se le consulta si desea sobreescribir el método
antiguo. Con <ENTER> se sobreescribe, con
<QUIT> vuelve a la entrada de la identificación del
método.
784 KFP Titrino
35
Page 41

2.12 Memoria de métodos, teclas <USER METH>
Borrar método
>borrar método
método:
Borrar método de la memoria de métodos (entrada de
una identificación de un método contenido en la
memoria)
Para mayor seguridad se le consulta de nuevo si
realmente desea borrar el método. Con <ENTER>
queda borrado, con <QUIT> vuelve a la memoria de
trabajo.
Si se introduce una identificación que no se encuentra
en la memoria, el valor introducido parpadea
Puede imprimir el contenido de la memoria de métodos con la secuencia de las teclas
<PRINT><USER METH><ENTER>
¡Documente sus métodos (por ejemplo con los informes "parámetros", DEF y C-FMLA)!
Si tiene Ud. un PC, haga periódicamente un "backup" de sus métodos con el programa
Vesuv 6.6008.XXX.
784 KFP Titrino
36
Page 42

2.13 Datos de la muestra actual, tecla <SMPL DATA>
Id#1.. . 3 o C21...C23, ident ificaciones de la
muestra:
Peso:
Unidad del peso
#
Datos de la muestra
SMPL
2.13 Datos de la muestra actual, tecla <SMPL DATA>
DATA
smpl data
id#1 o C21
id#2 o C22
id#3 o C23
peso 1.0 g
unidad del peso: g
Con la tecla <SMPL DATA> se pueden introducir los
datos de la muestra actual. El contenido de esta tecla
cambia si se conecta la memoria silo, vea página 39.
En lugar de introducir los datos de la muestra actual
con la tecla <SMPL DATA>, puede también hacerlo
de forma automática después del comienzo de la
determinación. Para ello debe configurar la secuencia
de la determinación en la tecla <PARAM>,
">preselecciones".
Los datos actuales de la muestra están accesibles
"live". Para trabajos con la memoria silo vea página 38.
Se puede utilizar las identificaciones como variables
de cálculo C21...C23 específicas a la muestra.
Peso de la muestra.
La cantidad del peso de la muestra se puede
supervisar, vea página 19. Los límites aparecen
entonces en esa ventana.
de la muestra.
Las pantallas del Titrino están representadas a la
izquierda. Los valores son los valores iniciales.
smpl data
id
id#2 o C22
id#3 o C23
peso 1.0 g
unidad del peso: g
1 o C21
Identificación de la muestra 1...3 o variable de cálculo
específica a la muestra C21...C23 (hasta 8 caracteres
ASCII)
Las identificaciones de la muestra se pueden introducir
por medio del teclado, con una balanza equipada con
un dispositivo especial de entradas o con un lector de
código de barras.
Peso (número de 6 dígitos: ±X.XXXXX)
Entrada por medio del teclado, de una balanza o con
un lector de código de barras.
Unidad del peso (g, mg, mL,
µ
L, pc, ninguna o hasta
5 caracteres ASCII)
Selección con <←/→>.
784 KFP Titrino
37
Page 43

2.14 Memoria silo para datos de muestras
Memoria de silo conteniendo 35 líneas.
6 de las 35 líneas han sido procesa-
1
2
255
35 1 2
255
35
6
41
2.14 Memoria silo para datos de muestras
En la memoria silo se pueden memorizar datos de muestras (método, identificaciones y
pesos). Esto es útil, por ejemplo, cuando se trabaja con cambiador de muestras u otro
sistema de aportación automática de muestras o si desea una tabla con vista de
conjunto de sus resultados, vea página 41.
SILO
-
9
Si la memoria silo está conectada, los datos de la muestra se dirigen a la última línea
libre. Si no se introducen nuevos valores, se copia automáticamente el valor de la última
línea. De este modo, se pueden aceptar datos simplemente cuando permanecen
invariables.
Cuando se pone en marcha el aparato se recogen los datos de la muestra de la línea de
silo más próxima.
Con la tecla <SILO> se conecta y desconecta la
memoria silo. El LED "SILO" está encendido si la
memoria silo está conectada. La memoria silo trabaja
según el principio FIFO (First In First Out).
Organización d e la memoria sil o
La próxima línea libre es la línea 36.
das. Las líneas libres son de la 36
hasta la 255, y de la 1 hasta la 6.
1 línea silo necesita entre 18 y 120 bytes de capacidad de memoria.
Introducir datos de una balanza en la memoria silo
¡Si la memoria silo se llena por medio de la balanza, debe asegurarse de que haya
suficiente espacio en la memoria para el número necesario de líneas silo! Se puede
imprimir el informe de la memoria de los métodos para ver el número de bytes libres.
Cuando se introducen los datos de la muestra por medio de una balanza, se toma la
transmisión del peso como el final de la línea silo. No debería editar el silo y transmeter
datos de una balanza al mismo tiempo.
En operaciones mixtas, entrada manual de identificaciones y pesos por medio de una
balanza, se envían los datos desde la balanza a la línea en la que se está editando. Debe
ser confirmado con <ENTER> en el Titrino.
784 KFP Titrino
38
Page 44

2.14 Memoria silo para datos de muestras
Editar silo:
Borrar silo:
Borrar todo:
#
Entrada de datos en la memoria de silo
Borrar líneas individuales del silo
SMPL
Tecla <SMPL DATA> con la memoria de silo conectada
Con la tecla <SMPL DATA> se puede introducir datos
de las muestras en la memoria silo.
DATA
smpl data
>editar silo
>borrar silo
>borrar todo
ciclo datos: no
memorizar resultados: no
Introducir datos de la muestra en la memoria silo.
Borrar líneas individuales.
Borrar todo la memoria silo.
Las pantallas del Titrino están representadas a la
izquierda. Los valores son los valores iniciales.
>editar silo
línea del silo 1
método:
id
id#2 o C22
id#3 o C23
peso 1.0 g
unidad del peso: g
1 o C21
Línea del silo (1...255)
Se indica automáticamente la próxima línea libre. Las
líneas ya ocupadas se pueden corregir.
Método con el que se procesa la muestra
(identificación del método de la memoria de métodos)
Si no se introduce ninguna identificación de método,
se procesa la muestra con el método de la memoria
de trabajo.
Se puede elegir el método con <←/→> o introducirlo
directamente.
Identificaciones de la muestra o variables de cálculo
específicas a la muestra (hasta 8 caracteres ASCII)
Peso (número de 6 dígitos: ±X.XXXXX)
Los valores límite específicos del método se verifican
con el cálculo del resultado.
Unidad del peso (g, mg, mL,
µ
L, pc, ninguna o hasta 5
caracteres ASCII)
Selección con <←/→>.
>borrar silo
borrar línea n no
784 KFP Titrino
Borrar líneas individuales del silo (1...255, no)
<CLEAR> pasa a "no".
Las líneas borradas permanecen en la memoria de
silo. El acceso está bloqueado durante el proceso.
Como indicación de que una línea ha sido borrada
aparecen las consultas con "*". El signo * indica que la
línea ha sido borrada.
Las líneas borradas se pueden reactivar cuando se
vuelven a editar.
39
Page 45

2.14 Memoria silo para datos de muestras
Borrar toda la memoria silo
Memoria silo conteniendo 35 líneas.
6 de las 35 líneas han sido
1
2
255
35 1 2
255
35
6
41
>borrar todo
borrar todo: no
ciclo datos: no
memorizar resultados: no
Borrar toda la memoria silo (sí, no)
Cuando se borran todas las líneas, el silo se queda
completamente vacío: la numeración de las líneas
empieza de nuevo con 1.
Ciclo de datos (sí, no)
El ciclo de datos "sí" es útil cuando tiene que procesar
siempre las mismas muestras. En tal caso, la línea silo
procesada no se borra, sino que se copia en la
siguiente línea libre. Si trabaja en este modo, no
debería introducir ninguna nueva
línea silo durante las
determinaciones.
Memorizar resultados en la memoria silo (sí, no)
Los resultados se memorizan en las variables C24 y
C25, si los métodos tienen asignación, vea página 42.
Sólo se puede desconectar (cambiar de "sí" a "no") con
la memoria silo vacía.
Memoria silo con ciclo de datos "sí"
La siguiente línea libre es la 36.
procesadas.
Las líneas procesadas han sido
copiadas al final de la memoria silo:
el silo está lleno hasta la línea 41.
784 KFP Titrino
40
Page 46

2.15 Memorización de resultados y cálculos silo
Cálculo silo
2.15 Memorización de resultados y cálculos silo
2.15.1 Memorización de resultados
Si se desea conservar los datos de muestras específicas de la memoria silo después de
la determinación y añadir los resultados, hay que realizar las siguientes entradas:
1. En el método, bajo la tecla <DEF>
Asignación de los resultados en C24 y / o C25.
2. En la memoria silo, tecla <SMPL DATA> (si la memoria silo está conectada):
"memorizar resultados: sí"
Asignación de los resultados
DEF
2
def
>fórmula
>cálculo silo
>variables comunes
>impresión
>media
(
Con la tecla <DEF> se puede asignar los resultados
de la determinación.
Las pantallas del Titrino están representadas a la
izquierda. Los valores son los valores iniciales.
>cálculo silo
C24=
C25=
Asignación en C24 (RSX, EPX, CXX)
Los resultados calculados (RSX), puntos finales (EPX)
o variables CXX se pueden memorizar como C24.
El mismo procedimiento para C25.
Importante:
Asegúrese de que hay suficiente espacio para la memorización de resultados C24 y C25.
(En el informe <PRINT> <USER METH> <ENTER> se presentará el número de bytes
libres ). Se memorizan el nombre del resultado, valor y unidad. El lugar que un valor
necesita se puede calcular con la ayuda de los siguientes datos:
Resultado con su texto (8 caracteres) y unidad (5 caracteres): 32 bytes
Valor medido C40, valor sin unidad: 22 bytes
784 KFP Titrino
41
Page 47

2.15 Memorización de resultados y cálculos silo
Cálculos silo
con resultados
Después de trabajar con algunas muestras, el informe silo puede tener el siguiente
aspecto (impresión con <PRINT><SILO><ENTER>):
'si
784 KFP Titrino 02134 784.0010
fecha 1999-08-15 hora 15:03 14
>silo
ciclo datos: no
memorizar resultados: sí
sl método id 1/C21 id 2/C22 id 3/C23 C00 C24 C25
+ 1 11-2 A/12 99-08-12 0.903g 2.6427ml 1.48%
+ 2 11-2 A/13 99-08-12 0.891g 2.6076ml 1.46%
/ 3 11-2 A/14 99-08-12 0.879g 2.5725ml 1.44%
4 11-2 A/15 99-08-12 0.913g NV NV
5 11-2 A/16 99-08-12 0.888g NV NV
Líneas silo
trabajadas
memorizados
Las líneas silo pueden estar señalizadas con los siguientes distintivos (a la izquierda del
informe):
+ La línea silo se ha trabajado. No se puede más editarlo.
* Se ha borrado una línea silo que no estaba aún trabajada.
– Se ha borrado una línea silo trabajada y, con ello, quitado del cálculo silo.
/ La última línea silo trabajada. En esta línea, recálculos se tienen en cuenta (por
ejemplo con un nuevo peso).
Sin marcado: La línea silo no está aún trabajada.
En líneas silo >100, la primera cifra está sobreescrita por el marcado.
2.15.2 Cálculos silo
A partir de los resultados que se encuentran en la memoria silo se pueden calcular
posteriormente las medias y desviaciones estándares durante toda la serie de
determinaciones.
En el método y bajo la tecla <DEF> se pueden realizar las siguientes indicaciones:
>cálculo silo
C24=
C25=
igualar a id: no
Asignación en C24 (RSX, EPX, CXX)
Los resultados calculados (RSX), puntos finales (EPX)
o variables CXX se pueden memorizar como C24.
El mismo procedimiento para C25.
Identificaciones de muestras que han de coincidir para
la recopilación de los resultados de las muestras (id1,
id1&2, todo, no).
"no" significa que no hay coincidencia en la
identificación; todas las muestras que se trabajan con
el mismo método serán recopiladas, vea ejemplos
abajo.
42
784 KFP Titrino
Page 48

2.15 Memorización de resultados y cálculos silo
Partiendo del siguiente informe silo:
'si
784 KFP Titrino 02134 784.0010
fecha 1999-08-15 hora 15:03 14
>silo
ciclo datos: no
memorizar resultados: sí
sl método id 1/C21 id 2/C22 id 3/C23 C00 C24 C25
+ 1 11-2 A/12 99-08-12 0.903g 2.6427ml 1.48%
+ 2 0-15 A/13 99-08-12 0.010g 4.9372mg/ml NV
+ 3 0-15 A/13 99-08-12 0.010g 4.9786mg/ml NV
+ 4 11-2 A/12 99-08-12 0.852g 2.4935ml 1.39%
/ 5 11-2 A/15 99-08-12 0.913g 2.6720ml 1.50%
*
Sólo asignación
en C24
*
*
Con "igualar a id: no" se reciben el siguiente informe de cálculo silo (cs cmpl):
:
método id 1/C21 id 2/C22 id 3/C23 media +/-s n
11-2 * * * consumo 2.6027ml 0.0957 3
cont. 1.46% 0.06 3
0-15 * * * título 4.9579 0.0293 2
Todas las
muestras que se
trabajan con el
mismo método
se unen.
Con "igualar a id: id1" se reciben el siguiente informe de cálculo silo (cs cmpl):
:
método id 1/C21 id 2/C22 id 3/C23 media +/-s n
11-2 A/12 * * consumo 2.5681ml 0.1055 2
cont. 1.44% 0.06 2
0-15 A/13 * * título 4.9579 0.0293 2
11-2 A/15 * * consumo 2.6720ml 0.000 1
cont. 1.50% 0.000 1
Las muestras
que se trabajan
con el mismo
método y tienen
la misma id1 se
unen.
El informe breve de los cálculos silo (cs breve) contiene sólo los cálculos para la última
muestra actual.
:
método id 1/C21 id 2/C22 id 3/C23 media +/-s n
11-2 A/15 * * consumo 2.6720ml 0.000 1
cont. 1.50% 0.000 1
Las medias de los cálculos silo están disponibles para otros cálculos de resultados
como C26 o C27 y se pueden utilizar en el Titrino en fórmulas.
Media de C24 ⇒ C26
Media de C25 ⇒ C27
784 KFP Titrino
43
Page 49

2.16 Dosificación manual
DOS
Importante:
• Si se trabaja con cálculos silo, hay que introducir el nombre del método en la memoria
silo.
• Recálculos se inscriben en la memoria silo, si la línea silo está marcada con "/". Si no
se desea realizar ninguna entrada, por ejemplo, porque hay que trabajar con una
muestra urgente, hay que desconectar la memoria silo.
• Los cálculos y las asignaciones se efectúan en el siguiente orden:
1. Cálculo del resultado (RSX de la fórmula)
2. Cálculo de la media (MNX)
3. Asignaciones de los resultados silo C24 y C25
4. Cálculos silo
5. Asignaciones de las medias de los cálculos silo en C26 y C27
6. Asignaciones de las variables comunes
2.16 Dosificación manual
Con <DOS> se dosifica con la bureta mientras está
pulsando la tecla <DOS>. La velocidad se ajuste con
el potenciometro en el Titrino.
784 KFP Titrino
44
Page 50

3.1 General rules
3 Operation via RS232 Interface
3.1 General rules
The Titrino has an extensive remote control facility that allows full control of
the Titrino via the RS 232 interface, i.e. the Titrino can receive data from an
external controller or send data to an external controller. CR and LF are used
as terminators for the data transfer. The Titrino sends 2xCR and LF as termination of a
LF as terminators. The controller terminates its commands with CR and LF. If
more than one command per line is sent by the controller, ";" is used as a separator between the individual commands.
The data are grouped logically and easy to understand. Thus e.g., for the selection of the dialog language, the following must be sent
whereby it is sufficient to only transmit the boldface characters, thus:
The quantities of the commands above are:
Config configuration data
Aux auxiliaries, various data
Language setting the dialog language
The data are hierarchically structured (tree form). The quantities that occur in
this tree are called objects in the following. The dialog language is an object
which can be called up with the
command.
If one is in the desired location in the tree, the value of the object can be queried.
The query command $Q initiates the issuing of the value on the instrument
and the value emission is triggered. Entries which start with $, trigger something. They are thus called triggers.
Values of objects can not only be queried, they can also be modified. Values
are always entered in quotes, for example:
&Config.Aux.Language "english"
data block, to differentiate between a data line
&Config.Aux.Language "english"
&C.A.L "english"
&Config.Aux.Language
&Config.Aux.Language $Q Q means Query
which has CR and
784 KFP Titrino
45
Page 51

3.1 General rules
Language
Prog
Aux
&
Root
RSSet
3rd node
2nd node
0st node
Change from node 'Language' via the root to
3.1.1 Call up of objects
An excerpt from the object tree is represented below:
1st node
Config
Mode
Rules Example
The root of the tree is designated by &.
The branches (levels) of a tree are marked with
a dot (.) when calling up an object.
When calling up an object, it is sufficient to give
only as many letters as necessary to uniquely
assign the object. If the call is not unequivocal,
Calling up the dialog language
&Config.Aux.Language or &C.A.L
the first object in the series will be recognized.
Upper- or lowercase letters may be used. &C.A.L or &c.a.l
To an object a value can be assigned. Values
are signified at the beginning and end by quotes
("). They may contain up to 24 ASCII characters.
Numerical values can contain up to 6 digits, a
negative sign, and a decimal point. Numbers
with more than 6 characters are not accepted;
more than 4 decimal places are rounded off. For
Entering the dialog language:
&C.A.L"english"
correct entry of numbers:
"0.1"
incorrect entry of numbers
"1,5" or "+3" or ".1"
numbers <1, it is necessary to enter leading
zeros.
The current object remains until a new object is
called.
New objects can be addressed relative to the
old object:
A preceding dot leads forwards to the next
level in the tree.
More than one preceding dot leads one level
backwards in the tree. n node backwards re-
quire n+1 preceding dots.
If you must jump back to the root, enter a preceding &.
784 KFP Titrino
46
entry of another dialog language:
"deutsch"
From the root to node 'Aux': &C.A
Forward from node 'Aux' to 'Prog': .P
Jump from node 'Prog' to node 'Aux' and select
a new object 'Language' at this level: ..L
node 'Mode': &M
Page 52

3.1 General rules
3.1.2 Triggers
Triggers initiate an action on the Titrino, for example, starting a process or
sending data. Triggers are marked by the introductory symbol $.
The following triggers are possible:
$G Go Starts processes, e.g. starting the mode run or setting the RS 232 interface
parameters
$S Stop Stops processes
$H Hold Holds processes
$C Continue Continues processes after Hold
$Q Query Queries all information from the current node in the tree forward up to and
including the values
$Q.P Path Queries the path from the root of the tree up to the current node
$Q.H Highest Queries the number of son nodes of the current node
Index
$Q.N"i" Name Queries the name of the son node with index i, i = 1 – n
$D Detail-Info Queries the detailed status information
$U qUit Aborts the data flow of the instrument, for example, after $Q
The triggers $G and $S are linked to particular objects, see the summary table
page 52ff.
All other triggers can be used at any time and at all locations on the object
tree.
Examples
Querying the value of the baud rate: &Config.RSSet.Baud $Q
Querying all values of the node "RSSet": &Config.RSSet $Q
Querying the path of the node "RSSet": &Config.RSSet $Q.P
Start mode: &Mode $G
Querying the detailed status: $D
:
784 KFP Titrino
47
Page 53

3.1 General rules
3.1.3 Status messages
In order to have an efficient control by an external control device, it must also
be possible to query status conditions; they provide information on the status
of the Titrino. The trigger $D initiates output of the status. Status messages
consist of the global status, the detailed status and eventual error messages,
e.g. $S.Mode.KFT;E26. The global status informs on the activity of the
process, while the detailed status conditions show the exact activity within the
process.
The following global status conditions are possible:
$G Go: The Titrino is executing the last command.
$H Hold: The Titrino has been held ($H, key <meas/hold> or by an error which
effects the hold status).
$C Continue: The Titrino has been restarted actively after hold.
$R Ready: The Titrino has executed the last command and is ready.
$S Stop: A process has been aborted in an "unnatural manner". e.g. stopped or aborted
because there was an error.
Detailed status conditions
Status conditions of the global $G:
$G .Mode.KFT .Inac: Instrument at the beginning or at the end of a titration.
.Req .Id1: Instrument in the KFT mode, requesting Id1 after start.
.Id2: Instrument in the KFT mode, requesting Id2 after start.
.Id3: Instrument in the KFT mode, requesting Id3 after start.
.Smpl: Instrument in the KFT mode, requesting sample size after start.
.Unit: Instrument in the KFT mode, requesting unit of sample size after start.
.Start: Instrument in the KFT mode, processing the start conditions.
.KFT1: Instrument in the KFT mode, titrating to the first endpoint.
.Cond.Ok: Instrument in the KFT, conditioning, endpoint reached (after the first
startup from the standby mode).
.Cond.Prog: Instrument in the KFT mode, conditioning, endpoint not reached
(Conditioning progressing).
$G .Assembly.Bur .Fill: Buret in filling process
.ModeDis: Buret in DIS mode
Status conditions of the global $H:
The status message of the action which has been held appears.
If the process is held because a monitored limit has been violated, its status
message is $H.Mode.KFT.Titr.
Status conditions of the global $C:
The status conditions of the global $C are identical with the ones of the global
status $G. They appear when the process has been restarted actively from
the status "Hold" ($C, key <meas/hold> or automatically after elimination of
an error).
Status conditions of the global $R:
$R .Mode.KFT.QuickMeas: Quick manual measurement from the initial status in mode KFT.
$R .Mode.KFT .Inac: Instrument in the KFT mode, inactive.
.Cond.Ok: Instrument in the KFT mode, conditioning, endpoint reached.
.Cond.Prog: Instrument in the KFT mode, conditioning, endpoint not reached.
$R .Assembly.Bur.ModeDis: Buret in the DIS mode, inactive.
784 KFP Titrino
48
Page 54

3.1 General rules
Status conditions of the global $S:
$S .Mode.KFT.QuickMeas: Quick manual measurement from the initial status in mode KFT.
The instrument gives the status from which it has been stopped. The detailed
status information is therefore identical the information for the global status
$G.
Violation of monitored limits with action "end" give the status message
$S.Mode.KFT.Inac;EYYY.
3.1.4 Error messages
Error messages are added to the status messages and separated from them
by the sign ";".
E20 Check exchange unit.
Exit: Mount Exchange Unit (properly) or &m $S.
E21 Check electrode, short circuit.
Exit: Rectify fault or &m $S.
E22 Check electrode, break.
Exit: Rectify fault or &m $S.
E23 Division by zero.
Exit: The error message disappears on next startup or on recalculation.
E26 Manual stop.
Exit: The error message disappears on next startup.
E27 Stop V reached in KFT.
Exit: The error message disappears on next startup.
E28 Wrong object call up.
Exit: Send correct path for object. Start path at root.
E29 Wrong value or no value allowed.
Exit: Send correct value or call up new object.
E30 Wrong trigger, this trigger is not allowed or carrying-out of action not
possible.
Exit: Send correct trigger (exception: $D) or call up new object.
E31 Command is not possible in active status. Repeat command in inactive
status.
Exit: Send new command.
E32 Command is not possible during titration. Repeat command during the
conditioning phase or in inactive status.
Exit: Send new command.
E33 Value has been corrected automatically.
Exit: Send new command.
E34 Instrument at the end of the titration and sample data is edited; the instrument
at rest or editing during filling.
Exit: &m $S.
784 KFP Titrino
49
Page 55

3.1 General rules
RS receive errors:
E36 Parity.
Exit: <QUIT> and ensure settings of appropriate parameters at
both devices are the same.
E37 Framing error.
Exit: <QUIT> and ensure settings of appropriate parameters at
both devices are the same.
E38 Overrun error. At least 1 character could not be read.
Exit: <QUIT>
E39 The internal working-off buffer of the Titrino is full
(>82 characters).
Exit: <QUIT>
RS send errors:
E42 CTS=OFF No proper handshake for more than 1 s.
Exit: <QUIT> Is the receiver switched on and ready to receive?
E43 The transmission of the Titrino has been interrupted with XOFF for
at least 6 s.
Exit: Send XON or <QUIT>
E45 The receive buffer of the Titrino contains an incomplete command
missing). Sending from the Titrino is therefore blocked.
(L
F
Exit: Send L
or <QUIT>.
F
E121 Measuring point list overflow (more than 500 measuring points).
Exit: The error message disappears on next startup.
E123 Missing EP for calculation.
Exit: The error message disappears on next startup or on
recalculation.
E128 No new mean.
Exit: The error message disappears on next startup or on
recalculation.
E129 No new common variable, old value remains.
Exit: The error message disappears on next startup or on
recalculation.
E130 Wrong sample. For KFT with preset titration direction the first
measured value lies behind the endpoint.
Exit: The error message disappears on next startup.
E132 Silo empty and it has been started with open silo or empty silo has
been opened.
Exit: Send a silo entry.
E133 Silo full.
Exit: Send new command.
E137 XXX Bytes are missing so that the method or the silo line could not be stored.
Exit: Send new command.
E155 No new silo result (C24 or C25).
Exit: The error message disappears on next start or on recalculation.
784 KFP Titrino
50
Page 56

3.1 General rules
E196 Result is out of limits.
Exit: The error message disappears on next start or on recalculation.
E197 Sample size is out of limits.
Exit: The error message disappears on next start or on introduction of new
sample size.
E198 Validation interval is expired.
Exit: The error message disappears on next start or clear counter with
&Config.Monitoring.Validation.ClearCount $G.
E199 Service date is reached.
Exit: The error message disappears on next start or change date in
&Config.Monitoring.Service.Date.
E203 No Oven parameters: Oven not (correctly) connected.
Exit: The error message disappears on next start. If you don't wish oven
parameters in your report, select &Mode.Parameter.Presel.Oven "no" in your
method(s).
E212 Transmission error from Remote Box. Unknown characters.
Exit: Rectify error and switch Titrino off and on again.
E213 Time-out error from PC keyboard (Remote Box)
Exit: Rectify error and switch Titrino off and on again.
E214 Check Remote Box. Remote Box not (properly) connected but activated in
&Config.Periph.RemoteBox.
Exit: Rectify error and switch Titrino off and on again.
784 KFP Titrino
51
Page 57

3.2 Remote control commands
3.2 Remote control commands
3.2.1 Overview
The internal object tree can be divided into the following branches:
& Root
├ Mode Method parameters
├ UserMeth Administration of the internal user-memory for methods
├ Config Instrument configuration
├ SmplData Sample specific data
├ Hotkey Keys with direct access
├ Info Current Data
├ Assembly Component data
├ Setup Setting the operating mode
└ Diagnosis Diagnostics program
784 KFP Titrino
52
Page 58

3.2 Remote control commands
&Mode
Object Description Input range Reference
& Root
├ Mode Mode $G, $S, $H, $C 3.2.2.1.
: ├ .QuickMeas Rapid meas. in basic mode $G, $S 3.2.2.2.
├ .Select Mode selection KFT 3.2.2.3.
├ .KFTQuantity Measured quantity for KFT Ipol, Upol ditto
├ .Name Name of current method read only/read+write 3.2.2.4.
├ .Parameter* Parameter of current mode, see below
│
├ .Def Definitions for data output
│ ├ .Formulas Calculation formulas
│ │ ├ .1 for result 1
│ │ │ ├ .Formula Calculation formula special 3.2.2.5.
│ │ │ ├ .TextRS Text for result output up to 8 ASCII char ditto
│ │ │ ├ .Decimal Number of decimal places 0...2...5 ditto
│ │ │ ├ .Unit Unit for result output up to 6 ASCII char ditto
│ │ │ ├ .Limits Limits for result ON, OFF ditto
│ │ │ ├ .LoLim Lower limit 0...±999 999 ditto
│ │ │ ├ .UpLim Upper limit 0...±999 999 ditto
│ │ │ ├ .Output Output on L13 active, pulse, OFF ditto
│ │ │ : up to 9 results
│ ├ .SiloCalc Silo calculations
│ │ ├ .Assign Assignment
│ │ │ ├ .C24 Store as variable C24 RSX,EPX,CXX 3.2.2.6.
│ │ │ ├ .C25 Store as variable C25 RSX,EPX,CXX
│ │ │ ├ .MatchId Matching of Id's id1, id1&2, all, OFF
│ ├ .ComVar Assignment of common variables
│ │ ├ .C30 for C30 RSX,EPX,CXX,MNX 3.2.2.7.
│ │ ├ up to C39
│ ├ .Report Reports at the end of determination
│ │ ├ .Assign1 Output to COM1 special 3.2.2.8.
│ │ ├ .Assign2 Output to COM 2 as COM1
│ ├ .Mean Assignment for mean calculation
│ │ ├ .1 MN1
│ │ │ ├ .Assign Input of variable RSX, EPX, CXX 3.2.2.9.
│ │ │ :
│ ├ .TempVar without meaning
├ .CFmla Calculation constants
│ ├ .1 Calculation constant C01
│ │ ├ .Value Input of value 0...±999999 3.2.2.10.
│ ├ up to C19
784 KFP Titrino
53
Page 59

3.2 Remote control commands
*Parameter Tree part "Parameters for KFT"
├ .CtrlPara Control parameters
│ ├ .EP Endpoint depends on meas.quant. 3.2.2.11.
│ ├ .UnitEp Unit of endpoint read only ditto
│ ├ .Dyn Dynamics depends on meas.quant. 3.2.2.12.
│ ├ .UnitDyn Unit of dynamics read only ditto
│ ├ .MaxRate Maximum dosing rate 0.01...150, max. ditto
│ ├ .MinIncr Minimum increment 0.1...9.9, min. ditto
│ ├ .Stop Titration stop
│ │ ├ .Type Type of stop criterion drift, time 3.2.2.13.
│ │ ├ .Drift Stop drift 1...20...999 ditto
│ │ ├ .Time Switch-off delay time 0...10...999, inf ditto
│ │ ├ .StopT Stop time 0...999999, OFF ditto
│ │
├
.TitrPara Titration parameters
│ ├ .Direction Titration direction +, –, auto 3.2.2.14.
│ ├ .XPause Waiting time before start volume 0...999999 3.2.2.15.
│ ├ .StartV Start volume
│ │ ├ .Type Type of start volume abs., rel., OFF 3.2.2.16.
│ │ ├ .V Volume for absolute start volume 0...999.99 ditto
│ │ ├ .Factor Factor for relative start volume 0...±999999 ditto
│ │ ├ .Rate Dispensing rate for start volume 0.01...150.0, max. ditto
│ ├ .Pause Waiting time after start volume 0...999999 3.2.2.17.
│ ├ .ExtrT Extraction time 0...999999 3.2.2.18.
│ ├ .MeasInput without meaning
│ ├ .Ipol Polarization current 0...50...±127 3.2.2.19.
│ ├ .Upol Polarization voltage 0...400...±1270 ditto
│ ├ .PolElectrTest Test for polarized electrodes ON, OFF ditto
│ ├ .Temp Titration temperature –170.0...25.0...500.0 3.2.2.20.
│ ├ .TDelta Time interv. for meas.acquisition 1...2...999999 3.2.2.21.
│ │
├
.StopCond Stop conditions
│ ├ .VStop Stop volume
│ │ ├ .Type Type of stop volume abs., rel., OFF 3.2.2.22.
│ │ ├ .V Volume for absolute stop volume 0...99.99...9999.99 ditto
│ │ ├ .Factor Factor for relative stop volume 0...±999999 ditto
│ ├ .FillRate Filling rate 0.01...150.0, max. 3.2.2.23.
│ │
├
.Statistics Statistics
│ ├ .Status Status of statistics calculation ON, OFF 3.2.2.24.
│ ├ .MeanN No. of individual determinations 2...20 ditto
│ ├ .ResTab Result table
│ │ ├ .Select original,delete n,delete all ditto
│ │ ├ .DelN Deletion of individual results 1...20 ditto
│ │
├
.Presel Preselections
│ ├ .Cond Conditioning ON, OFF 3.2.2.25.
│ ├ .DriftDisp Display of drift during cond. ON, OFF ditto
│ ├ .DCor Drift correction
│ │ ├ .Type Type of drift acquisition auto, man., OFF ditto
│ │ ├ .Value Drift value for manual drift corr. 0.0...99.9 ditto
│ ├ .IReq Request of Id's after start id1, id1&2, all, OFF 3.2.2.26.
│ ├ .SReq Request of smpl size after start value, unit, all, OFF ditto
│ ├ .LimSmplSize Limits for sample size 3.2.2.27.
│ │ ├ .Status Status of limit control ON, OFF ditto
│ │ ├ .LoLim Lower limit 0.0...999 999 ditto
│ │ ├ .UpLim Upper limit 0.0...999 999 ditto
│ ├ .Oven KF Oven connected COM1, COM2, no 3.2.2.28.
│ ├ .ActPulse Output of a pulse first, all, cond., OFF 3.2.2.29.
784 KFP Titrino
54
Page 60

3.2 Remote control commands
&UserMeth
Object Description Input range Reference
& Root
:
├ UserMeth Method memory
: ├ .FreeMemory Memory available read only 3.2.2.30.
├ .Recall Load method $G 3.2.2.31.
│ ├ .Name Method name 8 ASCII characters ditto
├ .Store Save method $G ditto
│ ├ .Name Method name 8 ASCII characters ditto
├ .Delete Delete method $G ditto
│ ├ .Name Method name 8 ASCII characters ditto
├ .DelAll Delete all methods $G ditto
├ .List List of methods
│ ├ .1 Method 1
│ │ ├ .Name Method name read only 3.2.2.32.
│ │ ├ .Mode Mode read only ditto
│ │ ├ .Quantity Measured quantity read only ditto
│ │ ├ .DosUnit Dosing element read only ditto
│ │ ├ .Bytes Method size in bytes read only ditto
│ │ ├ .Checksum Checksum of method read only ditto
├ .2 for each method
784 KFP Titrino
55
Page 61

3.2 Remote control commands
&Config
Object Description Input range Reference
& Root
:
├ Config Instrument configuration
: ├ .Monitoring Monitoring functions
│ ├ .Validation Validation monitoring 3.2.2.33.
│ │ ├ .Status Status of validation monitoring ON, OFF ditto
│ │ ├ .Interval Time interval for validation 1...365...9999 ditto
│ │ ├ .Counter Time counter 0...9999 ditto
│ │ ├ .ClearCount Clears the counter above $G ditto
│ ├ .Service Monitoring of Metrohm service $G 3.2.2.34.
│ │ ├ .Status Status of service monitoring ON, OFF ditto
│ │ ├ .Date Date of next service YYYY-MM-DD ditto
│ ├ .DiagRep Printing of system test report ON, OFF 3.2.2.35.
│
├ .PeriphUnit Selection of peripheral units
│ ├ .CharSet1 External printer Epson,Seiko,Citizen
│ │ IBM,HP 3.2.2.36.
│ ├ .CharSet2 as for CharSet1
│ ├ .RepToComport Output of manual reports 1, 2, 1&2 3.2.2.37.
│ ├ .Balance Selection of balance Sartorius,Mettler,Mettler AT
│ │ AND,Precisa 3.2.2.38.
│ ├ .Stirrer Stirrer control ON, OFF 3.2.2.39.
│ ├ .RemoteBox Connected remote box 3.2.2.40.
│ │ ├ .Status Status ON, OFF ditto
│ │ ├ .Keyboard Type of keyboard US, deutsch, francais,
│ │ │ español, schweiz. ditto
│ │ ├ .Barcode Input of barcode reader input, method, id1, id2,
│ │ │ id3, smpl size ditto
│
├ .Aux Miscellaneous
│ ├ .Language Dialog language english, deutsch,
│ │ français, español, italiano,
│ │ portugese, svenska 3.2.2.41.
│ ├ .Set Setting of date and time $G 3.2.2.42.
│ │ ├ .Date Date YYYY-MM-DD
│ │ ├ .Time Time hh:mm
│ ├ .RunNo Run number 0...9999 3.2.2.43.
│ ├ .AutoStart Automatic start 1...9999, OFF 3.2.2.44.
│ ├ .StartDelay Start delay time 0...999999 3.2.2.45.
│ ├ .ResDisplay Result display standard,bold 3.2.2.46.
│ ├ .DevName Device label 8 ASCII char. 3.2.2.47.
│ ├ .Prog Program version read only 3.2.2.48.
784 KFP Titrino
56
Page 62

3.2 Remote control commands
"Configuration", continuation
├ .RSSet1 Settings RS232, 1 $G 3.2.2.49.
│ ├ .Baud Baud rate 300,600,1200,2400,4800,
│ │ 9600,19200,38400,57600,
│ │ 115200 ditto
│ ├ .DataBit Number of data bits 7, 8 ditto
│ ├ .StopBit Number of stop bits 1, 2 ditto
│ ├ .Parity Parity even, odd, none ditto
│ ├ .Handsh Handshake HWs, SWchar,
│ │ SWline, none ditto
├ .RSSet2 as for RS1
│
├ .ComVar Values of common variables
│ ├ .C30 C30 0... ±999999 3.2.2.50.
│ ├ up to C39 0... ±999999
784 KFP Titrino
57
Page 63

3.2 Remote control commands
&SmplData
Object Description Input range Reference
& Root
:
├ SmplData Sample data
: ├ .Status Status of silo memory ON, OFF 3.2.2.51.
├ .OFFSilo Current sample data
│ ├ .Id1 Sample identification 1 up to 8 ASCII char 3.2.2.52.
│ ├ .Id2 Sample identification 2 up to 8 ASCII char ditto
│ ├ .Id3 Sample identification 3 up to 8 ASCII char ditto
│ ├ .ValSmpl Sample size ±X.XXXXX ditto
│ ├ .UnitSmpl Unit of sample size up to 5 ASCII char ditto
├ .ONSilo Current sample data
│ ├ .Counter Counter of silo memory
│ │ ├ .MaxLines Maximum lines read only 3.2.2.53.
│ │ ├ .FirstLine First line read only ditto
│ │ ├ .LastLine Last line read only ditto
│ ├ .EditLine Editing silo lines
│ │ ├ .1 1
│ │ │ ├ .Method Method name up to 8 ASCII char 3.2.2.54.
│ │ │ ├ .Id1 Sample identification 1 up to 8 ASCII char ditto
│ │ │ ├ .Id2 Sample identification 2 up to 8 ASCII char ditto
│ │ │ ├ .Id3 Sample identification 3 up to 8 ASCII char ditto
│ │ │ ├ .ValSmpl Sample size ±X.XXXXX ditto
│ │ │ ├ .UnitSmpl Unit of sample size up to 5 ASCII char ditto
│ │ │ ├ .C24 Value of variable C24 read only ditto
│ │ │ ├ .C25 Value of variable C25 read only ditto
│ │ │ ├ .Mark Mark of silo line read only ditto
│ │ ├ up to 255 lines
│ ├ .DelLine Delete silo line $G 3.2.2.55.
│ │ ├ .LineNum Line number 1...255, OFF ditto
│ ├ .DelAll Delete silo line $G 3.2.2.56.
│ ├ .CycleLines Cycle lines ON, OFF 3.2.2.57.
│ ├ .SaveLines Save results ON, OFF 3.2.2.58.
st
silo line
784 KFP Titrino
58
Page 64

3.2 Remote control commands
&HotKey
Object Description Input range Reference
& Root
:
├ HotKey Keys with direct access
: ├ .User User name 3.2.2.59.
│ ├ .Name Input of user name up to 10 ASCII char ditto
│ ├ .Delete Delete user $G ditto
│ │ ├ .Name Input of user name up to 10 ASCII char ditto
│ ├ .DelAll Delete all users $G ditto
│ ├ .List List of users
│ │ ├ .1 User 1
│ │ │ ├ .Name Name of user read only ditto
│ │ ├ up to 99
784 KFP Titrino
59
Page 65

3.2 Remote control commands
&Info
Object Description Input range Reference
& Root
:
├ Info Current data
: ├ .Report Transmission of formatted reports $G 3.2.2.60.
│ ├ .Select Report type configuration, parameters,
│ smpl data, statistics, silo,
│ C-fmla, def, user method,
│ full, short, mplist, curve,
│ scalc full, scalc srt, calc,
│ all, ff ditto
│
├ .Checksums Checksums $G 3.2.2.61.
│ ├ .MPList Checksum of meas.point list read only ditto
│ ├ .ActualMethod Checksum of current method read only ditto
│
├ .DetermData Determination data $G 3.2.2.62.
│ ├ .Write Read/write for several nods ON, OFF
│ ├ .ExV Volume of Exchange/Dosing unit read only/read+write ditto
│ ├ .MPList Measuring point list
│ │ ├ .1 Measuring point 1
│ │ │ ├ .Attribute Attribute read only/read+write ditto
│ │ │ ├ .X X coordinate read only/read+write ditto
│ │ │ ├ .Y Y coordinate read only/read+write ditto
│ │ │ ├ .Z1 Z1 coordinate read only/read+write ditto
│ │ │ ├ .Z2 Z2 coordinate read only/read+write ditto
│ │ │ for each measuring point
│
├ .TitrResults Titration results
│ ├ .RS Calculated results
│ │ ├ .1 1
│ │ │ ├ .Value Value read only 3.2.2.63.
│ │ ├ up to 9 results
│ ├ .EP Endpoint
│ │ ├ .1 1
│ │ │ ├ .V Value read only ditto
│ │ │ ├ .Meas Measured value read only
│ │ │ ├ .Mark without meaning
│ │ ├ up to 9 EP's
│ ├ .Var Variables C4X
│ │ ├ .C40 Start measured value read only/read+write ditto
│ │ ├ .C41 Titration end volume read only/read+write
│ │ ├ .C42 Titration time read only/read+write
│ │ ├ .C43 Volume drift read only/read+write
│ │ ├ .C44 Titration temperature read only/read+write
│ │ ├ .C45 Start volume read only/read+write
│ │ ├ .DTime Time for drift corr.or dosing time read only/read+write
st
result
st
result
784 KFP Titrino
60
Page 66

3.2 Remote control commands
"Info", continuation
├ .StatisticsVal Statistics values
│ ├ .ActN Number of results in chart read only 3.2.2.64.
│ ├ .1 1
│ │ ├ .Mean Mean read only ditto
│ │ ├ .Std Absolute standard deviation read only ditto
│ │ ├ .RelStd Relative standard deviation read only ditto
│ ├ up to 9 mean values
│
├ .SiloCalc Values of silo calculations
│ ├ .C24 Values of variable C24
│ │ ├ .Name Name read only 3.2.2.65.
│ │ ├ .Value Value read only ditto
│ │ ├ .Unit Unit read only ditto
│ ├ .C25 as for C24
│ ├ .C26 Values of variable C26
│ │ ├ .ActN Number of single values read only ditto
│ │ ├ .Mean Mean value read only ditto
│ │ ├ .Std Absolute standard deviation read only ditto
│ │ ├ .RelStd Relative standard deviation read only ditto
│ ├ .C27 as for C26
│
├ .ActualInfo Current data
│ ├ .Inputs I/O Inputs
│ │ ├ .Status Line status read only 3.2.2.66.
│ │ ├ .Change Change of line status read only ditto
│ │ ├ .Clear Clear change $G ditto
│ ├ .Outputs as for I/O Inputs
│ ├ .Assembly From Assembly
│ │ ├ .CyclNo Cycle number read only 3.2.2.67.
│ │ ├ .Counter Assembly counter read only 3.2.2.68.
│ │ │ ├ .V Volume counter read only ditto
│ │ │ ├ .Clear Clears counter $G ditto
│ │ ├ .Meas Measured value read only 3.2.2.69.
│ ├ .Titrator From Titrator
│ │ ├ .CyclNo Cycle number read only 3.2.2.70.
│ │ ├ .V Volume read only ditto
│ │ ├ .Meas Measured indicator voltage read only ditto
│ │ ├ .dVdt Volume drift dV/dt read only ditto
│ │ ├ .dMeasdt Measured value drift read only ditto
│ │ ├ .dMeasdV 1st deviation of titration curve read only ditto
│ ├ .MeasPt Entry in measuring point list
│ │ ├ .Index Index of entry read only 3.2.2.71.
│ │ ├ .X X coordinate read only ditto
│ │ ├ .Y Y coordinate read only ditto
│ │ ├ .Z1 Z1 coordinate read only ditto
│ │ ├ .Z2 Z2 coordinate read only ditto
│ ├ .EP EP entry
│ │ ├ .Index Index of entry read only ditto
│ │ ├ .X X coordinate read only ditto
│ │ ├ .Y Y coordinate read only ditto
st
mean
784 KFP Titrino
61
Page 67

3.2 Remote control commands
"Info", continuation
│ ├ .Oven Oven data
│ │ ├ .HeatTime Heating time read only 3.2.2.72.
│ │ ├ .SampleTemp Sample temperature read only ditto
│ │ ├ .LowTemp Lowest temperature read only ditto
│ │ ├ .HighTemp Highest temperature read only ditto
│ │ ├ .GasFlow Gas flow read only ditto
│ │ ├ .UnitFlow Unit of gas flow read only ditto
│ ├ .Display Display
│ │ ├ .L1 Text line 1 up to 32 ASCII char 3.2.2.73.
│ │ ├ up to line 8
│ │ ├ .DelAll Delete display $G ditto
│ ├ .Comport Comport
│ │ ├ .Number COM where PC is connected read only 3.2.2.74.
│
├ .Assembly Assembly
│ ├ CycleTime Cycle time read only 3.2.2.75.
│ ├ ExV Volume of Exchange/Dosing unit read only ditto
784 KFP Titrino
62
Page 68

3.2 Remote control comm ands
&Assembly
Object Description Input range Reference
& Root
:
├ Assembly Assembly control
├ . Bur Buret
│ ├ .Rates Rates
│ │ ├ .Forward Forward rate
│ │ │ ├ .Select Type of rate control digital, analog 3.2.2.76.
│ │ │ ├ .Digital Digital rate 0...150, max. ditto
│ │ ├ .Reverse as for forward rate
│ │ │ ├ .Select Type of rate control digital, analog ditto
│ │ │ ├ .Digital Digital rate 0...150, max. ditto
│ ├ .Fill Fill $G,$H,$C 3.2.2.77.
│ ├ .ModeDis Dispensing $G,$S,$H,$C 3.2.2.78.
│ │ ├ .Select Type of dispensing control volume, time ditto
│ │ ├ .V Volume to be dispensed 0.0001...0.1...9999 ditto
│ │ ├ .Time Time to dispense 0.25...1...86 400 ditto
│ │ ├ .VStop Limit volume 0.0001...9999, OFF ditto
│ │ ├ .AutoFill Filling after each increment ON, OFF ditto
│
├ .Meas Measuring
│ ├ .Status Measuring ON/OFF ON, OFF 3.2.2.79.
│ ├ .MeasInput Selection of measuring input Ipol, Upol ditto
│ ├ .Ipol Polarization current 0...1...±127 ditto
│ ├ .Upol Polarization voltage 0...400...±1270 ditto
│
├ .Outputs I/O outputs
│ ├ .AutoEOD Automatic output of EOD ON, OFF 3.2.2.80.
│ ├ .SetLines Set I/O lines $G ditto
│ │ ├ .L0 Signal on L0 active,inactive,pulse,OFF ditto
│ │ ├ up to L13
│ ├ .ResetLines Reset I/O lines $G ditto
│
├ .Stirrer Stirrer ON, OFF 3.2.2.81.
│
784 KFP Titrino
63
Page 69

3.2 Remote control commands
&Setup
Object Description Input range Reference
& Root
:
├ Setup Settings for the operating mode
├ .Comport Output of automatic info 1,2,1&2 3.2.2.82.
├ .Keycode Send key code ON, OFF 3.2.2.83.
├ .Tree Sending format of path info
│ ├ .Short Short format of path ON, OFF 3.2.2.84.
│ ├ .ChangedOnly Paths of modified nodes only ON, OFF ditto
│
├ .Trace Message on changed values ON, OFF 3.2.2.85.
│
├ .Lock Lock key functions
│ ├ .Keyboard Lock all keyboard keys ON, OFF 3.2.2.86.
│ ├ .Config Lock <CONFIG> key ON, OFF ditto
│ ├ .Parameter Lock <PARAM> key ON, OFF ditto
│ ├ .SmplData Lock <SMPL DATA> key ON, OFF ditto
│ ├ .UserMeth Lock functions
│ │ ├ .Recall Lock “loading” ON, OFF ditto
│ │ ├ .Store Lock “saving” ON, OFF ditto
│ │ ├ .Delete Lock “deletion” ON, OFF ditto
│ └ .Display Lock display function ON, OFF ditto
│
├ .Mode Setting waiting intervals
├ .StartWait Waiting time after start ON, OFF 3.2.2.87.
│
│ ├ .FinWait Waiting time after run ON, OFF ditto
│
├ .SendMeas Automatic sending of measured values
├ .SendStatus Connect/disconnect sending ON, OFF 3.2.2.88.
│
│ ├ .Interval Time interval 0.08...4...16200, ditto
│ MPList
│ ├ .Select Selection Assembly, Titrator 3.2.2.89.
│ ├ .Assembly From assembly
│ │ ├ .CyclNo Cycle number ON, OFF 3.2.2.90.
│ │ ├ .V Volume ON, OFF ditto
│ │ ├ .Meas Measured indicator voltage ON, OFF ditto
│ ├ .Titrator From Titrator
│ │ ├ .CyclNo Cycle number ON, OFF 3.2.2.91.
│ │ ├ .V Volume ON, OFF ditto
│ │ ├ .Meas Measured indicator voltage ON, OFF ditto
│ │ ├ .dVdt Volume drift dV/dt ON, OFF ditto
│ │ ├ .dMeasdt Measured value drift ON, OFF ditto
│ │ ├ .dMeasdV 1st deviation of titration curve ON, OFF ditto
│
784 KFP Titrino
64
Page 70

3.2 Remote control commands
"Setup", continuation
├ .AutoInfo Automatic message for changes 3.2.2.92.
│ ├ .Status Switch AutoInfo on/off ON, OFF ditto
│ ├ .P When mains is switched on ON, OFF ditto
│ ├ .T Titrator infos
│ │ ├ .R When "ready" ON, OFF ditto
│ │ ├ .G When method started ON, OFF ditto
│ │ ├ .GC When start is initiated ON, OFF ditto
│ │ ├ .S When stopped ON, OFF ditto
│ │ ├ .B Begin of method ON, OFF ditto
│ │ ├ .F End of process ON, OFF ditto
│ │ ├ .E Error ON, OFF ditto
│ │ ├ .H When "hold" ON, OFF ditto
│ │ ├ .C Continue after "hold" ON, OFF ditto
│ │ ├ .O Conditioning OK ON, OFF ditto
│ │ ├ .N Conditioning not OK ON, OFF ditto
│ │ ├ .Re Request after start ON, OFF ditto
│ │ ├ .Si Silo empty ON, OFF ditto
│ │ ├ .M Entry in measuring point list ON, OFF ditto
│ │ ├ .EP Entry in EP list ON, OFF ditto
│ │ ├ .RC Recalculation of results done ON, OFF ditto
│ ├ .C Comport infos
│ │ ├ .B1 When COM1 sends a report ON, OFF ditto
│ │ ├ .R1 When COM1 is ready again ON, OFF ditto
│ │ ├ .B2 When COM2 sends a report ON, OFF ditto
│ │ ├ .R2 When COM2 is ready again ON, OFF ditto
│ ├ .I Changing an I/O input ON, OFF ditto
│ ├ .O Changing an I/O output ON, OFF ditto
│
├ .Graphics Changing the curve output
│ ├ .Grid Grid on curve ON, OFF 3.2.2.93.
│ ├ .Frame Frame on curve ON, OFF ditto
│ ├ .Scale Type of depending axis Full, Auto ditto
│ ├ .Recorder Length of axes
│ │ ├ .Right Length of meas value axis 0.2...0.5...1.00 ditto
│ │ ├ .Feed Length of paper drive axis 0.01...0.05...1.00 ditto
│
├ .PowerOn RESET (power on) $G 3.2.2.94.
├ .Initialise Set default values $G 3.2.2.95.
│ ├ .Select Selection of branch ActMeth,Config,Silo,
│ Assembly,Setup,All ditto
├ .RamInit Initialization of working mem. $G 3.2.2.96.
├ .InstrNo Device Identification $G 3.2.2.97.
├ .Value Input of device identification 8 ASCII characters ditto
784 KFP Titrino
65
Page 71

3.2 Remote control commands
&Diagnose
Object Description Input range Reference
& Root
:
├ Diagnose Diagnose
├ .Report Output of adjustment parameters $G 3.2.2.98.
784 KFP Titrino
66
Page 72

3.2 Remote control commands
3.2.2 Description of the remote control commands
3.2.2.1. Mode $G, $S, $H, $C
Start and stop ($G, $S) or hold of the current method (3.2.2.3) with $H and
continue with $C.
$G also serves to continue after inquiries of identifications and sample size
after the start (see 3.2.2.26).
3.2.2.2. Mode.QuickMeas $G, $S
Start and stop of a measurement in the basic mode with the parameters
(measured quantity, measuring input) of the current method. Corresponds to
the <meas/hold> key.
With an ongoing measurement, the current mode can be started. This stops
the measurement automatically.
3.2.2.3. Mode.Select KFT
Mode.KFTQuantity Ipol, Upol
and
Selection of the standard mode. Mode
the complete selection.
If a method is selected from the method memory, the nodes &Mode.Select
and &Mode.XXXQuantity are overwritten with mode and measured quantity of
the corresponding user method.
3.2.2.4. Mode.Name read only
Name of the current method in the working memory. $Q sends 8 ASCII characters. Standard methods carry the name ********. The node can be set
read + write, see 3.2.2.62.
3.2.2.5. Mode.Def.Formulas.1.Formula EPX, CXX, RSX, +, –, ∗, /, (, )
Mode.Def.Formulas.1.TextRS up to 8 ASCII characters
Mode.Def.Formulas.1.Decimal 0...2...5
Mode.Def.Formulas.1.Unit up to 6 ASCII characters
Mode.Def.Formulas.1.Limits ON, OFF
Mode.Def.Formulas.1.LoLim 0...±999 999
Mode.Def.Formulas.1.UpLim 0...±999 999
Mode.Def.Formulas.1.Output active, pulse, OFF
Mode.Def.Formulas.2.Formula
etc. up to .9
Entry of formulas. Rules for formula entry, see page 25.
Example: "(EP2–EP1)∗C01/C00"
In addition to the formula, a text for result output, the number of decimal places and a unit for the result output can be selected. "No unit" is selected with
the blank string.
In place of "RSX", a result name may be entered (.TextRS). This name is outputted in the report full, short, scalc full and scalc srt. It is used for the result
and the corresponding mean value.
the measured quantity belong to
784 KFP Titrino
67
Page 73

3.2 Remote control commands
The limit control for results can also be activated. If a result is out of limit, a
message appears in the result report, E196 is sent, and output line L13 can
be set.
3.2.2.6. Mode.Def.SiloCalc.Assign.C24 RSX, EPX, CXX
Mode.Def.SiloCalc.Assign.C25 RSX, EPX, CXX
Mode.Def.SiloCalc.MatchId id1, id1&2, all, OFF
.Assign.C2X: Assignment to store results in the silo as C2X.
.MatchId: Indication which sample identification(s) have to match so that
the results can be combined.
3.2.2.7. Mode.Def.ComVar.C30 RSX, MNX, EPX, CXX
Mode.Def.ComVar.C31
etc., up to .C39
Assignment of common variables.
The values of the common variables are to be found in &Config.ComVar. They
can be viewed and entered there, see 3.2.2.50.
3.2.2.8. Mode.Def.Report.Assign1
Mode.Def.Report.Assign2
param, full, short, mplist, curve, scalc full, scalc srt, calc, ff
Definition of the report sequence, which is outputted automatically at the end
of the determination. Entries of more than one block have to be separated
with ";".
.Assign1: Output to COM1 of the Titrino. Identical for COM2.
3.2.2.9. Mode.Def.Mean.1.Assign RS1, RSX, EPX, CXX
Mode.Def.Mean.2.Assign
etc., up to .9
Assignment of the statistics calculations. Valid assignments are a requirement for statistics calculations. In addition, the statistics calculation must be
switched on, see 3.2.2.24. Rules for statistics calculations see page 29.
3.2.2.10. Mode.CFmla
Mode.CFmla.1.Value 0...±999999
Mode.CFmla.2.Value
etc., up to .19
Calculation constants specific to a method. Stored in the method memory of
the Titrino. Operands specific to the sample (3.2.2.52 and 3.2.2.63) and values of common variables (3.2.2.50) on the other hand are not stored with the
methods.
784 KFP Titrino
68
Page 74

3.2 Remote control commands
3.2.2.11. Mode.Parameter.CtrlPara.EP Ipol: 0...250...±2000
Upol: 0...25...±200.0
Mode.Parameter.CtrlPara.UnitEp read only
Setting of the EP, resp. Control point in mV (with Ipol) or µA (with Upol). The
corresponding unit can be read with .UnitEP.
3.2.2.12. Mode.Parameter.CtrlPara.Dyn Ipol: 1...100...2000
Upol: 0.1...10...200.0
Mode.Parameter.CtrlPara.UnitDyn read only
Mode.Parameter.CtrlPara.MaxRate 0.01...10...150, max.
Mode.Parameter.CtrlPara.MinIncr 0.1...9.9, min.
Control parameters.
.Dyn: Dynamics (control range) in mV (with Ipol) or µA (with Upol). The cor-
responding unit can be read with .UnitDyn.
.MaxRate: Maximum allowed titration rate in mL/min. Max. means maximum
possible rate with mounted Exchange Unit.
.MinIncr: Minimum volume increment in µL.
OFF means that the criterion is not monitored.
3.2.2.13. Mode.Parameter.CtrlPara.Stop.Type drift, time
Mode.Parameter.CtrlPara.Stop.Drift 1...20...999
Mode.Parameter.CtrlPara.Stop.Time 0...10...999, inf.
Mode.Parameter.CtrlPara.Stop.StopT 0...99999, OFF
Type and size of the stop criterion of the titration.
.Type: Type of stop criterion after stop drift or switch-off delay time.
.Drift: Stop drift in µL/min. Applies when "drift" has been selected.
.Time: Switch-off delay time in s. Applies when "time" has been selected.
"inf." means infinite.
.StopT: Stop time in s. Applies when "time" has been selected and the value
of .Time is set to "inf.".
3.2.2.14. Mode.Parameter.TitrPara.Direction +, –, auto
Titration direction.
"auto" means the titration direction is determined automatically by the instrument.
3.2.2.15. Mode.Parameter.TitrPara.XPause 0...999999
Pause time in s. Runs before dosing the start volume.
784 KFP Titrino
69
Page 75

3.2 Remote control commands
3.2.2.16. Mode.Parameter.TitrPara.StartV.Type abs., rel., OFF
Mode.Parameter.TitrPara.StartV.V 0...999.99
Mode.Parameter.TitrPara.StartV.Factor 0...±999999
Mode.Parameter.TitrPara.StartV.Rate 0.01...150, max.
Start volume.
If an
absolute
start volume (abs.) has been selected, the volume in mL is valid.
A
relative
start volume (rel.) is dispensed as a function of the sample size:
Start volume in mL = smpl size ∗ factor
The factor is valid.
The dispensing rate in mL/min applies to both cases. Max. means maximum
possible dispensing rate with the Exchange Unit in current use.
3.2.2.17. Mode.Parameter.TitrPara.Pause 0...999999
Pause time in s. Is waited off after the dispensing of the start volume.
3.2.2.18. Mode.Parameter.TitrPara.ExtrT 0...999999
Extraction time in s.
3.2.2.19. Mode.Parameter.TitrPara.Ipol –127...50...+127
Mode.Parameter.TitrPara.Upol –1270...400...+1270
Mode.Parameter.TitrPara.PolElectrTest ON, OFF
With Ipol, the inquiries for the polarization current in µA (Ipol) and
.PolElectrTest are valid.
With Upol, the inquiry for the polarization voltage in mV (Upol) is valid. Entry
in steps of 10 mV.
Besides .PolElectrTest is valid.
If the test for polarized electrodes is switched on, it is performed on changeover from the inactive state to an active state (titration or conditioning).
3.2.2.20. Mode.Parameter.TitrPara.Temp –170.0...25.0...500.0
Titration temperature in °C.
3.2.2.21. Mode.Parameter.TitrPara.TDelta 1...2...999999
Time interval in s for the entry of a measurement point in the list of measured
points.
784 KFP Titrino
70
Page 76

3.2 Remote control commands
3.2.2.22. Mode.Parameter.StopCond.VStop.Type abs., rel., OFF
Mode.Parameter.StopCond.VStop.V 0...99.99...9999.99
Mode.Parameter.StopCond.VStop.Factor 0...±999999
Stop volume.
If an
absolute
stop volume (abs.) has been selected, the volume in mL is valid.
A
relative
stop volume (rel.) is dispensed as a function of the sample size:
Stop volume in mL = smpl size ∗ factor
The factor is valid.
OFF means that the criterion is not monitored.
3.2.2.23. Mode.Parameter.StopCond.FillRate 0.01...150, max.
Filling rate in the titration in mL/min. Max. means maximum possible filling
rate with the Exchange Unit in current use.
3.2.2.24. Mode.Parameter.Statistics.Status ON, OFF
Mode.Parameter.Statistics.MeanN 2...20
Mode.Parameter.Statistics.ResTab.Selected original, delete n,
delete all
Mode.Parameter.Statistics.ResTab.DelN 1...20
Entries for the statistics calculations.
.Status: On/off switching. Requirement for statistics calculations is a valid
assignment, see 3.2.2.9.
.MeanN: Number of individual results for statistics calculations.
.ResTab.Select: Selection of the table for the statistics calculations.
original: Original table. The original table is (again) set up, i.e. any
individual results which have been deleted are reincorporated
in the statistics calculations.
delete n: Single result lines are removed from the statistics calcu-
lation. All results of the corresponding line in the statistics
table are deleted. Specification of the line number in
.ResTab.DelN.
delete all: Clear entire statistics table. The results can not be reac-
tivated.
.ResTab.DelN: Specification of the line number to be deleted.
3.2.2.25. Mode.Parameter.Presel.Cond ON, OFF
Mode.Parameter.Presel.DriftDisp ON, OFF
Mode.Parameter.Presel.DCor.Type auto, man., OFF
Mode.Parameter.Presel.DCor.Value 0.0...99.9
.Cond: Conditioning ON/OFF
.DriftDisp: Drift display during conditioning ON/OFF.
.DCor.Type: Type of drift take-over for the drift correction. auto: Take-over of
the drift value at start.
.DCor.Value: Drift value for the manual drift correction.
784 KFP Titrino
71
Page 77

3.2 Remote control commands
3.2.2.26. Mode.Parameter.Presel.IReq id1, id1&2, all, OFF
Mode.Parameter.Presel.SReq value, unit, all, OFF
Automatic inquiry after the start of the determination. From such an inquiry,
the determination continues if the requested entry/entries is/are made, e.g.
&SmplData.OFFSilo.Id1 (see 3.2.2.52) or with &M $G, see 3.2.2.1.
$H is not possible in requests.
3.2.2.27. Mode.Parameter.Presel.LimSmplSize.Status ON, OFF
Mode.Parameter.Presel.LimSmplSize.LoLim 0.0...999 999
Mode.Parameter.Presel.LimSmplSize.UpLim 0.0...999 999
Limit control for the sample size.
3.2.2.28. Mode.Parameter.Presel.Oven COM1, COM2, no
If an oven is connected, its result will be incorporated into the result report of
the Titrino. If there is no oven connected via RS232, the setting of this parameter has to be "no".
3.2.2.29. Mode.Parameter.Presel.ActPuls first, all, cond., OFF
Output of a pulse on the I/O line "Activate", see page 126.
3.2.2.30. UserMeth.FreeMem read only
Memory space, available for user methods or silo lines. $Q sends the number
of free bytes, e.g. "4928".
3.2.2.31. UserMeth.Recall $G
UserMeth.Recall.Name up to 8 ASCII characters
UserMeth.Store $G
UserMeth.Store.Name up to 8 ASCII characters
UserMeth.Delete $G
UserMeth.Delete.Name up to 8 ASCII characters
UserMeth.DelAll $G
Management of the internal method memory: Load, store and delete methods.
An action is performed if "$G" is sent to the corresponding node just after entering the name.
Do not use blank characters before and after method name!
.DelAll: Deletes all methods in the user memory.
784 KFP Titrino
72
Page 78

784 KFP Titrino
3.2 Remote control commands
3.2.2.32. UserMeth.List.1.Name read only
UserMeth.List.1.Mode read only
UserMeth.List.1.Quantity read only
UserMeth.List.1.DosUnit read only
UserMeth.List.1.Bytes read only
UserMeth.List.1.Checksum read only
for each method
List of the methods in the user method memory with the following characteristics:
.Name: Name of the method
.Mode: Mode
.Quantity: Measured quantity
.DosUnit: Buret of the method
.Bytes: Number of bytes of the user memory used by the method
.Checksum: Checksum of the method, see 3.2.2.61.
3.2.2.33. Config.Monitoring.Validation.Status ON, OFF
Config.Monitoring.Validation.Interval 1...365...9999
Config.Monitoring.Validation.Counter 0...9999
Config.Monitoring.Validation.ClearCount $G
Monitoring of validation.
.Interval: Time interval in days for validation.
.Counter: Time counter in days since last validation.
.ClearCount: Clears the above counter.
3.2.2.34. Config.Monitoring.Service.Status ON, OFF
Config.Monitoring.Service.Date YYYY-MM-DD
Monitoring of service interval.
3.2.2.35. Config.Monitoring.DiagRep ON, OFF
Printing of system test report after each switching on of the Titrino.
3.2.2.36. Config.PeriphUnit.CharSet1 Epson, Seiko, Citizen, HP, IBM
Config.PeriphUnit.CharSet2
Selection of the character set and the graphics control characters for COM1
resp. COM2 of the Titrino.
IBM means the IBM character set following character set table 437 and IBM
graphics control characters. Select 'IBM' for work with the computer.
3.2.2.37. Config.PeriphUnit.RepToComport 1, 2, 1&2
Selection of COM of the Titrino where manually triggered reports should be
outputted.
3.2.2.38. Config.PeriphUnit.Balance Sartorius,Mettler,Mettler AT,
AND,Precisa
Selection of the balance type.
73
Page 79

3.2 Remote control commands
3.2.2.39. Config.PeriphUnit.Stirrer ON, OFF
Automatic stirrer control. With "ON" the stirrer will be switched on after starting a method. At the end of the method it is switched off again.
3.2.2.40. Config.PeriphUnit.RemoteBox.Status ON, OFF
Config.PeriphUnit.RemoteBox.Keyboard US, deutsch, francais,
español, schweiz.
Config.PeriphUnit.RemoteBox.Barcode input, method, id1, id2,
id3, smpl size
Connections via Remote Box.
.Status: Select if a Remote Box is connected.
.Keyboard: Type of keyboard which is connected to the Remote Box.
.Barcode: Select target in Titrino where you wish to have the string from the
barcode reader. "input" means that the string comes into the field
where the cursor is currently placed.
3.2.2.41. Config.Aux.Language english, deutsch, francais, español,
italiano, portugese, svenska
Selection of the dialog language.
3.2.2.42. Config.Aux.Set $G
Config.Aux.Set.Date YYYY-MM-DD
Config.Aux.Set.Time hh:mm
Date and time.
Input format of the date: Year-month-day, two-digit, enter leading zeros.
Input format for the time: Hours:minutes, two-digit, enter leading zeros.
Date and time have to be set with &Config.Aux.Set $G just after entry of the
value.
3.2.2.43. Config.Aux.RunNo 0...9999
Current sample number.
Set to 0 on power on and initialization. After 9999, counting starts again at 0.
3.2.2.44. Config.Aux.AutoStart 1...9999, OFF
Number of automatic, internal starts.
3.2.2.45. Config.Aux.StartDelay 0...999999
Start delay time in s. During this time, the data of the preceding determination
are retained.
3.2.2.46. Config.Aux.ResDisplay bold, standard
Character set for the result display at the end of the determination.
784 KFP Titrino
74
Page 80

3.2 Remote control commands
3.2.2.47. Config.Aux.DevName up to 8 ASCII characters
Name of the instrument for connections with several units. It is advisable to
use only the letters A...Z (ASCII No. 65...90), a...z (ASCII No. 97...122) and
the numbers 0...9 (ASCII No. 48...57) when the function Setup.AutoInfo
(3.2.2.92) is used at the same time.
If a name has been entered, it will be printed out in the result report (full,
short).
3.2.2.48. Config.Aux.Prog read only
Output of the program version.
The Titrino sends "784.0010" on requests with $Q.
3.2.2.49. Config.RSSet1 $G
Config.RSSet1.Baud 300, 600, 1200, 2400, 4800, 9600,
19200, 38400, 57600, 115200
Config.RSSet1.DataBit 7, 8
Config.RSSet1.StopBit 1, 2
Config.RSSet1.Parity even, odd, none
Config.RSSet1.Handsh HWs, SWchar, SWline, none
$G sets all RS settings. The changes are performed only if the instrument is
inactive. After the setting of the interface parameters, wait at least 2 s to allow
the components to equilibrate.
Settings of the values for the data transmission via the RS interface: baud
rate, data bit, stop bit, parity and type of handshake, see also page 90ff. Baud
rates >9600 need a PC which is equipped accordingly (e.g. with 16550
component).
The setting of the values must be initiated with $G immediately after entry of
the values.
3.2.2.50. Config.ComVar.C30
with up to .C39, etc. 0... ±999999
Values of the common variables from C30 up to C39. Insert the common variables directly or describe the determination results directly from the method,
see 3.2.2.7.
3.2.2.51. SmplData.Status ON, OFF
On/off switching of silo memory. When the silo memory is switched on, the
sample data are fetched from the lowest valid silo line.
784 KFP Titrino
75
Page 81

3.2 Remote control commands
3.2.2.52. SmplData.OFFSilo.Id1 up to 8 ASCII characters
SmplData.OFFSilo.Id2 up to 8 ASCII characters
SmplData.OFFSilo.Id3 up to 8 ASCII characters
SmplData.OFFSilo.ValSmpl 6-digits, sign and decimal point
SmplData.OFFSilo.UnitSmpl up to 5 ASCII characters
Current sample data.
The identifications Id1...Id3 can be used in formulas as sample-specific calculation constants C21...C23.
If "no unit" is desired for the unit of the sample size, the blank string must be
entered.
3.2.2.53. SmplData.ONSilo.Counter.MaxLines read only
SmplData.ONSilo.Counter.FirstLine read only
SmplData.ONSilo.Counter.LastLine read only
Information on silo memory.
.MaxLines: Maximum possible number of silo lines.
.FirstLine: Lowest valid silo line.
.LastLine: Last occupied silo line.
3.2.2.54. SmplData.ONSilo.EditLine.1.Method up to 8 ASCII characters
SmplData.ONSilo.EditLine.1.Id1 up to 8 ASCII characters
SmplData.ONSilo.EditLine.1.Id2 up to 8 ASCII characters
SmplData.ONSilo.EditLine.1.Id3 up to 8 ASCII characters
SmplData.ONSilo.EditLine.1.ValSmpl 6-digits, sign and dec.point
SmplData.ONSilo.EditLine.1.UnitSmpl up to 5 ASCII characters
SmplData.ONSilo.EditLine.1.C24 read only
SmplData.ONSilo.EditLine.1.C25 read only
SmplData.ONSilo.EditLine.1.Mark read only
etc., up to .255
Contents of a silo line.
.Method: Method used to process the sample, from the method memory or
from the card.
.Id: The identifications Id1...Id3 can also be used as sample-specific
calculation constants C21...C23 in formulas.
.UnitSmpl: If "no unit" is desired for the sample size, the blank string must be
entered.
.C24, .C25: Results which have been assigned to C24 and C25.
.Mark: Mark of the silo line: "∗"=deleted line, "+"=line which is worked
off, "–"= line which is worked off and not valid for silo calculations (deleted), "/" last worked-off line, where recalculation can
still be done. Silo lines which have been worked off are "read only".
3.2.2.55. SmplData.ONSilo.DelLine $G
SmplData.ONSilo.DelLine.LineNum 1...255, OFF
Deletion of a silo line. The line # is deleted with &SmplData.ONSilo.DelLine
$G. If a formerly deleted line is edited again, it becomes valid (function "undelete").
784 KFP Titrino
76
Page 82

784 KFP Titrino
3.2 Remote control commands
3.2.2.56. SmplData.ONSilo.DelAll $G
Deletes the entire silo memory. Must be triggered with $G.
3.2.2.57. SmplData.ONSilo.CycleLines ON, OFF
Silo data cycling.
With "ON", executed lines are copied to the next free silo lines, see page 40.
Exercise caution if you edit the silo memory during the determinations!
3.2.2.58. SmplData.ONSilo.SaveLines ON, OFF
Silo lines are not deleted when they are worked off. Assigned results are
stored as C24 and C25. "Save lines" can only be set to "ON" if the silo is
completely empty. Delete the silo, see 3.2.2.56.
3.2.2.59. HotKey.User.Name up to 10 ASCII characters
HotKey.User.Delete $G
HotKey.User.Delete.Name up to 10 ASCII characters
HotKey.User.DelAll $G
HotKey.User.List.1.Name read only
Management of user names.
.Name: Input of user names.
.Delete.Name: Deletes selected user name with &HotKey.User.Delete $G.
.List: List of all user names.
3.2.2.60. Info.Report $G
Info.Report.Select configuration, parameters, smpl data,
statistics, silo, C-fmla, def, user method, full,
short, mplist, curve, scalc full, scalc srt, calc, all, ff
$G sends the selected report to the COM which is set in
&Config.PeriphUnit.RepToComport:
configuration: Configuration report. Is not accessible during a running deter-
mination.
parameters: Parameter report of the current method. During a running deter-
mination only "live"-parameters are accessible.
smpl data: Current sample data.
statistics: Statistics table with the individual results.
silo: Contents of the silo memory.
C-fmla: Contents of the <C-fmla> key.
def: Contents of the <def> key.
user method: Contents of the method memory.
full: Full result report of the last completed determination.
short: Short result report of the last completed determination.
mplist: Measuring point list of the running determination.
curve: Curve volume vs. time of the last determination.
scalc full: Full report of the silo calculations.
scalc srt: Short report of the silo calculations.
calc: Calculation report of the current method.
all: All reports.
ff: Form feed on printer.
77
Page 83

3.2 Remote control commands
Reports which are sent from the Titrino are marked with space (ASCII 32) and
' at the beginning. Then an individual identifier for each report follows. Reports
which are triggered by RS232 ($G) have the same introducer but without preceding space, i.e. they start with '.
3.2.2.61. Info.Checksums $G
Info.Checksums.MPList read only
Info.Checksums.ActualMethod read only
The checksums can be used to identify the content of a file unequivocally,
e.g. files with identical content
have identical results of the checksums. An empty file has checksum "0". The
calculation of the checksums is triggered with $G.
.MPList: Result of the checksum of the current measuring point list.
.ActualMethod: Result of the checksum of the current method in the working
memory. Identical methods with different method names have the
same results of the checksum.
3.2.2.62. Info.DetermData $G
Info.DetermData.Write ON, OFF
Info.DetermData.MPList.1.Attribute read only/read+write
Info.DetermData.ExV read only/read+write
Info.DetermData.MPList.1.X read only/read+write
Info.DetermData.MPList.1.Y read only/read+write
Info.DetermData.MPList.1.Z1 read only/read+write
Info.DetermData.MPList.1.Z2 read only/read+write
for every measuring point
Determination data in hexadecimal format. A measuring point list is available.
Recalculation of the measuring data is triggered with $G.
.Write: With "ON", the following nodes can be overwritten:
&Info.DetermData.MP.List, &Info.TitrResults.Var.C4X (X = 0...5),
and &Mode.Name.
.ExV: Volume of the exchange unit, with which the determination was
executed
.MPList.1.Attribute: Attribute
.MPList.X: X coordinate, time
.MPList.Y: Y coordinate, volume
.MPList.Z1: Z1 coordinate, measuring value
.MPList.Z2: without meaning
784 KFP Titrino
78
Page 84

3.2 Remote control commands
3.2.2.63. Info.TitrResults.RS.1.Value read only
etc., up to .9
Info.TitrResults.EP.1.V read only
Info.TitrResults.EP.1.Meas read only
etc., up to .2
Info.TitrResults.Var.C40 read only/read+write
etc., up to .C45
Info.TitrResults.Var.DTime read only/read+write
.RS: Values of the calculated results.
.EP: Endpoints:
Volume coordinate in mL, e.g. "1.2340"
Measured value coordinate in mV (with Ipol) "–241" or µA (with
Upol) "43.7".
.Var: Various variables. You may overwrite the variables C40...C45, see
3.2.2.62.
C40: Initial measured value in mV (with Ipol) "41" or µA (with
Upol).
C41: End volume in mL, "12.5360".
C42: Time from start of titration to end in s, "62".
C43: Volume drift on start of KFT titration from the conditioning in
µL/min, "3.5".
C44: Temperature in °C.
C45: Start volume in mL, "2.800".
DTime: Time for the drift correction in KFT with conditioning.
3.2.2.64. Info.StatisticsVal.ActN read only
Info.Statistics.1.Mean read only
Info.Statistics.1.Std read only
Info.Statistics.1.RelStd read only
etc. up to .9
The current values of the statistics calculation.
$Q sends, e.g.
ActN: Current value of the individual results "3"
Data for MN1:
Mean: Mean value (decimal places as in result) "3.421"
Std: Standard deviation (1 decimal place more than in result) "0.0231"
RelStd: Relative standard deviation (in %, 2 decimal places) "0.14"
3.2.2.65. Info.SiloCalc.C24.Name read only
Info.SiloCalc.C24.Value read only
Info.SiloCalc.C24.Unit read only
for .C25 as for .C24
Info.SiloCalc.C26.ActN read only
Info.SiloCalc.C26.Mean read only
Info.SiloCalc.C26.Std read only
Info.SiloCalc.C26.RelStd read only
for .C27 as for .C26
The current values from the silo calculations. C26 is the mean value out of the
C24 variables; C27 comes from C25.
784 KFP Titrino
79
Page 85

3.2 Remote control commands
$Q sends:
C24.Name: Name of the assigned value "RS1"
C24.Value: Value "2.222"
C24.Unit: Unit of the assigned value "%"
C26.ActN: Number of single results "3"
C26.Mean: Mean (decimal places as for the result itself) "3.421"
C26.Std: Standard deviation (decimal places as for the result + 1) "0.0231"
C26.RelStd: Relative standard deviation (in %, 2 decimal places) "0.14"
3.2.2.66. Info.ActualInfo.Inputs.Status read only
Info.ActualInfo.Inputs.Change read only
Info.ActualInfo.Inputs.Clear $G
Info.ActualInfo.Outputs.Status read only
Info.ActualInfo.Outputs.Change read only
Info.ActualInfo.Outputs.Clear $G
Status sends the current status of the I/O lines, Change sends the information
regarding whether a change in status of a line has taken place since the last
clearing, Clear clears the change information. For the output, there is a conversion from binary to decimal, e.g.
Line No.
Output: 2
| 0 | 0 | 0 | 0 | 0 | 0 | 0 | 0 | 0 | 0 | 1 | 0 | 1 | 0 |
| 13| 12| 11| 10| 9 | 8 | 7 | 6 | 5 | 4 | 3 | 2 | 1 | 0 |
1
+ 23 = "10"
1 means ON or change; 0 means OFF or no change.
The lines are assigned as follows (see also page 125ff):
Inputs: Outputs:
0 Start (pin 21) 0 Ready (pin 5)
1 Stop (pin 9) 1 Cond. ok (pin 18)
2 Enter (pin 22) 2 Titration (pin 4)
3 Clear (pin 10) 3 EOD (pin 17)
4 Smpl Ready (pin 23) 4 Monitoring, line L4 (pin 3)
5 pin 11 5 Error (pin 16)
6 pin 24 6 Activate, line L6 (pin 1)
7 pin 12 7 Pulse for recorder (pin 2)
8 not used (pin 6)
9 not used (pin 7)
10 not used (pin 8)
11 not used (pin 13)
12 not used (pin 19)
13 not used (pin 20)
3.2.2.67. Info.ActualInfo.Assembly.CyclNo read only
$Q sends the current cycle number of the voltage measurement cycle, e.g.
"127". From the cycle number and the cycle time (see 3.2.2.75), a time frame
can be set up.
The cycle number is set to 0 on switching on the instrument, on every start
and for QuickMeas. It is incremented as long as the instrument remains
switched on.
784 KFP Titrino
80
Page 86

3.2 Remote control commands
3.2.2.68. Info.ActualInfo.Assembly.Counter.V read only
Info.ActualInfo.Assembly.Counter.Clear $G
$Q sends the volume. With the function &Info.Assembly.Counter.Clear $G,
the volume counter is set to zero.
3.2.2.69. Info.ActualInfo.Assembly.Meas read only
$Q sends the current measured value from the assembly.
3.2.2.70. Info.ActualInfo.Titrator.CyclNo read only
Info.ActualInfo.Titrator.V read only
Info.ActualInfo.Titrator.Meas read only
Info.ActualInfo.Titrator.dVdt read only
Info.ActualInfo.Titrator.dMeasdt read only
Info.ActualInfo.Titrator.dMeasdV read only
Info.ActualInfo.Titrator.T read only
$Q sends the current values in the following formats:
KFT
CyclNo 127
V(mL) 1.2345
Meas:
Ipol (mV)
Upol (µA)
dVdt (µL/s)
dMeasdt
Ipol (mV/s)
Upol (µA/s)
dMeasdV (mV/µL)
–345.6
–12.5
2.5142
0.7957
0.7957
10.6326
NV: Not Valid.
OV will be sent for "overrange".
A time frame can be set up from the cycle number and the cycle time (see
3.2.2.75). The cycle number is set to 0 at the start of a method and it is incremented until the end of the method.
3.2.2.71. Info.ActualInfo.MeasPt.Index read only
Info.ActualInfo.MeasPt.X read only
Info.ActualInfo.MeasPt.Y read only
Info.ActualInfo.MeasPt.Z1 read only
Info.ActualInfo.MeasPt.Z2 read only
Info.ActualInfo.EP.Index read only
Info.ActualInfo.EP.X read only
Info.ActualInfo.EP.Y read only
$Q sends the last entry into the measuring point list (.MeasPt) or the last entry into the list of EP's.
784 KFP Titrino
81
Page 87

3.2 Remote control commands
.MeasPt.X"165" Time of the MPList in s
.MeasPt.Y"3.654" Volume of the MPList in mL
.MeasPt.Z1"6.34" Measured value of the MPList, format depends on the
measured quantity
.MeasPt.Z2 without meaning
.EP.X"1.234" Volume coordinate of the EP
.EP.Y"5.34" Measured value coordinate of the EP
3.2.2.72. Info.ActualInfo.Oven.HeatTime read only
Info.ActualInfo.Oven.SampleTemp read only
Info.ActualInfo.Oven.LowTemp read only
Info.ActualInfo.Oven.HighTemp read only
Info.ActualInfo.Oven.GasFlow read only
Info.ActualInfo.Oven.UnitFlow read only
$Q sends the current values from a connected KF Oven. If no Oven is connected, the values are empty.
.HeatTime: Heating time of sample in s.
.SampleTemp: Nominal sample temperature in °C.
.LowTemp: Lowest temperature during the sample heating time in °C.
.HighTemp: Highest temperature during the sample heating time in °C.
.GasFlow: Average gas flow during sample heating time.
.UnitFlow: Unit of gas flow.
3.2.2.73. Info.ActualInfo.Display.L1 up to 32 ASCII characters
Info.ActualInfo.Display.L8 up to 32 ASCII characters
Info.ActualInfo.Display.DelAll $G
Lines of the display. The display can be written to from the computer. Proceed as follows:
1. Lock the display, see 3.2.2.86.
2. Delete the whole display (.DelAll).
3. For writing onto the display, the standard character set will be used.
4. Unlock the display, see 3.2.2.86.
5. Delete the whole display (.DelAll).
6. Send a value to nod &Config.Aux.ResDisplay (see 3.2.2.46) to refresh the
display.
$Q sends the contents of the corresponding display line.
3.2.2.74. Info.ActualInfo.Comport.Number read only
$Q sends the comport number of the Titrino where the PC is connected.
3.2.2.75. Info.Assembly.CycleTime read only
Info.Assembly.ExV read only
Inquiries regarding basic variables of the assembly: Cycle time in s, volume of
the active Exchange Unit in mL.
784 KFP Titrino
82
Page 88

3.2 Remote control commands
3.2.2.76. Assembly.Bur.Rates.Forward.Selected digital, analog
Assembly.Bur.Rates.Forward.Digital 0...150, max.
Assembly.Bur.Rates.Reverse.Selected digital, analog
Assembly.Bur.Rates.Reverse.Digital 0...150, max.
Expel and aspirating rate.
Digital or analog control. With digital control, the inputted value applies (in
mL/min). "max." means maximum possible rate with the Exchange Unit in
current use.
Analog means rate control with the analog potentiometer on Titrino.
3.2.2.77. Assembly.Bur.Fill $G, $H, $C
$G starts the 'FILL' mode of the burette function.
3.2.2.78. Assembly.Bur.ModeDis $G, $S, $H, $C
Assembly.Bur.ModeDis.Selected volume, time
Assembly.Bur.ModeDis.V 0.0001...0.1...9999
Assembly.Bur.ModeDis.Time 0.25...1...86400
Assembly.Bur.ModeDis.VStop 0.0001...9999, OFF
Assembly.Bur.ModeDis.AutoFill ON, OFF
Dispensing mode with parameters. The dispensing mode can only be started
and stopped via the RS Control. During a running dosification, no method can
be started at the Titrino.
.Selected: Dispensing of volume increments or during a preset time.
.Volume, .Time: Size of the volume increments or entry of time.
.VStop: Limit volume for the dispensing.
.AutoFill: ON means automatic filling after every dispensing.
3.2.2.79. Assembly.Meas.Status ON, OFF
Assembly.Meas.MeasInput Ipol, Upol
Assembly.Meas.Ipol ±127...1...+127
Assembly.Meas.Upol ±1270...400...+1270
Measurement in assembly. The measuring function can only be started via
RS Control. When the measuring function is switched on, no method can be
started at the Titrino.
.Input: Selection of the "measuring input" for polarized electrodes.
.Ipol: Polarization current in µA.
.Upol: Polarization potential in mV, entry in steps of 10 mV.
784 KFP Titrino
83
Page 89

3.2 Remote control commands
3.2.2.80. Assembly.Outputs.AutoEOD ON, OFF
Assembly.Outputs.SetLines $G
Assembly.Outputs.SetLines.L0 active, inactive, pulse, OFF
up to .L13
Assembly.Outputs.ResetLines $G
Setting the I/O output lines.
.AutoEOD: The automatic output of the EOD (End of Determination) at the
end of the determination can be switched off. Thus, for example,
in conjunction with a Titrino several determinations can be per-
formed in the same beaker. Before AutoEOD is switched on, line 3
must be set to "OFF".
.SetLines: With $G, all lines are set.
.SetLines.LX: Set the line LX. "active" means setting of a static signal, "inac-
tive" means resetting of the signal, "pulse" means output of a
pulse of app. 150 ms, "OFF" means the line is not operated, see
also page 126.
Warnings:
• If you have "AutoEOD" to "ON", an active line 3 is set to "inac-
tive" by the EOD pulse.
• L6 is the line of the activate pulse. An active line 6 is set to "in-
active" by the activate pulse.
• L5 is the error line. It is continuously controlled by the Titrino
program and can therefore not be set freely.
Line assignments in Titrino program:
L0 Ready, inactive state
L1 Conditioning OK
L2 Titration in progress
L3 EOD (End Of Determination)
L4 ---
L5 Error
L6 Activate pulse
L7 Buret volume pulses
L8–13 ---
.ResetLines: Lines are set to the inactive status (= high).
3.2.2.81. Assembly.Stirrer ON, OFF
Switching stirrer ON/OFF.
3.2.2.82. Setup.Comport 1, 2, 1&2
Selects the Titrino COM for the output of automatic info:
&Setup.Keycode
&Setup.Trace
&Setup.SendMeas
&Setup.AutoInfo
784 KFP Titrino
84
Page 90

3.2 Remote control commands
3.2.2.83. Setup.Keycode ON, OFF
ON means the key code of a key pressed on the Titrino is outputted. The key
code comprises 2 ASCII characters; table of the keys with their code, see
page 102. A keystroke of key 11 is sent as follows:
#11
The beginning of the message is marked by a space (ASCII 32).
3.2.2.84. Setup.Tree.Short ON, OFF
Setup.Tree.ChangedOnly ON, OFF
Definition of the type of answer to $Q.
.Short: With "ON", each path is sent with only the necessary amount of
characters in order to be unequivocal (printed in bold in this manual). A combination of .Short and .ChangedOnly is not possible.
.ChangedOnly: Sends only the changed values, i.e. values which have
been edited. All paths are sent absolute, i.e. from the root.
3.2.2.85. Setup.Trace ON, OFF
The Titrino automatically reports when a value has been confirmed with <enter> at the Titrino. Message, e.g.:
&SmplData.OFFSilo.Id1"Trace"
The beginning of the message is marked by a space (ASCII 32).
3.2.2.86. Setup.Lock.Keyboard ON, OFF
Setup.Lock.Config ON, OFF
Setup.Lock.Parameter ON, OFF
Setup.Lock.SmplData ON, OFF
Setup.Lock.UserMeth.Recall ON, OFF
Setup.Lock.UserMeth.Store ON, OFF
Setup.Lock.UserMeth.Delete ON, OFF
Setup.Lock.Display ON, OFF
ON means disable the corresponding function:
.Keyboard: Disable all keys of the Titrinos
.Config: Disable the <configuration> key
.Parameter: Disable the <parameter> key
.SmplData: Disable the <smpl data> key
.UserMeth.Recall: Disable "recall" in <user meth> key
.UserMeth.Store: Disable "store" in <user meth> key
.UserMeth.Delete: Disable "delete" in <user meth> key
.Display: Disable the display, i.e. it will not be written to by the device pro-
gram of the Titrino and can be operated from the computer.
784 KFP Titrino
85
Page 91

3.2 Remote control commands
3.2.2.87. Setup.Mode.StartWait ON, OFF
Setup.Mode.FinWait ON, OFF
Holding points in the method sequence. If they are "ON", the sequence stops
until "OFF" is sent. Switching the instrument on sets both nodes to OFF:
.StartWait: Holding point right after starting a method (holding point after Au-
toInfo !".T.GC").
.FinWait: Holding point at the end a method (holding point after AutoInfo
!".T.F").
3.2.2.88. Setup.SendMeas.SendStatus ON, OFF
Setup.SendMeas.Interval 0.08...4...16200, MPList
.SendStatus: ON means the automatic transmission of measured values (see
3.2.2.90 and 3.2.2.91) in the inputted interval is active.
.Interval: Time interval (in s) for the automatic transmission of associated
measured values defined under points 3.2.2.90 and 3.2.2.91. The
inputted value is rounded off to a multiple of 0.08. The smallest
possible time interval depends on the number of measured values
which have to be sent, on the baud rate, on the load on the inter-
face and on the type of device connection. With "MPList" the
measured values are sent at the time of their entry into the meas-
ured point list.
The automatic transmission is switched on/off with 'SendStatus'.
3.2.2.89. Setup.SendMeas.Select Assembly, Titrator
Selection of the unit of which the measured values should be sent (3.2.2.90
and 3.2.2.91).
3.2.2.90. Setup.SendMeas.Assembly.CyclNo ON, OFF
Setup.SendMeas.Assembly.V ON, OFF
Setup.SendMeas.Assembly.Meas ON, OFF
Selection of the values from Assembly for the output in the set time interval
(see 3.2.2.88):
.CyclNo: Cycle number of the potential measurement. Together with the
cycle time (3.2.2.75), a time frame can be set up.
The cycle number is set to 0 on switching on the instrument and
it is always incremented as long as the instrument remains
switched on.
.V: Volume
.Meas: Measured value associated to the cycle number.
The unit "assembly" must be preset (see 3.2.2.89).
3.2.2.91. Setup.SendMeas.Titrator.CyclNo ON, OFF
Setup.SendMeas.Titrator.V ON, OFF
Setup.SendMeas.Titrator.Meas ON, OFF
Setup.SendMeas.Titrator.dVdt ON, OFF
Setup.SendMeas.Titrator.dMeasdt ON, OFF
Setup.SendMeas.Titrator.dMeasdV ON, OFF
784 KFP Titrino
86
Page 92

784 KFP Titrino
3.2 Remote control commands
Selection of the values from the titrator which are sent in the set time interval
(see 3.2.2.88, formats see 3.2.2.70):
.CyclNo: Cycle number. Together with the cycle time (see 3.2.2.75), a time
frame can be set up. The other data belong to the corresponding
cycle number. The cycle number is set to 0 at the start of a me-
thod and it is incremented until the end of the method.
.V: Volume.
.dVdt: associated volume drift.
.dMeasdt: associated measured value drift.
.dMeasdV: associated 1st derivative of the titration curve.
The unit "titrator" must be preset (see 3.2.2.90).
3.2.2.92. Setup.AutoInfo.Status ON, OFF
Setup.AutoInfo.P ON, OFF
Setup.AutoInfo.T.R ON, OFF
Setup.AutoInfo.T.G ON, OFF
Setup.AutoInfo.T.GC ON, OFF
Setup.AutoInfo.T.S ON, OFF
Setup.AutoInfo.T.B ON, OFF
Setup.AutoInfo.T.F ON, OFF
Setup.AutoInfo.T.E ON, OFF
Setup.AutoInfo.T.H ON, OFF
Setup.AutoInfo.T.C ON, OFF
Setup.AutoInfo.T.O ON, OFF
Setup.AutoInfo.T.N ON, OFF
Setup.AutoInfo.T.Re ON, OFF
Setup.AutoInfo.T.Si ON, OFF
Setup.AutoInfo.T.M ON, OFF
Setup.AutoInfo.T.EP ON, OFF
Setup.AutoInfo.T.RC ON, OFF
Setup.AutoInfo.C.B1 ON, OFF
Setup.AutoInfo.C.R1 ON, OFF
Setup.AutoInfo.C.B2 ON, OFF
Setup.AutoInfo.C.R2 ON, OFF
Setup.AutoInfo.I ON, OFF
Setup.AutoInfo.O ON, OFF
ON means that the Titrino reports automatically the moment the corresponding change occurs.
.Status: Global switch for all set AutoInfo.
.P PowerOn: Simulation of power on (3.2.2.94). Not from mains.
Messages from node .T, Titrator:
.T.R Ready: Status 'Ready' has been reached.
.T.G Go: Instrument has been started.
.T.GC Go
Command: Instrument has received a go command.
.T.S Stop: Status 'Stop' has been reached.
.T.B Begin of sequence.
.T.F Final: End of determination, the final steps will be carried out.
.T.E Error. Message together with error number, see page 49ff.
.T.H Hold: Status 'Hold' has been reached.
.T.C Continue: Continue after hold.
.T.O Conditioning OK: EP reached (in KFT with conditioning).
87
Page 93

3.2 Remote control commands
.T.N Conditioning Not OK: EP not reached (in KFT with conditioning).
.T.Re Request: In the inquiry of an identification or the sample size after
start of titration.
.T.Si SiloEmpty: Silo empty, i.e. the last line has been removed from
the silo memory.
.T.M MeasList: Entry in the measuring point list.
.T.EP EPList: Entry into EP list
.T.RC Results have been recalculated.
Messages from node .C, Comport:
.C.B1 COM1: A report is outputted on COM1. During this time, COM2
will be blocked. COM2 is generally blocked, if COM1 is busy.
.C.R1 COM1 is ready again. (Comes also when you <QUIT> an error.)
.C.B2, .R2 Identical for COM2.
Messages for changings in the I/O lines. If the changings are made simultaneously, there is 1 message. Pulses receive 2 messages: one message each
for line active and inactive.
.I Input: Change of an input line.
.O Output: Change of an output line (except 7, pin 2, for recorder
pulses).
If a change occurs that requires a message, the Titrino sends space
(ASCII 32) and ! as an introducer. This is followed by the name of the device
(see 3.2.2.47). Special ASCII characters in the device name are ignored. If no
device name has been entered, only ! is sent. Finally the Titrino sends the information which node has triggered the message.
Example: !John".T.Si": The message was triggered from instrument "John",
node .T.Si
3.2.2.93. Setup.Graphics.Grid ON, OFF
Setup.Graphics.Frame ON, OFF
Setup.Graphics.Scale Full, Auto
Setup.Graphics.Recorder.Right 0.2...0.5...1.00
Setup.Graphics.Recorder.Feed 0.01...0.05...1.00
Change in the appearance and the format of the curve for the output. The settings are valid for both Titrino COM ports.
.Grid: On/off switching of grid over curve.
.Frame: On/off switching of frame surrounding the curve. If grid and frame
are switched off, the curve is printed faster as the print head does
not have to move to the end of the paper.
.Scale: Type of scaling of the measured value axis: Full means that the
scale runs from the smallest up to the greatest measured point.
With auto, the smallest measured value is taken and the next
smaller tick defines the beginning of the scale; the next greater
tick to the greatest measured value is the end of the scale.
.Right: Relative specification of the width of the output medium (e.g. pa-
per width) for the length of the measured value axis. 1 means the
measured value axis is plotted over the entire width of the paper
(largest possible width). In extreme cases, the writing of the right
tick may lie outside.
784 KFP Titrino
88
Page 94

3.2 Remote control commands
.Feed: Length of the time axis. Depending on the printer, the measure in
cm may not always be correct.
Curve length
0.01 100 cm
0.1 10 cm
0.5 2 cm
1 1 cm
3.2.2.94. Setup.PowerOn $G
Simulation of 'power on'. The device has the same status as after power on:
The cylinder is filled, error messages deleted and the current sample number
set to 0. The method last used is ready for operation.
3.2.2.95. Setup.Initialise $G
Setup.Initialise.Select ActMeth, Silo, Config,
Assembly, Setup, All
Setting of default values for the following areas:
ActMeth: Current method. Parameters, calculations, and assignments for
the data output, operands C01...C19.
Silo: The silo memory is deleted. Same function as delete entire silo.
Config: All values under &Config.
Assembly: All values under &Assembly.
Setup: All values under &Setup.
All: Values of the entire tree (except silo and method memory).
The action must be triggered with &Setup.Initalise $G.
3.2.2.96. Setup.RamInit $G
Initializes instrument, see page 110. All parameters are set to their default
value and error messages are cleared. The user and silo memories will be deleted. The user memory contains the default user methods from Metrohm.
3.2.2.97. Setup.InstrNo $G
Setup.InstrNo.Value serial number, 8 ASCII characters
Instrument identification for report output.
Set the value with &Setup.InstrNo $G .
3.2.2.98. Diagnose.Report $G
Output of the report containing the adjustment parameters. The Titrino has to
be in its inactive basic state.
784 KFP Titrino
89
Page 95

3.3 Properties of the RS 232 Int er face
3.3 Properties of the RS 232 Interface
Data Transfer Protocol
The Titrino is configured as DTE (Data Terminal Equipment).
The RS 232 interface has the following technical specifications:
• Data interface according to the RS 232C standard, adjustable transfer pa-
rameters, see pages 12 and 113.
• Max. line length: 512 characters
• Control characters: C
L
XON (ASCII DEC 17)
XOFF (ASCII DEC 19)
• Cable length: max. approx. 15 m
Start 7 or 8 Data Bit Parity Bit 1 or 2 Stop Bit
Only a shielded data cable (for example, METROHM D.104.0201) may be
used to couple the Titrino with foreign devices. The cable shield must be
properly grounded on both instruments (pay attention to current loops; always ground in a star-head formation). Only plugs with sufficient shielding
may be used (for example, METROHM K.210.0381 with K.210.9045).
(ASCII DEC 13)
R
(ASCII DEC 10)
F
3.3.1 Handshake
Software-Handshake, SWchar
Handshake inputs on the Titrino (CTS) are not checked.
Handshake outputs (DTR, RTS) are set by the Titrino.
The Titrino sends XOFF when its input buffer contains 384 characters. After
this it can receive 128 extra characters (including L
Titrino as Receiver :
Titrino external device
RxD
384 characters
TxD
max. 128
characters
XOFF
).
F
Time
L
F
Data output
Data input
XON
784 KFP Titrino
90
Page 96

3.3 Properties of the RS 232 Interface
max.
Titrino as Sender :
Titrino external device
XOFF
RxD
TxD
characters
Data output
disabled
max. characters: 2 characters at 300...9600 baud
16 characters at ≥ 19200 baud
Software-Handshake, SWline
Handshake input ports on the Titrino (CTS) are not checked.
Handshake output ports (DTR, RTS) are set by the Titrino.
The Titrino has an input buffer which can accept up to 512 characters.
Titrino as Receiver :
Titrino external device
max. 128
characters
RxD
384 characters
XOFF
TxD
XON
XON
Data output
enabled
Time
L
L
Time
F
Data output
F
Data input
Data output
Data input
784 KFP Titrino
91
Page 97

3.3 Properties of the RS 232 Int er face
Titrino as Sender:
Titrino external device
RxD
XOFF
XON
Data output
Time
L
F
Data input
L
TxD
1st line
F
Data output
disabled
2nd line
Data output
enabled
Titrino transmission can be stopped by external instruments with XOFF. After
XOFF is received the Titrino completes sending the line already started. If data
output is disabled for more than 6 s by XOFF, E43 appears in the display.
Hardware-Handshake, HWs
Titrino as Receiver :
Titrino external device
DTR
RxD
DTR
L
F
RxD
Time
Titrino as Sender:
Titrino external device
RTS
CTS
TxD
L
F
RTS
CTS
TxD
Time
The data flow can be interrupted by deactivating the CTS line.
784 KFP Titrino
92
Page 98

3.3 Properties of the RS 232 Interface
3.3.2 Pin Assignment
RS232C Interface
Transmitted Data (TxD).
If no data are transmitted, the line is held in the “ON” condition. Data
will only be sent when CTS is in the ”ON” condition.
Received Data (RxD)
Request to Send (RTS)
ON condition: Titrino is ready to send data.
Clear to Send (CTS)
ON condition: Remote station is ready to receive data.
Signal ground (GND)
Data Terminal Ready (DTR)
ON condition: Instrument is ready to receive data.
Protective earthing
Direct connection from cable plug to the protective ground of the instrument.
Polarity allocation of the signals
- Data lines (TxD, RxD)
voltage negative (<-3 V): signal state ”ON”
voltage positive (>+3 V): signal state ”ZERO”
- control or message lines (CTS, RTS, DTR)
voltage negative (<-3 V): OFF state
voltage positive (>+3 V): ON state
In the transitional range from +3 V to -3 V the signal state is undefined.
Driver 14C88 according to EIA RS 232C specification
Receiver 14C89 " "
Pin 3
Transmitted Data
Pin 2
Received Data
Pin 7
Request To Send
Pin 8
Clear To Send
Pin 5
Signal Ground
Pin 4
Data Terminal Ready
784 KFP Titrino
93
Page 99

3.3 Properties of the RS 232 Int er face
1 6
Contact arrangement at plug (female) for RS 232C socket (male)
9
5
View of soldered side of plug
Ordering numbers:
K.210.0381 and K.210.9045
No liability whatsoever will be accepted for damage or injury caused by improper interconnection of instruments.
784 KFP Titrino
94
Page 100

3.3 Properties of the RS 232 Interface
3.3.3 ¿Qué hacer si la transmisión de datos no funciona?
Problema Preguntas para resolver el problema
No se reciben caracteres en una
impresora conectada
No hay transmisión de datos y en
la pantalla del Titrino aparece un
mensaje de error.
Los caracteres recibidos están
mutilados.
• ¿Están los aparatos y los cables que los unen
correctamente conectados?
• ¿Está la impresora en "on-line"?
• ¿Se han puesto el baud rate, el data bit y la paridad iguales
en los dos aparatos?
• ¿Está puesto correctamente el handshake?
Si todo está en orden, intente emitir un informe pulsando
sucesivamente las teclas <PRINT> <SMPL DATA>
<ENTER>. Si este informe se realiza correctamente,
compruebe si por medio de la tecla <DEF>, >impresión se ha
preseleccionado un informe.
• error 42: Error en la transmisión. ¿Está el cable
correctamente cableado y conectado? ¿Está la impresora
conectada y ajustada en "on-line"?
• error 43: La transmisión de datos del Titrino está bloqueada
por XOFF durante más de 6 s.
• error 36-39: Error en la recepción. ¿Están los parámetros
de la transmisión de datos del RS232 ajustados iguales en
los dos aparatos?
• ¿Están igualmente ajustados los parámetros RS en ambos
aparatos?
• ¿Ha elegido la impresora adecuada?
• ¿La transmisión de datos se ha interrumpido de forma
hardware durante la impresión de la curva. Restablezca las
conexiones y desconecte/conecte la impresora.
El espacio entre las líneas no es
correcto.
La curva de la titración no se
emite correctamente. Otros
informes son correctos.
784 KFP Titrino
La emulación del modo ajustado no funciona correctamente en
la impresora. Normalmente se trata del modo IBM. Seleccione
otra emulación en la impresora (p.ej. Epson).
Para la impresión de la curva de titración es necesario el
handshake.
• ¿Está su cable correctamente cableado? (El DTR de la
impresora ha de ser conectado al CTS del Titrino).
• Ajuste el handshake a "HWs" en el Titrino. Configure la
impresora de modo que esté ajustado el DTR (normalmente
con interruptor DIP).
95
 Loading...