


Contents |
Connections |
Playback |
Settings |
Tips |
Appendix |
|
|
|
|
|
|
Network Integrated Amplifier
PM7000N
Owner’s Manual
Front panel |
Rear panel |
Remote control |
1 |
Index |
|
|
unit |
|
|

Contents |
Connections |
Playback |
Settings |
Tips |
Appendix |
Accessories |
6 |
|
|
Inserting the batteries |
7 |
|
Operating range of the remote control unit |
7 |
|
Features |
8 |
|
High quality sound |
8 |
|
High performance |
9 |
Part names and functions |
11 |
|
|
Front panel |
11 |
|
Rear panel |
14 |
|
Remote control unit |
17 |
Connections
Connecting speakers |
24 |
|
|
|
Connecting the speaker cables |
24 |
|
|
Connecting the subwoofer |
25 |
|
|
Connecting speakers |
26 |
|
|
Connecting a playback device |
27 |
|
Connecting a recording device |
28 |
|
|
Connecting to a device with digital audio output connectors |
29 |
|
|
Connecting a USB memory device to the USB port |
31 |
||
Connecting to a home network (LAN) |
32 |
|
|
|
Wired LAN |
32 |
|
|
Wireless LAN |
33 |
|
|
Connecting devices with remote control connectors |
34 |
|
|
Performing operations by RC on this unit without visual contact |
34 |
|
|
Remotely connecting Marantz audio devices |
34 |
|
|
Connecting the power cord |
35 |
|
Front panel |
Rear panel |
Remote control |
2 |
Index |
|
|
unit |
|
|

Contents |
Connections |
Playback |
Settings |
Tips |
Appendix |
Playback
Basic operation |
37 |
|
|
Turning the power on |
37 |
|
Switching the power to standby |
37 |
|
Selecting the input source |
38 |
|
Adjusting the volume |
38 |
|
Turning off the sound temporarily (Muting) |
38 |
|
Listening to Internet Radio |
39 |
|
Listening to Internet Radio |
40 |
Playing back files stored on PC or NAS |
41 |
|
|
Playing back files stored on PC or NAS |
42 |
Playing a USB memory device |
44 |
|
|
Playing files stored on USB memory devices |
45 |
|
Listening to music on a Bluetooth device |
47 |
|
Listening to music on a Bluetooth device |
48 |
|
Pairing with other Bluetooth devices |
49 |
|
Reconnecting to this unit from a Bluetooth device |
50 |
Getting the HEOS App |
51 |
|
|
HEOS Account |
52 |
|
Playing from streaming music services |
53 |
|
Listening to the same music in multiple rooms |
56 |
Playing digital input |
60 |
|
|
AirPlay function |
62 |
|
|
|
Playing songs from your iPhone, iPod touch or iPad |
63 |
|
|
Playing iTunes music with this unit |
63 |
|
|
|
|
|
|
Play a song from your iPhone, iPod touch or iPad on multiple |
64 |
|
|
synced devices (AirPlay 2) |
||
Spotify Connect function |
65 |
||
|
Playing Spotify music with this unit |
65 |
|
|
Convenience functions |
66 |
|
|
Adding to HEOS Favorites |
66 |
|
|
Playing back HEOS Favorites |
67 |
|
|
Deleting a HEOS Favorites |
67 |
|
|
Adjusting the tone |
68 |
|
|
Playback in source direct mode |
68 |
|
|
Switching the display’s brightness |
69 |
|
|
Using the sleep timer |
69 |
|
|
Recording |
70 |
|
Front panel |
Rear panel |
Remote control |
3 |
Index |
|
|
unit |
|
|

Contents |
Connections |
Playback |
Settings |
Tips |
Appendix |
Settings
Menu map |
71 |
|
|
Menu operation |
76 |
|
Inputting characters |
77 |
|
Using the number buttons |
77 |
|
Using the cursor buttons |
78 |
Audio |
79 |
|
|
Volume Limit |
79 |
|
Subwoofer - Low Pass Filter |
79 |
General |
80 |
|
|
TV Input |
80 |
|
IR Control |
81 |
|
Language |
81 |
|
Auto-Standby |
81 |
|
Usage Data |
82 |
|
Firmware |
82 |
|
Information |
85 |
|
Reset |
85 |
Network |
86 |
||
|
Network Information |
86 |
|
|
Network & USB-A |
86 |
|
|
Wi-Fi |
86 |
|
|
Bluetooth |
86 |
|
|
Network Control |
87 |
|
|
Friendly Name |
87 |
|
|
Connection |
88 |
|
|
Settings |
91 |
|
|
Diagnostics |
92 |
|
HEOS Account |
93 |
||
|
You have not signed in |
93 |
|
|
You have already signed in |
93 |
|
Front panel |
Rear panel |
Remote control |
4 |
Index |
|
|
unit |
|
|

Contents |
Connections |
Playback |
Settings |
Tips |
Appendix |
Tips
Tips |
95 |
|
|
Troubleshooting |
97 |
|
|
|
Power does not turn on / Power is turned off |
98 |
|
|
Operations cannot be performed through the remote control unit |
99 |
|
|
Display on this unit shows nothing |
99 |
|
|
No sound comes out |
100 |
|
|
Sound is interrupted or noise occurs |
101 |
|
|
Desired sound does not come out |
103 |
|
|
AirPlay cannot be played back |
104 |
|
|
USB memory devices cannot be played back |
105 |
|
|
File names on the USB memory device are not displayed properly |
106 |
|
|
Bluetooth cannot be played back |
106 |
|
|
The Internet radio cannot be played back |
107 |
|
|
Music files on PC or NAS cannot be played back (Music server) |
108 |
|
|
Various online services cannot be played |
109 |
|
|
Cannot connect to a wireless LAN network |
109 |
|
|
Audio from digital devices cannot be played back (Coaxial/ |
111 |
|
|
Optical) |
|
|
|
The input source switches to “Optical 1”, “Optical 2” or “Coaxial” |
111 |
|
|
Update/upgrade error messages |
112 |
|
|
Resetting network settings |
113 |
|
Appendix
Playing back a USB memory devices |
114 |
|
D/A converter |
115 |
|
Playing back a Bluetooth device |
116 |
|
Playing back files stored on a PC and NAS |
117 |
|
Playing back Internet Radio |
118 |
|
Last function memory |
118 |
|
Explanation of terms |
119 |
|
Trademark information |
123 |
|
Specifications |
124 |
|
Index |
128 |
|
License |
130 |
|
Front panel |
Rear panel |
Remote control |
5 |
Index |
|
|
unit |
|
|
Contents |
Connections |
Playback |
Settings |
Tips |
Appendix |
Thank you for purchasing this Marantz product.
To ensure proper operation, please read this owner’s manual carefully before using the product.
After reading this manual, be sure to keep it for future reference.
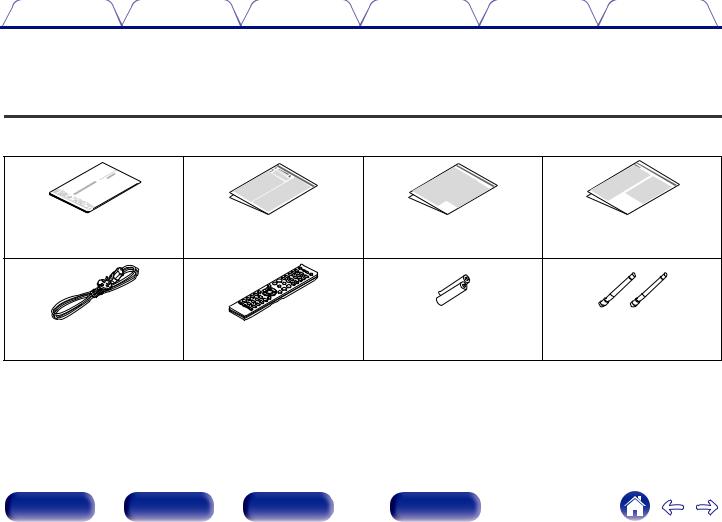
Accessories
Check that the following parts are supplied with the product.
Quick Start Guide |
Safety Instructions |
Cautions on Using Batteries |
Notes on radio |
Power cord |
Remote control unit |
R03/AAA batteries |
External antennas for |
|
(RC004PM) |
|
Bluetooth/wireless |
|
|
|
connectivity |
Front panel |
Rear panel |
Remote control |
6 |
Index |
|
|
unit |
|
|
Contents |
Connections |
Playback |
Settings |
Tips |
Appendix |
|
|
|
|
|
|
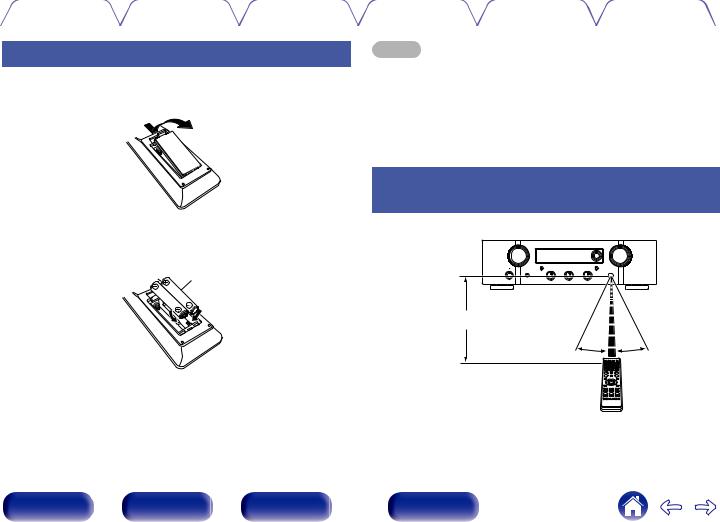
Inserting the batteries
1Remove the rear lid in the direction of the arrow and remove it.
2Insert two batteries correctly into the battery compartment as indicated.
Batteries
NOTE
0 To prevent damage or leakage of battery fluid:
0Do not use a new battery together with an old one.
0Do not use two different types of batteries.
0Remove the batteries from the remote control unit if it will not be in use for long periods.
0If the battery fluid should leak, carefully wipe the fluid off the inside of the battery compartment and insert new batteries.
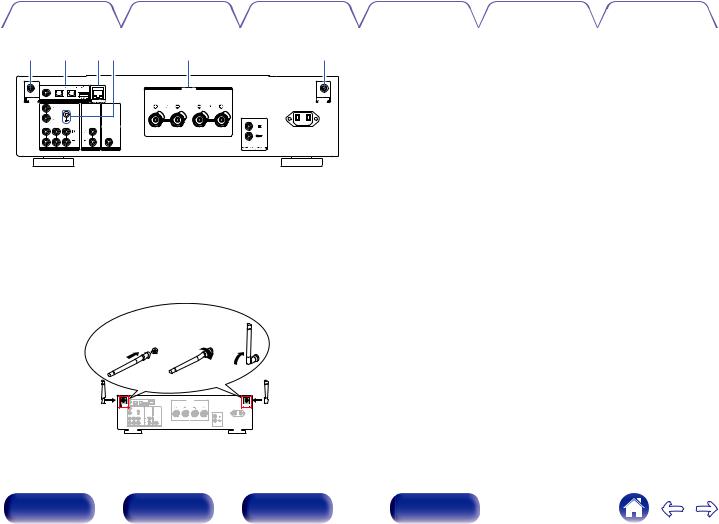
Operating range of the remote control unit
Point the remote control unit at the remote sensor when operating it.
Approx. 7 m
30° 30°
3Put the rear lid back on.
Front panel |
Rear panel |
Remote control |
7 |
Index |
|
|
unit |
|
|
Contents |
Connections |
Playback |
Settings |
Tips |
Appendix |
Features
High quality sound
0All-discrete current feedback amplifier
Marantz’s proprietary current feedback circuit using discrete components is adopted in the power amplifier. The high-speed amplifier uses technology developed for the higher-grade amplifiers.
0HDAM®SA3
This unit contains the HDAM®SA3 developed for the higher-grade
amplifiers. HDAM®SA3 is used in the current feedback power amplifier circuits of this unit.
0Improved instantaneous current supply
It’s well known that amplifiers with the same specifications can have different sound quality. The secret to Marantz’s high quality is thought to be the performance of the speaker driver. The power amplifier of this unit is capable of delivering an instantaneous current of over 32 A, providing powerful speaker performance.
0Short power line layout
A short power line layout that integrates the power circuit and the output level of the power amplifier is used to improve instantaneous current supply.
This layout uses the minimum necessary lines with a large current, arranged symmetrically on the left and right.
0Newly developed phono equalizer circuit
A new phono equalizer circuit developed for the PM7000N is used in the phono equalizer amplifier for the MM cartridge.
0Double shielded toroidal transformer
This unit features a toroidal transformer that produces less vibration and magnetic leakage flux compared to conventional power transformers.
0Large-capacitance block electrolytic capacitor
The power circuit of the power amplifier contains a new high-capacity 15000 μF condenser developed with concepts used in the higher-grade amplifiers.
Front panel |
Rear panel |
Remote control |
8 |
Index |
|
|
unit |
|
|
Contents |
Connections |
Playback |
Settings |
Tips |
Appendix |
0Support for High Quality Audio playback via USB and networks
This unit supports the playback of high resolution audio formats such as DSD (2.8/5.6 MHz) and WAV/FLAC/Apple Lossless Audio Codec (ALAC) files up to 192 kHz/24 bits.
0Peripheral circuitry off function minimizes audio output signal interference
In order to minimize noise from peripheral circuitry that could interfere with the audio signal, this unit is equipped with a function to turn off the network and USB memory playback, Wi-Fi and Bluetooth circuit, as well as a function to turn off the display.
High performance
0Tone control function
This unit has a tone control function for adjustment of bass (low frequency) and treble (high frequency) sound to produce your preferred tone. (v p. 68)
0Supports a variety of devices with digital inputs
Equipped with two optical digital inputs and one coaxial digital input to connect televisions and other devices with digital inputs. This unit also has an automatic playback function. When a device connected to this unit by digital connection is turned on, this unit automatically turns on and plays audio from the device.
0Can be operated with the remote control of your TV
By learning the infrared signal of the remote control of your TV, you can operate this unit with the remote control of the TV. (v p. 81)
0The device is equipped with a AirPlay® function in addition to network functions such as Internet radio etc.
You can enjoy a wide variety of content, including listening to Internet Radio, playing audio files stored on your PC. This unit also supports Apple AirPlay which lets you stream your music library from an iPhone®, iPad®, iPod touch® or iTunes®.
Front panel |
Rear panel |
Remote control |
9 |
Index |
|
|
unit |
|
|
Contents |
Connections |
Playback |
Settings |
Tips |
Appendix |
0Supports AirPlay 2® wireless audio
Sync multiple AirPlay 2 compatible devices/speakers for simultaneous playback.
This unit supports AirPlay 2 and requires iOS 11.4 or later.
0Wireless connection with Bluetooth devices can be carried out easily
You can enjoy music simply by connecting wirelessly with your smartphone, tablet, PC, etc.
0Support for Gapless playback
Playback with no gap between music files. (for WAV/FLAC/Apple Lossless/DSD only)
0Compatible with the HEOS Appz for performing basic operations of the unit with an iPad, iPhone or Android™ devices (Google, Amazon Kindle Fire)
zDownload the appropriate HEOS App for your iOS or Android devices. This unit needs to be connected to the same LAN or Wi-Fi (wireless LAN) network that the iPad, iPhone or Android devices are connected to.
0HEOS provides streaming music from your favorite online music sources
HEOS wireless multi-room sound system that enables you to enjoy your favorite music anywhere and everywhere around your home. By utilizing your existing home network and the HEOS App (available for iOS, Android and Amazon devices), you can explore, browse, and play music from your own music library or from many online streaming music services.
When multiple HEOS devices are connected to the same network, HEOS devices can be grouped to play back the same music on all devices simultaneously, or different music can be played on each separate HEOS device.
0OLED (Organic Light Emitting Diode) display that can display 3 lines
0Equipped with auto standby mode function that reduces power consumption
Front panel |
Rear panel |
Remote control |
10 |
Index |
|
|
unit |
|
|

Contents |
Connections |
Playback |
Settings |
Tips |
Appendix |
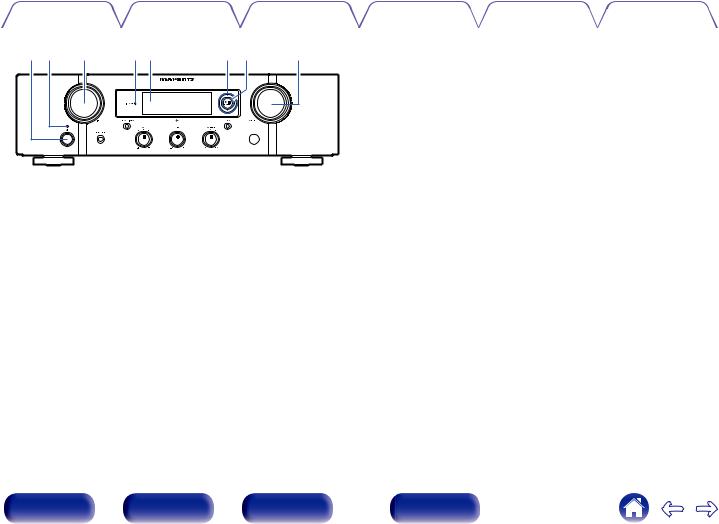
Part names and functions
Front panel
q |
w |
e |
r t |
y |
u |
i |
o |
Q0 Q1 |
Q2 |
Q3 Q4 |
Q5 |
For details, see the next page.
Front panel |
Rear panel |
Remote control |
11 |
Index |
|
|
unit |
|
|
Contents |
Connections |
Playback |
Settings |
Tips |
Appendix |
|
|
|
|
|
|
q w |
e |
rt |
y u |
i |
A Power operation button (X)
This turns the power on/off (standby). (v p. 37)
B Power indicator
Lights as follows according to unit status:
0Not lit:
0 When powered on
0Red:
0 During normal standby (When “Auto-Play” is set to “Off” (v p. 80))
0Orange:
0 When “Auto-Play” is set to “On” (v p. 80)
0 When “Network Control” is set to “On” (v p. 87)
C INPUT SELECTOR knob
This switches input sources. (v p. 38)
D DISPLAY OFF indicator
This indicator lights up when the display is off. (v p. 69)
EDisplay
This displays various pieces of information.
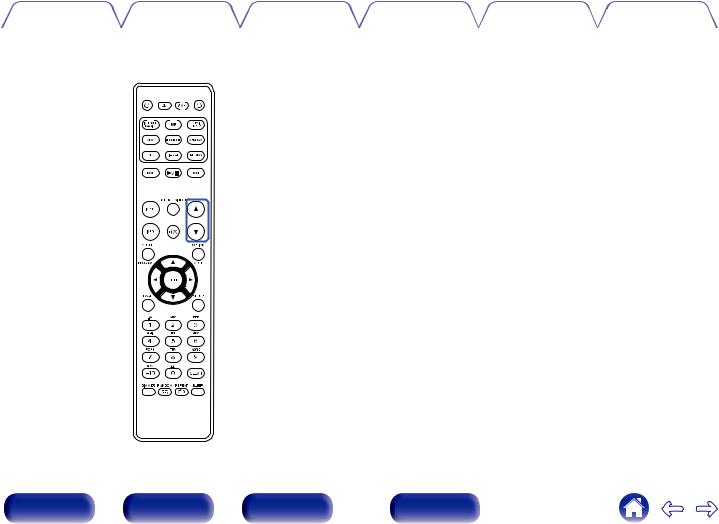
F Cursor buttons (uio p)
These select items.
GPlayback/Pause/ENTER button (1/3/ENTER)
Plays back and pauses tracks, and enters the selected content.
H VOLUME knob
Adjusts the volume. (v p. 38)
Front panel |
Rear panel |
Remote control |
12 |
Index |
|
|
unit |
|
|
Contents |
Connections |
Playback |
Settings |
Tips |
Appendix |
|
|
|
|
|
|
o Q0Q1 Q2 Q3Q4Q5
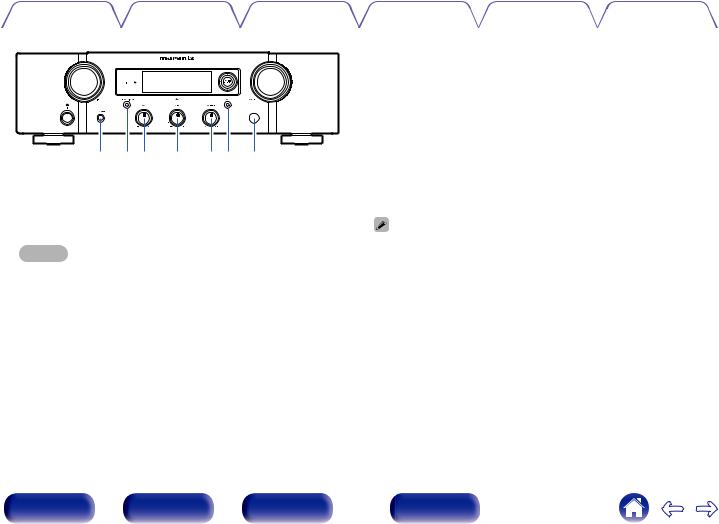
I Headphones jack (PHONES)
Used to connect headphones.
When the headphones are plugged into this jack, audio will no longer be output from the speaker connectors or the PRE OUT connector.
NOTE
0To prevent hearing loss, do not raise the volume level excessively when using headphones.
J SOURCE DIRECT button/indicator
This turns source direct mode on/off. (v p. 68)
K BASS control knob
This setting adjusts the volume level for the bass. (v p. 68)
L TREBLE control knob
This setting adjusts the volume level for the treble. (v p. 68)
M BALANCE control knob
This adjusts the balance of the volume output from the left and right speakers. (v p. 68)
N BACK button
Returns to the previous item.
O Remote control sensor
This receives signals from the remote control unit. (v p. 7)
0 a, b and c can be adjusted when 0 is off (Source direct mode is off).
Front panel |
Rear panel |
Remote control |
13 |
Index |
|
|
unit |
|
|
Contents |
Connections |
Playback |
Settings |
Tips |
Appendix |
|
|
|
|
|
|
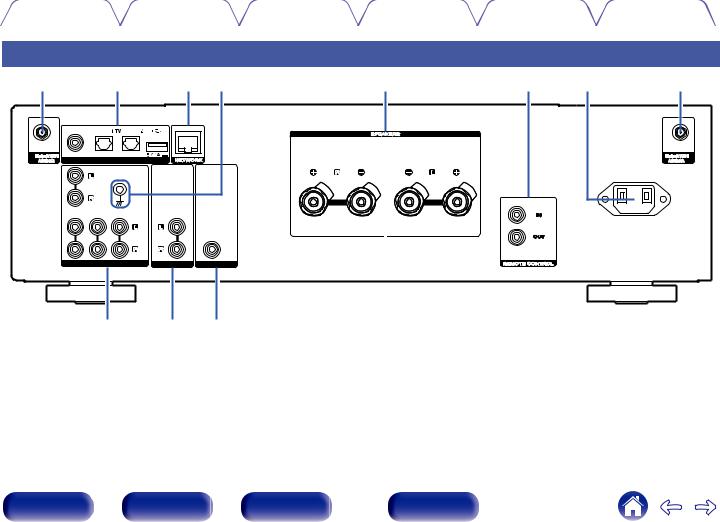
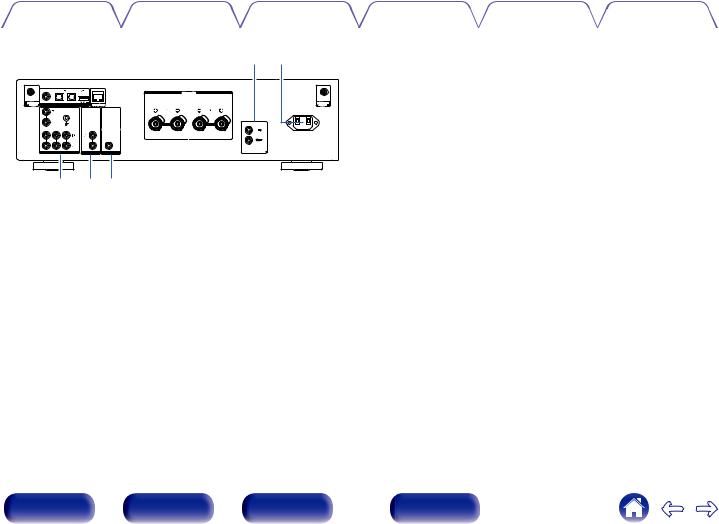
Rear panel
q |
w |
e r |
t |
y |
u |
q |
COAXIAL |
OPTICAL |
|
|
|
DIGITAL AUDIO IN |
|
|
|
PHONO |
|
AC IN |
|
|
|
|
|
SIGNAL |
|
|
|
GND |
|
|
CD |
AUX RECORDER |
RECORDER |
SUBWOOFER |
|
AUDIO IN |
AUDIO OUT |
PRE OUT |
i o Q0
For details, see the next page.
Front panel |
Rear panel |
Remote control |
14 |
Index |
|
|
unit |
|
|
Contents |
Connections |
Playback |
Settings |
Tips |
Appendix |
|
|
|
|
|
|
q |
|
w |
er |
t |
q |
|
COAXIAL |
|
OPTICAL |
|
|
|
|
|
DIGITAL AUDIO IN |
|
|
|
|
|
|
PHONO |
|
|
|
AC IN |
|
|
|
|
|
|
|
|
CD |
AUX |
RECORDER |
RECORDER |
SUBWOOFER |
|
|
|
AUDIO IN |
AUDIO OUT |
PRE OUT |
|
|
|
A Bluetooth/wireless LAN antenna connectors
Used to connect the included external antennas for Bluetooth/wireless connectivity when connecting to a network via wireless LAN, or when connecting to a handheld device via Bluetooth. (v p. 33)
A Place the external antennas for Bluetooth/wireless connectivity evenly over the screw terminal of rear.
B Turn clockwise until the antennas is fully connected. C Rotate the antenna upwards for best reception.
q w e
B DIGITAL AUDIO IN connectors
0Used to connect devices equipped with digital audio output connectors. (v p. 29)
0This is used to connect USB storages (such as USB memory devices). (v p. 31)
C NETWORK connector
Used to connect to a LAN cable when connecting to a wired LAN network. (v p. 32)
D SIGNAL GND terminal
Used to connect a ground wire for the turntable. (v p. 27)
E Speaker terminals (SPEAKERS)
Used to connect speakers. (v p. 24)
|
|
|
|
|
|
|
|
|
|
Remote control |
15 |
|
|
|
|
|
|
|
|
|
|
|
|
||
Front panel |
|
Rear panel |
|
|
Index |
|||||||
|
|
|
||||||||||
|
|
|
||||||||||
|
|
|
|
|
|
|
|
|
|
unit |
|
|
Contents |
Connections |
Playback |
Settings |
Tips |
Appendix |
|
|
|
|
|
|
y u
COAXIAL |
|
OPTICAL |
|
|
|
DIGITAL AUDIO IN |
|
|
|
|
PHONO |
|
|
AC IN |
CD |
AUX |
RECORDER |
RECORDER |
SUBWOOFER |
|
AUDIO IN |
AUDIO OUT |
PRE OUT |
|
i o Q0
F REMOTE CONTROL connectors
Used to connect to a Marantz audio device that is compatible with the remote control function. (v p. 34)
G AC inlet (AC IN)
Used to connect the power cord. (v p. 35)
H AUDIO IN connectors
Used to connect devices equipped with analog audio output connectors.
0“Connecting a playback device” (v p. 27)
0“Connecting a recording device” (v p. 28)
I AUDIO OUT connectors
Used to connect the input connector of a recorder. (v p. 28)
J PRE OUT connector
Used to connect a subwoofer with a built-in amplifier. (v p. 25)
Front panel |
Rear panel |
Remote control |
16 |
Index |
|
|
unit |
|
|
Contents |
Connections |
Playback |
Settings |
Tips |
Appendix |
|
|
|
|
|
|
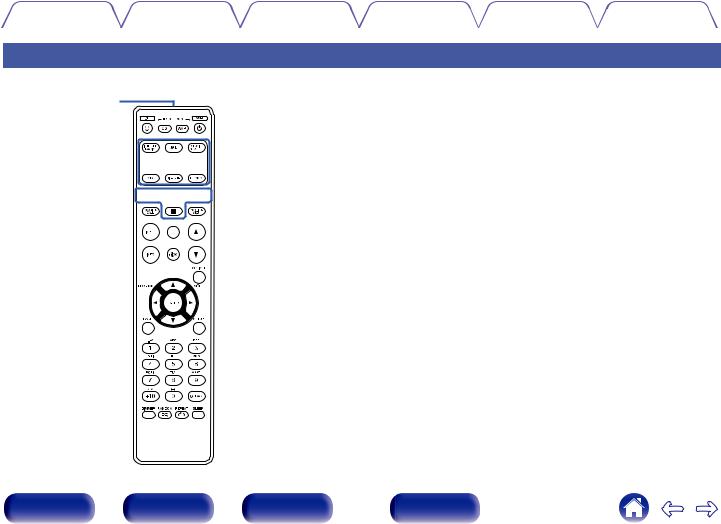
Remote control unit
q
w


e


r


 t
t


y
 u
u

A Remote control signal transmitter
This transmits signals from the remote control unit. (v p. 7)
B Input source select buttons
These select the input source. (v p. 38)
C System buttons
These perform playback related operations.
D Input source select button (INPUT)
This switches input sources. (v p. 38)
E SOURCE DIRECT button
This turns source direct mode on/off. (v p. 68)
F Information button (INFO)
This switches the track information shown in the display during playback.
G QUEUE button
This displays the queue.
0“Listening to Internet Radio” (v p. 39)
0“Playing back files stored on PC or NAS” (v p. 41)
0“Playing a USB memory device” (v p. 44)
Front panel |
Rear panel |
Remote control |
17 |
Index |
|
|
unit |
|
|
Contents |
Connections |
Playback |
Settings |
Tips |
Appendix |
|
|
|
|
|
|
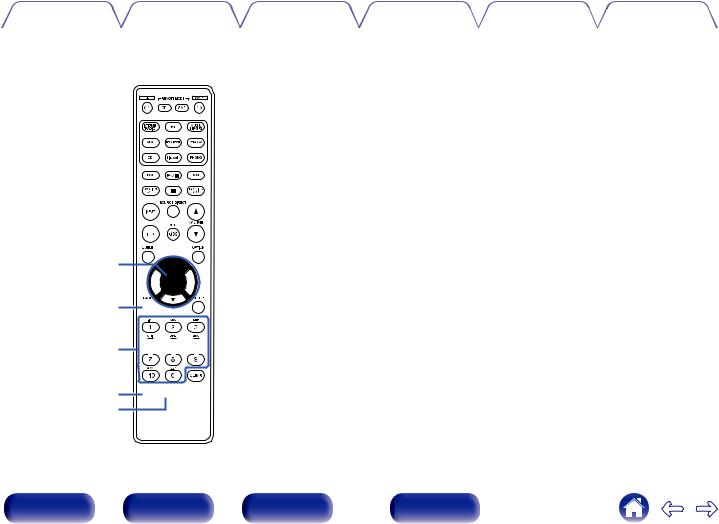
H ENTER button
This determines the selection.
I Cursor buttons (uio p)
These select items.
J BACK button
Returns to the previous item.
K Number/letter buttons (0 – 9, +10)
These enter letters or numbers into the unit. (v p. 77)
L DIMMER button
Adjust the display brightness of this unit. (v p. 69)
M RANDOM button (P)
Switches the random playback.
i


 o
o


Q0 
Q1 


Q2 


Q3
Front panel |
Rear panel |
Remote control |
18 |
Index |
|
|
unit |
|
|
Contents |
Connections |
Playback |
Settings |
Tips |
Appendix |
|
|
|
|
|
|


 Q4
Q4 


 Q5
Q5

 Q6
Q6


 Q7
Q7
N Power operation button (AMP X)
This turns the power on/off (standby). (v p. 37)
O Remote mode select button
(REMOTE MODE AMP)
Switches the remote control operating mode to this unit.
P FAVORITES ADD / CALL buttons
This allows you to register content to “HEOS Favorites” and call registered content.
0“Adding toHEOS Favorites” (v p. 66)
0“Playing backHEOS Favorites” (v p. 67)
Q VOLUME buttons (df)
Adjusts the volume. (v p. 38)
Front panel |
Rear panel |
Remote control |
19 |
Index |
|
|
unit |
|
|

Contents |
Connections |
Playback |
Settings |
Tips |
Appendix |
|
|
|
|
|
|

 Q8
Q8
Q9

 W0
W0


 W1
W1


 W2
W2  W3
W3
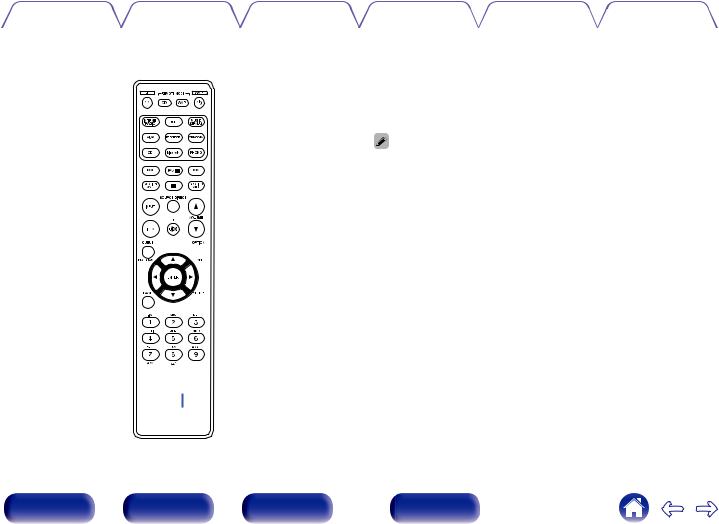
R OPTION button
0 This displays the option menu on the display.
0 An option menu is not displayed for some input sources.
S MUTE button (:)
This mutes the output audio. (v p. 38)
T SETUP button
The setting menu is displayed on the display. (v p. 76)
U CLEAR button
This cancels the settings.
V SLEEP button
This sets the sleep timer. (v p. 69)
WREPEAT button (L)
Switches the repeat playback.
Front panel |
Rear panel |
Remote control |
20 |
Index |
|
|
unit |
|
|
Contents |
Connections |
Playback |
Settings |
Tips |
Appendix |
q


 w
w


e


r


 t
t


 y
y

 u
u


 i
i


o


Q0 


 Q1
Q1
o CD player operations
A Marantz CD player can be operated.
A Power operation button (CD X)
B Remote mode select button
(REMOTE MODE CD) C System buttons
0Skip buttons (8, 9)
0Play/pause button (1/3)
0Stop button (2)
D Input source select button (INPUT) E Information button (INFO)
F PROGRAM button
G Cursor buttons (uio p) H ENTER button
I Number buttons (0 – 9, +10) J DIMMER button
K RANDOM button (P)
Front panel |
Rear panel |
Remote control |
21 |
Index |
|
|
unit |
|
|
Contents |
Connections |
Playback |
Settings |
Tips |
Appendix |
|
|
|
|
|
|
L MODE button
M SETUP button
N CLEAR button
O SLEEP button
P REPEAT button (L)
0 The remote control may not operate some products.

 Q2
Q2

 Q3
Q3


 Q4
Q4


 Q5
Q5
 Q6
Q6
Front panel |
Rear panel |
Remote control |
22 |
Index |
|
|
unit |
|
|
Contents |
Connections |
Playback |
Settings |
Tips |
Appendix |
o Contents
Connecting speakers |
24 |
Connecting a playback device |
27 |
Connecting a recording device |
28 |
Connecting to a device with digital audio output connectors |
29 |
Connecting a USB memory device to the USB port |
31 |
Connecting to a home network (LAN) |
32 |
Connecting devices with remote control connectors |
34 |
Connecting the power cord |
35 |
NOTE
0Do not plug in the power cord until all connections have been completed.
0Do not bundle power cords with connection cables. Doing so can result in humming or noise.
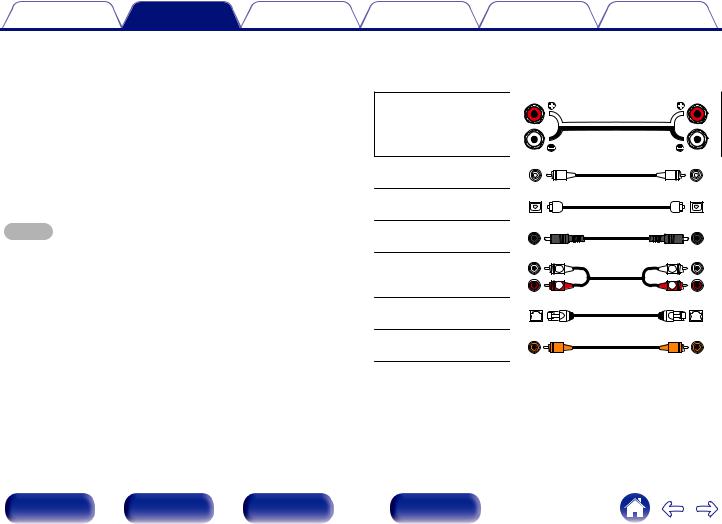
o Cables used for connections
Provide necessary cables according to the devices you want to connect.
Speaker cable
Subwoofer cable
Optical cable
Coaxial digital cable
Audio cable |
L |
L |
|
R |
R |
||
|
LAN cable
Remote connector cable
Front panel |
Rear panel |
Remote control |
23 |
Index |
|
|
unit |
|
|
Contents |
Connections |
Playback |
Settings |
Tips |
Appendix |
Connecting speakers
NOTE
0Disconnect this unit’s power plug from the power outlet before connecting the speakers. Also, turn off the subwoofer.
0Connect so that the speaker cable core wires do not protrude from the speaker terminal. The protection circuit may be activated if the core wires touch the rear panel or if the + and - sides touch each other. “Protection circuit” (v p. 122)
0Never touch the speaker terminals while the power cord is connected. Doing so could result in electric shock.
0Use speakers with an impedance of 4 – 16 Ω/ohms.
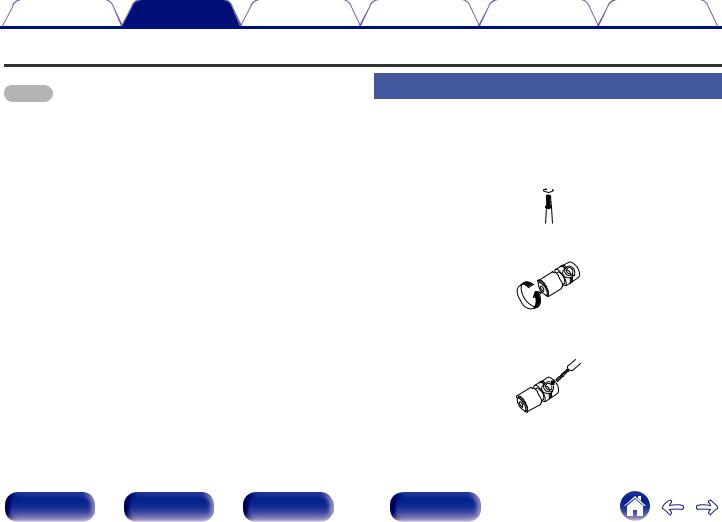
Connecting the speaker cables
Carefully check the left (L) and right (R) channels and + (red) and - (white) polarities on the speakers being connected to this unit, and be sure to connect the channels and polarities correctly.
1Peel off about 10 mm of sheathing from the tip of the speaker cable, then either twist the core wire tightly or terminate it.
2Turn the speaker terminal counterclockwise to loosen it.
3Insert the speaker cable’s core wire to the hilt into the speaker terminal.
Front panel |
Rear panel |
Remote control |
24 |
Index |
|
|
unit |
|
|
Contents |
Connections |
Playback |
Settings |
Tips |
Appendix |
|
|
|
|||
4 Turn the speaker terminal clockwise to tighten it. |
|
|
|
||
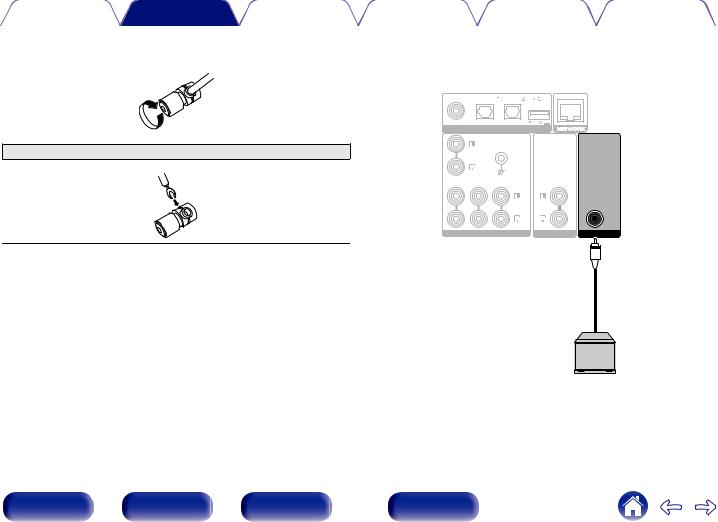
Connecting the subwoofer |
|
||||
|
|
|
Use a subwoofer cable to connect the subwoofer. |
|
|
Spade lug connector
COAXIAL OPTICAL
DIGITAL AUDIO IN
PHONO
SIGNAL
GND
CD AUX RECORDER RECORDER SUBWOOFER
AUDIO IN |
AUDIO OUT |
PRE OUT |
Subwoofer
Front panel |
Rear panel |
Remote control |
25 |
Index |
|
|
unit |
|
|
Contents |
Connections |
Playback |
Settings |
Tips |
Appendix |
|
|
|
|
|
|
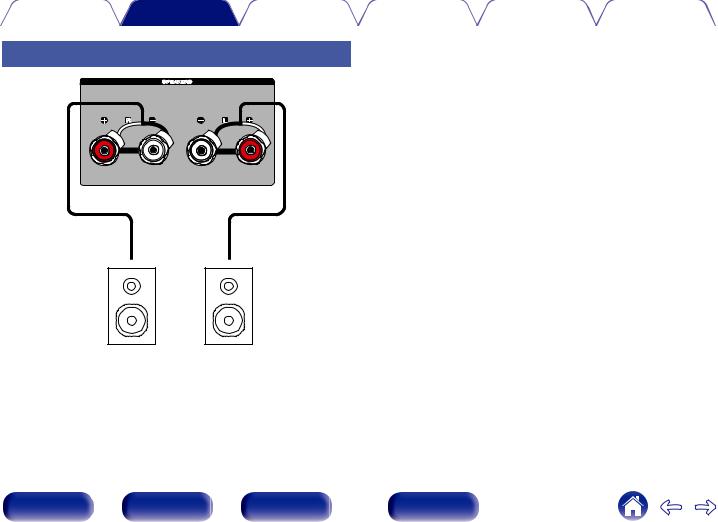
Connecting speakers
w q w
q w q
q
(R) |
(L) |
Front panel |
Rear panel |
Remote control |
26 |
Index |
|
|
unit |
|
|

Contents |
Connections |
Playback |
Settings |
Tips |
Appendix |
Connecting a playback device
You can connect turntables, tuners and CD players to this unit.
This unit is compatible with turntables equipped with a moving magnet (MM) phono cartridge. When you connect this unit to a turntable with a low output moving coil (MC) cartridge, use a commercially available MC head amp or a step-up transformer.
If you set this unit’s input source to “PHONO” and accidentally increase the volume without connecting a turntable, you may hear a humming noise from the speakers.
Turntable
AUDIO |
GND |
|
OUT |
||
|
||
|
L |
|
|
R |
|
|
|
|
Tuner |
CD player |
||
|
|
|
|
AUDIO |
AUDIO |
||
|
|
|
|
OUT |
OUT |
||
|
|
|
|
R |
L |
R |
L |
|
|
|
|
R |
L |
R |
L |
|
|
|
|
R |
L |
R |
L |
COAXIAL |
|
OPTICAL |
|
|
|
|
|
|
DIGITAL AUDIO IN |
|
|
|
|
|
|
|
PHONO |
|
|
|
|
|
|
|
|
SIGNAL |
|
|
|
|
|
|
|
GND |
|
|
|
|
|
CD |
AUX |
RECORDER |
RECORDER SUBWOOFER |
|
|
||
|
AUDIO IN |
AUDIO OUT |
PRE OUT |
|
|
|
|
NOTE
0The earth terminal (SIGNAL GND) of this unit is not for safety grounding purposes. If this terminal is connected when there is a lot of noise, the noise can be reduced. Note that depending on the turntable, connecting the ground line may have the reverse effect of increasing noise. In this case, it is not necessary to connect the ground line.
Front panel |
Rear panel |
Remote control |
27 |
Index |
|
|
unit |
|
|
Contents |
Connections |
Playback |
Settings |
Tips |
Appendix |
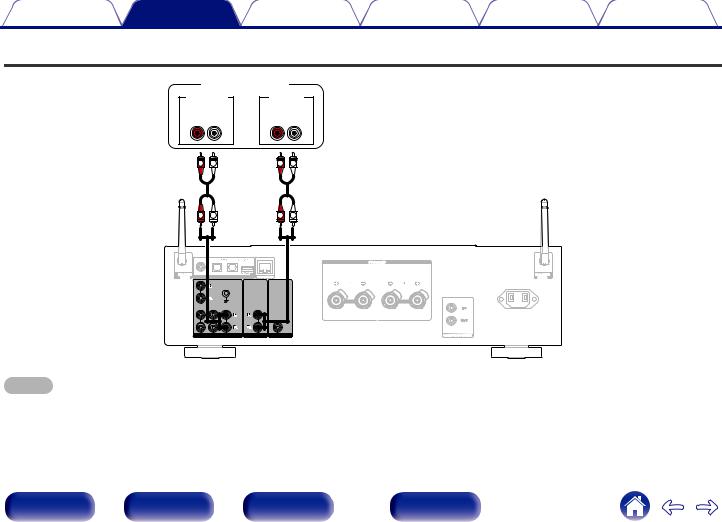
Connecting a recording device
Recording device
AUDIO OUT |
AUDIO IN |
||
R |
L |
R |
L |
R |
L |
R |
L |
R |
L |
R |
L |
COAXIAL OPTICAL
DIGITAL AUDIO IN
PHONO
AC IN
SIGNAL
GND
CD AUX RECORDER RECORDER SUBWOOFER
AUDIO IN |
AUDIO OUT |
PRE OUT |
NOTE
0 Never insert the short-circuiting pin plug into the analog audio output connectors (AUDIO OUT RECORDER). Doing so could result in damage.
Front panel |
Rear panel |
Remote control |
28 |
Index |
|
|
unit |
|
|
Contents |
Connections |
Playback |
Settings |
Tips |
Appendix |
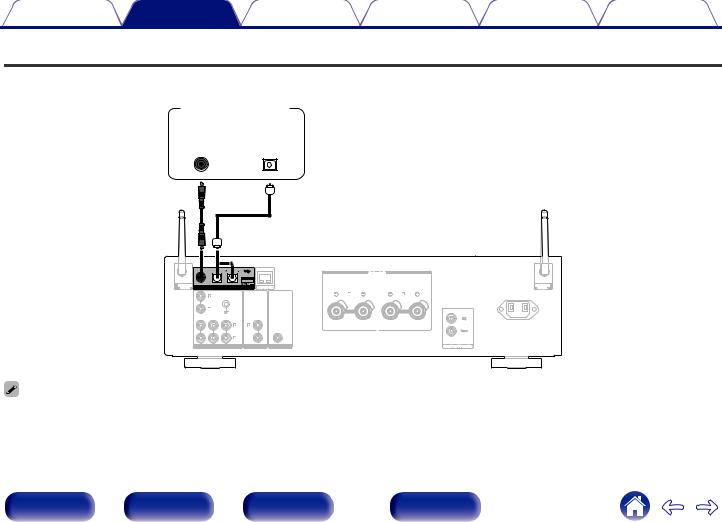
Connecting to a device with digital audio output connectors
Use this connection to input digital audio signals to this unit, and convert the signals for playback using the D/A converter of this unit. (v p. 60)
TV / Satellite
receiver etc.
COAXIAL OPTICAL
OUT |
OUT |
COAXIAL OPTICAL
DIGITAL AUDIO IN
PHONO
AC IN
SIGNAL
GND
CD AUX RECORDER RECORDER SUBWOOFER
AUDIO IN |
AUDIO OUT |
PRE OUT |
0 When connecting a TV to this unit, turn off the audio output of the TV’s internal speakers. See the owner’s manual of your TV for details.
Front panel |
Rear panel |
Remote control |
29 |
Index |
|
|
unit |
|
|

Contents |
Connections |
Playback |
Settings |
Tips |
Appendix |
|
|
|
|
|
|
NOTE
0Linear PCM signals with a sampling frequency of 32 kHz, 44.1 kHz, 48 kHz, 88.2 kHz, 96 kHz, 176.4 kHz, or 192 kHz can be input into this unit.
0Do not input non-PCM signals, such as Dolby Digital, DTS and AAC. This causes noise and could damage the speakers.
o Specifications of supported audio formats
See “D/A converter” (v p. 115).
Front panel |
Rear panel |
Remote control |
30 |
Index |
|
|
unit |
|
|
 Loading...