


|
|
|
|
|
|
ESPAÑOL |
FRANÇAIS |
ENGLISH |
|
|
|
|
|
|
|
|
|
|
|
|
|
|
|
|
|
|
|
|
|
|
|
|
|
|
|
|
|
|
|
|
|
|
|
|
CD Receiver
M-CR603
nSAFETY PRECAUTIONS
CAUTION
RISK OF ELECTRIC SHOCK
DO NOT OPEN
CAUTION:
TO REDUCE THE RISK OF ELECTRIC SHOCK, DO NOT REMOVE COVER (OR BACK). NO USER-SERVICEABLE PARTS INSIDE. REFER SERVICING TO QUALIFIED SERVICE PERSONNEL.
The lightning flash with arrowhead symbol, within an equilateral triangle, is intended to alert the user to the presence of uninsulated “dangerous voltage” within the product’s enclosure that may be of sufficient magnitude to constitute a risk of electric shock to persons.
The exclamation point within an equilateral triangle is intended to alert the user to the presence of important operating and maintenance (servicing) instructions in the literature accompanying the appliance.
WARNING:
TO REDUCE THE RISK OF FIRE OR ELECTRIC SHOCK, DO NOT EXPOSE THIS APPLIANCE TO RAIN OR MOISTURE.
CAUTION:
USE OF CONTROLS OR ADJUSTMENTS OR PERFORMANCE OF PROCEDURES OTHER THAN THOSE SPECIFIED HEREIN MAY RESULT IN HAZARDOUS RADIATION EXPOSURE.
THIS PRODUCT SHOULD NOT BE ADJUSTED OR REPAIRED BY ANYONE EXCEPT PROPERLY QUALIFIED SERVICE PERSONNEL.
n Laser Class (IEC 60825-1:2001)
IMPORTANT SAFETY
INSTRUCTIONS
1.Read these instructions.
2.Keep these instructions.
3.Heed all warnings.
4.Follow all instructions.
5.Do not use this apparatus near water.
6.Clean only with dry cloth.
7.Do not block any ventilation openings.
Install in accordance with the manufacturer’s instructions.
8.Do not install near any heat sources such as radiators, heat registers, stoves, or other apparatus (including amplifiers) that produce heat.
9.Do not defeat the safety purpose of the polarized or grounding-type plug. A polarized plug has two blades with one wider than the other. A grounding type plug has two blades and a third grounding prong. The wide blade or the third prong are provided for your safety. If the provided plug does not fit into your outlet, consult an electrician for replacement of the obsolete outlet.
10.Protect the power cord from being walked on or pinched particularly at plugs, convenience receptacles, and the point where they exit from the apparatus.
11.Only use attachments/accessories specified by the manufacturer.
12.Use only with the cart, stand, tripod, bracket, or table
specified by the manufacturer, or sold with the apparatus. When a cart is used, use caution when moving the cart/ apparatus combination to avoid injury from tip-over.
13. Unplug this apparatus during lightning storms or when unused for long periods of time.
14.Refer all servicing to qualified service personnel.
Servicing is required when the apparatus has been damaged in any way, such as power-supply cord or plug is damaged, liquid has been spilled or objects have fallen into the apparatus, the apparatus has been exposed to rain or moisture, does not operate normally, or has been dropped.
15.Batteries shall not be exposed to excessive heat such as sunshine, fire or the like.
CAUTION:
To completely disconnect this product from the mains, disconnect the plug from the wall socket outlet.
The mains plug is used to completely interrupt the power supply to the unit and must be within easy access by the user.
PRECAUTION:
Pour déconnecter complètement ce produit du courant secteur, débranchez la prise de la prise murale.
La prise secteur est utilisée pour couper complètement l’alimentation de l’appareil et l’utilisateur doit pouvoir y accéder facilement.
PRECAUCIÓN:
Para desconectar completamente este producto de la alimentación eléctrica, desconecte el enchufe del enchufe de la pared.
El enchufe de la alimentación eléctrica se utiliza para interrumpir por completo el suministro de alimentación eléctrica a la unidad y debe de encontrarse en un lugar al que el usuario tenga fácil acceso.
ESPAÑOL |
FRANÇAIS |
ENGLISH |
FCC INFORMATION (For US customers)
1.COMPLIANCE INFORMATION
Product Name: CD Receiver Model Number: M-CR603
This product complies with Part 15 of the FCC Rules. Operation is subject to the following two conditions: (1) this product may not cause harmful interference, and (2) this product must accept any interference received, including interference that may cause undesired operation.
Marantz America, Inc.
(a D & M Holdings Company) 100 Corporate Drive, Mahwah, NJ, 07430, U.S.A. Tel. (630) 741-0300
2.IMPORTANT NOTICE: DO NOT MODIFY THIS PRODUCT
This product, when installed as indicated in the instructions contained in this manual, meets FCC requirements. Modification not expressly approved by Marantz may void your authority, granted by the FCC, to use the product.
3.IMPORTANT
When connecting this product to network hub or router, use only shielded STP or ScTP LAN cables which is available at retailer.
Follow all installation instructions. Failure to follow instructions could void your authority, granted by the FCC, to use the product.
4.NOTE
This product has been tested and found to comply with the limits for a Class B digital device, pursuant to Part 15 of the FCC Rules. These limits are designed to provide reasonable protection against harmful interference in a residential installation.
This product generates, uses and can radiate radio frequency energy and, if not installed and used in accordance with the instructions, may cause harmful interference to radio communications. However, there is no guarantee that interference will not occur in a particular installation. If this product does cause harmful interference to radio or television reception, which can be determined by turning the product OFF and ON, the user is encouraged to try to correct the interference by one or more of the following measures:
•Reorient or relocate the receiving antenna.
•Increase the separation between the equipment and receiver.
•Connect the product into an outlet on a circuit different from that to which the receiver is connected.
•Consult the local retailer authorized to distribute this type of product or an experienced radio/TV technician for help.
For Canadian customers:
This Class B digital apparatus complies with Canadian ICES-003.
Cet appareil numérique de la classe B est conforme à la norme NMB-003 du Canada.
I
ENGLISH FRANÇAIS ESPAÑOL
nNOTES ON USE / OBSERVATIONS RELATIVES A L’UTILISATION / NOTAS SOBRE EL USO |
||||||
|
|
|
|
|||
WARNINGS |
AVERTISSEMENTS |
|
ADVERTENCIAS |
|||
|
|
|
|
|||
• Avoid high temperatures. |
• Eviter des températures élevées. |
|
• Evite altas temperaturas. |
|||
Allow for sufficient heat dispersion when |
Tenir compte d’une dispersion de |
chaleur |
Permite la suficiente dispersión del calor cuando |
|||
installed in a rack. |
suffisante lors de l’installation sur une étagère. |
está instalado en la consola. |
||||
• Handle the power cord carefully. |
• Manipuler |
le |
cordon |
d’alimentation |
avec |
• Maneje el cordón de energía con cuidado. |
Hold the plug when unplugging the cord. |
précaution. |
|
|
|
|
Sostenga el enchufe cuando desconecte el |
• Keep the unit free from moisture, water, and |
Tenir la prise lors du débranchement du cordon. |
cordón de energía. |
||||
dust. |
• Protéger l’appareil contre l’humidité, l’eau et la |
• Mantenga el equipo libre de humedad, agua y |
||||
• Unplug the power cord when not using the unit |
poussière. |
|
|
|
|
polvo. |
for long periods of time. |
• Débrancher |
le |
cordon |
d’alimentation |
lorsque |
• Desconecte el cordón de energía cuando no |
• Do not obstruct the ventilation holes. |
l’appareil n’est pas utilisé pendant de longues |
utilice el equipo por mucho tiempo. |
||||
• Do not let foreign objects into the unit. |
périodes. |
|
|
|
|
• No obstruya los orificios de ventilación. |
• Do not let insecticides, benzene, and thinner |
• Ne pas obstruer les trous d’aération. |
|
• No deje objetos extraños dentro del equipo. |
|||
come in contact with the unit. |
• Ne pas laisser des objets étrangers dans |
• No permita el contacto de insecticidas, gasolina |
||||
• Never disassemble or modify the unit in any way. |
l’appareil. |
|
|
|
|
y diluyentes con el equipo. |
• Ventilation should not be impeded by covering |
• Ne pas mettre en contact des insecticides, du |
• Nunca desarme o modifique el equipo de |
||||
the ventilation openings with items, such as |
benzène et un diluant avec l’appareil. |
|
ninguna manera. |
|||
newspapers, tablecloths or curtains. |
• Ne jamais démonter ou modifier l’appareil d’une |
• La ventilación no debe quedar obstruida por |
||||
• Naked flame sources such as lighted candles |
manière ou d’une autre. |
|
|
haberse cubierto las aperturas con objetos como |
||
should not be placed on the unit. |
• Ne pas recouvrir les orifices de ventilation avec |
periódicos, manteles o cortinas. |
||||
• Observe and follow local regulations regarding |
des objets tels que des journaux, nappes ou |
• No deberán colocarse sobre el aparato fuentes |
||||
battery disposal. |
rideaux. Cela entraverait la ventilation. |
|
inflamables sin protección, como velas |
|||
• Do not expose the unit to dripping or splashing |
• Ne jamais placer de flamme nue sur l’appareil, |
encendidas. |
||||
fluids. |
notamment des bougies allumées. |
|
• A la hora de deshacerse de las pilas, respete la |
|||
• Do not place objects filled with liquids, such as |
• Veillez à respecter les lois en vigueur lorsque |
normativa para el cuidado del medio ambiente. |
||||
vases, on the unit. |
vous jetez les piles usagées. |
|
• No exponer el aparato al goteo o salpicaduras |
|||
• Do not handle the mains cord with wet hands. |
• L’appareil ne doit pas être exposé à l’eau ou à |
cuando se utilice. |
||||
• When the switch is in the OFF position, the |
l’humidité. |
|
|
|
|
• No colocar sobre el aparato objetos llenos de |
equipment is not completely switched off from |
• Ne pas poser d’objet contenant du liquide, par |
líquido, como jarros. |
||||
MAINS. |
exemple un vase, sur l’appareil. |
|
• No maneje el cable de alimentación con las |
|||
• The equipment shall be installed near the |
• Ne pas manipuler le cordon d’alimentation avec |
manos mojadas. |
||||
power supply so that the power supply is easily |
les mains mouillées. |
|
|
• Cuando el interruptor está en la posición OFF, el |
||
accessible. |
• Lorsque l’interrupteur est sur la position OFF, |
equipo no está completamente desconectado de |
||||
|
l’appareil n’est pas complètement déconnecté du |
la alimentación MAINS. |
||||
|
SECTEUR (MAINS). |
|
|
• El equipo se instalará cerca de la fuente de |
||
|
• L’appareil |
sera |
installé |
près de la |
source |
alimentación de manera que resulte fácil acceder |
|
d’alimentation, de sorte que cette dernière soit |
a ella. |
||||
|
facilement accessible. |
|
|
|
||
n CAUTIONS ON INSTALLATION
PRÉCAUTIONS D’INSTALLATION EMPLAZAMIENTO DE LA INSTALACIÓN
|
z |
z |
z |
|
Wall |
z |
ParedParoi |
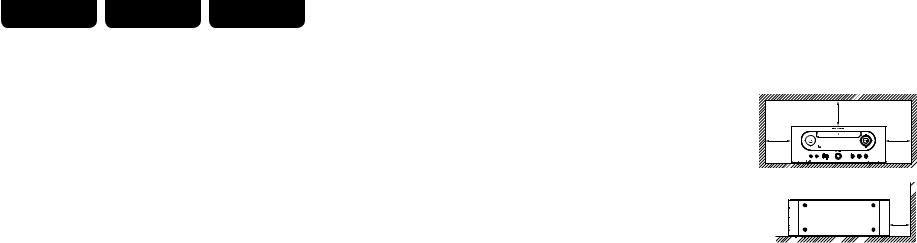
zFor proper heat dispersal, do not install this unit in a confined space, such as a bookcase or similar enclosure.
•More than 0.3 m (12 in.) is recommended.
•Do not place any other equipment on this unit.
zPour permettre la dissipation de chaleur requise, n’installez pas cette unité dans un espace confiné tel qu’une bibliothèque ou un endroit similaire.
•Une distance de plus de 0,3 m (12 po) est recommandée.
•Ne placez aucun matériel sur cet appareil.
zPara la dispersión del calor adecuadamente, no instale este equipo en un lugar confinado tal como una librería o unidad similar.
•Se recomienda dejar más de 0,3 m (12 pulg.) alrededor.
•No coloque ningún otro equipo sobre la unidad.
II

Contents
Getting started ·······································································2
Accessories ····················································································2
Main features·················································································2
Cautions on handling····································································2
About this guide············································································2
Discs ·······························································································3
Discs playable on this unit ····························································3
Holding discs ················································································3
Loading discs················································································3
Cautions on loading discs ·····························································3
Cautions on handling ····································································3
Cautions on storing discs······························································3 Cleaning discs···············································································3
About the remote control·····························································4
Inserting the batteries···································································4 Operating range of the remote control ········································4
Connections ·············································································5
Speaker connections ····································································5
Connecting the speaker cables·····················································5 Connecting recording components·············································6
CD recorder / MD recorder···························································6
Connecting a TV············································································6
Connecting an antenna ································································7
FM/AM··························································································7 Connecting to a home network (LAN) ········································8
Required system···········································································8 Connecting an iPod·······································································8
iPod stand ······················································································9
Connecting a USB memory device············································10
Connecting a portable player·····················································10
Connecting the power cord························································10
Basic operations···································································11
Preparations ················································································11
Turning the power on ·································································11
Turning the power off·································································11
Setting the current time (Auto Adjust) (12-Hour Display) ···········11
Operations possible during playback········································12
Input source switching ·······························································12
Adjusting the master volume······················································12 Muting the sound ·······································································12
Adjusting the tone ······································································12
Setting the sleep timer ·······························································13
Switching the display’s brightness ·············································13
Listening with headphones·························································13
CD playback ·················································································13
Before playing a disc···································································13 Playing CDs·················································································13 Playing repeatedly (Repeat playback) ········································13
Playing random order (Random playback) ··································13
Playing tracks in the desired order (Program playback) ··············14
Switching the display··································································14
MP3 and WMA files playback·····················································14
MP3 and WMA files playback·····················································14
Tuner playback ···········································································16
Tuning in Broadcast Stations ······················································16
Automatically presetting FM stations (Auto preset) ···················16
Presetting FM/AM stations manually ·········································17
Listening to preset stations ························································17
Calling stations reqistered in Preset List ····································17
Deleting stations registered in Preset List··································17
iPod® playback ···········································································18
Before playing a USB or an iPod·················································18
Playing an iPod············································································18 Disconnecting the iPod·······························································18
USB memory device playback ···················································19
Playing files stored on USB memory devices·····························19
Network audio playback ····························································20
Listening to internet radio···························································20
Playing files stored on a music server ·······································21
Listening to Napster ···································································21
Listening to Pandora···································································22
Listening to Rhapsody ································································23
Portable audio player playback ·················································25
Playing portable audio player ······················································25
Listening to AUX·········································································25
Favorite function ········································································25
Registering Internet radio stations, music servers, and tuners in Favorite List ················································································25
Calling Internet radio stations, files registered or tuners in Favorite List ················································································25
Deleting Internet radio stations, files registered or tuners in Favorite List ················································································25
Advanced operations·························································26
Menu map····················································································26
The wireless receiver connection ··············································27
Remote control connection························································27
Setting the remote control··························································27 Setting the timer [Timer] ···························································28
Setting the timer·········································································28
Adjusting the clock automatically [Clock] ································29
Setting the Time Zone ································································29
Setting the Summer Time ··························································29
Auto Adjust·················································································29
Setting the current time (Manual Adjust) (12-Hour Display) ·······29
ENGLISH
Setting the network [Network] ·················································30
Network connecting ···································································30
Network connecting (DHCP=Off) ···············································30
Proxy Settings·············································································31 Network Standby········································································31
PC Language···············································································31 Friendly Name Edit ·····································································31
Update Notification·····································································31
Upgrade Notification···································································31
Setting the others [Other]··························································32
Auto standby···············································································32 Screen saver···············································································32
Firmware update·········································································32 Add New Feature········································································32 Setting speaker output ·······························································33
Setting AMP characteristics ·······················································34
Other functions ···········································································35
Inputting characters····································································35
Auto power on············································································35
Last function memory·································································35 Resetting the microprocessor ····················································35
Information·············································································36
Part names and functions···························································36
Front panel··················································································36
Rear panel···················································································37
Remote control···········································································37
MP3 and WMA·············································································40
MP3 and WMA formats······························································40
iPod®····························································································40
USB memory ···············································································40
Important information·································································40
Network audio·············································································41
Important information·································································41
Explanation terms·······························································42
Troubleshooting···································································43
Specifications········································································45
Index ··························································································46
Index Specifications Troubleshooting terms Explanation Information Operations Advanced Operations Basic Connections Started Getting
1
ENGLISH
Getting started
Thank you for purchasing this Marantz product. To ensure proper operation, please read this user guide carefully before using the product.
After reading the guide, be sure to keep it for future reference.
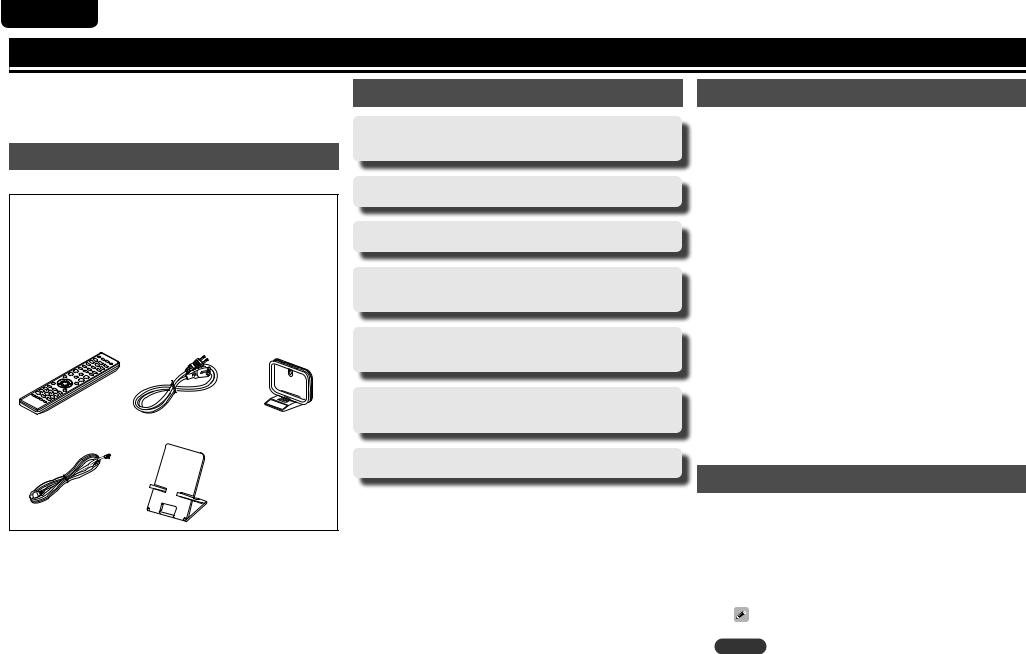
Accessories
Check that the following parts are supplied with the product.
q Remote control........................................................................ |
|
1 |
w R03/AAA batteries................................................................... |
|
2 |
e AC Power cord (Cord length: Approx. 6.6 ft / 2 m) |
.................. 1 |
|
r AM loop antenna ..................................................................... |
|
1 |
t FM indoor antenna .................................................................. |
|
1 |
y iPod stand................................................................................ |
|
1 |
u User guide ............................................................................... |
|
1 |
i Warranty card (U.S.A.)............................................................. |
|
1 |
o Warranty card (Canada) ........................................................... |
|
1 |
q |
e |
r |
t y
Main features
High quality & high power digital amplifier. Bi-amp operation.
DLNA ver. 1.5 supported for Audio Network.
Internet radio by vTuner.
USB input “Made for iPod” and “Made for iPhone”.
M-XPort for Bluetooth wireless connection (with Optional RX101).
3Lines OELD (Organic Electroluminescence
Display).
Stylish & compact aluminum cabinet.
Cautions on handling
•Before turning the power switch on
Check once again that all connections are correct and that there are no problems with the connection cables.
•Power is supplied to some of the circuitry even when the unit is set to the standby mode. When going on vacation or leaving home for long periods of time, be sure to unplug the power cord from the power outlet.
•Proper ventilation
If the unit is left in a room full of smoke from cigarettes, etc., for long periods of time, the surface of the optical pickup may get dirty, preventing it from receiving signals properly.
•About condensation
If there is a major difference in temperature between the inside of the unit and its surroundings, condensation may form on parts inside the unit, causing it to fail to operate properly.
If this happens, let the unit sit for an hour or two with the power turned off and wait until there is little difference in temperature before using the unit.
•Cautions on using mobile phones
Using a mobile phone near this unit may result in noise. If that occurs, move the mobile phone away from the unit when it is in use.
•Moving the unit
Turn off the power and unplug the power cord from the power outlet. Next, disconnect the cables connected to other system units before moving the unit.
About this guide
nOperation buttons
The operations described in this guide are based mainly on remote control operation.
nSymbols
vThis symbol indicates a reference page on which related information is described.
|
|
|
This symbol indicates a supplementary information |
|
|
|
|
and tips for operations. |
|
NOTE |
This symbol indicates points to remember operations |
|||
or function limitations. |
||||
|
|
|
||
nIllustrations
Note that the illustrations in these instructions may differ from the actual unit for explanation purposes.
2
Discs
Discs playable on this unit
q Music CDs
Discs marked with the logo below can be played in this unit.
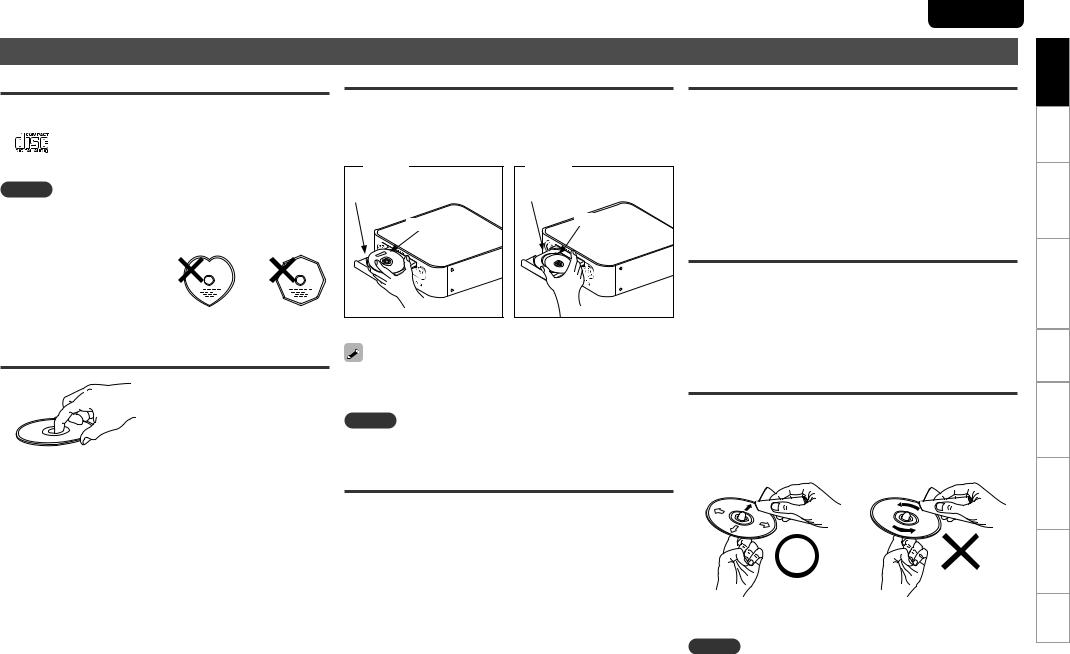
Loading discs
•Place the disc in the tray, label side up.
•Make sure the disc tray is fully open when inserting the disc.
•Place the discs flat, 12 cm discs in the outer tray guide (Figure 1), 8 cm discs in the inner tray guide (Figure 2).
w CD-R/CD-RW
NOTE
•Discs in special shapes (heart-shaped discs, octagonal discs, etc.) cannot be played. Do not attempt to play them, as doing so can damage the unit.
•Some discs and some recording formats cannot be played.
•Non-finalized discs cannot be played.
•What is finalization? Finalization is the process that
makes recorded CD-R/CD-RW discs playable on compatible players.
Figure 1 |
Outer tray guide |
12 cm disc |
Figure 2 |
Inner tray guide |
8 cm disc |
• Place 8 cm discs in the inner tray guide without using an adapter.
Holding discs
Do not touch the signal surface.
•“Unsupported” is displayed if a disc that cannot be played is loaded.
•“No Disc” is displayed if the disc is loaded upside-down or if no disc is loaded.
NOTE
Do not push the disc tray in by hand when the power is turned off. Doing so could damage the set.
ENGLISH
Cautions on handling
•Do not get fingerprints, oil or dirt on discs.
•Take special care not to scratch discs when removing them from their cases.
•Do not bend or heat discs.
•Do not enlarge the hole in the center.
•Do not write on the labeled (printed) surface with ball-point pens, pencils, etc., or stick new labels on discs.
•Water droplets may form on discs if they are moved suddenly from a cold place (outdoors for example) to a warm place, but do not try to dry them off using a hairdryer, etc.
Cautions on storing discs
•Be sure to remove discs after using them.
•Be sure to store discs in their cases to protect them from dust, scratches, warping, etc.
•Do not store discs in the following places:
1.Places exposed to direct sunlight for long periods of time
2.Dusty or humid places
3.Places exposed to heat from heaters, etc.
Cleaning discs
•If there are fingerprints or dirt on a disc, wipe them off before using the disc. Fingerprints and dirt can impair sound quality and cause interruptions in playback.
•Use a commercially available disc cleaning set or a soft cloth to clean discs.
Cautions on loading discs
• Only load one disc at a time. Loading two or more discs can damage the unit or scratch the discs.
• Do not use cracked or warped discs or discs that have been repaired with adhesive, etc.
• Do not use discs on which the sticky part of cellophane tape or labels is exposed or on which there are traces of where labels have been removed. Such discs can get caught inside the player and damage it.
Gently wipe the disc from the Do not wipe in a circular motion. inside towards the outside.
NOTE
Do not use record spray, antistatic agents, benzene, thinner or other solvents.
Index Specifications Troubleshooting terms Explanation Information Operations Advanced Operations Basic Connections Started Getting
3
ENGLISH
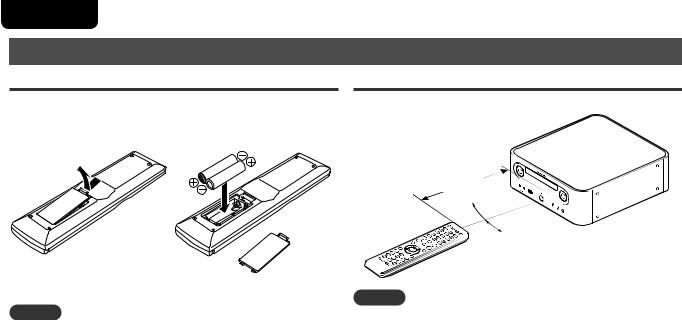
About the remote control
Inserting the batteries
q Remove the rear cover of the w Set two R03/AAA batteries in remote control. the battery compartment in the
indicated direction.
Operating range of the remote control
Operate the remote control while pointing it at the remote sensor.
Approx. 23 ft / 7 m
30°  30°
30°
e Put the rear cover back on.
NOTE
•Insert the specified batteries in the remote control unit.
•Replace the batteries with new ones if the set does not operate even when the remote control unit is operated close to the unit. (The supplied batteries are only for verifying operation.)
•When inserting the batteries, be sure to do so in the proper direction, following the q and w marks in the battery compartment.
•To prevent damage or leakage of battery fluid:
•Do not use a new battery together with an old one.
•Do not use two different types of batteries.
•Do not attempt to charge dry batteries.
•Do not short-circuit, disassemble, heat or dispose of batteries in flames.
•Do not keep the battery in a place exposed to direct sunlight or in places with extremely high temperatures, such as near a heater.
•If the battery fluid should leak, carefully wipe the fluid off the inside of the battery compartment and insert new batteries.
•Remove the batteries from the remote control unit if it will not be in use for long periods.
•Used batteries should be disposed of in accordance with the local regulations regarding battery disposal.
NOTE
The set may function improperly or the remote control may not operate if the remote control sensor is exposed in direct sunlight or strong artificial light such as a fluorescent or infrared light.
4
ENGLISH
Connections
This section explains how to connect speakers, recording |
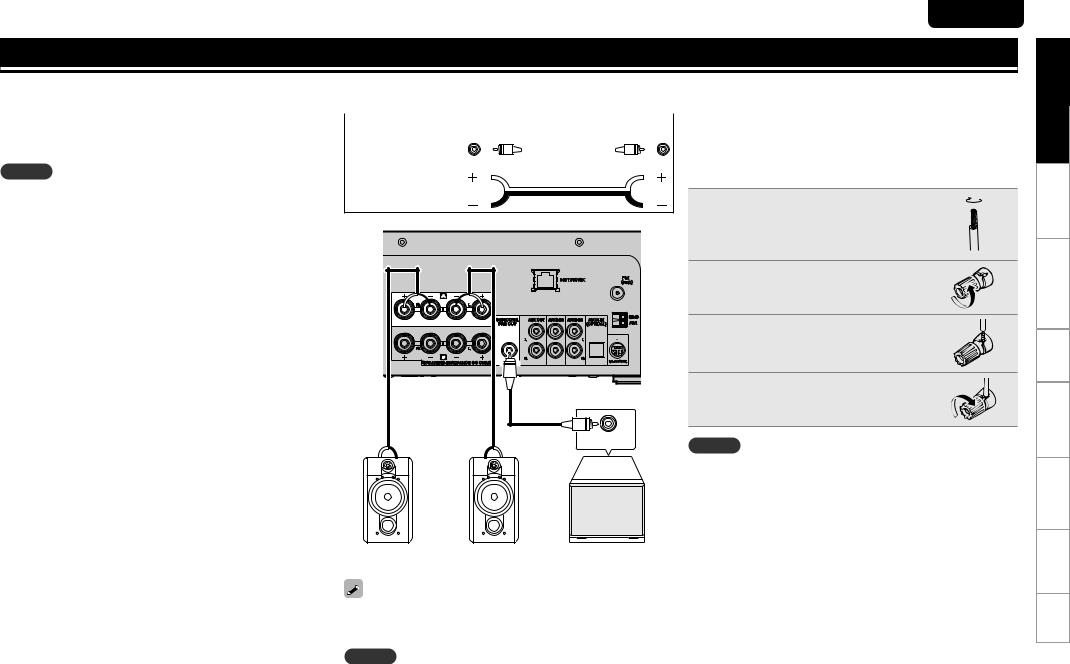
Speaker connections |
|
|
|||||||
equipment, antennas and network. |
|
|
||||||||
For other connections, see the sections below. |
|
|
|
|
|
|
|
|
Connecting the speaker cables |
|
n The wireless receiver connection (vpage 27) |
Audio cable (sold separately) |
|||||||||
|
|
|
|
|
|
|
|
|
||
Pin-plug cable (Black) |
|
|
|
|
|
|
Carefully check the left (L) and right (R) channels and + (red) and – |
|||
|
|
|
|
|
|
|
|
|||
|
|
|
|
|
|
|
|
(black) polarities on the speakers being connected to the unit, and be |
||
|
|
|
|
|
|
|
|
|
||
|
|
|
|
|
|
|
|
|
||
NOTE |
|
|
|
|
|
|
|
|
sure to connect the channels and polarities correctly. |
|
• Do not plug in the power cord until all connections have been |
Speaker cable |
|
|
|
Peel off about 10 mm of sheathing |
|
|
completed. |
|
|
|
|
|
|
|
• When making connections, also refer to the user guide of the other |
|
|
|
|
|
1 from the tip of the speaker cable, then |
|
components. |
|
|
|
|
|
either twist the core wire tightly or |
|
• Be sure to connect the left and right channels properly (left with left, |
|
|
|
|
|
apply solder to it. |
|
right with right). |
|
|
|
|
|
|
|
|
|
|
|
|
|
|
|
• Do not bundle power supply cords together with connection cables. |
|
|
|
|
|
Turn the speaker terminal |
|
Doing so can result in humming or noise. |
|
|
|
|
|
2 counterclockwise to loosen it. |
|
|
|
|
|
|
|
|
|
|
|
|
|
|
|
Insert the speaker cable’s core wire to |
|
|
|
|
|
|
|
3 all the way into the speaker terminal. |
|
|
|
|
|
|
|
Turn the speaker terminal clockwise |
|
|
|
|
|
|
|
4 to tighten it. |
|
|
|
|
|
|
Input terminals |
NOTE |
|
|
q |
w |
w |
q |
|
|
|
|
|
• Use speakers with an impedance of 6 to 8 Ω. The protection circuit |
|||||
|
|
|
|
|
|
||
|
|
|
|
|
|
may be activated if speakers with an impedance other than specified |
|
|
|
|
|
|
|
are used. |
|
|
|
|
|
|
|
• Connect the speaker cables so they do not stick out of the speaker |
|
|
|
|
|
|
|
terminals. The protection circuit may be activated if the wires |
|
|
|
|
|
|
|
touch the rear panel or if the + and – sides |
touch each other |
|
|
R |
L |
|
Subwoofer with |
(vpage 6 “Protection circuit”). |
|
|
|
|
• Never touch the speaker terminals while the |
power supply is |
|||
|
|
|
|
|
built-in amp |
||
|
|
|
|
|
connected. Doing so could result in electric shock. |
||
|
|
|
|
|
|
||
Set the speaker output for the unit to match the speaker connections made to terminals A and B (vpage 33 “Setting speaker output”). The default setting is SPEAKER A.
NOTE
Be sure to lower the audio volume before making speaker settings.
Index Specifications Troubleshooting terms Explanation Information Operations Advanced Operations Basic Connections Started Getting
5
ENGLISH
Speaker connections
Protection circuit
The protection circuit is be activated in the following situations:
•If the speaker cable wire touches the rear panel or screws or if the speaker cable wire touches the speaker cable’s + and – sides are touching
•If the surrounding temperature is extremely high
•If the inside of the amplifier gets hot to extended use at a high output
If this happens, unplug the power cord, then check the connections of the speaker cables and input cables. If the unit becomes very hot, wait for it to cool off and improve the ventilation around it. After doing this, plug the power cord back in.
If the protection circuit is activated even though there are no problems with the ventilation around the unit or in connections, the unit may be damaged. Turn off the power and then contact a Marantz service center.
|
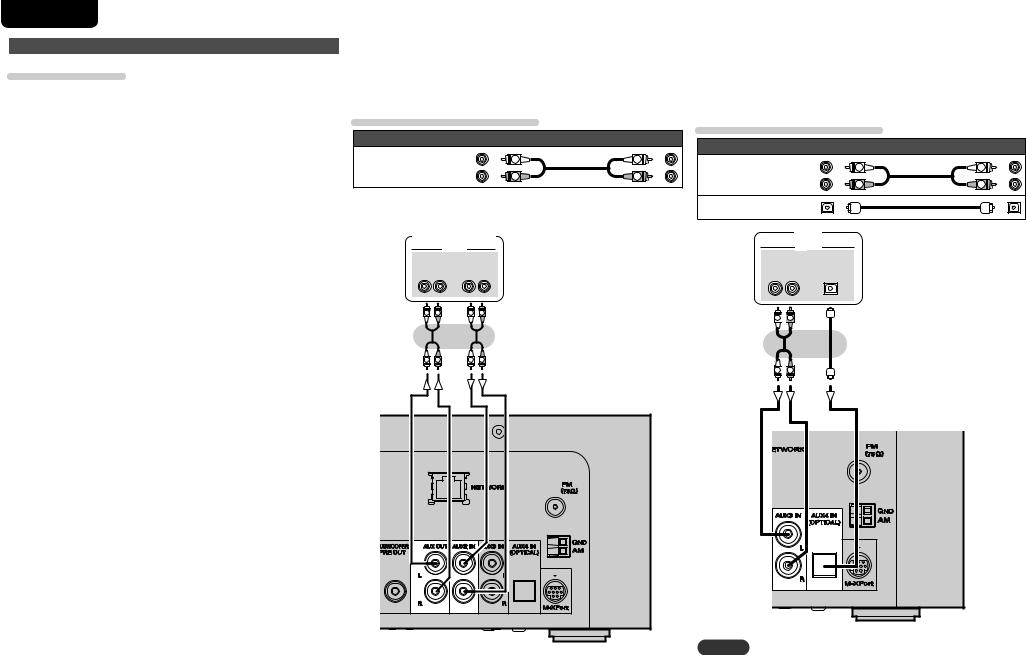
Connecting recording components |
|
Connecting a TV |
|
CD recorder / MD recorder |
• Select the connector to use and connect the device. |
|
|
• To listen to TV audio through this device, use the optical digital |
||
|
|
|
connection. |
Cables used for connections
Audio cable (sold separately)
Stereo |
(White) |
L |
L |
|
|
||
pin-plug cable |
(Red) |
R |
R |
CD recorder /
MD recorder /
Tape deck
|
|
AUDIO |
|
|
IN |
AUDIO |
|
|
OUT |
||
L |
R |
L |
R |
L |
R |
L |
R |
L |
R |
L |
R |
Cables used for connections
Audio cable (sold separately)
Stereo |
(White) |
L |
L |
|
|
||
pin-plug cable |
(Red) |
R |
R |
Optical cable
TV
AUDIO
AUDIO OPTICAL
OUT OUT
LR
L 
 R
R
L 
 R
R
NOTE
Other digital audio signals than 2 channel linear PCM cannot be input through AUX4 IN (OPTICAL) terminal of this unit.
When you try to input digital audio signals other than 2 channel linear PCM to this unit, set the digital audio output setting of the TV to 2 channel PCM.
For details, see the operating instructions of the TV.
6
Connecting an antenna
FM/AM
•Connect the FM antenna or AM loop antenna supplied with the unit to enjoy listening to radio broadcasts.
•After connecting the antenna and receiving a broadcast signal (vpage 16 “Tuning in Broadcast Stations”), fix the antenna with
tape in a position where the noise level becomes minimal.
|
AM loop antenna |
FM indoor antenna |
(Supplied) |
|
|
(Supplied) |
|
|
Black |
White |
q |
w |
e |
NOTE |
|
|
•Do not connect two FM antennas simultaneously.
•Even if an external AM antenna is used, do not disconnect the AM loop antenna.
•Make sure the AM loop antenna lead terminals do not touch metal parts of the panel.
•If the signal has noise interference, connect the ground terminal (GND) to reduce noise.
•If you are unable to receive a good broadcast signal, we recommend installing an outdoor antenna. For details, inquire at the retail store where you purchased the unit.
nAM loop antenna assembly
1Put the stand section through the bottom of the loop antenna from the rear and bend it forward.
2Insert the projecting part into the square hole in the stand.
Stand Square hole
Loop 

 Projecting antenna
 part
part
nUsing the AM loop antenna
Suspending on a wall
Suspend directly on a wall without assembling.
Nail, tack, etc.
Standing alone
Use the procedure shown upper to assemble.
ENGLISH
Index Specifications Troubleshooting terms Explanation Information Operations Advanced Operations Basic Connections Started Getting
7

ENGLISH
Connecting to a home network (LAN)
•This unit lets you play via your home network (LAN) music files stored on a computer and music content such as that from Internet radio.
•You can update by downloading the latest firmware from the Marantz website.
•See “Setting the network [Network]” (vpage 30) on the menu for more information on network setting.
Cables used for connections
Cable (sold separately)
Ethernet cable
Computer
Modem
Internet
Router |
To WAN side |
|
|
To LAN port |
|
|
To LAN port |
LAN port/ |
|
Ethernet |
|
|
|
|
|
|
connector |
For connections to the Internet, contact an ISP (Internet Service Provider) or a computer shop.
Required system
nBroadband internet connection
nModem
Device that connects to the broadband circuit and conducts communications on the Internet.
A type that is integrated with a router is also available.
nRouter
When using this unit, we recommend you use a router equipped with the following functions:
•Built-in DHCP server
This function automatically assigns IP addresses on the LAN.
•Built-in 100BASE-TX switch
When connecting multiple devices, we recommend a switching hub with a speed of 100 Mbps or greater.
nEthernet cable (CAT-5 or greater recommended)
•Use only shielded STP or ScTP LAN cable which is available at retailer.
•Some flat type Ethernet cables are easily affected by noise. We recommend using a normal type cable.
•If you have an Internet provider contract for a line on which network settings are made manually, make the settings at “Network connecting (DHCP=Off)” (vpage 30).
•With this unit, it is possible to use the DHCP and Auto IP functions to make the network settings automatically.
•When using this unit with the broadband router’s DHCP function enabled, this unit automatically performs the IP address setting and other settings.
When using this unit connected to a network with no DHCP function, make the settings for the IP address, etc., at “Network connecting (DHCP=Off)” (vpage 30).
•When setting manually, check the setting contents with the network administrator.
NOTE
•A contract with an ISP is required to connect to the Internet.
No additional contract is needed if you already have a broadband connection to the Internet.
•The types of routers that can be used depend on the ISP. Contact an ISP or a computer shop for details.
•Marantz assumes no responsibility whatsoever for any communication errors or troubles resulting from customer’s network environment or connected devices.
•This unit is not compatible with PPPoE. A PPPoE-compatible router is required if you have a contract for a type of line set by PPPoE.
•Do not connect an NETWORK connector directly to the LAN port/ Ethernet connector on your computer.
Connecting an iPod
Cables used for connections
Audio cable (sold separately)
iPod cable
iPod
To connect an iPod to this unit, use the iPod cable supplied with the iPod.
nSupported iPod models
8
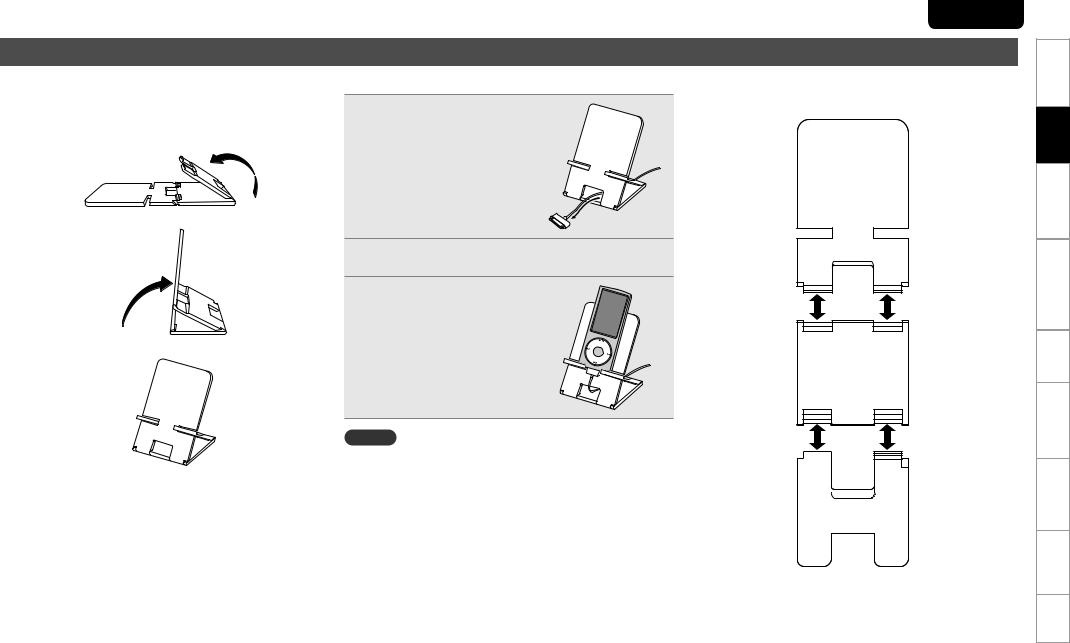
iPod stand
You can set your iPod or iPhone on the supplied iPod stand.
nSetting up the iPod stand
Use the procedure below to set up the iPod stand.
q
w
e
ENGLISH
nSetting your iPod on the iPod stand
1Pass the iPod cable through the opening on the iPod stand.
2 Connect the iPod to the iPod cable.
3 Setstand.your iPod on the iPod
nIf the iPod stand becomes detached
Assemble as shown below.
"
"
$
NOTE
• Make sure to place the iPod stand on a flat surface. |
|
|
|
|
|
||
|
|
||
• Do not operate the iPod or iPhone while it is set on the iPod stand. |
|
|
|
$ |
|||
Doing so could cause the iPod or iPhone to fall off from the stand. |
|||
• Some iPod models cannot be set on the iPod stand because the |
|
|
|
|
|
||
underside of the iPod is blocked when the iPod cable is connected. |
|
|
|
•Make sure to disable the iPhone vibration function before you set it on the iPod stand. If the iPhone vibrates when it is set on the stand, it could fall off from the stand and be damaged.
• Do not use the iPod stand for purposes other than the one it is intended to perform.
•Marantz will accept no responsibility whatsoever for any damage of equipment connected to this unit while it is used.
Index Specifications Troubleshooting terms Explanation Information Operations Advanced Operations Basic Connections Started Getting
9
ENGLISH
Connecting a USB memory device
USB memory device
NOTE
•A computer can not be connected to and operate the unit via its USB port.
•Do not use an extension cable when connecting a USB memory device.
•For details about USB memory devices, see “USB memory” (vpage 40).
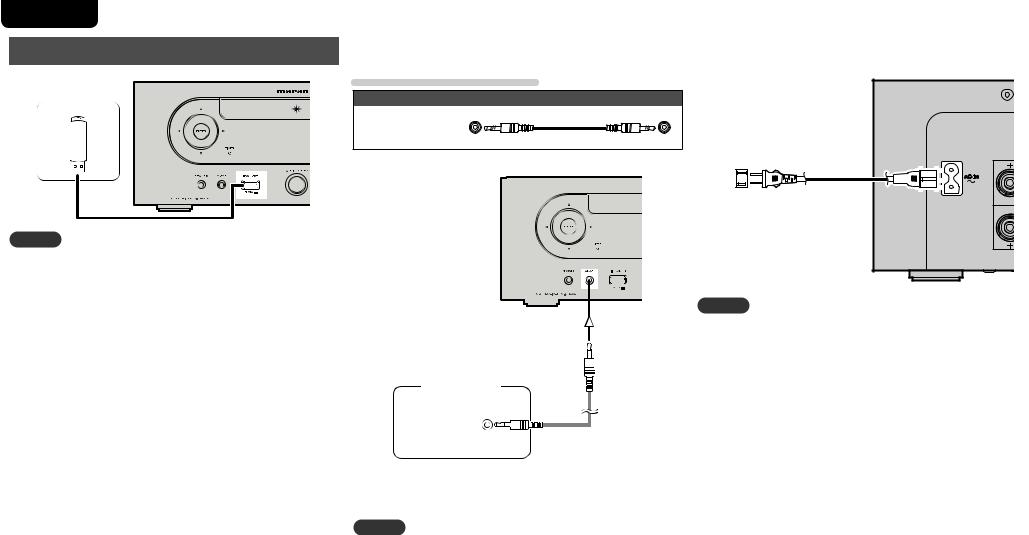
Connecting a portable player |
|
Connecting the power cord |
Cables used for connections
Audio cable (sold separately)
Stereo
mini-plug cable
Power cord (Supplied)
To household power outlet (AC 120 V, 60 Hz)
NOTE
• Only use the supplied power cord.
• Be sure the power cord is unplugged from the power outlet before connecting or disconnecting it to the AC IN.
Portable
Audio
HEADPHONE
Connect this unit and portable audio player using a separately sold mini-stereo audio cable.
NOTE
After you connect a portable audio player, the input source automatically switches to “AUX1”.
10

ENGLISH
Basic operations
Symbols used to indicate buttons in this guide
Button located on both the main unit and the remote control
BUTTON
Button only on the main unit  <BUTTON> Button only on the remote control
  [BUTTON]
ON/STANDBY


 ON/STANDBY
This section provides information on basic operations such as settings and playback procedures.
For other operations, see the sections below.
n Setting the timer [Timer] (vpage 28) n Setting the others [Other] (vpage 32)
Preparations
Turning the power on
Press ON/STANDBY.
NOTE
•Power continues to be supplied to some of the circuitry even when the power is in the standby mode. When leaving home for long periods of time, either press ON/STANDBY to turn off the power, or unplug the power cord from the power outlet.
•Be sure to stop playback before turning the power off.
nCompletely turning off the power
Unplug the power cord from the wall outlet.
•Note that the time setting is cleared when the power cord is unplugged from the outlet.
•The settings made for the various functions may be cleared if the power cord is left unplugged from a power outlet for an extended period of time.
Setting the current time (Auto Adjust) (12-Hour Display)
•When the unit is connected to the Internet, the current time is set automatically.
•The default Time Zone setting of this unit is the Eastern Standard
Time zone.
To change the Time Zone and Summer Time, see “Adjusting the clock automatically [Clock]” (vpage 29).
•When the unit is not connected to the Internet, set the current time manually. See “Setting the current time (Manual Adjust) (12-Hour Display)” (vpage 29).
Turning the power off
Press ON/STANDBY.
NOTE
• Be sure to stop playback before turning the power off.
Index Specifications Troubleshooting terms Explanation Information Operations Advanced Operations Basic Connections Started Getting
11
ENGLISH
Symbols used to indicate buttons in this guide
Button located on both the main unit and the remote control
BUTTON
Button only on the main unit  <BUTTON> Button only on the remote control
  [BUTTON]
o/p <ENTER> 8 9 <5> 13 2
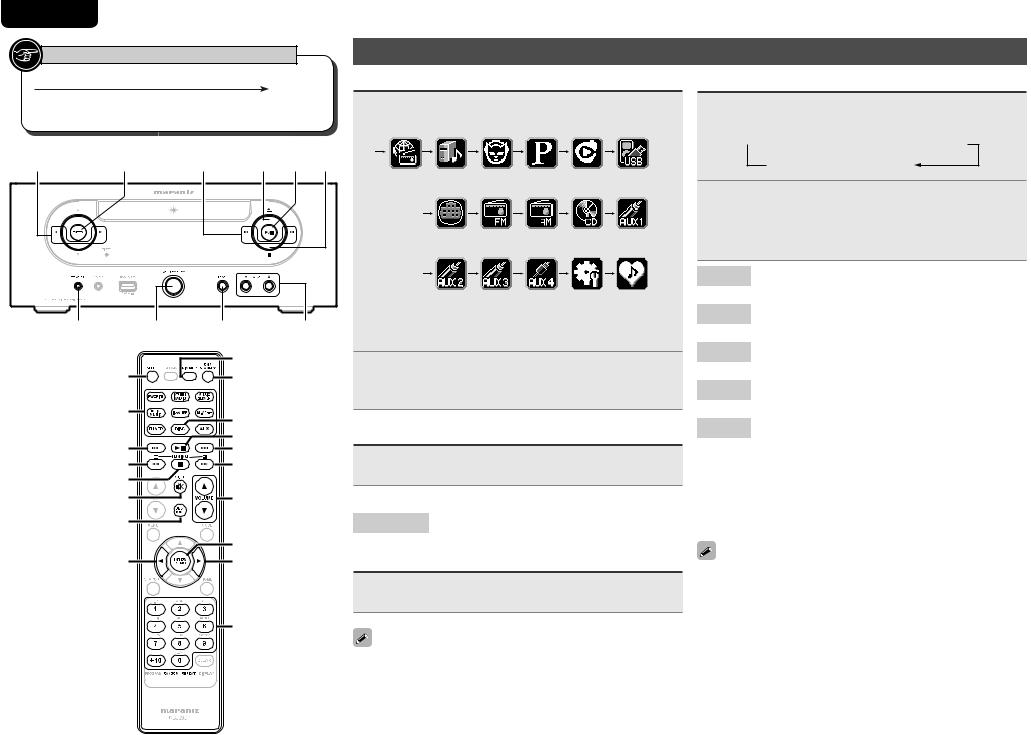
Operations possible during playback
Input source switching
Press <INPUT> and o p to select the input source, then press [ENTER/MEMO], <ENTER> or p.
|
|
|
|
|
|
|
|
||
|
|
|
|
|
|
|
|
|
|
|
|
|
|
|
|
|
|
|
|
|
|
|
|
|
|
|
|||
|
|
z1 |
|
|
|
|
|
|
|
|
|
|
|
|
|
|
|
|
|
|
|
|
|
|
|
|
|
||
|
|
|
|||||||
|
|
|
|
|
|
|
|
|
|
<PHONES> ON/STANDBY <INPUT> |
VOLUME df z1 “M-XPort” appears only when an RX101 wireless receiver is |
|
connected to M-XPort. |
|
[DIMMER] |
[SLEEP] |
ON/STANDBY |
[Input source select] |
[DISC] |
|
|
|
13 |
8 |
9 |
[6] |
[7] |
2 |
|
[MUTE] |
VOLUME df |
[DBB/TONE] |
|
|
[ENTER/MEMO] |
o |
p |
|
[NUMBER] |
Press [Input source select] ([FAVORITE], [INTERNET RADIO], [MUSIC SERVER], [ONLINE MUSIC], [iPod/ USB], [M-XPort], [TUNER], [DISC] or [AUX]).
Adjusting the master volume
Press VOLUME df.
The volume level is displayed.
[Adjustable range]
VOLUME 0 - 60 Default is “0”.
Muting the sound
Press [MUTE].
“MUTING” is displayed.
To cancel, press [MUTE] again.
(The mute mode is also canceled when VOLUME df is pressed.)
[RANDOM] 


 [REPEAT]
Adjusting the tone
1 Useadjusted.[DBB/TONE] to select the tone parameter to be
 DBB
DBB  Bass
Bass  Treble
S.Direct  Balance
2Adjust the volume with op.
•To make other tone adjustments at this time, press [DBB/ TONE].
•If no operation is performed for 5 seconds, the adjustment is retained and the normal display reappears.
DBB Emphasize the bass sound. (Dynamic Bass Boost)
[Selectable modes] |
ON |
– |
OFF |
|
|
|
|
BASS Adjusts the bass sound.
[Variable range] |
–10dB |
– |
+10dB |
|
|
|
|
TREBLE Adjusts the treble sound.
[Variable range] |
–10dB |
– |
+10dB |
|
|
|
|
BALANCE Adjusts the left/right volume balance.
[Variable range] |
L6 |
– |
CENTER |
– |
R6 |
|
|
|
|
|
|
S.DIRECT The tone is not adjusted.
This can also be set using (SOURCE DIRECT).
Settings made upon purchase:
• DBB....................................... |
OFF |
• BASS..................................... |
0dB |
• TREBLE................................. |
0dB |
• BALANCE....................... |
CENTER |
DBB, BASS and TREBLE can be set simultaneously.
12
 Loading...