


Contents |
Connections |
Playback |
Settings |
Tips |
Appendix |
|
|
|
|
|
|
Network Audio
Receiver
NR1200
Owner’s Manual
Front panel |
Display |
Rear panel |
1 |
Remote |
Index |

Contents |
Connections |
Playback |
Settings |
Tips |
Appendix |
Accessories |
7 |
|
|
|
Inserting the batteries |
8 |
|
|
Operating range of the remote control unit |
8 |
|
|
Features |
9 |
|
|
High quality sound |
9 |
|
|
High performance |
9 |
|
|
Easy operation |
13 |
|
Part names and functions |
14 |
|
|
|
Front panel |
14 |
|
|
Display |
17 |
|
|
Rear panel |
18 |
|
|
Remote control unit |
21 |
|
Connections |
|
|
|
Speaker installation |
25 |
|
|
Connecting speakers |
26 |
|
|
|
Before connecting speakers |
26 |
|
|
Connecting 2.1-channel speakers |
28 |
|
|
Second pair of speaker |
29 |
|
|
Bi-wiring connection |
30 |
|
Connecting a TV |
32 |
||
|
|
|
|
|
Connection 1 : TV equipped with an HDMI connector and |
33 |
|
|
compatible with the ARC (Audio Return Channel) |
||
|
|
|
|
|
Connection 2 : TV equipped with an HDMI connector and |
34 |
|
|
incompatible with the ARC (Audio Return Channel) |
||
|
Connecting a playback device |
35 |
|
|
Connecting a set-top box (Satellite tuner/cable TV) |
36 |
|
|
Connecting a DVD player or Blu-ray Disc player |
37 |
|
|
Connecting a turntable |
38 |
|
|
Connecting a USB memory device to the USB port |
39 |
|
Connecting FM/AM antennas |
40 |
||
Connecting to a home network (LAN) |
42 |
|
|
|
Wired LAN |
42 |
|
|
Wireless LAN |
43 |
|
|
Connecting an external control device |
44 |
|
|
REMOTE CONTROL jacks |
44 |
|
|
Connecting the power cord |
45 |
|
Front panel |
Display |
Rear panel |
2 |
Remote |
Index |

Contents |
Connections |
Playback |
Settings |
Tips |
Appendix |
Playback
Basic operation |
47 |
|
|
|
Turning the power on |
47 |
|
|
Selecting the input source |
47 |
|
|
Adjusting the volume |
48 |
|
|
Turning off the sound temporarily (Muting) |
48 |
|
|
Playback a DVD player/Blu-ray Disc player |
48 |
|
Playing a USB memory device |
49 |
|
|
|
Playing files stored on USB memory devices |
50 |
|
|
Listening to music on a Bluetooth device |
53 |
|
|
Playing music from Bluetooth device |
54 |
|
|
Pairing with other Bluetooth devices |
55 |
|
|
Reconnecting to this unit from a Bluetooth device |
56 |
|
|
Listening to FM/AM broadcasts |
57 |
|
|
Listening to FM/AM broadcasts |
58 |
|
|
Tuning in by entering the frequency (Direct Tune) |
59 |
|
|
Changing the tune mode (Tune Mode) |
60 |
|
|
Tuning in to stations and presetting them automatically (Auto |
60 |
|
|
Preset) |
|
|
|
Presetting the current broadcast station (Preset Memory) |
61 |
|
|
Listening to preset stations |
61 |
|
|
Specify a name for the preset broadcast station (Preset Name) |
62 |
|
|
Skipping preset broadcast stations (Preset Skip) |
63 |
|
|
Cancelling Preset Skip |
64 |
|
Listening to Internet Radio |
65 |
||
|
Listening to Internet Radio |
66 |
|
Playing back files stored on a PC or NAS |
67 |
|
|
|
Playing back files stored on a PC or NAS |
68 |
|
Getting the HEOS App |
71 |
||
|
HEOS Account |
72 |
|
|
Playing from streaming music services |
73 |
|
|
Listening to the same music in multiple rooms |
76 |
|
AirPlay function |
80 |
||
|
Playing songs from your iPhone, iPod touch or iPad |
81 |
|
|
Playing iTunes music with this unit |
81 |
|
|
|
|
|
|
Play a song from your iPhone, iPod touch or iPad on multiple |
82 |
|
|
synced devices (AirPlay 2) |
||
Spotify Connect function |
83 |
||
|
Playing Spotify music with this unit |
83 |
|
|
Convenience functions |
84 |
|
|
Adding to HEOS Favorites |
85 |
|
|
Playing back HEOS Favorites |
85 |
|
|
Deleting a HEOS Favorites |
86 |
|
|
Adjust the sound output balance of left and right speakers |
86 |
|
|
(Balance) |
||
|
Adjust the subwoofer output (Subwoofer) |
87 |
|
|
Adjusting the tone (Tone) |
88 |
|
|
|
|
|
|
Displaying your desired video during audio playback (Video |
89 |
|
|
Select) |
||
|
Playing the same music in all zones (All Zone Stereo) |
90 |
|
Front panel |
Display |
Rear panel |
3 |
Remote |
Index |

Contents |
Connections |
Playback |
Settings |
Tips |
Appendix |
Selecting a sound mode |
91 |
|
|
Selecting a sound mode |
91 |
|
Description of sound mode types |
92 |
HDMI Control function |
93 |
|
|
Setting procedure |
93 |
Smart Menu function |
94 |
|
Sleep timer function |
96 |
|
|
Using the sleep timer |
97 |
Smart select function |
98 |
|
|
Calling up the settings |
99 |
|
Changing the settings |
100 |
Panel lock function |
101 |
|
|
Disabling all key button operations |
101 |
|
Disabling all button operations except VOLUME |
101 |
|
Canceling the Panel lock function |
102 |
Remote lock function |
103 |
|
|
Disabling the sensor function of the remote control unit |
103 |
|
Enabling the remote sensor function |
103 |
Web control function |
104 |
|
|
Controlling the unit from a web control |
104 |
|
Playback in ZONE2 (Another room) |
106 |
|
Connecting ZONE2 |
106 |
|
Playback in ZONE2 |
107 |
Settings
Menu map |
109 |
||
|
Menu operations |
113 |
|
Audio |
114 |
|
|
|
M-DAX |
114 |
|
|
Audio Delay |
115 |
|
|
Volume |
116 |
|
Video |
117 |
||
|
HDMI Setup |
117 |
|
|
On Screen Disp. |
122 |
|
|
4K Signal Format |
123 |
|
|
TV Format |
124 |
|
Inputs |
125 |
|
|
|
Input Assign |
125 |
|
|
Source Rename |
128 |
|
|
Hide Sources |
128 |
|
|
Source Level |
128 |
|
|
Speakers |
129 |
|
|
Subwoofer |
129 |
|
|
Distances |
129 |
|
|
Levels |
130 |
|
|
Speaker Select |
131 |
|
Front panel |
Display |
Rear panel |
4 |
Remote |
Index |

Contents |
Connections |
Playback |
Settings |
Tips |
Appendix |
Network |
132 |
|
|
Information |
132 |
|
Connection |
132 |
|
Wi-Fi Setup |
133 |
|
Settings |
134 |
|
Network Control |
136 |
|
Friendly Name |
136 |
|
Diagnostics |
137 |
|
AirPlay |
137 |
HEOS Account |
138 |
|
|
You have not signed in |
138 |
|
You have already signed in |
138 |
General |
139 |
|
|
|
Language |
139 |
|
|
ECO |
139 |
|
|
ZONE2 Setup |
143 |
|
|
Zone Rename |
144 |
|
|
Smart Sel.Names |
144 |
|
|
Front Display |
144 |
|
|
Firmware |
145 |
|
|
Information |
148 |
|
|
Usage Data |
149 |
|
|
Save & Load |
150 |
|
|
Setup Lock |
150 |
|
|
Reset |
151 |
|
|
Operating CD player with the remote control unit |
152 |
|
Limiting the operating zone with the remote control |
153 |
|
|
Front panel |
Display |
Rear panel |
5 |
Remote |
Index |

Contents |
Connections |
Playback |
Settings |
Tips |
Appendix |
Tips
Tips |
155 |
|
Troubleshooting |
156 |
|
|
Power does not turn on / Power is turned off |
157 |
|
Operations cannot be performed through the remote control unit |
158 |
|
Display on this unit shows nothing |
158 |
|
No sound comes out |
159 |
|
Desired sound does not come out |
160 |
|
Sound is interrupted or noise occurs |
161 |
|
No video is shown on the TV |
162 |
|
The menu screen is not displayed on the TV |
163 |
|
The color of the menu screen and operations content displayed |
163 |
|
on the television is different from normal |
|
|
AirPlay cannot be played back |
164 |
|
USB memory devices cannot be played back |
165 |
|
Bluetooth cannot be played back |
166 |
|
The Internet radio cannot be played back |
167 |
|
Music files on PC or NAS cannot be played back |
168 |
|
Various online services cannot be played |
169 |
|
The HDMI Control function does not work |
169 |
|
Cannot connect to a wireless LAN network |
170 |
|
Update/upgrade error messages |
171 |
|
Resetting factory settings |
172 |
Resetting network settings |
173 |
|
Appendix
About HDMI |
174 |
|
Playing back a USB memory devices |
177 |
|
Playing back a Bluetooth device |
178 |
|
Playing back a file saved on a PC or NAS |
179 |
|
Playing back Internet Radio |
180 |
|
Personal memory plus function |
180 |
|
Last function memory |
180 |
|
Explanation of terms |
181 |
|
Trademark information |
184 |
|
Specifications |
185 |
|
Index |
189 |
|
License |
191 |
|
Front panel |
Display |
Rear panel |
6 |
Remote |
Index |
Contents |
Connections |
Playback |
Settings |
Tips |
Appendix |
Thank you for purchasing this Marantz product.
To ensure proper operation, please read this owner’s manual carefully before using the product.
After reading this manual, be sure to keep it for future reference.
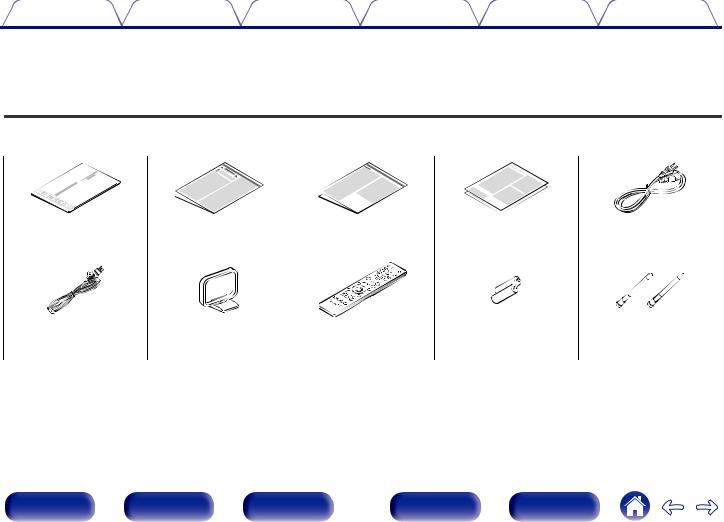
Accessories
Check that the following parts are supplied with the product.
|
|
|
|
|
|
|
Quick Start Guide |
Safety Instructions |
Notes on radio |
Warranty |
Power cord |
||
|
|
|
(for USA/for CANADA) |
|
||
FM indoor antenna |
AM loop antenna |
Remote control unit |
R03/AAA batteries |
External antennas for |
|
|
(RC041SR) |
|
Bluetooth/wireless |
|
|
|
|
connectivity |
Front panel |
Display |
Rear panel |
7 |
Remote |
Index |

Contents |
Connections |
Playback |
Settings |
Tips |
Appendix |
|
|
|
|
|
|
Inserting the batteries
1Remove the rear lid in the direction of the arrow and remove it.
2Insert two batteries correctly into the battery compartment as indicated.
Batteries
NOTE
0 To prevent damage or leakage of battery fluid:
0Do not use a new battery together with an old one.
0Do not use two different types of batteries.
0Remove the batteries from the remote control unit if it will not be in use for long periods.
0If the battery fluid should leak, carefully wipe the fluid off the inside of the battery compartment and insert new batteries.
Operating range of the remote control unit
Point the remote control unit at the remote sensor when operating it.
Approx. 23 ft/7 m
30° 30°
3Put the rear cover back on.
Front panel |
Display |
Rear panel |
8 |
Remote |
Index |

Contents |
Connections |
Playback |
Settings |
Tips |
Appendix |
Features
High quality sound
0High-power amplifier (100 Watts x 2-channels)
The power amplifier circuit is made with a power transformer and power supply capacitors designed for stereo receivers and uses a discrete part structure, achieving powerful, high-quality sound reproduction.
0Double-differential D/A converter circuit
A double-differential circuit is used to reduce noise, achieving clearer audio playback.
High performance
04K 60Hz input/output supported
When 4K Ultra HD (High Definition) is used, an input/output speed of 60 frames per second (60p) is achieved for video signals. When connected to 4K Ultra HD and 60p video signal input compatible TV, you can enjoy the sense of realism only available from high-definition images, even when viewing fast-moving video.
This unit also supports image processing for 4K 60p, 4:4:4 and 24-bit videos. By processing the video at the original resolution, this unit lets you enjoy flawless, high-definition picture quality.
This unit also supports HDR (High Dynamic Range) and BT.2020 wide color gamut.
0HDCP 2.3
This unit is compatible with HDCP 2.3 copyright protection standard.
Front panel |
Display |
Rear panel |
9 |
Remote |
Index |
Contents |
Connections |
Playback |
Settings |
Tips |
Appendix |
0HDMI connections enable connection to various digital AV devices (5 inputs, 1 output)
5  1
1
In Out
This unit is equipped with 5 HDMI inputs and 1 HDMI output enabling connection to various HDMI compatible devices such as Blu-ray Disc players, game consoles and HD video camcorders.
0The device is equipped with a AirPlay® function in addition to network functions such as Internet radio etc. (v p. 80)
You can enjoy a wide variety of content, including listening to Internet Radio, playing audio files stored on your PC.
This unit also supports Apple AirPlay which lets you stream your music library from an iPhone®, iPad®, iPod touch® or iTunes®.
0Supports AirPlay 2® wireless audio
Sync multiple AirPlay 2 compatible devices/speakers for simultaneous playback.
This unit supports AirPlay 2 and requires iOS 11.4 or later.
Front panel |
Display |
Rear panel |
10 |
Remote |
Index |
Contents |
Connections |
Playback |
Settings |
Tips |
Appendix |
0Playback of DSD and FLAC files via USB and networks
This unit supports the playback of high resolution audio formats such as DSD (5.6 MHz) and FLAC 192 kHz files. It provides high quality playback of high resolution files.
0Wireless connection with Bluetooth devices can be carried out easily (v p. 53)
0 Multi-Room audio (v p. 90)
GMAIN ZONEH |
GZONE2H |
You can enjoy music simply by connecting wirelessly with your smartphone, tablet, PC, etc.
You can select and play back the respective inputs in MAIN ZONE and ZONE2.
In addition, when the All Zone Stereo function is used, the music being played back in MAIN ZONE can be enjoyed in all the zones at the same time. This is useful when you want to let the BGM propagate throughout the whole house.
0Energy-saving design
This unit is equipped with an ECO Mode function that allows you to enjoy music and movies while reducing the power consumption during use, and also an auto-standby function that automatically turns off the power supply when the unit is not in use. This helps reduce unnecessary power use.
Front panel |
Display |
Rear panel |
11 |
Remote |
Index |

Contents |
Connections |
Playback |
Settings |
Tips |
Appendix |
0Compatible with the “Marantz 2016 AVR Remote” Appz for performing basic operations of the unit with an iPad, iPhone or Android™ devices (Google, Amazon Kindle Fire)
Along with many new features, the graphics and user interface have been completely overhauled. The new app gives you full control of this unit as well as access to its setup menu for detailed adjustments from your phones or tablets. “Marantz 2016 AVR Remote” App also gives you quick access to the receiver's status display, option menus, Marantz Blu-ray Disc player control, and online owner's manual for your convenience.
zDownload the appropriate “Marantz 2016 AVR Remote” App for your iOS or Android devices. This unit needs to be connected to the same LAN or Wi-Fi (wireless LAN) network that the iPad, iPhone or Android™ is connected to.
0HEOS provides streaming music from your favorite online music sources
HEOS wireless multi-room sound system that enables you to enjoy your favorite music anywhere and everywhere around your home. By utilizing your existing home network and the HEOS App (available for iOS, Android and Amazon devices), you can explore, browse, and play music from your own music library or from many online streaming music services.
When multiple HEOS devices are connected to the same network, HEOS devices can be grouped to play back the same music on all devices simultaneously, or different music can be played on each separate HEOS device.
Front panel |
Display |
Rear panel |
12 |
Remote |
Index |

Contents |
Connections |
Playback |
Settings |
Tips |
Appendix |
|
|
|
|
|
|
Easy operation
0“Setup Assistant” provides easy-to-follow setup instructions
First select the language when prompted. Then simply follow the instructions displayed on the TV screen to set up the speakers, network, etc.
0Easy to use Graphical User Interface
This unit is equipped with a Graphical User Interface for improved operability.
Front panel |
Display |
Rear panel |
13 |
Remote |
Index |

Contents |
Connections |
Playback |
Settings |
Tips |
Appendix |
Part names and functions
Front panel
q w e |
r t |
y |
u |
i |
o |
Q0Q1Q2Q3 Q4Q5Q6Q7Q8Q9 W0 |
For details, see the next page.
Front panel |
Display |
Rear panel |
14 |
Remote |
Index |

|
|
Contents |
|
Connections |
|
Playback |
Settings |
Tips |
Appendix |
|
qw e |
r t |
y |
u |
i |
C INPUT SELECTOR knob |
|
|
|
|
|
|
|
|
|
|
|
|
|
|
|
|
|
|
|
|
This selects the input source. (v p. 47) |
|
|
|
|
|
|
|
|
|
D M-DAX indicator |
|
|
|
|
|
|
|
|
|
This lights when the M-DAX mode is selected. (v p. 114) |
||
|
|
|
|
|
|
|
E Remote control sensor |
|
|
|
|
|
|
|
|
|
This receives signals from the remote control unit. (v p. 8) |
||
|
|
o |
|
|
|
|
F Display |
|
|
|
|
|
|
|
|
|
This displays various pieces of information. (v p. 17) |
||
A Power operation button (X) |
|
|
G PURE DIRECT indicator |
|
|
||||
Used to turn the power of the MAIN ZONE (room where this unit is |
This lights when the “Pure Direct” mode is selected as the sound mode. |
||||||||
located) on/off (standby). (v p. 47) |
|
|
(v p. 91) |
|
|
||||
B Power indicator |
|
|
|
|
H VOLUME knob |
|
|
||
This is lit as follows according to the power status: |
|
This adjusts the volume level. (v p. 48) |
|
||||||
0 |
Off: Power on |
|
|
|
|
I Headphones jack (PHONES) |
|
||
0 |
Red: Normal standby |
|
|
|
This is used to connect headphones. |
|
|||
0 |
Orange: |
|
|
|
|
When the headphones are plugged into this jack, audio will no longer |
|||
|
0 |
When “HDMI PassThrough” is set to “On” (v p. 118) |
be output from the connected speakers or from the PRE OUT |
||||||
|
connectors. |
|
|
||||||
|
0 |
When “HDMI Control” is set to “On” (v p. 119) |
|
|
|
||||
|
|
NOTE |
|
|
|||||
|
0 |
When “Network Control” is set to “Always On” (v p. 136) |
|
|
|||||
|
|
|
|
|
|
|
0 To prevent hearing loss, do not raise the volume level excessively when using |
||
|
|
|
|
|
|
|
headphones. |
|
|
Front panel |
Display |
Rear panel |
15 |
Remote |
Index |

Contents |
Connections |
Playback |
Settings |
Tips |
Appendix |
|
|
|
|
|
|
Q2 Q4 Q7
Q0Q1Q3 Q5Q6Q8Q9W0
J ZONE2 ON/OFF button
This turns the power of ZONE2 (another room) on/off. (v p. 107)
K ZONE2 SOURCE button
This selects the input source for ZONE2. (v p. 107)
L Bass control knob (BASS)
This setting adjusts the volume level for the bass.
M Tuner preset channel buttons
(TUNER PRESET CH +, –)
These select preset broadcast stations. (v p. 61)
N Treble control knob (TREBLE)
This setting adjusts the volume level for the treble.
O DIMMER button
Each press of this switches the brightness of the display. (v p. 144)
P STATUS button
Each press of this switches the status information that is shown on the display.
Q Balance knob (BALANCE)
This adjusts the balance of the volume output from the left and right speakers.
R Speaker switching button (SPEAKERS)
These select the speaker for audio output.
S SOUND MODE button
Switching the sound mode. (v p. 91)
TUSB port (T)
This is used to connect USB storages (such as USB memory devices). (v p. 39)
Front panel |
Display |
Rear panel |
16 |
Remote |
Index |

Contents |
Connections |
Playback |
Settings |
Tips |
Appendix |
|
|
|
|
|
|
Display
q |
w |
e |
r t |
y |
|
|
u i |
A Input mode indicators
These light according to the audio input mode settings of each input source. (v p. 127)
B Tuner reception mode indicators
These light up according to the reception conditions when the input source is set to “Tuner”.
TUNED: Lights up when the broadcast is properly tuned in. STEREO: Lights up when receiving FM stereo broadcasts.
C Sleep timer indicator
This lights when the sleep mode is selected. (v p. 96)
D Volume indicator
E MUTE indicator
This blinks while the sound is muted. (v p. 48)
F Information display
The input source name, sound mode, setting values and other information are displayed here.
G Input signal indicators
The respective indicator will light corresponding to the input signal. (v p. 127)
H ZONE2 indicator
This lights up when ZONE2 (another room) power is turned on. (v p. 107)
Front panel |
Display |
Rear panel |
17 |
Remote |
Index |
Contents |
Connections |
Playback |
Settings |
Tips |
Appendix |
|
|
|
|
|
|
Rear panel
q w e r |
|
|
|
|
t |
|
|
|
|
|
|
|
|
|
|
|
q |
|||||||||||||||||||||||||||
|
|
|
|
|
|
|
|
|
|
|
|
|
|
|
|
|
|
|
|
|
|
|
|
|
|
|
|
|
|
|
|
|
|
|
|
|
|
|
|
|
|
|
|
|
|
|
|
|
|
|
|
|
|
|
|
|
|
|
|
|
|
|
|
|
|
|
|
|
|
|
|
|
|
|
|
|
|
|
|
|
|
|
|
|
|
|
|
|
|
|
|
|
|
|
|
|
|
|
|
|
|
|
|
|
|
|
|
|
|
|
|
|
|
|
|
|
|
|
|
|
|
|
|
|
|
|
|
|
|
|
|
|
|
|
|
|
|
|
|
|
|
|
|
|
|
|
|
|
|
|
|
|
|
|
|
|
|
|
|
|
|
|
|
|
|
|
|
|
|
|
|
|
|
|
|
|
|
|
|
|
|
|
|
|
|
|
|
|
|
|
|
|
|
|
|
|
|
|
|
|
|
|
|
|
|
|
|
|
|
|
|
|
|
|
|
|
|
|
|
|
|
|
|
|
|
|
|
|
|
|
|
|
|
|
|
|
|
|
|
|
|
|
|
|
|
|
|
|
|
|
|
|
|
|
|
|
|
|
|
|
|
|
|
|
|
|
|
|
|
|
|
|
|
|
|
|
|
|
|
|
|
|
|
|
|
|
|
|
|
|
|
|
|
|
|
|
|
|
|
|
|
|
|
|
|
|
|
|
|
|
|
|
|
|
|
|
|
|
|
|
|
|
|
|
|
|
|
|
|
|
|
|
|
|
|
|
|
|
|
|
|
|
|
|
|
|
|
|
|
|
|
|
|
|
|
|
|
|
|
|
|
|
|
|
|
|
|
|
|
|
|
|
|
|
|
|
|
|
|
|
|
|
|
|
|
|
|
|
|
|
|
|
|
|
|
|
|
|
|
|
|
|
|
|
|
|
|
|
|
|
|
|
|
|
|
|
|
|
|
|
|
|
|
|
|
|
|
|
|
|
|
|
|
|
|
|
|
|
|
|
|
|
|
|
|
|
|
|
|
|
|
|
|
|
|
|
|
|
|
|
|
|
|
|
|
|
|
|
|
|
|
|
|
|
|
|
|
|
|
|
|
|
|
|
|
|
|
|
|
|
|
|
|
|
|
|
|
|
|
|
|
|
|
|
|
|
|
|
|
|
|
|
|
|
|
|
|
|
|
|
|
|
|
|
|
|
|
|
|
|
|
|
|
|
|
|
|
|
|
|
|
|
|
|
|
|
|
|
|
|
|
|
|
|
|
|
|
|
|
|
|
|
|
|
|
|
|
|
|
|
|
|
|
|
|
|
|
|
|
|
|
|
|
|
|
|
|
|
|
|
|
|
|
|
|
|
|
|
|
|
|
|
|
|
|
|
|
|
|
|
|
|
|
|
|
|
|
|
|
|
|
|
|
|
|
|
|
|
|
|
|
|
|
|
|
|
|
|
|
|
|
|
|
|
|
|
|
|
|
|
|
|
|
|
|
|
|
|
|
|
|
|
|
|
|
|
|
|
|
|
|
|
|
|
y u |
i |
o |
Q0 |
Q1 |
Q2 |
For details, see the next page.
Front panel |
Display |
Rear panel |
18 |
Remote |
Index |
Contents |
Connections |
Playback |
Settings |
Tips |
Appendix |
|
|
|
|
|
|
q we r |
|
t |
|
|
|
|
|
|
|
|
|
|
|
|
|
q |
|||||||||||||||||||||||
|
|
|
|
|
|
|
|
|
|
|
|
|
|
|
|
|
|
|
|
|
|
|
|
|
|
|
|
|
|
|
|
|
|
|
|
|
|
|
|
|
|
|
|
|
|
|
|
|
|
|
|
|
|
|
|
|
|
|
|
|
|
|
|
|
|
|
|
|
|
|
|
|
|
|
|
|
|
|
|
|
|
|
|
|
|
|
|
|
|
|
|
|
|
|
|
|
|
|
|
|
|
|
|
|
|
|
|
|
|
|
|
|
|
|
|
|
|
|
|
|
|
|
|
|
|
|
|
|
|
|
|
|
|
|
|
|
|
|
|
|
|
|
|
|
|
|
|
|
|
|
|
|
|
|
|
|
|
|
|
|
|
|
|
|
|
|
|
|
|
|
|
|
|
|
|
|
|
|
|
|
|
|
|
|
|
|
|
|
|
|
|
|
|
|
|
|
|
|
|
|
|
|
|
|
|
|
|
|
|
|
|
|
|
|
|
|
|
|
|
|
|
|
|
|
|
|
|
|
|
|
|
|
|
|
|
|
|
|
|
|
|
|
|
|
|
|
|
|
|
|
|
|
|
|
|
|
|
|
|
|
|
|
|
|
|
|
|
|
|
|
|
|
|
|
|
|
|
|
|
|
|
|
|
|
|
|
|
|
|
|
|
|
|
|
|
|
|
|
|
|
|
|
|
|
|
|
|
|
|
|
|
|
|
|
|
|
|
|
|
|
|
|
|
|
|
|
|
|
|
|
|
|
|
|
|
|
|
|
|
|
|
|
|
|
|
|
|
|
|
|
|
|
|
|
|
|
|
|
|
|
|
|
|
|
|
|
|
|
|
|
|
|
|
|
|
|
|
|
|
|
|
|
|
|
|
|
|
|
|
|
|
|
|
|
|
|
|
|
|
|
|
|
|
|
|
|
|
|
|
|
|
|
|
|
|
|
|
|
|
|
|
|
|
|
|
|
|
|
|
|
|
|
|
|
|
|
|
|
|
|
|
|
|
|
|
|
|
|
|
|
|
|
|
|
|
|
|
|
|
|
|
|
|
|
|
|
|
|
|
|
|
|
|
|
|
|
|
|
|
|
|
|
|
|
|
|
|
|
|
|
|
|
|
|
|
|
|
|
|
|
|
|
|
|
|
|
|
|
|
|
|
|
|
|
|
|
|
|
|
|
|
|
|
|
|
|
|
|
|
|
|
|
|
|
|
|
|
|
|
|
|
|
|
|
|
|
|
|
|
|
|
|
|
|
|
|
|
|
|
|
|
|
|
|
|
|
|
|
|
|
|
|
|
|
|
|
|
|
|
|
|
|
|
|
|
|
|
|
|
|
|
|
|
|
|
|
|
|
|
|
|
|
|
|
|
|
|
|
|
|
|
|
|
|
|
|
|
|
|
|
|
|
|
|
|
|
|
|
|
|
|
|
|
|
|
|
|
|
|
|
|
|
|
|
|
|
|
|
|
|
|
|
|
|
|
|
|
|
|
|
|
|
|
|
|
|
|
|
|
|
|
|
|
|
|
|
|
|
|
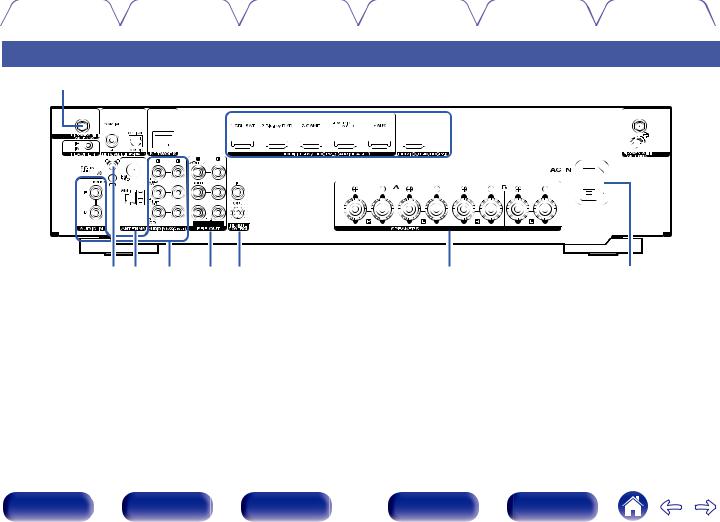
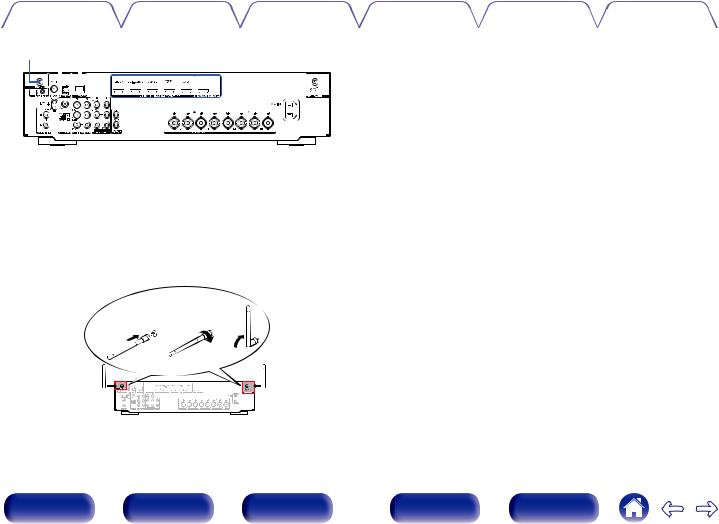
A Bluetooth/wireless LAN antenna connectors
Used to connect the included external antennas for Bluetooth/wireless connectivity when connecting to a network via wireless LAN, or when connecting to a handheld device via Bluetooth. (v p. 43)
A Place the external antennas for Bluetooth/wireless connectivity evenly over the screw terminal of rear.
B Turn clockwise until the antennas is fully connected. C Rotate the antenna upwards for best reception.
q w e
B FLASHER IN jack
Used when using a control BOX or other such control devices to control this unit.
C Digital audio connectors (DIGITAL AUDIO)
Used to connect devices equipped with digital audio connectors.
0“Connection 2 : TV equipped with an HDMI connector and incompatible with the ARC (Audio Return Channel)” (v p. 34)
D NETWORK connector
Used to connect to a LAN cable when connecting to a wired LAN network. (v p. 42)
E HDMI connectors
Used to connect devices equipped with HDMI connectors.
0“Connection 1 : TV equipped with an HDMI connector and compatible with the ARC (Audio Return Channel)” (v p. 33)
0“Connection 2 : TV equipped with an HDMI connector and incompatible with the ARC (Audio Return Channel)” (v p. 34)
0“Connecting a set-top box (Satellite tuner/cable TV)” (v p. 36)
0“Connecting a DVD player or Blu-ray Disc player” (v p. 37)
|
|
|
|
|
|
|
|
|
|
|
|
|
|
|
|
|
|
|
|
|
|
19 |
|
|
|
|
|
|
|
|
|
|
|
|
|
|
|
|
|
|
|
|
|
|
|
|
|
|
|
|
|
|
|
|
|
|
|
|
|
|
|
|
|
|
|
|
|
|
|
|
|
|
|
|
|
|
|
|
|
|
|
|
|
|
|
|
|
|
|
|
|
|
|
|
|
|
|
|
|
|
|
|
|
|
|
|
|
|
|
|
|
|
|
|
|
|
|
|
|
|
|
|
|
|
|
|
|
|
|
|
|
|
|
|
|
|
|
|
|
|
|
|
|
|
|
|
|
|
|
|
|
|
|
|
|
|
|
|
|
|
|
|
|
|
|
|
|
|
|
|
|
|
|
|
Front panel |
Display |
|
|
|
|
|
|
Rear panel |
Remote |
Index |
||||||||||||||

Contents |
Connections |
Playback |
Settings |
Tips |
Appendix |
|
|
|
|
|
|
yu i oQ0 |
Q1 |
Q2 |
F SIGNAL GND terminal
Used to connect a ground wire for the turntable. (v p. 38)
G FM/AM antenna terminals (ANTENNA)
Used to connect FM antennas and AM loop antennas. (v p. 40)
H Analog audio connectors (AUDIO)
Used to connect devices equipped with analog audio connectors.
0“Connecting a set-top box (Satellite tuner/cable TV)” (v p. 36)
0“Connecting a DVD player or Blu-ray Disc player” (v p. 37)
0“Connecting a turntable” (v p. 38)
I PRE OUT connectors
Used to connect a subwoofer with built-in amplifier or a power amplifier for ZONE2.
0“Connecting the subwoofer” (v p. 27)
0“Connecting ZONE2” (v p. 106)
J REMOTE CONTROL jacks
Used to connect infrared receivers/transmitters in order to operate this unit and external devices from a different room. (v p. 44)
K Speaker terminals (SPEAKERS)
Used to connect speakers. (v p. 26)
L AC inlet (AC IN)
Used to connect the power cord. (v p. 45)
NOTE
0Do not touch the inner pins of the connectors on the rear panel. Electrostatic discharge may cause permanent damage to the unit.
Front panel |
Display |
Rear panel |
20 |
Remote |
Index |
Contents |
Connections |
Playback |
Settings |
Tips |
Appendix |
|
|
|
|
|
|
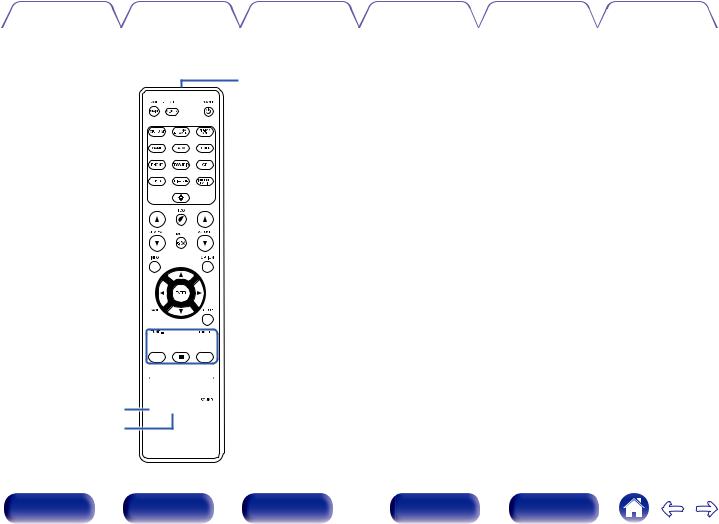
Remote control unit
q


w


e


 r
r


t

 y
y


A ZONE SELECT buttons
These switch the zone (MAIN ZONE, ZONE2) that is operated through the remote control unit.
0“Playback in ZONE2” (v p. 107)
0“Menu operations” (v p. 113)
B Input source select buttons
These selects the input source.
0“Selecting the input source” (v p. 47)
0“Playback in ZONE2” (v p. 107)
C Channel/page search buttons (CH/PAGE df)
These select radio stations registered to presets or switch pages. (v p. 61)
D MUTE button (:)
This mutes the output audio.
0“Turning off the sound temporarily (Muting)” (v p. 48)
0“Turning off the sound temporarily (Muting) (ZONE2)” (v p. 108)
E Information button (INFO)
This displays the status information on the TV screen. (v p. 149)
F Cursor buttons (uio p)
These select items.
Front panel |
Display |
Rear panel |
21 |
Remote |
Index |
Contents |
Connections |
Playback |
Settings |
Tips |
Appendix |
|
|
|
|
|
|
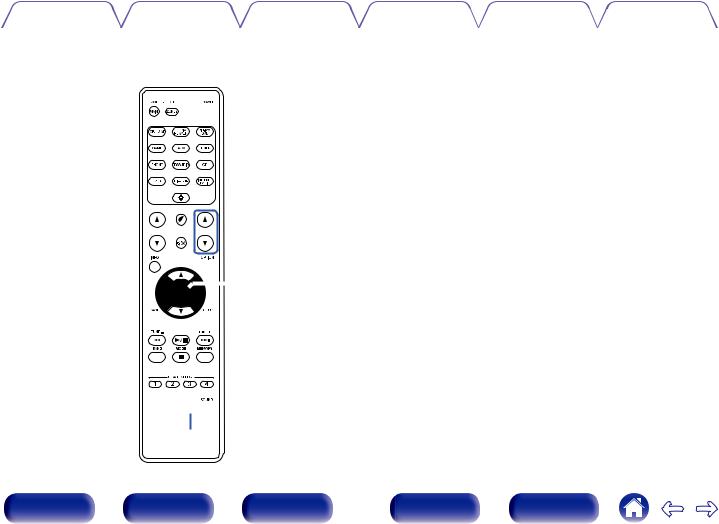
Q2
u

i


o


Q0 


Q1
G BACK button
This returns to the previous screen.
H System buttons
These perform playback related operations.
Tuning up / Tuning down buttons (TUNE +, –)
These select either FM broadcast or AM broadcast. (v p. 58)
Reception band select button (BAND)
This switches the reception band. (v p. 58)
Tune mode select button (MODE)
This switches the tuning mode. (v p. 60)
Preset memory button (MEMORY)
The current broadcast station that is preset. (v p. 61) Operating CD player. (v p. 152)
I SMART SELECT buttons (1 – 4)
These call up settings registered to each button, such as input source, volume level and sound mode settings. (v p. 98)
J Speaker switching button (SPEAKERS)
These select the speaker for audio output.
K SLEEP button
This sets the sleep timer. (v p. 96)
L Remote control signal transmitter
This transmits signals from the remote control unit. (v p. 8)
Front panel |
Display |
Rear panel |
22 |
Remote |
Index |
Contents |
Connections |
Playback |
Settings |
Tips |
Appendix |
|
|
|
|
|
|

 Q3
Q3


 Q4
Q4 


 Q5
Q5

 Q6
Q6


 Q7
Q7 

 Q8
Q8


 Q9
Q9  W0
W0
M POWER button (X)
This turns the power on/off.
0“Turning the power on” (v p. 47)
0“Playback in ZONE2” (v p. 107)
NECO Mode button (G)
This switches to ECO Mode. (v p. 139)
O VOLUME buttons (df)
These adjusts the volume level.
0“Adjusting the volume” (v p. 48)
0“Adjusting the volume (ZONE2)” (v p. 108)
P OPTION button
This displays the option menu on the TV screen.
Q ENTER button
This determines the selection.
R SETUP button
This displays the menu on the TV screen. (v p. 113)
S SOUND MODE button
These select the sound mode. (v p. 91)
T DIMMER button
Each press of this switches the brightness of the display. (v p. 144)
Front panel |
Display |
Rear panel |
23 |
Remote |
Index |

Contents |
Connections |
Playback |
Settings |
Tips |
Appendix |
o Contents
Speaker installation |
25 |
Connecting speakers |
26 |
Connecting a TV |
32 |
Connecting a playback device |
35 |
Connecting a USB memory device to the USB port |
39 |
Connecting FM/AM antennas |
40 |
Connecting to a home network (LAN) |
42 |
Connecting an external control device |
44 |
Connecting the power cord |
45 |
NOTE
0Do not plug in the power cord until all connections have been completed. However, when the “Setup Assistant” is running, follow the instructions in the “Setup Assistant” (page 9 in the separate “Quick Start Guide”) screen for making connections. (During “Setup Assistant” operation, the input/output connectors do not conduct current.)
0Do not bundle power cords together with connection cables. Doing so can result in noise.
o Cables used for connections
Provide necessary cables according to the devices you want to connect.
Speaker cable
Subwoofer cable
HDMI cable
Coaxial digital cable
Optical cable
Audio cable |
L |
L |
|
R |
R |
||
|
LAN cable
Front panel |
Display |
Rear panel |
24 |
Remote |
Index |

Contents |
Connections |
Playback |
Settings |
Tips |
Appendix |
Speaker installation
Determine the speaker system depending on the number of speakers you are using and install each speaker and subwoofer in the room.
Speaker installation is explained using this example of a typical installation.
L |
R |
 SW2
SW2
SW1
L/R |
Place the LEFT and RIGHT speakers an equal |
|
distance from the main listening position. The |
||
(LEFT/RIGHT |
||
distance between each speaker and your TV |
||
speaker): |
||
should also be the same. |
||
|
||
SW 1/2 |
Place the SUBWOOFER at a convenient location |
|
near the speakers. If you have two subwoofers, |
||
(Subwoofer): |
place them asymmetrically across the front of |
|
|
your room. |
Front panel |
Display |
Rear panel |
25 |
Remote |
Index |

Contents |
Connections |
Playback |
Settings |
Tips |
Appendix |
Connecting speakers
Here we connect the speakers in the room to this unit.
Before connecting speakers
NOTE
0Disconnect this unit’s power plug from the power outlet before connecting the speakers. Also, turn off the subwoofer.
0Connect so that the speaker cable core wires do not protrude from the speaker terminal. The protection circuit may be activated if the core wires touch the rear panel or if the + and - sides touch each other. (“Protection circuit” (v p. 183))
0Never touch the speaker terminals while the power cord is connected. Doing so could result in electric shock. When the “Setup Assistant” (page 9 in the separate “Quick Start Guide”) is running, follow the instructions in the “Setup Assistant” screen for making connections. (Power is not supplied to the speaker terminals while the “Setup Assistant” is running.)
0Use speakers with an impedance of 4 – 16 Ω/ohms.
NOTE
0Carry out the following settings when using a speaker with an impedance of 4 – 6 Ω/ohms.
1.Press and hold the main unit’s ZONE2 SOURCE and STATUS at the same time for at least 3 seconds.
“V.Format:< NTSC>” appears on the display.
2.Press DIMMER on the main unit three times. “Sp.Imp.:<8ohms>” appears on the display.
3.Press ZONE2 SOURCE or TUNER PRESET CH - on the main unit to select the impedance.
8ohms |
Select when the impedance for all of the |
||
(Default): |
connected speakers is 8 |
Ω/ohms or over. |
|
6ohms: |
Select when the impedance for any of the |
||
connected speakers is 6 |
Ω/ohms. |
||
|
|||
4ohms: |
Select when the impedance for any of the |
||
connected speakers is 4 |
Ω/ohms. |
||
|
|||
4. Press the main unit’s STATUS to complete the setting.
Front panel |
Display |
Rear panel |
26 |
Remote |
Index |

Contents |
Connections |
Playback |
Settings |
Tips |
Appendix |
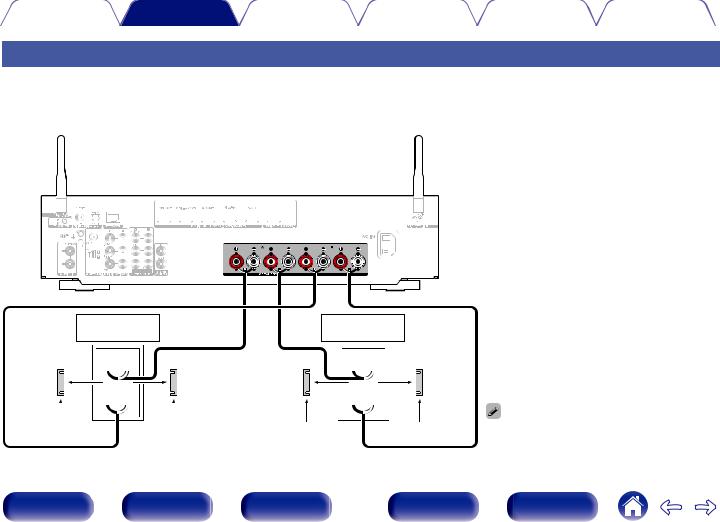
o Connecting the speaker cables
Carefully check the left (L) and right (R) channels and + (red) and – (black) polarities on the speakers being connected to this unit, and be sure to connect the channels and polarities correctly.
1Peel off about 3/8 inch (10 mm) of sheathing from the tip of the speaker cable, then either twist the core wire tightly or terminate it.
2Turn the speaker terminal counterclockwise to loosen it.
3Insert the speaker cable’s core wire to the hilt into the speaker terminal.
o Connecting the subwoofer
Use a subwoofer cable to connect the subwoofer. Two subwoofers can be connected to this unit.
The same signal is output from the respective subwoofer terminals.
|
|
|
|
|
|
|
|
|
|
|
|
|
|
|
|
|
|
|
|
|
|
|
|
|
|
|
|
|
|
|
|
|
|
|
|
|
|
|
|
|
|
|
|
|
|
|
|
|
|
|
|
|
|
|
|
|
|
|
|
|
|
|
|
|
|
|
|
|
|
|
|
|
|
|
|
|
|
|
|
|
|
|
|
|
|
|
|
|
|
|
|
|
|
|
|
|
|
|
|
|
|
|
|
|
|
|
|
|
|
|
|
|
|
|
|
|
|
|
|
|
|
|
|
|
|
|
|
|
|
|
|
|
|
|
|
|
|
|
|
|
|
|
|
|
|
|
SW1 |
|
|
|
|
|
|
|
|
|
|
|
|
|
SW2 |
|
|
|
|
|
|
||||||||||||
4Turn the speaker terminal clockwise to tighten it.
Front panel |
Display |
Rear panel |
27 |
Remote |
Index |

Contents |
Connections |
Playback |
Settings |
Tips |
Appendix |
|
|
|
|
|
|
Connecting 2.1-channel speakers
This serves as a basic 2.1-channel surround system.
L  R
R
SW
SW |
R |
L |
Front panel |
Display |
Rear panel |
28 |
Remote |
Index |

Contents |
Connections |
Playback |
Settings |
Tips |
Appendix |
|
|
|
|
|
|
Second pair of speaker
This system enables switching playback between speakers A and B as desired.
L |
|
L |
|
|
|
R |
|
R |
|
|
|
|
|
|
|
|
|
|
|
|
|
|
|
|
|
|
|
|
|
|
|
|
||||||||
(B) |
|
(A) |
|
|
|
(A) |
|
(B) |
|
|
|
|
|
|
|
|
|
|
|
|
|
|
|
|
|
|
|
|
|
|
|
|
||||||||
|
|
|
|
|
|
|
|
|
|
|
|
|
|
|
|
|
|
|
|
|
|
|
|
|
|
|
|
|
|
|
|
|
|
|
|
|
|
|
|
|
|
|
|
|
|
|
|
|
|
|
|
|
|
|
|
|
|
|
|
|
|
|
|
|
|
|
|
|
|
|
|
|
|
|
|
|
|
|
|
|
|
|
|
|
|
|
|
|
|
|
|
|
|
|
|
|
|
|
|
|
|
|
|
|
|
|
|
|
|
|
|
|
|
|
|
|
|
|
|
|
|
|
|
|
|
|
|
|
|
|
|
|
|
|
|
|
|
|
|
|
|
|
|
|
|
|
|
|
|
|
|
|
|
|
|
|
|
|
|
|
|
|
|
SW
|
|
|
|
|
|
|
|
|
|
|
|
|
|
|
|
|
|
|
|
|
|
|
|
|
|
|
|
|
|
|
|
|
|
|
|
|
|
|
|
|
|
|
|
|
|
|
|
|
|
|
|
|
|
|
|
|
|
|
|
|
|
|
|
|
|
|
|
SW |
R (A) |
|
L (A) |
|
R (B) |
|
|
L (B) |
||||||||
CAUTION:
0Set speaker impedance to “4ohms” before performing simultaneous playback from speakers A and B. (v p. 26)
Front panel |
Display |
Rear panel |
29 |
Remote |
Index |
Contents |
Connections |
Playback |
Settings |
Tips |
Appendix |
|
|
|
|
|
|
Bi-wiring connection
This connection limits the effects of signal interference between the high range speakers (tweeters) and low range speakers (woofers), allowing you to enjoy high quality playback.
When bi-wiring with bi-wireable speakers, connect the mid and high range terminals to SPEAKERS A (or B), the low range terminals to SPEAKERS B (or A).
|
|
|
|
|
|
|
|
|
|
|
|
|
|
|
|
|
|
|
|
|
|
|
|
|
|
|
|
|
|
|
|
|
|
|
|
|
|
|
|
|
|
|
|
|
|
|
|
|
|
|
|
|
|
|
|
|
|
|
|
|
|
|
|
|
|
|
|
|
|
|
|
|
|
|
|
|
|
|
|
|
|
|
|
|
|
|
|
|
|
|
|
|
|
|
|
|
|
|
|
|
|
|
|
|
|
|
|
|
|
|
|
|
|
|
|
|
|
|
|
|
|
|
|
|
|
|
|
|
|
|
|
|
|
|
|
|
|
|
|
|
|
|
|
|
|
|
|
|
|
|
|
|
|
|
|
|
|
|
|
|
|
|
|
|
|
|
|
|
|
|
|
|
|
|
|
|
|
|
|
|
|
|
|
|
|
|
|
|
|
|
|
|
|
|
|
|
Speaker |
|
|
Speaker |
|||||||||
|
|
|
|
|
|
|
|
|
|
|||||||||||
|
|
|
|
|
|
|
|
|
|
(R) |
|
|
(L) |
|||||||
Remove shorting bar |
Remove shorting bar |
Remove shorting bar |
Remove shorting bar |
0 |
When using bi-wiring connections, set the speaker to |
|
|
|
|
|
“A+B” to output audio from both SPEAKERS A and |
SPEAKERS B speaker terminals. (v p. 131)
Front panel |
Display |
Rear panel |
30 |
Remote |
Index |
 Loading...