


Makita DVC665ZU Manual
EN
Cordless Backpack Vacuum
Cleaner
INSTRUCTION MANUAL 11
FR
DE
IT
NL
ES
PT
DA
EL
TR
Aspirateur dorsal sans l MANUEL D’INSTRUCTIONS 24
Akku-Rucksackstaubsauger BETRIEBSANLEITUNG 38
Aspirapolvere spalleggiato a
batteria
Ruggedragen accustofzuiger GEBRUIKSAANWIJZING 66
Aspiradora de mochila a
batería
Aspirador Costal a Bateria MANUAL DE INSTRUÇÕES 94
Akku rygstøvsuger BRUGSANVISNING 108
Φορητή μηχανή
αναρρόφησης πλάτης
Akülü Sırt Süpürgesi KULLANMA KILAVUZU 136
DVC665
ISTRUZIONI PER L’USO 52
MANUAL DE
INSTRUCCIONES
ΕΓΧΕΙΡΙΔΙΟ ΟΔΗΓΙΩΝ 121
80
Fig.1
Fig.2
1
2
1
2
3
3
Fig.4
1
1
2
Fig.5
2
Fig.3
2
1 2
Fig.6
1
1
1
2
Fig.7
2
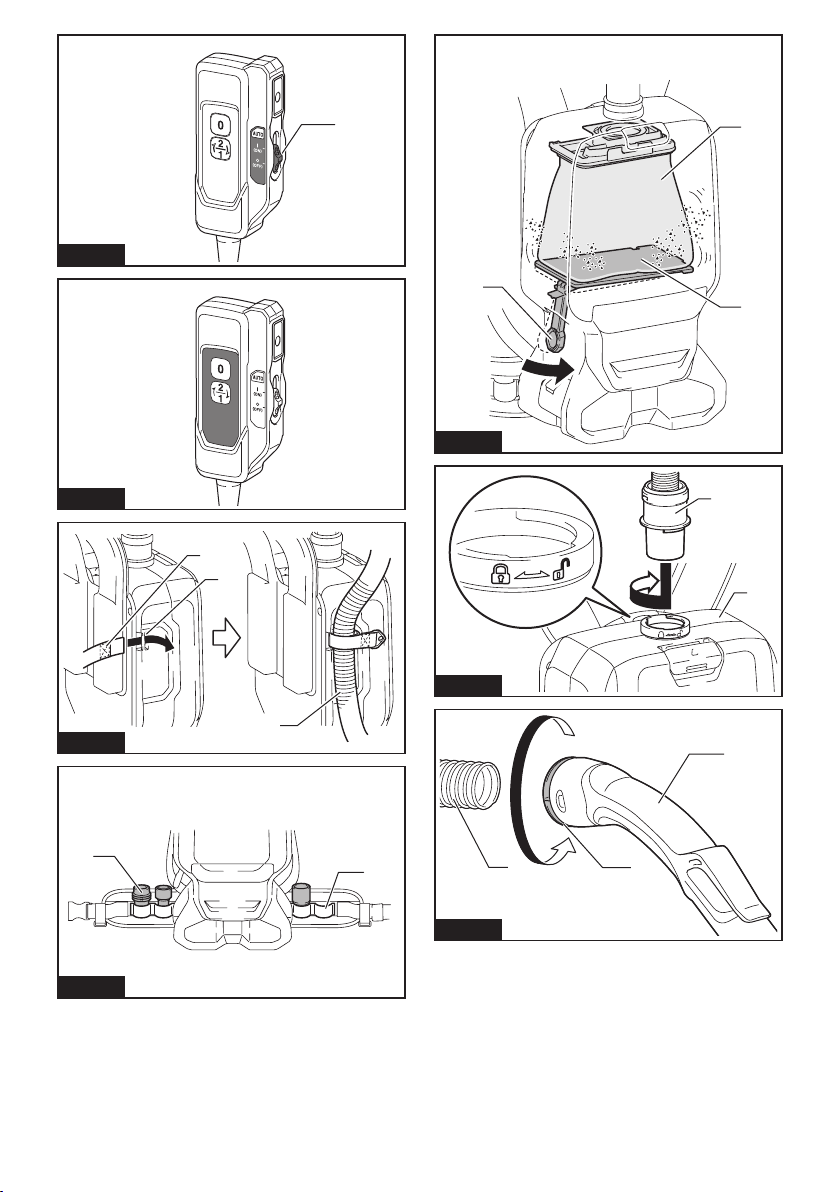
Fig.8
1
2
1
3
Fig.12
Fig.9
Fig.10
2
Fig.11
1
1
2
Fig.13
2
3
2
1
Fig.14
1
3
3
3
Fig.15
1
2
1
3
4
2
Fig.16
Fig.17
1
Fig.19
2
1
2
Fig.20
1
3
1
3
2
1
Fig.18
234
Fig.21
4
1
1
Fig.22
Fig.23
2
Fig.25
1
2
Fig.26
1
Fig.24
2
3
Fig.27
5
11
1
1
2
1
3
Fig.28
Fig.29
Fig.30
4
Fig.31
2
1
Fig.32
1
Fig.33
Fig.34
6
1
1
Fig.35
3
4
Fig.36
Fig.38
2
1
2
1
1
2
Fig.39
3
2
1
Fig.37
Fig.40
7
Fig.41
Fig.42
2
1
1
1
1
2
Fig.44
2
3
1
2
Fig.43
1
Fig.45
2
1
Fig.46
8
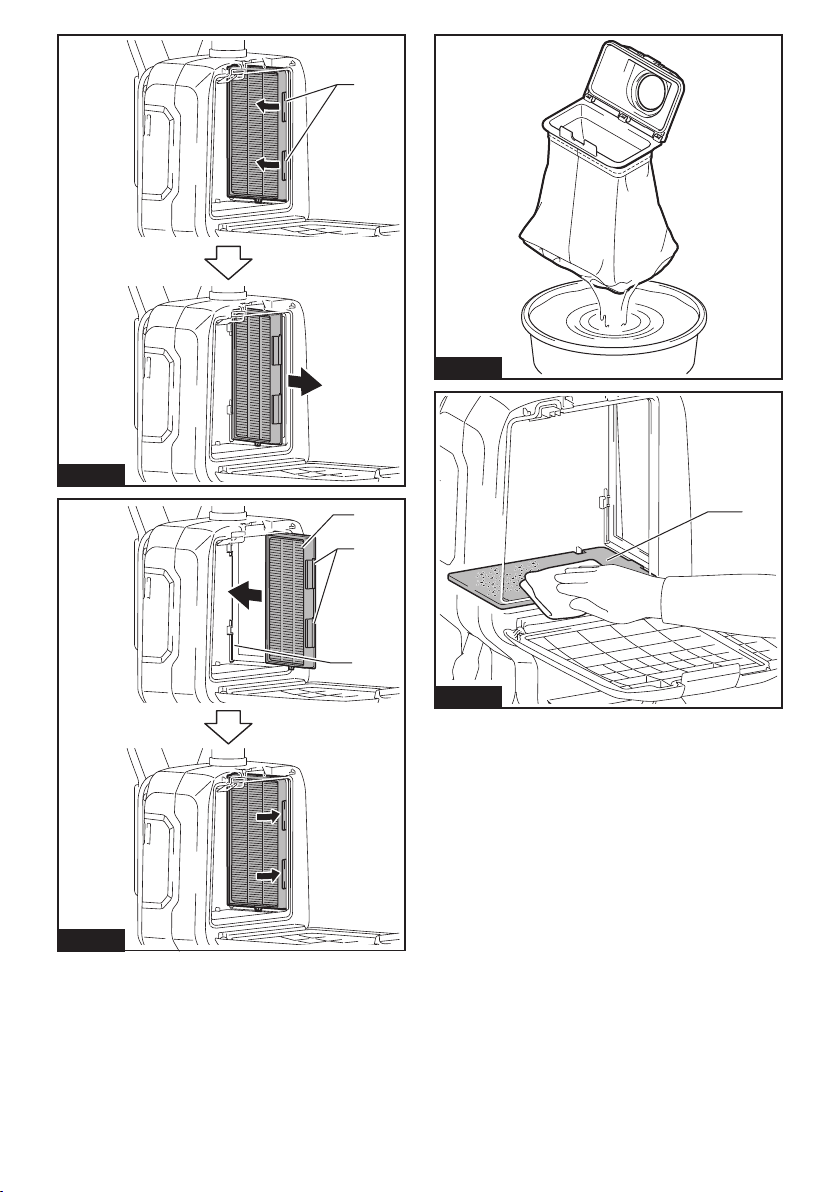
Fig.47
1
Fig.49
Fig.48
2
1
3
1
Fig.50
9
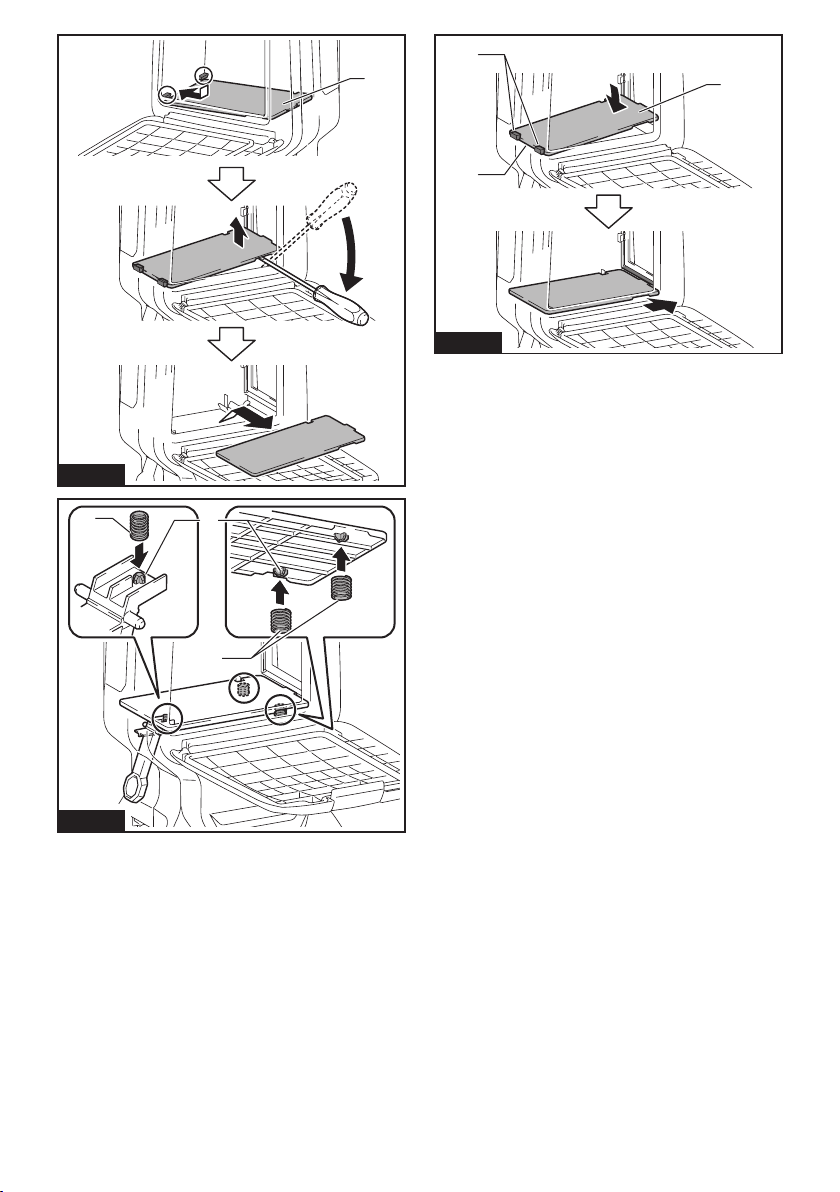
Fig.51
3
1
1
2
Fig.53
2
Fig.52
3
1
10
ENGLISH (Original instructions)
Ni-MH
SPECIFICATIONS
Model: DVC665
Capacity Filter bag 6.0 L
Dust bag 5.5 L
Maximum air volume
(With hose ø28 mm x 1.5 m)
Vacuum 110 hPa
Dimensions (L x W x H)
(excluding the harness)
Rated voltage D.C. 36 V
Net weight 6.1 - 6.7 kg
•
Due to our continuing program of research and development, the specications herein are subject to change without notice.
297 mm x 174 mm x 523 mm
• Specications may differ from country to country.
• The weight does not include accessories but battery cartridge(s). The lightest and heaviest combination weight
of the appliance and battery cartridge(s) are shown in the table.
Applicable battery cartridge and charger
Battery cartridge BL1815N / BL1820 / BL1820B / BL1830 / BL1830B / BL1840 /
Charger DC18RC / DC18RD / DC18RE / DC18SD / DC18SE / DC18SF /
•
Some of the battery cartridges and chargers listed above may not be available depending on your region of residence.
WARNING: Only use the battery cartridges and chargers listed above. Use of any other battery cartridges
and chargers may cause injury and/or re.
BL1840B / BL1850 / BL1850B / BL1860B
1.8 m
DC18SH
3
/min
Symbols
The followings show the symbols used for the equipment. Be sure that you understand their meaning before
use.
Read instruction manual.
Only for EU countries
Do not dispose of electric equipment or
battery pack together with household
waste material! In observance of the
European Directives, on Waste Electric
and Electronic Equipment and Batteries
and Accumulators and Waste Batteries and
Accumulators and their implementation
in accordance with national laws, electric
equipment and batteries and battery
pack(s) that have reached the end of
their life must be collected separately and
returned to an environmentally compatible
recycling facility.
Li-ion
Intended use
The appliance is intended for collecting dry dust. The
appliance is suitable for commercial use, for example in
hotels, schools, hospitals, factories, shops, ofces and
rental businesses.
Noise
The typical A-weighted noise level determined according to EN60335-2-69, EN60704-2-1:
Sound pressure level (LpA) : 70 dB(A) or less
Uncertainty (K) : 2.5 dB(A)
The noise level under working may exceed 80 dB (A).
NOTE: The declared noise emission value(s) has
been measured in accordance with a standard test
method and may be used for comparing one tool with
another.
NOTE: The declared noise emission value(s)
may also be used in a preliminary assessment of
exposure.
WARNING: Wear ear protection.
WARNING: The noise emission during actual
use of the power tool can differ from the declared
value(s) depending on the ways in which the
tool is used especially what kind of workpiece is
processed.
WARNING: Be sure to identify safety mea-
sures to protect the operator that are based on an
estimation of exposure in the actual conditions of
use (taking account of all parts of the operating
cycle such as the times when the tool is switched
off and when it is running idle in addition to the
trigger time).
11 ENGLISH
Vibration
The vibration total value (tri-axial vector sum) determined according to EN60335-2-69:
Work mode: operation without load
Vibration emission (ah) : 2.5 m/s2 or less
Uncertainty (K) : 1.5 m/s
NOTE: The declared vibration total value(s) has been
measured in accordance with a standard test method
and may be used for comparing one tool with another.
NOTE: The declared vibration total value(s) may also
be used in a preliminary assessment of exposure.
2
WARNING: The vibration emission during
actual use of the power tool can differ from the
declared value(s) depending on the ways in which
the tool is used especially what kind of workpiece
is processed.
WARNING: Be sure to identify safety mea-
sures to protect the operator that are based on an
estimation of exposure in the actual conditions of
use (taking account of all parts of the operating
cycle such as the times when the tool is switched
off and when it is running idle in addition to the
trigger time).
EC Declaration of Conformity
For European countries only
The EC declaration of conformity is included as Annex A
to this instruction manual.
SAFETY WARNINGS
Cordless vacuum cleaner safety warnings
WARNING: IMPORTANT! READ CAREFULLY
all safety warnings and all instructions BEFORE
USE . Failure to follow the warnings and instructions
may result in electric shock, re and/or serious injury.
1. Before use, make sure that this cleaner must
be used by people who have been adequately
instructed on the use of this cleaner.
2. Do not use the cleaner without the lter.
Replace a damaged lter immediately.
3. Do not attempt to pick up ammable materials,
re works, lighted cigarettes, hot ashes, hot
metal chips, sharp materials such as razors,
needles, broken glass or the like.
4. NEVER USE THE CLEANER IN THE VICINITY
OF GASOLINE, GAS, PAINT, ADHESIVES OR
OTHER HIGHLY EXPLOSIVE SUBSTANCES.
The switch emits sparks when turned ON and
OFF. And so does the motor commutator during
operation. A dangerous explosion may result.
5. Never vacuum up toxic, carcinogenic, com-
bustible or other hazardous materials such
as asbestos, arsenic, barium, beryllium,
lead, pesticides, or other health endangering
materials.
6. Never use the cleaner outdoors in the rain.
7. Do not use close to heat sources (stoves, etc.).
8. Do not block cooling vents. These vents per-
mit cooling of the motor. Blockage should be
carefully avoided otherwise the motor will burn
out from lack of ventilation.
9. Keep proper footing and balance at all times.
10. Do not fold, tug or step on the hose.
11. Stop the cleaner immediately if you notice
poor performance or anything abnormal
during operation.
12. DISCONNECT THE BATTERIES. When not in
use, before servicing, and when changing
accessories.
13.
Clean and service the cleaner immediately after
each use to keep it in tiptop operating condition.
14. MAINTAIN THE CLEANER WITH CARE. Keep
the cleaner clean for better and safer performance. Follow instructions for changing
accessories. Keep handles dry, clean, and free
from oil and grease.
15. CHECK DAMAGED PARTS. Before further use
of the cleaner, a guard or other part that is
damaged should be carefully checked to determine that it will operate properly and perform
its intended function. Check for alignment of
moving parts, binding of moving parts, breakage of parts, mounting, and any other conditions that may affect its operation. A guard or
other part that is damaged should be properly
repaired or replaced by an authorized service
center unless otherwise indicated elsewhere
in this instruction manual. Have defective
switches replaced by authorized service center. Don’t use the cleaner if switch does not
turn it on and off.
16. REPLACEMENT PARTS. When servicing, use
only identical replacement parts.
17. STORE IDLE CLEANER. When not in use, store
the cleaner indoors.
18. Be kind to your cleaner. Rough handling can
cause breakage of even the most sturdily built
cleaner.
19. Do not attempt to clean the exterior or interior
with benzine, thinner or cleaning chemicals.
Cracks and discoloration may be caused.
20. Do not use cleaner in an enclosed space where
ammable, explosive or toxic vapors are given
off by oil-base paint, paint-thinner, gasoline,
some mothproong substances, etc., or in
areas where ammable dust is present.
21. Do not operate the cleaner while under the
inuence of drugs or alcohol.
22. As a basic rule of safety, use safety goggles or
safety glasses with side shields.
23. Use a dust mask in dusty work conditions.
24. This machine is not intended for use by per-
sons including children with reduced physical,
sensory or mental capabilities, or lack of experience and knowledge.
25. Children should be supervised to ensure that
they do not play with the cleaner.
26. Never handle batteries and cleaner with wet
hands.
12 ENGLISH

27. Use extreme caution when cleaning on stairs.
28. Do not use the cleaner as a stool or work
bench. The machine may fall down and may
result in personal injury.
Battery tool use and care
1. Recharge only with the charger specied by
the manufacturer. A charger that is suitable for
one type of battery pack may create a risk of re
when used with another battery pack.
2. Use power tools only with specically desig-
nated battery packs. Use of any other battery
packs may create a risk of injury and re.
3. When battery pack is not in use, keep it away
from other metal objects, like paper clips,
coins, keys, nails, screws or other small metal
objects, that can make a connection from one
terminal to another. Shorting the battery termi-
nals together may cause burns or a re.
4. Under abusive conditions, liquid may be
ejected from the battery; avoid contact. If con-
tact accidentally occurs, ush with water. If
liquid contacts eyes, additionally seek medical
help. Liquid ejected from the battery may cause
irritation or burns.
5. Do not use a battery pack or tool that is dam-
aged or modied. Damaged or modied batteries
may exhibit unpredictable behaviour resulting in
re, explosion or risk of injury.
6. Do not expose a battery pack or tool to re or
excessive temperature. Exposure to re or tem-
perature above 130 °C may cause explosion.
7. Follow all charging instructions and do not
charge the battery pack or tool outside the
temperature range specied in the instructions. Charging improperly or at temperatures
outside the specied range may damage the
battery and increase the risk of re.
Service
1. Have your power tool serviced by a qualied
repair person using only identical replacement
parts. This will ensure that the safety of the power
tool is maintained.
2. Follow instruction for lubricating and chang-
ing accessories.
3. Keep handles dry, clean and free from oil and
grease.
Important safety instructions for
battery cartridge
1. Before using battery cartridge, read all instructions and cautionary markings on (1) battery
charger, (2) battery, and (3) product using
battery.
2. Do not disassemble battery cartridge.
3. If operating time has become excessively
shorter, stop operating immediately. It may
result in a risk of overheating, possible burns
and even an explosion.
4. If electrolyte gets into your eyes, rinse them
out with clear water and seek medical attention right away. It may result in loss of your
eyesight.
5. Do not short the battery cartridge:
(1) Do not touch the terminals with any con-
ductive material.
(2) Avoid storing battery cartridge in a con-
tainer with other metal objects such as
nails, coins, etc.
(3) Do not expose battery cartridge to water
or rain.
A battery short can cause a large current
ow, overheating, possible burns and even a
breakdown.
6. Do not store the tool and battery cartridge in
locations where the temperature may reach or
exceed 50 °C (122 °F).
7. Do not incinerate the battery cartridge even if
it is severely damaged or is completely worn
out. The battery cartridge can explode in a re.
8. Be careful not to drop or strike battery.
9. Do not use a damaged battery.
10.
The contained lithium-ion batteries are subject to
the Dangerous Goods Legislation requirements.
For commercial transports e.g. by third parties,
forwarding agents, special requirement on packaging and labeling must be observed.
For preparation of the item being shipped, consulting an expert for hazardous material is required.
Please also observe possibly more detailed
national regulations.
Tape or mask off open contacts and pack up the
battery in such a manner that it cannot move
around in the packaging.
11. When disposing the battery cartridge, remove
it from the tool and dispose of it in a safe
place. Follow your local regulations relating to
disposal of battery.
12. Use the batteries only with the products
specied by Makita. Installing the batteries to
non-compliant products may result in a re, excessive heat, explosion, or leak of electrolyte.
13. If the tool is not used for a long period of time,
the battery must be removed from the tool.
SAVE THESE INSTRUCTIONS.
CAUTION: Only use genuine Makita batteries.
Use of non-genuine Makita batteries, or batteries that
have been altered, may result in the battery bursting
causing res, personal injury and damage. It will
also void the Makita warranty for the Makita tool and
charger.
Tips for maintaining maximum
battery life
1. Charge the battery cartridge before completely
discharged. Always stop tool operation and
charge the battery cartridge when you notice
less tool power.
2.
Never recharge a fully charged battery cartridge.
Overcharging shortens the battery service life.
3.
Charge the battery cartridge with room temperature at 10 °C - 40 °C (50 °F - 104 °F). Let a hot
battery cartridge cool down before charging it.
4. Charge the battery cartridge if you do not use
it for a long period (more than six months).
13 ENGLISH
Important safety instructions for
wireless unit
1. Do not disassemble or tamper with the wireless unit.
2. Keep the wireless unit away from young children. If accidentally swallowed, seek medical
attention immediately.
3. Use the wireless unit only with Makita tools.
4. Do not expose the wireless unit to rain or wet
conditions.
5. Do not use the wireless unit in places where
the temperature exceeds 50°C (122°F).
6. Do not operate the wireless unit in places
where medical instruments, such as heart
pace makers are nearby.
7. Do not operate the wireless unit in places
where automated devices are nearby. If oper-
ated, automated devices may develop malfunction
or error.
8. Do not operate the wireless unit in places
under high temperature or places where
static electricity or electrical noise could be
generated.
9. The wireless unit can produce electromagnetic
elds (EMF) but they are not harmful to the
user.
10. The wireless unit is an accurate instrument. Be
careful not to drop or strike the wireless unit.
11. Avoid touching the terminal of the wireless
unit with bare hands or metallic materials.
12. Always remove the battery on the product
when installing the wireless unit into it.
13. When opening the lid of the slot, avoid the
place where dust and water may come into the
slot. Always keep the inlet of the slot clean.
14. Always insert the wireless unit in the correct
direction.
15. Do not press the wireless activation button
on the wireless unit too hard and/or press the
button with an object with a sharp edge.
16. Always close the lid of the slot when
operating.
17. Do not remove the wireless unit from the slot
while the power is being supplied to the tool.
Doing so may cause a malfunction of the wireless
unit.
18. Do not remove the sticker on the wireless unit.
19. Do not put any sticker on the wireless unit.
20. Do not leave the wireless unit in a place where
static electricity or electrical noise could be
generated.
21. Do not leave the wireless unit in a place subject to high heat, such as a car sitting in the
sun.
22. Do not leave the wireless unit in a dusty or
powdery place or in a place corrosive gas
could be generated.
23. Sudden change of the temperature may bedew
the wireless unit. Do not use the wireless unit
until the dew is completely dried.
24. When cleaning the wireless unit, gently wipe
with a dry soft cloth. Do not use benzine, thinner, conductive grease or the like.
25. When storing the wireless unit, keep it in the
supplied case or a static-free container.
26. Do not insert any devices other than Makita
wireless unit into the slot on the tool.
27. Do not use the tool with the lid of the slot damaged. Water, dust, and dirt come into the slot may
cause malfunction.
28. Do not pull and/or twist the lid of the slot more
than necessary. Restore the lid if it comes off
from the tool.
29. Replace the lid of the slot if it is lost or
damaged.
SAVE THESE INSTRUCTIONS.
FUNCTIONAL
DESCRIPTION
CAUTION: Always be sure that the appli-
ance is switched off and the battery cartridge is
removed before adjusting or checking function on
the appliance.
Installing or removing battery
cartridge
CAUTION: Always switch off the appliance
before installing or removing of the battery
cartridge.
CAUTION: Hold the appliance and the bat-
tery cartridge rmly when installing or removing
battery cartridge. Failure to hold the appliance and
the battery cartridge rmly may cause them to slip off
your hands and result in damage to the appliance and
battery cartridge and a personal injury.
► Fig.1: 1. Red indicator 2. Button 3. Battery cartridge
To remove the battery cartridge, slide it from the
appliance while sliding the button on the front of the
cartridge.
To install the battery cartridge, align the tongue on the
battery cartridge with the groove in the housing and slip
it into place. Insert it all the way until it locks in place
with a little click. If you can see the red indicator on the
upper side of the button, it is not locked completely.
CAUTION: Always install the battery cartridge
fully until the red indicator cannot be seen. If not,
it may accidentally fall out of the appliance, causing
injury to you or someone around you.
CAUTION: Do not install the battery cartridge
forcibly. If the cartridge does not slide in easily, it is
not being inserted correctly.
14 ENGLISH
Appliance / battery protection
system
The appliance is equipped with a appliance / battery
protection system. This system automatically cuts off
power to the motor to extend appliance and battery life.
The appliance will automatically stop during operation
if the appliance or battery is placed under one of the
following conditions.
Overload protection
When the appliance is operated in a manner that
causes it to draw an abnormally high current, the appliance automatically stops without any indication. In this
situation, turn the appliance off and stop the application
that caused the appliance to become overloaded. Then
turn the appliance on to restart.
Overheat protection
When the appliance is overheated, the appliance stops
automatically. Let the appliance cool down before turning the appliance on again.
Overdischarge protection
When the battery capacity becomes low, the appliance
stops automatically. If the product does not operate
even when the switches are operated, remove the batteries from the appliance and charge the batteries.
Indicating the remaining battery
capacity
Only for battery cartridges with the indicator
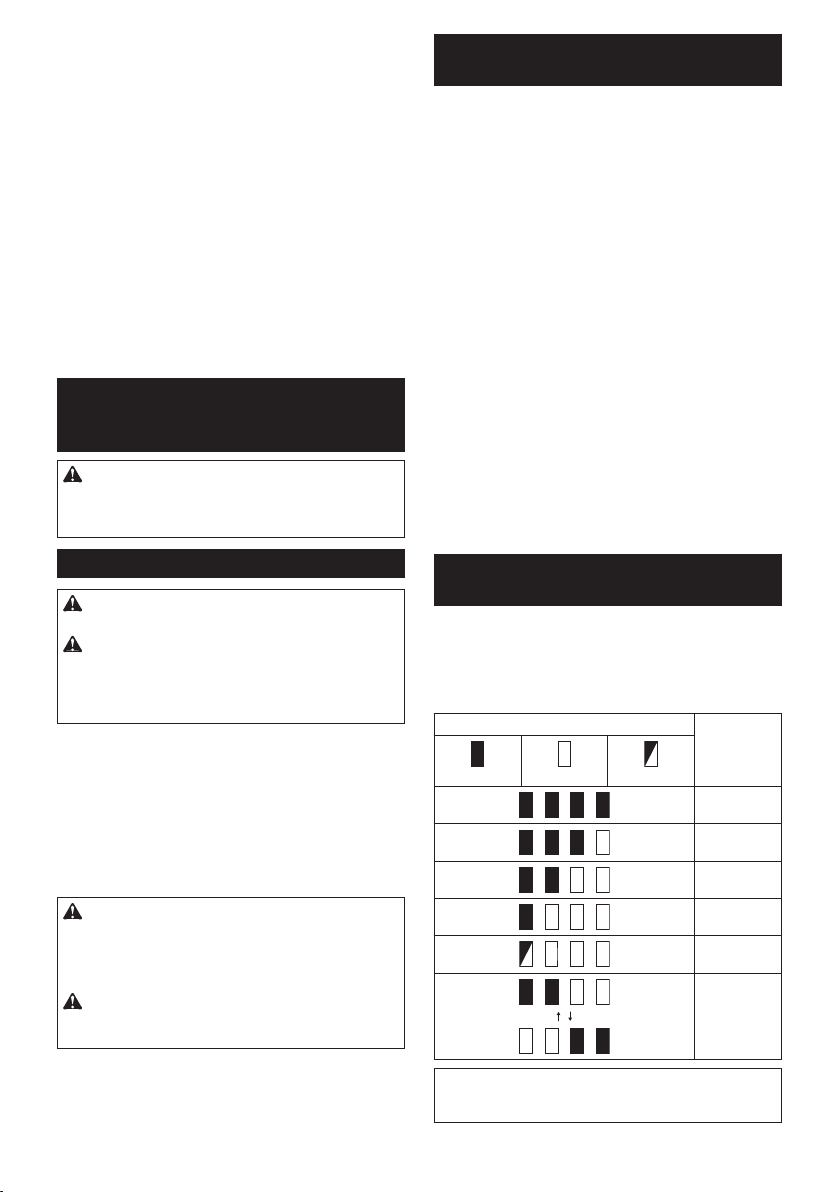
► Fig.2: 1. Indicator lamps 2. Check button
Press the check button on the battery cartridge to indi-
cate the remaining battery capacity. The indicator lamps
light up for a few seconds.
Indicator lamps Remaining
Lighted Off Blinking
NOTE: Depending on the conditions of use and the
ambient temperature, the indication may differ slightly
from the actual capacity.
capacity
75% to 100%
50% to 75%
25% to 50%
0% to 25%
Charge the
battery.
The battery
may have
malfunctioned.
Switch box position
The switch box can be hooked on either side of the lower
belt. Arrange the cord so that the switch box comes to
your desired side. To prevent the cord from being damaged, pass the cord through the groove as illustrated.
► Fig.3: 1. Groove 2. Cord
Adjusting belts
The tightness of the shoulder belts, upper and lower belts can
be adjusted. Put your arms through the shoulder belts rst then
fasten the lower and upper belts. To tighten, pull the end of the
strap as illustrated. To loosen, pull up the end of the fastener.
Lower belt
► Fig.4: 1. Strap 2. Fastener
Shoulder belts
► Fig.5: 1. Strap 2. Fastener
Upper belt
► Fig.6: 1. Strap 2. Fastener
Carrying hook
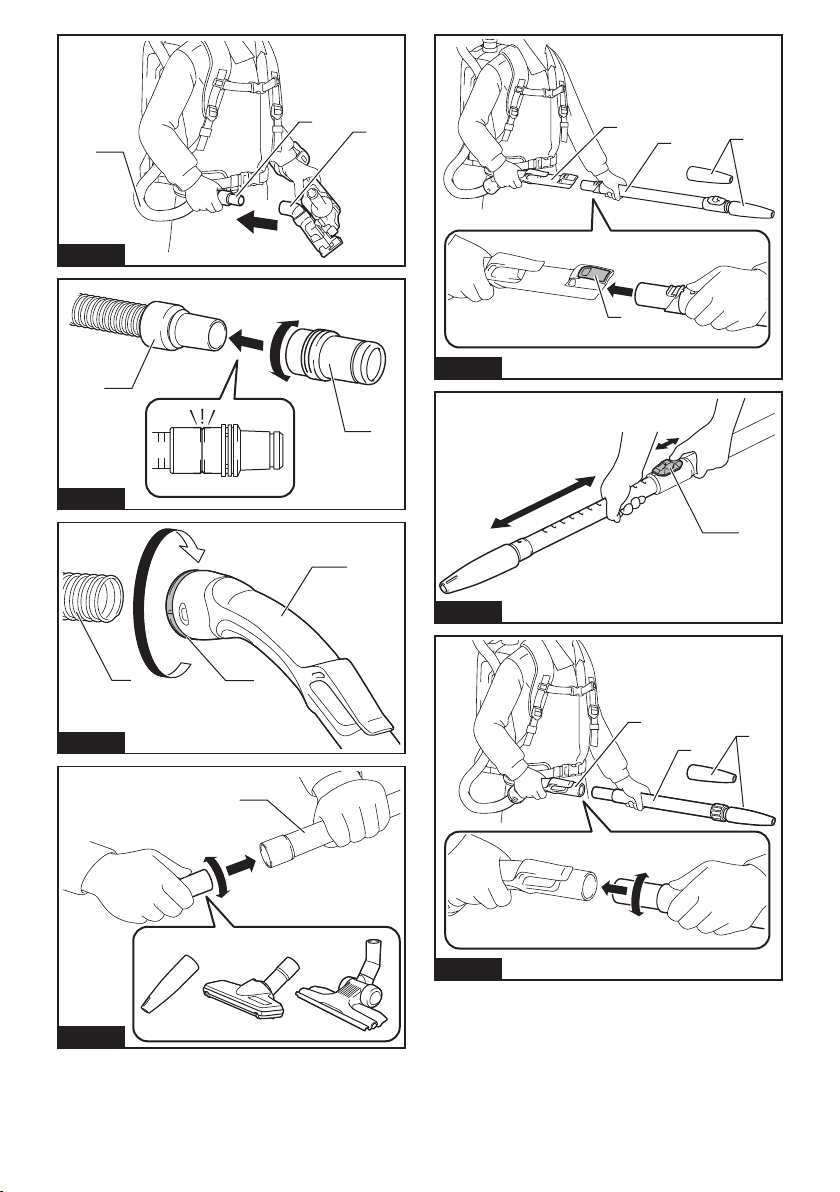
Always grab the carrying hook when handling the vacuum cleaner body.
► Fig.7: 1. Carrying hook
Stand-by switch
The stand-by switch is the switch to turn on/off the wireless activation function. The vacuum cleaner is in the stand-by state regard-
less of the switch position and it runs when button is pushed.
► Fig.8: 1. Stand-by switch
Switch position Status
AUTO I
The vacuum cleaner is in the stand-by
(ON)
state and the wireless activation function
is available.
O
The vacuum cleaner is in the stand-by
(OFF)
state however the wireless activation
function is not available.
Switch action
To start vacuuming, press button once. The vacuum
cleaner will start in the same suction power when you
turned it off previously. When you press button
while the vacuum cleaner is running, the suction power
switches between normal (1) and higher (2) suction
power. To turn off the vacuum cleaner, press button.
► Fig.9
NOTE: If you want to run the vacuum cleaner along
with the switch operation of the tool connected to the
vacuum cleaner (wireless activation function), set the
stand-by switch to " I (ON)".
NOTE: To use the wireless activation function, nish
the tool registration beforehand. Refer to "WIRELESS
ACTIVATION FUNCTION" section for detail.
NOTE: When using the wireless activation function, you will not be able to stop the vacuuming
button.
by
15 ENGLISH
Hose band
Hose band can be used for holding the hose or free
nozzle.
To secure the hose to the vacuum cleaner body, pass
the hose band through the slot on the body. You can
attach the hose band on either side.
► Fig.10: 1. Hose band 2. Slot 3. Hose
The loop on the lower belt can be used for carrying
nozzles as illustrated.
► Fig.11: 1. Loop 2. Nozzles
Dust beating system
Dust goes down when you pull the lever or walk with
wearing the cleaner. This system helps the cleaner
maintaining the suction power.
► Fig.12: 1. Lever 2. Filter bag/dust bag 3. Board
NOTE: This function works when the cleaner is
switched off and the lter bag/dust bag contains a
certain amount of dust to touch the board.
ASSEMBLY
CAUTION: Always be sure that the appli-
ance is switched off and the battery cartridge
is removed before carrying out any work on the
appliance.
Assembling hose
Insert the hose cuff into the vacuum cleaner body and
turn it clockwise.
► Fig.13: 1. Hose cuff 2. Vacuum cleaner body
Connecting the tool
If the bent pipe assembly is attached to the hose,
loosen the sleeve of bent pipe assembly and remove it.
► Fig.14: 1. Hose 2. Bent pipe assembly 3. Sleeve
1. Attach the front cuff to the hose for dust extraction.
When connecting the front cuff, make sure that it is
securely screwed on the hose.
2. Connect the front cuff to the tool's extraction
outlet.
► Fig.15: 1. Front cuff 2. Extraction outlet 3. Hose
The front cuff can be detached by turning it counterclockwise while holding the hose.
NOTE: Always use a suitable front cuff. When using
the front cuff 24, attach it to the front cuff 22 that is
connected to the hose.
► Fig.16: 1. Front cuff 22 2. Front cuff 24
Using as a cleaner
If you want to use this product as a cleaner, follow the
below procedures.
NOTICE: If the front cuff is attached to the hose,
remove it beforehand.
NOTE:
The bent pipe assembly, extension wand, and noz-
zles are supplied as optional accessories in some countries.
NOTE:
There are two types of bent pipe assembly; the
one for slide-type extension wand and the one for ringtype extension wand. If you prepare the bent pipe assembly, choose the one for your desired extension wand type.
1. Fasten the sleeve of bent pipe assembly onto the
hose.
► Fig.17: 1. Hose 2. Bent pipe assembly 3. Sleeve
To remove the bent pipe assembly, loosen the sleeve of
bent pipe assembly from the hose.
2. Twist and insert the nozzle to the extension wand.
► Fig.18: 1. Extension wand 2. Free nozzle
NOTE: By twisting the nozzle while inserting, the noz-
zle can be attached to the extension wand securely.
3. Follow the procedures below, depending on the
type of the extension wand :
NOTE: The slide-type extension wand and the ringtype extension wand are not compatible with each
other. If you want to change the slide-type extension
wand to the ring-type extension wand or vice versa,
change the bent pipe assembly also.
NOTE: The free nozzle can be attached to the bent
pipe assembly directly.
For the slide-type extension wand
Shoulder the vacuum cleaner body then insert the
extension wand into the bent pipe assembly until it
clicks. To disconnect, extract the extension wand with
pressing the button.
► Fig.19: 1. Bent pipe assembly 2. Button 3. Slide-
The length of the wand can be adjusted.
With pressing the slide button, adjust the wand length.
The length is locked when releasing the slide button.
► Fig.20: 1. Slide button
For the ring-type extension wand
Shoulder the vacuum cleaner body then twist and insert
the extension wand into the bent pipe assembly. To
disconnect, twist and extract it.
► Fig.21: 1. Bent pipe assembly 2. Ring-type exten-
The length of the wand can be adjusted.
Loosen the ring on the wand and adjust the wand
length. Tighten the ring at your desired length.
► Fig.22: 1. Ring
3. T-shape nozzle 4. T-shape nozzle (slim)
type extension wand 4. Free nozzle
sion wand 3. Free nozzle
Hose hook
When you suspend the operation, the hook on the bent
pipe assembly can be used for hanging the wand on the
lower belt.
► Fig.23
16 ENGLISH
Installing lter bag / dust bag
Optional accessory
CAUTION: Do not use a damaged lter bag.
Always use the vacuum cleaner with the lter bag
properly installed. Otherwise the vacuumed dust
or particles may be exhausted from the cleaner
and they may cause respiratory disease to the
operator.
Install either dust bag or lter bag before using cleaner.
— Dust bag are usable many times repeatedly by
cleaning it out.
— Filter bag is a throw-away type. Throw away the
entire lter bag without emptying when it has
become full.
NOTICE: When the lter bag is already full,
replace with new one. When the dust bag is
already full, empty it. Continuous use with the lter
bag/dust bag full results in reduced suction power.
NOTICE: To prevent dust from getting into the
motor:
— Make sure that the lter bag/dust bag is
installed before use.
— Do not use a broken or ripped bag.
Otherwise the motor may be broken.
NOTICE: Do not fold the cardboard at its open-
ing when installing the lter bag/dust bag.
NOTICE: The lter bag/dust bag for the cleaner
is an important component for maintaining the
appliance performance. Using non-genuine lter
bag/dust bag may cause smoke or ignition.
NOTE: When the lter bag/dust bag is not installed in
the cleaner, the front cover does not close completely.
► Fig.24
1. Unlock the latch by lifting the bottom side. Push
the grooved area to lift the front latching side. Pull the
latch to open the lid.
► Fig.25: 1. Hook 2. Lid
2. Insert the lter bag into the slit on the upper side of
the room as illustrated.
► Fig.26: 1. Slit 2. Filter bag
When using the dust bag, insert the brim of the dust bag
into the slit.
► Fig.27: 1. Slit 2. Brim 3. Dust bag
3. Align the hole of the lter bag with the hose cuff
and push the cardboard portion to the end. Make sure
that the rubber ring on the lter bag goes over the rim
on the hose cuff.
► Fig.28: 1. Rubber ring on the lter bag 2. Rim on
the hose cuff 3. Cardboard portion of the
lter bag 4. Hose cuff
OPERATION
WARNING: Operators shall be adequately
instructed on the use of the vacuum cleaner.
WARNING: This vacuum cleaner is not suit-
able for picking up hazardous dust.
CAUTION: This cleaner is for dry use only.
CAUTION: This cleaner is for indoor use only.
CAUTION: Always insert the battery cartridge
all the way until it locks in place. If you can see the
red indicator on the upper side of the button, it is not
locked completely. Insert it fully until the red indicator
cannot be seen. If not, it may accidentally fall out
of the appliance, causing injury to you or someone
around you.
CAUTION: During operation, be conscious
of the vacuum cleaner on your back. You may
lose your balance if the vacuum cleaner body bumps
against a wall or the hose is hooked by an obstacles.
1. Shoulder the vacuum cleaner body and fas-
ten lower and upper belts. Adjust the tightness as
necessary.
► Fig.29
2. Press
the suction power, press button while the vacuum
cleaner is running. The suction power switches between
normal (1) and higher (2) suction power. Press button to stop.
► Fig.30
During the operation, hook the switch box on the lower
belt or the ring.
► Fig.31: 1. Ring 2. Lower belt
3. Replace the lter bag when it becomes full. Open
the lid and take out the lter bag. Pull the strip on the
side of the opening to shut the lter bag and dispose of
the lter bag in whole.
► Fig.32: 1. Strip
When using a dust bag, take out the dust bag and dispose of the dust by releasing the latch.
► Fig.33: 1. Latch
NOTICE: Do not put lter bag/dust bag or other
heavy objects on the lid. The appliance may fall
down.
NOTICE: Periodically check the lter bag if it is
full. Continuous use with the lter bag full results in
reduced suction power.
NOTICE: Do not use an used lter bag. The lter
bag is designed for single use. Using lter bag repeatedly may cause clogging of the lter and results in
damage to the cleaner. If you want to use the bag
repeatedly, use a dust bag.
button to start vacuuming. To change
17 ENGLISH
WIRELESS ACTIVATION
FUNCTION
What you can do with the wireless
activation function
The wireless activation function enables clean and comfortable operation. By connecting a supported tool to the cleaner, you can run the
cleaner automatically along with the switch operation of the tool.
► Fig.34
NOTICE: Be sure to refer to the instruction man-
ual of the tool when using the cleaner with wireless activation function.
NOTICE: Do not disassemble or tamper with the
wireless unit.
NOTICE: To prevent dust coming into the slot
of the wireless unit, always close the lid securely
during operation and storage.
NOTICE: Do not remove the wireless unit while
the power is being supplied. Doing so may cause a
malfunction of the wireless unit.
NOTICE:
hard and/or press the button with an object with a sharp edge.
NOTE: Wireless activation needs Makita tools
equipped with the wireless unit.
NOTE:
function with each tool, the tool registration is required.
Once the registration is nished with the tool, the
re-registration is not required unless it is cancelled.
NOTE: Before registration, be sure that the wireless
unit is properly inserted.
NOTE: One wireless unit can register up to 10 links
with other wireless units. If more than 10 other wireless units are registered to one wireless unit, the one
registered earliest will be cancelled automatically.
NOTE: The position of the wireless activation button
varies depending on the tool.
NOTE: The cleaner also starts by pressing
when the stand-by switch is set to " I (ON)".
However the button will not work when the wireless activation function is used.
Installing the wireless unit
stable surface when installing the wireless unit.
NOTICE:
before installing the wireless unit. Dust or dirt may cause
malfunction if it comes into the slot of the wireless unit.
NOTICE:
static, touch a static discharging material, such as
a metallic part, before picking up the wireless unit.
NOTICE:
be sure that the wireless unit is inserted in the correct direction and the lid is completely closed.
Do not press the wireless activation button too
Prior to the initial use of the wireless activation
button
CAUTION: Place the cleaner on a at and
Clean the dust and dirt on the cleaner
To prevent the malfunction caused by
When installing the wireless unit, always
1. Open the lid on the cleaner as shown in the gure.
► Fig.35: 1. Lid
2. Insert the wireless unit to the slot and then close
the lid.
When inserting the wireless unit, align the projections
with the recessed portions on the slot.
► Fig.36: 1. Wireless unit 2. Projection 3. Lid
4. Recessed portion
When removing the wireless unit, open the lid slowly.
The hooks on the back of the lid will lift the wireless unit
as you pull up the lid.
► Fig.37: 1. Wireless unit 2. Hook 3. Lid
After removing the wireless unit, keep it in the supplied
case or a static-free container.
NOTICE: Always use the hooks on the back of
the lid when removing the wireless unit. If the
hooks do not catch the wireless unit, close the lid
completely and open it slowly again.
Tool registration for the cleaner
NOTE: A Makita tool supporting the wireless activa-
tion function is required for the tool registration.
NOTE: Finish installing the wireless unit to the tool
before starting the tool registration.
NOTE: During the tool registration, do not pull the
switch trigger on the tool or push the cleaner's switch
for vacuuming.
NOTE: Refer to the instruction manual of the tool, too.
If you wish to activate the cleaner along with the
switch operation of the tool, nish the tool registration
beforehand.
1. Install the wireless units to the cleaner and the
tool, respectively.
2. Install the batteries to the cleaner and the tool.
3. Set the stand-by switch on the cleaner to " I (ON)".
► Fig.38: 1. Stand-by switch
4. Press the wireless activation button on the cleaner
for 3 seconds until the wireless activation lamp blinks in
green. And then press the wireless activation button on
the tool in the same way.
► Fig.39: 1. Wireless activation button 2. Wireless
activation lamp
If the cleaner and the tool are linked successfully, the
wireless activation lamps will light up in green for 2
seconds and start blinking in blue.
NOTE: The wireless activation lamps nish blinking
in green after 20 seconds elapsed. Press the wireless
activation button on the tool while the wireless activation lamp on the cleaner is blinking. If the wireless
activation lamp does not blink in green, push the wire-
less activation button briey and hold it down again.
NOTE: When performing two or more tool registration
for the cleaner, nish the tool registration one by one.
18 ENGLISH
Starting the wireless activation
function
NOTE: Finish the tool registration for the cleaner for
wireless activation.
NOTE: Always place the cleaner so that you can see
the status of the wireless activation lamp.
NOTE: Refer to the instruction manual of the tool, too.
After registering a tool to the cleaner, the cleaner will
automatically runs along with the switch operation of
the tool.
1. Install the wireless units to the cleaner and the
tool, respectively.
2. Install the batteries to the cleaner and the tool.
3. Connect the hose of the cleaner with the tool.
► Fig.40
4. Set the stand-by switch on the cleaner to " I (ON)".
The wireless activation lamp will blink in blue.
► Fig.41: 1. Stand-by switch
5. Push the wireless activation button on the tool
briey. The wireless activation lamp will blink in blue.
► Fig.42: 1. Wireless activation button 2. Wireless
activation lamp
6. Pull the switch trigger of the tool. Check if the
cleaner runs while the switch trigger on the tool is being
pulled.
CAUTION: Always check if the wireless acti-
vation function works before starting a work with
the tool.
To stop the wireless activation, push the wireless activation button on the tool or set the stand-by switch on the
cleaner to "O (OFF)".
NOTE: The wireless activation lamp on the tool will
stop blinking in blue when there is no operation for
2 hours. In this case, press the wireless activation
buttons on the tool again.
NOTE: The cleaner starts/stops with a delay. There is
a time lag when the cleaner detects a switch operation of the tool.
NOTE: The transmission distance of the wireless unit
may vary depending on the location and surrounding
circumstances.
NOTE: When two or more tools are registered to one
cleaner, the cleaner may start running even if you
don't pull the switch trigger because other user is
using the wireless activation function.
Cancelling tool registration for the
cleaner
Perform the following procedure when cancelling the
tool registration for the cleaner.
1. Install the wireless units to the cleaner and the
tool, respectively.
2. Install the batteries to the cleaner and the tool.
3. Set the stand-by switch on the cleaner to " I (ON)".
► Fig.43: 1. Stand-by switch
4. Press the wireless activation button on the cleaner
for 6 seconds. The wireless activation lamp blinks in
green and then become red. After that, press the wireless activation button on the tool in the same way.
► Fig.44: 1. Wireless activation button 2. Wireless
activation lamp
If the cancellation is performed successfully, the wireless activation lamps will light up in red for 2 seconds
and start blinking in blue.
NOTE: The wireless activation lamps nish blinking in
red after 20 seconds elapsed. Press the wireless activation button on the tool while the wireless activation
lamp on the cleaner is blinking. If the wireless activation lamp does not blink in red, push the wireless
activation button briey and hold it down again.
Erasing all tool registrations
You can erase all tool registrations from the cleaner as
follows.
► Fig.45: 1. Stand-by switch 2. Wireless activation
button 3. Wireless activation lamp
1. Install the wireless unit to the cleaner.
2. Install the batteries to the cleaner.
3. Set the stand-by switch to " I (ON)".
4. Hold down the wireless activation button for about
6 seconds until the wireless activation lamp blinks in red
(about twice per one second).
5. When the wireless activation lamp starts blinking
in red, release your nger from the wireless activation
button. Thereafter, hold down the wireless activation
button again for about 6 seconds.
6. When the wireless activation lamp starts blinking
fast (about 5 times per one second) in red, release your
nger from the wireless activation button. When the
wireless activation lamp lights up in red and later lights
off, all tool registrations are erased.
NOTE: If the wireless activation lamp does not blink
in red, press the wireless activation button briey and
try again.
19 ENGLISH
Description of the wireless activation lamp status
► Fig.46: 1. Wireless activation button 2. Wireless
The wireless activation lamp shows the status of the wireless activation function. Refer to the below table for the
meaning of the lamp status.
registration
Cancelling/
registration
activation lamp
Status Wireless activation lamp Description
Color
Standby Blue
Tool
Green
erasing
tool
Others Red
Red
Off - - The stand-by switch is not set to " I (ON)".
On Blinking
(slow: 2 times/sec.)
(fast: 5 times/sec.)
Duration
(approximate)
Cleaner: con-
tinuing
Tool: 2 hours
When the tool is
running.
20 seconds Ready for the tool registration. Searching the tool to be registered.
2 seconds The tool registration has been nished. The wireless activation
20 seconds Ready for the cancellation of the tool registration. Searching the
When the
wireless activation button is
pressed down.
2 seconds The tool registration has been cancelled/erased. The wireless
3 seconds The power is supplied to the wireless unit and the wireless activa-
Waiting for the tool registration or the wireless activation function
is available.
The lamp on the cleaner blinks when the stand-by switch is set in
" I (ON)". The lamp on the tool blinks when the wireless activation
button is pushed. The lamp on the tool will automatically turn off
when no operation is performed for 2 hours.
The wireless activation of the cleaner is available and the tool is
running.
lamp will start blinking in blue.
tool to be cancelled.
Ready to erase all tool registrations.
activation lamp will start blinking in blue.
tion function is starting up.
20 ENGLISH
Troubleshooting for wireless activation function
Before asking for repairs, conduct your own inspection rst. If you nd a problem that is not explained in the manual,
do not attempt to dismantle the tool. Instead, ask Makita Authorized Service Centers, always using Makita replacement parts for repairs.
State of abnormality Probable cause (malfunction) Remedy
The wireless activation lamp does
not light/blink.
Cannot nish tool registration / cancelling tool registration successfully.
The wireless unit is not installed into the
cleaner and/or the tool.
The wireless unit is improperly installed
into the cleaner and/or the tool.
The terminal of the wireless unit and/or
the slot is dirty.
The wireless activation button on the
tool have not been pushed.
The stand-by switch on the cleaner is
not set to " I (ON)".
No power supply Supply the power to the tool and the cleaner.
The wireless unit is not installed into the
cleaner and/or the tool.
The wireless unit is improperly installed
into the cleaner and/or the tool.
The terminal of the wireless unit and/or
the slot is dirty.
The stand-by switch on the cleaner is
not set to " I (ON)".
No power supply Supply the power to the tool and the cleaner.
Incorrect operation Push the wireless activation button briey and
The tool and cleaner are away from
each other (out of the transmission
range).
Before nishing the tool registration/
cancellation;
- the switch trigger on the tool is pulled
or;
- the cleaner's switch to start vacuuming
is pushed.
The tool registration procedures for
the tool or the cleaner has not been
nished.
Radio disturbance by other appliances
which generate high-intensity radio
waves.
Install the wireless unit correctly.
Gently wipe off dust and dirt on the terminal of the
wireless unit and clean the slot of the cleaner and/
or the tool.
Push the wireless activation button on the tool
briey. Make sure that the wireless activation lamp
is blinking in blue.
Set the stand-by switch on the cleaner to " I (ON)".
Install the wireless unit correctly.
Gently wipe off dust and dirt on the terminal of the
wireless unit and clean the slot of the cleaner and/
or the tool.
Set the stand-by switch on the cleaner to " I (ON)".
perform the tool registration/cancellation procedures
again.
Get the tool and the cleaner closer to each other.
The maximum transmission distance is approximately 10 m however it may vary according to the
circumstances.
Push the wireless activation button briey and
perform the tool registration/cancellation procedures
again.
Perform the tool registration procedures for the tool
and the cleaner at the same timing.
Keep the tool and the cleaner away from the appliances such as Wi-Fi devices and microwave ovens.
21 ENGLISH
State of abnormality Probable cause (malfunction) Remedy
The cleaner does not run along with
the switch operation of the tool.
The cleaner runs while the tool's
switch trigger is not pulled.
Cannot erase all tool registrations in
the cleaner.
The wireless unit is not installed into the
cleaner and/or the tool.
The wireless unit is improperly installed
into the cleaner and/or the tool.
The terminal of the wireless unit and/or
the slot is dirty.
The wireless activation button on the
tool have not been pushed.
The stand-by switch on the cleaner is
not set to " I (ON)".
More than 10 tools are registered to
the cleaner.
The cleaner erased all tool
registrations.
No power supply Supply the power to the tool and the cleaner.
The tool and cleaner are away from
each other (out of the transmission
range).
Radio disturbance by other appliances
which generate high-intensity radio
waves.
Other users are using the wireless activation of the cleaner with their tools.
Pressing the wireless button on the tool. Press the wireless button on the cleaner for erasing
The stand-by switch on the cleaner is
not set to " I (ON)".
The wireless activation button is not
held down correctly.
Install the wireless unit correctly.
Gently wipe off dust and dirt on the terminal of the
wireless unit and clean the slot of the cleaner and/
or the tool.
Push the wireless activation button on the tool
briey. Make sure that the wireless activation lamp
is blinking in blue.
Set the stand-by switch on the cleaner to " I (ON)".
Perform the tool registration again.
If more than 10 tools are registered to the cleaner,
the tool registered earliest will be cancelled
automatically.
Perform the tool registration again.
Get the tool and the cleaner closer to each other.
The maximum transmission distance is approximately 10 m however it may vary according to the
circumstances.
Keep the tool and the cleaner away from the appliances such as Wi-Fi devices and microwave ovens.
Perform one of the following way;
- set the stand-by switch on the cleaner to "O"
position or;
- turn off the wireless activation button of the other
tools or;
- cancel the tool registration of the other tools.
all tool registrations.
Set the stand-by switch on the cleaner to " I (ON)".
Hold down the wireless activation button for more
than 6 seconds and then release it when the wireless activation lamp blinks in red. Hold down the
wireless activation button for more than 6 seconds
again until the wireless activation button rapidly
blinks in red and then release the button.
MAINTENANCE
CAUTION: Always be sure that the appli-
ance is switched off and the battery cartridge is
removed before attempting to perform inspection
or maintenance.
NOTICE: Never use gasoline, benzine, thinner,
alcohol or the like. Discoloration, deformation or
cracks may result.
To maintain product SAFETY and RELIABILITY,
repairs, any other maintenance or adjustment should
be performed by Makita Authorized or Factory Service
Centers, always using Makita replacement parts.
Cleaning the HEPA lter
CAUTION: Do not use the vacuum cleaner
without a lter or continue to use dirty or damaged lter. Vacuumed dust or particles may be
exhausted from the cleaner and they may cause
respiratory disease to the operator.
NOTICE: To keep optimum suction power and
clean exhaust, clean the lter periodically. If
enough suction power is not obtained even after
the cleaning, replace the lter with new one.
NOTICE: To prevent the lter from being dam-
aged, do not use following tools and similar items
for cleaning :
— Air duster
— High pressure washer
— Tools made of hard materials such as a
metallic brush
22 ENGLISH

1. Open the lid and take out the lter bag/dust bag.
Release the hook on the lter and remove it from the
vacuum cleaner body.
► Fig.47: 1. Hook
2. Beat the dust off from the lter. The lter can be
washed with water. Rinse away the dust and particles
on the lter every 1 or 2 month. After that, dry the lter
completely in a shaded and well-ventilated place to
prevent unpleasant odor or malfunctions.
3. To install the lter, insert the side without the
hooks into the groove then push in the lter until the
hooks are secured with a click.
► Fig.48: 1. Groove 2. HEPA lter 3. Hook
Cleaning the dust bag
Regularly clean the dust bag with soap and water. Turn
the dust bag inside out and remove the sticky dust.
Wash lightly by hand and rinse well with water. Dry
completely before installing to the vacuum cleaner.
► Fig.49
NOTICE: Wet dust bag lowers the vacuuming per-
formance as well as the life of the motor.
Cleaning the room for lter bag/
dust bag
When cleaning the room for lter bag/dust bag, remove
and wipe the board inside.
► Fig.50: 1. Board
Removing the board
1. Remove the HEPA lter. Refer to the section for
cleaning the HEPA lter for how to remove.
2. Push down the board, and slide it to left until the
board touches the wall.
3. Lift the right side of the board up and take it out.
► Fig.51: 1. Board
The board is supported by three springs.
If the springs came off from the board or the lever,
reattach them as illustrated.
► Fig.52: 1. Spring for board 2. Spring for lever
3. Projection
NOTE: Attach the springs securely so that the springs
touch the root of the projections.
OPTIONAL
ACCESSORIES
CAUTION: These accessories or attachments
are recommended for use with your Makita prod-
uct specied in this manual. The use of any other
accessories or attachments might present a risk of
injury to persons. Only use accessory or attachment
for its stated purpose.
If you need any assistance for more details regarding these accessories, ask your local Makita Service
Center.
• Hose (for dust extraction type)
• Hose (for vacuum cleaner type)
• Extension wand
• Free nozzle
• T-shape nozzle
• Seat nozzle
• Corner nozzle
• Shelf brush
• Round brush
• Filter bag
• Dust bag
• Front cuff
• HEPA lter
• Wireless unit
• Makita genuine battery and charger
NOTE: Some items in the list may be included in the
tool package as standard accessories. They may
differ from country to country.
Attaching the board
1. Insert the straight side of the board into the
catches in the lower left side of the room.
2. Put the right side of the board in place.
► Fig.53: 1. Board 2. Straight side 3. Catch
23 ENGLISH
FRANÇAIS (Instructions originales)
Ni-MH
SPÉCIFICATIONS
Modèle : DVC665
Capacité Sac-ltre 6,0 L
Sac à poussière 5,5 L
Volume d’air maximum
(Avec un tuyau de ø28 mm x 1,5 m)
Vide 110 hPa
Dimensions (L x P x H)
(sans le harnais)
Tension nominale 36 V CC
Poids net 6,1 - 6,7 kg
297 mm x 174 mm x 523 mm
• Étant donné l’évolution constante de notre programme de recherche et de développement, les spécications
contenues dans ce manuel sont sujettes à modication sans préavis.
• Les spécications peuvent varier suivant les pays.
• Le poids ne comprend pas les accessoires, mais la ou les batteries. Le poids combiné le plus léger et le plus
lourd de l’appareil et de la ou des batteries est indiqué dans le tableau.
Batterie et chargeur applicables
Batterie BL1815N / BL1820 / BL1820B / BL1830 / BL1830B / BL1840 /
Chargeur DC18RC / DC18RD / DC18RE / DC18SD / DC18SE / DC18SF /
•
Certains chargeurs et batteries répertoriés ci-dessus peuvent ne pas être disponibles selon la région où vous résidez.
AVERTISSEMENT : N’utilisez que les batteries et les chargeurs répertoriés ci-dessus. L’utilisation
d’autres batteries et chargeurs peut provoquer des blessures et/ou un incendie.
BL1840B / BL1850 / BL1850B / BL1860B
1,8 m
DC18SH
3
/min
Symboles
Vous trouverez ci-dessous les symboles utilisés pour
l’appareil. Veillez à comprendre leur signication avant
toute utilisation.
Lire le mode d’emploi.
Uniquement pour les pays européens
Ne jetez pas les appareils électriques ou
les batteries avec vos ordures ménagères !
Conformément aux directives européennes
relatives aux déchets d’équipements
électriques et électroniques et aux piles
et accumulateurs ainsi qu’aux déchets de
piles et d’accumulateurs et leur mise en
œuvre conformément aux lois nationales,
les équipements électriques et les piles et
batteries en n de vie doivent faire l’objet
d’une collecte sélective et être conés à
une usine de recyclage respectueuse de
l’environnement.
Li-ion
Utilisations
L’appareil est conçu pour la collecte des poussières
sèches. L’appareil est prévu pour un usage commercial,
par exemple, dans les hôtels, écoles, hôpitaux, usines,
magasins, bureaux et agences de location.
Bruit
Niveau de bruit pondéré A typique, déterminé selon
EN60335-2-69 EN60704-2-1 :
Niveau de pression sonore (LpA) : 70 dB (A) ou moins
Incertitude (K) : 2,5 dB (A)
Le niveau de bruit en fonctionnement peut dépasser 80 dB (A).
NOTE :
La ou les valeurs d’émission de bruit déclarées ont
été mesurées conformément à la méthode de test standard
et peuvent être utilisées pour comparer les outils entre eux.
NOTE : La ou les valeurs d’émission de bruit déclarées peuvent aussi être utilisées pour l’évaluation
préliminaire de l’exposition.
AVERTISSEMENT :
AVERTISSEMENT : L’émission de bruit
lors de l’usage réel de l’outil électrique peut être
différente de la ou des valeurs déclarées, suivant
la façon dont l’outil est utilisé, particulièrement
selon le type de pièce usinée.
AVERTISSEMENT :
prendre pour protéger l’utilisateur doivent être basées
sur une estimation de l’exposition dans des conditions réelles d’utilisation (en tenant compte de toutes
les composantes du cycle d’utilisation, comme par
exemple le moment de sa mise hors tension, lorsqu’il
tourne à vide et le moment de son déclenchement).
24 FRANÇAIS
Portez un serre-tête antibruit.
Les mesures de sécurité à
Vibrations
Valeur totale de vibrations (somme de vecteur triaxial)
déterminée selon EN60335-2-69 :
Mode de travail : coupe de planches
Émission de vibrations (ah) : 2,5 m/s2 ou moins
Incertitude (K) : 1,5 m/s
NOTE : La ou les valeurs de vibration totales déclarées ont été mesurées conformément à la méthode
de test standard et peuvent être utilisées pour comparer les outils entre eux.
NOTE : La ou les valeurs de vibration totales déclarées peuvent aussi être utilisées pour l’évaluation
préliminaire de l’exposition.
2
AVERTISSEMENT : L’émission de vibrations
lors de l’usage réel de l’outil électrique peut être
différente de la ou des valeurs déclarées, suivant
la façon dont l’outil est utilisé, particulièrement
selon le type de pièce usinée.
AVERTISSEMENT : Les mesures de sécurité
à prendre pour protéger l’utilisateur doivent être
basées sur une estimation de l’exposition dans
des conditions réelles d’utilisation (en tenant
compte de toutes les composantes du cycle
d’utilisation, comme par exemple le moment de
sa mise hors tension, lorsqu’il tourne à vide et le
moment de son déclenchement).
Déclaration de conformité CE
Pour les pays européens uniquement
La déclaration de conformité CE est fournie en Annexe
A à ce mode d’emploi.
CONSIGNES DE
SÉCURITÉ
Consignes de sécurité pour
aspirateur sans l
AVERTISSEMENT : IMPORTANT ! LIRE
ATTENTIVEMENT toutes les consignes de
sécurité et toutes les instructions AVANT
UTILISATION. Le non-respect des avertissements et
des instructions peut entraîner une électrocution, un
incendie et/ou de graves blessures.
1. Avant l’utilisation, veillez à ce que l’aspirateur
soit utilisé par des personnes ayant reçu des
instructions adéquates quant à son utilisation.
2. N’utilisez pas l’aspirateur sans le ltre.
Remplacez immédiatement le ltre s’il est
endommagé.
3. N’essayez pas d’aspirer des matériaux
inammables, du matériel pyrotechnique, des
cigarettes allumées, des cendres chaudes,
des copeaux de métal chauds, des matériaux
tranchants comme un rasoir, des aiguilles, des
morceaux de verre, etc.
4. N’UTILISEZ JAMAIS L’ASPIRATEUR À
PROXIMITÉ D’ESSENCE, GAZ, PEINTURE,
ADHÉSIFS OU AUTRES SUBSTANCES TRÈS
EXPLOSIVES. L’interrupteur émet des étincelles
à la mise sous et hors tension. Tout comme le
commutateur du moteur pendant le fonctionnement. Une dangereuse explosion peut survenir.
5.
N’aspirez jamais des matériaux toxiques, cancérigènes, combustibles ou d’autres produits dangereux comme l’amiante, l’arsenic, le baryum, le
béryllium, le plomb, les pesticides ou d’autres
matières présentant un danger pour la santé.
6. N’utilisez jamais l’aspirateur à l’extérieur sous
la pluie.
7. N’utilisez pas l’aspirateur près de sources de
chaleur (cuisinières, etc.).
8. Ne bloquez pas les fentes d’aération. Ces
fentes permettent le refroidissement du
moteur. Il faut éviter soigneusement de les bloquer sous peine de griller le moteur en raison
d’un manque d’aération.
9. Maintenez constamment une bonne assise et
un bon équilibre.
10. Ne pliez pas le tuyau, ni ne tirez ou marchez
dessus.
11. Arrêtez immédiatement l’aspirateur si vous
remarquez des performances médiocres
ou toute autre anomalie pendant le
fonctionnement.
12. DÉBRANCHEZ LES BATTERIES. Lorsque vous
n’utilisez pas l’aspirateur, avant de le réparer
et lors du remplacement des accessoires.
13. Procédez au nettoyage et à l’entretien de l’aspirateur immédiatement après chaque utilisation pour le maintenir dans des conditions de
fonctionnement optimales.
14. ENTRETENEZ SOIGNEUSEMENT
L’ASPIRATEUR. L’aspirateur doit toujours être
propre pour améliorer la sécurité et les performances. Suivez les instructions pour remplacer les accessoires. Les poignées doivent
toujours être sèches, propres et exemptes
d’huile ou de graisse.
15.
VÉRIFIEZ LES PIÈCES ENDOMMAGÉES. Avant toute
nouvelle utilisation de l’aspirateur, vériez soigneusement un carter de protection ou toute autre pièce
endommagés pour déterminer qu’ils fonctionnent
bien et remplissent leurs fonctions respectives.
Vériez l’alignement des pièces mobiles, le blocage
des pièces mobiles, les pièces cassées, l’installation
et tout autre état susceptible d’affecter le fonctionnement. Un carter de protection ou toute autre pièce
endommagés doivent être réparés ou remplacés
correctement par un centre de service après-vente
agréé sauf indication contraire de ce mode d’emploi.
Conez le remplacement des interrupteurs défectueux à un centre de service après-vente agréé.
N’utilisez pas l’aspirateur s’il ne peut pas être mis
sous et hors tension au moyen de l’interrupteur.
16. PIÈCES DE RECHANGE. En cas de réparation,
utilisez uniquement des pièces de rechange
identiques.
17. RANGEZ L’ASPIRATEUR APRÈS UTILISATION.
Lorsque vous n’utilisez pas l’aspirateur, rangez-le à l’intérieur.
25 FRANÇAIS

18. Épargnez votre aspirateur. Une manipulation
brutale peut entraîner la rupture de l’aspirateur
le plus robuste.
19. Ne nettoyez pas l’extérieur ou l’intérieur avec
du benzène, du diluant ou d’autres produits
chimiques de nettoyage. Vous risqueriez de le
ssurer ou de le décolorer.
20.
N’utilisez pas l’aspirateur dans un endroit fermé
où des vapeurs inammables, explosives ou
toxiques sont dégagées par de la peinture à base
d’huile, du diluant pour peinture, de l’essence,
certains produits antimites, etc., ou dans des
endroits exposés à des poussières inammables.
21. N’utilisez pas l’aspirateur sous l’inuence de
drogues, de médicaments ou d’alcool.
22. Par mesure de sécurité, utilisez des lunettes
à coques ou des lunettes de sécurité avec
écrans latéraux.
23. Utilisez un masque anti-poussière dans des
conditions de travail poussiéreuses.
24. Cette machine n’est pas destinée à être utilisée
par des personnes (y compris les enfants) aux
facultés physiques, sensorielles ou mentales
diminuées ou sans expérience ni expertise.
25. Les enfants doivent être sous la surveillance
d’un adulte an de s’assurer qu’ils ne jouent
pas avec l’aspirateur.
26. Ne manipulez jamais les batteries et l’aspirateur avec les mains mouillées.
27. Redoublez de précaution lorsque vous nettoyez des escaliers.
28. N’utilisez pas l’aspirateur comme marchepied
ou établi. La machine pourrait tomber et provoquer des blessures corporelles.
Utilisation et entretien des outils fonctionnant sur batterie
1. Rechargez la batterie uniquement avec le char-
geur spécié par le fabricant. Un chargeur qui
est adapté à un type spécique de batterie peut
présenter un risque d’incendie s’il est utilisé avec
un autre type de batterie.
2. Utilisez un outil électrique uniquement avec la
batterie spéciquement indiquée. L’utilisation
de toute autre batterie peut présenter un risque de
blessure et d’incendie.
3.
Lorsque vous n’utilisez pas la batterie, tenez-la
à l’écart des objets métalliques, comme des
trombones, pièces de monnaie, clés, clous, vis
ou autres petits objets métalliques, susceptibles
de créer une connexion entre deux bornes.
Court-circuiter les bornes d’une batterie entre elles
peut provoquer des brûlures ou un incendie.
4. Dans des conditions d’utilisation inadéquate,
il peut y avoir une fuite de l’électrolyte de la
batterie. Le cas échéant, évitez tout contact
avec ce liquide. En cas de contact accidentel,
rincez à l’eau. Si le liquide pénètre dans les
yeux, consultez par ailleurs un médecin. Le
liquide s’échappant de la batterie peut provoquer
une irritation ou des brûlures.
5. N’utilisez pas une batterie ou un outil s’ils sont
endommagés ou modiés. Une batterie endom-
magée ou modiée peut avoir un comportement
imprévisible susceptible d’entraîner un incendie,
une explosion ou des blessures.
6. N’exposez pas la batterie ou l’outil au feu ou à
une température excessive. L’exposition au feu
ou à une température supérieure à 130 °C peut
provoquer une explosion.
7. Respectez toutes les instructions de charge et
ne chargez pas la batterie ou l’outil en dehors
de la plage de température indiquée dans les
instructions. Une charge incorrecte ou à une
température en dehors de la plage indiquée peut
endommager la batterie et augmenter le risque
d’incendie.
Dépannage
1. Conez la réparation de votre outil électrique à
un réparateur qualié qui utilise des pièces de
rechange identiques. La sécurité de l’outil électrique sera ainsi préservée.
2. Suivez les instructions pour la lubrication et
le remplacement des accessoires.
3. Gardez toutes les poignées sèches, propres et
sans trace d’huile ou de graisse.
Consignes de sécurité importantes
pour la batterie
1. Avant d’utiliser la batterie, lisez toutes les
instructions et précautions relatives (1) au
chargeur de batterie, (2) à la batterie, et (3) au
produit utilisant la batterie.
2. Ne démontez pas la batterie.
3. Cessez immédiatement l’utilisation si le temps
de fonctionnement devient excessivement
court. Il y a risque de surchauffe, de brûlures,
voire d’explosion.
4. Si l’électrolyte pénètre dans vos yeux, rincez-les à l’eau claire et consultez immédiatement un médecin. Il y a risque de perte de la
vue.
5. Ne court-circuitez pas la batterie :
(1) Ne touchez les bornes avec aucun maté-
riau conducteur.
(2) Évitez de ranger la batterie dans un
conteneur avec d’autres objets métalliques, par exemple des clous, des pièces
de monnaie, etc.
(3) N’exposez pas la batterie à l’eau ou à la
pluie.
Un court-circuit de la batterie peut provoquer
une intensité de courant élevée, une surchauffe, parfois des brûlures et même une
panne.
6. Ne rangez pas l’outil et la batterie dans un
endroit où la température risque d’atteindre ou
de dépasser 50 °C.
7. Ne jetez pas la batterie au feu même si elle est
sérieusement endommagée ou complètement
épuisée. La batterie peut exploser au contact
du feu.
8. Évitez de laisser tomber ou de cogner la
batterie.
9. N’utilisez pas la batterie si elle est
endommagée.
26 FRANÇAIS
10. Les batteries au lithium-ion contenues sont
soumises aux exigences de la législation sur
les marchandises dangereuses.
Lors du transport commercial par des tierces
parties ou des transitaires par exemple, des exi-
gences spéciques en matière d’étiquetage et
d’emballage doivent être respectées.
Pour la préparation de l’article expédié, il est nécessaire de consulter un expert en matériau dangereux.
Veuillez également respecter les réglementations
nationales susceptibles d’être plus détaillées.
Recouvrez les contacts exposés avec du ruban adhésif
ou du ruban de masquage et emballez la batterie de telle
sorte qu’elle ne puisse pas bouger dans l’emballage.
11.
Lors de la mise au rebut de la batterie, retirez-la de
l’outil et jetez-la en lieu sûr. Suivez les réglementations
locales en matière de mise au rebut des batteries.
12. Utilisez les batteries uniquement avec les
produits spéciés par Makita. L’insertion de
batteries dans des produits non conformes peut
provoquer un incendie, une chaleur excessive,
une explosion ou une fuite de l’électrolyte.
13. Lorsque vous n’utilisez pas l’outil pendant une
période prolongée, la batterie doit être retirée
de l’outil.
CONSERVEZ CES
INSTRUCTIONS.
ATTENTION : N’utilisez que des batteries
Makita d’origine. L’utilisation de batteries de marque
autre que Makita ou de batteries modiées peut provoquer l’explosion des batteries, ce qui présente un
risque d’incendie, de dommages matériels et corporels. Cela annulera également la garantie Makita pour
l’outil et le chargeur Makita.
Conseils pour assurer la durée
de vie optimale de la batterie
1. Chargez la batterie avant qu’elle ne soit complètement déchargée. Arrêtez toujours l’outil
et rechargez la batterie quand vous remarquez
que la puissance de l’outil diminue.
2. Ne rechargez jamais une batterie complètement chargée. La surcharge réduit la durée de
service de la batterie.
3.
Chargez la batterie à une température ambiante
comprise entre 10 °C et 40 °C. Avant de charger
une batterie chaude, laissez-la refroidir.
4. Rechargez la batterie si elle est restée inutilisée pendant une période prolongée (plus de
six mois).
Consignes de sécurité importantes
pour le connecteur sans l
1.
Ne démontez ni ne modiez le connecteur sans l.
2.
Conservez le connecteur sans l hors de portée
des jeunes enfants. En cas d’ingestion accidentelle, consultez immédiatement un médecin.
3. Utilisez le connecteur sans l uniquement
avec des outils Makita.
4. N’exposez pas le connecteur sans l à la pluie
ou à l’humidité.
5. N’utilisez pas le connecteur sans l dans un
endroit où la température dépasse 50 °C.
6. Ne faites pas fonctionner le connecteur sans
l dans un endroit où des appareils médicaux
comme des simulateurs cardiaques sont
utilisés.
7. Ne faites pas fonctionner le connecteur sans
l dans un endroit où des appareils automatiques sont utilisés. Sinon, ces appareils pour-
raient présenter un dysfonctionnement ou une
erreur.
8. N’utilisez pas le connecteur sans l dans
un endroit à température élevée ou dans un
endroit susceptible de générer de l’électricité
statique ou du bruit électrique.
9. Le connecteur sans l peut produire
des champs électromagnétiques (CEM),
mais ceux-ci ne sont pas dangereux pour
l’utilisateur.
10. Le connecteur sans l est un instrument de
précision. Évitez de laisser tomber ou de
cogner le connecteur sans l.
11. Évitez de toucher la borne du connecteur sans
l avec les mains nues ou avec des objets
métalliques.
12. Retirez toujours la batterie du produit avant
d’y installer le connecteur sans l.
13. Évitez d’ouvrir le couvercle de la fente dans un
endroit où de la poussière ou de l’eau pourrait
pénétrer dans la fente. Maintenez toujours
propre l’entrée de la fente.
14. Insérez toujours le connecteur sans l dans le
bon sens.
15. N’appuyez pas trop fort sur le bouton d’activation sans l du connecteur sans l, ni n’appuyez dessus avec un objet pointu.
16. Fermez toujours le couvercle de la fente pendant le fonctionnement.
17. Ne retirez pas le connecteur sans l de la
fente alors que l’outil est sous tension. Vous
risqueriez de provoquer un dysfonctionnement du
connecteur sans l.
18.
Ne retirez pas l’autocollant du connecteur sans l.
19. Ne placez pas d’autocollant sur le connecteur
sans l.
20. Ne laissez pas le connecteur sans l dans un
endroit susceptible de générer de l’électricité
statique ou du bruit électrique.
21. Ne laissez pas le connecteur sans l dans un
endroit soumis à une forte chaleur, comme
une voiture en plein soleil.
22. Ne laissez pas le connecteur sans l dans un
endroit poussiéreux ou sablonneux ou dans
un endroit susceptible de générer des gaz
corrosifs.
23. De la condensation peut se former sur le
connecteur sans l en cas de brusque changement de température. N’utilisez pas le connec-
teur sans l tant que la condensation n’a pas
complètement séché.
24. Pour nettoyer le connecteur sans l,
essuyez-le délicatement avec un chiffon doux
et sec. N’utilisez pas de benzine, diluant,
graisse conductrice ou autre.
27 FRANÇAIS
25. Rangez le connecteur sans l en le conser-
vant dans l’étui fourni ou dans un récipient
anti-statique.
26. N’insérez pas d’autres dispositifs que le
connecteur sans l Makita dans la fente sur
l’outil.
27. N’utilisez pas l’outil si le couvercle de la fente
est endommagé. L’eau, la poussière ou la saleté
pourraient pénétrer dans la fente provoquant un
dysfonctionnement.
28. Ne tirez, ni ne tordez plus que nécessaire le
couvercle de la fente. Remettez le couvercle en
place s’il se détache de l’outil.
29. Remplacez le couvercle de la fente si vous le
perdez ou l’endommagez.
CONSERVEZ CES
INSTRUCTIONS.
DESCRIPTION DU
FONCTIONNEMENT
ATTENTION : Assurez-vous toujours que
l’appareil est hors tension et que sa batterie
est retirée avant de l’ajuster ou de vérier son
fonctionnement.
Insertion ou retrait de la batterie
ATTENTION : Éteignez toujours l’appareil
avant de mettre en place ou de retirer la batterie.
ATTENTION : Tenez fermement l’appareil et la
batterie lors de la mise en place ou du retrait de la
batterie. Si vous ne tenez pas fermement l’appareil
et la batterie, ils peuvent vous glisser des mains, et
s’abîmer ou vous blesser.
► Fig.1: 1. Voyant rouge 2. Bouton 3. Batterie
Pour retirer la batterie, faites-la glisser hors de l’appareil
tout en faisant glisser le bouton à l’avant de la batterie.
Pour mettre en place la batterie, alignez la languette sur
la batterie avec la rainure sur le compartiment et insé-
rez-la. Insérez-la à fond jusqu’à ce qu’un léger déclic
se fasse entendre. Si le voyant rouge sur le dessus du
bouton est visible, cela signie qu’elle n’est pas bien
verrouillée.
ATTENTION : Insérez toujours complètement
la batterie jusqu’à ce que le voyant rouge ne soit
plus visible. Sinon, elle pourrait tomber accidentel-
lement de l’appareil au risque de vous blesser ou de
blesser quelqu’un se trouvant à proximité.
ATTENTION : N’insérez pas la batterie de
force. Si elle ne glisse pas facilement, c’est que vous
ne l’insérez pas correctement.
Système de protection de l’appareil/
la batterie
L’appareil est équipé d’un système de protection de
l’appareil/la batterie. Ce système met automatiquement
hors tension le moteur pour accroître l’autonomie de
l’appareil et de la batterie. Si l’appareil ou la batterie se
trouve dans l’une des situations suivantes, l’appareil
cessera automatiquement de fonctionner.
Protection contre la surcharge
Lorsque l’appareil est utilisé d’une manière provoquant un
appel de courant anormalement élevé, il s’arrête automatiquement sans indication. Dans ce cas, éteignez l’appareil
et arrêtez la tâche ayant provoqué la surcharge de l’appareil. Puis rallumez l’appareil pour reprendre la tâche.
Protection contre la surchauffe
En cas de surchauffe de l’appareil, il s’arrête automatiquement. Laissez l’appareil refroidir avant de le
remettre sous tension.
Protection contre la décharge totale
de la batterie
Lorsque la charge restante de la batterie devient faible,
l’appareil s’arrête automatiquement. Si le produit ne
fonctionne pas même lorsque les boutons sont actionnés, retirez les batteries de l’appareil et chargez-les.
Indication de la charge restante de
la batterie
Uniquement pour les batteries avec voyant lumineux
► Fig.2: 1. Témoins 2. Bouton de vérication
Appuyez sur le bouton de vérication sur la batterie
pour indiquer la charge restante de la batterie. Les
témoins s’allument pendant quelques secondes.
Témoins Charge
Allumé Éteint Clignotant
restante
75 % à 100 %
50 % à 75 %
25 % à 50 %
0 % à 25 %
Chargez la
batterie.
Anomalie
possible
de la batterie.
NOTE : Selon les conditions d’utilisation et la température ambiante, l’indication peut être légèrement
différente de la capacité réelle.
28 FRANÇAIS

Position du boîtier de commande
Le boîtier de commande peut être accroché de n’importe quel côté de la ceinture inférieure. Arrangez le
cordon de sorte que le boîtier de commande se place
du côté souhaité. Pour éviter d’abîmer le cordon,
faites-le passer dans la rainure comme illustré.
► Fig.3: 1. Rainure 2. Cordon
Réglage des ceintures
Il est possible de régler les courroies d’épaule et les
ceintures supérieure et inférieure. Passez d’abord
vos bras par les courroies d’épaule, puis serrez les
ceintures inférieure et supérieure. Pour serrer, tirez sur
l’extrémité de la courroie comme illustré. Pour desserrer, soulevez l’extrémité de la barrette.
Ceinture inférieure
► Fig.4: 1. Courroie 2. Barrette
Courroies d’épaule
► Fig.5: 1. Courroie 2. Barrette
Ceinture supérieure
► Fig.6: 1. Courroie 2. Barrette
Crochet de transport
Tenez toujours le crochet de transport lorsque vous
manipulez le corps de l’aspirateur.
► Fig.7: 1. Crochet de transport
Bouton de veille
Le bouton de veille sert à activer/désactiver la fonction
d’activation sans l. L’aspirateur est à l’état de veille
quel que soit la position du bouton et il fonctionne
lorsque le bouton est enfoncé.
► Fig.8: 1. Bouton de veille
Position du
bouton
AUTO I
(ON)
(OFF)
L’aspirateur est à l’état de veille et la fonc-
tion d’activation sans l est disponible.
O
L’aspirateur est à l’état de veille toutefois
la fonction d’activation sans l n’est pas
disponible.
État
Fonctionnement de la gâchette
Pour commencer à aspirer, appuyez une fois sur le
bouton . L’aspirateur démarrera à la même puis-
sance d’aspiration qu’au moment où vous l’avez éteint
précédemment. Si vous appuyez sur le bouton alors
que l’aspirateur fonctionne, la puissance d’aspiration
permute entre normale (1) et élevée (2). Pour éteindre
l’aspirateur, appuyez sur le bouton .
► Fig.9
NOTE : Si vous souhaitez faire fonctionner l’aspi-
rateur en utilisant l’interrupteur de l’outil raccordé à
l’aspirateur (fonction d’activation sans l), placez le
bouton de veille sur « I (ON) ».
NOTE : Pour utiliser la fonction d’activation sans l,
terminez d’abord l’enregistrement de l’outil. Consultez
la section « FONCTION D’ACTIVATION SANS FIL »
pour en savoir plus.
NOTE : Lorsque vous utilisez la fonction d’activation
sans l, vous n’êtes pas en mesure d’arrêter l’aspira-
tion avec le bouton
.
Collier du tuyau
Le collier du tuyau peut servir à tenir le tuyau ou le raccord libre.
Pour xer le tuyau au corps de l’aspirateur, faites passer le collier du tuyau par la fente sur le corps. Vous
pouvez xer le collier du tuyau de n’importe quel côté.
► Fig.10: 1. Collier du tuyau 2. Fente 3. Tuyau
L’arceau présent sur la ceinture inférieure peut être
utilisé pour transporter les raccords comme illustré.
► Fig.11: 1. Arceau 2. Raccords
Système de battage des poussières
La poussière descend lorsque vous tirez sur le levier ou
marchez en portant l’aspirateur. Ce système aide l’aspirateur à maintenir sa puissance d’aspiration.
► Fig.12: 1. Levier 2. Sac-ltre/Sac à poussière
NOTE : Cette fonction fonctionne lorsque l’aspirateur
est hors tension et que le sac-ltre/sac à poussière
contient tellement de poussière qu’elle touche le
plateau.
3. Plateau
ASSEMBLAGE
ATTENTION : Vériez toujours que l’appareil
est hors tension et que la batterie est retirée avant
toute intervention dessus.
Assemblage du tuyau
Insérez le manchon du tuyau dans le corps de l’aspirateur et tournez-le dans le sens des aiguilles d’une
montre.
► Fig.13: 1. Manchon du tuyau 2. Corps de
Raccordement de l’outil
Si l’ensemble du tube cintré est xé sur le tuyau, desserrez le manchon de l’ensemble du tube cintré et retirez-le.
► Fig.14: 1. Tuyau 2. Ensemble du tube cintré
1. Fixez le manchon avant sur le tuyau d’extraction
de poussière.
Lors du raccordement du manchon avant, assurez-vous
qu’il est bien vissé sur le tuyau.
l’aspirateur
3. Manchon
29 FRANÇAIS
2. Raccordez le manchon avant sur la bouche d’ex-
traction de l’outil.
► Fig.15: 1. Manchon avant 2. Bouche d’extraction
3. Tuyau
Le manchon avant peut être retiré en le tournant dans
le sens inverse des aiguilles d’une montre tout en
tenant le tuyau.
NOTE : Utilisez toujours un manchon avant adapté.
Lorsque vous utilisez le manchon avant 24, xez-le
sur le manchon avant 22 qui est raccordé au tuyau.
► Fig.16: 1. Manchon avant 22 2. Manchon avant 24
Utilisation en tant qu’aspirateur
Si vous souhaitez utiliser ce produit comme aspirateur,
procédez comme indiqué ci-dessous.
REMARQUE : Si le manchon avant est xé sur
le tuyau, retirez-le au préalable.
NOTE : L’ensemble du tube cintré, le tube prolon-
gateur et les raccords sont fournis en tant qu’accessoires en option dans certains pays.
NOTE : Il existe deux types d’ensemble du tube cintré
: celui pour le tube prolongateur de type coulissant et
celui pour le tube prolongateur avec bague. Si vous
préparez l’ensemble du tube cintré, choisissez celui
correspondant au type de tube prolongateur souhaité.
1. Serrez le manchon de l’ensemble du tube cintré
sur le tuyau.
► Fig.17: 1. Tuyau 2. Ensemble du tube cintré
3. Manchon
Pour retirer l’ensemble du tube cintré, desserrez le
manchon de l’ensemble du tube cintré sur le tuyau.
2. Insérez en tournant le raccord sur le tube
prolongateur.
► Fig.18: 1. Tube prolongateur 2. Raccord libre
3. Raccord en forme de T 4. Raccord en
forme de T (mince)
NOTE : Tourner le raccord en l’insérant permet de le
xer solidement au tube prolongateur.
3. Procédez comme indiqué ci-dessous en fonction
du type de tube prolongateur :
NOTE : Le tube prolongateur de type coulissant et le
tube prolongateur avec bague ne sont pas compatibles. Pour remplacer le tube prolongateur de type
coulissant par le tube prolongateur avec bague ou
inversement, il faut également changer l’ensemble du
tube cintré.
NOTE : Le raccord libre peut être directement xé à
l’ensemble du tube cintré.
Pour le tube prolongateur de type coulissant
Chargez le corps de l’aspirateur sur vos épaules, puis
insérez le tube prolongateur dans l’ensemble du tube
cintré jusqu’au déclic. Pour le déconnecter, retirez le
tube prolongateur en appuyant sur le bouton.
► Fig.19: 1. Ensemble du tube cintré 2. Bouton
3. Tube prolongateur de type coulissant
4. Raccord libre
Il est possible de régler la longueur du tube.
Tout en appuyant sur le bouton coulissant, réglez la
longueur du tube. La longueur est bloquée lorsque vous
relâchez le bouton coulissant.
► Fig.20: 1. Bouton coulissant
Pour le tube prolongateur avec bague
Chargez le corps de l’aspirateur sur vos épaules, puis
insérez en tournant le tube prolongateur dans l’ensemble du tube cintré. Pour le déconnecter, tirez en
tournant.
► Fig.21: 1. Ensemble du tube cintré 2. Tube prolon-
gateur avec bague 3. Raccord libre
Il est possible de régler la longueur du tube.
Desserrez la bague sur le tube et réglez la longueur du
tube. Serrez la bague à la longueur souhaitée.
► Fig.22: 1. Bague
Crochet du tuyau
Lorsque vous interrompez la tâche, le crochet sur l’ensemble du tube cintré peut être utilisé pour pendre le
tube à la ceinture inférieure.
► Fig.23
Installation du sac-ltre/sac à
poussière
Accessoire en option
ATTENTION : N’utilisez pas un sac-ltre
endommagé. Utilisez toujours l’aspirateur avec
le sac-ltre correctement installé. Autrement, la
poussière et les particules aspirées peuvent être
expulsées de l’aspirateur, ce qui présente un
risque de maladie respiratoire pour l’utilisateur.
Installez le sac à poussière ou le sac-ltre avant d’utiliser l’aspirateur.
— Les sacs à poussière sont réutilisables si vous les
nettoyez correctement.
— Le sac-ltre est de type jetable. Jetez l’ensemble
du sac-ltre sans le vider une fois qu’il est plein.
REMARQUE : Lorsque le sac-ltre est plein,
remplacez-le par un neuf. Lorsque le sac à poussière est plein, videz-le. Si vous continuez à utiliser
le sac-ltre/sac à poussière plein, la puissance d’aspiration sera réduite.
REMARQUE : Pour éviter que la poussière
pénètre dans le moteur :
— Assurez-vous que le sac-ltre/sac à pous-
sière est installé avant utilisation.
— N’utilisez pas un sac rompu ou déchiré.
Cela risquerait d’endommager le moteur.
REMARQUE : Ne pliez pas l’ouverture en car-
ton du sac-ltre/sac à poussière lorsque vous
l’installez.
REMARQUE : Le sac-ltre/sac à poussière pour
aspirateur est un élément important du maintien
des performances de l’appareil. L’utilisation d’un
autre ltre que le sac-ltre/sac à poussière d’origine peut provoquer un dégagement de fumée ou
une combustion.
30 FRANÇAIS
 Loading...