

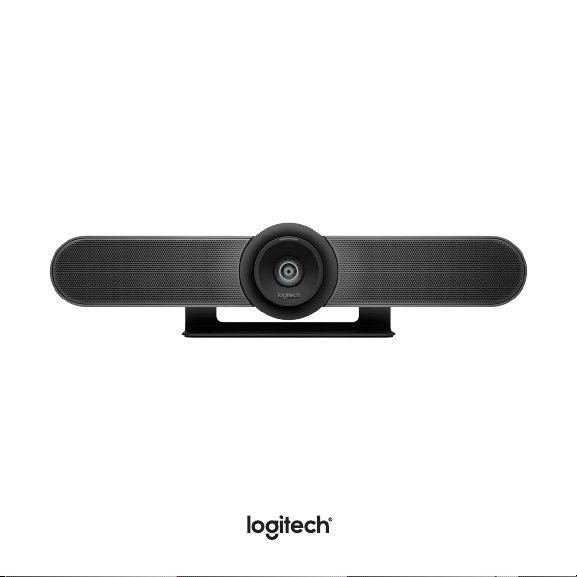
MeetUp
Setup Guide | Guide d’installation

English . . . . . . . . . . . . . . . . 3
Français . . . . . . . . . . . . . . .10
Español . . . . . . . . . . . . . . . 17
Português . . . . . . . . . . . . . 24
2
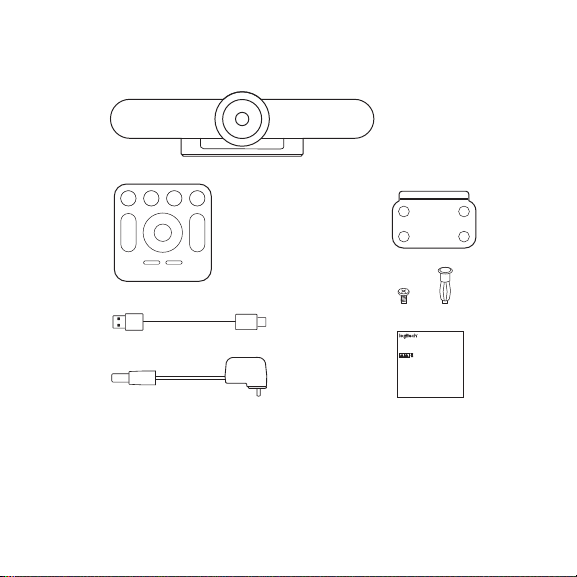
WHAT’S IN THE BOX
Note: This equipment has been tested and found to comply with the
limits for a Class A digital device, pursuant to part 15 of the FCC Rules.
These limits are designed to provide reasonable protection against
harmful interference when the equipment is operated in a commercial
environment. This equipment generates, uses, and can radiate radio
frequency energy and, if not installed and used in accordance with
the instruction manual, may cause harmful interference to radio
communications. Operation of this equipment in a residential area
is likely to cause harmful interference in which case the user will be
required to correct the interference at his own expense.
Warning: Where shielded interface cables or accessories have been
provided with the product or specified additional components
or accessories elsewhere defined to be used with the installation of
the product, they must be used in order to ensure compliance with
FCC. Changes or modifications to product not expressly approved
by Logitech, Inc could void your right to use or operate your
by the FCC.
Radiation Exposure Statement: This equipment complies with
FCC and IC radiation exposure limits set forth for an uncontrolled
environment. This equipment should be installed and operated with
minimum distance 20cm between the radiator & your body.
This transmitter must not be co-located or operating in conjunction
with any other antenna or transmitter.
Caution: (i) the device for operation in the band 5250-5150 MHz is
only for indoor use to reduce the potential for harmful interference
to co-channel mobile satellite systems; (ii) high-power radars are
allocated as primary users (i.e. priority users) of the bands -5250
5350 MHz and 5850-5650 MHz and that these radars could cause
interference and/or damage to LE-LAN devices.
IC statement: CAN ICES003- (A) / NMB003- Class (A)
This device complies with Industry Canada licence-exempt RSS
standard(s). Operation is subject to the following two conditions:
(1) this device may not cause interference, and (2) this device must
accept any interference, including interference that may cause
undesired operation of the device.
Cordless (Radio Transmitter) products: RSS210- and RSS2.4)247- GHz
transmitters or transceivers): This Category I radio communication
device complies with RSS210- and RSS247- of Industry Canada.
1
2 5
3
4
6
7
x4 x4
Important Safety, Compliance and Warranty Information
Informations importantes concernant la sécurité, la mise en conformité
et la garantie
your mouth for any reason as they may be swallowed accidentally.
English
Always check medication before ingesting as adults have mistaken
Read Manual Before Product Use.
button batteries for pills or tablets. If a button battery is ingested,
seek medical attention immediately. Contact the National Battery
Ingestion Hotline at (3333-625 (202. It is available 24 hours a day.
Safe Usage Guidelines for Products
POWER SUPPLY WARNING! The power supply is for indoor
• Do not open or modify the product except for battery removal
use only. Only use the power supply included with your product.
and replacement.
Do not attempt to repair or use a damaged power supply.
• Do not disassemble or attempt to service this product.
Do not immerse the power supply in water or subject it
• This product is safe under normal and reasonably foreseeable
to physical abuse. Inspect the power supply regularly for cable,
operating conditions.
plug, and casing damage.
• If product is operating improperly, call Logitech support.
BATTERY WARNING!: Improperly replaced batteries may
• Product must be returned to the manufacturer for any service
present a risk of leak or explosion and personal injury.
or repair.
Mistreated rechargeable batteries may present a risk of fire or
• This is not a Children’s Product and is not intended for use
chemical burn. Do not disassemble or expose to conducting
by children under 14 years old.
materials, moisture, liquid, or heat above °54C (°130F). Do not use or
• Warning: Not suitable for children under 36 months. Small parts.
charge the battery if it appears to be leaking, discolored, deformed,
Choking hazard.
or in any way abnormal. Do not leave your battery discharged or
• Mount camera properly according to the provided instructions.
unused for extended periods. Do not short circuit. Your device may
Improper installation of this product may cause damage or injury.
contain an internal, rechargeable battery that is not replaceable.
Logitech Compliance. For Product Safety, EMC, RF and Energy
Battery life varies with usage. Non-operational batteries should be
information, go to www.logitech.com/compliance. Maintenance is not
discarded according to local laws. If no laws or regulations govern,
required for product compliance.
dispose of your device in a waste bin for electronics. Keep batteries
away from children.
FCC statement
BUTTON BATTERIES—WARNING! Coin-sized and button batteries
This device complies with Part 15 of the FCC Rules. Operation is
may be easily swallowed, which may cause personal injury and
subject to the following two conditions: 1) this device may not cause
death in children and senior citizens. Keep these batteries away
harmful interference, and 2) this device must accept any interference
from children! Do not allow children to play with or be in contact
received, including interference that may cause undesired operation.
with these batteries or this product at any time. Add further security
to the battery compartment as necessary. Never place batteries in
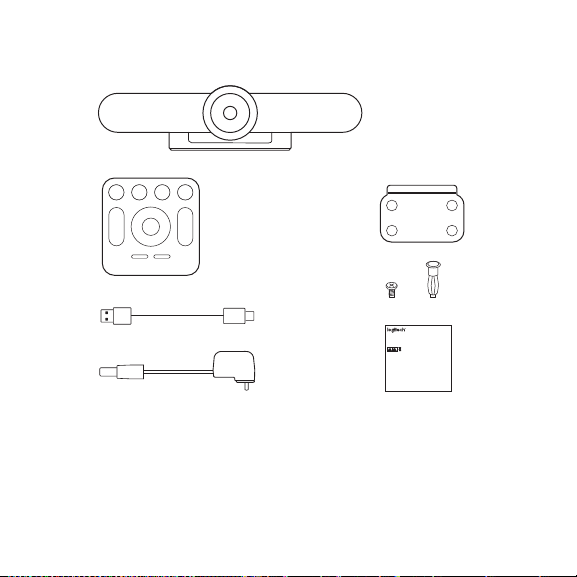
1. MeetUp camera
and speakerphone unit
2. Remote control
3. 5m USB cable
4. Power adapter
5. Wall mounting bracket
6. Wall mounting hardware
7. Documentation
English 3
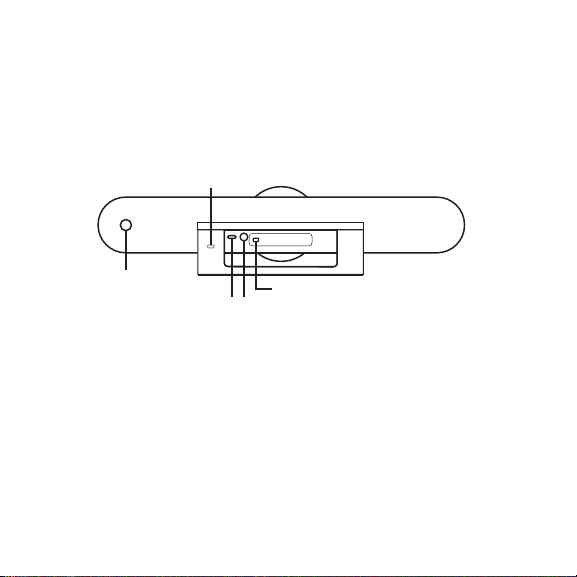
WHAT’S WHAT
CAMERA SPEAKERPHONE
1
4 English
2
5
43
1. Security slot
2. Remote control pairing
3. USB
4. Power
5. Optional expansion microphone
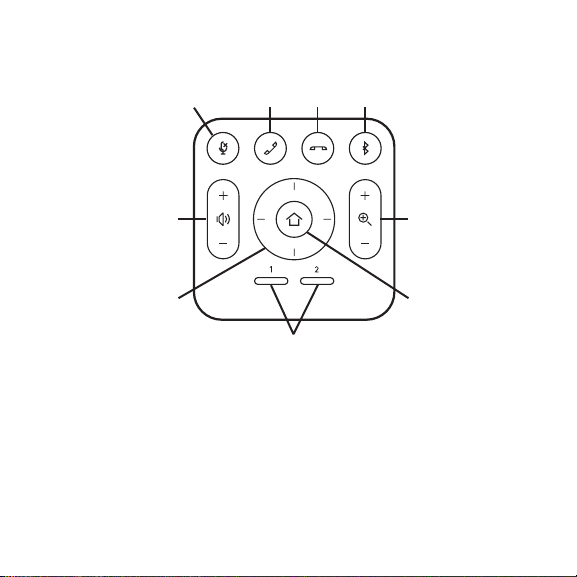
REMOTE
5
7
1. Microphone mute
2. Call answer
3. Call end
4. Bluetooth® pairing
5. Volume up/down
6. Zoom in/out
1 2
3 4
6
8
9
7. Camera pan/tilt
8. Camera home
9. Camera preset
* Please note that not all
applications support call
answer and end buttons.
English 5
Thanks for buying MeetUp. We think you’ll nd the extra wide
eld of view will help everyone feel included in the meeting,
enhancing communication.
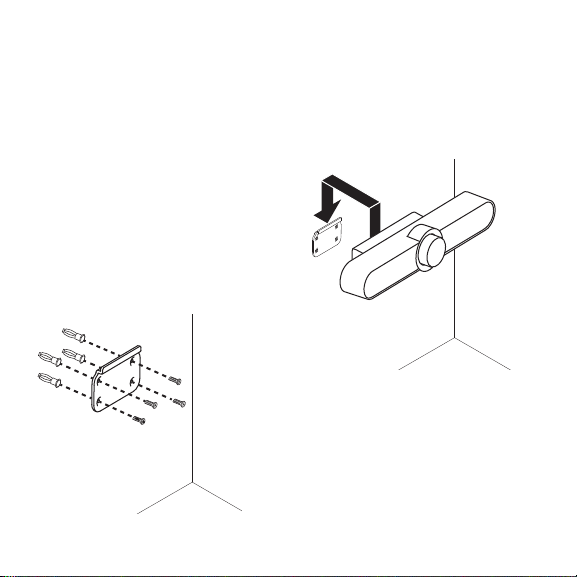
PLACEMENT
We recommend placing the camera
as close to eye level as possible.
Best results typically come from
mounting below the monitor.
1. Place on a table or shelf near
the monitor.
2. Connect the cables.
3. Mount on the wall:
a. Attach bracket to the wall.
Please use the appropriate type
of screws for your wall type.
6 English
b. Attach the camera
to the bracket.
4. Mount to the TV: An optional TV
mount bracket is available
on Logitech.com.
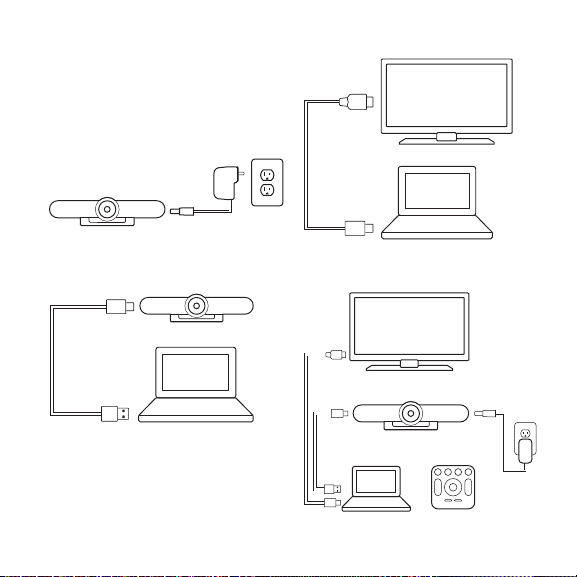
CONNECTION
Connec ting MeetUp is the same
whether you plan on using
a dedicated computer in the room,
or your team members bring a laptop
to the room to run the meeting.
1. Plug MeetUp into power.
3. Connect the TV to the computer.
2. Connect the USB cable from
MeetUp to the computer.
Diagram of all connections:
HDMI
USB
English 7

MAKE MEETUP
THEDEFAULTDEVICE
Ensure that MeetUp is chosen as
the camera, speaker and microphone
in your video conferencing
applications. Please consult
the application documentation for
further instruc tions on how to do this.
NOTE REGARDING 4K VIDEO
The USB 2.0 cable included with
MeetUp supports FullHD video
(up to 1080p). If you plan on using
4k video, please use a USB 3.0 cable
(not included).
STARTING A VIDEO CALL
After installing MeetUp and ensuring
it is the default device in your video
conferencing application, simply start
the application in the normal manner
and enjoy the benets of improved
audio and video.
8 English
PAIRING MEETUP
TOABLUE TOOT H DEVICE
You can use MeetUp for audio calls
when paired to a Bluetooth device.
To pair your Bluetooth device
to MeetUp, follow these simple s tep:
1. Press and hold the Blue tooth
button on the remote control until
you see a ashing blue light near
the camera lens.
2. Place your mobile device in
Bluetooth pairing mode and select
“Logitech MeetUp”.
You are now ready to use MeetUp
for audio calls.
Pressing the B luetooth button on the
remote after pairing will disconnect
the Bluetooth device (it will still
be “paired” but not “connected”).
Pressing it again will reconnect
the last paired device in range.

PAIRING THE REMOTE
CONTROL TO THE CAMERA
Your camera and remote control are
paired at the factory. However, if you
need to pair a remote to the camera
(such as when replacing a lost
remote) do the following:
1. Press and hold button on
the back of the camera until LED
ashes blue.
2. Press and hold the Blu etooth
button on the remote for
10 seconds to place it in pairing
mode.
3. Once the remote and camera are
paired the LED will stop ashing.
4. If the pairing fails, the LEDs will
keep ashing. Start from step 2
and repeat.
FOR MORE INFORMATION
You can nd additional information
on MeetUp including:
– FAQ s
– Software to enable functions in
various applications
– How to order replacement parts
– And more at
www.Logitech.com/MeetUp
English 9
CONTENU DU COFFRET
Note: This equipment has been tested and found to comply with the
limits for a Class A digital device, pursuant to part 15 of the FCC Rules.
These limits are designed to provide reasonable protection against
harmful interference when the equipment is operated in a commercial
environment. This equipment generates, uses, and can radiate radio
frequency energy and, if not installed and used in accordance with
the instruction manual, may cause harmful interference to radio
communications. Operation of this equipment in a residential area
is likely to cause harmful interference in which case the user will be
required to correct the interference at his own expense.
Warning: Where shielded interface cables or accessories have been
provided with the product or specified additional components
or accessories elsewhere defined to be used with the installation of
the product, they must be used in order to ensure compliance with
FCC. Changes or modifications to product not expressly approved
by Logitech, Inc could void your right to use or operate your
by the FCC.
Radiation Exposure Statement: This equipment complies with
FCC and IC radiation exposure limits set forth for an uncontrolled
environment. This equipment should be installed and operated with
minimum distance 20cm between the radiator & your body.
This transmitter must not be co-located or operating in conjunction
with any other antenna or transmitter.
Caution: (i) the device for operation in the band 5250-5150 MHz is
only for indoor use to reduce the potential for harmful interference
to co-channel mobile satellite systems; (ii) high-power radars are
allocated as primary users (i.e. priority users) of the bands -5250
5350 MHz and 5850-5650 MHz and that these radars could cause
interference and/or damage to LE-LAN devices.
IC statement: CAN ICES003- (A) / NMB003- Class (A)
This device complies with Industry Canada licence-exempt RSS
standard(s). Operation is subject to the following two conditions:
(1) this device may not cause interference, and (2) this device must
accept any interference, including interference that may cause
undesired operation of the device.
Cordless (Radio Transmitter) products: RSS210- and RSS2.4)247- GHz
transmitters or transceivers): This Category I radio communication
device complies with RSS210- and RSS247- of Industry Canada.
1
2 5
3
4
6
7
x4 x4
Important Safety, Compliance and Warranty Information
Informations importantes concernant la sécurité, la mise en conformité
et la garantie
your mouth for any reason as they may be swallowed accidentally.
English
Always check medication before ingesting as adults have mistaken
Read Manual Before Product Use.
button batteries for pills or tablets. If a button battery is ingested,
seek medical attention immediately. Contact the National Battery
Ingestion Hotline at (3333-625 (202. It is available 24 hours a day.
Safe Usage Guidelines for Products
POWER SUPPLY WARNING! The power supply is for indoor
• Do not open or modify the product except for battery removal
use only. Only use the power supply included with your product.
and replacement.
Do not attempt to repair or use a damaged power supply.
• Do not disassemble or attempt to service this product.
Do not immerse the power supply in water or subject it
• This product is safe under normal and reasonably foreseeable
to physical abuse. Inspect the power supply regularly for cable,
operating conditions.
plug, and casing damage.
• If product is operating improperly, call Logitech support.
BATTERY WARNING!: Improperly replaced batteries may
• Product must be returned to the manufacturer for any service
present a risk of leak or explosion and personal injury.
or repair.
Mistreated rechargeable batteries may present a risk of fire or
• This is not a Children’s Product and is not intended for use
chemical burn. Do not disassemble or expose to conducting
by children under 14 years old.
materials, moisture, liquid, or heat above °54C (°130F). Do not use or
• Warning: Not suitable for children under 36 months. Small parts.
charge the battery if it appears to be leaking, discolored, deformed,
Choking hazard.
or in any way abnormal. Do not leave your battery discharged or
• Mount camera properly according to the provided instructions.
unused for extended periods. Do not short circuit. Your device may
Improper installation of this product may cause damage or injury.
contain an internal, rechargeable battery that is not replaceable.
Logitech Compliance. For Product Safety, EMC, RF and Energy
Battery life varies with usage. Non-operational batteries should be
information, go to www.logitech.com/compliance. Maintenance is not
discarded according to local laws. If no laws or regulations govern,
required for product compliance.
dispose of your device in a waste bin for electronics. Keep batteries
away from children.
FCC statement
BUTTON BATTERIES—WARNING! Coin-sized and button batteries
This device complies with Part 15 of the FCC Rules. Operation is
may be easily swallowed, which may cause personal injury and
subject to the following two conditions: 1) this device may not cause
death in children and senior citizens. Keep these batteries away
harmful interference, and 2) this device must accept any interference
from children! Do not allow children to play with or be in contact
received, including interference that may cause undesired operation.
with these batteries or this product at any time. Add further security
to the battery compartment as necessary. Never place batteries in
1. Caméra avec haut-parleur intégré
MeetUp
2. Télécommande
3. Câble USB de 5 m
10 Français
4. Adaptateur secteur
5. Suppor t pour xation murale
6. Matériel pour montage mural
7. Documentation

DISPOSITIF
HAUTPARLEUR DE CAMÉRA
1
2
5
43
1. Emplacement de sécurité
2. Couplage par télécommande
3. USB
4. Alimentation
5. Extension microphones facultative
Français 11

TÉLÉCOMMANDE
1. Sourdine du microphone
2. Prise d'appel
3. Fin d'appel
4. Couplage Bluetoot h
5. Volum e +/-
6. Zoom avant/arrière
12 Français
®
1 2
5
7
3 4
6
8
9
7. Mouvement panoramique/
inclinaison de la caméra
8. Accueil de la caméra
9. Préréglage de la caméra
* Veuillez noter que certaines
applications ne prennent pas en
charge les boutons de prise et
de n d'appel.

Nous vous remercions d'avoir acheté la caméra MeetUp.
Vous verrez comme le champ de vision extra-large permet d'inclure tous
les participants à la réunion et d'optimiser la communication.
INSTALLATION
Nous vous recommandons de
positionner la caméra à hauteur
des yeux, dans la mesure du
possible. Les résultats obtenus sont
généralement bien meilleurs lorsque
le dispositif est ins tallé en dessous
du m o nite u r.
1. Placez la caméra sur une table ou
une étagère à côté du moniteur.
2. Connectez les câbles.
3. Montez le dispositif au mur:
a. Fixez le support au mur.
Utilisez des vis adaptées
à votre type de mur.
b. Fixez la caméra au support.
4. Montage sur un téléviseur:
un support pour téléviseur
(en option) est disponible
sur Logitech.com.
Français 13

CONNEXION
Que vous utilisiez un ordinateur
dédié dans la salle de réunion ou
que les membres de votre équipe
y apportent un ordinateur portable,
le processus de connexion de
la caméra MeetUp reste le même.
1. Branchez la caméra MeetUp
à une prise de courant.
2. Connectez le câble USB de la
caméra MeetUp à l'ordinateur.
14 Français
3. Connectez le téléviseur
à l'ordinateur.
Schéma de l'ensemble
des connexions:
HDMI
USB

CONFIGURATION DE
LACAMÉRA MEETUP
ENTANTQUE DE DISPOSITIF
PAR DÉFAUT
Vériez que la caméra MeetUp est
sélectionnée en tant que caméra,
haut-parleur et microphone dans
vos applications de visioconférence.
Veuillez consulter la documentation
fournie avec vos applications pour
savoir comment procéder.
REMARQUE CONCERNANT
LAVIDÉO 4K
Le câble USB 2.0 fourni avec
la caméra MeetUp prend en charge
les vidéos Full HD (jusqu'à 1080p).
Si vous souhaitez passer au format
vidéo 4k, veuillez utiliser un câble
USB 3.0 (non fourni).
DÉMARRER UN APPEL VIDÉO
Après avoir installé la caméra MeetUp
et l'avoir congurée comme dispositif
par défaut dans votre application
de visioconférence, démarrez
l'application normalement et protez
d'une qualité audio et vidéo optimale.
COUPLAGE DE LA CAMÉRA
MEETUP À UN DISPOSITIF
BLUE TO OTH
Vous pouvez utiliser la caméra
MeetUp pour des appels audio
lorsqu'elle est couplée à un dispositif
Bluetooth. Pour coupler votre
dispositif Bluetooth à la caméra
MeetUp, procédez comme suit:
1. Maintenez appuyé le bouton
Bluetooth de la télécommande
jusqu'à ce que le témoin près de
la lentille de la caméra clignote
en bleu.
2. Activez le couplage Bluetooth
de votre dispositif mobile et
sélectionnez "Logitech MeetUp".
Vous pouvez maintenant utiliser
MeetUp pour vos appels audio.
Si vous appuyez sur le bouton
Bluetooth de la télécommande
après avoir eectué le couplage,
le dispositif Bluetooth sera
déconnecté (le couplage sera établi,
mais pas la connexion). Le fait
d'appuyer sur le bouton une seconde
fois reconnectera le dernier dispositif
couplé dans la zone de portée de
la caméra.
Français 15

COUPLAGE DE
LATÉLÉCOMMANDE
ÀLACAMÉRA
Votre caméra et sa télécommande
sont couplées en usine.
Cependant, si vous souhaitez
coupler une autre télécommande
à la caméra (lorsque vous avez
égaré la télécommande d'origine,
par exemple), procédez comme suit:
1. Maintenez appuyé le bouton
à l'arrière de la caméra jusqu'à ce
que le témoin lumineux clignote
en bleu.
2. Appuyez sur le bouton Bluetooth
de la télécommande pendant
10 secondes pour la passer
en mode de couplage.
3. Une fois télécommande et
la caméra couplées, le témoin
lumineux cesse de clignoter.
4. Si le couplage échoue, les témoins
lumineux continueront de
clignoter. Reprenez l'ensemble
de la procédure à partir de
la deuxième étape.
16 Français
POUR EN SAVOIR PLUS
Des informations supplémentaires sur
la caméra MeetUp sont disponibles,
notamment:
– Questions fréquentes
– Logiciels permettant d'activer
des fonctions dans diérentes
applications
– Modalités de commande de pièces
de rechange
– Et bien plus encore, à l'adresse
www.Logitech.com/MeetUp

CONTENIDO DE LA CAJA
Note: This equipment has been tested and found to comply with the
limits for a Class A digital device, pursuant to part 15 of the FCC Rules.
These limits are designed to provide reasonable protection against
harmful interference when the equipment is operated in a commercial
environment. This equipment generates, uses, and can radiate radio
frequency energy and, if not installed and used in accordance with
the instruction manual, may cause harmful interference to radio
communications. Operation of this equipment in a residential area
is likely to cause harmful interference in which case the user will be
required to correct the interference at his own expense.
Warning: Where shielded interface cables or accessories have been
provided with the product or specified additional components
or accessories elsewhere defined to be used with the installation of
the product, they must be used in order to ensure compliance with
FCC. Changes or modifications to product not expressly approved
by Logitech, Inc could void your right to use or operate your
by the FCC.
Radiation Exposure Statement: This equipment complies with
FCC and IC radiation exposure limits set forth for an uncontrolled
environment. This equipment should be installed and operated with
minimum distance 20cm between the radiator & your body.
This transmitter must not be co-located or operating in conjunction
with any other antenna or transmitter.
Caution: (i) the device for operation in the band 5250-5150 MHz is
only for indoor use to reduce the potential for harmful interference
to co-channel mobile satellite systems; (ii) high-power radars are
allocated as primary users (i.e. priority users) of the bands -5250
5350 MHz and 5850-5650 MHz and that these radars could cause
interference and/or damage to LE-LAN devices.
IC statement: CAN ICES003- (A) / NMB003- Class (A)
This device complies with Industry Canada licence-exempt RSS
standard(s). Operation is subject to the following two conditions:
(1) this device may not cause interference, and (2) this device must
accept any interference, including interference that may cause
undesired operation of the device.
Cordless (Radio Transmitter) products: RSS210- and RSS2.4)247- GHz
transmitters or transceivers): This Category I radio communication
device complies with RSS210- and RSS247- of Industry Canada.
1
2 5
3
4
6
7
x4 x4
Important Safety, Compliance and Warranty Information
Informations importantes concernant la sécurité, la mise en conformité
et la garantie
your mouth for any reason as they may be swallowed accidentally.
English
Always check medication before ingesting as adults have mistaken
Read Manual Before Product Use.
button batteries for pills or tablets. If a button battery is ingested,
seek medical attention immediately. Contact the National Battery
Ingestion Hotline at (3333-625 (202. It is available 24 hours a day.
Safe Usage Guidelines for Products
POWER SUPPLY WARNING! The power supply is for indoor
• Do not open or modify the product except for battery removal
use only. Only use the power supply included with your product.
and replacement.
Do not attempt to repair or use a damaged power supply.
• Do not disassemble or attempt to service this product.
Do not immerse the power supply in water or subject it
• This product is safe under normal and reasonably foreseeable
to physical abuse. Inspect the power supply regularly for cable,
operating conditions.
plug, and casing damage.
• If product is operating improperly, call Logitech support.
BATTERY WARNING!: Improperly replaced batteries may
• Product must be returned to the manufacturer for any service
present a risk of leak or explosion and personal injury.
or repair.
Mistreated rechargeable batteries may present a risk of fire or
• This is not a Children’s Product and is not intended for use
chemical burn. Do not disassemble or expose to conducting
by children under 14 years old.
materials, moisture, liquid, or heat above °54C (°130F). Do not use or
• Warning: Not suitable for children under 36 months. Small parts.
charge the battery if it appears to be leaking, discolored, deformed,
Choking hazard.
or in any way abnormal. Do not leave your battery discharged or
• Mount camera properly according to the provided instructions.
unused for extended periods. Do not short circuit. Your device may
Improper installation of this product may cause damage or injury.
contain an internal, rechargeable battery that is not replaceable.
Logitech Compliance. For Product Safety, EMC, RF and Energy
Battery life varies with usage. Non-operational batteries should be
information, go to www.logitech.com/compliance. Maintenance is not
discarded according to local laws. If no laws or regulations govern,
required for product compliance.
dispose of your device in a waste bin for electronics. Keep batteries
away from children.
FCC statement
BUTTON BATTERIES—WARNING! Coin-sized and button batteries
This device complies with Part 15 of the FCC Rules. Operation is
may be easily swallowed, which may cause personal injury and
subject to the following two conditions: 1) this device may not cause
death in children and senior citizens. Keep these batteries away
harmful interference, and 2) this device must accept any interference
from children! Do not allow children to play with or be in contact
received, including interference that may cause undesired operation.
with these batteries or this product at any time. Add further security
to the battery compartment as necessary. Never place batteries in
1. Cámara MeetUp y unidad de
sistema manos libres
2. Control rem oto
3. Cable USB de 5 m
4. Adaptador de corriente
5. Soporte de montaje en pared
6. Accesorios para montaje en pared
7. Documentación
Español 17

QUÉ ES CADA COSA
SISTEMA MANOS LIBRES
DECÁMARA
1
18 Español
2
5
43
1. Conector de seguridad
2. Emparejamiento del remoto
3. USB
4. Alimentación
5. Micrófono de expansión opcional

REMOTO
1 2
5
7
1. Silenciamiento de micrófono
2. Respuesta de llamada
3. Finalización de llamada
4. Emparejamiento Bluetooth
5. Subir y bajar volumen
6. Zoom para ampliar/reducir
3 4
6
8
9
7. Panorámica/inclinación
de cámara
8. Centrar cámara
®
9. Valores predeterminados
de cámara
* Ten en cuenta que no todas
las aplicaciones admiten
los botones de respuesta
y nalización de llamada.
Español 19

Gracias por comprar MeetUp. Pensamos que apreciarás que el campo
visual extra amplio ayudará a que todos se sientan incluidos en la reunión,
lo que mejorará la comunicación.
COLOCACIÓN
Recomendamos colocar la cámara
lo más cerca posible de la altura de
la mirada. Los mejores resultados
suelen obtenerse con el montaje
debajo del monitor.
1. Coloca en una mesa o estante
cerca del monitor.
2. Conecta los cables.
3. Monta en la pared:
a. Monta el soporte en la pared.
Usa el tipo de tornillos
adecuado para el tipo de pared.
20 Español
b. Acopla la cámara al soporte.
4. Monta en el televisor:
En Logitech.com encontrarás
un soporte de montaje en televisor
opcional.

CONEXIÓN
La conexión de MeetUp es
la misma tanto si piensas usar
una computadora exclusiva en la sala
como si los miembros del equipo
llevan una laptop a la sala para
realizar la reunión.
1. Conecta MeetUp
a la alimentación.
3. Conecta el televisor
a la computadora.
2. Conecta el cable USB de MeetUp
a la computadora.
Diagrama de todas las conexiones:
HDMI
USB
Español 21

CONFIGURA MEETUP
COMO DISPOSITIVO
PREDETERMINADO
Asegúrate de elegir MeetUp como
cámara, altavoz y micrófono en las
aplicaciones de videoconferencia.
Consulta la documentación de la
aplicación para más instrucciones
sobre cómo hacerlo.
NOTA SOBRE VIDEO 4K
El cable USB 2.0 incluido con MeetUp
admite video Full HD (hasta 1080p).
Si piensas usar video 4K, usa un cable
USB 3.0 (no incluido).
INICIO DE UNA
VIDEOCONFERENCIA
Después de la instalación de
MeetUp y de asegurarte de que sea
el dispositivo predeterminado en
la aplicación de videoconferencia,
inicia la aplicación del modo normal
y disfruta de las ventajas del audio
y video mejorados.
22 Español
EMPAREJAMIENTO DE
MEETUP A UN DISPOSITIVO
BLUE TO OTH
Puedes usar MeetUp para llamadas
de audio cuando esté emparejada
con un dispositivo Blueto oth.
Para emparejar el dispositivo
Bluetooth a MeetUp, sigue estos
simples pasos:
1. Mantén pulsado el botón de
Bluetooth en el remoto hasta
que se vean destellos azules cerca
de la lente de la cámara.
2. Coloca el dispositivo móvil
en modo de emparejamiento
Bluetooth y selecciona “Logitech
MeetUp”.
Ya puedes usar MeetUp para
llamadas de audio.
Al pulsar el botón de Blueto oth
en el remoto después
del emparejamiento se desconectará
el dispositivo Bluetooth
(seguirá “emparejado”, pero no
“conectado”). Al volver a pulsarlo
se reconectará el último dispositivo
emparejado dentro del radio
de acción.

EMPAREJAMIENTO
DELREMOTO CON
LACÁMARA
La cámara y el remoto vienen
emparejados de fábrica.
Sin embargo, si tienes que emparejar
un remoto con la cámara (como al
sustituir un remoto extraviado),
haz lo siguiente:
1. Mantén pulsado el botón en la
parte posterior de la cámara hasta
que el LED emita destellos azules.
2. Mantén pulsado el botón
de Bluetooth en el remoto durante
10 segundos para activar el modo
de emparejamiento.
3. Cuando el remoto y la cámara
estén emparejados, el LED dejará
de emitir destellos.
4. Si el emparejamiento falla,
el LED seguirá emitiendo destellos.
Inicia desde el paso 2 y repite.
PARA OBTENER
MÁSINFORMACIÓN
Encontraré información adicional
sobre MeetUp, que incluye:
– Preguntas más habituales
– Software para activar funciones
en varias aplicaciones
– Cómo pedir piezas de repuesto
– Y más en
www.Logitech.com/MeetUp
Español 23

ITENS INCLUÍDOS NA EMBALAGEM
Note: This equipment has been tested and found to comply with the
limits for a Class A digital device, pursuant to part 15 of the FCC Rules.
These limits are designed to provide reasonable protection against
harmful interference when the equipment is operated in a commercial
environment. This equipment generates, uses, and can radiate radio
frequency energy and, if not installed and used in accordance with
the instruction manual, may cause harmful interference to radio
communications. Operation of this equipment in a residential area
is likely to cause harmful interference in which case the user will be
required to correct the interference at his own expense.
Warning: Where shielded interface cables or accessories have been
provided with the product or specified additional components
or accessories elsewhere defined to be used with the installation of
the product, they must be used in order to ensure compliance with
FCC. Changes or modifications to product not expressly approved
by Logitech, Inc could void your right to use or operate your
by the FCC.
Radiation Exposure Statement: This equipment complies with
FCC and IC radiation exposure limits set forth for an uncontrolled
environment. This equipment should be installed and operated with
minimum distance 20cm between the radiator & your body.
This transmitter must not be co-located or operating in conjunction
with any other antenna or transmitter.
Caution: (i) the device for operation in the band 5250-5150 MHz is
only for indoor use to reduce the potential for harmful interference
to co-channel mobile satellite systems; (ii) high-power radars are
allocated as primary users (i.e. priority users) of the bands -5250
5350 MHz and 5850-5650 MHz and that these radars could cause
interference and/or damage to LE-LAN devices.
IC statement: CAN ICES003- (A) / NMB003- Class (A)
This device complies with Industry Canada licence-exempt RSS
standard(s). Operation is subject to the following two conditions:
(1) this device may not cause interference, and (2) this device must
accept any interference, including interference that may cause
undesired operation of the device.
Cordless (Radio Transmitter) products: RSS210- and RSS2.4)247- GHz
transmitters or transceivers): This Category I radio communication
device complies with RSS210- and RSS247- of Industry Canada.
1
2 5
3
4
6
7
x4 x4
Important Safety, Compliance and Warranty Information
Informations importantes concernant la sécurité, la mise en conformité
et la garantie
your mouth for any reason as they may be swallowed accidentally.
English
Always check medication before ingesting as adults have mistaken
Read Manual Before Product Use.
button batteries for pills or tablets. If a button battery is ingested,
seek medical attention immediately. Contact the National Battery
Ingestion Hotline at (3333-625 (202. It is available 24 hours a day.
Safe Usage Guidelines for Products
POWER SUPPLY WARNING! The power supply is for indoor
• Do not open or modify the product except for battery removal
use only. Only use the power supply included with your product.
and replacement.
Do not attempt to repair or use a damaged power supply.
• Do not disassemble or attempt to service this product.
Do not immerse the power supply in water or subject it
• This product is safe under normal and reasonably foreseeable
to physical abuse. Inspect the power supply regularly for cable,
operating conditions.
plug, and casing damage.
• If product is operating improperly, call Logitech support.
BATTERY WARNING!: Improperly replaced batteries may
• Product must be returned to the manufacturer for any service
present a risk of leak or explosion and personal injury.
or repair.
Mistreated rechargeable batteries may present a risk of fire or
• This is not a Children’s Product and is not intended for use
chemical burn. Do not disassemble or expose to conducting
by children under 14 years old.
materials, moisture, liquid, or heat above °54C (°130F). Do not use or
• Warning: Not suitable for children under 36 months. Small parts.
charge the battery if it appears to be leaking, discolored, deformed,
Choking hazard.
or in any way abnormal. Do not leave your battery discharged or
• Mount camera properly according to the provided instructions.
unused for extended periods. Do not short circuit. Your device may
Improper installation of this product may cause damage or injury.
contain an internal, rechargeable battery that is not replaceable.
Logitech Compliance. For Product Safety, EMC, RF and Energy
Battery life varies with usage. Non-operational batteries should be
information, go to www.logitech.com/compliance. Maintenance is not
discarded according to local laws. If no laws or regulations govern,
required for product compliance.
dispose of your device in a waste bin for electronics. Keep batteries
away from children.
FCC statement
BUTTON BATTERIES—WARNING! Coin-sized and button batteries
This device complies with Part 15 of the FCC Rules. Operation is
may be easily swallowed, which may cause personal injury and
subject to the following two conditions: 1) this device may not cause
death in children and senior citizens. Keep these batteries away
harmful interference, and 2) this device must accept any interference
from children! Do not allow children to play with or be in contact
received, including interference that may cause undesired operation.
with these batteries or this product at any time. Add further security
to the battery compartment as necessary. Never place batteries in
1. Unidade de câmara e altifalante
MeetUp
2. Controlo remoto
3. Cabo USB de 5 m
24 Português
4. Adaptador de alimentação
5. Suporte de montagem na parede
6. Hardware de montagem na
parede
7. Documentação

IDENTIFICAÇÃO DE COMPONENTES
ALTIFALANTE DA CÂMARA
1
2
5
43
1. Ranhura de segurança
2. Emparelhamento do controlo
remoto
3. USB
4. Alimentação
5. Microfone de expansão opcional
Português 25

CONTROLO REMOTO
1. Silenciar microfone
2. Atender chamada
3. Terminar chamada
4. Emparelhamento Blueto oth
5. Aumentar/diminuir o volume
6. Ampliar/reduzir
26 Português
1 2
5
7
®
3 4
9
7. Rodar/inclinar câmara
8. Início da câmara
9. Predenição da câmara
* Tenha em atenção que nem
todas as aplicações suportam
os botões de atender e terminar
chamada.
6
8

Obrigado por adquirir o MeetUp. Acreditamos que irá vericar que
o campo de visão extra largo ajuda toda a gente a sentir-se incluída
na reunião, melhorando a comunicação.
COLOCAÇÃO
Recomendamos que coloque
a câmara o mais próxima possível
do nível dos olhos. Normalmente,
obtêm-se os melhores resultados
quando se coloca em baixo
do monitor.
1. Coloque numa mesa ou estante
próximas do monitor.
2. Ligue os cabos.
3. Montagem na parede:
a. Fixe o supor te na parede.
Utilize o tipo de parafusos
adequado ao seu tipo
de parede.
b. Fixe a câmara no suporte.
4. Montagem na TV: Está disponível
um suporte de montagem em TV
em Logitech.com.
Português 27

LIGAÇÃO
Ligar o MeetUp é sempre igual,
caso pretenda utilizar um computador
dedicado numa sala ou caso
os membros da equipa tragam
um computador portátil para a sala
para dirigir a reunião.
1. Ligue o MeetUp à alimentação.
3. Ligue a TV ao computador.
2. Ligue o cabo USB do MeetUp
ao computador.
28 Português
Diagrama de todas as ligações:
HDMI
USB

TORNAR O MEETUP
ODISPOSITIVO PREDEFINIDO
Certique-se de que o MeetUp
está seleccionado como câmara,
altifalante e microfone nas aplicações
de conferência de vídeo. Consulte a
documentação da aplicação para
obter instruções adicionais acerca
de como efectuar esta acção.
NOTA RELACIONADA COM
OVÍDEO 4K
O cabo USB 2.0 incluído no MeetUp
suporta vídeo Full HD (até 1080
p). Se pretender utilizar vídeo 4k,
utilize um cabo USB 3.0 (não incluído).
INICIAR UMA CHAMADA
DEVÍDEO
Após instalar o MeetUp e certicarse de que é o dispositivo predenido
na aplicação de conferência
de vídeo, inicie simplesmente
a aplicação normalmente e desfrute
das vantagens de áudio e vídeo
melhorados.
EMPARELHAR O MEETUP COM
UM DISPOSITIVO BLUETO OTH
Pode utilizar o MeetUp para
chamadas de áudio quando estiver
emparelhado com um dispositivo
Bluetooth. Para emparelhar
o dispositivo Bluetooth com
o MeetUp, sigas este simples passo:
1. Mantenha premido o botão
Bluetooth no controlo remoto até
ver uma luz intermitente azul junto
da lente da câmara.
2. Coloque o dispositivo móvel
em modo de emparelhamento
Bluetooth e seleccione "Logitech
Me etU p".
Está agora pronto para utilizar
o MeetUp para chamadas de áudio.
Premir o botão B luetooth no controlo
remoto após o emparelhamento
desliga o dispositivo B luetooth
(continuará "emparelhado", mas não
"ligado"). Premi-lo novamente
restabelece ligação com o último
dispositivo emparelhado dentro
do alcance.
Português 29

EMPARELHAR O CONTROLO
REMOTO COM A CÂMARA
A câmara e o controlo remoto
estão emparelhados de fabrico.
No entanto, se for necessário
emparelhar um controlo remoto com
a câmara (ao substituir um controlo
remoto perdido, por exemplo),
efectue o seguinte:
1. Mantenha premido o botão na
parte posterior da câmara até que
o LED que intermitente a azul.
2. Mantenha premido o botão
Bluetooth no controlo
remoto durante 10 segundos
para o colocar em modo
de emparelhamento.
3. Quando o controlo remoto
e a câmara estiverem
emparelhados, o LED deixará
de estar intermitente.
4. Se o emparelhamento falhar,
os LED continuarão intermitentes.
Comece no passo 2 e repita
o processo.
30 Português
PAR A OBTER
MAISINFORMAÇÕES
Pode encontrar informações
adicionais sobre o MeetUp, incluindo:
– Perguntas frequentes
– Software para activar funções
em várias aplicações
– Como encomendar peças
de substituição
– E muito mais em
www.Logitech.com/MeetUp


© 2017 Logitech. Logitech, Logi and other Lo gitech marks are owned by Logite ch
andmay be registere d. All other tra demark s are the prop erty of their resp ective owners.
Logitech assumes n o respons ibilit y for any error s that may appear in this manual.
Informa tion contai ned herein is subjec t to change without notice.
© 2017 Logitech. Logitech, Logi e t les autre s marques Lo gitech sont la propriété
deLogitech et sont susceptibles d’être déposées. Toutes les autres marques sont
lapropriété exclusive de leurs détenteurs respectifs. Logitech décline toute responsabilité
encas d’erreurs susceptibles de s’être glissées dans le présent manuel. Les informations
énoncé es dans ce document p euvent faire l’objet de mo dications sans av is préala ble.
620-007607.003
 Loading...