


 Loading...
<![endif]>ENGLISH
OWNER’S MANUAL
LCD TV
Please read this manual carefully before operating the your TV and retain it for future reference.
LCD TV MODELS
M2241A
M2341A
www.lg.com

<![endif]>ENGLISH
2 TABLE OF CONTENTS
CONTENTS
4ASSEMBLING AND PREPARING
4Unpacking
5Parts and buttons
6Lifting and moving the TV
6Setting up the TV
6- Attaching the Stand Base
6- Detaching the Stand Base and Body 7 - Mounting on a table
8 - Mounting on a wall
20 Adjusting the sound
20- Selecting an sound mode
20- Customizing sound options
21ENTERTAINMENT
21Using integrated media features
21- Connecting USB storage devices
22- Browsing files
23- Viewing Photos
24- Listening to Music
10 REMOTE CONTROL |
|
26 |
CUSTOMIZING SETTINGS |
||
|
|
26 |
Accessing main menus |
||
12 |
WATCHING TV |
27 |
Customizing settings |
||
27 |
- SETUP settings |
||||
12 |
Connecting an antenna or cable |
||||
28 |
- PICTURE settings |
||||
12 |
- Connecting an antenna or basic cable |
||||
30 |
- AUDIO settings |
||||
12 |
- Connecting with a cable box |
||||
32 |
- TIME settings |
||||
13 |
Accessing the TV for the first time |
||||
33 |
- OPTION settings |
||||
14 |
Watching TV |
||||
34 |
- USB settings |
||||
14 |
Managing programmes |
||||
|
|
|
|||
14 |
- Automatically setting up programmes |
|
35 |
MAKING CONNECTIONS |
|
14 |
- Manually setting up programmes |
|
|||
35 |
Connection overview |
||||
14 |
- Editing your programme list |
||||
15 |
- Selecting the programme list |
37 |
Connecting to a Camcorder, Camera, HD |
||
15 |
- Favourite programme setup |
|
|
receiver, DVD, VCR player or Gaming |
|
16 |
Using additional options |
|
|
device |
|
16 |
- Adjusting aspect ratio |
37 |
- HDMI connection |
||
17 |
- Using the input list |
37 |
- Composite connection |
||
17 |
- On-screen menu language |
37 |
Connecting to a USB |
||
17 |
- Locking the buttons on the TV |
|
|
|
|
18 CONNECTING TO A PC
18RGB connection
19Adjusting the screen
19- Selecting an image mode
19- Customizing image options
20- Customizing PC display options
38 TELETEXT
38Switch On/Off
38Simple Text
38- Page selection
38- Programming a colour button in LIST mode
39Top Text

39- Block / Group / Page Selection
39- Direct Page Selection
39Fastext
39- Page selection
40Special Teletext Function
41MAINTENANCE
41Screen and frame
41Cabinet and stand
41Power cord
42TROUBLESHOOTING
42General
43PC mode
45 SPECIFICATIONS
48 LICENSES
TABLE OF CONTENTS 3
<![if ! IE]><![endif]>ENGLISH
<![endif]>ENGLISH
4 ASSEMBLING AND PREPARING
ASSEMBLING AND PREPARING
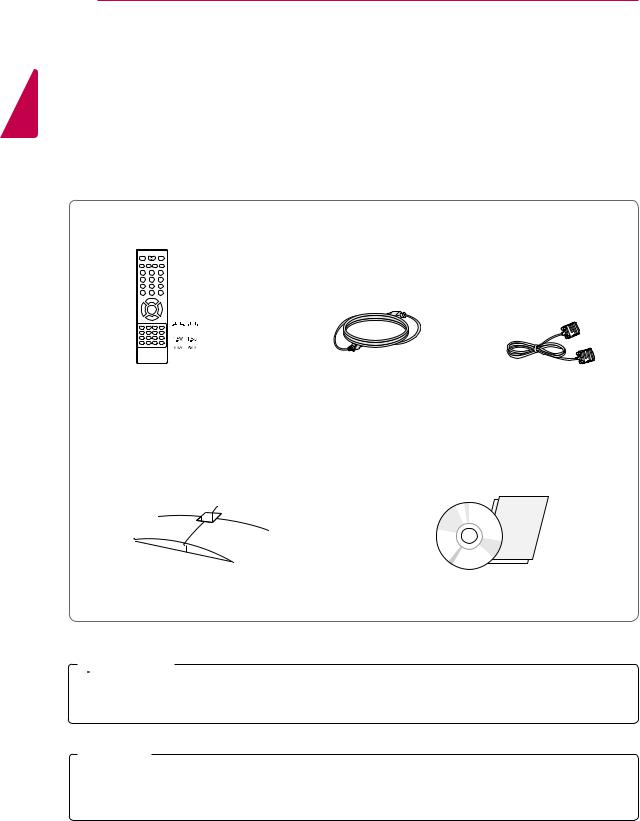
Unpacking
Check your product box for the following items. If there are any missing accessories, contact the local dealer where you purchased your product. The illustrations in this manual may differ from the actual product and accessories.
|
|
|
|
|
|
|
|
|
|
|
|
|
|
Remote control and Batteries |
Power Cord |
RGB Cable |
||||
|
|
|
|
|
|
|
|
|
|
|
|
|
|
Stand base |
CD(Owner's Manual) / Card |
 CAUTION
y yDo not use any pirated items to ensure the safety and product life span.
y yAny damages or injuries by using pirated items are not covered by the warranty.
 NOTE
NOTE
y yThe accessories supplied with your product may vary depending on the model.
y yProduct specifications or contents in this manual may be changed without prior notice due to upgrade of product functions.

ASSEMBLING AND PREPARING 5
Parts and buttons
<![if ! IE]><![endif]>ENGLISH
Buttons
Remote Control
Sensor
HDMI IN
USB IN
RGB IN (PC)
AV IN
| <![if ! IE]> <![endif]>L MONO VIDEO |
ANTENNA / |
| <![if ! IE]> <![endif]>AUDIO |
CABEL IN |
|
|
| <![if ! IE]> <![endif]>R |
|
y y 
 (Power Button)
y yPower Indicator
»» Lighting On:Turned on
»» Lighting Off: Turned off
|
|
|
|
|
|
|
|
|
Connection panel ( See p.35) |
|
|
|
|
|
|
|
|
|
|
|
|
|
|
|
|
|
|
|
|
|
|
|
|
|
|
button |
|
|
Description |
MODE " " |
Selects the mode.(Programme Volume INPUT) |
||||||||
|
|
|
|
|
|
|
|
|
|
|
|
|
|
|
|
|
Programme |
Scrolls through the saved programmes. |
|
|
|
|
|
|
|
|
|
|
|
|
|
|
|
|
|
|
Volume |
Adjust the volume level. |
|
|
|
|
|
|
|
|
|
|
|
|
|
|
|
|
|
|
INPUT |
Changes the input source. |
|
|
|
|
|
|
|
|
|
|
|
|
|
|
|
, |
|
|
Adjusts the mode button level. |
||
|
|
|
|
|
|
||||
|
|
|
|
|
|
|
|
|
|
 NOTE
NOTE
y yYou can set the Power indicator to on or off by selecting OPTION in the main menus. y yLocal keys work on Power, Programme, Volume and Input only.
<![endif]>ENGLISH
6 ASSEMBLING AND PREPARING
Lifting and moving the TV
When moving or lifting the TV, read the following to prevent the TV from being scratched or damaged and for save transportation regardless of its type and size.
 CAUTION
Avoid touching the screen at all times, as this may result in damage to the screen or some of the pixels used to create images.
y yIt is recommended to move the TV in the box or packing material that the TV originally came in.
y yBefore moving or lifting the TV, disconnect the power cord and all cables.
y yHold the top and bottom of the TV frame firmly. Make sure not to hold the transparent part, speaker, or speaker grill area.
y yWhen holding the TV, the screen should face away from you to prevent the screen from scratches.
y yWhen transporting the TV, do not expose the TV to jolts or excessive vibration.
y yWhen transporting the TV, keep the TV upright, never turn the TV on its side, or tilt towards the left or right.
Setting up the TV
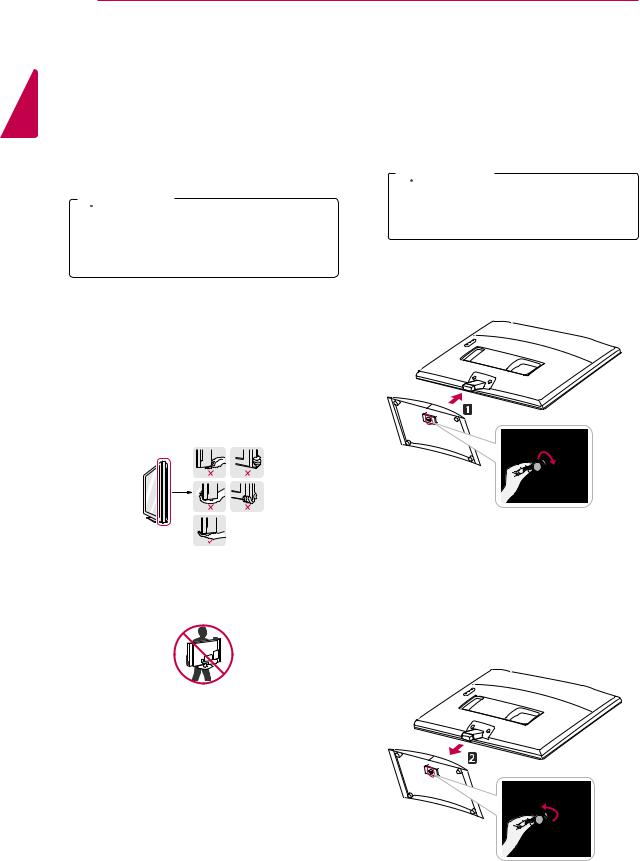
Attaching the Stand Base
1Place the TV with the screen side down on a flat and cushioned surface.
 CAUTION
Lay a foam mat or soft protective cloth on the surface to protect the screen from damage.
2Attach the Stand Base from the TV by turning the screw to the right with a Coin.
Detaching the Stand Base and
Body
1Place the TV with the screen side down on a flat and cushioned surface.
2Turn the screw to the left, and then pull out the
Stand Base from the Stand Body.

|
ASSEMBLING AND PREPARING 7 |
|
3 Remove 2 screws and pull out the Stand Body |
2 Connect the Power Cord to a wall outlet. |
|
from the TV. |
|
|
<![endif]>ENGLISH
Mounting on a table
1Lift and tilt the TV into its upright position on a table.
Leave a 10 cm (minimum) space from the wall for proper ventilation.
 10 cm
10 cm
10 cm |
10 cm |
|
10 cm
WARNING
yIt's a head fixed model and prohibited from adjusting the angle. yIf you try to adjust the angle forcibly, It can be damaged.
Using the Kensington security system
The Kensington security system connector is located at the back of the TV. For more information of installation and using, refer to the manual supplied with the Kensington security system or visit http://www.kensington.com.
Connect the Kensington security system cable between the TV and a table.
NOTE
Kensington security system is optional. You can obtain additional accessories from most electronics stores.
<![endif]>ENGLISH
8 ASSEMBLING AND PREPARING
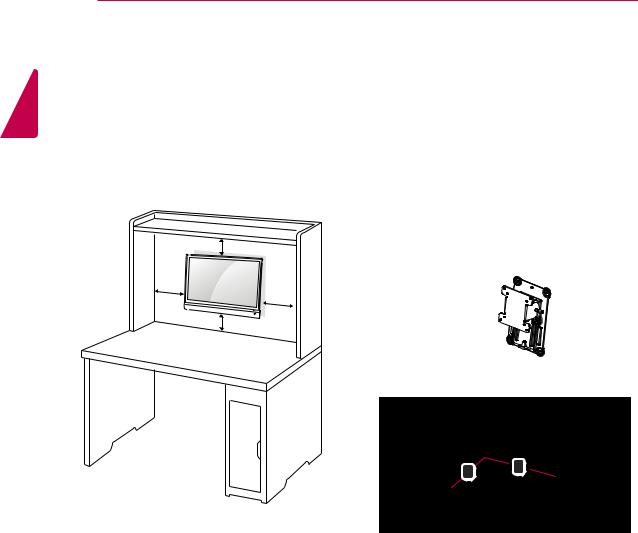
Mounting on a wall
For proper ventilation, allow a clearance of 10 cm on each side and from the wall. Detailed installation instructions are available from your
dealer, see the optional Tilt Wall Mounting Bracket Installation and Setup Guide.
10 cm
10 cm
10 cm
10 cm
5 Please use VESA standard as below. y y784.8 mm (30.9 inch) and under
*Wall Mount Pad Thickness : 2.6 mm * Screw : Φ 4.0 mm x Pitch 0.7 mm x Length 10 mm
y y787.4 mm (31.0 inch) and above
*Please use VESA standard wall mount pad and screws.
Model |
|
|
|
|
|
|
M2241A |
M2341A |
|||
|
|
|
|
|
|
VESA (A x B) |
75 x 75 |
||||
Standard screw |
M4 |
||||
Number of screws |
4 |
|
|
|
|
Wall mount bracket |
RW120 |
||||
(optional) |
|
|
|
|
|
|
|
|
|
|
|
y yVESA (A x B)
B A
If you intend to mount the TV to a wall, attach Wall mounting interface (optional parts) to the back of the set.
When you install the TV using the wall mounting interface (optional parts), attach it carefully so it will not drop.
1Please, Use the screw and wall mount interface in accordance with VESA Standards.
2If you use screw longer than standard, the TV might be damaged internally.
3If you use improper screw, the product might be damaged and drop from mounted position. In this case, LG Electronics is not responsible for it.
4VESA compatible only with respect to screw mounting interface dimensions and mounting screw specifications.

 CAUTION
y yDisconnect the power cord first, and then move or install the TV. Otherwise electric shock may occur.
y yIf you install the TV on a ceiling or slanted wall, it may fall and result in severe injury. Use an authorized LG wall mount and contact the local dealer or qualified personnel.
y yDo not over tighten the screws as this may cause damage to the TV and void your warranty.
y yUse the screws and wall mounts that meet the VESA standard. Any damages or injuries by misuse or using an improper accessory are not covered by the warranty.
 NOTE
NOTE
y yUse the screws that are listed on the VESA standard screw specifications.
y yThe wall mount kit includes an installation manual and necessary parts.
y yThe wall mount bracket is optional. You can obtain additional accessories from your local dealer.
y yThe length of screws may differ depending on the wall mount. Be sure to use the proper length.
y yFor more information, refer to the instructions supplied with the wall mount.
ASSEMBLING AND PREPARING 9
<![if ! IE]><![endif]>ENGLISH
<![endif]>ENGLISH
10 REMOTE CONTROL
REMOTE CONTROL
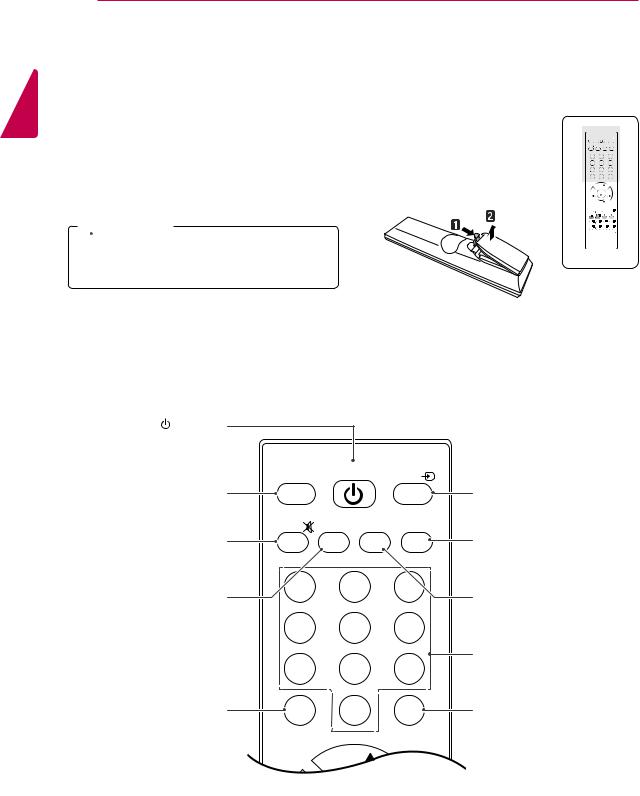
The descriptions in this manual are based on the buttons of the remote control. Please read this manual carefully and use the TV correctly.
To replace batteries, open the battery cover, replace batteries (1.5 V AAA) matching  and
and  ends to the label inside the compartment, and close the battery cover.
To remove the batteries, perform the installation actions in reverse.
 CAUTION
Do not mix old and new batteries, as this may damage the remote control.
TV/PC POWER INPUT
MUTE PSM SSM I/II
1 |
|
2 |
3 |
4 |
|
5 |
6 |
7 |
|
8 |
9 |
|
|
0 |
|
LIST |
|
|
Q.VIEW |
|
PR |
|
|
VOL |
|
OK |
VOL |
|
PR |
|
|
MENU |
EXIT ARC/MARK TEXT |
||
HOLD |
SIZE |
MIX |
TIME |
REVEAL |
INDEX |
MODE |
UPDATE |
USBVOLUSBVOL+
Make sure to point the remote control to the remote control sensor on the TV.
(POWER) |
|
|
|
|
Turns the TV on or off. |
|
|
|
|
|
TV/PC |
POWER |
INPUT |
|
TV/PC |
|
|
|
INPUT ( See p.17) |
Selects TV or PC mode. |
|
|
|
Selects the input mode. |
|
MUTE |
PSM SSM |
I/II |
I/II ( See p.31) |
MUTE |
|
|
|
|
Mutes all sounds. |
|
|
|
Selects the sound output. |
PSM |
1 |
2 |
3 |
SSM |
|
|
|
||
Recalls your preferred picture |
4 |
5 |
6 |
Recalls your preferred sound |
setting. |
setting. |
|||
|
7 |
8 |
9 |
Number buttons |
|
Enters numbers. |
|||
LIST ( See p.15) |
|
0 |
|
Q.VIEW |
Displays the programme |
LIST |
|
Q.VIEW |
Returns to the previously |
table. |
|
viewed programme. |
REMOTE CONTROL 11
Navigation buttons 
Scrolls through menus or options.
VOL
Adjusts the volume level.
EXIT 
Clears all on-screen displays and returns to TV viewing from any menu.
MENU ( See p.26) Accesses the main menus or saves your input and exit menus.
Coloured buttons
These buttons are used for teletext (on TELETEXT models only) , Programme edit.
USB Menu control buttons
USB menu(Music List).
|
|
I/II |
1 |
2 |
3 |
4 |
5 |
6 |
7 |
8 |
9 |
|
0 |
|
LIST |
|
Q.VIEW |
MENU |
EXIT ARC/MARK |
|
|
USB |
USBV |
VOL OK VOL
PR 
MENU |
EXIT |
ARC/MARK TEXT |
 HOLD
HOLD SIZE
SIZE MIX
MIX TIME
TIME

REVEAL INDEX
INDEX MODE
MODE UPDATE
USBVOLUSBVOL+ |
Programme
Selects a programme.
OK
Selects menus or options and confirms your input.
ARC( See p.16)
Selects your desired picture format.
MARK
Check and un-check files in the USB menu.
Teletext buttons ( See p.38) These buttons are used for teletext. For further details, see the ‘Teletext’ section.
 USB VOL(Only USB Mode)
Adjusts the USB volume level.
<![endif]>ENGLISH
 NOTE
NOTE
y yIf you lost remote controller, you have to buy it at once because local keys work at Power, Programme, Volume and Input only.

<![endif]>ENGLISH
12 WATCHING TV
WATCHING TV
Connecting an antenna or cable
Connect an antenna, cable, or cable box to watch TV referring to the following. The illustrations may differ from the actual accessories and an RF cable is optional.
Connecting an antenna or basic cable
Connect the TV to a wall antenna socket with an RF cable (75 ohm).
 NOTE
NOTE
y yUse a signal splitter to use more than 2 TVs. y yIf the image quality is poor, install a signal amplifier properly to improve the image
quality.
y yIf the image quality is poor with an antenna connected, aim the antenna to the proper direction.
y yVisit http://AntennaWeb.org for more information about the antenna and cable connection.
Connecting with a cable box
Connect the TV to a cable box and the cable box to a wall antenna socket with 2 RF cables (75 ohm).
 CAUTION
y yMake sure not to bend the copper wire of the RF cable.
Copper wire
y yComplete all connections instructions between devices, and then connect the power cord to the power outlet to prevent damages to your TV.

WATCHING TV 13
Accessing the TV for the first time
When you access the TVt for the first time, the initial setting screen appears. Select a language and customize the basic settings.
1 Connect the power cord to a power outlet.
2Press 
 on the TV to turn the TV on. The Power indicator lighting is turned on.
 NOTE
NOTE
When the TV is in Power saving mode, the Power indicator lighting blinks.
3The initial setting screen appears if you access the TV for the first time.
 NOTE
NOTE
y yYou can also switch the TV from PC mode to TV mode, press TV/PC.
y yYou can also access Factory Reset by accessing OPTION in the main menus.
y yIf you do not operate the TV within 40 seconds when the setting menu screen appears, the setting menus will disappear.
4Follow the on-screen instructions to customize your TV according to your preferences.
|
Selects a language for |
|
Language |
||
the display. |
||
|
||
|
||
Selects Home Use for |
||
|
||
Mode Setting |
||
the home environment. |
||
|
||
|
|
|
Scans and saves |
|
Auto Tuning |
||
available programmes |
||
|
automatically. |
|
|
 NOTE
NOTE
y yTo display images in the best quality for your home environment, select Home Use mode.
y yStore Demo mode is suitable for the retail environment.
y yIf you select Store Demo mode, the previously customized settings will switch to the default settings of Store Demo in 5 minutes.
5When the basic settings are complete, press
OK.
 NOTE
NOTE
If you do not complete the initial setting, it will appear whenever you access the TV.
6To turn the TVt off, press 
 on the TV. The Power Indicator turns off.
 CAUTION
Disconnect the power cord from the power outlet when you do not use the TV for a long period of time.
<![endif]>ENGLISH

<![endif]>ENGLISH
14 WATCHING TV
Watching TV
1Press  on the Remote control or
 on the TV to turn the TV on.
2 Press INPUT and select Antenna.
3Control the TV using the following buttons and menus while you are watching TV.
Button / Menu |
Description |
||
|
|
|
|
PR( |
, |
) |
Scrolls through the saved |
|
|
|
programmes |
0 - 9 |
|
|
Selects a programme by entering |
|
|
|
numbers |
|
|
|
|
VOL ( |
, |
) |
Adjusts the volume level |
MUTE |
|
|
Mutes all sounds |
|
|
|
|
PSM |
|
|
Selects one of the preset image |
|
|
|
modes ( See p.28) |
|
|
|
|
SSM |
|
|
Selects one of the preset audio |
|
|
|
modes. ( See p.30) |
ARC |
|
|
Resizes an image ( See p.16) |
|
|
|
|
4To turn the TV off, Press  on the Remote control or
 on the TV.
Managing programmes
Automatically setting up programmes
Use this to automatically find and store all available programmes.
1 Press MENU to access the main menus.
2Press the Navigation buttons to scroll to SETUP and press OK.
3Press the Navigation buttons to scroll to
Auto Tuning and press OK.
4Select Yes to start automatic tuning.
The TV scans and saves available programmes automatically.
5When you are finished, press EXIT.
When you return to the previous menu, press
MENU.
Manually setting up programmes
Manual Tuning lets you manually tune and arrange the stations in whatever order you desire.
1 Press MENU to access the main menus.
2Press the Navigation buttons to scroll to SETUP and press OK.
3Press the Navigation buttons to scroll to
Manual Tuning and press OK.
4Press the Navigation buttons to scroll to
TV System.
5Press the Navigation buttons to scroll to
V/UHF or Cable.
6Press the Navigation buttons or Number buttons to scroll Select the desired channel number.
7Press the Navigation buttons to scroll to Commence searching.
8Press the Navigation buttons to scroll to Store and press OK
9When you are finished, press EXIT.
When you return to the previous menu, press
MENU.
Editing your programme list
1 Press MENU to access the main menus.
2Press the Navigation buttons to scroll to SETUP and press OK.
3Press the Navigation buttons to scroll to Programme Edit and press OK.
4 Edit programmes using the following buttons.
Button |
Description |
|
|
Navigation |
Scrolls through programme types |
|
or programmes |
|
|
OK |
Selects a programme to view |
|
|
Colour |
Adds or deletes a programme. |
Button |
The deleted programme displays |
|
in gray. |
|
|

WATCHING TV 15
Selecting the programme list
You can check which programmes are stored in the memory by displaying the programme list.
Displaying programme LIST
1Press LIST button to access the Programme List.
2 When you are finished, press MENU or EXIT.
NOTE
y yYou may find some blue programmes. These have been set up to be skipped by auto programming or in the programme edit mode.
y ySome programmes with the channel number shown in the programme LIST indicate there is no station name assigned.
Selecting a programme in the programme list
1 Press the Navigation buttons to programme.
2Switch to the chosen programme number, press OK.
Favourite programme setup
Selecting favourite programme
Favourite programme is a convenient feature that lets you quikly scan up to programmes of your choice without having to wait for the TV to scan through all the in-between programmes.
1 Press MENU to access the main menus.
2Press the Navigation buttons to scroll to SETUP and press OK.
3Press the Navigation buttons to scroll to
Programme Edit and press OK.
4Press the Navigation buttons to scroll to Programme you want and press GREEN button.
5When you are finished, press EXIT.
When you return to the previous menu, press
MENU.
NOTE
y yThis will automatically include the selected programme into your favourite programme list.
Displaying the favourite programme list
1Press Green button to access the Favourite Programme List.
2 When you are finished, press MENU or EXIT.
<![endif]>ENGLISH
Loading...