


 Loading...
OWNER’S MANUAL
Multi-touch
Overlay Kit
Please read this manual carefully before operating the your set and retain it for future reference.
KT-T320
KT-T430
KT-T490
KT-T550
www.lg.com

ENGLISH
2 TABLE OF CONTENTS
TABLE OF CONTENTS
3 ASSEMBLY AND PREPARATION
3Accessories
4Safety Precautions
5Assembly Instructions
11HOW TO ATTACH THE IR
12INSTALLATION INSTRUCTIONS
12Connecting Touch USB Cable
13BEFORE USE
13TOUCH SPECIFICATIONS
13OS SUPPORT AVAILABILITY
14PRODUCT SPECIFICATIONS
17TROUBLESHOOTING GUIDE
WARNING: This product contains chemicals known to the State of California to cause cancer and birth defects or other reproductive harm. Wash hands after handling.
ASSEMBLY AND PREPARATION |
3 |
ASSEMBLY AND PREPARATION
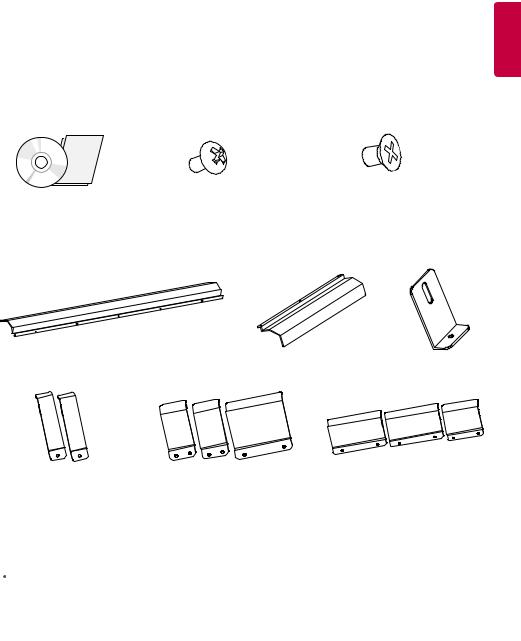
Accessories
Check your product box for the following items. If there are any missing accessories, contact the local dealer where you purchased your product. The illustrations in this manual may differ from the actual product and accessories.
ENGLISH
|
|
|
|
M3 x L6 Screws |
|
|
|
|
KT-T320 : 9 ea |
|
|
|
|
KT-T430 : 14 ea |
CD (Owner’s Manual) / Cards |
|
M3 x L8 Screw (1 ea) |
|
KT-T490 / KT-T550 : 16 ea |
|
|
|
|
|
Top Bracket |
|
Side Bracket (2 ea) |
|
IR Bracket |
|
|
|
|
|
KT-T320 |
|
KT-T430 |
|
KT-T490 / KT-T550 |
Bottom Bracket (2 ea) |
|
Bottom Bracket (3 ea) |
|
Bottom Bracket (3 ea) |
|
|
|
|
|
 CAUTION
•• Always use genuine components to ensure safety and product performance.
•• The product warranty will not cover damage or injury caused by the use of unauthorized components.
 NOTE
NOTE
•• The accessories provided with your product may vary depending on the model or region.
•• Product specifications or contents in this manual may be changed without prior notice due to upgrade of product functions.

4 ASSEMBLY AND PREPARATION
ENGLISH |
Safety Precautions |
- If you are a professional installer, please give this manual to the user after installation and ensure that the user |
|
|
- If you are a professional installer, please read this manual carefully before installing the product. |
|
also reads the manual carefully and retains it for future reference. |
|
- After reading the manual, please keep it handy for future reference. |
|
WARNING |
|
yyThe product should be installed by a qualified professional specified by the retail store. |
|
- Product installation by non-qualified personnel is very dangerous and may cause personal injury. |
|
yyWhen moving or replacing the product after installation, contact a qualified installer specified by the |
|
retail store. |
|
- Installation or movement of the product must be carried out by a skilled professional. If an unqualified |
|
person moves or installs the product, it may cause safety risks. |
|
yyDo not hang the power cable and signal cable on the back of the monitor when mounting the monitor |
|
to the wall. |
|
- Damaged cables may result in fire, electric shock, or damage to the product. |
-Keep the monitor upright when mounting the monitor to the wall. yyThe product should be installed where its weight can be fully supported.
-If the product is installed on a weak surface, the product may fall, causing injury.
-Check the maximum allowed weight of the wall mount (LSW230B : 40 kg , LSW350B : 50 kg). yyDo not hang on this product. Protect it from severe impact after installation.
-The product may fall and cause injury.
yyModels with the Multi-touch Overlay Kit cannot be installed on stands. - The product may fall.
ASSEMBLY AND PREPARATION |
5 |
Assembly Instructions
- The picture may differ from the actual product.
 NOTE
NOTE
yyBefore installing the product, if there are any water drops or foreign materials on the inner/outer side of the glass, wipe them out with a soft cloth.
yyWhile using the product, if there are any water drops or foreign materials on the inner/outer side of the glass, wipe them out with a soft cloth and install it again.
yyAssemble the product in a clean, uncontaminated area to prevent dust or foreign material from entering it.
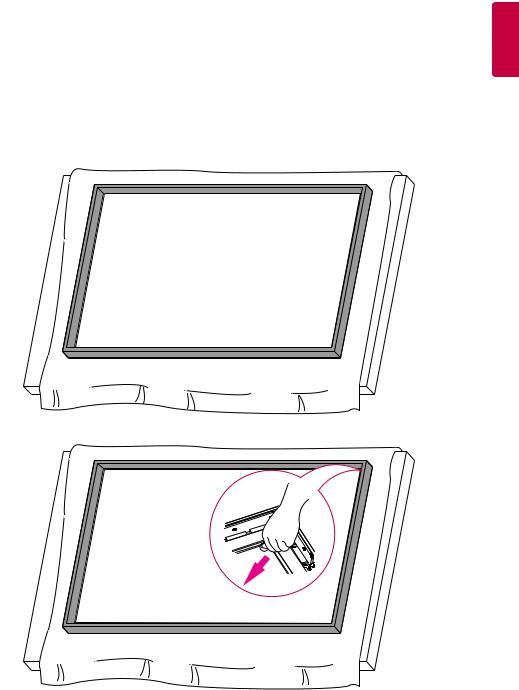
1 Place a soft cloth on the table and place the Multi-touch Overlay Kit over it as illustrated.
2 Remove the internal protective film using the handle at the upper right corner of the glass as illustrated.
ENGLISH

ENGLISH
6 ASSEMBLY AND PREPARATION
3 Place the display product on the Multi-touch Overlay Kit as illustrated.
4 Use the screws and the top bracket provided to make the product stationary. yyNumber of screws to attach the top bracket:
-KT-T320: 3 screws
-KT-T430/KT-T490/KT-T550: 4 screws
Loading...