


 Loading...
User Guide

Table of Contents |
|
Get Started .................................................................................................................................................... |
1 |
Tablet Layout ........................................................................................................................................ |
1 |
microSIM Card ...................................................................................................................................... |
2 |
Handling the microSIM Card......................................................................................................... |
2 |
Insert microSIM Card .................................................................................................................... |
3 |
microSD Card........................................................................................................................................ |
4 |
Insert microSD Card ..................................................................................................................... |
4 |
Unmount the microSD Card.......................................................................................................... |
4 |
Remove microSD Card ................................................................................................................. |
5 |
Format microSD Card ................................................................................................................... |
5 |
Battery Use ........................................................................................................................................... |
5 |
Charge the Battery........................................................................................................................ |
5 |
Turn Your Tablet On and Off ................................................................................................................ |
7 |
Use the Touchscreen ............................................................................................................................ |
7 |
Activate Your Tablet............................................................................................................................ |
11 |
Complete the Setup Screens .............................................................................................................. |
12 |
Basic Operations ......................................................................................................................................... |
14 |
Basics.................................................................................................................................................. |
14 |
Home Screen and Applications (Apps) List ................................................................................ |
14 |
Select Options and Navigate Screens ........................................................................................ |
14 |
Menu Operations ........................................................................................................................ |
14 |
Tablet Settings Menu .................................................................................................................. |
14 |
Portrait and Landscape Screen Orientation................................................................................ |
14 |
Capture Screenshots .................................................................................................................. |
15 |
Applications......................................................................................................................................... |
15 |
Enter Text............................................................................................................................................ |
17 |
Tips for Editing Text .................................................................................................................... |
19 |
Search Your Tablet and the Web........................................................................................................ |
21 |
Tablet and Web Search Using Text Entry .................................................................................. |
21 |
Tablet and Web Search Using Voice Command ........................................................................ |
22 |
Using Clip Tray.................................................................................................................................... |
23 |
Google Account................................................................................................................................... |
23 |
TOC |
i |
Create a Google Account............................................................................................................ |
23 |
Sign into Your Google Account................................................................................................... |
24 |
Google Play Store ............................................................................................................................... |
24 |
Lock and Unlock Your Screen ............................................................................................................ |
25 |
Unlock Your Screen Using the Knock Code Feature.......................................................................... |
26 |
Update Your Tablet ............................................................................................................................. |
27 |
Update Profile ............................................................................................................................. |
27 |
Update Firmware ........................................................................................................................ |
27 |
Update LG Software ................................................................................................................... |
27 |
UICC Unlock ............................................................................................................................... |
28 |
Your Tablet Interface................................................................................................................................... |
29 |
Home Screen Basics........................................................................................................................... |
29 |
Home Screen Layout .................................................................................................................. |
29 |
Extended Home Screens ............................................................................................................ |
30 |
Status Bar ........................................................................................................................................... |
30 |
Notifications Window........................................................................................................................... |
33 |
Customize the Home Screen .............................................................................................................. |
33 |
Create Shortcuts ......................................................................................................................... |
33 |
Add and Remove Widgets on the Home Screen ........................................................................ |
34 |
Change the Tablet's Wallpaper................................................................................................... |
35 |
Customize Applications Icons on the Home Screen................................................................... |
35 |
Tablet App ................................................................................................................................................... |
37 |
Contacts .............................................................................................................................................. |
37 |
Add a Contact ............................................................................................................................. |
37 |
Check Contacts........................................................................................................................... |
37 |
Edit a Contact.............................................................................................................................. |
38 |
Delete a Contact ......................................................................................................................... |
38 |
Import Contacts................................................................................................................................... |
38 |
Import Contacts from an microSD card or USB Storage ............................................................ |
38 |
Import Contacts From Your Internal Storage.............................................................................. |
39 |
Export Contacts to Your Internal Storage ................................................................................... |
39 |
Sharing Contacts ........................................................................................................................ |
39 |
Join and Separate Contacts........................................................................................................ |
39 |
Messaging and Internet............................................................................................................................... |
41 |
Create and Send Gmail ...................................................................................................................... |
41 |
TOC |
ii |
Create a Google Account............................................................................................................ |
41 |
Sign into Your Google Account................................................................................................... |
41 |
Access Gmail .............................................................................................................................. |
42 |
Send a Gmail Message............................................................................................................... |
42 |
Read and Reply to Gmail Messages .......................................................................................... |
43 |
Email ................................................................................................................................................... |
44 |
Add an Email Account (POP3 or IMAP) ..................................................................................... |
44 |
Corporate Email (Outlook) .......................................................................................................... |
44 |
Open Email ................................................................................................................................. |
45 |
Create and Send Email............................................................................................................... |
45 |
Reply to or Delete an Email Message ........................................................................................ |
46 |
Configure and Sync Corporate Email Settings ........................................................................... |
46 |
Data Services General Information (Sprint Spark LTE)...................................................................... |
48 |
Sprint Spark LTE......................................................................................................................... |
49 |
Data Connection Status and Indicators ...................................................................................... |
49 |
Browser ............................................................................................................................................... |
49 |
Learn to Navigate the Browser ................................................................................................... |
50 |
Go to a Specific Website............................................................................................................. |
51 |
Browser Menu ............................................................................................................................. |
51 |
Adjust Browser Settings .............................................................................................................. |
52 |
Create Website Settings ............................................................................................................. |
52 |
Create Bookmarks ...................................................................................................................... |
53 |
Camera and Video ...................................................................................................................................... |
55 |
Take Pictures ...................................................................................................................................... |
55 |
Record Videos..................................................................................................................................... |
55 |
Camera and Video Settings ................................................................................................................ |
56 |
Multi-point Auto-focus ......................................................................................................................... |
56 |
Gesture Shot ....................................................................................................................................... |
56 |
View Your Pictures.............................................................................................................................. |
57 |
Gallery Options ................................................................................................................................... |
57 |
Assign Pictures ................................................................................................................................... |
58 |
Video Options...................................................................................................................................... |
58 |
Live Zoom ........................................................................................................................................... |
59 |
Dual Play............................................................................................................................................. |
60 |
Useful Features ........................................................................................................................................... |
61 |
TOC |
iii |
Navigation ........................................................................................................................................... |
61 |
Google Maps............................................................................................................................... |
61 |
Hangouts ............................................................................................................................................. |
61 |
Google Hangouts ........................................................................................................................ |
61 |
QPair ................................................................................................................................................... |
62 |
Peel Smart Remote............................................................................................................................. |
63 |
QuickMemo+ ....................................................................................................................................... |
63 |
Dual Window ....................................................................................................................................... |
65 |
Music ................................................................................................................................................... |
65 |
Google Play Music ...................................................................................................................... |
65 |
Music Player................................................................................................................................ |
66 |
Back Up Your Downloaded Music Files...................................................................................... |
67 |
Calendar.............................................................................................................................................. |
67 |
Open the Calendar...................................................................................................................... |
67 |
Change Calendar View ............................................................................................................... |
67 |
View Event Details ...................................................................................................................... |
67 |
Create an Event .......................................................................................................................... |
68 |
Edit or Delete an Event ............................................................................................................... |
68 |
Set an Event Reminder............................................................................................................... |
69 |
Respond to an Event Reminder.................................................................................................. |
69 |
Display and Synchronize Calendars ........................................................................................... |
69 |
Change Calendar Settings.......................................................................................................... |
70 |
Folders ................................................................................................................................................ |
70 |
Clock ................................................................................................................................................... |
71 |
Calculator ............................................................................................................................................ |
73 |
Connectivity................................................................................................................................................. |
74 |
Connections Optimizer........................................................................................................................ |
74 |
Connect to a PC via USB.................................................................................................................... |
74 |
Transfer Files Between Your Tablet and a Computer ................................................................ |
75 |
Wi-Fi.................................................................................................................................................... |
76 |
Turn Wi-Fi On and Connect to a Wireless Network.................................................................... |
76 |
Wi-Fi Settings.............................................................................................................................. |
76 |
Disconnect Wi-Fi......................................................................................................................... |
77 |
Wi-Fi Direct ................................................................................................................................. |
77 |
Wi-Fi Hotspot .............................................................................................................................. |
78 |
TOC |
iv |
Tethering ............................................................................................................................................. |
78 |
Bluetooth ............................................................................................................................................. |
79 |
Bluetooth Information .................................................................................................................. |
79 |
Enable the Bluetooth Feature ..................................................................................................... |
79 |
Pair Bluetooth Devices................................................................................................................ |
79 |
Connect to a Paired Bluetooth Device ........................................................................................ |
80 |
Send Information Using Bluetooth .............................................................................................. |
81 |
Receive Data via Bluetooth......................................................................................................... |
81 |
SmartShare ......................................................................................................................................... |
82 |
Enjoy Content Via a Variety of Devices ...................................................................................... |
82 |
Enjoy Content from Nearby Devices........................................................................................... |
83 |
Virtual Private Networks (VPN) ........................................................................................................... |
83 |
Prepare Your Tablet for VPN Connection................................................................................... |
84 |
Set Up Secure Credential Storage ............................................................................................. |
84 |
Add a VPN Connection ............................................................................................................... |
84 |
Connect to or Disconnect From a VPN....................................................................................... |
84 |
Settings ....................................................................................................................................................... |
86 |
Wireless Networks Settings ................................................................................................................ |
86 |
Airplane Mode ............................................................................................................................. |
86 |
Wi-Fi............................................................................................................................................ |
86 |
Bluetooth ..................................................................................................................................... |
86 |
Mobile Data ................................................................................................................................. |
86 |
Share & Connect......................................................................................................................... |
87 |
More Settings .............................................................................................................................. |
87 |
Device Settings ................................................................................................................................... |
90 |
Sound.......................................................................................................................................... |
90 |
Display ........................................................................................................................................ |
92 |
Home Screen .............................................................................................................................. |
92 |
Lock Screen ................................................................................................................................ |
93 |
Storage........................................................................................................................................ |
99 |
Battery......................................................................................................................................... |
99 |
Apps ............................................................................................................................................ |
99 |
Dual Window ............................................................................................................................. |
100 |
Personal Settings .............................................................................................................................. |
100 |
Location..................................................................................................................................... |
101 |
TOC |
v |
Security ..................................................................................................................................... |
101 |
Accounts & Sync ....................................................................................................................... |
102 |
Language & Input...................................................................................................................... |
102 |
Backup & Reset ........................................................................................................................ |
103 |
System Settings ................................................................................................................................ |
104 |
Shortcut Key.............................................................................................................................. |
104 |
Date & Time .............................................................................................................................. |
104 |
Accessibility............................................................................................................................... |
104 |
Activate This Device ................................................................................................................. |
107 |
System Updates........................................................................................................................ |
107 |
Printing ...................................................................................................................................... |
108 |
About Tablet.............................................................................................................................. |
108 |
Copyright Information........................................................................................................................ |
108 |
For Assistance .......................................................................................................................................... |
109 |
Sprint Account Information and Help ................................................................................................ |
109 |
Sprint Account Passwords ........................................................................................................ |
109 |
Manage Your Account .............................................................................................................. |
109 |
Index.......................................................................................................................................................... |
110 |
TOC |
vi |
Get Started
This section gives you all the information you need to set up your tablet and Sprint service for the first time.
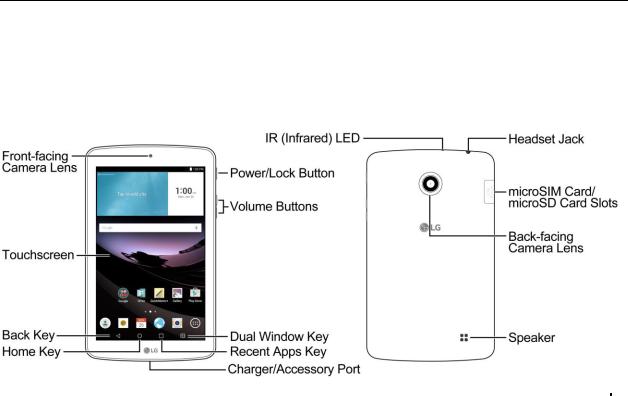
Tablet Layout
The following illustration outlines your tablet‟s primary external features and buttons.
|
|
|
|
|
Part |
|
|
Description |
|
|
|
|
|
|
Front-Facing Camera Lens |
|
|
Allows you to take pictures and video of yourself. Also lets you |
|
|
|
participate in video chats. |
|
|
|
|
|
|
|
|
|
|
|
|
|
|
|
Displays all the information needed to operate your tablet, such as |
|
Touchscreen |
|
|
the applications, the Contacts list, the date and time, and the |
|
|
|
|
signal and battery strength. |
|
|
|
|
|
|
|
|
|
Returns to the previous screen. It also closes pop-up display items |
|
Back Key |
|
|
such as menus and dialog boxes. Touch and hold to access the |
|
|
|
|
Dual window feature. |
|
|
|
|
|
|
|
|
|
Returns to the Home screen. If you're already viewing one of |
|
Home Key |
|
|
extension canvases, it opens the central Home screen. Touch and |
|
|
|
|
hold to access Google Now. |
|
|
|
|
|
|
Charger/Accessory Port |
|
|
Allows you to connect the tablet charger or an optional USB cable. |
|
|
|
|
|
|
Get Started |
1 |
|
|
|
Part |
|
Description |
|
|
|
|
|
Allows you to access recently-used apps. Touch and hold to |
Recent Apps Key |
|
access the available options available for the current screen or |
|
|
app. |
|
|
|
|
|
Allows you to change to dual window mode and allows you to |
Dual Window Key |
|
manage two different apps at the same time by splitting the screen |
|
|
in two. |
|
|
|
Volume Buttons |
|
Allow you to adjust the ringer and media volumes. |
|
|
|
|
|
Locks the screen. Press and hold to open the tablet options menu |
Power/Lock Button |
|
for the following options: Power off, Power off and restart, and |
|
|
Turn on/off Airplane mode. |
|
|
|
IR (Infrared) LED |
|
Uses infrared to communicate with devices using the Peel Smart |
|
Remote app. |
|
|
|
|
|
|
|
Speaker |
|
Lets you hear the different ringers and sounds. |
|
|
|
Back-Facing Camera Lens |
|
Lets you take pictures and record videos. |
|
|
|
microSIM Card/microSD Card |
|
Allows you to insert your microSIM card and a microSD card. |
Slots |
|
|
|
|
|
Headset Jack |
|
Allows you to plug in a headset for convenient, hands-free |
|
conversations. |
|
|
|
|
|
|
|
CAUTION! Inserting an accessory into the incorrect jack may damage the tablet.
microSIM Card
The microSIM card is an IC (Integrated Circuit) card containing the tablet number and other customer information.
Handling the microSIM Card
Keep the following in mind when handling a microSIM card.
●Customer is responsible for any damage caused by inserting microSIM card in another-brand IC card reader, etc. The company is not responsible in such case.
●Always keep the IC chip clean.
●Wipe clean with a dry, soft cloth.
●Avoid applying labels. May damage the microSIM card.
Get Started |
2 |
●See instructions included with the microSIM card for handling.
●The microSIM card is the property of the company.
●The microSIM card is replaceable (at cost) in case of loss/damage.
●Return the microSIM card to the company when cancelling your subscription.
●Returned microSIM cards are recycled for environmental purposes.
●Note that microSIM card specifications and performance may change without notice.
●It is recommended that you keep a separate copy of information that is stored on the microSIM card. The company is not responsible for damages from stored information that is lost.
●Always follow emergency procedures to suspend service if your microSIM card or tablet (microSIM card inserted) is lost/stolen. For details, contact Customer Service.
●Always power off the tablet before inserting/removing a microSIM card.
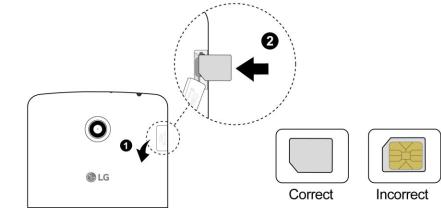
Insert microSIM Card
Follow these instructions to insert a microSIM card. Remember to power off your tablet before inserting a microSIM card.
1.Open the cover of the microSIM/microSD card slots.
Open gently in the direction shown.
2.Insert the microSIM card in the upper slot.
Insert gently with gold IC chip facing downward.
3.Close the cover of the microSIM/microSD card slots.
Make sure all the tabs are secure and there are no gaps around the cover.
Get Started |
3 |
microSD Card
Your tablet supports the use of an optional microSD card (not included) to expand its storage capacity. Some cards may not operate properly with your tablet.
microSD Card Cautions
Data: Information stored on microSD card can become lost or changed accidently or as a result of damage. It is recommended that you keep a separate copy of important data. The company is not responsible for damages from data that is lost or changed.
Reading/Writing Data: Never power off or remove the battery while reading or writing data.
Handling microSD card: Use/store microSD cards away from the reach of infants. May cause choking if swallowed.
Insert microSD Card
Follow these step to insert an optional microSD card (not included). Make sure to power your tablet off before inserting or removing a microSD card.
1.Open the cover of the microSIM/microSD card slots.
Open gently in the direction shown.
2.Insert the microSD card in the lower slot.
Insert the microSD card all the way gently without bending and with the terminals facing upward.
Insert only microSD cards.
3.Close the cover of the microSIM/microSD card slots.
Make sure all the tabs are secure and there are no gaps around the cover.
Unmount the microSD Card
Always unmount the microSD card before removing it from your tablet.
Get Started |
4 |
1.Tap  >
>  > Settings
  .
.
2.Tap Storage.
3.Tap Unmount SD card.
The menu option name changes from Unmount SD card to Mount SD card. The card is now unmounted.
Remove microSD Card
Follow these instructions to remove a microSD card. Always power the tablet off before inserting or removing a microSD card.
1.Tap  >
>  > Settings
  .
.
2.Tap Storage.
3.Tap Unmount SD card.
4.Open the cover of the microSIM/microSD card slots.
5.Push the microSD card inwards to release it, then slide it out of the slot to remove it.
6.Close the cover of the microSIM/microSD card slots.
Format microSD Card
When you insert an optional microSD card for the first time, it is recommended that you format it on your tablet.
1.Tap  >
>  > Settings
  .
.
2.Tap Storage.
3.Tap Erase SD card.
4.Tap Erase SD card again.
5.Tap Erase everything to confirm.
All data on the microSD card is erased, and the card is formatted for use on your tablet.
Battery Use
The following topics explain how to charge your tablet‟s battery.
Charge the Battery
Follow these instructions to charge your tablet‟s battery using either the included AC adapter or via a USB connection on your computer.
Get Started |
5 |

Charge Using the AC Adapter
1. Plug the USB connector into the charger/accessory port at the bottom of your tablet.
2.Plug the other end of the USB cable into the AC adapter.
3.Plug the AC adapter into an electrical outlet.
4.After charging, disconnect the tablet from the charger.
Unplug the AC adapter from the outlet, and remove the micro USB cable from the tablet and the AC adapter.
Note: Always unplug the charger from the wall socket after the tablet is fully charged to save unnecessary power consumption of the charger.
Charge Using a PC Connection
Before using a PC connection to charge your tablet, ensure that the computer is turned on. Depending on the type of connection, your tablet‟s battery may not charge.
1.Insert the small end of the micro USB cord into the charger/accessory port at the bottom of your tablet.
2.Insert the large end of the micro USB cord into an external USB port on your computer.
3.After charging, remove the micro USB cable from both the tablet and the computer.
Get Started |
6 |
Turn Your Tablet On and Off
The instructions below explain how to turn your tablet on and off.
Turn Your Tablet On
■Press and hold the Power/Lock Button.
Your tablet will power on. Depending on the settings, you may see the lock screen.
See Lock and Unlock Your Screen and Select Screen Lock for information about using the screen lock.
The first time you turn the tablet on, you will see the setup screens. See Complete the Setup Screens for details.
If your tablet is not yet activated, see Activate Your Tablet for more information.
Turn Your Tablet Off
1.Press and hold the Power/Lock Button to open the tablet options menu.
2.Tap Power off to turn the tablet off.
3.Tap OK to confirm.
Your tablet will power off.
Your screen remains blank while your tablet is off (unless the battery is charging).
Tip: The KnockON feature allows you to double-tap the screen to easily turn it on or off.
Use the Touchscreen
Your tablet‟s touchscreen lets you control actions through a variety of touch gestures.
Tap or Touch
When you want to type using the onscreen keyboard, select items onscreen such as application and settings icons, or press onscreen buttons by simply tapping or touching them with your finger.
Get Started |
7 |

Touch and Hold
To open the available options for an item (for example, a contact or link in a Web page), touch and hold the item.
Get Started |
8 |
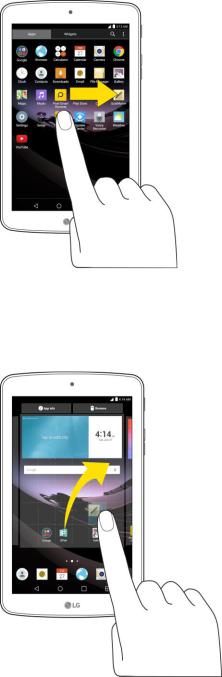
Swipe or Slide
To swipe or slide means to quickly drag your finger vertically or horizontally across the screen.
Drag
To drag, press and hold your finger with some pressure before you start to move your finger. While dragging, do not release your finger until you have reached the target position.
Flick
Flicking the screen is similar to swiping, except that you need to swipe your finger in light, quick strokes. This finger gesture is always in a vertical direction, such as when flicking the contacts list.
Get Started |
9 |

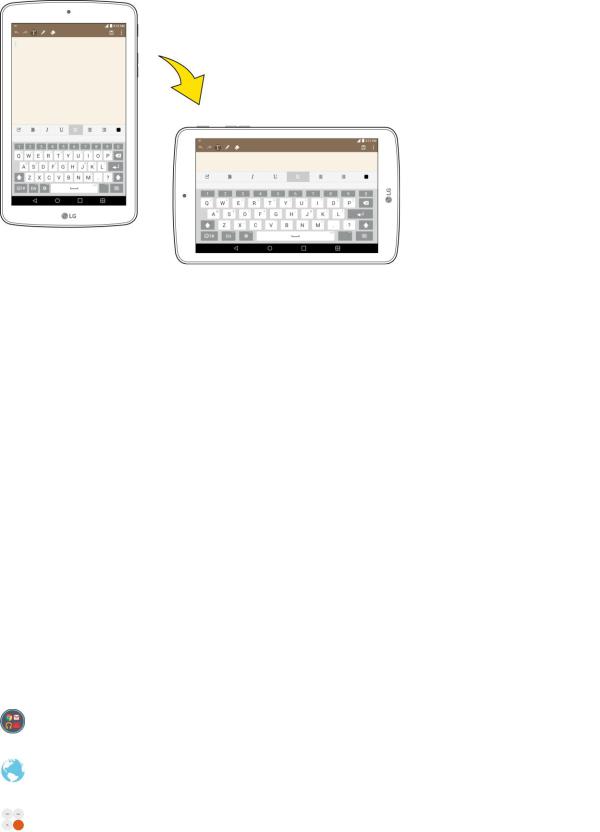
Rotate
For most screens, you can automatically change the screen orientation from portrait to landscape by turning the tablet sideways. When entering text, you can turn the tablet sideways to bring up a bigger keyboard.
Note: The Auto-rotate check box needs to be selected for the screen orientation to automatically change. Tap  >
>  > Settings
  > Display > Auto-rotate screen.
Tip: You can also access the screen rotation setting from the notifications window. Pull down the status bar and tap Rotation to select or deselect the option.
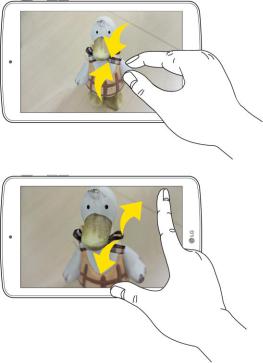
Pinch and Spread
“Pinch” the screen using your thumb and forefinger to zoom out or “spread” the screen to zoom in when viewing a picture or a Web page. (Move fingers inward to zoom out and outward to zoom in.)
Get Started |
10 |
Activate Your Tablet
Follow the instructions below to activate your tablet if it has not already been activated. Depending on your account or how and where you purchased your tablet, it may be ready to use or you may need to activate it on your Sprint account.
●If you purchased your tablet at a Sprint Store, it is probably activated and ready to use.
●If you received your tablet in the mail and it is for a new Sprint account or a new line of service, it is designed to activate automatically.
When you turn the tablet on for the first time, you should see a Hands Free Activation screen, which may be followed by a Firmware Update screen. Follow the onscreen instructions to continue.
●If you received your tablet in the mail and you are activating a new tablet for an existing number on your account (you‟re swapping tablets), you can activate on your computer online or directly on your tablet.
Activate on your computer:
•Go to sprint.com/activate and complete the online instructions to activate your tablet.
Activate on your tablet:
•Turn on your new tablet. (Make sure the old one is turned off.) Your tablet will automatically attempt Hands-Free Activation.
Get Started |
11 |
•Tap Activate to override auto-activation and start the manual activation wizard.
•Follow the on-screen prompts to complete the activation process.
If your tablet is still not activated, visit sprint.com/support Internet, call Sprint Customer Service at 1-888-211-4727
for assistance. If you do not have access to the from another tablet.
Tip: Do not press the Power/Lock Button while the tablet is being activated. Pressing the Power/Lock Button cancels the activation process.
Note: If you are having any difficulty with activation, visit sprint.com/support.
Complete the Setup Screens
The setup screens help you set up certain features and preferences on your tablet. Once your tablet has been turned on, you will see a Accessibility message. You can then complete the setup process.
Note: You may be able to complete the setup screens before your tablet has been activated on your Sprint account.
Note: During or after setup, you may see a Connections Optimizer notice. Read the notice and touch I Agree to allow your tablet to connect automatically to the best available data network, including Wi-Fi. To
turn Connections Optimizer off at any time, tap  >
>  > Settings
  > More… > Mobile networks > Connections optimizer and uncheck the box. See Connections Optimizer for details.
1.On the configuration screen, touch Next to get started.
2.Follow the onscreen instructions to complete each section. For each topic, you will have the option to skip it and continue to the next screen.
Select language - Select a desired language.
Set internet connection - If prompted, follow the prompts to sign in to an available Wi-Fi network. For secured Wi-Fi networks, you will need to enter a password. See Wi-Fi for more details.
Tap & Go - Allows you to quickly copy any Google Accounts, backed up apps and data from your existing Android device. Tap SKIP if you want to skip this step.
Google Services - Read all of the information for the available Google Services and, if you agree, tap Next. Otherwise, uncheck the options and tap Next.
•Use Google's location service - Helps apps determine location. This means sending anonymous location to Google, even when no apps are running. Tap Learn more for additional information.
•Help improve location services - Allows apps and services to scan for Wi-Fi networks even when Wi-Fi is off.
•Help improve your Android experience - Allows your device to send diagnostic and usage data to Google automatically. Tap Learn more for additional information.
Get Started |
12 |
Useful settings - Set the tablet name to be used for Bluetooth® and Wi-Fi Direct and contact information in case your tablet is lost.
Knock Code - Set your personalized Knock Code for your security.
Home touch button combination - Select the desired home touch button combination.
3.Tap Done. Your setup is now complete. Follow the onscreen instructions to learn about basic touch menu navigation, view tutorials, or just get started.
Get Started |
13 |
Basic Operations
The following topics outline basic features and operations of your tablet.
Basics
The following topics offer an overview of your tablet‟s basic operations.
Home Screen and Applications (Apps) List
Most of your tablet‟s operations originate from the home screen or the apps list.
For information about using the home screen, see Home Screen Basics.
Select Options and Navigate Screens
Tap icons, onscreen keys, and other items to open or activate the assigned function.
●Tap Back  to return to the previous screen.
Menu Operations
You can display options menus using the menu key, any app-specific menu icon, or by tapping and holding a screen area, depending on your current app.
■Tap Menu  to view available settings and options.
Tablet Settings Menu
You can customize your tablet‟s settings and options through the Settings menu.
■Tap  >
>  > Settings
  .
.
– or –
Tap  > touch and hold
  > System settings.
– or –
Drag the status bar down and tap Settings  .
.
For more information, see Settings.
Portrait and Landscape Screen Orientation
The default orientation for your tablet‟s screen is portrait (vertical), but many apps will change to landscape orientation (widescreen) when you rotate the tablet sideways.
Basic Operations |
14 |
●Not all screens will adjust for landscape orientation.
Note: The Auto-rotate check box needs to be selected for the screen orientation to automatically change. Tap  >
>  > Settings
  > Display > Auto-rotate screen.
Tip: You can also access the screen rotation setting from the notifications window. Pull down the status bar and tap Rotation to select or deselect the option.
Capture Screenshots
You can use your tablet‟s power and volume down buttons to capture screenshots.
■Press and hold the Power/Lock Button and Volume Down button at the same time to capture a screenshot of the current screen.
The current screenshot will be captured and stored in the Screenshots album in the tablet‟s
Gallery. Tap  >
>  > Gallery
 .
.
Applications
The following is a listing of the default applications available on your tablet.
|
App |
|
|
Function/Service |
|
|
|
|
|
|
|
||
|
|
|
|
|
|
|
|
|
|
|
Access the Google applications. |
|
|
|
|
|
|
|||
|
|
|
|
|
|
|
|
|
|
|
Launches the browser. |
|
|
|
|
Browser |
|
|
||
|
|
|
|
|
|
|
|
|
|
|
Launches the Calculator application. |
|
|
|
|
Calculator |
|
|
||
|
|
|
|
|
|
|
Basic Operations |
15 |

|
|
|
|
|
App |
|
Function/Service |
|
|
|
|
|
|
|
Launches the Calendar application that can sync to either your Google |
|
Calendar |
|
or Outlook® work calendar. Events can only be synched to a managed |
|
|
account. |
|
|
|
|
|
|
|
|
|
|
|
|
Launches the Camera. |
|
Camera |
|
|
|
|
|
|
|
|
|
Launches the Chrome web browser. |
|
Chrome |
|
|
|
|
|
|
|
|
|
Access the Clock application. |
|
Clock |
|
|
|
|
|
|
|
|
|
Displays the Contacts that can be synchronized with your tablet from |
|
Contacts |
|
either your Google or Outlook account. Contacts can only be synched |
|
|
to a managed account. |
|
|
|
|
|
|
|
|
|
|
|
|
Launches the Downloads application where you can view, reopen, or |
|
Downloads |
|
delete what you've downloaded. |
|
|
|
|
|
|
|
Provides access your POP3, IMAP, and Exchange Server (Outlook) |
|
|
email accounts. Also provides access to your Gmail account. |
|
|
|
|
|
|
|
|
Allows you to manage files. |
|
File Manager |
|
|
|
|
|
|
|
|
|
Displays a Gallery of camera images and video saved on your tablet. |
|
Gallery |
|
|
|
|
|
|
|
|
|
Lookout Security provides mobile device-specific security features that |
|
|
|
are coupled with a minimal performance hit. Lookout Mobile Security |
|
|
|
provides key security options that are unique to the mobile market. |
|
Lookout Security |
|
Along with the antivirus and anti-malware tech, there's a lost and stolen |
|
|
|
tablet locator service, an application privacy adviser, and a backup |
|
|
|
service. |
|
|
|
|
|
|
|
Launches a dynamic map that helps you find local businesses, locate |
|
Maps |
|
friends, view maps and get driving directions. |
|
|
|
|
|
|
|
Launches the Music Player. |
|
Music |
|
|
|
|
|
|
|
|
|
Launches the Peel Smart Remote app, which allows you to use your |
|
Peel Smart |
|
tablet as a remote control. |
Remote |
|
|
|
|
|
|
|
Basic Operations |
16 |

|
|
|
|
|
App |
|
Function/Service |
|
|
|
|
|
|
|
Browse, search for, and download applications from the Google Play |
|
Play Store |
|
Store app. |
|
|
|
|
|
|
|
By connecting your tablet and mobile tablet via QPair, you can sync |
|
QPair |
|
incoming calls, messages, and social networking notifications between |
|
|
your tablet and mobile tablet. |
|
|
|
|
|
|
|
|
|
|
|
|
Allows you to take screen shots and write a memo using the images. |
|
QuickMemo+ |
|
|
|
|
|
|
|
|
|
Accesses the tablet‟s Settings menu. |
|
Settings |
|
|
|
|
|
|
|
|
|
Launches the Setup application to configure various device settings. |
|
Setup |
|
|
|
|
|
|
|
|
|
Launches the ThinkFree Viewer application so that you can view |
|
ThinkFree Viewer |
|
document files on your tablet. |
|
|
|
|
|
|
|
Launches the Update Center, which allows you to manage LG apps. |
|
Update Center |
|
|
|
|
|
|
|
|
|
Launches Voice Recorder application and lets you record and play the |
|
Voice Recorder |
|
sound files. |
|
|
|
|
|
|
|
Launches the Weather application. |
|
Weather |
|
|
|
|
|
|
|
|
|
Launches the YouTube application. |
|
YouTube |
|
|
|
|
|
|
Note: The Email application can access both Exchange Server-based email (such as Work email) and other Internet-based email providers such as Yahoo! and Gmail.
Enter Text
The on-screen keyboard displays automatically when you tap a text entry field. To manually display the keyboard, simply tap a text field where you want to enter text.
Basic Operations |
17 |

QWERTY Keyboard
1.Tap a text field where you want to enter text.
2.Enter the desired text.
To enter numbers or symbols, tap  .
.
To enter letters again, tap  .
.
Note: If you do not want the screen to change orientations automatically, uncheck the Auto-rotate screen. Tap  >
>  > Settings
  > Display and select Auto-rotate screen.
Basic Operations |
18 |
3. When you have finished typing, tap  to close the keyboard.
Tips for Editing Text
Your tablet gives you many options to make entering text easier, including copying, cutting, and pasting text, using voice-to-text input, customizing the user dictionary, using predictive text, and more.
To cut/copy and paste:
1.Touch and hold a word to highlight it.
2.Drag the blue highlight markers to highlight the text you want.
– or –
To select all the text, tap Select all in the context menu.
To cancel the selection, simply tap unselected text or empty area.
3.Tap Cut or Copy in the context menu.
4.Place the cursor on the location where you want to paste the text.
5.Touch and hold the text field and tap Paste. The text that you pasted also remains in the tablet's memory (temporarily), so you can paste that same text in another location.
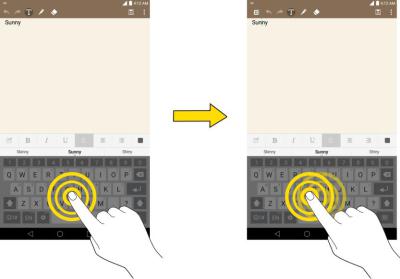
Move Cursor Using the Space Bar
Touch and hold the Space Key and slide your finger to the left or right to move the cursor.
Split Keyboard Using Gesture
The split keyboard feature allows you to use both hands to type while in landscape view. Each half of the keyboard withdraws to the left and right of the screen. Place both thumbs on the keyboard and slide them outwards in opposite directions.
Basic Operations |
19 |
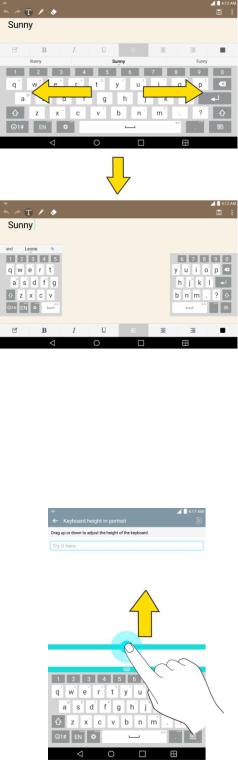
To change the keyboard height:
Adjust height of keyboard to show more of the screen and to control keyboard more easily.
1.Tap  > Keyboard height and layout > Keyboard height in portrait or Keyboard height in landscape.
2.Drag the blue bar to adjust the keyboard height.
To change the bottom row keys:
Touch and drag to add or delete keys or change the order.
Basic Operations |
20 |

1.Tap  >
>  > Settings
  > Language & input > LG Keyboard
  > Keyboard height and layout > QWERTY keyboard layout.
2.Drag to add or delete keys or change the order. To change to another character on the visible key, tap the key and choose the desired character that you want displayed.
Note: Only QWERTY, QWERTZ, and AZERTY keyboards can be customized. This function does not support some languages.
Search Your Tablet and the Web
You can search for information on your tablet and on the web using the Search application. Some applications, such as Gmail, Contacts, and Browser have the ability to search contents within those specific applications. You can conduct the search by typing in the search terms or saying what you‟re looking for. Typing can be useful because the search application can provide suggestions so you don‟t necessarily have to type out your full request.
Tablet and Web Search Using Text Entry
You can search on your tablet and on the web by entering text.
1.From the Home screen, tap the Search Widget  . (For information on how to add widget, see Add and Remove Widgets on the Home Screen.)
Basic Operations |
21 |

2. Enter the text you're searching for in the search field.
You can use the Search preferences to configure some aspects of Google web search (for example, whether it makes suggestions below the search field as you type), and what tablet features you want to include in searches.
To access these settings, touch and hold  > Settings.
3.Tap  to search for the entered text.
– or –
If what you want to search for appears in the suggestions list, tap that item to conduct the search.
4.If the tablets asks you to select which browser to use, tap your preference. Then, make sure that the Use as default app check box is selected to keep this preference setting.
Tablet and Web Search Using Voice Command
You can search on your tablet and on the web by voice command.
Basic Operations |
22 |

■From the Home screen, tap the  on the Google Search Widget.
For more information on Google Search, touch and hold  > Help & feedback from the Google search screen.
Using Clip Tray
Easily access the contents you stored in the Clip Tray whenever and wherever you want. You can copy images or texts and keep them in the Clip Tray. Then, you can paste them whenever and wherever you want.
●Tap and hold text and images while editing them and tap Clip Tray.
●Tap and hold a text input field and select Clip Tray. You can also access the Clip Tray by tapping and holding  , then tapping
  .
.
Note: Saved items are stored in the Clip Tray temporarily. In Clip Tray, tap  and an item then select
Done to lock the item and prevent deletion. Tap  to delete items. This function may not be supported in the downloaded apps.
Google Account
You will need a Google Account to access several tablet features such as Gmail, Google Maps, Hangouts, and the Google Play applications. Before you are able to access Google applications, you must enter
your account information. These applications sync between your tablet and your online Google Account.
Google Account Cautions
Be sure not to forget your Google Account ID or password.
Create a Google Account
You must create and/or sign into a Google Account to use Gmail, Google HangoutsTM, Google CalendarTM, and other Google Apps. Signing into a Google Account is also necessary to download applications from the Google Play Store app to sync your data (if applicable) with the Google servers, and to take advantage of any other available Google services on your tablet.
If you don‟t have a Google Account, you will be prompted to create one. If you have an enterprise account through your company or other organization, your IT department may have special instructions on how to sign into that account.
1.From a computer, or from your tablet's Browser, navigate to www.google.com.
2.On the main page, select Sign in, then click Create an account.
3.Follow the on-screen prompts to create your free account.
4.Log into your provided email address, locate the email from Google, and respond to the new email to both confirm and activate your new account.
Basic Operations |
23 |
Loading...