


Welcome
Start Guide
|
|
|
|
|
|
|
|
BC |
|
|
|
|
|
|
|
|
|
||
|
|
|
|
|
|
|
|
||
|
|
|
|
|
|
|
|
||
TCS519591.1 |
MBM64236002 (1.0) G Printed in Korea |
||||||||
|
|||||||||

TABLEOFCONTENTS
INTRODUCTION........................................................ |
2 |
|
Your Phone ............................................................... |
4 |
|
Getting Started ......................................................... |
6 |
|
Set Up Your Accounts ............................................... |
9 |
|
Customize Your Phone ............................................ |
10 |
|
Touch Screen.......................................................... |
11 |
|
QuickTheater.......................................................... |
13 |
|
Dual Window .......................................................... |
14 |
|
Guest mode ............................................................ |
15 |
|
Slide Aside ............................................................. |
17 |
|
Camera and Video .................................................. |
18 |
|
Transfer Music and Pictures.................................... |
19 |
|
Calls and Voicemail................................................. |
20 |
|
Text Messaging....................................................... |
21 |
|
Email ...................................................................... |
22 |
|
Web........................................................................ |
23 |
|
Text Link................................................................. |
23 |
|
Input Language Settings ......................................... |
24 |
|
Voice Mate.............................................................. |
25 |
|
QSlide .................................................................... |
26 |
|
Wi-Fi and Bluetooth® ............................................... |
27 |
|
Google Play™ Store ................................................ |
28 |
|
T-Mobile Applications ............................................. |
29 |
|
Network Indicators.................................................. |
33 |
|
Accessories............................................................ |
34 |
|
Approved Firmware Versions................................... |
35 |
|
Safety Tips.............................................................. |
35 |
|
Information About Safeguarding Handsets .............. |
36 |
|
Emergency Dialing.................................................. |
37 |
|
Caring For Your Phone ............................................ |
37 |
|
Additional Information ............................................ |
38 |
|
For Your Safety ....................................................... |
42 |
1 |

INTRODUCTION
Support
This guide provides you with the information you need to get started.
For more information and additional support, please visit www.t-mobile.com/support where you can:
•Register at My.T-Mobile.com to check your minutes, pay your bill, upgrade your phone, and change your rate plan.
•Review your phone’s User Manual and troubleshooting FAQs.
•View the latest troubleshooting solutions in the Support Forums or ask a question of your own.
You can also access account and device information from your phone.
1From the Home screen, touch  .
.
2Under the Apps tab, touch T-Mobile My Account
 .
.
NOTE
•Illustrations may differ from those you see on actual phone.
•Available accessories may vary depending on your region, country or service provider.
•Some features and service may vary by region, phone, service provider and software version.
•All information in this document is subject to change without notice.
2

Service
If you are a new T-Mobile® customer and your service has not yet been activated, call Customer Care at 1-800-937-8997 and a T-Mobile Activations representative will assist you.
You will need the following information when activating service:
•Service Agreement and agent code on your Agreement.
•Your name, home address, home phone number, and billing address.
•Your Social Security number, current driver’s license number, and date of birth for credit check purposes.
•Your choice of T-Mobile plan and services (see http://www.t-mobile.com/ for latest plan information).
•Micro SIM serial number and IMEI number (located on the box barcode label).
NOTE
For business and government accounts, please provide the name of your company or government agency, address, and tax ID.
NOTE
By activating service, you acknowledge that you have read, understand, and agree to be bound by each of T-Mobile’s Terms and Conditions, and your Service Agreement.
3
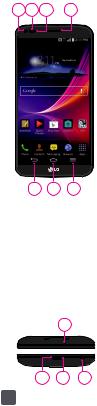
YourPhone
Front view
1 |
2 |
3 |
4 |
1 Front Camera Lens
2Proximity / Ambient Light Sensor
3LED Indicator
4Earpiece
5Back Key
6Home Key
7Menu Key
5 6 7
NOTE
The back cover of this product applies a “self-healing” technology, which self-repairs minor scratches in just a few minutes. Minor scratches are those cause by ordinary and normal use of the phone. Scratches caused by abrasive surface, misuse, including but not limited to intentional scratches, and damages caused by a fall or dropping the product, may not disappear. The “self-healing” results may vary depending on the extent of the damage as well as other conditions. Any warranty on the “selfhealing” is hereby expressly excluded.
|
8 |
|
8 |
Microphone (Sub) |
|
|
|
|
|||
|
|
|
9 |
Charger/Accessory |
|
|
|
|
|
Port |
|
9 |
10 |
11 |
10 |
Microphone (Main) |
|
11 |
3.5mm Headset Jack |
||||
|
|
|
4
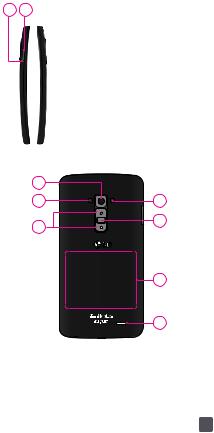
Side view
1 2
1 Eject Button Aperture
2 Micro SIM card slot
Rear view
1
2
3
1Back Camera Lens
2IR (infrared) LED
3Volume Keys
4
5
6
7
4Flash
5Power/Lock Key
6NFC touch point
7Speaker
5
GettingStarted
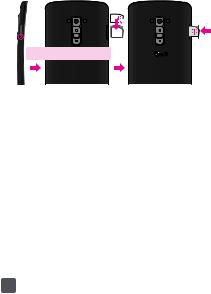
Before you start using the phone, you may need to insert the Micro SIM card.
Installing the Micro SIM card
The eject button is a small round aperture on the tray door. To install a new Micro SIM card:
1Insert the Micro SIM ejection tool that comes with the phone (or a thin pin) into the eject button aperture, and push firmly but gently until the tray pops out.
 Eject button
 aperture
2Remove the tray and place the Micro SIM card inside it (see image above). There is only one possible way to fit the card snugly into the tray.
3Carefully reposition the tray in the slot and push it gently back into the phone.
NOTE
Make sure the gold contact area on the card is facing downwards.
6
Charging your phone
A rechargeable Li-ion polymer battery is used to power your phone.
A USB Adapter, which is included with your phone, is used to charge the battery. Ask your T-Mobile sales representative for further details regarding approved batteries and chargers.
Before using your phone for the first time, make sure the battery is fully charged. An uncharged battery will fully recharge after 3.5 hours.
 USB Adapter
USB Cable
Warning!
If the touch screen does not function while the phone is in the process of charging, it may be due to an unstable power supply. As a result, disconnect the USB cable from the device or unplug the USB Adapter from the power outlet.
7
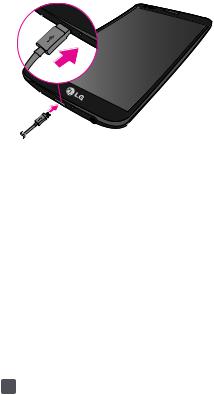
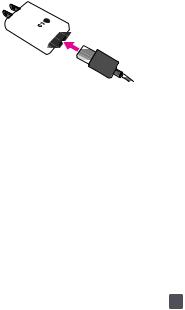
1Connect the USB Adapter and USB cable (as shown on the previous page).
2Plug the USB cable (as shown on the next image) into the phone’s Charger/Accessory Port.
NOTE
•The battery must be fully charged initially to improve battery lifetime.
•Your phone has an internal antenna. Be careful not to scratch or damage this rear area, as that will cause loss of performance.
•When charging your phone with a fully discharged battery, the red LED indicator will briefly flash indicating charging is occurring in a mode designed to prevent battery damage. The blinking will stop and normal
charging will commence once a sufficient minimum charge has been established.
8
SetUpYourAccounts
Adding accounts will populate email, contacts, calendar, and other information on your device. You may want to set up accounts over Wi-Fi to save on your data plan usage.
1On any screen, swipe down from the top of the screen to display the Notifications Panel.
2Tap  at the top right corner of the screen, then tap the General tab > Accounts & sync > Add account.
3Select the type of account you would like to add. Enter your information and follow any additional on-screen instructions.
NOTE
Contact your IT administrator to help set up your corporate Microsoft® Exchange account.
9

CustomizeYourPhone
Add widgets and apps to your Home screen, change the wallpaper, and more.
Customize a Home Screen
1Press and hold an empty spot on a Home screen panel and choose a category:
•Apps: Add shortcuts to your favorite apps.
•Widgets: Add dynamically updating widgets.
•Wallpapers: Change your wallpaper.
2Tap the desired option to add it to the Home screen. To move an item, press and hold it and drag it to a
new location. To delete it, drag it to Remove  at the top of the screen.
Customize Your Sounds
From the Home screen, tap the Menu Key  > System settings > Sound tab. You can change your ringtones, set notification sounds, and adjust your touch feedback options.
10

TouchScreen
Double-tap the screen to turn the screen on or off. You can also access most phone functions from the Notifications Panel.
Unlocking the Screen
1Press the Power/Lock Key  to turn on your screen. Your Lock Screen will appear.
2From the center of the screen, swipe in any direction to unlock it.
•Shortcuts can be added for quick access to your favorite apps. To add shortcuts, access the Settings menu, tap the Display tab > Lock screen > Shortcuts.
•To use a shortcut, swipe the shortcut icon at the bottom of the screen in any direction. The screen will unlock and open the application.
11

KnockON
The KnockON feature allows you to double-tap the screen to easily turn it on and off. You can enable/ disable this feature in the Gestures settings.
1KnockON is enabled by default. To turn it on or
off, from the Home screen, tap the Menu Key 
> System settings > General tab > Gestures > Screen on/off.
2With KnockON enabled and the screen off, quickly double-tap the screen to wake the phone.
3Double-tap the screen again to turn the screen off.
Knock Code
The Knock Code feature allows you to unlock the screen when screen is off by tapping the correct area and sequence. It allows you to define how many times and where on the screen to tap to unlock your phone. You can set this feature in the Lock Screen settings.
1From the Home screen, tap the Menu Key 
> Settings > Lock screen > Select screen lock > Knock Code.
NOTE
If Knock Code is set, you cannot turn the screen on using the KnockON feature.
12
Notifications Panel
Swipe the top of the screen downwards to open the Notifications Panel.
•To respond to a notification, tap it.
•To remove a notification, swipe it left or right.
•To remove all notifications, tap Clear.
•Adjust the Quick Settings by tapping them (i.e., Sound).
•Tap  at the top right corner of the Notifications Panel to access the Settings menu.
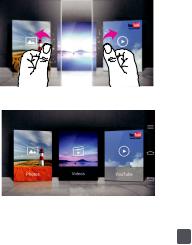
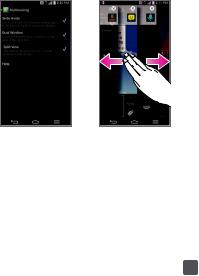
QuickTheater
QuickTheater allows you to see the slideshow for photos, videos, and YouTube.
1From the lock screen, hold the phone horizontally.
2Use both thumbs and slide them apart (as seen below).
3Choose the desired option.
NOTE
QuickTheater is only available if the lock screen is set to Swipe.
13
DualWindow
This feature allows you to use two apps at the same time.
Setting up Dual Window
Dual Window should be set before using the feature.
1From the Home screen, tap the Menu Key  >
>
System settings > General tab > Multitasking.
2Tap the Dual Window checkbox to enable/disable this feature.
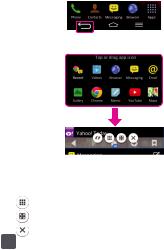
Using Dual Window
1Touch and hold the Back Key  to split the screen.
2Touch or drag an app icon to the desired space.
 Switch: Switch the two apps.
 Resize/Toolbar: Drag to resize the screens. Tap to view the toolbar.
 Apps list: Tap to open other apps.
 Expand: Tap to expand a screen to full view.
  Exit: Tap to exit a screen.
14
Guestmode
Use Guest mode when you let someone else use your phone. They will only be able to use the applications that you’ve selected. Once you set it up, you can easily put your phone in Guest mode by drawing the guest pattern on the Lock screen that you set, which is different from your normal unlock pattern.
NOTE
Guests can also use applications that your selected applications link to.
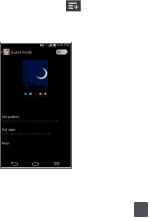
Setting up Guest mode
1From the Home screen, tap the Menu Key  >
>
System settings > General tab > Guest mode.
2Tap Set pattern, then set the pattern you want to use to put your device in Guest mode.
3Tap Set apps to view which apps can be accessed
in Guest mode. Tap the Add icon in the upper right corner of the screen to change the Guest apps list.
4Tap the Use Guest mode switch  to enable this mode.
15

Using Guest mode
After you’ve set up and enabled Guest mode, lock the screen so that you can enter your Guest mode pattern. The Guest mode Home screen is displayed with only the apps you’ve selected for guest access. To exit Guest mode, enter your normal unlock pattern on the Lock screen.
NOTE
Guest mode is automatically disabled if your lock sequence is changed from Pattern. Otherwise, manually disable it if you no longer want to allow guest access.
16
SlideAside
Slide Aside allows you to quickly switch between three open applications (or tasks) using a three finger gesture.
1From the Home screen, tap the Menu Key  >
>
System settings > General tab > Multitasking.
2Tap the Slide Aside checkbox to enable/disable the feature.
3Tap the Home Key  and open an app.
4Place three fingers on the screen and drag the app off the screen to the left.
5To bring the app back, drag three fingers to the right.
*Some apps may restart when brought back later.
NOTE
You can save up to 3 apps at once.
17
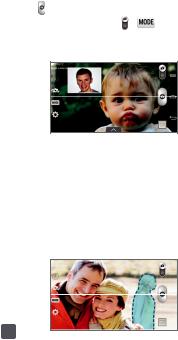
CameraandVideo
Your phone has innovative camera and video features.
Dual Camera and Dual Recording
1From the Home screen, tap  >
>  > Dual camera.
2You’ll see an inset box with the front-facing camera view in the viewfinder. You can move, resize, and switch camera views.
3Tap to take a picture.
4 To use Dual Recording, tap > |
> Dual |
recording. |
|
5 Tap  to start recording. To stop recording, tap
  .
.
< Dual Camera/Recording >
Shot & Clear
1From the Home screen, tap  >
>  > Shot & Clear.
2Tap  to take a picture.
3Objects that can be removed from the photo are outlined in blue. Tap an outlined area to remove the unwanted portion of the image in your photo.
4Tap  to save.
18 |
< Shot & Clear > |
|
TransferMusicandPictures
Transfer music and photos to and from your phone in a few simple steps.
1Connect your phone to your computer with a USB cable. Steps may vary depending on your operating system.
2You may be prompted to install PC programs. Tap
OK > Media sync (MTP).
3On your PC, choose Open device to view files using Windows Explorer.
4Your phone will appear as another portable device on your computer. Click on the drive to view it.
5Drag and drop your files* into the corresponding folders, such as music, movies, or pictures. You can also transfer files from your PC to your phone.
*Files must be Digital Rights Management (DRM) free.
19
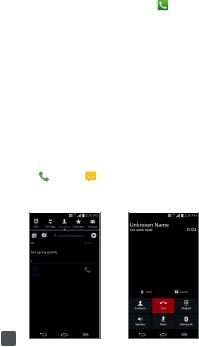
CallsandVoicemail
It’s easy to make calls and access voicemail and your call logs with your phone.
Make a Call
1From the Home screen, tap  .
.
2Enter a phone number or spell the name of a
contact. Tap the contact and then tap |
to place |
the call. |
|
Access Voicemail
1From the Home screen, tap  .
.
2Touch and hold  .
.
3Follow the voice prompts to listen to messages.
Access Call Logs
1From the Home screen, tap  .
.
2Tap the Call logs tab.
3Tap an entry to view it.
4 Tap |
to call or |
to send a message. Tap New |
||||||
contact to create a new contact or tap Update |
||||||||
contact add the number to an existing entry. |
||||||||
|
|
|
|
|
|
|
|
|
|
|
|
|
|
|
|
|
|
|
|
|
|
|
|
Julia |
||
|
|
|
|
1 555-555-5555 |
|
|
||
|
|
Julia |
|
|
|
|
|
|
20
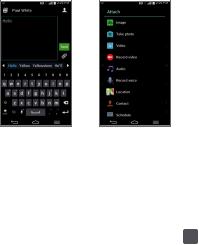
TextMessaging
Communicate quickly via text message with the phone. Attach images, videos, and other files to your messages.
1From the Home screen, tap  .
.
2Tap  to compose a new message.
3In the To field, enter a number or tap  to select a name from your contact list. You can enter several names to send your message to multiple people.
4Enter your message.
5Tap  to attach a file.
6Tap Send (or Send MMS) to send the message.
NOTE
Messaging rates apply.
NOTE
Please don’t text and drive.
21
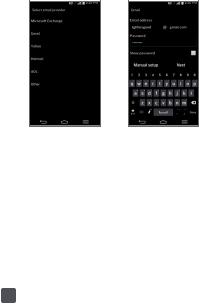
In addition to Gmail™, you can set up other types of email accounts on your phone, including Microsoft® Exchange accounts.
1From the Home screen, tap  >
>  .
.
2Tap an account type. Steps may vary from this point.
3Enter your email address and password and tap
Next.
4Follow additional on-screen instructions to complete setup and tap Done.
NOTE
Contact your IT administrator to help set up your corporate Microsoft® Exchange account.
22
Web
Use the Web browser to surf the Web with ease.
1From the Home screen, tap  .
.
2Tap the address bar at the top of the page and enter an address. You may need to scroll to the top of the page to access the address bar.
3Tap Go on the keyboard.
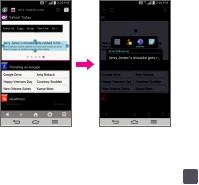
TextLink
Text Link recommends apps related to text in messages or other selected text. It connects directly to the Calendar, Contacts, Phone, Messaging, Email, Browser, Maps, YouTube, Calculator, and more.
To use Text Link:
•Tap a message bubble with the  icon.
icon.
•Highlight text on a web page or e-mail and select Text Link in the pop-up.
•Tap Share and select Text Link  .
.
23
 Loading...