


ICOA 15 A
USER´S MANUAL
BEDIENUNGSANLEITUNG
MANUEL D`UTILISATION
MANUAL DE USUARIO
INSTRUKCJA OBSŁUGI
MANUALE D‘ USO
操作说明书
操作說明書
ICOA® SERIES
12" / 15" ACTIVE COAXIAL PA SPEAKER (BLUETOOTH)
LDICOA12A(BT) / LDICOA15A(BT)

CONTENTS / INHALTSVERZEICHNIS / CONTENU / CONTENIDO /
TREŚĆ / CONTENUTO / 目录 / 目錄
ENGLISH
SAFETY INFORMATION 3
PROPERTIES 4
CONNECTIONS, CONTROL, AND DISPLAY ELEMENTS 5
OPERATION 6
STAND ADAPTER 9
USE AS A FLOOR MONITOR 10
ROTATE TWEETER BY 90° 10
OPTIONAL ACCESSORIES 11
TECHNICAL SPECIFICATIONS 11
MANUFACTURER’S DECLARATIONS 12
DEUTSCH
SICHERHEITSHINWEISE 14
EIGENSCHAFTEN 15
ANSCHLÜSSE, BEDIEN- UND ANZEIGEELEMENTE 16
BEDIENUNG 17
STATIVFLANSCH 20
VERWENDUNG ALS BODENMONITOR 21
HOCHTONHORN UM 90° DREHEN 21
OPTIONALES ZUBEHÖR 22
TECHNISCHE DATEN 22
HERSTELLERERKLÄRUNGEN 23
FRANCAIS
CONSIGNES DE SÉCURITÉ 25
CARACTÉRISTIQUES 26
RACCORDEMENTS, ÉLÉMENTS DE COMMANDE ET D’AFFICHAGE 27
UTILISATION 28
BRIDE SUPPORT 31
UTILISATION COMME RETOUR DE SCÈNE AU SOL 32
TOURNER LE PAVILLON D’AIGUS À 90° 32
ACCESSOIRE DISPONIBLE EN OPTION 33
CARACTÉRISTIQUES TECHNIQUES 33
DÉCLARATIONS DU FABRICANT 34
POLSKI
ZASADY BEZPIECZEŃSTWA 47
CHARAKTERYSTYKA 48
PRZYŁĄCZA, ELEMENTY OBSŁUGI I WSKAŹNIKI 49
OBSŁUGA 50
KOŁNIERZ STATYWU 53
WYKORZYSTANIE W FUNKCJI MONITORA PODŁOGOWEGO 54
GŁOŚNIK WYSOKOTONOWY OBRACANY O 90° 54
AKCESORIA OPCJONALNE 55
DANE TECHNICZNE 55
OŚWIADCZENIA PRODUCENTA 56
ITALIANO
INDICAZIONI SULLA SICUREZZA 58
CARATTERISTICHE 59
CONNESSIONI, ELEMENTI DI COMANDO E DI VISUALIZZAZIONE 60
UTILIZZO 61
FLANGIA TREPPIEDE 64
UTILIZZO COME MONITOR DA PAVIMENTO 65
RUOTARE IL TWEETER A TROMBA DI 90° 65
ACCESSORI OPZIONALI 66
DATI TECNICI 66
DICHIARAZIONI DEL PRODUTTORE 67
简体中文
安全提示 69
特征 70
接口、操作和显示元件 71
操作 72
三脚架法兰 75
用作地板监视器 76
将高音喇叭转动90° 76
可选配件 77
技术参数 77
制造商声明 78
ESPAÑOL
INSTRUCCIONES DE SEGURIDAD 36
CARACTERÍSTICAS 37
CONEXIONES, ELEMENTOS DE MANEJO Y ELEMENTOS DE VISUALIZACIÓN 38
FUNCIONAMIENTO 39
BRIDA DE SOPORTE 42
USO COMO MONITOR DE SUELO 43
DIFUSOR DE ALTA FRECUENCIA CON GIRO DE 90° 43
ACCESORIOS OPCIONALES 44
DATOS TÉCNICOS 44
DECLARACIONES DEL FABRICANTE 45
繁體中文
安全注意事項 79
特性 80
連接器、操縱及顯示元件 81
操作 82
三腳架法蘭 85
用作地面監測器 86
將高音喇叭旋轉90° 86
可選配件 87
技術資料 87
製造商聲明 88

ENGLISH
YOU‘ VE MADE THE RI GHT CHOICE!
We hav e design ed this pr oduct to o perat e reliabl y over many y ears . LD Syst ems sta nds for th is with i ts name an d many year s of exp erience
as a man ufact urer of hi gh-qual ity audio p roduc ts. Plea se read t his User ‘s Manua l caref ully, so th at you can b egin maki ng optim um use of
your L D Syste ms produc t quickl y.
You ca n nd more inf ormat ion about L D-SYSTEMS at our I nterne t site W WW.LD-SYSTEMS.COM
SAFETY INFORMATION
1. Ple ase rea d these in struc tions c areful ly.
2. Ke ep all infor mation a nd instr uctio ns in a saf e place.
3. Fol low the ins truc tions.
4. Ob serve a ll safe ty warn ings. Ne ver remo ve safe ty warn ings or ot her infor matio n from the e quipment .
5. Us e the equipm ent only in t he inten ded manner a nd for the in tended pu rpose .
6. Us e only suf cient ly stab le and comp atible s tands and /or mount s (for xed i nstal lation s). Make cer tain th at wall mo unts are p roperl y
ins talled an d secure d. Make cer tain th at the equ ipment is i nstall ed secur ely and can not fall do wn.
7. Duri ng inst allatio n, obser v e the appl icable sa fety r egulat ions for y our count ry.
8. Nev er inst all and oper ate the e quipment n ear radia tors , heat re gister s, ove ns or other s ource s of heat . Make cer tain tha t the equip ment
is alw ays ins talled s o that is c ooled suf cient ly and can not over heat.
9. Nev er place s ources o f igniti on, e.g. , burning c andles, o n the equipm ent.
10. Ve ntilat ion slit s must no t be blocke d.
11. K eep a minimum di stanc e of 20 cm aro und and abov e the devi ce.
12. Do n ot use th is equipme nt in the imme diate v icinit y of wate r (does n ot apply t o special o utdoor e quipment - in t his cas e, obser ve the
spec ial inst ruct ions not ed below. Do n ot expo se this equ ipment to ammable m ateri als, uid s or gases . Avoid dir ect sunli ght!
13. M ake cert ain tha t dripping o r splashe d water c annot en ter the equ ipment . Do not plac e conta iners lle d with liq uids, suc h as vase s or
drin king ves sels, on t he equipme nt.
14. M ake cer tain tha t object s canno t fall int o the devic e.
15. Us e this equ ipment onl y with th e acces sories r ecommend ed and int ended by th e manufac turer.
16. Do n ot open or mo dify thi s equipmen t.
17. Af ter conn ectin g the equipm ent, che ck all cabl es in order t o preven t damage o r acciden ts, e.g ., due to tr ipping ha zards .
18. Dur ing tra nspor t, make ce rtain t hat the e quipment c annot fa ll down and p ossibl y cause pr opert y damage a nd perso nal injuri es.
19. If y our equipm ent is no lon ger func tioning pr operly , if uids or obj ects h ave got ten insid e the equipm ent or if it h as been dam aged in
anot h er way, sw itch it o ff immedi ately an d unplug it f rom the ma ins outl et (if it is a p owered d evice). T his equipme nt may onl y be repair ed
by au thoriz ed, quali ed pers onnel.
20. Cl ean the equ ipment us ing a dry cl oth.
21. C omply wi th all appli cable dis posal la ws in your c ountr y. During di sposal o f packag ing, ple ase sepa rate pl astic an d paper/car dboard .
22. P lasti c bags mus t be kept ou t of reac h of childre n.
23. P lease no te that c hanges or m odica tions no t expre ssly appr oved by t he part y respo nsible f or complia nce could vo id the use r´s
aut horit y to opera te the equ ipment.
FOR EQU IPMENT THAT C ONNECTS T O THE POWER MA INS
24. C AUTIO N: If the po wer cord o f the devic e is equippe d with an e arthin g conta ct, the n it must b e connect ed to an ou tlet wi th a prot ectiv e
gro und. Neve r deacti vate t he prote ctive g round of a p ower cor d.
25. If t he equipmen t has been e xposed t o stron g uc tuatio ns in temper ature (f or examp le, aft er trans port), do n ot swit ch it on immedi ately.
Mois ture and c ondens ation cou ld damage t he equipme nt. Do no t switc h on the equi pment unt il it has r eached r oom temper ature .
26. Be fore con nectin g the equip ment to th e power ou tlet, r st ver ify th at the main s volta ge and fre quency m atch the v alues sp ecied on
the eq uipment . If the equi pment ha s a volta ge selec tion swi tch, con nect th e equipmen t to the pow er outle t only if th e equipmen t values
and th e mains pow er value s match. I f the inclu ded power c ord or pow er adapt er does not t in your wa ll outle t, cont act your e lectr ician.
27. Do no t step on t he power c ord. Make c erta in that th e power ca ble does no t become ki nked, es peciall y at the main s outle t and/or pow er
adap ter and th e equipmen t connec tor.
28. W hen connec ting the e quipmen t, make ce rtain t hat the po wer cord o r power ad apter is al ways f reely ac cessib le. Alwa ys disc onnect t he
equip ment fro m the powe r supply if t he equipme nt is not in u se or if you w ant to cle an the equip ment. A lways u nplug the po wer cord a nd
powe r adapte r from the p ower out let at th e plug or adap ter and no t by pulling o n the cord . Never to uch the pow er cord and p ower adap ter
wit h wet hand s.
29. W henever p ossible , avoid sw itchin g the equipm ent on and of f in quick s uccess ion becau se othe rwise t his can sh orten t he usef ul life of
the equipment.
30. IMP ORTANT I NFORMAT ION: Repla ce fuse s only wit h fuse s of the same t ype and r ating . If a fuse bl ows rep eatedl y, please c ontac t an
aut horise d servi ce centr e.
31. To di sconnec t the equi pment fr om the pow er mains com pletel y, unplug th e power cor d or power ad apter f rom the po wer outl et.
32. I f your devi ce is equipp ed with a V olex powe r connec tor, the ma ting Vole x equipmen t connec tor mus t be unlocke d before i t can be
remo ved. How ever, thi s also mean s that th e equipmen t can slide a nd fall dow n if the pow er cable i s pulled, wh ich can lea d to pers onal
injur ies and/or o ther dam age. For t his reas on, alwa ys be car eful whe n laying c ables.
33. Un plug the po wer cord an d power ad apter fr om the pow er outle t if there i s a risk of a l ightnin g strik e or befor e exte nded perio ds
of dis use.
ENGLISHFRANCAIS
DEUTSCH
ESPAÑOL
POLSKI
ITALIANO
简体中文繁體中文
3
34. The appliance is not to be used by persons (including children) with reduced physical, sensory or mental capabilities, or lack of experience
and knowledge.
35. Children must be instructed not to play with the device.
36. If the power cord of the device is damaged, do not use the device. The power cord must be replaced by an adequate cable or assembly from an
authorized service center.
DEUTSCHENGLISH FRANCAIS
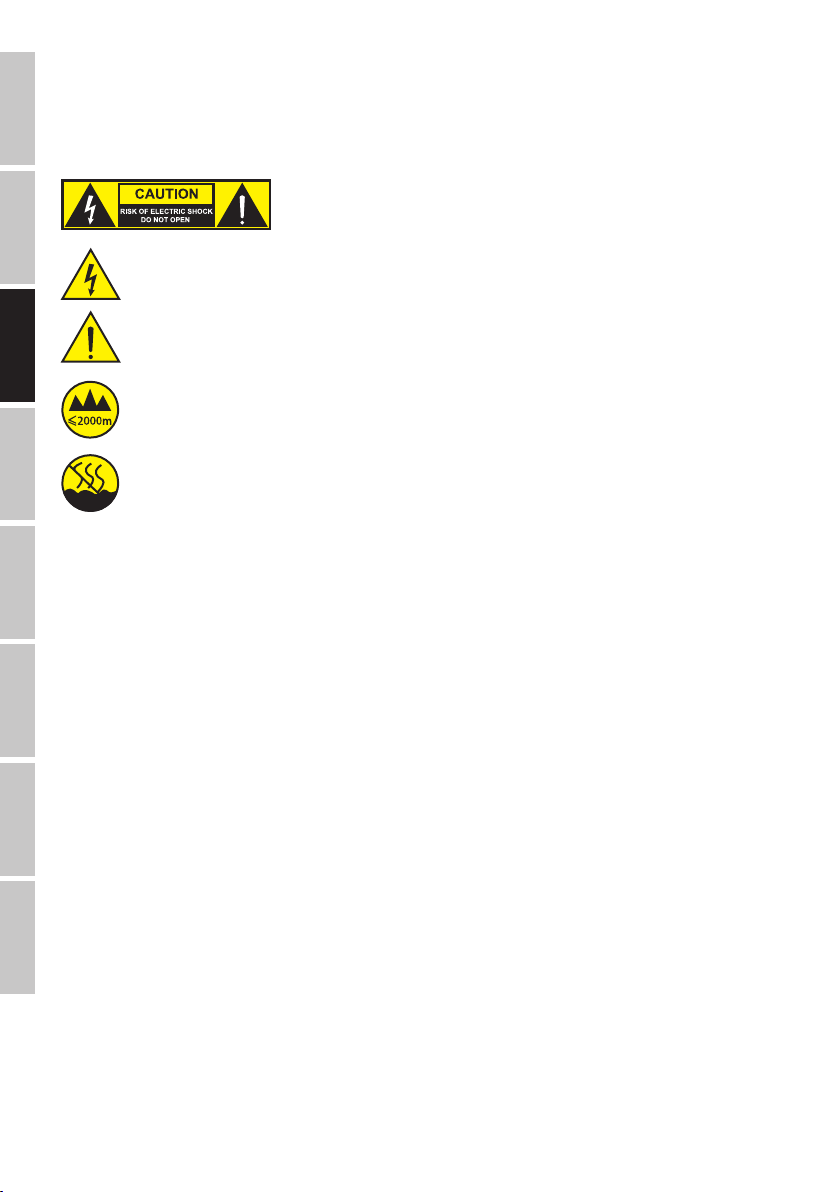
The w arning tr iangle w ith lig htning s ymbol indi cates d angerou s uninsul ated vol tage in side the uni t, whic h may caus e an
electrical shock .
The w arning tr iangle w ith exc lamat ion mark ind icate s import ant oper ating an d mainte nance ins truc tions.
War ning! Thi s device is d esigne d for use be low 2000 me tres in a ltitu de.
CAUTION:
To redu ce the ris k of elect ric shoc k, do not r emove co ver (or back) . There ar e no user se rvice able
par ts insi de. Maint enance an d repair s should be e xclusi vely car ried ou t by qualie d servi ce
personnel.
ESPAÑOL
War ning! Thi s produc t is not int ended for u se in trop ical clim ates.
CAUT ION! HIGH VOLU MES IN AUDIO PR ODUCTS!
Thi s device is m eant for p rofes sional us e. Ther efore, c ommerc ial use of t his equipme nt is subj ect to th e respec tivel y applica ble natio nal ac-
POLSKI ITALIANO
ciden t preve ntion ru les and re gulati ons. As a m anufac turer, Ad am Hall is obl igate d to notif y you for mally ab out the ex isten ce of pote ntial
health risks.
Hear ing damag e due to high v olume and pr olonged e xposu re: When in u se, thi s produc t is capabl e of produc ing high so und-pre ssure l evels
(SPL ) that can l ead to irr evers ible hear ing damag e in perf ormers , employe es, and aud ience memb ers. Fo r this rea son, avo id prolon ged
exp osure t o volumes in e xcess o f 90 dB.
PROPERTIES
LDICOA12A(BT)
• Genuine all-rounder for full-range, satellite, and monitor applications
• Two-way speaker with 12” woofer
• BT model equipped with Bluetooth® audio streaming
简体中文 繁體中文
• 126 dB max. SPL and 300 W RMS power handling
• Coaxial design with rotatable, BEM-optimized CD horn for vertical and horizontal use
• Horn-loaded woofer
• DynX DSP with four presets featuring three band equalizer (EQ) and delay function
• Two line/mic input channels with individual gain controllers, 3.5 mm jack input plus mono mix output
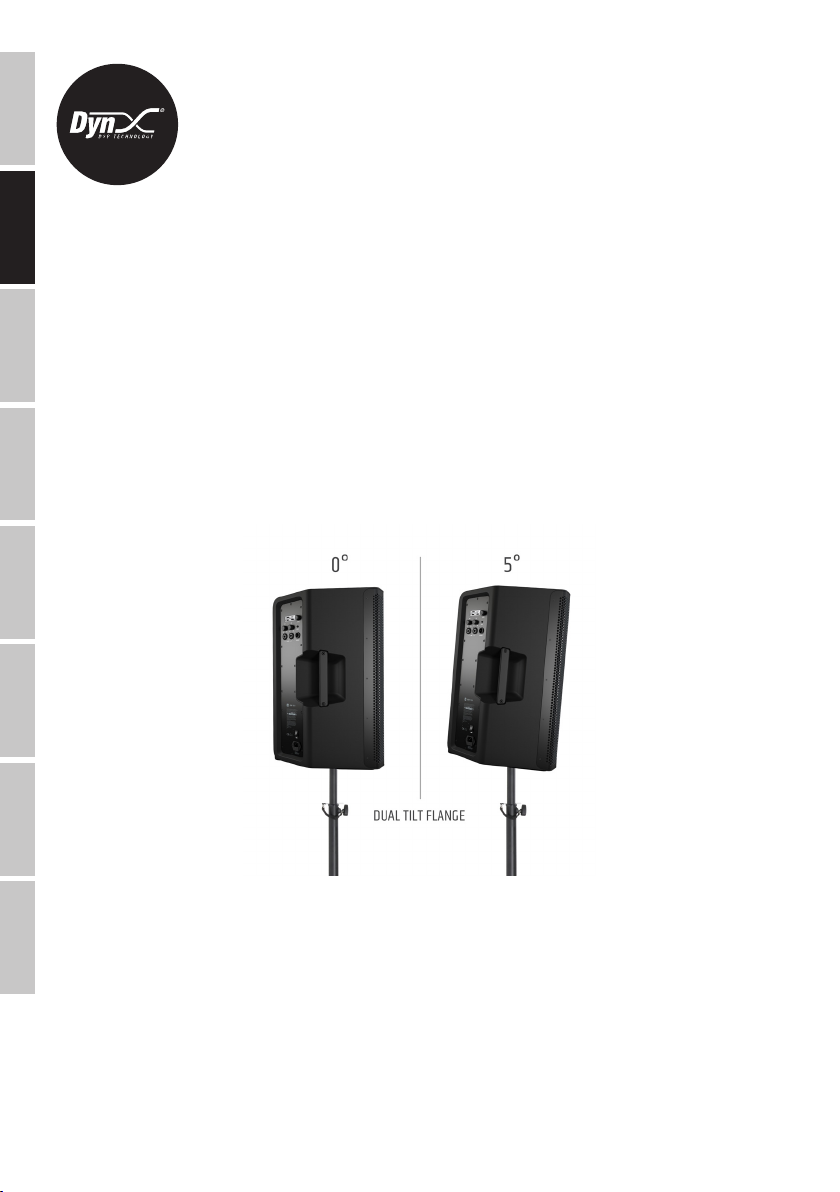
• 36 mm dual-tilt stand connection with a tilt angle of 0° and 5°, 55° monitor angle with sturdy stand
• Shockproof front grille for the best speaker protection
• Four aluminium handles with ergonomic, rubberized surface
• Comprehensive range of optionally available accessories for installation and transport
4
LDICOA15A(BT)
• Genuine all-rounder for full-range, satellite, and monitor applications
• Two-way speaker with 15" woofer
• BT model equipped with Bluetooth® audio streaming
• 128 dB max. SPL and 300 W RMS power handling
• Coaxial design with rotatable, BEM-optimized CD horn for vertical and horizontal use
• Horn-loaded woofer
• DynX DSP with four presets featuring three band equalizer and delay function
• Two line/mic input channels with individual gain controllers, 3.5 mm jack input plus mono mix output
• 36 mm dual-tilt stand connection with a tilt angle of 0° and 5°, 55° monitor angle with sturdy stand
• Shockproof front grille for the best speaker protection
• Four aluminium handles with ergonomic, rubberized surface
• Comprehensive range of optionally available accessories for installation and transport
CONNECTIONS, CONTROL, AND DISPLAY ELEMENTS
3
ENGLISHFRANCAIS
DEUTSCH
1
4
6
2
5
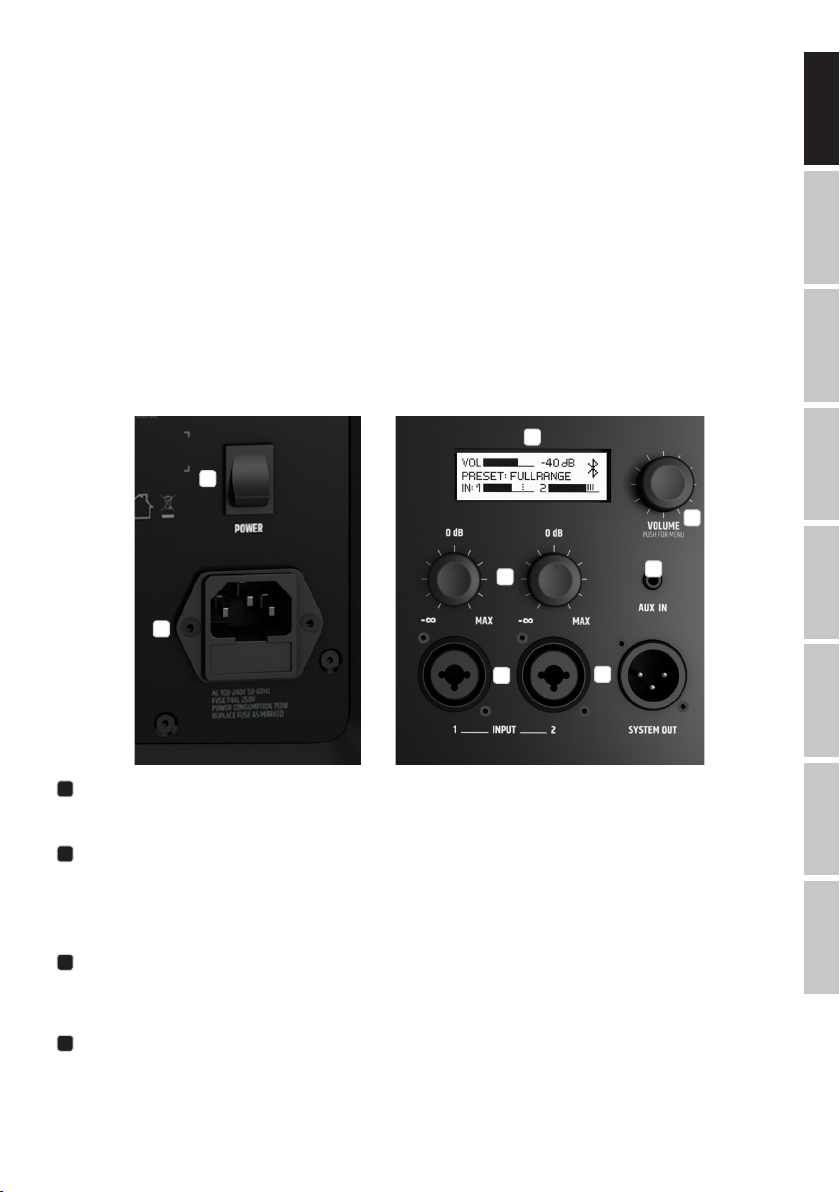
POWER
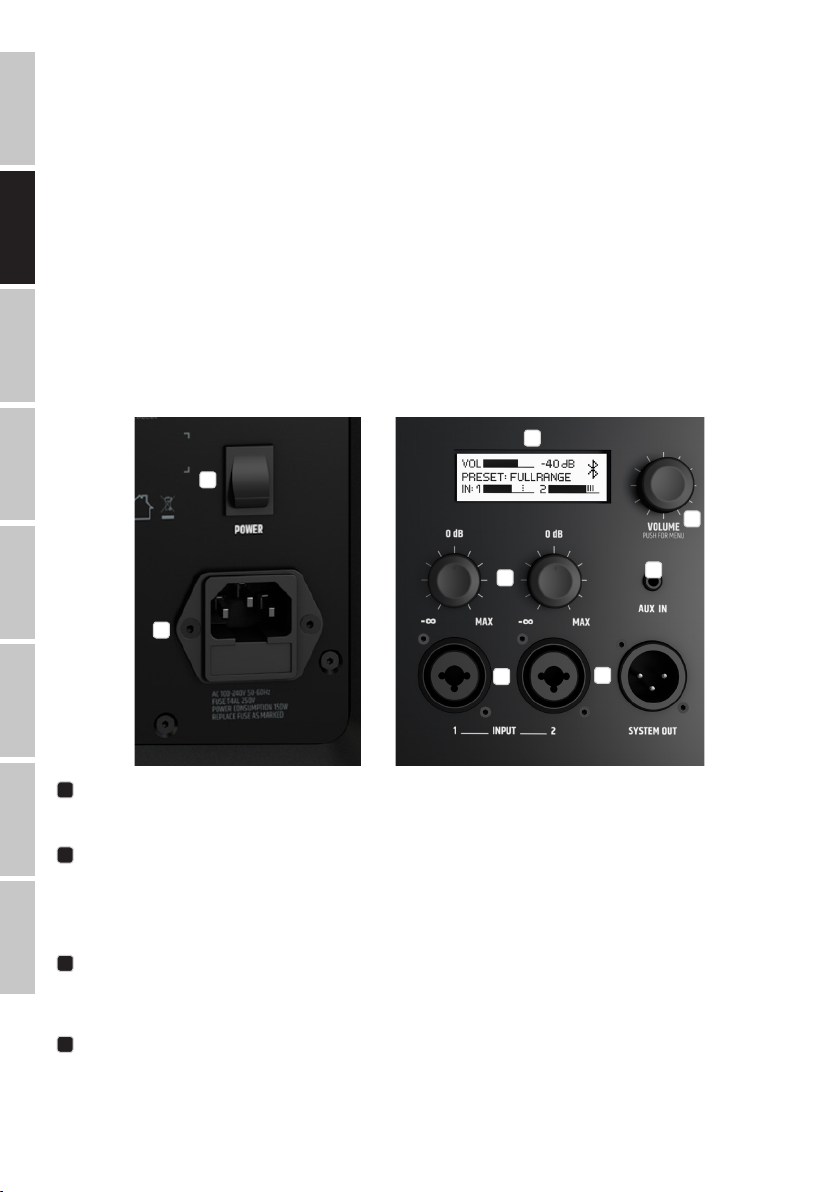
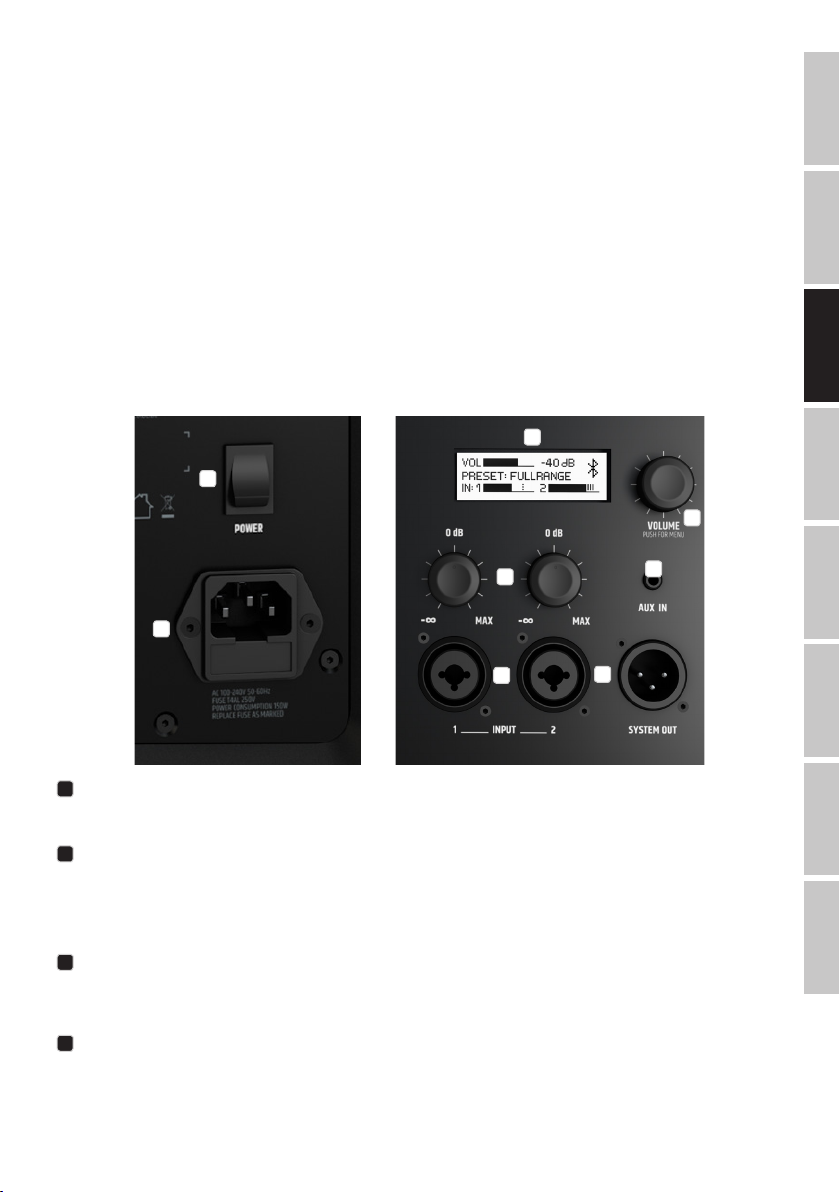
1
On/off switch. The speaker should always be the last device to be switched on in the signal chain, and the rst to be switched off.
POWER SOCKET AND FUSE HOLDER
2
IEC power socket with integrated fuse holder. A suitable power cable is included in delivery.
IMPORTANT NOTE: Only replace the fuse with a fuse of the same type and values. Please note
the inscription on the housing. If a fuse trips repeatedly, please contact an authorized service center.
LC DISPLAY
3
Multifunctional graphic LC display for displaying the master volume, the DSP preset and the input level for channels 1 and 2 in the main menu. The
menu items, submenu items, and corresponding editing options are displayed in the Editing menu.
VOLUME / PUSH FOR MENU
4
From the main menu, the master volume can be adjusted by turning the rotary-push encoder. Press the rotary-push encoder to access the Editing
menu. Use the rotary-push encoder to navigate the Editing menu, adjust system settings, and change values in the respective menu items.
7
8
ESPAÑOL
POLSKI
ITALIANO
简体中文繁體中文
5
INPUT 1–2
5
XLR/jack combo sockets for balancing audio output of channels 1 and 2 The inputs are suited for both line-level signals as well as for directly
connecting the microphone. The inputs are not equipped with phantom power.
GAIN
6
Controller for adjusting the input gain of channels 1 and 2. For an optimum signal-to-noise ratio, set the signal as high as possible, but make sure
that the Peak display does not light up or briey appear, to prevent signal distortion and system damage. If necessary, also adjust the player’s
DEUTSCHENGLISH FRANCAIS
output level.
AUX IN
7
Unbalanced audio input with 3.5 mm stereo jack socket. A connected stereo signal is summed to mono internally. Control the volume for the AUX IN
channel using the gain controller for channel 2. If necessary, also adjust the player and master volume with the rotary-push-encoder.
SYSTEM OUT
8
Balanced audio output with male 3-pin XLR socket. The connected signal is a mix out of channel 1 and 2 and AUX IN.
OPERATION
ESPAÑOL
NOTE:
The LD Systems logo briey appears on the display as soon as the speaker is correctly connected to the power supply and switched on. All settings
(e.g. Preset, EQ, and Delay) resume the way they were as before the speaker was switched off. If Bluetooth was previously enabled (on models with
Bluetooth), it will be automatically disabled after a restart. The speaker will be ready for use after completion of this process, which usually takes
one second.
MAIN MENU
POLSKI ITALIANO
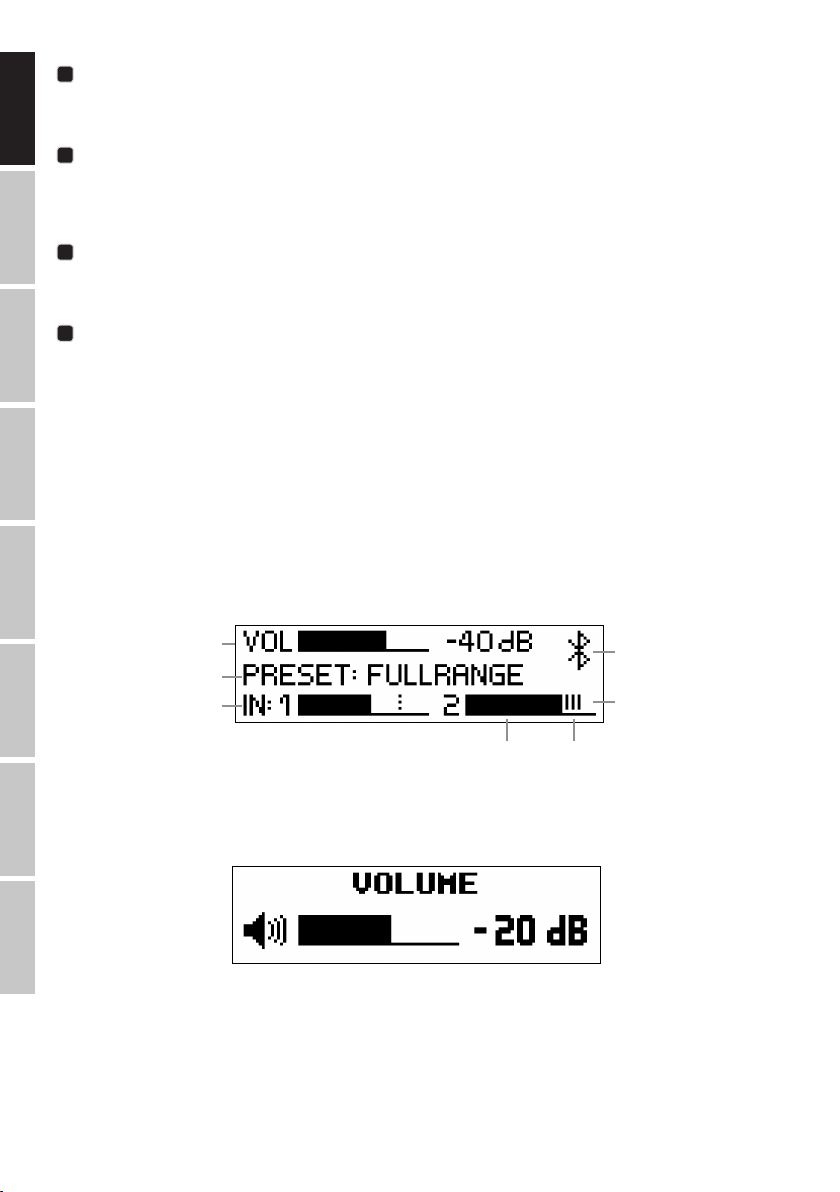
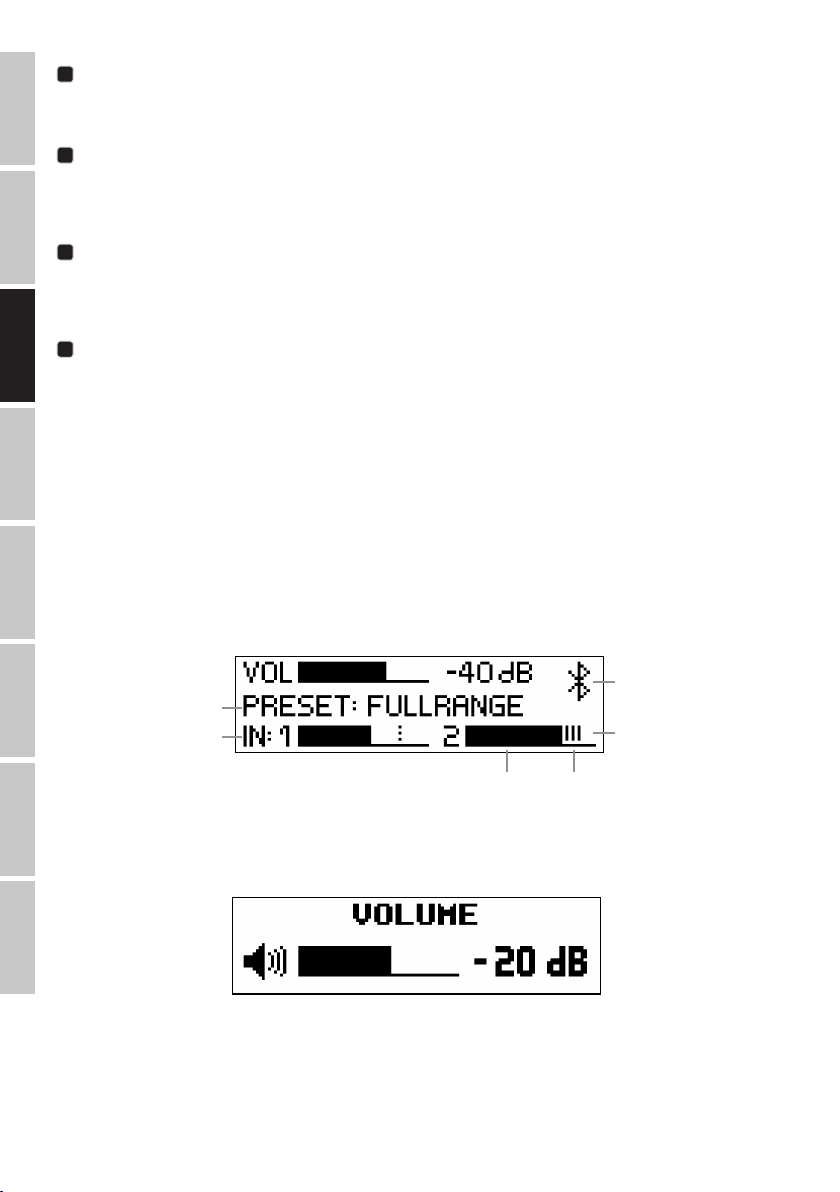
The main display is activated during normal operation. It shows the master volume setting, the activated speaker preset, the input levels of chan-
nels 1 and 2, and Bluetooth if it is activated on Bluetooth-enabled models (see gure).
Master volume
Speaker preset
Input level with peak display
channel 2
Level Peak
简体中文 繁體中文
VOLUME
From the main menu, the master volume can be directly adjusted by turning the rotary-push encoder VOLUME / PUSH FOR MENU from -60 to +10 dB.
When the encoder is rotated, the display automatically changes to the corresponding symbol (see gure below). The main menu will automatically
reappear after approx. 8 seconds of inactivity. Pressing the encoder immediately changes the display to the main menu.
Bluetooth
Input level with peak display
channel 2
6
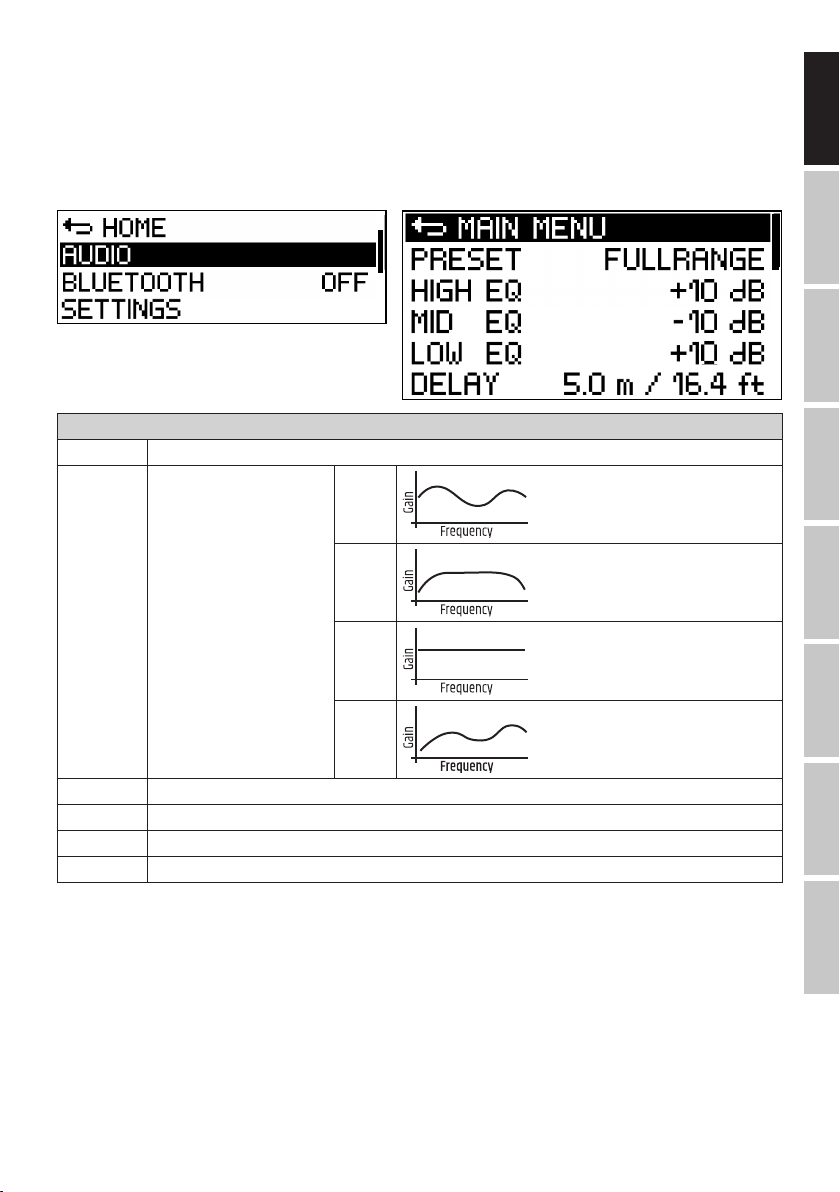
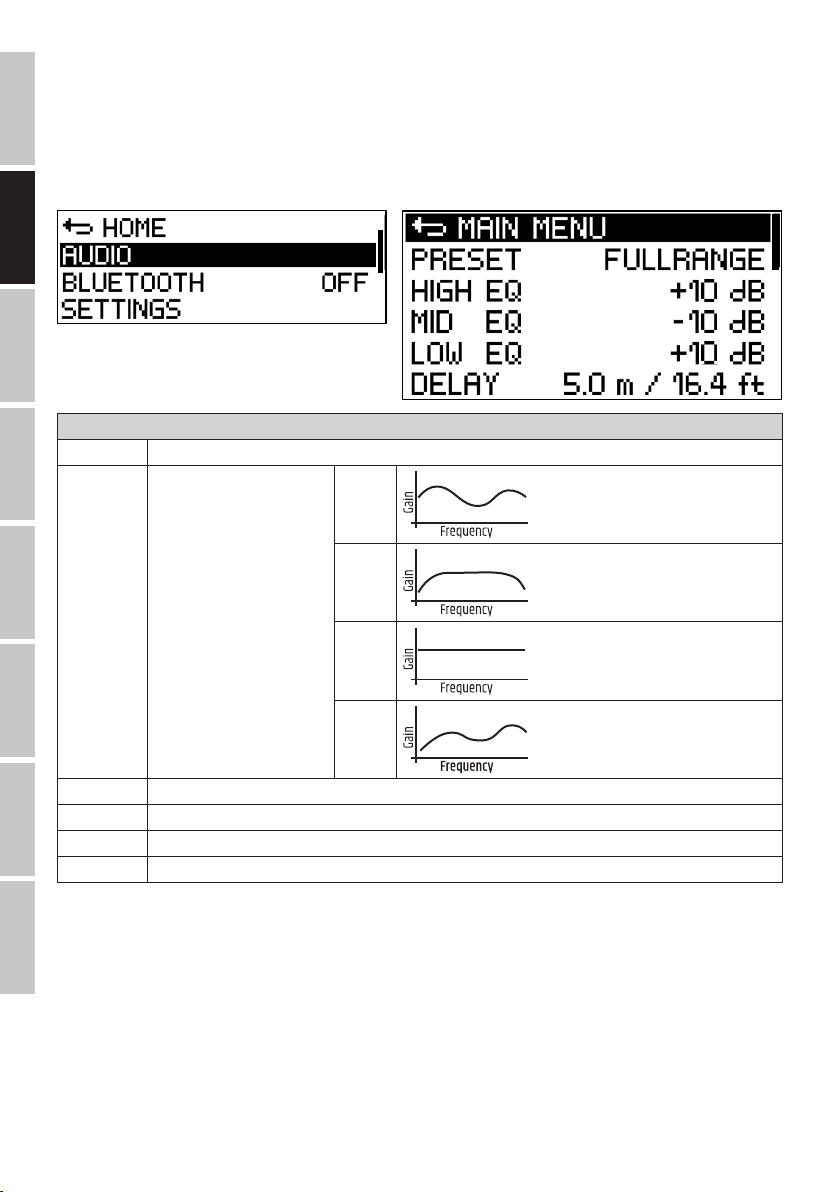
AUDIO SETTINGS (AUDIO)
Pre ss the ro tary -push enc oder to acc ess the m ain menu and t hen turn t he encode r to selec t the menu i tem AUDIO (da rk backg round). P ress
the en coder aga in to acce ss the sub menu and the n turn the e ncoder to s elect t he desire d submenu i tem. Con rm the se lectio n by pres sing
the en coder. Turn t he encoder t o change a v alue and th en conrm t he change i n value by pr essin g the encod er. Refer to t he table b elow for
the s ubmenu it ems and the r elevan t inform ation. I n the subme nu, selec t MAI N MENU and pre ss the en coder to r eturn t o the main men u.
In the m ain menu, s elect HOME an d then pre ss the enc oder to con rm this s elect ion and ret urn to th e main menu. T he main men u will
aut omatic ally be dis played a fter app rox. 8 se conds of in acti vity.
AUDIO (Change value = turn encoder, conrm change in value = press encoder)
MAIN MENU Return to main menu
PRESET Selection of the speaker preset FULL
RANGE
MONITOR
FLAT
ENGLISHFRANCAIS
DEUTSCH
ESPAÑOL
POLSKI
SAT
HIGH EQ Setting treble frequencies from -10dB to + 10dB
MID EQ Setting mid frequencies from -10dB to +10dB
LOW EQ Setting bass frequencies from -10dB to +10dB
DELAY Time delay of the audio signal in 0.32 ft steps up to 32 ft (0 ft = OFF, display in meters and feet)
ITALIANO
简体中文繁體中文
7
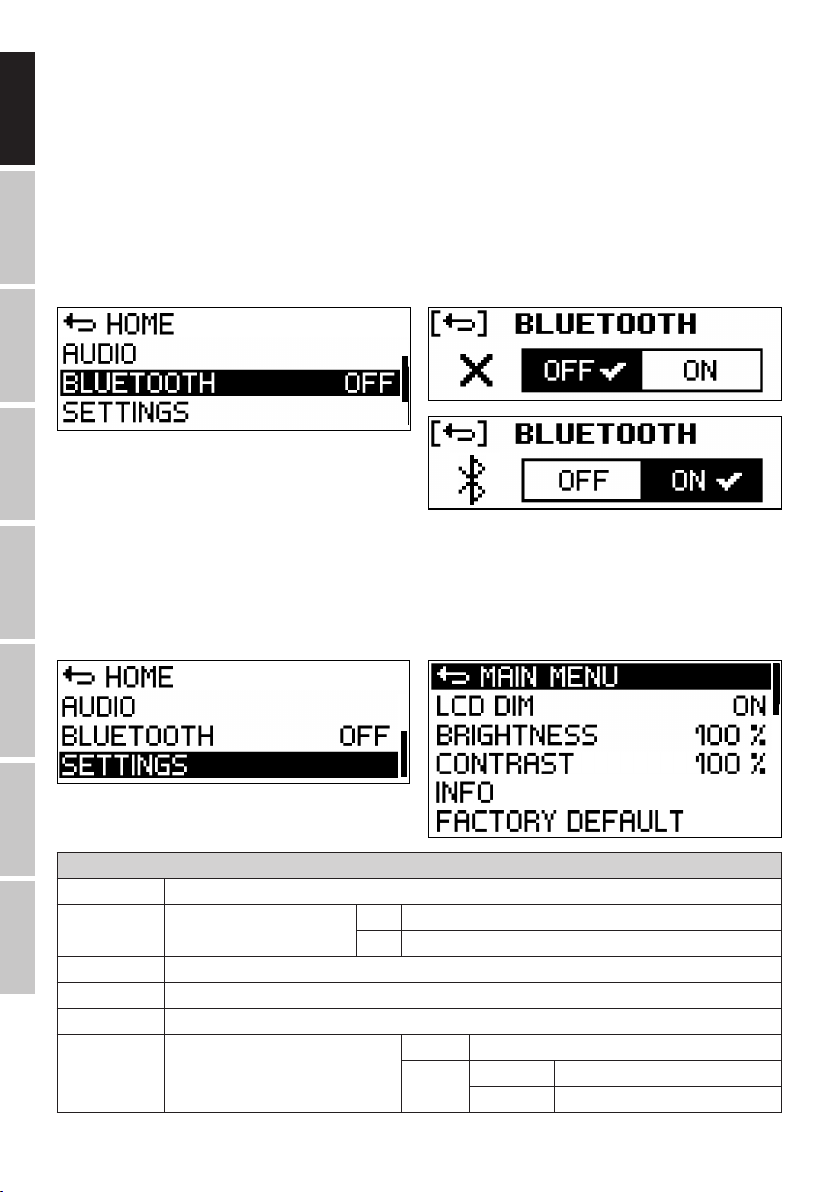
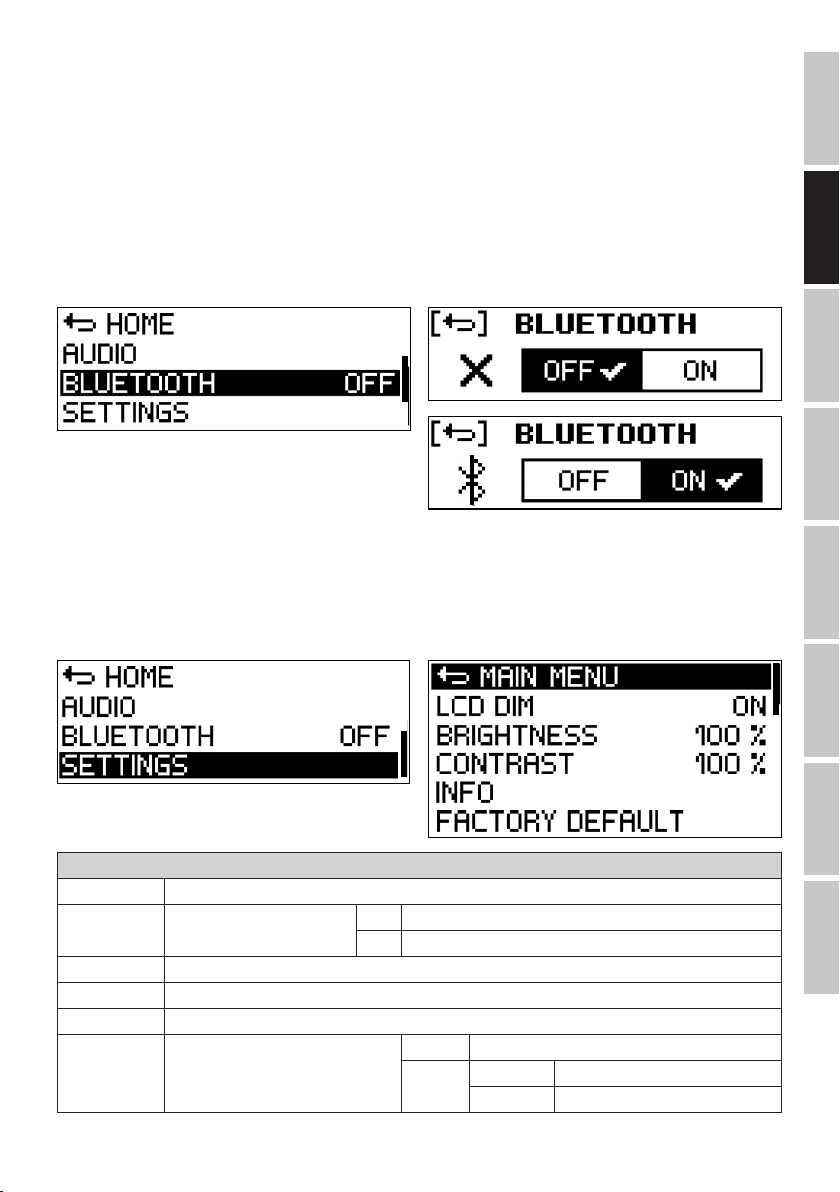
BLUE TOOTH® (only LD ICOA12AB T and LDICOA15 ABT models)
The LD ICOA12 ABT and LDIC OA15AB T model s are Bluet ooth-e nabled to all ow for audio le s on anot her Bluet ooth dev ice (e.g. sma rtphon e, table t) to
be pla yed back o n speake rs (max imum dis tance be twee n both de vices i s approx . 10 met ers; s tereo s ignals a re summe d to mono in terna lly.). To
enab le Blueto oth, pr ess the r otar y-push en coder to ac cess th e main menu an d then tur n the encod er to selec t the menu i tem BLUE TOOT H
(dark b ackgr ound). Pre ss the enc oder agai n to acces s the subm enu and then t urn the en coder to s elect ON (r eturn t o main menu wi th []).
Con rm the sel ection b y press ing the enc oder. Selec t the sub menu item H OME and then p ress th e encoder t o conrm t he selec tion.
A as hing Bluet ooth ic on will now ap pear in the m ain displa y. Switc h on Bluet ooth on yo ur smart phone or t ablet and lo ok for ava ilable
dev ices on the u ser inte rface . Selec t “LD ICOA® 12 ” or “LD ICO A® 15” to pair a nd connec t your Blue tooth de vice wi th the spe aker’s Bl uetoo th
DEUTSCHENGLISH FRANCAIS
unit . The audio p laybac k can st art as so on as the pr ocess is c omplet ed. The Blu etoot h symbol no w perman ently ap pears on t he displa y.
If the B luetoo th connec tion is l ost (e.g. o ut of rang e), the Blue tooth ic on will st art to ash agai n. The volu me sett ing is car ried ou t on the
play er, and the ma ster vo lume is adju sted us ing the enc oder. If a Blue tooth c onnect ion to the s peaker is no t requir ed to emit s ound, dis able
Blue tooth in t he Bluet ooth sub menu (BLUE TOOTH O FF).
ESPAÑOL
SYSTEM SETTINGS (SETTINGS)
Pre ss the ro tary -push enc oder to acc ess the m ain menu and t hen turn t he encode r to selec t the menu i tem SET TINGS (da rk backg round).
POLSKI ITALIANO
Pre ss the enc oder agai n to acces s the subm enu and then t urn the en coder to se lect the d esired s ubmenu it em. Con rm the sele ction b y
pre ssing th e encoder. Tur n the encod er to chan ge a value and t hen conr m the chan ge in value b y press ing the enc oder. Refe r to the tab le
belo w for the su bmenu ite ms and the r elevan t inform ation. In t he submen u, selec t MAIN M ENU and pre ss the enc oder to re turn to t he
main me nu. In the m ain menu, se lect H OME and then p ress t he encoder t o conrm t his selec tion and r eturn t o the main me nu. The mai n
menu w ill autom atical ly be displ ayed af ter appr ox. 8 sec onds of ina ctivi ty.
简体中文 繁體中文
SETTINGS (Change value or status = turn encoder, conrm or request information = press encoder)
MAIN MENU Return to main menu
LCD DIM Automatic display dimming ON Display is dimmed after approx. 8 seconds of inactivity
OFF Automatic display dimming switched off
BRIGHTNESS Setting the display brightness (0–100%)
CONTRAST Setting the display contrast (0–100%)
INFO Display of model number and software version
FACTORY DEFAULT Reset to factory default
(AUDIO, BLUETOOTH + SETTINGS)
CANCEL Cancel reset
RESET SURE? YES Execute reset
CANCEL Cancel reset
8
WHAT DOES LD SYSTEMS DynX® DSP MEAN?
DSP is an acronym that stands for digital signal processing. DynX® includes the Limiter, EQ, Compressor, and Crossover functions. Digital signal
processing ensures optimal audio playback with maximum clarity while protecting the PA system from overloading.
WHAT EXACTLY DOES DynX® DSP DO?
The Limiter function protects the speaker and prevents overload-induced distortion. Separate limiters for the bass, mid, and treble regions limit the
signal if the level exceeds a value that could have negative effects. Each limiter is optimized for one of the three seamlessly connected frequency
ranges (multi-band limiter). This allows the system to be operated at an overall higher sound pressure since extreme signal peaks are automatically
limited so that the master volume does not have to be reduced.
The multi-band EQ handles the entire frequency range and optimizes the system’s overall sound.
Depending on the frequency range, the crossovers divide the audio signal into the respective speakers, i.e. the subwoofer, midrange tweeter, and
tweeter of the array column. The amplitude and run-time optimization of the crossovers also ensure that all frequencies are evenly emitted and reach
listeners at the same time.
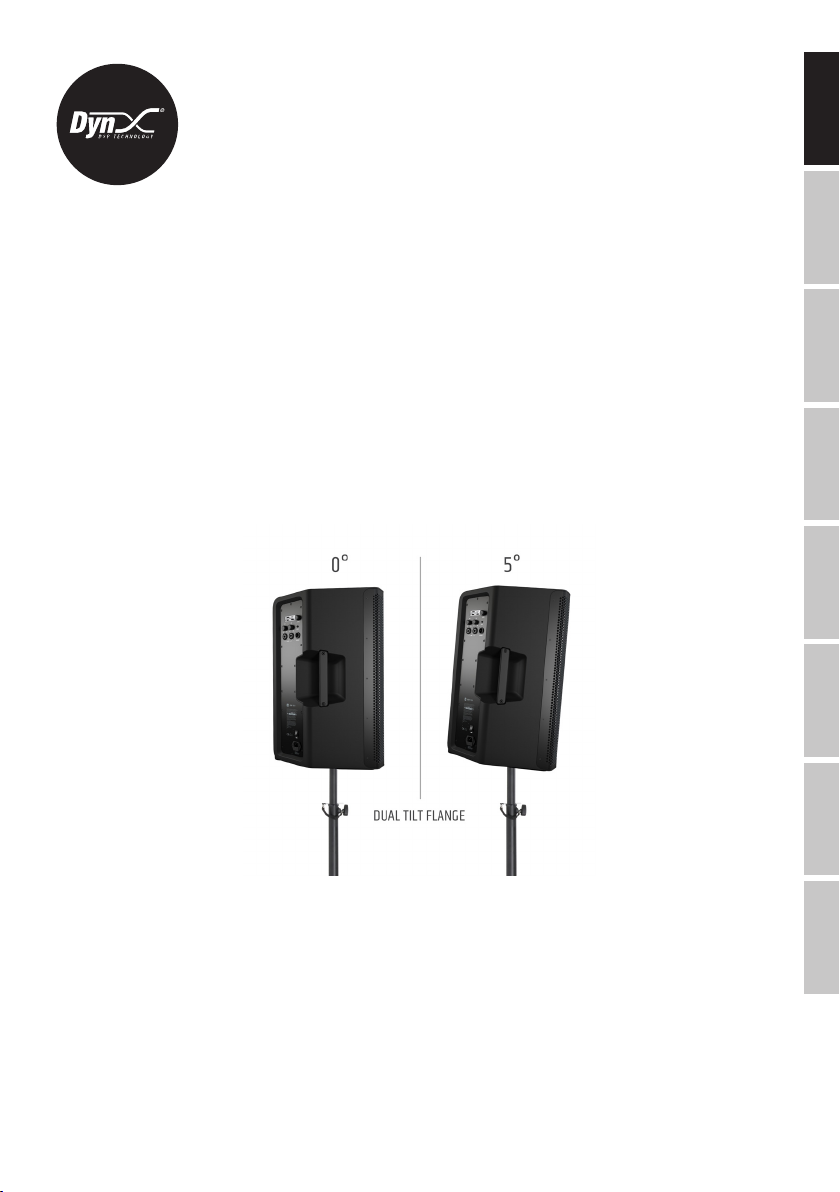
STAND ADAPTER
ENGLISHFRANCAIS
DEUTSCH
ESPAÑOL
POLSKI
The speakers are equipped with a stand adapter with a stand connection with an angle of 0° (rear position) and a stand connection with a tilt angle
of 5° (front position). Examples of use: Use the stand adapter with an angle of 0° for emitting sound to a public audience and the stand adapter
with a tilt angle of 5° for emitting sound to a seated audience.
ITALIANO
简体中文繁體中文
9

USE AS A FLOOR MONITOR
DEUTSCHENGLISH FRANCAIS
The speakers can also be used entirely as oor monitors thanks to the monitor DSP preset, the rotatable tweeter, and its all-purpose housing. Non-
ESPAÑOL
slip rubber washers ensure secure positioning. The monitor angle is positioned at 55°.
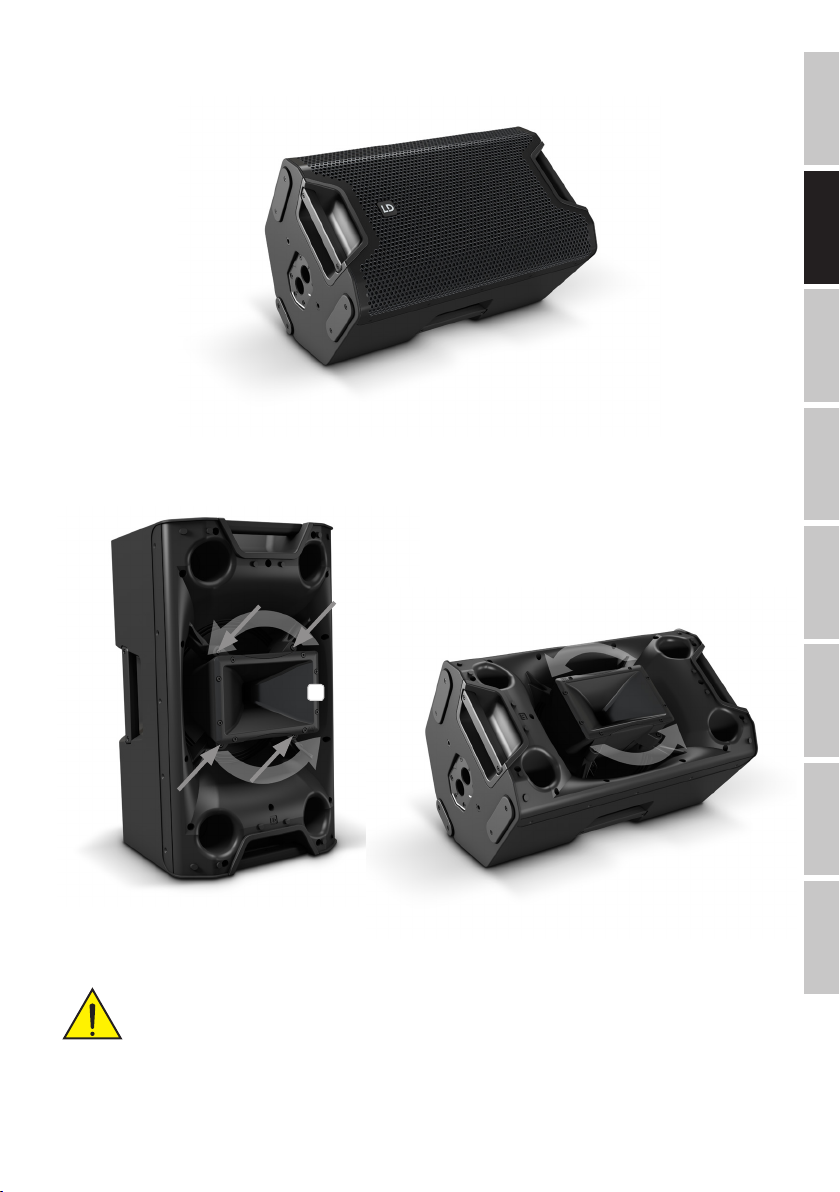
ROTATE TWEETER BY 90°
POLSKI ITALIANO
A
简体中文 繁體中文
The tweeter can be rotated 90° when the speaker needs to be used in situations where it is installed horizontally or used as a oor monitor.
IMPORTANT!
Warning: Risk of electric shock! Dangerous voltages present inside device! Opening the device and rotating the high-frequency horn
requires specialist knowledge and may only be carried out by specially trained personnel! If you are not suitably qualied, do not
attempt the procedure yourself. Refer instead to a qualied professional.
10

Take care when opening the device and rotating the high-frequency horn, in order to avoid damage to the speaker and injury to persons. Follow
each step of the instructions exactly. The manufacturer shall not be liable for any damage to devices or injury to persons resulting from improper
handling.
1. Fully disconnect the speaker from the mains (pull out the mains plug) and wait for approx. 3 minutes before starting work!
2. Disconnect all cables from the speaker.
3. Place the speaker in its slanted monitoring position, remove the front grille from the housing (5 x 2.5-mm internal hex screws on left and right of
the housing).
4. Loosen the 4 screws that secure the high-frequency horn (see gure A).
5. Carefully lift the horn and rotate it through 90°, taking care not to damage the tweeter driver cable.
6. Feed the tweeter driver cable into the retainer nut next to the securing lug and replace the horn in the retainers. Ensure that the cable is not
pinched.
7. Carefully secure the horn with the screws and re-install the front grille on the housing.
OPTIONAL ACCESSORIES
LDICOA12UB - Universal bracket for ICOA® 12
LDICOA15UB - Universal bracket for ICOA® 15
LDICOA12PC - Padded protective cover for ICOA® 12
LDICOA15PC - Padded protective cover for ICOA® 15
LDICOA12PC2 - Protective cover for ICOA® 12
LDICOA15PC2 - Protective cover for ICOA® 15
TECHNICAL SPECIFICATIONS
Article number: LDICOA12A LDICOA12ABT LDICOA15A LDICOA15ABT
Product type: Coaxial PA speaker
Type: Active
Bluetooth audio receiver: - Bluetooth 4.0 - Bluetooth 4.0
Large woofer: 12" 15”
Large woofer: 304.8 mm 381 mm
Woofer magnet: Ferrite
Woofer brand: Custom-made
Tweeter: BEM-optimized CD horn
Large HF driver: 1”
Large HF driver: 25.4 mm
HF driver magnet: Ferrite
HF driver brand: Custom-made
HF driver voice coil: 1”
HF driver voice coil: 25.4 mm
Amplier: Class D
Dispersion (H x V): 90° x 50°
Power (RMS): 300 W
Power (Peak): 1200 W
Frequency response: 50 Hz–20 kHz 48 Hz–20 kHz
Crossover frequency: 2 kHz
Max. SPL (Peak): 126 dB 128 dB
ENGLISHFRANCAIS
DEUTSCH
ESPAÑOL
POLSKI
ITALIANO
简体中文繁體中文
11
Protection circuits: Multi-band limiter, overheating, overvoltage, excess current
Control elements: On/Off switch, rotary-push encoder, 2 x gain controller
Display elements: LC display
Mic/line inputs: 2
Mic/line input connections: XLR/6.3 mm jack combi sockets (balanced)
DEUTSCHENGLISH FRANCAIS
Line inputs: 1
Line input connections: 3.5 mm stereo socket
Line outputs: 1
Line output connections: XLR
AD/DA converter sampling frequency: 48 kHz
AD/DA converter resolution: 24 bit
Power supply: SMPS
Operating voltage: 100–240 V AC 50–60 Hz
Fuse: T4AL 250 V
ESPAÑOL
Power consumption: 150 W
Ambient temperature (running): 0 - 40°C
Relative humidity: < 80% (non-condensing)
Housing material: Polypropylene
Housing design: Bassreex
POLSKI ITALIANO
Stand bracket: 36 mm, 0° and 5°
Monitor angle: 55°
Dimensions (W x H x D): 375 x 635 x 396 mm 416 x 695 x 415 mm
Weight: 19.9 kg 24.3 kg
Accessories included: Power cable
Additional features: 4 handles, 6 x M10 rigging points, rubber feet for using the monitor, robust front grille,
DSP with user EQ and Delay function
简体中文 繁體中文
MANUFACTURER´S DECLARATIONS
MANUFACTURER‘S WARRANTY & LIMITATIONS OF LIABILITY
You can nd our current warranty conditions and limitations of liability at: https://cdn-shop.adamhall.com/media/pdf/MANUFACTURERS-DECLARATIONS_
LD_SYSTEMS.pdf To request warranty service for a product, please contact Adam Hall GmbH, Adam-Hall-Str. 1,
61267 Neu Anspach / Email: Info@adamhall.com / +49 (0)6081 / 9419-0.
CORRECT DISPOSAL OF THIS PRODUCT
(valid in the European Union and other European countries with a differentiated waste collection system)
This symbol on the product, or on its documents indicates that the device may not be treated as household waste. This is to avoid environmental damage or personal injury due to uncontrolled waste disposal. Please dispose of this product separately from other waste and have it
recycled to promote sustainable economic activity. Household users should contact either the retailer where they purchased this product, or their
local government ofce, for details on where and how they can recycle this item in an environmentally friendly manner. Business users should
contact their supplier and check the terms and conditions of the purchase contract. This product should not be mixed with other commercial waste
for disposal.
FCC STATEMENT
Changes or modications not expressly approved by the party responsible for compliance could void the user‘s authority to operate the equipment.
This device complies with Part 15 of the FCC Rules. Operation is subject to the following two conditions:
(1) This device may not cause harmful interference, and
(2) This device must accept any interference received, including interference that may cause undesired operation
12

NOTE: This equipment has been tested and found to comply with the limits for a Class B digital device, pursuant to Part 15 of the FCC
Rules. These limits are designed to provide reasonable protection against harmful interference in a residential installation. This equipment
generates, uses and can radiate radio frequency energy and, if not installed and used in accordance with the instructions, may cause
harmful interference to radio communications. However, there is no guarantee that interference will not occur in a particular installation. If
this equipment does cause harmful interference to radio or television reception, which can be determined by turning the equipment off and
on, the user is encouraged to try to correct the interference by one or more of the following measures:
- Reorient or relocate the receiving antenna.
- Increase the separation between the equipment and receiver.
- Connect the equipment into an outlet on a circuit different from that to which the receiver is connected.
- Consult the dealer or an experienced radio/TV technician for help.
CE Compliance
Adam Hall GmbH states that this product meets the following guidelines (where applicable):
R&TTE (1999/5/EC) or RED (2014/53/EU) from June 2017
Low voltage directive (2014/35/EU)
EMV directive (2014/30/EU)
RoHS (2011/65/EU)
The complete declaration of conformity can be found at www.adamhall.com.
Furthermore, you may also direct your enquiry to info@adamhall.com.
EU DECLARATION OF CONFORMITY
Hereby, Adam Hall GmbH declares that this radio equipment type is in compliance with Directive 2014/53/EU.
The full text of the EU declaration of conformity is available at the following
internet address: www.adamhall.com/compliance/
ENGLISHFRANCAIS
DEUTSCH
ESPAÑOL
POLSKI
13
ITALIANO
简体中文繁體中文

DEUTSCH
SIE HABEN DIE RICHTIGE WAHL GETROFFEN!
Dieses Gerät wurde unter hohen Qualitätsanforderungen entwickelt und gefertigt, um viele Jahre einen reibungslosen Betrieb zu gewährleisten.
Dafür steht LD Systems mit seinem Namen und der langjährigen Erfahrung als Hersteller hochwertiger Audioprodukte. Bitte lesen Sie diese Bedienungsanleitung sorgfältig, damit Sie Ihr neues Produkt von LD Systems schnell optimal einsetzen können.
Mehr Informationen zu LD SYSTEMS nden Sie auf unserer Internetseite WWW.LD-SYSTEMS.COM
DEUTSCHENGLISH FRANCAIS
SICHERHEITSHINWEISE
1. Lesen Sie diese Anleitung bitte sorgfältig durch.
2. Bewahren Sie alle Informationen und Anleitungen an einem sicheren Ort auf.
3. Befolgen Sie die Anweisungen.
4. Beachten Sie alle Warnhinweise. Entfernen Sie keine Sicherheitshinweise oder andere Informationen vom Gerät.
5. Verwenden Sie das Gerät nur in der vorgesehenen Art und Weise.
6. Verwenden Sie ausschließlich stabile und passende Stative bzw. Befestigungen (bei Festinstallationen). Stellen Sie sicher, dass Wandhalterungen
ordnungsgemäß installiert und gesichert sind. Stellen Sie sicher, dass das Gerät sicher installiert ist und nicht herunterfallen kann.
7. Beachten Sie bei der Installation die für Ihr Land geltenden Sicherheitsvorschriften.
8. Installieren und betreiben Sie das Gerät nicht in der Nähe von Heizkörpern, Wärmespeichern, Öfen oder sonstigen Wärmequellen. Sorgen Sie dafür,
dass das Gerät immer so installiert ist, dass es ausreichend gekühlt wird und nicht überhitzen kann.
9. Platzieren Sie keine Zündquellen wie z.B. brennende Kerzen auf dem Gerät.
10. Lüftungsschlitze dürfen nicht blockiert werden.
11. Halten Sie einen Mindestabstand von 20 cm seitlich und oberhalb des Geräts ein.
12. Betreiben Sie das Gerät nicht in unmittelbarer Nähe von Wasser. Bringen Sie das Gerät nicht mit brennbaren Materialien, Flüssigkeiten oder
ESPAÑOL
Gasen in Berührung. Direkte Sonneneinstrahlung vermeiden!
13. Sorgen Sie dafür, dass kein Tropf- oder Spritzwasser in das Gerät eindringen kann. Stellen Sie keine mit Flüssigkeit gefüllten Behältnisse wie
Vasen oder Trinkgefäße auf das Gerät.
14. Sorgen Sie dafür, dass keine Gegenstände in das Gerät fallen können.
15. Betreiben Sie das Gerät nur mit dem vom Hersteller empfohlenen und vorgesehenen Zubehör.
16. Öffnen Sie das Gerät nicht und verändern Sie es nicht.
17. Überprüfen Sie nach dem Anschluss des Geräts alle Kabelwege, um Schäden oder Unfälle, z. B. durch Stolperfallen zu vermeiden.
POLSKI ITALIANO
18. Achten Sie beim Transport darauf, dass das Gerät nicht herunterfallen und dabei möglicherweise Sach- und Personenschäden
verursachen kann.
19. Wenn Ihr Gerät nicht mehr ordnungsgemäß funktioniert, Flüssigkeiten oder Gegenstände in das Geräteinnere gelangt sind, oder das Gerät an-
derweitig beschädigt wurde, schalten Sie es sofort aus und trennen es von der Netzsteckdose (sofern es sich um ein aktives Gerät handelt). Dieses
Gerät darf nur von autorisiertem Fachpersonal repariert werden.
20. Verwenden Sie zur Reinigung des Geräts ein trockenes Tuch.
21. Beachten Sie alle in Ihrem Land geltenden Entsorgungsgesetze. Trennen Sie bei der Entsorgung der Verpackung bitte Kunststoff und Papier bzw.
Kartonagen voneinander.
22. Kunststoffbeutel müssen außer Reichweite von Kindern aufbewahrt werden.
23. Sämtliche vom Benutzer vorgenommenen Änderungen und Modikationen, denen die für die Einhaltung der Richtlinien verantwortliche Partei
nicht ausdrücklich zugestimmt hat, können zum Entzug der Betriebserlaubnis für das Gerät führen.
BEI GERÄTEN MIT NETZANSCHLUSS
24. ACHTUNG: Wenn das Netzkabel des Geräts mit einem Schutzkontakt ausgestattet ist, muss es an einer Steckdose mit Schutzleiter angeschlossen
简体中文 繁體中文
werden. Deaktivieren Sie niemals den Schutzleiter eines Netzkabels.
25. Schalten Sie das Gerät nicht sofort ein, wenn es starken Temperaturschwankungen ausgesetzt war (beispielsweise nach dem Transport). Feuchtigkeit und Kondensat könnten das Gerät beschädigen. Schalten Sie das Gerät erst ein, wenn es Zimmertemperatur erreicht hat.
26. Bevor Sie das Gerät an die Steckdose anschließen, prüfen Sie zuerst, ob die Spannung und die Frequenz des Stromnetzes mit den auf dem Gerät
angegebenen Werten übereinstimmen. Verfügt das Gerät über einen Spannungswahlschalter, schließen Sie das Gerät nur an die Steckdose an,
wenn die Gerätewerte mit den Werten des Stromnetzes übereinstimmen. Wenn das mitgelieferte Netzkabel bzw. der mitgelieferte Netzadapter
nicht in Ihre Netzsteckdose passt, wenden Sie sich an Ihren Elektriker.
27. Treten Sie nicht auf das Netzkabel. Sorgen Sie dafür, dass spannungsführende Kabel speziell an der Netzbuchse bzw. am Netzadapter und der
Gerätebuchse nicht geknickt werden.
28. Achten Sie bei der Verkabelung des Geräts immer darauf, dass das Netzkabel bzw. der Netzadapter stets frei zugänglich ist. Trennen Sie das
Gerät stets von der Stromzuführung, wenn das Gerät nicht benutzt wird, oder Sie das Gerät reinigen möchten. Ziehen Sie Netzkabel und Netzadapter
immer am Stecker bzw. am Adapter und nicht am Kabel aus der Steckdose. Berühren Sie Netzkabel und Netzadapter niemals mit nassen Händen.
29. Schalten Sie das Gerät möglichst nicht schnell hintereinander ein und aus, da sonst die Lebensdauer des Geräts beeinträchtigt werden könnte.
30. WICHTIGER HINWEIS: Ersetzen Sie Sicherungen ausschließlich durch Sicherungen des gleichen Typs und Wertes. Sollte eine Sicherung wiederholt
auslösen, wenden Sie sich bitte an ein autorisiertes Servicezentrum.
31. Um das Gerät vollständig vom Stromnetz zu trennen, entfernen Sie das Netzkabel bzw. den Netzadapter aus der Steckdose.
32. Wenn Ihr Gerät mit einem verriegelbaren Netzanschluss bestückt ist, muss der passende Gerätestecker entsperrt werden, bevor er entfernt werden kann. Das bedeutet aber auch, dass das Gerät durch ein Ziehen am Netzkabel verrutschen und herunterfallen kann, wodurch Personen verletzt
werden und/oder andere Schäden auftreten können. Verlegen Sie Ihre Kabel daher immer sorgfältig.
33. Entfernen Sie Netzkabel und Netzadapter aus der Steckdose bei Gefahr eines Blitzschlags oder wenn Sie das Gerät länger nicht verwenden.
34. Das Gerät darf nicht von Personen (einschließlich Kindern) mit eingeschränkten körperlichen, sensorischen oder geistigen Fähigkeiten oder
mangelnder Erfahrung und Kenntnis benutzt werden.
14
35. Kinder müssen angewiesen werden, nicht mit dem Gerät zu spielen.
36. Wenn das Netzkabel des Geräts beschädigt ist, darf das Gerät nicht verwendet werden. Das Netzkabel muss durch ein adäquates Kabel oder eine
spezielle Baugruppe von einem autorisierten Service-Center ersetzt werden.
ACHTUNG
Entfernen Sie niemals die Abdeckung, da sonst das Risiko eines elektrischen Schlages besteht. Im In-
neren des Geräts benden sich keine Teile, die vom Bediener repariert oder gewartet werden können.
Lassen Sie Wartung und Reparaturen ausschließlich von qualiziertem Servicepersonal durchführen.
Das gleichseitige Dreieck mit Blitzsymbol warnt vor nichtisolierten, gefährlichen Spannungen im Geräteinneren, die einen elektrischen
Schlag verursachen können.
Das gleichseitige Dreieck mit Ausrufungszeichen kennzeichnet wichtige Bedienungs- und Wartungshinweise.
Warnung! Dieses Gerät ist für eine Nutzung bis zu einer Höhe von maximal 2000 Metern über dem Meeresspiegel bestimmt.
Warnung! Dieses Gerät ist nicht für den Einsatz in tropischen Klimazonen bestimmt.
ENGLISHFRANCAIS
DEUTSCH
ACHTUNG HOHE LAUTSTÄRKEN BEI AUDIOPRODUKTEN!
Dieses Gerät ist für den professionellen Einsatz vorgesehen. Der kommerzielle Betrieb dieses Geräts unterliegt den jeweils gültigen nationalen
Vorschriften und Richtlinien zur Unfallverhütung. Als Hersteller ist Adam Hall gesetzlich verpichtet, Sie ausdrücklich auf mögliche Gesundheitsrisiken
hinzuweisen. Gehörschäden durch hohe Lautstärken und Dauerbelastung: Bei der Verwendung dieses Produkts können hohe Schalldruckpegel
(SPL) erzeugt werden, die bei Künstlern, Mitarbeitern und Zuschauern zu irreparablen Gehörschäden führen können. Vermeiden Sie länger anhaltende
Belastung durch hohe Lautstärken über 90 dB.
EIGENSCHAFTEN
LDICOA12A(BT)
• Echter Allrounder für Fullrange-, Satelliten- und Monitor-Anwendungen
• 2-Wege Lautsprecher mit 12“ Tieftöner
• Bluetooth® Audio-Streaming beim BT-Modell
• 126 dB max. SPL und 300 W RMS-Leistung
• Vertikale und horizontale Anwendung durch koaxialen Aufbau mit drehbarem, BEM-optimiertem CD-Horn
• Horngeladener Woofer
• DynX DSP mit 4 Presets mit 3-Band-EQ und Delay-Funktion
• 2 Line/Mic Eingangskanäle mit individuellen Gain-Reglern, 3,5mm Klinkeneingang plus Mono Mix Ausgang
• 36 mm Dual-Tilt Stativaufnahme mit 0° und 5° Neigungswinkel, 55° Monitorwinkel mit stabilem Stand
• Stoßsicheres Frontgitter zum optimalen Schutz des Lautsprechers
• 4 Aluminiumgriffe mit ergonomischer, gummierter Oberäche
• Umfangreiches, optional erhältliches Zubehör für Installation und Transport
ESPAÑOL
POLSKI
ITALIANO
简体中文繁體中文
15
LDICOA15A(BT)
• Echter Allrounder für Fullrange-, Satelliten- und Monitor-Anwendungen
• 2-Wege Lautsprecher mit 15“ Tieftöner
• Bluetooth® Audio-Streaming beim BT-Modell
• 128 dB max. SPL und 300 W RMS-Leistung
• Vertikale und horizontale Anwendung durch koaxialen Aufbau mit drehbarem, BEM-optimiertem CD-Horn
DEUTSCHENGLISH FRANCAIS
• Horngeladener Woofer
• DynX DSP mit 4 Presets, 3-Band-EQ und Delay-Funktion
• 2 Line/Mic Eingangskanäle mit individuellen Gain-Reglern, 3,5mm Klinkeneingang plus Mono Mix Ausgang
• 36 mm Dual-Tilt Stativaufnahme mit 0° und 5° Neigungswinkel, 55° Monitorwinkel mit stabilem Stand
• Stoßsicheres Frontgitter zum optimalen Schutz des Lautsprechers
• 4 Aluminiumgriffe mit ergonomischer, gummierter Oberäche
• Umfangreiches, optional erhältliches Zubehör für Installation und Transport
ANSCHLÜSSE, BEDIEN- UND ANZEIGEELEMENTE
ESPAÑOL
1
3
4
POLSKI ITALIANO
6
2
5
简体中文 繁體中文
POWER
1
Ein- und Ausschalter. Schalten Sie den Lautsprecher stets als letztes Gerät in der Signalkette ein und als erstes Gerät wieder aus.
NETZBUCHSE UND SICHERUNGSHALTER
2
IEC Netzbuchse mit integriertem Sicherungshalter. Ein geeignetes Netzkabel bendet sich im Lieferumfang.
WICHTIGER HINWEIS: Ersetzen Sie die Sicherung ausschließlich durch eine Sicherung des gleichen Typs und mit gleichen Werten. Achten
Sie auf den Aufdruck auf dem Gehäuse. Sollte die Sicherung wiederholt auslösen, wenden Sie sich bitte an ein autorisiertes Servicezentrum.
LC DISPLAY
3
Multifunktionales Grak-LC-Display für die Anzeige der Gesamtlautstärke, des DSP-Presets und der Eingangspegel für die Kanäle 1 und 2 in der
Hauptanzeige. Im Bearbeitungsmenü werden die Menüpunkte, die Untermenüpunkte und die entsprechenden Bearbeitungsoptionen angezeigt.
VOLUME / PUSH FOR MENU
4
Ausgehend von der Hauptanzeige kann die Gesamtlautstärke direkt durch Drehen des Dreh-Drück-Encoders eingestellt werden. Drücken Sie auf
den Dreh-Drück-Encoder, um ins Bearbeitungsmenü zu gelangen. Navigieren Sie mit Hilfe des Dreh-Drück-Encoders im Bearbeitungsmenü, passen
Systemeinstellungen an und ändern Werte in den entsprechenden Menüpunkten.
7
8
16

INPUT 1 - 2
5
Symmetrische Audioeingänge der Kanäle 1 und 2 mit XLR/Klinke Kombibuchsen. Die Eingänge sind sowohl für Signale mit Line-Pegel als auch zum
direkten Anschließen eines Mikrofons geeignet. Die Eingänge sind nicht mit einer Phantomspeisung ausgestattet.
GAIN
6
Regler für die Eingangsverstärkung der Kanäle 1 und 2. Für einen optimalen Rauschabstand pegeln Sie ein Signal so hoch wie möglich ein, sorgen
aber dafür, dass die Peak-Anzeige im Display nicht oder nur kurzzeitig erscheint, um Signalverzerrungen und Schäden am System zu vermeiden.
Passen Sie ggf. auch den Ausgangspegel des Zuspielgeräts an.
AUX IN
7
Unsymmetrischer Audioeingang mit 3,5mm Stereo-Klinkenbuchse. Ein anliegendes Stereosignal wird intern Mono summiert. Regeln Sie die Lautstärke für den AUX IN-Kanal mit Hilfe des Gain-Reglers von Kanal 2, ggf. auch am Zuspielgerät und die Gesamtlautstärke mit Hilfe des Dreh-DrückEncoders.
SYSTEM OUT
8
Symmetrischer Audioausgang mit männlicher 3-Pol XLR-Buchse. Das anliegende Signal ist ein Mix aus Kanal 1 und 2 und AUX IN.
BEDIENUNG
HINWEISE
Sobald der Lautsprecher korrekt am Stromnetz angeschlossen und eingeschaltet wird, erscheint das LD Systems Logo für kurze Zeit im Display. Alle
Einstellungen, wie z.B. Preset, EQ und Delay werden geladen, so, wie sie vor dem Ausschalten des Lautsprechers eingestellt waren. Bluetooth wird
bei einem Neustart automatisch deaktiviert, falls Bluetooth zuvor aktiviert war (bei den Modellen mit Bluetooth). Nach diesem Vorgang, der nur
etwa eine Sekunde dauert, ist der Lautsprecher betriebsbereit.
DISPLAY HAUPTANZEIGE
Im normalen Betrieb ist die Hauptanzeige aktiviert, dabei werden im Display die eingestellte Gesamtlautstärke, das aktivierte Lautsprecher-Preset,
die Eingangspegel der Kanäle 1 und 2 und bei Modellen mit Bluetooth-Funktion das Bluetooth-Symbol angezeigt, wenn Bluetooth aktiviert ist (siehe
Abbildung).
ENGLISHFRANCAIS
DEUTSCH
ESPAÑOL
POLSKI
Gesamtlautstärke
Lautsprecher-Preset
Eingangspegel mit Peak-Anzeige
Kanal 1
Pegel Peak
LAUTSTÄRKE (VOLUME)
Ausgehend von der Hauptanzeige kann die Gesamtlautstärke direkt durch Drehen des Dreh-Drück-Encoders VOLUME / PUSH FOR MENU von -60 bis +10
dB eingestellt werden. Die Anzeige im Display wechselt beim Drehen des Encoders automatisch zur entsprechenden Darstellung (siehe Abbildung
unten). Nach circa 8 Sekunden Inaktivität wird automatisch wieder die Hauptanzeige angezeigt, durch Drücken auf den Encoder wechselt die
Anzeige sofort zur Hauptanzeige.
Bluetooth
Eingangspegel mit Peak-Anzeige
Kanal 2
ITALIANO
简体中文繁體中文
17
AUDIOEINSTELLUNGEN (AUDIO)
Drücken Sie auf den Dreh-Drück-Encoder, um in das Hauptmenü zu gelangen und wählen dann durch Drehen des Encoders den Menüpunkt
AUDIO a us (dunkel hi nterle gt). Dr ücken Sie w iederum au f den Encod er, um ins Unt ermenü z u gelangen u nd wählen de n gewüns chten
Untermenüpunkt durc h Drehen des Encoders aus. Best ätigen Sie durch Drücken auf den Encoder. Ändern Sie einen Wert durch Drehen des
Encoders, bes tätigen Sie die Wertänderung durch Drücken des Encoder s. Entnehmen Sie die Untermenüpunkt e und die entsprechenden
Info rmati onen dazu a us nachf olgender Ta belle. Wäh len Sie im Un termenü MA IN MENU und dr ücken au f den Encode r, um zum Haup tmenü
zurückz ugelangen, wählen Sie im Hauptmenü HOME , bestä tigen durch Drücken auf den Encoder, um dann zur Hauptanzeige zurückz ukehren . Nach circ a 8 Sekund en Inakt ivit ät wird die H aupta nzeige au tomat isch ang ezeig t.
DEUTSCHENGLISH FRANCAIS
AUDIO (Wert ändern = Encoder drehen, Wertänderung bestätigen = Encoder drücken)
ESPAÑOL
MAIN MENU Zurück zum Hauptmenü
PRESET Auswahl des Lautsprecher-Presets FULL-
RANGE
POLSKI ITALIANO
MONITOR
FLAT
SAT
简体中文 繁體中文
HIGH EQ Einstellen der Höhenfrequenzen von -10dB bis +10dB
MID EQ Einstellen der Mittenfrequenzen von -10dB bis +10dB
LOW EQ Einstellen der Bassfrequenzen von -10dB bis +10dB
DELAY Zeitverzögerung des Audiosignals in 0,1m Schritten bis 10m (0m = OFF, Anzeige in Meter und Feet)
18
BLUETOOTH® (nur Modelle LDICOA12ABT und LDICOA15ABT)
Die Mod elle LDIC OA12A BT und LDI COA15A BT sind mi t Bluet ooth aus gest att et, wa s bedeut et, d ass Audi o-Dat eien eine s andere n Blueto oth-G erät s
(z. B. Smart phone, Tabl et) über die La utspr echer wie dergege ben werden k önnen (max imale Ent fernun g zwi schen beid en Gerät en ca. 10 Mete r,
Stereo- Signale werden intern Mono-summiert). Dr ücken Sie z um Akt iviere n von Bluet ooth auf d en Dreh-D rück-En coder, um in d as Haupt menü
zu gel angen und w ählen dann d urch Dreh en des Enco ders den M enüpunkt B LUETO OTH aus (dun kel hinte rlegt ). Drücke n Sie wiede rum auf
den En coder, um ins U nterme nü zu gelan gen und wähl en durch Dr ehen des En coders O N aus (zur ück zum Haup tmenü mi t []). Be stät igen
Sie durch Drücken auf den Encoder, wählen den Untermenüpunkt HOME au s und best ätigen a bermal s durch Dr ücken auf de n Encoder. E in
blink endes Blue tooth -Symbo l ersche int nun in der H auptan zeige, a ktivi eren Sie Bl uetoot h auf Ihrem S mart phone oder Tab let und suc hen
auf de r Benutz erober äche na ch verf ügbare n Geräte n. Wählen S ie den Eint rag „LD I COA® 12“ bz w. „LD ICO A® 15“ und kopp eln und ver binden
dami t Ihr Bluet ooth- Gerät mi t der Bluet ooth-E inheit de s Laut sprech ers. So bald der Vor gang abg eschlo ssen is t, kann di e Audiowi eder-
gabe g estar tet w erden, da s Blueto oth-Sy mbol im Dis play ers cheint n un perman ent. Wir d die Bluet ooth- Verbindu ng unter brochen ( z.B.
über schrei ten der Re ichweit e), beginn t das Blue tooth -Symbol w ieder zu bl inken. Die L auts tärke einste llung erf olgt am Z uspielg erät und mi t
Hilf e des Encod ers wir d die Gesam tlaut stär ke einge stellt . Wenn eine B luetoo th-Ver bindung zu m Laut spreche r während e iner Besc hallung
nich t benöti gt wird , deakt iviere n Sie Bluet ooth im Blu etoot h Unterm enü (BLUE TOOTH OF F).
SYSTEMEINSTELLUNGEN (SETTINGS)
Drücken Sie auf den Dreh-Drück-Encoder, um in das Hauptmenü zu gelangen und wählen dann durch Drehen des Encoders den Menüpunkt
SET TINGS a us (dunkel hin terle gt). Dr ücken Sie w iederum au f den Encod er, um ins Unt ermenü zu g elangen u nd wählen de n gewüns chten
Untermenüpunkt durc h Drehen des Encoders aus. Best ätigen Sie durch Drücken auf den Encoder. Ändern Sie einen Wert durch Drehen des
Encoders, bes tätigen Sie die Wertänderung durch Drücken des Encoder s. Entnehmen Sie die Untermenüpunkt e und die entsprechenden
Info rmati onen dazu a us nachf olgender Ta belle. Wäh len Sie im Un termenü M AIN MENU un d drücken a uf den Encod er, um zum Haup tmenü
zurückz ugelangen, wählen Sie im Hauptmenü HOME, best ätigen durch Drücken auf den Encoder, um dann zur Hauptanzeige zurück zukehren . Nach circ a 8 Sekund en Inakt ivit ät wird die H aupta nzeige au tomat isch ang ezeig t.
ENGLISHFRANCAIS
DEUTSCH
ESPAÑOL
POLSKI
SETTINGS (Wert bzw. Status ändern = Encoder drehen, Wertänderung bestätigen bzw. Informationen abfragen = Encoder drücken)
MAIN MENU Zurück zum Hauptmenü
LCD DIM Automatische Display-Abdunklung ON Display wird nach ca. 8 Sekunden Inaktivität automatisch abgedunkelt
OFF Automatische Display-Abdunklung ausgeschaltet
BRIGHTNESS Einstellen der Display-Helligkeit (0 - 100%)
CONTRAST Einstellen des Display-Kontrasts (0 - 100%)
INFO Anzeige von Modellnummer und Software-Version
FACTORY DEFAULT Zurücksetzen auf Werkseinstellungen
(AUDIO, BLUETOOTH + SETTINGS)
CANCEL Zurücksetzen abbrechen
RESET SURE? YES Zurücksetzen durchführen
CANCEL Zurücksetzen abbrechen
ITALIANO
简体中文繁體中文
19
DEUTSCHENGLISH FRANCAIS
WAS BEDEUTET LD SYSTEMS DynX® DSP?
DSP ist die Abkürzung für Digital Signal Processing (Digitale Signalverarbeitung), DynX® beinhaltet die Funktionen Limiter, EQ, Kompressor und
Frequenzweiche. Die digitale Signalverarbeitung gewährleistet eine optimale Audiowiedergabe mit maximaler Klarheit und schützt gleichzeitig das
PA-System vor Überlastung.
WAS GENAU BEWIRKT DynX® DSP?
Die Limiter-Funktion schützt die Lautsprecher und verhindert durch Übersteuerung verursachte Verzerrungen. Separate Limiter für den Bass-Mittenund Höhenbereich schwächen das Signal ab, sobald der Pegel einen Wert übersteigt, der sich negativ auswirken könnte. Jeder Limiter ist für einen
der drei nahtlos aneinander anschließenden Frequenzbereiche optimiert (Multiband-Limiter). Das System lasst sich auf diese Weise mit einem
insgesamt höheren Schalldruck betreiben, da extreme Signalspitzen automatisch abgeschwächt werden, sodass die Gesamtlautstärke nicht
reduziert werden muss.
Der Multiband-EQ bearbeitet den gesamten Frequenzbereich und optimiert den Gesamtklang des Systems.
ESPAÑOL
Die Frequenzweichen teilen das Audiosignal je nach Frequenzbereich den jeweiligen Lautsprechern, also dem Subwoofer bzw. den Mitten- und Hochtönern der Array-Säule zu. Die Amplituden- und Laufzeit-Optimierung der Frequenzweichen sorgt dafür, dass alle Frequenzen gleichmäßig ausgegeben
werden und den Zuhörer zeitgleich erreichen.
STATIVFLANSCH
POLSKI ITALIANO
简体中文 繁體中文
Die Lautsprecher verfügen über einen Stativansch mit einer Stativaufnahme mit 0° Winkelung (Position hinten) und einer Stativaufnahme mit 5°
Neigungswinkel (Position vorne). Anwendungsbeispiele: Verwenden Sie die Stativaufnahme mit 0° Winkelung für die Beschallung von stehendem
Publikum und die Stativaufnahme mit 5° Neigungswinkel für die Beschallung von sitzendem Publikum.
20
VERWENDUNG ALS BODENMONITOR
Dank des Monitor DSP-Presets, des drehbaren Hochtonhorns und ihrer Universalgehäuse können die Lautsprecher auch als vollwertige Bodenmonitore eingesetzt werden. Rutschfeste Gummischienen sorgen für einen sicheren Stand, der Monitorwinkel beträgt 55°.
ENGLISHFRANCAIS
DEUTSCH
HOCHTONHORN UM 90° DREHEN
A
Das Hochtonhorn lässt sich für Anwendungen, bei denen der Lautsprecher horizontal montiert oder als Bodenmonitor eingesetzt wird, um
90° drehen.
WICHTIGE HINWEISE!
Warnung: Stromschlaggefahr! Im Geräteinneren benden sich gefährliche Spannungen!
Das Öffnen des Geräts und das Drehen des Hochtonhorns erfordert detailliertes Fachwissen und darf nur von speziell ausgebildetem
Personal durchgeführt werden! Wenn Sie diese Qualikation nicht haben, versuchen Sie nicht, den Eingriff selbst vorzunehmen,
sondern nutzen Sie die Hilfe von professionellen Unternehmen!
ESPAÑOL
POLSKI
ITALIANO
简体中文繁體中文
21

Gehen Sie beim Öffnen des Lautsprechers und beim Drehen des Hochtonhorns sehr behutsam vor, um den Lautsprecher nicht zu beschädigen und
um Personenschäden zu vermeiden. Befolgen Sie jeden Schritt der Anleitung genau. Der Hersteller haftet nicht für etwaige Schäden an Geräten,
sowie Personenschäden, die durch unsachgemäße Handhabung entstehen!
1. Trennen Sie den Lautsprecher allpolig vom Stromnetz (Netzstecker ziehen) und warten circa 3 Minuten, bevor Sie mit dem Umbau beginnen!
2. Trennen Sie alle angeschlossenen Kabel vom Lautsprecher.
3. Legen Sie den Lautsprecher auf die Monitorschräge, entfernen das Frontgitter vom Gehäuse (je fünf Schrauben für 2,5mm Innensechskantwerkzeuge links und rechts am Gehäuse).
DEUTSCHENGLISH FRANCAIS
4. Lösen Sie die 4 Schrauben, mit dem das Hochtonhorn am Gehäuse befestigt ist (siehe Abbildung A).
5. Heben Sie nun das Horn leicht an, drehen es um 90° und achten dabei darauf, dass das Hochtönerkabel nicht beschädigt wird.
6. Führen Sie das Hochtönerkabel in die dafür vorgesehene Haltenut neben dem Befestigungsloch ein und setzen das Horn wieder auf die Halterungen. Achten Sie dabei darauf, dass das Kabel nicht eingeklemmt ist.
7. Schrauben Sie das Horn sorgfältig fest und montieren das Frontgitter wieder am Gehäuse.
OPTIONALES ZUBEHÖR
LDICOA12UB - Universalhalterung für ICOA® 12
LDICOA15UB - Universalhalterung für ICOA® 15
LDICOA12PC - Gepolsterte Schutzhülle für ICOA® 12
ESPAÑOL
LDICOA15PC - Gepolsterte Schutzhülle für ICOA® 15
LDICOA12PC2 - Schutzhülle für ICOA® 12
LDICOA15PC2 - Schutzhülle für ICOA® 15
TECHNISCHE DATEN
POLSKI ITALIANO
Artikelnummer: LDICOA12A LDICOA12ABT LDICOA15A LDICOA15ABT
Produktart: Coaxial PA-Lautsprecher
Typ: Aktiv
Bluetooth-Audioempfänger: - Bluetooth 4.0 - Bluetooth 4.0
Größe Tieftöner: 12“ 15“
Größe Tieftöner: 304,8 mm 381 mm
Magnet Tieftöner: Ferrit
Marke Tieftöner: Custom Made
Hochtonhorn: BEM optimiertes CD Horn
简体中文 繁體中文
Größe HF Treiber: 1“
Größe HF Treiber: 25,4 mm
Magnet HF Treiber: Ferrit
Marke HF Treiber: Custom Made
Schwingspule HF Treiber: 1“
Schwingspule HF Treiber: 25,4 mm
Verstärker: Class D
Abstrahlwinkel (H x V): 90° x 50°
Leistung (RMS): 300 W
Leistung (Peak): 1200 W
Frequenzgang: 50Hz – 20 kHz 48 Hz – 20 kHz
Übernahmefrequenz: 2 kHz
Max. SPL (Peak): 126 dB 128 dB
22
Schutzschaltungen: Multiband Limiter, Überhitzung, Überspannung, Überstrom
Bedienelemente: Ein-/Ausschalter, Dreh-Drück-Encoder, 2 x Gain
Anzeigeelemente: LC-Display
Mic-/Line-Eingänge: 2
Mic-/Line-Eingangsanschlüsse: XLR/6,3 mm Klinke Kombibuchsen (symmetrisch)
Line-Eingänge: 1
Line-Eingangsanschlüsse: 3,5 mm Stereo Klinke
Line-Ausgänge: 1
Line-Ausgangsanschlüsse: XLR
AD/DA Konverter Samplingfrequenz: 48 kHz
AD/DA Konverter Auösung: 24 Bit
Stromversorgung: SMPS
Betriebsspannung: 100 - 240 V AC 50-60 Hz
Sicherung: T4AL 250 V
Leistungsaufnahme: 150 W
Umgebungstemperatur (in Betrieb): 0 - 40° C
Relative Luftfeuchtigkeit: <80% (nicht kondensierend)
Gehäusematerial: Polypropylen
Gehäusebauart: Bassreex
Stativansch: 36 mm, 0° und 5°
Monitorwinkel: 55°
Abmessungen (B x H x T): 375 x 635 x 396 mm 416 x 695 x 415 mm
Gewicht: 19,9 kg 24,3 kg
Zubehör inklusive: Netzkabel
Weitere Eigenschaften: 4 Griffe, 6 x M10 Flugpunkte, Gummischienen für Monitoranwendung, robustes Frontgitter,
DSP mit User-EQ und Delay-Funktion
ENGLISHFRANCAIS
DEUTSCH
ESPAÑOL
POLSKI
ITALIANO
HERSTELLERERKLÄRUNGEN
HERSTELLERGARANTIE & HAFTUNGSBESCHRÄNKUNG
Unsere aktuellen Garantiebedingungen und Haftungsbeschränkung nden Sie unter: https://cdn-shop.adamhall.com/media/pdf/MANUFACTURERS-
DECLARATIONS_LD_SYSTEMS.pdf. Im Service Fall wenden Sie sich bitte an Adam Hall GmbH, Adam-Hall-Str. 1,
61267 Neu Anspach / E-Mail Info@adamhall.com / +49 (0)6081 / 9419-0.
KORREKTE ENTSORGUNG DIESES PRODUKTS
(Gültig in der Europäischen Union und anderen europäischen Ländern mit Mülltrennung) Dieses Symbol auf dem Produkt oder dazugehörigen
Dokumenten weist darauf hin, dass das Gerät am Ende der Produktlebenszeit nicht zusammen mit dem normalen Hausmüll entsorgt werden
darf, um Umwelt- oder Personenschäden durch unkontrollierte Abfallentsorgung zu vermeiden. Bitte entsorgen Sie dieses Produkt getrennt von
anderen Abfällen und führen es zur Förderung nachhaltiger Wirtschaftskreisläufe dem Recycling zu. Als Privatkunde erhalten Sie Informationen zu
umweltfreundlichen Entsorgungsmöglichkeiten über den Händler, bei dem das Produkt erworben wurde, oder über die entsprechenden regionalen
Behörden. Als gewerblicher Nutzer kontaktieren Sie bitte Ihren Lieferanten und prüfen die ggf. vertraglich vereinbarten Konditionen zur Entsorgung der
Geräte. Dieses Produkt darf nicht zusammen mit anderen gewerblichen Abfällen entsorgt werden.
FCC-Erklärung
Änderungen oder Modikationen, die nicht ausdrücklich von der für die Einhaltung der Vorschriften verantwortlichen Stelle genehmigt wurden,
könnten die Befugnis des Benutzers zum Betrieb des Geräts aufheben. Dieses Gerät entspricht den Bestimmungen in Abschnitt 15 der FCC-Richtlini-
en (Federal Communications Commission). Der Betrieb unterliegt den folgenden beiden Bedingungen:
(1) Dieses Gerät darf keinerlei Störungen verursachen, und
(2) dieses Gerät muss jegliche Art von Störsignalen zulassen, einschließlich solcher, die zu Funktionsstörungen führen können.
简体中文繁體中文
23

HINWEIS: Dieses Gerät wurde geprüft und erfüllt die Grenzwerte für ein Digitalgerät der Klasse B gemäß Abschnitt 15 der FCC-
Richtlinien. Diese Grenzwerte sollen einen angemessenen Schutz gegen schädliche Funkstörungen innerhalb von Wohngebieten sicherstellen.
Dieses Gerät erzeugt, nutzt und emittiert Hochfrequenzstrahlung und kann bei einer nicht den Anweisungen entsprechenden Installation und
Verwendung funktechnische Störungen verursachen. Es besteht jedoch keine Garantie, dass bei einer bestimmten Installation keine Störungen
auftreten. Kommt es durch dieses Gerät zu Störungen im Radio- oder Fernsehempfang, was sich durch Ein- und Ausschalten des Geräts überprüfen
lässt, kann der Benutzer versuchen, die Störung durch eine oder mehrere der folgenden Maßnahmen zu beheben:
- Richten Sie die Empfangsantenne neu aus, oder stellen Sie sie an einem anderen Ort auf.
- Vergrößern Sie den Abstand zwischen Gerät und Empfänger.
DEUTSCHENGLISH FRANCAIS
- Schließen Sie das Gerät an einer Steckdose an, die nicht über denselben Stromkreis wie die Steckdose des Empfängers versorgt wird.
- Wenden Sie sich an den Händler oder einen erfahrenen Radio-/Fernsehtechniker.
EG-KONFORMITÄTSERKLÄRUNG
Hiermit erklärt die Adam Hall GmbH, dass dieser Funkanlagentyp der Richtlinie 2014/53/EU entspricht.
Der vollständige Text der EU-Konformitätserklärung ist unter der folgenden
Internetadresse verfügbar: adamhall.com/compliance/
CE-Konformität
Hiermit erklärt die Adam Hall GmbH, dass dieses Produkt folgenden Richtlinien entspricht (soweit zutreffend):
R&TTE (1999/5/EG) bzw. RED (2014/53/EU) ab Juni 2017
Niederspannungsrichtlinie (2014/35/EU)
EMV-Richtlinie (2014/30/EU)
RoHS (2011/65/EU)
Die vollständige Konformitätserklärung nden Sie unter www.adamhall.com.
Des Weiteren können Sie diese auch unter info@adamhall.com anfragen.
ESPAÑOL
POLSKI ITALIANO
简体中文 繁體中文
24

FRANCAIS
VOUS AVEZ FAIT LE BON CHOIX!
Cet appareil a été développé et fabriqué en appliquant des exigences de qualité très élevées : il garantit des années de fonctionnement sans
problème. Grâce à de nombreuses années d‘expérience, LD Systems est un nom connu dans le domaine des produits audio haut de gamme. Veuillez
lire attentivement ce Manuel Utilisateur : vous apprendrez rapidement à utiliser votre appareil LD Systems de façon optimale.
Pour plus d‘informations sur LD Systems, visitez notre site Web, WWW.LD-SYSTEMS.COM
MESURES PRÉVENTIVES
1. Veuillez lire attentivement ce manuel.
2. Rangez tous les documents d‘information et d‘instructions en lieu sûr.
3. Veuillez suivre toutes les instructions
4. Observez tous les messages d‘avertissement N‘enlevez pas de l‘appareil les étiquettes de sécurité ou autres informations.
5. N‘utilisez l‘appareil que pour des applications et de la façon appropriées.
6. Utilisez exclusivement des pieds et des dispositifs de xation stables et adaptés lorsque l‘appareil est utilisé en installation xe. Assurez-vous que
les xations murales ont été montées correctement, et qu‘elles sont sécurisées. Vériez que l‘appareil est installé en toute sécurité, et qu‘il ne peut
pas tomber.
7. Lors de l‘installation, observez les règlementations de sécurité en vigueur dans votre pays.
8. N‘installez et n‘utilisez pas l‘appareil à proximité de radiateurs, d‘accumulateurs de chaleur, de fours ou de toute autre source de chaleur. Vériez
que l‘appareil est installé de façon à bénécier en permanence d‘un refroidissement efcace et qu‘il ne peut pas chauffer de façon excessive.
9. Ne placez aucune source de amme sur l‘appareil – par exemple, une bougie allumée.
10. Ne bloquez pas les ouïes d‘aération. Éviter toute exposition directe aux rayons du soleil !
11. Gardez une distance minimale de 20 cm autour et au-dessus de l‘appareil.
12. N‘utilisez pas l‘appareil à proximité immédiate d‘eau (à moins qu‘il ne s‘agisse d‘un appareil conçu pour une utilisation en extérieur – dans ce cas,
respectez les instructions correspondantes ci après) Ne mettez pas l‘appareil en contact avec des matériaux, des liquides ou des gaz inammables.
13. Vériez qu‘aucune projection ou liquide ne puisse s‘introduire dans l‘appareil. Ne posez sur l‘appareil aucun objet renfermant du liquide : vase,
verre d‘eau...
14. Vériez qu‘aucun petit objet ne puisse tomber à l‘intérieur de l‘appareil.
15. N‘utilisez avec cet appareil que des accessoires recommandés et approuvés par le fabricant.
16. N‘ouvrez pas l‘appareil, et n‘essayez pas de le modier.
17. Lors du branchement de l‘appareil, sécurisez le passage du câble secteur, an d‘éviter tout dommage ou accident, par exemple quelqu‘un qui
trébuche sur le câble.
18. Lors du transport, vériez que l‘appareil ne peut tomber, ce qui pourrait provoquer des dommages matériels et/ou corporels.
19. Si votre appareil ne fonctionne plus correctement, que de l‘eau ou des objets ont pénétré à l‘intérieur, ou qu‘il a été endommagé de quelque
façon que ce soit, éteignez-le immédiatement et débranchez sa prise secteur (s‘il s‘agit d‘un appareil alimenté). Cet appareil ne doit être réparé que
par un personnel autorisé.
20. Pour le nettoyage de l‘appareil, utilisez un chiffon sec.
21. Observez toutes les réglementations en vigueur dans votre pays pour mettre l‘appareil au rebut. Lorsque vous jetez l‘emballage de l‘appareil,
veuillez séparer plastique, papier et carton.
22. Les lms plastique doivent être mis hors de portée des enfants.
23. Veuillez noter que les changements ou modications n‘ayant pas été expressément approuvés par la partie responsable de la conformité
pourraient annuler le droit accordé à l‘utilisateur de faire fonctionner l‘équipement.
APPAREILS RELIÉS AU SECTEUR
24. ATTENTION : Si le câble de l‘appareil est muni d‘un l de terre, il doit être relié à une prise murale avec terre. Ne désactivez jamais la mise à la
terre d‘un appareil.
25. N‘allumez pas l‘appareil immédiatement s‘il a subi une grande différence de température ambiante (par exemple, lors du transport). L‘humidité
et la condensation pourraient l‘endommager. Ne mettez l‘appareil sous tension que lorsqu‘il est parvenu à la température de la pièce.
26. Avant de relier l‘appareil à la prise murale, vériez que la valeur et la fréquence de tension secteur sur laquelle il est réglé correspondent bien
à la valeur et à la fréquence de la tension secteur locale. Si l‘appareil possède un sélecteur de tension, ne le branchez sur la prise murale qu‘après
avoir vérié que la valeur réglée correspond à la valeur effective de la tension secteur. Si la che du cordon secteur ou du bloc adaptateur livré avec
votre appareil ne correspond pas au format de votre prise murale, veuillez consulter un électricien.
27. Ne piétinez pas le câble secteur. Assurez-vous que le câble secteur n‘est pas trop pincé, notamment au niveau de l‘arrière de l‘appareil (ou de son
adaptateur secteur) et de la prise murale.
28. Lors du branchement de l‘appareil, vériez que l‘accès au câble secteur ou au bloc adaptateur reste facile. Sortez la che secteur de la prise
murale dès que vous n‘utilisez pas l‘appareil pendant un certain temps, ou si vous désirez nettoyer l‘appareil. Pour ce faire, tirez toujours sur la che
elle-même, ou sur le bloc secteur lui-même ; ne tirez jamais sur le câble. Ne manipulez jamais le câble secteur ou l‘adaptateur secteur avec des
mains mouillées.
29. N‘éteignez/rallumez pas l‘appareil rapidement plusieurs fois de suite : vosu risquez de réduire la longévité de ses composants internes.
30. CONSEIL IMPORTANT : Ne remplacez le fusible que par un fusible de même type et du même calibre. Si le fusible fond de façon répétée, veuillez
consulter un centre de réparations agréé.
31. Pour séparer complètement l‘appareil du secteur, débranchez le cordon secteur ou l‘adaptateur de la prise murale.
32. Si votre appareil est muni d‘un connecteur secteur verrouillable (Volex), il faut d‘abord déverrouiller le mécanisme avant d‘enlever le cordon secteur. Attention, lorsque vous retirez le câble secteur, à ne pas faire bouger l‘appareil, ce qui pourrait se traduire par un risque de chute, de blesser
quelqu‘un, ou tout autre dommage. Manipulez toujours le cordon secteur avec soin.
ENGLISHFRANCAIS
DEUTSCH
ESPAÑOL
POLSKI
ITALIANO
简体中文繁體中文
25
33. Débranchez la che secteur ou l‘adaptateur de la prise murale en cas d‘orage, ou si vous n‘utilisez pas l‘appareil pendant une longue période.
34. L’appareil ne peut pas être utilisé par des personnes (y compris des enfants) ayant des capacités physiques, sensorielles ou mentales limitées
ou un manque d’expérience et de connaissances.
35. On doit interdire aux enfants de jouer avec l’appareil.
36. Si le câble d’alimentation de l’appareil est endommagé, l’appareil ne peut pas être utilisé. Le cordon d’alimentation doit être remplacé par un
câble approprié ou un module spécial provenant d’un centre de service agréé.
DEUTSCHENGLISH FRANCAIS
Le pictogramme en forme de triangle équilatéral contenant un éclair terminé d‘une èche avertit l‘utilisateur de la présence d‘une
tension dangereuse à l‘intérieur de l‘appareil, tension susceptible de provoquer un choc électrique.
Le pictogramme en forme de triangle équilatéral renfermant un point d‘exclamation signale à l‘utilisateur la présence d‘instructions
importantes concernant l‘utilisation ou l‘entretien de l‘appareil.
ATTENTION :
Ne démontez jamais le couvercle de l‘appareil, vous risquez de recevoir un choc électrique. L‘appareil
ne renferme aucune pièce ni composant réparable ou remplaçable par l‘utilisateur. Ne conez
l‘entretien et la réparation qu‘à un personnel qualié.
ESPAÑOL
Attention ! Cet appareil est conçu pour une utilisation à une altitude maximale de 2000 m au-dessus du niveau de la mer.
Attention ! Ce produit ne convient pas à une utilisation dans les climats tropicaux.
ATTENTION ! NIVEAUX SONORES ÉLEVÉS SUR LES PRODUITS AUDIO
POLSKI ITALIANO
Cet appareil a été conçu en vue d‘une utilisation professionnelle. L‘utilisation commerciale de cet appareil est soumise aux réglementations et
directives en vigueur dans votre pays en matière de prévention d‘accident. En tant que fabricant, Adam Hall est tenu de vous avertir formellement
des risques relatifs à la santé. Risques provoqués par une exposition prolongée à des niveaux sonores élevés : Lors de l‘utilisation de ce produit, il
est possible d‘atteindre des niveaux de pression sonore (exprimés en dB SPL) élevés, susceptibles de provoquer des dommages auditifs irréparables
chez les artistes, les techniciens et le public. Évitez toute exposition prolongée à des niveaux de pression sonore élevés (supérieurs à 90 dB SPL).
CARACTÉRISTIQUES
LDICOA12A(BT)
• Véritable modèle polyvalent pour utilisations en mode large bande, satellite et en retour de scène
• Enceinte 2voies avec boomer 12“
• Bluetooth® Audio Streaming sur le modèle BT
简体中文 繁體中文
• SPL max. de 126dB et puissance RMS de 300W
• Application verticale et horizontale grâce à la structure coaxiale, avec tweeter rotatif CD optimisé grâce à la BEM
• Boomer pavillonné
• DSP DynX à 4préréglages avec égaliseur 3bandes et fonction délai
• 2canaux d’entrée Ligne/Micro, avec potentiomètres individuels de réglage de gain, entrée jack 3,5mm et sortie Mono Mix
• Embase pour pied Dual Tilt 36mm avec angle d’inclinaison de 0° et 5°, angle de moniteur de 55° avec assise stable
• Grille frontale résistante aux chocs, assurant une protection optimale de l’enceinte
• 4poignées en aluminium à surface ergonomique caoutchoutée
• Accessoires divers et disponibles en option pour l’installation et le transport
26
LDICOA15A(BT)
• Véritable modèle polyvalent pour utilisations en mode large bande, satellite et en retour de scène
• Enceinte 2voies avec boomer 15“
• Bluetooth® Audio Streaming sur le modèle BT
• SPL max. de 128dB et puissance RMS de 300W
• Application verticale et horizontale grâce à la structure coaxiale, avec tweeter rotatif CD optimisé grâce à la BEM
• Boomer pavillonné
• DSP DynX à 4préréglages avec égaliseur 3bandes et fonction délai
• 2canaux d’entrée Ligne/Micro, avec potentiomètres individuels de réglage de gain, entrée jack 3,5mm et sortie Mono Mix
• Embase pour pied Dual Tilt 36mm avec angle d’inclinaison de 0° et 5°, angle de moniteur de 55° avec assise stable
• Grille frontale résistante aux chocs, assurant une protection optimale de l’enceinte
• 4poignées en aluminium à surface ergonomique caoutchoutée
• Accessoires divers et disponibles en option pour l’installation et le transport
RACCORDEMENTS, ÉLÉMENTS DE COMMANDE ET D’AFFICHAGE
3
ENGLISHFRANCAIS
DEUTSCH
1
4
6
2
5
POWER
1
Interrupteur marche/arrêt. Dans la chaîne du signal, toujours allumer l’enceinte en dernier et l’éteindre en premier.
EMBASE SECTEUR ET PORTE-FUSIBLE
2
Embase secteur CEI avec porte-fusible intégré. Un câble d’alimentation adapté est fourni.
REMARQUE IMPORTANTE: Remplacer le fusible exclusivement par un fusible de même type et de même valeur. Respecter
les indications gurant sur le boîtier. Si le fusible saute de façon récurrente, contacter un centre de réparation agréé.
ÉCRAN À CRISTAUX LIQUIDES
3
Écran graphique à cristaux liquides multifonction permettant d’afcher le volume général, le préréglage DSP et les niveaux d’entrée des canaux 1 et
2 Le menu d’édition afche les options de menu, les options de sous-menu et les options de modication correspondantes.
VOLUME/PUSH FOR MENU
4
Le volume général peut être directement réglé depuis l’écran principal en tournant l’encodeur rotatif à bouton poussoir. Appuyer sur l’encodeur
rotatif à bouton poussoir pour accéder au menu d’édition. Naviguez à travers le menu d’édition à l’aide de l’encodeur rotatif à bouton poussoir,
ajustez les paramètres du système et modiez les valeurs dans les options de menu correspondantes.
7
8
ESPAÑOL
POLSKI
ITALIANO
简体中文繁體中文
27
INPUT 1 - 2
5
Entrées audio symétriques des canaux 1 et 2 avec embases combo XLR/jack. Les entrées conviennent aussi bien pour les signaux de niveaux ligne
que pour le raccordement direct d’un microphone. Les entrées ne sont pas équipées d’une alimentation fantôme.
GAIN
6
Potentiomètre pour l’amplication d’entrée des canaux 1 et 2. Pour un rapport signal/bruit optimal, régler un signal au niveau le plus élevé possible
en veillant à ce que le témoin de crête n’apparaisse pas à l’écran ou seulement pour une courte durée an d’éviter la distorsion de signal et
DEUTSCHENGLISH FRANCAIS
l’endommagement du système. Si nécessaire, réglez également le niveau de sortie de la source.
AUX IN
7
Entrée audio asymétrique avec prise jack stéréo de 3,5mm. Un signal stéréo en présence est sommé en mono en interne. Régler le volume du canal
AUXIN à l’aide du potentiomètre de gain du canal2, mais aussi sur le support de lecture si nécessaire, et le volume général à l’aide de l’encodeur
rotatif à bouton poussoir.
SYSTEM OUT
8
Sortie audio symétrique avec connecteur XLR mâle à 3broches. Le signal délivré est un mélange des canaux 1 et 2 et AUXIN.
ESPAÑOL
UTILISATION
REMARQUES
Dès que l’enceinte est correctement raccordée au réseau électrique et allumée, le logo LDSystems s’afche à l’écran pendant un court instant.
Tous les réglages, tels que les presets, l’égaliseur et le délai sont chargés tels qu’ils étaient lors de la mise hors tension de l’enceinte. Bluetooth est
désactivé automatiquement en cas de redémarrage si la fonction était préalablement activée (sur les modèles équipés de Bluetooth). Après cette
procédure, qui ne dure qu’environ une seconde, l’enceinte est opérationnelle.
POLSKI ITALIANO
AFFICHAGE PRINCIPAL DE L’ÉCRAN
En mode de fonctionnement normal, l’afchage principal est activé. Par ailleurs, le volume général réglé, le preset de haut-parleurs activé, le niveau
d’entrée des canaux 1 et 2, et le symbole Bluetooth sur les modèles pourvus de cette fonction, s’afchent à l’écran lorsque Bluetooth est activé (voir
l’illustration).
Volume général
Preset de haut-parleurs
Niveau d’entrée avec afchage
de la puissance-crête du canal 1
简体中文 繁體中文
VOLUME
Depuis l’écran principal, le volume général peut être directement réglé de -60 à +10 dB en tournant l’encodeur rotatif à bouton poussoir VOLUME/
PUSH FOR MENU. Le réglage effectué en tournant l’encodeur s’afche alors automatiquement à l’écran (voir l'illustration ci-dessous). Au bout
d’environ 8secondes d’inactivité, l’écran principal s’afche à nouveau automatiquement. Pour un afchage immédiat de l’écran principal, appuyer
sur l’encodeur.
Niveau
sonore
Bluetooth
Niveau d’entrée avec afchage
de la puissance-crête du canal 2
Puissance-crête
28
 Loading...