


La Crosse Technology WS-9611U, WS-9611U User Manual

42
WIRELESS WEATHER STATION
WITH ADVANCED FORECAST ICON
Instruction Manual
Thank You and Congratulations on selecting a La Crosse Technology Wireless
Weather Station! We are positive you will enjoy the benefits of accurate weather
readings and the precise, radio-controlled time information that our instruments
offer. La Crosse Technology introduced radio controlled clocks to the US market in
1991, and continues to be on the cutting-edge of this technology in America.
This manual will guide you step-by-step through setting up your La Crosse
Technology device. Use this manual to become familiar with your wireless weather
station and save it for future reference
43
FEATURES:
The Weather clock
12 or 24 Hour
Radio
Moon Phase
and
Sun Rise/Set
& Sun
Duration for
99 Cities
Indoo
r
Temperature
and Humidity
Advanced Forecast
Icon Display
Outdoor Temperature

44
FEATURES:
• WWVB Radio-controlled time with manual setting option
• Time reception ON/OFF (user selectable)
• 12/24-hour time display
• Automatic daylight saving time (DST) updating
• DST ON/OFF (daylight saving time)
• Time zone option ±12 hours
• Year, month, date, weekday calendar display
• Crescendo alarm with snooze function
• Advanced Weather Forecast Icons with 15 combinations of weather icons
• Weather tendency indicator
• Temperature display with MIN/MAX records and time and date of reception
• Indoor and outdoor temperature display in ºF or ºC
• Indoor humidity data display as RH% with MIN/MAX records
• Can receive up to 3 remote temperature/humidity sensors
• Sun rise and sun set for 99 selected US and Canada cities
• Moon phase
• LCD contrast selectable
• LED backlight
• Low battery indicator
• Wall hanging or table standing

45
The Wireless Temperature Sensor (TX6U)
• Wireless transmission of
outdoor temperature to your
wireless weather station by
433 MHz
• Rain proof casing
• Wall mounting case
TO INSTALL AND REPLACE BATTERIES IN THE WIRELESS
TEMPERATURE SENSOR
The wireless temperature sensor uses 2 “AA” Alkaline Batteries. To
install and replace the batteries, please follow the steps below:
1. Remove the battery cover.
2. Insert the batteries, observing the correct polarity (see
marking).
3. Replace the battery cover on the unit.
Wireless
Temperature Sensor
Mounting Case

46
Note: In the event of changing batteries in any of the units, all units need to be reset by
following the set-up procedures. This is due to a random security code assigned by the
wireless temperature sensor at start-up. This code must be received and stored by the
wireless weather station in the first 3 minutes of power being supplied to the wireless
temperature sensor.
TO INSTALL AND REPLACE BATTERIES IN THE WIRELESS WEATHER
STATION
The wireless weather station uses 2 “AA” Alkaline Batteries. To install and replace the
batteries, please follow the steps below:
1. Push down on the top center of the
battery cover and pull away from the
unit to remove the cover.
2. Insert batteries observing the correct
polarity (see marking).
3. Replace compartment cover.
BATTERY CHANGE:
It is recommended to replace the batteries in all units on an annual basis to ensure
optimum accuracy of these units.

47
Please participate in the preservation of the environment. Return
used batteries to an authorized depot.
SETTING UP
1. First, insert the batteries into the wireless temperature sensor (see “To install and
replace batteries in the wireless temperature sensor”)
2. Within 4 minutes of activating the wireless temperature sensor, insert the batteries
into the wireless weather station (see “To install and replace batteries in the
wireless weather station”). Once the batteries are in place, all segments of the
LCD will light up briefly and a short signal tone will sound. If the indoor
temperature and indoor humidity are not displayed after 15 seconds, remove the
batteries and wait for at least 3 minutes before reinserting them. Once the indoor
data is displayed proceed to step 3.
3. After inserting the batteries into the wireless temperature sensor, the wireless
weather station will start receiving data from the temperature sensor. The outdoor
temperature should then be displayed on the wireless weather station. If this does
not happen after 3 minutes, the batteries will need to be removed from both units
and reset from step 1.
4. The wireless weather station can receive up to 3 temperature sensors. If you have
purchased additional temperature sensors, repeat from step 1 for all extra
temperature sensors. However, ensure that you leave 10 seconds in between the
reception of the last temperature sensor and the set-up of the following
temperature sensor. The wireless weather station will number the temperature

48
sensors in the order of set-up, i.e. the first temperature sensor will have the
temperature displayed with the number 1 against it and so on.
5. With less than 3 temperature sensors received, the wireless weather station will try
to pick up the remaining one in approximately another 3 minutes. If 3 temperature
sensors are received, the wireless weather station will stop further reception.
6. Once the outdoor temperature has been received and displayed on the wireless
weather station, the WWVB time code reception is automatically started. This
takes typically between 6-8 minutes in good conditions.
7. If after 10 minutes, the WWVB time has not been received, use the SET key to
manually enter a time initially. The clock will automatically attempt to receive the
WWVB time from 12:00 to 6:00 a.m. for a successful reception. When WWVB
reception signal is successful, the received time will override the manually set
time. The date is also updated with the received time. The next reception attempt
will occur on the following day. (Please refer to notes on “About WWVB Radio
controlled Time” and “Manual Time Setting”).
Your wireless weather station is now operational!
RESETTING WIRELESS WEATHER STATION
The wireless weather station and the wireless temperature sensor need to be reset when
one of the following conditions occur:
• Unsuccessful 433MHz signal reception of the wireless temperature sensor.
• Malfunction of the units.
• Batteries need replacement.

49
In order to establish proper communication between the display and outdoor sensor it is
important that they be set up as follows:
1. Bring any units outside, inside and place all units 3-5 feet apart with nothing in-
between them.
2. Remove batteries from all units.
3. Press any of the buttons on the display at least 10 times to clear the memory.
Verify that the display is blank before proceeding.
4. Using good quality alkaline batteries, place the batteries back into the wireless
temperature sensor(s); making sure that they are installed according to the
diagrams in the battery compartment.
5. Taking care not to press any buttons, re-install the batteries in the weather station
according to the diagram in the battery compartment.
6. Do not press any buttons for at least 15 minutes after installing the batteries.
(This is to let them establish a good connection.)
ABOUT WWVB RADIO CONTROLLED TIME
The NIST (National Institute of Standards and Technology—Time and Frequency
Division) WWVB radio station is located in Ft. Collins, Colorado, and transmits the exact
time signal continuously throughout the United States at 60 kHz. The signal can be
received up to 2,000 miles away through the internal antenna in the weather projection
station. However, due to the nature of the Earth’s Ionosphere, reception is very limited

50
during daylight hours. The wireless weather station will search for a signal every night
when reception is best.
The WWVB radio station receives the time data from the NIST Atomic clock in Boulder,
Colorado. A team of atomic physicists is continually measuring every second, of every
day, to an accuracy of ten billionths of a second per day. These physicists have created
an international standard, measuring a second as 9,192,631,770 vibrations of a Cesium-
133 atom in a vacuum. For more detail, visit http://www.boulder.nist.gov/timefreq.htm. To
listen to the NIST time, call (303)499-7111. This number will connect you to an
automated time, announced at the top of the minute in “Coordinated Universal Time”,
which is also known as Greenwich Mean Time (GMT). This time does not follow Daylight
Saving Time changes. After the top of the minute, a tone will sound for every second. It is
possible that your wireless weather station may not be exactly on the second due to the
variance in the quartz. However, the clock will adjust the quartz timing over the course of
several days to be very accurate; under 0.10 seconds per day.

51
FUNCTION KEYS:
Weather clock:
The Weather clock has five easy to use function keys.
SET ke
y
MIN/
MAX ke
y
A
LM key
CH/ + key
SNOOZE/ SUN key

52
SET key (Setting):
• Toggle between month, day, & year; weekday, month, & day; seconds; & alarm
time
• Press and hold to enter manual setting modes: LCD contrast, time zone, daylight
saving time ON/OFF, time reception ON/OFF, 12/24 hour display, manual time
setting, calendar setting, sun rise/set city selection, snooze function, temperature
°F or °C, and weather icon sensitivity setting
• Reset MIN/MAX values (channels 1, 2, & 3)
• Stop the alarm during alarm ringing
• Stop snooze mode
• Back-light on
CH/ + key
• Increase value in all setting modes
• Stop the alarm during alarm ringing
• Press and release to toggle between the outdoor sensor 1, 2 and 3 (if more than 1
sensor is used)
• Stop snooze mode
• Backlight on
ALM key (alarm)
• Enter/exit the alarm setting mode
• Active/de-active the alarm time (even inside snooze mode)

53
• Stop the alarm during alarm ringing
• Backlight on
MIN/ MAX
• Press and release to toggle between MIN/MAX and current temperature/humidity
values for selected outdoor temperature channel
• Stop the alarm during alarm ringing
• Stop snooze mode
• Backlight on
SNOOZE/ SUN key
• Active/de-active snooze function
• Exit the setting modes
• Toggles between sun rise time (sun icon with arrow pointing up), sun set time (sun
icon with arrow pointing down), and sun duration (sun icon with arrows pointing up
and down)
• To switch on the backlight
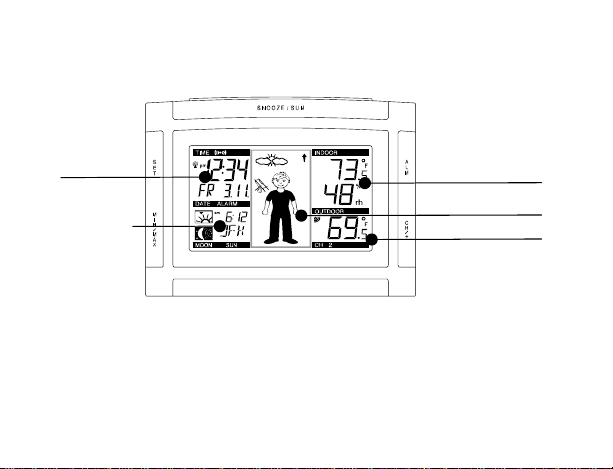
LCD SCREEN AND SETTINGS:
For better distinctness the LCD screen is split into 5 sections displaying the
information for time, date, weather forecast, indoors and outdoors.

54
Indoor Relative
Humidity %
Weather
Tendency icon
WWVB Towe
r
Icon (for time
reception)
Time
Calenda
r
Weather Forecast
icon (Weather boy)
Indoor
Temperature
Outdoor
Temperature
Outdoor
Reception
Signal
Number showing
Sensor unit
A
larm icon
Moon phase
display
Sunrise/ sunset
display

55
MANUAL SETTINGS:
The following manual settings can be done in the setting mode:
• LCD contrast setting
• Time zone setting
• Daylight Saving Time (DST) ON/OFF
• Time reception ON/OFF setting
• 12/24-Hour setting
• Manual time setting
• Calendar setting (Year, Day, & Month)
• Sunrise/ Sunset city location
• Snooze setting
• °F/°C setting
• Weather forecasting icon sensitivity setting
LCD CONTRAST SETTING
The LCD contrast can be set within 8 levels, from LCD 0 to LCD7 (Default setting is LCD
5):
flashing
 Loading...