


1
WIRELESS 915 MHz TEMPERATURE STATION
This product offers:
INSTANT TRANSMISSION is the state-of-the-art new
wireless transmission technology, exclusively
designed and developed
TECHNOLOGY.
offers you
an immediate update (every 8 seconds!) of all your
outdoor data measured from the transmitters: follow
your climatic variations in real
2
Stand
Hanging hole
Battery
compartment
LCD
Display
Function Keys
3
4
5
6
+ key
SET key
Instruction Manual
by LA CROSSE
INSTANT TRANSMISSION
-time!
good conditions be a distance no more than 200 feet (60 meters) between the
final position of the Temperature Station and the transmitter (see notes on
“Positioning” and “915 MHz Reception”).
HOW TO INSTALL AND REPLACE BATTERIES IN THE TEMPERATURE
STATION
The Temperature Station uses 3 x AA, IEC LR6 1.5V
batteries. When batteries need to be replaced, the
low battery icon will appear on the LCD. To install
and replace the batteries, please follow the steps
below:
1. Lift up the battery compartment cover.
2. Insert batteries observing the correct polarity
(see marking).
3. Replace compartment cover.
INVENTORY OF CONTENTS
1. Wireless Temperature Station (WS-9782U-IT)
2. Wireless Temperature Sensor (TX40U-IT) and mounting bracket.
3. Instruction Manual
SETUP
1. First, insert the batteries to the transmitter (see “How to install and replace
batteries in the Temperature transmitter” below).
2. Within 30 seconds of powering up the transmitter, insert the batteries to the
Temperature Station (see “How to install and replace batteries in the
Temperature station” below). Once the batteries are in place, all segments of
the LCD will light up briefly. Following the indoor temperature, the Weather
Girl icon and the time as 12:00 will be displayed. If they are not shown in LCD
after 60 seconds, remove the batteries and wait for at least 60 seconds before
reinserting them. Once the indoor data is displayed user may proceed to the
next step.
3. After the batteries are inserted, the Temperature Station will start receiving
data signal from the transmitter. The outdoor temperature should then be
displayed on the Temperature station. If this does not happen after 2 minutes,
the batteries will need to be removed from both units and reset from step 1.
4. In order to ensure sufficient 915 MHz transmission however, this should under
HOW TO INSTALL AND REPLACE BATTERIES IN THE TEMPERATURE
TRANSMITTER
The Temperature transmitter uses 2 x AAA, IEC LR3, 1.5V
batteries. When batteries will need to be replaced, the low
battery icon will appear on the LCD of the Temperature Station.
To install and replace the batteries, please follow the steps
below:
1. Remove the battery compartment cover.
2. Insert the batteries, observing the correct polarity (see
marking).
3. Replace the battery holder to the unit.
Note:
When changing batteries in any of the units, all units need to be reset by following
the setup procedures. This is because a random security code is assigned by the
transmitter at start-up and this code must be received and stored by the
Temperature Station in the first few minutes of power supplying.
FUNCTION KEYS
The Temperature Station has only two easy to use function keys.
SET key
x Press and hold for about 3 seconds to enter the Manual setting mode.
+ key
x Press to make adjustment in the setting mode.
x Press and hold to reset all MIN/MAX records
7
Outdoor Reception Signal icon*
MIN/MAX Outdoor
temperature
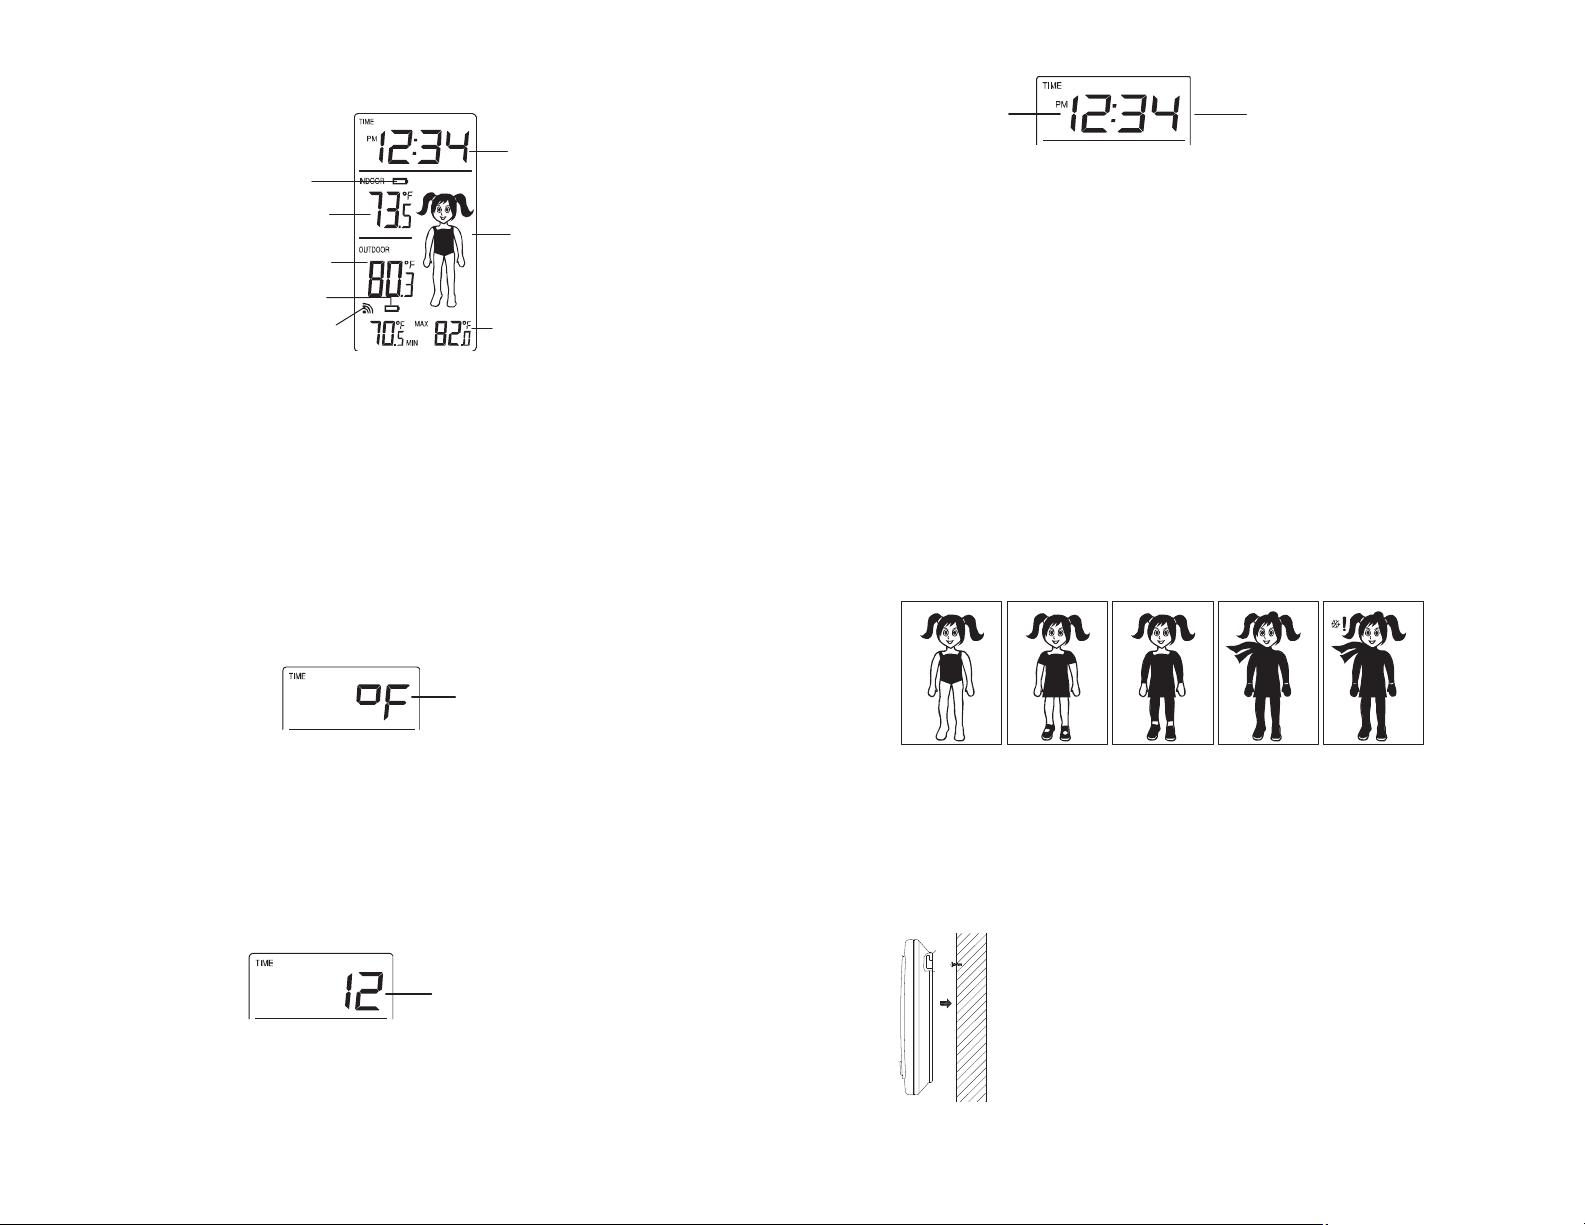
LCD SCREEN AND SETTINGS:
Time
Indoor Temperature in °F/°C
Outdoor Temperature in °F/°C
Temperature icon
(Weather Girl icon)
Low battery indicator
station)
Low battery indicator (transmitter)
8
Flashing
9
Flashing
10
Minutes (flashing)
Hour (flashing)
11
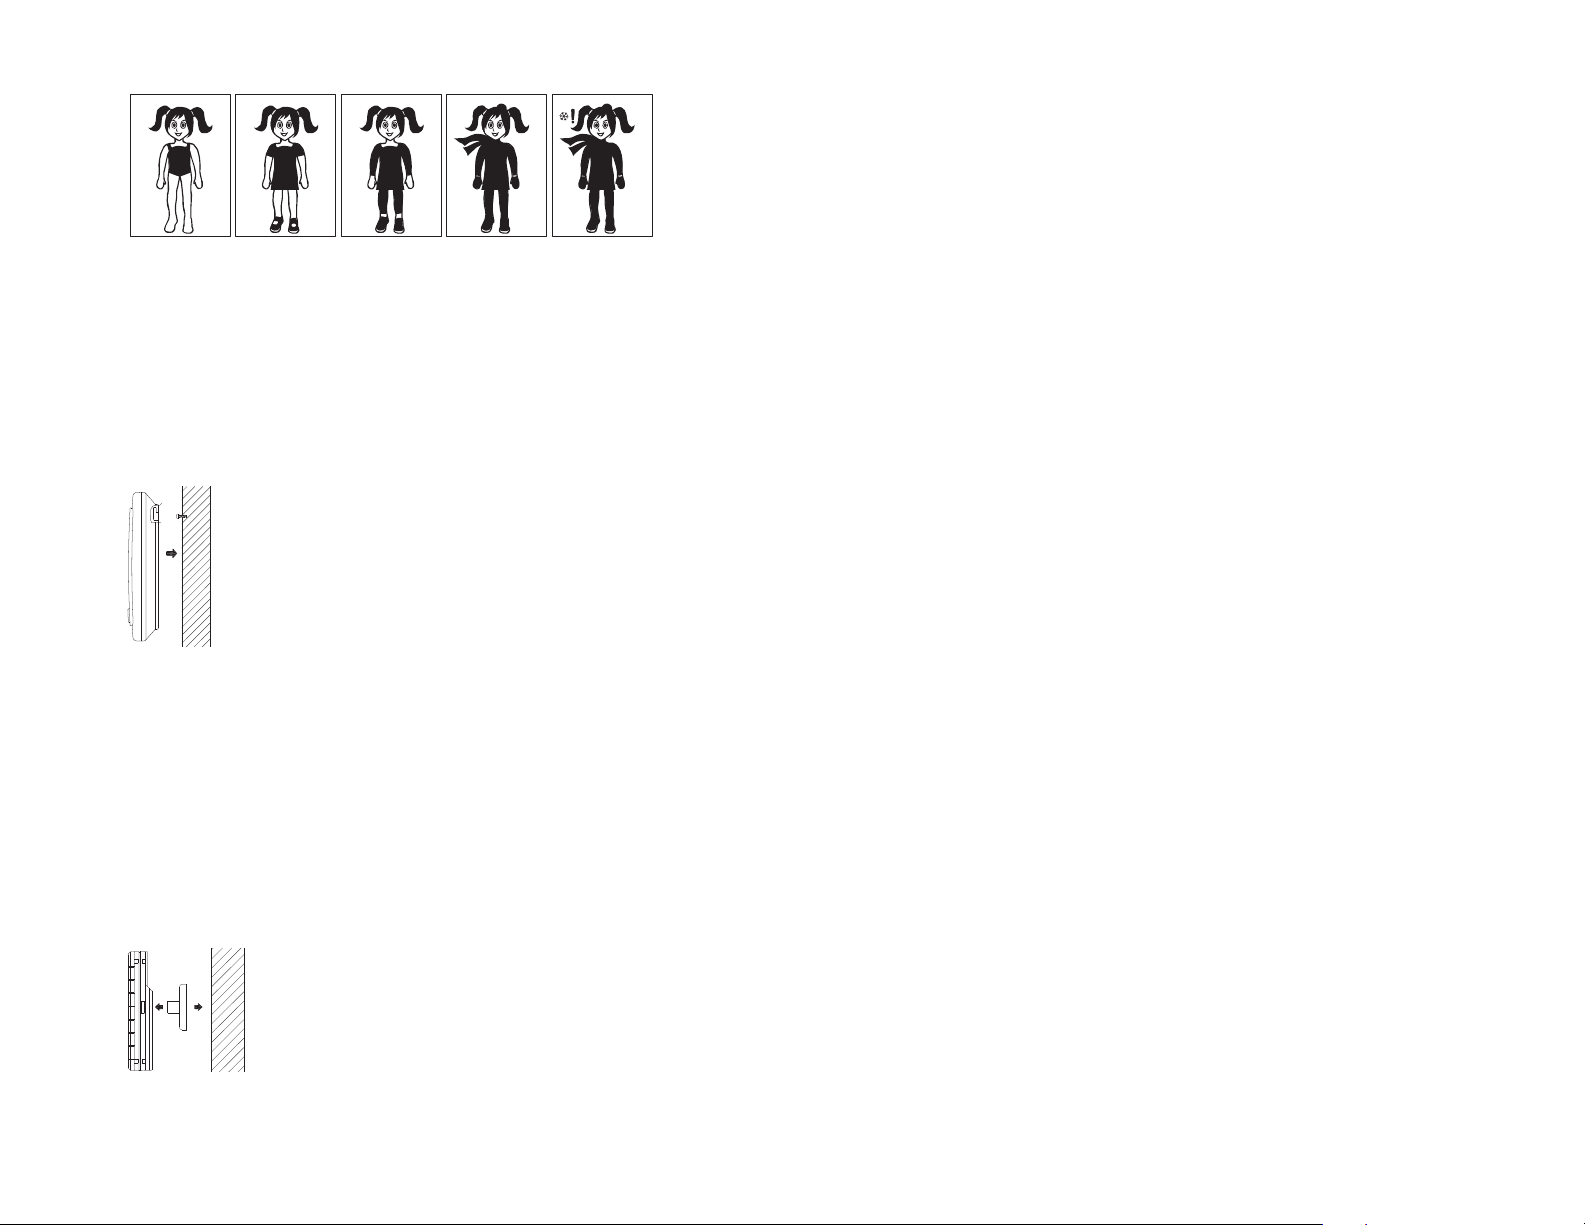
>78.8qF 66.2 - 78.7 qF 50 - 66.1qF 32 – 49.9qF < 32qF
12
(temperature
1. The hour digit of the time display will be flashing.
2. Press the + key to adjust the hour (press and hold to allow fast advance).
Press SET key to confirm and go to the minute setting.
3. The minute digit will be flashing. Press the + key to adjust the minute (press
and hold to allow fast advance). Press SET key once more to return to normal
display.
TO RESET THE MIN/MAX OUTDOOR DATA
The MIN/MAX outdoor temperature can be reset manually by pressing and holding
the + key for about 3 seconds. This will reset the MIN/MAX temperatures to current
outdoor temperature.
* When the signal from the transmitter is successfully received by the Temperature
Station, this icon will be switched on. (If not successful, the icon will not be shown
on the LCD). User can therefore easily see whether the last reception was
successful (“ON” icon) or not (“OFF” icon). On the other hand, the short blinking of
the icon shows that a reception is being done at that time.
MANUAL SETTINGS
In normal display mode, press and hold the SET key for 3 seconds to enter the
manual setting mode.
qqF/qC TEMPERATURE UNIT SETTING
The temperature can be set in qF (degree Fahrenheit) or qC (degree Celsius);
default setting in qF:
1. Press and hold the SET key for about 3 seconds, the digit "qF" will be flashing.
2. Press the + key to select the unit as qF or qC.
3. Confirm by pressing the SET key.
12 / 24- HOUR TIME DISPLAY SETTING
The time format can be set to 12 or 24 hour mode (default: 12):
1. The "12" or "24" digit will be flashing.
2. Press the + key to set the desired time display mode.
3. Press shortly the SET key to advance to the MANUAL TIME SETTING.
MANUAL TIME SETTING
To manually set the time of the Temperature Station:
WEATHER GIRL ICON (Temperature condition icons)
One of 5 different temperature icons (featured by weather girl with different clothing)
is displayed on the right side of the LCD, indicating the different temperature
conditions due to the current outdoor temperature.
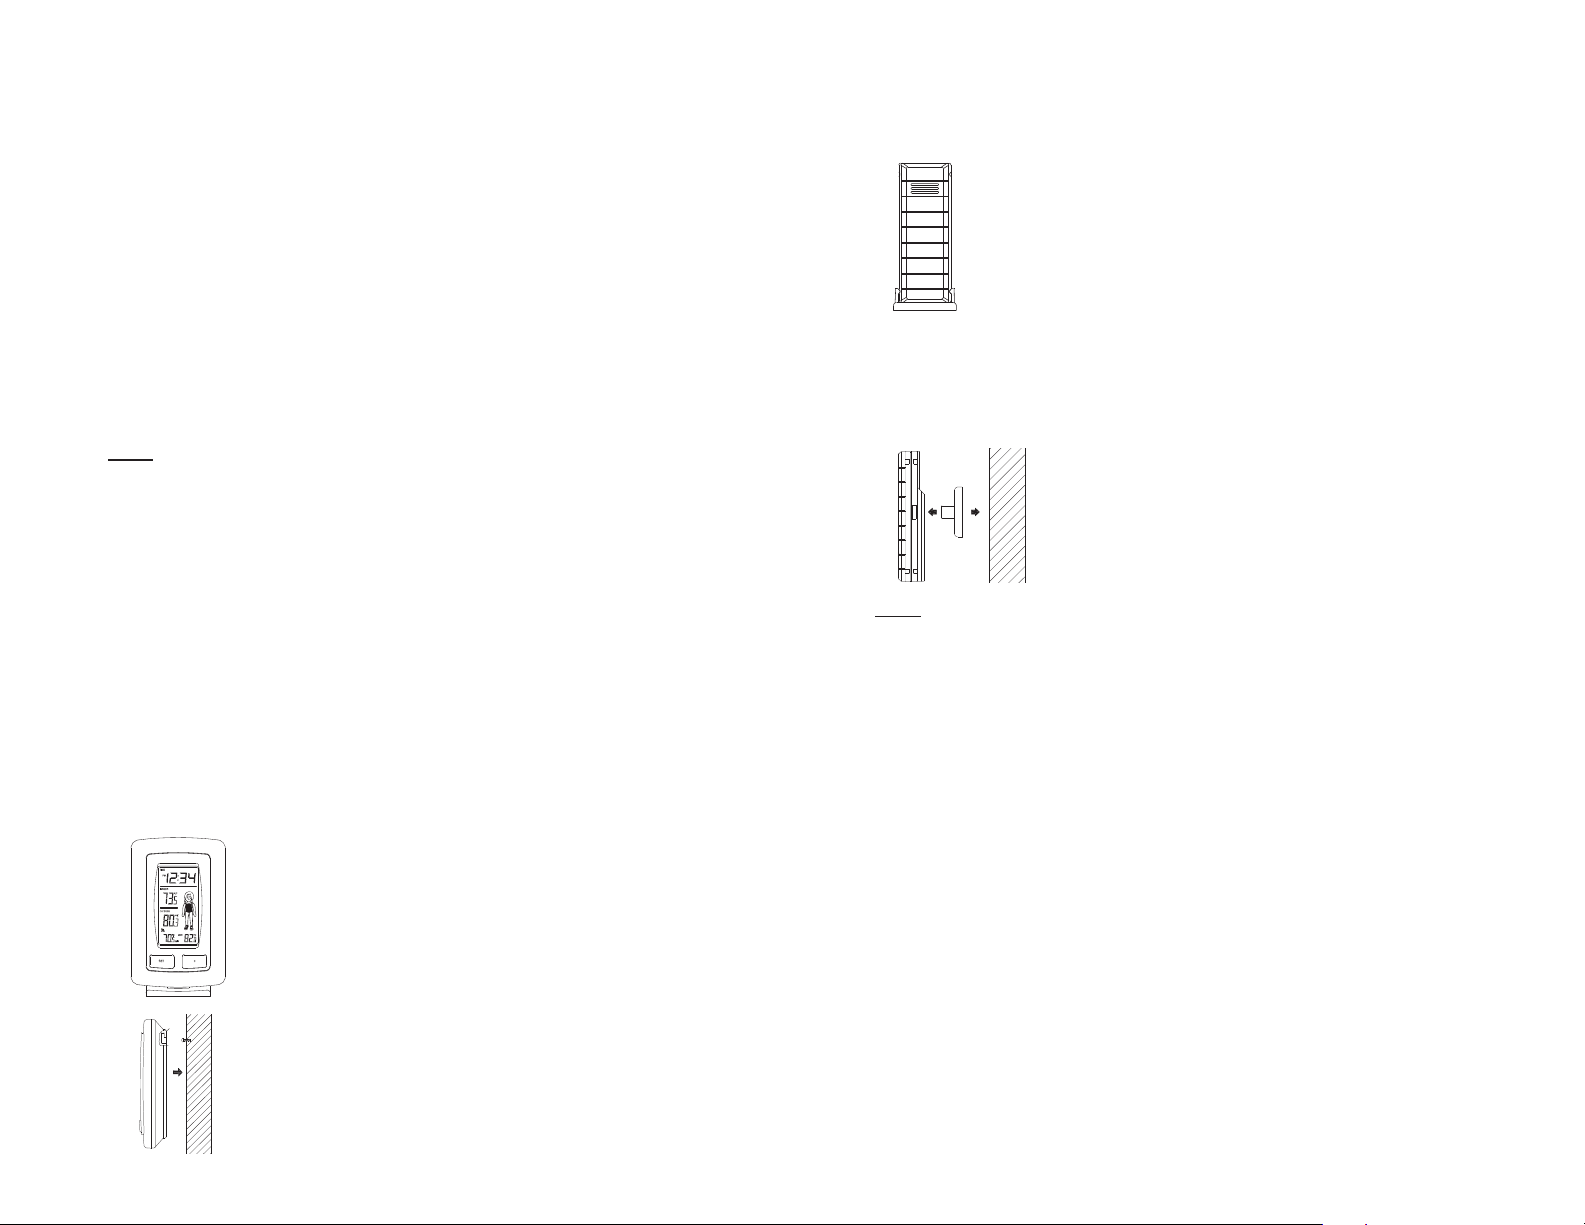
POSITIONING THE TEMPERATURE STATION:
The Temperature Station comes attached with a table stand, which provides the
option of table standing the unit in addition to wall mounting. Before wall mounting,
please check that the outdoor temperature values can be received from the desired
locations.
To wall mount:
1. Fix a screw (not supplied) into the desired wall, leaving
the head extended out by about 5mm.
2. Hang the Temperature Station onto the screw.
Remember to ensure that it locks into place before
releasing.

13
POSITIONING THE REMOTE TEMPERATURE TRANSMITTER:
14
15
16
17
18
The remote temperature transmitter can be placed onto any
flat surface or wall mounted using the bracket which doubles
as a stand or wall mount base.
To wall mount:
1. Secure the bracket onto a desired wall using the screws
and plastic anchors.
2. Clip the remote temperature transmitter onto the bracket.
Note:
The mounting surface can affect the transmission range. We recommend not
placing the unit on any metal surfaces or in any position where a large metal or
highly polished surface is in the immediate vicinity (garage doors, double glazing,
etc.). Before securing in place, please ensure that the Temperature Station can
receive the 915MHz signal from the temperature transmitter at the positions that
you wish to place them.
based on misrepresentation by the seller or performance variations resulting from
installation-related circumstances.
LA CROSSE TECHNOLOGY, LTD WILL NOT ASSUME LIABILITY FOR INCIDENTAL,
CONSEQUENTIAL, PUNITIVE, OR OTHER SIMILAR DAMAGES ASSOCIATED WITH
THE OPERATION OR MALFUNCTION OF THIS PRODUCT. THIS PRODUCT IS NOT
TO BE USED FOR MEDICAL PURPOSES OR FOR PUBLIC INFORMATION. THIS
PRODUCT IS NOT A TOY. KEEP OUT OF CHILDREN’S REACH.
This warranty gives you specific legal rights. You may also have other rights specific to
your State. Some States do no allow the exclusion of consequential or incidental
damages therefore the above exclusion of limitation may not apply to you. For warranty
work, technical support, or information contact:
La Crosse Technology, Ltd
2817 Losey Blvd. S.
La Crosse, WI 54601
On the Web: www.lacrossetechnology.com/support
WARRANTY
La Crosse Technology, Ltd provides a 1-year limited warranty on this product against
manufacturing defects in materials and workmanship.
This limited warranty begins on the original date of purchase, is valid only on products
purchased and used in North America and only to the original purchaser of this product.
To receive warranty service, the purchaser must contact La Crosse Technology, Ltd for
problem determination and service procedures. Warranty service can only be performed
by a La Crosse Technology, Ltd authorized service center. The original dated bill of sale
must be presented upon request as proof of purchase to La Crosse Technology, Ltd or
La Crosse Technology, Ltd’s authorized service center.
La Crosse Technology, Ltd will repair or replace this product, at our option and at no
charge as stipulated herein, with new or reconditioned parts or products if found to be
defective during the limited warranty period specified above. All replaced parts and
products become the property of La Crosse Technology, Ltd and must be returned to La
Crosse Technology, Ltd. Replacement parts and products assume the remaining
original warranty, or ninety (90) days, whichever is longer. La Crosse Technology, Ltd
will pay all expenses for labor and materials for all repairs covered by this warranty. If
necessary repairs are not covered by this warranty, or if a product is examined which is
not in need or repair, you will be charged for the repairs or examination. The owner must
pay any shipping charges incurred in getting your La Crosse Technology, Ltd product to
a La Crosse Technology, Ltd authorized service center. La Crosse Technology, Ltd will
pay ground return shipping charges to the owner of the product to a USA address only.
Your La Crosse Technology, Ltd warranty covers all defects in material and
workmanship with the following specified exceptions: (1) damage caused by accident,
unreasonable use or neglect (including the lack of reasonable and necessary
maintenance); (2) damage occurring during shipment (claims must be presented to the
carrier); (3) damage to, or deterioration of, any accessory or decorative surface; (4)
damage resulting from failure to follow instructions contained in your owner’s manual; (5)
damage resulting from the performance of repairs or alterations by someone other than
an authorized La Crosse Technology, Ltd authorized service center; (6) units used for
other than home use (7) applications and uses that this product was not intended or (8)
the products inability to receive a signal due to any source of interference. This warranty
covers only actual defects within the product itself, and does not cover the cost of
installation or removal from a fixed installation, normal set-up or adjustments, claims
FCC ID: OMO-TX40U (transmitter)
FCC DISCLAIMER
RF Exposure mobile:
The internal / external antennas used for this mobile transmitter must provide a separation
distance of at least 20 cm (8 inches) from all persons and must not be co-located or operating
in conjunction with any other antenna or transmitter."
Statement according to FCC part 15.19:
This device complies with Part 15 of the FCC Rules. Operation is subject to the following two
conditions: (1) this device may not cause harmful interference, and (2) this device must accept
any interference received, including interference that may cause undesired operation.
Statement according to FCC part 15.21:
Modifications not expressly approved by this company could void the user's authority to
operate the equipment.
Statement according to FCC part 15.105:
NOTE: This equipment has been tested and found to comply with the limits for a Class B digital
device, pursuant to Part 15 of the FCC Rules. These limits are designed to provide reasonable
protection against harmful interference in a residential installation. This equipment generates,
uses and can radiate radio frequency energy and, if not installed and used in accordance with
the instructions, may cause harmful interference to radio communications.
However, there is no guarantee that interference will not occur in a particular installation. If this
equipment does cause harmful interference to radio or television reception, which can be
determined by turning the equipment off and on, the user is encouraged to try to correct the
interference by one or more of the following measures:
x Reorient or relocate the receiving antenna.
x Increase the separation between the equipment and receiver.
x Connect the equipment into an outlet on a circuit different from that to which the receiver
is connected.
x Consult the dealer or an experienced radio/TV technician for help.
All rights reserved. This handbook must not be reproduced in any form, even in excerpts, or duplicated or
processed using electronic, mechanical or chemical procedures without written permission of the publisher.
This handbook may contain mistakes and printing errors. The information in this handbook is regularly
checked and corrections made in the next issue. We accept no liability for technical mistakes or printing errors,
or their consequences. All trademarks and patents are acknowledged.

19
ESTACIÓN DE TEMPERATURA INALÁMBRICA DE
La TRANSMISIÓN INSTANTÁNEA es lo último en
tecnología de transmisión inalámbrica, diseñada y
desarrollada exclusivamente por LA CROSSE
TECHNOLOGY.
La TRANSAMISIÓN
INSTANTÁNEA
le ofrece la actualización
inmediata (¡cada 8 segundos!) de todos los datos
en el exterior medidos desde sus transmisores:
¡Siga las variaciones climáticas en tiempo real!
Este producto ofrece:
20
Orificio para colgar
Pantalla
LCD
Compartimento de
las baterías
Teclas de
función
Base
21
22
23
24
Tecla SET
Tecla +
Manual de instrucciones
915 MHz
4. Sin embargo, para garantizar una transmisión de 915 MHz suficiente, éste,
bajo buenas condiciones, se debe colocar a una distancia no mayor que
60,96 metros (200 pies) entre la posición final de la Estación de temperatura y
el transmisor (consulte las notas sobre “Ubicación” y “Recepción de 915
MHz”).
CÓMO INSTALAR Y REEMPLAZAR LAS BATERÍAS EN LA ESTACIÓN DE
TEMPERATURA
La Estación de temperatura utiliza 3 baterías AA,
IEC LR6 de 1, 5 V. Cuando se deba reemplazar las
baterías, el ícono de batería baja aparecerá en la
pantalla LCD. Para instalar y reemplazar las
baterías, siga los pasos a continuación:
1. Levante la cubierta del compartimiento para las
baterías.
2. Inserte las baterías según la polaridad correcta
(consulte las marcas).
LISTA DEL CONTENIDO
1. Estación de temperatura inalámbrica (WS-9782U-IT)
2. Sensor de temperatura inalámbrico (TX40U-IT) y abrazadera de montaje.
3. Manual de instrucciones
CONFIGURACIÓN
1. Primero, inserte las baterías en el transmisor (consulte “Cómo instalar y
reemplazar baterías en el transmisor de temperatura” a continuación).
2. Luego de 30 segundos de encender el transmisor, inserte las baterías en la
Estación de temperatura (consulte “Cómo instalar y reemplazar baterías en
la estación de temperatura” a continuación). Una vez que las baterías estén
en su lugar, se iluminarán brevemente todos los segmentos de la pantalla
LCD. Luego de la temperatura interior, se mostrará el ícono de la niña que da
la temperatura y la hora en 12:00. Si no se aparecen en la pantalla LCD
después de 60 segundos, retire las baterías y espere al menos 60 segundos
antes de volver a insertarlas. Una vez que aparezcan los datos interiores, el
usuario puede continuar con el siguiente paso.
3. Luego de insertar las baterías, la Estación de temperatura comenzará a
recibir señales de datos desde el transmisor. Entonces se debe mostrar la
temperatura exterior en la estación de temperatura. Si esto no ocurre luego
de 2 minutos, deberá retirar las baterías de ambas unidades y comenzar
nuevamente desde el paso 1.
3. Vuelva a colocar la cubierta del compartimiento
para las baterías.
CÓMO INSTALAR Y REEMPLAZAR LAS BATERÍAS EN EL TRANSMISOR DE
TEMPERATURA
El Transmisor de temperatura utiliza 2 baterías AAA, IEC LR3
de 1, 5 V. Cuando se deba reemplazar las baterías, el ícono de
batería baja aparecerá en la pantalla LCD de la Estación de
temperatura. Para instalar y reemplazar las baterías, siga los
pasos a continuación:
1. Retire la cubierta del compartimiento para las baterías.
2. Inserte las baterías según la polaridad correcta (consulte
las marcas).
3. Vuelva a colocar el soporte para baterías en la unidad.
Nota:
Cuando cargue las baterías en cualquiera de las unidades, deben reestablecerse
todas las unidades siguiendo los procedimientos de configuración. Esto se debe a
que el transmisor asigna un código de seguridad aleatorio al arrancar y este
código debe ser recibido y almacenado por la Estación de temperatura en los
primeros minutos de suministro de alimentación.
TECLAS DE FUNCIÓN
La Estación de temperatura sólo tiene dos teclas de función fáciles de usar.
Tecla SET
x Presione y mantenga presionado alrededor de 3 segundos para acceder al
modo de Configuración manual.
Tecla +

25
Temperatura exterior
MÍN./MÁX.
Ícono de señal de
recepción exterior*
x Presione para realizar ajustes en el modo de configuración.
Hora
Indicador de batería baja
(estación de temperatura)
Temperatura interior en ºF/ºC
Ícono de temperatura
(Icono de la niña que
da la temperatura)
Temperatura exterior en ºF/ºC
Indicador de batería baja
(transmisor)
26
27
Imagen
intermitente
28
Imagen
intermitente
29
Minutos (intermitente)
Hora (intermitente)
30
x Mantenga presionado para restablecer todos los registros MÍN./MÁX.
Pantalla lcd y configuraciones:
CONFIGURACIÓN QUE Brinda la hora 12/24
El formato de hora también puede configurarse en modo de 12 ó 24 horas
(predeterminado: 12):
1. El dígito "12" ó "24" aparecerá intermitentemente.
2. Presione la tecla + para establecer el modo de exhibición de la hora deseado.
3. Presione brevemente la tecla de CONFIGURACIÓN para avanzar a la
CONFIGURACIÓN DE HORA MANUAL.
CONFIGURACIÓN DE HORA MANUAL
Para configurar manualmente la hora de la Estación de
temperatura:
* Cuando la señal desde el transmisor es recibida exitosamente por la Estación de
temperatura, se encenderá este ícono. (Si no es exitosa, el ícono no aparecerá en
la pantalla LCD). Por lo tanto, el usuario puede ver fácilmente si la última
recepción fue exitosa (ícono "ON" (ENCENDIDO) o no (ícono "OFF" (APAGADO)).
Por otra parte, el destello breve del ícono muestra que la recepción se está
llevando a cabo en ese momento.
CONFIGURACIONES MANUALES
En el modo de pantalla manual, presione y mantenga presionada la tecla de
CONFIGURACIÓN por 3 segundos para acceder al modo de configuración
manual.
CONFIGURACIÓN DE LA UNIDAD DE TEMPERATURA EN ºF/ºC
La temperatura se puede configurar en ºF (grados
Fahrenheit) o en ºC (grados Celsius); la configuración
predeterminada esta en ºF:
1. Presione y mantenga presionado la tecla de CONFIGURACIÓN alrededor de
3 segundos; el dígito "F" comenzará a mostrarse intermitentemente.
2. Presione la tecla + para seleccionar la unidad como ºF o ºC.
3. Confirme presionando la tecla de CONFIGURACIÓN.
1. El dígito de la hora de la pantalla de la hora aparecerá intermitentemente.
2. Presione la tecla + para ajustar la hora (presione y mantenga presionado para
avanzar más rápidamente). Presione la tecla de CONFIGURACIÓN para
confirmar y continúe con la configuración de los minutos.
3. El dígito de los minutos aparecerá intermitentemente. Presione la tecla + para
ajustar los minutos (presione y mantenga presionado para avanzar más
rápidamente). Presione la tecla de CONFIGURACIÓN una vez más para
volver a la pantalla normal.
PARA RESTABLECER LOS DATOS DEL EXTERIOR MÍN./MÁX.
La temperatura MÍN./MÁX. exterior se puede restablecer manualmente al
mantener presionada la tecla + por 3 segundos aproximadamente. Esto
restablecerá las temperaturas MÍN./MÁX. a las temperaturas interiores y exteriores
actuales.
ÍCONO DE LA NIÑA QUE DA LA TEMPERATURA (íconos de condiciones
de la temperatura)
Se muestra uno de 5 íconos de temperatura diferente en el
lado derecho de la pantalla LCD (mostrando a la niña que da
la temperatura con distinta vestimenta), indicando las
distintas condiciones de temperatura según la temperatura
exterior actual.
31
>78.8qF 66.2 - 78.7 qF 50 - 66.1qF 32 – 49.9qF < 32qF
32
33
34
35
36
UBICACIÓN DE LA ESTACIÓN DE TEMPERATURA:
La Estación de temperatura viene fijada a una base para mesa, la cual proporciona
la opción de colocar la unidad sobre una mesa además del montaje en la pared.
de garaje, vidrios dobles, etc.). Antes de asegurarla en su lugar, asegúrese de que
la Estación de temperatura pueda recibir la señal de 915 MHz del transmisor de
temperatura en las ubicaciones en que desee colocarlos.
GARANTÍA
La Crosse Technology, Ltd proporciona 1 año de garantía limitada para este producto
contra defectos de fabricación en los materiales y la mano de obra.
Esta garantía limitada tiene vigencia a partir de la fecha de compra original, es válida
sólo para los productos comprados y utilizados en América del Norte y únicamente para
el comprador original de este producto. Para obtener el servicio de garantía, el
comprador debe ponerse en contacto con La Crosse Technology, Ltd para determinar
cuál es el problema y los procedimientos de servicio. Únicamente el centro de servicio
autorizado de La Crosse Technology, Ltd puede llevar a cabo el servicio de garantía. A
solicitud de La Crosse Technology, Ltd, se debe presentar la factura original con fecha
como prueba de la compra en La Crosse Technology, Ltd o en el centro de servicio
autorizado de La Crosse Technology, Ltd.
Antes de montar en la pared, verifique que los valores de la temperatura exterior
puedan ser recibidos desde las ubicaciones deseadas.
Para montar en la pared:
1. Fije un tornillo (no se incluye) en la pared deseada, dejando
que la cabeza sobresalga unos 5 mm aproximadamente.
2. Cuelgue la Estación de temperatura en el tornillo. Recuerde
asegurarse de que quede bien sujeta en su lugar antes de
soltarla.
UBICACIÓN DEL TRANSMISOR DE TEMPERATURA REMOTO:
El transmisor de temperatura remoto se puede colocar sobre
cualquier superficie plana o montarse en la pared con la
abrazadera que sirve tanto como soporte o como base para
montaje en la pared.
Nota: La superficie de montaje puede afectar el rango de transmisión.
Recomendamos no colocar la unidad sobre superficies de metal o en cualquier
posición cercana a una superficie de metal de gran tamaño o muy pulida (puertas
Para montar en la pared:
1. Fije la abrazadera en la pared deseada con los tornillos
y anclas de expansión de plástico.
2. Fije el transmisor de temperatura remoto en la
abrazadera.
La Crosse Technology, Ltd reparará o reemplazará este producto, según nuestro criterio y sin
cargo, como se estipula aquí, con productos o piezas nuevas o reacondicionadas si presentan
defectos durante el período de garantía limitada antes especificado. Todas las piezas y
productos reemplazados pasan a ser propiedad de La Crosse Technology, Ltd y deben ser
devueltos a La Crosse Technology, Ltd. Las piezas y productos de repuesto reciben el resto
de la garantía original o noventa (90) días, lo que ocurra más tarde. La Crosse Technology,
Ltd pagará todos los gastos de mano de obra y materiales para todas las reparaciones
cubiertas por esta garantía. Si las reparaciones necesarias no están cubiertas por la garantía,
o si un producto se examina pero no tiene defectos ni requiere reparación, se le cobrará la
reparación o la examinación. El dueño debe pagar los cargos de transporte del producto de
La Crosse Technology, Ltd a un centro de servicio autorizado de La Crosse Technology, Ltd.
La Crosse Technology, Ltd pagará cargos de envío por devolución por tierra al propietario del
producto sólo a una dirección en EE. UU.
Su garantía La Crosse Technology, Ltd cubre todos los defectos de material y mano de obra
con las siguientes excepciones especificadas: (1) daño causado por accidentes, mal uso o
negligencia (incluida la falta de mantenimiento necesario y razonable); (2) daños ocurridos
durante el envío (los reclamos se deben presentar al transportista); (3) daños en cualquier
accesorio o superficie decorativa o deterioros en dichos elementos; (4) daños que resultan por
no haber seguido las instrucciones del manual del propietario; (5) daños ocasionados por la
realización de reparaciones o alteraciones por parte de una persona que no pertenezca a un
centro de servicio de la garantía autorizado de La Crosse Technology, Ltd; (6) unidades que
se hayan utilizado para fines no domésticos; (7) aplicaciones y usos para los cuales no se
diseñó este producto; o (8) la imposibilidad de los productos de recibir señal por algún tipo de
fuente de interferencia. Esta garantía sólo cubre defectos reales en el producto en sí y no
cubre el costo de instalación o retiro de una instalación fija, configuración o ajustes normales,
reclamaciones basadas en la tergiversación del vendedor o variaciones de rendimiento
producto de circunstancias relacionadas con la instalación.
LA CROSSE TECHNOLOGY, LTD NO ASUMIRÁ NINGÚN TIPO DE RESPONSABILIDAD
POR DAÑOS ACCIDENTALES, RESULTANTES, PUNITORIOS O DE OTRO TIPO
ASOCIADOS CON LA MANIPULACIÓN O MAL FUNCIONAMIENTO DE ESTE PRODUCTO.
ESTE PRODUCTO NO DEBE SER USADO PARA FINES MÉDICOS O PARA
INFORMACIÓN PÚBLICA. ESTE PRODUCTO NO ES UN JUGUETE. MANTENGA
ALEJADO DEL ALCANCE DE LOS NIÑOS.
Esta garantía le otorga derechos legales específicos. Es posible que tenga otros derechos
específicos según su estado. Algunos estados no permiten la exclusión o limitación de los
daños accidentales o resultantes, de modo que es posible que la exclusión o limitación anterior

37
no se aplique en su caso. Para obtener asistencia técnica, trabajos cubiertos por la garantía o
38
Ce produit présente:
INSTANT TRANSMISSION est la nouvelle
technologie de transmission sans fil de pointe
conçue et développée en exclusivité par LA
CROSSE TECHNOLOGY.
TRANSMISSION
immédiate (toutes les 8 secondes !) de toutes
les données extérieures relevées par les
capteurs : suivez les variations climatiques en
temps réel !
39
Pied amovible
Encoche de
suspension
Couvercle du
compartiment
des piles
Affichage
LCD
Touches de
fonction
40
41
42
información, póngase en contacto con:
La Crosse Technology, Ltd
2817 Losey Blvd. S.
La Crosse, WI 54601
Todos los derechos reservados. No se debe reproducir este manual de modo alguno, extraer fragmentos,
duplicar ni procesar con procedimientos electrónicos, mecánicos o químicos sin la autorización por escrito de
la editorial.
Este manual puede presentar imprecisiones o errores de impresión. La información de este manual se verifica
regularmente y las correcciones se realizan en la próxima edición. No nos hacemos responsables por errores
técnicos o de impresión, o de las consecuencias de este tipo de errores. Se reconocen todas las marcas
registradas y patentes.
En Internet: www.lacrossetechnology.com/support
x Horloge à quartz, affichage au format 12 H ou 24 H (heures et minutes,
réglage manuel)
x Affichage des températures en degrés Celsius (°C) ou Fahrenheit (°F)
x Affichage de l'une des 5 icônes de température représentées par Miss Météo
x Affichage permanent des températures extérieures MIN/MAX
x Transmission sans fil par ondes 915 MHz
x Transmission des données extérieures toutes les 4 secondes
x Indicateur de piles faibles
x S’accroche au mur ou se pose sur une table.
STATION DE TEMPERATURE 915 MHz
INVENTAIRE
1. Station de température sans fil (WS-9782U-IT)
2. Emetteur extérieur de température sans fil (TX40U-IT) et support.
3. Mode d’emploi
CARACTERISTIQUES:
Manuel d’Utilisation
assure la mise à jour
INSTANT
Emetteur de température extérieure
x Transmonsieurion à distance de la température
extérieure vers la Station de température par ondes 915
MHz
x Boîtier résistant à l’eau
x Support pour fixation murale
x Installer l’émetteur dans un endroit abrité. Eviter l’exposition
à la pluie et aux rayons du soleil.
INSTALLATION :
Note: La station de température ne fonctionne qu’avec un seul émetteur.
5. Commencer par installer les piles dans l’émetteur de température (voir
“Installation et remplacement des piles dans l’émetteur de température”).
6. Dans les 30 secondes qui suivent la mise sous tension de l’émetteur, installer
les piles dans la Station de température (voir “Installation et remplacement
des piles dans la Station de température ”). Une fois que les piles sont en
place, tous les segments du LCD s’allument brièvement, puis l’heure sous la
forme « 12 :00 » et "Miss météo" s’affichent. Si ces informations ne s’affichent
pas à l’écran dans les 60 secondes qui suivent la mise en oeuvre, retirer les
piles de la Station de température et attendre au moins 10 secondes avant de
les réinsérées.
7. Quand les piles sont en place, la Station de température commence à
recevoir les données de l’émetteur. La température extérieure et l’icône de
réception du signal devraient alors s’afficher sur la Station de température. Si
ce n’est pas le cas dans les 3 minutes qui suivent la mise en oeuvre, retirer
les piles des deux appareils et recommencer à partir de l’étape 1.
8. Afin d’optimiser la transmission par ondes 915 MHz, la distance entre la
Station de température et l’émetteur ne doit pas excéder 60m / 200 pieds (voir
les paragraphes “Mise en place” et “ Réception 915 MHz”).

43
INSTALLER ET REMPLACER LES PILES DANS LA STATION DE
44
45
46
Touche SET
(réglage)
Touche +
47
Icône de réception du signal de
l’émetteur extérieur*
Température extérieure
MIN/MAX
Affichage de l’heure
Température intérieure
Température extérieure
Icône Miss Météo
Icône de piles faibles
pour la Station
Icône de piles faibles
dans l’émetteur
48
TEMPERATURE
La Station de température fonctionne avec 3 piles AA,
IEC LR6, 1.5V. Pour les installer ou les remplacer,
suivre les étapes ci-dessous :
4. Retirer le couvercle du compartiment des piles
situé au dos de la Station de température.
5. Installer les piles en respectant les polarités (voir
le marquage).
6. Replacer le couvercle.
Touche SET (Réglage)
x Appuyez sur la touche pendant environ 3 secondes pour accéder aux
différents réglages manuels.
Touche +
x Permet de modifier les valeurs lors des différents réglages manuels.
x Réinitialiser tous les relevés MIN/MAX.
INSTALLER ET REMPLACER LES PILES DANS L’EMETTEUR DE
TEMPERATURE
L’émetteur de température fonctionne avec 2 piles AAA, IEC
LR3, 1.5V. Pour les installer ou les remplacer, suivre les étapes
ci-dessous :
4. Ouvrir le compartiment des piles en le faisant glisser vers
le bas.
5. Installer les piles en respectant les polarités (voir le
marquage).
6. Replacer le couvercle.
Note :
Lors du remplacement des piles dans l’un des appareils (base ou émetteur), il est
nécessaire de réinitialiser tous les appareils conformément à la procédure
d’installation indiquée ci-dessus. En effet, un code de sécurité est attribué de façon
aléatoire par l’émetteur au moment de sa mise en fonction et ce code doit être reçu
et stocké en mémoire par la Station de température, et ce dans les 3 minutes qui
suivent l’installation des piles.
REMPLACEMENT DES PILES:
Il est recommandé de remplacer régulièrement les piles de tous les appareils pour
en assurer un maximum de précision (voir les Spécifications ci-dessous).
TOUCHES DE FONCTION :
Participez à la protection de l’environnement et déposez toutes piles usagées
dans une décharge autorisée.
Station de température
La Station de température possède deux touches de fonctions :
ECRAN LCD ET REGLAGES:
* Lorsque le signal de l’émetteur extérieur est capté par la Station de température,
cette icône s’affiche (dans le cas contraire, l’icône ne s’affiche pas). Ceci permet à
l’utilisateur de savoir si la dernière réception des données extérieures a réussi
(icône allumée) ou non (icône absente).
Pour plus de clarté, l’écran LCD est divisé en 3 sections.
Section 1 - HEURE
x Affichage de l'heure (réglage manuel).
Section 2 - TEMPÉRATURE INTÉRIEURE
Affichage de la température intérieure.
Section 3 - TEMPÉRATURE EXTÉRIEURE ACTUELLE AVEC RELEVÉS
MIN/MAX DE TEMPERATURE EXTÉRIEURE ET ICÔNE DE LA
"MISS MÉTÉO"
x Affichage de la température extérieure relevée.
x Affichage des relevés MIN/MAX de température extérieure.

49
x Représentation de la température extérieure relevée sous forme d'une icône
clignotant
50
clignotant
51
Minutes (clign)
Heures (clign.)
52
Température intérieure
53
Température extérieure
MAX
Température extérieure
MIN
Température extérieure
54
>78.8qF 66.2 - 78.7 qF 50 - 66.1qF 32 – 49.9qF < 32qF
(5 icônes Miss Météo possibles)
REGLAGES MANUELS :
Appuyer sur la touche SET pendant 3 secondes environ pour accéder aux
différents réglages :
REGLAGE DE L’UNITE DE TEMPERATURE EN °C/ °F
L’unité d’affichage de la température est réglée par défaut en °F (degrés
Fahrenheit). Pour changer cette unité en °C (degrés Celsius), procédez comme
indiqué ci-dessous :
1. “qF” clignote à l’écran. Utilisez la touche + pour alterner entre “°C” et “°F”.
Note:
Si aucun des boutons n’est appuyé dans les 8 secondes environ durant les modes
de réglages manuels, l'appareil retournera au mode normale.
AFFICHAGE DE LA TEMPERATURE INTERIEURE
La température intérieure de la Station de température s’affiche dans la deuxième
section du LCD.
AFFICHAGE DE LA TEMPERATURE EXTERIEURE ET DES MIN/MAX
La température extérieure de la Station de température s’affiche de façon dans la
dernière section du LCD avec les températures extérieures MIN/MAX en bas de
l’écran.
2. Appuyez ensuite sur la touche SET pour confirmer le réglage et passer au
“Réglage de l’affichage de l’heure 12/24 H”.
Note:
Si aucun des boutons n’est appuyé dans les 8 secondes environ durant les modes de
réglages manuels, l'appareil retournera au mode normale.
REGLAGE DE L’AFFICHAGE DE L’HEURE 12/24 H
1. “12” ou “24” clignote à l’écran (réglage par défaut: « 12 »)
2. Appuyez sur la touche + pour sélectionner le format d’affichage “12” ou “24”.
3. Appuyez encore une fois sur la touche SET pour confirmer le réglage et
passer au “Réglage manuel de l’heure”.
Note:
Si aucun des boutons n’est appuyé dans les 8 secondes environ durant les modes
de réglages manuels, l'appareil retournera au mode normale.
REGLAGE MANUEL DE L’HEURE
Pour règler l’heure :
1. Les chiffres des heures et des minutes se mettent à clignoter.
2. Utilisez la touche + pour régler les heures. Une fois les heures réglées,
appuyez sur la touche SET pour passer au réglage des minutes.
3. Les minutes se mettront à clignoter. Appuyez sur la touche + pour régler les
minutes.
4. Confirmez le réglage en appuyant sur la touche SET et quitter la fonction de
réglage.
Note : La résolution des températures MIN/MAX est de 0.5°C/ 0.5°F.
REINITIALISATION DES DONNEES MIN/MAX :
Appuyez sur la touche + pendant 3 secondes pour réinitialiser les relevés
MIN/MAX respectifs aux valeurs de températures actuelles.
ICÔNE "MISS MÉTÉO" (Icône des conditions de température) :
Au centre de l'écran LCD s'affiche l'une des 5 icônes de température (sous forme
d'une jeune femme vêtue de différentes façons). Cette icône indique les
changements de température extérieure en se basant sur la température
extérieure relevée :
55
RECEPTION 915 MHz
56
57
58
59
60
La station de température devrait réceptionner et afficher la température extérieure
dans les 2 minutes qui suivent la mise en oeuvre. En cas de non réception des
données extérieures dans les 2 minutes qui suivent la mise en oeuvre ou si, sur
l’affichage principal, la réception des données extérieures ne se fait pas (la section
« extérieur » indique alors “- - -”), vérifiez les points suivants :
1. La station de température ou l’émetteur devraient être situés à 1,5-2 mètres (5-6
pieds) au moins de toutes sources d’interférences telles que les moniteurs
d’ordinateurs ou téléviseurs.
2. Eviter de positionner le capteur sur ou à proximité immédiate de cadres de
fenêtres métalliques.
3. L’utilisation d’autres appareils électriques tels que des casques ou enceintes
fonctionnant sur la même fréquence de signal (915MHz) peut empêcher une
bonne transmonsieurion et réception du signal.
4. Des voisins utilisant des appareils électriques sur la fréquence de signal 915MHz
peuvent aussi brouiller la transmonsieurion des données.
2. Retirez le socle amovible de la Station de température en
le tirant délicatement et accrochez la Station sur la vis.
Assurez-vous du bon maintient de la Station avant de la
lâcher.
MISE EN PLACE DE L’EMETTEUR DE TEMPERATURE
L’émetteur est fourni avec un support qui peut se fixer au mur à
l’aide des deux vis fournies. Il peut aussi être posé sur une surface
plane en enclenchant l’émetteur sur le support.
Note :
x Quand la réception du signal 915 MHz est effective, il est conseillé de ne pas
rouvrir le couvercle des piles de l’émetteur ou de la Station Météo : les piles
risquent en effet de se dégager de leurs contacts et de forcer une fausse
réinitialisation. Si tel est le cas, il faut alors réinitialiser tous les appareils (voir
le paragraphe « Installation » ci-dessus) afin de palier aux éventuels
problèmes de transmonsieurion.
x Le rayon de transmonsieurion de l’émetteur à la station de température est
d’environ 60 m / 200 pieds, en espace dégagé. Cependant, ceci dépend de
l’environnement et des niveaux d’interférence. Si la réception reste impossible
alors que tous ces facteurs ont été respectés, réinitialisez tous les appareils
(voir le paragraphe « Installation » ci-dessus).
INSTALLATION DE LA STATION DE TEMPERATURE
La Station de température est conçue pour être accrochée à un mur ou posée sur
une table.
Posée
Grâce à son socle amovible, la Station de température peut
se poser sur n’importe quelle surface plane.
Fixation murale
Avant de fixer la Station de façon définitive, assurez-vous de la
bonne transmonsieurion des données de température
extérieure à partir de l’endroit sélectionné.
1. Fixez une vis (non fournie) dans le mur désiré en laissant
dépasser la tête d’environ 5mm.
Fixation murale
3. Fixer le support au mur désiré à l’aide des vis et
chevilles fournies
4. Encastrer l’émetteur de température dans le support.
Note :
Avant de fixer l’émetteur au mur de façon définitive, placez tous les appareils aux
endroits désirés et assurez-vous de la bonne réception de la température
extérieure. En cas de non réception de la température par la Station, changez
l’émetteur de place, ceci pouvant généralement aider à la réception du signal.
ENTRETIEN :
x Eviter les températures extrêmes, vibrations et chocs qui risquent
d’endommager l’appareil et de produire des relevés inexacts.
x Nettoyer l’affichage et les boîtiers avec un chiffon doux et humide
uniquement. Ne pas utiliser de dissolvants ou de produits abrasifs qui risquent
de rayer le LCD et les boîtiers.
x Ne pas plonger l’appareil dans l’eau.
x Retirer sans délai toutes les piles faibles afin d’éviter fuites et dégâts. Ne les
remplacer que par des piles neuves du type recommandé.
x Ne pas tenter de réparer l’appareil. Si nécessaire, retourner l’appareil au lieu
d’achat pour le faire réparer par un technicien qualifié. Ouvrir et réparer soimême l’appareil en annule la garantie.
x Ne pas soumettre les appareils à des changements de température soudains
et extrêmes. Ceci entraînerait un changement rapide des relevés, ce qui en
diminuerait la précision.

61
SPECIFICATIONS :
62
63
64
65
66
Rayon de relevé de température:
Intérieure : -9,9ºC à +59,9ºC avec résolution de 0,1ºC / 14,2°F à +139,8°F avec
résolution de 0,2°F (“OF.L” affiché en-dehors de ce rayon)
Extérieure: -39,9ºC à +59,9ºC avec résolution de 0.1ºC / -39,8°F à +139,8°F avec
résolution de 0,2°F(“OF.L” affiché en-dehors de ce rayon)
Alerte de givre: affiche lorsque la température descend au-dessous de 0ºC
(32ºF)
Relevé de la température intérieure : toutes les 20 secondes
Réception des données extérieures : toutes les 8 secondes
Alimentation:
Station de température : 3 x AA, IEC LR6, 1.5V
Emetteur de température : 2 x AAA, IEC LR3, 1.5V
Durée de vie des piles (piles alcalines recommandées)
Station de température : Approximativement 24 mois
usage abusif ou négligence (y compris le manque d’un entretien raisonnable et
nécessaire); (2) dommage encouru durant le transport (les réclamations doivent
être présentées au transporteur); (3) endommagement ou détérioration de tout
accessoire ou surface décorative; (4) dommage résultant de la non-observation
des instructions contenues dans le mode d’emploi; (5) dommage résultant de
réparations ou modifications effectuées par une personne autre qu’un technicien
agréé par La Crosse Technology, Ltd; (6) appareils utilisés pour un usage autre
que personnel ; (7) applications et usages pour lesquels cet appareil n’est pas
conçu ou (8) incapacité de l’appareil à recevoir un signal en raison de sources
d’interférence.
Cette garantie ne couvre que les défauts du produit même et ne couvre pas les
frais d’installation ou de déplacement d’une installation fixe, montage normal ou
réglages, demandes basées sur une représentation fallacieuse du vendeur ou
variations dans le fonctionnement résultant de circonstances liées à l’installation.
LA CROSSE TECHNOLOGY, LTD DECLINE TOUTE RESPONSABILITE POUR
TOUS DOMMAGES FORTUITS, INDIRECTS, SECONDAIRES OU SIMILAIRES
ASSOCIES A L’UTILISATION OU AU MAUVAIS FONCTIONNEMENT DE CE
Emetteur de température : Approximativement 12 mois
Dimensions (L x l x H)
Station de température : 91 x 70,1 x 144,9 mm / 3,58” x 2,76” x 5,70”
Emetteur de température : 32,4 x 14,1 x 86,5mm / 1,27" x 0,55" x 3,40"
GARANTIE
La Crosse Technology Ltd assure un an de garantie limitée sur cet appareil contre
tout défaut de matériel et fabrication.
Cette garantie limitée qui entre en vigueur à partir de la date d’achat de l’appareil
n’est valide que pour les produits achetés et utilisés en Amérique du Nord, et
uniquemement pour l’acheteur d’origine. Pour recevoir les services de la garantie,
contacter La Crosse Technology pour déterminer la nature du problème et la
procédure à suivre. Les services de la garantie ne peuvent être effectués que par
un service après-vente approuvé par La Crosse Technology, Ltd. La facture
d’origine datée doit être présentée sur demande en preuve que l’appareil a été
acheté auprès de La Crosse Technology, Ltd ou d’un dépositaire agréé par La
Crosse Technology, Ltd.
La Crosse Technology, Ltd réparera ou remplacera ce produit, à notre choix et
gratuitement avec des pièces neuves ou reconditionnées si le produit est jugé
défectueux durant la période de la garantie limitée décrite ci-dessus. Toutes les
pièces ou appareils remplacés deviennent la propriété de La Crosse Technology,
Ltd et doivent lui être retournés.
Les pièces et appareils remplacés sont soumis à la garantie d’origine restante ou
une période de garantie de quatre-vingt-dix (90) jours, la période la plus longue
étant en vigueur. La Crosse Technology, Ltd paiera tous les frais de main d’oeuvre
et de pièces couverts par cette garantie. Si les pièces nécessaires ne sont pas
couvertes par cette garantie, ou si un produit examiné ne requiert aucune
réparation, les frais de transport et d’inspection encourus vous seront facturés.
Tous les frais de transport encourus pour faire parvenir le produit au service aprèsvente de La Crosse Technology, Ltd sont à la charge du propriétaire.
Votre garantie La Crosse Technology, Ltd couvre tous les défauts de matériaux et
de fabrication avec les exceptions ci-dessous: (1) dommage causé par accident,
PRODUIT. CE PRODUIT NE DOIT PAS ETRE UTILISE DANS UN BUT MEDICAL
OU POUR L’INFORMATION DU PUBLIC. CE PRODUIT N’EST PAS UN JOUET.
LE GARDER HORS DE LA PORTEE DES ENFANTS.
Cette garantie vous donne des droits spécifiques. Vous pouvez aussi avoir d’autres
droits spécifiques à votre Etat. Certains Etats n’autorisent pas l’exclusion de
dommages indirects ou fortuits auquel cas, les restrictions ci-dessus ne
s’appliquent pas.
Pour tout travail de garantie, support technique ou information, contacter:
La Crosse Technology, Ltd
2817 Losey Blvd. S.
La Crosse, WI 54601
Sur le Web: www.lacrossetechnology.com/support
Tous droits réservés. Ce livret ne peut pas être reproduit sous aucune forme, y compris extraits, ni dupliqués
ou traités par procédé électronique, mécanique ou chimique sans l’autorisation écrite de l’éditeur.
Ce livret peut contenir des erreurs ou fautes d’impression. Les informations qu’il contient sont vérifiées
régulièrement et corrigées nécessairement dans l’édition suivante. Nous déclinons toute responsabilité pour
tout défaut technique ou erreur d’imprimerie ou leurs conséquences.
 Loading...