


Before beginning assembly, please read these instructions thoroughly.
Bitte lesen Sie die Anweisungen vor Gebrauch genau durch!
Veuillez attentivement lire les instructions avant l’emploi!
Lea cuidadosamente este manual de instrucciones antes de comenzar el montaje
GT2
 TM
TM
|
|
|
|
|
1:8 Scale Radio Controlled .28 Engine Powered 4WD Touring Car |
||||
Inferno GT2 Series readyset |
MAINTENANCE MANUAL |
|||
● |
● |
|||
|
|
|
|
|
|
|
|
|
|
This instruction manual follows the model's order of assembly. |
Take care not to lose parts or screws etc. when performing |
|
maintenance or replacing parts. |
||
Please keep and refer to this manual for maintenance or when |
||
replacing parts. Users unfamiliar with maintaining and assembling |
Achten Sie darauf, dass Sie keine Teile oder Schrauben waehrend |
|
this model should contact their Kyosho distributor or hobby shop. |
||
der Montage am Modell verlieren. |
||
|
Diese Bauanleitung beschreibt die Montage des Modells. Bewahren Sie diese Dokumentation unbedingt fuer Ersatzteilbestellungen oder Reparaturen am Modell auf. Falls Sie Fragen haben, wenden Sie sich bitte an Ihren Fachhaendler oder direkt an KYOSHO Deutschland.
Cette notice décrit les différentes phases de montage et de maintenance du modèle. Pour les utilisateurs peu familier avec le modélisme, en cas de doute ou de problème, contacter votre revendeur afin d'obtenir les conseils d'un spécialiste.
Este manual de instrucciones explica los pasos de montaje del modelo. Por favor conserve este manual siempre a mano para realizar un correcto mantenimiento y consultar la lista de piezas a la hora de cambiar algún repuesto.
Faire attention de ne pas perdre de vis ou autres petites pièces du châssis ... En cas de perte, les remplacer immédiatement.
Tenga precaución de no perder ninguna pieza a la hora de realizar el mantenimiento o de cambiar algún repuesto.
R
THE FINEST RADIO CONTROL MODELS
31817-MM01 |
|
/ REQUIRED FOR OPERATION
DAS NOTWENDIGE ZUBEHÖR / MATÉRIEL NÉCESSAIRE / PARA SU FUNCIONAMIENTO
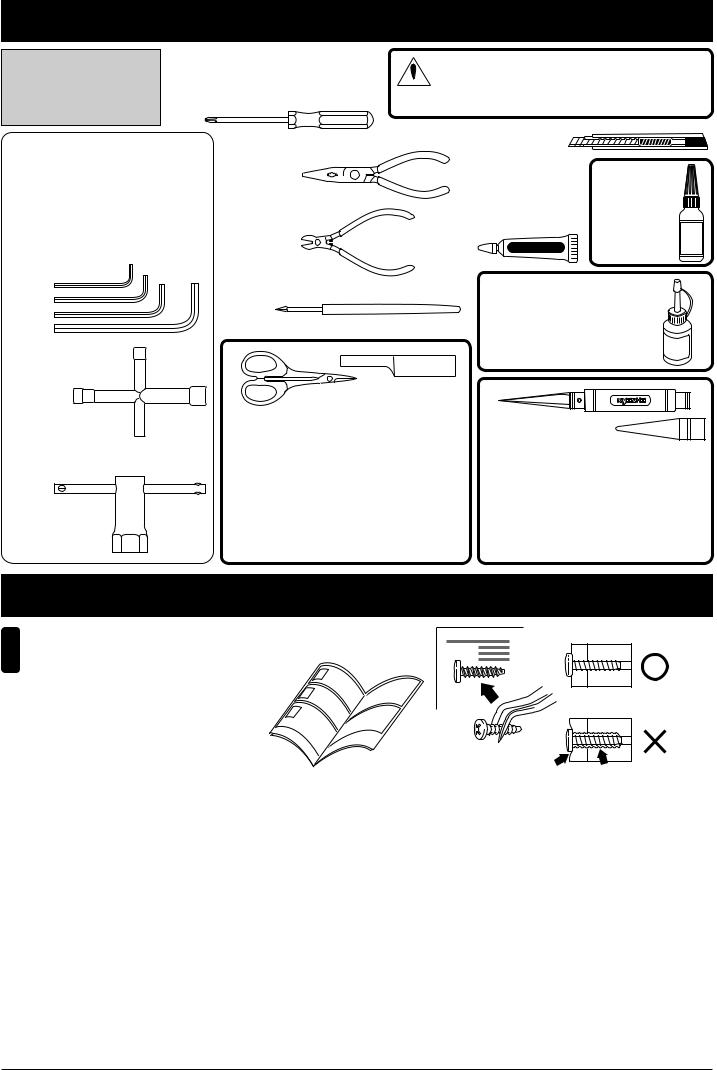
Tools required
Die notwendigen Werkzeuge Les outils utilisés Herramientas necesarias
TOOLS INCLUDED GELIEFERTE WERKZEUGE OUTILS FOURNIS HERRAMIENTAS INCLUIDAS
■ 1.5mm, 2mm, 2.5mm, 3mm
Hex Wrench (1.5mm, 2mm, 2.5mm, 3mm) Sechskantschlüssel (1.5mm, 2mm, 2.5mm, 3mm) Clé allen (1.5mm, 2mm, 2.5mm, 3mm)
Llaves Allen (1.5mm, 2mm, 2.5mm, 3mm)
1.5mm
2mm
2.5mm
3mm
■
Cross Wrench Kreuzschlüssel Clé en croix Llave de cruz
●
Can be Used as plug wrench.
Krezenschluessel
Peut-être utilisé comme clé à bougie. Puede utilizarse como llave de bujías
■
Wheel Wrench Felgenschluessel Clé démonte pneus Llave de ruedas
■
Phillips Screwdriver (L, M, S) Kreuzschlitzschraubendreher Tournevis cruciforme Destornilladores Phillips
■
Needle Nose Pliers Flachzange  Pinces plates

Alicates de punta fina
■
Wire Cutters Seitenschneider  Pince coupante
  Alicate cortacables
■
Awl Spitzahle Poinçon Punzón
CAUTION: Handle tools carefully!
 WICHTIG: Gehen Sie vorsichtig mit Werkzeugen um!IMPORTANT: Maniez les outils avec prudence!
AVISO: Maneje las herramientas cuidadosamente!
■ |
|
|
|
Sharp Hobby Knife |
|
|
|
Scharfes Bastelmesser |
|
|
|
Cutter |
|
|
|
Cuchilla de Hobby |
■ |
|
|
■ |
|
|
|
Screw Cement |
|
||
Rubber Cement |
|
||
Schraubensicherung |
|
||
Gummi-Kleber |
|
||
Frein filet |
|
||
Colle à pneus |
|
||
Fijatornillos |
|
||
Cola de contacto |
|
||
|
LOCTITE |
||
RUBBER CEMENT |
|||
(Medium Strength) |
|
||
|
No.96178 |
|
|
KYOSHO |
|
||
KYOSHO Special Glue |
|
|
|
|
No.96154 |
|
|
Instant Glue |
|
||
Sekundenkleber |
KYOSHO Special |
|
|
Colle cyanoacrylate |
|
||
|
Glue |
|
|
Pegamento instantáneo |
|
|
|
No.1829
CURVED SCISSORS & SANDER
LEXANSCHERE
CISEAUX A LEXAN
TIJERAS Y LIJADOR
For trimming body shells. Makes cutting curved lines easy! Schneidet ohne Probleme auch Kurven. Für Karosserien aus Lexan.
Coupe le long de lignes courbées. Pour les carrosseries. Para recortar las carrocerías con la máxima precisión.
SP
SP KNIFE EDGE REAMER
REIBAHLE No.36219
ALESOIR SPECIAL
HERRAMIENTA TALADRO CARROCERíA
1 ~ 15mm
No need to pre-drill! Drills neat 1 ~ 15mm holes directly! Unerläßlich, nützlich! Diese Ahle bohrt Ihnen 1 ~ 15mm Löcher, einfach und sauber!
Un must! Permet de faire des trous de 1 ~ 15mm sans effort! Idéal pour les carrosseries.
Perfora agujeros desde 1 a 15mm.
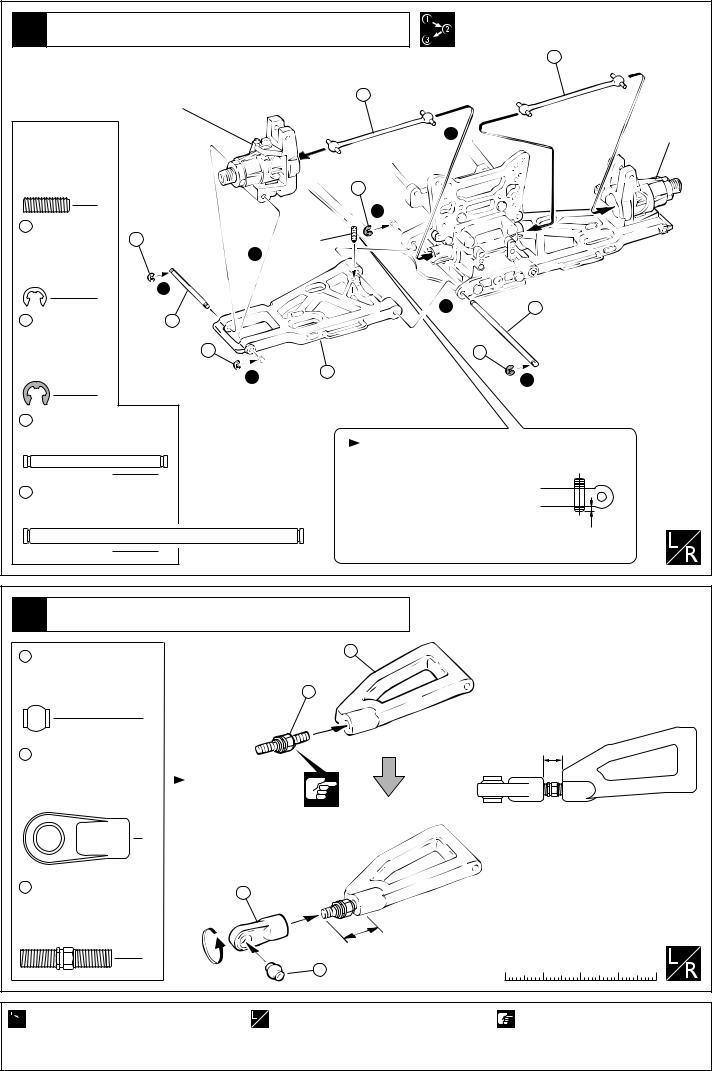
1 / BEFORE YOU BEGIN(1)
BEVOR SIE BEGINNEN(1) / AVANT DE COMMENCER(1) / ANTES DE EMPEZAR(1)
1 ●
●
●
●TP
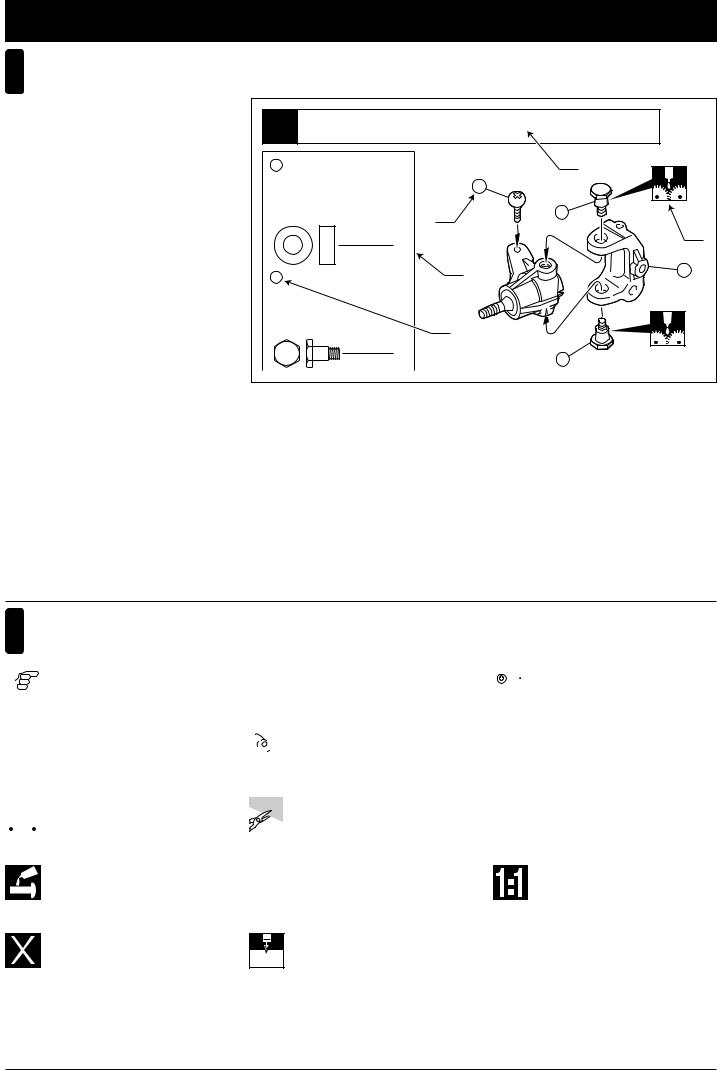
Before assembling, please read the following carefully:
●First, read this instruction manual and familiarise yourself with the model’s construction.
●Check the kit contents. Should any parts be missing, contact the retail shop from whom the model was purchased.
●Compare nuts, bolts, screws, etc to the "Actual Size" drawings on each page before fitting to ensure that you are installing the correct parts.
●Tighten Self tapping (TP) screws into parts until you have a secure attachment. However, be careful not to over-tighten TP screws or you may strip the plastic thread in the part!
Correct
Richtig
Bon
Correcto
Wrong
Falsch
Mauvais
Mal
Avant l’assemblage, veuillez lire les points suivants attentivement:
●Lisez d’abord complètement cette notice; ainsi vous aurez un aperçu du déroulement et pourrez mieux vous orienter.
●Vérifiez ensuite le contenu du kit.
Si jamais il y a des pièces manquantes, adressez-vous directement à votre magazin spécialisé ou au distributeur Kyosho dans votre pays.
●Ne confondez pas les vis et les petites pièces! Vérifiez-les à l’aide des illustrations dans chaque plage de montage, puis assemblez les.
●Lorsque vous serrez une vis autotaraudeuse:
Serrez jusqu’à ce que la pièce à monter soit bien installée. Pourtant, veillez à ne pas trop la serrer puisque vous risquez d’abîmer le filet dans la pièce.
Lesen Sie folgendes vor dem Zusammenbau aufmerksam durch:
●Lesen Sie zuerst die Bauanleitung ganz durch und verstehen Sie den Aufbau Ihres Modelles.
●Überprüfen Sie den Verpackungsinhalt.
Sollten Teile fehlen, wenden Sie sich direkt an Ihren Fachhändler oder an den Kyosho-Vertreiber in Ihrem Land.
●Verwechseln Sie Schrauben sowie kleine Bauteile nicht! Vergleichen Sie sie vor dem Einbau mit den Darstellungen in Originalgröße in den Baustufen.
●Beachten Sie beim Festziehen einer Treibschraube folgendes:
Schrauben Sie solange, bis das anzubringende Teil sicher und fest sitzt. Achten Sie jedoch darauf, daß Sie den Gewindegang im Material nicht überdrehen!
Antes de comenzar el montaje, lea atentamente lo siguiente:
●Lea, en primer lugar, este manual para obtener una idea general. ●Compruebe la conformidad de todas las piezas.
Si faltara alguna pieza, contacte con la tienda donde lo adquirió.
Pemar Model S.A. no admitirá reclamaciones en modelos en proceso de montaje. ●Antes de colocar las piezas y tornillos, asegurese mirando la tabla en cada paso. ●A la hora de apretar Tornillos Autorroscantes(TP):
Apriételos firmemente en la pieza donde corresponda.
No intente apretarlos demasiado, ya que podrían deformar la pieza.
2
2 / BEFORE YOU BEGIN(2)
BEVOR SIE BEGINNEN(2) / AVANT DE COMMENCER(2) / ANTES DE EMPEZAR(2)
2 |
|
So funktioniert die Bauanleitung: |
How to read the instruction manual: |
Comment lire les instruction: |
Cómo leer el manual de instrucciones:
Example
Exemple Beispiel Ejemplo
C:No. No.
A:Indicates the number of the assembly step and the part(s) that are to be assembled.
B:Details Key Number, Actual Size drawings and the Quantity of parts Used.
C:All parts, except screws, are identified by key Numbers. When purchasing spare parts, identify the key number of the part required and cross reference this to the Spare Parts page, which shows the purchasable spare parts and the key numbers contained within.
D:This instruction manual uses several symbols. Pay careful attention to them during construction. Details are given at the bottom of each page.
|
/ Front Suspension / Vordere Aufhängung |
|
||
1 Suspension avant / Suspensión Delantera |
A |
|
||
4 5 x 10mm |
|
|
||
|
Metal Bushing |
6 |
|
|
|
Lager |
|
|
|
|
Bague Métal 5x10mm |
C |
5 |
|
|
Casquillo Metálico 5x10mm |
D |
||
|
4 |
B |
|
|
|
|
|
||
5 |
|
|
7 |
|
|
King Pin |
|
|
|
|
Achsschenkelbolzen |
C |
|
|
|
Vis à fusée |
|
|
|
|
King Pin |
|
|
|
|
4 |
|
5 |
|
A:Die Nummer der Baustufe sowie das zu bauende Teil werden angegeben.
B:Teilenummer, Teilename, Darstellung in Originalgröße und Anzahl.
C:Die Teilenummer stellt den Bezug zu unserer Bestellnummer her. Am Ende der Bauanleitung finden Sie eine Ersatzteilliste, die zu der Teilenummer die entsprechende Bestellnummer liefert.
D:Diese Bauanleitung verwendet verschiedene Piktogramme, deren Bedeutungen unten auf jeder Seite erklärt werden.
A:Numéro de la plage de montage et le nom de la pièce à assembler.
B:Numéro de référence de la pièce, nom, illustration en grandeur réelle et quantité utilisée.
C:Toutes les pièces, exceptées les vis, sont identifiées par un numéro de référence. Pour l’achat de pièces de rechange, trouvez ce numéro dans la liste pour pièces de rechange à la fin de cette notice. Toute à la gauche de cette même liste, vous trouverez ainsi le numéro de commande correspondant.
D:Cette notice utilise des icônes dans les plages de montage. Référez-vous au bas de chaque page pour savoir leur signification.
A:Indica el número del Paso y la Parte a ser montada.
B:Número, Nombre de la Pieza, Dibujo a escala real, Cantidad utilizada.
C:Todas las piezas, excepto los tornillos vienen identificadas por un número. Para comprarlas por separado,
mire el número en la lista de piezas y apunte la referencia de la columna izquierda.
D:Este manual de instrucciones utiliza diversos símbolos.
Téngalos en cuenta durante el montaje.
3 |
|
Erklaerung zu den Symbolen in dieser Anleitung |
Symbols used throughout the instruction manual, comprise: |
Liste des symboles à respecter lors du montage: |
|
|
|
Pictogramas utilizados en este manual de instrucciones |
|
|
|
|
|
|
|
|
||
|
|
|
|||||||
|
Pay close attention here! |
|
|
|
Assemble left and right sides the same way. |
|
Ensure smooth, non-binding movement when assembling. |
||
|
Vorsicht! Wichtiger Hinweis! |
|
|
|
Bauen Sie eine linke und eine rechte Seite. |
|
Das Teil muß sich leicht bewegen lassen. |
||
|
Attention! Avis important! |
|
|
|
Assemblez le côté gauche comme le côté droit. |
|
La pièce doit pouvoir pivoter autour de la vis. |
||
|
Preste atención. |
|
|
|
Realice el montaje de igual forma en ambos lados. |
|
Asegúrese que la pieza se mueve suavemente. |
||
|
|
|
|
|
|
|
|
|
|
|
|
|
|
|
|||||
|
Apply instant glue (CA glue, super glue). |
|
|
|
|
Cut off excess. |
|
Assemble in the specified order. |
|
|
Verwenden Sie Sekundenkleber. |
|
|
|
|
Überschüssiges Material abschneiden. |
|
In der angegebenen Reihenfolge zusammenbauen. |
|
|
Collez avec de la colle cyanoacrylate. |
|
|
|
|
Coupez l’excès. |
|
Assemblez dans l’ordre indiqué. |
|
|
Aplique pegamento cianocrilato |
|
|
|
Corte el sobrante. |
|
Realice el montaje en el orden indicado. |
||
|
|
|
|
|
|
|
|
|
|
|
|
|
|
|
|
x2 |
|||
|
Apply grease. |
|
|
|
|
Cut |
off shaded portion. |
Assemble as many times as specified. |
|
|
Fetten. |
|
|
|
Schneiden Sie die schraffierten Flächen heraus. |
Sooft wie angegeben zusammenbauen. |
|||
|
Graissez. |
|
|
|
Coupez la partie grisée. |
|
Assemblez aussi souvent qu’indiqué. |
||
|
Aplicar grasa. |
|
|
Corte la zona oscurecida. |
|
Repita las veces señaladas. |
|||
|
|
|
|
|
|
|
|
|
|
|
|
|
|
|
|||||
|
Apply threadlocker (screw cement). |
|
|
|
|
Temporarily tighten. |
|
True-to-scale diagram. |
|
|
Verwenden Sie Schraubensicherungslack. |
|
|
|
|
Vorläufig festziehen. |
|
Maßstabsgetreue Darstellung. |
|
|
Appliquer du frein filet. |
|
|
|
|
Vissez temporairement. |
|
Illustration à l’échelle. |
|
|
Aplique líquido fijatornillos. |
|
|
|
Apriete de manera provisional. |
|
Dibujo a tamaño real. |
||
Must be purchased separately!
Das Teil ist nicht im Bausatz enthalten! Doit être acheté séparément!
Debe comprarse por separado.
2mm |
2mm
Drill holes with the specified diameter. Bohren Sie Löcher im angegebenen Ø. Percez des trous dans le Ø indiqué. Perfore agujeros con la medida indicada.
3

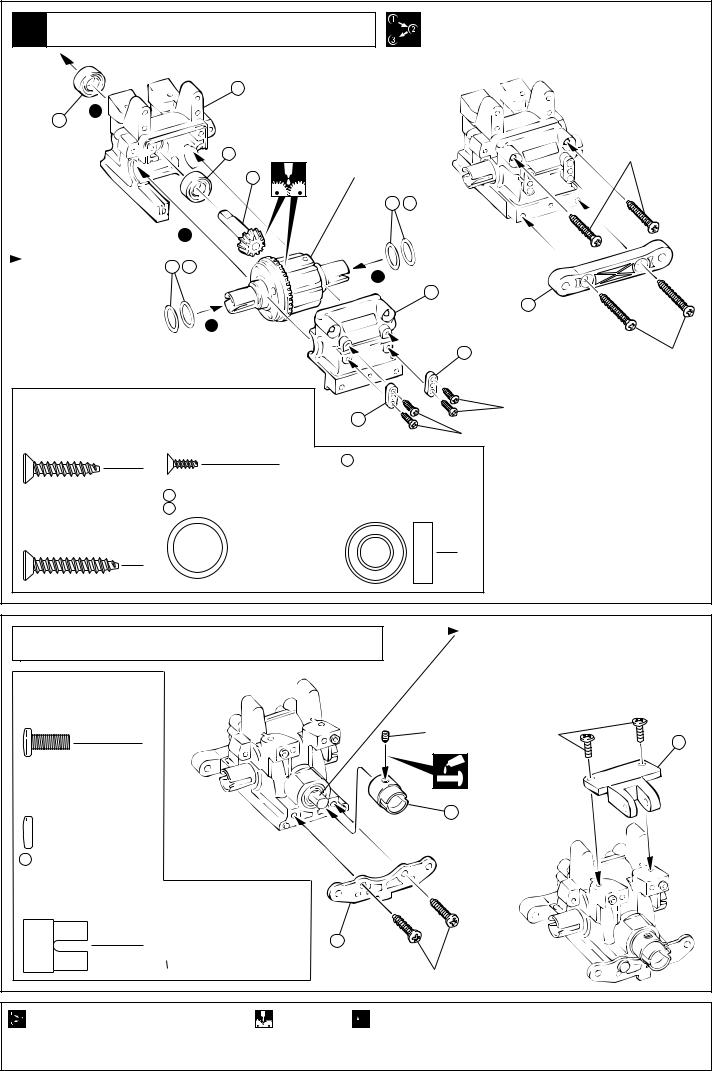
1 |
/ Differential / Gear Differential |
|
|
Différentiel / Diferencial |
|
|
|
|
|
|
4x4mm |
|
1 |
|
4 |
|
3 |
|
|
|
|
1 |
|
|
|
|
|
|
8 ( ) |
|
6 |
|
(For front and rear) |
5 |
|
|
(vorn & hinten) |
|
2 |
|
(Pour l'avant et l'arrière) |
|
2 |
|
(Delantero y Trasero) |
|
|
x2
For front and rear vorn & hinten
Pour l'avant et l'arrière
Delantero y Trasero
|
|
4 |
|
|
4 x 4mm |
11 4 x 10mm |
|
11 |
10 |
Set Screw |
Shim |
|
|
|
Gewindestift |
Unterlegscheibe |
|
9 |
|
Vis BTR 4x4mm |
Rondelle de callage |
5 8 x 16mm |
|
|
Prisionero 4x4mm |
Arandela |
11 |
|
|
2 |
8 |
Ball Bearing |
|
|
Kugellager |
|
|
||
6 6mm O |
|
Roulements à billes |
|
|
O-ring |
4 2.6 x 14mm |
Rodamiento |
|
11 |
O-Ring |
Shaft (Black) |
|
|
|
Joint thorique |
Welle (Schwarz) |
2 |
|
|
Junta Tórica |
Axe 2.6x12.5mm (Noir) |
10 |
|
|
2 |
Eje 2.6x12.5mm (Negra) |
|
|
|
|
2 |
|
|
|
/ Differential / Gear Differential |
|
x2 |
|
|
2 Différentiel / Diferencial |
|
For front and rear |
||
|
vorn & hinten |
|||
|
|
|
Pour l'avant et l'arrière |
|
|
|
|
|
Delantero y Trasero |
4
|
|
No.SIL3000 |
|
|
|
Diff. Oil |
#3000 |
2 |
|
Differential-Oel |
|
1 |
Huile de différentiel |
||
|
Aceite diferenciales |
||
2
6 |
3x12mm |
|

 15 12 5


5 8 x 16mm Ball Bearing Kugellager Roulements à billes Rodamiento
2
8 ( ) |
|
( ) |
|
(For front and rear) |
|
(For front and rear) |
|
(vorn & hinten) |
|
(vorn & hinten) |
3x12mm |
(Pour l'avant et l'arrière) |
(Pour l'avant et l'arrière) |
||
(Delantero y Trasero) |
|
(Delantero y Trasero) |
|
4 2.6 x 14mm |
3 x 12mm TP |
6 6mm O |
|
Shaft (Black) |
TP F/H Screw |
O-ring |
|
Welle (Schwarz) |
SK Treibschraube |
O-Ring |
|
Axe 2.6x12.5mm (Noir) |
Vis TP F/H 3x12mm |
Joint thorique |
|
Eje 2.6x12.5mm (Negra) |
Tornillo 3x12mm TP F/H |
Junta Tórica |
2 |
2 |
8 |
|
|
|
|
|
|
x2
Assemble as many times as specified. Sooft wie angegeben zusammenbauen. Assemblez aussi souvent qu’indiqué. Repita las veces señaladas.
|
|
|
|
|
|
||
|
Assemble in the specified order. |
|
Must be purchased separately! |
|
In der angegebenen Reihenfolge zusammenbauen. |
|
Das Teil ist nicht im Bausatz enthalten! |
|
Assemblez dans l’ordre indiqué. |
|
Doit être acheté séparément! |
|
Realice el montaje en el orden indicado. |
|
Debe comprarse por separado. |
|
Apply grease. |
Fetten. |
Graissez. |
Aplicar grasa. |
4
3 |
/ Rear Gearbox / Hintere Getriebegehäuse |
|
|||
Carter de différentiel arrière / Caja de transmisión Trasera |
|
||||
|
|
|
16 |
|
|
|
5 |
1 |
|
|
|
|
|
|
|
Rear Differential |
|
|
|
5 |
|
Hintere Gear Differential |
4x20mm |
|
|
|
Différentiel Arrière |
||
|
|
|
18 |
Diferencial Trasera |
|
|
|
|
|
|
|
19 , 20 |
Adjust the backlash with the shims.
Zahnflankenspiel mit Distanzscheiben justieren
Ajuster l'entre-dents avec les rondelles.
Ajuste la holgura con las arandelas.
3 |
|
|
19 , 20 |
2 |
|
|
|
|
|
17 |
192 |
|
2 |
|
|
|
49 |
4x25mm |
4 x 20mm TP |
2.6 x 8mm TP |
|
2.6x8mm |
||
TP F/H Screw |
|
TP F/H Screw |
49 |
||
SK Treibschraube |
|
SK Treibschraube |
2.6x8mm |
||
Vis TP F/H 4x20mm |
|
Vis TP F/H 2.6x8mm |
|
||
Tornillo 4x20mm TP F/H |
|
Tornillo 2.6x8mm TP F/H |
5 8 x 16 x 5mm |
|
|
2 |
|
|
4 |
||
|
|
|
Ball Bearing |
||
4 x 25mm TP |
19 13 x 16 x 0.5mm |
Thick |
Kugellager |
||
Roulements à billes |
|||||
TP F/H Screw |
20 |
13 x 16 x 0.3mm |
Thin |
Rodamiento |
|
SK Treibschraube |
|
Shim |
|
|
|
Vis TP F/H 4x25mm |
|
Unterlegscheibe |
|
|
|
Tornillo 4x25mm TP F/H |
|
Rondelle de callage |
|
2 |
|
2 |
|
Arandela |
|
||
|
|
|
|||
|
|
|
|
|
|
|
/ Rear Gearbox / Hintere Getriebegehäuse |
|
4 |
||
Carter de différentiel arrière / Caja de transmisión Trasera |
4 x 10mm Screw
LK Schraube
Vis 4x10mm
Tornillo 4x10mm
2
4 x 15mm TP
TP Screw
LK Treibschr
Vis TP 4x15mm
Tornillo 4x15mm TP

 2
2
181L Joint Cup (L) Getriebeausgang (L) Noix de cardan (Longue) Vaso Salida Palier (L)
1
5 x 4mm Set Screw
Gewindestift
Vis BTR 5x4mm 22 Prisionero 5x4mm

 1
1
Firmly tighten the set screws onto the flat spots.
Ziehen Sie die Gewindestifte auf die ab-geflachten
Flächen fest.
Vissez les vis type BTR sur les méplats.
Apriete los prisioneros firmemente en las partes
planas del eje.
5x4mm |
4x10mm |
251 |
|
|
181
4x15mm
Assemble in the specified order.
In der angegebenen Reihenfolge zusammenbauen. Assemblez dans l’ordre indiqué.
Realice el montaje en el orden indicado.
|
Apply grease. |
Fetten. |
Graissez. |
Aplicar grasa. |

 Apply threadlocker (screw cement). Verwenden Sie Schraubensicherungslack. Appliquer du frein filet.
Aplique líquido fijatornillos.
5
5 |
/ Chassis / Das Chassis |
Chassis / Chasis |
4 x 15mm TP |
252 |
|
|
|
TP F/H Screw |
|
|
|
SK Treibschraube |
|
4x15mm |
|
Vis TP F/H 4x15mm |
|
|
|
Tornillo 4x15mm TP F/H |
|
|
|
4 |
4x15mm |
|
|
|
|
|
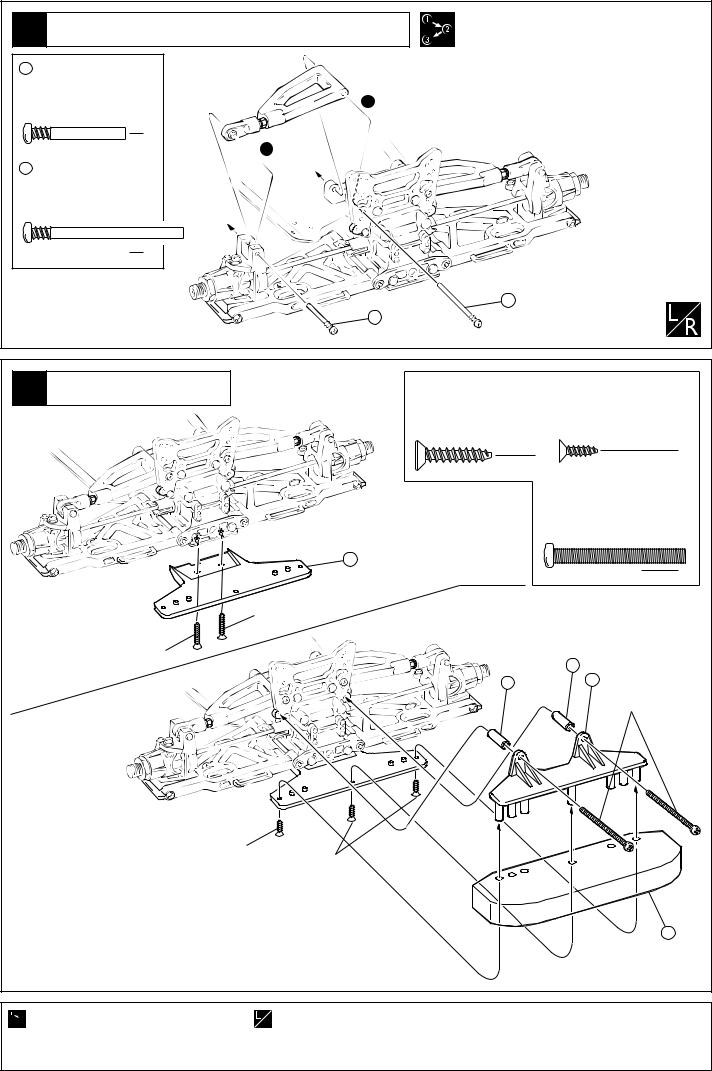
6 |
/ Front Gearbox / Vorderes Getriebegehäuse |
|
|
Carter de différentiel avant / Caja de transmisión Delantera |
|
||
|
16 |
|
|
5 |
1 |
|
|
|
|
||
|
|
|
|
|
|
Front Differential |
|
|
5 |
Vorne Gear Differential |
4x20mm(TP F/H) |
|
Différentiel Avant |
||
|
18 |
Diferencial Delantera |
|
19 , 20 |
Adjust the backlash with the shims.
Zahnflankenspiel mit Distanzscheiben justieren Ajuster l'entre-dents
avec les rondelles. Ajuste la holgura con
las arandelas.
|
3 |
|
19 , 20 |
|
2 |
|
|
|
|
|
17 |
|
2 |
203 |
|
|
|
|
|
49 |
4x20mm
4 x 20mm TP |
2.6 x 8mm TP |
2.6x8mm |
||
TP Screw |
|
TP F/H Screw |
49 |
|
LK Treibschr |
|
SK Treibschraube |
|
2.6x8mm |
Vis TP 4x20mm |
|
Vis TP F/H 2.6x8mm |
||
Tornillo 4x20mm TP |
|
Tornillo 2.6x8mm TP F/H |
5 8 x 16 x 5mm |
|
2 |
|
|
4 |
|
|
|
Ball Bearing |
||
|
|
|
|
|
4 x 20mm TP |
19 13 x 16 x 0.5mm |
Thick |
Kugellager |
|
Roulements à billes |
||||
TP F/H Screw |
20 |
13 x 16 x 0.3mm |
Thin |
Rodamiento |
SK Treibschraube |
|
Shim |
|
|
Vis TP F/H 4x20mm |
|
Unterlegscheibe |
|
|
Tornillo 4x20mm TP F/H |
|
Rondelle de callage |
2 |
|
2 |
|
Arandela |
||
|
|
|||
|
|
|
|
|

 Assemble in the specified order.
In der angegebenen Reihenfolge zusammenbauen. Assemblez dans l’ordre indiqué.
Realice el montaje en el orden indicado.
|
Apply grease. |
Fetten. |
Graissez. |
Aplicar grasa. |
6

|
|
7 |
/ Front Gearbox / Vorderes Getriebegehäuse |
Carter de différentiel avant / Caja de transmisión Delantera |
Firmly tighten the set screws onto the flat spots.
Ziehen Sie die Gewindestifte auf die ab-geflachten Flächen fest.
Vissez les vis type BTR sur les méplats.
Apriete los prisioneros firmemente en las partes planas del eje.
5x4mm
181
61
|
|
4x20mm |
5 x 4mm |
4 x 20mm TP |
181 L |
Set Screw |
TP F/H Screw |
Joint Cup (L) |
Gewindestift |
SK Treibschraube |
Getriebeausgang (L) |
Vis BTR 5x4mm |
Vis TP F/H 4x20mm |
Noix de cardan (Longue) |
Prisionero 5x4mm |
Tornillo 4x20mm TP F/H |
Vaso Salida Palier (L) |
1 |
4 |
|
|
1 |
|
|
|
62
4x20mm
8 |
/ Chassis / Das Chassis |
Chassis / Chasis |
4 x 15mm TP |
|
TP F/H Screw |
|
SK Treibschraube |
|
Vis TP F/H 4x15mm |
|
Tornillo 4x15mm TP F/H |
4x15mm |
2 |
4x15mm |
|
|
Apply threadlocker (screw cement). |
|
Verwenden Sie Schraubensicherungslack. |
|
Appliquer du frein filet. |
|
Aplique líquido fijatornillos. |
|
7
|
|
|
|
9 |
2 / 2 Speed Transmission / 2-Gang-Getriebe |
269 |
|
Boite de vitesse / Cambio 2 velocidades |
|||
268 |
|||
|
|
3 x 6mm |
|
5 |
8 x 16mm 269 |
4 x 4mm |
254 E7 E |
267 |
||
Screw |
|
|
Ball Bearing |
Lock Set Screw |
|
E-ring E-Ring E7 |
||
LK Schraube |
|
Kugellager |
Inbusschraube |
|
Clips 7mm Clip E7 |
|
||
Vis 3x6mm |
|
Roulements à billes |
Vis de réglage |
|
|
|
||
Tornillo 3x6mm4 |
Rodamiento |
Tornillo prisionero |
1 |
1 |
262 |
|||
267 3mm |
Ball Kugel |
2 |
|
|
|
|
|
|
Rotule |
Rótula |
1 |
6 x 12mm |
258 |
259 |
|
|
|
257 6 x 12mm |
260 |
|
|
3x6mm |
|
|||
|
|
|
|
|||||
Washer Scheibe |
|
Metal Bushing |
|
|
|
|
||
|
|
|
|
|
|
|||
Rondelle Arandela |
|
Lager |
|
|
|
|
261 |
|
|
|
|
Bague Métal 6x12mm |
|
|
|
|
|
|
|
1 |
Casquillo Metálico 6x12mm |
|
|
|
3x6mm |
260 |
|
|
|
|
|
|
|||
267 5 x 4mm |
|
2 |
|
326 |
|
260 |
|
|
Set Screw |
|
|
5 |
|
|
|
||
Gewindestift |
|
|
|
|
|
|||
Vis BTR 5x4mm |
|
|
|
|
|
|
||
Prisionero 5x4mm |
|
255 |
|
|
|
|
||
|
|
2 |
254 |
|
|
257 |
|
|
268 |
|
|
|
No.92638 |
||||
|
|
|
|
|||||
Shift Cam Spring |
|
|
|
255 No.92638 |
||||
Feder |
|
|
|
|
||||
Ressort de cliquet |
|
253 |
|
No.92638 Snap Pin can be used instead of |
255 . |
|||
Muelle |
|
1 |
|
Klammer Best.-Nr. 92638 kann alternativ verwendet werden. |
||||
|
|
|
|
La pièce 255 |
peut être remplacée par des clips réf.92638. |
|||
|
|
|
|
|
Puede utilizar el clip No.92638 . |
|
||
5x4mm
5x4mm
5 270
Snap Pin Karosserieklammer Insérer le clips Clip carrocería
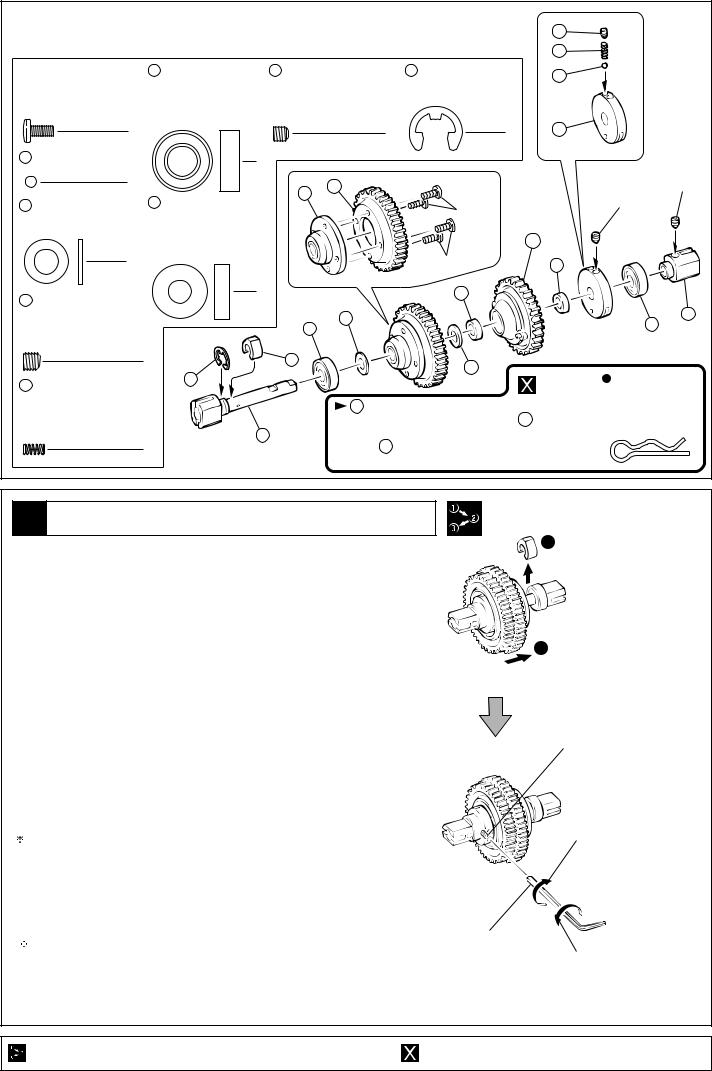
10 / Center Gearbox / Die mittlere Getriebegehäuse Carter de différentiel central / Caja central
4x4mm4
Before adjusting the gear shift timing, adjust the engine itself. Screw the locking set screw 4x4mm in 4 turns (set screw for gear shift timing adjustment) so the 2-speed transmission unit does not shift up when adjusting and running the engine. Adjust the engine while running the car and do not over tighten the set screw as it may cause major damages which will be difficult to repair.
Vor dem Einstellen des Getriebes, muss der Motor korrekt eingestellt werden! Die Inbusschraube M4x4 mm 4 Umdrehungen einschrauben, so dass das Getriebe nicht schalten kann. Schraube nicht gewaltsam eindrehen!
Régler tout d'abord le moteur lui-même (avant de régler la boite de vitesse). Pour cela, visser - SANS EXCES - la vis de réglage de la boite d'environ 4 tours, afin de la bloquer et que la seconde vitesse ne passe pas pendant le réglage du moteur. Régler le moteur en roulant.
Antes de ajustar el cambio, ajuste el motor. Apriete el tornillo prisionero 4x4mm 4 vueltas de manera que el cambio no actúe mientras ajusta y rueda el motor. Ajuste el motor y no apriete el motor demasiado para evitar daños.
While running the car and checking the gear shift timing, unscrew the locking set screw 4x4mm half a turn at a time. For reasons of safety, adjust only when the engine is not running ! Continue adjusting until the shift timing is matched and becomes suitable for the location where the car is run.
Nun die Inbusschraube M4x4 mm schrittweise (jeweils ein halbe Umdrehung) wieder herausdrehen und den Schaltpunkt des Getriebes beobachten. Einstellungen nur bei stehendem Motor vornehmen!
Pour régler le temps de passage de la boite de vitesse, dévisser la vis de réglage 4x4mm. par demi-tours successifs. Pour des rasions de sécurité, procéder au réglage de la boite moteur coupé! Peaufiner le réglage selon la configuration spécifique de la piste.
Mientras rueda el motor y comprueba el cambio, afloje el tornillo 4x4mm de media en media vuelta cada vez. Por razones de seguridad realice el ajuste con el coche parado. Reajuste hasta que el cambio se ajuste al tipo de circuito en el que vaya a rodar.
80%
Set the timing so the gears shift up when 80% of total rpm are reached. This type of setting will allow you to make a better use of engine performance.
Der Schaltpunkt soll bei ca. 80% der max. Drehzahl des Motors liegen.
Régler le temps de passge de la vitesse lorsque le régime moteur est à 80%. Ce type de réglage permettra une exploitation optimale des performances du moteur.
Realice el ajuste de manera que el cambio actúe al alcanzar el 80% de las rpm. Este tipo de ajuste le permitirá obtener unas mejores prestaciones de su motor.
2
Because the 2-speed transmission is running at high speed, often overhaul and - if nesessary - adjust and retighten all its bearings and screws.
Das Getriebe regelmaeflig warten, ggf. die Lager austauschen und die Schrauben auf festen Sitz pruefen!
La boite de vitesse automatique permettant de hautes vitesses, il est parfois nécessaire de vérifier et de réajuster ses vis et roulements.
Ya que el cambio de 2 velocidades actúa a alta velocidad puede desajustarse, reajuste y apriete de nuevo los tornillos y rodamientos si fuera necesario.
1Remove the collar. Lager entfernen Retirer l'entretoise.
Desmonte el casquillo
2 |
Slide the gear unit forward. |
Einheit nach vorn schieben |
Faire tourner la pignnerie vers l'avant.
Empuje las coronas
4x4mm
Locking Set Screw 4x4mm Inbusschraube M4x4 mm Vis de réglage 4x4mm. Apriete el tornillo 4x4mm
Shift timing becomes slower. Spaeter Schaltpunkt
Le temps de passge devient lent. El cambio actúa más lento.
2mm |
|
Hex Wrench (2mm) |
|
Sechskantschlüssel (2mm) |
|
Clé Hexagonale (2mm) |
Shift timing becomes quicker. |
Llave Allen (2mm) |
Frueher Schaltpunkt |
|
Le temps de passge devient rapide. |
|
El cambio actúa más rápido. |
/ Assemble in the specified order. / In der angegebenen Reihenfolge zusammenbauen. Assemblez dans l’ordre indiqué. / Realice el montaje en el orden indicado.
/ Must be purchased separately! / Das Teil ist nicht im Bausatz enthalten! Doit être acheté séparément! / Debe comprarse por separado.
8
11 / Center Gearbox / Die mittlere Getriebegehäuse Carter de différentiel central / Caja central
3 x 18mm |
78 |
|
Screw |
Brake Caliper |
|
LK Schraube |
Bremssattel |
|
Vis 3x18mm |
Plaquette de frein |
|
Tornillo 3x18mm |
Zapata freno |
|
2 |
|
|
79 |
|
|
Brake Pad (Black) |
3 |
|
Bremsbelag |
||
|
||
Garniture de frein (Noire) |
|
|
Zapata freno (Negra) |
|
|
4 |
|
11mm approx. 11mm ca. 11mm environ. 11mm aprox. 11mm
79 78
79 |
78 |
79 |
271 |
|
80 |
3x18mm |
78 |
79 |
80 |
|
|||
|
|
|
271
Note the direction. Einbaurichtung beachten. Notez le sens.
Fíjarse en el dibujo.
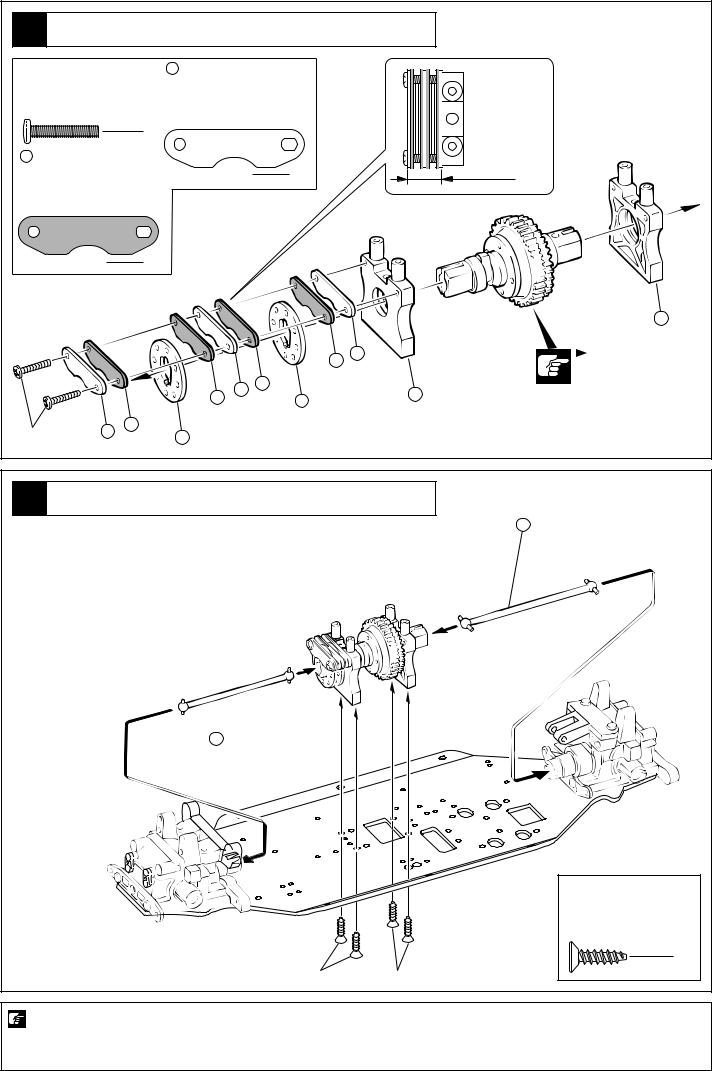
12 / Center Gearbox / Die mittlere Getriebegehäuse Carter de différentiel central / Caja central
86 ( ) (Long) (Lang)
(Longue)
(Largo)
263 ( ) (Short) (Kurz)
(Courte)
(Corto)
4 x 15mm TP
TP F/H Screw
SK Treibschraube
Vis TP F/H 4x15mm
Tornillo 4x15mm TP F/H
|
4 |
4x15mm |
4x15mm |
Pay close attention here! Vorsicht! Wichtiger Hinweis! Attention! Avis important! Preste atención.
9

/ Chassis / Das Chassis |
|
|
|
13 Chassis / Chasis |
|
|
|
76 |
|
|
|
57 |
|
|
|
58 |
58 |
56 |
3x15mm |
60mm |
|
|
|
approx. 60mm |
|
|
|
ca.60mm |
|
|
|
environ.60mm |
|
|
|
aprox.60mm |
|
|
|
3 x 10mm |
58 |
6.8mm L |
56 |
3x10mm |
|
|
|||||
F/H Hex Screw |
|
|
Ball End (L) |
Torque Rod Ball |
|
SK Schraube |
|
|
Kugelpfanne (L) |
Kugelpfosten |
|
Vis F/H 3x10mm |
|
|
Chape (L) |
Rotule épaulée |
|
Tornillo 3x10mm F/H |
|
Rótula (L) |
Rótula rigidificador |
|
|
1 |
|
|
2 |
1 |
|
|
|
|
|
||
3 x 15mm |
76 |
6.8mm |
|
57 4 x 80mm |
|
Screw |
|
|
Ball |
Rod |
|
LK Schraube |
|
|
Kugel |
Anlenkgestänge |
|
Vis 3x15mm |
|
|
Rotule 6.8mm |
Tringle |
|
Tornillo 3x15mm |
|
|
Rótula 6.8mm |
Tirante |
|
1 |
|
|
1 |
|
1 |
14 / Rear Shock Stay / Hintere Dämpferbrücke Support amortisseurs arrière / Soporte amortiguadores trasero
45
3x10mm
45
26

 3x10mm
Holes for mounting.
Diese Bohrungen verwenden
Trous pour le montage.
Agujeros a utilizar
3x12mm
3x12mm |
4x10mm |
|
4 x 10mm |
3 x 12mm TP |
45 7.8mm |
3 x 10mm |
Screw |
TP Screw |
Flange Ball |
Cap Screw |
LK Schraube |
LK Treibschr |
Kugel m. Bund |
Inbusschraube |
Vis 4x10mm |
Vis TP 3x12mm |
Boule épaulée |
Vis |
Tornillo 4x10mm |
Tornillo 3x12mm TP |
Rótula biselada |
Tornillo allen |
4 |
2 |
2 |
2 |
|
|
|
|
Pay close attention here! |
|
|
|
Vorsicht! Wichtiger Hinweis! |
|
|
|
Attention! Avis important! |
|
|
|
Preste atención. |
|
|
|
10
/ Rear Suspension / Hintere Aufhängung |
|
|
R |
35 |
||||||||
15 Suspension arrière / Suspensión Trasera |
|
|
For Right |
|
Marked “R” |
|
||||||
|
|
Rechts |
|
R links markiert |
||||||||
|
|
L |
|
|
|
|
|
|
Drolte |
|
Marqué “R” |
|
For Left |
|
Marked “L” |
|
34 |
|
|
|
Derecha |
|
"R" derecha |
|
|
Links |
|
L links markiert |
|
|
|
|
|
|
|
|
||
Gauche |
|
Marqué “L” |
|
|
|
|
|
|
|
|
|
|
Izquierda |
|
"L" derecha |
|
|
5 |
40 |
|
|
|
|
|
|
|
|
|
36 |
|
|
|
|
|
|
|
||
|
|
|
|
|
|
|
|
|
|
|
|
|
54 |
|
5 |
|
|
|
|
|
|
|
|
|
|
|
2 |
|
|
|
1 |
4x12mm |
|
|
|
|
|
|
3 |
|
|
|
|
|
|
|
|
|
|||
|
|
|
|
|
|
|
|
Oben |
||||
|
|
|
|
|
|
|
|
|
Top |
For adjusting the |
||
|
|
|
|
|
|
|
|
|
Haut |
Parte superior |
ground clearance. |
|
5x4mm |
33 |
|
|
|
|
|
|
|
|
|
|
Zur Justierung der |
|
|
|
|
|
|
|
|
|
|
Bodenfreiheit. |
||
|
39 |
38 |
|
|
|
|
|
|
|
|
3mm |
Réglage de la garde |
|
|
|
|
|
|
|
|
|
|
au sol. |
||
|
|
|
|
|
|
|
|
|
|
|
Para ajustar la altura. |
|
|
|
|
|
|
|
|
|
|
Bottom |
unten |
||
|
|
|
|
|
|
|
|
|
|
|||
|
|
|
39 |
|
|
|
|
Bas |
|
Parte inferior |
|
|
|
|
|
|
|
|
37 |
|
|
|
|
||
|
|
|
|
|
|
|
|
|
|
|
|
|
4 x 12mm |
|
|
|
|
|
|
|
|
|
|
|
|
|
Set Screw |
|
|
|
|
|
|
|
|
|
|
|
|
Gewindestift |
|
|
|
|
|
5 x 4mm |
|
|
|
||
|
Vis BTR 4x12mm |
36 |
3 x 8 x 5mm |
|
|
|
|
|
||||
|
Prisionero 4x12mm |
|
|
Plastic Collar |
|
Set Screw |
|
|
|
|||
|
|
2 |
|
|
Kunststofflager |
Gewindestift |
|
|
|
|||
5 8 x 16mm |
|
|
Entretoise plastique |
Vis BTR 5x4mm |
|
|
|
|||||
|
|
Casquillo Plástico |
Prisionero 5x4mm |
|
|
|
||||||
Ball Bearing |
|
|
|
|
2 |
|
|
2 |
|
|
|
|
Kugellager |
|
|
|
|
|
|
38 3 x 48mm |
|
|
|
|
|
Roulements à billes |
54 2.6 x 17mm |
|
|
39 E |
|
|||||||
Rodamiento |
|
|
Shaft (Black) |
|
|
|||||||
|
|
|
|
|
Shaft |
|
Welle (Schwarz) |
|
E-ring |
|
||
|
|
|
|
|
Welle |
|
Axe 3x48mm (Noir) |
|
E-Ring |
|
||
|
|
4 |
|
|
Axe 2.6x17mm |
|
Eje 3x48mm (Negra) |
|
Clips |
|
||
|
|
|
|
Eje 2.6x17mm |
|
|
|
|
Clip |
|
||
|
|
|
|
|
|
2 |
|
|
2 |
|
|
4 |
|
|
|
|
|
|
|
|
|
|
|
|
|
/ Rear Suspension / Hintere Aufhängung |
|||
16 Suspension arrière / Suspensión Trasera |
|
||
|
|
|
For Right |
43 4 x 74mm |
|
|
Rechts |
Shaft Welle |
Eje 4x74mm |
2 |
Drolte |
Axe 4x74mm |
Derecha |
||
44 E |
|
|
43 |
E-ring |
|
|
|
E-Ring |
44 |
|
|
Clips |
|
|
|
Clip |
|
|
|
4 |
|
|
|
|
|
|
|
For Left |
|
|
|
Links |
|
|
|
Gauche |
|
|
|
Izquierda |
|
|
|
|
|
|
44 |

 Assemble in the specified order.
In der angegebenen Reihenfolge zusammenbauen. Assemblez dans l’ordre indiqué.
Realice el montaje en el orden indicado.
 Assemble left and right sides the same way. Bauen Sie eine linke und eine rechte Seite. Assemblez le côté gauche comme le côté droit. Realice el montaje de igual forma en ambos lados.
11
17 / Rear Suspension / Hintere Aufhängung Suspension arrière / Suspensión Trasera
42 5 x 38mm |
|
Adjust Rod |
|
Gestaenge |
|
Biellette réglable |
|
Tirante ajustable |
|
2 |
|
41 7.8mm |
|
Ball End |
x2 |
Kugelpfanne |
|
Chape |
|
Rótula |
|
4 |
41 |
|
17.5mm approx. 17.5mm ca. 17.5mm environ 17.5mm aprox. 17.5mm
42 41
The Side with groove is reverse screw.
Die markierte Seite hat ein Linksgewinde.
Le côté avec le déport est le pas inversé.
El lado con la muesca es el lado con
rosca inversa.
|
/ Rear Suspension / Hintere Aufhängung |
||
18 Suspension arrière / Suspensión Trasera |
|||
46 |
3 x 25mm |
48 7.8mm |
|
|
Screw Pin |
|
Ball |
|
Schraubachse |
|
Kugel |
|
Vis |
|
Rotule 7.8mm |
|
Tornillo Pasador |
|
Rótula 7.8mm 2 |
|
2 |
|
|
|
|
|
1 |
|
|
48 |
|
|
3 |
|
46 |
|
|
|
4 |
|
|
|
2 |
|
|
|
|
|
Holes for mounting. |
|
47 |
Diese Bohrungen verwenden |
|
||
Trous pour le montage. |
|
|
|
|
Agujeros a utilizar. |
|
|

 Assemble in the specified order.
In der angegebenen Reihenfolge zusammenbauen. Assemblez dans l’ordre indiqué.
Realice el montaje en el orden indicado.
Assemble left and right sides the same way. Bauen Sie eine linke und eine rechte Seite. Assemblez le côté gauche comme le côté droit. Realice el montaje de igual forma en ambos lados.
Pay close attention here! Vorsicht! Wichtiger Hinweis! Attention! Avis important! Preste atención.
x2
Assemble as many times as specified. Sooft wie angegeben zusammenbauen. Assemblez aussi souvent qu’indiqué. Repita las veces señaladas.
True-to-scale diagram. Maßstabsgetreue Darstellung. Illustration à l’échelle. Dibujo a tamaño real.
12
19 / Front Shock Stay / Vordere Dämpferbrücke Support amortisseurs avant / Soporte amortiguadores delantero
|
|
|
|
|
|
63 |
|
|
|
|
|
|
4x10mm |
3 x 12mm TP |
|
4 x 10mm |
|
|
|
|
TP Screw |
|
|
Screw |
|
|
3x12mm |
LK Treibschr |
|
|
LK Schraube |
|
|
|
Vis TP 3x12mm |
|
|
Vis 4x10mm |
|
4x10mm |
|
Tornillo 3x12mm TP |
|
|
Tornillo 4x10mm |
|
||
2 |
|
|
|
2 |
3x12mm |
|
|
|
|
|
|
||
/ Front Suspension / Vordere Aufhängung |
|
|||||
20 Suspension avant / Suspensión Delantera |
|
|
|
|||
|
|
|
|
|
4x10mm |
64 |
|
|
|
|
|
|
|
|
|
|
|
|
|
|
|
|
For Right |
R |
|
|
|
4 x 10mm |
|
Rechts |
|
|
|
|
|
|
Marked “R” |
|
|
||
Cap Screw |
|
Drolte |
|
R links markiert |
|
|
|
Derecha |
|
||||
Inbusschraube |
|
Marqué “R” |
68 |
|
||
Vis |
|
|
|
"R" derecha |
69 |
|
Tornillo allen 4 |
|
|
|
|
|
|
|
|
|
|
|
|
|
5 8 x 16 x 5mm |
|
|
|
66 |
|
|
Ball Bearing |
|
|
|
5 |
|
4x10mm |
Kugellager |
|
54 |
|
|
5 |
|
Roulements à billes |
|
2 |
|
|
||
Rodamiento |
|
|
|
|
|
|
4 |
|
5x4mm |
|
1 |
69 |
|
|
|
|
|
|||
54 2.6 x 17mm |
|
3 |
33 |
|
65 |
|
|
|
|
For Left |
67 |
||
Shaft |
|
|
|
|
Links |
|
Welle |
|
|
|
|
Gauche |
|
Axe 2.6x17mm |
|
|
|
|
Izquierda |
|
Eje 2.6x17mm |
69 |
|
|
|
|
|
2 |
|
|
|
|||
5 x 4mm |
|
Knuckle Collar |
|
|
|
|
|
Lager |
|
|
L |
|
|
Set Screw |
|
|
|
|
||
|
Bague épaulée de fusée |
|
|
|||
Gewindestift |
|
|
Marked “L” |
|
||
|
Casquillo |
|
|
|
||
Vis BTR 5x4mm |
|
|
|
L links markiert |
|
|
|
|
|
|
|
||
Prisionero 5x4mm |
|
|
4 |
|
Marqué “L” |
|
2 |
|
|
|
"L" derecha |
|
|
|
|
|
|
|
||
 Assemble left and right sides the same way. Bauen Sie eine linke und eine rechte Seite. Assemblez le côté gauche comme le côté droit. Realice el montaje de igual forma en ambos lados.
|
|
|
|
|
|
||
|
Assemble in the specified order. |
|
Apply threadlocker (screw cement). |
|
In der angegebenen Reihenfolge zusammenbauen. |
|
Verwenden Sie Schraubensicherungslack. |
|
Assemblez dans l’ordre indiqué. |
|
Appliquer du frein filet. |
|
Realice el montaje en el orden indicado. |
|
Aplique líquido fijatornillos. |
13
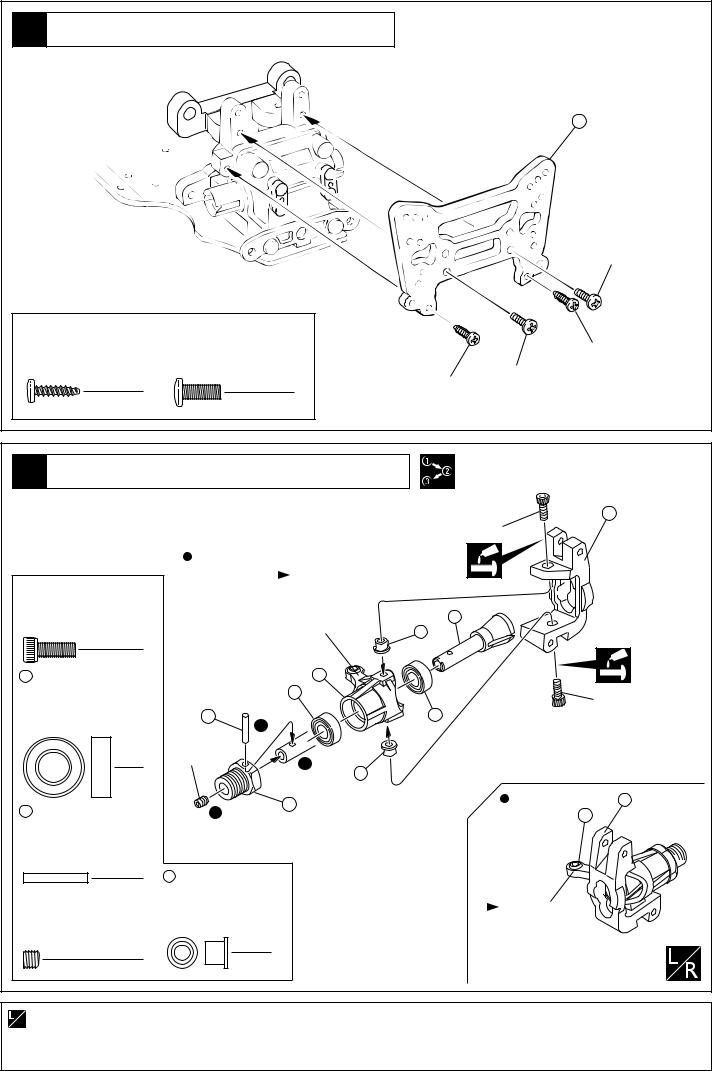
21 / Front Suspension / Vordere Aufhängung Suspension avant / Suspensión Delantera
|
|
|
|
|
|
|
47 |
|
|
|
|
|
|
47 |
|
|
|
|
|
|
|
|
|
|
For Left |
|
|
|
|
|
|
|
|
Links |
|
|
|
|
For Right |
7 |
|
|
Gauche |
|
4 x 12mm |
Rechts |
|
|
|
Izquierda |
|||
|
Set Screw |
|
Drolte |
|
|
|
|
|
|
Gewindestift |
Derecha |
|
|
|
|
||
|
Vis BTR 4x12mm |
|
|
44 |
|
|
|
|
|
Prisionero 4x12mm |
|
|
|
|
|||
|
|
2 |
|
|
3 |
|
|
|
39 |
E |
|
|
|
|
|
|
|
|
39 |
|
|
|
|
|
||
|
E-ring |
|
4x12mm |
|
|
|
|
|
|
E-Ring |
|
|
5 |
|
|
|
|
|
Clips |
|
|
|
|
|
|
|
|
Clip |
|
4 |
|
|
|
|
|
|
|
4 |
|
2 |
43 |
|
|
|
|
|
|
|
|
|
|||
44 |
E |
|
71 |
|
|
|
||
|
|
|
|
|
|
|||
|
E-ring |
|
|
|
|
|
|
|
|
E-Ring |
|
|
39 |
|
44 |
|
|
|
Clips |
|
|
70 |
|
|
||
|
Clip |
|
|
6 |
1 |
|
|
|
|
|
4 |
|
|
|
|
||
|
|
|
|
|
|
|
|
|
71 3 x 38mm |
|
|
|
|
|
|
||
|
Shaft |
Welle |
Eje 3x38mm |
|
|
|
|
|
|
Axe 3x38mm |
|
Oben |
|||||
|
|
|
|
|
For adjusting the |
Top |
||
|
|
|
2 |
|
ground clearance. |
Haut |
Parte superior |
|
|
|
|
|
Zur Justierung der |
|
|
|
|
43 4 x 74mm |
|
|
|
|
||||
|
Bodenfreiheit. |
|
|
|
||||
|
Shaft |
Welle |
|
|
Réglage de la garde au sol. |
|
|
|
|
Axe 4x74mm |
Eje 4x74mm |
|
PAra ajustar la altura. |
|
|
3mm |
|
|
|
|
|
|
|
Bottom |
Unten |
|
|
|
|
2 |
|
|
Bas |
|
Parte inferior |
|
/ Front Suspension / Vordere Aufhängung |
|
|
|
||||
22 Suspension avant / Suspensión Delantera |
|
|
|
|
||||
48 |
6.8mm |
|
74 |
|
|
|
||
|
Ball |
|
|
|
|
|
|
|
|
Kugel |
|
73 |
|
6mm |
|
||
|
Rotule 6.8mm |
|
|
|||||
|
Rótula 6.8mm |
|
|
approx. 6mm |
||||
|
|
|
2 |
|
|
ca. 6mm |
|
|
|
|
|
|
|
|
environ 6mm |
||
72 6.8mm |
|
|
aprox. 6mm |
|||||
|
|
|
|
|
||||
|
Ball End |
|
|
|
|
|
||
|
Kugelpfanne |
|
|
|
|
|||
|
Chape |
|
The Side with groove |
|
|
|
|
|
|
Rótula |
|
is reverse screw. |
|
|
|
|
|
|
|
|
|
Die markierte Seite hat |
|
|
|
|
|
|
|
2 |
ein Linksgewinde |
|
|
|
|
|
|
|
Le côté avec le déport |
|
|
|
|
|
|
|
|
|
est le pas inversé. |
|
|
|
|
|
|
|
|
Lado con rosca inversa. |
|
|
|
|
73 5 x 24mm |
72 |
|
Adjust Rod |
||
Gestaenge |
|
|
Biellette réglable |
|
|
Tirante ajustable |
13mm |
|
2 |
||
48 |
||
|

 Assemble in the specified order.
In der angegebenen Reihenfolge zusammenbauen. Assemblez dans l’ordre indiqué.
Realice el montaje en el orden indicado.
 Assemble left and right sides the same way. Bauen Sie eine linke und eine rechte Seite. Assemblez le côté gauche comme le côté droit. Realice el montaje de igual forma en ambos lados.
Pay close attention here! Vorsicht! Wichtiger Hinweis! Attention! Avis important! Preste atención.
14
23 / Front Suspension / Vordere Aufhängung Suspension avant / Suspensión Delantera
46 |
3 x 25mm |
|
|
Screw Pin |
|
|
Schraubachse |
1 |
|
Vis |
|
|
Tornillo Pasador |
|
|
2 |
2 |
|
|
272 3 x 40mm Screw Pin Schraubachse Vis
Tornillo Pasador
2 |
|
|
|
|
272 |
|
|
|
46 |
|
|
/ Bumper / Stoßstange |
4 x 20mm TP |
3 x 10mm TP |
|
24 Pare-choc / Parachoques |
TP F/H Screw |
|
TP F/H Screw |
|
SK Treibschraube |
|
SK Treibschraube |
|
Vis TP F/H 4x20mm |
|
Vis TP F/H 3x10mm |
|
Tornillo 4x20mm TP F/H |
|
Tornillo 3x10mm TP F/H |
|
2 |
|
3 |
|
4 x 35mm |
||
|
|
|
Screw |
|
|
|
RK Schraube |
|
|
|
Vis 4x35mm |
|
|
|
Tornillo 4x35mm |
|
273 |
|
2 |
|
|
|
|
4x20mm |
|
|
|
4x20mm |
|
276 |
|
|
276 |
275 |
|
|
|
|
4x35mm |
3x10mm |
3x10mm |
|
|
|
|
|
|
|
|
|
274 |

 Assemble in the specified order.
In der angegebenen Reihenfolge zusammenbauen. Assemblez dans l’ordre indiqué.
Realice el montaje en el orden indicado.
 Assemble left and right sides the same way. Bauen Sie eine linke und eine rechte Seite. Assemblez le côté gauche comme le côté droit. Realice el montaje de igual forma en ambos lados.
15
 Loading...