


B efore commencing as s embly, pleas e read thes e ins tructions thoroughly.
G S 21R
ENGINE
INS T R UC T ION S HE E T
No.74022
●
HE AD
NE E DLE V ALV E
F UE L INLE T
T HR OT T LE V ALV E ADJ US T ME NT S C R E W
S T AR T E R K NOB
T HR OT T LE LE V E R
AIR /F UE L MIXT UR E ADJ US T ME NT S C R E W
8No.74721
R E C OIL S T AR T E R (No,74721)
2 |
4 |
7 |
|
1 |
3 |
|
|
6 |
|
|
|
5
8
●
(B P K Y OS HO NO.73001)
(B P K Y OS HO No.73401)
( No.73801)( No.73802)
2.( No.74902)
●E QUIP ME NT NE C E S S AR Y F OR S T AR T ING T HE E NG INE (NOT INC L UDE D)
1.F uel for R /C models:
Use glow fuel (available in all R /C hobby shops).
(B P Handy F uel from K Y OS HO No. |
73001) |
|||||
(K Y OS HO |
P R O |
S pec |
F uel |
R AC ING |
No. |
73801) |
(K Y OS HO |
P R O |
S pec |
F uel |
B UG G Y |
No. |
73802) |
2.G low P lug:
Use a high performance glow plug. (O.S . / A5, R 5; E NY A / No.4, No.5)
は、絶対に使用しない。
OS A5, R 5 E NY A No.4, No.5
( K Y OS HO No.F D-30)
( K Y OS HO No.96411)
( & K Y OS HO No.80312)
( K Y OS HO No.1876)
(クイックフュールポンプ250cc/ 500cc KYOSHO No. 96421 / 96422)
Never us e gas oline, keros ene or alcohol ins tead of glow fuel!
Warning T his may caus e fires !
3.B ooster C ord or One-touch G low P lug Heater, and B atteries:
Used for heating and electrifying the glow plug.
(B attery Holder S et from K Y OS HO No. F D-30)
4.P lug Wrench:
F or removals when examining or exchanging the glow plug.
(L ocking J ig & Wrench S et from K Y OS HO No. 80312)
5. F uel F ilter:
(F uel F ilter from K Y OS HO No. 1876)
A fuel bottle comes in very handy for quick and neat refillings of the tank.
(Quick-F ill |
F uel B ottle 250cc / 500cc from K Y OS HO |
No. 96421 |
/ 96422) |
●
●E NG INE MOUNT ING
T he position for mounting the engine depends largely on the model itself! F ollow the instruction manualsupplied with the model to mount the engine properly.
●
G S 21R
1 3 
2
|
|
|||
|
|
|
|
|
|
|
|||
|
||||
|
|
|||
|
|
|
|
|
|
|
|
|
|
|
|
|
|
|
1 2
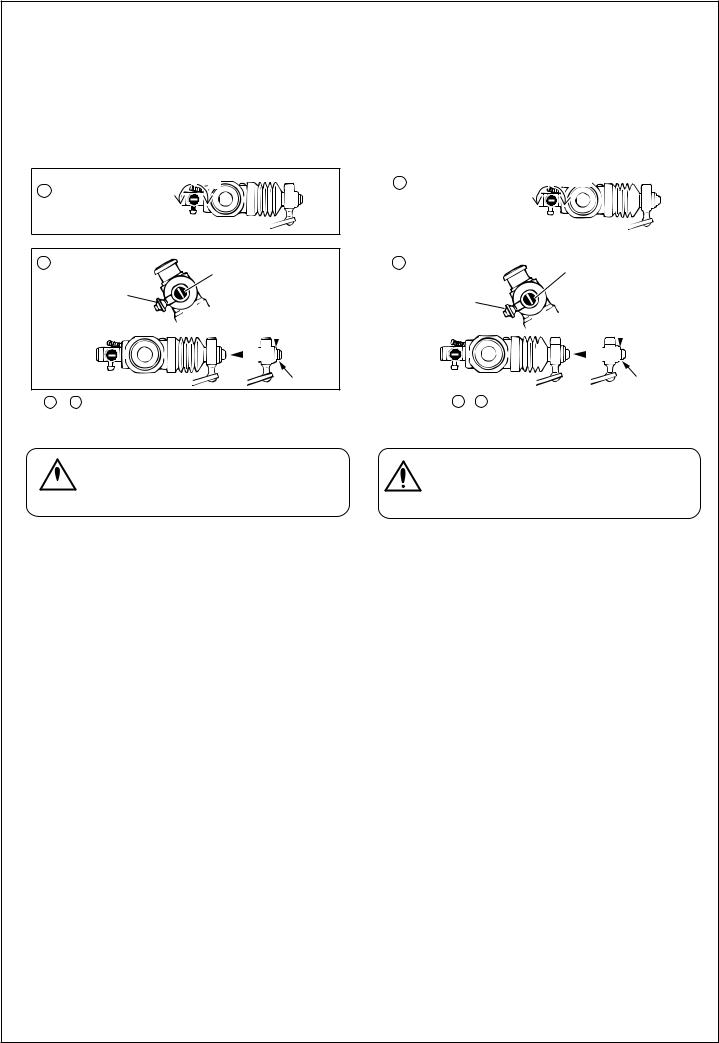
●E NG INE S T AR T ING & B R E AK -IN
Adjust the needle valve and air/fuel mixture adjustment screw to their standard position as follows:
1 Needle Valve |
|
Unscrew T ighten |
|||
3 turns unscrewed |
|
|
|
|
|
from closed position. |
|
|
|
|
|
|
|
|
|
|
|
|
|
|
|
|
|
2 Air/F uel Mixture |
Air/F uel Mixture |
||||
Adjustment |
|
||||
|
Adjustment S crew |
||||
Hold tight so it |
|
T ighten until the |
|||
will not rotate. |
|
||||
|
groove disappears . |
||||
|
|
||||
|
|
|
|
|
G roove |
|
|
|
|
|
|
|
|
|
|
|
|
|
|
|
|
|
|
Adjustments 1 ~ 2 |
may slighty vary according to the type |
||||
of glow plug and glow fuel.

●
1. り、3
2
3 2 3
4.20 30cm
50cm
5.5 10
6.2 3
1/8
1
As long as the engine is hot, avoid touchinganything except the needle
Warning valve! If dis regarding this warning,
●E NG INE S T AR T ING & B R E AK -IN
P roceed as follows when starting and breaking the engine in:
1.Make sure the needle valve is unscrewed 3 turns from closed position.
2.F ill fuel into the tank. Move the throttle lever to the high position, prime the engine (push the choke button 2 ~ 3 times or put 2 ~ 3 drops of fuel directly into the carburetor) and move the throttle lever back to the slow throttle position.
C AUT ION: carefully check if no dirt or depos its clog the tank!
3. Attach the booster cord or one-touch glow plug heater to the engine in order to electrify the glow plug.
4.Quickly pull the recoil starter rope (starter knob) several- times . Only pull out 20 - 30cm of cord.
C aution: B e careful not to pull |
out |
more |
than |
50cm |
||
of cord |
becaus e |
you may |
tear it |
and |
the |
|
s pring |
ins ide the |
recoil |
s tarter! |
|
|
|
5.Once the engine is started, wait 5 ~ 10 seconds before de-- taching the booster cord or one-touch glow plug heater.
6.R un the engine another 2 ~ 3 tanks and make sure you do not apply full throttle. Also afterwards, do not increase R P M abruptly! T ighten the needle valve by 1/8 turns and continue to run the engine, handling it gently.
C aution: After each tank, allow the engine- |
to cool |
off naturally! |
|
 Loading...