


Before beginning assembly, please read these instructions thoroughly. Bitte lesen Sie die Anweisungen vor Gebrauch genau durch. Veuillez attentivement lire les instructions avant lÕemploi.
Lea cuidadosamente este manual antes de comenzar el montaje.
R
THE FINEST RADIO CONTROL MODELS
INSTRUCTION MANUAL
GAS POWERED
PureTen GP Alpha 3
4WD SERIES
*The tires and wheels shown in the pictures change, depending on the type of body shell being used.
*Die zeichnerische Darstellung der Felgen und Reifen kann von dem Lieferumfang abweichen, da dieses je nach verwendeter Karosserie unterschiedlich sind. *Pneus et jantes peuvent varier en fonction des modeles.
*Los neumaticos y llantas de los dibujos cambian segun el tipo de carroceria.
ARR readyset |
la notice contient 2 exemplaires . Un pour le chassis , l'autre pour la carrosserie. |
|||||
ARR 24 33 |
Les deux exemplaires sont valables pour les chassis ARR et Readyset. |
|||||
readyset 10 28 33 |
Les etapes de 24 |
a 33 ainsi que la notice de la carrosserie concernent la |
||||
The instruction manual describes assembly and operation of both the |
version ARR. |
|
||||
L' tape 10, 28 , |
33 et la notice de la carrosserie sont destin es aux versions |
|||||
ARR and Readyset versions of the model. It consists of two parts: one |
||||||
Readyset. |
|
|
||||
focusing on the Chassis and another on the Body Shell. |
|
|
||||
El manual de instrucciones consta de dos partes, una para el chasis y la otra para |
||||||
Steps |
24 through 33 and the Body Manual apply to the ARR version. |
|||||
Steps |
10 , 28 , 33 and the Body Manual apply to the Readyset version. |
la carroceria. Y estos manuales son validos para las versiones ARR y Readyset. |
||||
Diese Anleitung beschreibt die Montage der ARR und der ReadySet |
Los pasos |
24 al |
33 y el manual de la carroceria son para la version ARR. |
|||
Los pasos |
10 , 28 , 33 y el manual de la carrocer’a corresponden a la versi—n |
|||||
Version. Der erste Teil beschreibt die Montage des Chassis, der zweite |
||||||
Readyset. |
|
|
||||
Teil die Montage der Karosserie. |
|
|
||||
|
|
|
||||
Die Baustufen 24 |
bis 33 und die Karosserie-Montageanleitung beziehen sich auf die Montage der ARR-Version. |
|||||
Die Baustufe 10 , |
28 , 33 und die Karosserie-Montageanleitung beziehen sich ausschlie§lich auf die ReadySet Version. |
|||||

!
●
UNDER SAFETY PRECAUTIONS
This radio control model is not a toy!
●First-time builders should seek the advice of experienced modelers before beginning assembly and if they do not fully understand any part of the construction.
●Assemble this kit only in places out of childrenÕs reach!
●Take enough safety precautions prior to operating this model. You are responsible for this modelÕs assembly and safe operation!
●Always keep this instruction manual ready at hand for quick reference, even after completing the assembly.
ACHTUNG!
Dieses Modell ist kein Spielzeug!
●AnfŠnger sollten mšglichst Rat bei Modellbaukundigen einholen, um das Modell richtig zusammenzubauen und gefahrlos bedienen zu kšnnen.
●Bauen Sie dieses Modell nur au§er Reichweite von Kindern zusammen!
●Treffen Sie genŸgend Sicherheitsvorkehrungen, bevor Sie Ihr Modell bedienen! Sie alleine tragen die Verantwortung fŸr Ihr Modell und dessen gefahrlose Bedienung!
●Bitte bewahren Sie diese Dokumentation zur spŠteren Verwendung auf.
●
●
●
ATTENTION!
Ce mod le nÕest pas un jouet!
●Si vous tes d butant dans le mod le r duit, prenez conseils aupr s de mod listes confirm- s afin dÕutiliser votre mod le dans des conditions optimales.
●Assemblez ce kit en dehors de la port e de jeunes enfants!
●Prenez des pr cautions lors de lÕutilisation. Vous seul tes responsable des volutions de votre mod le. La soci t KYOSHO ou son distributeur ne peuvent en aucun cas tre tenus responsables des accidents pouvant survenir lors de lÕutilisation de ce mod le!
●Gardez cette notice ˆ port e de main afin de vous y r f rer rapidement.
CONSEJOS DE SEGURIDAD
Este modelo de Radio Control no es un juguete
●Los no inicados en este hobby deber‡n ser aconsejados por expertos antes de comenzar el montaje de este modelo.
●Realice el montaje en un lugar fuera del alcance de los ni–os.
●Siempre extreme las medidas de seguridad. Usted es el œnico responsable del funcionamiento de su modelo.
●Mantenga este manual a mano.
Specifications are subject to be changed without prior notice! Technische nderungen sind ohne vorherige AnkŸndigungen mšglich! Les sp cifications peuvent changer sans pr avis! El fabricante se reserva el derecho de introducir modificaciones en los kits sin previo aviso!
© 2003 KYOSHO CORPORATION
BEC
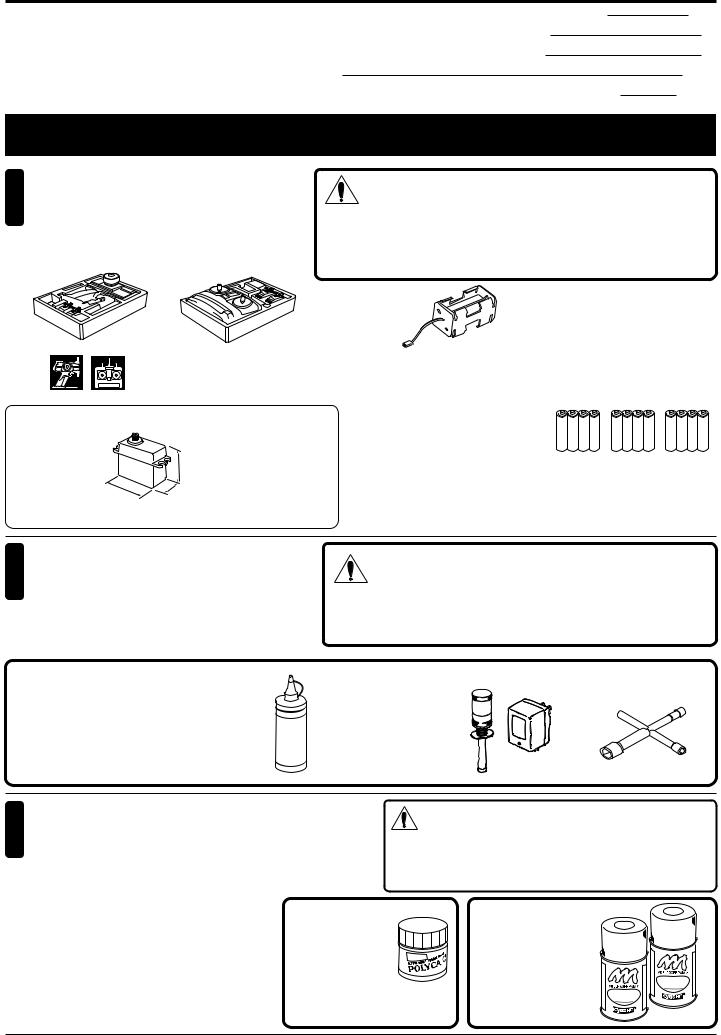
1 Minimum 2 channel radio with 2 servos.
Eine 2-Kanal BEC Fernlenkanlage mit 2 Servos. Radio type B.E.C. 2 voies avec 2 servos
Equipo de Radio de dos canales con dos servos.
■ / Wheel-type |
■ / Stick-type |
Drehknopfsteuerung / A volant |
Knüppelsteuerung / A manches |
Emisora tipo volante |
Emisora tipo sticks |
readyset
Supplied with readyset version. Im Readyset enthalten.
Livré dans la version Readyset. Incluido en el Readyset.
2~3
3
4
5~20
21~27
2 2
|
CAUTION: Only use a radio suitable for surface use! |
||
|
WICHTIG: Benutzen Sie ausschließlich eine 2-Kanal RC-Anlage mit |
||
|
|
2 Servos für den Autobereich! |
|
|
IMPORTANT: N’utilisez qu’une radio 2 voies avec 2 servos pour voitures! |
||
|
AVISO: Utilice siempre una emisora para coche R/C de 2 canales |
||
|
|
con dos servos |
|
■ |
• |
||
Battery Box |
• If a battery box not included with your radio system, |
||
Batteriehalter |
one must be purchased separately. |
||
• Wenn der Batteriehalter schon mit der RC-Anlage |
|||
Boîtier à piles |
geliefert wird, brauchenSie keinen gesondert |
||
Portapilas |
kaufen. |
||
• S’il est déjà fourni avec l’ensemble radio, il est inutile |
|||
|
|
||
readyset |
d’acheter un boîtier à piles séparé. |
||
• El portapilas viene incluido en su equipo de radio. |
|||
Supplied with readyset version. / Im Readyset enthalten.
Livré dans la version Readyset. / Incluido en el Readyset.
Suitable size servos Passende Servos Servos compatibles Dimensiones apropiadas para los servos
38~41mm
|
|
|
Fit only servos of a suitable size, |
|
as indicated left. |
|
Bitte beachten Sie, das ausschließlich |
31~36mm |
Servos der Größe <Standard> im |
|
Modell eingebaut werden können. |
16~20mm |
Vérifier que les servos utilisés soient |
adaptés à l'emplacement prévu ! |
|
|
Compruebe las medidas de los |
|
servos antes de instalarlos. |
■ / AA-size Batteries |
|
|
|
AA Trockenbatterien / Piles type AA |
AA |
AA |
AA |
Baterías tipo AA |
|
|
|
●
●For more information on the radio, refer to its instruction manual.
●Für mehr Einzelheiten über die RC-Anlage, lesen Sie bitte die Gebrauchsanweisung der RC-Anlage durch.
●Lisez la notice de la radio pour plus d’informations.
●Lea el manual de instrucciones de su equipo de radio.
|
|
|
2 Required for engine starting: |
|
|
|
WARNING: Never use petrol or kerosene! |
|
Zum Starten von Verbrennungsmotoren benötigtes Zubehör: |
|
|
Pour faire démarrer le moteur thermique: |
|
VORSICHT: Verwenden Sie niemals handelsübliches |
Equipo necesario para el arranque del motor: |
|
Benzin und Diesel! |
|
|
ATTENTION: N’utilisez jamais ni de l’essence ni du gasoil! |
|
|
AVISO: Nunca utilice gasolina |
No.73201 |
■ |
■ |
■ |
|
Glow Fuel |
Plug Heater / AC Charger |
Plug Wrench |
Super Starter Pack |
|
|
|
● |
|
FUEL |
|
|
|
|
3
Paints (for painting the body shell) Farben (zur Lackierung der Karosserie) Peintures (pour peindre la carrosserie) Pintura (Para el pintado de la carrocería)
readyset
The readyset version is supploed with a factory painted body shell.
Die Readyset Version beinhaltet die fertig lackierte Karosserie.La carroserie de la version Readyset est peinte en usine.La versión Readyset incluye la carrocería pintada.
|
CAUTION: Before using Kyosho Spray Colours, always read the |
|
instructions thoroughly! |
WICHTIG: Lesen Sie bitte zuerst die Gebrauchsanleitung der Spray- |
|
|
farben sorgfältig durch! |
|
IMPORTANT: Avant l’utilisation des Kyosho Spray Colors, lisez atten- |
|
tivement les explications! |
|
AVISO: Antes de comenzar a pintar, lea las instrucciones. |
No.2230
(筆ぬり塗料)
POLYCA COLOR (Brush paint) (Pinselfarben)
(Peintures à pinceau) (Para pincel)
No.76301 ~ 76711
KYOSHO SPRAY COLOR
S
P
KYOS R AY C
HO
O LO
S
R
P
KYOS R AY C
HO
O LO
R
2
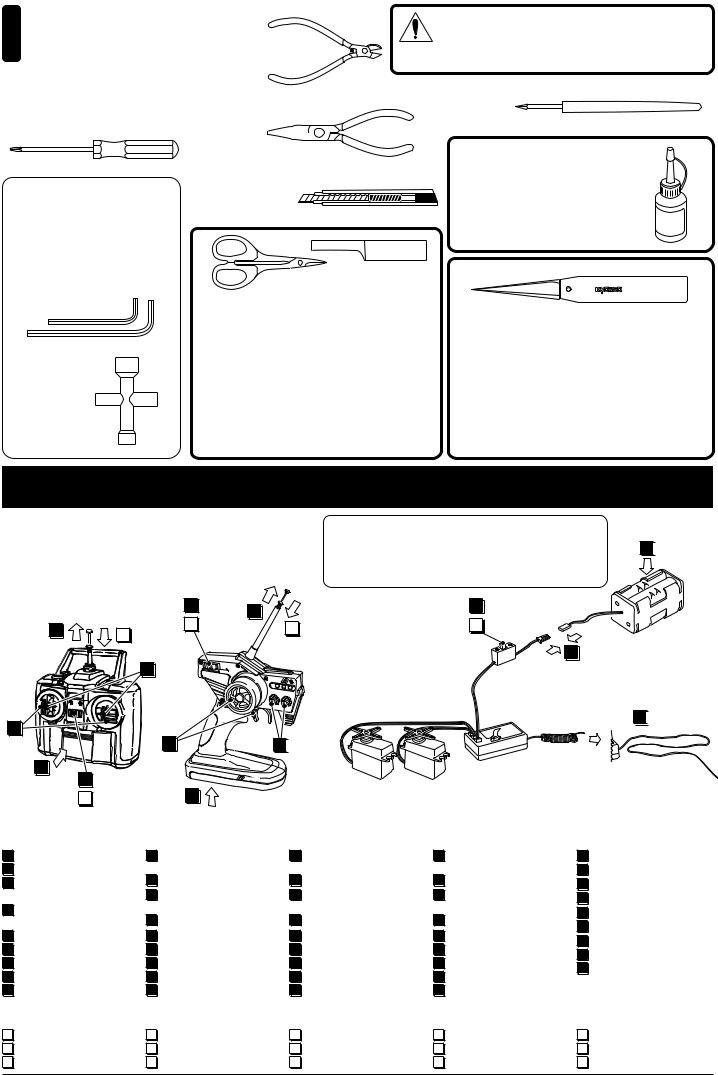
4 Tools required
Die notwendigen Werkzeuge Les outils utilisés Herramientas necesarias
■
Phillips Screwdriver (L, M, S) Kreuzschlitzschraubendreher Tournevis cruciforme Destornilladores Phillips
TOOLS INCLUDED GELIEFERTE WERKZEUGE OUTILS FOURNIS HERRAMIENTAS INCLUIDAS
■ 1.5 / 2mm
Hex Wrench (1.5 / 2mm) Sechskantschlüssel (1.5 / 2mm) Clé allen (1.5 / 2mm)
Llaves Allen (1.5 / 2mm)
■
Cross Wrench Kreuzschlüssel Clé en croix Llave de cruz
■
Wire Cutters Seitenschneider Pince coupante Alicate cortacables
■
Needle Nose Pliers Flachzange  Pinces plates

Alicates de punta fina
■
Sharp Hobby Knife Scharfes Bastelmesser Cutter
Cuchilla de Hobby
|
|
|
CAUTION: Handle tools carefully! |
|
WICHTIG: Gehen Sie vorsichtig mit Werkzeugen um! |
IMPORTANT: Maniez les outils avec prudence! |
|
|
AVISO: Maneje las herramientas cuidadosamente! |
|
■ |
|
Awl |
|
Spitzahle |
|
Poinçon |
|
Punzón |
KYOSHO |
No.96154 |
|
KYOSHO Special Glue |
|
|
|
|
|
Instant Glue |
|
|
Sekundenkleber |
KYOSHO Special Glue |
|
Colle cyanoacrylate |
||
Pegamento instantáneo |
||
|
|
No.1829 |
|
|
|
|
|
|
|
|
|
|
|
|||
|
|
|
|
|
|||
|
|
|
|||||
CURVED SCISSORS & SANDER |
No.695101 |
||||||
|
|||||||
LEXANSCHERE |
|
KNIFE EDGE REAMER |
|||||
|
|
|
|||||
CISEAUX A LEXAN |
|
REIBAHLE |
|
|
|||
TIJERAS Y LIJADOR |
|
ALESOIR SPECIAL |
|
|
|||
|
|
HERRAMIENTA TALADRO CARROCERíA |
|||||
|
|
1 ~ 15mm |
|||||
|
|
||||||
|
No need to pre-drill! Drills neat 1 ~ 15mm holes directly! |
||||||
For trimming body shells. Makes cutting curved lines easy! |
|||||||
Unerläßlich, nützlich! Diese Ahle bohrt Ihnen 1 ~ 15mm |
|||||||
Schneidet ohne Probleme auch Kurven. Für Karosserien |
Löcher, einfach und sauber! |
|
|
||||
aus Lexan. |
|
Un must! Permet de faire des trous de 1 ~ 15mm sans |
|||||
Coupe le long de lignes courbées. Pour les carrosseries. |
effort! Idéal pour les carrosseries. |
|
|
||||
Para recortar las carrocerías con la máxima precisión. |
Perfora agujeros desde 1 a 15mm. |
|
|
||||
/ RADIO PREPARATION
DIE RC-ANLAGE / PRÉPARATION DE LA RADIO / PREPARACION EQUIPO DE RADIO
●
Set up the radio as explained below.
Bereiten Sie die RC-Anlage wie unten beschrieben vor. Préparez votre radiocommande comme ci-dessous. Prepare el equipo de radio tal y como se indica.
|
7 |
ON |
2 |
|
|
11 |
OFF |
||
2 |
12 |
|||
12 |
|
|||
|
|
|
|
9 |
|
POWER ON |
|
|
|
Model No.KT-3 |
|
|
|
ST.D/R |
6 |
|
|
|
|
|
9 |
|
1 |
ON |
DIGITAL PROPORTIONAL RADIO |
|
7 |
|
CONTROL SYSTEM |
|
|
|
|
PERFEX KT-3 |
11 |
OFF |
1 |
|
POWER
ST.TRIM |
TH.TRIM |
|

 6
6 

Use the Transmitter "reverse switch" for steering and throttle. Überprüfen sie die laufrichtung der beiden servos.
Inversez le sens de rotation des servos de gaz et de direction ne position rev sur votre emetteur.
Conecte los interruptores de inversión de la dirección y gas.
8 |
ON |
10 |
OFF |
▲ |
4 |
Transmitter |
▲ |
Sender |
Switch |
Émetteur |
Schalter |
Emisora |
Interrupteur |
|
Interruptor |
|
▲ |
▲ |
Receiver |
Empfänger |
|
Servo |
Récepteur |
Seovo |
Receptor |

 3
3 

▲
Battery Box
Batteriehalter Boîtier à piles Portapilas

 5
5 

● |
●START |
●ANFANG |
●DEBUT |
●COMIENZO |
||||||
1 |
3 1 |
Insert AA-size batteries into |
1 |
Setzen Sie die AA Batterien |
1 |
Installez les piles type AA |
1 |
Coloque las pilas AA en la emisora. |
||
2 |
|
the Transmitter. |
|
in den Sender ein. |
|
dans l’émetteur. |
2 |
Extienda la antena de la emisora. |
||
3 |
3 2 |
Extend the Transmitter antenna. |
2 |
Ziehen Sie die Senderantenne aus. |
2 |
Déployez l’antenne de l’émetteur. |
3 |
Coloque las pilas AA en el portapilas. |
||
|
|
3 |
Insert the AA-size dry batter- |
3 |
Setzen Sie die AA Batterien |
3 |
Installez les piles type AA |
4 |
Conecte el portapilas. |
|
|
|
|
ies into the battery box. |
|
in den Batteriehalter ein. |
|
dans le boîtier à piles. |
|||
4 |
|
|
|
|
5 |
Extienda la antena del receptor. |
||||
4 |
Plug in the battery box. |
4 |
Schließen Sie den Batteriehalter an. |
4 |
Ensuite, branchez le boîtier à piles. |
|||||
|
|
6 |
Coloque los trims en neutro. |
|||||||
5 |
5 |
Unwind the Receiver antenna. |
5 |
Entspulen Sie die Empfängerantenne. |
5 |
Déployez l’antenne du récepteur. |
||||
7 |
Conecte la emisora. |
|||||||||
6 |
6 |
Center the Transmitter trims. |
6 |
Stellen Sie die Trimmer neutral. |
6 |
Mettez les trims au neutre. |
||||
8 |
Conecte el receptor. |
|||||||||
7 |
7 |
Switch "ON" the Transmitter. |
7 |
Schalten Sie den Sender an. |
7 |
Mettez l’émetteur sur “ON”. |
||||
9 |
Asegúrese que los servos se mueven |
|||||||||
8 |
8 |
Switch "ON" the Receiver. |
8 |
Schalten Sie den Empfänger an. |
8 |
Mettez le récepteur sur “ON”. |
||||
|
proporcionalmente a los movimientos |
|||||||||
9 |
/ 9 |
Make sure the servos move ac- |
9 |
Überprüfen Sie, ob die Servos sich |
9 |
Vérifiez si les servos bougent selon |
|
de los sticks. |
||
|
|
cording to your transmitter inputs. |
|
Ihrer Richtung entsprechend verhalten. |
|
vos maneuvres sur l’émetteur. |
|
|
||
● |
●FINISH |
●ENDE |
●FIN |
●FINAL |
|||||
10 |
|
10 |
Switch "OFF" the Receiver. |
10 |
Schalten Sie den Empfänger aus. |
10 |
Mettez le récepteur sur “OFF”. |
10 |
Desconecte el receptor. |
11 |
|
11 |
Switch "OFF" the Transmitter. |
11 |
Schalten Sie den Sender aus. |
11 |
Mettez l’émetteur sur “OFF”. |
11 |
Desconecte la emisora. |
12 |
12 |
Retract the Transmitter antenna. |
12 |
Ziehen Sie die Senderantenne ein. |
12 |
Rentrez l’antenne de l’émetteur. |
12 |
Pliegue la antena de la emisora. |
|
3
/ BEFORE YOU BEGIN
BEVOR SIE BEGINNEN / AVANT DE COMMENCER / ANTES DE EMPEZAR
1 ● ●
●
●TP
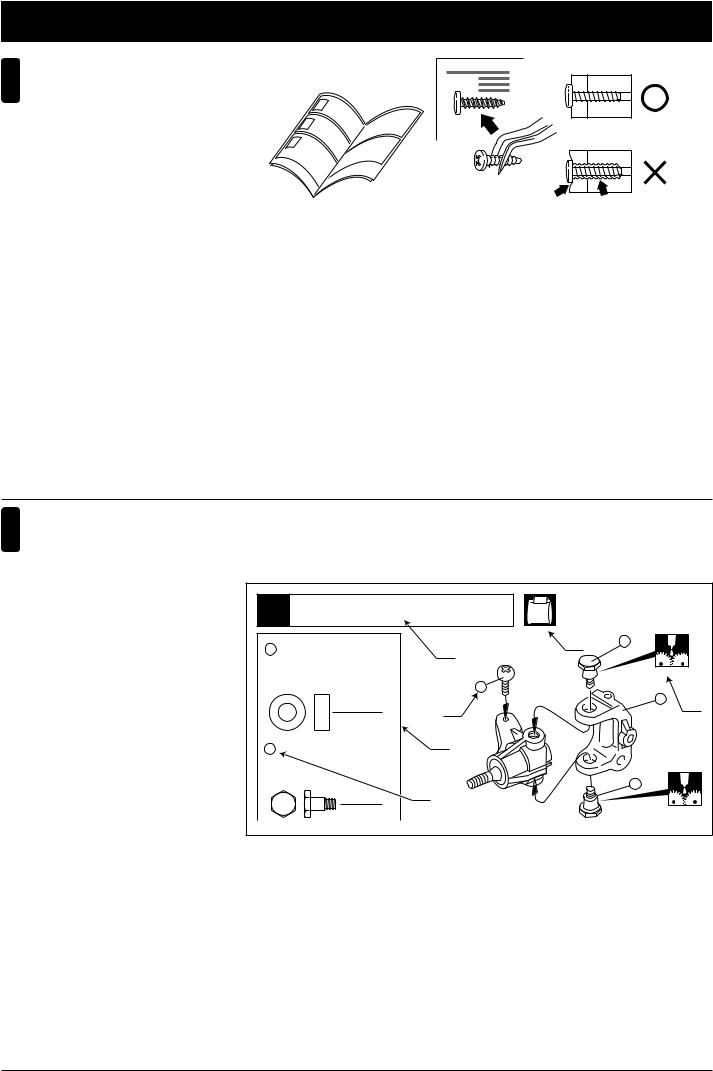
Before assembling, please read the following carefully:
●First, read this instruction manual and familiarise yourself with the model’s construction- .
●Check the kit contents. Should any parts be missing, contact the retail shop from whom the model was purchased.
●Compare nuts, bolts, screws, etc to the "Actual Size" drawings on each page before fitting to ensure that you are installing the correct parts.
●Tighten Self tapping (TP) screws into parts until you have a secure attachment. However, be careful ont to over-tighten TP screws or you may strip the plastic thread in the part!
Correct
Richtig
Bon
Correcto
Wrong
Falsch
Mauvais
Mal
Avant l’assemblage, veuillez lire les points suivants attentivement:
●Lisez d’abord complètement cette notice; ainsi vous aurez un aperçu du déroulement et pourrez mieux vous orienter.
●Vérifiez ensuite le contenu du kit.
Si jamais il y a des pièces manquantes, adressez-vous directement à votre magazin spécialisé ou au distributeur Kyosho dans votre pays.
●Ne confondez pas les vis et les petites pièces! Vérifiez-les à l’aide des illus-- trations dans chaque plage de montage, puis assemblez les.
●Lorsque vous serrez une vis autotaraudeuse:
Serrez jusqu’à ce que la pièce à monter soit bien installée. Pourtant, veillez à ne pas trop la serrer puisque vous risquez d’abîmer le filet dans la pièce.
Lesen Sie folgendes vor dem Zusammenbau aufmerksam durch: |
Antes de comenzar el montaje, lea atentamente lo siguiente: |
●Lesen Sie zuerst die Bauanleitung ganz durch und verstehen Sie den Aufbau Ihres Modelles.
●Überprüfen Sie den Verpackungsinhalt.
Sollten Teile fehlen, wenden Sie sich direkt an Ihren Fachhändler oder an den Kyosho-Vertreiber in Ihrem Land.
●Verwechseln Sie Schrauben sowie kleine Bauteile nicht! Vergleichen Sie sie vor dem Einbau mit den Darstellungenin Originalgröße in den Baustufen.
●Beachten Sie beim Festziehen einer Treibschraube folgendes:
Schrauben Sie solange, bis das anzubringende Teil sicher und fest sitzt. Achten Sie jedoch darauf, daß Sie den Gewindegang im Material nicht überdrehen!
●Lea, en primer lugar, este manual para obtener una idea general. ●Compruebe la conformidad de todas las piezas.
Si faltara alguna pieza, contacte con la tienda donde lo adquirió. No se admitirán reclamaciones en modelos en proceso de montaje.
●Antes de colocar las piezas y tornillos, asegurese mirando la tabla en cada paso.
●A la hora de apretar Tornillos Autorroscantes(TP): Apriételos firmemente en la pieza donde corresponda.
No intente apretarlos demasiado, ya que podrían deformar la pieza.
|
So funktioniert die Bauanleitung: |
|
|
|
|
|
2 How to read the instruction manual: |
Comment lire les instruction: |
|
|
|
|
|
|
Cómo leer el manual de instrucciones: |
|
Example |
|
|
|
|
|
|
|
|
||
A: |
|
|
Exemple |
Beispiel Ejemplo |
|
|
B: |
|
|
|
|
|
|
C: |
|
|
Vordere Aufhängung |
|
|
|
No. |
No.4, No.5, No.6 |
|
||||
No. |
1 Front Suspension |
Suspension avant |
|
|||
|
|
|
||||
D: |
|
|
A |
D |
5 |
|
|
|
4 5 x 10mm |
|
|||
|
|
|
|
|||
|
Metal Bushing |
|
|
|
||
|
|
|
|
|
|
|
|
Metallager |
|
|
|
|
|
A: Indicates the number of the assembly step |
|
|
|
|
||
Palier métal |
6 |
|
|
D |
||
and the part(s) that are to be assembled. |
|
|
C |
|
7 |
|
B: Details Key Number, Actual Size drawings |
4 |
|
||||
and the Quantity of parts Used. |
|
|
B |
|
|
|
C: All parts, except screws, are identified by key |
|
|
|
|
||
Numbers. When purchasing spare parts, |
|
5 |
|
|
|
|
identify the key number of the part required |
King Pin |
|
|
|
|
|
and cross reference this to the Spare Parts |
Achsschenkelbolzen |
C |
|
|
|
|
page, which shows the purchasable spare |
Vis de fusée |
|
5 |
|
||
parts and the key numbers contained within. |
4 |
|
|
|
||
D: This instruction manual uses several |
|
|
|
|
|
|
symbols. Pay careful attention to them |
|
|
|
|
|
|
during construction. Details are given at the |
|
|
|
|
|
|
bottom of each page. |
|
|
|
|
|
|
A:Die Nummer der Baustufe sowie das zu bau-- ende Teil werden angegeben.
B:Teilenummer, Teilename, Darstellung in Originalgrößeund Anzahl.
C:Die Teilenummer stellt den Bezug zu unserer
Bestellnummer her. Am Ende der Bauanlei-- tung finden Sie eine Ersatzteilliste, die zu der Teilenummer die entsprechende Bestellnum-- mer liefert.
D:Diese Bauanleitung verwendet verschiedene Piktogramme, deren Bedeutungen unten auf jeder Seite erklärt werden.
A:Numéro de la plage de montage et le nom de la pièce à assembler.
B:Numéro de référence de la pièce, nom, illu-- stration en grandeur réelle et quantité utilisée.
C:Toutes les pièces, exceptées les vis, sont identifiéespar un numéro de référence. Pour l’achat de pièces de rechange, trouvez ce numéro dans la liste pour pièces de rechange à la fin de cette notice. Toute à la gauche de cette même liste, vous trouverez ainsi le numéro de commande correspondant.
D:Cette notice utilise des icônes dans les plages de montage. Référez-vous au bas de chaque page pour savoir leur signification.
A:Indica el número del Paso y la Parte a ser montada.
B:Número, Nombre de la Pieza, Dibujo a escala real, Cantidad utilizada.
C:Todas las piezas, excepto los tornillos vienen identificadas por un número. Para comprarlas por separado,
mire el número en la lista de piezas y apunte la referencia de la columna izquierda.
D:Este manual de instrucciones utiliza diversos símbolos.
Téngalos en cuenta durante el montaje.
4

1 |
/ Differential / Gear Differential |
|
|
|
|
|
Différentiel / Diferencial |
|
|
|
|
|
|
2 x 8mm TP |
|
|
|
|
|
|
|
TP Screw |
|
|
|
|
|
|
RK Treibschr |
|
|
|
|
|
|
Vis TP 2x8mm |
|
|
|
|
|
|
Tornillo 2x8mm TP |
|
|
|
|
|
|
8 |
|
|
|
3 |
2x8mm |
4 3 x 20mm |
|
|
|
|
||
|
|
|
|
|
||
|
Shaft |
|
|
|
|
|
|
Welle |
|
|
|
|
|
|
Axe 3x20mm |
|
|
|
|
|
|
Eje 3x20mm |
|
|
|
|
|
|
2 |
|
|
|
|
2 |
|
|
|
|
|
|
2x8mm |
|
1 |
3 |
|
|
|
|
|
|
5 |
4 |
5 |
|
x2 |
|
|
|
|
|
|
|
2 |
/ Front Gearbox / Vorderes Getriebegehäuse |
Carter de différentiel avant / Caja de transmisión Delantera |
4 x 4mm |
10 10 x 14mm |
|
4x4mm |
|
||||
Set Screw |
|
Metal Bushing |
|
|
Firmly tighten the set screws onto the flat spots. |
|||
Gewindestift |
|
Lager |
|
|
Ziehen Sie die Gewindestifte auf die ab-geflachten |
|||
Vis BTR 4x4mm |
Bague Métal 10x14mm |
|
Flächen fest. |
|
||||
Prisionero 4x4mm 3 |
Casquillo Metálico 10x14mm |
|
Vissez les vis type BTR sur les méplats. |
|||||
5mm |
Apriete los prisioneros firmemente en las partes |
|||||||
3 x 12mm |
TP |
|
|
|
|
planas del eje. |
|
|
|
|
|
2 |
|
|
|
||
TP Screw |
|
|
|
|
|
|
||
LK Treibschr |
|
|
|
|
|
|
||
Vis TP 3x12mm |
9 8 x 10mm |
94 |
|
|
||||
Tornillo 3x12mm TP |
|
|
||||||
|
|
3 |
|
Metal Collar |
|
7 |
|
|
|
|
|
Metall Ring |
|
|
|
||
|
|
|
|
|
|
|
||
3 x 16mm |
TP |
|
|
Collier Métal |
|
|
|
|
TP Screw |
|
|
Casquillo Metálico |
|
8 |
|
||
LK Treibschr |
|
|
|
|
||||
|
|
|
|
Hex Wrench |
||||
Vis TP 3x16mm |
|
|
2 |
BRG001 |
|
|||
|
|
|
Sechskantschlüssel |
|||||
Tornillo 3x16mm TP |
|
|
|
7 |
|
|||
|
|
|
|
Clé Hexagonale |
||||
|
|
1 |
|
|
|
|
|
|
|
|
|
|
|
|
|
Llave Allen |
|
|
|
|
|
|
|
|
|
|
5mm Washer |
|
|
|
|
||||
|
Firmly tighten the set screws onto the flat spots. |
|
|
|||||
Scheibe Rondelle 5mm |
|
|
|
|||||
|
Ziehen Sie die Gewindestifte auf die ab-geflachten |
|
|
|||||
|
Arandela 5mm |
|
4x4mm |
|
||||
|
|
Flächen fest. |
|
|
||||
|
|
3 |
|
|
|
|
||
|
|
|
Vissez les vis type BTR sur les méplats. |
|
|
|||
|
|
|
|
Apriete los prisioneros firmemente en las partes |
|
|
||
7 5 x 10mm |
|
planas del eje. |
|
|
|
|||
|
|
|
|
|
|
|||
Metal Bushing |
Metall |
|
|
|
|
|
|
|
|
|
Métal |
|
4x4mm |
|
|
|
|
|
|
Metálico |
|
|
9 |
|
|
|
|
|
2 |
|
|
|
|
|
|
|
|
|
|
|
|
9 |
|
6 |
|
|
|
|
10 |
|
|
5mm |
|
|
|
|
|
|
|
10 |
||
|
|
|
6 |
|
|
|
|
|
|
|
|
|
|
|
|
12 |
|
|
|
|
|
|
|
|
|
|
|
|
|
|
5mm |
|
|
BRG004 |
|
|
|
|
|
|
|
|
|
|
|
|
|
|
|
|
|
|
|
|
|
|
|
|
|
Differential |
|
|
|
|
|
|
|
|
Gear Differential |
|
|
|
|
|
|
|
|
Différentiel |
|
|
3x12mm |
|
3x16mm |
11 |
BRG004 |
Diferencial |
|
|
|
|
|
|
|
|
|
|
||
|
x2 |
|
Apply grease. |
Assemble as many times as specified. |
|
Fetten. |
|
Sooft wie angegeben zusammenbauen. |
Graissez. |
|
Assemblez aussi souvent qu’indiqué. |
Aplicar grasa. |
|
Repita las veces señaladas. |
|
: No.BRG001 |
|
|
|
|
||
|
Ball bearings are optional ! (with optional part no.) |
|
Apply threadlocker (screw cement). |
BRG001 |
|
||
|
Wahlweise Kugellager (Jeweils mit Best.-Nr.) |
Verwenden Sie Schraubensicherungslack. |
|
|
Les roulements sont en option. (avec les pièces en option N ) |
Appliquer du frein filet. |
|
|
Rodamientos opcionales disponibles. |
Aplique líquido fijatornillos. |
|
5
3 |
/ Front Suspension / Vordere Aufhängung |
Suspension avant / Suspensión Delantera |
3 x 8mm TP TP F/H Screw SK Treibschraube
Vis TP F/H 3x8mm
Tornillo 3x8mm TP F/H 
 6
6
A |
2 |
Marked “A” |
|
A links markiert |
|
Marqué “A” |
|
"A" derecha |
|
 1 13
1 13 
Top Oben
Haut Arriba
100
|
3x8mm |
|
Note the direction. |
||
3x8mm |
||
Einbaurichtung beachten. |
||
|
||
Notez le sens. |
|
|
Fíjese en el dibujo. |
|
|
|
3x8mm |
/ Front Suspension / Vordere Aufhängung |
|
|
||
Top |
Oben |
|||
4 Suspension avant / Suspensión Delantera |
||||
Haut |
Arriba |
|||
16 3 x 52mm Shaft |
|
|
|
|
Welle Axe 3x52mm |
|
|
|
|
Eje 3x52mm |
|
|
||
|
|
|||
2 |
|
Note the direction. |
||
|
Einbaurichtung beachten. |
|||
3 x 8mm TP |
|
Notez le sens. |
||
TP F/H Screw |
14 |
Fíjese en el dibujo. |
||
SK Treibschraube |
|
|
||
|
3x8mm |
|
||
Vis TP F/H 3x8mm |
|
|
||
Tornillo 3x8mm TP F/H |
|
|
|
|
2 |
|
|
|
|
15 5.8mm |
|
13 |
|
|
|
||
Pillow Ball |
|
|
|
Kugelschraube |
16 |
A |
|
Rotule 5.8mm |
15 |
Marked “A” |
|
Rótula 5.8mm |
|||
|
A links markiert |
||
|
|
||
2 |
1mm |
Marqué “A” |
|
|
|
"A" derecha |
5 |
/ Front Suspension / Vordere Aufhängung |
|
|
Suspension avant / Suspensión Delantera |
|
||
3 x 10mm TP |
|
|
|
|
TP Screw |
|
|
|
LK Treibschr |
|
|
|
Vis TP 3x10mm |
|
|
|
Tornillo 3x10mm TP |
19 |
|
|
8 |
|
|
|
17 |
|
|
|
|
|
|
|
18 |
|
|
|
|
|
3x10mm |
|
3x10mm |
|
|
Note the direction. |
|
||
|
|
||
Einbaurichtung beachten. |
|
|
|
Notez le sens. |
|
|
|
Fíjese en el dibujo. |
|
3x10mm |
|
|
|
|
|

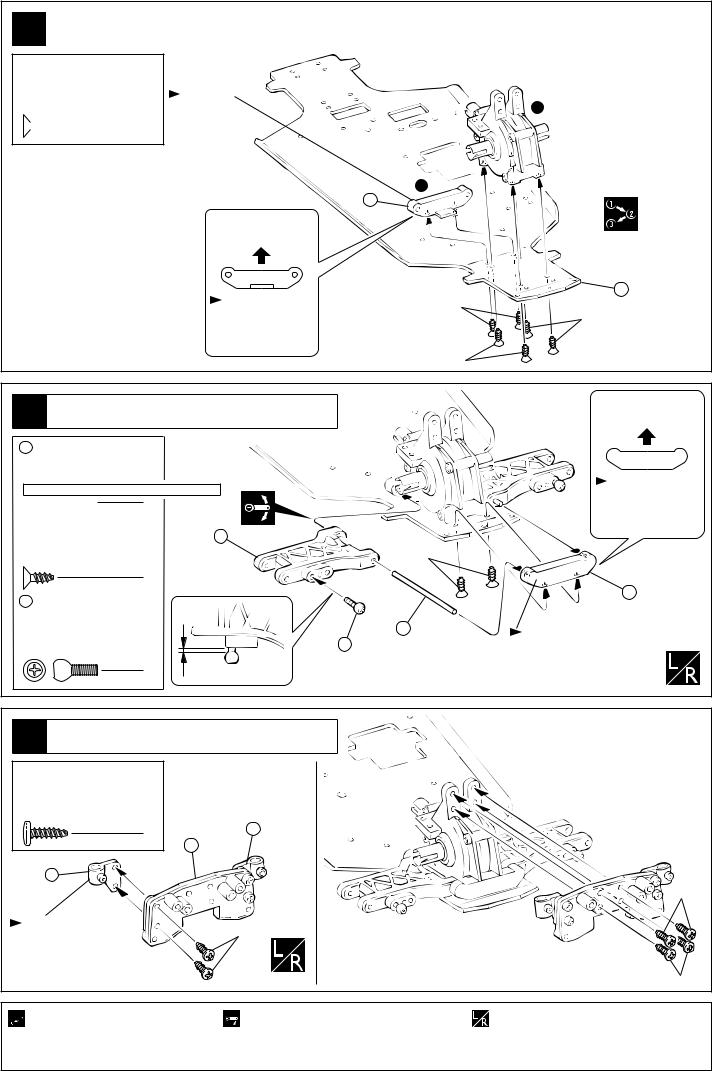
Assemble in the specified order.
In der angegebenen Reihenfolge zusammenbauen. Assemblez dans l’ordre indiqué.
Realice el montaje en el orden indicado.

Ensure smooth, non-binding movement when assembling. Das Teil muß sich leicht bewegen lassen.
La pièce doit pouvoir pivoter autour de la vis. Asegúrese que la pieza se mueve suavemente.
Assemble left and right sides the same way. Bauen Sie eine linke und eine rechte Seite. Assemblez le côté gauche comme le côté droit. Realice el montaje de igual forma en ambos lados.
6

6 |
/ Front Suspension / Vordere Aufhängung |
Suspension avant / Suspensión Delantera |
24 |
King Pin |
Achsschenkelbolzen |
|
Vis à fusée |
King Pin |

 4
4
15 5.8mm
Pillow Ball (silver) Kugelschraube (silber) Rotule (argent) 5,8mm Rótula 5.8mm (Plateado)


 2
2
9 5 x 10mm
Metal Bushing Lager
Bague Métal 5x10mm
Casquillo Metálico 5x10mm 4
15 |
1mm |
|
|
BRG001 |
25 |
|
9 24
9 22
 R
R  BRG001 Marked “R”
R echts markiert Marqué “R”
"R" derecha
< |
Right > |
|
< Rechts |
Drolte Derecho > |
|
24 |
R |
|
|
|
|
|
Marked “R” |
|
|
R echts markiert |
|
|
Marqué “R” |
|
|
"R" derecha |
|
|
20 |
|
|
< > |
|
|
< Left Links > |
|
|
< Gauche Izquierda > |
|
|
|
L |
|
21 |
Marked “L” |
|
L links markiert |
|
|
|
|
|
|
Marqué “L” |
|
|
"L" derecha |
L |
|
Marked “L” |
|
L links markiert |
|
Marqué “L” |
23 |
"L" derecha |
/ Front Suspension / Vordere Aufhängung |
|
0.5mm |
||
7 Suspension avant / Suspensión Delantera |
|
|||
|
|
|||
28 3 x 24mm 29 |
|
|
|
|
3x12mm |
For Left |
|||
Screw Pin |
Front Upper Rod |
|||
|
Links |
|||
Schraubachse |
Oberer Querlenker |
|
||
|
Gauche |
|||
Vis 3x24mm |
Biellette supérieure |
|
||
|
Izquierda |
|||
Tornillo Pasador 3x24mm |
Trapecio Superior |
|
||
|
|
|||
2 |
|
|
|
|
3 x 12mm TP |
|
|
|
|
TP Screw |
2 |
|
|
|
LK Treibschr |
|
29 |
|
|
Vis TP 3x12mm |
3x12mm |
|
||
|
|
|||
Tornillo 3x12mm TP |
27 |
|
|
|
4 |
|
|
||
|
|
|
For Right |
26 |
|
Rechts |
||
|
||
Drolte |
28 |
|
Derecho |
||
|
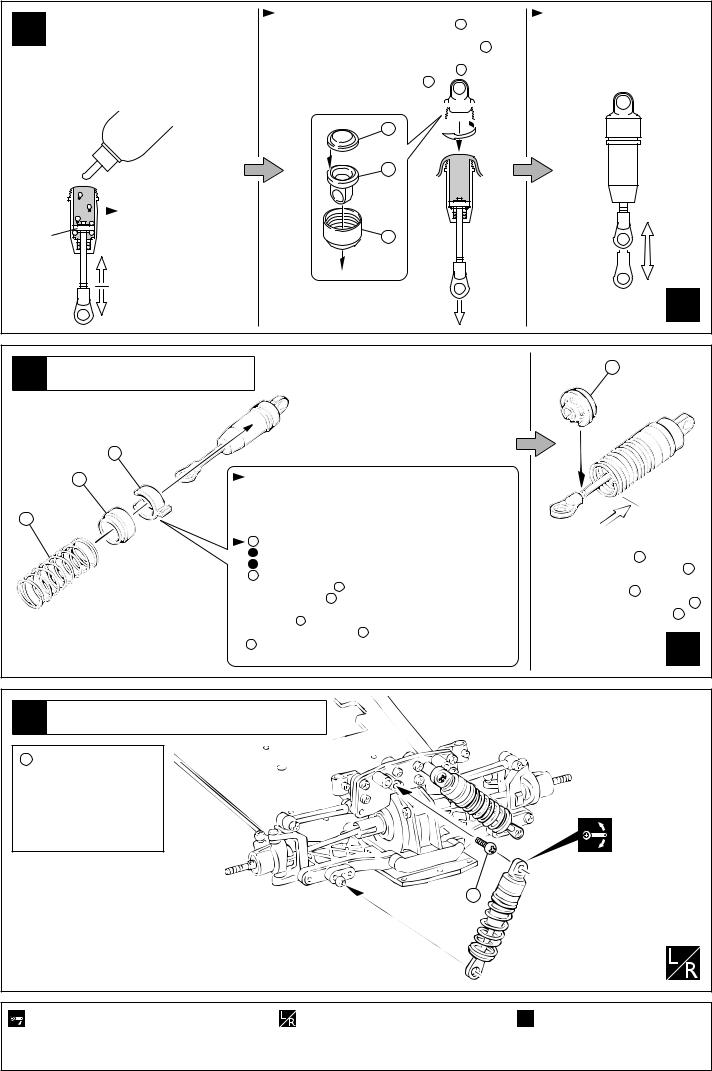
/ Shock Absorber / Stoßdämpfer |
|||
8 Amortisseur / Amortiguador |
|
||
145 S |
|
|
|
Shock Shaft (S) Kolbenstange, kurz |
146 |
||
Axe d'amortisseur court Eje amortiguador corto |
|||
|
|||
4 |
|
145 |
|
148 5.8mm S Ball End (S) |
|||
|
|||
Kugelpfanne (S) Chape (S) Rótula (S) |
|
||
4 |
147 3 x 6 x 2mm |
||
|
|||
|
|
Plastic Collar |
|
123 E2.5 E |
|
Kunststofflager |
|
E-ring E-Ring E2.5 |
|
Palier plastique |
|
Clips 2.5mm Clip E2.5 |
|
Casquillo plástico |
|
8 |
|
8 |
|
123
123
147 |
|
|
Cover the shaft with cloth |
148 |
before gripping it with pliers. |
|
Kolbenstange mit Papier |
|
umwickeln, bevor Sie sie |
|
mit der Zange greifen! |
|
Proteger l ' axe avec du |
|
tissus avant de l ' acgripper |
|
avec une pince. |
|
Proteja el eje con un paño |
|
antes de sujetarlo con |
|
los alicates. |
|
149 x4
|
|
: No.BRG001 |
|
|
|||
Apply grease. |
|
Ball bearings are optional ! (with optional part no.) |
Ensure smooth, non-binding movement when assembling. |
BRG001 |
|||
Fetten. |
|
Wahlweise Kugellager (Jeweils mit Best.-Nr.) |
Das Teil muß sich leicht bewegen lassen. |
Graissez. |
|
Les roulements sont en option. (avec les pièces en option N ) |
La pièce doit pouvoir pivoter autour de la vis. |
Aplicar grasa. |
|
Rodamientos opcionales disponibles. |
Asegúrese que la pieza se mueve suavemente. |
Assemble left and right sides the same way. Bauen Sie eine linke und eine rechte Seite. Assemblez le côté gauche comme le côté droit. Realice el montaje de igual forma en ambos lados.
x4
Assemble as many times as specified. Sooft wie angegeben zusammenbauen. Assemblez aussi souvent qu’indiqué. Repita las veces señaladas.
7
9 |
/ Shock Absorber / Stoßdämpfer |
Amortisseur / Amortiguador |

Pull down the piston and slowly pour in oil.
Ziehen Sie den Kolben herunter und füllen Sie Öl ein. Descendez le piston et remplissez le d’huile à ras bord. Tire del pistón hacia abajo y vierta aceite lentamente.
/ Oil Öl / Huile Aceite
|
|
|
Move the piston up and down |
|
to get rid of air bubbles. |
Piston |
Bewegen Sie den Kolben auf |
Kolben |
und ab, um Luftein-schlüsse |
Piston |
austreten zu lassen. |
Pistón |
Faites monter et descendre |
afin d’évacuer les bulles d’air. Mueva el pistón hacia arriba y
abajo para eliminar las burbujas de aire.
|
|
||||||||||||||
Keep the piston pulled down and screw on 152 causing |
Confirm that each piston moves up |
||||||||||||||
excessive oil to overflow. |
and down smoothly. |
||||||||||||||
Halten Sie den Kolben unten und schrauben Sie 152 |
Prüfen Sie, ob der Dämpfer Wirkung zeigt. |
||||||||||||||
langsam auf. Ggf. Öl abwischen. |
Vérifiez que le piston navigue librement. |
||||||||||||||
Avec le piston descendu, vissez lentement 152 . |
Asegúrese qua el pistón funciona |
||||||||||||||
Mantenga el pistón abajo y apriete 152 |
suavemente. |
||||||||||||||
limpiando el aceite sobrante. |
|
|
|
|
|
||||||||||
|
|
|
|
|
|
|
|
|
|
|
|
|
|
|
|
|
|
|
|
|
|
|
|
|
|
|
|
|
|
|
|
150
151
152
x4
10 / Shock Absorber / Stoßdämpfer Amortisseur / Amortiguador
|
155 |
|
|
154 |
|
||
|
For adjusting the spring tension. |
||
|
Zur Justierung der Federvorspannung. |
||
153 |
Bagues de réglage de tension de ressort. |
||
Para regular la tensión del muelle. |
|||
|
|||
|
155 5 ……… |
||
|
1 |
|
|
|
2 |
……… , |
|
|
155 |
exists in 5 widths. For a level front / rear end ride height, |
|
adjust the amount of 155. When adjusting, always run your car. Der Abstandshalter 155 existiert in 5 Größen. Justieren Sie hiermit die Bodenfreiheit des Fahrzeugs an der Vorderund Hintcrachse. Les bagues 155 existent dans 5 épaisseurs différentes. choisir le nombre et l ' épaisseur de 155 pour les réglages de suspension. 155 está disponible en 5 anchuras. Elija la que más se adapte al tipo de terreno.
156
 156
156
Compress the spring and install 156 . Drücken Sie die Feder zusammen
und schieben Sie 156 auf. Compresser le ressort pour monter 156 . Comprima el muelle e Instale 156 .
x4
11 / Front Suspension / Vordere Aufhängung Suspension avant / Suspensión Delantera 
15 5.8mm
Pillow Ball (silver) Kugelschraube (silber) Rotule (argent) 5,8mm Rótula 5.8mm (Plateado)


 2
2
15

Ensure smooth, non-binding movement when assembling. Das Teil muß sich leicht bewegen lassen.
La pièce doit pouvoir pivoter autour de la vis. Asegúrese que la pieza se mueve suavemente.
Assemble left and right sides the same way. Bauen Sie eine linke und eine rechte Seite. Assemblez le côté gauche comme le côté droit. Realice el montaje de igual forma en ambos lados.
x4
Assemble as many times as specified. Sooft wie angegeben zusammenbauen. Assemblez aussi souvent qu’indiqué. Repita las veces señaladas.
8

12 / Steering Lenkung / Direction / Dirección
46 |
|
|
39 |
|
|
Rod Anlenkgestänge |
|
|
|
|
|
Tringle Tirante |
|
|
|
|
|
|
15 |
|
|
|
|
2 |
|
|
|
41 |
|
15 5.8mm |
|
|
|
|
|
|
|
|
|
|
|
Pillow Ball (silver) |
|
43 |
|
|
|
Kugelschraube (silber) |
|
|
|
|
|
Rotule (argent) 5,8mm |
46 |
|
42 |
|
|
Rótula 5.8mm (Plateado) |
|
|
40 |
||
|
|
|
|
||
2 |
|
|
|
|
|
3 x 8mm TP |
|
|
45 |
42 |
|
TP Screw |
|
|
|
|
|
LK Treibschr |
|
|
|
|
|
Vis TP 3x8mm |
|
|
|
|
38 |
Tornillo 3x8mm TP |
|
|
15 |
||
|
44 |
|
|
||
2 |
|
|
|
||
To more easy fit 43 to 44, carefully |
|
|
|
|
|
|
|
|
|
|
|
45 4.5mm |
prise 43 apart with a screwdriver. |
|
3x8mm |
|
|
Installieren Sie Nr. 43 und Nr. 44 |
|
|
|
|
|
Pillow Ball |
|
|
|
|
|
wie auf dem Bild dargestellt. |
|
|
|
|
|
Kugelschraube |
38 |
|
3x8mm |
|
|
Insérer les pièces 43 et 44 dans |
|
|
|||
Rotule 4,8mm |
|
|
46 |
||
l'espace indiqué sur le schéma. |
|
|
|
||
Rótula 4.8mm |
|
|
|
||
Abra tal y como muestra el dibujo |
|
|
|
|
|
|
|
|
|
|
|
1 |
e instale 43-44. |
|
|
|
|
43
44
13 / Steering Lenkung / Direction / Dirección
3 x 8mm F/H Screw SK Schraube
Vis F/H 3x8mm
Tornillo 3x8mm F/H

 2
2
|
|
|
|
Ensure that you use the correct holes. |
|
3x8mm |
Achten Sie auf die Verwendung der richtigen Löcher. |
|
Veiller à utiliser les trous indiqués sur le schéma. |
||
|
||
|
Compruebe el agujero. |

Pay close attention here! Vorsicht! Wichtiger Hinweis! Attention! Avis important! Preste atención.

Ensure smooth, non-binding movement when assembling. Das Teil muß sich leicht bewegen lassen.
La pièce doit pouvoir pivoter autour de la vis. Asegúrese que la pieza se mueve suavemente.
9
 Loading...