


 Loading...
Table of Contents
|
|
Using the Copier Properly .............................................................. |
X-1 |
|
|
What is an Energy Star Copier ?.................................................... |
X-3 |
|
|
EP1054 .......................................................................................... |
X-4 |
|
|
CE Marking (Declaration of Conformity) ........................................ |
X-4 |
|
|
Terms and Symbols for the Type of Originals and Copy Paper..... |
X-5 |
|
|
Feeding Direction (copy paper path).............................................. |
X-5 |
|
|
“Width” and “Length” ...................................................................... |
X-5 |
|
|
Terms and Symbols Used.............................................................. |
X-6 |
1 |
Safety Notes |
|
|
|
1.1 |
Installing the Copier...................................................................... |
1-1 |
|
|
Installation Site................................................................................ |
1-1 |
|
|
Power Source.................................................................................. |
1-1 |
|
|
Grounding ....................................................................................... |
1-2 |
|
|
Space Requirements....................................................................... |
1-2 |
|
1.2 |
Precautions for Use ...................................................................... |
1-3 |
|
|
Operating Environment ................................................................... |
1-3 |
|
|
Using the Copier Properly ............................................................... |
1-3 |
|
|
Care of Copier Supplies .................................................................. |
1-4 |
|
|
Moving............................................................................................. |
1-4 |
|
|
Legal Restrictions on Copying ........................................................ |
1-5 |
|
|
Financial Instruments ...................................................................... |
1-5 |
|
|
Legal Documents ............................................................................ |
1-5 |
|
|
General ........................................................................................... |
1-5 |
2 |
Getting to Know Your Copier |
|
|
|
2.1 |
System Overview .......................................................................... |
2-1 |
|
|
Multi Bypass Tray MB-4 <Option> .................................................. |
2-1 |
|
|
EP1054 ........................................................................................... |
2-1 |
|
2.2 |
Copier Parts and Accessories ..................................................... |
2-2 |
|
|
Outside Copier ................................................................................ |
2-2 |
|
|
Inside Copier ................................................................................... |
2-3 |
|
|
Multi Bypass Tray MB-4 .................................................................. |
2-5 |
EP1054

|
|
|
|
|
|
|
|
|
|
|
|
2.3 |
.............................................Control Panel Keys and Indicators |
2-6 |
|||
|
|
|
Control Panel.................................................................................. |
2-6 |
|
|
|
|
Display............................................................................................ |
2-8 |
|
|
|
|
Monitor Display............................................................................... |
2-8 |
|
|
|
|
Paper Information Display .............................................................. |
2-9 |
|
|
|
|
Zoom Ratio Indicator / Multi-Copy Display ..................................... |
2-9 |
|
|
|
|
Exposure Information Display....................................................... |
2-10 |
|
2.4 Turning ON and OFF, and Resetting the Copier...................... |
2-11 |
Turning ON and OFF.................................................................... |
2-11 |
When the Copier is Turned ON .................................................... |
2-11 |
Minimizing the Warm-up Time...................................................... |
2-12 |
Initial Mode and Panel Resetting.................................................. |
2-13 |
Auto Reset Function ..................................................................... |
2-14 |
3 |
Making Copies |
|
|
|
3.1 |
Copying Overview ........................................................................ |
3-1 |
|
3.2 |
Copying Procedure ...................................................................... |
3-4 |
|
|
Placing Originals............................................................................. |
3-4 |
|
|
Sheet Originals (Standard Size) ..................................................... |
3-4 |
|
|
Highly Transparent Originals .......................................................... |
3-4 |
|
|
Book Original .................................................................................. |
3-5 |
|
|
Checking the Copy Paper Size and Selecting the Paper Source... |
3-6 |
|
|
Selecting the Paper Source |
|
|
|
(Only when the Multi Bypass Tray is used) .................................... |
3-6 |
|
3.3 |
Zoom Ratio.................................................................................... |
3-7 |
|
|
Fixed Zoom Ratios ......................................................................... |
3-7 |
|
|
Zoom Ratios ................................................................................... |
3-7 |
|
|
Selecting the Fixed Zoom Ratios.................................................... |
3-7 |
|
|
Setting a Zoom Ratio...................................................................... |
3-8 |
|
3.4 |
Image Density ............................................................................... |
3-9 |
|
|
Types of Exposure Modes.............................................................. |
3-9 |
|
|
Selecting the Auto Exposure Mode .............................................. |
3-10 |
|
|
Selecting the Manual Exposure Mode.......................................... |
3-10 |
|
|
Selecting the Photo Mode ............................................................ |
3-10 |
|
3.5 |
Book Copying ............................................................................. |
3-11 |
|
|
Selecting the Book Copying Mode ............................................... |
3-11 |
|
3.6 |
Manual Bypass Copying ............................................................ |
3-13 |
|
|
Using the Manual Bypass Tray..................................................... |
3-14 |
|
|
Using the Multi Bypass Tray (Option)........................................... |
3-14 |
EP1054

|
|
|
|
|
|
|
|
|
|
4 |
Auxiliary Functions |
|
|
|
|
4.1 |
Checking the Total Number of Copies Mode.............................. |
4-1 |
|
|
|
Types of Counters........................................................................... |
4-1 |
|
|
|
Counter Display............................................................................... |
4-1 |
|
|
|
Using the Meter Count Function ..................................................... |
4-2 |
|
|
4.2 |
Toner Replenisher Function (Increasing the Image Density) ... |
4-3 |
|
|
4.3 |
Drum Dehumidifier Function........................................................ |
4-4 |
|
|
4.4 |
User’s Choice ................................................................................ |
4-6 |
|
|
|
Functions Available in User’s Choice.............................................. |
4-6 |
|
|
|
Description of Each User’s Choice Function................................... |
4-6 |
|
|
|
Making the User’s Choice Mode Settings ..................................... |
4-11 |
|
5 When an Indicator Lights Up |
|
|
||
|
5.1 |
Quick Reference for Indicator Lights .......................................... |
5-1 |
|
|
|
Warning Indicators .......................................................................... |
5-1 |
|
|
5.2 |
Detailed Instructions for Indicator Lights................................... |
5-2 |
|
|
|
Add Toner Indicator......................................................................... |
5-2 |
|
|
|
Replacing the Toner Bottle.............................................................. |
5-2 |
|
|
|
Add Paper Indicator ........................................................................ |
5-4 |
|
|
|
Adding Paper (Drawer) ................................................................... |
5-4 |
|
|
|
Adding Paper (Multi Bypass Tray) .................................................. |
5-5 |
|
|
|
Closure Failure Indicator................................................................. |
5-6 |
|
|
|
Misfeed Indicator............................................................................. |
5-7 |
|
|
|
Misfeed Clearing Procedure............................................................ |
5-7 |
|
|
|
Call-Tech.-Rep. Indicator .............................................................. |
5-10 |
|
|
|
Resetting the Call-Tech.-Rep. Indicator ........................................ |
5-10 |
|
|
|
I.U. Service Life Indicator Lights Up.............................................. |
5-11 |
|
|
|
Precautions for Handling............................................................... |
5-12 |
|
|
|
Removing the I. U. from the copier ............................................... |
5-13 |
|
|
|
Unpacking the I. U......................................................................... |
5-14 |
|
|
|
Setting up the I. U. ........................................................................ |
5-14 |
|
|
|
Charging the Copier with Starter and Toner ................................. |
5-16 |
|
6 |
Troubleshooting |
|
|
|
|
6.1 |
When this Type of Copy is Produced.......................................... |
6-1 |
|
|
6.2 |
The Copier is not functioning as designed ................................ |
6-3 |
|
7 |
Specifications |
|
|
|
|
|
Copier EP1085................................................................................ |
7-1 |
|
|
|
Multi Bypass Tray MB-4 .................................................................. |
7-2 |
|
EP1054

|
|
|
|
|
|
|
|
|
|
|
|
8 |
Miscellaneous |
|
|
||
|
|
8.1 |
Care of the Copier ........................................................................ |
8-1 |
|
|
|
|
Daily Checks................................................................................... |
8-1 |
|
|
|
|
Power Cord, Communications Cable, Ground Cable ..................... |
8-1 |
|
|
|
|
Original Glass ................................................................................. |
8-1 |
|
|
|
|
Original Cover, Automatic Document Feeder................................. |
8-1 |
|
|
|
|
Copy Paper..................................................................................... |
8-2 |
|
|
|
|
Sound of Copier Operation............................................................. |
8-2 |
|
|
|
|
Copier Housing Temperature ......................................................... |
8-2 |
|
|
|
|
Cleaning ......................................................................................... |
8-2 |
|
|
|
|
Housing .......................................................................................... |
8-2 |
|
|
|
|
Original Pad.................................................................................... |
8-2 |
|
|
|
|
Original Glass ................................................................................. |
8-3 |
|
|
|
|
Control Panel.................................................................................. |
8-3 |
|
|
|
|
Front Door ...................................................................................... |
8-3 |
|
|
|
|
Corona Units................................................................................... |
8-4 |
|
|
|
8.2 |
Paper Size and Zoom Ratio Table............................................... |
8-5 |
|
|
|
|
Paper Size ...................................................................................... |
8-5 |
|
|
|
|
Zoom Ratio Table (Original Size to Copy Paper Size) ................... |
8-6 |
|
EP1054

Using the Copier Properly
To ensure the optimum performance of the copier, follow the precautions listed below.
Never place a heavy object on the copier.
Never subject the copier to shocks.
Never open doors or turn the copier off while he is making copies.
Never bring any magnetized object near the copier.
Never use flammable sprays, liquids or gases near the copier.
Never modify the copier, as a fire or electrical shock could result.
Never remove any panel or cover which is secured. The copier contains high voltage components which can cause electrical shock.
Never tamper with the laser mechanism in laser-equipped models, as blindness or other injury may result.
Never drop paper clips, staples or other small pieces of metal through the vents or other openings in the copier, as a fire or electrical shock can result.
Never place containers of liquid on the copier. If liquids get inside the copier, they can cause fire or electrical shock. If a piece of metal or any liquid gets inside the copier, immediately turn the copier off, unplug the power cord and call your technical representative. A fire or electrical shock can result if the copier remains plugged in or is operated after metal or liquid gets inside.
Never leave the copier running if it becomes unusually hot, or if smoke or an unusual odor or noise is detected. Should any of these conditions occur, immediately turn the copier off, unplug the power cord and call your technical representative. A fire or electrical shock can result if the copier remains plugged in under any of these conditions.
Always insert the power plug all the way into the outlet.
Always make sure that the outlet is visible, clear of the copier or copier cabinet.
Always provide good ventilation when making a large number of continuous copies.
Never pull on the power cord, and always hold the plug when unplugging the power cord. A damaged cord could result in a fire or cause an electrical shock.
Never unplug the power cord with a wet hand, as it could cause an electrical shock.
Always unplug the power cord before moving the copier. Moving the copier with the power cord plugged in can damage the cord resulting in a fire or causing an electrical shock.
EP1054 |
X-1 |
Always unplug the power cord when the copier is not going to be used for a long time.
Never place a heavy object on the power cord, or pull or bend it, as a fire or electrical shock can result.
Always ensure that the copier does not sit on or move onto the power cord or communications cable of other electrical equipment, as malfunctioning equipment or a fire could result.
Always ensure that the power cord or communications cable of other electrical equipment does not become wedged into the copier mechanism, as malfunctioning equipment or a fire could result.
Always use the correct power voltage, as improper voltage can cause a fire or electrical shock.
Never use a multiple outlet adapter, as a fire or electrical shock can result.
Should the power cord become damaged, immediately turn the copier off, unplug the power cord and call your technical representative. A damaged cord can result in a fire or cause an electric shock.
If an extension cord is needed, use one with a greater rated capacity than the maximum power requirements of the copier. The use of an extension cord that falls short of supporting the maximum power requirements can result in overheating or a fire
Always unplug the copier whenever anything unusual is observed during operation. Make sure that the outlet is nearby and clear of the copier and furniture.
NOTE
Locate the Copier in a Well Ventilated Room
èA negligible amount of ozone is generated during normal operation of this copier. An unpleasant odor may, however, be created in poorly ventilated rooms during extensive copier operations. For a comfortable, healthy and safe operating environment, it is recommended that the room be well ventilated.
Placer le copieur dans une pièce largement ventilée
èUne quantité d’ozone négligeble est dégagée pendant le fonctionnement du copieur quand celui-ci est utilisé normalement. Cependant, une odeur désagréable peut être ressentie dans les pièces dont l’aération est insuffisante et lorsqu’une utilisation prolongée du copieur est effectuée. Pour avoir la certitude de travailler dans un environnment réunissant des conditions de confort, santé et de sécurité, il est préférable de bien aérer la pièce ou se trouve le copieur.
X-2 |
EP1054 |
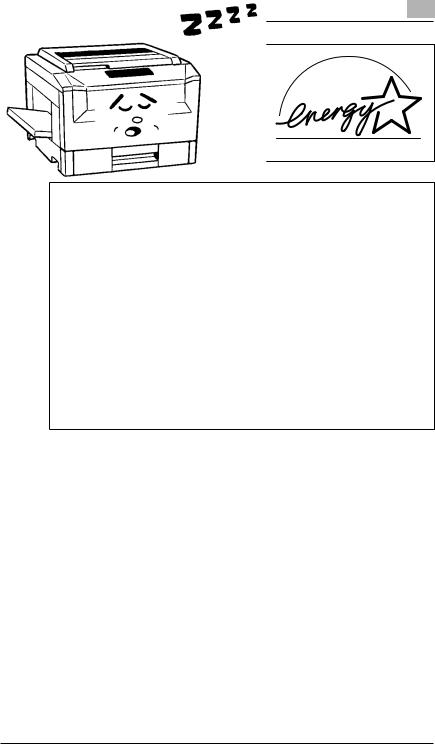
As an ENERGY STAR®Partner, we have determined that this copier meets the ENERGY STAR®Guidelines for energy efficiency.
What is an Energy Star Copier ?
Energy Star Copiers have a feature that allows them to automatically turn off or “go to sleep” after a period of inactivity, ensuring night and weekend shut off. This auto-feature can reduce a copier’s annual electricity costs by over 60 percent. In addition, high speed copiers will be set to automatically make double sided copies. An organization’s paper costs can be reduced and the volume of paper sent into the waste stream will decline. It takes 10 times more energy to produce a piece of paper than it does to make a single copy on a copier. Therefore, using less paper also means decreased national energy consumption.
EP1054 |
X-3 |

EP1054
Thank you for choosing Minolta.
This operator’s manual explains how to operate the copier and replenish its supplies. It also gives some troubleshooting tips as well as general precautions to be observed when operating the copier.
To ensure the best performance and effective use of your copier, read this manual carefully until you familiarize yourself thoroughly with its operation and features. After you have read through the manual, keep it for ready reference.
Please use this manual as a quick and handy reference tool for immediately clarifying any questions which may arise.
CE Marking (Declaration of Conformity)
We declare under our sole responsibility that this copier and options to which this declaration relates is in conformity with the specifications below. This declaration is valid for the area of the European Union (EU) only.
Product Type |
Copying Machine |
|
Product Name |
EP1054 |
|
|
|
|
Options |
MB-4 |
|
|
|
|
Standards |
Safety*2: |
EN 60 950 / 1992 |
|
|
(A1 : 1993, A2 : 1993, A3 : 1995, A4 : 1996) |
|
|
(Safety of information technology equipment, including |
|
EMC*1: |
electrical business equipment) |
|
EN55 022 Class B:1994 (A1:1995) |
|
|
|
(Limits and method for measurement of radio |
|
|
disturbance characteristics of information technology |
|
|
equipment (ITE)) |
|
|
EN 50 082-1 / 1992 |
|
|
(Electromagnetic compatibility-Generic immunity |
|
|
standard Part1 : Residential, commercial and light |
|
|
industry) |
|
|
IEC 801-2 / 1991 |
|
|
(Electrostatic discharge requirement) |
|
|
IEC 801-3 / 1984 |
|
|
(Radiated electromagnetic field requirement) |
|
|
IEC 801-4 / 1988 |
|
|
(Electrical fast transient / burst requirement) |
|
Notes: |
*1) EMC performance : |
|
|
This product was designed for operation in a typical |
|
|
office environment |
|
|
*2) First year of labelling according to EC-directive |
|
|
73/23 / EEC and 93 / 68 / EEC : 98 |
|
|
|
EC Directives |
Safety: |
73 / 23 / EEC and 93 / 68 / EEC |
|
BMC: |
89 / 336 / EEC and 93 / 68 / EEC |
|
|
|
X-4 |
EP1054 |
Terms and Symbols for the Type of Originals and Copy Paper
A few special terms and symbols are used in this manual to designate types of originals and copy paper. This page explains about these terms and symbols.
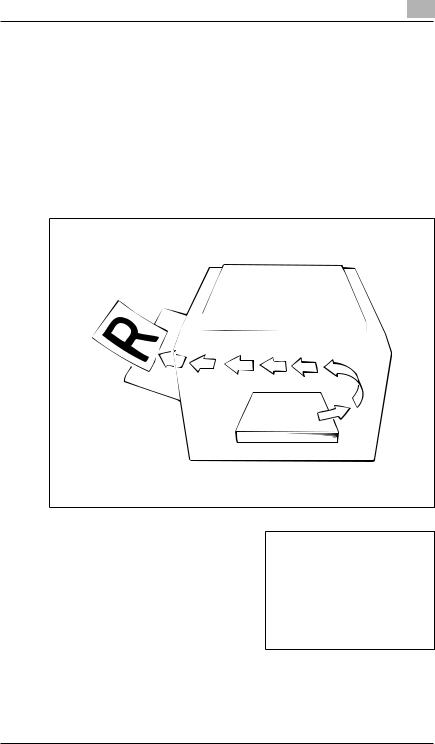
Feeding Direction (copy paper path)
In this copier system, copy paper is taken up from the right-hand side of the copier and fed through the copier toward the left-hand side, out face up onto the Exit Tray. In the figure below, the direction in which the copy paper is fed, as indicated by the arrow, is called the “feeding direction.”
“Width” and “Length”
When we talk about the size of the original or copy, we call side A “width” and side B “length.”
A:Width
B:Length
EP1054 |
X-5 |

Terms and Symbols Used
Lengthwise 
When the original or copy has a “length” longer than its “width,” we call it “lengthwise” and use symbol “L” or
“  “.
“.
Crosswise 
When the original or copy has a “length” shorter than its “width,” we call it “crosswise” and use symbol “C” or “ ”
|
|
|
|
|
|
|
|
X-6 |
EP1054 |
||
Safety Notes |
1 |
|
|
|
|
1 Safety Notes
1.1Installing the Copier
Installation Site
To ensure utmost safety and prevent possible malfunctions of the copier, install it in a location which meets the following requirements.
A place away from a curtain or the like that may catch fire and burn easily.
An area where there is no possibility of being splashed with water or other types of liquid.
An area free from direct sunlight.
A place out of the direct air stream of an air conditioner, heater, or ventilator.
A well-ventilated place.
A dry place.
A dust-free location.
An area not subject to undue vibration.
A stable and level location.
Power Source
The power source voltage requirements are as follows.
Use a power source with little voltage fluctuation.
Voltage Fluctuation: |
Within ±10% |
Frequency Fluctuation: |
50/60 Hz Within ±0.3% |
If any other electrical equipment is sourced from the same power outlet, make sure that the capacity of the outlet is not exceeded.
The outlet should be located near the copier and easily accessible.
Never connect by means of a multiple socket any other appliances or machines to the outlet being used for the copier.
If an extension cord is needed, use one with a capacity more than the power consumption of the copier.
Make sure that no unusual, excessive force is being applied to the power cord or extension cord.
EP1054 |
1-1 |

1 |
Safety Notes |
|
Grounding
To prevent receiving electrical shocks in the case of electrical leakage, always ground the copier.
Connect the grounding wire to:
The ground terminal of the outlet.
A grounding contact which complies with the local electrical standards.
NOTE
èNever connect the grounding wire to a gas pipe, a grounding wire for a telephone or a water pipe.
Space Requirements
To ensure easy copier operation, supply replacement and service maintenance, adhere to the recommended space requirements detailed below.
NOTE
èBe sure to allow a clearance of 150mm. or more at the back of the copier as there is a ventilation duct.
Copier |
|
|
1,085 |
|
448 |
637 |
|
|
1,250 |
469 |
|
253 |
655 |
|
|
|
|
841 |
|
|
|
372 |
|
|
|
387 |
|
|
|
|
Scale: mm |
|
|
|
|
1-2 |
EP1054 |

Safety Notes |
1 |
|
|
|
|
1.2Precautions for Use
Operating Environment
The operating environmental requirements of the copier are as follows.
Temperature: |
10°C to 30°C (50°F to 86°F) with a fluctuation of |
|
10°C (50°F) per hour |
Humidity: |
15% to 85% with a fluctuation of 20% per hour |
Using the Copier Properly
To ensure the optimum performance of the copier, follow the precautions listed below.
NEVER place a heavy object on the copier or subject the copier to shocks.
NEVER open any doors, or turn OFF the copier while the copier is making copies.
NEVER bring any magnetized object or use flammable sprays near the copier.
NEVER place a vase or vessel containing water on the copier.
NEVER drop paper clips, staples, or other small pieces of metal into the copier.
NEVER attempt to remove any Cover that is secured.
NEVER remodel the copier, as a fire or electrical shock could result.
ALWAYS insert the power plug all the way into the outlet.
ALWAYS make sure that the outlet is visible, clear of the copier or copier cabinet.
ALWAYS ensure that the copier does not ride on the power cord or communications cable of other electrical equipment, and it does not get such a cord or cable wedged into its own mechanism.
NEVER leave damage or cracks evident on the copier power cord unattended. If you find any of these conditions, immediately shut down the copier, unplug the power cord, and call your Technical Representative for appropriate action.
ALWAYS provide good ventilation when making a large number of continuous copies.
NEVER keep the copier running when it becomes inordinately hot or produces abnormal noise. If that happens, immediately turn OFF the copier, unplug it, and then call your Technical Representative.
EP1054 |
1-3 |

1 |
Safety Notes |
|
NOTE
Locate the Copier in a Well Ventilated Room
èA negligible amount of ozone is generated during normal operation of this copier. An unpleasant odor may, however, be created in poorly ventilated rooms during extensive copier operations. For a comfortable, healthy, and safe operating environment, it is recommended that the room be well ventilated.
Placer le copieur dans une pièce largement ventilée
èUne quantité d’ozone négligable est dégagée pendant le fonctionnement du copieur quand celui-ci est utilisé normalement. Cependant, une odeur désagréable peut être ressentie dans les pièces dont l’aération est insuffisante et lorsque une utilisation prolongée du copieur est effectuée. Pour avoir la certitude de travailler dans un environnement réunissant des conditions de confort, santè et de sécurité, il est préférable de bien aérer la pièce ou se trouve le copieur.
Care of Copier Supplies
Use the following precautions when handling the copier supplies (toner, paper, etc.).
Store the paper, toner, and other supplies in a place free from direct sunlight and away from any heating apparatus. Keep them in a dry, clean environment.
Store paper, which has been removed from its wrapper but not loaded into the drawer, in a sealed plastic bag in a cool, dark place.
Use the correct toner for the exclusive use by the copier. The applicable copier model name is indicated on the Toner Bottle.
Keep supplies out of the reach of children.
If your hands become soiled with toner, wash them with soap and water immediately.
Moving
If you need to transport the copier over a long distance, consult your Technical Representative.
1-4 |
EP1054 |

Safety Notes |
1 |
|
|
|
|
Legal Restrictions on Copying
Certain types of documents must never be copied by the copier for the purpose or with the intent to pass copies of such documents off as the original. The following is not a complete list but is meant to be used as a guide to responsible copying.
Financial Instruments
Personal Checks
Travelers Checks
Money Orders
Certificates of Deposit
Bonds or other Certificates of Indebtedness
Stock Certificates
Legal Documents
Food Stamps
Postage Stamps (canceled or uncanceled)
Checks or Drafts drawn by Government Agencies
Internal Revenue Stamps (canceled or uncanceled)
Passports
Immigration Papers
Motor Vehicle Licenses and Titles
House and Property Titles and Deeds
General
Identification Cards, Badges, or Insignias
Copyrighted Works without permission of the copyright owner
In addition, it is prohibited under any circumstances to copy domestic or foreign currencies or Works of Art without permission of the copyright owner.
When in doubt about the nature of a document, consult with legal counsel.
EP1054 |
1-5 |

1 |
Safety Notes |
|
1-6 |
EP1054 |
Getting to Know Your Copier |
2 |
|
|
|
|
2 Getting to Know Your Copier
2.1System Overview
Multi Bypass Tray MB-4 <Option>
Holds up to 50 sheets of standard paper
which is not loaded in any of the EP1085 Drawers, allowing to make copies on
them, see page 3-14.
EP1054
The Paper Drawer can hold up to 250 sheets of copy paper. The Manual Bypass Tray allows you to make a copy on paper which is not loaded in the Drawer and which is fed into the copier manually via this Tray.
EP1054 |
2-1 |
2 |
Getting to Know Your Copier |
|
2.2Copier Parts and Accessories
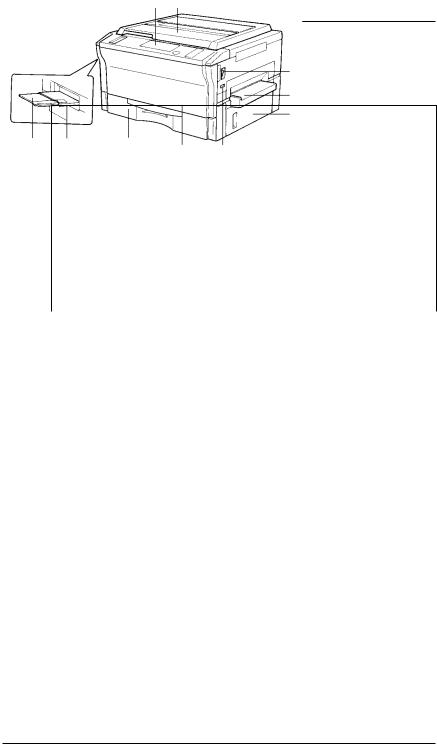
Outside Copier
1 2
3
4
5
|
10 |
9 |
|
8 |
6 |
|
|
|
|
7 |
|
|
|
|
|
|
|
|
|
|
|
|
|
Pcs. |
Specification |
|
Description |
|
|
1 |
Control Panel |
|
Use to start a copy cycle or to make copying-job settings, |
||
|
|
|
see page 2-6. |
|
|
|
|
|
|
||
2 |
Original Cover |
|
Holds the original placed on the Original Glass in position. |
||
|
|
|
To place an original, raise the Cover and place it in position |
||
|
|
|
on the Original Glass, see page 3-4 |
||
|
|
|
|
||
3 |
Power Switch |
|
Use to turn the copier ON and OFF, see page 2-11. |
||
|
|
|
|||
4 |
Manual Bypass Tray |
Use for manual feeding of paper into the copier, |
|||
|
|
|
see page 3-13. |
|
|
|
|
|
|
||
5 |
Right Door |
|
Open to clear a paper misfeed, see page 5-7. |
||
|
|
|
|
||
6 |
Total Counter |
|
Shows the total number of copies made so far. |
||
|
|
|
|
|
|
7 |
Front Door |
|
Open to: |
|
|
|
|
|
|
Replace the Toner Bottle, see page 5-2. |
|
|
|
|
|
Clear a paper misfeed, see page 5-7. |
|
|
|
|
|
Clean the Corona Units, see page 8-4. |
|
|
|
|
Closing the Front Door after a misfeed has been cleared |
||
|
|
|
will turn the Misfeed Indicator on the control panel OFF. |
||
|
|
|
|
||
8 |
Paper Drawer |
|
Holds up to 250 sheets of paper. The Edge Guide and |
||
|
|
|
Trailing Edge Stop are movable, allowing you to load paper |
||
|
|
|
of different sizes, see page 5-4. |
||
|
|
|
|
||
9 |
Exit Tray |
|
Holds copies fed out of the copier. |
||
|
|
|
|||
10 |
Copy Tray Extender |
Slide this out when making copies on large-size paper. |
|||
|
|
|
|
|
|
2-2 |
EP1054 |
Getting to Know Your Copier |
2 |
|
|
|
|
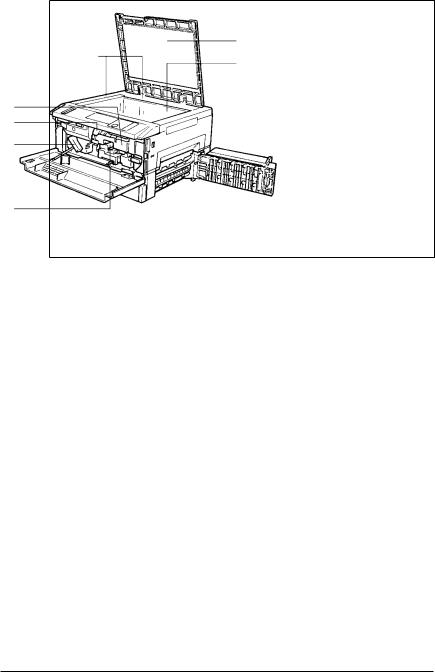
Inside Copier
|
2 |
1 |
3 |
|
|
7 |
|
6 |
|
5 |
|
4 |
|
Pcs. |
Specification |
Description |
1 |
Original Width/Length |
Place the original along these Scales for correct |
|
Scale |
positioning, see page 3-4. |
|
|
|
2 |
Original Pad |
Holds the original in position on the Original Glass. |
|
|
|
3 |
Original Glass |
Place the original face down on this Glass, see page 3-4. |
|
|
|
4 |
Corona Unit Cleaning |
Operate the Lever to clean the corresponding Corona Unit |
|
Lever (Upper/Lower) |
if unwanted lines are produced on the copy, |
|
|
see page 8-4. |
|
|
|
5 |
Lock Release Lever |
Turn counterclockwise to swing up the Upper Half of the |
|
|
copier to clear a paper misfeed, see page 5-7. |
|
|
|
6 |
Toner Bottle |
Contains toner. Replace it with a new one when the Add |
|
|
Toner Indicator lights up, see page 5-2. |
|
|
|
7 |
Toner Bottle Holder |
Swing open to replace the Toner Bottle, see page 5-2. |
|
|
|
EP1054 |
2-3 |
2 |
|
|
Getting to Know Your Copier |
||
|
|
|
|
|
|
|
|
|
|
||
8 |
9 |
|
|||
13 |
10 |
|
|
|
11 |
|
|
12 |
|
|
|
|
|
|
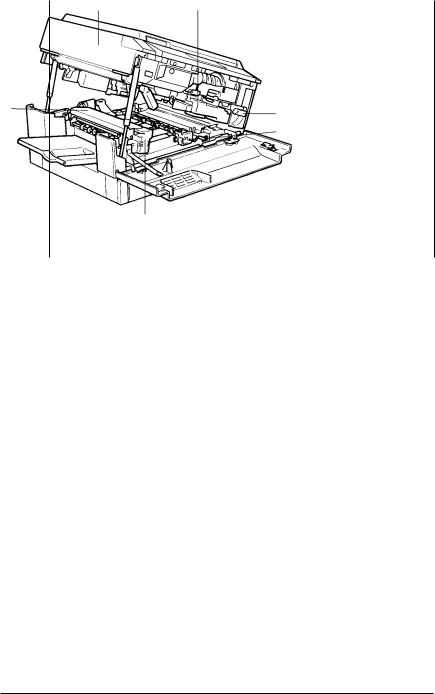
Pcs. |
Specification |
Description |
8 |
Upper Half of Copier |
The copier main body can be divided into two parts, the |
|
|
upper and lower. The Upper Half can be swung upward, |
|
|
see page 5-7. |
|
|
|
9 |
Imaging Unit |
Converts the original image to the copy image. |
|
|
|
10 |
Imaging Unit Lock |
Operate when replacing the Imaging Unit, see page 5-13. |
|
Release Lever |
|
|
|
|
11 |
Dehumidifier Switch |
Turn ON to prevent condensation from forming on the PC |
|
|
Drum when power is turned OFF. (For Technical |
|
|
Representative only) |
|
|
|
12 |
Fusing Unit Handle |
Hold onto this Handle when lifting the Upper Half of the |
|
|
Fusing Unit, see page 5-7. |
|
|
|
13 |
Fusing Unit |
Fuses the toner image onto the paper. |
|
|
|
2-4 |
EP1054 |
Getting to Know Your Copier |
2 |
|
|
|
|
Multi Bypass Tray MB-4
1
3
2
Pcs. |
Specification |
Description |
1 |
Paper Guide Plate |
Slide as necessary to the size of the copy paper, see page |
|
|
3-14. |
|
|
|
2 |
Multi Bypass Tray |
Load your paper on this Tray. It allows you to make copies |
|
|
continuously on paper fed from this Tray, see page 3-14. |
|
|
|
3 |
Multi Bypass Tray |
Slide this out to use large-size copy paper, see page 3-14. |
|
Extender |
|
|
|
|
EP1054 |
2-5 |
2 |
Getting to Know Your Copier |
|
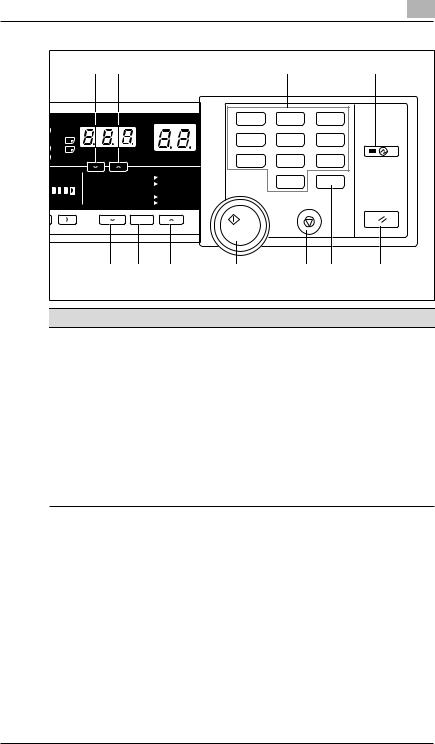
2.3Control Panel Keys and Indicators
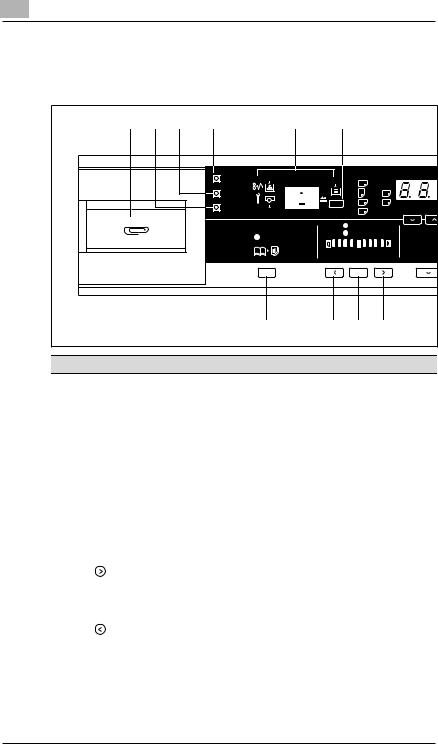
Control Panel
|
1 |
2 |
3 |
4 |
5 |
6 |
|
|
|
|
|
|
|
|
Meter Count |
|
|
A3 |
@ @ |
|
|
|
|
|
|
|
|
|
|
|
||
|
|
|
|
Toner |
|
|
A4 |
@ @ |
B4 |
|
|
|
|
|
Drum Dehumidify |
|
Paper |
A4 |
@ @ |
FLS. |
50%~200% |
|
|
|
|
|
|
A5 |
@ @ |
Inch |
||
|
|
|
|
|
|
|
|
|||
|
|
|
|
|
|
|
Auto |
|
141% |
|
|
|
|
|
|
Book |
|
Photo |
|
||
|
|
|
|
|
|
|
115% |
|||
|
|
|
|
|
|
|
|
|
||
|
|
|
|
|
|
|
|
|
|
100% |
|
|
|
|
|
|
Lighter |
|
|
Darker |
81% |
|
|
|
|
|
|
Auto/Photo |
|
70% |
||
|
|
|
|
|
|
|
|
A |
|
|
|
|
|
|
|
10 |
9 |
|
8 |
7 |
|
Pcs. |
Specification |
|
|
Description |
|
|
|
|
|
|
1 |
Clip Tray |
Use this tray to put the paper clips used with the |
||||
|
|
|
|
|
|
documents. |
|
|
|
|
|
|
|
2 |
Drum Dehumidify Key |
Press to remove condensation formed on the surface of the |
||||
|
|
|
|
|
|
PC Drum, see page 4-4. |
|
|
|
|
|
|
|
3 |
Auxiliary Toner |
Press when the image on the copy becomes too light, see |
||||
|
Replenishing Key |
page 4-3. |
||||
|
|
|
|
|
|
|
4 |
Meter Count Key |
Press to check for the current counts of four electronic |
||||
|
|
|
|
|
|
counters of the copier, see page 4-2. |
|
|
|
|
|
|
|
5 |
Display |
See the other pages in this manual, see page 2-8. |
||||
|
|
|
|
|
|
|
6 |
Paper Select Key |
Press to select the paper source, Drawer or Multi Bypass |
||||
|
|
|
|
|
|
Tray (option), when the Multi Bypass Tray is mounted to |
|
|
|
|
|
|
the copier, see page 3-6. |
|
|
|
|
|
|
|
7 |
Exposure Control Key |
Press as necessary to make the exposure level higher in |
||||
|
( |
|
|
,Darker) |
the Manual Exposure Mode, see page 3-10. |
|
|
|
|
|
|
|
|
|
|
|
|
|
|
|
8 |
Auto Exposure Mode |
Press to select the Auto Exposure, Manual Exposure or |
||||
|
Key |
|
|
Photo Mode, see page 3-10. |
||
|
|
|
|
|
|
|
9 |
Exposure Control Key |
Press as necessary to make the exposure level lower in the |
||||
|
( |
|
,Lighter) |
Manual Exposure Mode, see page 3-10. |
||
|
|
|
|
|
|
|
10 |
Book Key |
Press as necessary to select the Book Copying Mode , see |
||||
|
|
|
|
|
|
page 3-11. |
|
|
|
|
|
|
|
2-6 |
EP1054 |
Getting to Know Your Copier |
|
|
|
|
|
2 |
||||
|
|
|
|
|
|
|
|
|
|
|
|
|
11 |
12 |
|
|
|
13 |
|
|
14 |
|
|
|
|
|
|
1 |
2 |
|
3 |
|
@ |
|
|
|
% |
|
4 |
5 |
|
6 |
|
@ |
B4 |
|
|
|
|
|
||||
@ |
FLS. |
50%~200% |
|
|
|
|
|
|
|
|
@ |
Inch |
|
|
7 |
8 |
|
9 |
|
||
|
|
|
|
|
|
|||||
o |
|
|
141% |
A4 |
@ A3 |
|
0 |
|
C |
|
|
|
115% |
B4 |
@ A3 |
|
|
|
|||
|
|
|
|
|
|
|
|
|||
|
|
|
100% |
@ @ @Full Size |
|
|
|
|
|
|
|
Darker |
|
81% |
B4 |
@ A4 |
|
|
|
|
|
oto |
|
|
70% |
A3 |
@ A4 |
|
|
|
|
|
|
|
|
|
100% |
|
|
|
|
|
|
|
|
|
21 |
20 |
19 |
18 |
|
17 |
16 |
15 |
Pcs. |
Specification |
|
Description |
|
|
|
|
|||
11 |
Zoom Down Key |
Press as necessary to make the zoom smaller in 1% |
|
|
increments, see page 3-8. |
|
|
|
12 |
Zoom Up Key |
Press as necessary to make the zoom larger in 1% |
|
|
increments, see page 3-8. |
|
|
|
13 |
Key Pad |
Use to enter the number of copies to be made and other |
|
|
numeric data. |
|
|
|
14 |
Energy Saver Key |
Press to set the copier into the Energy Saver Mode, see |
|
|
page 2-12. |
|
|
|
15 |
Panel Reset Key |
Press to set the copier into the initial mode, clearing all |
|
|
settings made previously on the control panel, see page |
|
|
2-13. |
Holding down the Key for 3 seconds will initiate the User’s Choice, see page 4-11.
16 |
Clear Key |
Press to clear the number of copies, zoom and other |
|
|
settings. |
|
|
|
17 |
Stop Key |
Press to stop a multi-copy cycle. |
|
|
|
18 |
Start Key |
Press to start a copy cycle. |
|
|
|
19 |
Enlargement Key |
Press to select a desired fixed enlargement ratio, see page |
|
|
3-8. |
|
|
|
20 |
Full Size Key |
Press to select full size (100%), see page 3-8. |
|
|
|
21 |
Reduction Key |
Press to select a desired fixed reduction ratio, |
|
|
see page 3-8. |
|
|
|
EP1054 |
2-7 |

2 |
Getting to Know Your Copier |
|
Display |
|
|
|
|
|
|
|
|
Paper Information |
Zoom Ratio Indicator/ |
|||||
Monitor Display |
Display |
|
|
Multi Copy Display |
|||
Meter Count |
A3 |
@ @ |
|
|
|
% |
|
|
|
|
|
|
|||
Toner |
A4 |
@ @ |
B4 |
|
|
|
|
Paper |
A4 |
@ @ |
FLS. |
50%~200% |
|
|
|
Drum Dehumidify |
A5 |
@ @ |
Inch |
|
|
||
|
|
|
|
|
|||
|
Auto |
|
|
141% |
A4 |
@ A3 |
|
Book |
Photo |
|
|
||||
|
|
|
|
115% |
B4 |
@ A3 |
|
|
|
|
|
|
100% |
@ @ @Full Size |
|
Lighter |
|
Darker |
|
81% |
B4 |
@ A4 |
|
|
Auto/Photo |
|
|
70% |
A3 |
@ A4 |
|
|
|
A |
|
|
|
100% |
|
Exposure Information |
|
|
|
|
|||
Display |
|
|
|
|
|
|
|
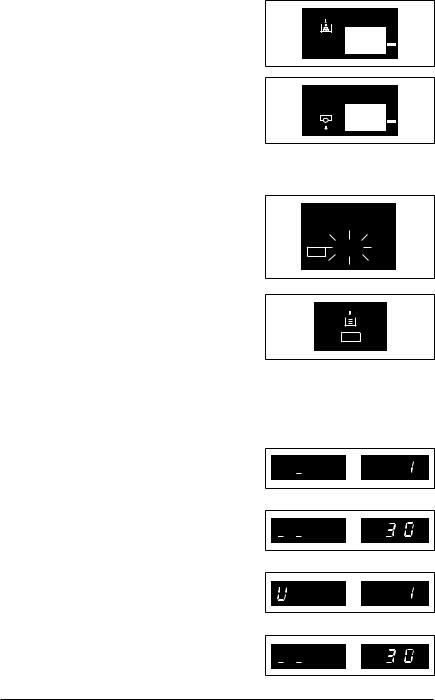
Monitor Display
Paper Source Indicator
Shows the paper source which is currently selected for use, see page 3-6.
Example: Shows that the Drawer is currently selected for use.
Closure Failure Indicator
The location of a Door left open is also indicated by a round marker, see page 5-6.
Example: Indicates that the Front Door or Right Door is left open.
Misfeed Indicator
Indicates that a paper misfeed has occurred. The location of the misfeed is also indicated by a round marker, see page 5-7.
Example: Shows that a misfeed has occurred inside the copier.
Call-Tech.-Rep. Indicator
Indicates that the copier has developed a malfunction. When a malfunction occurs, the corresponding malfunction code is
shown across the Zoom Ratio
Indicator and Multi-Copy Display, see page 5-10.
2-8 |
EP1054 |
Getting to Know Your Copier |
2 |
|
|
|
|
Add Toner Indicator
Indicates that the Toner Bottle is running out of toner. Replace the Toner Bottle as soon as possible, see page 5-2.
I. U. Service Life Indicator Indicates that the Imaging Unit needs replacement. Replace the Imaging Unit, see page 5-11.
Paper Information Display
Paper Size Indicators
Show the size of paper currently loaded in the Drawer,
see page 3-6.
Paper A4 
1142O143DA
Add Paper Indicator
Lights up when the currently selected Drawer has run out of paper. Add paper as necessary, see page 5-4.
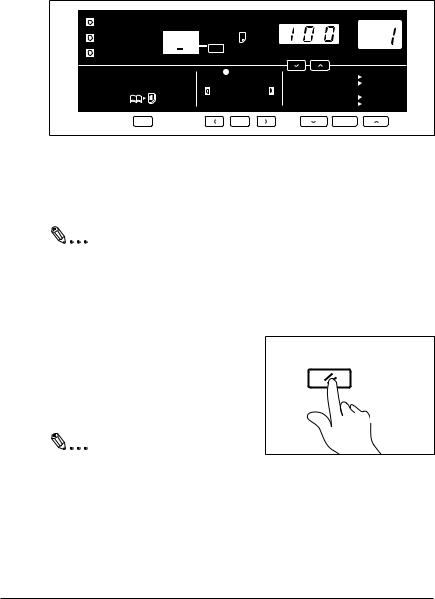
Zoom Ratio Indicator / Multi-Copy Display
Paper
Each shows the following data.
Example
Zoom ratio: 100% No. of copies: 1
Count of the Total Counter Example: 93,930 (copies)
User’s Choice code and setting value
Example: Choice code: 14, Setting: 1
Malfunction code
Example: Malfunction code C0F30


 %
%


 %
%


 %
%


 %
%
EP1054 |
2-9 |

2 |
|
|
|
Getting to Know Your Copier |
||||||||||||
|
|
|
|
|
|
|
|
|
|
|
|
|
|
|
|
|
|
|
Exposure Information Display |
|
|
|
|
|
|
|
|
|
|
|
|
||
|
|
|
Auto Exposure Indicator |
|
|
|
|
|
|
|
|
|
|
|
|
|
|
|
|
|
|
|
|
|
|
|
|
|
|
|
|
||
|
|
|
Indicates that the copier is now in |
|
|
|
|
|
Auto |
|
||||||
|
|
|
the Auto Exposure Mode, see page |
|
|
|
|
|
Photo |
|
||||||
|
|
|
3-10. |
|
|
|
|
|
|
|
|
|
|
|
|
|
|
|
|
|
|
Lighter |
|
|
Darker |
|
|
||||||
|
|
|
|
|
|
|
|
Auto/Photo |
|
|||||||
|
|
|
Exposure Level Indicator |
|
|
|
|
|
|
|
|
|
|
|
|
|
|
|
|
|
|
|
|
|
|
|
|
|
|
|
|
||
|
|
|
|
|
|
|
|
|
|
|
|
|
|
|
||
|
|
|
Shows the exposure setting level in |
|
|
|
|
|
Auto |
|||||||
|
|
|
the Manual Exposure Mode, see |
|
|
|
|
|
Photo |
|||||||
|
|
|
page 3-10. The center LED is |
|
|
|
|
|
|
|
|
|
|
|
|
|
|
|
|
|
|
|
|
|
|
|
|
|
|
|
|
||
|
|
|
normally lit. |
|
Lighter |
|
|
Darker |
||||||||
|
|
|
|
|
|
|
|
Auto/Photo |
||||||||
|
|
|
Photo Mode Indicator |
|
|
|
|
|
|
|
|
|
|
|
|
|
|
|
|
|
|
|
|
|
|
|
|
|
|
|
|
||
|
|
|
|
|
|
|
|
|
|
|
|
|
|
|
||
|
|
|
Indicates that the copier is now in |
|
|
|
|
|
Auto |
|||||||
|
|
|
the Photo Mode, see page 3-10. |
|
|
|
|
|
Photo |
|||||||
|
|
|
|
|
|
|
|
|
|
|
||||||
|
|
|
|
|
|
|
|
|
|
|
|
|
||||
|
|
|
|
|
Lighter |
|
|
Darker |
||||||||
|
|
|
|
|
|
|
|
Auto/Photo |
||||||||
|
|
|
|
|
|
|
|
|
|
|
|
|
|
|
|
|
2-10 |
EP1054 |
Getting to Know Your Copier |
2 |
|
|
|
|
2.4Turning ON and OFF, and Resetting the Copier
Turning ON and OFF
Turning the Copier ON: Press the
Power Switch to the “1” position.
Turning the Copier OFF: Press the
Power Switch to the “… ” position.
NOTE
èThe Auto Shut OFF function will automatically shut down the copier a givenperiod of time after the last activity. The initial setting is 30 minutes.
Useful Tip
The period of time can be changed by using the User’s Choice, see page 4-10.
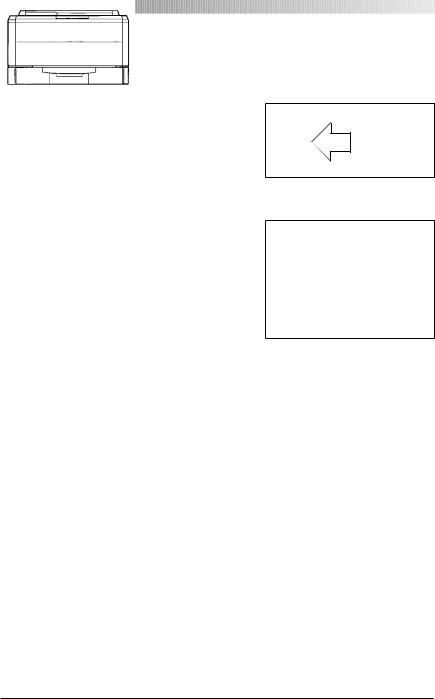
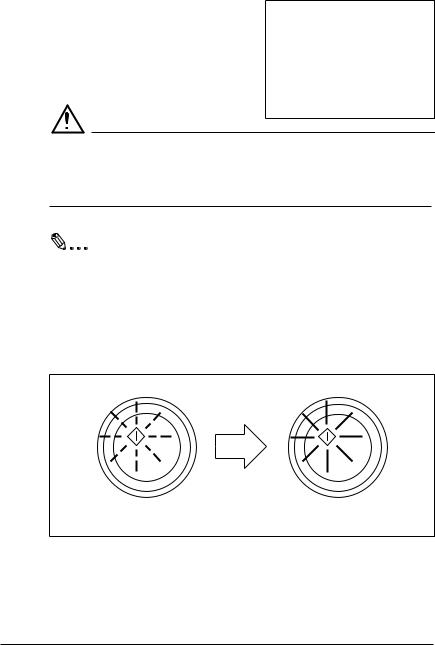
When the Copier is Turned ON
Blinking Orange |
Turns Green |
The Start Key blinks orange, indicating that the copier is now warming up.
In about 30 sec., the Start key turns green. Now the copier is ready to make copies.
EP1054 |
2-11 |
2 |
Getting to Know Your Copier |
|
Minimizing the Warm-up Time
Instead of turning the copier OFF, it’s a good idea to use the Energy Saver Mode. This mode will minimize the time for the copier to complete the warm-up cycle to about 20 sec.
The Energy Saver Mode is automatically activated a given period of time after the copier has been used last. The initial is 15 min.
Useful Tip
The time for the copier to enter the Energy Saver Mode can be selected from 1 to 98 min., or for 240 min. by using User’s Choice, see page 4-10.
NOTE
èThe copier is shut down if the Auto Shut OFF function activates while the copier is in the Energy Saver Mode.
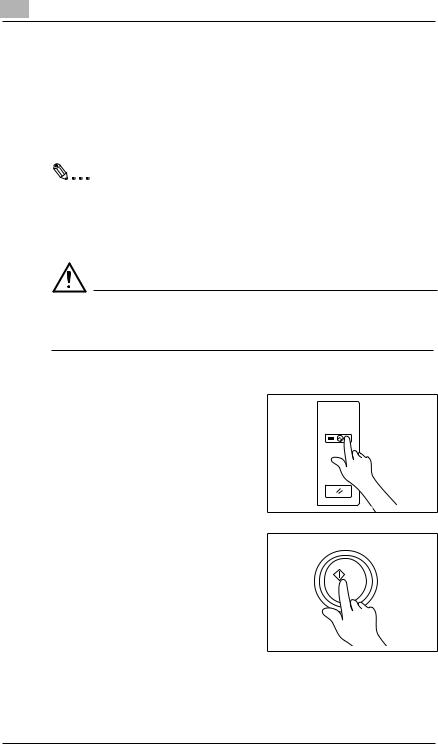
Entering The Energy Saver Mode
Press the Energy Saver Key on the control panel.
All control panel Indicators go out, except that the Start Key and the Energy Saver Key which remain lit green.
Energy Saver
1142O093CA
Leaving the Energy Saver Mode
Press any Key on the control panel, for instance, the Start Key.
This cancels the Energy Saver Mode, and the copier will be ready to make copies in about 20 seconds.
1139O2360A
2-12 |
EP1054 |
Getting to Know Your Copier |
2 |
|
|
|
|
Initial Mode and Panel Resetting
Initial Mode
When the Power Switch is turned ON, the initial settings are indicated on the control panel. The initial settings serve as the reference for all control panel settings to be later made.
Meter Count |
A3 |
@ @ |
|
|
% |
|
|
|
|
|
|||
Toner |
A4 |
@ @ |
B4 |
|
|
|
Paper |
A4 |
@ @ |
FLS. |
50%~200% |
|
|
Drum Dehumidify |
A5 |
@ @ |
Inch |
|
|
|
|
|
|
|
|||
|
Auto |
|
141% |
A4 |
@ A3 |
|
Book |
Photo |
|
||||
|
|
|
115% |
B4 |
@ A3 |
|
|
|
|
|
100% |
@ @ @Full Size |
|
Lighter |
|
Darker |
81% |
B4 |
@ A4 |
|
|
Auto/Photo |
|
70% |
A3 |
@ A4 |
|
|
|
A |
|
|
100% |
|
No. of copies to be made: 1
Zoom ratio: Full size (100%)
Auto Exposure Mode
Non-Sort Mode
Useful Tip
The initial settings can be changed by User’s Choice. For details see page 4-6.
Panel Resetting
The Panel Reset Key resets all control panel settings to default settings including the number of copies to be made and zoom ratio.
Useful Tip
Panel Reset
1139O4782A
The Panel Reset Key enables you to cancel all previous settings efficiently. To avoid miscopy, try to press the Panel Reset Key before attempting to make any setting for your own job.
EP1054 |
2-13 |
Loading...