


ENGLISH
AV-28E50SK
AV-32E50SK
INTEGRATED DIGITAL COLOUR TELEVISION |
INSTRUCTIONS |
|
|
Digital Video
Broadcasting
50066123
|
|
Trade Mark of the DVB Digital Video Broadcasting |
©2005 Victor Company of Japan, Limited |
0205MKH-VT-VT |
Project (1991 to 1996) Number: 3590, 3591 |

Contents |
|
Remote Control ............................................. |
2 |
TV Buttons and Functions ............................ |
3 |
Features .......................................................... |
4 |
Safety Precautions ........................................ |
4 |
Preparation ..................................................... |
6 |
Before Switching on your TV ....................... |
6 |
Power connection ................................................. |
6 |
Connections to the RF input socket ...................... |
6 |
How to connect other devices ............................... |
6 |
Inserting batteries into the remote control ............. |
6 |
Switching the TV ON/OFF ............................. |
6 |
To switch the TV on .............................................. |
6 |
To switch the TV off............................................... |
6 |
Initial Settings ................................................ |
7 |
T-V LINK ............................................................... |
7 |
Basic Operations ........................................... |
8 |
Operating while watching IDTV.................... |
9 |
Everyday Operation............................................... |
9 |
Digital Teletext ..................................................... |
11 |
DTV Menus .................................................... |
11 |
Timers (DTV Timer Recording) ............................. |
11 |
Configuration ....................................................... |
13 |
Edit PR List ........................................................ |
14 |
Installation .......................................................... |
15 |
Common Interface ............................................... |
16 |
Setting the TV .............................................. |
16 |
Picture Menu ...................................................... |
17 |
Sound Menu ....................................................... |
18 |
Feature Menu ..................................................... |
18 |
Installation Menu ................................................. |
19 |
Programme Menu ............................................... |
20 |
Other Features ............................................ |
21 |
Analogue Teletext ....................................... |
22 |
Peripheral Equipment Connections .......... |
23 |
Rear Panel .................................................... |
25 |
Antenna Connections.................................. |
26 |
Tips................................................................ |
27 |
Specifications .............................................. |
28 |
Important Instruction ................................... |
29 |
- 1 -

Remote Control
 / I = (Stand By) button
TV / VCR / DVD Switch
Number buttons
AV button (EXT1, EXT2, EXT2S, EXT3)
Colour buttons
MENU = Menu button
= Cursor Up button
OK button
= Cursor Right button
 BACK = Back button
= Volume - /+ buttons
GUIDE button
SUBTITLE button
 = Hyper Sound on/off button
ZOOM = Zoom button
VCR / DVD / Teletext control buttons
P |
buttons |
= Cursor Down button
 = Teletext button
= Cursor Left button
 TV / DTV button
 = Information Button / T-V Link in Program Menu
= Mute button
Functions of VCR / DVD control buttons:
|
VCR |
DVD |
|
: Prog. up |
Chapter up |
|
: Rewind |
Rewind |
|
: Play |
Play |
|
: Fast Forward |
Fast Forward |
|
: Prog. down |
Chapter down |
|
: Record |
Top Menu |
|
: Stop |
Stop |
|
||
|
: Pause |
Pause |
|


- 2 -

TV Buttons and Functions
"
#
$
Power On / Off |
"Menu |
Power lamp |
#Programme Up/Down |
!Remote control sensor |
$Volume Up/Down |
- 3 -

Features
•It is a remote controlled Integrated Digital colour television.
•100 programmes from VHF, UHF bands or cable channels can be preset.
•It can tune cable channels.
•Controlling the TV is very easy by its menu driven system.
•It has two Euroconnector sockets for external devices (such as computer, video, video games, audio set, etc.)
•NICAM Stereo sound system.
•Teletext (Fastext, Toptext).
•It is possible to connect headphone.
•Direct channel access.
•A.P.S. (Automatic Programming System).
•All programmes can be named.
•Programme swapping between last watched two programmes.
•Forward or backward automatic tuning.
•Sleep timer.
•Child Lock.
•Automatic sound mute when no transmission.
•When no valid signal is detected, after 5 minutes the TV switches itself automatically to stand-by mode.
•WSS (Wide Screen Signaling).
•NTSC Playback.
•S-VHS (via SCART)
•Front AV in is available.
•Real Flat
Safety Precautions
1. Power Source
The receiver should be operated only from a 220-240V AC, 50 Hz outlet. Ensure you select the correct voltage setting for your convenience.
2. Power Cord
The power supply cord should be placed so that it is not likely to be walked on or pinched by items placed upon them or against it. Pay particular attention to cord where it enters the plug, power outlet, and the point where it exits from the receiver.
3. Moisture and Water
Do not use this equipment in a humid and damp place (avoid the bathroom, the sink in the kitchen, and near the washing machine). Do not expose this equipment to rain or water, as this may be dangerous and do not place objects filled with liquids on top. Avoid from dripping or splashing.
4. Cleaning
Before cleaning, unplug the TV from the main supply, outlet. Do not use liquid or aerosol cleaners. Use soft and dry cloth.
5. Ventilation
The slots and openings on the receiver are intended for ventilation and to ensure reliable operation. To prevent overheating, these openings must not be blocked or covered in anyway.
6. Lightning
In case of storm and lightning or when going on holiday, disconnect the power cord from the wall outlet.
7. Replacement Part
When replacement parts are required, be sure the service technician has used replacement parts which are specified by the manufacturer or have the same specifications as the originals. Unauthorised substitutions may result in fire, electrical shock, or other hazards.
- 4 -

8. Servicing
Please refer all servicing to qualified personnel. Do not remove cover as this may result in electric shock.
9. X-rays
The X-rays generated in this television are shielded sufficiently.
10. Naked Flame Sources
Do not place naked flame sources on the apparatus.
Warning!
Any intervention contrary to regulations, in particular, any modification of high voltage or a replacement of the picture tube may lead to an increased concentration of x-rays. Any television modified in this way no longer complies with license and must not be operated.
Instructions for waste disposal:
•Packaging and packaging aids are recyclable and should principally be recycled. Packaging materials, such as foil bag, must be kept away from children.
•Batteries, including those which are heavy metal-free, should not be disposed of with household waste. Please dispose of used batteries in an environmentally sound manner. Find out about the legal regulations which apply in your area.
“DO NOT LEAVE YOUR TV AT STAND-BY OR OPERATING WHEN YOU LEAVE YOUR HOUSE”
Cleaning The Screen
Your TV is fitted with a “Real Flat" picture tube. The surface of the screen is covered with a foil. Under no circumstances may this be damaged.
To clean
Clean the laminated screen with a soft cotton cloth. Only non-alkaline, thinned soapsuds on a basis of water or alcohol be used to moisten the cloth. Rub the surface gently with the cloth until the surface is completely dry.
Under no circumstances...
may the screen be wiped with conventional glass cleaning fluid.
may the screen be brought into contact with abrasive materials.
may soiling be removed by polishing or scouring.
To clean off sticky substances, the cloth can be moistened with acetone.
Under no circumstances should acetone be used to clean the TV cabinet.
CAUTION
RISK OF ELECTRIC SHOCK
The lightning flash with arrowhead symbol, within an equilateral triangle, is intended to alert the user to the presence of uninsulated "dangerous voltage" within the product's enclosure that may be of sufficient magnitude to constitute a risk of electric shock of persons.
The exclamation point within an equilateral triangle is intended to alert the user to the presence of important operating and maintenance (servicing) instructions in the literature accompanying the appliance.
- 5 -
Preparation
For ventilation, leave a space of at least 10 cm free all around the set. To prevent any fault and unsafe situations, please do not place any objects on top of the set.
Use this apparatus in moderate climate.
Before Switching on your TV
Power connection
IMPORTANT: The TV set is designed to operate on 220240V AC, 50 Hz.
•After unpacking, allow the TV set to reach the ambient room temperature before you connect the set to the mains.
Connections to the RF input socket
•Connect the aerial or cable TV plug to the RF input socket located at the back of the TV and connect the cable plug coming out from the TV out socket located at the devices (VCR, DVB etc.) to this socket as well.

How to connect other devices
IMPORTANT: Switch off the TV before connecting any external device.
Sockets for external connections are at the back and right side of the TV. For connection of other devices via Euroconnector refer to the manuals of the related devices.
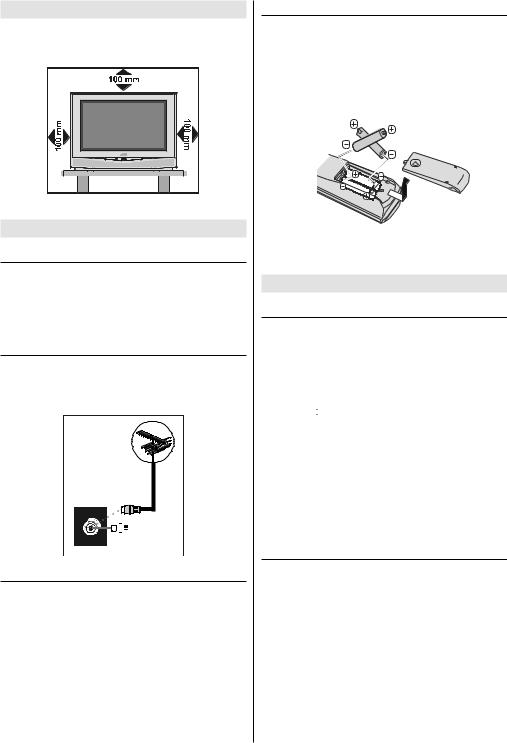
Inserting batteries into the remote control
•Remove the battery cover located on the back of the remote control by gently pulling downwards from the indicated part.
•Insert two AA (R06) or equivalent type batteries inside. Place the batteries in the right directions as seen below.
•Replace the battery cover.
NOTE: Remove batteries from remote control when it is not to be used for a long period. Otherwise it can be damaged due to any leakage of batteries.
Switching the TV ON/OFF
To switch the TV on
Your TV will switch on in two steps:
1- Press the power button located on the front of the TV. Then the TV switches itself to standby mode and the power lamp becomes RED located on the lower part of the TV.
2- To switch on the TV from stand-by mode either:
Press the “ ,” button on the remote control, or,
Press a digit button on the remote control so that a programme number is selected,
or,
Press Programme Up or Down buttons on the right side of the TV or on the remote control, so that last switched off programme is selected.
The TV will switch on and the power lamp will turn off.
To switch the TV off
•Press the stand-by button on the remote control, so the TV will switch to stand-by mode and the power lamp will become RED,
or,
•Press the power button located on the front of the TV, so the TV will switch off and the power lamp will turn off.
- 6 -

Initial Settings
When the TV is first turned on, it goes into the initial settings mode. Follow the instructions on the screen display to make the initial settings.
Note: If the TV does not go into the initial settings mode this is because your TV has already been turned on for the first time. (Perform the factory settings with “INSTALLATION” (see page 15) in the DTV menu and “AUTO STORE” (Analogue) (see page 20) in the PROGRAMME menu.)
Because this is the first time that IDTV has been used, there are no channels stored in the memory and below information will be displayed on the screen.
1. Press the OK button to start the automatic search.
The IDTV will automatically tune to the UHF transmission channels 21 to 68 looking for digital terrestrial TV broadcasts and displaying the names of channels found. This process will take about five minutes. To cancel searching, you can press MENU button at any time during the process.
HINT: Depending on the reception conditions in your particular area, you may find that the list of channels found includes one or more repeated names. This is because the receiver may detect and store some channels, including those it cannot receive clearly, from adjacent areas alongside the strong channels from a transmitter nearby. This is not a problem and the weaker channels can be deleted from the receiver later, as described in -
Edit PR List on page 14.
2. When the automatic search has finished, the EDIT PR LIST menu appears.
•If you want to, you can now edit the programme numbers (PR) using the EDIT PR LIST function. For details, see “Edit PR List” on page 14.
•If you do not want to edit programme numbers (PR), go to the next step.
3. Press the MENU button.
The EDIT PR LIST menu disappears and the following message appears.
If you select “Yes”, Analogue terrestrial broadcasting AUTOMATIC PROGRAMMING SYSTEM (A.P.S.) window is displayed.
•If you do not want to start A.P.S., you can cancel it by pressing the TV/DTV button on your remote control.
•First select your country by pressing “ ” or “
 ” button. This will affect the sort process in APS.
•By pressing the “ ” or “
 ” buttons, come to the Language item and select the language in which the menus of the TV will appear. You can see the available lan-
guages by pressing “ ” or “
 ” button. As soon as you change the language, the menu items will be displayed in the selected language.
•To select “Continue” use “ ” or “
 ” button. By pressing “
 ” or “
 ” button start the A.P.S.
•When you start A.P.S. the following window will appear on the screen.


After APS is finalized, a programme list will appear on the screen. In the programme list you will see the programme numbers and names assigned to the programmes.
If you do not accept the locations and / or the programme names of programmes, you can change them in Program menu. For details see PROGRAMME menu on page 20.
If you do not have a T-V LINK compatible VCR, press MENU button to exit the menu.
If you have a T-V LINK compatible VCR connected to
the EXT.2 terminal, press “ ” button to display T-V LINK menu. Then follow the operating procedure “Downloading data to VCR” in the following T-V LINK section.
T-V LINK
When a T-V LINK compatible VCR is connected to the EXT.2 terminal on the TV, it is easier to set up the VCR and to view videos. T-V LINK uses the following features:
To use T-V LINK functions
A “T-V LINK compatible VCR” means a JVC video cassette recorder with the T-V LINK logo, or with one of the following logos. For details see your VCR instruction manual.
“Q-LINK” (A trademark of Panasonic Corporation) “Data Logic” (A trademark of Metz Corporation) “Easy Link” (A trademark of Philips Corporation) “Megalogic” (A trademark of Grundig Corporation) “SMARTLINK” (A trademark of Sony Corporation)
Downloading data to VCR:
The VCR will automatically download the registered data on the TV channels from the TV. This means you do not
- 7 -

need to set up the programme channels on your VCR manually.
The “T-V LINK” menu will be displayed when you press the “ ” button while PROGRAM menu is displayed.
Press “OK” button to start downloading data to VCR. “TRANSFER” is displayed in the menu.


If you do not want to continue press the TV/DTV button to exit the menu.
If “FEATURE NOT AVAILABLE” is displayed, download was not performed correctly. Before trying to download again, check that:
•The VCR power is turned on.
•The VCR is T-V LINK compatible.
•The VCR is connected to the EXT.2.
•The scart cable is fully wired.
Direct REC:
You can easily record to VCR the images that you are watching on the TV. For details, read the manual for your VCR. Use your VCR controls. “VCR IS RECORDING” is diplayed. You can not carry out Direct REC using your TV’s control.
When the VCR is not ready (For example when there is no tape inserted), “NO RECORDING” is displayed.
When you press the following buttons ( ,,
,,  , AV, MENU, TV/DTV,

 , BACK, SUBTITLE, GUIDE, ZOOM,
  ,
, 


 /
/ 

 , number buttons) during recording, a message appears asking if you want to stop recording or not. Press OK button to stop recording or BLUE button to continue recording.
Do not turn the TV off in the following cases:
•When recording images from an external device connected to TV (For example camcorder).
•When recording a TV channel after it has been unscrambled on a decoder.
•When recording a TV channel by using the TV’s output because the VCR’s own tuner can not properly receive that channel.
•When recording Digital terrestrial broadcasting (DVB- T).
TV autopower on/VCR image view:
When the VCR starts playing, the TV automatically turns on and images from EXT2 appear on the screen.
This function does not happen if your TV’s main power is turned off. Set your TV’s main power to on (StandBy Mode).
Basic Operations
You can operate your TV using both the remote control and onset buttons.
Operation with the buttons on the TV
Volume Setting
• Press “ -” button to decrease volume or “
 +” button to increase volume, so a volume level scale (slider) will be displayed at the middle of the bottom on the screen.
Programme Selection
•Press “P/CH +” button to select the next programme or “P/CH -” button to select the previous programme.
Entering Main Menu
•Press “MENU” button to enter Main menu. In the Main menu select sub-menu using “P/CH -” or “P/CH +” button and enter the sub-menu using “ -” or “
 +” button. To learn the usage of the menus, refer to the Menu System sections.
Operation with Remote Control
The remote control of your TV is designed to control all the functions of the model you selected. The functions will be described in accordance with the menu system of your TV.
Functions of the menu system are described in following sections.
Volume Setting
Press “ +” button to increase volume. Press “
 -” button to decrease volume. A volume level scale (slider) will be displayed in the middle at the bottom of the screen.
Programme Selection (Previous or next programme)
•Press “

 ” button to select the previous programme.
•Press “

 ” button to select the next programme.
Programme Selection (direct access):
Press digit buttons on the remote control to select programmes between 0 and 9. TV will switch to the selected programme. To select programmes between 10 - 99, press the digit buttons consecutively which programme you want to select (eg. for programme 27, first press 2 and then 7). When it is late to press second digit button only the first digit programme will be displayed. The limit of the delay time is 3 seconds.
- 8 -
 Loading...