


 Loading...
ENGLISH  DEUTSCH
  FRANÇAIS
  NEDERLANDS
  CASTELLANO
  ITALIANO
PORTUGUÊS 
AV-32H50SU AV-28H50SU AV-32H57SU
COLOUR TELEVISION
FARBFERNSEHGERÄT TELEVISEUR COULEUR KLEURENTELEVISIE TELEVISOR A COLOR TELEVISORE A COLORI TELEVISOR A CORES
INSTRUCTIONS
BEDIENUNGSANLEITUNG
MANUEL D’INSTRUCTIONS
GEBRUIKSAANWIJZING
MANUAL DE INSTRUCCIONES
ISTRUZIONI
INSTRUÇÕES
Thank you for buying this JVC colour television.
To make sure you understand how to use your new TV, please read this manual thoroughly before you begin.
WARNING: TO PREVENT FIRE OR SHOCK HAZARD, DO NOT EXPOSE THIS APPLIANCE TO RAIN OR MOISTURE.
CAUTION:
•Operate only from the power source specified (AC 220 – 240 V, 50 Hz) on the unit.
•Avoid damaging the AC plug and power cord.
•When you are not using this unit for a long period of time, it is recommended that you disconnect the power cord from the mains outlet.
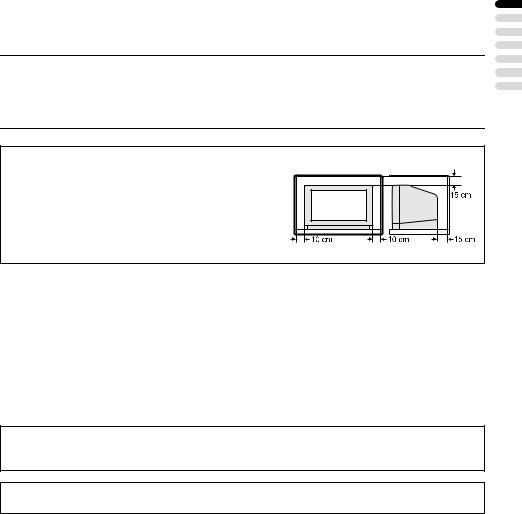
Distance recommendations
Avoid improper installation and never position the unit where good ventilation is impossible.
When installing this TV, distance recommendations must be maintained between the set and the wall, as well as inside a tightly enclosed area or piece of furniture. Keep to the minimum distance guidelines shown for safe operation.
Failure to take the following precautions may result in damage to the TV or remote control.
DO NOT block the TV’s ventilation openings or holes.
(If the ventilation openings or holes are blocked by a newspaper or cloth, etc., the heat may not be able to get out.)
DO NOT place anything on top of the TV.
(such as cosmetics or medicines, flower vases, potted plants, cups, etc.)
DO NOT allow objects or liquid into the cabinet openings.
(If water or liquid is allowed to enter this equipment, fire or electric shock may be caused.)
DO NOT place any naked flame sources, such as lighted candles, on the TV.
The surface of the TV screen is easily damaged. Be very careful with it when handling the TV. Should the TV screen become soiled, wipe it with a soft dry cloth. Never rub it hard.
Never use any cleaner or detergent on it.
In the event of a fault, unplug the unit and call a service technician. Do not attempt to repair it yourself or remove the rear cover.
ENGLISH
1

CONTENTS
Setting up your TV ................................... |
3 |
Connecting the aerial and VCR ................. |
3 |
Connecting the power cord to the AC |
|
outlet....................................................... |
4 |
Putting the batteries into the Remote |
|
control..................................................... |
4 |
Initial settings ............................................. |
4 |
T-V LINK FUNCTIONS .............................. |
8 |
TV buttons and functions........................ |
9 |
Turn the Main power on ........................... |
10 |
Turn the TV on from standby mode ......... |
10 |
Choose a TV channel .............................. |
10 |
Adjust the volume .................................... |
10 |
Remote control buttons and |
|
functions.............................................. |
11 |
Turn the TV on or off from standby mode ... |
11 |
Choose a TV channel .............................. |
11 |
Watch images from external devices ....... |
12 |
Adjust the volume .................................... |
13 |
Displaying the current time ...................... |
13 |
ZOOM function......................................... |
14 |
HYPER SOUND function ......................... |
15 |
Return to TV channel instantly................. |
15 |
Operating a JVC brand VCR or DVD |
|
player.................................................... |
15 |
Teletext function .................................... |
16 |
Basic operation ........................................ |
16 |
Using the List Mode ................................. |
16 |
Hold.......................................................... |
17 |
Sub-page ................................................. |
17 |
Reveal...................................................... |
17 |
Size.......................................................... |
17 |
Index ........................................................ |
17 |
Cancel...................................................... |
18 |
Using the TV’s menu.............................. |
19 |
Basic operation ........................................ |
19 |
PICTURE menu ...................................... |
20 |
PICTURE MODE...................................... |
20 |
CONTRAST ............................................. |
20 |
BRIGHT.................................................... |
20 |
SHARP..................................................... |
20 |
COLOUR.................................................. |
20 |
HUE.......................................................... |
20 |
COLOUR TEMP....................................... |
20 |
FEATURES .............................................. |
21 |
SOUND menu ......................................... |
23 |
STEREO / I • II ......................................... |
23 |
BASS........................................................ |
23 |
TREBLE ................................................... |
23 |
BALANCE ................................................ |
23 |
HYPER SOUND....................................... |
23 |
FEATURES menu................................... |
24 |
SLEEP TIMER ......................................... |
24 |
CHILD LOCK............................................ |
24 |
BLUE BACK ............................................. |
26 |
SET UP menu ......................................... |
27 |
AUTO PROGRAM.................................... |
27 |
EDIT/MANUAL ......................................... |
27 |
LANGUAGE ............................................. |
31 |
PICTURE TILT ......................................... |
31 |
DECODER (EXT-2).................................. |
32 |
EXT SETTING.......................................... |
33 |
Additional preparation .......................... |
36 |
Connecting the external devices .............. |
36 |
CH/CC numbers ..................................... |
38 |
Troubleshooting .................................... |
40 |
Specifications ........................................ |
43 |
2
Setting up your TV
Caution
• Turn off all the equipment including the TV before connecting anything.
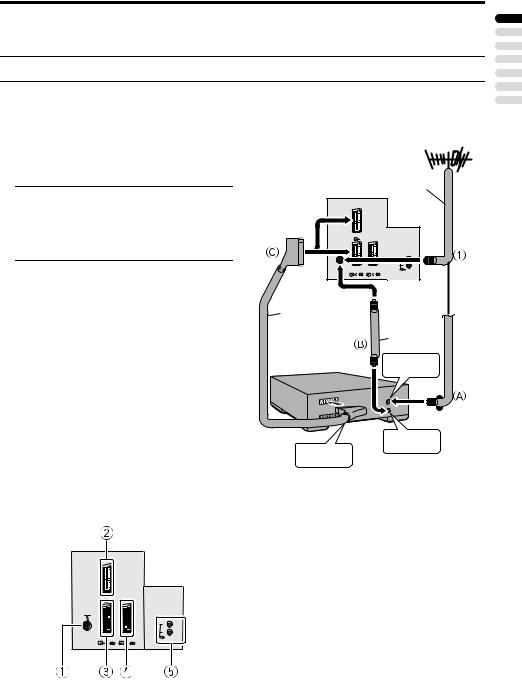
Connecting the aerial and VCR
•The connecting cables are not provided.
•For further details, refer to the manuals provided with the devices to be connected.
If connecting a VCR, follow A → |
|
|
Aerial |
|
B → C. |
|
|
|
|
If not connecting a VCR, follow 1. |
|
|
75-ohm |
|
|
Back of the TV |
Coaxial |
||
To operate T-V LINK functions, a T-V |
Cable |
|||
|
|
|||
LINK compatible VCR must be connected to |
|
|
|
|
the EXT-2 terminal on the TV. For details |
|
|
|
|
about T-V LINK functions, see “T-V LINK |
EXT-1 |
|
|
|
FUNCTIONS” on page 8. |
|
|
|
|
|
|
|
L |
|
• A video can be viewed from the VCR |
|
|
R |
|
EXT-2 |
EXT-3 |
AUDIO OUT |
||
|
|
|||
|
S |
S |
|
|
without performing C. For details, refer |
21-pin |
|
|
|
to your VCR instruction manual. |
|
|
||
SCART |
|
|
||
• To connect additional external devices, |
Cable |
|
75-ohm |
|
please see “Additional preparation” on |
|
|
Coaxial |
|
page 36. |
|
|
Cable |
|
• To connect speakers and amplifier, please |
VCR |
|
To Aerial |
|
see “Connecting Speakers/Amplifier” on |
|
|||
|
|
Input |
||
page 37. |
|
|
|
|
• When a decoder is connected to a T-V |
|
|
|
|
LINK compatible VCR, set the |
|
|
|
|
DECODER (EXT-2) function to ON. For |
|
|
|
|
details, see “DECODER (EXT-2)” on |
|
|
To Aerial |
|
page 32. Otherwise, you will not be able |
AV IN/OUT |
|
Output |
|
to view scrambled channels. |
Terminal |
|
|
|
Rear Panel
1 Aerial socket (3)
2 EXT-1 terminal (3, 33, 36) 3 EXT-2 terminal (3, 8, 33, 36) 4 EXT-3 terminal (33, 36)
5 AUDIO OUT terminal (37)
EXT-1
|
|
L |
|
|
R |
EXT-2 |
EXT-3 |
AUDIO OUT |
|
||
S |
S |
|
ENGLISH
3
Setting up your TV
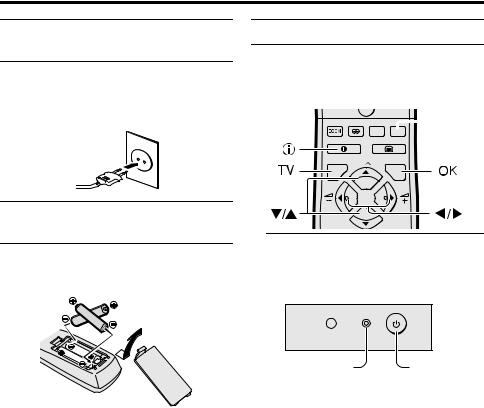
Connecting the power cord to the AC outlet
Caution
•Operate only from the power source specified (AC 220 – 240 V, 50 Hz) on the unit.
Initial settings
When the TV is first turned on, it enters the initial setting mode, and the JVC logo is displayed. Follow the instructions on the onscreen display to make the initial settings.
AV
 Blue button
MENU
P
TV |
OK |
Putting the batteries into the Remote control
Use two AA/R6 dry cell batteries.
Insert the batteries from the -end, making sure the +and -polarities are correct.
1Press the Main power button on the TV
The Power lamp lights, and the JVC logo is displayed.
•Follow the warnings printed on the batteries.
•Battery life is about six months to one year, depending on your frequency of use.
•The batteries we supply are only for setting up and testing your TV, please replace them as soon as necessary.
•If the remote control does not work properly, replace the batteries.
Power lamp |
Main power |
|
button |
•The JVC logo does not appear when your TV has been turned on once. In this case, use the “LANGUAGE” and “AUTO PROGRAM” functions to make the initial settings. For details, see “SET UP menu” on page 27.
4

Setting up your TV
2Press the abutton
The LANGUAGE menu appears.
LANGUAGE
TV  OK
OK
D0002(E) -EN
3Press the 5 and 6 buttons to choose ENGLISH. Then press the abutton
English is set for the on-screen display description. The COUNTRY menu appears as a sub-menu of the AUTO PROGRAM function.
There are two COUNTRY menus. Pressing the yellow button changes the COUNTRY menu as follows:
COUNTRY
TV  OK START
MORE
COUNTRY
TV |
OK |
START |
|
|
MORE
D0003 -EN
4Press the 5 and 6 buttons to choose the country where you are now located
5Press the blue button to start the AUTO PROGRAM function
The AUTO PROGRAM menu appears and received TV channels are automatically registered in the Programme numbers (PR).
•To cancel the AUTO PROGRAM function:
Press the bbutton.
AUTO PROGRAM
CH 24
10%
TV OK
D0004 -EN
After the TV channels have been registered in the Programme numbers (PR), the EDIT menu appears
•You can proceed to edit the Programme numbers (PR) using the EDIT/MANUAL function. For details, see “EDIT/MANUAL” on page 27.
•If you do not need to use the EDIT/ MANUAL function, go to the next step.
EDIT
PR |
ID |
CH/CC |
|
AV |
|
CH |
36 |
1 |
BBC1 |
CH |
21 |
2CH 22
3CH 23
4CH 24
5CH 25
6CH 26
7CH 27
8CH 28
9CH 29
TV |
OK |
ID |
MANUAL |
|
MOVE |
||
|
|
|
|
|
|
INSERT |
DELETE |
D0038-EN
ENGLISH
5
Setting up your TV
6Press the abutton to display the
T-V LINK menu
T-V LINK
DOWNLOAD TV  RECORDING DEVICE
TV OK
EXIT
D0005-EN
7If you do not have a T-V LINK compatible VCR connected:
Press the bbutton to exit the T-V LINK menu.
The T-V LINK menu disappears.
If you have a T-V LINK compatible VCR connected to the EXT-2 terminal:
Follow the operating procedure “Downloading the data to VCR” on page 7 to transmit the Programme number (PR) data.
Now, the initial settings are complete, and you can watch the TV
•When your TV can detect the TV channel name from the TV channel broadcast signal, it automatically registers the TV channel name (ID) to the Programme number (PR) in which the TV channel has been registered.
•If a TV channel you want to view is not set to a Programme number (PR), manually set it using the MANUAL function. For details, see “EDIT/ MANUAL” on page 27.
•The TV channel is not registered in Programme number PR 0 (AV). When you want to register a TV channel to PR 0 (AV), manually set it using the MANUAL function. For details, see “EDIT/MANUAL” on page 27.
ACI function
This TV has an ACI function which decodes the ACI (automatic Channel Installation) data.
Using the ACI function allows all TV channels transmitted from the cable TV station to be properly registered quickly according to the data from the cable TV station.
Caution
•If your cable TV station broadcasts ACI data and if “ACI START/ACI SKIP” appears in the AUTO PROGRAM menu, the ACI function is enabled. In all other cases, it is disabled.
1Press the 6 buttons to choose ACI START. Then press the a button to start the ACI function
When you don’t want to use the ACI function:
Press the 6buttons to choose ACI SKIP and then press the abutton.
If the AUTO PROGRAM menu changes to another menu:
Depending on your cable TV station, there may be a broadcast selection menu set up by the cable TV station.
Follow the menu indications and use the 5and 6buttons to operate the
menu. After you have made the setting, press the abutton.
If “ACI ERROR” is displayed in the AUTO PROGRAM menu:
“ACI ERROR” denotes that the ACI
function is not working properly. Press the abutton to start the ACI function again.
If “ACI ERROR” still appears even after you have tried to start the ACI function several times, press the 3button to start the AUTO PROGRAM function. It does not cause any problem because all the TV channels are registered to the Programme numbers (PR) by the AUTO PROGRAM function.
6
Setting up your TV
2When the settings are completed, the EDIT menu is displayed. Return to the instructions that you were reading before, and continue the operation
When the “Initial settings” has been made:
Return to step 6 of “Initial settings” on page 4.
When the “AUTO PROGRAM” has been made:
Return to step 6 of “Initial settings” on page 4.
•If you have any questions about the items in the Broadcast Selection menu or how to operate the menu, please contact your cable TV station.
•When the cable TV broadcast reception is poor, the ACI function will not work properly.
•If there is an error in the ACI data itself, the TV channel cannot be registered properly. If this happens, turn the ACI function off (ACI SKIP) and use the AUTO PROGRAM function. Alternatively, use the EDIT/ MANUAL function to correct the Programme number (PR) setting.
Downloading the data to VCR
You can transmit to the latest Programme numbers (PR) data to the VCR with the T-V LINK function.
Caution
• Only when the T-V LINK compatible VCR is connected to the EXT-2 terminal, this operation is enabled.
• Only when the T-V LINK menu is being displayed, this operation is enabled.
1Turn on the VCR
2Press the abutton
The data transmission begins.
DOWNLOAD TV  RECORDING DEVICE
TRANSFER. . . . .
D0037-EN
The T-V LINK menu disappears once the data transmission ends.
When the T-V LINK menu is changed over to another menu:
The menu operation at the TV side is completed and it is shifted to the menu operation at the VCR side. Refer to the VCR Instruction Manual and operate the VCR.
If “FEATURE NOT AVAILABLE” appears at the T-V LINK menu, ensure the following three items are correct; then press the abutton to retry data transmission.
•Has the T-V LINK compatible VCR been connected to the EXT-2 terminal?
•Has the VCR power been turned on?
•Does the SCART cable that is connected to the EXT-2 terminal to T- V LINK compatible VCR have all proper connections?
T-V LINK
DOWNLOAD TV  RECORDING DEVICE
TV OK
EXIT
D0005-EN
ENGLISH
7

Setting up your TV
T-V LINK FUNCTIONS
When a T-V LINK compatible VCR is connected to the EXT-2 Terminal on the TV, it is easier to set up the VCR and to view videos. T-V LINK uses the following features:
To use T-V LINK functions:
A T-V LINK compatible VCR is necessary. The VCR must be connected to the EXT-2 terminal on the TV by a fully wired SCART cable.
A “T-V LINK compatible VCR” means a JVC VCR with the T-V LINK logo or a VCR with one of the following logos. However, these VCRs may support some or all of the features described below. For details, refer to your VCR instruction manual.
“Q-LINK” (a trademark of Panasonic Corporation)
“Data Logic” (a trademark of Metz Corporation)
“Easy Link” (a trademark of Phillips Corporation)
“Megalogic” (a trademark of Grundig Corporation)
“SMARTLINK” (a trademark of Sony Corporation)
Pre-set Download
Download the registered data on the TV channels from the TV to the VCR.
The Preset Download function automatically begins when the initial setting is complete or whenever the AUTO PROGRAM or EDIT/ MANUAL operations are performed.
•This function can be operated via VCR operation.
When “FEATURE NOT AVAILABLE” is displayed:
If “FEATURE NOT AVAILABLE” is displayed, the download was not performed correctly. Before trying to download again, ensure the following:
•The VCR power is turned on.
•The VCR is T-V LINK compatible.
•The VCR is connected to the EXT-2 terminal.
•The SCART cable is fully wired.
Direct Rec
“What You See Is What You Record”
You can record to VCR the images that you are currently viewing on TV by a simple operation. For details, read the manual for your VCR. Operate via the VCR. “VCR IS RECORDING” is displayed.
In the following conditions, the VCR will stop recording if the TV is turned off, if the TV channel or input is switched, or if the menu is displayed on the TV:
•When recording images from an external device connected to the TV.
•When recording a TV channel after it has been unscrambled on a decoder.
•When recording a TV channel by using the TV’s output because that TV channel cannot be properly received on the VCR’s tuner.
•When the VCR is not ready (for example, when there is no tape inserted), “NO RECORDING” is displayed.
•Operation via the TV is not possible.
•Generally, the VCR cannot record a TV channel that cannot be received properly by the VCR’s tuner, even though you can view that TV channel on the TV.
However, some VCRs can record a TV channel by using the TV’s output if that channel can be viewed on the TV, even though the TV channel cannot be received properly by the VCR’s tuner. For details, refer to your VCR instruction manual.
TV Auto Power On/VCR Image View
When the VCR starts playing, the TV automatically turns on and the images from EXT-2 terminal are displayed on the screen. When the VCR menu is operated, the TV automatically turns on and the images from EXT-2 terminal are displayed on the screen.
•This function does not operate if your TV’s main power is turned off. Set your TV’s main power to on (standby mode).
8
TV buttons and functions
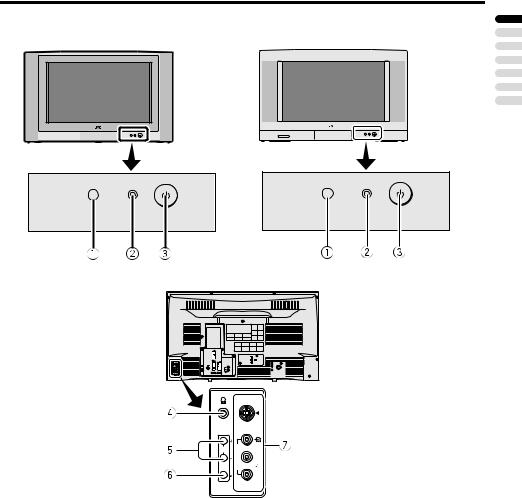
AV-32H50SU/AV-28H50SU |
AV-32H57SU |
||
|
|
|
|
ENGLISH
S
P  EX L / MONO
T
4
R
Refer to the pages in parentheses for details.
1 Remote control sensor
2 Power lamp (4, 10)
3 Main power button (4, 10)
4 Headphone jack (mini jack) (36)
5 P p buttons/ q buttons (10)
6 r (Volume) button (10)
7 EXT-4 terminal (33, 36)
9
TV buttons and functions
Turn the Main power on
Press the Main power button on the TV.
The Power lamp lights red and your TV is in the standby mode.
To turn the Main power off:
Press the Main power button again. The Power lamp goes off.
Caution
•The main power button on the TV does not fully isolate the TV from the AC supply. If you are not going to use this TV for a long period of time, be sure to disconnect the AC plug from the AC socket.
Turn the TV on from standby mode
Press the P pbuttons to turn the TV on from standby mode
When the TV is turned on, the power lamp dims slightly.
Choose a TV channel
Press the P p buttons to choose a programme number (PR) or an EXT terminal
Adjust the volume
1Press the r (Volume) button
The volume level indicator appears.
2Press the q buttons while the volume level indicator is displayed
10
Remote control buttons and functions
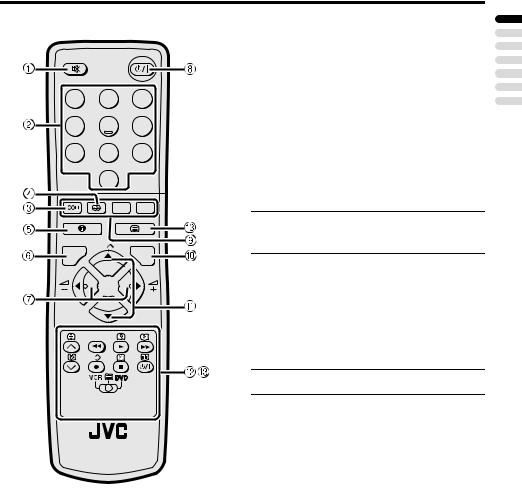
1 2 3
4 5 6
7 8 9
0 |
AV |
P |
MENU |
|
|
TV |
OK |
P |
|
F.T/L |
|
TV
1 Muting button
2 Number buttons
3 cbutton
4 i(hyper sound) button
5 Information button
6 bbutton
7 5 buttons
8 #(standby) button
9 Colour buttons
0 abutton - 6 buttons
= VCR/DVD/Teletext control button ~ VCR P DVD switch g(text) button
Turn the TV on or off from standby mode
Press the #(standby) button to turn the TV on or off.
When the TV is turned on, the power lamp dims slightly.
•The power can be turned on by pressing the bbutton, 6buttons or Number buttons.
Choose a TV channel
Use the number buttons:
Enter the programme number (PR) of the channel using the number buttons.
Example:
•PR 6 → press 6
•PR 12 → press 1and 2
ENGLISH
11
Remote control buttons and functions
Use the 6 buttons:
Press the 6 buttons to choose the programme number (PR) you want.
Use the PR LIST:
1Press the h(Information) button to display the PR LIST
Pressing the h(Information) button changes the display as follows:
PR LIST |
|
PR |
ID |
AV |
|
1 |
BBC1 |
2 |
|
3 |
|
4 |
|
5 |
|
6 |
|
7 |
|
8 |
|
9 |
|
TV |
OK |
D0011-EN |
|
12 : 00
No indication
2Press the 5 and 6 buttons to choose a Programme number (PR). Then press the abutton
•For Programme numbers (PR) with the CHILD LOCK function set, the n (CHILD LOCK) mark is displayed next to the Programme number (PR) in the PR LIST.
•Even if you try to choose a Programme number (PR) with the CHILD LOCK function set, the n(CHILD LOCK) mark will appear, and you cannot watch the TV channel. To watch the TV channel, see “CHILD LOCK” on page 24.
•If the picture is tilted, correct it. See “PICTURE TILT” on page 31.
Watch images from external devices
Use the o button:
Press the obutton to choose an EXT terminal.
TV mode |
|
|
|
EXT modes |
|||||||
|
|
|
|
|
|
|
|
|
|
|
|
Programme |
|
|
EXT-1 |
|
|
EXT-2 |
|||||
numbers |
|
|
|
|
|||||||
|
|
|
|
|
|
|
|
|
|
|
|
PR 1 – PR 99 |
|
|
|
|
|
|
|
|
|
|
|
|
|
|
|
|
|
|
|
|
|
|
|
|
|
|
|
|
|
|
|
|
|
|
|
EXT-4 EXT-3
Use the 6 buttons:
Press the 6 buttons to choose an EXT terminal.
Use the PR LIST:
1Press the h(Information) button to display the PR LIST
2Press the 5 and 6 buttons to choose an EXT terminal. Then press the abutton
•The EXT terminals are registered after the Programme number PR 99.
•You can choose a video input signal from the S-VIDEO signal (Y/C signal) and regular video signal (composite signal). For details, see “S-IN (S- VIDEO input)” on page 33.
•If you do not have a clear picture or no colour appears, change the colour system manually. See “COLOUR SYSTEM” on page 21.
•If you choose an EXT terminal with no input signal, the EXT terminal number becomes fixed on the screen.
•This TV set has a function which can automatically change over the input according to a special signal output from an external device. (The EXT-4 terminal does not support it.)
12
Remote control buttons and functions
To return to a TV channel:
Press the bbutton, the 6buttons or the Number buttons.
To use the Programme number PR 0 (AV):
When the TV and VCR are connected only by the Aerial cable, choosing the Programme number PR 0 (AV) allows you to view images from the VCR. Set the VCR RF channel to the Programme number PR 0 (AV) manually. For details, see “EDIT/ MANUAL” on page 27.
Pressing the obutton changes the choice as follows:
TV mode |
|
|
|
EXT modes |
|||||||
|
|
|
|
EXT-1 |
|
|
EXT-2 |
||||
Programme |
|
|
|
|
PR 0 |
|
|
|
|
||
numbers |
|
|
|
|
|
|
|
|
|
|
|
PR 1 – PR 99 |
|
|
|
|
|
|
|
|
|
||
|
|
|
|
|
|
|
|
|
|
|
|
EXT-4 EXT-3
•The VCR RF channel is sent as the RF signal from the VCR.
•Also refer to your VCR instruction manual.
Displaying the current time
You can display the Current Time on the screen.
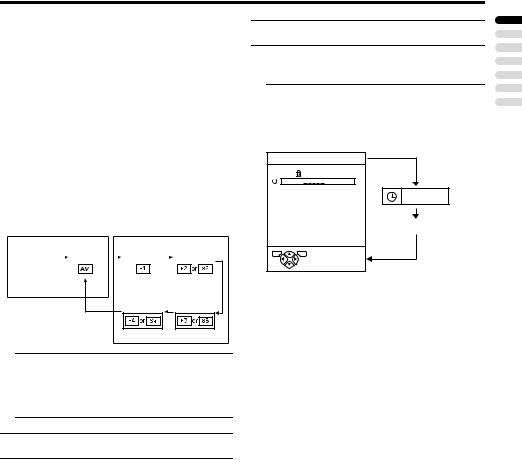
Press the h(Information) button to display the current time
Pressing the h(Information) button changes the display as follows:
PR LIST |
|
PR |
ID |
AV |
|
1 |
BBC1 |
2 |
|
3 |
|
4 |
|
5 |
|
6 |
|
7 |
|
8 |
|
9 |
|
TV |
OK |
D0011-EN |
|
12 : 00
No indication
•This TV uses teletext data to set the current time. If the TV has not received a TV channel that has teletext programmes since it was turned on, the time display is blank. To view the current time, choose a TV channel that has teletext programmes.
•When watching videos, an incorrect current time is sometimes displayed.
Adjust the volume
Press the 5 buttons to adjust the volume.
The Volume indicator appears and the volume changes as you press the q buttons.
Muting the sound
Press the l(muting) button to turn off the sound.
Pressing the l(muting) button again restores the previous volume level.
ENGLISH
13
Loading...