


JER8550AAA
JENN-AIR JER8550AAA, JER8550AAB, JER8550AAW, JER8550ACB, JER8550ACW Owner's Manual
...
For Future Assistance .............................. 1
Safety Instructions ............................... 1-3
Range at a Glance ................................... 4
Controls at a Glance ............................ 5-7
Surface Cooking .................................. 8-10
Surface Controls ................................. 8
Panel Light .......................................... 9
Coil Element Surface ......................... 9
Glass-Ceramic Surface .................... 10
Oven Operation ................................ 11-14
Oven Controls .................................. 11
Oven Light ........................................ 11
Oven Vent ......................................... i2
Oven Racks ...................................... 12
Baking Chart .................................... 13
Broiling ............................................. 13
Clock Controlled
Oven Cooking ............................. 14
Care and Cleaning ........................... 15-19
Self-Clean Oven .......................... 15-16
Cleaning Chart ........................... 17-18
Cleaning Products ............................ 19
Maintenance .................................... 19-20
Before You Call for Service .............. 21-22
Warranty ................................................ 23
[ For Future Assistance
• • • • • • • • • • • • • • • • • • • • • • • • • • • • • • • • • • • • • • •
Congratulations on your choice of a Jenn-Air electric range. IMPORTANT SAFETY
Your complete satisfaction is very important to us. INSTRUCTIONS
Read this user's guide carefully. It is intended to help you
operate and maintain your new range. Read and follow all instructions before using this ap-
In addition, you will find a booklet entitled "Cooking Made pliance to prevent the potential risk of fire, electric shock,
Simple." It contains information on selecting cookware and personal injury or damage to the appliance as a result of
improper usage of the appliance. Use appliance only for
provides baking, roasting and broiling tips. its intended purpose as described in this guide.
Save time and money. Check the "Before You Call" section
of this guide. It lists causes of minor operating problems that To ensure proper and safe operation: Appliance must
be properly installed and grounded by a qualified techni-
you can correct yourself, cian.
However, should you need service, it is helpful to have the
model and serial numbers available. This information can be _ ,_EWA R NING
found on the data plate located on the storage drawer frame. _ • ALL RANGESCANTIP AND
These numbers arealso on theProduct Registration card that CAUSE INJURIESTO
came with your appliance. Before sending in this card, record _ PERSONS
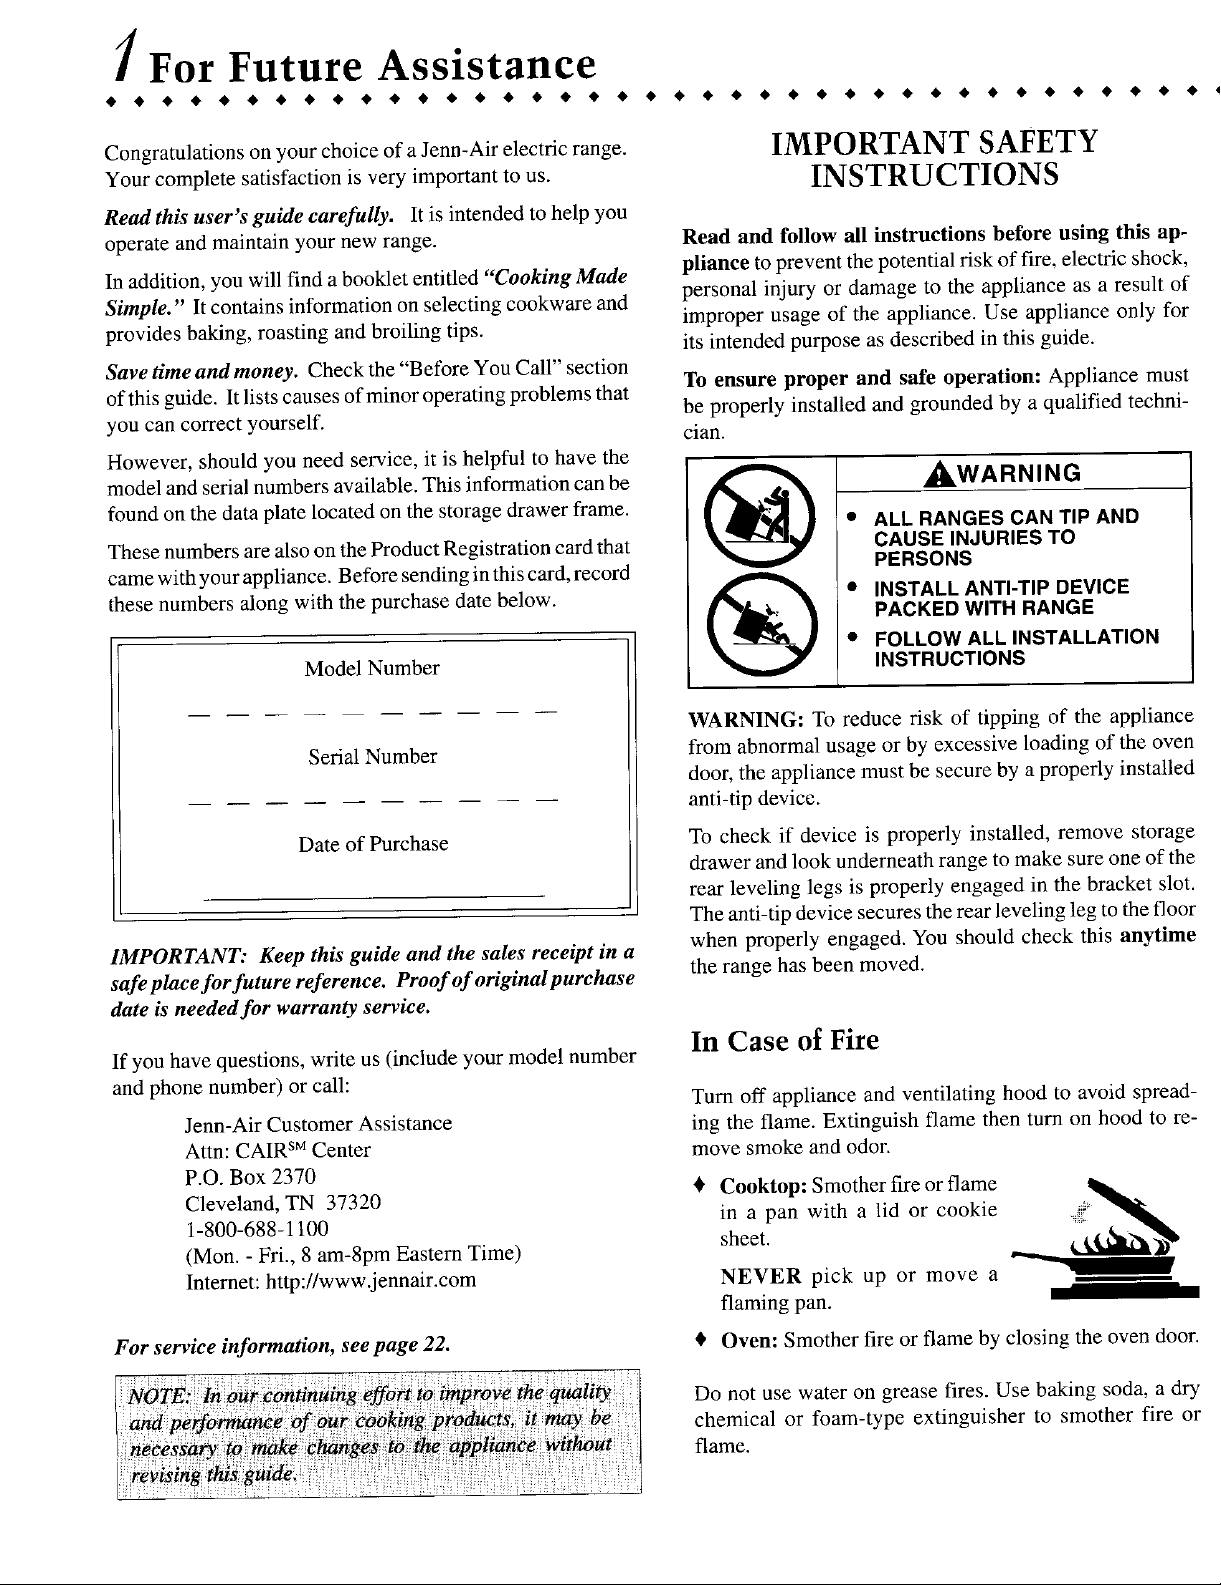
these numbers along with the purchase date below. _ll_-_ "_ • PACKEDINSTALLWITHANTI'TIPRANGEDEVICE
• FOLLOWALL INSTALLATION
Model Number INSTRUCTIONS
WARNING: To reduce risk of tipping of the appliance
Serial Number from abnormal usage or by excessive loading of the oven
door, the appliance must be secure by a properly installed
anti-tip device.
Date of Purchase To check if device is properly installed, remove storage
drawer and look underneath range to make sure one of the
rear leveling legs is properly engaged in the bracket slot.
The anti-tip device secures the rear leveling leg to the floor
when properly engaged. You should check this anytime
IMPORTANT: Keep this guide and the sales receipt in a
safeplaceforfutare reference. Proof of originalpurchase the range has been moved.
date is needed for warranty service.
In Case of Fire
If you have questions, write us (include your model number
and phone number) or call: Turn off appliance and ventilating hood to avoid spread-
Jenn-Air Customer Assistance ing the flame. Extinguish flame then turn on hood to re-
Attn: CAIR TM Center move smoke and odor.
P.O. Box 2370 _ Cooktop: Smother fire or flame
Cleveland, TN 37320 _,_
1-800-688-1100 in a pan with a lid or cookie
(Mon.- Fri., 8 am-8pm Eastern Time) sheet.
Internet: http://www.jennair.com NEVER pick up or move a
flaming pan.
For service information, see page 22. _ Oven: Smother fire or flame by closing the oven door.
Do not use water on grease fires. Use baking soda, a dry
chemical or foam-type extinguisher to smother fire or
flame.
Important Safety Instructions
• • • • • • • • • • • • • • • • • • • • • • • • • • • • • • • • • • • • • • • • •
General Instructions Cooktop
WARNING: NEVER use appliance _J_ .... NEVER leave surface units unattended es- _,_.
door,or drawer, if equipped, as astep stool _ _%iii_ pecially when using high heat settings. An _i_ _.
•,.... ,ii_ '%_ %
or seat as this may result in possible tip-o. -_l]"i1"1_% _l!i unattended boilover could cause smoking i!_4_ _"i__
_i '_I_I_ _ii and a greasy spillover can cause a fire.
ping of the appliance, damage to the ap- iii_ 1
pliance, and serious injuries. _i!i_J-J_ if This appliance is equipped with different %. | ]_!'_iii_
If appliance is installed near a window, ""_"'= size surface elements. Select pans having '_it%_e--
proper precautions should be taken to pre...... _*,_. flat bottoms large enough to cover ele-
vent curtains from blowing over surface i _iii_ '_e-. merit.Proper relationship of pan to element _ .....%_
_i!l__ will improve cooking efficiency, ff'_li_. '9_i-
elements, i:i!::i ._'_'i i_!- ...
NEVER use appliance to warm or heat i If pan is smaller than element, a portion _i
the room. Failure to follow this instruc- of the element will be exposed to direct
tion can lead to possible bums, injury, fire, contact and could ignite clothing or
or damage to the appliance. .d_i_)¢_r_%% potholder.
__i_'_ "%
NEVER wear loose-fitting or hanging i' • Only certain types of glass, glass/ceramic, ceramic, earthen-
iiii
garments while using the appliance. _I,]_ .... ware, or other glazed utensils are suitable for cooktop or oven
_iiii__,, iii_ service without breaking due to the sudden change in tem-
Clothing could catch utensil handles or ,._ ._i, o
ignite and cause burns if garment comes perature. Follow utensil manufacturer's instructions when us-
in contact with hot heating elements. "_ ..... ing glass.
To ensure proper operation and to avoid damage to the ap- Turn pan handle toward center of cooktop, _ii_,..............._e%_
pliance or possible injury, do not adjust, service, repair or not out into the room or over another sur- ff-_,. _z
replace any part of the appliance unless specifically recom- face element. This reduces the risk of _,..
mended in this guide. Refer allother servicing to a qualified burns, ignition of flammable materials, or !_'i " '_°
technician, spillage if pan is accidently bumped or
NEVER store or use gasoline or other combustible or ram- reached by small children. _ _
mable materials in the oven, near surface units or in the vi- To prevent damage to removable heating elements, do not
cinity of this appliance as fumes could create a fire hazard immerse, soak or clean in a dishwasher or self-clean oven. A
or an explosion, damaged element could short resulting in a fire or shock
hazard.
To prevent grease fires, do not let cooking grease or other
flammable materials accumulate in or near the appliance. Make sure drip bowls are in place as absence of these bowls
Use only drypotholders. Moist ordamp ,_;_I_ _,_ during cooking could damage wiring. (select models)
fill
potholders on hot surfaces may result ,_i__.,. _
in a steam burn. Do not let potholder _
touch hot heating elements. Do not use Glass-Ceramic Cooktop (select models}
atowel or other bulky cloth which could _ NEVER cook on broken cooktop. If cooktop should break,
easily touch hot heating elements and ....._"_--_"_" cleaning solutions and spillovers may penetrate the broken
ignite, cooktop and create a risk of electric shock. Contact a quali-
Always turn off all controls when cooking is completed, fled technician immediately.
NEVER heat unopened containers on the surface unit or in Clean cooktop with caution. Some cleaners can produce nox-
the oven. Pressure build-up in the container may cause con- ious fumes if applied to a hot surface. If a wet sponge, cloth,
tainer to burst resulting in burns, injury or damage to the or paper towel is used to wipe spills on a hot cooking area,
appliance, be careful to avoid steam bum.
NEVER use aluminum foil to line drip bowls, or to cover
an oven rack or oven bottom. Misuse could result in risk Deep Fat Fryers
of electric shock, fire, or damage to the appliance. Use foil
only as directed in this guide. Use extreme caution when moving the grease pan or dispos-
ing of hot grease. Allow grease to cool before attempting to
move pan.
Important Safety Instructions
• • • • • • • • • • • • • • • • • • • • • • • • • • • • • • • • • • • • • •
Oven Child Safety iiii
Use care when opening door. Let hot air NEVER leave children alone or unsuper- _iI_
_iiii
or steam escape before removing or re- vised in area where appliance is in use or "_"_._-" -'_.e '
placing food. is still hot. _
For proper oven operation and performance, do not block or NEVER allow children to sit or stand on [_,.-'-._0'_"_r._i_
obstruct oven vent duct. any part of the appliance as they could be _!ili_o_o
Always place oven racks in desired locations while oven is injured or burned. :i
cool. If rack must be moved while oven is hot, do not let CAUTION: NEVER store items of in- iiii!,li___.iii
potholder contact hot heating element in oven. terest to children in cabinets above an ap- _....
pliance or on backguard of a range. Chil-
dren climbing on appliance, door or drawer to reach items
Self-Cleaning Oven could damage the appliance or be burned or seriously in-
jured.
Clean only parts listed in this guide. Do not clean door gas- Children must be taught that the appliance and utensils in o_
ket. The gasket is essential for a good seal. Care should be on it can be hot. Let hot utensils cool in a safe place, out ot
taken not to rub, damage, or move the _...,_*E_:_ reach of small children. Children should be taught that an
gasket. _'_-_[_"--lli__'d_cd_% i appliance is not a toy. Children should not be allowed tG
i '_i play with controls or other parts of the unit.
Do not use oven cleaners. No commercial il i t,_ ll_
oven cleaner oroven liner protective coat- .
ing of anykind should be used inor around
any part of the oven. "a_-=_-_,_,_.'¢_ Ventilating Hoods
Before self-cleaning the oven, remove broiler pan, oven racks Clean range hood and filters frequently to prevent grease or
and other utensils to prevent excessive smoking, discolora- other flammable materials from accumulating on hood or
tion of the oven racks or possible damage to utensils, filter and to avoid grease fires.
Wipe up excessive spillovers, especially greasy spills, be- Turn the fan off when flambring foods (such as Cherry Jubi-
fore the clean cycle to prevent smoking or flare-ups, lee) under the hood. The fan, if operating, may spread the
It is normal for the cooktop to become hot during a clean flame.
cycle. Therefore, avoid touching or lifting the cooktop dur-
ing a clean cycle.
Important Safety Notice and Warning
Heating Elements The California Safe Drinking Water and Toxic Enforcement
Act of 1986 (Proposition 65) requires the Governor of Cali-
NEVER touch surface or oven heating elements, areas fornia to publish a list of substances known to the State of
near elements, or interior surfaces of oven. California to cause cancer or reproductive harm, and requires
businesses to warn customers of potential exposures to such
Heating elements may be hot even though they are dark in
substances.
color. Areas near surface elements and interior surfaces of
an oven may become hot enough to cause burns. During and Users of this appliance are hereby warned that when the oven
after use, do not touch or let clothing or other flammable is engaged in the self-clean cycle, there may be some low
materials contact heating elements, areas near elements, or level exposure to some of the listed substances, including
interior surfaces of oven until they have had sufficient time carbon monoxide. Exposure to these substances can be mini-
to cool. mized by properly venting the oven to the outdoors during
Other potentially hot surfaces include: Cooktop, areas fac- the self-clean cycle by opening a window and/or door in the
ing the cooktop, oven vent, and surfaces near the vent open- room where the appliance is located.
ing, oven door, areas around the door and oven window.
SAVE THESE INSTRUCTIONS FOR FUTURE REFERENCE
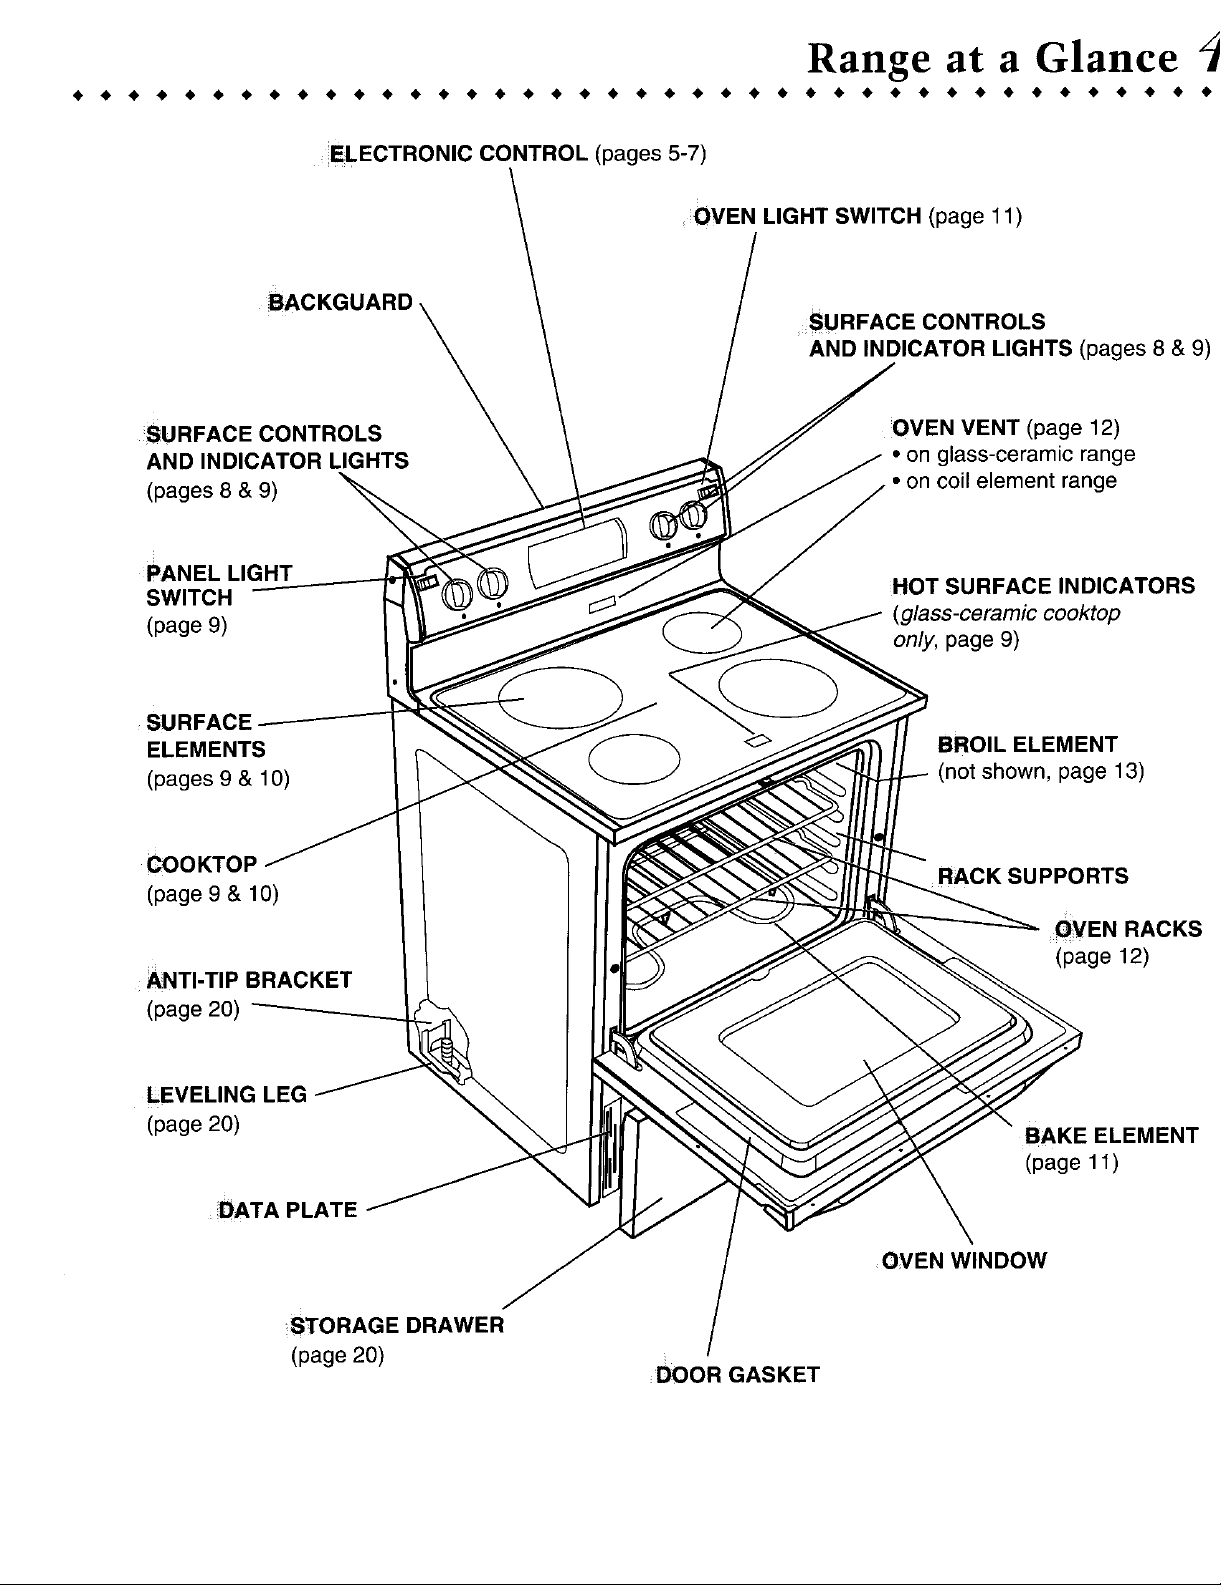
Range at a Glance
• • • • • • • • • • • • • • • • • • • • • • • • • • • • • • • • • • • • • • • • •
ELECTRONIC CONTROL (pages 5-7)
OVEN LIGHT SWITCH (page 11)
/i
BACKGUARD SURFACE CONTROLS
AND INDICATOR LIGHTS (pages 8 & 9)
SURFACE CONTROLS OVEN VENT (page 12)
AND INDICATOR LIGHTS • on glass-ceramic range
(pages 8 & 9) • on coil element range
PANEL LIGHT
SWITCH HOT SURFACE INDICATORS
(glass-ceramic cooktop
(page 9) only, page 9)
SURFACE
ELEMENTS _> BROIL ELEMENT
(pages 9 & 10) (not shown, page 13)
COOKTOP RACK SUPPORTS
(page 9 & 10)
OVEN RACKS
(page 12)
ANTI-TIP BRACKET
(page 20)
LEVELING LEG
(page 20) I 11 ELEMENT
(page 11)
DATA PLATE \
OVEN WINDOW
Z
STORAGE DRAWER
(page 20) DOOR GASKET
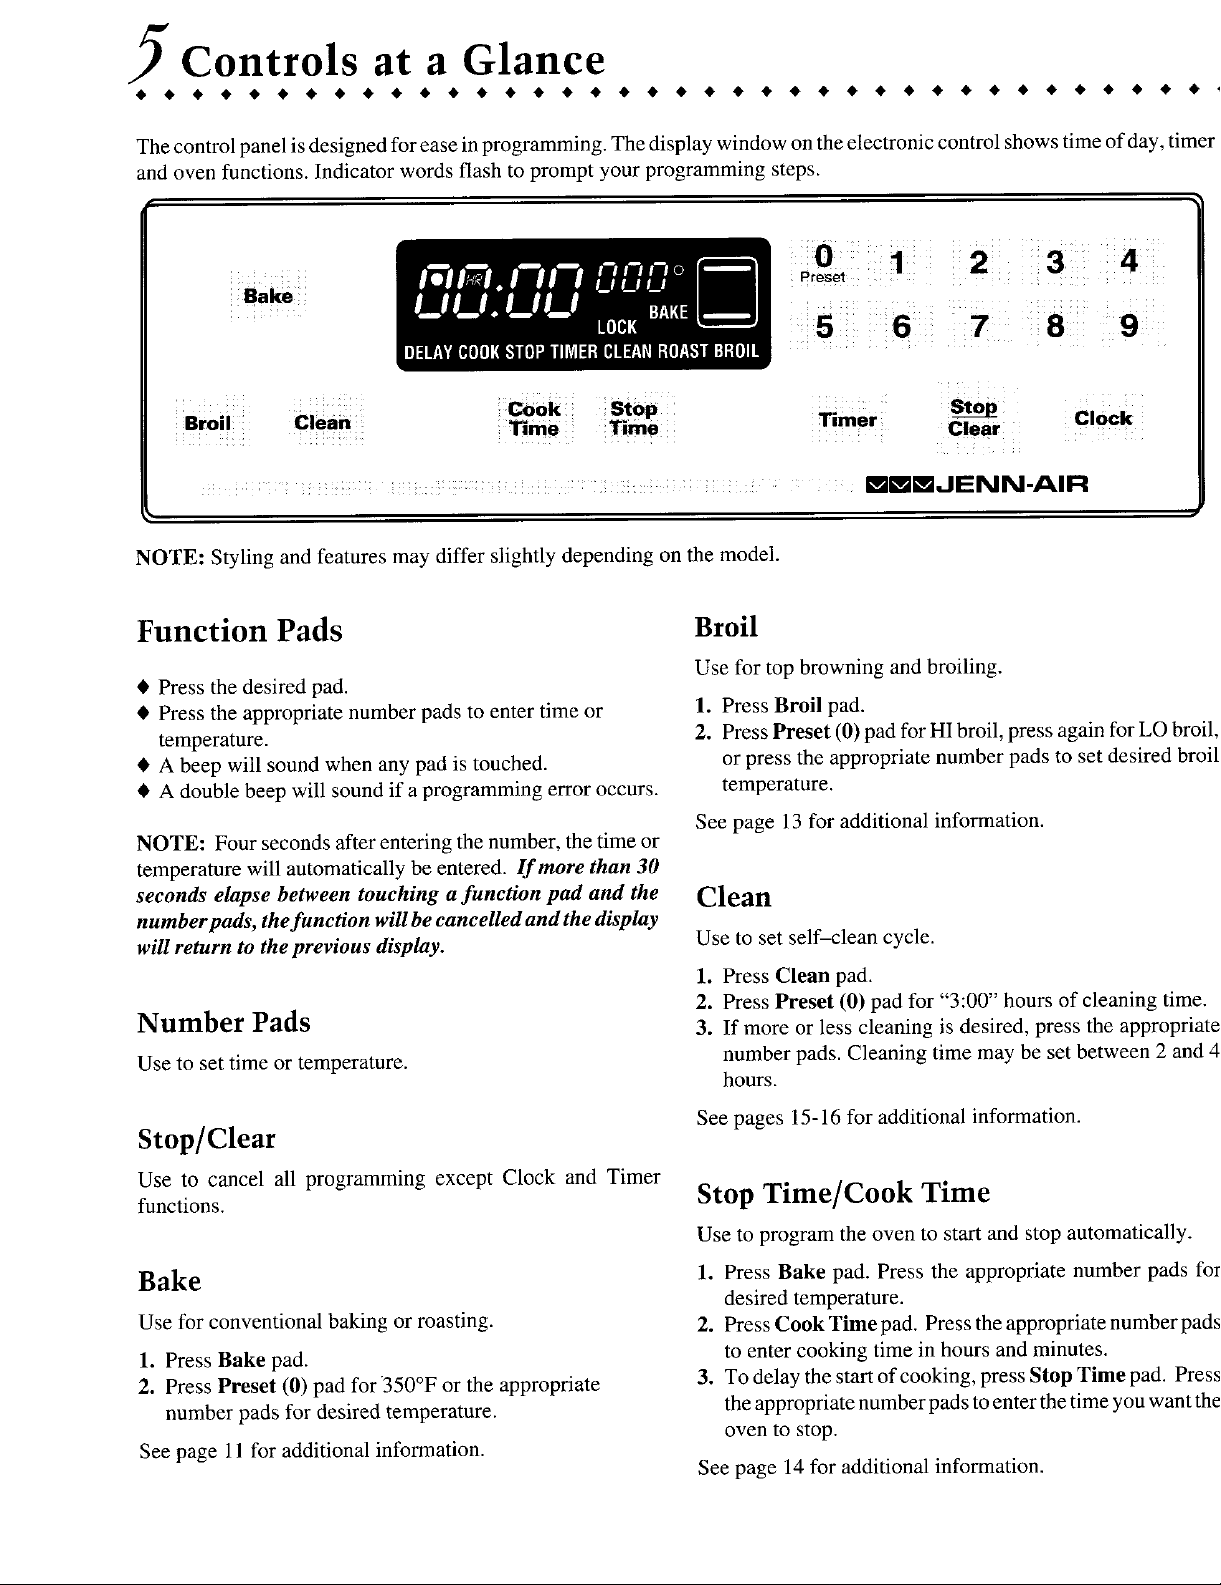
Controls at a Glance
The control panel isdesigned for ease in programming. The display window on the electronic control shows time of day, timer
and oven functions. Indicator words flash to prompt your programming steps.
2 3 4
Bake
6 7 e 9
Stop
Broil clean Time Time Timer Clock
........... Clear
: ; mmmJENN-AIR
NOTE: Styling and features may differ slightly depending on the model.
Function Pads Broil
Use for top browning and broiling.
• Press the desired pad.
• Press the appropriate number pads to enter time or 1. Press Broil pad.
temperature. 2. Press Preset (0) pad for HI broil, press again for LO broil,
• A beep will sound when any pad is touched, or press the appropriate number pads to set desired broil
• A double beep will sound if a programming error occurs, temperature.
See page 13 for additional information.
NOTE: Four seconds after entering the number, the time or
temperature will automatically be entered. If more than 30
seconds elapse between touching a function pad and the Clean
number pads, thefunction will becancelled and the display
will return to the previous display. Use to set self-clean cycle.
1. Press Clean pad.
2. Press Preset (0) pad for "3:00" hours of cleaning time.
Number Pads 3. If more or less cleaning is desired, press the appropriate
numberpads. Cleaning time may be set between 2 and 4
Use to set time or temperature.
hours.
See pages 15-16 for additional information.
Stop/Clear
Use to cancel all programming except Clock and Timer
functions. Stop Time/Cook Time
Use to program the oven to start and stop automatically.
Bake 1. Press Bake pad. Press the appropriate number pads for
desired temperature.
Use for conventional baking or roasting. 2. Press Cook Time pad. Press the appropriate number pads
1. Press Bake pad. to enter cooking time in hours and minutes.
2. Press Preset (0) pad for 350°F or the appropriate 3. To delay the start of cooking, press Stop Time pad. Press
number pads for desired temperature, the appropriate number pads to enterthe time you want the
oven to stop.
See page 11 for additional information.
See page 14 for additional information.
Controls at a Glance 6
Setting the Clock
1. Press Clock pad. 4. At theend of the time set, the timer will beep and "End"
• The indicator word TIME will flash in the display, will appearinthe display. To change the numberof timer
beeps and add reminder beeps, see page 7.
2. Pressthe appropriatenumberpadsuntilthe correct timeof
day appears in the display. To cancel:
When electrical power is supplied or after a power interrup- 1. Press andhold Timer pad for three seconds. The time of
tion, the last clock time, before power was interrupted, will day will reappear.
flash. OR
To recall the time of day when another time function is 2. Press the Timer padand the "0" number pad. After a
showing, press the Clock pad. slight delay the time of day will reappear.
Clock time cannot be changed when the oven has been
NOTE: Pressing StopClear pad to cancel the timer will
programmed for clock controlled cooking, self-clean or
delayed self-clean, cancel ALL selected oven functions except the timer.
Setting the Timer Control Options
Use toset andthen signal the completion of atime period up Control Lockout Option
to 99 hours and 59 minutes.
The control touch pads can belocked to prevent unwanted
The timer can be used independently of any other oven
activity and can be set while another oven function is oper- use. They will not function when locked.
ating. The timer does not control the oven. If an oven function is currently being used, the controls
1. Press Timer pad. cannot be locked.
• The indicator word TIMER will flash and "0Hr:00" The current time of day will remain in the display when this
appears in the display, feature is activated.
2. Press the appropriate number pads until the desired num- Setting Control Lockout
bet of minutes or hours and minutes appear in thedisplay.
1. Press and hold the Stop Time and the Stop/Clear pads at
Example: To setthe Timer for5 minutes, press the Timer the same time for three seconds. The control will beep
pad and the number 5 pad. The control will begin when option is activated.
countdown after a four second delay. • The indicator word OFF will appear in the display for 15
seconds if any pad is pressed.
To Cancel: Press and hold the Stop Time and the Stop/
Clear pads at the same time for three seconds. The indicatoi
word OFF will disappear in the display.
Example: To set the Timer for 1 hour and 30 minutes,
press the Timer pad and the numbers 1,3,0 pads. The Cancel Clock Display Option
control will begin countdown after a four second delay.
If you prefer that the time of day not be displayed:
1. Press Clock and Stop/Clear pads at the same time ant
hold for three seconds.
2. Press Clock padto briefly recall the time of day, ifdesired
3. The last minute of the countdown will be displayed as To restore: Press the Clock andStop/Clear pads atthe sam_
seconds, time and hold for three seconds. The time of day will reappeaJ
in the display.

Controls at a Glance
Oven Temperature Adjustment Option Clock Controlled Oven
Ifyouthinktheovenshouldbehotterorcooler, youcanadjust Cooking Beep Options
ityourself. Todecide how much tochange thethermostat, set
theoven temperature 25°F higher or lower thanthe tempera- • Option 1 (default option): Four beeps at the end of
ture inyour recipe, thenbake.The results of the "test" should cooking, then, one beep every 30 seconds for the next five
give you an idea of how much to adjust the thermostat, minutes or until the Stop/Clear pad is pressed.
To adjust the thermostat: • Option 2: Four beeps at the end of cooking, then, one
beep every minute for the next 12hours or until the Stop/
1. Press the Bake pad. Clear padis pressed.
2. Enter 550° by pressing the number pads "5, 5, 0". • Option 3: Four beeps at the end of cooking, then, no
3. Press and hold the Bake pad for several seconds until 0° other beeps.
appears in the display.
4. Press any number pad to change the temperature. Each Setting Clock Controlled Oven Cooking Beeps
time a pad is pressed, the temperature changes by 5°F. 1. Press Cook Time and Stop/Clear pads at the same time
I_ Press repeatedly to reach +35°F. Continue pressing to and hold for three seconds.
reduce the temperature up to -35°E • A single beep will sound.
• Display will showthe indicator word COOK and the
5. When you have made the adjustment, press the Stop/Clear
current option.
pad and the time of day will reappear in the display. The
oven will now bake at the adjusted temperature. 2. Press the appropriate number pad (1, 2, or 3) to select the
It is not necessary to readjust the oven temperature if there is option you wish. The current time of day will reappear in
the display after four seconds.
a power interruption. This adjustment will not affect broil or
clean temperatures.
Automatic Oven Turn Off Option
Timer Beep Options The oven will automatically turn off after 12 hours, if you
• Optionl: Onelongbeepattheendofthetimeroperation, accidentaIIyleave it on. You can deactivate this feature, if
then, one short beep every 30 seconds for the next five desired.
minutes or until the Stop/Clear pad is pressed. To Eliminate 12 Hour Turn Off
• Option 2: One long beep atthe end of the timer opera- 1. Press the Clock pad and hold for three seconds or until
tion, then, one short beep every minute for the next 12 "12"appearsinthedisplay. TheindicatorwordTIMEwill
hours or until the Stop/Clear pad is pressed, flash in the display.
• Option 3 (defualt option): One beep atthe end of the 2. Press any number pad until 8888 appears in the display.
timer operation, then, no other beeps. Current time of day will reappear inthe display after four
seconds.
Setting the Timer Beeps
To restore: Press the Clock pad andhold for three seconds
1. PresstheTimerandStop/Clearpadsatthesametimeand oruntil8888appears.Press"l"numberpad. "12"will appeal
hold for three seconds, briefly in the display followed by the current time of day.
• A single beep will sound.
• Display will show the indicator word TIMER
and the current option.
2. Press the appropriate number pad (1, 2, or 3) to select the
option you wish. The current time of day will reappear in
the display after four seconds.
 Loading...