


TVN-2216-16T
Interlogix TVN-2216-16T, TVN-2216S-8T, TVN-2232P-12T, TVN-2216P-12T, TVN-2232P-48T User Manual
...
© 2016 United Technologies Corporation. All rights reserved.
Interlogix is part of UTC Climate, Controls & Security, a unit of United Technologies Corporation. All rights reserved.
P/N 1072800-EN • REV C • ISS 10AUG16
TruVision Recorder Operator Guide
Live view
In the viewer you can see displayed on the live image the current date and time,
camera name, and whether a recording is in progress.
Information on the system and camera status is displayed as icons on the main
and event monitors. The camera status icons are shown for each camera. Each
icon represents information on a specific item. These icons include:
Icon Description
A sensor alarm.
Recording is in progress (such as manual recording, motion
detection, or alarm-triggered recording).
A motion detection event.
Blank
screen
A video loss event.
Alarm and system notifications. Click the icon to open a screen
with a list of the notifications.
Manual recording.
Live view is locked from the front panel. Mouse actions are still
allowed.
Note: Not available on all recorders.
Controlling live view mode
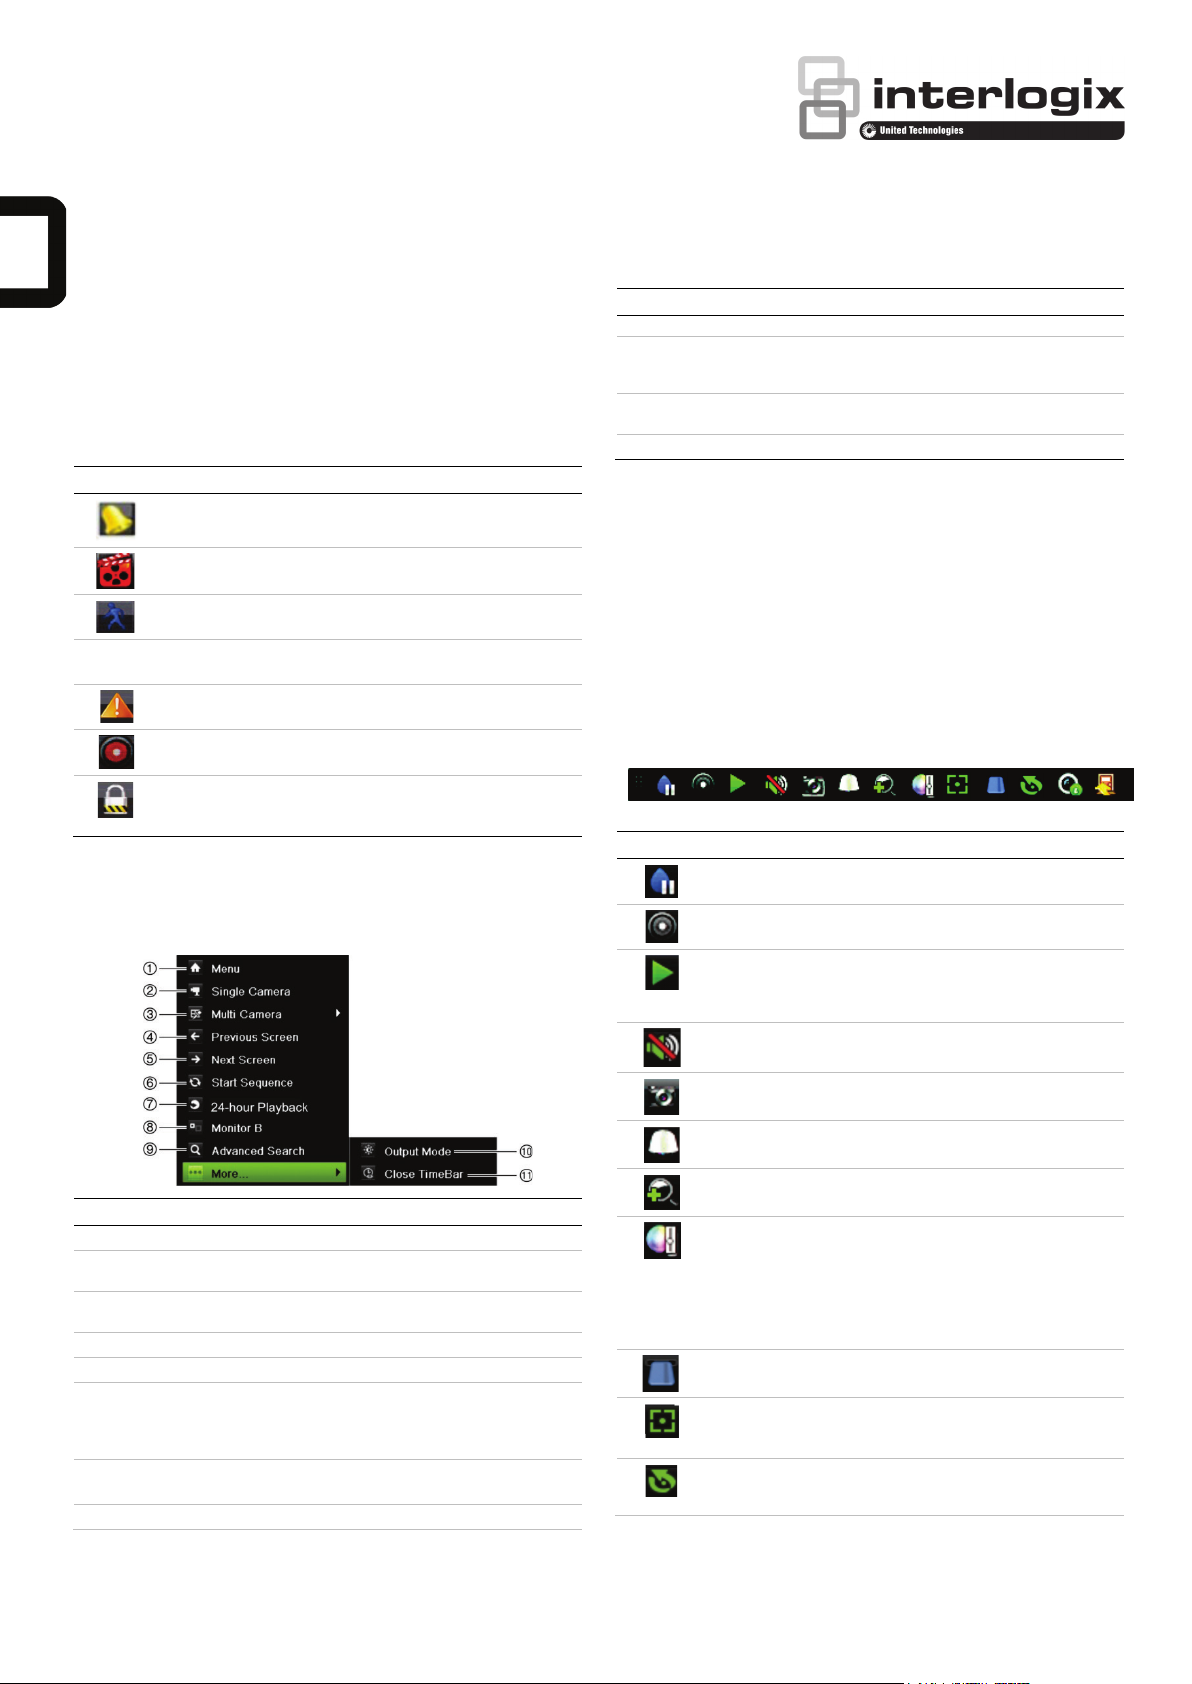
Right-click the mouse on a live image to display the mouse menu:
Name Description
1. Menu Enter the Main menu.
2. Single Camera Switch to a full-screen view for the selected
camera from the dropdown list.
3. Multi Camera Switch between the different multiview options
from the dropdown list.
4. Previous Screen Displays the previous camera screen.
5. Next Screen Displays the next camera screen.
6. Start Sequence Turn on sequence m ode. The screen automatically
sequences between cameras.
Go to Menu > Displa y Settings > Layout >
Sequence Dwell Time to set up.
7. Monitor B Switch between monitors.
Note: Not available on all recorders.
8. 24-hour Playback Playback the recorded video of the current day
Name Description
from the selected camera.
9. Advanced Search Enter the advanced video search menu. See
“Searching recorded video” on page 3 for more
information.
10. Output Mode Select Standard, Bright, Soft, or Vivid mode to
display.
11. Close Timebar Open/close the time bar.
Login screen
For most recorder functions (such as playback, menu access, taking snapshots,
etc), you need to log in with a valid user account and password.
Default user: admin
Default password: 1234
Live view toolbar
Use the live view toolbar in live view to quickly access regularly used commands.
Position the cursor over a live image and left-click the mouse. The toolbar
appears:
Note: Not all commands listed below are available on all recorders.
Icon Description
Pause: Freeze the live image of the selected camera. Although
the image pauses, time and date information does not.
Manual Recording: Start/stop manual recording. The icon is
red when manual recording is enabled.
Instant Playback: Playback the recorded video from the last
five minutes (default time). If no recording is found, then there
was no recording m ade. Click the icon and select the desired
camera. Click OK.
Audio: Enable/Disable audio output. The audio option must
already have been setup in the Display menu.
Capture: Capture a snapshot of a video image. The image is
saved on the unit.
PTZ Control: Enter PTZ control mode.
Digital Zoom: Enter digital zoom.
Image Settings: Enter the Image Settings menu to modify the
image lighting levels. There are two options:
Customize: Modify brightness, contrast, saturation, and hue
values.
Default: Restore image settings to previous values.
These settings can also be modified from the Camera > Image
menu.
Text insertion: Display inserted text on screen.
Note: Not available on all recorders.
Auxiliary Focus: Automatically focus the camera lens for the
sharpest picture.
Note: Not available on all recorders.
Lens Initialization: Initialize the lens of a camera with a
motorized lens, such as PTZ or IP cam eras. This function helps
to maintain lens focus accuracy over prolong periods of time.
2 / 4 TruVision Recorder Operator Guide
Icon Description
Note: Not available on all recorders.
Stream Information: Display the real-time frame rate, bit rate,
resolution and video compression.
Note: Not available on all recorders.
Close Toolbar: Close the shortcut toolbar.
Some of the functions can only be accessed after entering a valid user name and
password.
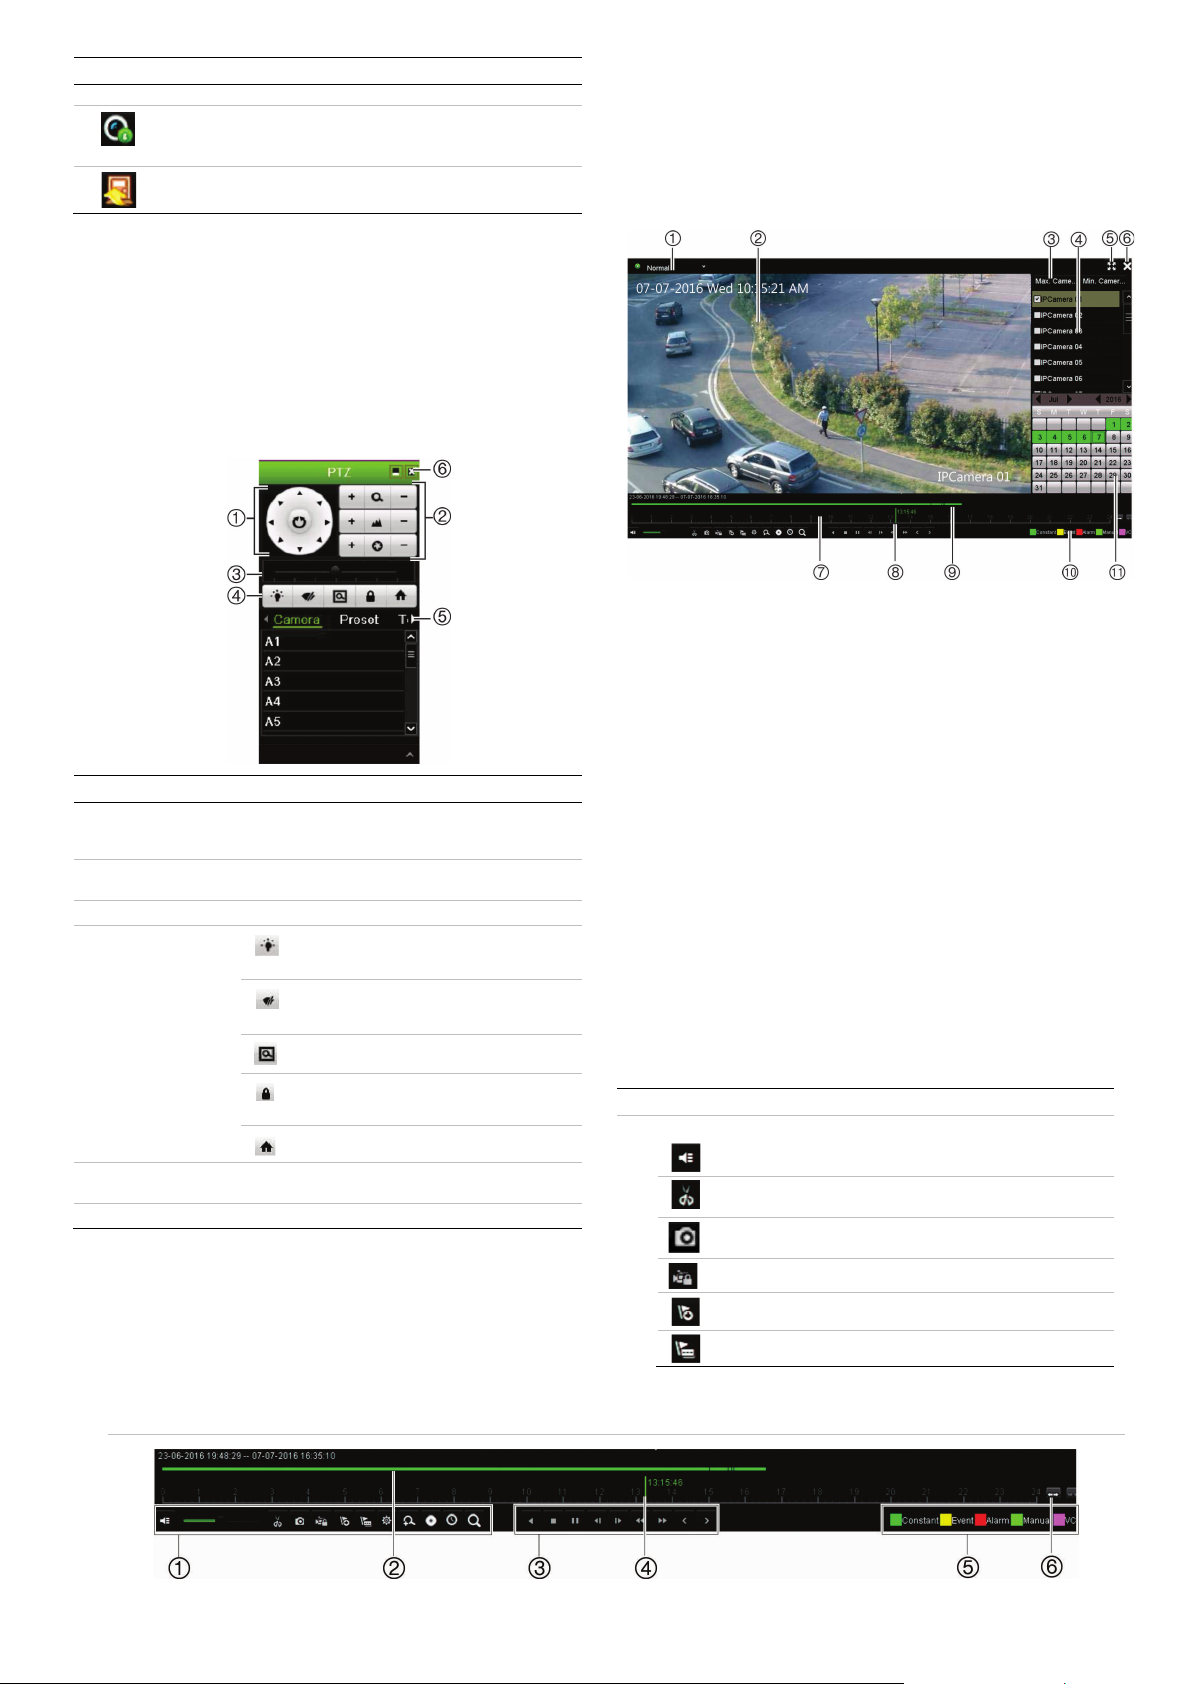
Controlling a PTZ camera
Left-click the mouse on the desired camera image to call-up the Quick Access
toolbar. Click the PTZ control icon in the toolbar to enter the PTZ mode.
If the display is in multiview format, it changes to full screen format for the
selected camera.
PTZ control panel
Name Description
1. Directional
pad/auto-scan
buttons
Controls the movements and directions of the PTZ.
Center button is used to start auto-pan by the PTZ
dome camera.
2. Zoom, focus, and
iris
Adjusts zoom, focus, and iris.
3. PTZ movement Adjusts the speed of PTZ movement.
4. Toolbar
Turns on/off camera light. This command is
not supported on all PTZ cameras.
Turns on/off camera wiper. This command is
not supported on all PTZ cameras.
Zoom area
Centers the PTZ dome camera image. This
command is not supported on all PTZ cameras.
Jumps to the home position.
5. Select PTZ
command
Displays the desired function from the scroll bar:
camera, preset, preset tour or shadow tour.
6. Exit Exits the PTZ control panel.
Playback
There are four ways to play back video:
• Instant playback of the most recently recorded video
• 24-hour playback of the day’s recorded video (This function is called “All-
day Playback” on some recorders)
• Search the video archives by specific time, date, bookmark, snapshot, or
event
• Search the system log
Playback window (24-hour playback shown)
1. Playback mode: Select one of seven playback modes to view: Normal,
Event, Bookmark, Smart, Sub-periods, External File, or Snapshot.
Note: Not available on all recorders.
2. Playback viewer.
3. Quick camera select.
Note: Not available on all recorders.
4. Camera panel: Select the cameras for playback. Move the mouse over the
area to display the list of cameras available.
5. Full screen.
6. Exit playback
7. Playback contr ol toolbar (see below for more information).
8. Time line: Time of actual playback. This is only displayed in 24-hour
playback.
9. Playback progress bar: This bar displays how much of the 24-hour period
has been recorded. Its color depends on the recording type.
10. Recording type: Description of the color coding of the recording types that
appear in the playback progress bar.
11. Calendar panel. Blue: Current date. Green/Yellow/Red: Recordings
available on the recorder.
Playback control toolbar
See Figure 1 below.
Description
1. Audio and video control toolbar:
Audio on/off.
Start/stop a video clip during playback. Sections of a
recording can be saved to an external storage device.
Quick snapshot. Click to take a snapshot of the recording
(depends on recorder model)
Lock a file during playback.
Add default bookmark.
Add customized bookmark.
Figure
1: Playback control toolbar
 Loading...