


 Loading...
Remote Supervisor Adapter II SlimLine |
|
and Remote Supervisor Adapter II |
User’s Guide
Remote Supervisor Adapter II SlimLine |
|
and Remote Supervisor Adapter II |
User’s Guide
Note: Before using this information and the product it supports, read the general information in Appendix B, “Notices,” on page 115.
Seventh Edition (April 2007)
© Copyright International Business Machines Corporation 2003, 2007. All rights reserved.
US Government Users Restricted Rights – Use, duplication or disclosure restricted by GSA ADP Schedule Contract with IBM Corp.

Contents
Chapter 1. Introduction . . . . . . . . . . . . . . . . . . . . . . 1
Remote Supervisor Adapter II features . . . . . . . . . |
. . |
. . |
. |
. |
. |
1 |
Web browser and operating-system requirements . . . . . |
. . |
. . |
. |
. |
. |
3 |
Notices used in this book . . . . . . . . . . . . . . |
. . |
. . |
. |
. |
. |
3 |
Chapter 2. Opening and using the Web interface. . . . . |
. . |
. . |
. |
. |
. |
5 |
Logging in to the Remote Supervisor Adapter II . . . . . . |
. . |
. . |
. |
. |
. |
5 |
Remote Supervisor Adapter II action descriptions. . . . . . |
. . |
. . |
. |
. |
. |
8 |
Chapter 3. Configuring the Remote Supervisor Adapter II . |
. . |
. . . |
. |
. |
|
11 |
Setting system information . . . . . . . . . . . . . |
. . |
. . . |
. |
. |
|
12 |
Setting server timeouts . . . . . . . . . . . . . . . . . . . . . 13
Setting the date and time . . . . . . . . |
. . |
. . . . |
. . |
. . |
. |
. |
16 |
Synchronizing clocks in a network . . . . . |
. . |
. . . . |
. . |
. . |
. |
. |
17 |
Disabling the USB device driver interface . . |
. . |
. . . . |
. . |
. . |
. |
. |
18 |
Creating a login profile . . . . . . . . . . |
. . |
. . . . |
. . |
. . |
. |
. |
18 |
Configuring the global login settings . . . . . |
. . |
. . . . |
. . |
. . |
. |
. |
20 |
Configuring remote alert settings . . . . . . |
. . |
. . . . |
. . |
. . |
. |
. |
22 |
Configuring remote alert recipients. . . . . |
. . |
. . . . |
. . |
. . |
. |
. |
23 |
Forwarding alerts . . . . . . . . . . . . . . . . . . . . . . . 25 Setting remote alert attempts. . . . . . . . . . . . . . . . . . . 26 Setting remote alerts . . . . . . . . . . . . . . . . . . . . . . 27 Setting local events . . . . . . . . . . . . . . . . . . . . . . 29 Configuring the serial connectors . . . . . . . . . . . . . . . . . . 30 Configuring the dual serial connectors for serial redirection. . . . . . . . . 33 Serial-to-serial redirection . . . . . . . . . . . . . . . . . . . . 34 Serial-to-Telnet redirection . . . . . . . . . . . . . . . . . . . . 35
Configuring the command-line interface settings. . . . . . . . . . |
. |
. |
36 |
Configuring port assignments . . . . . . . . . . . . . . . . . |
. |
. |
38 |
Configuring network interfaces . . . . . . . . . . . . . . . . . . . 39
Configuring an Ethernet connection to the Remote Supervisor Adapter II |
39 |
Configuring PPP access over a serial connection . . . . . . . . . |
. . 42 |
Configuring network protocols . . . . . . . . . . . . . . . . . . . 43
Configuring SNMP . . . . . . . . . . . . . . . . . . . . |
. |
. |
43 |
Configuring SMTP. . . . . . . . . . . . . . . . . . . . . . . 45 |
|||
Configuring LDAP . . . . . . . . . . . . . . . . . . . . . . . . 46 |
|||
Setting up a client to use the LDAP server. . . . . . . . . . . . |
. |
. |
46 |
Configuring the LDAP client authentication. . . . . . . . . . . . |
. |
. |
49 |
Configuring the LDAP search attributes . . . . . . . . . . . . . |
. |
. |
49 |
TCP Command Mode Protocol . . . . . . . . . . . . . . . . . |
. |
. |
52 |
Service Location Protocol (SLP) . . . . . . . . . . . . . . . . |
. |
. |
52 |
Secure Web server and secure LDAP . . . . . . . . . . . . . . |
. |
. |
53 |
Configuring security . . . . . . . . . . . . . . . . . . . . |
. |
. |
53 |
SSL certificate overview . . . . . . . . . . . . . . . . . . |
. |
. |
54 |
SSL server certificate management . . . . . . . . . . . . . . |
. |
. |
55 |
Enabling SSL for the secure Web server . . . . . . . . . . . . |
. |
. |
60 |
SSL client certificate management . . . . . . . . . . . . . . . |
. |
. |
60 |
SSL client trusted certificate management . . . . . . . . . . . . |
. |
. |
61 |
Enabling SSL for the LDAP client . . . . . . . . . . . . . . . |
. |
. |
62 |
Configuring the Secure Shell server . . . . . . . . . . . . . . . |
. |
. |
62 |
Generating a Secure Shell server key . . . . . . . . . . . . . |
. |
. |
63 |
Enabling the Secure Shell server . . . . . . . . . . . . . . . |
. |
. |
63 |
Using the Secure Shell server . . . . . . . . . . . . . . . . |
. |
. |
64 |
© Copyright IBM Corp. 2003, 2007 |
iii |
Using the configuration file . . . . . . . . . |
. . . |
. . |
. . . . . |
. |
64 |
Backing up your current configuration . . . . |
. . . |
. . |
. . . . . |
. |
64 |
Restoring and modifying your ASM configuration |
. . . |
. . |
. . . . . |
. |
65 |
Restoring ASM defaults. . . . . . . . . . . . . . . . . . . . . . 66 Restarting ASM. . . . . . . . . . . . . . . . . . . . . . . . . 66 Logging off . . . . . . . . . . . . . . . . . . . . . . . . . . 66
Chapter 4. Monitoring remote server status . . . . . . . . . . . . . 69 Viewing system health . . . . . . . . . . . . . . . . . . . . . . 69
Viewing the event log . . . . . . . . . . . . . . . . . |
. . |
. |
. |
. |
73 |
Viewing vital product data . . . . . . . . . . . . . . . . |
. . |
. |
. |
. |
75 |
Chapter 5. Performing Remote Supervisor Adapter II tasks . . |
. . |
. |
. |
. |
79 |
Server power and restart activity . . . . . . . . . . . . . |
. . |
. |
. |
. |
79 |
Remotely controlling the power status of a server . . . . . . . |
. . |
. |
. |
. |
80 |
Remote control . . . . . . . . . . . . . . . . . . . . . . . . . 81
Important information about updating your Remote Supervisor Adapter II |
|
|
|
firmware . . . . . . . . . . . . . . . . . . . . . . . |
. |
. |
81 |
Remote console . . . . . . . . . . . . . . . . . . . . . |
. |
. |
82 |
Remote console keyboard support. . . . . . . . . . . . . . . |
. |
. |
83 |
Remote disk . . . . . . . . . . . . . . . . . . . . . . . . . 83 Setting up PXE network boot. . . . . . . . . . . . . . . . . . . . 86 Serial redirection quick setup. . . . . . . . . . . . . . . . . . . . 86 Updating firmware. . . . . . . . . . . . . . . . . . . . . . . . 88 Accessing remote adapters through an ASM interconnect network . . . . . . 89
Chapter 6. Command-line interface . |
. |
. . |
. . |
. . . . . . . . |
. |
. |
91 |
Accessing the command line . . . . . |
. |
. . |
. . |
. . . . . . . . |
. |
. |
91 |
Logging in to the command-line session |
. |
. . |
. . |
. . . . . . . . |
. |
. |
91 |
Command syntax . . . . . . . . . . . . . . . . . . . . . . . . 91
Features and limitations |
. . . |
. . . . |
. . . . . |
. . . . |
. |
. |
. . |
. |
92 |
Utility commands . . . |
. . . |
. . . . |
. . . . . |
. . . . |
. |
. |
. . |
. |
93 |
exit command . . . |
. . . |
. . . . |
. . . . . |
. . . . |
. |
. |
. . |
. |
93 |
help command . . . . . . . . . . . . . . . . . . . . . . . . 93 history command . . . . . . . . . . . . . . . . . . . . . . . 93 Monitor commands . . . . . . . . . . . . . . . . . . . . . . . 94 clearlog command. . . . . . . . . . . . . . . . . . . . . . . 94 fans command . . . . . . . . . . . . . . . . . . . . . . . . 94
readlog command . |
. . . . . . . . . . . . . |
. . . . |
. |
. . . |
. |
94 |
syshealth command |
. . . . . . . . . . . . . |
. . . . |
. |
. . . |
. |
95 |
temps command . |
. . . . . . . . . . . . . |
. . . . |
. |
. . . |
. |
95 |
volts command . . |
. . . . . . . . . . . . . |
. . . . |
. |
. . . |
. |
95 |
vpd command . . |
. . . . . . . . . . . . . |
. . . . |
. |
. . . |
. |
96 |
Server power and restart control commands . . . . . |
. . . . |
. |
. . . |
. |
96 |
|
power command . |
. . . . . . . . . . . . . |
. . . . |
. |
. . . |
. |
97 |
reset command. . |
. . . . . . . . . . . . . |
. . . . |
. |
. . . |
. |
97 |
Serial redirect command . . . . . . . . . . . . . . . |
. . |
. |
. . . 97 |
||||||||
console command. . . . . . . . . . . . . . . . . |
. . |
. |
. . . 97 |
||||||||
Configuration commands . . . |
. . |
. . |
. . |
. |
. . . . . . . . . |
. |
. |
98 |
|||
dhcpinfo command . . . . |
. . |
. . |
. . |
. |
. . . . . . . . . |
. |
. |
98 |
|||
ifconfig command . . . . . . . . . . . . . |
. . |
. . |
. |
. . . |
. |
. |
99 |
ldap command . . . . . . . . . . . . . |
. . |
. . |
. . |
. . |
. |
. |
100 |
ntp command . . . . . . . . . . . . . . . . . . . . |
. . . . 102 |
||||||||
passwordcfg command . . . . . . . . . . . . . . . . |
. . . . 102 |
||||||||
portcfg command |
. . . . . . . . . . . |
. . |
. . |
. . . . |
. |
. |
. |
103 |
|
slp command . . |
. . . . . . . . . . . |
. . |
. . |
. . . . |
. |
. |
. |
104 |
|
iv Remote Supervisor Adapter II SlimLine and Remote Supervisor Adapter II: User’s Guide
srcfg command . . . . . . . . . . . . . . . . . . . . . . . 104 ssl command . . . . . . . . . . . . . . . . . . . . . . . . 105 tcpcmdmode command . . . . . . . . . . . . . . . . . . . . 106 timeouts command . . . . . . . . . . . . . . . . . . . . . . 107 users command . . . . . . . . . . . . . . . . . . . . . . . 108
ASM control commands . . . . . . . . . . . . . . . . . . . . . 109 clearcfg command . . . . . . . . . . . . . . . . . . . . . . 109 clock command . . . . . . . . . . . . . . . . . . . . . . . 109
resetsp command . . . . . . . . . . . . . . . . . . |
. |
. . . 110 |
|||
update command . . . . . . . . . . . . . . . . . . |
. |
. . . 110 |
|||
Appendix A. Getting help and technical assistance . . . . . . |
. . |
. |
. |
113 |
|
Before you call . . . . . . . . . . . . . . . . . . . . |
. . |
. |
. |
113 |
|
Using the documentation . . . . . . . . . . . . . . . . . . . . . 113
Getting help and information from the World Wide Web |
. . . . . |
. . |
. . 114 |
|||
Software service and support . . . . . . . . . . |
. . . . . |
. . |
. . 114 |
|||
Hardware service and support . . . . . . . . . . |
. . . . . |
. |
. . |
. |
114 |
|
IBM Taiwan product service . . . . . . . . . . . |
. . . . . |
. |
. . |
. |
114 |
|
Appendix B. Notices . . . . . . . . . . . . . . . . . . . . . |
. 115 |
||||
Trademarks. . . . . . . . . . . . . . . . . . . . . . . . . . 115 |
|||||
Important notes . . . . . . . . . . . . |
. . . . |
. . . . . . |
. |
. |
116 |
Index . . . . . . . . . . . . . . . . |
. . . . |
. . . . . . |
. |
. |
119 |
Contents v
vi Remote Supervisor Adapter II SlimLine and Remote Supervisor Adapter II: User’s Guide

Chapter 1. Introduction
This document explains how to use the functions of the IBM® Remote Supervisor Adapter II SlimLine and the IBM Remote Supervisor Adapter II when they are installed in an IBM server. The Remote Supervisor Adapter II SlimLine and the Remote Supervisor Adapter II provide the following functions:
vAround-the-clock remote access and system management of your server.
vRemote management independent of the status of the managed server
vRemote control of hardware and operating systems
vWeb-based management with standard Web browsers
Note: Throughout this document, the term Remote Supervisor Adapter II is used to denote both the Remote Supervisor Adapter II SlimLine and the Remote Supervisor Adapter II, unless otherwise noted.
If firmware and documentation updates are available, you can download them from the IBM Web site. The Remote Supervisor Adapter II might have features that are not described in the documentation that comes with the adapter, and the documentation might be updated occasionally to include information about those features, or technical updates might be available to provide additional information that is not included in the adapter documentation. To check for updates, complete the following steps.
Note: Changes are made periodically to the IBM Web site. Procedures for locating firmware and documentation might vary slightly from what is described in this document.
1.Go to http://www.ibm.com/systems/support/.
2.Under Product support, click System x.
3.Under Popular links, click Software and device drivers for firmware updates, or click Publications lookup for documentation updates.
Important:
vTo avoid system problems due to firmware differences, do not move a Remote Supervisor Adapter II from one server type to another server type. For example, do not move a Remote Supervisor Adapter II from an IBM System x3500 server to an IBM System x3850 server.
vIf a Remote Supervisor Adapter II SlimLine is installed in an xSeries 366 server, when you turn on the server for the first time after the adapter is installed, the server might appear to be unresponsive for an unusual length of time (up to 10 minutes). If this happens, when the server completes POST, flash the BIOS and baseboard management controller (BMC) firmware to the latest available levels. Then, flash the Remote Supervisor Adapter II SlimLine firmware. For more information, go to http://www.ibm.com/support/ and search for MIGR-59095.
Remote Supervisor Adapter II features
The Remote Supervisor Adapter II has the following standard features:
vAccess to critical server settings
vAccess to server vital product data (VPD)
vAdvanced Predictive Failure Analysis® (PFA) support
© Copyright IBM Corp. 2003, 2007 |
1 |
vAlphanumeric or numeric pager alerts (not supported with the Remote Supervisor Adapter II SlimLine)
vAutomatic notification and alerts
vAutomated Server Restart (ASR)
vContinuous health monitoring and control
vDomain Name System (DNS) server support
vDynamic Host Configuration Protocol (DHCP) support
vE-mail alerts
vEnhanced user authority levels
vEvent logs that are time stamped, saved on the Remote Supervisor Adapter II, and can be attached to e-mail alerts
vIndependent power, which enables around-the-clock access to the server even when the server power is off
vAdvanced System Management (ASM) interconnect remote access (not supported with the Remote Supervisor Adapter II SlimLine)
vOperating-system-failure screen capture
vRemote access through Ethernet and ASM interconnect peer-to-peer network
vRemote disk enabling the attachment of a diskette drive, CD-ROM drive, USB flash drive, or disk image to a server
vRemote firmware update and access to critical server settings
vRemote power control
vSeamless remote accelerated graphics
vSecure Web server user interface
vServer console redirection.
This feature is not supported with the Remote Supervisor Adapter II SlimLine when it is installed in any of the following servers:
–IBM xSeries 236
–IBM xSeries 260
–IBM xSeries 336
–IBM xSeries 346
–IBM xSeries 366
–IBM xSeries 460
–IBM System x3800
–IBM System x3850
–IBM System x3950
vSimple Network Management Protocol (SNMP) support
vRemote firmware update
vUser authentication using a secure connection to a Lightweight Directory Access Protocol (LDAP) server
2 Remote Supervisor Adapter II SlimLine and Remote Supervisor Adapter II: User’s Guide
Web browser and operating-system requirements
The Remote Supervisor Adapter II Web interface requires the Java™ Plug-in 1.4 or later and one of the following Web browsers:
vMicrosoft® Internet Explorer version 5.5 or later with the latest Service Pack
vNetscape Navigator version 7.0 or later
vMozilla version 1.3 or later (Remote Control features are supported only on the Remote Supervisor Adapter II SlimLine with Refresh 2 firmware.)
Note: The Remote Disk feature works with only the Microsoft Windows 2000 and Windows XP operating systems (for the Remote Supervisor Adapter II only, not the Remote Supervisor Adapter II SlimLine).
The following server operating systems have USB support, which is required for the Remote Control feature:
vMicrosoft Windows® Server 2003
vMicrosoft Windows 2000 with Service Pack 4 or later
vRed Hat Linux version 7.3
vSUSE Linux version 8.0
vNovell NetWare 6.5
Note: The Remote Supervisor Adapter II Web interface does not support the double-byte character set (DBCS) languages.
Notices used in this book
The following notices are used in the documentation:
vNotes: These notices provide important tips, guidance, or advice.
vImportant: These notices provide information or advice that might help you avoid inconvenient or problem situations.
vAttention: These notices indicate potential damage to programs, devices, or data. An attention notice is placed just before the instruction or situation in which damage could occur.
Chapter 1. Introduction 3
4 Remote Supervisor Adapter II SlimLine and Remote Supervisor Adapter II: User’s Guide

Chapter 2. Opening and using the Web interface
To access the Remote Supervisor Adapter II remotely using the Remote Supervisor Adapter II Web interface, you must log in to the adapter. This chapter describes the login procedures and describes the actions you can perform from the Remote Supervisor Adapter II Web interface.
Logging in to the Remote Supervisor Adapter II
To access the Remote Supervisor Adapter II through the Remote Supervisor
Adapter II Web interface, complete the following steps:
1.Open a Web browser. In the address or URL field, type the IP address or host name of the Remote Supervisor Adapter II to which you want to connect.
Notes:
a.If you are logging in to the Remote Supervisor Adapter II for the first time after installation, the Remote Supervisor Adapter II defaults to DHCP. If a DHCP host is unavailable, the Remote Supervisor Adapter II uses the default static IP address 192.168.70.125.
b.You can obtain the DHCP-assigned IP address or the static IP address from the server BIOS or from your network administrator.
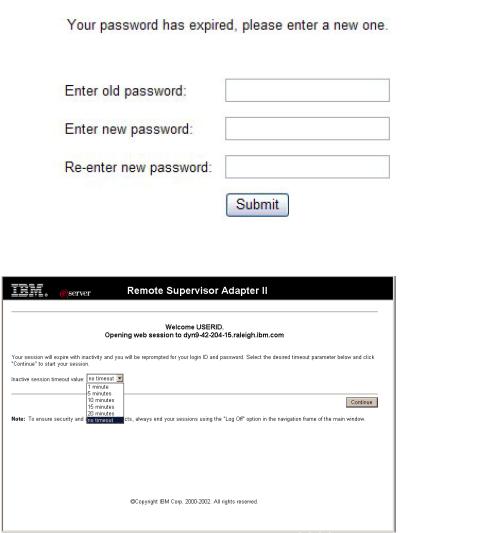
The Enter Network Password window opens.
Note: The values in the following window are examples. Your settings will be different.
2.Type your user name and password in the Enter Network Password window. If you are using the Remote Supervisor Adapter II for the first time, you can obtain your user name and password from your system administrator. All login attempts are documented in the event log. A welcome page opens in your browser.
Note: The Remote Supervisor Adapter II is set initially with a user name of USERID and password of PASSW0RD (with a zero, not the letter O). This user has read/write access. Change this default password during your initial configuration for enhanced security.
© Copyright IBM Corp. 2003, 2007 |
5 |
3.Depending on how your system administrator has configured the user ID, the following window might open.
4. The Welcome window opens.
Select a timeout value from the drop-down list in the field that is provided. If your browser is inactive for that number of minutes, the Remote Supervisor Adapter II logs you off the Remote Supervisor Adapter II Web interface.
Note: Depending on how your system administrator has configured the global login settings, the timeout value might be a fixed value.
6 Remote Supervisor Adapter II SlimLine and Remote Supervisor Adapter II: User’s Guide
5.Click Continue to start the session.
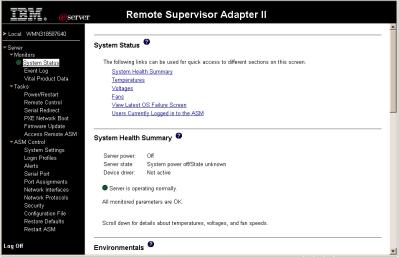
The browser opens the System Status page, which gives you a quick view of the server status and the server health summary.
For descriptions of the actions that you can perform from the links in the left navigation pane of the Remote Supervisor Adapter II Web interface, see “Remote Supervisor Adapter II action descriptions” on page 8. Then, go to Chapter 3, “Configuring the Remote Supervisor Adapter II,” on page 11.
Chapter 2. Opening and using the Web interface 7

Remote Supervisor Adapter II action descriptions
Table 1 lists the actions that are available when you are logged in to the Remote Supervisor Adapter II.
Table 1. Remote Supervisor Adapter II actions
Link |
Action |
Description |
|
|
|
System Status |
View system health for a server, |
You can monitor the server power and state and the |
|
view the operating-system-failure |
temperature, voltage, and fan status of your server on the |
|
screen capture, and view the |
System Health page. You can also view the image of the |
|
users who are logged in to the |
last operating-system-failure screen capture and the users |
|
Remote Supervisor Adapter II |
who are logged in to the Remote Supervisor Adapter II. |
|
|
|
Event Log |
View event logs for remote |
The Event Log page contains entries that are currently |
|
servers |
stored in the server event log and power-on self-test |
|
|
(POST) event log. Information about all remote access |
|
|
attempts and dial-out events are recorded in the event log. |
|
|
All events in the log are time stamped using the Remote |
|
|
Supervisor Adapter II date and time settings. Some events |
|
|
will also generate alerts, if configured to do so on the |
|
|
Alerts page. You can sort and filter events in the event log. |
|
|
|
Vital Product Data |
View the server VPD |
When the server starts, the Remote Supervisor Adapter II |
|
|
collects system information, basic input/output system |
|
|
(BIOS) information, and server component vital product |
|
|
data (VPD) and stores it in nonvolatile memory. This data |
|
|
is available from the Vital Product Data page. |
|
|
|
Power/Restart |
Remotely turn on or restart a |
The Remote Supervisor Adapter II provides full remote |
|
server |
power control over your server with power-on, power-off, |
|
|
and restart actions. In addition, power-on and restart |
|
|
statistics are captured and displayed to show server |
|
|
hardware availability. |
|
|
|
Remote Control |
Redirect the server video console |
From the Remote Control page, you can start the Remote |
|
and use your computer disk drive |
Control function. Using the Remote Control function, you |
|
or disk image as a drive on the |
can redirect the server console to your computer, and you |
|
server |
can mount one of your computer disk drives, such as the |
|
|
CD-ROM drive or the diskette drive, on the server. When |
|
|
you have redirected the server console, you can use your |
|
|
mouse and keyboard to control the server. When you have |
|
|
mounted a disk, you can use it to restart the server and to |
|
|
update firmware on the server. You can use the Remote |
|
|
Console function to access the mounted disk, which will |
|
|
appear as a Universal Serial Bus (USB) disk drive that is |
|
|
attached to the server. |
|
|
|
Serial Redirect1 |
Configure serial-to-serial |
From the Serial Redirect page, you can use the serial |
|
redirection or serial-to-Telnet |
redirection quick setup to simplify the configuration of |
|
redirection. |
serial-to-serial redirection or serial-to-Telnet redirection. |
|
|
|
PXE Network Boot |
Change the host server startup |
If your server BIOS and Preboot Execution Environment |
|
(boot) sequence for the next |
(PXE) boot agent utility are properly defined, from the PXE |
|
restart to attempt a PXE/DHCP |
Network Boot page you can change the host server |
|
network startup. |
startup (boot) sequence for the next restart to attempt a |
|
|
PXE/DHCP network startup. The host startup sequence |
|
|
will be altered only if the host is not under Privileged |
|
|
Access Protection (PAP). After the next restart occurs, the |
|
|
check box on the PXE Network Boot page will be cleared. |
|
|
|
Firmware Update |
Update firmware on the Remote |
Use the options on the Firmware Update page to update |
|
Supervisor Adapter II |
firmware of the Remote Supervisor Adapter II. |
|
|
|
8 Remote Supervisor Adapter II SlimLine and Remote Supervisor Adapter II: User’s Guide
Table 1. Remote Supervisor Adapter II actions (continued)
Link |
Action |
Description |
|
|
|
Access Remote |
Access other service processors |
From the Access Remote ASM page, you can view a list of |
ASM2 |
on the ASM interconnect network |
service processors that are present on the ASM |
|
|
interconnect network and establish a connection to any of |
|
|
those systems. |
|
|
Note: Service processors are Remote Supervisor Adapter |
|
|
IIs, Remote Supervisor Adapters, ASM processors, ASM |
|
|
PCI adapters, and integrated system management |
|
|
processors (ISMPs). |
|
|
|
System Settings |
View and change the Remote |
You can configure the server location and general |
|
Supervisor Adapter II system |
information, such as the name of the Remote Supervisor |
|
settings |
Adapter II, the operating system that supports the Remote |
|
|
Supervisor Adapter II (Windows or Linux), server timeout |
|
|
settings, and contact information for the Remote |
|
|
Supervisor Adapter II, from the System Settings page. |
|
|
|
|
Set the Remote Supervisor |
You can set the Remote Supervisor Adapter II clock that is |
|
Adapter II clock |
used for time stamping the entries in the event log. |
|
|
|
Login Profiles |
Configure the Remote Supervisor |
You can define 12 login profiles that enable access to the |
|
Adapter II login profiles and global |
Remote Supervisor Adapter II. You can also define global |
|
login settings |
login settings that apply to all login profiles, including |
|
|
enabling Lightweight Directory Access Protocol (LDAP) |
|
|
server authentication and customizing the account security |
|
|
level. |
|
|
|
Alerts |
Configure remote alerts and |
You can configure the Remote Supervisor Adapter II to |
|
remote alert recipients |
generate and forward alerts for a number of different |
|
|
events. On the Alerts page, you can configure the alerts |
|
|
that are monitored and the recipients that are notified. |
|
|
|
|
Configure local events |
You can set the local events that are monitored by the |
|
|
Remote Supervisor Adapter II, for which notifications are |
|
|
sent to the IBM Director console. |
|
|
|
|
Configure alert settings |
You can establish global settings that apply to all remote |
|
|
alert recipients, such as the number of alert retries and the |
|
|
delay between the retries. |
|
|
|
Serial Port |
Configure the Remote Supervisor |
From the Serial Port page, you can configure the serial |
|
Adapter II serial ports1 and |
ports1 and modem settings2 that are used by the Remote |
|
modem settings2 |
Supervisor Adapter II. You can also configure the serial |
|
|
redirect and command-line interface (CLI) settings.1 |
|
|
|
Port assignments |
Change the port numbers of the |
From the Port Assignments page, you can change the port |
|
Remote Supervisor Adapter II |
numbers of Remote Supervisor Adapter II protocols (for |
|
protocols. |
example, HTTP, HTTPS, Telnet, and SNMP). |
|
|
|
Network Interfaces |
Configure the network interfaces |
From the Network Interfaces page, you can configure |
|
of the Remote Supervisor Adapter |
network-access settings for the Ethernet connection on the |
|
II |
Remote Supervisor Adapter II. The Remote Supervisor |
|
|
Adapter II Ethernet connection enables remote access |
|
|
using a Web browser. You can also configure the |
|
|
point-to-point protocol (PPP) access through the Remote |
|
|
Supervisor Adapter II serial port. |
|
|
|
Network Protocols |
Configure the network protocols of |
You can configure Simple Network Management Protocol |
|
the Remote Supervisor Adapter II |
(SNMP), Domain Name System (DNS), and Simple Mail |
|
|
Transfer Protocol (SMTP) settings that are used by the |
|
|
Remote Supervisor Adapter II from the Network Protocols |
|
|
page. You can also configure LDAP parameters. |
|
|
|
Chapter 2. Opening and using the Web interface 9

Table 1. Remote Supervisor Adapter II actions (continued)
Link |
Action |
Description |
|
|
|
Security |
Configure the Secure Sockets |
You can enable or disable SSL and manage the SSL |
|
Layer (SSL) |
certificates that are used. You can also enable or disable |
|
|
whether an SSL connection is used to connect to an LDAP |
|
|
server. |
|
|
|
Configuration File |
Back up and restore the Remote |
You can back up, modify, and restore the configuration of |
|
Supervisor Adapter II configuration |
the Remote Supervisor Adapter II, and view a |
|
|
configuration summary, from the Configuration File page. |
|
|
|
Restore Defaults |
Restore the Remote Supervisor |
Attention: When you click Restore Defaults, all of the |
|
Adapter II defaults |
modifications you made to the Remote Supervisor Adapter |
|
|
II are lost. |
|
|
You can reset the configuration of the Remote Supervisor |
|
|
Adapter II to the factory defaults. |
|
|
|
Restart ASM |
Restart the Remote Supervisor |
You can restart the Remote Supervisor Adapter II. |
|
Adapter II |
|
|
|
|
Log off |
Log off the Remote Supervisor |
You can log off your connection to the Remote Supervisor |
|
Adapter II |
Adapter II. |
|
|
|
1 This feature is available for the Remote Supervisor Adapter II SlimLine, except when the SlimLine is installed in any of the following servers:
v IBM xSeries 236
v IBM xSeries 260
v IBM xSeries 336
v IBM xSeries 346
v IBM xSeries 366
v IBM xSeries 460
v IBM System x3800
v IBM System x3850
v IBM System x3950
2 This feature is not available for the Remote Supervisor Adapter II SlimLine.
You can click the View Configuration Summary link, which is available on most pages, to quickly view the configuration of the Remote Supervisor Adapter II.
10 Remote Supervisor Adapter II SlimLine and Remote Supervisor Adapter II: User’s Guide

Chapter 3. Configuring the Remote Supervisor Adapter II
Use the links under ASM Control in the navigation pane to configure the Remote Supervisor Adapter II.
vFrom the System Settings page, you can:
–Set system information
–Select the operating system to support (Microsoft Windows or Linux)
Important: For the Remote Supervisor Adapter II to function correctly, the specified operating system must match the operating system of the server in which the Remote Supervisor Adapter II is installed.
-Select Linux before installing Remote Supervisor Adapter II software for Linux operating systems.
-Select Other before installing Remote Supervisor Adapter II software for Microsoft Windows and Novell Netware operating systems.
–Set server timeouts
–Set ASM date and time
vFrom the Login Profiles page, you can:
–Set login profiles to control access to the Remote Supervisor Adapter II
–Configure global login settings, such as the lockout period after unsuccessful login attempts
–Configure the account security level
vFrom the Alerts page, you can:
–Set integrated system management processor (ISMP) alert forwarding
–Configure remote alert recipients
–Set the number of remote alert attempts
–Select the delay between alerts
–Select which alerts will be sent and how they will be forwarded
vFrom the Serial Port page, you can:
–Configure the serial ports of the Remote Supervisor Adapter II
–Configure advanced modem settings (not available for the Remote Supervisor Adapter II SlimLine)
–Set up serial redirection
Note: Setting up serial redirection is not available for the Remote Supervisor
Adapter II SlimLine in some server models.
vFrom the Port Assignments page, you can change the port numbers of Remote Supervisor Adapter II services.
vFrom the Network Interfaces page, you can:
–Set up the Ethernet connection for the Remote Supervisor Adapter II
–Set up a PPP over serial port connection (not available for the Remote Supervisor Adapter II SlimLine)
vFrom the Network Protocols page, you can:
–Configure SNMP setup
–Configure DNS setup
–Telnet protocol
–Configure SMTP setup
–Configure LDAP setup
© Copyright IBM Corp. 2003, 2007 |
11 |

–TCP command mode protocol
–Service location protocol
v From the Security page, you can install and configure the Secure Sockets Layer (SSL) settings.
vFrom the Configuration File page, you can back up, modify, and restore the configuration of the Remote Supervisor Adapter II.
vFrom the Restore Defaults page, you can reset the Remote Supervisor Adapter II configuration to the factory defaults.
vFrom the Restart ASM page, you can restart the Remote Supervisor Adapter II.
Setting system information
To set the Remote Supervisor Adapter II system information, complete the following steps:
1.Log in to the Remote Supervisor Adapter II where you want to set the system information. For more information, see Chapter 2, “Opening and using the Web interface,” on page 5.
2.In the navigation pane, click System Settings. A page similar to the one in the following illustration is displayed.
Note: The available fields in the System Settings page are determined by the accessed remote server.
3.In the Name field in the ASM Information area, type the name of the Remote Supervisor Adapter II.
Use the Name field to specify a name for the Remote Supervisor Adapter II in this server. The name is included with e-mail, SNMP, and alphanumeric pager alert notifications to identify the source of the alert.
Notes:
a.If you plan to set up an SMTP server for e-mail alert notifications, make sure that the name in the Name field is valid as part of an e-mail address (for example, there are no spaces).
b.Your Remote Supervisor Adapter II name (in the Name field) and the IP host name of the Remote Supervisor Adapter II (in the Host Name field on the Network Interfaces page) do not automatically share the same name because the ASM Name field is limited to 15 characters. The Host Name
12 Remote Supervisor Adapter II SlimLine and Remote Supervisor Adapter II: User’s Guide
field can contain up to 63 characters. To minimize confusion, set the ASM Name field to the nonqualified portion of the IP host name. The nonqualified IP host name consists of up to the first period of a fully qualified IP host name. For example, for the fully qualified IP host name asmcard1.us.company.com, the nonqualified IP host name is asmcard1. For information about your host name, see “Configuring an Ethernet connection to the Remote Supervisor Adapter II” on page 39.
4.In the ID number field, assign the Remote Supervisor Adapter II a unique identification number.
5.In the Contact field, type the contact information. For example, you can specify the name and phone number of the person to contact if there is a problem with this server. You can type a maximum of 47 characters in this field.
6.In the Location field, type the location of the server. Include in this field sufficient detail to quickly locate the server for maintenance or other purposes. You can type a maximum of 47 characters in this field.
7.In the HOST O/S menu, click the type of operating system that is running on the server.
Important: For the Remote Supervisor Adapter II to function correctly, the specified operating system must match the operating system of the server in which the Remote Supervisor Adapter II is installed.
vSelect Linux before installing Remote Supervisor Adapter II software for Linux operating systems.
vSelect Other before installing Remote Supervisor Adapter II software for Microsoft Windows and Novell Netware operating systems.
8.Scroll to the bottom of the page and click Save.
Setting server timeouts
To set your server timeout values, complete the following steps:
1.Log in to the Remote Supervisor Adapter II where you want to set the server timeouts. For more information, see Chapter 2, “Opening and using the Web interface,” on page 5.
2.In the navigation pane, click System Settings and scroll down to the Server Timeouts area.
A page similar to the one in the following illustration is displayed.
You can set the Remote Supervisor Adapter II to respond automatically to the following events:
vHalted power-on self-test
vHalted operating system
vFailure to load operating system
vPower-off delay to shut down operating system
Chapter 3. Configuring the Remote Supervisor Adapter II 13
v Nonmaskable interrupt
3.Enable the server timeouts that correspond to the events that you want the Remote Supervisor Adapter II to respond to automatically.
POST watchdog
Use the POST watchdog field to specify the number of minutes that the Remote Supervisor Adapter II will wait for the server to complete a power-on self-test (POST). If the server that is being monitored fails to complete a POST within the specified time, the Remote Supervisor Adapter II generates a POST timeout alert and automatically restarts the server. The POST watchdog is then automatically disabled until the operating system is shut down and the server is power cycled (or until the operating system starts and the software is successfully loaded).
Note: Power cycling means that the server is turned off and then immediately turned on.
To set the POST timeout value, select a number from the menu. To turn off this option, select Disabled.
Note: If the POST Time-out check box is selected in the Remote Alerts area of the Remote Alerts page, the Remote Supervisor Adapter II attempts to forward the alert to all configured remote alert recipients. Also, the POST watchdog requires a specially constructed POST routine that is available only on specific IBM servers. If this routine does not exist on your server, all settings in this field are ignored.
For more information about POST routines, see the documentation that comes with your server.
O/S watchdog
Use the O/S watchdog field to specify the number of minutes between checks of the operating system by the Remote Supervisor Adapter II. If the operating system fails to respond to one of these checks, the Remote Supervisor Adapter II generates an O/S timeout alert and restarts the server. After the server is restarted, the O/S watchdog is disabled until the operating system is shut down and the server is power cycled.
To set the O/S watchdog value, select a time interval from the menu. To turn off this watchdog, select Disabled. To capture operating-system-failure screens, you must enable the watchdog in the O/S watchdog field and select the O/S Time-out check box in the Remote Alerts area of the Alerts page.
Notes:
a.The O/S watchdog feature requires that the Remote Supervisor Adapter II software be installed on the server. For information about installing this software, see the Remote Supervisor Adapter II Installation Guide.
b.If the O/S Time-out check box is selected in the Remote Alerts area of the Alerts page, the Remote Supervisor Adapter II will attempt to send an alert to all configured remote alert recipients.
Loader watchdog
Use the Loader watchdog field to specify the number of minutes that the Remote Supervisor Adapter II waits between the completion of
14 Remote Supervisor Adapter II SlimLine and Remote Supervisor Adapter II: User’s Guide
POST and the starting of the operating system. If this interval is exceeded, the Remote Supervisor Adapter II generates a loader timeout alert and automatically restarts the server. After the server is restarted, the loader timeout is automatically disabled until the operating system is shut down and the server is power cycled (or until the operating system starts and the software is successfully loaded).
To set the loader timeout value, select the time limit that the Remote Supervisor Adapter II will wait for the operating-system startup to be completed. To turn off this watchdog, select Disabled.
Notes:
a.Before you start (boot) an operating system that does not have the Remote Supervisor Adapter II software installed (this can also include using a flash update diskette), make sure to select Disabled in the Loader watchdog field to prevent an unwanted restart of your server.
b.If the Loader Time-out check box is selected in the Remote Alerts area of the Alerts page, the Remote Supervisor Adapter II will send an alert to all configured remote alert recipients.
Power off delay
Attention: Read the following information to prevent the loss of data or damage to data when you perform a remote shutdown of your operating system:
If the Windows 2000, Windows Server 2003, Red Hat Linux, SUSE Linux, or Novell NetWare operating system is installed on your server, you have to install only the Remote Supervisor Adapter II software to support remote operating-system shutdown.
Note: If the value in the Power off delay field is less than 45 seconds, the Remote Supervisor Adapter II software will adjust the value to 45 seconds when it is loaded. You can decrease the power-off delay value after the server has started, but the Remote Supervisor Adapter II software will reset it to 45 seconds on the next server restart. The Remote Supervisor Adapter II software will not change a power-off delay value that is 45 seconds or greater.
Use the Power off delay field to specify the number of minutes that the Remote Supervisor Adapter II will wait for the operating system to shut down before turning off the server.
Shut down your server to determine how long it takes to shut down. Add a time buffer to that value and use it as your power-off delay setting to ensure that the operating system has time for an orderly shutdown before power is removed from the server.
To set the power-off delay value, select the time from the menu.
NMI reset delay
Use the NMI reset delay field to specify the length of time, in minutes, that the Remote Supervisor Adapter II waits to automatically restart the server after a nonmaskable interrupt (NMI) is triggered. A nonmaskable interrupt usually indicates a critical error such as a hardware fault. A nonmaskable interrupt usually signals a parity error in the memory subsystem.
Chapter 3. Configuring the Remote Supervisor Adapter II 15

To disable the automatic server restart after a nonmaskable interrupt, select Disabled.
4. Scroll to the bottom of the page and click Save.
Setting the date and time
The Remote Supervisor Adapter II contains its own real-time clock to time stamp all events that are logged in the event log. Alerts that are sent by e-mail, LAN, and SNMP use the real-time clock setting to time stamp the alerts. The clock settings support Greenwich mean time (GMT) offsets and daylight saving time (DST) for added ease-of-use for administrators who are managing systems remotely over different time zones. You can remotely access the event log even if the server is turned off or disabled.This facilitates immediate problem determination and resolution.
To verify the date and time settings of the Remote Supervisor Adapter II, complete the following steps:
1.Log in to the Remote Supervisor Adapter II where you want to set the ASM date and time values. For more information, see Chapter 2, “Opening and using the Web interface,” on page 5.
2.In the navigation pane, click System Settings and scroll down to the ASM Date and Time area, which shows the date and time when the Web page was generated.
3.To override the date and time settings and to enable daylight saving time (DST) and Greenwich mean time (GMT), click Set ASM Date and Time. A page similar to the one in the following illustration is displayed.
4.In the Date field, type the numbers of the current month, day, and year.
5.In the Time field, type the numbers that correspond to the current hour, minutes, and seconds in the applicable entry fields. The hour (hh) must be a number from 00 to 23 as represented on a 24-hour clock. The minutes (mm) and seconds (ss) must be numbers from 00 to 59.
6.In the GMT offset field, type the number that specifies the offset, in hours, from Greenwich mean time (GMT), corresponding to the time zone where the server is located.
7.Select or clear the Automatically adjust for daylight saving changes check box to specify whether the Remote Supervisor Adapter II clock will automatically adjust when the local time changes between standard time and daylight saving time.
8.Click Save.
16 Remote Supervisor Adapter II SlimLine and Remote Supervisor Adapter II: User’s Guide

Synchronizing clocks in a network
The Network Time Protocol (NTP) provides a way to synchronize clocks throughout a computer network, enabling any NTP client to obtain the correct time from an NTP server.
The Remote Supervisor Adapter II NTP feature provides a way to synchronize the Remote Supervisor Adapter II real-time clock with the time that is provided by an NTP server. You can specify the NTP server that is to be used, specify the frequency with which the Remote Supervisor Adapter II will be synchronized, enable or disable the NTP feature, and request an immediate time synchronization.
The NTP feature does not provide the extended security and authentication that are provided through encryption algorithms in NTP Version 3 and NTP Version 4. The Remote Supervisor Adapter II NTP feature supports only the Simple Network Time Protocol (SNTP) without authentication.
To set up the Remote Supervisor Adapter II NTP feature settings, complete the following steps:
1.Log in to the Remote Supervisor Adapter II on which you want to synchronize the clocks in the network. For more information, see Chapter 2, “Opening and using the Web interface,” on page 5.
2.In the navigation pane, click System Settings and scroll down to the Network Time Protocol (NTP) area. A page similar to the one in the following illustration is displayed.
3.You can select from the following setttings:
NTP auto-synchronization service
Use this selection to enable or disable automatic synchronization of the ASM clock with an NTP server.
NTP server host name or IP address
Use this field to specify the name of the NTP server to be used for clock synchronization.
NTP update frequency
Use this field to specify the approximate interval (in minutes) between synchronization requests.
Synchronize Clock Now
Click this button to request an immediate synchronization instead of waiting for the interval time to lapse.
4.Click Save.
Chapter 3. Configuring the Remote Supervisor Adapter II 17
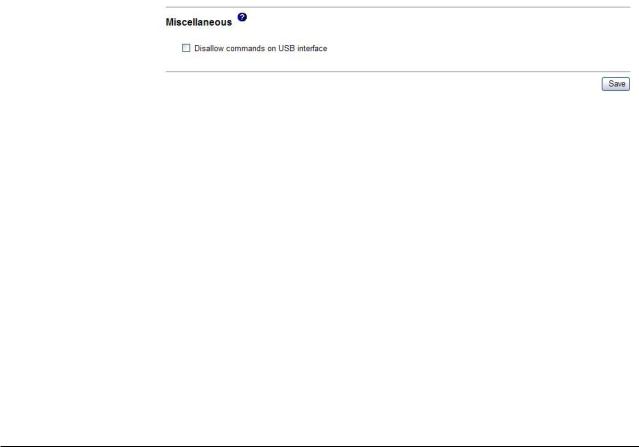
Disabling the USB device driver interface
If you want to prevent any application that is running on the server from requesting the Remote Supervisor Adapter II to perform tasks, you must disable the USB device driver interface. To disable the USB device driver interface, complete the following steps.
1.Log in to the Remote Supervisor Adapter II on which you want to disable the USB device driver interface. For more information, see Chapter 2, “Opening and using the Web interface,” on page 5.
2.In the navigation pane, click System Settings and scroll down to the Miscellaneous area. A page similar to the one in the following illustration is displayed.
3.Select the Disallow commands on USB interface check box to disable the USB device driver interface. Selecting this option does not affect the USB remote control functions (for example, keyboard, mouse, and mass storage). When you disable the USB device driver interface, the in-band system-management applications such as the management processor command-line interface (MPCLI) and Advanced Settings Utility (ASU) are disabled. If you try to use system-management applications while the device driver interface is disabled, there might be unwanted consequences.
4.Click Save.
Important: If you disable the USB device driver interface, you cannot perform an in-band update of the Remote Supervisor Adapter II firmware using the Linux or Windows flash utilities. If the USB device driver interface is disabled, use the Firmware Update option on the Remote Supervisor Adapter II Web interface to update the firmware. For more information, see “Updating firmware” on page 88.
To enable the USB device driver interface after it has been disabled, clear the Disallow commands on USB interface check box and then restart the server so that the USB device driver is loaded and initialized correctly.
Creating a login profile
Use the Login Profiles table to view, configure, or change individual login profiles. Use the links in the Login ID column to configure individual login profiles. You can define up to 12 unique profiles. Each link in the Login ID column is labeled with the configured login ID for that particular profile. If you have not configured a profile, the name of the link, by default, will be ~ not used ~.
To configure a login profile, complete the following steps:
1.Log in to the Remote Supervisor Adapter II where you want to create a login profile. For more information, see Chapter 2, “Opening and using the Web interface,” on page 5.
2.In the navigation pane, click Login Profiles. The Login Profiles page displays each login ID, the login access level, and the password expiration information, as shown in the following illustration.
18 Remote Supervisor Adapter II SlimLine and Remote Supervisor Adapter II: User’s Guide

Note: By default, the Remote Supervisor Adapter II is configured with one login profile that enables remote access using a login user ID of USERID and a password of PASSW0RD (the 0 is a zero, not the letter O). To avoid a potential security exposure, change this default login profile during the initial setup of the Remote Supervisor Adapter II.
3.Click one of the unused login profile links. An individual profile page similar to the one in the following illustration is displayed.
4.In the Login ID field, type the name of the profile.
You can type a maximum of 15 characters in the Login ID field. Valid characters are uppercase and lowercase letters, numbers, periods, and underscores.
Chapter 3. Configuring the Remote Supervisor Adapter II 19

Note: This login ID is used to grant remote access to the Remote Supervisor
Adapter II.
5.In the Password field, assign a password to the login ID.
A password must contain at least five characters, one of which must be a nonalphabetic character. Null or empty passwords are accepted.
Note: This password is used with the login ID to grant remote access to the Remote Supervisor Adapter II.
6.In the Confirm Password field, type the password again.
7.In the Authority level area, select one of the following options to set the access rights for this login ID:
Supervisor
The user has no restrictions.
Read Only
The user has read-only access only and cannot perform actions such as file transfers, power and restart actions, or remote control functions.
Custom
If you select the Custom option, you must select one or more of the following custom authority levels:
v User Account Management: A user can add, modify, or delete users and change the global login settings in the Login Profiles page.
vRemote Console Access: A user can access the remote console.
vRemote Console and Virtual Media Access: A user can access both the remote console and the virtual media feature.
vRemote Server Power/Restart Access: A user can access the power on and restart functions for the remote server. These functions are available in the Power/Restart page.
vAbility to Clear Event Logs: A user can clear the event logs. Everyone can look at the event logs, but this particular permission is required to clear the logs.
vAdapter Configuration - Basic: A user can modify configuration parameters in the System Settings and Alerts pages.
vAdapter Configuration - Networking & Security: A user can modify configuration parameters in the Security, Network Protocols, Network Interface, Port Assignments, and Serial Port pages.
vAdapter Configuration (Advanced): A user has no restrictions when configuring the adapter. In addition, the user is said to have administrative access to the Remote Supervisor Adapter II, meaning that the user can also perform the following advanced functions: firmware updates, PXE network boot, restore adapter factory defaults, modify and restore adapter configuration from a configuration file, and restart and reset the adapter.
Note: To return the login profile to the factory defaults, click Clear
Login Profiles.
8. Click Save to save your login ID settings.
Configuring the global login settings
Complete the following steps to set conditions that apply to all login profiles for the Remote Supervisor Adapter II:
20 Remote Supervisor Adapter II SlimLine and Remote Supervisor Adapter II: User’s Guide
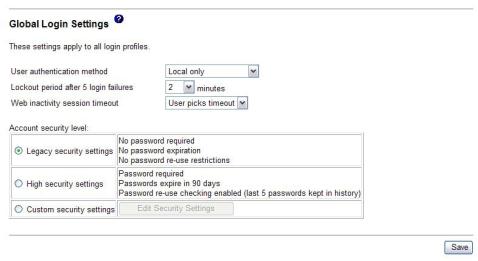
1.Log in to the Remote Supervisor Adapter II for which you want to set the global login settings. For more information, see Chapter 2, “Opening and using the Web interface,” on page 5.
2.In the navigation pane, click Login Profiles.
3.Scroll down to the Global Login Settings area. A page similar to the one in the following illustration is displayed.
4.In the User authentication method field, specify how users who are attempting to log in are authenticated. Select one of the following authentication methods: v Local only: Users are authenticated by a search of a table that is local to the
Remote Supervisor Adapter II. If there is no match on the user ID and password, access is denied. Users who are successfully authenticated are assigned the authority level that is configured in “Creating a login profile” on page 18.
vLDAP only: The Remote Supervisor Adapter II attempts to authenticate the user by using the LDAP server. Local user tables on the Remote Supervisor Adapter II are never searched with this authentication method.
vLocal first, then LDAP: Local authentication is attempted first. If local authentication fails, LDAP authentication is attempted.
vLDAP first, then Local: LDAP authentication is attempted first. If LDAP authentication fails, local authentication is attempted.
5.In the Lockout period after 5 login failures field, specify how long, in minutes, the Remote Supervisor Adapter II will prohibit remote login attempts, if more than five sequential failures to log in remotely are detected.
6.In the Web inactivity session timeout field, specify how long, in minutes, the Remote Supervisor Adapter II will wait before disconnecting an inactive Web session. Select No timeout to disable this feature. Select User picks timeout if the user will select the timeout period during the login process.
7.(Optional) In the Account security level area, select a password security level. The Legacy security settings and High security settings set the default values as indicated in the requirement list.
8.To customize the security setting, select Custom security settings and then click Edit Security Settings. A page similar to the one in the following illustration is displayed.
Chapter 3. Configuring the Remote Supervisor Adapter II 21

You can view and change the account security management configuration on the Custom Security Settings page. When you change the User login password required setting, you must also have a password, to be consistent with the requirement.
User login password required
Use this field to indicate whether a login ID with no password is allowed.
Number of previous passwords that cannot be used
Use this field to indicate the number of previous passwords that cannot be reused. Up to five previous passwords can be compared. Select 0 to allow the reuse of all previous passwords.
Maximum Password Age
Use this field to indicate the maximum password age that is allowed before the password must be changed. Values of 0 to 365 days are supported. Select 0 to disable the password expiration checking.
9. Click Save.
Configuring remote alert settings
Note: For the Remote Supervisor Adapter II SlimLine, the configuring remote alert settings feature is available only when using LAN-based alert functionality.
You can configure remote alert recipients, the number of alert attempts, incidents that trigger remote alerts, and local alerts from the Alerts link on the navigation pane.
After you configure a remote alert recipient, the Remote Supervisor Adapter II will send an alert to that recipient. The alert is sent through a serial connection or a network connection, a numeric pager, or an alphanumeric pager when any event selected from the Monitored Alerts group occurs. This alert contains information about the nature of the event, the time and date of the event, and the name of the system that generated the alert.
The Remote Supervisor Adapter II offers alert redundancy for several managed systems at the same location. It sends alerts only once per connection type, even when there is more than one active LAN or serial connection. However, if one connection device fails, all other interconnected devices route the alerts to the next available connection.
Notes:
1.If the SNMP Agent or SNMP Traps fields are not set to Enabled, no SNMP traps are sent. For information about these fields, see “Configuring SNMP” on page 43.
22 Remote Supervisor Adapter II SlimLine and Remote Supervisor Adapter II: User’s Guide
Loading...