


i
Note: Before |
using this information and the product it |
supports, |
be |
sure to read the general information under |
“Safety |
Information” on page viii and “Notices” on |
page 160. |
For |
ergonomicsOnlineinformation, see the |
User's |
Guide. |
|
|
|
First |
Edition |
(August |
1999) |
|
|
|
|
|
|
|
|
|
|
|
|
|
|
|
|
||||||
The |
following |
paragraph |
does |
not |
apply |
to |
the |
United |
Kingdom |
or |
any |
country |
where |
such |
provisions |
are |
|
|
|
|
|
||||
inconsistent |
with local law: |
|
|
|
|
|
|
|
|
|
|
|
|
|
|
|
|
|
|
|
|||||
INTERNATIONAL |
BUSINESS |
MACHINES |
CORPORATION |
PROVIDES THIS PUBLICATION "AS IS" WITHOUT ANY |
|
|
|||||||||||||||||||
WARRANTY OF ANY KIND, EITHER EXPRESS OR |
IMPLIED, |
INCLUDING, BUT |
NOT |
LIMITED |
TO, |
THE |
LIMITED |
|
|
||||||||||||||||
WARRANTIES |
OF MERCHANTABILITY OR FITNESS FOR A PARTICULAR PURPOSE. Some states do not |
allow |
|
|
|||||||||||||||||||||
disclaimers |
or |
express |
or |
implied warranties |
in |
certain |
transactions; |
therefore, this statement may |
not |
apply to you |
|||||||||||||||
This publication could include technical inaccuracies or typographical errors. |
Changes are periodically made to the |
||||||||||||||||||||||||
information |
herein; |
these |
changes |
will be |
incorporated |
in |
new |
editions |
of |
the |
publication. IBM may make improvements |
||||||||||||||
or changes in the products or the |
programs |
described |
in this |
publication |
at |
any time. |
|
|
|||||||||||||||||
Requests |
for technical information about IBM products should be made to your IBM Authorized Dealer or your IBM |
||||||||||||||||||||||||
Marketing |
Representative. |
|
|
|
|
|
|
|
|
|
|
|
|
|
|
|
|
|
|
||||||
|
Copyright |
International |
Business |
Machines |
Corporation |
1999. All rights reserved. |
|
Note |
to |
US |
Government |
|
|
||||||||||||
Users |
— |
Documentation related to restricted rights — Use, duplication, or disclosure is subject |
to |
restrictions s |
|||||||||||||||||||||
in |
GSA |
ADP |
Schedule |
Contract |
with |
IBM |
Corp. |
|
|
|
|
|
|
|
|
|
|
|
|
|
|||||

Thank You for Selecting an IBM ThinkPad 390X Computer
We at |
IBM |
have |
developed |
this ThinkPad |
computer |
to meet both your technical requirements |
and your |
|
tations. |
To |
help |
us continue |
to build products that address your mobile computing needs, |
please take |
|||
|
|
|
|
complete the |
ThinkPad |
Registration. |
|
|
|
|
|
|
|
|
|
|
|
Copyright IBM Corporation 1999 |
iii |
Functional Highlights
Functional Highlights
All-in-one design |
with |
core |
technology |
|
|
|
The |
well-balanced, |
|
|
|
|
|
|||||||||||||
|
|
|
all-in-one design |
of |
the ThinkPad 390X computer brings |
|
||||||||||||||||||||
|
|
|
ease-of-use to |
your |
computing |
needs. |
|
|
|
|
|
|
|
|||||||||||||
High-speed |
processor |
|
|
The |
Intelhigh-speed processor enables |
|
|
|||||||||||||||||||
|
|
|
high-speed data processing and provides advanced per- |
|||||||||||||||||||||||
|
|
|
formance. |
|
|
|
|
|
|
|
|
|
|
|
|
|
|
|
|
|
|
|
|
|||
Large-capacity |
hard |
disk |
drive |
|
|
The |
large-capacity |
hard |
disk |
drive |
|
|||||||||||||||
|
|
|
can |
respond |
to |
a |
|
wide variety of your business demands. |
||||||||||||||||||
Large |
color |
|
LCD |
|
The |
large |
TFT |
(thin-film transistor) display provides |
||||||||||||||||||
|
|
|
clear |
and |
brilliant |
text |
and |
graphics. |
|
|
|
|
|
|
||||||||||||
Nickel |
metal |
hydride or lithium-ion |
battery |
pack |
|
|
|
The |
|
large- |
|
|
|
|
|
|
||||||||||
|
|
|
capacity battery pack extends the operating time of your |
|||||||||||||||||||||||
|
|
|
computer, further |
enhancing |
its |
portability. |
|
|
|
|
||||||||||||||||
Audio |
with |
|
3D |
Stereo |
|
Sound |
|
|
Your computer is equipped with |
|
|
|||||||||||||||
|
|
|
internal |
audio |
record and playback capabilities including |
|||||||||||||||||||||
|
|
|
3D |
audio from just two speakers. When you enable the |
||||||||||||||||||||||
|
|
|
3D |
stereo |
feature, |
sounds |
|
will appear |
to |
be |
generated al |
|||||||||||||||
|
|
|
around |
you, |
even |
though |
only |
two |
speakers |
|
are |
used. |
||||||||||||||
|
|
|
The |
audio feature supports the following: |
|
|
|
|
|
|||||||||||||||||
|
|
|
Ÿ |
Wave |
audio |
recording |
and |
playback |
of |
up |
to |
16 |
bits, |
|||||||||||||
|
|
|
|
stereo, |
and |
48 |
KHz |
sampling. |
|
|
|
|
|
|
|
|
|
|||||||||
|
|
|
Ÿ |
DOS |
games |
using |
the |
Sound |
|
Blaster |
Pro** |
interface. |
|
|||||||||||||
|
|
|
For |
more |
information |
on |
|
using |
|
the |
audio |
function, |
see |
the |
||||||||||||
|
|
|
Online |
User's |
Guide. |
|
|
|
|
|
|
|
|
|
|
|
|
|
|
|
||||||
ThinkPad |
Modem |
|
|
The ThinkPad modem enables you to send or |
|
|||||||||||||||||||||
|
|
|
receive |
data |
and |
faxes |
over |
a |
telephone |
line. |
|
|||||||||||||||
|
|
|
For |
more |
information |
on |
|
using |
|
the |
ThinkPad |
modem, |
see |
|
||||||||||||
|
|
|
theOnline User's Guide. |
|
|
|
|
|
|
|
|
|
|
|
|
|
|
|||||||||
TrackPoint |
with |
Enhanced |
Controls |
|
|
Your |
computer |
has |
an |
|
|
|
|
|
||||||||||||
|
|
|
enhanced TrackPoint function that enables you to make |
|
||||||||||||||||||||||
|
|
|
selections |
merely |
by |
|
pressing |
on |
the |
TrackPoint. |
A new |
|||||||||||||||
iv
|
|
|
Functional Highlights |
|
|
|
|
center |
button |
converts the |
TrackPoint |
into |
a |
scroll control- |
|
ling device |
or |
a magnifying |
glass on |
the |
screen. |
||
For more information on using the TrackPoint, see |
|||||||
“TrackPoint” |
on |
page 11. |
|
|
|
|
|
PC Card Support |
Your |
computer provides two PC Card slots that |
|||||
accept |
a |
16–bit PC Card, CardBus Card, |
and |
Zoomed |
|||
Video |
Card. |
|
|
|
|
|
|
For more information on installing PC Cards, see “Inserting a PC Card” on page 79.
v
About This Book
About This Book
This book |
contains |
information |
that will help you operate the IBM |
ThinkPad 390X computer. Be sure toThinkPare d 390Xthe Setup |
|||
Guide and |
Chapter |
1 of this |
book before using the computer. |
Chapter 1. "Getting Familiar with Your Computer," acquaints you
with the basic features of your computer
Chapter 2. "Extending the Features of Your Computer," provides information on installing options and using your computer's high-technology features.
Chapter 3.
"Protecting Your Computer," provides information on using passwords, and using locks.
Chapter 4. "Solving Computer Problems," describes what to do when you have a computer problem. The chapter includes a troubleshooting guide and information on how to recover lost or damaged software.
Chapter 5. "Getting Service," describes various options of IBM's support and service.
Appendix |
A, |
Features |
and |
Specifications |
describes |
the |
features |
|||||
and |
specifications |
associated |
with |
your |
computer, |
including informa- |
||||||
tion |
on |
power |
cords. |
|
|
|
|
|
|
|
||
Appendix |
B, |
Product |
Warranties |
and |
Notices |
|
contains |
the |
war- |
|||
ranty statements |
for |
your computer |
and |
notices |
for |
this book. |
||||||
The |
book |
concludes |
withindex an. |
|
|
|
|
|
|
|||
vi

About This Book
Icons Used in This Book
For procedures or information unique to the operating system installed in your computer:
Information for Microsoft Windows 98 users.
WIN
98
Information for Microsoft Windows NT users.
WIN
NT
Information for Microsoft Windows 95 users.
WIN
95
Information for Microsoft Windows 3.11 users.
WIN
3.1
Information for IBM PC DOS users.
DOS
OS/2 |
Information for IBM Operating System/2 (OS/2) |
|
users. |
||
|
vii

Safety Information
Safety Information
Electrical Safety Notice
DANGER
Electrical |
current |
from power, telephone, and communi- |
|
|
|||||||||||
cation |
cables |
is |
|
hazardous. Reduce the risk of |
fire |
and |
|||||||||
electric |
shock |
by |
always |
|
following |
basic |
safety |
precau- |
|
||||||
tions, |
including |
the |
following: |
|
|
|
|
|
|
||||||
Ÿ |
Do |
not |
use |
|
your |
computer in |
or near |
water. |
|
|
|||||
Ÿ |
During |
electrical |
storms, |
do |
not |
connect |
the |
cable |
to |
||||||
|
or |
disconnect |
|
it |
from |
the |
telephone |
outlet on |
the |
|
|||||
|
wall. |
|
|
|
|
|
|
|
|
|
|
|
|
|
|
To |
avoid |
shock |
hazard, |
connect |
and |
disconnect |
cables |
|
|||||||
as |
shown |
below |
|
when |
installing, |
moving, |
or |
opening the |
|||||||
covers |
of |
this |
|
product |
or |
attached |
devices. |
The |
3–pin |
|
|||||
power |
|
cord |
must |
be |
used |
with |
a |
properly grounded |
|
|
|||||
outlet. |
|
|
|
|
|
|
|
|
|
|
|
|
|
||
|
|
|
|
|
|
|
|
|
|
|
|
|
|
|
|
viii

To Connect
Turn everything OFF.
First, attach all cables to devices.
Attach the signal cables to the receptacles.
Attach the power cord to an outlet.
Turn the device ON.
Safety Information
To Disconnect
Turn everything OFF.
First, remove the power cord from the outlet.
Remove the signal cables from the receptacles.
Remove all cables from device.
DANGER
Do |
not |
disassemble, |
incinerate, |
or |
short-circuit |
the |
|
||||
rechargeable battery pack. Do not |
put |
it |
in |
trash |
that is |
||||||
disposed |
of in |
landfills. |
Dispose |
of |
it |
as |
required |
by |
|||
local |
ordinances |
or regulations. |
In |
the |
United |
States, |
call |
||||
IBM |
at |
1-800-IBM-4333 |
for |
information |
on |
disposal. |
|
||||
|
|
|
|
|
|
|
|
|
|
|
|
ix

Safety Information
|
DANGER |
|
|
|
|
|
|
|
|
|
|
|
|
|
|
|
|
|
|
|
|
|
|
|
|
There |
is |
a |
danger |
of |
an |
explosion |
if |
the |
battery |
is |
incor- |
|
|||||||||||
|
rectly |
replaced. |
|
|
|
|
|
|
|
|
|
|
|
|
|
|
|
|
|
|||||
|
The |
lithium |
battery |
(IBM |
P/N |
02K6502 |
UL-recognized |
|
|
|
|
|
|
|||||||||||
|
component |
|
[file |
no. |
MH12210]) |
contains |
lithium |
and |
can |
|
|
|
|
|||||||||||
|
explode |
if |
it |
is |
not |
properly |
handled |
or |
|
disposed |
|
of. |
|
|
|
|||||||||
|
Replace |
only |
with |
|
a battery |
of |
|
the |
same |
type. |
|
|
|
|
|
|
||||||||
|
Do |
not: |
(1) |
throw |
or |
immerse |
|
it |
into |
water, |
(2) |
allow it |
to |
|||||||||||
|
heat |
to |
more |
than |
100°C |
(212°F), |
or |
(3) |
attempt |
to |
repair |
|
||||||||||||
|
or |
disassemble |
it. |
Dispose of |
it as |
required |
by |
local |
ordi- |
|
||||||||||||||
|
nances |
or |
regulations. |
|
|
|
|
|
|
|
|
|
|
|
|
|
|
|
||||||
|
|
|
|
|
|
|
|
|
|
|
|
|
|
|
|
|
|
|
|
|
|
|
|
|
|
CAUTION: |
|
|
|
|
|
|
|
|
|
|
|
|
|
|
|
|
|
|
|
|
|
|
|
|
The |
fluorescent |
|
lamp |
in |
the |
liquid |
crystal |
display |
(LCD) |
|
contains |
|
|
||||||||||
|
mercury. |
Do |
|
not |
put |
it |
in |
trash |
that |
is |
|
disposed |
|
of |
in |
landfills. |
|
|||||||
|
Dispose |
of |
it |
as |
required |
by |
local |
ordinances |
|
or |
regulations. |
|
|
|
||||||||||
|
The |
LCD |
is |
|
made |
of |
glass, |
and |
rough |
handling |
|
or |
dropping |
the |
|
|
|
|||||||
|
computer |
can |
cause |
the |
LCD |
to |
break. |
|
If |
the |
|
LCD |
breaks |
and |
|
|
|
|||||||
|
the |
internal |
|
fluid |
gets |
into |
your |
eyes |
or |
on |
your |
hands, |
imme- |
|
|
|||||||||
|
diately |
wash |
the |
affected |
areas |
with |
water |
|
for |
at |
least |
15 |
|
|
||||||||||
|
minutes; |
then |
get |
medical |
care |
if |
any |
symptoms are |
present |
|
|
|
||||||||||||
|
after |
washing. |
|
|
|
|
|
|
|
|
|
|
|
|
|
|
|
|
|
|
|
|||
Laser Compliance Statement |
|
|
|
|
|
|
|
|
|
|
|
|
|
|
|
|
|
|
|
|
|
|
||
|
The |
CD-ROM |
|
drive or DVD-ROM drive option of the ThinkPad 390X |
||||||||||||||||||||
|
computer is a laser product. The CD-ROM or DVD-ROM drive's clas- |
|||||||||||||||||||||||
|
sification |
label |
(shown |
below) |
is |
located |
on |
the |
top of the drive |
|||||||||||||||
|
CLASS |
1 |
LASER |
PRODUCT |
|
|
|
|
|
|
|
|
|
|
|
|
|
|
|
|||||
|
LASER |
KLASSE |
|
1 |
|
|
|
|
|
|
|
|
|
|
|
|
|
|
|
|
|
|
||
|
LUOKAN |
1 |
|
LASERLAITE |
|
|
|
|
|
|
|
|
|
|
|
|
|
|
|
|
||||
x
|
|
|
|
|
|
|
|
|
|
|
|
|
|
Safety |
Information |
|
|
|
|
|
|
|||
APPAREIL |
A |
LASER |
DE |
CLASSE |
1 |
|
|
|
|
|
|
|
|
|
|
|
|
|
|
|
||||
KLASS |
1 |
|
LASER |
APPARAT |
|
|
|
|
|
|
|
|
|
|
|
|
|
|
|
|
|
|
||
The |
CD-ROM |
or DVD-ROM drive |
is |
certified |
in |
the |
U.S. |
to |
conform |
|||||||||||||||
to the requirements of the Department |
of |
Health |
and |
Human |
Ser- |
|
||||||||||||||||||
vices |
|
21 |
Code |
of |
Federal |
Regulations |
(DHHS |
21 |
CFR) |
Subchapter |
J |
|||||||||||||
for |
Class |
1 |
|
laser |
products. |
|
|
|
|
|
|
|
|
|
|
|
|
|
||||||
In |
other |
countries, the drive is certified to |
conform to the |
r |
||||||||||||||||||||
ments |
of |
EN60825. |
|
|
|
|
|
|
|
|
|
|
|
|
|
|
|
|
|
|
||||
CAUTION: |
|
|
|
|
|
|
|
|
|
|
|
|
|
|
|
|
|
|
|
|
|
|
|
|
Do not |
|
open |
the |
CD-ROM |
or |
DVD-ROM |
drive; |
no |
user |
adjust- |
|
|
|
|
|
|
|
|
||||||
ments |
or |
serviceable parts |
are |
inside. |
|
|
|
|
|
|
|
|
|
|
|
|
|
|
||||||
Use |
of |
|
controls, |
|
adjustments, |
or |
the |
performance |
of |
procedures |
|
|
|
|
|
|
|
|
||||||
other than those specified may |
result |
in |
hazardous |
radiation |
|
|
|
|
|
|
|
|
||||||||||||
exposure. |
|
|
|
|
|
|
|
|
|
|
|
|
|
|
|
|
|
|
|
|
|
|
|
|
Class |
1 laser |
products |
are |
|
not |
considered |
to |
be |
hazardous. The |
|||||||||||||||
CD-ROM |
|
or |
DVD-ROM drive has an internal, Class 1, |
0.5-milliwatt, |
|
|||||||||||||||||||
aluminum |
gallium-arsenide |
laser |
|
that |
operates |
|
at |
a |
wavelength |
of |
|
|||||||||||||
760 |
to |
|
810 |
nanometers. The |
design |
|
of |
the laser |
system |
and |
the |
|
||||||||||||
CD-ROM |
|
or |
DVD-ROM |
drive |
ensures |
that |
there |
|
is |
no |
exposure |
to |
|
|||||||||||
laser radiation above a Class 1 level during normal operation, use maintenance, or servicing conditions.
xi
xii

Contents
Thank You |
for |
Selecting an IBM ThinkPad 390X Computer |
. iii |
Functional Highlights . . . . . . . |
. . . . . iv. . . . . . . |
||
About |
This |
Book. . . . . . . . . . . . . . . . . . . . . vi. . . . . . . |
|
Safety Information . . . . . . . . . . . . viii. . . . . . .
Electrical Safety Notice. . . . . . . . . . . . . . . . . .viii. . . .
Laser |
Compliance |
Statement. . . . . . . . . . . . . . . x. . . . |
||
Getting Familiar with Your Computer |
. . . . . . . . . . . . 1. . . |
|||
Identifying |
the |
Hardware .Features. . . . . . . . . . . . . .2 . . . |
||
Front |
View |
of |
the Computer. . . . . . . . . . . . . . . .2. . . . |
|
Rear View of the Computer. . . . . . . . . . . . . . . .5 . . . .
Bottom View of the Computer. . . . . . . . . . . . . . . 7. . . .
System Status Indicators. . . . . . . . . . . . . . . . . . 8. . . . .
Distinctive Functions of Your Computer. . . . . . . . . . . .11. .
Keyboard Functions . . . . . . . . . . . .11. . . . . .
UltraBay FX . . . . . . . . . . . . . 17. . . . . . .
ThinkPad Utility Programs. . . . . . . . . . . . . . . . 19. . . .
Online User's Guide. . . . . . . . . . . . . . . . . . .35. . . . .
Reinstalling Software. . . . . . . . . . . . 36. . . . . . .
ThinkPad Software Selections CD. . . . . . . . . . . . .36. .
Recovery CD . . . . . . . . . . . . . 36. . . . . . .
ConfigSafe . . . . . . . . . . . . . . 36. . . . . . .
ThinkPad Web Site or Bulletin . Board. . . . . . . . . . .37. .
Replacing the Battery. .Pack. . . . . . . . . . . . . . .38. . . .
Service Hints & Tips. . . . . . . . . . . . . . . . . . . .39. . . . .
Handling |
Your |
ThinkPad |
Computer. . . . . . . . . . . . .39. . |
|
ThinkPad Don'ts |
. . . . . . . . . . . . .39 . . . . . . |
|||
ThinkPad Do's |
. . . . . . . . . . . . . 41. . . . . . . |
|||
Carrying Your Computer. . . . . . . . . . . . . . . . .41. . . . |
||||
Cleaning |
Your |
Computer. . . . . . . . . . . . . . . . .42. . . . |
||
Extending Your Battery . Life. . . . . . . . . . . . . . 42. . . . |
||||
Getting Service |
. . . . . . . . . . . . .43 . . . . . . |
|||
For More Information. . . . . . . . . . . . . . . . . . 44. . . . . |
||||
Extending the |
Features |
of Your |
Computer |
. . . . . . . . .45. |
Customizing |
the |
TrackPoint. . . . . . . . . . . . . . . . .46. . . . |
||
Copyright IBM Corporation 1999 |
|
|
|
xiii |
Using the Press-to-Select Window. . . . . . . . . . . . .47. . |
|
|||||||||||
Using the Sensitivity Window. . . . . . . . . . . . . . .49. . . |
|
|||||||||||
Using |
the |
Scrolling |
Window. . . . . . . . . . . . . . . |
50. . . . |
|
|||||||
Increasing Memory . . . . . . . . . . . . .52 . . . . . . . |
||||||||||||
Creating |
the |
Hibernation |
Function. . . . . . . . . . . . .55 . . |
|
||||||||
Upgrading the Hard Disk. .Drive. . . . . . . . . . . . . |
57. . . . |
|
||||||||||
Replacing the UltraBay FX . Device. . . . . . . . . . . . .59. . . |
|
|||||||||||
Installing a Second Battery. .Pack. . . . . . . . . . . |
61. . . |
|
||||||||||
Installing a Second Hard Disk. .Drive. . . . . . . . . .61. . |
|
|||||||||||
Attaching an External Mouse, Keypad or .Keyboard. . . . . .63 |
|
|||||||||||
Attaching an External Mouse or Numeric Keypad. . . . . . |
63 |
|
||||||||||
Attaching an External Keyboard and. .Mouse. . . . . . . |
66. |
|
||||||||||
Disabling the |
|
TrackPoint. . . . . . . . . . . . . . . . .67. . . . |
|
|||||||||
Attaching |
an |
External |
|
Monitor. . . . . . . . . . . . . . . |
69. . . . |
|
||||||
Display |
Output |
Location. . . . . . . . . . . . . . . . .70. . . . |
|
|||||||||
Display Modes |
. . . . . . . . . . . . . 71. . . . . . . |
|||||||||||
Using the Dual Display Function. . . . . . . . . . . . . |
72. . . |
|
||||||||||
Attaching |
a |
Television |
to |
Your Computer. . . . . . . . . . . |
76. . |
|
||||||
Attaching |
a Printer. . . . . . . . . . . . . . . . . . . . |
78. . . . . . |
|
|||||||||
Inserting |
a |
PC |
Card. . . . . . . . . . . . . . . . . . . .79 . . . . . |
|
||||||||
Removing |
the |
PC |
Card. . . . . . . . . . . . . . . . . .80 . . . . |
|
||||||||
Using a Port Replicator. . . . . . . . . . . . . . . . . . |
82. . . . . |
|
||||||||||
Enabling the CardBus Sockets on the ThinkPad Port |
|
|
||||||||||
Replicator with |
Advanced |
Etherjet Feature (for Windows 98) |
83 |
|||||||||
Protecting |
Your |
Computer |
|
|
|
. . . . . . . . . . . . . . . . |
85. . . . |
|
||||
Using Passwords . . . . . . . . . . . . . 86 . . . . . . . |
||||||||||||
Setting |
a Password. . . . . . . . . . . . . . . . . . .88. . . . . |
|
||||||||||
Entering |
a Password. . . . . . . . . . . . . . . . . . |
90. . . . . |
|
|||||||||
Changing |
or |
Removing |
a Password. . . . . . . . . . . .91. . |
|
||||||||
Using Locks |
|
. . . . . . . . . . . . . . 93. . . . . . . . |
||||||||||
Using the Security .Screw. . . . . . . . . . . . . . . . .94. . . . |
|
|||||||||||
Solving |
Computer |
Problems |
|
|
|
. . . . . . . . . . . . . . . |
95. . . . |
|
||||
Frequently Asked Questions. . . . . . . . . . . . . . . . |
96. . . . |
|
||||||||||
Hints, |
Tips |
and |
|
Limitations. . . . . . . . . . . . . . . . 104. . . . . |
|
|||||||
Using a PC Card with the |
Port .Replicator. . . . . . . . 105. . |
|
||||||||||
Using |
the |
Network |
|
Feature in the Port. .Replicator. . . .105 |
|
|||||||
USB |
Connector |
Considerations. . . . . . . . . . . . . .106. . . |
|
|||||||||
Using a Second CardBus Card. . . . . . . . . . . . . .106. . . |
|
|||||||||||
Using |
an |
External |
Condenser |
Microphone. . . . . . . . . 106. . |
|
|||||||
xiv
Troubleshooting Guide . . . . . . . . . . . 107. . . . . . .
Troubleshooting Charts . |
. . . . . . . . . .108. . . . . . . |
||||
Error Codes |
or |
Messages. . . . . . . . . . . . . . . .109. . . . |
|||
No Error Codes or Messages. . . . . . . . . . . . . . 112. . . . |
|||||
Input Problems |
. . . . . . . . . . . . 113. . . . . . . |
||||
Suspend |
or |
Hibernation |
Problems. . . . . . . . . . . . 115. . . |
||
LCD Problems |
. |
. . . . . . . . . . . .117. . . . . . . |
|||
Indicator Problems . . . . . . . . . . . 118. . . . . . . |
|||||
Battery Problems |
. . |
. |
. . . . . . . . .118. . . . . . . |
||
CD-ROM Problems |
. . . . . . . . . . . 119. . . . . . . |
||||
Infrared Communication Problems. . . . . . . . . . . . 120. . . |
|||||
Audio Problems |
. . . . . . . . . . . . 121. . . . . . . |
||||
Universal Serial Bus (USB) Problems. . . . . . . . . . .121. . |
|||||
Modem Problems |
|
. . . . . . . . . . . .122. . . . . . . |
|||
PC Card |
Problems |
. . . . . . . . . . . . . . . . . . 123. . . . . . |
|||
Printer Problems . . . . . . . . . . . . 124. . . . . . . |
|||||
External |
Monitor |
Problems. . . . . . . . . . . . . . . .125. . . . |
|||
Port Replicator Problems. . . . . . . . . . . . . . . . 127. . . . . |
|||||
Other Option Problems. . . . . . . . . . . . . . . . .128. . . . . |
|||||
Software Problems |
. . . . . . . . . . . 129. . . . . . . |
||||
Other Problems |
. . . . . . . . . . . . 130. . . . . . . |
||||
Recovering Lost or Damaged Software. . . . . . . . . . . 132. . . |
|||||
Using |
the |
PC-Doctor |
Program. . . . . . . . . . . . . . 132. . . . |
||
Using the ThinkPad Software Selections. . .CD. . . . .133.
Using the Recovery . CD. . . . . . . . . . . . . . . 134. . . . .
ThinkPad Web Site or Bulletin . Board. . . . . . . . . . 134. . .
Getting Service |
. . . . . |
. . . . . . . .137. . . . . . . |
Information on Your Computer. . . . . . . . . . . . . . .138. . . . |
||
Option List . . . . . . |
. . . . . . . .138. . . . . . . |
|
Identification Numbers. . . |
. . . . . . . 138. . . . . . . |
|
Problem Recording Sheet. . . . . . . . . . . . . . . .139. . . .
Customer Support and Service. . . . . . . . . . . . . . .140. . . .
Online Support |
Services. . . . . . . . . . . . . . . . 140. . . . . |
|
Fax Information |
. . . . . . . . . . . . 140. . . . . . . |
|
Help by Telephone. . . . . . . . . . . . . . . . . . 141. . . . . . |
||
EasyServ |
. . |
. . . . . . . . . . . . 142. . . . . . . |
Getting Help Around the World. . . . . . . . . . . . . .142. . .
Purchasing Additional Services. . . . . . . . . . . . . . .143. . . .
Enhanced PC Support Line . . . . . . . . . . . . . . .143. . . .
Client Support Line. . . . . . . . . . . . . . . . . . 144. . . . . .
xv
Network and Server Support .Line. . . . . . . . . . . .144. . .
Ordering Support Line Services. . . . . . . . . . . . . .144. . .
Warranty and Repair Services. . . . . . . . . . . . . . 145. . . .
Obtaining IBM Operating System Updates. . . . . . . . . .146. .
Getting Update Diskettes. . . . . . . . . . . . . . . . 146. . . . .
Ordering Publications . . |
. . . . . . . . |
.146. . . . . . . . |
Appendix A. Features and Specifications |
. . . . . . . |
. . 147. . |
Features . . . . . . . . . . . . . . . 148. . . . . . . .
Specifications. . . . . . . . . . . . . .151. . . . . . .
IBM Power Cords. . . . . . . . . . . . . . . . . . . . .153. . . . . .
Appendix |
B. |
Product Warranties |
and |
Notices |
. . . . . . . 155. |
|||
Notices . . . . . . . . . . . . . . . |
160. . . . . . . . |
|||||||
Year 2000 Readiness and Instructions. . . . . . . . . . .160. . |
||||||||
Trademarks |
. . . . . . . . . . . . . |
161. . . . . . . . |
||||||
Macrovision |
Copyright Protection Statement. . . . . . . .161. |
|||||||
Electronic |
Emission |
Notices. . . . . . . . . . . . . . .162. . . . |
||||||
Telecommunication Notice . . . . . . . . . |
163. . . . . . . . |
|||||||
Industry Canada Requirements. . . . . . . . . . . . . .165. . . |
||||||||
Regions where ThinkPad 390X has ThinkPad Modem |
|
|||||||
Integrated. . . . . . . . . . . . . .168 . . . . . . . |
||||||||
Notice |
to |
European Users of the IBM ThinkPad. . . 168Modem |
||||||
Warning |
Notice to |
New |
Zealand |
Users of |
the |
IBM ThinkPad |
||
Modem |
|
. . . . . . . . . . . . . . |
169. . . . . . . . |
|||||
Index |
. . |
. . . |
. . . . . |
. . . . |
. .171. . . . . . . . |
|||
xvi

Getting Familiar with Your Computer
This chapter provides basic information about your computer.
Identifying the Hardware .Features. . . . . . . . . . . . . .2 . . .
Front View of the Computer. . . . . . . . . . . . . . . .2. . . .
Rear View of the Computer. . . . . . . . . . . . . . . .5 . . . .
Bottom View of the Computer. . . . . . . . . . . . . . . 7. . . .
System Status Indicators. . . . . . . . . . . . . . . . . . 8. . . . .
Distinctive Functions of Your Computer. . . . . . . . . . . .11. .
Keyboard Functions . . . . . . . . . . . .11. . . . . .
TrackPoint . |
. . . . . . . . . . . . |
11. . . . . . . |
|
Fn Key |
. . |
. . . . . . . . . . . . |
14. . . . . . . |
Numeric Keypad |
. . . . . . . . . . . .16 . . . . . . |
||
UltraBay FX . |
. . . . . . . . . . . . |
17. . . . . . . |
|
CD-ROM Drive |
. . . . . . . . . . . . 17. . . . . . . |
||
ThinkPad Utility Programs. . . . . . . . . . . . . . . . 19. . . .
BIOS Setup Utility. . . . . . . . . . . . . . . . . . 20. . . . .
ThinkPad Configuration . . . . . . . . . .33. . . . . . .
Online User's Guide. . . . . . . . . . . . . . . . . . .35. . . . .
Reinstalling Software. . . . . . . . . . . . 36. . . . . . .
ThinkPad Software Selections CD. . . . . . . . . . . . .36. .
Recovery CD . . . . . . . . . . . . . 36. . . . . . .
ConfigSafe . . . . . . . . . . . . . . 36. . . . . . .
ThinkPad Web Site or Bulletin . Board. . . . . . . . . . .37. .
Replacing the Battery. .Pack. . . . . . . . . . . . . . .38. . . .
Service Hints & Tips. . . . . . . . . . . . . . . . . . . .39. . . . .
Handling Your ThinkPad Computer. . . . . . . . . . . . .39. .
ThinkPad Don'ts . . . . . . . . . . . . .39 . . . . . .
ThinkPad Do's . . . . . . . . . . . . . 41. . . . . . .
Carrying Your Computer. . . . . . . . . . . . . . . . .41. . . .
Cleaning Your Computer. . . . . . . . . . . . . . . . .42. . . .
Extending Your Battery . Life. . . . . . . . . . . . . . 42. . . .
Getting Service . . . . . . . . . . . . .43 . . . . . .
International Warranty Service. . . . . . . . . . . . . 43. . .
For More Information. . . . . . . . . . . . . . . . . . 44. . . . .
Copyright IBM Corporation 1999 |
1 |

Identifying the Hardware Features
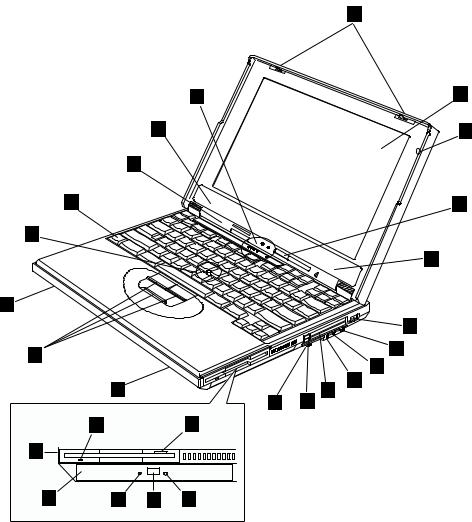
Front View of the Computer
(1) |
TheLCD |
latches |
|
release |
the |
LCD |
when |
|
pressed |
and |
allow |
it |
to |
||||||||||
|
be |
opened. |
|
|
|
|
|
|
|
|
|
|
|
|
|
|
|
|
|
|
|||
(2) |
Thecolor |
LCD |
screen |
|
displays |
computer |
|
output. |
|
|
|
|
|
|
|||||||||
(3) |
Thebuilt-in microphone |
|
|
captures sound |
and voice when it is |
|
|||||||||||||||||
|
used |
with |
an |
application |
program |
capable |
of |
handling |
audio. |
||||||||||||||
|
Note: |
The |
built-in |
microphone |
is located at the top right |
corner of |
|||||||||||||||||
|
|
|
the |
LCD |
for |
12.1-/14.1-inch LCD models, |
or |
at |
the |
left |
|||||||||||||
|
|
|
lower |
edge |
of the LCD for 15.0-inch models. |
|
|
|
|||||||||||||||
(4) |
Thebrightness |
control |
|
adjusts |
the brightness of the display. |
||||||||||||||||||
(5) |
The |
left |
andinternalrightspeakers |
|
generate |
stereo |
sound. |
|
|
|
|||||||||||||
|
Note: |
The |
internal |
speakers are located below the LCD for |
|||||||||||||||||||
|
|
|
12.1-/14.1-inch LCD models, or |
|
on the |
front |
ends |
of |
the |
||||||||||||||
|
|
|
computer |
for |
15.0-inch |
LCD |
models. |
|
|
|
|
|
|
|
|||||||||
(6) |
|
|
Theinternal modem port (select |
models |
|
only) |
|
is |
used |
for |
|
|
|||||||||||
|
|
|
|
|
|
|
|||||||||||||||||
|
connecting |
your |
computer |
to |
an |
analog |
telephone |
line. |
|
|
|
||||||||||||
(7) |
|
|
Theheadphone jack |
|
, |
⅛ainch |
(3.5mm) |
diameter |
jack, |
is |
where |
||||||||||||
|
|
|
|
||||||||||||||||||||
|
you |
connect |
stereo |
headphones |
or |
external |
speakers. |
|
|
|
|||||||||||||
(8) |
|
|
Theline-in jack , |
⅛ainch (3.5mm) diameter jack, |
is |
where |
|
|
|||||||||||||||
|
|
|
|
|
|||||||||||||||||||
|
you |
connect |
an |
external |
audio |
device. |
|
|
|
|
|
|
|
||||||||||
(9) |
|
|
Themicrophone |
jack |
|
, |
⅛ainch |
(3.5mm) |
diameter |
jack, |
is |
|
|
|
|||||||||
|
|
|
|
|
|
|
|||||||||||||||||
|
where |
you |
connect |
a |
self-powered |
stereo |
microphone. |
|
|
|
|||||||||||||
Note: Do not plug any device into the microphone jack except a microphone.
(10)ThePC Card slots accept PC Cards.
(11) |
ThePC Card eject buttons |
eject |
the |
PC Card from the PC Card |
|||||
|
slot. |
|
|
|
|
|
|
|
|
(12) |
|
|
|
|
|
|
|
|
|
|
Theaudio |
volume |
control |
adjusts |
the |
volume |
of |
the |
|
|
speakers. |
|
|
|
|
|
|
|
|
(13) |
Thediskette |
drive |
(shown |
installed in |
the |
UltraBay |
FX). |
||
(14) |
Thediskette-drive-activity indicator |
lights |
up |
when |
the |
computer |
|||
|
is accessing the |
diskette |
drive. |
(15) |
Thediskette-eject button |
ejects |
the diskette from the diskette |
|
drive. |
|
|
2 ThinkPad 390X User's Reference
Identifying the Hardware Features
1
23
5
3
22
21
5
5
6
7
20
8
9
5 |
|
10 |
|
12 |
11 |
14 |
15 |
|
13
16 17 18 19
2
3
4
(16) |
TheCD-ROM drive |
(shown |
installed |
in |
the |
UltraBay |
FX). |
|
||||
|
Note: |
You |
can |
purchase |
a |
DVD-ROM |
drive |
option which |
can be |
|||
|
|
installed |
in the UltraBay FX. |
|
|
|
||||||
(17) |
TheCD-ROM access indicator |
|
is on when data is read from a |
|||||||||
|
CD-ROM in the |
CD-ROM |
drive. |
|
|
|
|
|
|
|||
(18) |
TheCD-ROM eject button |
ejects the CD-ROM |
tray . |
|
|
|||||||
(19) |
Themanual-eject hole |
|
is |
used |
to |
eject the CD-ROM |
tray |
when it |
||||
|
does |
not |
open |
with |
the eject |
button. |
|
|
|
|||
Getting Familiar with Your Computer3
Identifying the Hardware Features
(20)TheTrackPoint buttons work with the TrackPoint stick (21) and
|
function |
similar |
to |
the buttons on a mouse. |
|
||
(21) |
TheTrackPoint |
|
is |
a |
built-in pointing device that provides |
a func- |
|
|
tion |
similar |
to that of a mouse. |
|
|||
(22) |
TheFn |
key |
is |
used |
with the function keys Fntokeyactivate |
the |
|
|
functions. |
|
|
|
|
||
(23) |
Theindicator |
panel |
|
consists of the system-status indicators and |
|||
|
their |
associated |
symbols. |
|
|||
4 ThinkPad 390X User's Reference
Identifying the Hardware Features
Rear View of the Computer
14
13
12
11
1
10
9 |
|
2 |
8 |
|
|
|
3 |
|
7 |
|
|
|
|
|
|
6 |
4 |
|
5 |
|
|
|
(1) |
|
|
Thebattery |
pack |
|
is |
a |
built-in |
power |
source for |
the |
computer. |
|||||||||||||
(2) |
|
|
|
|
|
|
|
Theinfrared |
port |
allows the computer to communicate with |
|||||||||||||||
|
|
|
|
|
|
|
|
||||||||||||||||||
|
other devices |
that |
have |
infrared |
data-transfer |
capability. |
|||||||||||||||||||
(3) |
|
|
|
|
|
|
|
Thepower |
switch |
|
turns |
the |
computer |
on |
and |
off. |
|
|
|||||||
|
|
|
|
|
|
|
|
|
|
|
|||||||||||||||
|
Note: |
|
If you |
power |
off |
the computer, |
wait |
at |
least 5 seconds |
||||||||||||||||
|
|
|
|
|
|
|
|
before |
you |
power |
it |
on |
again. |
|
|
|
|
|
|||||||
(4) |
|
|
TheS-video |
jack |
|
|
is |
where |
you |
connect a television or external |
|||||||||||||||
|
display |
devices |
with |
|
an |
S-video |
in-out |
cable. |
|
|
|
||||||||||||||
(5) |
|
|
|
|
|
|
|
Theuniversal |
serial |
bus |
(USB) |
allows |
you |
to |
connect any |
||||||||||
|
device |
that |
conforms |
to |
the |
USB |
standard. |
|
|
|
|
||||||||||||||
(6) |
|
|
|
|
|
|
|
Thepower |
jack |
|
is |
where the |
AC |
Adapter |
cable |
is |
con- |
||||||||
|
nected. |
|
|
|
|
|
|
|
|
|
|
|
|
|
|
|
|
|
|||||||
(7) |
|
|
|
|
|
|
|
Theexternal-monitor connector |
|
|
is |
where |
you |
attach |
the |
||||||||||
|
|
|
|
|
|
|
|
|
|
||||||||||||||||
|
external |
monitor. |
|
|
|
|
|
|
|
|
|
|
|
|
|
||||||||||
(8) |
|
|
|
|
|
|
|
Theserial |
connector |
|
is |
where |
you |
connect |
a |
9–pin, |
serial- |
||||||||
|
|
|
|
|
|
|
|
||||||||||||||||||
|
|
|
|
|
|
|
|
||||||||||||||||||
|
|
|
|
|
|
|
|
|
|||||||||||||||||
|
device |
cable. |
|
|
|
|
|
|
|
|
|
|
|
|
|
|
|||||||||
(9) |
|
|
|
|
|
|
Thesecurity |
keyhole |
|
|
|
|
|
|
|
|
|
|
|
|
|
||||
|
|
|
|
|
|
|
is |
used |
with |
a |
mechanical |
lock. |
|
||||||||||||
(10) |
|
To |
|
remove |
the |
hard11),diskloosen( |
thishard |
disk screw . |
|
|
|
||||||||||||||
Getting Familiar with Your Computer5

Identifying the Hardware Features
(11)Thehard disk drive is the built-in mass storage device for the computer.
(12)
|
|
|
|
Theparallel |
connector |
is where you connect a parallel- |
||||||||
|
printer |
signal |
cable. |
|
|
|
|
|
|
|||||
(13) |
|
|
|
Theexternal-input-device connector |
|
is used to attach a |
||||||||
|
|
|
|
|
||||||||||
|
mouse, |
external |
keyboard, |
or |
external numeric |
keypad to the com- |
||||||||
|
puter. |
|
|
|
|
|
|
|
|
|
|
|||
(14) |
|
|
|
Thebattery status |
lamp shows |
the |
status of |
the |
battery |
|||||
|
|
|
||||||||||||
|
pack. |
|
|
|
|
|
|
|
|
|
|
|||
|
|
|
|
Thesuspend |
lamp |
|
lights |
when |
the |
computer |
is |
in |
suspend |
|
|
mode. |
|
|
|
|
|
|
|
|
|
|
|||
6 ThinkPad 390X User's Reference

Identifying the Hardware Features
Bottom View of the Computer
2 |
3 |
4 |
1 |
5 |
|
6
(1) |
|
Flip |
out tiltthefeet to |
tilt |
the computer to an angle |
for |
more |
com- |
|||||||||||||
|
fortable |
use of |
your computer, especially when typing. |
|
|||||||||||||||||
(2) |
|
Thememory-slot cover |
|
covers |
the |
memory |
slot. |
|
|
|
|
||||||||||
|
The two memory |
slots |
|
accept |
dual |
inline |
memory |
module |
(DIMM) |
|
|||||||||||
|
options. |
|
|
|
|
|
|
|
|
|
|
|
|
|
|
|
|||||
|
Note: |
Base |
memory |
(32 |
MB |
or |
64 |
MB) |
occupies |
one |
memory |
|
|||||||||
|
|
|
|
|
|
slot. |
|
|
|
|
|
|
|
|
|
|
|
|
|
|
|
(3) |
|
Thebattery-pack latch |
|
locks |
or |
releases |
the |
battery |
pack. |
|
|||||||||||
(4) |
|
When |
thebay |
|
LED |
is |
on, |
you |
should |
not |
remove |
the |
UltraBay |
FX |
|||||||
|
device. |
|
|
|
|
|
|
|
|
|
|
|
|
|
|
|
|||||
(5) |
|
The UltraBay |
FX |
device |
lock |
locks |
or |
releases |
the UltraBay |
FX |
|
||||||||||
|
device. |
|
|
|
|
|
|
|
|
|
|
|
|
|
|
|
|||||
(6) |
|
|
|
|
|
Thesystem-expansion |
connector |
|
|
|
(240-pin) allows you |
to |
|
|
|||||||
|
connect the ThinkPad Port Replicator with Advanced Etherjet |
|
|||||||||||||||||||
|
Feature. |
|
|
|
|
|
|
|
|
|
|
|
|
|
|
|
|||||
Getting Familiar with Your Computer7
Identifying the Hardware Features
System Status Indicators
The |
system-status indicators |
on the computer |
show the |
current |
||||
status |
of |
your computer by |
their |
on |
or off states |
and colors (g |
||
and |
orange). Each indicator |
is identified with a symbol. The follow |
||||||
shows |
the |
location and the |
meaning |
of |
each |
icon: |
|
|
8 ThinkPad 390X User's Reference

System Status Indicators
1 2
|
|
|
|
|
|
|
|
|
|
|
|
|
|
|
|
|
|
|
|
|
|
|
|
|
|
|
|
3 |
|
4 |
|
|
5 |
|
6 |
|
7 |
|
|
||
|
|
|
|
|
|
|
|
|
|
|
|
|
|
|
|
|
|
|
|
|
|
|
|
|
|
|
|
|
|
|
|
|
|
|
|
|
|
|
|
|
|
|
|
|
|
|
|
|
|
|
|
|
|
|
|
2 1
Getting Familiar with Your Computer9

System Status Indicators
Symbol |
|
|
|
Color |
|
Meaning |
|
|
|
|
|
|
|
|
|
|
|
|
|
|
|
|
|
|
|||
|
|
|
|
|
|
|
|
|
|
|
|
|
|
|
|
|
|||||||||||
(1) |
Battery |
status |
Green |
|
Enough |
battery |
power |
remains |
for |
operation. |
|
||||||||||||||||
|
|
|
|
|
|
|
|
|
|
|
|
|
|
||||||||||||||
|
|
|
|
|
|
|
Blinking |
orange |
The |
|
battery pack needs to be charged |
|
|||||||||||||||
|
|
|
|
|
|
|
|
|
|||||||||||||||||||
|
|
|
|
|
|
|
|
|
|
|
|
|
|
|
|||||||||||||
|
|
|
|
|
|
|
Orange |
|
The |
|
battery pack is being charged. |
|
|
||||||||||||||
|
|
|
|
|
|
|
|
|
|
|
|
|
|
|
|
||||||||||||
(2) |
|
Suspend |
mode |
Green |
|
The |
|
computer is in suspend mode |
|
|
|
|
|
|
|||||||||||||
|
|
|
|
|
|
|
|
|
|
|
|
|
|
|
|||||||||||||
|
|
|
|
|
|
|
Blinking |
green |
The |
|
computer is entering suspend mode, |
|
|
||||||||||||||
|
|
|
|
|
|
|
|
|
hibernation mode, or is resuming |
normal |
opera- |
|
|||||||||||||||
|
|
|
|
|
|
|
|
|
tion. |
|
|
|
|
|
|
|
|
|
|
|
|
|
|
|
|
|
|
|
|
|
|
|
|
|
|
|
|
|
|
||||||||||||||||
(3) |
|
Drive in use |
Orange |
|
Data |
|
is being read from or |
written to the |
hard |
||||||||||||||||||
|
|
|
|
|
|
|
|
|
disk, |
|
floppy |
drive, |
or |
data |
is being read from the |
||||||||||||
|
|
|
|
|
|
|
|
|
CD-ROM |
|
drive. Do not enter suspend mode or |
|
|||||||||||||||
|
|
|
|
|
|
|
|
|
power |
off |
the |
computer |
when |
this |
indicator |
is |
|||||||||||
|
|
|
|
|
|
|
|
|
on. |
|
|
|
|
|
|
|
|
|
|
|
|
|
|
|
|
|
|
|
|
|
|
|
|
|
|
|
|
|
|
||||||||||||||||
(4) |
|
Numeric |
lock |
Green |
|
The |
|
numeric keypad on the keyboard is |
|
||||||||||||||||||
|
|
|
|
|
|
|
|
|
enabled. You enable or disable the keypad by |
||||||||||||||||||
|
|
|
|
|
|
|
|
|
pressing and holdingShiftthekey, and |
|
|
|
|
|
|
||||||||||||
|
|
|
|
|
|
|
|
|
pressing |
theNumLk |
key. For |
details, |
|
see |
|
|
|||||||||||
|
|
|
|
|
|
|
|
|
“Numeric |
Keypad” on |
page 16. |
|
|
|
|
|
|
|
|||||||||
|
|
|
|
|
|
|
|
|
|
|
|
|
|
||||||||||||||
(5) |
|
Caps |
lock |
|
Green |
|
Caps |
|
|
Lock mode is enabled. All alphabetic |
|
||||||||||||||||
|
|
|
|
|
|
|
|
|
characters(A-Z) are entered in capital letters |
|
|||||||||||||||||
|
|
|
|
|
|
|
|
|
without |
theShift |
key |
being |
pressed. |
You |
enable |
|
|||||||||||
|
|
|
|
|
|
|
|
|
or |
disable |
the |
Caps |
Lock |
mode |
by |
pressing |
the |
||||||||||
|
|
|
|
|
|
|
|
|
Caps |
Lock |
|
key. |
|
|
|
|
|
|
|
|
|
|
|
|
|||
|
|
|
|
|
|
|
|
|
|
|
|
|
|
|
|
|
|
||||||||||
(6) |
|
Scroll |
lock |
Green |
|
Scroll |
|
Lock |
mode |
is |
enabledArrow. |
Thekeys |
|
|
|
|
|||||||||||
|
|
|
|
|
|
|
|
|
can be used as screen-scroll function keys. The |
||||||||||||||||||
|
|
|
|
|
|
|
|
|
|||||||||||||||||||
|
|
|
|
|
|
|
|
|
cursor |
cannot |
be |
moved |
withArrow |
thekys. |
|
|
|||||||||||
|
|
|
|
|
|
|
|
|
|
|
|||||||||||||||||
|
|
|
|
|
|
|
|
|
Not |
all |
application |
programs |
support |
|
this |
func- |
|
||||||||||
|
|
|
|
|
|
|
|
|
tion. You enable or disable Scroll Lock mode by |
||||||||||||||||||
|
|
|
|
|
|
|
|
|
pressing |
theScrLk |
key. |
|
|
|
|
|
|
|
|
|
|
||||||
|
|
|
|
|
|
|
|
|
|
|
|
|
|
|
|||||||||||||
(7) |
|
Power |
on |
|
Green |
|
The |
|
computer |
is |
operational. |
This |
indicator is on |
||||||||||||||
|
|
|
|
|
|
|
|
|
when |
|
|
the computer is on and |
not |
in |
|
suspend |
|
||||||||||
|
|
|
|
|
|
|
|
|
mode. |
|
|
|
|
|
|
|
|
|
|
|
|
|
|
|
|
||
|
|
|
|
|
|
|
|
|
|
|
|
|
|
|
|
|
|
|
|
|
|
|
|
|
|
|
|
10 ThinkPad 390X User's Reference
System Status Indicators
Distinctive Functions of Your Computer
Your |
computer has unique |
keyboard functions |
and utility programs |
for |
easy configuration. |
This section includes |
the following topics: |
ŸKeyboard functions
ŸUltraBay FX
ŸThinkPad utilities
ŸOnline User's Guide
Keyboard Functions
Your computer's keyboard has the following functions:
ŸTrackPoint
ŸFn key
ŸNumeric keypad
TrackPoint
The keyboard contains a unique cursor-pointing device called the
TrackPoint. |
Pointing, |
|
selecting, |
and |
dragging |
all |
become |
part |
of |
a |
|||||||||
single |
process |
|
you can perform without moving your fingers from |
|
|||||||||||||||
their |
typing |
position. |
|
|
|
|
|
|
|
|
|
|
|
|
|||||
The |
TrackPoint |
consists stickof |
aon |
the keyboard andclick three |
|
|
|
|
|||||||||||
buttons |
below |
the |
|
keyboard. |
Movement |
of the pointer |
on |
the |
scree |
||||||||||
is |
controlled |
by |
the |
amount |
of |
pressure |
you |
apply |
to |
the |
nonslip |
||||||||
on |
the |
stick |
in any direction parallel to |
the |
keyboard; |
the |
stic |
||||||||||||
does not |
move. |
The |
speed |
at which |
the |
pointer moves |
corresponds |
||||||||||||
to |
the |
pressure |
you |
apply |
to the stick. The function of the cl |
||||||||||||||
buttons |
depends |
on |
the software |
you |
are |
using. |
|
|
|
|
|
||||||||
Getting Familiar with Your Computer11

Distinctive Functions of Your Computer
Stick
Left click button |
|
|
|
|
|
|
|
|
|
|
|
|
|
Center button |
|
|
|
|
|
|
|
|
|
||
|
|
|
|
Right click button |
|
|
|
|
|
|
||
If |
you are |
not |
familiar |
with |
using |
the |
TrackPoint, these |
instruction |
||||
will |
help |
you |
get started: |
|
|
|
|
|
|
|||
1. Place |
your hands in the typing |
position |
and press |
gently with |
||||||||
|
either |
index |
finger on |
the |
stick in |
the |
direction |
you |
want the |
|||
|
cursor |
to |
move. |
|
|
|
|
|
|
|
|
|
|
Pressing |
the stick |
away |
from you moves the cursor up the |
||||||||
|
screen; |
pressing it toward you moves the cursor down the |
||||||||||
|
screen. You can also move the cursor side to side by pressing |
|||||||||||
|
sideways. |
|
|
|
|
|
|
|
|
|
|
|
|
Note: The cursor may drift. This is not a defect. Do not use |
|||||||||||
|
TrackPoint |
until |
the |
cursor stops moving. |
|
|
||||||
12 ThinkPad 390X User's Reference

Mouse pointer
(Cursor)
Stick
Distinctive Functions of Your Computer
Right click button
Center button
Left click button
2. Press |
the click buttons with either thumb to select and drag |
|||||||||||||
|
required |
by |
your |
software. |
|
|
|
|||||||
|
Changing |
the |
Cap |
|
|
|
|
|
|
|
|
|
||
|
|
|
|
|
|
|
|
|
|
|||||
The cap |
(1) |
on |
the |
end |
of |
the TrackPoint is |
|
removable. |
You can |
|||||
replace |
it |
with |
|
one |
of |
the |
spares shipped |
with your |
computer. |
|||||
|
|
|
|
|
|
|
|
|
|
|
|
|
||
|
1 |
|
|
|
|
|
|
|
|
|
|
|
|
|
|
|
|
|
|
|
|
|
|
|
|
|
|
|
|
For more |
information on |
customizing |
the TrackPoint, see “Custom- |
izing the |
TrackPoint” |
on page 46. |
|
Getting Familiar with Your Computer13

Distinctive Functions of Your Computer
Fn Key
The Fn |
key |
function |
allows |
you |
to change operational features |
|
instantly. |
When |
you |
use |
the |
following functions, press and hold the |
|
Fn key |
(1); |
then |
press |
the |
appropriateF1 functiontoF12 ). key (2) ( |
|
|
|
2 |
|
|
|
|
1 |
|
|
|
|
|
|
|
The |
Fn |
Key |
Lock Function |
|
|
|
|
|
|
|
|
|
|
|
|
|
|
|||
|
|
|
|
|
|
|
|
|
|
|
|
|
|
|
|||||||
The |
following |
setup |
give |
|
|
you |
the same effect |
as |
when |
you |
press |
||||||||||
and |
hold |
theFn |
key |
and then |
press an appropriate function key: |
|
|||||||||||||||
Start the ThinkPad Configuration program, (See “ThinkPad |
|
|
|||||||||||||||||||
Configuration” |
on |
page 33.) |
clickAccessibilityon the ( |
) |
|
|
|
|
|
||||||||||||
button, |
and |
clickEnable on |
forFn |
key |
lock . |
|
|
|
|
|
|
|
|||||||||
After you |
enableFn |
thekey |
lock |
|
and Fnpressonce, press |
one |
|
|
|
||||||||||||
of the function keys. The |
|
computer |
works |
the |
same |
as |
when |
you |
|||||||||||||
pressFn + the function key. |
|
|
|
|
|
|
|
|
|||||||||||||
If |
you |
|
Fnpresstwice after |
|
enabling |
the |
lock, |
pressing |
a function |
|
|||||||||||
key |
alone |
|
is |
recognized |
as |
a |
combinationFn + that offunction |
|
|
|
|||||||||||
key. |
To |
|
stop |
this |
function,Fn |
againpress. |
|
|
|
|
|
|
|
||||||||
|
|
|
|
|
|
|
|
|
|
|
|
|
|
|
|
|
|
|
|
|
|
14 ThinkPad 390X User's Reference
 Loading...